#unitytips
Text
/nerd talk start
Instant load time in Unity!
Tired of Play Mode loading time in Unity? Wanna massively speed up your iteration workflow? Do you value your own time? Then you are at the right place cause this tip is just for you!
Just go to Project Settings -> Editor -> Enter Play Mode Settings and turn on the Enter Play Mode Options option (see snapshot). It's a bit confusing, but when you turn the main option on, you should turn off the two suboptions.
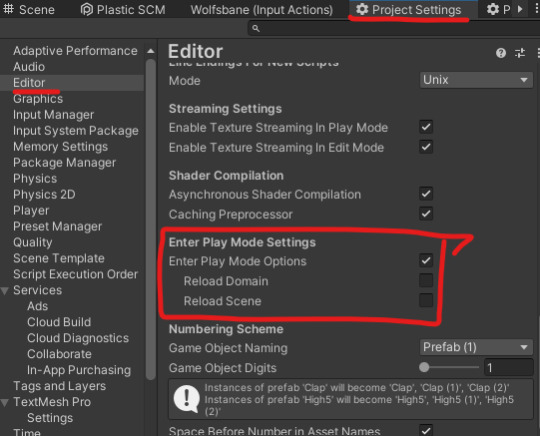
Of course, this isn't a magic option. There are caveats you should know about, which are explained here in the documentation.
Luckily for me, I am a free spirit and trivialities like important details about the inner workings of the engine I make my living off don't concern me so I just wing it.
/nerd talk end
16 notes
·
View notes
Photo
Make interframe sprites with color lerp between two frame in animation. I was wondering how it would look
Demo on Steam
https://store.steampowered.com/app/1224030/Erra_Exordium/
#pixelart#animation#gamedev#indiedev#madewithunity#unity2d#pixel art#pixel game#pixelgame#sumerian#dieselpunk#unitytips
2 notes
·
View notes
Text
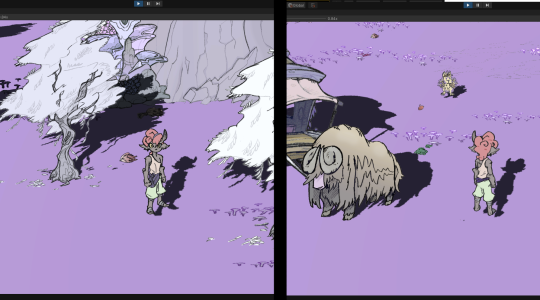
Shadows integration with Unity
🎮📽#devlog
We are working on shadows integration (which is not easy with 2D sprites)
We still have some issues (low resolutions). But we’re making progress!
Similar videogames: Don't Starve, Stardew Valley, Pokémon, Digimon World, Spiritfarer
-----
🔗Follow us - All Links: ▶https://linktr.ee/GoldenEarth_official
🔗Twitter: https://twitter.com/GoldenEarth_Off
-----
(c) GoldenEarth game
#indiedev#indiegame#IndieGameDev#indiegames#unity3d#Java#UnityTips#DontStarveTogether#100daysofcoding#video game#gaming#sfw furry#furry#furry character#wholesomegame#cozygame#farm#exploration#stardew valley#don't starve#spiritfarer#digimon world#pokemon#Cozy grove#GoldenEarth#GoldenEarth game#Golden Earth game#GoldenEarth jeu#concept art#creature design
5 notes
·
View notes
Text
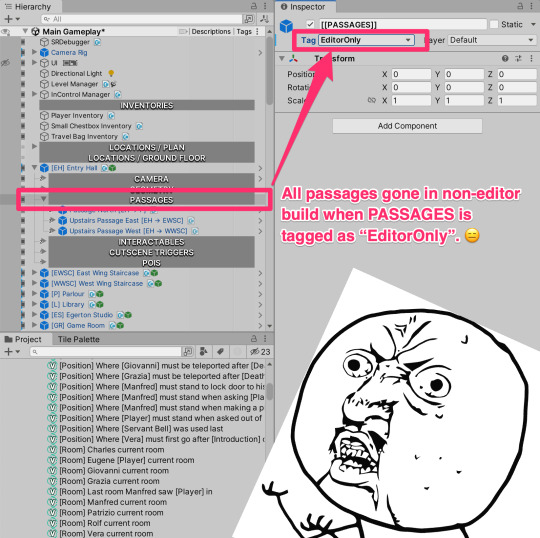
“EditorOnly” tag is one of those “cool” Unity features that make it extremely easy to shoot yourself in the foot. Last week I've spent three days trying to find out why my game was not running correctly in Android build.
It took me three days because I've started digging down the wrong rabbit hole – I thought the error was caused by my editor extension that programmatically changes values (creating cross-references) in prefabs on the scene.
But no, it was *just* the case of accidental tagging as “EditorOnly”. 😑
1 note
·
View note
Photo
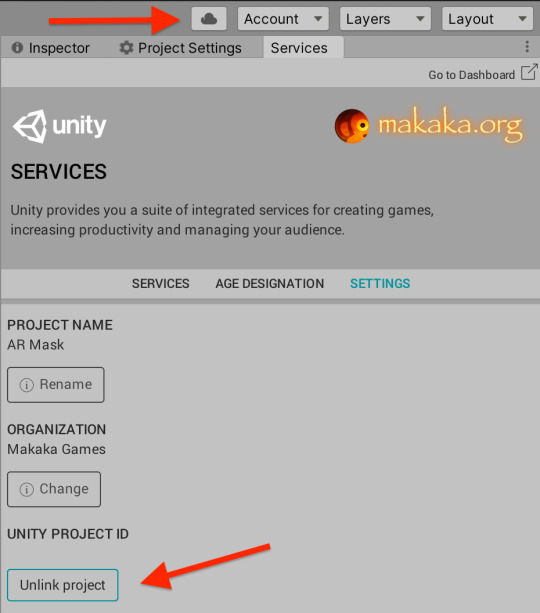
How to remove IDs of Unity Ads & Unity Analytics when you publish assets to Unity Asset Store?
When you create Unity Assets which use 3rd-party services, then they can add some sensitive information like ID, license number and so on.
To stay secure, you need to delete them:
For Ads and Analytics services: Services View > Settings > Unity Project ID > Unlink Project, then File > Save.
For Ads package from Package Manager, delete Ads ID in your script.
P.S. If you are interested in making assets for the Unity Asset Store or want to improve your skills in this business then check my book:
"Asset Store Publisher: How to Create & Sell Unity Assets?".
Book on Unity Asset Store:
https://makaka.org/o/book
#unity#UnityAsset#unityassetstore#Unity3D#game development#gamedev#game dev#unity asset#Unity Asset Store#игрострой#UnityTips#unity tutorial
1 note
·
View note
Text
Unity 2018 and PlayerLoop
Introduction
This is a repost of a blog post I made on my old website, pretty much all of this information still applies in 2020!
Before Unity 5.X (specifically 5.0), control over the application lifecycle was basically nonexistent. For application startup/initialization code you could’ve created a script that was sorted earliest in the Script Execution Order window and used Awake, but you would’ve ran into issues. An object with that script would need to exist in any scene that required that initialization code to run, a state that is really difficult to maintain while in the editor. It’s too easy to forget that object needs to be around, and that functionality needs to be explained to other developers working on the project.
With Unity 5.0 we were provided RuntimeInitializeOnLoad, an attribute placed on a static function which is then executed automatically at runtime consistently. Its a foolproof way of ensuring that some code always executes, regardless of scene setup. In 5.2 an optional argument in form of the RuntimeInitializeLoadType enum was added, allowing developers to decide if the marked function should execute before or after the initial scene is loaded (before the Awake message is sent). With this single feature it suddenly became viable to use Unity without scenes, slightly closer to using a game framework, such as MonoGame.
However, the systems that are updated each frame (some more often) were still out of reach. These systems are otherwise known as the main/game update loop. Systems could not be disabled for performance, reordered for preference, and, most importantly, new arbitrary systems could not be added into the update loop. Of course you could always use functions like Update, FixedUpdate and LateUpdate to hook into the built in update systems, but these always occurred inbetween Unity’s internal systems, beyond user control.
With Unity 2018.1, the PlayerLoop and PlayerLoopSystem classes and the UnityEngine.Experimental.PlayerLoop namespace have been introduced, allowing users to remove and reorder engine update systems, as well as implement custom systems.
The Default PlayerLoop
The first step to understanding the PlayerLoop is to find a way of viewing what the out-of-the-box loop is actually made of. You can get the default loop thusly:
PlayerLoopSystem loop = PlayerLoop.GetDefaultPlayerLoop()
PlayerLoopSystem is a struct that is organized in a recursive, tree-like structure. From this object you can get some information about the system:
type: For default systems this is a System.Type object that acts as a representation of what update system this is. These types are only used as identifiers, and don’t actually contain anything. For example, the type of the PlayerLoopSystem responsible for updating AI is UnityEngine.Experimental.PlayerLoop.AIUpdate. We’ll use this field later to search for built-in types from the default player loop. This field is mostly useless for custom systems, except for its use as a label for the system in the Profiler.
subSystemList: As previously stated, PlayerLoopSystem is a recursive structure, so this is an array of all of the PlayerLoopSystems underneath this system. Traversing this array recursively will let us inspect the default loop.
updateFunction: For default systems this is a pointer to the native-side function that is executed for this update system. This field is unused for custom systems.
updateDelegate: This is a C# delegate that is primarily used for custom systems. However, it seems that it is possible to use this to add a callback to default systems as well. When we implement a custom system this is where all the work will happen.
loopConditionFunction: For default systems this is a pointer to a native-side function that is executed to check if this system and all of the systems below it should be executed. This field is unused for custom systems.
The system returned by GetDefaultPlayerLoop() is somewhat bogus. The only field that has a value is subSystemList. This is because this system is used as a “root node”, which every recursive structure requires. It’s fairly trivial to write a quick recursive function to pretty-print the contents of the default loop:
[RuntimeInitializeOnLoadMethod] private static void AppStart() { var def = PlayerLoop.GetDefaultPlayerLoop(); var sb = new StringBuilder(); RecursivePlayerLoopPrint(def, sb, 0); Debug.Log(sb.ToString()); } private static void RecursivePlayerLoopPrint(PlayerLoopSystem def, StringBuilder sb, int depth) { if (depth == 0) { sb.AppendLine("ROOT NODE"); } else if (def.type != null) { for (int i = 0; i < depth; i++) { sb.Append("\t"); } sb.AppendLine(def.type.Name); } if (def.subSystemList != null) { depth++; foreach (var s in def.subSystemList) { RecursivePlayerLoopPrint(s, sb, depth); } depth--; } }
Running this gives us a pretty large tree of systems:
ROOT NODE Initialization PlayerUpdateTime AsyncUploadTimeSlicedUpdate SynchronizeInputs SynchronizeState XREarlyUpdate EarlyUpdate PollPlayerConnection ProfilerStartFrame GpuTimestamp UnityConnectClientUpdate CloudWebServicesUpdate UnityWebRequestUpdate ExecuteMainThreadJobs ProcessMouseInWindow ClearIntermediateRenderers ClearLines PresentBeforeUpdate ResetFrameStatsAfterPresent UpdateAllUnityWebStreams UpdateAsyncReadbackManager UpdateTextureStreamingManager UpdatePreloading RendererNotifyInvisible PlayerCleanupCachedData UpdateMainGameViewRect UpdateCanvasRectTransform UpdateInputManager ProcessRemoteInput XRUpdate TangoUpdate ScriptRunDelayedStartupFrame UpdateKinect DeliverIosPlatformEvents DispatchEventQueueEvents DirectorSampleTime PhysicsResetInterpolatedTransformPosition NewInputBeginFrame SpriteAtlasManagerUpdate PerformanceAnalyticsUpdate FixedUpdate ClearLines NewInputEndFixedUpdate DirectorFixedSampleTime AudioFixedUpdate ScriptRunBehaviourFixedUpdate DirectorFixedUpdate LegacyFixedAnimationUpdate XRFixedUpdate PhysicsFixedUpdate Physics2DFixedUpdate DirectorFixedUpdatePostPhysics ScriptRunDelayedFixedFrameRate ScriptRunDelayedTasks NewInputBeginFixedUpdate PreUpdate PhysicsUpdate Physics2DUpdate CheckTexFieldInput IMGUISendQueuedEvents NewInputUpdate SendMouseEvents AIUpdate WindUpdate UpdateVideo Update ScriptRunBehaviourUpdate ScriptRunDelayedDynamicFrameRate DirectorUpdate PreLateUpdate AIUpdatePostScript DirectorUpdateAnimationBegin LegacyAnimationUpdate DirectorUpdateAnimationEnd DirectorDeferredEvaluate UpdateNetworkManager UpdateMasterServerInterface UNetUpdate EndGraphicsJobsLate ParticleSystemBeginUpdateAll ScriptRunBehaviourLateUpdate ConstraintManagerUpdate PostLateUpdate PlayerSendFrameStarted DirectorLateUpdate ScriptRunDelayedDynamicFrameRate PhysicsSkinnedClothBeginUpdate UpdateCanvasRectTransform PlayerUpdateCanvases UpdateAudio ParticlesLegacyUpdateAllParticleSystems ParticleSystemEndUpdateAll UpdateCustomRenderTextures UpdateAllRenderers EnlightenRuntimeUpdate UpdateAllSkinnedMeshes ProcessWebSendMessages SortingGroupsUpdate UpdateVideoTextures UpdateVideo DirectorRenderImage PlayerEmitCanvasGeometry PhysicsSkinnedClothFinishUpdate FinishFrameRendering BatchModeUpdate PlayerSendFrameComplete UpdateCaptureScreenshot PresentAfterDraw ClearImmediateRenderers PlayerSendFramePostPresent UpdateResolution InputEndFrame TriggerEndOfFrameCallbacks GUIClearEvents ShaderHandleErrors ResetInputAxis ThreadedLoadingDebug ProfilerSynchronizeStats MemoryFrameMaintenance ExecuteGameCenterCallbacks ProfilerEndFrame
A Simple Custom PlayerLoopSystem
Creating a complete replacement system is quite easy:
[RuntimeInitializeOnLoadMethod] private static void AppStart() { var systemRoot = new PlayerLoopSystem(); systemRoot.subSystemList = new PlayerLoopSystem[] { new PlayerLoopSystem() { updateDelegate = CustomUpdate, type = typeof(PlayerLoopTest) } }; PlayerLoop.SetPlayerLoop(systemRoot); } private static void CustomUpdate() { Debug.Log("Custom update running!"); }
A few things to take notice of: It seems that root system execution is completely ignored. If you specify a value for updateDelegate on the root system it will not be executed. This is why we need to define a root node and place our system underneath. Also note that this is a complete replacement. None of the default systems are running here. If you place a dynamic physics object in the scene it won’t move. The values in the Time class won’t be updated, and neither will input. Clearly, the default player loop is extremely sensitive to changes.
Borrowing Default Systems
Just for fun, why don’t we add one default system back into the mix? We can once again use recursion to find a default system by type and include it in our subsystem list:
[RuntimeInitializeOnLoadMethod] private static void AppStart() { var defaultSystems = PlayerLoop.GetDefaultPlayerLoop(); var physicsFixedUpdateSystem = FindSubSystem<FixedUpdate.PhysicsFixedUpdate>(defaultSystems); var systemRoot = new PlayerLoopSystem(); systemRoot.subSystemList = new PlayerLoopSystem[] { physicsFixedUpdateSystem, new PlayerLoopSystem() { updateDelegate = CustomUpdate, type = typeof(PlayerLoopTest) }, }; PlayerLoop.SetPlayerLoop(systemRoot); } private static void CustomUpdate() { Debug.Log("Custom update running!"); } private static PlayerLoopSystem FindSubSystem<T>(PlayerLoopSystem def) { if (def.type == typeof(T)) { return def; } if (def.subSystemList != null) { foreach (var s in def.subSystemList) { var system = FindSubSystem(s, type); if (system.type == typeof(T)) { return system; } } } return default(PlayerLoopSystem); }
There’s more efficiency to be gained here if we’re looking for multiple systems by type, but this works for now. You’ll notice that this creates incorrect behavior; physics forces are way too powerful! That’s because we’re updating physics on a framerate dependent update loop instead of on a fixed time update loop. The FixedUpdate PlayerLoopSystem handles timing and using correct delta times for all of the subsystems beneath it, which we aren’t doing here. Fixing this would be both daunting and freeing; you could implement your own timestep! We won’t be covering that here, though.
Replacing a Default System
You may have read the 10000 Update() calls article on the official Unity blog. In this article the author discusses implementing a managed-side custom update loop as a replacement for the Update call. We can do this better by actually replacing the default Update call, which was printed in our list as Update.ScriptRunBehaviourUpdate. We can modify our previous function to replace the system we found by type with our own system, maintaining the execution order. However, PlayerLoopSystem is a struct, and will be passed by value into our function. In order to modify what we pass in, we’ll use the ref keyword:
[RuntimeInitializeOnLoadMethod] private static void AppStart() { var defaultSystems = PlayerLoop.GetDefaultPlayerLoop(); var customUpdate = new PlayerLoopSystem() { updateDelegate = CustomUpdate, type = typeof(PlayerLoopTest) }; ReplaceSystem<Update.ScriptRunBehaviourUpdate>(ref defaultSystems, customUpdate); PlayerLoop.SetPlayerLoop(defaultSystems); } private static void CustomUpdate() { Debug.Log("Custom update running!"); } private static bool ReplaceSystem<T>(ref PlayerLoopSystem system, PlayerLoopSystem replacement) { if (system.type == typeof(T)) { system = replacement; return true; } if (system.subSystemList != null) { for (var i = 0; i < system.subSystemList.Length; i++) { if (ReplaceSystem(system.subSystemList[i], replacement, toReplace)) { return true; } } } return false; }
If you create a new script with an Update() call and add it to an object in your scene, you’ll notice it won’t be called anymore. Note that this example doesn’t cover the other required steps to actually replace all of the functionality of Update(), such as creating an object management system to add and remove updatable objects from a global collection and calling update functions on them. The ideal implementation would probably use an IUpdatable interface to allow nearly any object to be included in the custom update loop (and eliminate the need for “magic methods”).
…And More
There’s certainly more to be experimented with this wonderful new access to the low level systems that literally makes Unity tick. Hopefully this post gives you a good head start to shaping Unity to fit your needs. A few quick ideas as to interesting additions that you can try to add as utility API:
Inserting systems. Some modifications to the replacement example could allow you to insert a system into a subsystem array instead of replacing it.
Explore different ways of disabling systems temporarily. If your game is in a pause menu you don’t need AI updates running!
Create a visualizer. This could be in-game or in-editor. The Profiler does list every system using the PlayerLoopSystem type field as a label, but knowing in a debug build what systems are currently enabled could be very beneficial when doing heavy customization to the default PlayerLoop.
High performance update loops. This could be used for mobile games that don’t need systems like physics, AI or XR.
Let me know what you think on Twitter or Reddit about this new API, how you might use it for your games, and what else you’re looking for in the Unity application lifecycle.
3 notes
·
View notes
Video
Multi screen UI adjustments on steroids! #UnityTips #gamedev #indiegames #madewithunity #BattleBirds https://www.instagram.com/p/B2ouvrLAUvI/?igshid=127y60bwcqyw8
1 note
·
View note
Photo

#NAIRI - Tower of Shirin is out NOW on #NintendoSwitch & Windows PC 🐱 ⠀ ⠀ Join Nairi & Rex as they embark on an adventure that will change their world, forever. ⠀ ⠀ 😸😸🐶🎨🎮🎨🐶😸😸 ⠀ =----Love what you see?----= ⠀ ⠀ What do you think? We'd love to hear your thoughts. 💬 ⠀ ⠀ Please do #repost & ♥️ if you enjoyed! ⠀ ⠀ 😸😸🐶🎨🎮🎨🐶😸😸 ⠀ ====----More Info----==== ⠀ ⠀ NAIRI: Tower of Shirin is out NOW! ⠀ ⠀ Add us to your Steam Wishlist: Just search "NAIRI". ⠀ ⠀ 😸😸🐶🎨🎮🎨🐶😸😸 ⠀ ====----Tags----==== ⠀ #MadewithUnity #Unity3D #UnityTips #IndieDev #IndieGame #IndieGameLover #IndieGameDev #GameDev #GameDevelopment #GamersUnite #studioghibli #art #drawing #sketching #artsy #instaart #creative #instaartist #graphic #graphics #VideoGame #GamingLife #GamingNerd #NintendoSwitch #Nindies #VisualNovel #CustomJoyCons https://www.instagram.com/p/BqxG0VLl6cL/?utm_source=ig_tumblr_share&igshid=3e5miycroiyi
#nairi#nintendoswitch#repost#madewithunity#unity3d#unitytips#indiedev#indiegame#indiegamelover#indiegamedev#gamedev#gamedevelopment#gamersunite#studioghibli#art#drawing#sketching#artsy#instaart#creative#instaartist#graphic#graphics#videogame#gaminglife#gamingnerd#nindies#visualnovel#customjoycons
5 notes
·
View notes
Text
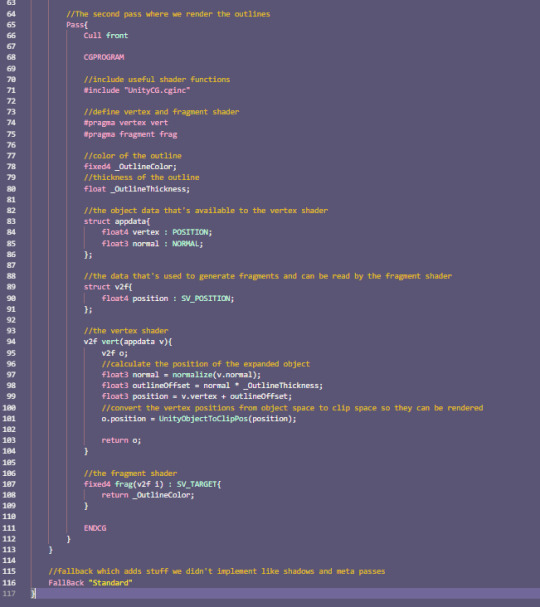
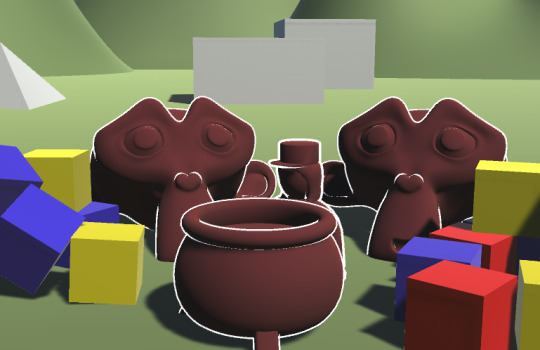
Multipass Shaders (& inverted Hull outlines)
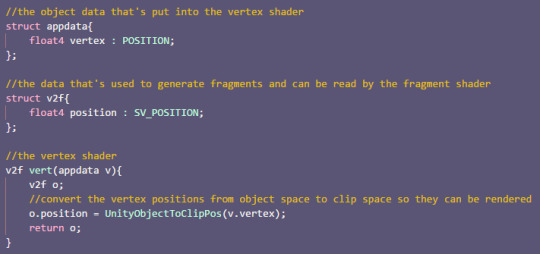
So far we only ever wrote a color to the screen once per shader (or let unity generate multiple passes for us via surface shaders). But we have the possibility to draw our mesh multiple times in a single shader. A great way to use this is to draw outlines. First we draw our object as usual and then we draw it again, but we change the vertices a bit so it’s only visible around the original object, drawing a outline.
To understand this Tutorial it’s best if you understood surface shaders: https://ronja-tutorials.tumblr.com/post/172421924392/surface-shader-basics
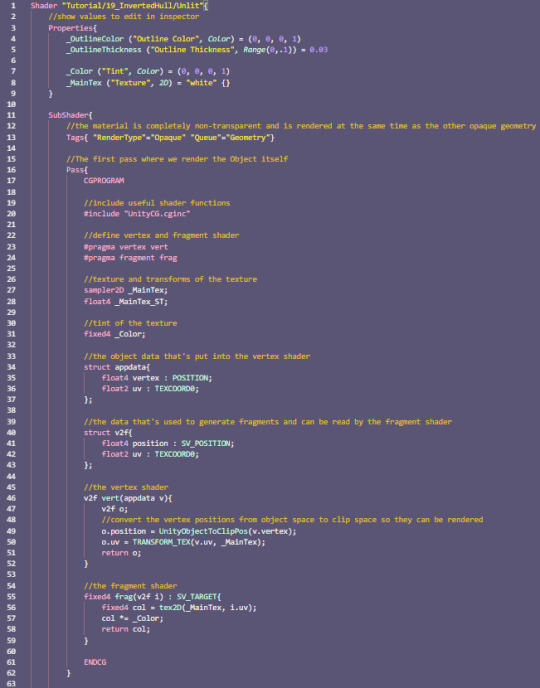
The first version of this shader will be based on the simple unlit shader: https://ronja-tutorials.tumblr.com/post/172173911737/textures

We already have a shader pass in this shader, so we just duplicate that for now. Because we’re writing the same information twice, this doesn’t change how the shader looks though.
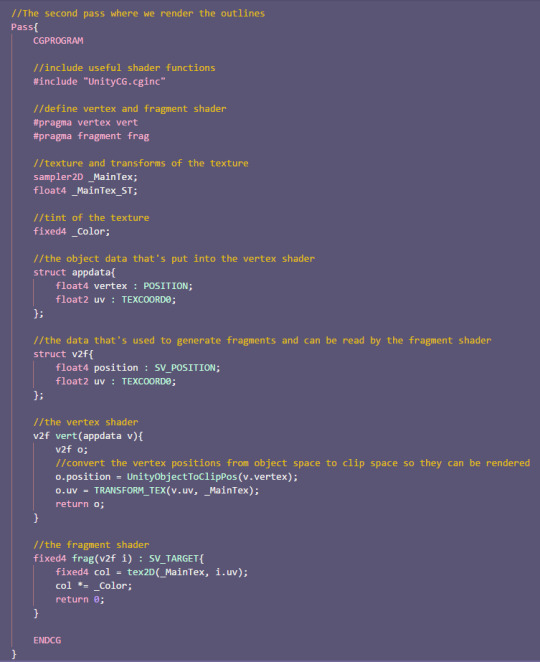
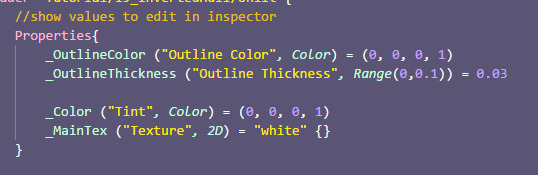
The next change is to set up our properties and variables. This second pass will only write a simple color to the screen so we don’t need the texture. we just need the outline color and the outline thickness. We put the properties in the properties area at the top like usual. It’s important that we put the new variables in the second pass though.

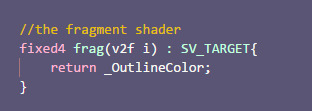
The next step is to rewrite our fragment shader to use the new variable instead of a texture. We can simply return the color without any additional calculations in there.
Because we don’t read from a texture in this pass, we can also ignore the uv coordinates, so we remove them from our input struct, our vertex to fragment struct and we stop passing them between the structs in the vertex shader.
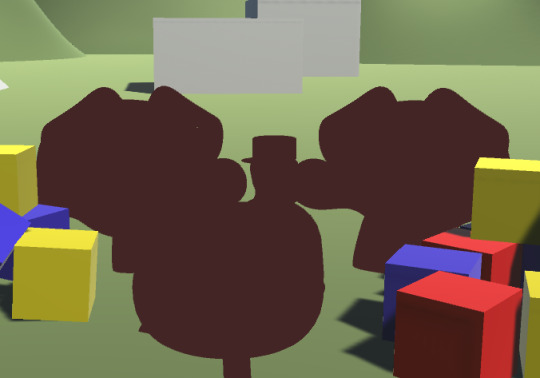
With those changes, we can see in the editor that the objects now simply have the color the outlines should have. That’s because our second pass simply draws over everything the first pass has drawn. That’s a thing we’re going to fix later though.
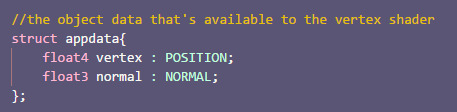
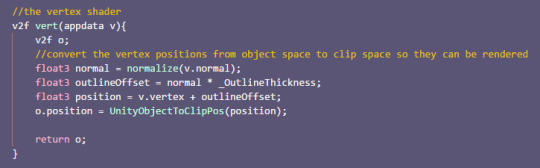
Before that we ensure that the outlines are actually outside of the base object. For that we simply expand them along the their normals. That means we need the normals in our input struct, then we simply add them to the position of the vertices. We also normalize the normals and multiply them with the outline thickness to make the outlines as thick as we want them to be.
With this we can now adjust the thickness of our hull, but it’s still hiding the base objects. The fix for that is that we don’t draw the front of the hull. Usually when we render objects we only draw the front because of performance reasons (you might have looked inside a object before and were able to look outside, that’s why). For this we can now invert that and only draw the backside. That means we can still see the object because we can look into the hull and we can see the hull behinde the object because it’s bigger than the object itself.
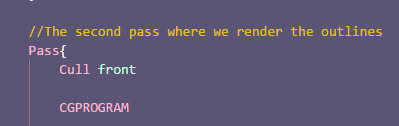
To tell unity to not render the frontsides of objects we add the Cull Front attribute to the hull pass outside of the hlsl area.
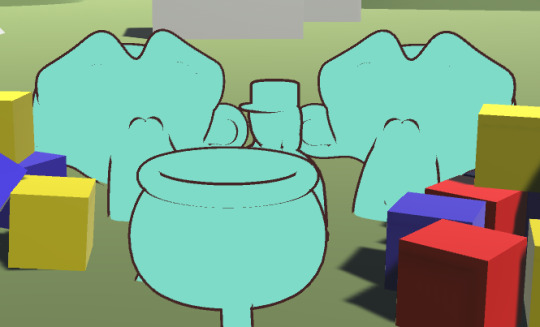
And with this we have the outlines how we want them.
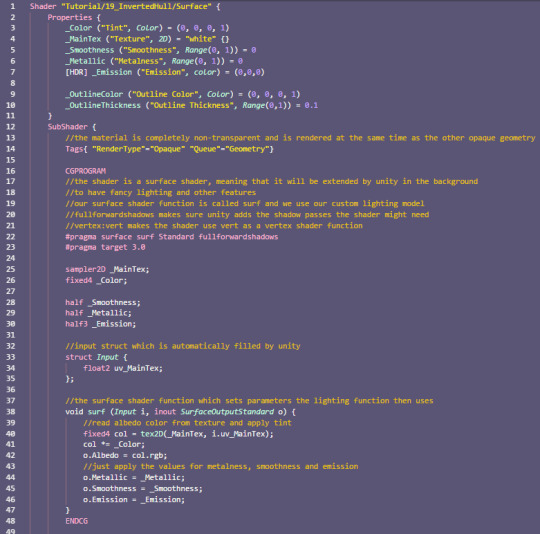
It is pretty straightforward to also apply the outlines to a surface shader. Unity does generate the passes of the surface shader for us, but we can still use our own passes too which unity won’t touch so they operate as usual.
This means we can simply copy the outline pass from our unlit shader into a surface shader and have it work just as we expect it to.
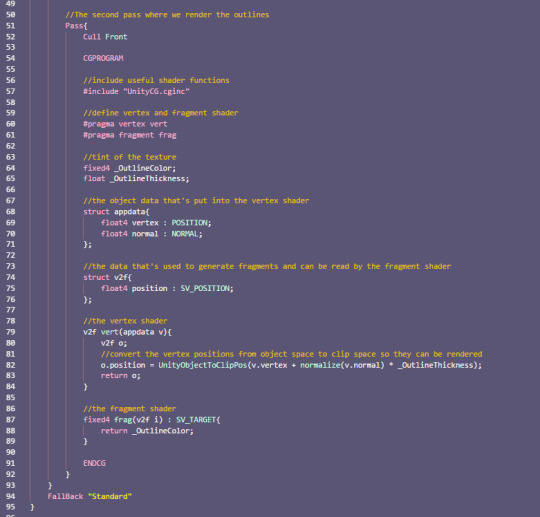
The differences of outlines via a inverted hull shader to a postprocessing effect is that you can make the outlines on a material by material basis, you don’t have to apply it to all objects. Also it’s a different look than choosing outlines based on depth and normals. It’s best to inform yourself about both techniques and then choose which is better for your game.
I hope it’s now clear how shaders with multiple passes can work and how to use them to make outlines.
You can also find the source code for the shaders here:
https://github.com/axoila/ShaderTutorials/blob/master/Assets/19_Inverted_Hull/UnlitOutlines.shader
https://github.com/axoila/ShaderTutorials/blob/master/Assets/19_Inverted_Hull/SurfaceOutlines.shader
If you have any questions feel free to contact me here on tumblr or on twitter @axoila.
17 notes
·
View notes
Text
/nerd talk start
You guys know about this new awesome amazing wonderful package called Hot Reload? It allows you to change code and see the changes on the fly all while in Play Mode.
Check it out
p.s. did I mention it's amazing?
/nerd talk end
9 notes
·
View notes
Photo
ERRA: EXORDIUM
Simple solution for fix situations leveldesign, so as not to get stuck in the ceilings
#unitytips#madewithunity#pixelart#pixel art#gamedevelopment#leveldesign#level design#gamedev#gamedevs#indiedev#indiedevs#indiegames#indiegaming#indie games#coding#code
0 notes
Photo

In a world where you can be who you want to be, who would you choose to be? #patreon #tcg #rpg #gaming #cardgame #artstationHQ #magic #HybridTCG #gamedev #indiegame #roleplaying #roleplayinggame #monster #indiegamewatch #indietrends #indiedev #tcgplayer #30daydev #unitytips
#tcg#monster#roleplayinggame#indietrends#indiegame#gamedev#magic#indiedev#cardgame#artstationhq#indiegamewatch#tcgplayer#30daydev#rpg#patreon#unitytips#gaming#hybridtcg#roleplaying
1 note
·
View note
Text
Use this simple trick to regain tranquility when using Visual Studio 2019 (8.1) with Unity 3D on Mac
UPDATE: Turns out this issue affected Visual Studio for Mac version 8.1. It is solved in latest version 8.3.
A quick Unity 3D tip before weekend: if you're using Visual Studio 2019 and it freezes for a few seconds every time you save a file, it's because it tells Unity to refresh asset database. This is by design and you have to manually disable this option.
Here’s how:

P.S.: This option forces asset database refresh even if you have "Auto Refresh" option disabled in Unity preferences.
#unity#unity3d#game development#gamedev#unitydev#tips#tips & tricks#unitytips#visual studio#mac#asset database
1 note
·
View note
Photo
Unity Asset Store Sale ⭐ 60% — 80% OFF CODE ⭐ 2 Days
https://makaka.org/o/sale
Unity Asset Store Sales are held regularly.
There are 2 big sales in Year: Spring & Autumn.
Last 2 days you have opportunity to get 525 most successful assets with Additional 10% off coupon: SSAFF2020
So you can get (50 + 10)% & (70 + 10)% (for daily deal) discount appropriately. Enjoy.
⭐ $27.50 Bonus (Odin - Inspector and Serializer)
In Current sale you can get Odin with 60% discount if you want to support the publisher: https://makaka.org/o/odin
However, there is an official way to get asset for free on GitHub:
https://github.com/TeamSirenix/odin-serializer
⭐ Makaka Games — Gift Program
My assets are not included in official sale, however here is my gift program for you: https://makaka.org/unity-assets-free
#unity#Unity3D#Asset#assetstore#Unity Asset Store#UnityAsset#Asset Store#game development#game template#game dev#gamedev#AR#UnityTips#VR#AugmentedReality#Augmented reality#indiedev
1 note
·
View note
Photo
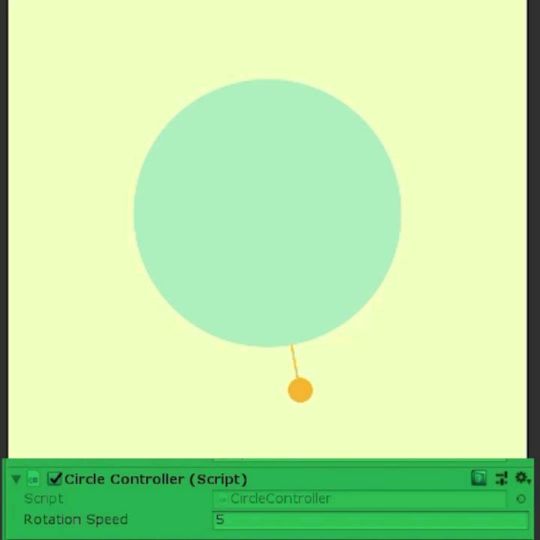
Short unity tutorial Want more short tutorials? ... #unitytips #unityproject #unitycode #unitycsharp #gameprogramming #gamecoding #tipsandtricks #gamedesigntip #gamedevtips #unitytutorials #unitytutorial https://www.instagram.com/p/B_R2cBzF5PV/?igshid=pr3ouhsizjjm
#unitytips#unityproject#unitycode#unitycsharp#gameprogramming#gamecoding#tipsandtricks#gamedesigntip#gamedevtips#unitytutorials#unitytutorial
0 notes
Last Seen Blogs

quadrantmodelquotes
Quadrant Model Quotes from 2013 Lectures

wyattcarmichael
keep it short

thesantacarla80svampiresn
The Santa Carla Vampires & Hunters


xcidity-blog
falling