
esoxy
EsoxY
The solid emperor of the northern pike
20 posts
Don't wanna be here? Send us removal request.
Last Seen Blogs


Text
If you want to deploy your stuff to the internet, but also want to do it for free I have assessed a couple of free providers for you. Because I'm nice. Or not.
12 notes
·
View notes
Text
So let's get into the nitty-gritty technical details behind my latest project, the National Blue Trail round-trip search application available here:
This project has been fun with me learning a lot about plenty of technologies, including QGis, PostGIS, pgRouting, GTFS files, OpenLayers, OpenTripPlanner and Vita.
So let's start!
In most of my previous GIS projects I have always used custom made tools written in ruby or Javascript and never really tried any of the "proper" GIS tools, so it was a good opportunity for me to learn a bit of QGIS. I hoped I could do most of the work there, but soon realized it's not fully up to the job, so I had to extend the bits to other tools at the end. For most purposes I used QGis to import data from various sources, and export the results to PostGIS, then do the calculations in PostGIS, re-import the results from there and save them into GeoJSON. For this workflow QGIS was pretty okay to use. I also managed to use it for some minor editing as well.
I did really hope I could avoid PostGIS, and do all of the calculation inside QGIS, but its routing engine is both slow, and simply not designed for multiple uses. For example after importing the map of Hungary and trying to find a single route between two points it took around 10-15 minutes just to build the routing map, then a couple seconds to calculate the actual route. There is no way to save the routing map (at least I didn't find any that did not involve coding in Python), so if you want to calculate the routes again you had to wait the 10-15 minute of tree building once more. Since I had to calculate around 20.000 of routes at least, I quickly realized this will simply never work out.
I did find the QNEAT3 plugin which did allow one to do a N-M search of routes between two set of points, but it was both too slow and very disk space intense. It also calculated many more routes than needed, as you couldn't add a filter. In the end it took 23 hours for it to calculate the routes AND it created a temporary file of more than 300Gb in the process. After realizing I made a mistake in the input files I quickly realized I won't wait this time again and started looking at PostGIS + pgRouting instead.
Before we move over to them two very important lessons I learned in QGIS:
There is no auto-save. If you forget to save and then 2 hours later QGIS crashes for no reason then you have to restart your work
Any layer that is in editing mode is not getting saved when you press the save button. So even if you don't forget to save by pressing CTRL/CMD+S every 5 seconds like every sane person who used Adobe products ever in their lifetimes does, you will still lose your work two hours later when QGIS finally crashes if you did not exit the editing mode for all of the layers
----
So let's move on to PostGIS.
It's been a while since I last used PostGIS - it was around 11 years ago for a web based object tracking project - but it was fairly easy to get it going. Importing data from QGIS (more specifically pushing data from QGIS to PostGIS) was pretty convenient, so I could fill up the tables with the relevant points and lines quite easily. The only hard part was getting pgRouting working, mostly because there aren't any good tutorials on how to import OpenStreetMap data into it. I did find a blog post that used a freeware (not open source) tool to do this, and another project that seems dead (last update was 2 years ago) but at least it was open source, and actually worked well. You can find the scripts I used on the GitHub page's README.
Using pgRouting was okay - documentation is a bit hard to read as it's more of a specification, but I did find the relevant examples useful. It also supports both A* search (which is much quicker than plain Dijsktra on a 2D map) and searching between N*M points with a filter applied, so I hoped it will be quicker than QGIS, but I never expected how quick it was - it only took 5 seconds to calculate the same results it took QGIS 23 hours and 300GB of disk space! Next time I have a GIS project I'm fairly certain I will not shy away from using PostGIS for calculations.
There were a couple of hard parts though, most notably:
ST_Collect will nicely merge multiple lines into one single large line, but the direction of that line looked a bit random, so I had to add some extra code to fix it later.
ST_Split was similarly quite okay to use (although it took me a while to realize I needed to use ST_Snap with proper settings for it to work), but yet again the ordering of the segments were off a slight bit, but I was too lazy to fix it with code - I just updated the wrong values by hand.
----
The next project I had never used in the past was OpenTripPlanner. I did have a public transport project a couple years ago but back then tools like this and the required public databases were very hard to come by, so I opted into using Google's APIs (with a hard limit to make sure this will never be more expensive than the free tier Google gives you each month), but I have again been blown away how good tooling has become since then. GTFS files are readily available for a lot of sources (although not all - MAV, the Hungarian Railways has it for example behind a registration paywall, and although English bus companies are required to publish this by law - and do it nicely, Scottish ones don't always do it, and even if they do finding them is not always easy. Looks to be something I should push within my party of choice as my foray into politics)
There are a couple of caveats with OpenTripPlanner, the main one being it does require a lot of RAM. Getting the Hungarian map, and the timetables from both Volánbusz (the state operated coach company) and BKK (the public transport company of Budapest) required around 13GB of RAM - and by default docker was only given 8, so it did crash at first with me not realizing why.
The interface of OpenTripPlanner is also a bit too simple, and it was fairly hard for me to stop it from giving me trips that only involve walking - I deliberately wanted it to only search between bus stops involving actual bus travel as the walking part I had already done using PostGIS. I did however check if I could have used OpenTripPlanner for that part as well, and while it did work somewhat it didn't really give optimal results for my use case, so I was relieved the time I spend in QGIS - PostGIS was not in vain.
The API of OpenTripPlanner was pretty neat though, it did mimic Google's route searching API as much as possible which I used in the past so parsing the results was quite easy.
----
Once we had all of the data ready, the final bit was converting it to something I can use in JavaScript. For this I used my trusted scripting language I use for such occasion for almost 20 years now: ruby. The only interesting part here was the use of Encoded Polylines (which is Google's standard of sending LineString information over inside JSON files), but yet again I did find enough tools to handle this pretty obscure format.
----
Final part was the display. While I usually used Leaflet in the past I really wanted to try OpenLayers, I had another project I had not yet finished where Leaflet was simply too slow for the data, and I had a very quick look at OpenLayers and saw it could display it with an acceptable performance, so I believed it might be a good opportunity for me to learn it. It was pretty okay, although I do believe transparent layers seem to be pretty slow under it without WebGL rendering, and I could not get WebGL working as it is still only available as a preview with no documentation (and the interface has changed completely in the last 2 months since I last looked at it). In any case OpenLayers was still a good choice - it had built in support for Encoded Polylines, GPX Export, Feature selection by hovering, and a nice styling API. It also required me to use Vita for building the application, which was a nice addition to my pretty lacking knowledge of JavaScript frameworks.
----
All in all this was a fun project, I definitely learned a lot I can use in the future. Seeing how well OpenTripPlanner is, and not just for public transport but also walking and cycling, did give me a couple new ideas I could not envision in the past because I could only do it with Google's Routing API which would have been prohibitively expensive. Now I just need to start lobbying for the Bus Services Act 2017 or something similar to be implemented in Scotland as well
21 notes
·
View notes
Text
My latest mapping project. Based on the data collected by https://datamap-scotland.co.uk/ but also added a bit more filtering options. Will try to add some historical graphs where possible as well.
2 notes
·
View notes
Text
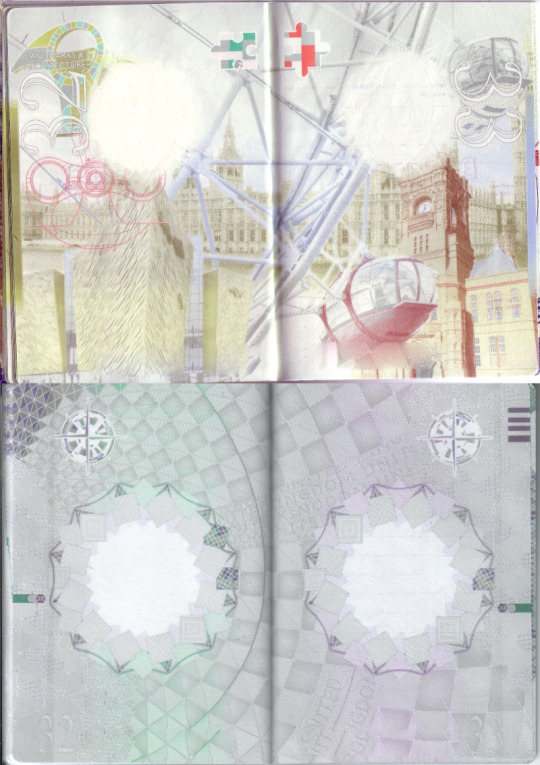
The fabled blue UK passport is 3 years old today
So this is the perfect time to do a proper, page-by-page comparison of both the old and the new passports, to see how much better the new one is.
Let's start with the front cover
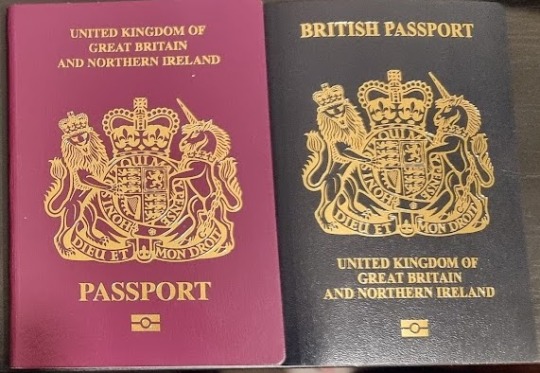
Although neither of them says anything about the EU anymore, the new one contains the words "BRITISH" and is also (a very dark shade of) blue. 0-1 so far to the blue one
Opening up the pages you can start to see some changes.
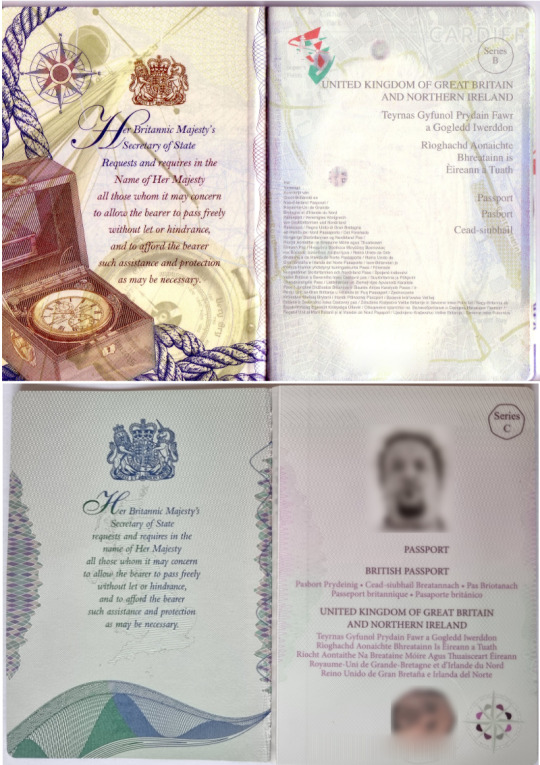
The first thing you'll notice that the second page is now in HARD plastic, hard as the Brexit that allowed this passport to become blue.
Since EU rules don't apply anymore so you could also remove all of those 22 extra pesky translations of our great country, only leaving English, Welsh, Gaelic, Irish, French and Spanish freeing up the space to include your face not just once, but two times!
We also got rid of the map of Cardiff in the background, and the references to seafaring. The latter was recently banned anyway.
2 points to the blue one so far
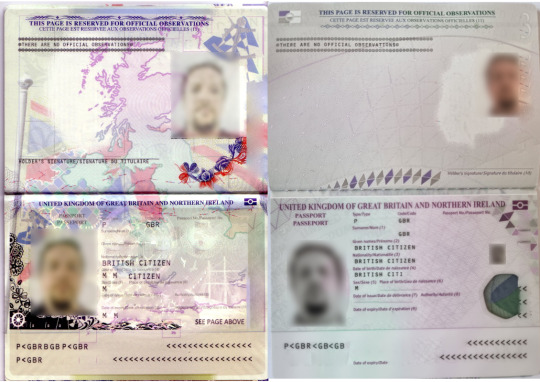
Not much change on the next page, apart from the use of hard plastic on the photo page, and the fact that I gained weight. Getting rid of the map of the UK was also a nice change as it was showing Scotland too prominently. They don't deserve this.
In any case this is a tie, so 1-3 points so far
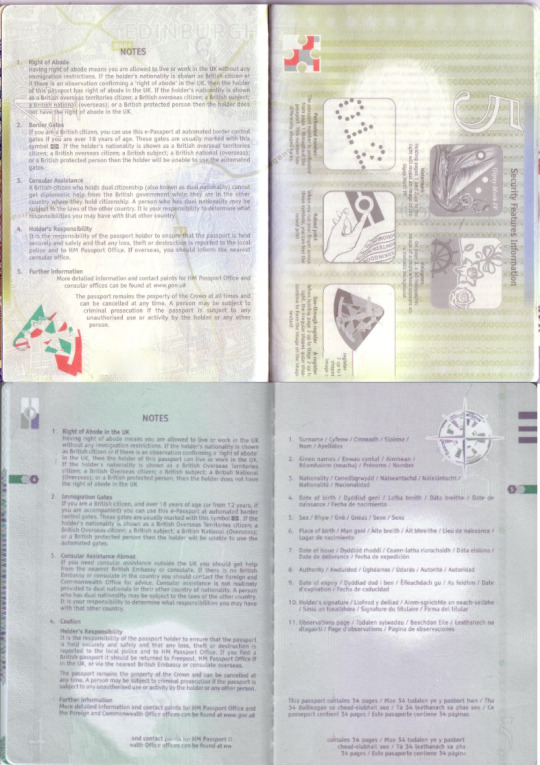
Next one up some notes and some security notes on the old passport, while the translations of the previous page on the new one. There is a watermark of Shakespeare on the old old one, and a map of Edinburgh, both which were replaced with a watermark of the floral emblem. This at least contains reference to all four countries, so that's definitely a nice addition, but so far this is also a tie. 2-4 points so far
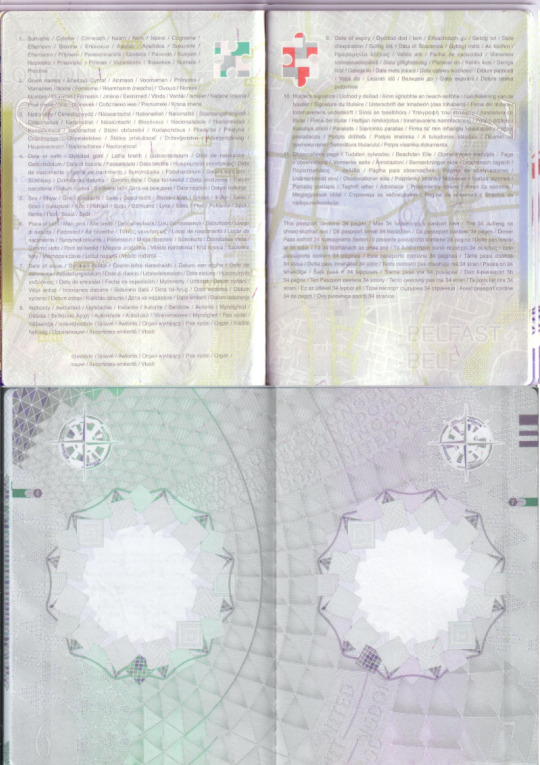
Next up on the old design we had to fill up two whole pages with translations. Completely superflous, we could have just used up the same space to allow for extra visas to be added to the passport. With the abolishment of the Freedom of Movement having two extra pages for visas is definitely a worthy addition, so 1 point extra for the blue passport. 2-5 so far.
(We also got rid of the map of London and Belfast. Who needs them)
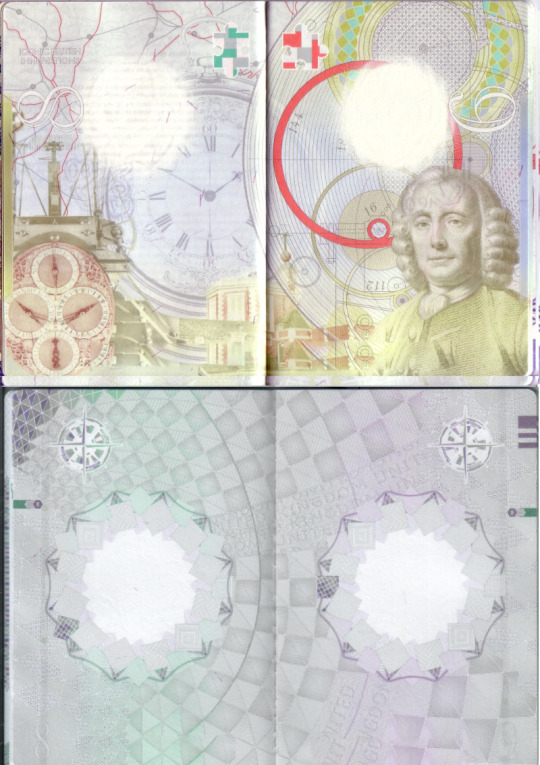
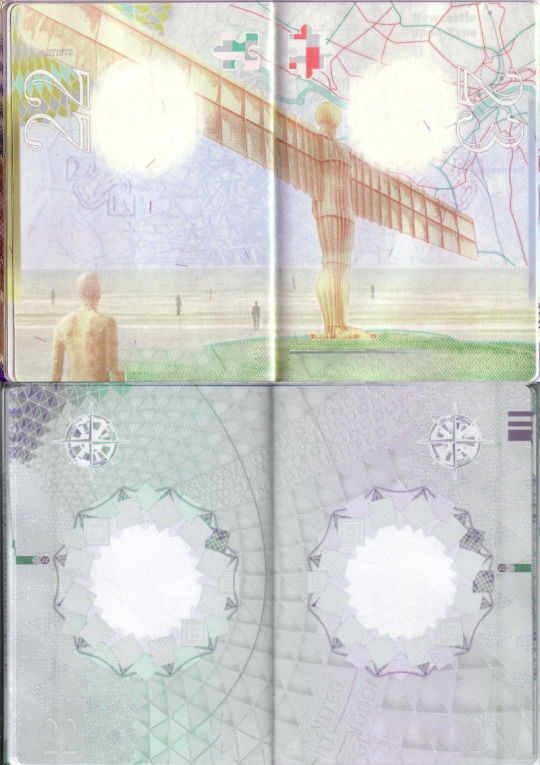
Page 8 and 9 shows John Harrison and his invention of the marine chronometer that revolutioned sea travel. On the other hand sea travel is dangerous and we just recently banned it, so it's good that this has been removed in favour of a much more stylized clock-like image. Note that it's hand aligns nicely with the page number, showing 8 and 9 respectively. This is definitely a nice touch, much more self-referential than the image of John Harrison, so a win to the blue one. 2-6 so far.
On the old passport the next two pages show John Constable, someone who pursued a lesser career like painting instead of becoming a much more important member of society, like banker or a CEO. There is no need for this kind of vice in our society, so thank this has been removed.
On the new design you can see that the hand of the clock jumped to the 1 position, instead of pointing at 11 and 12 respectively! And it remained in the same position on both pages. This choice must have saved the artist designing the passport some work, so extra points for keeping the design cheap and affordable. 2-7 so far
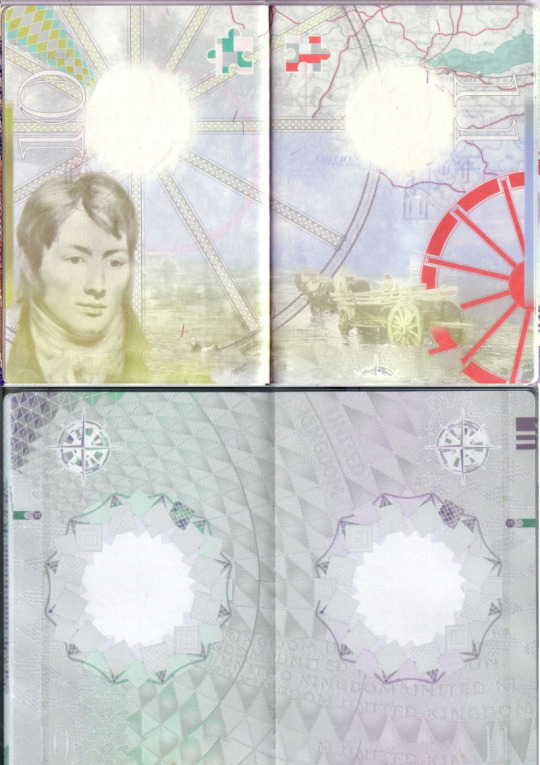
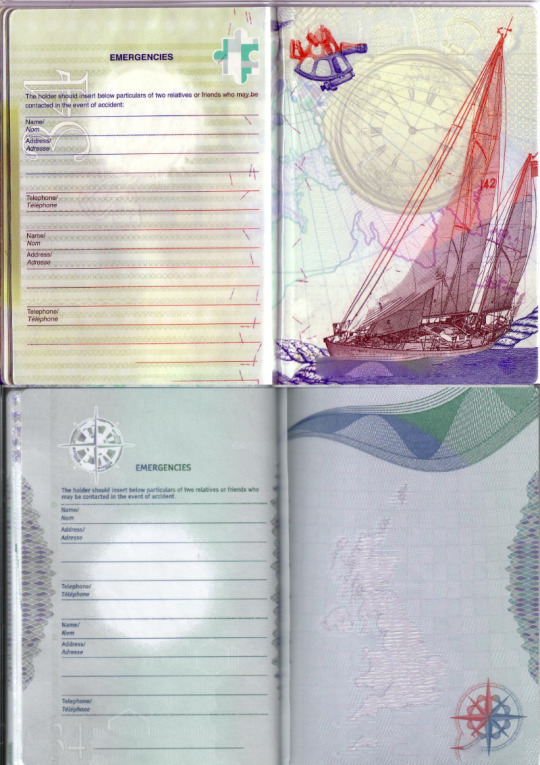
Next two pages show references to the Royal Mail including the iconic post box, and the first adhesive stamp, the Penny Black. On the other hand spending two pages on this archaic institution is just a waste of paper, especially as they do nothing just strike all the time nowadays.
On the new design? Look, there are now TWO HANDS on the clock! What a lovely addition, it definitely took me by surprise, 2-8 so far.
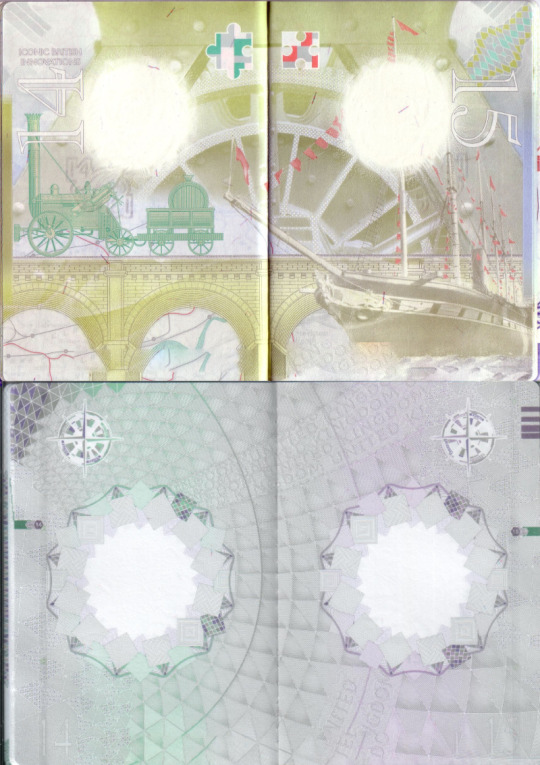
Next up on the old one are trains, you know that things that are always late, if not cancelled. They are also expensive as hell compared to car ownership, so no need to promote them anymore.
Look a magical line of UNITED KINGDOM has appeared in the background. Hats off to yet another surprise change in design, 2-9!
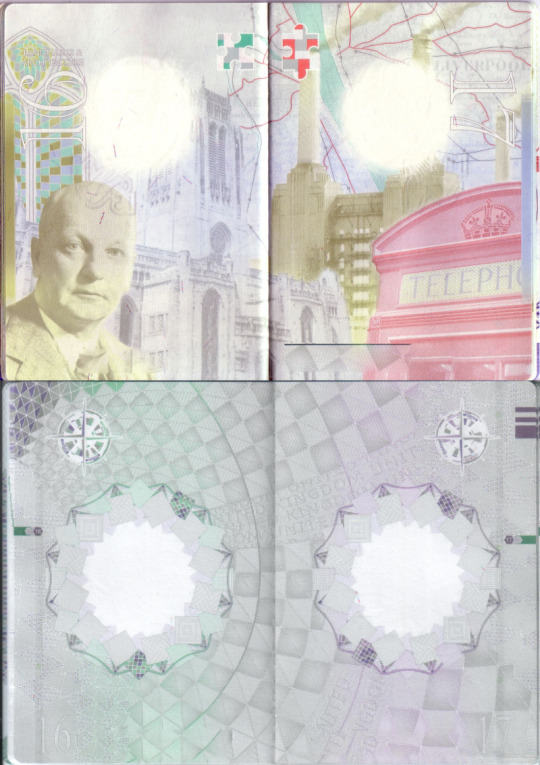
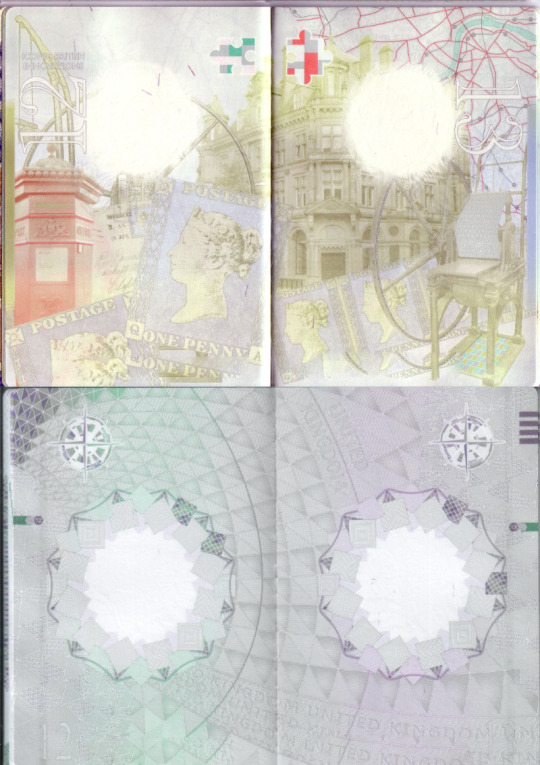
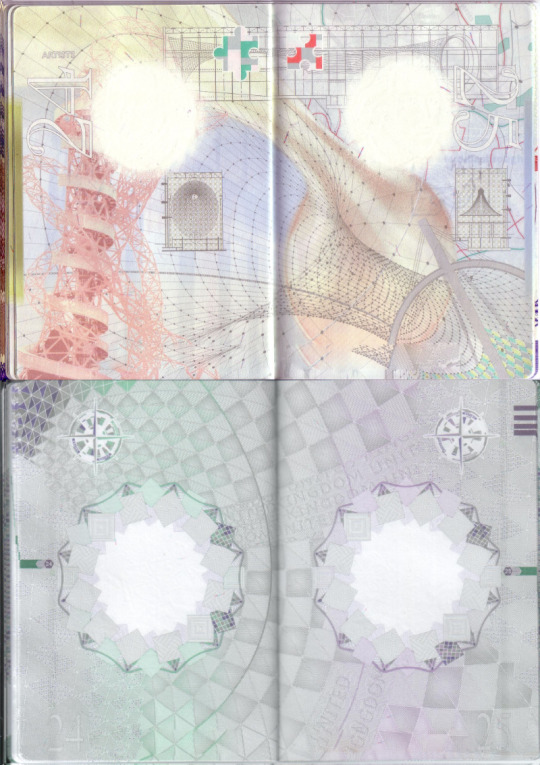
Next two pages feature Sir Giles and his architectural designs. Unfortunately for him he designed too many well known things and therefore now the page simply looks too cramped for the average viewer.
Unlike the new design, which is still clear, spacious and easy to understand. 2-10
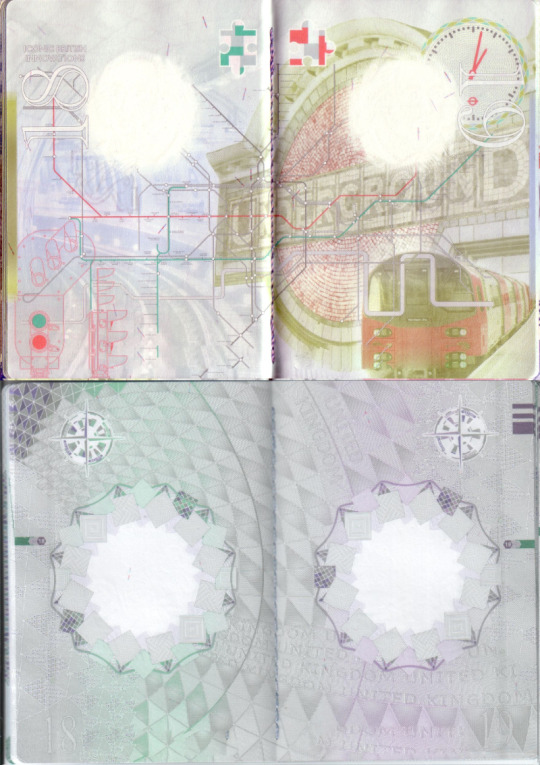
Next two pages feature the London Underground, which will definitely give PTSD to anyone who ever used it during peak hours. London was already featured in the passport with Greewinch and Battersea already anyway, while we haven't seen anything from Wales, Northern Ireland or Scotland yet.
No such issue from the new passport, clean and clear with no surprises, and representation from all corners of the UK inside the watermark. 2-11 of course
Architecture yet again, this time from a woman. Also England again, Triple boring.
Seall! The design on page 21 is the same as the one on page 12 albeit the colour difference. This duplication hopefully has yet again driven down the design costs! 2-12!
Antony Gormley. Yet another useless artist who could have become something great during his lifeteime, like I don't know, a Conservative MP, but has chosen not to.
On the other hand we have yet another page where we have design reuse - with page 20 and 22, but this time the colours match as well! Must have been some great savings, 2-13
Come on, didn't we have enough artists so far? And featuring one of the most hated artist of all time? And he is also an immigrant? Yuck!
Thank god we got rid of all of this perversion! 2-14
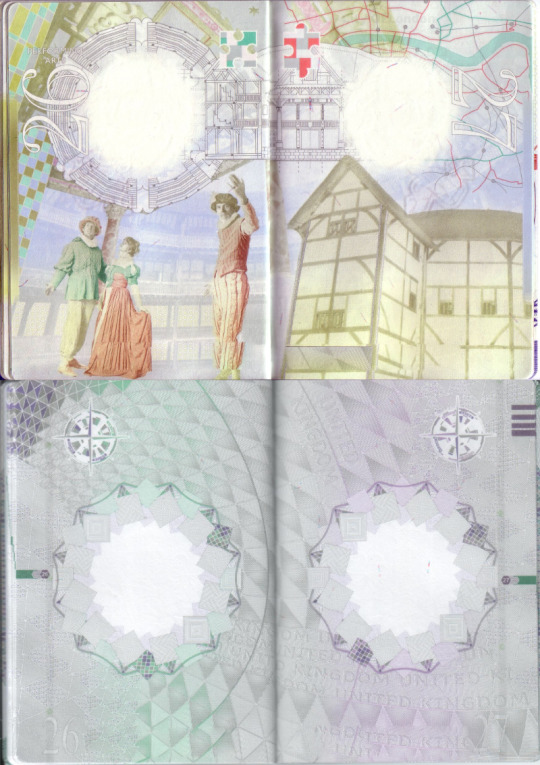
Arts, Architecture, Shakespeare and London, all on the same page. Everything we have seen so far. Space could have been used for something much more important.
Like this nice and plain design we can see on the new passport. 2-15
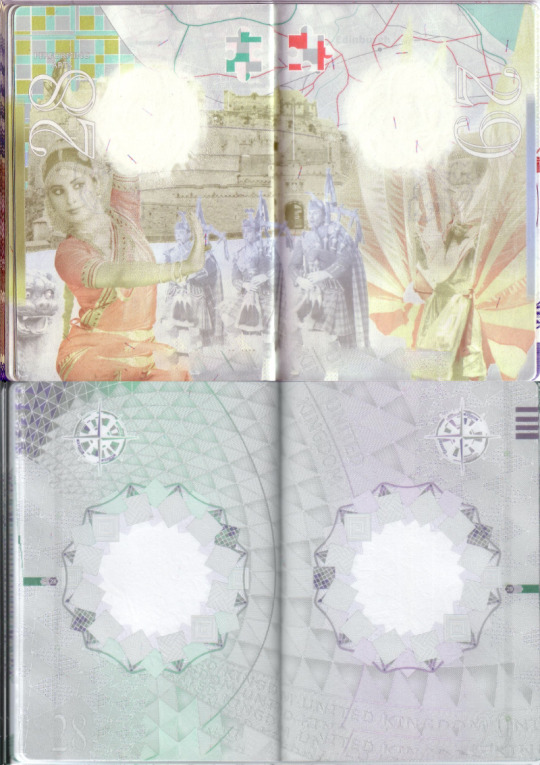
Edinburgh Castle? Bagpipes? Who allowed Scotland to be present in the design, we definitely need to fire them and never let them design passports anymore. Also the dragon on the corner looking at the girl like that? That is definitely sexual harassement, let's get rid of this carnality!
On the other hand we can see another clean and nice design, a perfect place to put your last remaining few visas before you need to get another one for £82.50 + shipping fees. 2-16

Finally no more arts or achitecture but something useful: Computers! Internet! The stuff bankers use to do important stuff! No idea why they had to put a women on this page though, but let's just disregard that.
Watch that elements from new design can be seen on the computer screen in the old one. This must have been some great foreknowledge. Let's make this one a tie! 3-17
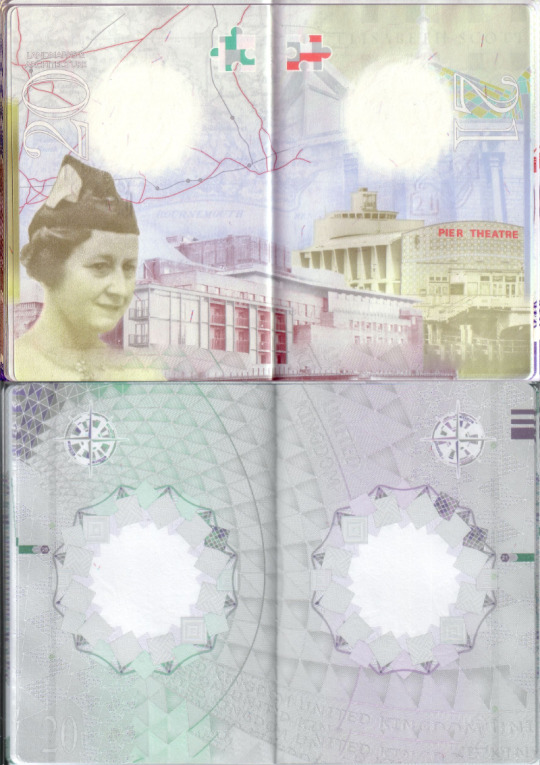
Buildings? Again? And why so many? Ah, yeah we forgot to include Wales and Northern Ireland in the designs yet, so let's quickly sort them out, before the nationalists notice! Let's still make sure the London eye is centre and front, not to give them too much credit though.
The new one? Same old same old. You can see some art reuse on page 33 (vs page 30) as usual.
However since both designs feature all 4 countries, let's make this one a tie as well: 4-18
Final page! Yet again, only Scotland and Northern Ireland above, but the whole of the UK on the new one. Blue one is a clear winner here: 4-19
And finally the back page. Plain burgundy on the old one, a nice embossed floral design on the blue one. The winner is clear.
So this takes our total to 4-20! A clear and massive victory to the new passport, an exquisite masterpiece, perdectly designed and ideal to the new place of Global Britain in the world, far away from the woke dictatorship of the European Union, and the best Brexit dividend so far (apart from being able to buy cheep booze at airports again)
11 notes
·
View notes

Photo
After some fine-tunement here are some updates results:
http://sztupy.hu/kossuth-map/world/index.html
Kossuth
Petőfi
Lenin
Budapest
London
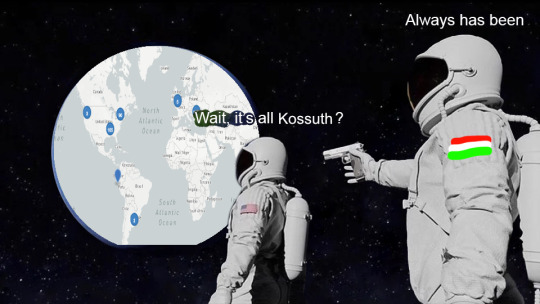
All the Kossuth in the world
Once question that was raised a couple of times was to find out all the places in the world named after Lajos Kossuth, Hungarian Lawyer. The solution is fairly simple, but due to the volume of data involved there are a few changes that needed to be used.
1. Download the Planet
First you have to download the entire planet data from OSM. Fortunately they provide you with the call to do that:
docker run –rm -it -v $PWD:/download openmaptiles/openmaptiles-tools download-osm planet – -d /download
2. Convert the pbf file to o5m
The tools I used to get the data out from the Hungarian database were unfortunately not happy with the large dataset, so I had to use osmfilter - which only supports o5m files.
osmconvert planet-200720.osm.pbf –max-objects=10000000000 –hash-memory=3000 -o=planet.o5m
3. Filter out anything Kossuth
osmfilter now can filter out. It unfortunately only supports case-sensitive searches so we have to do some tricks
osmfilter planet.o5m –keep=“name=*kossuth* or name=*KOSSUTH* or name=*Kossuth*” –drop-author -o=“planet-filtered.o5m”
4. Finally convert the result to CSV and then to GeoJson
osmconvert planet-filtered.o5m –all-to-nodes –csv=“@id @lon @lat name” –csv-headline > kossuth.csv
Then use this small tool for the GeoJSON conversion
5. Upload the result to GitHub and use it’s built-in geojson viewer
https://github.com/sztupy/kossuth-map/blob/gh-pages/images/world_kossuth.geojson
Note that this depends on OSM having a good dataset - which might or might not be true. I’d be happy to know if the filtering above have missed anything so I can re-run the script with those points included
101 notes
·
View notes
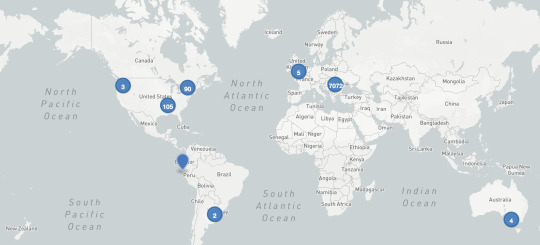
Photo
All the Kossuth in the world
Once question that was raised a couple of times was to find out all the places in the world named after Lajos Kossuth, Hungarian Lawyer. The solution is fairly simple, but due to the volume of data involved there are a few changes that needed to be used.
1. Download the Planet
First you have to download the entire planet data from OSM. Fortunately they provide you with the call to do that:
docker run --rm -it -v $PWD:/download openmaptiles/openmaptiles-tools download-osm planet -- -d /download
2. Convert the pbf file to o5m
The tools I used to get the data out from the Hungarian database were unfortunately not happy with the large dataset, so I had to use osmfilter - which only supports o5m files.
osmconvert planet-200720.osm.pbf --max-objects=10000000000 --hash-memory=3000 -o=planet.o5m
3. Filter out anything Kossuth
osmfilter now can filter out. It unfortunately only supports case-sensitive searches so we have to do some tricks
osmfilter planet.o5m --keep="name=*kossuth* or name=*KOSSUTH* or name=*Kossuth*" --drop-author -o="planet-filtered.o5m"
4. Finally convert the result to CSV and then to GeoJson
osmconvert planet-filtered.o5m --all-to-nodes --csv="@id @lon @lat name" --csv-headline > kossuth.csv
Then use this small tool for the GeoJSON conversion
5. Upload the result to GitHub and use it’s built-in geojson viewer
https://github.com/sztupy/kossuth-map/blob/gh-pages/images/world_kossuth.geojson
Note that this depends on OSM having a good dataset - which might or might not be true. I’d be happy to know if the filtering above have missed anything so I can re-run the script with those points included
101 notes
·
View notes
Link
Did an app a couple of years ago to automatically add missing double acute accents to fonts, but realised it might be much better to provide this as a webservice.
110 notes
·
View notes
Link
Shortest route avoiding uphill slopes
Based on this https://www.reddit.com/r/Showerthoughts/comments/f4zr9d/in_theory_a_path_could_exist_between_mount/ shower thought, stating
In theory a path could exist between Mount Everest and the Netherlands where you'd always be walking downhill. A marble could therefore potentially roll for around 6800km.
Unfortunately the premise is wrong, but I was wondering what would be the route with the least amount of climb (going downhill is fine), and what would be the alternative routes if we'd block large slopes as well uphill (again downhill any slope is accepted).
The solution is using NASA's Earth Heightmap as a base, and uses a simple A* style algorithm where the heuristic tries to get as close to the end goal as possible while discouraging going uphill.
Three generated images and routes are available in the images directory for three different heuristics, they are also available at google maps at https://drive.google.com/open?id=1NA6uWC96Vovlv1o-uHTS6G7sdo_sHJ6N&usp=sharing
Google Maps:

A generált gráf az külön cukin néz ki
@instantfollow
30 notes
·
View notes
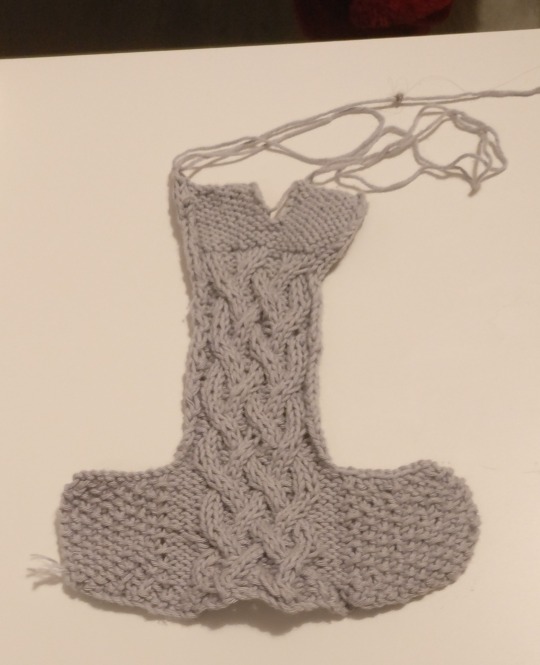
Text
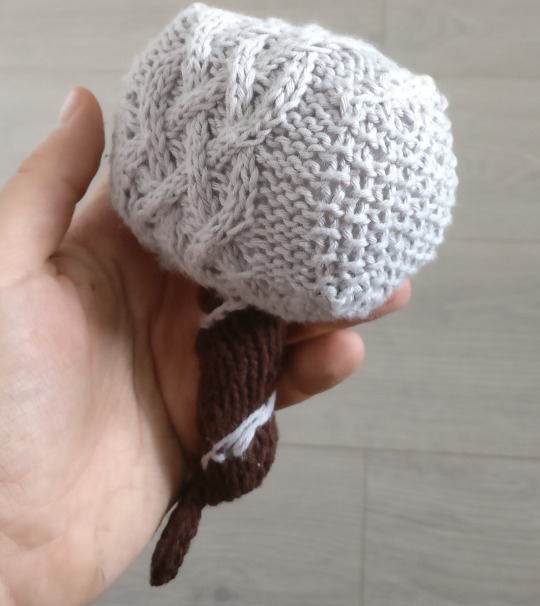
I’ve based the Hammer on the main instructions present on this instructable site.
However I disliked that the head of the hammer looked too plain. I mean a proper Thor’s hammer should have some nice design on it, so I tried to add a nice cable knitted design on top. The best pattern I found was on this page, however that was too large - it needed at least 30 stitches, but the hammer itself was only around 20 stitches wide.
In the end I had to adapt both a bit, by making the celtic pattern slimmer (this is done by making each block in the pattern 2/3 of it’s size, e.g. a p4k6 became p2k4), and changing the hammer’s instructions to accommodate this pattern in the middle, by replacing the simple 20 stitch stocking stitch with the slimmed down pattern and two p3 columns on each side, making it 21 stitch wide.
Here are full knitting instructions merging the two instructions together
Legend:
k: knit
p: purl
c4f: slip 2 stitches onto cable needle, then put it in front of the work. k2 from the main needle, then k2 from the cable needle
c4b: slip 2 stitches onto cable needle, then put it in back of the work. k2 from the main needle, then k2 from the cable needle
t3f: slip 2 stitch onto cable needle, and put it in front of the work. p1 from the main needle, then k2 from the cable needle
t3b: slip 1 stitch onto cable needle, and put in back of the work. k2 from the main needle, then p1 from the cable needle
1. Hammer head
Cast on 41 stitches on 4mm needle using grey DK cotton wool
Row 1: (k1 p1)*5, p3, k2, p2, k4, p2, k4, p4, (k1 p1)*5
Row 2: (p1 k1)*5, k4, p4, k2, p4, k2, p2, k3, (p1 k1)*5
Row 3: (k1 p1)*5, p3, k2, p2, c4f, p2, c4f, p4, (k1 p1)*5
Row 4: (p1 k1)*5, k4, p4, k2, p4, k2, p2, k3, (p1 k1)*5
Row 5: (k1 p1)*5, p3, t3f, t3b, t3f, t3b, t3f, p3, (k1 p1)*5
Row 6: (p1 k1)*5, k3, p2, k2, p4, k2, p4, k4, (p1 k1)*5
Row 7: (k1 p1)*5, p4, c4b, p2, c4b, p2, k2, p3, (k1 p1)*5
Row 8: (p1 k1)*5, k3, p2, k2, p4, k2, p4, k4, (p1 k1)*5
Row 9: (k1 p1)*5, p3, t3b, t3f, t3b, t3f, t3b, p3, (k1 p1)*5
Row 10: (p1 k1)*5, k4, p4, k2, p4, k2, p2, k3, (p1 k1)*5
Row 11-18: Repeat rows 3-10
Row 19: Cast off 10, p3, k2, p2, c4f, p2, c4f, p4, (k1 p1)*5
Row 20: Cast off 10, k4, p4, k2, p4, k2, p2, k3
Row 21: p3, t3f, t3b, t3f, t3b, t3f, p3
Row 22: k3, p2, k2, p4, k2, p4, k4
Row 23: p4, c4b, p2, c4b, p2, k2, p3
Row 24: k3, p2, k2, p4, k2, p4, k4
Row 25: p3, t3b, t3f, t3b, t3f, t3b, p3
Row 26: k4, p4, k2, p4, k2, p2, k3
Row 27: p3, k2, p2, c4f, p2, c4f, p4
Row 28: k4, p4, k2, p4, k2, p2, k3
Row 29-44: Repeat rows 21-28 2 more times
Row 45-48: Repeat rows 21-24
Row 49: p21
Row 50: k21
Row 51: p21
Row 52: k21
Row 53: p10, turn (leave the rest of the 11 on the needle)
Row 54: k10, turn
Row 55-58: Repeat rows 53-54 2 more times
Row 59: Cast off 10
Follow up rows 53-59 for the other 11 stitches as well. Make sure you leave a bit of yarn between the two sides so they don’t stick together
2. Handle
Cast on 12 stitches onto a 4mm needle from brown DK cotton wool
Stocking stitch 21 rows
Purl 2 together on the final row to get 6 stitches in the end.
Thread remaining yarn onto the stitches and pull tight, then start stitching the sides together with a needle to form a cylinder
3. Strap
Do a 3 stitch wide, 14 row long i-cord in brown DK yarn
Joining everything together
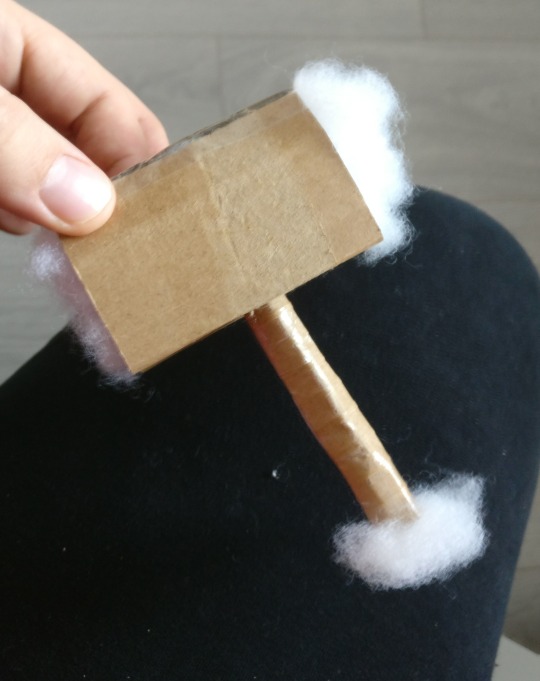
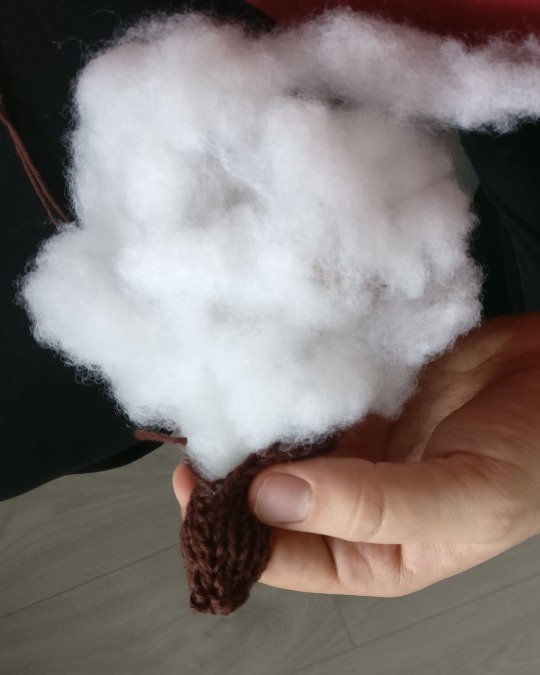
Stitch together the side of the hammer leaving the side that will hold the handle open. Get a piece of cardboard that will fit into the knitted hammer. I used a piece 7cm wide, 14cm long, but dependent on the yard you used this might be a bit bigger or smaller. Make this cardboard into a shape of a cuboid with sides 7cm, 2 1/3cm, 4 2/3cm, then fill it with filling material. Put some hot glue around the outside and glue filling material there as well. Cut out a small piece at the bottom, and then put a rolled up cardboard there for the handle. Also fill that with filling material and glue some on the outside as well.
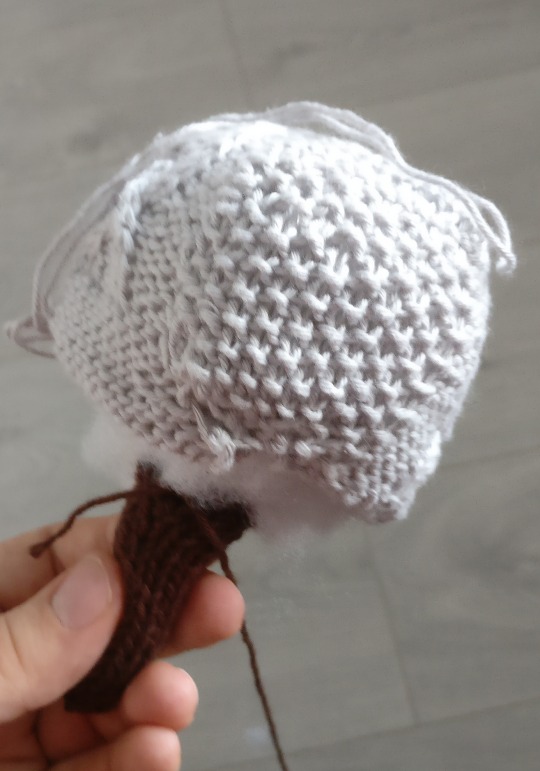
Once that’s done start by putting the knitted hammer’s head over the filled inside, stitching it up a bit, then pulling the handle as well, stitching it up and together.
Once done you can add a slight grey spiralling line onto the handle for extra design, and stitch the strap onto the end of the handle

Kesztyűk után valami sokkal hasznosabb, hisz minden kis vikingnek szüksége van egy rendes Mjölnirre
72 notes
·
View notes
Video
youtube
This is my first try in making a Magic Mirror. Since this is my first try in building one I wanted it to be cheap. Also being me I wanted it to be somewhat different than the others out there.
I had an old Galaxy GT-N8000 lying around with no real use (as it is fairly old now). However I didn’t want to get rid of it as it one cool feature: it is a Galaxy Note, hence it allows using a pen to take notes.
I was wondering if maybe the pen would still work behind the two-way mirror glass - meaning I would be able to still control the tablet and not really lose the touch features - just with a pen instead of my fingers.
Also I wanted it to be really cheap so I used foil on a glass instead of a proper two-way glass.
So what is needed:
Hardware
- Frame: Bought a 40cmx4cm deep frame box from Hobbycraft. They were on sale for £5 a piece
- Glass: used the glass that came with the frame, and put some foil on it, that I bought here for £5
- Black and White foam boards for filling also from Hobbycraft for £10
- Some counterweight I had lying around
- Black paper
- Samsung GT-N8000: Probably the most expensive of the requirements, but I already had one so it was free for me. In any case you can get one refurbished on eBay from £80-100, or even less if it’s even more used. If the S-Pen works it’ll be fine for this project.
Assembly was more and less straightforward. Obviously when using foil + glass although it’s cheap the quality is not as good. Also no matter how careful you wish to be there will always be small blemishes and spots around the glass. You will also likely need to put the foil outwards, as the other side of the foil will be much more tainted with the soapy water you’ll have to use during assembly.
In any case here are the assembly steps:
First cut the foil to size, clean up the glass and put it into the frame:
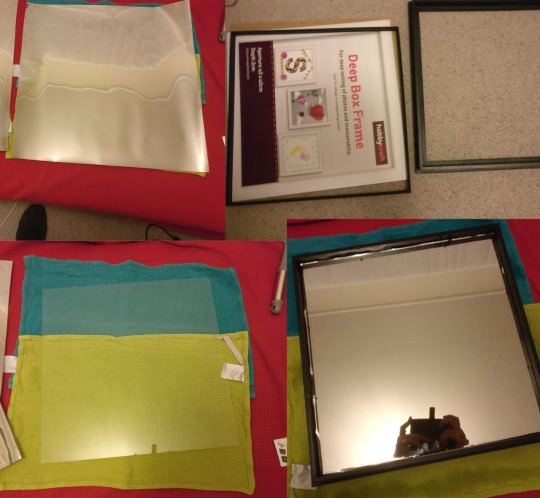
As stated the area between the glass and the foil remained permamentaly dirty with all of the soapy water I used, so I had to turn the foil to the outside. Fortunately it’s strong enough that the S-Pen doesn’t scratch it, but it’s still more vulnerable like this from the elements.
Once the glass is ready let’s put in the tablet. First I added a frame to it from some black paper, and then assemble it layer by layer:
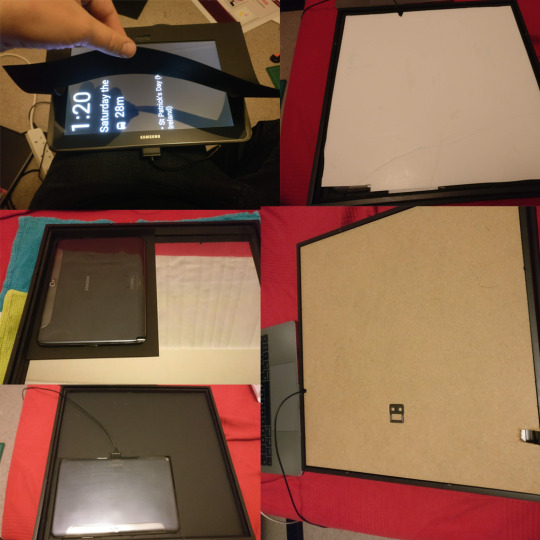
I used two layers of foam boards for this. I also added a slight counterweight (not present in the picture) to the other end of the frame to make it more stable - as otherwise the tablet’s mass will tilt the frame to one end when it’s hanged.
Finally it’ll look like this from the front:
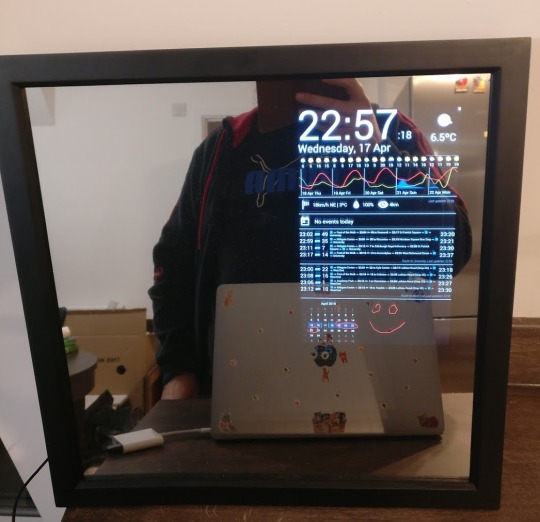
Software
I used Speculum as a base as it looked a good base, but then I heavily customised it to my taste. Main additions:
- Built-in support for turning the screen on and off (with animation) if there are any motion captured by the camera (note: it uses the non-free Motion Detector app to help in this)
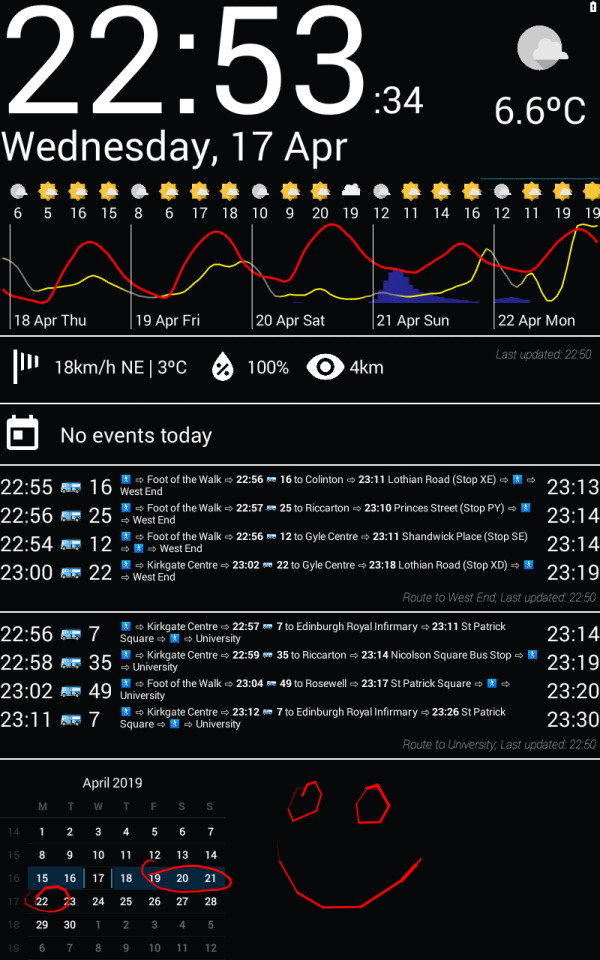
- More weather details, including a 5 day forecast with temperature, cloud cover and precipitation graph, and a separate one hour mini-rain forecast widget.
- Two bars to show bus times using Google Maps API to two separate locations
- A calendar
- And support for drawing onto the screen using the pen. This works nicely with pressure sensitivity support from the pen as well.
The code is available from https://github.com/sztupy/Speculum-Android
Here’s a screenshot of all the features displayed:
And also see the video above for it in action.
Future plans
- Replace the glass with a proper two-way mirror. While the foil is good for experimentation it is definitely visible that it’s quality is not as good.
- Remove the requirement for the Motion Detector app and make this feature built-in. Motion Detector is simply too power-intense, as you can’t really tell it to only check the camera every 1-2 seconds (which would still be okay for our purpose)
- Make sure the bus times widget uses the Google API as less as possible. Currently Google gives $250 of free credit, and the current usage almost uses this up fully. I plan on making it only use around $50-$100 worth of API calls a month, as that would still leave me with $100-$150 extra credit for other uses.
- Make the pen more useful: one of the main ideas here was to get some kind of touch support cheaply for this Magic Mirror, but currently the only thing is that you can take notes and switch the calendar’s month. The whole mirror could be made much more interactive
24 notes
·
View notes
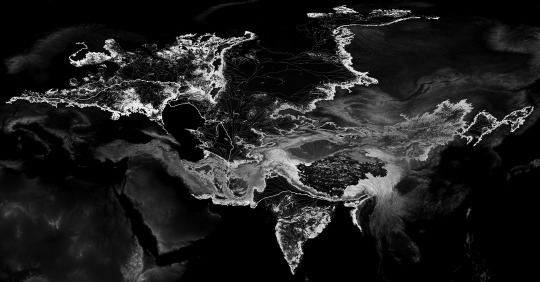
Link
There was a thread raised where in Hungary is the point which is furthest away from any street called Kossuth (which is a very common street name)
To figure this out first we have to obtain a data source. OSM’s data dump looked about right, and I could extract the street names, and the latitude and longitude of their geographic centres.
Once that was done I used rubyvor to generate the below Voronoi diagram:
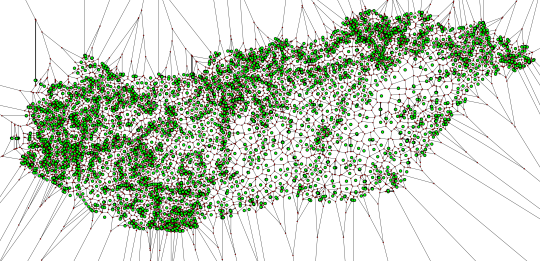
A Voronoi-diagram will create cells where each of the point inside the cell is closest to a specific point in our dataset. This means that the points furthest away from our points in the dataset lie on the edges of these cells.
Next I simply went through the list of all of these cells and calculated their distance to the nearest node. I had to filter out out the points that lie outside of Hungary, and finally saw that the winner is inside the Hortobágy National Park, more specifically here: https://www.google.com/maps/place/@47.6805713,21.2295144,17z
The nearest street named Kossuth from this point lies around 15km.
You can find the dataset and the scripts I used in the github repo linked to this post.
10 notes
·
View notes
Link
Available My first Wear OS project for the Stack Overflow SWAG competition:
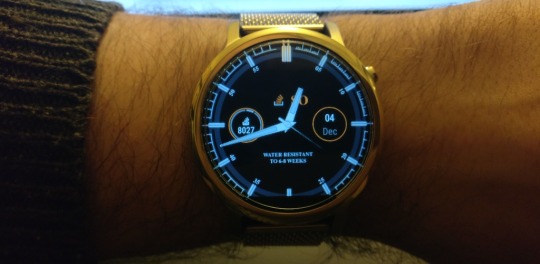
Comes with lots of features and all:
Features
Two watch faces, a simple one, and another that looks like the SWAG you can win.
Supports two complications on the watch face.
Includes a complication that can show a specific user's reputation
Displays the UTC offset so you know when the Stack Overflow counters reset.
Water Resistant to 6-8 weeks
Available on the play store (search for Stack Overflow if you’re on the watch), source code available as well
1 note
·
View note
Photo
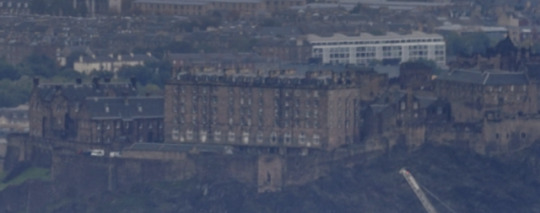
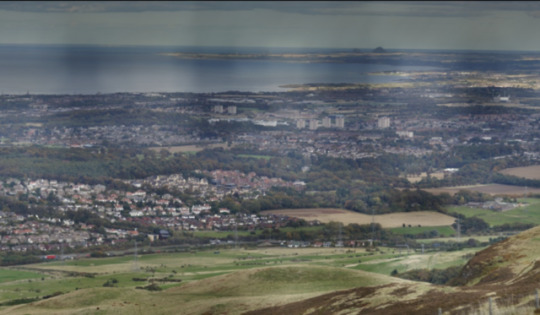
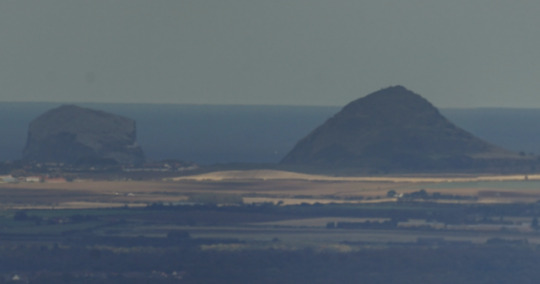
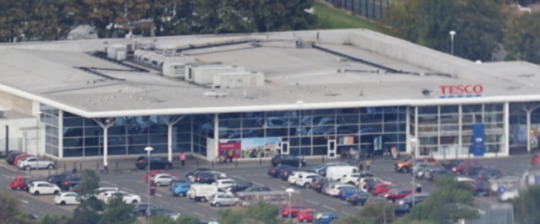
Edinburgh from Pentland Hills
My first try in creating a gigapixel panorama. Well it could’ve been worse, I learned a lot how to be more prepared the next time I’ll try it.
There’s around 4.4 billion pixels in the image, making it possible to see landmarks like the Forth Bridge, Edinburgh Castle or even Bass Rock which is some 45km in the distance.
The site is unfortunately very crappy and crashes a lot of times with 500 errors, but you can just keep retrying if you wish to play around.

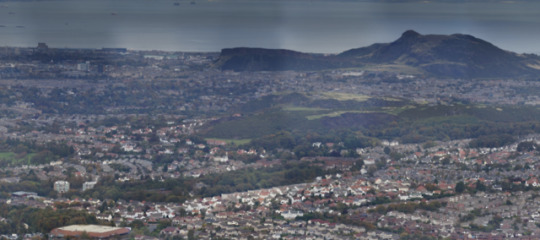
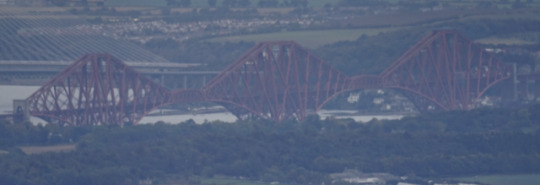

#Edinburgh#Pentland Hills#Forth Bridge#Bass Rock#Scotland#UK#panorama#gigapan#gigapixel#post#own#rant
18 notes
·
View notes
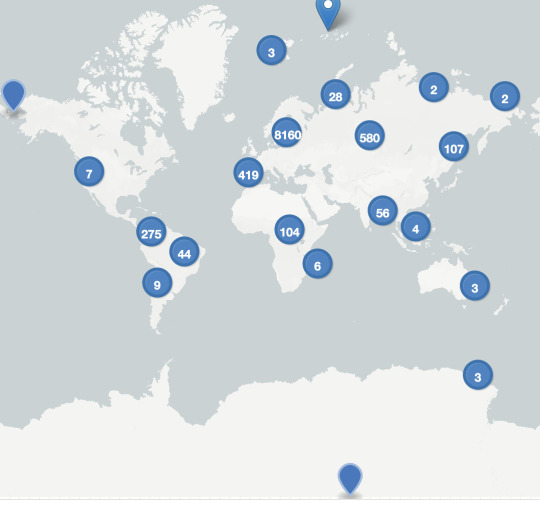
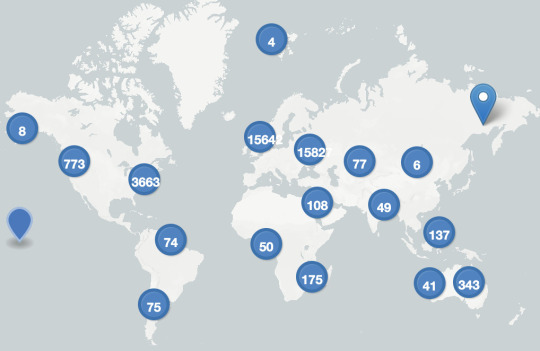
Link
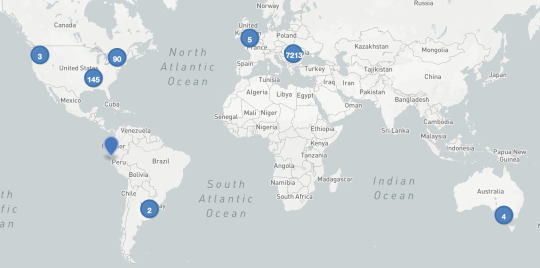
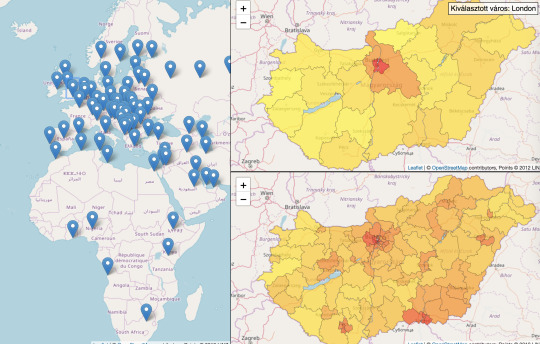
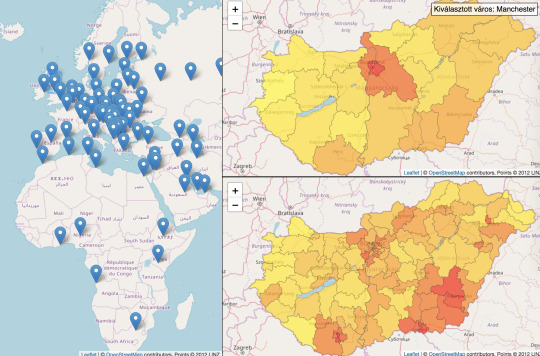
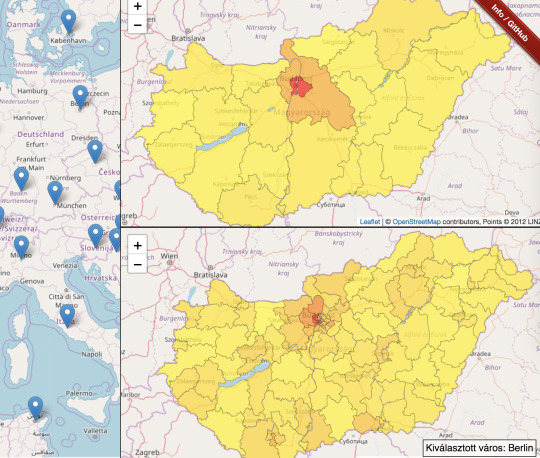
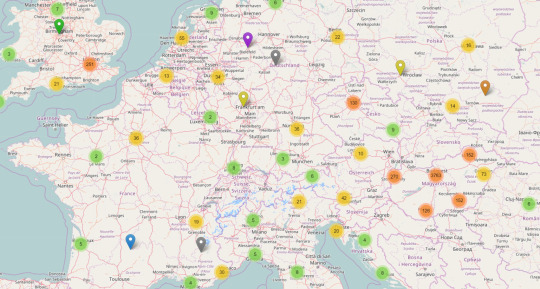
Since Hungary had its recent general election, let’s look at one of the statistics provided by the National Election Office: where do Hungarians have their Hungarian residency, who voted abroad.
Now obviously from the statistics we don’t know whether these people are actually living abroad but didn’t close their Hungarian residency (which is fairly common practice), or whether they were just visiting, but hopefully we can still get a nice picture.
Here is the international statistics (with redder colours meaning more people):
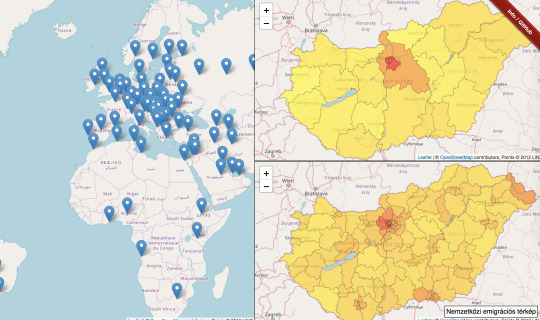
Here are some excerpts:
London:
Manchester:
Berlin:
5 notes
·
View notes
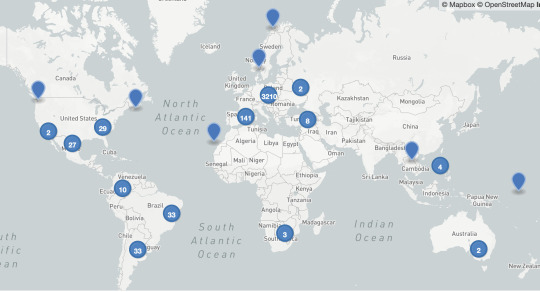
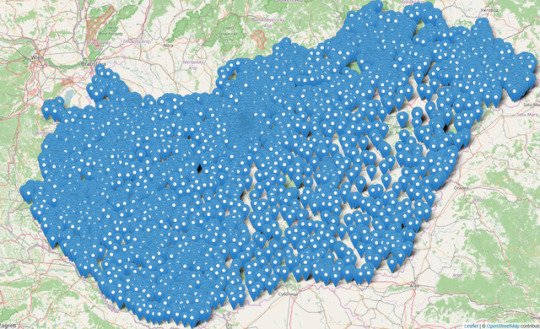
Photo
Map of stadiums and other smaller football fields in Hungary
Interactive map
150 notes
·
View notes
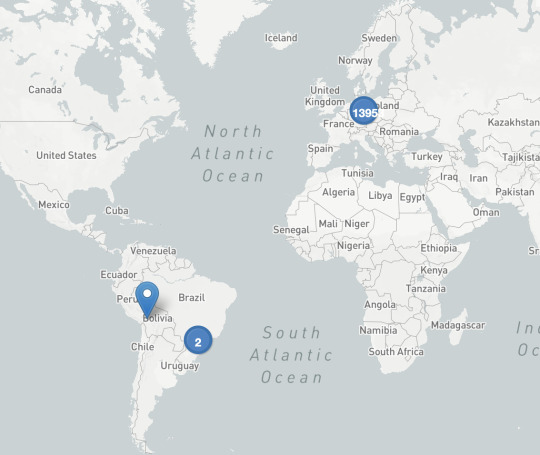
Photo
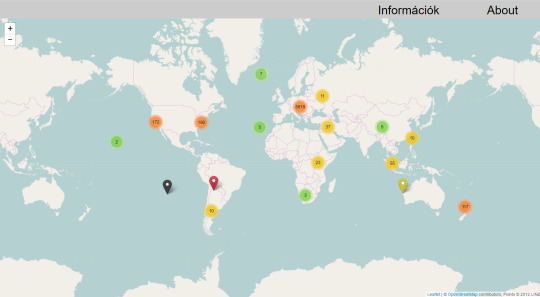
Tumblr Map
What is this?
A map showing the location of the photos taken by the Hungarian Tumblr community
How does it work?
EXIF is a way to store metadata inside your image files. This includes things like what camera you used to take the pictures, what creative settings you applied on it, and nowadays it might also contain the location where the image was taken.
As this information might be considered sensitive data (especially if you have taken the picture at home or at work), most social sites, like Facebook, Twitter or Instagram remove these metadata from the uploaded images, so other people who check them will not find them. Tumblr however does no such thing.
Who are depicted on the map?
The photos of about 500 Hungarian Tumblr users.
Can I also be included?
It takes a while to generate the data, but if you are interested in doing it yourself you can either check you own blog using this app (more information about it here), or generate a similar map by following the instructions on https://github.com/sztupy/tumblr-exif-map
My picture is included and I don't want it to be there, what can I do?
Unfortunately due to the nature of Tumblr, neither deleting the posts, nor deleting your blog will make sure that your pictures are gone, as any reblog of your pictures will still contain the original image, with your location in them. The best thing you can do is to send a message to Tumblr's abuse staff telling them that you accidentally exposed confidential information, and ask them to remove all traces of the offending pictures from their site.
Also make sure that you disable location tracking inside your camera, or photo application you are using, so future photos you post will not end up exposing your location. Also always upload the image directly from Tumblr's site and not through a 3rd party site or application, as they can still inject geolocation based on their own metadata into the picture.
If possible try to also spread the word, so maybe Tumblr will eventually fix the problem by either automatically removing the GPS data from uploaded pictures, or at least add more visibility to the fact that an uploaded picture might contain geolocation data.
1 note
·
View note