#And with watered down acrylics and colored pencils and a desk pen
Text
For some reason I love drawing him zooted or miserable looking.

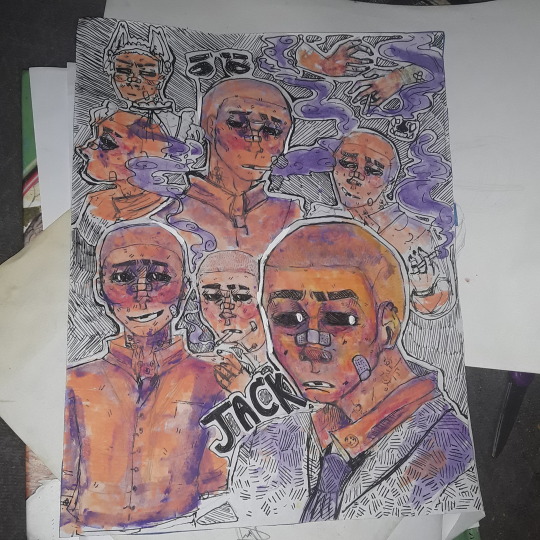
#Got sucked back into older hyperfix once again#Drew these in the dim light of the car light with blankets covering the windows#And with watered down acrylics and colored pencils and a desk pen#Was fun though#Listened to nirvana while drawing these and honestly dsaf plus nirvana is a great combo#Dsaf#Dsaf 1#Dsaf 2#Dsaf 3#Dayshift at freddy's#Dayshift at freddys#Traditional art#dsaf jack
90 notes
·
View notes
Text
QHAVPPFAQ


Quarantine Halloween: A Virtual Paint Party
FREQUENTLY ASKED QUESTIONS
Who are you?
Kyle Marcus Bryant, aka @caelpictor. He/him/his/pronoun-flexible, Black, queer, 26 (and a half), Taurus, INFP, ADHD af. I’m an artist (with a degree in it, as of 2018!), a nerd, and a lover of Halloween!
What is this event?
Quarantine Halloween: A Virtual Paint Party is an art class conducted via video call in which I teach you step-by-step how to paint a Halloween masterpiece! #distancelearning
When is this taking place?
There are two classes scheduled: Friday October 30, 2020, and Saturday October 31, 2020 (AKA Halloween) from 7-9 PM EST.
Where?
It’s all happening on Zoom! Technology is amazing!
Why?
Like many of us, I lost my job to the pandemic. I am now safely quarantined away in VA with family, staring down my student loan debt, bored out of my mind, and looking for a fun way to connect with others while also offering my talents in exchange for your cold. hard. cash!
How much does it cost?
The $10 instructor fee covers one participant for one night. If you want to take both classes, make sure to get two tickets! And if two or more people will be joining the class from one location, please make sure everyone in the group is covered! Thanks 🙂
Is there a difference between the two classes?
Nope! They will be the same. I’m just offering two different dates for your convenience! Aren’t I nice?
How do I sign up?
Simply send in your payment and the best way to contact you, and let me know which day you’ll be participating (Fri 30 or Sat 31). Once I receive your payment, I’ll add you to my little list, confirm with you that you’re on it, and I’ll send you the Zoom link/meeting ID and password on the day of the event.
Where do I send my payment?
Venmo: @KyleBryant
PayPal: KyleMB13
CashApp: $KyleMarcusBryant
None of these are case-sensitive. If there’s one you prefer that’s not listed, let me know, and we’ll see what we can do!
Which is your preferred payment method?
Venmo, but any of the ones listed above are great!
Do you accept tips/donations?
Yes 🙂 always :)))
What’s the vibe?
Very casual. Drinking, Halloween costumes, and conversation are all highly encouraged! (But never forced)! I will be in costume, probably sipping wine or a cocktail and jamming out to music while I teach. It’s quite liberating, being able to drink on the job.
What’s the etiquette?
We try to stay on mute while the teacher is teaching, but otherwise, go wild. ***And please ALWAYS feel free to jump off mute if you have questions or comments!
Who can join?
Literally everyone! Spread the word! Bring your friends! The more the merrier!
I have no artistic skills! Can I join?
I said EVERYONE, didn’t I? That’s exactly what I’m here for! Just think of me as your personal Bob Ross; I may not be able to hold your hand in person, but I will break every brushstroke down for you as simply as possible, and you’ll be surprised at how well you do. Again, if you ever have questions or need my advice, feel free to chime in at any time! And remember to focus on the experience of the painting, not the product!
General advice for first-time painters?
Work in big, general shapes first, then focus on smaller details later. I also usually start with the background and build the foreground on top of that. Also, relax, experiment, and have fun with it! There are no rules!
How long is the event?
Two hours, but please allow a little extra time for people to settle in at the beginning, finish up at the end, etc.. I promise it’ll breeze right by, but don’t feel pressured to be there for the whole event. If you miss the beginning, I’m great at catching people up, and if you duck out early, I won’t mind!
What image are you teaching us to paint?
Coming soon!
What materials do I need?
Here’s a breakdown:
Essentials:
1. Acrylic paints (a nice set of 5-12 colors is plenty)
2. Palette (for holding/mixing paint; a paper plate works just as well)
3. Brushes (at least one small brush for details, and one large brush for covering large areas; preferably one medium-sized brush as well)
4. Canvas (either a stretched canvas or a flat canvas panel, any size!)
5. Water cup (a vessel to hold brushes; I’m using an old plastic gelato container)
6. Easel (to hold the painting upright and steady; not strictly necessary, as you can use a desk or table or your lap instead if you’d like)
7. Paper towels or old rag (for cleanup and drying brushes)
Other:
1. Workspace (away from things you don’t want paint on; lay down tarp or newspaper to protect walls, floors, and other surfaces if necessary)
2. Paint clothes, smock, apron, etc. (wear something you don’t mind getting paint on!)
3. Trash can, running water, acetone, etc. (for cleanup)
Bonus:
1. Hair dryer (to help paint dry faster)
2. Pencils, pens, markers, pastels, etc. (for sketching, signing your name, etc)
3. Glitter, collage materials, sponges, stamps, stencils, etc. (just for fun!)
4. Your favorite drink (for inspiration 😉)
Where can I get them?
I’ve bought literally everything on this list from Target and Michael’s (except the easel, which I bought online). I would mask up and check your local department store or arts and crafts store (Walmart, Blick, Plaza, Hobby Lobby, Jerry’s, JoAnne’s, etc.), or if you prefer to order it all online, you can do so easily from those same retailers or… 😬 Amazon. (Protip: If you’re lost on the internet, but would like to avoid buying from Amazon, you can use its search engine as a jumping-off point and go directly to the retailers they have listed 😜) Pretty much everything else is just household items.
What will it cost me?
If you’re not worried about the quality—and you shouldn’t be! I’ve found the cheaper stuff works just as well!—you can buy the essentials (paints, palettes, brushes, and canvases) for ~$20. These items are also often sold in bulk, or in sets with each other!
What colors are we using?
My current plan for the palette is black, white, yellow, purple, orange, and green, the sp00kiest of colors! If you just want to get those six, feel free. However, I always recommend having the primary colors: red, yellow, and blue, plus black and white; that way you can mix any color you want!
What size canvas should I buy?
That is entirely up to you! 8 x 10” and 16 x 20” are pretty popular sizes, though.
Are there any extra precautions I should take?
Acrylic paint comes off skin, hair, nails, and smooth non-porous surfaces fairly easily, but it does stain clothing and carpet, and is very stubborn once dried. I would recommend being careful to prevent spills in the first place, but if it does get on something precious, rinse immediately and completely with water. If already dry, try acetone or a similar cleanser to break down the plastic particles in the paint.
How do I clean up afterward?
My method: Scrub brushes along the bottom of your water cup to get all the paint off them, then rinse under running water until water runs clear. Either let the paint water sit in the cup until the paint particles have settled to the bottom, or pour it through a filter (coffee filter, cloth, etc, because acrylic paint is made of a micro-plastic that can be harmful to the environment and your plumbing in large amounts!) Leave everything else alone until it’s completely dry, and then peel or scratch dried paint off your palette if desired. Scrub your paint-covered hands and other body parts until clean, preferably with something exfoliating.
Is the paint non-toxic?
I mean, I wouldn’t drink it on purpose, but yeah, paint left on the skin or ingested (in small amounts) is harmless.
How can I contact you?
You can comment right here on this post, DM me on any of my social media, or email me! I promise to get back to you ASAP!
Social Media: @caelpictor (everywhere)
Email: [email protected]
I will update this post as questions are asked between now and the event, so please let me know if there’s a question I didn’t answer here for you!
Thanks for reading, and I’m excited to see you all there!!!
11 notes
·
View notes
Text

Hey. Here is my another artistic attempt of “keeping summer alive on paper”
So what’s this article going to be about ?- My art.
Almost 2 month ago me and my friend – co-writer of books section Domc moved to our first “grown ups” apartment in Prague. In attempt to decorate our cozy little place I got kick from creativity muse and got this idea of realistic painting of flowers but make it minimalistic. So I got to thinking.
Originally I wanted it to be three separated same size papers – 2 outsides papers were supposed to be flowery and middle one just minimalistic shapes but I still wanted to connect it somehow.
So I kept thinking and this was the time when I was supposed to throw away old posters from pharmacy where work in. That’s when the final idea hit me and I took the posters home and started working.
My canvas was not usual paper as it was back side of poster so it was bit shiny, colors I used was (I guess) acrylic colors – not bought by me so that’s why I’m not really sure what type of colors I actually used. Some time ago I ordered “painting by numbers” from AliExpress and now I used the same colors I had rest from that time. It was all really small containers and I used very little amount of water to soften it up a bit – otherwise it was just pure color so it was pretty thick and created pretty patterns on slick paper.
Firstly I googled some flowers for inspiration and drew them on paper by pencil and created some shades. Here is photography evidence of how first picture came to life:
Once I had the realistic painting part done I moved to the minimalistic part. I did not have any ruler of any sort so I took free one from IKEA. I made 2 cm wide squares to create background black and white check desk – with just a pencil and a black pen. Final version:
It took me around a week till I decided to finally finish the other one (yay procrastination). Different flowers, same background pattern but upside down. Here it is with many detailed photos.
Middle simple poster is made out of 2 smaller posters as my pharmacy did not have any bigger one left so I combined 2 smaller ones with just plain check background to connect the rest to the one whole picture separated by small white wall parts.
Final look:

Why I like it:
As my room is quite simple – one big wardrobe with mirror on it, 2 white shelves and one double king size bed, I like how it connects the room by its white background – kinda looks like it’s coming out of the wall. Colorful flowers are dominant part of my room now even though it’s just simple paper, no frame or anything (but I’m still thinking about ways to make it look more minimalistic – I might put it into black thin frame in the future). It’s right in front of my bed so when I’m lying in a bed I’m not just staring at the wall, I’m staring at my own big creation. It’s kinda inspiring to see physical version off an idea, grow my confidence in myself and in all that I am capable of.
Thank you for your attention
xo Natalia
Keeping summer alive on paper Hey. Here is my another artistic attempt of "keeping summer alive on paper" So what's this article going to be about ?- My art.
363 notes
·
View notes
Text
10 simple ideas to decorate your home
New Post has been published on http://www.homedecoy.com/10-simple-ideas-decorate-home-diy/
10 simple ideas to decorate your home
Homedecoy – Have you been planning on how you want to redecorate your house for a long period but the lack of options stops you? Well then take a look at these DIY home decor alternative options which you can carry out without further complication. The materials you will require are easily obtainable in stationery stores or paint shops. It’s time for you to get the artist you’re inside out!
1. Decorated eggs
Materials:
Shells
Acrylic paint
Sequins
Diamantina
Brush
Double-sided tape
The simplest method to empty the eggs is to beat them with a spoon in the lower part until generating a small hole. Wash and dry them perfectly before beginning to paint; We recommend simple designs, almost smooth and according to the colors of your home to create harmony. Glue them with double-sided tape on the walls in a linear or stepped way. Your room will not be the same again!
2. Cushions with phrases
Materials:
A plain color cushion
Acrylic paint
Pencil
To do this DIY home decor crafts, first you need to draw the phrase that you like most with a pencil and then trace it with acrylic paint. It’s amazing how the view of the room changes or where you put it! You can also make the layout with an indelible down, only with some fabrics the ink expands in the fabric and the design can be irregular; We recommend you make a small line or point in a corner so you can see how it behaves.
3. Wall of hearts
Materials:
Colored leaves
Scissors
White or transparent thread
Needle
Scotch tape
Acrylic paint
Pencil
Adhesive pen
In order to complete this diy wall art, you need to draw hearts of the same size on the sheets of paper and cut out. When you have the necessary pieces it will be time to join them; Paste half of one heart with half of another and so on until you join four. Then you must go through the needle through the center with each group to go forming rows. Finally place them on your wall with the help of the adhesive tape; which you must paint with acrylic of the color of your wall so that it looks harmonious. Fall in love with the result!
4. Wall type blackboard
Materials:
Painting of blackboard
Gises
Just follow the manufacturer’s instructions to create the paint formula (in some cases it’s ready to be used), let it dry and let your imagination run wild. It is perfect to decorate the room of the smallest, or capture your big ideas. You will love the result!
5. Decorated stones
Materials:
Stones of different sizes
Acrylic paint
Dimensional painting (plastic or inflatable)
Pencil
This could be really cheap diy home decor ideas. First, whip the stones in a single color, then trace the design you want to make with the pencil, and finally paint it with acrylic or dimensional paint. You can even put a few touches of diamond before it comes out to give them a glam touch. They are perfect as a centerpiece or to decorate your desk.
6. Weathered closet
Materials:
White paint
Colored paint
Plastic or newspaper
Brush
Small containers
It’s time to give a new view to your room! And what better way to do it than with your closet? To achieve this you only need to divide the white paint into equal portions (depending on how many tones you want to make), then add a small amount of color in the first container, double in the second, and so on until you reach the fifth container. Now just divide your wardrobe into equal sections, cover the floor with plastic or anything that can be stained and get to work! Tip: If your furniture is colored, you must first give it a white layer and wait for it to dry before putting the gradient.
7. Pictures with phrases
Materials:
Framework
Fabriano paper sheet (if you do not have this paper, use a normal sheet)
Watercolors
Pencil
Brush
Liquid masking
The first thing you should do is trace the phrase or design that you like most in pencil, when you have it you should highlight it with liquid masking and wait for it to dry perfectly. Now create a gradient over the entire sheet and let it dry. When the necessary time has elapsed, remove the liquid masking and observe the magic. Frame your creation and voilà.
8. Vases of jars
Materials:
Jar
flowers
Strips or laces
If you are a fan of the vintage style, then go ahead and reuse the jars of jam, mayonnaise, etc., only for a cord or ribbon on the top to give a different touch and place the flowers of your choice. Tip: Add to the water a mixture of two tablespoons of white vinegar and two tablespoons of sugar so that your flowers last longer. Vinegar prevents the proliferation of bacteria while sugar feeds the flowers.
9. Vases of cups
Materials:
Cup
Acrylic paint
Brush
flowers
Give your old or cracked cups a second chance! Paint them in a uniform color and finish with a few stitches all over the outside. It will look super chic on your desk or dresser!
10. Minimalist paintings
Materials:
Decorative ribbon (smooth or with patterns)
Acrylic paint
A white sheet
Pattern : elephant, giraffe, lion, hippopotamus
If yours are not nails, then you only need to print the design of your liking, highlight the silhouettes with acrylic or tape and stick to your wall. It would only be necessary to make a tape frame and that’s it! Another option would be to trace the design directly on your wall and highlight the silhouettes with the material you like.
Which DIY home decor project beat you the most?
0 notes
Last Seen Blogs

canesqueen
The Way Of Me

cooldiaperkid
CoolDiaperKid

supermarioterrarium
SuperMarioTerrarium

boywonder-1981
Untitled

mama--yamanaka
[ ❤ ] お母さん