#OMG I FOUND 720p QUALITY VIDEOS
Note
🦋 - hi! If u can't recall, I was the anon who asked you about gifmaking before.
I know some of the raw videos of jannik/tennis in general may or may not have good video resolution. But your end-result of your gifs are usually sharpened but not that grainy either. How do you usually adjust your gifs' adjustments when it comes to low quality videos? Bcs your gifset tends to be in 540px wide, so it makes me wonder as well how you retain/enhance the quality of the gifs. I hope I delivered my question well 😂
i remember u omg hiiii! now i may have gone a little overboard on details here under the cut but i suppose you’ll appreciate it anyway haha
disclaimer, for a lot of these settings, i can’t remember where i first found them but i had seen them used in gif tutorials when i was just learning how to make them. i’ve basically stuck with these ever since!
so join me as i go through the process of making this jannik gif (exclusive content, never before seen on my blog, etc etc):

okay so first of all, ofc as much as possible i try to get the best quality version even if the video itself is bad. like, if it’s on streaming i would screen record but otherwise i try to download the original file. it makes the end result much better imo
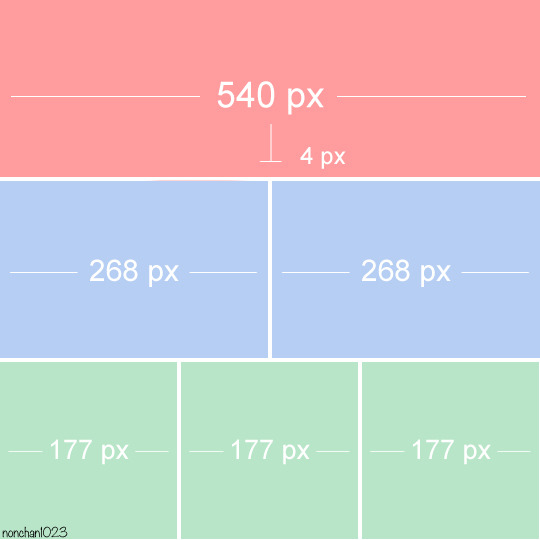
i generally go for 540px width bc i read somewhere that that’s the ideal size for tumblr gifs. if the cropped video is smaller than that or needs to be portrait oriented, i would usually just put two gifs side by side (like in this gifset) bc it’s better than trying to resize it bigger
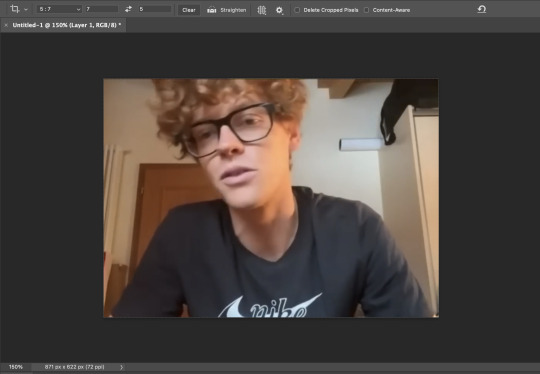
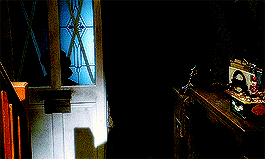
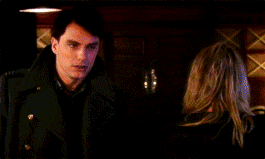
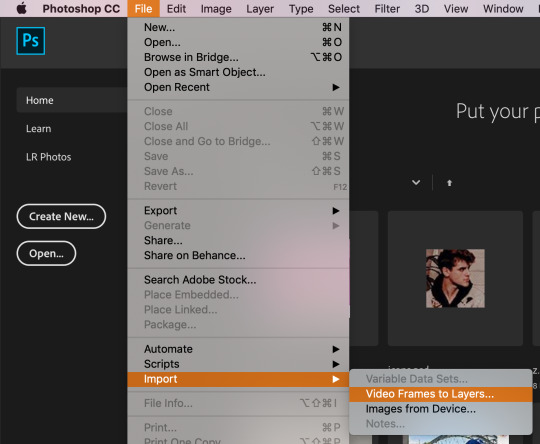
but when a source video is around 720p, i can generally work with it! so here’s a sample that i trimmed from a fairly low quality jannik video from youtube. he's presumably on webcam here, which explains the bluriness
i loaded it in using video frames as layers. this pic shows it already cropped on my photoshop, with a frame delay set to 0.08 (my personal default, which i realized after everything was saved was still too fast for my liking but oh well i’m not redoing it):
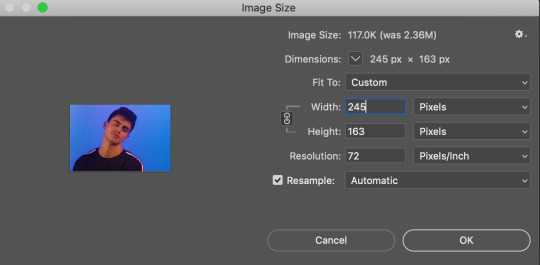
as you can see on the bottom left corner, it still has a width slightly over 540px. so then i can proceed with the next step: resizing. what i do is go to the image tab and select image resizing, which brings up this window:
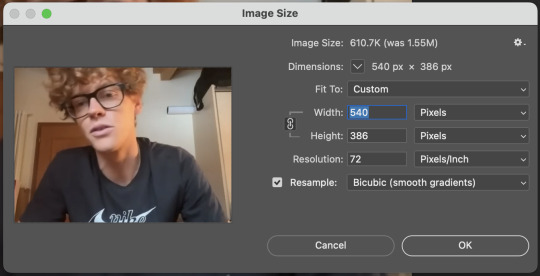
i change only the width to what i want (in this case 540px) and i use bicubic (smooth gradients) resampling
when that’s done, i convert to video timeline on the timeline window. then i select all the layers on the layers window and convert into smart object
now we can move on to sharpening! under the filter tab, i select sharpen and then smart sharpen. that gets this window to open up:
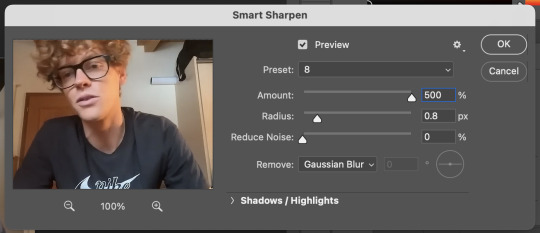
my presets have the amount at 500%, reduce noise at 0%, and remove gaussian blur. as for the radius, that depends on the video. by default i have it set to 0.5px, but i change it as needed. in this case, since it’s a close-up of jannik’s face, i feel comfortable using 0.8px (my highest setting). usually, if the video is shot from afar, i use something lower like 0.3px or 0.4px. i tend to find that oversharpening some really blurry videos makes them look worse, so i prefer to keep it looking a bit blurry if i really have to. thankfully, in our case right now jannik looks fine with high sharpening!
then i adjust the color and lighting as i wish. i would say that creating more contrast between the black and white levels of the gif helps it to appear sharper! though personally, i just like having more vibrant and contrast-y gifs so yeah
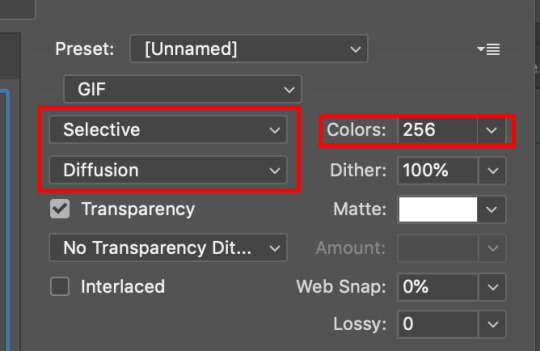
the final important thing happens when i save it. here are my settings in the save for web window:
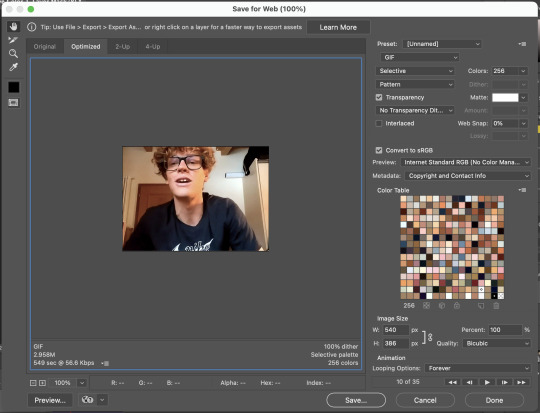
i set max colors to 256, color reduction to selective, and dither to pattern. the last bit there is what i think is most important for keeping my gifs looking non-grainy! i looooove pattern dither, and i find that the other settings do make my gifs look more grainy so i never use them
and that’s it!! this is the process i use for all my gifs tbh, the main thing i play with for low quality ones is cropping and resizing + the smart sharpening radius
hope this helps 🫶
#theres also smth abt MB sizes and whether or not tumblr will compress a gif further based on that which probably affects the quality too#but i didnt rly. pay attention to it LMAO sometimes u just cant make certain gifs any smaller yknow#asks#anon#*#*gifs#<- sorta????
5 notes
·
View notes
Note
Hello i've got a question that i been trying to get a answer for, from allot of people but i found it weird how allot of them blocked me for no reason
ur gifs are so incredible and its so unbelievable to see gifs like that with such high quality, i never thought gifs like this exists and my question is, what app do u use and how do u get them like that? to have such a OP graphics, one of ur cool gifs for a example is the recent one piece red film gifs

__
im asking not to start uploading gifs like u, the reason why i wanna learn is, i always love to change my discord banner and sometimes i cant find the specific anime clip as a gif to put on my banner
i would really really appreciate it if u could tell me 🙏🏼
hi!! omg maybe it's because u have the default icon and theme, with no reblogged posts, so they probably think you're a bot.
thank you so much!! i really aprreciate it. first i download the anime i want and get a high quality video. 720p is enough if it's anime. then i use handbrake to cut the clips with the scenes i need. after that, i make the gifs using adobe photoshop. you can check out a detailed tutorial here if you wanna learn how to make high quality gifs.
7 notes
·
View notes
Text
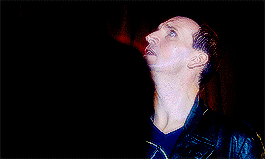


Doctor Who Rewatch -> 1x09 The Empty Child
When that bomb dropped, there was just one. Dead? At first. His injuries were truly dreadful. By the following morning, every doctor and nurse who had treated him, who had touched him, had those exact same injuries. By the morning after that, every patient in the same ward, the exact same injuries. Within a week, the entire hospital. Physical injuries as plague. Can you explain that?
#dwedit#doctor who#tardisgifs#9th doctor#ninth doctor#dw rewatch#i've spent a month watching nothing else than doctor who#so now i'm going to make a gifset per episode#because i am a masochist#OMG I FOUND 720p QUALITY VIDEOS#this ep is my fave because of jack#the next because of JUST THIS ONCE: EVERYONE LIVES#lilysedits
247 notes
·
View notes
Note
hi monica! where do you get your video files for making gifs of the untamed? do you download or screen record them from somewhere? your gifs are always so pretty and hq, ty!!!
omg hi!! thank you so much you are so sweet anon 🥺❤️! and to answer your question...
i use torrents here’s the one i used to download the untamed (if you don’t know how torrents work lmk and i can help you with that!), or if you would prefer something different there’s this website i recently found that is a godsend and you can download all types of asian shows there with translations (here’s where i also downloaded lof and dldl), however im pretty sure most episodes are only 720p instead of 1080p so i would recommend using the torrent instead but if you feel more comfortable this way then definitely use this website (it’s completely safe too btw, it hasnt caused me any trouble so far) here’s the link to that, usually 720p wont affect your gifs that much but 1080p is the way to go for high quality gifs. hope this helped! if you have any questions lmk!! and if you make gifs also lmk!!!!!!!
3 notes
·
View notes
Text
giflinsky’s gif tutorial
ok so !! before i start, a disclaimer: i do not claim to be a professional at photoshop or know how to do everything omg i know there are multiple ways to make gifs, but this is just how i personally learned how to make gifs from a mix of tutorials that i’ve found over the years
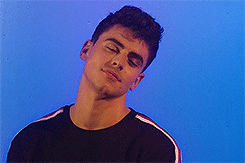
now onto the tutorial !! i’m gonna be gif’ing my baby ofc & here’s the end product
step 1: pick the video you wanna gif

usually i get my videos from youtube or instagram, especially since i mostly gif jack gilinsky & insta is where i get like 90% of his content from lol. for this tutorial, i’m gonna gif jack & jack’s day dreaming music video ok cool
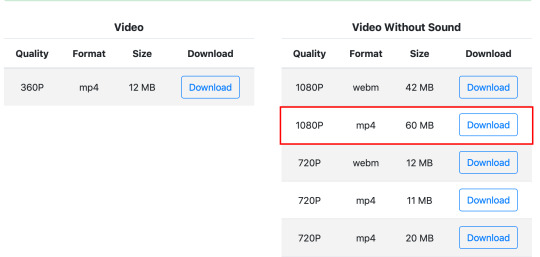
i use keepvid to download youtube videos, making sure to get the highest quality available ( 720p — 1080p ) & that the format is mp4
step 2: opening in photoshop
so i currently use photoshop cc, but i’ve used photoshop cs5 & photoshop cs6 to gif in the past. tbh i can’t remember the differences so i’m pretty sure the process is the same?? if not lmk
anyway so to import the video, go to file > import > video frames to layers
upload your video & this thing will pop up
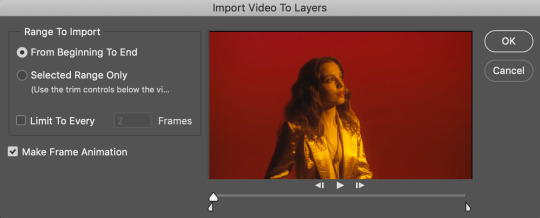
depending on the length of the video & what scene you wanna gif, you can either click from beginning to end or selected range only. if the video is 10 seconds or shorter i usually pick the 1st option, but since this is a whole music video & i only wanna gif one tiny part of it, i chose the 2nd option. either way, check the box for limit to every 2 frames (tbh i’m not sure what happens if you change the number; every tutorial i read just said leave it at that lol)
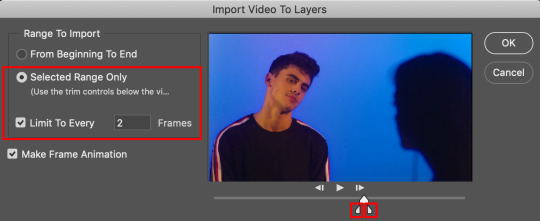
to clip the video to the part you want, use those lil’ sliders. it doesn’t have to be exact bc you can delete frames later
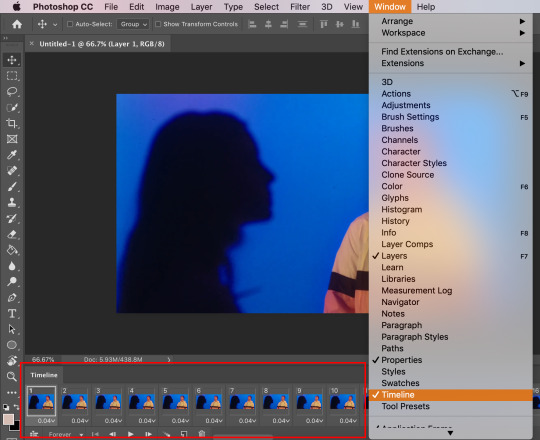
once you click OK, the gif should open in photoshop. make sure the timeline is open at the bottom & if it’s not go to window > timeline
step 3: trimming the frames
so since i imported some extra scenes from the video, there are frames that i don’t want in the gif. all i have to do is select the unnecessary frames & click the lil’ trashcan at the bottom

this next step isn’t really required, but i found that it helps load things faster ig? so i select all the layers in the right sidebar by using the shortcut option + command + a (control + alt + a on windows) then i press command + g (control + g) to group them together
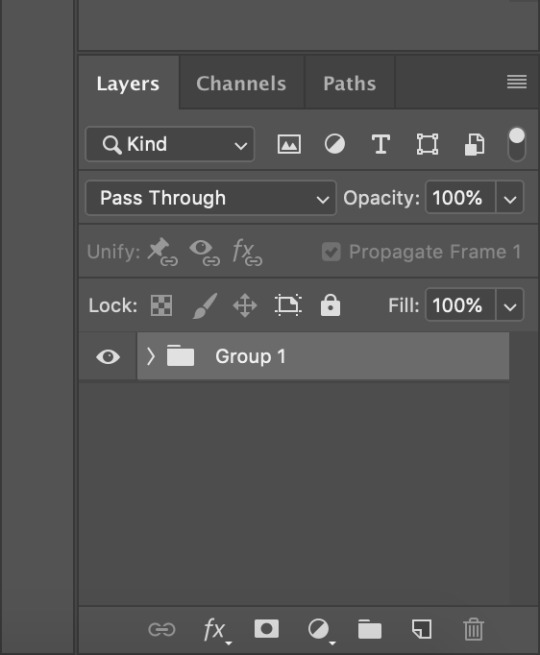
then i click the 3 stacked lines button & flatten frames into layers so that it’s only the frames that i want
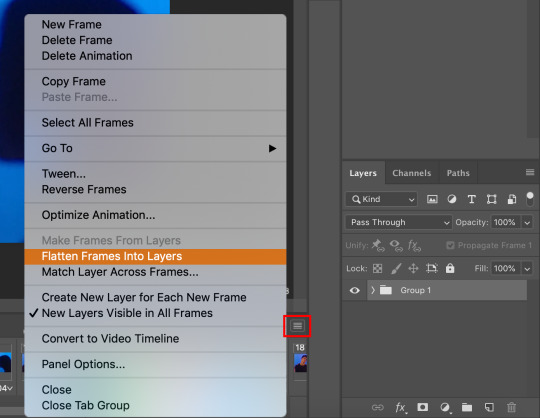
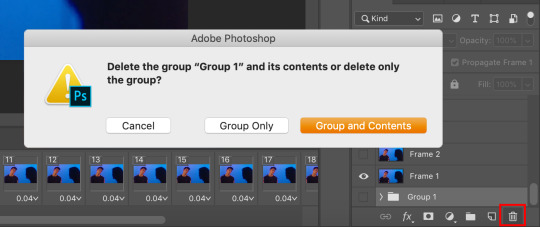
then i delete the original group bc i don’t need them anymore
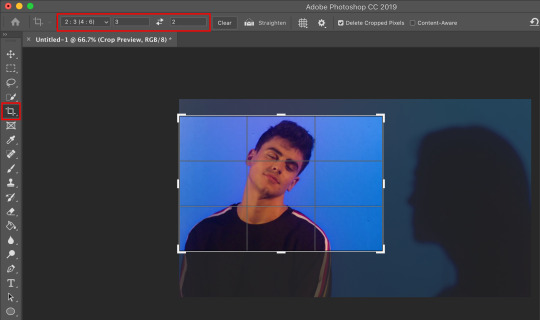
step 4: cropping
it’s just like cropping a regular image. it depends on the video (i.e. if it’s horizontal or vertical) & you can do whatever you like, there’s really no rules? for this gif, i used the 2:3 ratio to isolate gilinsky’s face
step 5: resizing
since the video size is pretty big, i have to resize it to fit tumblr’s guidelines. these are the photoset sizes for 2019 for reference
i usually make my gifs a little bit bigger, for example i size up 268px to 300px. i don’t really have a reason lol i just prefer things a little bigger i guess? anyway so to resize, go to image > image size or the keyboard shortcut option + command + i (control + alt + i)
i made the width 245 pixels & it automatically set the height
step 6: sharpening
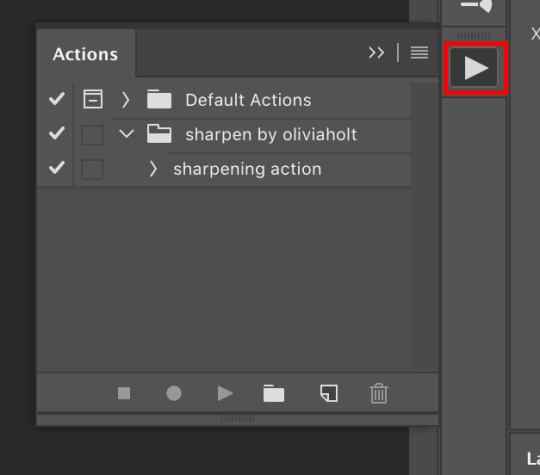
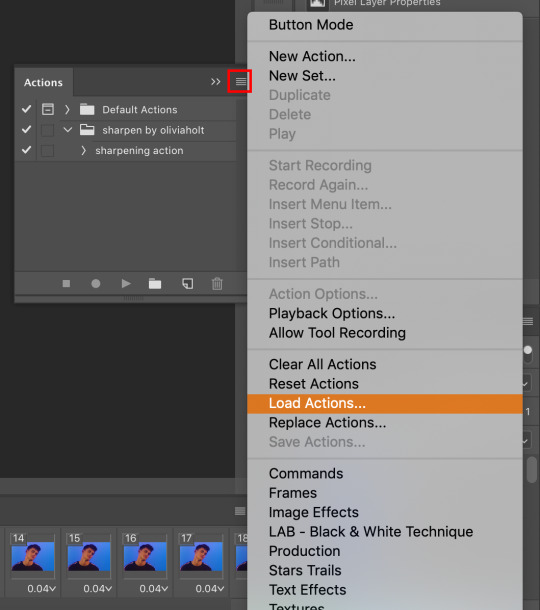
this step is optional, but i’ve found that it can make a difference in quality a lot of times. i use this sharpening action. in order to use it, you’ll have to load it onto photoshop, so click the play button thing on the right sidebar or go to window > actions
click the 3 stacked lines, go to load actions, then select the sharpening action i linked
once it’s loaded, make sure the 1st frame in both the timeline & layers are selected, then click play selection on the action bar & it will work its sharpening magic

step 7: gif speed
after you sharpen the gif, all the frames should be highlighted/selected. click the drop down arrow next to 0.06 on any of the frames & some numbers should pop up
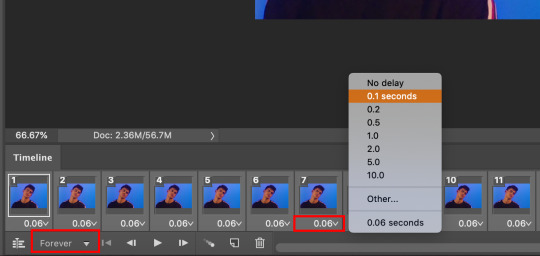
these are the options for how fast you want your gif to be. i usually use 0.08 seconds for gifs with more frames, but 0.1 seconds is a good general speed for most gifs
oh and make sure that drop down is set to forever, which loops the gif
step 9: coloring
this step is also optional. it’s really for aesthetic purpose, especially if the color isn’t to your liking
i’m not creative enough to make my own colorings lol so i usually use one of these PSDs to color my gifs. for this particular gif, however, i used this one. you can find a bunch of other PSDs just searching through the tumblr tags
i just open the file onto photoshop, drag the group over to my gif & it makes it pretty?
it changed the gif from this
to this
step 8: saving
your gif is made! now all you gotta do is save & you’ll be able to use it however you please. go to file > export > save for web
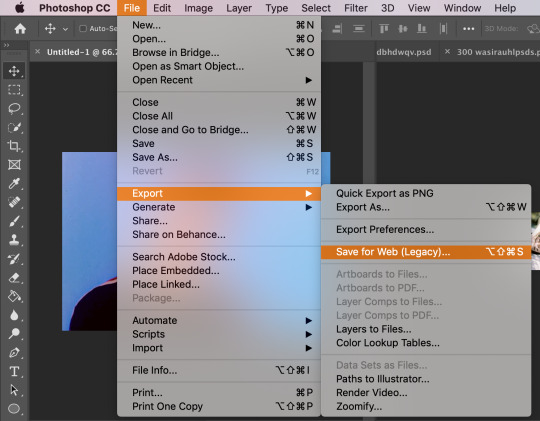
there will be another pop up window. these are the settings i have (based on the tutorials i’ve read). colors should be 256, but you can mess around with the selective and/or diffusion to see how your gif looks
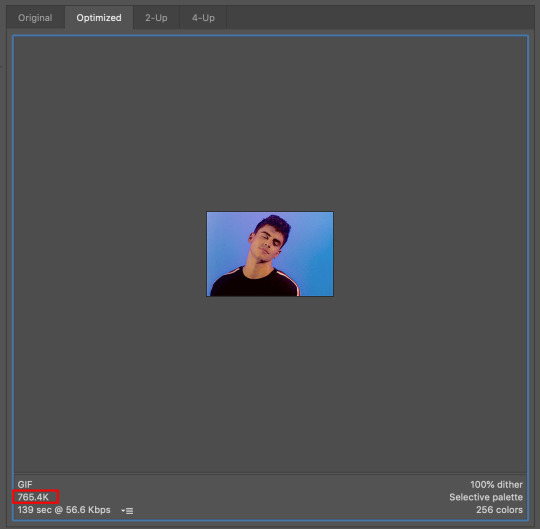
the last thing to check is the gif size. i believe the maximum for tumblr is 3.00M? any larger & the gif will freeze
& that's all i have for y’all !! i hope this made sense omg i really tried to be thorough & provide enough screenshots but like tumblr made the quality booty so if you can’t see something or if you have any questions at all please feel free to send me an ask or hit up the IMs & i’ll try my best to help you out :)
thank you to the anon who liked my gifs enough to request a tutorial, i really appreciate you & anyone who cares to like/reblog my posts !!
#gif tutorial#how to make gifs#how to edit gifs#photoshop#photoshop help#???? idk what else to tag#*#*personal
82 notes
·
View notes
Note
henlo! can u post a gif tutorial cause your gifs are so pretty and look amazing, even on mobile which messes up with everythjng 😆
ahh anon u flatter me!! thank you for your kind words!!! i honestly have ways to go, but it means a lot that u say this thank you
so for starters i have a mac + photoshop cs5 so a lot of this tutorial will be based on what you do for that, but i’m sure u could do the same thing on pcs (actually pcs have more programs available so i highly recommend, if u have a pc, finding a tutorial that is based around pcs) and other photoshop versions too! but i think the general process is still the same, a different tutorial might just be more nuanced^^
1. Finding/downloading your video~so for normal mp4 videos on youtube i use this website. it’s pretty useful it can download from actually a wide variety of sites like naver (up till 1080p!) ~for v app videos i use this site~ts files i find on kpopexciting or kpop24hrs (u need an account for kpop24hrs i think to download video but! signing up isnt difficult and its nothing fishy. i use it a lot esp for older ts files it has a good archive, kpopexciting tends to be faster though.)~the higher quality files you find the better! i find that it tends to go mp4~honestly finding the right high quality video is a HUGE part of making gifs look nice2. Extracting your video~there are many many many ways to extract your video but I highly recommend downloading avisynth! There are ways to download it for pc! avisynth is beautiful because it doesn’t really reduce the quality of your video to the extent that photoshop does, plus it can extract 60fps from ts files. some gifs ive made through avisynth ( x x x ) if you’re interested in avisynth further, tumblr user @/brandinator is a good place to start! if you want to know more regarding how to use it and a different tutorial through that, let me know! ~now i’m not sure if there is an avisynth tutorial for mac anymore, BUT theres another great program, vapoursynth, that mac users can look into. here’s a tutorial that i’ve found~Before I got avisynth I used VLC player for ts files but I had to basically screenshot each frame individually. Some gifs I’ve made through this method ( x x x ). these gifs are 60fps only bc i found a user who uploaded the ts file in 60fps. usually you cant get 60fps w/o avisynth. but this is also me saying that if you cant get avisynth or vapoursynth, there are still ways to work around it i think! one of my fav giffers for the longest time didnt use either!! and sharpening and coloring were always on point.~I think pcs can use kmplayer? id look into that if you have a pc~for normal mp4 videos I just use photoshops ‘import video frames to layers’ option (under file in the menubar)! you can use avisynth as well, but for me it takes forever to extract what i want in avisynth (minimum like a minute ish), whereas ps can get the part of the video i want to gif in a couple of seconds. I think it’s self explanatory but basically you find the video you want to extract, find where u want ur gif to start, and for photoshop cs5, you hit the ‘shift’ key and let the part u want giffed in the video play. when youre done u lift the shift key and hit ‘ok’ (idk if it differs for different versions of ps). i extract all!!! frames!! it makes it look smoother too :)
3. Coloring/Sharpening/Cropping/Etc~now this is the step that I can’t really give a tutorial on because honestly it varies for everyone! but i feel that this is the step that a lot of ppl need guidance with (me included) because it is the hardest step, probably because it is so ‘up in the air’ for lack of a better word? there is no one right way of doing it the possibilities are literally endless but here are some tips~Coloring: ~most important rule: don’t whitewash ur gifs!! ~other than that, the world is yours. ~honestly have fun with this part! coloring is something that i haven’t fully learned yet ~i tend to play around mainly with the curves, selective color, hue/saturation, and color balance layers ~you can also download psds other ppl have made (i dont do this myself) and use those! ~also i feel that a lot of the times, the right coloring can make ur gif seem higher quality. coloring can also play a role in reducing gif size if u do it correctly. ~honestly this part is just a lot of experimentation, over the course of a gifset and over the course of time in general. some people find their coloring style easily, but i was not one of those people. ive spent a lot of time trying to figure out how to adjust what layers to get the colors that i want and i think only as of this era ive been able to execute the coloring i had pictured in my mind. so patience is a virtue!!! ~Sharpening: ~ah yes my biggest enemy: sharpening ~first things first, i sharpen my gifs using smart sharpen + topaz ~settings for my smart sharpen are 500%; 0.4 ~check the box that says ‘more accurate’ and i personally remove ‘gaussian blur’ ~some people also use topaz denoise, and/or topaz clean ~ honestly topaz is a lifesaver for me bc it smoothes out a lot of grain that can be introduced via coloring! also!!! it can reduce gif size by a lot!!!!!!!!!!! ~on topaz denoise i hit the ‘light’ setting on the side and adjust the settings accordingly ~idk how to use topaz clean even though I have it, because it refuses to work ~to apply topaz you have to hit ‘flatten frames into layers’ ~some gifs i’ve made with just topaz and no avisynth ( x x x x) ~there are ways to make it look nice without topaz but i’ve forgotten how after i got it ~id duplicate the frame then use smart sharpen and ‘gaussian blur’ under ‘blur’ ~then adjust the opacity levels in some way. ~my settings for the opacity levels aren’t good so i’ll refrain from sharing ~some gifs ive made through this method ( x x ) ~last but not least i’ll bring up avisynth again. avisynth is nice at preserving video quality ~a lot of ppl i know say they don’t even sharpen gifs out of avisynth ~here are some gifs i have made with avisynth + topaz ( x x x x x x x ) ~honestly when it comes to sharpening, im still floundering with it. my sharpening needs a lot of work but, amongst the people who i consider good sharpners, most of them use avisynth, topaz denoise and/or clean, and smart sharpen! so all the resources are here !
~Cropping: ~it’s super important to follow tumblr dimensions otherwise gifs come out looking grainy! even when they’re not ! (case in point: x in which i used 168 instead of 178 for the dimensions)~Timing: ~Timing is so important!!! I almost forgot!! Always make sure u dont have duplicate frames for starters! for 60fps source videos i use .03, for mp4s i typically use .04 but sometimes the frame rate is kinda funky so you may have to go slower accordingly! and the important thing about timing is that if u use smart object, when u save ur gif, it’ll be in a different timing? like .04 gets changed to .07 but in order to fix that, u can simply just save ur gif in the wrong timing, and then reopen the gif in ps, simply change the timing to what u want on all ur frames, and then save it again!! idk if that made any sense but laskdjf this was the biggest mystery for me for so long omg4. Saving the gif~personally the save settings I use are “Selective/Adaptive” ; “Diffusive”; Dither: 100%; 256 colors. sometimes this makes the gif super grainy so i use “pattern” instead of “diffusive” in those instances5. Pray Perseverance ~a lot of the time when you’re giffing, gifs won’t come out the way you want it (i’m sure for every gifset i’ve uploaded on tumblr, there’s a gifset that i started making and never finished because it looked really bad). idk sometimes it feels like photoshop has its own will, sharpenings wont always work the same way each time, video quality won’t be the way you want it, i’m honestly still very experimental right now I don’t have ps figured out at all. so yeah…sometimes all u can do is that when u hit that save for web button (that ruins everything alskf), pray that ps doesnt mess it up too bad ahahaha but also that even when it does, its okay and you can try again! or try something new!
this is a super generic guide! let me know if you need more information!
10 notes
·
View notes
Last Seen Blogs
mastermasx
Untitled

dunyadanbirisiiste
helin ♤⁸

fireheart-666
Untitled
annemkedilerisevmiyor
Selamyalnızlıkbengeldim

novolocus
Hanami Azuki