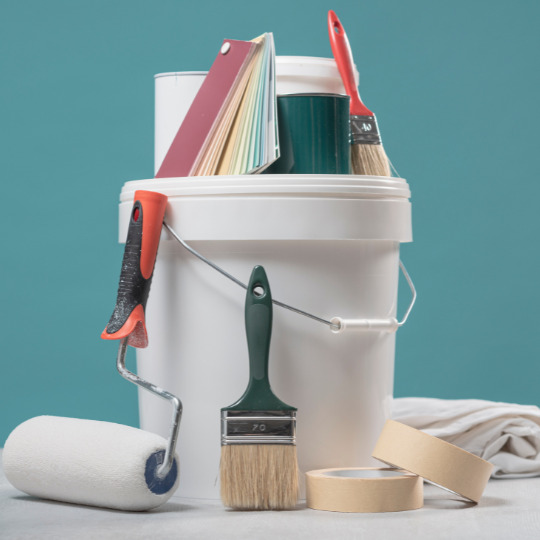
#One Stroke Painting DIY Kits
Text

Coffee Painting On Round Coasters DIY Kit By Penkraft
• Cartridge Papers-3
• Coffee Powder
• Brush No. 000 And Brush No 03.
• Free Video Tutorial
#coffeepaintingDIYkit#Penkraft DIY Kits#Decoupage DIY Kits#Image Transfer DIY Kits#Knife Painting DIY Kits#Resin Art DIY Kits#Fluid Art DIY Kits#Alcohol Ink DIY Kits#Pop Art DIY Kits#One Stroke Painting DIY Kits
0 notes
Text

Penkraft's DIY Kits contain all material and tools that you need to undertake an art or craft activity - be it ethnic art forms, modern art forms or calligraphy.... And each DIY Kit comes with a Video Tutorial that teaches you how to use the material and create an amazing piece of art from ordinary objects!
#Penkraft DIY Kits#Pen Mandala DIY Kits#Resin Art DIY Kits#Fluid Art DIY Kits#Alcohol Ink DIY Kits#Dot Mandala DIY Kits#Gond Art DIY Kits#Warli Painting DIY Kits#Lippan Art DIY Kits#Decoupage DIY Kits#Image Transfer DIY Kits#Kalamkari DIY Kits#Kalighat DIY Kits#Knife Painting DIY Kits#Pop Art DIY Kits#One Stroke Painting DIY Kits#Brush Pen Calligraphy DIY Kits#Cut Nib Calligraphy DIY Kits#Devanagari Calligraphy DIY Kits#pattachitra art#art#artsy
0 notes
Text
Prep and Paint Like a Professional: Tips to Improve
Whether your a novice looking to tackle your first prep and paint project or a seasoned DIY enthusiast, initial planning can make all the difference to the outcome of your work. Painting is one of the most cost-effective ways to transform the appearance of a room or the exterior of your house. Here are some expert tips to help you achieve the best results for your paint project and a flawless finish.
Plan and Prepare
When preparing for a painting job, one often overlooked aspect is thorough surface preparation. A smooth, clean canvas is vital for achieving that professional finish. This means sanding down rough patches, removing any old flaking paint or wallpaper residue, filling in cracks or holes and ensuring that the condition of your walls are free from dust and debris before applying any paint. Additionally, don't forget the power of primer – it's the key foundation for successful paint adhesion and an even finish.
Another critical element in proper prep is attention to detail. Taking care of small imperfections such as nail holes or cracks can seem tedious but will ultimately pay off in creating a polished final result. Don't rush through this process; embrace it as part of the process involved in achieving truly professional-looking interior or exterior paintwork.
Choose the Right Tools and Materials
Investing in high-quality tools and materials is essential and best way to achieving quality results. Purchase paint brushes, roller and roller cover, plus a paint tray suitable for the type of paint you'll be using and the proposed wall surface. Quality brushes and rollers will help you apply paint more evenly for a smoother finish and efficiently, saving you time and effort in the long run. Investing in durable drop cloths or plastic sheeting helps protect surfaces from drip or splatter, minimizing clean-up time and potential damage.
Utilizing sandpaper of various grits is crucial for properly preparing surfaces for the next step of new coats of paint. Coarse-grit sandpaper helps smooth rough patches, while fine grit sandpaper creates a suitable surface for paint adhesion. Equally important is selecting the appropriate primer for different surfaces; using a bonding primer on slick or glossier paints to ensure better paint cover, while stain-blocking primers help prevent bleed-through on porous surfaces. By choosing the right tools and materials for prep and painting projects, individuals elevate their work to professional standards with ease and confidence.
The Ultimate Tool Kit
The Basic:
9-inch Rollers and Tray
Synthetic-bristle brushes
The Prep Set:
Dust Sheet
Filling Knife
Fine grit and Coarse Sandpaper plus Sanding Blocks
Clean Cloth for spills
The Paint Picks:
Paint
Stirring Stick
Stepladder
Extension Pole
Good Lighting
Good lighting is essential for achieving a first coat flawless paint job and results. Insufficient light can make it difficult to spot imperfections when painting interior walls and inconsistencies on the surface, leading to subpar outcomes. Adequate illumination or natural light can also help in accurately detecting paint colors matching and blending issues for a flawless result.
In essence, investing in proper light fixtures and lighting solutions not only elevates the overall quality of work but also streamlines the painting process, making it more efficient and rewarding for all DIY enthusiasts involved. By paying attention to this often overlooked aspect of painting, individuals can enhance their work, achieving remarkable results with every stroke of the brush.
Select the Perfect Paint
It is essential to consider both the walls of a room and type of surface you'll be working with to achieve the desired finish. When looking for the right new paint, don't just focus on color; pay attention to durability and ease of application as well. Investing in high-quality paint may cost more upfront, but it will save you time and money in the long run by lasting longer and requiring fewer coats.
Take some time to familiarize yourself with different types of paints, such as latex or oil-based options, as well as their best applications. Consider factors such as humidity levels in your area when choosing your paint type – this can affect drying times and overall finish quality. In addition to understanding different paints' characteristics, mastering painting techniques can make a significant difference in achieving professional-looking results. By honing your preparation process and choosing the right materials for each specific project, you'll elevate your interior painting to new heights.
Prime for Success
Before diving into the exciting first step of applying the paint, taking the time to prepare and prime the surface in the correct order will set you up for success. Whether you're tackling an accent wall, furniture piece, or exterior surface, investing in proper priming techniques can make all the difference in the final outcome.
One vital aspect of successful priming is by selecting the right product for your specific project. Choosing a primer that matches the type of surface you're working with and addresses any existing issues such as stains or odours is crucial for ensuring optimal cover. Additionally, thorough cleaning and sanding of the surface prior to priming will help create a smooth foundation for your paint application, resulting in a flawless finish.
Another essential factor in achieving quality results is understanding the importance of patience during the priming process. The best practices of allowing each coat of primer to fully dry before moving on to subsequent layers or applying paint is fundamental for preventing peeling, cracking, or poor adhesion down the line.
Practice Proper Painting Techniques
Mastering proper painting techniques is key to achieving professional results. Start by cutting in the entire wall—using a brush to create clean, straight lines along the edges of walls, ceilings, and trim. Then, use a stroke of your roller to fill in the larger areas, working in small sections and applying paint in a smooth, even coat. Avoid overloading the paint roller with paint, as this can lead to drips and uneven coverage.
Learning how to properly load and apply paint to a roller or clean brushes can greatly impact the final result. Taking the time to practice these techniques will not only improve the appearance of your work, waste of paint and also reduce wasted time and resources due to mistakes or rework.
Work Smart, Not Hard
Painting can be physically demanding, but working smart can help you avoid fatigue and achieve better results. Take breaks as needed, stay hydrated, and pace yourself to maintain focus and precision throughout the project. A final tip is to use hand and drop cloths to protect floors and furniture from spills and splatters, and use painter's tape to mask off areas you want to keep paint-free.
Finish Strong
Once you've applied the final second coat of paint, step back and admire your handiwork. Allow the existing paint to dry completely before removing any tape or reassembling the room. Take the time to inspect your work for any missed spots or imperfections, and touch up as needed to ensure a flawless professional finish.
Conclusion
By following these best painting tips and techniques, you can prep and paint like a professional, transforming your space with confidence and skill. With careful planning, attention to detail, and a little hard work, you can achieve beautiful results that will enhance your home improvement and visual appeal for years to come.
Read the full article
0 notes
Text
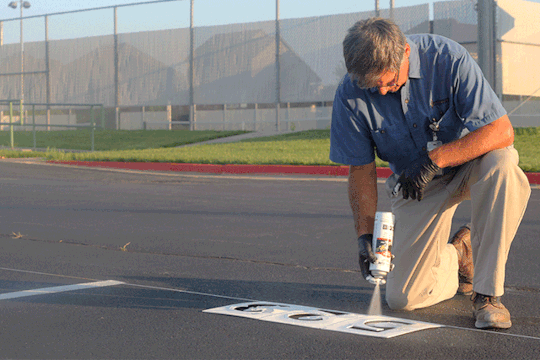
Community Brilliance: Transform with Our Exclusive Address Curb Painting Kit for HOAs
Unleash the vibrancy of your HOA community with our Address Curb Painting Kit, an exclusive solution designed to elevate your curb appeal effortlessly. This all-in-one kit combines style, functionality, and simplicity to redefine how your addresses are showcased. Dive into a world of creativity and precision as we guide your HOA towards a visually stunning and cohesive streetscape.
Precision in Every Stroke: Our Address Curb Painting Kit ensures precision in every stroke, turning ordinary curbs into a canvas of organized beauty. Tailored for Homeowners Associations, our kit provides the tools needed to craft professional-looking house numbers that stand out, enhancing navigation and adding a touch of elegance to your community.
Easy DIY Solution: No need for professional painters – our Address Curb Painting Kit empowers your community members to take charge of their own curb appeal. The user-friendly kit comes complete with stencils, high-quality paints, and step-by-step instructions, making it a hassle-free and enjoyable DIY experience. Elevate your community's aesthetic with the simplicity of our DIY solution.
Customization Made Simple: Bring a unique flair to your community by customizing each house number with our versatile kit. Choose from various fonts, colors, and finishes to match your HOA's aesthetic preferences. Whether adhering to specific color schemes or incorporating community logos, our Address Curb Painting Kit offers flexibility for personalized expression.
Weather-Resistant Longevity: Our commitment to durability is reflected in the high-quality, weather-resistant paints included in the kit. Say goodbye to faded and worn-out numbers – our paints ensure long-lasting vibrancy that can withstand the elements, maintaining a polished look for years to come.
Enhanced Safety and Navigation: In emergencies, time is of the essence. Our Address Curb Painting Kit doesn't just enhance aesthetics; it contributes to community safety by ensuring clear and visible house numbers. Promote a safer environment with easily identifiable addresses, allowing emergency services to locate properties swiftly.
Exclusive HOA Offer: As a token of appreciation for your commitment to community excellence, we present an exclusive offer for HOAs. Purchase our Address Curb Painting Kit in bulk and enjoy a special discounted rate, making it even more accessible for your community to embark on this transformative journey together.
Strengthen Community Pride: A well-maintained and visually appealing streetscape fosters a sense of community pride. The Address Curb Painting Kit is a cost-effective way to strengthen the identity of your HOA, increasing property values and creating a welcoming atmosphere for residents and visitors alike.
Environmentally Friendly Practices: Our commitment to sustainability extends to our Address Curb Painting Kit. Crafted with eco-friendly materials and practices, you can enhance your community's curb appeal with a clear conscience, knowing you're making a responsible and environmentally conscious choice.
Effortless Transformation: With our Address Curb Painting Kit, the transformation of your community's curb appeal is effortless and immediate. Empower residents to take charge of their own surroundings, fostering a sense of collective pride as each house contributes to the overall brilliance of the neighborhood.
In conclusion, our Address Curb Painting Kit is the key to unlocking your HOA community's visual potential. Empower residents, enhance safety, and promote a unified and aesthetically pleasing streetscape with this exclusive DIY solution. Elevate your community's curb appeal with our Address Curb Painting Kit today.
0 notes
Text
DIY Delight: Creating Custom Wall Hangings for a Personalized Touch
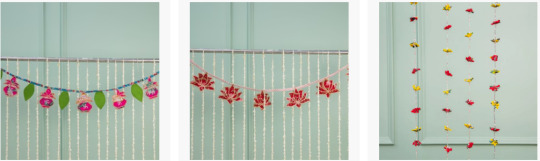
Welcome to the world of do-it-yourself (DIY) home decor, where creativity knows no bounds. Today, let's embark on a journey to transform your living space with a personalized touch through custom wall hangings. Whether you're a seasoned crafter or a beginner looking for a fun project, creating your own wall art can be a rewarding and fulfilling experience.
Materials You'll Need:
Canvas or Fabric: Start with a blank canvas or a piece of fabric as your base. Choose a size that fits the space you have in mind for your wall hanging.
Paints or Dyes: Express your artistic flair with a variety of paints or fabric dyes. Acrylic paints work well on canvas, while fabric dyes are ideal for textiles. Consider a color palette that complements your existing decor.
Brushes and Tools: Invest in a set of quality brushes, sponges, or stencils to create different textures and patterns. Experiment with brush strokes and techniques to add depth and dimension to your artwork.
Embellishments: Elevate your wall hanging with embellishments like beads, sequins, or buttons. These small details can add a touch of luxury and uniqueness to your creation.
Wooden Dowel or Branch: For a bohemian or rustic vibe, use a wooden dowel or a branch as a hanging rod. This will not only support your wall hanging but also enhance its overall aesthetic.
Hot Glue Gun or Sewing Kit: Depending on your chosen materials, you may need a hot glue gun for a quick and sturdy bond or a sewing kit for a more traditional approach.
Step-by-Step Guide:
Inspiration and Design: Begin by gathering inspiration for your custom wall hanging. Pinterest, Instagram, and DIY blogs are great places to discover different styles and techniques. Once inspired, sketch out a rough design to guide your creative process.
Prepare Your Base: Whether you're using a canvas or fabric, ensure it's clean and stretched tightly. If you're working with fabric, consider hemming the edges for a polished finish.
Painting or Dying: Let your artistic instincts shine as you apply paints or dyes to your chosen surface. Experiment with colors, patterns, and textures to bring your vision to life. Allow ample drying time between layers to prevent smudging.
Add Embellishments: Take your wall hanging to the next level by incorporating embellishments. Whether you're creating a whimsical piece for a child's room or an elegant design for the living room, carefully place beads, sequins, or buttons to enhance the overall aesthetic.
Attach the Hanging Rod: Once your masterpiece is dry and adorned with embellishments, it's time to attach the hanging rod. Use a hot glue gun for canvas or fabric, or sew a loop at the top for a more traditional look. Ensure it's securely attached for safe hanging.
Hang and Enjoy: Find the perfect spot to showcase your creation. Whether it's the focal point above your sofa or a charming addition to a gallery wall, step back and admire the personalized touch you've added to your home.
Tips for Success:
Experiment and Have Fun: Don't be afraid to try new techniques and experiment with different materials. The beauty of DIY is in the freedom to express yourself.
Consider Your Space: Keep in mind the existing color scheme and style of the room where your wall hanging will be displayed. Aim for harmony and balance.
Take Your Time: Rome wasn't built in a day, and neither is a masterpiece. Enjoy the process and take your time to ensure each layer is dry before moving on to the next.
Personalize with Meaning: Incorporate elements that hold personal significance, whether it's a favorite quote, a meaningful symbol, or colors that evoke happy memories.
In conclusion, creating custom wall hanging decor is a delightful way to infuse your personality into your living space. Embrace the DIY spirit, let your creativity flow, and revel in the satisfaction of showcasing a one-of-a-kind piece of art that tells your unique story. Happy crafting!
1 note
·
View note
Text
The Nail Coloring Tools
Nail coloring has evolved from being a simple beauty routine to a form of self-expression and creativity. Whether you love classic and elegant shades or bold and vibrant designs, nail coloring tools play a crucial role in achieving the perfect manicure. In this blog, we will explore the diverse range of nail coloring tools available in the market, from the traditional nail polish brush to the innovative nail art pens, stampers, and more. Get ready to unlock your nail art potential and take your manicure game to a whole new level!
The Classic Nail Polish Brush
The classic nail polish brush is undoubtedly the most common and widely used tool for applying nail color. These brushes come with various bristle shapes and sizes, allowing you to choose the best option based on your nail size and desired effect. The key to a flawless manicure with a nail polish brush lies in the technique. Steady hands and even strokes ensure an even distribution of color, preventing streaks and clumps.
Nail Art Pens: Precision at Your Fingertips
For those who crave intricate designs and patterns, nail art pens are a must-have in their nail coloring kit. These pens feature fine tips, enabling you to create detailed artwork with ease. From floral motifs to geometric shapes, the possibilities are limitless with nail art pens. Even beginners can achieve impressive results using these pens, making them a popular choice for DIY nail art enthusiasts.
Nail Airbrush: Effortless Gradient Nails
One of the key advantages of using a nail airbrush is its exceptional precision. Unlike traditional nail brushes, the airbrush emits a fine mist of color, allowing for seamless blending and gradient effects. This level of precision enables nail artists to create intricate designs with sharp lines and smooth transitions, resulting in professional-looking manicures that were once challenging to achieve by hand.

Nail Stamping Kits: Effortless Artistry
Nail stamping kits have revolutionized the nail art industry by making complex designs achievable in minutes. These kits consist of image plates with various patterns and a stamper to transfer the design onto the nails. All you need to do is apply nail polish on the desired pattern, scrape off the excess, and stamp it onto your nails for instant nail art magic. With nail stamping kits, you can effortlessly recreate stunning designs that would otherwise require hours of intricate brushwork.
Nail Stencils: Easy Designs for Beginners
For those new to nail art, nail stencils are an excellent tool to experiment with. Stencils come in a range of shapes and patterns, from hearts and stars to chevron and stripes. Simply stick the stencil onto your nails, apply the desired color, and peel off the stencil to reveal the design. Nail stencils are beginner-friendly and a great way to build confidence in creating nail art.
Nail Dotters: Perfect Polka Dots and More
If you’re a fan of polka dots or want to add small details to your nail art, nail dotters are the way to go. These tools have a fine, rounded tip that allows you to create small dots and intricate patterns. Nail dotters are versatile and can be used with various nail polish colors to achieve unique designs, making them a favorite among nail artists.
Conclusion
The world of nail coloring tools is vast and exciting, offering countless possibilities for nail enthusiasts to express their creativity. Whether you prefer the classic elegance of a traditional nail polish brush or the precision of nail art pens, nail airbrush and stamping kits, the tools you choose can significantly impact the outcome of your manicure. Embrace the array of nail coloring tools available in the market, and let your creativity shine through your stunning nail art designs. Remember, practice makes perfect, so don’t be afraid to experiment and have fun with your nail coloring journey! Happy painting!
#beauty#beauty secrets#nails#pretty nails#nailsalon#airbrush#nail salon#nail art#nail design#manicure#pedicure
0 notes
Text
youtube
Penkraft DIY kits are available for Clay Art, Cement Art, Clay Art, Pen Mandala, Cheriyal Painting, Pichwai Painting, Dot Mandala, Warli Painting, Madhubani Painting, Gond Art, Lippan Art, Kalamkari Painting, Kalighat Art, Pattachitra Art, Kerala Mural Art, Tanjore Painting, Pop Art, Resin Art, Fluid Art, Decoupage Art, Alcohol Ink Art, Knife Painting, Image Transfer, One Stroke Painting, Scandinavian Art, Water Colors, Resin Art Advanced, Coffee Painting, Pencil Shading, Cut Nib Calligraphy, Brush Pen Calligraphy, Devanagari Calligraphy, Copperplate Calligraphy, on a variety of surfaces, along with their video tutorials!
#PenkraftDIYKits#DIY#artist#artistic#artistoninstagram#Creativity#artsy#artwork#creative#artoftheday#hobby#diycrafts#diyinspiration#love#art#beautiful#instalike#instadaily#unleashyourinnerartist#homedecor#decor#indianart#india#lippanart#lippan#lippanartdesign#lippanartist#Youtube
0 notes
Text
#Unleash the artist in you - Create your own masterpiece using #Penkraft Kerala Mural Art on Canvas DIY Kit This #Penkraft's Kerala Mural Art on Canvas DIY Kit provides you with all the necessary materials to undertake this activity- • 1 Canvas Board (8"X8") • Acrylic Colors Set of 6 • Brush No. 000 and 3 (One each) • Stencil on tracing paper • Free Video Tutorial The price of the DIY Kit is ₹599 /- DM us to buy or You can buy this Kit directly from our website. The link is in the bio Penkraft DIY kits are available for Clay Art, Cement Art, Pen Mandala, Cheriyal Painting, Pichwai Painting, Dot Mandala, Warli Painting, Madhubani Painting, Gond Art, Lippan Art, Kalamkari Painting, Kalighat Art, Pattachitra Art, Kerala Mural Art, Tanjore Painting, Pop Art, Resin Art, Fluid Art, Decoupage Art, Alcohol Ink Art, Knife Painting, Image Transfer, One Stroke Painting, Scandinavian Art, Water Colors, Resin Art Advanced, Coffee Painting, Pencil Shading, Cut Nib Calligraphy, Brush Pen Calligraphy, Devanagari Calligraphy, Copperplate Calligraphy, on a variety of surfaces, along with their video tutorials! For any queries/assistance, please contact us at 9136024968
0 notes
Text
Have you joined the DIY Art Revolution, yet? Be a DIY-er with Penkraft & see your hidden creativity blossom.

DIY Art Kit are buzzwords in the creative community but how do you go about crafting a new art piece for home or gift? Have you ever hunted the art objects, colors, glue, sparkles, etc. all around the marketplace, and ended up purchasing large volumes of expensive materials going to waste? We at Penkraft have already-packed, budget-friendly, creative DIY Art Kits with various Art forms ready for you.
For instance, you purchase DIY Art Kit and start decorating the item! Just assume you have a simple frame to be transformed into a trendy art piece that will stand apart from the rest. Try decorating your frame with different traditional, folk artwork or trendy abstract patterns of art, like Madhubani painting, Mandala art, Decoupage art. If you are confused about how to start watching video tutorials on Penkraft's YouTube channel for ideas and tips on decorating the frame. These videos help non-artists and beginners to learn and flourish their art skills. All you need to do is initiate your first step towards the creative world by purchasing the already-packaged DIY Art Kit and start exploring the creative world with different art forms.
The best thing about these DIY Art Kit is that you can gift them to your children, family, and friends who are art-lovers or gift them your handmade art piece on special occasions. Gifting your children with DIY Kits will help them have thoughtful and creative time learning and crafting new artform, during their vacations. For eager crafters, DIY Art Kits are no longer a hobby, but a moment. So, be a part of this moment and strike the creative fire in you. Decorate your room with a unique collection of traditional or trendy artwork all hand-painted by you.
Penkraft's DIY Art Kit has unique combinations of articles for each Artform set. Each kit has its own unique material in self-sufficient quantity, having no need to wander or hunt around the marketplace to purchase expensive objects, colors, brushes, and glue in large quantity. The price of the kit is quite affordable for a particular art.
Penkraft's DIY Kits are cost-effective and supplied worldwide. You simply have to log in to the Penkraft website order the kit of your choice and watch the available video tutorial for guidance on the art technique.
Penkraft is launching its new range of DIY Art Kits, take a step forward to be a DIY-er yourself and join the DIY Art Revolution. Do visit our website to purchase the DIY Art Kit of your choice now.
Penkraft conducts classes, course, online courses, live courses, workshops, teachers' training & online teachers' training in Handwriting Improvement, Calligraphy, Abacus Maths, Vedic Maths, Phonics and various Craft & Artforms - Madhubani, Mandala, Warli, Gond, Lippan Art, Kalighat, Kalamkari, Pichwai, Cheriyal, Kerala Mural, Pattachitra, Tanjore Painting, One Stroke Painting, Decoupage, Image Transfer, Resin Art, Fluid Art, Alcohol Ink Art, Pop Art, Knife Painting, Scandinavian Art, Water Colors, Coffee Painting, Pencil Shading, Resin Art Advanced etc. at pan-India locations. With our mission to inspire, educate, empower & uplift people through our endeavours, we have trained & operationally supported (and continue to support) 1500+ home-makers to become Penkraft Certified Teachers? in various disciplines.
0 notes
Text
The Best Gift For An 11-Year-Old Daughter
If you're looking for the best gift for an eleven-year-old girl, consider giving her a craft-tastic craft kit. This craft set offers endless possibilities and helps develop hand-eye coordination, creativity, and self-regulation. The materials are safe for paint and wall-friendly, and they make it easy for girls of any age to participate.
Clothing
For 11-year-old girls who are looking for a fun gift, clothing is a great option. Cotton socks are soft, skin-friendly, and made with Australian cotton, spandex, and polyamide. They're also perfect for any occasion because they can be worn with all kinds of shoes and boots. They also have boneless sewing, which means they stay in place no matter how much she wears them.
If you're looking for a more educational gift for your daughter's eleventh birthday, you might consider a book. This gift can give your daughter an idea about how to solve problems and improve her skills. You can also consider buying a slime kit, which contains 4 different varieties of putty and slime.
Accessories
Buying a gift for an 11-year-old girl doesn't have to be difficult. You can find a great accessory that fits her personality and interests. For example, your daughter may love unicorns, so give her a unicorn journal. This cute journal features 50 ruled pages on one side and blank pages on the other. It also has a soft unicorn-themed cover.
Another great accessory gift idea for an 11-year-old girl is a personalized name necklace. You can customize the name necklace with the girl's first name. You can also choose the length of the chain and the material. You can even customize it with her favorite jewelry combination.
Books
If you're looking for a gift for your daughter who is eleven years old, books are a great choice. They can be used for a number of purposes, including promoting reading habits and improving writing skills. Whether she's planning to become a professional writer or editor, a book is the best push in the right direction.
A book with inspiring quotes can be a perfect gift for your girl. A coloring book can help her to express her creativity and reduce boredom. It also has 50 pages that are blank and 50 ruled pages. The unicorn cover is soft and fanciful, making it a wonderful gift for her.
Activ Flyer rings
If your daughter loves to play with frisbees but is not able to catch them, you can consider Activ Flyer Rings. These balls are 80% lighter and easier to catch than a regular frisbee. Moreover, they are water-resistant, allowing them to float in water. You can also opt for other creative camping toys such as rock painting kits and water-based paint pens.
A unique item that will make your daughter's day is a scarf-stroke hat in a peach-pink color combo. The long handles of the hat can be used as a scarf, and it has a pocket for her hands. Tassels add to the cuteness of this item. Girls in this age like funky jewelry, so consider buying a kit with different materials that she can use to make a fun bracelet.
Lip-smacker products
If your daughter loves wearing lipstick, a clear lip balm kit would be a great start. It features ingredients such as shea butter, safflower oil, and beeswax beads to prevent bacteria. It also comes with labels and six tubes or jars. You can purchase a variety of different flavors.
Friendship bracelet kit
If you're looking for a gift that will delight a creative child, then consider giving her a friendship bracelet kit. The DIY kit includes everything needed to create several different friendship bracelets, including beads and embroidery floss. The kit is great for both adults and kids and helps build creativity while also creating memories.
The set comes with an 18'' cable chain, an extender of 2'' and an instruction manual. The necklace features an electrocoating that adds a lustrous look. It almost looks like a real diamond! The art set helps the girl to develop her creative skills, and all the materials used are non-toxic. It also comes with a 25-piece slime-making kit, which allows her to create cool Galaxy slime that glows in the dark!
0 notes
Text
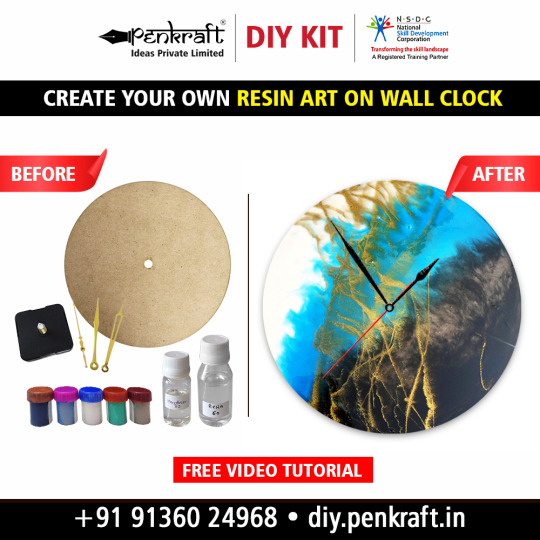
Resin Art On Round Clock DIY Kit By Penkraft
• 1 MDF Round Clock (9"dia)
• 1 Clock Movements and 1 Clock Machine
• Color Pigments(set of 5 color)
• Resin 60gm and Hardner 30gm (1 Bottle of each.)
• Free Video Tutorial
#Penkraft DIY Kits#Decoupage DIY Kits#Image Transfer DIY Kits#Knife Painting DIY Kits#Resin Art DIY Kits#Fluid Art DIY Kits#Alcohol Ink DIY Kits#Pop Art DIY Kits#One Stroke Painting DIY Kits
0 notes
Text

• 1 MDF Round Board (6"dia)
• Acrylic Colors Set of 6
• Kundan
• Ceramic Powder
• Gold Foil
• 1 Unit of Glue
• Brush No. 000 and 3 (One each)
• Stencil on tracing paper
• Free Video Tutorial
#Alcohol Ink DIY Kits#Dot Mandala DIY Kits#Gond Art DIY Kits#Warli Painting DIY Kits#Lippan Art DIY Kits#Decoupage DIY Kits#Image Transfer DIY Kits#Kalamkari DIY Kits#Kalighat DIY Kits#Knife Painting DIY Kits#Pop Art DIY Kits#One Stroke Painting DIY Kits#artsy#Tanjore art#Tanjore painting#art#homedecor#penkraft#artwork#artforms#creative#penkraft diy kits
0 notes
Text
How to Restore and Shine One's Headlamps Like New
Headlights square measure the foremost necessary things to stay clean on your automobile. Not solely do these powerful beams allow you to see the road, but they let different motorists see you.
Most light lenses square measure fabricated from polycarbonate plastic. This robust plastic is ideal for seizing harsh road conditions while not breaking, which you certainly need, however it doesn’t play well with the sun. to guard it at first, makers coat the lenses with ultraviolet radiation protecting film. however, over time, this film is destroyed by ultraviolet radiation rays, permitting the plastic to oxidize.
If your headlights have begun to conceal or become yellow, then it’s clear the oxidization method has begun. Don’t fret tho, as a result of obtaining those headlights trying new ones once more is a straightforward DIY task. Follow the steps on a way to restore your headlights that we’ve set out below and you’ll get your visual sense back to works recent in no time.
Step 1: Buy What You’ll Need
Start by ensuring you have got the providers you’ll want. the best thanks to doing this is to grab a headlamp restoration kit, which is able to embody all the required materials. we have a tendency to simply tested a couple of the foremost common kits on the market to assist you to choose the that one is best for you. (They all work regarding a similar method, which we’ll describe below.)
You could conjointly separately obtain the merchandise that might be available in those boxes, that is wise for people that may have already got a number of the elements. Basically, you would like a couple of totally different grits of wet/dry sandpaper (1000, 2000, and 3000 grit square measure usually safe bets), a sprucing compound, paste wax, and an ultraviolet sealer. A roll of blue painter’s tape and microfiber towels ought to even be on your search list.
Step 2: Get Your Headlights Clean
The first step is going to be a radical laundry of the light source lenses with automobile soap and water. you would possibly wish to clean the encircling areas a touch, too, in order that the tape can stick throughout the consequent step.
Step 3: Tape Off the Headlights
You’ll be sanding in a very minute, and it’s necessary that you just sand solely the lenses and not the encircling paint or trim. therefore use the painter’s tape to utterly block off the headlamp and defend the remainder of the automotive. once your hand slips and you mistakenly run rough sandpaper over the painter’s tape, you’ll be glad you took the time to try and do this.
Step 4: Sand Away
You’ll wish to begin with the foremost abrasive sandpaper possibility you've got. If you followed our recommendation and got one thousand, 2000, and 3000, for instance, reach for the one thousand grit (lower numbers mean a lot of abrasive). Wet the sandpaper and therefore the light source, then sand the lens in straight, horizontal strokes. Sand within the same direction as the total time with this 1st one. ensure you retain the surface wet as you're employed – otherwise, you risk badly scratching the lens because of grit particle buildup. Your results can rely on however smart of employment you are doing during this stage, thus don’t be afraid to pay five to ten minutes round-backed down there.
Step 5: Polish and Wax
Wipe off and dry your headlights, then squeeze a number of your sharpening compounds out onto a clean microfiber towel. Rub within the polish for a couple of minutes mistreatment circular motions. you'll get through this method faster if you've got a comfy mistreatment orbital buffer (but don’t purchase one only for this job unless you intend on mistreatment it in the future). Once you’ve created the lenses clear once more, you'll take the wax thereto. Wax the lens such as you would an automotive. this may totally clean and defend the lens in preparation for the ultimate step.
0 notes
Text
Expecting.
Summary: Tired of dating for nothing, Henry laid everything out for her on that very first date. But when he gets everything he hoped for, there’s one thing left that he really wants.
Word count: 1683
Warnings: trying to get pregnant (no heartbreak tho, it just takes a lil time), fluffy baby daddy Henry
A/N: this was for @henrythickcavill, requested via my patreon.
Forever tag list: @luclittlepond | @fcgrizi | @henrythickcavill | @mitzwinchester | @mary-ann84 | @hell1129-blog | @pensieve-foryour-thoughts | @agniavateira | @dancingwendigo | @living-in-the-darkness | @trippedmetaldetector | @watermeloncavill | @justaboringadult | @madbaddic7ed | @ruthoakenshield | @omgkatinka | @iloveyouyen | @spursondele |
________
Henry has been on cloud nine ever since she told him she was pregnant.
Tired and mentally exhausted trying to find the right person, Henry had all but given up. It’s not that he was actively looking for a girlfriend, or wife in his case, but he did hope that when the right person came along, he’d just know. He’d feel it in his bones. He didn’t think it would happen like it does in the movies, where everything aligns, everything tastes better, music sounds better and he can breathe like he’s never breathed before. But he thought he’d feel something different.
She didn’t breeze into his life. She didn’t make him understand now why everything else hadn’t worked out. But what she did do was make him wonder how the hell he’d managed to feel so complete before when he felt bursting at the seams when he was around her. He’d laid it all on the table on their first date.
“I know this is a little full on, but I’m going to be honest with you. I can’t keep doing meaningless dates. If you’re not looking for something serious, something long term and possibly the end goal, then this date isn’t going to go far. You can leave, I’ll still pay for the bill, but I won’t hold it against you. I understand not everyone will be on the same page.”
Instead of pushing her chair back, grabbing her coat and bag and walking out of the restaurant, she pulled her chair a little closer, poured them both a drink and said, “so what colour theme are we having at the wedding and how many children are we having?”
She took an open interest in what he had to say, she challenged him on a few of his viewpoints just for a good conversation piece. They shared many of the same opinions and differed on a handful but nothing deal breaking or something that neither could get past. Henry understood that not everyone was the same and listening to her speak was amazing. He adored that they were on the same page when it came to values and their life.
As the weeks and months went on, he tried to trip her up. Tried to catch her out and see if she was just spoon feeding him everything he wanted to hear but no, it continued to flow almost perfectly. Henry took her on several vacations per year, she joined him on set, rode him when he needed his stress relieving and helped him with his lines. She was by no means a good actress, but she would try to put her feelings into it, try to give the script some sort of justice and helped Henry when he needed it.
They married three years later, with her joking that Henry would rush her down the aisle just so he could get straight to the baby making part of marriage. But it didn’t happen as quickly as either of them hoped. She came off her birth control and though they’d lose themselves within the sheets (or on the counter tops, table, against the hallway wall, the sofa, his gaming chair…just anywhere which could hold their weight,) as often as possible without wanting to take the fun out of sex and just have it for the sake of having a baby, pregnancy just wasn’t as easy to happen as they’d thought.
A year and half into their marriage, she’d began to draw up schedules, bought thermometers to check her temperature and downloaded several “trying to get pregnant” apps. She tracked her cycles, found the optimum times for having sex and had started to pitch it all to Henry when she realised she was two weeks late.
He’d sat there before her, waiting for her to reach the main part of her big presentation of why looking at their baby making schedule would be most effective when he’d watched the blood drain from her face and her scramble out of the room, roughly slamming the bathroom door closed and lock it before he’d been able to fully understand what had just happened. He’d heard things dropping onto the floor, things being torn open and as he’d stood nervously on the other side of the bathroom door, his hand on the wooden surface, listening carefully for anything which could give him an idea of what had happened, he’d finally heard the little sob that came from her.
“Are you ok?” He’d asked softly, not wanting to refer to her by any pet names, instead addressing her by her name. She hadn’t replied for a moment or two, just the sound of her soft cries filling the room in which he couldn’t access until she’d finally slid the lock open and he found her sitting on the floor, surrounded by torn open pregnancy test boxes and four tests sitting in front of her, letters boasting PREGNANT 4+ WEEKS on each of them.
Henry hadn’t wanted to go too crazy. He’d wanted this for too long and didn’t want to curse anything by purchasing anything too early. He’d gripped her hand, their fingers locked together, tears falling from his eyes as he’d pressed their hands to his lips as his eyes had remained fixated on the screen during her scan, watching as their two babies wriggled around for them. Watching as their tiny limbs stretched out and they flipped themselves around in their little bubble of comfort.
With each passing week, Henry ensured that he took care of any of the big jobs, needing her to take it as easily as possible. She hadn’t wanted to completely give up their workouts, and he’d make sure that he was there to observe each one, with a personalised plan specifically for pregnancy. They scoured the websites for the perfect nursery set up. With the babies genders remaining a secret, pots of neutral paint sits in the room. Dust sheets are down ready to catch any splatters of paint which hadn’t made it onto the walls. Tins of light colours are waiting to be applied and Henry has changed into his “DIY” clothes which are sweatpants and a loose, though still fitted for him, cotton tee shirt.
Most of the walls will be a pale grey to match the carpet, but there’ll be soft mint greens, duck egg blues, pale yellows scattered around the room in forms of cuddle bears, artwork and books that he wants to read to them. Two rocking chairs have been placed, and tested, and he already looks forward to sitting in them while reading to the two of them as they have their feed, much like he’s already done with her sitting beside him, their joined hands pressed to her large bump as he’d read some of his favourite childhood stories to them so that they would already recognise his voice. She’s due in one months’ time, and only now does he feel confident enough to begin to paint and assemble everything he’d bought.
She’d caught him in the middle of their living room two months ago, the boxes emptied out and him checking every screw, every nut, bolt and piece against the assembly instructions to ensure that everything was there, fully prepared with the phone and laptop beside him to make all the forms of contact needed to get the right parts sent out.
“I’m not leaving it until last minute to then find out something is missing, or wrong or damaged and it’s too late.”
He’s strolled around the house with the double pram, telling her he needed to break in the wheels. He’s practiced for what felt like hours closing the pram and re-opening it again. Getting it in and out of the large car which he bought for the babies in mind. He’s tested numerous ways of picking up the baby carriers and how to get them in and out of the car with ease. He’s completed a baby first aid course and made sure he’s bought enough things to baby proof the house.
“You have some explaining to do.” She says, waddling into the doorway of the nursery, holding up some of the baby outfits he’s purchased.
“Look at the little cape though.” He grins, putting down the paint roller and tray before he’s even applied the first stroke. He walks over to her, his hand instinctively going to her belly as the other touches the cape of the baby vest which reads “my daddy is superman.”
“And this?” She holds up a mini Chiefs kit.
“I don’t make the rules around here. It’s law that they should match their daddy.”
“But what if they choose to suppo-”
“Ah, ah, ah,” Henry cuts her off with a wag of his finger, “we don’t have none of that negativity around here. Absolutely not.” It takes everything she can muster not to crack another smile and to try and keep her expression as neutral as possible but the stern look upon Henry’s face makes it more difficult to do so.
“You can’t wait for this, can you?” She asks him as she sinks down into her rocking chair and slowly goes back and forth, sighing contently to get the weight from her swelling ankles and sore feet.
“Lumberjack beard, bags under my eyes so big I could do a months shopping in them and endless stories of ‘so yeah, my kid pooped today’ conversations. I can’t wait.”
“No dad bod?” She questions.
“I’m a daddy now, and I’ve got a body.”
You sure are daddy, she thinks. If she weren’t suffering from her aching hips, she’d be wanting to climb onto his lap and ride him. He looks far too good right now.
“Yeah you have, now let me see that body of yours get to work….on this room. Not on me.” She says, holding up her finger and lifting a leg up as though that could stop Henry from covering her body with his own, “you’ve done enough.”
“Well, you know what they say… it helps to speed things along…”
383 notes
·
View notes
Text
Midnight Snack - Playing House

Fluff to the max. Intimate times between two men insinuated but not graphically described in text. Deep kissing is present. Skip between the &&& if you prefer to not read it. The Getting In Deep series and it’s short stories are my own creation. Do not steal or alter.
Papers, magazine cutouts, and equations sat in piles on Will's desk. Will, headless of the slippery magazine paper that threatened to kiss the ground, kept taking notes from his screen.
When Reese arrived, he was surprised to see Will at work before everyone else in Main Tech.
"Getting a head start on a case?" asked Reese.
"No." Will tabbed his screen and frowned. "I'm helping Louis find a house."
"Really?" Reese wondered how far Louis and Will had gotten in their relationship. "Why would he want to move?"
Reese walked around Will's desk to look at the screen.
When house hunting, most people imagine realtors, property tax, curb appeal, square footage, and zoning issues. The average challenges one would find on HGTV shows. Reese expected to see Zillow listings, or Homefinder. He hadn't expected Barbie's Malibu Dream Home from Toys-R-Us.
Reese blinked, wondering if the morning caffeine had yet to kick in. "A dollhouse?"
Louis walked into Main Tech with two mugs. "Yeah, because everything I found is, in Will's words, "dinky plastic trash"."
"They don't even have it proportioned right. I did the calculations," said Will, scrolling through the preview images of other child- sized dollhouse. "The bathtub is right next to the door, who does that?"
"Those things are meant for playing with, not living in," said Louis, nursing his second cup of coffee and handing Will his tea. They had spent the last half hour descending into a research spiral of toy sites looking at houses and miniatures. Louis began thinking this was actually worse than real house hunting.
"I have a civil engineering degree, I'm allowed to be offended," said Will.
"You would be offended at the construction of a gingerbread house."
"Those are for decoration and eating. It's not the same thing."
"One moment. I feel like I need a little bit of clarification." Reese struggled to catch up with the train of thought Louis and Will had gotten on, apparently leaving him behind at the station. "Louis, why are you in the market for a dollhouse?"
Louis sat and spun his chair to catch the slipping pile of magazine clippings. "Because some nights I'm sleeping in a shoebox on Rachel's desk."
There had been nights when Louis was too exhausted to switch back from his tiny sized self and had to sleep in Rachel's office. His "room" consisted of a shoe box with a tiny flat pillow for a mattress, a linen square for a blanket, a charging stand for his large sized phone, and a rectangle hole for a door.
"I feel like a kitten awaiting adoption by the side of the road," Louis continued.
"I see. I wouldn't mind sleeping in a shoebox on Rachel's desk," said Reese, a dreamy look in his eyes.
Beni, carrying a dozen doughnuts in one hand and a RockStar energy drink in the other, paused as she entered Main Tech. "I think I need context."
***
Ten minutes later, Beni had been pulled into the communal craze of looking up tiny dollhouses. They pulled up everything from antique houses made in the 1950s, to Lego replicas of Hogwarts. By a stroke of a keyword during Beni's search, she hit the mother load with DIY Dollhouse kits sold on specialty hobby sites. They ranged from Modern loft apartments, to Chinese homesteads complete with a throne room. They even had miniature cafe's with tiny pastries. Each dollhouse listing came with a video on how to construct it. Of course, with a specialty hobby, it came with a specialty price.
"It's a friggin' bed," said Louis, gesturing to the miniature furniture on the screen. "How hard is it to make a proper bed for at 1/24th scale that isn't going to cost a fortune? That's what... eight popsicle sticks?"
"If you want quality at that size then you are going to pay what its' worth," said Reese. "What is more expensive, a Rolex, or a bedside clock?"
Will pulled up a video with a house similar to a few of the magazine cutouts. "Most of these do-it-yourself kits use either hot glue or E6000. Not keen on having a building kept together with hot glue."
Louis grunted, mesmerized by large hands setting up a tiny living room. "Are we spiraling again?"
"Yes, but it's a very satisfying spiral."
Louis, Will, Reese, and Beni gathered around one screen, tallying the pros and cons of certain designs, and pulling up more DIY dollhouse videos.
When Cetz arrived at Main Tech, he saw four of his agents picking out dollhouses.
Cetz felt a headache coming on. "Know what. I don't need context. Meeting in ten."
**
Eventually Louis picked a DIY kit for a cabin that put him back sixty dollars. It arrived a week later and Louis set up shop in a spare workroom at the Watch. He proceeded to burn his hand with a hot glue gun while trying to assemble the walls. Will approached with ice, tweezers, and a small tube of craft glue. They finished the small dwelling in an afternoon.
Half of the tiny furnishings, flower pots, pictures, cute figurines of boats, never made it into the cabin. They were pasted together for posterity to say it had been finished, and they left in a heap by the dwelling. None of the furniture went where it was supposed to; Louis didn't trust the stairs to hold if he walked up to the second floor. The bed ,made of thin wood, looked better than the tiny pillow in his shoebox. If nothing else, it looked more like a bed. It looked like a dwelling meant for a human. It even had lighting he could turn off and on with a switch at the bottom of the display platform.
Louis stood back from the cabin and cracked his back. His fingers had nearly been glued together while applying wallpaper, and his eyes ached having to look through a magnifying glass. Will clicked on the light to the house. They looked proud of their creation, showing it off to Beni, Reese, and Rachel when they came by.
"It's a good starter home," said Rachel, handing Louis a bag of coffee grounds with a bow taped on it. "Happy housewarming."
Louis grinned. The cabin itself was slightly wider than his shoebox but twice as tall, and the platform it stood on was as big as a desk blotter.
"I want one," said Beni, flipping the switch on and off.
"Make your own," said Louis.
"I will!" said Beni, a spark of competition in her eyes. "I'll make one so nice you'll want to sleep there instead!"
Reese, enticed leaned over. "Care to make a wager?"
The next day, Beni and Reese also ordered DIY dollhouses.
Louis vowed to never set foot in any of their deathtraps.
Will vowed to make sure neither of them burned their fingers or used adhesives that could cause respiratory distress.
While Beni and Reese awaited their kits, Louis ended up exhausted after a long day of testing, and unable to switch back to normal size. The first night in his new, self-made home. Rachel left him on her desk, the shoebox on one side, and his cabin on the other. Louis stumbled wearily to the cabin. When he laid down on the bed he immediately regretted the thin bit of padding he had mistaken for a mattress. It had looked fluffy enough when he had glued the stuffing down. He dragged the cheap pillow out of the shoebox and into the cabin.
Will found him the next morning splayed akimbo on the cushion, wrapped up in the thin "bed spread" like a croissant.
"Bed not work?"
"I could feel beads of dried glue under the mattress." Louis snuggled tighter into the pillow until Will coaxed him onto his palm and into the lab to "grow up".
Louis had been so miserable with the construction of his tiny bed, he actually looked forward to Beni and Reese's dollhouses
The two kits arrived and Will made sure the construction was a surprise to Louis, warding him from the workshop as Beni and Reese unpacked their kits with child-like glee.
They wondered if the two former thieves ever got something like a dollhouse in their younger years.
Instead of cranking out the houses in an afternoon, Beni and Reese took half hours off between shifts to work on them. Both seemed to find contentment in their distraction. After a week, they were finished.
Reese had constructed a gothic themed Victorian home with a tiny staircase hidden behind a bookshelf full of miniature books. Several windows were painted to look like stained glass. And the bed was a four-poster with a canopy. His pride had been renovating the kitchen area to have a tiny fridge that actually worked and held tiny shots of pudding he had made himself. And on one wall he had put up a tiny grandfather clock, made with a working clock face.
"Somebody likes their gothic," said Will as he squinted to see inside the hidden staircase. "Good detail."
"Classic taste is good taste."
Beni had gone modern with a split level house. White on silver furnishings with touches of neon purple and one of the accent walls for a workout room consisted of an entire mirror. The bed was covered in multiple pillows, each a shade of gray or white. Her pride was adding a slide from the top level to the bottom, the landing cushioned with a layer of cotton balls.
"Very playful," said Will.
"Got most of the style stuff from a Home & Garden magazine. But who wouldn't want a slide in their house?"
Louis shrunk, bypassed all the fancy additions and special furnishings, shooting like a tired arrow towards the beds. First the canopy bed, then a gray bed with all the pillows.
Louis groaned in defeat. "It's still not comfortable enough."
However, he did try the slide, the hidden stairs, and the pudding in the tiny fridge. Beni and Reese then made Louis promise to shrink them so they could experience the houses themselves.
Will eyed the beds and the shoebox a warm glow coming to his eyes. It had been a while since he had done a construction project.
***
The magazine clippings came back out; Will organizing different furniture pieces and photos from Architectural Digest. Over the next month, between date entry and retrieval missions, Will peppered Louis with random questions.
"Dark stain or light?"
"Oriental, log cabin, industrial, modern?"
"How much do you cook verses eating out?"
"Do you like gardens?"
"How about koi ponds?"
"Silk sheets or cotton?"
"How do you not know the answer to that?" said Louis, setting aside another patent. "Cotton."
"I mean if you won the lottery and could afford anything, silk or cotton?" said Will.
"Still cotton."
It wasn't until Will pulled Louis over to look at a blueprint that he caught on to what Will had been doing.
"Are you designing a custom dollhouse for me?"
"Kinda. I'm not an architect, but I thought I could make you something more than a shoebox or a DIY kit." A light blush bloomed on Will's neck. "I want your input on it. You'd be sleeping there after all."
"All I want is a better bed," said Louis. "I respect that little pillow, it's gotten me through some rough nights, but I want a real bed."
From the blueprint it looked similar to some of the custom DIY dollhouses the three of them had constructed. Everything from the steps to the sofa had equations measuring out its diameters so it would match Louis' stature when he shrunk. Multiple chambers, the front wall of the house on a hinge so the insides could be exposed or not, a set of stairs, all on a platform with an outside space with a...
"Is that a gazebo?"
"Yep," said Will. "Do you want a pond or a pool?"
"It's a place for me to sleep when I have to stay the night, fanboy," insisted Louis. "You don't have to go all out with this. I just wanted something better than a shoebox."
"But I want to."
Louis smirked. "Feeling a little competitive after Beni and Reese made their own houses?"
"...little bit."
"I thought so." Louis brushed his lips to the side of Will's mouth, leaving a coffee ghost of a kiss, and grabbed Will's empty mug. They both needed refills. "Have at it, fanboy. Surprise me. Just... no koi pond. Especially no koi; those suckers can get huge."
***
A month later Will led a blindfolded Louis to Rachel's office.
"Are we there yet?" asked Louis.
"One moment." Will let go of Louis' hands with a squeeze. "Stay here. No peeking."
Louis heard the flicking of switches and the opening of a door.
"Okay, you can see."
Louis peeled off the blindfold. Rachel's office was dimmed, the majority of the light coming from another dollhouse. His jaw dropped. It spanned half of Rachel's desk. The house was modern, mostly white trimmed in dark blue and splashes of red. Like most of the DIY dollhouses the insides were exposed for "play", but this one had a full roof and a panel that acted like a door to the whole front half of the house. However, the house only took up a third of the platform.
Behind the house stood a stately garden of green moss, flat pebble paths, and a gazebo overlooking the rise of real seedlings from a small herb patch. In the center of the garden rose a bonsai strung up with tiny lights like a Christmas tree, and a swing. The bonsai stood small in comparison to a regular sized shrub, but to an almost three inch human, it would look like a grand tree.
Louis came closer, leaning in to see the tiny details of the dollhouse. "How in the world did you do something like this?"
"Civil engineer, remember. A lot of my college projects were making models of infrastructure. That and a lot of model kits."
Louis motioned to the hinged front of the house. "Can I...?"
"I made it for you, yes!"
Louis opened the front of the house to an open floor plan, tiny lighting, bits of shiny tile, and dark stained furniture. The DIY houses had similar plans, but this one seemed polished, more real than play.
"Cetz and Reese helped assemble most of the house," said Will. "Beni picked out the bonsai."
"The furniture." Louis gently picked up the coffee table from the living room. I weighed heavy in his hand, not balsa wood or cardboard. "Those aren't popsicle sticks. How the hell did you...?"
"I have some crafty friends on the con circuit that were willing to do some detailed commissions. A lot of it was 3D printed, but the finer furniture was done by hand. Not a hot-glue stick in sight."
Louis set down the coffee table and took a closer look at the kitchen. "Those drawers actually pull out?"
"Yep."
"The sink... holy shit there is actual water."
"Yeah, actual plumbing. We'll have to do the dishes by hand, no dishwasher that size. But there is water in the kitchen area and the bathroom, both connected to a gallon water heater under the desk."
Louis noted the "we". One of them washing while the other dried with the tiny towels and the tiny drying rack. A domestic image he never thought he'd get in real life. Well, really tiny life.
"Reese installed his patented snack fridge, I see," said Louis.
"Snacks are a must," said Will. "Fully stocked with bits of cheese, chocolate, pudding, and a slice of pepperoni. Eating like borrowers."
"Every window has curtains."
"And blackout curtains if you need some dark space."
A refuge, Louis realized. If I need space or time and I'm stuck, I don't have to feel like a lab rat.
"That's actual leather on that couch," said Louis, dragging his mind back to the house tour.
"I could afford a quarter yard of real leather."
Louis saw two charging ports for phones set into the wall so the screens could act as a television. He could imagine the movie nights. One giant kernel of popped corn between them.
"The doors actually shut and lock?" asked Louis.
"Tiny magnets in the door and door frame. Also..." Will pointed to where the front of the house closed, hiding the view of the inside. "Push a latch here, and the whole front of the house will lock from the inside so you can have privacy."
Louis reopened the front of the house. He followed the line of sight from the living room, up the stairs, to the bedroom. Dark wood furnishings and soft gray upholstery. The bed looked neat and tidy as a stuffed envelope, lined in silvery blue and deep red pillows.
"I made the bed."
"Like you folded the sheets or you made the bed and bed frame personally?" He had to ask because it seemed Will had been willing to spin his own thread for the sheets.
"Both. Took a couple of live video tutorials for the frame. No craft glue, or double sided tape. Half a drop of wood paste, tiny dove joints, and teeny finishing nails. I know you said cotton, but I got denier microfiber silk fabric for the sheets so the thickness is comparable what you would have at normal size."
Louis pressed a finger down on the tiny bed, eyeballing the measurements. "California King?"
"Yep." Will skipped over the fact he had carved by hand a bed definitely made for two. "Cut the mattress out of memory foam."
Louis examined the rest of the bedroom. Interesting that Will had included a washbasin and washcloths when there was an en suite bathroom. No closet or wardrobe, instead an empty trunk lay at the foot of the bed. Louis wouldn't need changes of clothing since whatever he shrunk with would have to grow back with him. The lamp on the bedside table gave a golden glow. When he opened the bedside cabinet he found a few extra amenities that made the back of his neck heat up.
Will's bashful look said it all.
"Wow." Louis cleared his throat, trying to draw his mind away from the bedroom. The gesture of it all struck him deep. Will and he still lived in separate places. Will had made a place for them to be together. A home that belong to them, not one or the other.
Okay. No tears. Suck it up.
Louis sniffed, needing a distraction. "So, random question, what was the most expensive thing in this whole house?"
"Well, parts of the electrical plan and plumbing nearly cost me my patience."
Louis snickered, pulling Will in by the back of the head to kiss his temple. "Your poor brain. Let me guess, the leather couch?"
"Nope. Made from scraps. Very cheap."
"The tiny fridge?"
"The way Reese made it, no. It cost me a dozen maple bacon doughnuts and a cheesecake."
"The bonsai. Gotta be the bonsai."
"Actually the bonsai was the second most expensive thing. But Beni did some good bargaining."
"Really?"
"Mh hm."
"What was the most expensive then?"
Will touched the fine sheet on the bed.
"The bed?" said Louis.
"The sheets," Will clarified.
"How are a tiny set of sheets that expensive?!"
"When you include express shipping from Japan."
"Fanboy!"
"You said the bed was the most important thing, so I made sure it got the right stuff!"
Laughter took over when Louis refused tears. He hugged Will closed, his nose brushing into hair that still smelled of soap.
"C'mere. Thank you. I can't believe you went so far for this."
"I wanted to," murmured Will into Louis' neck, leaving a soft touch of breath.
Will had wanted to give him a home. Louis wanted Will to know he was home.
&&&
It sent a shiver down Louis' back, making his belly flutter. He leaned back on the desk until he sat on it, his thigh close to pushing off a pencil box. Then he pulled Will by the hips until he stood between his legs, chest to chest. Louis curled his head under Will's neck. Will's hands draped across Louis shoulders as if a buoy to a drowning man and breathed in deep. Warmth surrounded them like an atmosphere growing around a new planet.
Louis looked over at the house and smirked. He wouldn't mind spending the night, if he had company.
"Wanna test out the bed?" said Louis, pulling back. "Make sure it's up to your standards?"
"You mean you want to see if you can wreck the bed," said Will.
"I know I can wreck you on the bed; if I can wreck the bed with you, bonus."
The blush at Will's neck charged over the hinge of his jaw and conquered his cheeks and nose. Louis knew by experience the blushing army had already conquered collarbones and sternum. He planted the final flag of victory by drawing Will's head down for a kiss, deeper than the rest. Will relaxed into his embrace like a puddle needing earth to sink into. Their chests expanded wider with each breath, trying to catch each other in the air around them to pull into their lungs and keep.
Will pulled back, nipping Louis' jaw. "I dropped the bed, twice." Nip. "Survived both times." A kiss on the chin. "I'd like to see you achieve what my clumsiness and gravity could not."
"That a challenge?" Louis bent his head down, pressed his lips around Will's Adam's apple, and sucked.
Will moaned, his voice buzzing against Louis' mouth. Louis pulled Will in by the shoulders as he leaned back further onto the desk, and then focused on the light. In a breathless flash, they both sat on the desk, just short of three inches tall. After a moment to orient themselves, and calm down enough to get to their feet, they both ran to the door of the dollhouse.
The bed did not break. Though they tried.
They collapsed under sheets of light silk, catching their breath as sweat cooled on their aching bodies. Will had been wise to include a wash basin, thought Louis. He didn't want to go all the way to the bathroom for a washcloth.
&&&
Will tucked himself into the curve of Louis' body. "So... home sweet home?"
"Maybe." Louis leaned down and kissed right below Will's sternum, tasting heated skin. "I've got a home here too."
Oh, that blush would not go away for hours now.
"Yeah, you do," whispered Will.
A well deserved exhaustion overtook them.
Louis woke before Will. Making sure Will kept dreaming, Louis scurried out of the house and over to the side of Rachel's desk that still held the cabin. To the side lay the pile of extra frills that had come with the DIY house; bits of potted plants, fake books and posters. He picked up a piece of thick printed cardstock about the size of a large postage stamp, and carried it back to Will's house. It had been a miscellaneous bit of inspirational word art one could find in any furnishing or poster aisle at a craft shop, but it seemed very appropriate.
"Where there's a will, there's a way".
Louis set it by the front door of the new house and then went back in. He would see if Reese had put anything in the tiny fridge that could help construct a breakfast in bed.
---------------
If you enjoyed this short, consider buying me a ko-fi!
#GETTING IN DEEP#midnight snack#Giant/tiny#Louis Patriarch#William James Rowe#g/t#dollhouse#ideas that happen after seeing too many diy dollhouses on youtube#and now i want one
51 notes
·
View notes
Text
Orthopedic Surgeons Like Pink Hair, Apparently
I have always wanted to be a redhead.
My admiration of fiery locks stretches back to my earliest memories and my absolute adoration of Jessica Rabbit. (Which I mean everyone had that period of adoring Jessica, but...) And cursed with chestnut hair that had, in my mother’s words, “gold and red highlights” did not assuage this desire for flaming red hair in the slightest.
Naturally, one would assume I began dyeing my hair the moment I realized such a thing was possible, but I wasn’t actually lured into the magic of hair dye until late high school. My sister-in-law--who remains the girliest person I’ve ever met--dyed her hair regularly, heard my profound desire to become a redhead and dutifully set about to fulfill said longing.
My hair was red and I was astoundingly happy.
Thus began my dedication to the magic of some incredibly stinky chemicals making my scalp itch, my shower looking as if Lars Thorwald was my roommate and an increasing number of shirts with red/dark brown/pink stains on them.
Now having naturally dark hair meant I was unable to achieve truly red hair. I’m talking flaming. I wanted there to be absolutely no doubt that my hair was RED. For a considerable time, however, I was a coward. I feared what might come if I were to attempt bleaching my hair to get that real red I was eternally chasing.
Until 2011.
Working in an operating room meant two things specifically: a stringent dress code (mainly for the sake of safety--i.e. no fake nails) and a lot of flexibility in said dress code simply because focus was on patient care and not on making sure everyone followed the hospital code to the letter.
[One example? I kept my nails black for a month, got acrylics (painted black) and policy changed so personnel who didn’t interact with patients were allowed to have acrylics. HAH. Make me follow rules? I’ll show you what’s what.]
I wasn’t intending on flouting the dress code when I bought a DIY bleach kit and a couple boxes of BRIGHT red hair dye. It was simple math--I’d dyed my hair black a few months back, wanted to go back to red and the only way to effectively do that was to strip off the black and give my red dye a fresh bleached blonde base to settle into.
Now, you should probably have someone help when you bleach your hair for the first time ever. Preferably someone with actual experience dyeing hair (their own or someone else’s). My second ex had no experience whatsoever, but I blithely submitted my head to him as he slathered on the bleach.
I hadn’t taken a couple of things into account. One, the bleached areas we started with were going to be saturated for muuuuuuch longer than the rest. Two, I hadn’t chosen a dark red dye. I’d gone for a bright, lovely RED-red, because every time I’d dyed my hair before, I’d always gone up a shade or two in order to get a brighter shade on my naturally dark hair.
When the bleach was washed out, I was a punk dandelion.
My hair went from bright yellowish-white at the crown to an amazing orange at the tips. I looked like a Q-tip on fire.
Needless to say, this was not what I’d anticipated happening post-bleach. However, I still had me two boxes of red dye (I always bought two because long, thick hair = needs lots of dye) and I could fix this. The red might be a little brighter than usual, but it’d cover up all the strange tonal areas and be a pleasant red.
The result?

Pink.
Not just “pink” but neon rose straight through to pale pastel. There was no ‘red,’ that was not a shade that happened. Somehow, through the magic of inexpertly applied chemistry, I ended up with absolutely wild pink hair.
Having committed this error of judgement, I had two realizations: it was Sunday night and I had less than 24 hours before I had to show up at work. In the conservative hospital. With the stringent dress code.
Two possibilities presented themselves: run to the nearest store, grab dark red dye and hope for the best or cover up as much hair as possible with a scrub cap and wait out a few days to avoid burning my hair any worse than it’d already suffered.
I slathered on conditioner like it was going out of style, used every bit of coconut oil I could and made sure I had the hand-sewn cutsey scrub caps available that one of the OR nurses had lovingly given me.
Once I arrived at work and was faced with the woman who I have eternally proclaimed “Best Supervisor Ever,” I was struck with a guilty conscience. There was no way I couldn’t tell her about the mishap and let her know I was going to remedy this as soon as it was safely possible.
So with only her in the office, I tugged off my scrub cap, unfastened the clip and revealed the elbow-length rush of sheer pink that my hair had become. Her response was to laugh so hard she nearly cried, all the while trying to gasp that it actually didn’t “look bad.”
As I’m sharing a laugh with her--because if I couldn’t laugh at myself, I’d be absolutely insufferable--the office door opens and one of the orthopedic surgeons walks in. He was one of the nicer doctors in the OR, always pleasant and treated the support staff with respect.
And all he managed to say was “...it’s so pink!”
He’d never seen so much pink hair before. He was fascinated. As I’m standing there between the printer and the desk, awkwardly trying not to laugh, he circled me, staring at the flood of pink that was floofing out over my shoulders. And then he nearly killed me by giving me the most Earnest Look and asking “...can I touch it?”
I, of course, said yes and his surgeon-skilled hands were immediately buried in my hair. He floofed it, fluffed it, held it up, turned it over and rubbed it between his fingers, all the while whispering “It’s so pink! ...and soft! ...and pink!”
This went on for a full five minutes.
With my supervisor’s assurance that I wasn’t going to be fired for a “hair mishap,” I settled back in to work and my only concession to the whole thing was to make sure I wore a full-coverage scrub cap every day for the week or so that I gave my hair to recover.
Except for what became the evening routine.
Between five and six in the evening, the surgeon would come into view, peering towards the office from around the corner. He’d always check to make sure I was alone before creeping up to the window--open to let people hand in paperwork without breaking stride--and whisper “Can I?”
I nodded. And he’d dash around to the door, pop into the office and wait with eager anticipation until I’d gotten my scrub cap and hair clip off.
And then he just went to town. This MD with decades of experience and specialized training, nearly in his early sixties, would stand behind me and act like my hair was a brand-new toy JUST like one he’d always wanted as a kid and now he could damn well have it.
Floofing, flipping, petting, braiding, unbraiding, petting, smoothing, stroking my hair with an expression of absolutely childlike glee while whispering “...it’s so pink! ...and soft! ...and pink!”
The day I came to work with my hair redyed a more subdued, appropriate red, I saw what true disappointment looked like. He never asked to play with my hair again, but every so often, he’d bring paperwork to the office and say “It was just so pink.”
#Angel's Life Experiences#My mother specifically requested I write this one out#She absolutely loves this story#It still cracks me up that an ortho surgeon was SO ENTHRALLED with my hair#God he had fun with it LOL#Dr Brindley just found it to be the B E S T thing ever
3 notes
·
View notes
Last Seen Blogs

strait2jacket
Strait2Jacket

runawaytaurus
Nazeem

verticrow
rigel black art blog

galacticnat
Personal Art Trashcan

marashi96art
Anything But