#edited to add tag for findability:
Note
Do you think you could fall in love again?
On the one hand, this is a wildly personal question, anon, and from the reaction of my knitting group, it would be totally appropriate for me to just abandon this in the depths of my unanswered asks.
On the other hand, if it is possible to know one thing about me as a person, just from my blog, it’s that I was deeply madly in love, and that that person died. And also: you have in fact activated my trap card.
Because I thought about this, almost as soon as they died, and not in a way where I was ready to fall in love immediately, but I think I said to @faintvox maybe the next day: can you be polyamorous with a ghost?
Because when I got divorced from my first spouse, I thought I wouldn’t find love for a long time. I expected to be single for years, because I had so much trauma from that, because I had loved him and it had broken me, because I thought it would be too hard to start over after more than 20 years with someone else.
And when I told Ryn that, after we started dating, they laughed at me. “There is no way you were going to be single for five years,” they said, which how long I said I’d expected. (For the record: I left my ex in August 2018; Ryn and I started dating in October 2019.)
Because Ryn and I were in a polyamorous relationship when we started out, and we were just trying to figure out how we wanted to do that again, more deliberately, and instead cancer-wedding-death. Our wedding vows deliberately included that space in our lives, in a way where it also was about our friendships, and was also something that would not be totally obvious to a couple of my older relatives.
Because I realized, after they died, that we together had written me a way through it — the fic we wrote together, one of the central characters is a widower, and the guy who created him always said “Magnus never loves again,” and we said “Fuck that,” and we said (altho this is I think @nekosd43's formulation originally), “Magnus is made for love,” and we shipped him in stories set before his marriage and we shipped him in stories set after. And Magnus’s grief and love for Julia is woven through the love that we gave him in the stories we wrote with him and Taako and him and Lucretia, and the love and the grief are both important. (JFC I WROTE A PIECE ABOUT LUCRETIA ASKING HIM ABOUT A TATTOO HE GOT FOR JULIA.)
Because among many other things, for the benefit of all the broken hearts is in part about what it means to have love that isn’t The Love, what it means to find love in the aftermath of tragedy, to find love in places you didn’t expect.
Because people in my family live a really fucking long time, and the idea of living another 30, 40, 50 years without romantic love, without being in love, is kind of horrifying to me. (No offense to my aromantic pals, but could not be me.) Especially given that I am already of a mindset that it is possible to have romantic love for more than one person at a time — to say that I couldn’t have it again at all is just not realistic for who I am.
No one is ever going to have the exact place that Ryn did and does. No one will ever be them, no other relationship will be the one that we had from when they first messaged me in 2017 until I lay next to their corpse in a hospital bed in 2021. Even in death they are literally my safe space.
And yet.
So the scene in OFMD 1x10, where Stede asks Mary what love feels like. I have always associated that with Ryn, and with my own little montage, because that is what our love felt like. (There are so many things about s1 Ed and Stede that are ridiculously us.) If we’d been married a year later, I bet some of that would have been in our wedding ceremony.
And yet.
I haven’t posted about it on Tumblr, but there is a somebody, and I am quite in love with them, and one time last summer I was watching Our Flag Means Death, as you do. And I got to that scene, and my mind was doing the montage overlay thing with moments of Ryn…and also moments with this other person. And I knew that I loved them, that I was in love with them, but to have that connection happen? I burst into tears.
Because I had known intellectually, but I felt it in a different way, deeply and truly, the simultaneousness of that love, the way it overlaps, and neither makes the other less, and there was love, and there is love, and whatever happens next there will be love.
#anon ask#I hope this helps anon#I have a lot of thoughts about love actually#edited to add tag for findability:#not all exits are made equal
36 notes
·
View notes
Note
I just wanted to say that I am in AWE of your organization skills. That masterlist is masterfully done. I’m trying to do something similar for my own blog, but I’m having a hard time figuring out categories and making sure things don’t overlap and everything is easily findable. I aspire to get it looking like yours!
@thegirlsinthecity Thank you for your kind words 😊. It's still an imperfect system (some tag overlappings that seemed like a good idea at the time, now I'm doubtful about, and the Archive view is rather unwieldly), but hopefully it's useful for the visitor.
This whole thing grew with time, and I wouldn't be able to handle it if not for a few tools. Just in case you didn't know them, they are:
XKit: a desktop browser plugin that brings a set of little fantastic "quality of life" tools to Tumblr. The ones I use the most are:
Quick Tags, where I have a lot of tagging presets. Most of times, adjusting them is just a matter of deleting some tags in the result of its application (for example, when a fan art post isn't about SWTOR, I just delete that tag), which is fast to do.

And One-Click Postage: it has the Reblog button bring up this little panel that can produce a reblog, a scheduled one or a draft at the click of one of those bottom buttons. The beauty of it is that it can auto-tag with the original post's tags and the name of the original blogger (which is great if one is doing a reblogs drafts spree while idly scrolling the site and wants to later remember what they were about, for when the time comes to tidy them up and reblog them). That, or let you add the tags from the very Quick Tags list, either at that moment or while editing them.
They are a lifesaver. The thing is, there are several XKit variants around, each with a different level of feature parity and compatibility, but they can coexist. I'm mostly using @new-xkit-extension for classic editor posts and reblogs, and XKit-Rewritten for the new editor ones.
And speaking of lifesavers: given the poor state of Tumblr's blog maintenance tools, every time an artist changes their blog's name or I discover a better way to tag old posts and reblogs, the idea of having to edit a lot of them becomes quite dreadful. There is, though, this tool: tags.circumfluo.us. Basically, a web application that offers tag search-and-substitute functions (including replacing sequences of tags, say, find A B C and replace with A D C keeping that order).
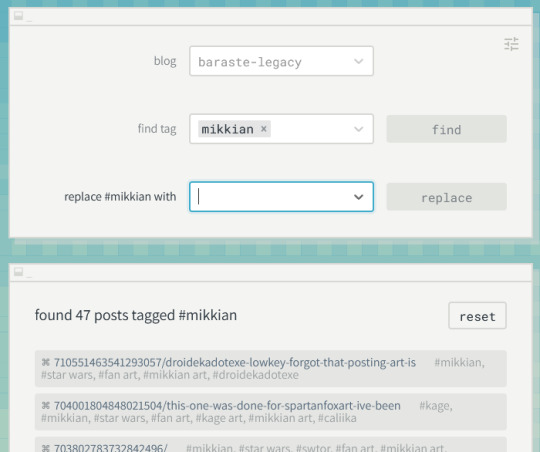
One must be a little careful when the list of posts exceeds certain amount, as Tumblr has some daily limits for this kind of post modifications (at worst, you can find out that it didn't manage to process all of them and that you can't post any more for the day, but you could do it again another day to process the ones left). It is great for massaging the way one has tagged things into shape.
So, I'd say just tag things in a way that feels usable to you 🙂. Consistency doesn't have to be perfect, although these tools make it far easier, and you can always readjust things later with tools like that webpage.
And again, thanks for the praise. I really love it when people find this thingy of mine both useful and usable.
#miscellanea#social#tumblr tools#xkit#new-xkit-extension#xkit-rewritten#tags.circumfluo.us#thegirlsinthecity
10 notes
·
View notes
Text
I have to remember to edit my tags and to, from now on, tag my posts with stuff like
"do not tag with Moomin" "do not tag with Snufkin" "do not tag with Moomin Fanart" "do not use main tags"
Or whatever is the correct thing because
I do not
Do Not
Want my selfshipping stuff in the main tags.
Anything that I want in the main stream of Moomin content, I will post on my regular Moomin blog.
Please...don't reblog stuff from this blog and add common tags or else regular fans will find it then find my blog.
I'm not embarrassed. I just want my selfshipping to be separated from my regular Moomins fanart.
I want my regular fanart to be enjoyable without people immediately associating it with my identity as a self shipper.
And I don't want to gain followers only to lose them straight away when they realize where they are.
I tag my stuff the way I do so that I'm found only by fellow self shippers. My goal is to only be findable by Moomin fans if they already know my URL or tags. In which case, I would hope that they are okay with selfshipping.
2 notes
·
View notes
Text
okay I couldn’t find the post outlining this for anon so I just wrote it out instead ajfdbjd I hope this is understandable
‘on posting nsft content’
okay so here’s what you need to prepare:
- your uncensored image
- post content/links/tags/etc
- your censored/filler image
step 1- creating your post
add your uncensored photo, create your caption, add links, whatever you wanna have there, don’t bother with tags yet otherwise you’ll mess up your tagging system (unless you want only your censored content findable via tags)
step 2- publish your post
step 3- reblog your post, hurry to step 4
step 4- edit your original post (not the reblog) by taking out the uncensored image and replacing it with something sft, quickly save it
step 5 (optional, depending on preference)- go back to your reblog to add your tags so your blog can find your content (leaving this till after the time crunch is just less stress, you can do it in step 3 if you wish)
there is another option to forego the stand-in photo and either delete the image entirely or the original post itself altogether. I’m a fan of the former out of these simply due to being able to still read tags and get notifications, which you will not be able to see if the original post is deleted
#I’m an academic#i don’t personally do this because it hasn’t been working as well for me lately so idk if they’ve figured it out or?#but I also just rarely post uncensored stuff here since I have twitt n it’s more reliable
7 notes
·
View notes
Text
A starting place for self-editing your novel
I wrote this in a reblog to one of @boy-who-can-fly‘s posts, but as I couldn’t add any tags to that that would make it findable to more than just my followers, I figured I’d make the same content in an original post because YAY TAGS!
Without further ado...
1) Take a break.
Some authors have suggested taking a break for six or so weeks, but I find anything longer than three makes me too distanced from my story, and I have to work a lot harder to get back into my protagonist’s head. During this break, don’t so much as look at your story. Instead, focus on something else. Maybe growing your author platform, planning or developing another wip, or researching the publishing industry if publishing is the end goal for your book (this goes for both traditional and self pub). The point of this is that without some distance, it’s going to be a lot harder to see larger developmental flaws.
(this is a very long post, so the rest of the steps are below the break)
2) The first read-through.
After your break has ended, and you’ve got to be a little stern with yourself not to extend it farther than what you set, or else you’ll never return to it, do a readthrough. This means either just reading it off you’re computer or kindle, or going to somewhere like staples and getting it printed and spiral bound (this costs money, but I found it helpful down the line). Two rules: 1) no editing. 2) look at the first rule. This read-through is going to help give you a general sense of what is and isn’t working in your book; the problems you notice here are likely going to be the biggest ones. (if you want, you can combine this step with step three, but I found it more helpful to keep them seperate)
3) Outline.
It doesn’t matter whether you outlined before, or whether you decided to pants it. By the time you get to editing, you need to have an outline that’s reflective of what you actually put on the page. Go through your story, chapter by chapter, and for each new scene write down
what is your character’s goal in this scene
what is standing in their way
what is the outcome of the scene.
This list should not go into depth; one short sentece per point, MAX. That being said, make sure to keep things specific, so “MC wants to convice X to go with them to Y.” is going to be a lot more useful to you later on than “MC tries to convince them to go.” This outline is going to help you objectively look at your story structure, as you can see a lot more of what’s happening at once, without being quite so overwhelmed by the sheer mass of the words you wrote. Yes, this step can be a bit tedious, but it is so, so worth it.
4) Sort out what you need to fix, aka start making a game plan for your edits.
Now that you’ve read through your wip at least once through, and probably twice, you probably have a pretty good idea of what you need to fix. The key here is that right now, you want to be fixing on the global edits - the things that span beyond just a single scene or chapter. The reason why is that you don’t want to be spending hours perfecting a scene that you’re just going to need to cut later because it doesn’t advance the plot.
In a new document or spreadsheet (whatever you think will work better for you, I liked using a google doc), write issues you see with:
Each of your main cast (regarding character development, motivations voice, etc)
Setting/s (consistancy, realism for your world)
General worldbuilding (consistancy, things poorly explained/set up)
Main plot (following a given plot structure, building tension, etc)
Each subplot (how it intertwines with the main plot, plot structure, building tension, etc)
Other major things you noticed during your readthroughs
These things tend to be larger scope, and generally are worth addressing first.
5) Picking your edit.
Look at the list of edits, and see which one is going to cause the most ripples through your story. This is going to be the first thing you look at to fix. If there are more than one edits that will all have major impacts on the story, think about which edit would make the other ones easier.
For example, in my wip, Project Toxin, my plot was, well, a trainwreck and a dumpster fire’s love child. But my characterization for my MC was also a wreck. Still, getting the overall plot more in order would make it easier for me to edit my MC, so I chose plot first.
6) Make a game plan for your edit.
Before diving in and ripping through your first draft, come up with a game plan. Brainstorm possible solutions to the edit you’ve chosen, and look at what ripples it would cause. You want to make sure that what route you take isn’t going to upset something major or crucial to your story. Most likely whatever solution you choose will cause some other upsets, so just make sure to think through what makes most sense for your story.
For example, when working on my story, I was fixing plot first. Figuring out my game plan meant looking at my scene list and moving things around/adding/cutting content until I had a plot that was much more satisfactory, and that was, in my mind, not a wreck.
Possible game plans for different types of edits:
1. Plot:
Look at your scene list. What helps to advance the plot? What is dragging the pacing. Are there any elements that you are adding or cutting in your overall story that need to be accounted for? With this in mind, cross out scenes that you want to cut, move scenes around that need to come in a different order, add scenes that need to be added, and mark scenes that need to be combined into one.
2. Characters:
For each of your characters, look at their character development. It’s going to be hard to make them come to life better on the page unless you’ve got a grasp of who they are, even if you didn’t plan them out originally. If you have not, consider listing in a spreadsheet or google doc what their backstory is, what their goals are, why they want those goals, and what a few of their strengths and weaknesses are. Also think about their voice: what words do they use more often? Sentence structures? What do they sound like when they’re talking? Stuff like that. If your character is inconsistant, pick one version of them that you want to follow (knowing that they will likely change over the course of the story), and look at what parts of them you will need to change to accomodate that.
3. Setting/Worldbuilding:
I’ve put these together here as they’re somewhat similar. For poorly explained aspects of worldbuilding, look at where you might add in little details so you can better set that foundation (this is not usually a global edit). If things are inconsistant, look at what makes the most sense for your story, and like what we talked about with characters, alter the rest to accomodate that.
7) Making edits.
This is where you really get to dig in and really move things around. Using the edit you’ve picked and the game plan you’ve developed, go through scene by scene and make the changes. I strongly recommend having a seperate doc from your rough draft to store your second draft in. Currently, my process is to have both open at the same time, and if a scene is already fine, I’ll just copy/paste it over. At least for me, however, it’s usually not, and I’ll either make tweaks to fix it up, or, more often at this early stage, I’ll rewrite it. As an added bonus, I also find that rewriting it makes my prose a lot stronger, since I’ve grown so much as a writer since I originally wrote the scene.
Since you know your story better, you may find other elements that you want to change are improving as you edit. If not though, don’t worry - they’ll get their own editing pass.
8) Repeat steps 5-7
You made a list of edits you needed to make back in step four. Now, follow steps 5-7 to make all of those edits and changes.
9) Repeat steps 2-8
Two steps telling you to repeat in a row? Yes. The deal now is that you want to make sure you’ve cleaned up any global edits before moving on to anything smaller. If you’ve been thourough thus far, this will be a very fast step. If not, think of this step as a safety net. There may have been ripples that you didn’t notice earlier on, and it’s a good thing you’re catching them now.
10) Chapter edits
At this point, we’ve cleaned up all the big edits. Now we’re going to look at each chapter. Within each chapter, there needs to be a mini-arc. A beginning, middle, and end. This is the time to really focus on that. Also focus on things like tightening up prose, combining or compressing paragraphs, making sure you’ve adequately set the scene, etc. If you’re over the word count limit regarding your genre, also focus on cutting a certain number of words from each chapter to put your story back within those limits.
11) The little things
This is about combing through your wip to find all of the little errors that have made their way through edits. Typos, weird or incorrect grammar, useless adverbs, things like that. At this point, everything is on a more superficial level.
Beta Readers
Given that this has gotten quite long, I’m not going to go in depth about beta readers here, but around step 10/11, you’re going to start recruiting beta readers (you’re going to want to try and have multiple rounds of somewhere around 10 betas each, which is why having a good author platform is useful: recruiting is easier). Between each round, you’re going to look at their feedback and make the necessary edits. After several rounds of beta readers, you’re going to look it over a few more times, and then if you’re going the traditional publishing route, you’re going to query agents. If you’re going the self-pub route you’re going to look to hire a professional editor. If you’re not looking to publish, this may be the end of the line.
Good luck editing!
#writing#writing advice#writing tips#writing references#writeblr#writers on tumblr#editing#amediting#how to edit#novel editing#editing guide#novel writing#writing refs#editing references#editing refs#long post#developmental editing#big edits#major edits#killing your darlings#olive's writing vibes
46 notes
·
View notes
Text
Glitch | Ateez Gang! AU | THREE
⟶ gang!au, hacker!au, love triangle? poly? female!original character
How curious it is, the fact that the police just gave a media conference, confirming ATZ’s involvement in Kyungri’s families newly-appointed murder, just as she sat down for her best friend, Jaehyeon, to be tattooed by one of the gang members?
⟶ glitch ml! main ml!
⟶ prologue | previous | next
⟶ note! @atinyluna @iis4d @untainted-memories !! if anyone wants to be on a tag list for this fic just let me know!
⟶ 4000 words
⟶ edited 08.03.2020

THREE: The Loft, 15:03,
Saturday 25 October 2025,
“Ah! There she is! Our princess has arrived! Finally!” The voice of her boss, Noh Gongmyung, filtered through the hidden speakers and to her ears as soon as she stuck her key into its lock. With a roll of her eyes, she looked up to where she knew a camera was and sharply turned the key, opening the sliding door.
“I’m not a princess, Gongmyung. How many times do I have to tell you?”
“At least once more!” The speakers hummed as she slammed the door shut, it’s automatic locks clicking into place. Kyungri could just hear the grin on his face from his words.
She walked up the metal floating stairs that led to the loft, her workspace and also home to her boss. She hadn’t cared that she worked in someone’s house, she knew well enough how well she worked when she was in the comfort of her own space. When they started working together Gongmyung hadn’t lived in the loft – it was a home away from home for both of them. However, while Kyungri chose to stay at home with her aunt and younger cousin, Gongmyung realised that he spent all of his time in the loft and that the gas money was not worth the thirty-minute trip from his house to the loft every day.
So he moved in.
He had offered Kyungri a room of her own and, while she did take it, she told him it was mainly for when they had to work long jobs. She didn’t like taking their not-so-legal jobs back to her aunt’s house.
The loft was quite large, having three separate rooms, one bathroom and an open-plan kitchen-living room that they turned into what Gongmyung called The Hacker’s Cave.
After a few years of making modulations to the loft, the two of them decided to buy the whole building, converting the downstairs area into space for their unsanctioned work. More specifically it was essentially a giant closet, locked under a padlock and a fingerprint scanner. Gongmyung had wanted to add a retina scanner but Kyungri thought that would be pushing it a little too much. They had only just been able to hide the fingerprint scanner in the wall, having a camera outside the door would just be suspicious.
She typed in the code specific to her entry and opened the door to the loft. Closing it behind her and listening for the tell-tale click which signified the door was locked again.
Once, a while ago now, Chaeyoung had called everything over the top and that the two hackers were overly paranoid. Now she just called them “hacker spies.” Chaeyoung was the only one of her friends – and family – that had been to the loft, that had seen inside the loft. Kyungri didn’t exactly know why Chaeyoung had been let onto their little secret but she couldn’t say she was complaining. Gongmyung liked Chaeyoung too, which was always a plus, he referred to her as his second employee even though Chaeyoung couldn’t hack anything to save her life. She was a good informant and strategist though, which is why she fits in so well in their unofficial jobs. Kyungri wondered if Jaehyeon even knew they partook in felonious jobs too.
“Good afternoon, princess.” Gongmyung grinned at her, twisting his spinning chair around to face her as she entered the room.
“I brought you a coffee.” Kyungri smiled at him softly, holding the paper cup out to him, her own still half full in her other hand. She had stopped at another café, one closer to the loft, on the way – having forgotten to buy it when she was at The Café – so it was still piping hot. Just how he liked it.
“You’re buttering me up,” Gongmyung stated, taking the coffee anyway, leaning back in his chair and letting out a satisfied sigh as he took a sip. “What do you need?”
“A favour,”
“Of what kind, pray tell?” He raised an eyebrow, leaning forward in his chair.
Kyungri took a second to reply, speaking slowly like the words hurt to say, “I need your help.”
“You? Need my help?” Gongmyung emphasised, placing his free hand to his chest as if he was clutching his heart. Kyungri’s eyes closed as regret washed over her. “Our Great Hacker, the Pyo Kyungri…” he placed his coffee down on a nearby table, “wants her poor, old mentors help? The honour!” He shouted dramatically. Kyungri was tempted to just walk back out, but before she could, Gongmyung had shot up from his chair to place a hand against her forehead. “Are you feeling ill?”
She swatted his hand away, a small scowl taking over her features. “You’re thirty-four.” She rolled her eyes. Poor and old my ass, she thought. “Can you not be a dramatic dick right now? I ask you for help all the time.” She grumbled, finally taking her jacket off, hanging it on the back of the couch.
Gongmyung grinned at her. He didn’t have to verbalise his acceptance to help, he would help Kyungri even if she hadn’t asked. With the flourish of a hand, he turned to kneel on his chair with one knee and kicking off from the floor with the other, using his chair to glide across the room towards his set up area. Kyungri shook her head slightly, walking after him. Sometimes she wondered how he was the older one.
Gongmyung’s set up was… over the top, to say the least. He had lined a wall with monitors, twenty-four in total, with four servers ranging in sizes and psychedelic colours underneath them. Kyungri had always wondered why he kept a few servers upstairs, especially when they had a whole room dedicated to server’s downstairs, but she couldn’t fault him for wanting to keep the ones he built from scratch separate. When the monitors weren’t being used – by the surveillance cameras or from completing several long-range hacks at once (or downloading the latest version of his favourite video game, unreleased to the public) – they linked with each other to create one big screen. Usually when the loft had visitors – sometimes the police liked to pop in uninvited – the monitors served as a functioning TV. Gongmyung’s over the top personality and a rather large bank account had saved them from suspicion numerous times.
Kyungri had often told him that it wasn’t necessary, that everything could be done on a singular screen. He had always answered her with a simple “I know, this is just more fun!” to which she would roll her eyes, silently agreeing with the eccentric man. Their set-ups were like them: total opposites. While Gongmyung’s took up half a room, Kyungri preferred to stay mobile. She was simplistic, having three of each kind of electronic (two for her and one as a backup). Three phones – two iPhones and a Huawei – three tablets – two Samsung and a Huawei – two iPod and three laptops – her treasured Microsoft laptop and her two new ones: a MacBook and a Huawei laptop. (They had done a job for the company Huawei and were gifted with their electronics, which they kept after completely wiping them and making sure they were secure.)
In a way, the two hackers were described by how they worked. Gongmyung was over the top, in your face with a dramatic flair that everyone had to appreciate no matter how hard they tried not to. Kyungri was mobile, working incognito, on the move, classic. It was why they worked so well together: he was the guy in the chair, and she was the girl on the move.
(Chaeyoung loved to refer to their little team as spies. “We could totally be Charlie’s Angels.” She had said once. “We just need the third angel.” At her words, Gongmyung drew in a theatrical gasp, hand to his chest, offended. “How dare you say that I’m not an angel.” That day was fun.)
“What’s got you in a rough patch?” He asked, grabbing a neon pink keyboard – the one that was connected to the hot pink server, the one he kept separate because it was the only one connected to the dark web.
Kyungri pulled her own laptop out. Her trusty laptop lovingly named Microsoft (All her laptops were names as such: Mack the MacBook, Huawei the laptop.) and began typing away, still standing up next to him. “Two people apparently don’t exist anywhere other than a singular police file.”
“Now, this is interesting.”
“That’s the weird thing! It’s like these men only exist for the purpose of one measly police file and nothing else.”
“You only used your laptop to search, right? Microsoft?”
Kyungri nodded.
“Perhaps your server isn’t strong enough. Run the searches again with Huawei connected to the server room downstairs. Maybe you’ll get wider search field parameters.” Gongmyung grinned. While he wasn’t exactly a patron of the black net, he did have access to it and its connections – anything was findable for the right price. “Also, just send me all you’ve got, and I’ll get in touch with connections.”
Kyungri nodded again.
“This is quite unusual, isn’t it?” Gongmyung said after a few minutes of silence as he read over the information she had gathered. “Jo Jowon. Choi Jongho. Pictures.” He mumbled, narrating as he typed out an invisible email – an incognito way of communicating with his contacts without a trace. “I don’t think my contact is online at the moment. It might take a while to get a response.”
Kyungri nodded a third time. She wasn’t in a rush. She just got easily frustrated when things didn’t go right, quickly.
“So the police are re-investigating their deaths.”
“Yeah.”
“And Soonchul is the lead.”
Kyungri hummed in agreement.
“You have to know that ATZ aren’t even five years old yet. The crash was –’’
“Seven years ago. I know.” Kyungri cut him off, fingers stopping their tapping as she looked over at him. “I figured that out the same hour I heard the police were suspecting them.”
“So why are you still looking for them.” He asked, also stopping, having finished for now.
“I don’t know. Something doesn’t feel right, it’s bugging me.”
“Ah, and then these two boys don’t seem to exist.” He realised, teasing her slightly, “you can’t resist.”
“Soonchul is trying to pin my family’s death on a gang who hadn’t even formed yet. It’s sloppy, and I don’t appreciate it.” She shrugged, turning her attention to a monitor on the wall, where a figure had walked to the front door. She looked away after realising she knew who it was, continuing her little speech. “I don’t understand the connection. I’ve been waiting for six years for them to re-open the case and when it is, I can’t help but feel angry.”
“My father wants to find ATZ, everyone wants the Pyo Crash case solved once and for all. He’s killing two birds with one stone, trying to twist everything together by his own will.” Chaeyoung called loudly, having heard the last part of Kyungri’s sentence as she entered the door. She leant back against it, waiting for the click before she wandered into the room. While she wasn’t a hacker, Chaeyoung worked with Kyungri on their out-of-hours jobs. She had her own keys and her own password for the loft, she was part of the team. She shrugged her black trench coat off, throwing it haphazardly in the direction of the couch, not bothering to see if it fell on the floor or not. “I went to lunch with him last week, he wouldn’t stop muttering about how he was going to get the station to look for ATZ and get off his back about the Pyo case.” Chaeyoung rested on Kyungri, her arms over the now seated Kyungri’s shoulders and her head resting on her shoulder. Kyungri leant back into the orange-haired girl, trying to give her stronger stability to lean against – she knew she was tired. “We are talking about my dad, right?”
“Bit of a poor solution. It’s not even thought out well.” Gongmyung tsked.
Chaeyoung yawned a little, “I don’t think the station cares if I’m being honest. They’re just happy he’s finally doing it.”
“Anyway, now that both of you are here, I can brief you of tonight’s job.”
“Sure thing GM but, can I go get pizza first? I came straight here from the café, and I’m starving.” Chaeyoung’s tired expression had cleared into a livelier one at the thought of food through her words still slurred a little. Gongmyung mirrored her grin and pulled a silver card out of thin air, holing it out in front of her.
“It’s on me or rather, on you. That’s your card for the night, there’s five million won on it.” He told Chaeyoung, emphasising the amount on the card. “It’s for the job, to keep up appearances. You have to be expensive to look like a regular at an expensive club.” Chaeyoung nodded, plucking the card from his fingers. She pressed a gentle kiss on Kyungri’s cheek before standing, walking to the door and scooping her coat up from the floor on the way.
“Got it! You want the usual?” She called over her shoulder as she opened the door.
Kyungri and Gongmyung hadn’t left it a second before they chorused a ‘yes’. After the orange-haired woman had left Gongmyung turned to Kyungri, another card in his hand.
“Thank you.” Kyungri smiled at him softly. He reached out the same hand to pat her hair gently. “While she’s gone I’ll go shower, the world knows I'm quicker. She’ll need at least an hour just for her shower.” Kyungri let out a laugh as she slapped her hands against her thighs as she stood.
“I’ll keep you updated.”
“Ah yes, we can play Is Gongmyung’s Voice Louder Than The Shower again.”
The bathroom was standard compared to the rest of the building. Kyungri only really used it for its essentials – to shower and to use the toilet – while Gongmyung couldn’t care less what a bathroom looked like. Chaeyoung kept bringing in little decorations around every now and then, but they always seemed to go missing after a week or two. The walls were tiled in white, a toilet sink and shower the only appliances inside. On one wall hung five towels, two were black, two were hot pink and the last of was a white hair towel, stained with diluted hair dye. Also hung on the wall, above the sin, was a large square mirror.
Kyungri stared at her reflection, letting the shower warm-up before she got in it. She had bags under her eyes that would need to be covered properly before they left for the job, no one going to the club would flaunt their designer eyebags. She’d have to get Chaeyoung to fix her up with the strong stuff later. Kyungri took her hair in her hands, looping it through her fingers. It was getting quite long, the black hair dye starting to leave her roots. They weren’t that bad, her natural hair a dark brown anyway, but she knew they would bother her is she didn’t get them done again soon.
The water was hot against her skin; it almost burnt. But that’s how she liked it. She liked being warm and would often cuddle herself up under at least three blankets when she could. She closed her eyes and leant her head back, letting her hair fall down her back, under the steady stream of water. She liked showers, they were relaxing. However, she could never spend more than fifteen minutes in there. She washed out the shampoo in her dark locks and applied the conditioner, twisting her hair into a makeshift top-knot to sit for a little while as she bent over slightly to shave her legs. Kyungri liked having smooth legs but, in reality, she hated having to shave them. Just as she finished up with the razor and went to wash the conditioner from her hair, the bathroom door bounced open startling her a little but not enough for her to make a sound.
“I’m back, and your pizza will get cold if you take forever!” Chaeyoung shouted over the flow of water. Kyungri shook her head in amusement, continuing to wash out her hair.
“Thanks, Chae.” She shouted back. She could feel Chaeyoung’s cheeky grin as she heard her laugh.
“OH! Before I forget! After you left the café earlier, I overheard Mr Tattooist and his friend. Whose name is Yoosang by the way and, he’s completely one-hundred-per cent cute. Apparently San did something, and you didn’t notice? I assumed it was that he tried asking for your number by the way Yoosang laughed at him, but I had already given him your number, so it got me thinking.”
Kyungri switched off the water, stepping out of the shower. She didn’t rush to cover herself in front of Chaeyoung, but she wrapped a pink towel around her body because the window was open, and the breeze was cold.
“Just be careful around him okay, he’s like super pretty to look at but, now I have a funny feeling about that tattooist. Like there’s something hidden about him.” Chaeyoung spoke seriously as she sat on top of the toilet as if it were a chair.
“You gave him my number?”
“Before he was being shady!”
Kyungri couldn’t help but laugh, and after a few seconds, Chaeyoung had joined in.
“I also went outfit digging so finish up in here and then just come through to the room, yeah?” Chaeyoung smiled up at her tall best friend. Kyungri returned the smile and kissed her cheek as Chaeyoung departed from the bathroom.
She left the bathroom, hair and body wrapped up in pink towels and headed towards the living room. She didn’t care that she was in just a towel around Gongmyung, he was essentially her brother for all intents and purposes.
“I did tell Chae you were in the shower, sorry she interrupted you.” He told Kyungri as she stopped next to him at the table. From where she was sat on the floor on the opposite side of the table, Chaeyoung grinned up at Kyungri with a wink.
“It’s not like she doesn’t do it every time anyway but, thanks,” Kyungri replied to Gongmyung with a small amused smile. She propped a hand on her waist, her other hand holding its wrist as she focused back to Chaeyoung. “So what are my options, Chae?”
“Under very tight time restrictions, not fair by the way,” She glared at the man in the room for a second, “I’ve given you a dress and a crop-top-shorts combo.” Chaeyoung gave her a dazzling smile, hands shaking back and forth like she was in a jazz number. Kyungri nodded a little, looking over both options. “I get to wear the other one so, please choose the one I don’t want,” Chaeyoung added with a rushed mumble and a little squeal, her hands shooting into the air to show off her crossed fingers. Kyungri rolled her eyes a little, the smile growing on her face. She should have known.
The dress was a lively red colour, the woven cotton was laced with glittered fabric to give off a shine under every angle. It was lined with cream-coloured silk, smooth to the touch. It was also quite small, and Kyungri knew it would fit Chaeyoung better. The orange-haired girl had even paired it with a pair of black criss-cross stiletto heels in her size.
The other outfit was quite racy, but Kyungri really didn’t care. While she preferred to live her life in leggings and jumpers three sized too big for her, she knew her body was fit. She looked after herself; going to the gym every other day and running two miles every morning. Her core was strong, ready for anything that was thrown at her. She knew she had abs, not rock hard, but there was some definition there. She knew she would feel comfortable in the crop top (which was actually just a fancy lace bralette) and matching shorts. It was placed with a peached coloured jacket - a thin material studded in large sequins - and a pair of black sneakers that were jazzed up with the same peach colour, but the sequins were extra small. She loved it, she knew that Chaeyoung had expected her to choose that outfit and so, just to mess with her she picked up the dress and turned on her heel towards her bedroom.
“Kyungri!” Chaeyoung called after her. Kyungri couldn’t help the giddy laugh that left her lips as Chaeyoung started chasing her.
“You’re too easy to wind up, Chaeyoung.” She told her once they had stopped running around. Kyungri handed the dress and heels over to the shorter girl with a teasing smile over her lips. Chaeyoung grumbled a little under her breath, making her look slightly younger than she was than how she acted. Kyungri was reminded that Chaeyoung had only just turned twenty the other month.
Kyungri returned to the living room to scoop up her outfit, and the two girls left Gongmyung to eat his pizza alone. Which wasn’t particularly unusual.
An hour and a half later, Chaeyoung was out of the shower and drying her hair out with a hairdryer as Kyungri nibbled on the last slice of her own pizza, still in her towel as she worked on Sam, her Samsung tablet. (Truthfully, she had been distracted by Twitter.) The two girls got dressed together, helping one another with small adjustments and styling choices. Chaeyoung helped Kyungri twist her long hair up into two twisted space buns, doing her makeup for her since Kyungri was kind of helpless. Kyungri had pulled a detailed braid through one side of Chaeyoung’s hair, decorating it with small metal loops and hair gems. By eight P.M they emerged from Kyungri’s bedroom, dressed to the nines and glowing. Gongmyung, who had seen them dressed up for club jobs before, let out a little wolf whistle as they came into view.
“Stunning, as always.” He complimented them. Kyungri gave him a small, yet confident, smile as Chaeyoung dipped down into a curtsey.
“Thank you, I know. I know.” She spoke in a fake posh accent, dramatically waving her hands around as if she were royalty. They all made their way to Gongmyung’s set up, waiting to get briefed.
“The club is called X-Clusive.” He began, sitting down in his chair. The two girls sat down together of one of Kyungri’s huge beanbag chairs, sharing a tablet to see what Gongmyung would be talking about. “The official job Kyungri’s on tonight is to figure out how one gets through all their security. There's a singular back door entrance under a set of seven different electronic locks. The bouncers are given a printed version of the guest list, which is very specific, so as a fall back you will both be on it as yourselves.
“However, for your second job tonight, you will be known as Park Hyeri and Lee Chanmi, two old college friends who reconnect after seeing each other at a fancy club. There is talk of a gun pass happening in the high levels of X-Clusive tonight. The gangs are unknown, but connections think NCT will be there. You are to observe and relay information. Do that by any means necessary, we don’t know who else we’ll be dealing with.” He finished.
Both girls nodded once in unison.
“Great. After that, you’re free to stay as long as you want and spend as much as you want. Stay alert, I want to be able to get to you if anything happens, got it?”
Again, the girl’s nodded, grinning at one another. Time to go clubbing.
#glitch#ateeztreasures#ateez#ateez fic#ateez au#ateez fanfic#ateez fiction#ateez fanfiction#ateez writing#ateez oneshot#ateez gang au#ateez imagine#ateez headcannon#ateez scenario#kpop#kpop au#kpop gang au#kpop fic#kpop fanfic#kpop fiction#kpop fanfiction#forms 9#lee chaeyoung
41 notes
·
View notes
Text
navigating Tumblr’s tag search woes: what I’ve figured out
This is troubleshooting, so it can be unfortunately a lot like “have you tried turning it off and on again”? Sometimes Tumblr lets posts that breaks these rules through. But if your post isn’t getting through, here’s some things to try.
If you make a post and it doesn’t show up in tag search:
If a multi-image post doesn’t show up in tag search, delete it and repost as a single image. Check to see if that single image shows up in tag search. If it does, try editing it to add the other images. If it still doesn’t, try another image from the set until you find one that gets through.
Check the tags for words that might be triggering filters. Lots of sex and violence related words trigger filters. Compound phrases like “hurt comfort” that are innocent can get caught up in these filters.
Remove ALL links from the main body of the post. If you need to add a single link, you can use the content source field (click the gear in the upper right).
Remove all tags and see if a single, known innocent tag gets through. If it does, add the tags back one at a time to see if one of them was triggering the filter.
Sometimes the filter doesn’t like very long tags, so if you like to make funny tags, Tumblr says: no having fun.
Tag search is important because it’s the #1 way that new people find your content. Tagging well significantly increases the reach of your content. The fewer followers you have, the more important it is to be findable in tag search.
114 notes
·
View notes
Text
Test test
Speak to your potential clients in a language they understand
Make your website multilingual in just a few simple steps.
Internet users browse and buy in their language. To get your business noticed, start by making your website available in your audience’s language. Website localization projects are not a costly and development-heavy project anymore — you can manage them all from one dashboard.
Auto content addAlways up-to-date
Changes in your content are detected and handled automatically. WOVN.io supports your evolving website.
Visual EditorTranslations in context
Edit all of your translations in context using the WOVN.io Visual Editor. Get it just right before publishing.
Auto translateNew content translated automatically
WOVN.io can automatically translate new content for you. This feature is especially useful if you often update your website and for dynamic content.
SEOSEO for your translated content
Make your content findable online, no matter the language. WOVN gives your translations the VIP treatment.
Any device
WOVN.io supports your users' mobile and tablet devices.
Dynamic content
Translate dynamic content on your website, from user comments to account pages.
CMS compatible
WOVN.io is compatible with your favorite CMS. Check out our wordpress plugin and other integration guides.
Meta/alt tag translation
<meta> and <alt> tags can be localized to improve SEO.
Full widget customization
Choose your widget from a range of colors, styles, and positions or use your own design.
Image translation
Change images by language for the best user experience.
Workflow labels
Organize and manage your project workflow using page labels.
Easy set-up
Compatible with any type of website.Get started easily and include your team in the project. If you need help with translations, we will connect you with the translators best suited for your needs.
Saas Compatible
WOVN.io plugs into SaaS websites you use everyday.
Cost and time
Less time and cost to get your website localized.Eliminate website development from your localization project and allocate those resources to other projects.
Low maintenance
All your content in one place.WOVN.io will automatically add changes on your website to your project, you can make in-context edits and check the result before publishing.
All you need, from one dashboard
Translating your website increases your visibility and enables you to reach a bigger audience. With WOVN.io's Library, your translated content will appear on search engines, such as Google or Bing, bringing more potential customers to your website.
0 notes
Text
How to Make A Thousand Training Videos for YouTube FAST (Customer Story)
At a glance
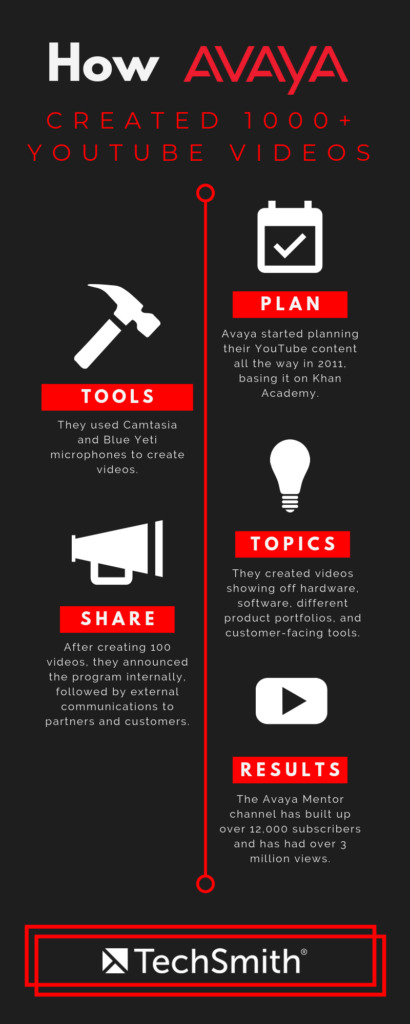
Avaya, a global provider of business collaboration and communications software and services, created a video library of resources for customers and employees.
Using Camtasia and Blue Yeti microphones, they produced 995 videos in the first 20 months and more since then.
Avaya’s video articles receive significantly more page views than their text-based articles.
About Avaya
Avaya is a global provider of business collaboration and communications software and services, providing unified communications, contact centers, networking, and related services to companies of all sizes around the world.
The Problem
Back in 2011, Carl Knerr was the Services Director at Avaya. He was tasked with creating and implementing a library of training videos for Avaya products and services.
The problem was that he was tasked with creating training videos and video tutorials in a very short amount of time. And he wasn’t a professional content creator or videographer.
Knerr was inspired by Khan Academy, the non-profit website with thousands of different types of videos for learning and education, but he wasn’t sure how he’d be able to pull off that sort of accomplishment.
Knerr and his team found themselves asking, “Wouldn’t Avaya employees and customers benefit from the company’s own Khan Academy?”
And Knerr’s challenge was bigger than making videos. He was challenged to make Avaya a successful organization that could create a buzz.
Avaya wanted to take the lead, and creating instructional videos for their customers and employees was how they were going to do it.
Using YouTube for training
Knerr then decided to put together a series of videos geared toward Avaya products and services. He limited the scope to basic how-to videos designed to help those that install, maintain, and support Avaya products, whether they were customers, partners, or Avaya employees.
These types of video lessons are traditionally created by instructional designers and can require a dedicated learning management system and special authoring tools.
Knerr proposed that unlike Avaya’s existing knowledge base, which is only available to Avaya customers with a maintenance agreement, the vast majority of videos would be available for free on YouTube’s video platform.
“PERHAPS THE MOST INTERESTING METRIC IS THAT WE ARE SEEING SIGNIFICANTLY MORE VIEWS PER [VIDEO] ARTICLE THAN AVAYA’S TEXT-BASED ARTICLES,”
Carl Knerr
This would allow search engines like Google would be aware of the content, making it much easier for someone to find the answer to an Avaya-related question.
This is an important step to think about as you create your online training content. Because if someone can’t find your video, it can’t be helpful.
Tips for creating “findable” videos
The following tips will help you optimize your YouTube videos and make sure your users can easily find the right content.
Write a clear video title: Your title should clearly state the problem that your video is solving, how it is presented, and the product it applies to.
Create a detailed description: Craft a description that carefully outlines the content and key learning points of your video.
Conduct keyword research: Incorporate alternative terms and wordings into your description and video tags.
Tag your video: Pick your target keyword as a tag, and then choose other tags related to your primary keyword.
Add captions: Captions will make your content more accessible, and they are additionally used by video sites like YouTube for content-indexing to improve search results.
Avaya used Camtasia and Blue Yeti microphones to create their Youtube training videos.
How Avaya makes training videos for YouTube
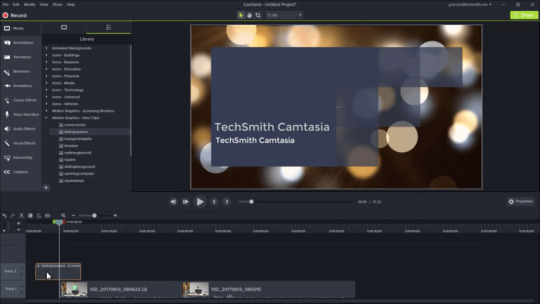
Knerr’s team evaluated a number of video production software suites and settled on Camtasia, the screen-recording and video editing tool from TechSmith. With Camtasia, the team could use templates, splice in video and audio, as well as special editing features to highlight or zoom to certain parts of the screen. The team also purchased high-quality microphones called the Blue Yeti.
Knerr felt it was important to maintain a common look and feel to the videos, so the team built a template for Camtasia with legal and branding-approved intros and outros while standardizing other aspects like transitions and video length.
Once the team started creating consistent, high-quality content, the Avaya branding team gave Knerr the freedom to publish to YouTube without further oversight.
How Avaya maintained quality control and scaled their videos
To reduce the number of errors made by video authors, Knerr frequently shared a list of common problems he encountered during a review.
Common errors included background noise or odd transitions within videos. While this was often a pain, viewers noticed and complimented Knerr’s team on the quality of their videos.
After six months, Knerr transferred the approval process to one of the team’s top video authors, Bhavya Reddy.
After a year of approving videos within the team, Knerr and Reddy transitioned the approval process to the company’s formal knowledge management team where it could be better integrated into the other knowledge management processes.
This also ensured that any videos the team published to YouTube would also be available in the standard knowledge database at support.avaya.com.
Customers, employees, and partners watched more than 1,200 hours of Avaya Mentor videos per month, which equates to about 11 full-time support employees.
How Avaya spread the word about their content
“Building a knowledge base, or any tools, is pointless if you can’t get user adoption,” said Knerr. “I felt it important to delay the initial announcement until we had the first 100 videos published. I was concerned if someone came to the site and only saw 5 videos, they might never return.”
Once the team reached 100 videos, Knerr had the President of Services announce the program internally, followed by similar announcements in external communications to Avaya partners and customers.
To reinforce this in a more detailed way, Knerr wrote a blog post for the Avaya corporate site and created a Twitter account for Avaya Mentor, allowing people to receive tweets when new videos are uploaded.
At the next International Avaya Users Group Conference (IAUG), Knerr and his team passed out materials to all the customers and partners they met. The IAUG even helped with advertising on all the plasma screens throughout the conference center.
Knerr has also partnered with the Avaya product documentation teams to include references to the Avaya Mentor program directly in the user documentation.
The Results
After 20 months, Knerr and his team published nearly 1,000 videos on YouTube which were watched more than 350,000 times.
youtube
While the U.S. provides the largest set of viewers, Knerr happily notes that the Avaya Mentor program reaches 196 distinct geographies. Additionally, customers, employees, and partners watched more than 1,200 hours of Avaya Mentor videos per month, which equates to about 11 full-time support employees.
“Perhaps the most interesting metric is that we are seeing significantly more views per article than Avaya’s text-based articles,” said Knerr. “This is not an apples-to-apples comparison given that we used some of the company’s most knowledgeable resources and posted our content publicly. However, I still think it is clear that video-enabled content is much more compelling than text alone.”
Since 2011, Avaya has created over 1000 videos and the Avaya Mentor channel has built up over 12,000 subscribers and has had over 3 million views.
Want to make instructional videos for YouTube?
If you’re interested in learning more about creating your own videos for YouTube, we have two helpful guides that will walk you through the entire process.

The Ultimate Guide to Easily Make Instructional Videos

How to Make a YouTube Video: The Definitive Guide
If you’re ready to dive and try to make a video, you can also download a completely free trial of Camtasia, and give it a shot for yourself.
If you ever need help along the way you can always find us on Twitter, Facebook, and YouTube.
The post How to Make A Thousand Training Videos for YouTube FAST (Customer Story) appeared first on Welcome to the TechSmith Blog.
https://www.techsmith.com/blog/training-videos-youtube-customer-story/
0 notes
Text
6 Best Practices to Optimize Your WordPress Database
Your WordPress site can be slow for many different reasons; a bloated database running in the background is one of them. A professional WordPress maintenance workflow includes a regular database optimization practice during which you get rid of unnecessary data and locate and fix errors and inconsistencies in your database.
WordPress database optimization doesn’t require any specific programming knowledge, although you occasionally need to edit the wp-config file. In this article, we will show you a couple of best practices about how to optimize your WordPress database.
Start with a Backup
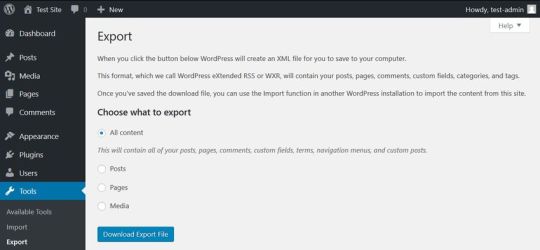
Before getting started with optimization, create a backup of your database. In this way, if anything goes wrong, you won’t lose any data and can return to a previous version of your site. There are different solutions to back up a WordPress site, here are the most important ones:
you can create a full site backup from the cPanel of your hosting account,
you can export all your content including your posts, pages, comments, and other post types from the Tools > Export menu in your WordPress admin area,
you can use a backup plugin such as BackupBuddy or VaultPress that allows you to create different kinds of custom backups.
Delete the Content You Don’t Need
One of the most important things of database optimization is to get rid of all the overhead content you don’t need. As each post, page, comment, and post revision is an entry in your database, you can free up a lot of space by deleting unused, obsolete, or duplicate content right from your WordPress admin area.
If you have a WordPress site for a while, you can find such content in many different places. First and foremost, it’s worth deleting the Trash folder of your Posts and Pages menus (even if WordPress automatically deletes posts from the trash after 30 days). You can also go through your Drafts and Pending posts to see if you really need all of them.
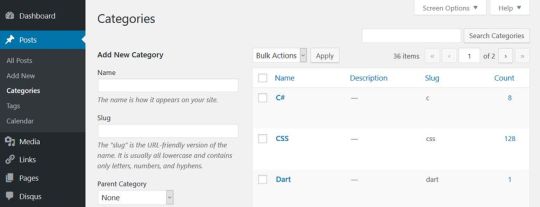
You can also check if you have any taxonomies you don’t use. WordPress has two kinds of taxonomies by default: posts and categories. You can find both of them in the Posts menu. Database optimization is also a good opportunity to think through your taxonomy structure, get rid of duplicate tags and categories, and improve the findability of your posts.

Besides default posts and pages, you can also have custom post types such as calendars, recipes, or affiliate links that include content you don’t need anymore.
Remove Themes and Plugins You Don’t Use
Although WordPress saves themes and plugins into the wp-content folder instead of the database, it’s still a good idea to delete the ones you don’t use. Many plugins and some of the more complicated themes create extra tables inside your database. Besides, all plugins and themes store their options in the wp-options table as well.
Plugins and themes developed following WordPress’ coding standards clean up after themselves when you remove them from your site. In this case, you only need to delete them from the WordPress admin area using the Appearance and Plugins menu. Note that it’s not enough to only deactivate them, you also need to hit the Delete button. If your plugin doesn’t clean up after itself, you can still get rid of the related database overhead using one of the methods below.
Optimize Your Tables in phpMyAdmin
You can run a database optimization query right from your phpMyAdmin interface. PhpMyAdmin is the application that allows you to access your raw database. You can reach phpMyAdmin from the cPanel of your hosting account, from the Databases menu.
In phpMyAdmin, open the database belonging to your WordPress site and check the tables you want to optimize. You can also choose the Check All option, as you can see on the image below:

Here, scroll down the dropdown list (with the “With selected: “ label) you can find below the tables. From the Table maintenance group, select the Optimize table option and run the query.
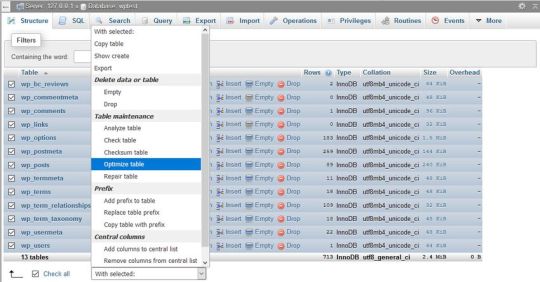
The Optimize table option runs the OPTIMIZE TABLE command on your data, which, according to the MySQL documentation:
“reorganizes the physical storage of table data and associated index data, to reduce storage space and improve I/O efficiency when accessing the table.”
Besides OPTIMIZE TABLE, you can also run the REPAIR TABLE query from the same phpMyAdmin menu, which “repairs a possibly corrupted table”.
Run WordPress’ Database Optimization Tool
The WordPress Core also has a built-in database optimization tool. It’s turned off by default, however, you can activate it by editing your wp-config.php file. You can find wp-config in the root directory of your WordPress install on your server. Open it in your code editor and add the following option to the top of the file:
define( 'WP_ALLOW_REPAIR', true );
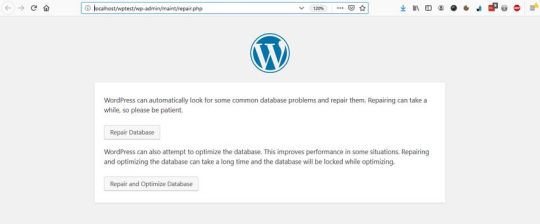
You can find the optimization script under the https://ift.tt/2DdDCih URL, where you need to replace your-site.com with your own domain.

Here, you can choose from two options:
Repair Database – it looks for and repairs common database problems,
Repair and Optimize Database – besides all the tasks performed by Repair Database, it also tries to optimize your database to improve performance.
In most cases, the first option is enough, but if you want an in-depth cleanup, choose the second one. Wait until the tool repairs and/or optimizes your database, then remove the option you have added to your wp-config file (otherwise, anyone on the web can see data related to your database).

Use a Database Cleanup Plugin
If you don’t want (or can’t) access your raw database and your wp-config file, or you want to run advanced database optimization tasks, you can also put a plugin into use. Below, we have collected the three best database cleanup plugins for you.
Note that you shouldn’t use more than one database optimization plugins at the same time, as these plugins have similar functionalities that can interact with each other in unexpected ways.
1. WP-Optimize

WP-Optimize is a free plugin that takes care of all kinds of optimizations on your WordPress site. Besides cleaning your database, it also compresses your images and caches the content on your site. Its database cleanup feature:
removes all unnecessary data, even expired transients hidden in the wp-options table,
optimizes all your MySQL tables,
lets you run regular automatic cleanups,
shows database statistics,
and more.
The plugin is frequently updated and the support team is responsive, so it’s a good and safe solution if you want to run automated cleanups on a regular basis.
2. Advanced Database Cleaner

Advanced Database Cleaner is another free database optimization plugin that comes with many advanced options. It allows you to remove all kinds of unused, obsolete, and duplicate content types, such as:
old revisions, drafts, and auto-drafts of posts, pages, and custom post types,
pending, spam, and trash comments,
orphan metadata and relationships,
expired transients,
and more.
You can also schedule and run automatic cleanups, view and clean tables, and display and view items before removing them. Besides, Advanced Database Cleaner supports multisite installs, too.
3. Optimize Database after Deleting Revisions

Optimize Database after Deleting Revisions is a database optimization plugin that lets you clean up your database with one single click. If you need a simple solution that doesn’t need much configuration, Optimize Database after Deleting Revisions can be the best choice for you. With this plugin, you can remove:
revisions of posts, pages, and custom post types,
trashed posts, pages, and comments (also spam comments),
orphan postmeta items,
unused tags,
expired or all transients,
pingback and trackbacks,
and more.
It also supports WordPress Multisite and adds an “Optimize DB” link to your admin bar with which you can run a one-click database optimization any time you want.
Conclusion
Database optimization is an essential task you need to perform regularly if you want to maintain good data health on your site. You can either do the optimization manually or make use of a data cleanup plugin that lets you configure and automate the entire process.
Besides, database optimization is also a typical maintenance service you can offer to your clients if you have a WordPress business. If you want to know more about what else to pay attention to when working with clients, have a look at our guide about what your clients need to know about their WordPress site, too.
6 Best Practices to Optimize Your WordPress Database published first on http://7elementswd.tumblr.com/
0 notes
Text
6 Best Practices to Optimize Your WordPress Database
Your WordPress site can be slow for many different reasons; a bloated database running in the background is one of them. A professional WordPress maintenance workflow includes a regular database optimization practice during which you get rid of unnecessary data and locate and fix errors and inconsistencies in your database.
WordPress database optimization doesn’t require any specific programming knowledge, although you occasionally need to edit the wp-config file. In this article, we will show you a couple of best practices about how to optimize your WordPress database.
Start with a Backup
Before getting started with optimization, create a backup of your database. In this way, if anything goes wrong, you won’t lose any data and can return to a previous version of your site. There are different solutions to back up a WordPress site, here are the most important ones:
you can create a full site backup from the cPanel of your hosting account,
you can export all your content including your posts, pages, comments, and other post types from the Tools > Export menu in your WordPress admin area,
you can use a backup plugin such as BackupBuddy or VaultPress that allows you to create different kinds of custom backups.

Delete the Content You Don’t Need
One of the most important things of database optimization is to get rid of all the overhead content you don’t need. As each post, page, comment, and post revision is an entry in your database, you can free up a lot of space by deleting unused, obsolete, or duplicate content right from your WordPress admin area.
If you have a WordPress site for a while, you can find such content in many different places. First and foremost, it’s worth deleting the Trash folder of your Posts and Pages menus (even if WordPress automatically deletes posts from the trash after 30 days). You can also go through your Drafts and Pending posts to see if you really need all of them.
You can also check if you have any taxonomies you don’t use. WordPress has two kinds of taxonomies by default: posts and categories. You can find both of them in the Posts menu. Database optimization is also a good opportunity to think through your taxonomy structure, get rid of duplicate tags and categories, and improve the findability of your posts.
Besides default posts and pages, you can also have custom post types such as calendars, recipes, or affiliate links that include content you don’t need anymore.
Remove Themes and Plugins You Don’t Use
Although WordPress saves themes and plugins into the wp-content folder instead of the database, it’s still a good idea to delete the ones you don’t use. Many plugins and some of the more complicated themes create extra tables inside your database. Besides, all plugins and themes store their options in the wp-options table as well.
Plugins and themes developed following WordPress’ coding standards clean up after themselves when you remove them from your site. In this case, you only need to delete them from the WordPress admin area using the Appearance and Plugins menu. Note that it’s not enough to only deactivate them, you also need to hit the Delete button. If your plugin doesn’t clean up after itself, you can still get rid of the related database overhead using one of the methods below.
Optimize Your Tables in phpMyAdmin
You can run a database optimization query right from your phpMyAdmin interface. PhpMyAdmin is the application that allows you to access your raw database. You can reach phpMyAdmin from the cPanel of your hosting account, from the Databases menu.
In phpMyAdmin, open the database belonging to your WordPress site and check the tables you want to optimize. You can also choose the Check All option, as you can see on the image below:
Here, scroll down the dropdown list (with the “With selected: “ label) you can find below the tables. From the Table maintenance group, select the Optimize table option and run the query.

The Optimize table option runs the OPTIMIZE TABLE command on your data, which, according to the MySQL documentation:
“reorganizes the physical storage of table data and associated index data, to reduce storage space and improve I/O efficiency when accessing the table.”
Besides OPTIMIZE TABLE, you can also run the REPAIR TABLE query from the same phpMyAdmin menu, which “repairs a possibly corrupted table”.
Run WordPress’ Database Optimization Tool
The WordPress Core also has a built-in database optimization tool. It’s turned off by default, however, you can activate it by editing your wp-config.php file. You can find wp-config in the root directory of your WordPress install on your server. Open it in your code editor and add the following option to the top of the file:
define( 'WP_ALLOW_REPAIR', true );
You can find the optimization script under the https://ift.tt/2DdDCih URL, where you need to replace your-site.com with your own domain.
Here, you can choose from two options:
Repair Database – it looks for and repairs common database problems,
Repair and Optimize Database – besides all the tasks performed by Repair Database, it also tries to optimize your database to improve performance.
In most cases, the first option is enough, but if you want an in-depth cleanup, choose the second one. Wait until the tool repairs and/or optimizes your database, then remove the option you have added to your wp-config file (otherwise, anyone on the web can see data related to your database).

Use a Database Cleanup Plugin
If you don’t want (or can’t) access your raw database and your wp-config file, or you want to run advanced database optimization tasks, you can also put a plugin into use. Below, we have collected the three best database cleanup plugins for you.
Note that you shouldn’t use more than one database optimization plugins at the same time, as these plugins have similar functionalities that can interact with each other in unexpected ways.
1. WP-Optimize

WP-Optimize is a free plugin that takes care of all kinds of optimizations on your WordPress site. Besides cleaning your database, it also compresses your images and caches the content on your site. Its database cleanup feature:
removes all unnecessary data, even expired transients hidden in the wp-options table,
optimizes all your MySQL tables,
lets you run regular automatic cleanups,
shows database statistics,
and more.
The plugin is frequently updated and the support team is responsive, so it’s a good and safe solution if you want to run automated cleanups on a regular basis.
2. Advanced Database Cleaner

Advanced Database Cleaner is another free database optimization plugin that comes with many advanced options. It allows you to remove all kinds of unused, obsolete, and duplicate content types, such as:
old revisions, drafts, and auto-drafts of posts, pages, and custom post types,
pending, spam, and trash comments,
orphan metadata and relationships,
expired transients,
and more.
You can also schedule and run automatic cleanups, view and clean tables, and display and view items before removing them. Besides, Advanced Database Cleaner supports multisite installs, too.
3. Optimize Database after Deleting Revisions

Optimize Database after Deleting Revisions is a database optimization plugin that lets you clean up your database with one single click. If you need a simple solution that doesn’t need much configuration, Optimize Database after Deleting Revisions can be the best choice for you. With this plugin, you can remove:
revisions of posts, pages, and custom post types,
trashed posts, pages, and comments (also spam comments),
orphan postmeta items,
unused tags,
expired or all transients,
pingback and trackbacks,
and more.
It also supports WordPress Multisite and adds an “Optimize DB” link to your admin bar with which you can run a one-click database optimization any time you want.
Conclusion
Database optimization is an essential task you need to perform regularly if you want to maintain good data health on your site. You can either do the optimization manually or make use of a data cleanup plugin that lets you configure and automate the entire process.
Besides, database optimization is also a typical maintenance service you can offer to your clients if you have a WordPress business. If you want to know more about what else to pay attention to when working with clients, have a look at our guide about what your clients need to know about their WordPress site, too.
6 Best Practices to Optimize Your WordPress Database published first on https://deskbysnafu.tumblr.com/
0 notes
Text
How to get your YouTube videos appear in Google’s video carousel
30-second summary:
Google is giving a lot of visibility to video content through its interactive SERP section called a “video carousel”.
Getting your video ranked in Google’s “video carousels” can drive lots of views to your channel but it will also allow you to control more elements in your target SERPs.
Ranking in Google’s video carousel is quite doable and doesn’t require months of work or waiting. All you need is keyword research and video page optimization.
YouTube is one of the most popular social media networks out there allowing brands to get discovered by their customers. While creating a popular YouTube channel takes time and a lot of effort, it is well worth it. One piece of a puzzle many YouTube creators are missing is optimizing your videos for organic discoverability through Google’s video carousel.
Here’s a comprehensive guide that looks into all the elements that you can capture to win your spot in Google’s top SERP real estate.
What are YouTube video carousels?
Google offers a huge deal of organic visibility to YouTube videos through so-called video carousels, that is, interactive boxes featuring videos relating to the target search query:
Source: Google as of August 2020
There’s even more organic visibility for videos in mobile search results where videos carousels take almost the whole screen:
Source: Google as of August 2020
Whenever my video starts ranking in Google organic, it brings in lots of well-engaged views, especially as compared to other videos, even for very new/inactive channels:
Source: YouTube as of August 2020
But this strategy is not only helpful for driving views to your own channel. It is also a good way to better control your target Google SERPs.
There’s no denying a fact that videos are highly engaging and convert well, and we are pretty sure that visuals (in this case video thumbnails) may be stealing a lot of attention from Google’s organic results (in fact, there’s a real science behind the visual impact on consumers’ behavior), so ranking your video there will help you drive more exposure for your brand.
The good news, YouTube SEO takes less time than traditional SEO does. I have seen my videos ranking in Google within a week after I upload them to YouTube! So this is a pretty fast way to boost your channel views by ranking your videos in Google’s video carousel.
Craft a detailed and factual title
Your video page title is what you type in the “title” field when uploading your video:
For SEO purposes (which implies organic search visibility), the title of the page is the most important on-page element, so treat it with care.
Optimizing a page title is always about maintaining a fine balance: You want it to be creative and original enough to get clicks while still being able to add some searchable keywords.
You can only make your title 100 characters long max which is not much!
Here are a few suggestions for you:
Always include a searchable keyword (here’s a quick guide on identifying one)
If your video includes entities (names, places, events, brands, products, etc), include those in the video title
Titles that include numbers generally get more clicks, so experiment with adding numbers to your video title
Titles that are worded as questions may spur curiosity and get more clicks
How-to titles always perform well for guides and instructions
Tip: Create videos around your target queries
You can go the other way around: Instead of trying to find a searchable keyword for your video idea, you can create videos around keywords you already know are popular with Google’s users.
You can easily do that with tools like Placeit that allows you to turn text content into the video format:
Screenshot source: Placeit as of August 2020
Placeit doesn’t require subscription payment, plus it offers free templates which makes it the most affordable video creation solution on the market.
The way it could work:
Grab any article from your site that received Google traffic
Use Google Search Console to find which search queries exactly drive clicks to your page
Create videos around those queries (using your existing article)
Another way to find opportunities to get your video visible on Google’s video carousel is by using Ahrefs:
Run your domain in Ahrefs and click to “Organic keywords”
Click the filter called “SERP features” and check “Videos”
Here you go. There are all keywords your site is ranking for in Google and those are also search queries showing video carousels.
Source: Ahrefs as of August 2020
Ahrefs is my preferred SERP analytics tool due to its usability but of course, there are many more cool tools that can help you with this task.
Create a longer description
While for the video titles, we don’t have too many characters to work with, the video description field allows more characters than enough, so take the full advantage of those.
The video description field allows creators to put up to 5000 characters. It is important to create more detailed description for your video because search engines still rely on text content to index and rank your video.
Here are a few ideas on creating a more detailed and high-ranking video description:
1. Create your script
If you are uploading a video interview, a webinar, or conference coverage, chances are you have more than enough text spoken to create a detailed description.
Fiverr is full of gigs offering you to transcribe a video and turn it into text, so it is a pretty easy way to create the text version of any video:
Source: Fiverr as of August 2020
2. Use semantic analysis
I turn to semantic analysis at any time I am writing content. It always helps me discover more topics to cover and identify more questions to answer.
Text Optimizer is an easy and effective semantic research tool that analyzes Google’s search snippets to identify underlying concepts which will make your content more relevant to your target topic:
Source: Text Optimizer as of August 2020
I don’t think I know an alternative to Text Optimizer for creating an optimized context so easily, but here’s more on semantic analysis and why it is useful.
3. Create a time-stamped video outline
Don’t miss this step! YouTube allows you to add clickable timestamps that take viewers deeper into your video to where you discuss that subtopic.
Here’s a detailed tutorial on creating YouTube timestamps:
Play your video up to the point where it starts discussing a new topic
Pause your video at the point you want to timestamp
Type the time exactly as you see in the video player into the video description field.
Source: YouTube as of August 2020
This clickable video outline in the video description will drive people deep into the video, so you will see more engagements.
On top of that, your video may enjoy even more exposure in search, because Google sometimes grabs that outline to show right inside search results:
Source: Google as of August 2020. (Google giving extra visibility to a video by showing its clickable outline right inside search results)
Add more tags and a few hashtags
YouTube tagging is still a good way to categorize your video the right way. They help search engines to better understand what it is your video is about and rank it accordingly.
You can up to 500-character worth of tags for each of your videos, and there’s no reason saving on those characters. Feel free to use all of them.
Hashtags were introduced not so long ago, and creators still confuse the two, so to help you out, here’s a quick list of how they work and:
YouTube tags YouTube hashtags Where to enter Separate the “Tags” field on the video edit page Anywhere in the video description Has limits Max 500 characters Max 15 hashtags Have the hash/pound symbol # No Yes Is visible on the public video pages No Yes Helps make the video more findable Yes Yes
While tags are mostly for YouTube search rankings, hashtags appear as a visible part of the page, so they send some relevancy signals to search engines:
Source: YouTube as of August 2020. (Enter hashtags into the description area and tags in the separate “Tags” field)
If you need help brainstorming more tags for your video, try Rapidtags.io which generates tags:
Source: Rapidtags.io as of August 2020
Create an eye-catching video thumbnail
A video thumbnail is what shows up in Google’s video carousel, so it will directly impact your click-through. This makes your video thumbnail one of the major assets for your video:
Source: YouTube as of August 2020
Luckily creating an eye-catching and, more importantly, click-inviting video thumbnail is not difficult. There are tools to create one for free, as well as cool templates to come up with your own unique recognizable style:
Conclusion
YouTube video optimization strategy is very much like any SEO strategy: You need to create a lot of relevant context for search engines to be able to understand and correctly classify your video. To optimize your YouTube video page:
Craft an attention-grabbing title which would include your target keyword
Write a detailed, semantically optimized video description (and include clickable video outline for viewers and search engines to easily access the part they are most interested in)
Add tags and hashtags to make your video even more findable
Finally, links play a huge part in organic visibility, so make sure to link to your videos from your own site. This includes both embedding your videos and linking to them directly.
Ann Smarty is the Brand and Community manager at InternetMarketingNinjas.com. She can be found on Twitter @seosmarty.
The post How to get your YouTube videos appear in Google’s video carousel appeared first on Search Engine Watch.
from Digital Marketing News https://www.searchenginewatch.com/2020/09/11/how-to-get-your-youtube-videos-appear-in-googles-video-carousel/
0 notes
Text
Tackling ECommerce SEO: A Guide For Beginners On The Basics

Any online business owner wants to get as much high-quality (and free) traffic to their website and eCommerce shop as possible. Why? The more traffic there is the higher the likelihood of greater transactions and more user engagement. With higher sales margins comes the ability to invest in more advertising, better products, and tools that will support scalability. However, getting more high-quality traffic to your online business requires you to use on-site search engine optimization, which for many, can be confusing with its technical jargon, constant updates, and ever-changing tactics. This beginners guide will prime you on the basics of getting started, taking you through the major areas of on-site search engine optimization which are keyword research, site structure, and on-page SEO.
First Off, What Is SEO & Why Is It Important for eCommerce Businesses?
Search engine optimization is the process of generating free, natural, and organic traffic from search engine websites like Bing, Google, and Yahoo by making your website or eCommerce store more visible within the search engine results pages (SERPs). When people search for products or services through Google, Yahoo, and Bing, the results that pop up on the first page are the ones you want to be ranking at. In order to get yourself on the front page of these search engines, you have to engage in search engine optimization, which involves optimizing your product descriptions, headlines, internal link structure, user experience, meta-data, and navigation structure. This also includes optimizing your static pages like your homepage, about page, help centre, blog articles, FAQ section, and contact page. To optimize your static pages, you want to use long-tail keywords and semantic keywords.
Why Is SEO Important for eCommerce Exactly?
When a consumer needs a product or service, unless they already know exactly where they are going to buy it from, the chances are that they are going to perform a search engine search. The reason for this is that they are looking for information to help them make an informed decision on what service or product to buy, which includes looking for comparisons, tips, and the best options that are out there. When your website doesn’t appear in their search engine results, you lose critical access to potential eCommerce customers because your services or products aren’t “findable” or rather, not on the first three pages of results. SEO provides you with a way to reach your targeted audience, by helping you rank higher on the Google search results with the search terms your potential customers are using.
Understanding Keyword Research as Step One of the SEO Journey
The first step to understanding how search engine optimization works, is in knowing the value that high-quality keywords offer you. The first step to this is figuring out what search terms your potential customers are using, which is done through keyword research. As an eCommerce business, you are going to want to rank for commercial keywords that show buying intent (transactional searches) rather than informational keywords which are used on content-heavy websites like blogs. There are two categories of commercial intent keywords, which are “Buy Now” and “Product” related. Examples include the following:
Buy Now: Buy, discounts, deals, coupons, free shipping. Generally, these keywords are going to be the first word in the phrase that is being used. They are a strong signal that the individual wants to make a transaction immediately.
Product-Related: Branded searches, specific product searches, affordable, cheapest, best, comparison, review, top, product categories like beach accessories or dog collars. All of these tend to lead to specific product searches.
How to Go About Keyword Research?
There are a few ways and tools that you can use to find keywords that match your eCommerce business.
1. Use Google & Amazon Suggest Tool: If you already have a few keywords in mind, you can use Google or Amazon’s related searches to find additional keywords.
1.1 To do this, head on over to Google, type in a keyword that is associated with your eCommerce business-like “Dog Collars” or “rouge lipstick” and hit enter. Down at the bottom of the page, you will see search terms that are related to your search query. These can give you some fantastic keyword ideas that you may not have thought of.
1.2 On Amazon, type in a keyword that is associated with your eCommerce business in the search bar (make sure it is set to ALL) and do not hit enter. Take a look at the drop-down menu that pops up when you type your keyword in. These search terms are going to be product-focused (since you are on Amazon) and are going to be long-tail keywords. Long-tail keywords are good because they are more specific which means they have less competition and higher conversion rates.
1.3 A second way you can find keywords on Amazon is by going to the product category that you sell and taking a look at all of the ways that they sort a particular product. For instance, books can be sorted by theme, characters, format, and genre. You can mix and match these filter categories to get new keyword ideas.
2. Use a Keyword Research Tool: A keyword research tool will allow you to either input in a competitor’s website and show you which keywords they are ranking for or allow you to put in keyword ideas and give you similar results. When you use these types of tools, make sure you find unique keywords and pay attention to the keyword volume, keyword competition, and keyword traffic.
Once you have a list of potential keywords figured out, you have to choose which ones to use. Here is how to choose the right keywords for your eCommerce business.
Always look for keywords that have higher search volumes. These have higher organic traffic, which means they are being searched a lot.
Take a look at the competition percentage. The lower the competition, the more likely it is that you will be able to rank for it. A higher competition percentage means that more people are trying to rank for that particular keyword. You want high volume keywords with low competition.
Make sure you choose keywords that are relevant to your products.
Always pick keywords that have commercial intent. For instance, someone searching for size small dog collar blue is better than dog collar trends as the first one shows buying intent and the second one shows informational intent.
Organizing Your Website Structure for Ecommerce is Step Two in the Journey.
How your eCommerce website is structured will have an impact on your search engine rank. This is because it impacts your user experience and dictates whether someone can actually find what they are searching for within your site. With eCommerce websites, the more products & categories that you add and remove, the more complex the structure gets. You want to go for simplicity. Visitors need to be able to get to what they want within a few clicks without having to make multiple passes through your navigation system. So, there are two rules to follow.
Make your site structure simple and scalable.
Every page is a few clicks away from the homepage as possible.
Why? Your homepage has the most link authority. To figure out which pages should be indexed in which order, use the supply and demand principle. If your audience is using search terms or queries that directly relate to the faceted page, index it. If the search volume for specific queries is enough to compensate for the indexation effort, then index it. If there is enough relevant products, services, and offerings on the page for a targeted keyword, description, or query, then index it. The rest don’t bother indexing them.
Using On-Page SEO to Optimize for Keywords is the Third Step in the Journey.
Now that your site is structured properly and you have done your keyword research and selection, you now need to optimize the pages so that they are grabbed and seen by search engines. To do this, you need to do on-page SEO which will encourage people to click on your search engine result through to your website. What does this involve?
You need to edit all of the title tags and meta descriptions to include your keywords.
You will need to edit the alt text for your images to include your keywords.
You will need to edit the file names (of all uploads) to include your keywords.
The URLs for your blog posts, products, collections, and pages need to include keywords.
You can do all of this editing in the back end of your eCommerce website. A few things to keep in mind include, matching your URL to the page title as closely as possible, removing the use of stop words, as well as, using short URLs over long ones (below 50-60 characters). Do not keyword stuff your content as this will make your website look spammy and people will not click through as a result.
On pages that have little to no written content, use long and in-depth product descriptions to fill the space and make sure to include keywords within those descriptions. Finally, don’t forget to include secondary keywords that describe your products. For instance, if you are selling glass jars, make sure to include how many ounces it is! These are strong, short, and easily searchable identifying keywords that are common elements of search queries and must be included.
If you really want to hire professional SEO Experts for your eCommerce shopping Websites, or want to know more about tackling e-Commerce, then feel free to contact [email protected]
0 notes
Text
Titles and meta variables in Yoast SEO
Variables have become a staple of Yoast SEO. Variables make it possible to automate certain processes on your site. They also make it easy to change large batches of meta descriptions for instance, since you only have to change the structure of the variable – the site fills in the data automatically. Here, we’ll take a closer look at the Titles and Meta variables in Yoast SEO.
Optimize your site for search & social media and keep it optimized with Yoast SEO Premium »
$89 - Buy now »
Info What is a variable?
First things first: a variable is a name or a symbol that stands for a value. For instance, Yoast SEO uses the variable %%sitename%% to get the site name from the site itself. This way, you, as a user, don’t have to type in this information by hand. Now, when the name of the site changes, the variable automatically gets the new name from the site. If you had this hard-coded in your site, you’d have to change everything manually – everywhere. Consider doing this on hundreds of pages and you’ll start to see how powerful variables are.
How does Yoast SEO use variables?
Yoast SEO uses variables to give you the freedom and flexibility you need when working on your SEO. It makes it much easier to find a common ground for your text fields. What’s more, if you ever need to change something, variables let you do this as quickly as possible.
You can only find the relevant options in the Titles and Metas section of the Yoast SEO plugin if you activate the advanced settings. There you’ll find loads of options for setting variables to automate your SEO efforts. The full list of variables is listed on the HELP tab of the plugin. Just go to SEO → Titles & Metas and click the help tab in the top right. You can also check our knowledge base article on Titles and Metas variables.
You are free to change any of the settings as you see fit, but remember, the default settings are almost always a great fit for any site. That being said, you can set variables for:
The homepage
Site title
Posts
Pages
Media
Custom types
Categories
Tags
Archives
How to set variables in Yoast SEO
You can use variables in a multitude of ways. Most site-owners only use the most basic ones, while someone more at home in SEO might use the advanced ones. There are even variables for use with WooCommerce, so you can automatically extract product information from your store to use in the metadata. In this post, we’ll keep it simple and give a small example. Let’s look at the different variables that you can use to determine the title of a post on a site.
* Open the Yoast SEO advanced settings and go to Titles and Metas.
* Go to the Post section and find the Title template field.
* The field is prepopulated, but you can change it to whatever you want.
* If you need the list of supported variables, click on Help Center.
Snippet editor
If you want, you can edit the SEO title per post in the snippet editor of Yoast SEO. There, you’ll find the title according to the variables you’ve chosen. In addition, you also get the option to override that title with a custom-made variant if you think that’ll attract more clicks in the search engines.
The default title variable string is:
%%title%% %%page%% %%sep%% %%sitename%%
Which, for the post you are now reading, leads to:
These variables combined form the SEO title of the post. In this string, the title takes the title of the post, adds a page number if any (f.i. page 3 of 4), the separator symbol you picked and the site name of the site it’s posted on. You could add lots of other variables in there, but remember, you’re working with limited space for the snippets. If you’d add a %%category%% for instance, the title would become too long and Google would cut it off. Try to find a middle ground between readability, findability and branding. Yes, your branding is important, so don’t omit %%sitename%%.
Using variables for SEO
Yoast SEO supports a wide range of variables and they can be used for almost any situation. You should, however, always ask yourself if the change you want to make improves your metadata. If not, why not let the default settings do their work? Experienced SEOs will enjoy using the advanced variables and online store owners can make use of the extra WooCommerce variables. For the rest of you? Don’t overdo it.
Read more: ‘Why every website needs Yoast SEO’ »
http://ift.tt/2fnqvkO
0 notes
Last Seen Blogs

idiotsnake
skylar

casey-paige
( the rest is still unwritten )

tsubasale
夢の底でもがくのなら

peachesandcreames
Morning Glory & Afternoon Delight

ohyay-bpd
oh yay... bpd ://