#i tried to read the tou of all of the cc but i may have missed some and i apologize if i did!
Text


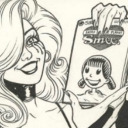
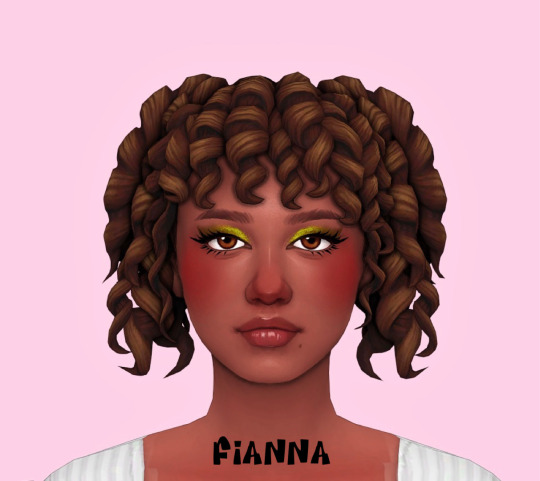
SIM DUMP #1
from left to right: alex, norah, alysia, sade
hair, genetics, makeup, & tray files included
download: sfs
tou: please do not change their genetics if you're going to post them. you may use them as a base for personal gameplay. tag me if you use them!! i'd love to see them in action.
#ts4#sim dump#simblr#sims 4#ts4 edit#ts4 gameplay#the sims#sims 4 edit#ts4 pictures#the sims 4#ts4 sim dump#i hope you all love them as much as i do#MWAH#if the files are too big you can leave out anything from the sliders folder or the adult clothes folder#a few of them may have an outfit but a lot of my adult clothes are merged and i didn't want to include the giant merged file LOL#i tried to read the tou of all of the cc but i may have missed some and i apologize if i did!#my dwnlds
39 notes
·
View notes
Text


DL (mediafire)
Today I bring you not cc, but a small collection of .blend files for making cc a little easier. If you've ever wanted to quickly put a braid into a custom hair without completely obliterating your poly count*, then these might be able to help.
*braids will still add a LOT of polygons to your hair, but since every single polygon is visible** on these tiling braids, at least you know they're all being put to use, whereas if you were to physically braid 3 strands of geometry, lots of those polygons would wind up inside the braid, just adding to your count without contributing anything to the look
**if some polygons end up inside of other meshes, you may want to delete them to reduce the poly count further. The boolean modifier may be able to help you, but I haven't tried
These are completely hollow, tiling braid "facades". They just look like a braid, without being anything more than a stylized tube. Available in 9 shapes (which are all pretty similar, more or less, but have different 'vibes', and one of them technically doesn't resemble a braid, but if you squint it looks close enough) and 3 polygon counts to hopefully fit in with your project.

TOU: Same as my cc. Read it here. I obviously don't own this concept, so feel free to reverse engineer, make your own braid tiles, etc. Just don't use mine for anything commercial (using them in commissions is fine, just not paywalled final products!)
You will need to be using one of the newer versions of blender, I believe 2.8 and up. These were made in blender 3.6, so the files will not be compatible with old versions like 2.7x.
Quick start guide:
Open your hair wip's .blend
In object mode, 'Append' the 'BraidTile' object of your choice
Select 'BraidPath' and, in Edit mode, position it however you like
Additional info under the cut, because I tend to ramble, and these require a little bit of a primer before use, probably. Unless you for sure know what you're doing, in which case, feel free to just take these and run with them.
THIS IS NOT A TUTORIAL ON MAKING HAIR, OR HOW TO USE BLENDER. Seek that information elsewhere.
Before appending braids, you may want to open up the blender file and look at all the shapes, to decide which one you want to use.
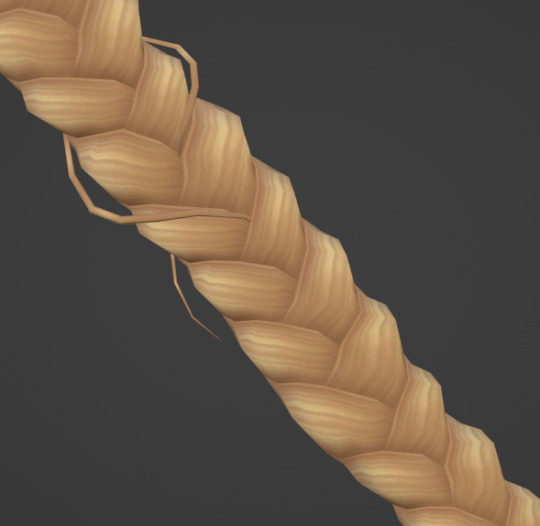
When you first append your braid, or open the blend files, you may notice it does not look like the preview images above, and instead looks like a shiny pink slug. This is intentional! For previews and development work, I use @/simandy's base textures, but your hair will probably be using a different texture, so I have not included a texture at all.
Simply switch the material of the 'BraidTile' to the same material your hair is using, and adjust the uv map accordingly. I'm going to assume if you are making hairs that you know how to do that, so it will not be explained here.
Once you have your braid appended, and have edited the UV Map of the 'BraidTile' piece to your liking, you can also try scaling the tile in the X, Y, and Z axes to change up the look a little. Make sure you select all of the vertices before scaling, to make sure it still tiles. This should be safe to do, and not mess up the tiling at all, but make sure you do it in Edit mode, not Object mode. (If you mistakenly do it in Object mode, you just have to press ctrl+A and select 'scale', and that should fix it)
When you have your braid adjusted, switch over to the 'BraidPath' object, and use edit mode to move the points around however you want. This is just like any other hair strand, if you're used to making hairs with paths and curves then this should already be familiar to you. All the same controls should work.
And, if you already have a curve in your hair that you'd like the braid to snap to instead, you can select the 'BraidTile' object, locate the curve modifier, and switch the curve object to any other curve in your .blend. You'll want to change the curve in the array modifier to the same one, most likely.
If you haven't used curves to make a hair before, here's a couple quick controls you might like to know:
ctrl+T will let you Twist the object around the selected point(s)
alt+S will let you Scale the object around the selected point(s)
selecting the first or last point of the 'BraidPath' and pressing E will Extrude a new point, making your braid longer
Remember to do all of your positioning on the 'BraidPath' object! You do not need to edit the 'BraidTile' at all once you've set up the UV map and adjusted the scale!
It should tile, twist, etc. with little issue, and should get longer or shorter according to the length of your curve with no issue. If it doesn't, make sure both the array and curve modifiers of your 'BraidTile' object are using the same curve. They should be using the 'BraidPath' object by default, but if you changed this manually, ensure that both modifiers match for best results.
Unless you know what you are doing, I do not recommend messing with any other settings in the modifiers, or adjusting the 'BraidTile' mesh in any way besides scaling the entire object at once. Otherwise you could end up with gaps and holes in your braid.
When you are done posing your braid, you can apply the modifiers to turn the whole thing into a regular mesh. I like to make a copy of my 'BraidTile' and 'BraidPath' first, just in case I want to go back and change the shape later. After converting it to a regular mesh, I'd recommend going in with proportional editing turned on and randomly scale and move a few of the pleats just a little, to make the braid look a little more organic. You can even add a couple strands to make it look messier, if you dont mind adding to your poly count even more. But this comes down to your preference and style. The braid below has had some half-assed editing done to demonstrate the concept. (Note: This is actually the low-poly version of this particular braid shape)
Ultimately, it is up to you to decide how you want to blend the braid in with the rest of your hairstyle. I can't tell you how to do that, as it is ultimately going to come down to your own personal preference, workflow, and the hairstyle you are making.
How do I know if I should use Hi, Mid, or Lo poly?
This is largely due to personal preference, and how you're using the braids in your project. I have included the three different poly versions to try and be mindful of the overall poly count of your poor poor meshes, but even a lo-poly braid is going to add an easy couple thousand polygons to your project. Keep that in mind! If you plan on having a LOT of braids, something like this EA hairstyle, for example:
You will probably want to follow their example and use a very simple mesh and just apply a braid texture instead of using these. EA's braids here appear to be a simple box shape painted to look like braids.
If you only plan on having one, maybe two braids in your entire project, especially if they are very large braids, then you might want to go with the hi-poly option. They're the smoothest, roundest choice.
If your braid has a very small diameter, you can probably get away with just using the lo-poly option, and save some polygons you won't need anyway.
The mid-poly version exists as a sort of happy medium. They aren't quite as pointy as some of the lo-poly shapes, and they won't inflate your poly count as much as the hi-poly models, so you may find you prefer them for your applications.
It's all very subjective.
I think that's pretty much everything I wanted to say. If you have specific questions, my inbox is open.
Keep in mind I am not very skilled in blender! There's probably some optimization that can be done if you know what you're doing, and I welcome you to tweak these meshes to your heart's content, if that's you! I made these for me, but I figure they could make someone else's life a little easier too, so here you go.
If you make anything using them you are welcome to tag me! If you don't end up making anything with these then I hope you at least have some fun playing with them!
#simoleon#THIS IS NOT CC DO NOT DOWNLOAD THINKING ITS CC#im going to the store now if anyone has any questions ill answer them later#dl#(as in 'download' not 'delete later')#i dont wanna put this in my cc tag but i also dont wanna lose track of it yknow
204 notes
·
View notes
Text

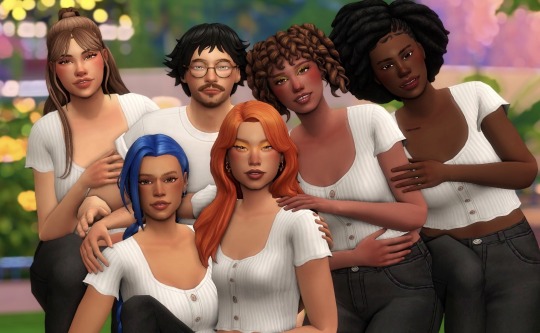


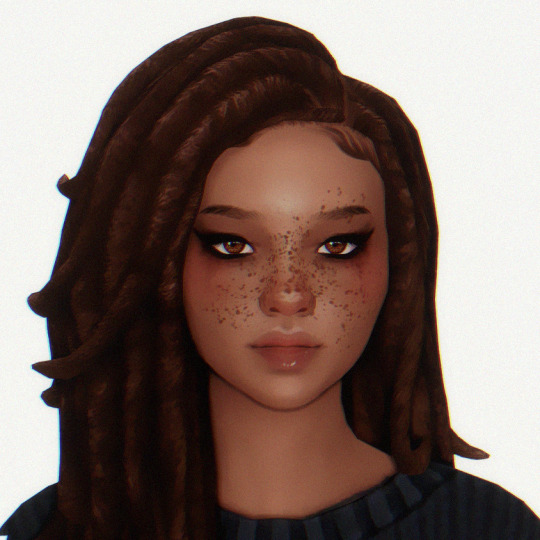
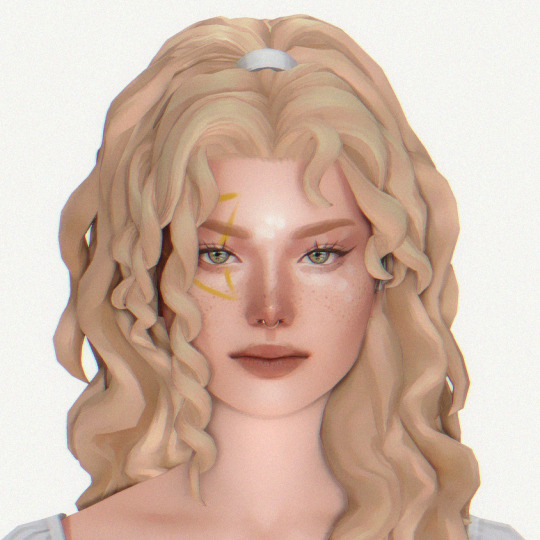
Follower Gift ♡
i genuinely have no words. the fact that so many people choose to follow me actually blows my mind. it's unreal. i started posting on this blog just for funsies and it’s now become one of my favorite spaces to be. i appreciate and adore all of you endlessly. these are some of my favorite sims i’ve ever made (some new, some of which you may have seen before) and i hope you enjoy them!!
minimal cc (skin details, hair, makeup, acc)
only dressed in a base game everyday outfit
traits and aspirations randomized
cc included!! (includes a .txt file with cc details)
feel free to make them your own! have fun!! all i ask is that you don’t whitewash / majorly alter their body types :)
please don’t reupload or claim as your own
if any creator would like me to link their cc instead, let me know and i’ll change it! (i tried to read everyone’s tou but i may have missed some)
feel free to tag me if you use any of them, i always love to see ♡
small disclaimer!! i do use a gshade preset in my game as well as different sliders and presets, so sims may differ slightly
download (patreon, always free)
alt (sfs)
#ts4 sim dump#sim: nevra#sim: haven#sim: adisa#sim: mitzi#sim: clyde#ts4 sim dl#sim dump#sim download#sim dl#ts4#s4#sims4#thesims#the sims 4#ts4cc#my cc
119 notes
·
View notes
Photo

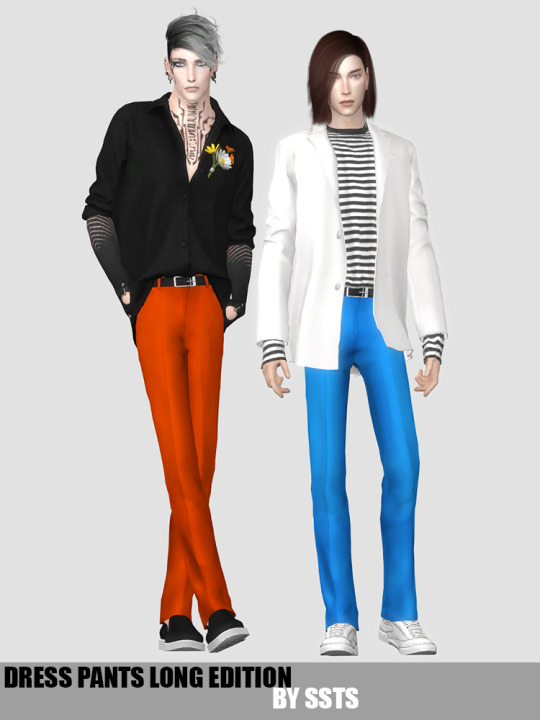
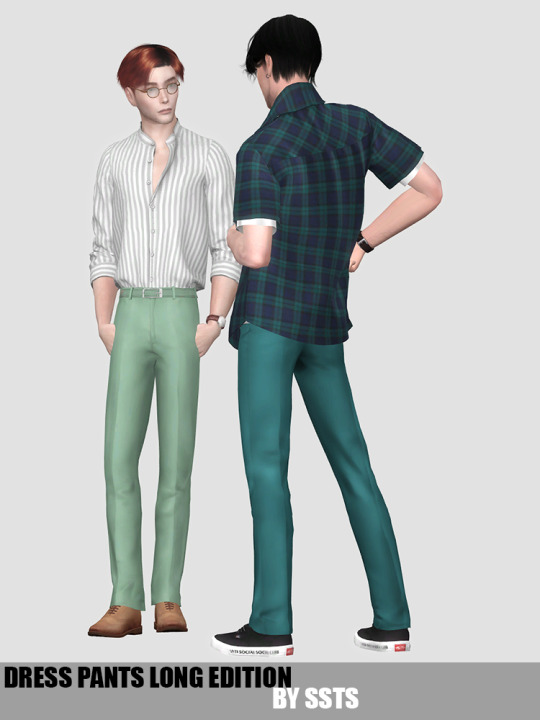
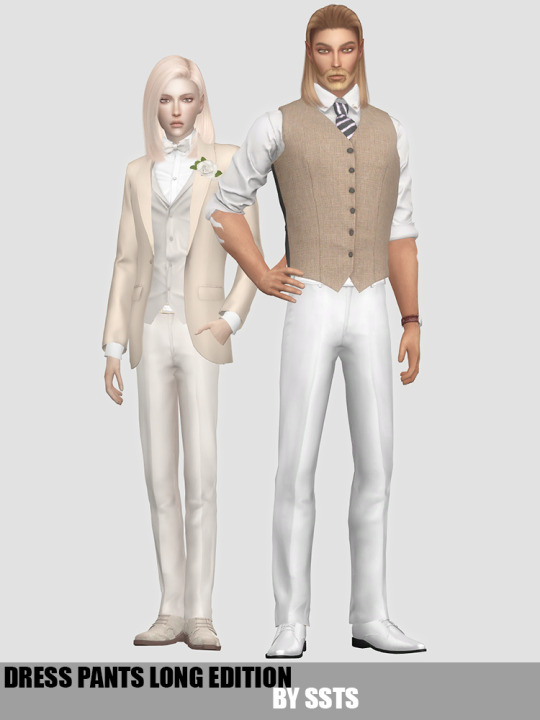
DRESS PANTS LONG EDITION by SSTS
Teen to Elder
Pants
Everyday, Formal, Party, Cold Weather, Hot Weather, Career
Disabled for Random
New mesh.~3800 poly, normal and specular maps, all LODs, all morphs. Basegame compatible. HQ mod compatible.
Since these pants are shorter than the previous ones, they will work with more shoes [ see preview pictures ]. I also tried to make them quite close to the sim body in the belt area - to avoid overlap with tops. But still there may and will be a clipping issue with some high shoes and a shadow issue with some not very correctly textured tops. The custom icon is marked with an L so you can easily identify these pants from extra long version that is marked EL.
Preview pics are pure screenshots 100% from the game [ no HQ mod, no ReShade, no edit ].
Hope you’ll find this useful - tag me if you do, I’m always glad to see your screenshots. Happy simming, have fun and don’t forget to read my TOU.
DOWNLOAD - Patreon Early Access
Public access - 15/06
Credits go to @helgatisha for the poses and to all the creators of cc used on the preview pics.
#ts4cc#ts4 custom content#strangestorytellersims#ts4 custom clothes#ts4 male clothing#ts4 modern#the sims 4 cc#the sims 4 custom content#the sims 4 custom clothes#my ts4cc male clothes#my ts4cc cas
324 notes
·
View notes
Text
Downtown Revamp - A complete overhaul of Downtown from The Sims 2 Nightlife
It’s finally here! This is going to be a long post, please read everything before you download, as there is quite a bit of information to go over! Let’s get started!
First, a picture of the finalized Downtown!
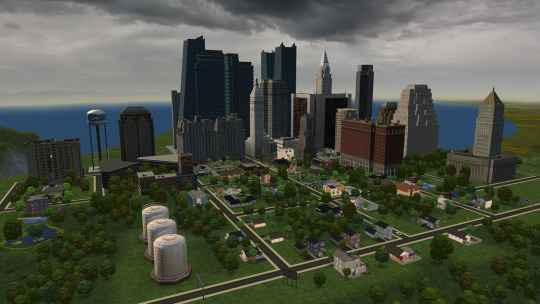
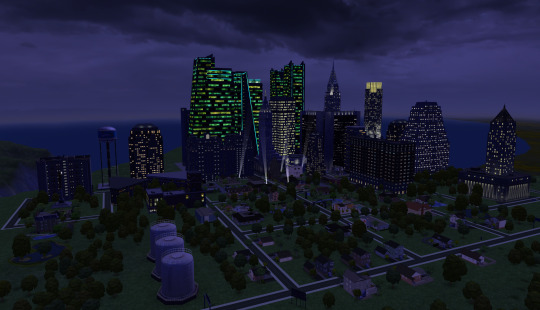
Click here for a relatively complete imgur album of all the lots!
*The pics are not in order. I seriously cannot be bothered going through 140 pictures. Sorry!
*Please note that some of the venues may look different in the final download than the pictures. This is because after building everything I went through and picked/replaced all of the CC that I felt wasn’t 100% necessary to use in the hood, thus some of the color schemes of the lots may differ, especially on interiors.
What is this?
If you haven’t been following me for the past few weeks, I took on a project to completely renovate all of Downtown from The Sims 2 Nightlife. This means all lots have been completely remodeled and updated. No more fugly Maxis lots! I had three main goals for this project - First, to update everything to look good and be fun to play, second to have each lot offer a unique “experience”, and third, to keep the original feeling of the lots in tact.
This comes in two versions - a Subhood version that you can add to your existing hoods, like you would with a traditional Downtown, and a Main Hood version, so you can play my updated Downtown as a main hood if you’d like!
General Information:
I renovated every single lot (except four lots which I removed from the hood, more on that later). Downtown had a special way of reusing the same idea for multiple different lots - I stopped counting how many dark vampy dance lounges with raised or lowered dance floors there were. Three freakin bowling alleys? As I mentioned earlier, I wanted each lot to have its own reason for you to come visit, and there were four lots that I ultimately felt offered nothing and wouldn’t be missed if they were taken out. The following lots are not in this Downtown:
Lost in Love Hedge Maze
P.U.R.E.
The Corner Shoppes
Comandgo Emporium
Aside from those four lots, every lot has been renovated - Including Residential lots!
This is not populated. There are no townies and/or Tricou ghosts.
There are a few unavoidable NPC’s that have spawned when I made this such as a busker and the New Year’s Toddler. There are also a few stray animals that decided to spawn, but those could not be avoided. All in all, don’t worry about this adding tons and tons of NPC’s to your game - I did my best to ensure the hood was empty.
This hood does include custom content. Sorry if you don’t play with it, but there’s just some things that I couldn’t go without. I tried to use only what I felt was necessary to make the hood look and play nicely.
This was built in the Ultimate Collection, so unfortunately I don’t know exactly what is “required”. Recommended at the very least to have NL, H&M, BV, FT, UNI, and AL.
Custom Content info & Download links/Instructions below the cut :)
UPDATE: You can now download all Downtownies (Except dead Tricou’s) easily to add to this hood! Check out the post and download here!
Custom Content:
Firstly, a HUGE thank you to all of the following CC creators who have so kindly allowed me to include their CC in a single download folder. Below are links to the individual pieces that were used, along with their creators blogs/profiles as well. There are also some important pieces of information and disclaimers about certain sets and defaults below. Please read everything before you bork up your game and blame me.
Custom Content used in this hood/Credits:
**You do NOT need to download the following items one by one. These are credits. All but ONE of them are included in a single download folder included with both hood versions**
*Those with a * next to their name are Default Replacements.
Pub Bottle Recolors and *Clothing Rack Defaults both by @withlovefromsimtown
Better Nightlife, Tarmac Hood Deco, and Matching Road Floor Tiles by @criquette-was-here
A few recolor sets from @cluedosims AKA @shastakiss
Community Phonebooth by nicvncnt
*Linden Trees, Seasonal AL Pond, Tower of Communism Skybox, and The Emerald City Skyscraper Set all by @lowedeus
Skyfix by @simnopke
Hood Deco Buildings by @dulcinean-alien
Criquette Horizons by @witheredlilies and @criquette-was-here
*Terrain Default Replacement by @dramallamadingdang
Invisible Driveway Recolor by Roddyalexio
*Invisible Stop Sign Default Replacement by Psychosims
4T2 City Living Murals by @moocha-muses
Simlish Neon Signs by @polllinationtech
Some (excluding the DFR) items from the Bespoke Build Set by @honeywell-mts
Public Bathroom Deco by @nekosayuri
Vampire Gravestones by @tony-veis
*Low Poly Tree Defaults and *Edited Defaults of Criquette’s Rural Road by @peppermint-ginger
I do not claim any of the included CC as my own. If I mistakenly included CC that you created and you do not want it included (Though I contacted those I was unsure about) please immediately reach out to me and I will remove them :)
Additional credit to the amazing and dear Mootilda for this extremely helpful tutorial :,)
Important CC Info:
DISCLAIMER: There are SOME default replacements in this CC folder. They have been marked in a separate folder with “-DFR” in front of their names. If you have your own defaults, simply do NOT add them to your downloads.
Note about Bespoke Set: This does NOT include all of the items in the Bespoke Build Set. If you already have it, do not add these
folders to your game. If you do have it and plan on getting the rest of the pack later on, just delete these two folders and install
those from MTS. The items included in this folder are the following:
Windows
Doors
Wall Coverings
Floor Edging
If you do not wish to use the entirety of BBS, then just use the items in the folders I have provided, as these are the ones
that are necessary in Downtown :) Thanks again Honeywell!
The Roads that I use in this hood do not have a grass median between the road and sidewalk. The way my DFR’s work is that that space needs to be filled in once the overlays are placed. If you do not use a DFR OR if you use something different, you may have to remove the filled in section. You’ll know what I mean when you load it up. Also, if you don’t use these defaults, there may be random rugs in the road, that is just the game replacing unavailable content.
If you don’t plan on using the Phone Booths that are included, you will want to go back through the lots and add back the EA default phone booths. I am not sure if your sims will be able to get back to their home lot if you don’t download the custom ones, since I deleted the original vanilla booths.
Excluded CC:
I used these recolors of Numenor’s stairs. You WILL need to download these (be sure to properly download them) as they are NOT included, since Numenor does not allow this.
CC Download Instructions:
CC is included with both versions of the hoods.
Instructions: Download the zip file for the hood version you want, unzip it with your preferred zipping program, and extract the contents into your downloads folder. Don’t forget to check your Default Replacements!
Download Instructions:
Instructions:
If you want the Subhood version - Download the DTWN Subhood zip, unzip with your preferred program, and extract it to the following folder, depending on which version of the game you have:
DELETE THE D001 Folder, or move it to a safe location. This is the original Downtown.
Ultimate Collection: C:\Program Files (x86)\Origin Games\The Sims 2 Ultimate Collection\Double Deluxe\EP2\TSData\Res\NeighborhoodTemplate
Disk: C:\Program Files\EA GAMES\The Sims 2 Nightlife\TSData\Res\NeighborhoodTemplate
Once this is installed, load up the hood that you wish to add the new Downtown subhood to, and add it as you would with the vanilla Downtown. Note that you will know it’s the right one as the thumbnail will be different.
If you want the Main Hood version - Download the DTWN Main Hood zip, unzip with your preferred program, and extract to the following folder, depending on which version of the game you have:
Ultimate Collection: Documents\EA Games\The Sims™ 2 Ultimate Collection\Neighborhoods
Disk: Documents\EA Games\The Sims 2\Neighborhoods
Hood Download Links:
*Links include CC
Main Hood
Subhood
If you have trouble downloading, let me know and I’ll throw in an alternate link :)
TOU: I guess I need my own TOU now. Please don’t be an asshole, don’t steal my lots or hood and claim it as your own. Use common sense. I am fine if you renovate one of my renovations and want to post it yourself, just give me credit and link to this original post. Also, do NOT redistribute the cc folder included. This is meant only for Downtown, only saying this as I wish for the creators to get all the credit.
Thank you all once more for your interest in the project! I can’t wait to see what you all do with this! Please feel free to tag me in screenshots, renos of my renos, etc...
Additional thanks to everyone at PleasantSims’ discord for the interest and motivation for this project, especially to Sabrina, Melting Magnetz, Crosimmer, Yeetus, and much more!
Keep an eye out for my next project. Thinking of moving on to Bluewater Village or a Vacation Hood!
Enjoy and have fun :D
- Mike
#sims 2#the sims#the sims 2#sims#simblr#sims 2 downtown#sims 2 hood#sims 2 cc#the sims 2 cc#s2cc#ts2cc#ts2mm#s2mm#sims 2 build#sims 2 lot#sims 2 neighborhood#sims 2 lots#sims build#dwtdtdowntown#tdwtdtdowntown#sims 2 custom content#i cant think of any more tags
587 notes
·
View notes
Note
any tips on making sims? like i've seen a few a few bodyshop tricks but most ppl tend to keep that type of stuff to themselves. (if you'd be open to doing a speed vid of you making a sim would be cool 👀👀)
Hi! I currently can’t make, or more accurately put, upload, a speed vid (WiFi problems), but I’ll share all the bodyshop tips I can think of!
NOTE: These tips are for realistic looking sims, not sims you’d typically use for gameplay (maxis match is superior with game play don’t @ me). So these tips might not be for everyone! What works for me, might not work for someone else, so keep that in mind going in! I hope they help, anyway. <3 Let’s go.
1) Diversify. I try to never make two sims that are of the same race back-to-back. This is may be the most important tip I can think of, because once you venture outside making all of your sims the same race, you’re just forced to go a different direction than the sim you made prior. Also, you’ll have the added benefit of your sims world having a real-life world touch, and your game becomes way less vanilla. That is, if you don’t end up with your sims all looking like same, with just a different shade of skintone slapped on them. This brings me to my second tip,
2) Reference pictures. This one is something I’ve just recently (in the past 2 years or so) started doing myself and it is a GAME CHANGER. What I do is look up, mostly on pinterest, models for reference. I then try and use those references while creating the sims. This really helps because you get to have an accurate representation of the race you’re trying to create, without having to depend on your sole memory. I’m an Arab, but I find myself constantly blanking when it comes to making Arab sims. I literally forget what Arabs look like, LOL, so I always go back to the references! Here is an example of the same sims from 2017 (before I started using reference pictures) vs. 2020.
3) Age. This is also a really important factor that I don’t think many people account for, which is totally fine if you’re creating sims to play! But if you’re creating sims for machinima (which I, 90% of the time, am) then it’s not something you should overlook. You need to show your sims aging. Most people only do that through CC (namely, wrinkles). That sometimes works, but most times it’s just not enough. You’ve got to also use the sliders. Fact is, a sim that’s supposed to be in their 20s, and another sim that’s supposed to be in their 50s, will share the same age in the game (Adult sim), but realistically won’t have the same face. You can show age by giving them thinner faces, a less defined jawline, eyes that are less open, etc... I tend to use reference pictures from tip 2 to help with that. Here are pictures of two of my characters from my series, The Rivers, as an 18 year old and as a 28 year old (all as adult sims). The pictures are from four years ago, back when there weren’t custom sliders omfg i can’t even fathom a world like that anymore, and my sim-making has thankfully evolved since then, but it’s the only example I can think of where I used the same adult sim to represent different age groups!
NOTE: If you’re just making sims for the sake of playing, and you still want to show age progression in adult sims, I highly recommend these great graying hairs by @deedee-sims Always my go-to when I’m playing!
4) Base. If you’re just starting, or you’re beginning from scratch and don’t know where to start, I’d recommend downloading default face templates - because maxis face templates are horrendous. LOL Or, and only if the creator ALLOWS IT (always read the TOU!!!), use another creator’s sim as a base sim. BUT, if you are going to use someone else’s work (templates or base sim) as your blank canvas, then make sure to make it your own, or else you’re going to end up copying someone else’s style. A lot of people tend to do that subconsciously. You can use references pictures to guide you with that. This tip is only if you’re starting from scratch. If you already have some sims lying around, I recommend to use your own sims as your base sim. That way, you can avoid accidentally copying someone else, and you’ll have your own style of sims that is unique to only you, that I believe every simmer has/should have eventually.
5) Don’t give up! I literally make, like, a minimum of half a dozen sims before I kinda like one of them. And that’s after 10 years of making sims for youtube and sims machinima (not just sims to play!). So, don’t be discouraged if you haven’t yet found your style, or if you’re not happy with the sims you make. Practice makes perfect, you’ll get there eventually. Just venture outside of your comfort zone, try things you haven’t yet tried, and be confident in the work you’ve had so far because you’ll only get better from here!
Hopefully, my WiFi will get better some time soon, and I’ll be able to make a speed CAS video. Until then, I hope these 5 tips help and feel free to ask me more questions or privately DM me if you need anything else!
8 notes
·
View notes
Last Seen Blogs