#tanzhong
Text
Tanzhong milk bread …porn.
3 notes
·
View notes
Text

Kinda love this recipe.
2 notes
·
View notes
Photo


tanzhong milk bread! (link to original video here)
22 notes
·
View notes
Text
Administrative geography of Western Han (22,109) etc

Yang揚州
Yuzhang豫章郡
Gan贛
Nanye南野
Jing 荊州
Guiyang桂陽郡
Chen郴
Linwu臨武
Nanping南平
Guiyang桂陽
Yangshan陽山
Qujiang曲江
Hankuang含洭
Chengyang湞陽
Lingling零陵郡
Lingling零陵
Yingdao營道
Shi'an始安
Yingpu營浦
Lingdao泠道
Jiao交州
Nanhai南海郡
Panyu番禺
Boluo博羅
Zhongsu中宿
Longchuan龍川
Sihui四會
Yulin鬱林郡
Bushan布山
Anguang安廣
Alin阿林
Zhongliu中留
Guilin桂林
Tanzhong潭中
Cangwu蒼梧郡
Guangxin廣信
Xiemu謝沐
Gaoyao高要
Fengyang封陽
Linhe臨賀
Duanxi端溪
Fengcheng馮乘
Fuchuan富川
Lipu荔浦
Mengling猛陵

Jiao交州
Nanhai南海郡
Jieyang揭陽
Jiao交州
Hepu合浦郡
Xuwen徐聞
Hepu合浦
Yi益州
Yuesui越嶲郡
Qingling青蛉
Yizhou益州郡
Shuangbai雙柏
Xielong邪龍
Yeyu葉榆
Buwei不韋
Yunnan雲南
Suitang嶲唐
Nongdong弄棟
Yi益州
Yizhou益州郡
Dianchi滇池
Tonglao同勞
Tonglai銅瀨
Lianran連然
Yuyuan俞元
Shouma收靡
Guchang穀昌
Qinzang秦臧
Mei味
Kunze昆澤
Lügao律高
Bengu賁古
Wuzhuo毋棳
Shengxiu勝休
Jianling健伶
Zangke牂柯郡
Xunfeng鐔封
Louwo漏臥
Tongban同竝
Tanzhi談指
Yuanwen宛溫
Wulian毋斂
Yelang夜郎
Wudan毋單
Loujiang漏江
Xisui西隨
Dumeng都夢
Tangao談稿
Jinsang進桑
Quting句町
Jiao交州
Yulin鬱林郡
Guangyu廣郁
Linchen臨塵
Dingzhou定周
Zengshi增食
Lingfang領方
Yongji雍雞
County locations and ancient rivers, lakes, and shorelines from The Historical Atlas of China.
I have intentionally stuck to the Hanshu where it differs from the Historical Atlas.
6 notes
·
View notes
Photo

shannon_fermentation
88 notes
·
View notes
Photo
Ekşi mayalı #tanzhongbread deniyorum!🍞 Tam buğday unuyla çalıştığım için orjinalindeki kadar yastık dokusunda olmuyor ama yine yumuşacık, kahvaltıda sürmelikler için birebir, çok lezzetli✨ . . . . . . . . #tanzhong #tanzhongmethod #milkbread #sourdoughbread #sourdough #sourdoughclub #sourdoughbaking #sourdoughschool #sourdoughlove #dough #bread #breadbosses #breadbaker #breadbaking #breadmaking #breadlove #japanessebread #eksimaya #eksimayaliekmek #ekşimaya #ekşimayalıekmek #ekşimayalı #ekmek #bake #homemade #f52community #f52grams #f52bread #japanesefood (Istanbul, Turkey) https://www.instagram.com/p/CFFPy1iJkl2/?igshid=c6bwhgeg3h1j
#tanzhongbread#tanzhong#tanzhongmethod#milkbread#sourdoughbread#sourdough#sourdoughclub#sourdoughbaking#sourdoughschool#sourdoughlove#dough#bread#breadbosses#breadbaker#breadbaking#breadmaking#breadlove#japanessebread#eksimaya#eksimayaliekmek#ekşimaya#ekşimayalıekmek#ekşimayalı#ekmek#bake#homemade#f52community#f52grams#f52bread#japanesefood
0 notes
Text
masterpost of cooking, crafting, domestic, etc things i found
an introductory guide to watercolour painting
apple cookies
boss the basics - how to make bread
cherry pie pastry envelopes
cream cheese strawberry cookies
create your own hanging garden
crochet cat paw chair socks
crochet easy coin wallet
crochet strawberry coaster
cute crochet mushrooms
crochet wildflower coasters
dandelion and daisy cookies
diy chive vinegar
diy jewellery organisers
diy rose oil and rose water
easy homemade potpourri
edible glitter chocolate bars
floral bath salts
frog macarons
handmade floral gift ideas for any occasion
homemade deodorant
how to make daisy salve
how to make dandelion oil and ways to use it
how to make diy fairy wings with cellophane
how to dry herbs
how to make heart shaped pot holders
how to make an ocean diorama
how to make seashell string lights
how to make a terrarium
how to preserve flowers in resin
how to press flowers and leaves
how to sustainably tap a birch tree
how to turn wildflowers into crystallised candied sweets
lavender body oil
lavender cookies
lavender honey lemon cake
lavender lemonade
lilac honey recipe
map coasters
moon and stars baby mobile crochet pattern
painting an acrylic cherry tree forest
pinecone picture frame ornaments
rose ice-cream
sand art terrarium
strawberry and cream handbag crochet pattern
strawberry and orange personal pouch crochet pattern
strawberry butter
strawberry, elderflower, and dandelion wine
tanzhong milk bread
the art of japanese bookbinding
the free coffee that grows all around us
vintage floral nail art
white chocolate cherry fudge
wild violet vinegar
4 types of drawing clouds - acrylic painting
5 ways to grow food without a garden
8 cute and easy hairstyles from japanese fashion magazines
10 copycat cleaner recipes
10+ things to make with violets
12 homemade gifts for book lovers
13 crafts made from recycled jars
19+ flavoured butters
21 household problems you can solve with bicarbonate of soda
30 cleaning hacks
50+ dandelion recipes
TRAD WIVES BEGONE; I'M A LEFT WING LESBIAN AND DIDN'T MAKE THIS FOR YOU HOMOPHOBES AND MISOGYNISTS
4K notes
·
View notes
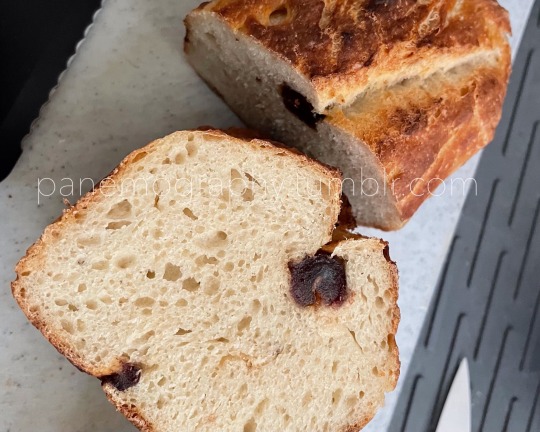
Text
Japanese Milk Bread
Last night I had decided that I wanted to make bread and I remembered seeing someone bake this on a tik tok. She had listed the recipe in the comments so I went and followed that. I think it turned out very well, especially since I don’t have a lot of experience making bread.
Tangzhong ingredients:
1/4 cup water
1/4 cup milk
23g bread flour
You want to pour the water in a saucepan, not on heat. Then add the bread flour and mix until smooth. Once it’s smooth, add the milk and mix again. Then put it on medium heat while mixing constantly until it reaches a pudding-like consistency and thickens. Once it has that, put it in a bowl and cover, setting aside for later and to let it cool.
Bread ingredients:
1/2 cup lukewarm milk
1 tsp sugar
2 1/4 tsp yeast (7g) (my yeast package was exactly right)
1/4 cup sugar minus the 1 tsp
1 egg
2 2/3 cup flour
1 tsp salt
4 tbsp softened butter
tangzhong
First you want to activate the yeast, start by mixing the 1tsp sugar with the lukewarm milk until it’s dissolved, then add the yeast and let it sit until its bubbly and frothy, 5-10 minutes.
After that, put that in a bowl and add the rest of the sugar, tanzhong, egg, flour and then salt in that order, salt last, mixing a bit between. You want to kneed it for about five minutes, getting it all into one ball. Then add the butter in 4 editions, one tbsp at a time, kneading in between. Then you want to kneed for 5-7 minutes more after all the butter had been added in and mixed. Here is where I didn’t knead enough, make sure you are kneading until it becomes smooth almost. Then you want to shape it into a ball, cover the bowl and let it prove for 1-2 hours depending on how hot it is. I only proved it for one hour however I didn’t have the air conditioning on, only the windows opened.

Once it’s proved you can either stick it in the fridge for two or so hours to make it easier to handle, let it sit in the fridge for 12 hours to do a slow prove or just immediately go into the next step. I immediately went into the next step. I first buttered and floured by loaf pans, I used two smaller loaf pans but you can easily use one larger one. You want to press the excess air out of the dough, separate it into two if you’re using two pans and let it prove for another 1-2 hours. When you put them in the pans you want to shape them, I didn’t really do that and my loaves came out with two different shapes but it isn’t a big deal.
Once it’s proved, you can do a milk wash or an egg wash, I did an egg wash and then sprinkled them with some salt. Then you bake them at 350°F / 177°C for 30-35 minutes. Mine took 30 minutes, probably because it was a bit smaller. Let it cool for a little bit inside the pans, then flip them out and your bread is ready.


I think my bread turned out very well, it tasted very nice and the crust was delicious. It tastes great plain, with honey, toasted, with cheese, whatever really. Maybe don’t start making it at 9pm though seeing as it was only done around 12:30am and mine didn’t prove long at all.
#baking#bake#baking recipe#recipe#baking recipes#recipes#bread#bread recipe#baking bread#making bread#japanese milk bread#japanese milk bread recipe#my recipes
2 notes
·
View notes
Text
Japanese Milk Bread
Hi! Another Monday. Let me distract you for a few minutes with this wonderful fluffy and totally comforting recipe for Japanese Milk Bread. I can’t think of a more worthy way to use your flour right now!
If you’ve never tasted Japanese milk bread you are in for a real treat! It’s addictive! So soft, airy and buttery—like a cross between brioche, challah and the most perfect white bread you’ve ever had.
It makes amazing toast, french toast, sandwiches—you name it!
I promise you’re going to love it!
So..how do you make it? First off, you cook up a very simple starter (in Japanese it’s called a tanzhong) which is made up of flour and you guessed it, milk. it makes a thick paste which almost seems like more of a roux than what you’d traditionally think of as a starter but it’s what gives the bread its airy, springy texture. And unlike sourdough starters, it comes together in just minutes and you can use it as soon as it cools to room temperature.
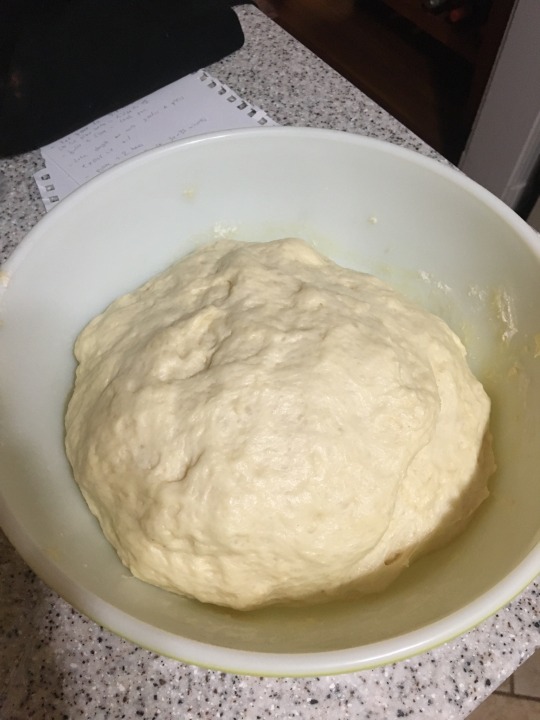
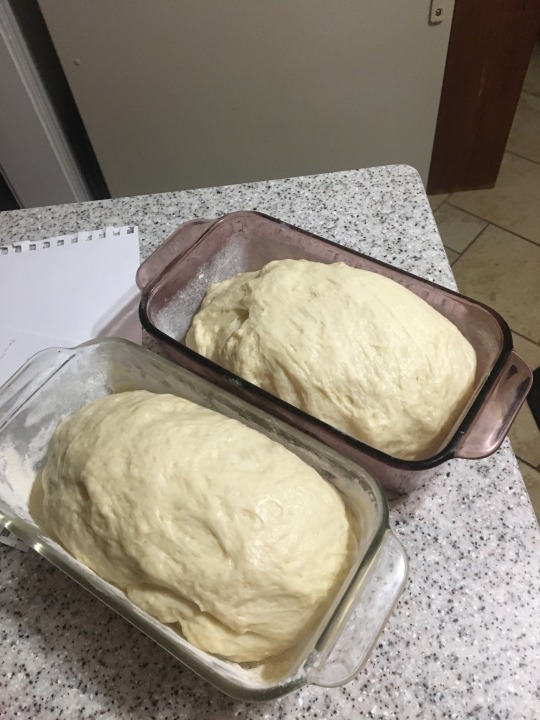
The dough is easily mixed in stand mixer with a dough hook and once you’ve prepared it and let it rise, it looks something like this.
You’re then going to punch it down, and divide it into four pieces (I’m only showing you two here)
And shape into balls.
Now comes the fun—you roll each ball into a rough oval
Fold over the top and bottom
And then roll the whole thing up into a nice tight little log.
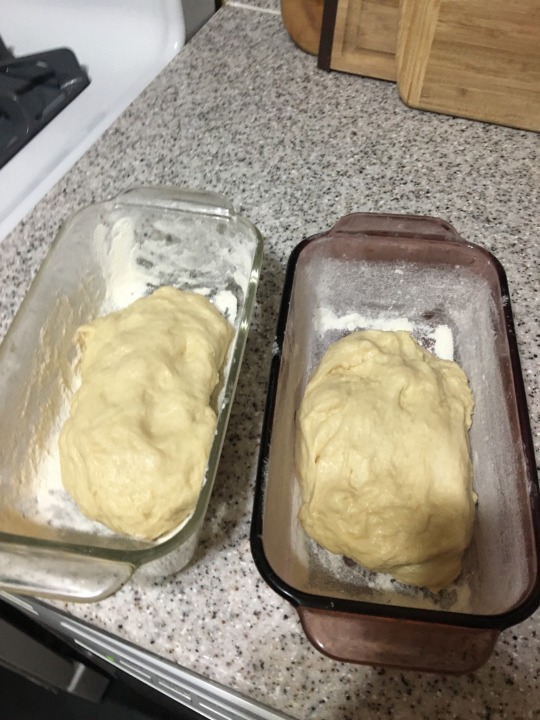
Each log now gets nestled in the opposite ends of a loaf pan to rise again.
Right before you’re ready to bake, you brush the loaves with a little milk and pop the pans in the oven.
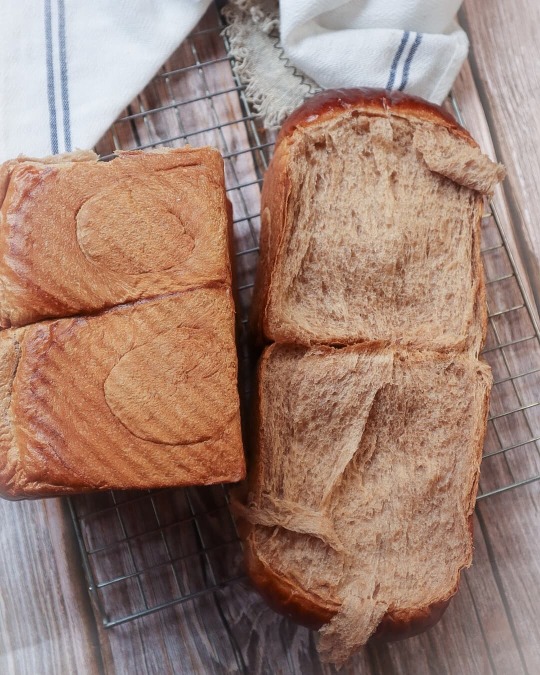
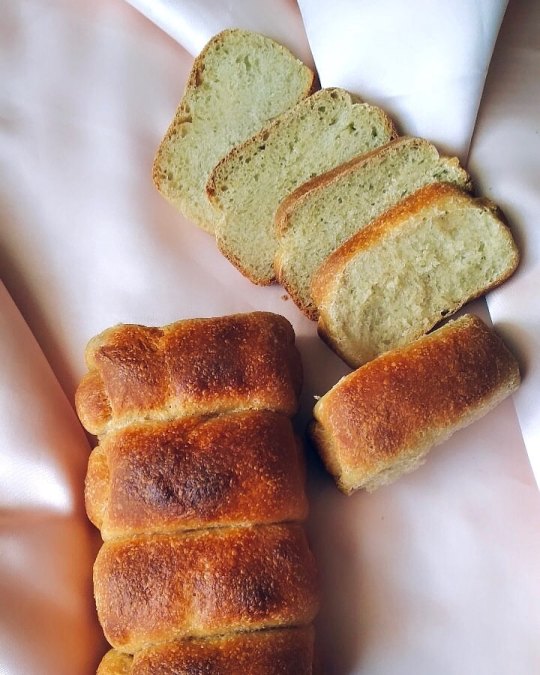
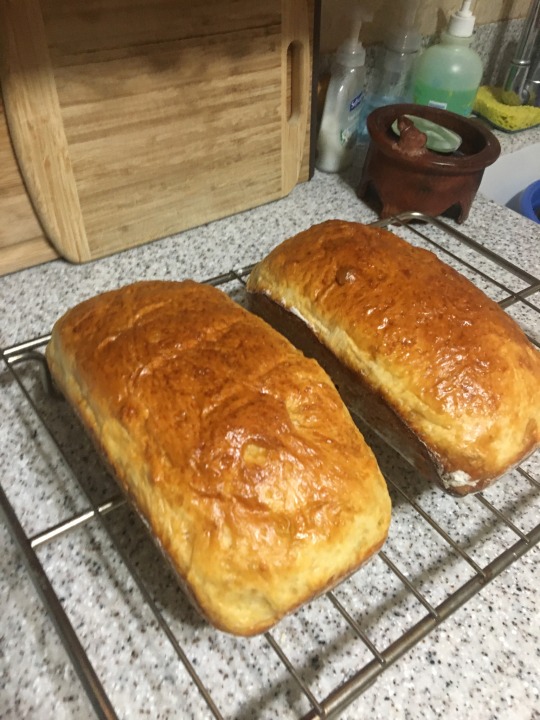
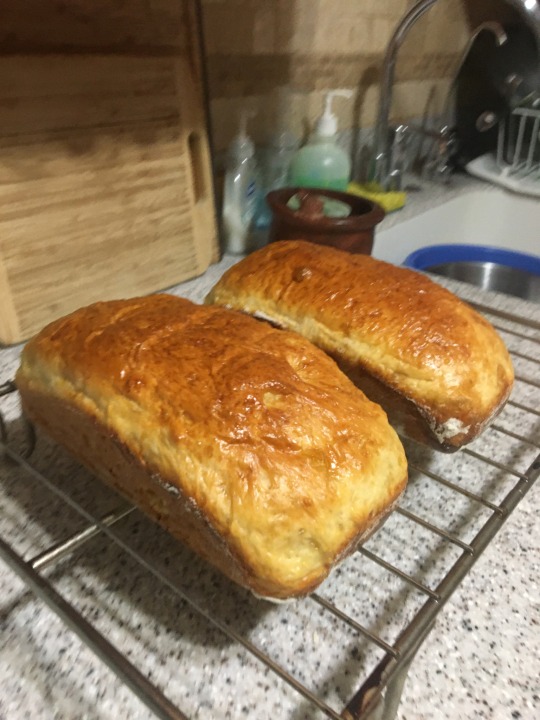
What emerges is nothing short of carb heaven: 2 shiny, golden brown, bulbous and loveable loaves that are guaranteed to please.
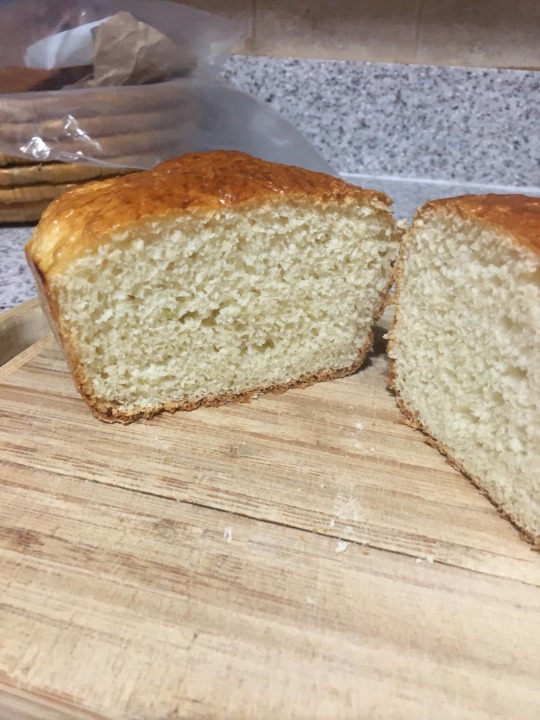
Now focus on that light and airy crumb and hang in there!
Japanese Milk Bread
Makes 2 loaves
It really helps to have a stand mixer with a dough hook for this—you can do it by hand but it will take a lot longer.
Prep Time: 45 minutes; plus a few hours of rising; Bake Time: 35-40 minutes
Ingredients
For the starter
⅔ cup bread flour (90 grams)*
1 cup whole milk (240 ml)
1 cup water
For the Dough
5 cups bread flour (750 grams)*
½ cup sugar (120 grams)
4 teaspoons active dry yeast (14 grams)
2 teaspoons salt (8 grams)
2 large eggs
1 cup warm whole milk (240 ml) plus a little extra for brushing on loaves
8 tablespoons unsalted butter (120 grams) room temperature, cut into small pieces, plus a little extra softened butter for greasing the bowl and pans
The Recipe
1. To make the starter: Place the bread flour, milk and water in a medium heavyweight pot and whisk together until smooth. Bring to a simmer over medium-low heat and cook, stirring often, until mixture is thickened, but still thin enough to pour—this takes about 8-10 minutes. If you scrape the spoon along the bottom of the pot, it will leave tracks. Remove the pot from the heat. Scrape the mixture into a small bowl and loosely cover with plastic wrap. Let cool to room temperature—takes about 30 minutes.
2. To make the dough: Fit your electric mixer with the dough hook and combine the flour, sugar, yeast and salt in the large bowl of the mixer. Add the eggs, milk and cooled starter and on low speed, knead the mixture for about 5 minutes.
3. Add all of the butter at once and knead the dough for another 10-12 minutes, until the butter is entirely incorporated and the dough and smooth, springy and just slightly tacky.
4. Lightly butter the inside of a large bowl with softened butter. Use your hands to scoop the dough out of the mixing bowl and form into a ball. Place into the buttered bowl and cover with a kitchen towel. Let rise in a warm place until doubled in bulk, anywhere from 45-60 minutes, depending on the temperature in your house.
5. Place a board on the counter or use a clean counter. Punch the dough down in the bowl and then transfer to the board (or counter). Using a bench scraper or sharp knife, cut the dough in half and then cut each half in half again, so that you have 4 equal pieces. Lightly form each one into a ball, cover with the towel and let rise 15 minutes.
6. Make sure one of the racks is in the bottom third of the oven and preheat to 350ºF. Butter two 9x5-inch loaf pans. Set aside.
7. Use a lightly floured rolling pin to gently roll out one of the dough balls into a thick oval about 12 inches long and 6 inches wide. Try to roll away from yourself first and then pull the pin in—makes it easier to get an oval shape but don’t stress too much about this.
8. Fold the top 3 inches of the oval down and then the bottom 3 inches up, making a rough square. Now, starting from the right, roll up the dough into a short, fat log. Pick it up, smooth the top with your hands and place it into the prepared pan, seam side down and crosswise at one end. Repeat the entire procedure with the second piece of dough and place it in the other end of the pan. Then do the same thing for the remaining 2 pieces.
9. Cover the pans with the towel again and let rise until the dough is coming over the edge of the pan and the logs are meeting in the center, anywhere from 30-45 minutes. Brush the tops of the dough with a little milk and bake on the bottom shelf until golden brown and puffed, about 35-40 minutes. Let cool in the pans for 10 minutes and then turn out onto wire racks to finish cooling completely. If you cut these too soon, the bread will sink.
Enjoy!
Note: Recipe adapted from The New York Times via Julia Moskin. I doubled the recipe cause you might as well make two if you doing it anyway.
*You can totally sub in regular all-purpose flour for the bread flour if you don’t have any on hand. I promise it will still be delicious.
4 notes
·
View notes
Text
TANGZHONG HAMBURGER BUNS
There are hamburger buns, and hamburger buns with Zen. These will Zen you out. Tanzhong is a method of Japanese baking in which part of the flour is cooked before being incorporated into the dough. What that does is create quite a unique crumb, with more moisture and tenderness. Perfect for hamburger and hot dog buns in which the crust is secondary. All you want is pillowy bread. You will need…
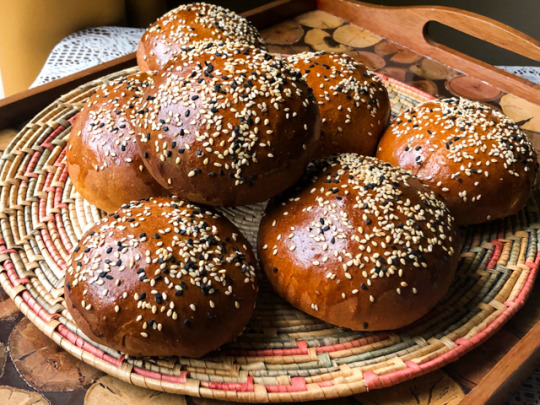
View On WordPress
0 notes
Text
Tanzhong milk bread…porn.
3 notes
·
View notes
Text

❤️ KIVIE Knowledge👩🏻🎓
Keep warm after the beginning of Autumn 🍂
Cold and dampness enter the human body most easily through these five acupoints:
① "Dazhui Point" on the shoulder and neck,
②"Tanzhong Point" on the front chest,
③ "Shenque point" at the belly button,
④ "Mingmen Point" on the waist,
⑤ "Yongquan Point" on the soles of the feet.
💕薇愛小知識
立秋後 注意保暖!
寒濕氣最容易通過這五個穴位進入人體:
①肩頸部的“大椎穴”,
②前胸的"膻中穴",
③肚臍部位的“神闕穴”,
④腰部的“命門穴”,
⑤腳底的“湧泉穴”。
0 notes
Photo

I made U/Ketoluna Keto Crazy Dough Dinner Rolls Hi everyone.I took a stab at the experimental keto Flour/ keto crazy dough that you are probably all familiar with! If you are not please see this post.As far as the ingredients/measurements go I followed the recipe exactly. The technique I used was a little different since I don't have a microwave or a stand mixer.I made the Tanzhong Roux using a double boiler. I put the "milk" and "flour" in a mason jar which I gently heated in a pot of water, I stirred it until it thickened like a pudding. This took maybe 8 minutes? I had it going low and slow so I could check it periodically while working on the rest of the ingredients.I don't have a stand mixer, so I combined the wet ingredients in a bowl with a whisk. I added the dry ingredients in two parts. After I added the first half of the dry ingredients I whisked to combine. Then I added the second half and used a spatula to stir everything together. I tried kneading the dough by hand but it was way way too sticky. I added maybe another tablespoon and a half of flour and using a spatula, I stirred the dough around until the extra flour I added was incorporated. The dough had shaped itself into a ball pretty much at this stage. I pushed it around the bowl with the spatula a little more and then covered the bowl with plastic wrap. I didn't want to transfer it into a ziplock bag, partly because i didn't want to touch it and get it all over my hands again, and partly because I thought it would stick inside the bag and I would lose a bunch of dough.I set the bowl of dough on my stovetop (the oven was on at 350 during this time, I was baking other things) for maybe an hour. The dough did expand and rise, probably by about half.The dough was way way way less sticky after the resting/rising. I put the dough between two sheets of parchment paper to roll it out. It was a little tough, it had some spring/push back while I was rolling it out. It didn't stick to the paper at all. I had a crescent roll shape in mind but didn't put much effort into shaping the dough. Then I put them in the oven at 350.They were in the oven for maybe 8 minutes and then I checked u/ketoluna's instagram post where she made the cinnamon rolls and I saw that she baked hers at 325 so I turned my oven down. After maybe 10 more minutes I went to check them and they had PUFFED UP and were golden brown so I took them out. The finished rolls expanded about 3x the size of the dough when I put them in the oven. I was very surprised.I didn't put any butter or fat on these before or during the cooking and you can see in the photos that they are golden brown and they browned nicely on the bottom.Ok finally the taste!!! These don't taste like any keto baked good I have ever made. I have made coconut flour, almond flour, flax, psyllium husk, and protein powder based keto baked goods. The texture is definitely the closest to bread that I have had. They don't have that slimy texture like flax and psyllium husk have. They have some chew/tooth like a gluten bread has. They aren't really dry and crumbly like other protein powder baked goods i've made are.I think these taste pretty close to a generic white bread frozen dinner roll. The yeast flavor comes through and gives that 'bread' taste. If you are curious/inclined about this flour/dough I would definitely recommend trying it. I think the dough is really forgiving since I was able to make it with good results without having a stand mixer or really paying attention to the cook time/temperature.Here is an image gallery of my rolls. and thanks u/Ketoluna for sharing your recipe!
0 notes
Text
Administrative history of Jiaozhou: Western Han
In 214 BC, the 33rd Year of the First Emperor of Qin, Qin's armies conquered the far southern lands of Luliang陸梁, and settled them with such miscreants as fugitives from justice, free-loading son-in-laws, and merchants. The new conquests were divided into three new commanderies, these were from east to west Nanhai南海, Guilin桂林, and Xiang象 commanderies.

During the reign of the First Emperor's successor, the Second Emperor (r. 210 – 207 BC), the Qin empire quickly began to crumble. When the Commandant of Nanhai南海, Ren Xiao, died, the Prefect of Longchuan龍川, Zhao Ta took over as Commandant. After the fall of Qin, Zhao Ta conquered Guilin桂林 and Xiang象, and declared himself King Wu of Nanyue, with his capital at Panyu番禺, the old capital of Nanhai南海.
In 196 BC, after meeting with the Han envoy Lu Jia, Zhao Ta accepted to nominally become a vassal of Han. Over the next years, Zhao Ta expanding his territory by over-awing and bribing the nearby states, and eventually declared himself emperor. Though in correspondence with the Han court, he continued to refer to himself as king. Zhao Ta's successors continued to rule Nanyue until 111 BC, during the reign of Emperor Wu of Han, when Han invaded and conquered.
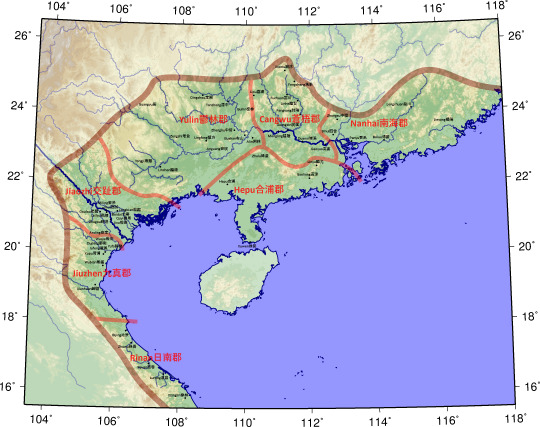
The Han split the newly conquered territories into seven commanderies, Nanhai南海, Yulin鬱林, Cangwu蒼梧, Jiaozhi交趾, Hepu合浦, Jiuzhen九真, and Rinan日南. In 110 BC, the Han also created two new commanderies on a great island south of the sea, Dan'er儋耳, and Zhuya珠崖.

In 82 BC, during the reign of Emperor Zhao, Dan'er儋耳 was abolished and merged into Zhuya珠崖. In 46 BC, during the reign of Emperor Yuan, Zhuya珠崖 was also abolished.
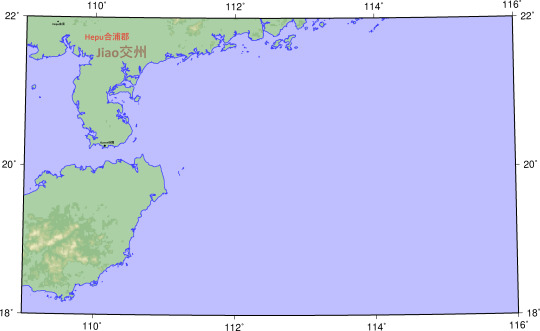
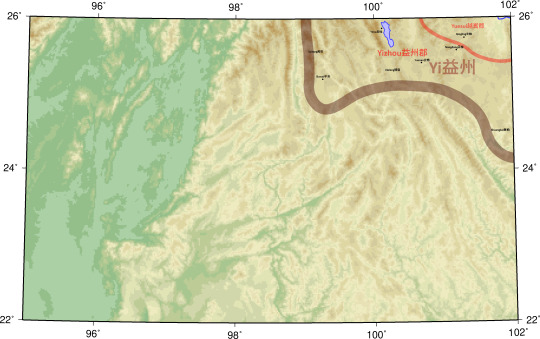
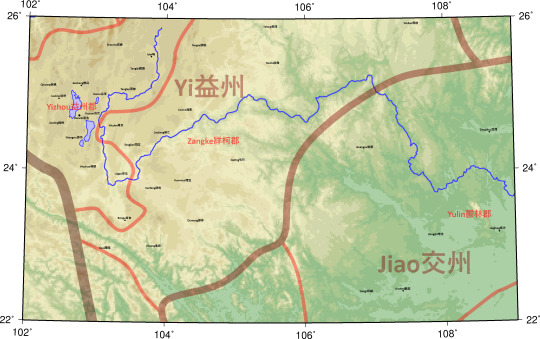
The maps below show the structure of the five far southern commanderies as they appear in the geographical treatise in Ban Gu's Hanshu, describing the situation in 2 AD. Here they are said to belong to Jiao province交州
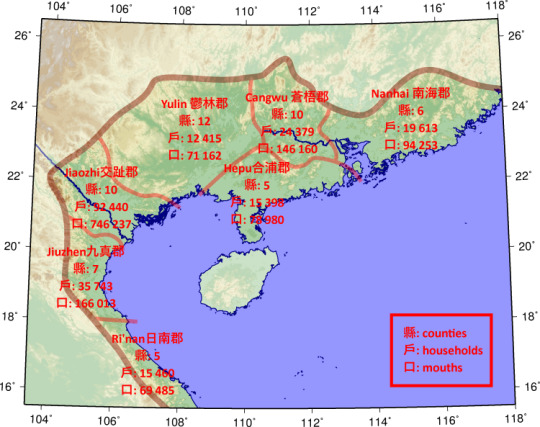
From this it is clear that Jiaozhi交趾郡 had the highest tax-payer density in the province by a good margin, with 23.2% of the total households (followed by Jiuzhen九真郡, 9.0%; Cangwu 蒼梧郡, 6.1%; Nanhai 南海郡, 4.9%; Rinan日南郡, 3.9%; Hepu合浦郡, 3.9%; Yulin 鬱林郡, 3.1%).
Complete list of counties:
Nanhai南海郡: Panyu番禺, Boluo博羅, Zhongsu中宿, Longchuan龍川, Sihui四會, Jieyang揭陽.
Yulin commandery鬱林郡: Bushan布山, Anguang安廣, Alin阿林, Guangyu廣郁, Zhongliu中留, Guilin桂林, Tanzhong潭中, Linchen臨塵, Dingzhou定周, Zengshi增食, Lingfang領方, Yongji雍雞
Cangwu commandery蒼梧郡: Guangxin廣信, Xiemu謝沐, Gaoyao高要, Fengyang封陽, Linhe臨賀, Duanxi端溪, Fengcheng馮乘, Fuchuan富川, Lipu荔浦, Mengling猛陵,
Jiaozhi commandery交趾郡: Leilou羸𨻻, Anding安定, Goulou苟屚, Miling麋泠, Quyi曲易, Beidai北帶, Jixu稽徐, Xiyu西於, Longbian龍編, Zhugou硃迸
Hepu commandery合浦郡: Xuwen徐聞, Gaoliang高涼, Hepu合浦, Linyu臨允, Zhulu硃盧
Jiuzhen commandery九真郡: Xupu胥浦, Jufeng居風, Dupang都龐, Yufa餘發, Xianhuan鹹驩, Wuqie無切, Wubian無編
Rinan commandery日南郡: Zhuwu硃吾, Bijing比景, Lurong盧容, Xijuan西卷, Xianglin像林
12 notes
·
View notes
Text
Scraping benefits, different parts of the different roles
Scraping is a common folk traditional Chinese medicine health care method, mainly through the meridians to pass through the meridians, so that the body to achieve detoxification effect. Common with back scraping and facial scraping.
The role of Gua Sha
1, scraping eyes, can improve eyesight
When it comes to scraping, I believe everyone will not feel too strange, because we are doing eye exercises, but also on several points which are very familiar with.
The scraping instead of fingers rubbing, can form more effective stimulation of the acupuncture point. First use the scraping points, according to the eye of the Ming point, and then the bright eye as the starting point, the outer canthus as the end, respectively, from the upper eye socket and lower eye in two directions scraping. Can improve the eye around the meridians, Qi and blood movement, relieve visual fatigue, dry.
2, shave soles, relieve insomnia
Patients with insomnia can shave their feet before going to bed at night to help promote sleep and relieve headaches. The first method is to heel direction from a foot full foot scraping, scraping the heat and then scraping plate single angle scraping the central arch yongquan.
3, shave sternum, wide chest Qi
Many people are in a bad mood or very tired, have some shortness of breath feeling, this time, we can take the scraping comb from the single angle of scraping slow down since the second half of the sternum.
There are eight points in the "gas" Tanzhong this position, to stimulate the acupuncture points have wide chest Qi. In addition, people who love hiccups can often scratch this part.
4, scraping hands and feet, line Qi Tongluo
Women often suffer from cold and cold symptoms, and Chinese doctors believe that this is mainly related to the lack of Yang Qi in the body or the sluggish running of Qi and blood. It is recommended that you scrape the palm with the scraping board. After the palm is hot, wipe the four sides of the finger with the flute on the scraping board, and scrape it 5 or 10 times from the root to the fingertips. The same can be used to scrape feet.
5, scraping the abdomen, can catharsis
Chronic constipation will not only affect digestion and absorption function, but also make the body absorb toxins. Usable scraping board surface in the abdomen from top to bottom, from left to right sweep scraping. It should be noted that if there is an internal sag, it should be scraped upward.
6, shave neck, invigorate the tendons and tendons
If you feel the neck and shoulder discomfort, so it is most probably because of long-term work led to the "occupation disease", can be achieved by scraping Huoxueshujin, so as to improve the local blood stasis effect.
0 notes
Photo

Two kinds of Qigong exercise to prevention before disease onset
Through the movement of limbs and body Qigong can promote the meridian flow, and the use of breathing and mind regulating qi and blood circulation, so as to achieve weight loss, skin care, and prevention of various diseases, therefore, qigong plays an important role in the "preventive treatment of disease".
Two kinds of Qigong exercises:
The dynamic reactive power
The first step: arms and abdomen. Lying in the back of the head to the mat, natural straight arms, hands buckle, arms ears shrink abdomen, the scapular upward repeated 25 to 50 times.
The second step: the abdomen hips. Lying on the floor, his hands flat on the floor or the arms close to the chest in his knees, making them into 90 degrees shrink abdomen, buttocks off the ground so that the legs move upward movement range is very small, only the hip, without shaking legs, repeat 25 ~ 50 times.
The third step: left and right ridge. Lying on the mat, hands on the abdomen, the left lower limb was like walking down the stretch, the activities of paraspinal muscles, repeated 25 to 50 times.
Static
The first step: breath. Also called pranayama". That is decomposed into suction, stop, breathe slowly and call three stages and mix thoroughly, make steady breathing. Conditioned reflex nasal respiration nasal suction, gas sink dantian. When breathing, the brain must be conscious of induction, the gas sink Dantian, gradually, patiently conditioning.
The second step: omphaloskepsis. Also known as the "heart", namely in the mind activities, to imagine a five inch intra-abdominal umbilical at Qihai point as the center to form a spherical, to focus on ideas, eliminate distractions. The meaning should be natural, not to defend, also can not be strong, should be like to keep watch. The better the more static effect, stable quiet half sleep state, the higher nervous center played a protective inhibitory effect, combined with natural and gentle visceral activities, so that each part of the body function returned to normal physiological state. When you practice breathing, you should keep your breath, and feel the gentle, natural, comfortable and smooth breathing".
The third step: slow closing. Finished not to rush up to the navel as the center, with a hand on the navel, another palm stick in the hand on the back of his hands at the same time, to the navel as the center from the inside out, rubbing, ascending slowly circled, the left thirty ring. After a short pause, and then from outside to inside, from large to small circle, turn right thirty times, to the navel stops, is closing. Then you can move your body at will, but don't do strenuous exercise.
Note: the correct understanding, to really improve the effect of false existence, follow the guidance, persevere grasp the essentials of step by step, pay attention to summing up, anti detours.
Practicing asceticism to a certain extent, will feel a warm gas gas gathering, storage in the true sense. Extending to customers, back to rise after a long, Du Meridian Jiaji, Baihui, jade and so on, go down along the meridian, Ren from "Tanzhong" back to "Dantian points", appeared by Ren and Du cycle feeling small Sunday circulation. Further exercise, it can appear along the body's twelve meridians and the eight extra meridians circulation feel Sunday circulation. This practice, people can feel the body meridian smooth, full of go.
Needs to be emphasized is that the static and dynamic reactive power should be combined with each other, and to persevere in training, in order to achieve the best effect. The dynamic reactive power through the blood to make Shujinhuoluo motions through consciousness induced respiration can run in both directions unblockedly, will gather to Qi Dan Tian, run body combination, played a total of illnesses, fitness, weight loss, skin effect.
http://www.tongshanmed.com/tcm/qigong/1831.html
0 notes
Last Seen Blogs

youngnstars
#forever

juggal04l1fe
Many things

hour-of-unnecessary-royalty
High Love & Emotion

polsekbojonegorokota
Tanpa judul

radiogagaga
kiLLer qUEEEEn