#roaming world
Text
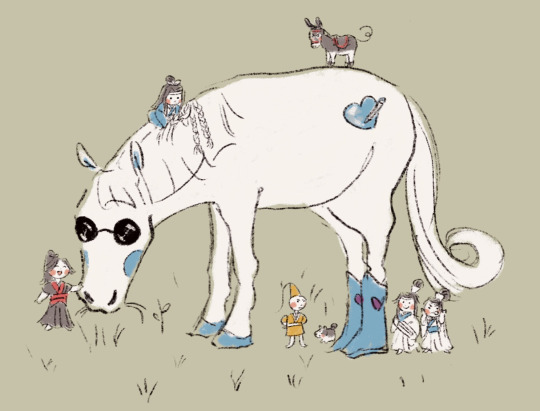
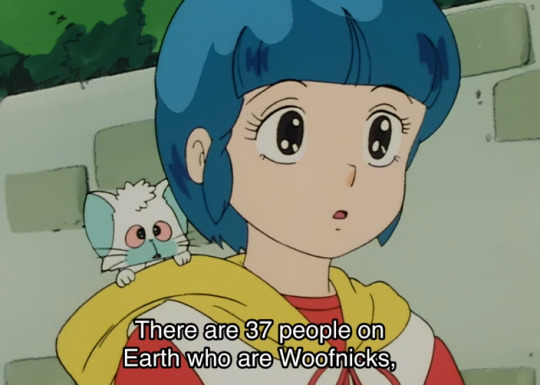
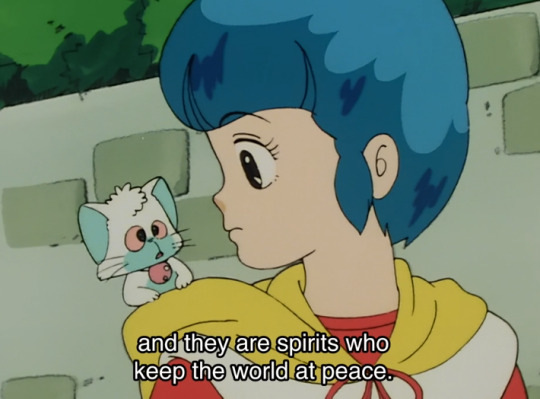
adventures in bookbinding: making the negret colophon playing card book!

it's diy girl summer and i am Bored. time to attempt a completely new craft with zero research except for like. 3 youtube videos!
so, to start off, i suppose i will ramble a wee bit about my plans/goals/reasoning. truth be told, i just really really like my blorbo who book binds and i think it would be very fun to become Just like him for real. therefore we will be embarking on a journey!! to become my blorbo and also find something crafty to do today. quick psa that this is not a real tutorial because i have absolutely zero experience, but more of a general guide and/or craft with me! let's do this in sectionssss!!
1 - the plan!!
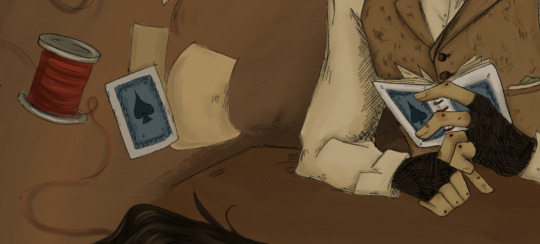
so for my first bookbinding project we are going to do something small, starting out by being silly and taking a page (lol) out of negret colophon's book (lol....) when he makes a tiny book and uses two playing cards as the covers. this will give me a little tiny trial run so i can learn the basic skills and use easily available materials around my house!! afterwards i think i'll sketch out a more ambitious journal idea - i have lots of fabric lying around that would work perfectly to cover a cardboard cover. wow, that's wordy! so! without further ado let's begin :) negret's little bookbinding project is described in the first chapter of raconteurs in this little excerpt here.
seems simple enough!! also the absolute perfect beginner project. it is tiny and the materials consist of Literally Anything. let's get groovy!!
2. materials!!

here's what we're working with:
playing cards! i found a deck lying around in a random drawer somewhere and chances are you have one laying around too. i chose the ace of spades and diamonds, because the text specifies a pair of aces but i couldn't find a matching pair, lol. i was also very tempted to choose one of the king cards as an homage to maisie's story later on (and because the king cards are absolutely gorgeous and detailed) but we're sticking to canon right now. we'll use the other cards for a future project.
needles!! a lot of the tutorials i see use very big or thick needles but i don't have those and this is also a very small project, not a huge journal, so any can work.
thread!! use whatever color you would like! at this point i was very indecisive because i have a lot of options and they're all quite pretty colors, but i settled on red later.
an assortment of papers!! use literally whatever you have lying around. for me, i managed to dig up the one scrap of newspaper in my house, since that's specifically listed, but most of my pages were from a book i sacrificed for an old art project, magazines and flyers, a lot of which were college mail because we're at that point in my life, lol. this is a recycling sort of project. choose anything! the more variety the better :)
i didn't display these in the photo, but if you have an awl, use an awl! i do not have one so i improvised, which i'll elaborate upon later. also, scissors! to cut the pages to scale. a ruler also came in handy :)
alright, now that we have all our tools in order, it's time to get into it :)
3. creating the pages!!
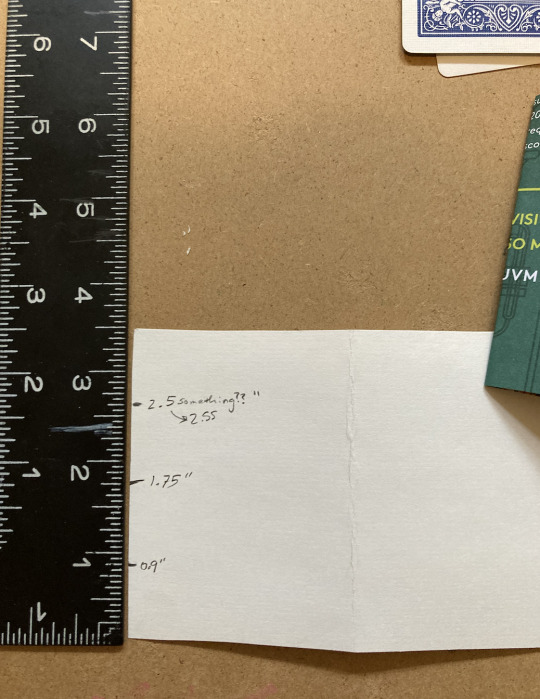
our first step is to measure our playing cards! you might not have to do this step because i'm fairly certain most cards are uniform in size/make, but check just in case, lol.


my cards measured to be 2.5" wide and 3.5" tall. i am no mathematician but using my singular brain cell i deduced that the papers should be twice the width of our cover, since those will fold to be the same size. so, using my Expert calculations, i made a little template cut from an index card measuring 3.5" x 5".

now we get to cutting!! using your various materials, cut out a bunch of papers to the size of your template. i just cut around it because i could not be bothered enough to waste time tracing, lol. i didn't go in with a plan, but i cut 16 papers to this size, which ended up being perfect. here are all my pages !! look at all the colors and textures!! the fun thing about the project being so small is that you can specifically cut the pages as the most interesting photos or sections, or you can even do it at angles too. as long as it ends up the right size, anything is fair game

now, we're going to make the papers into signatures! i just learned this word today lol. essentially, we will be grouping our papers and then folding those in half to become little mini books/pages. since i had 16 papers, i made 4 signatures with 4 pages each.
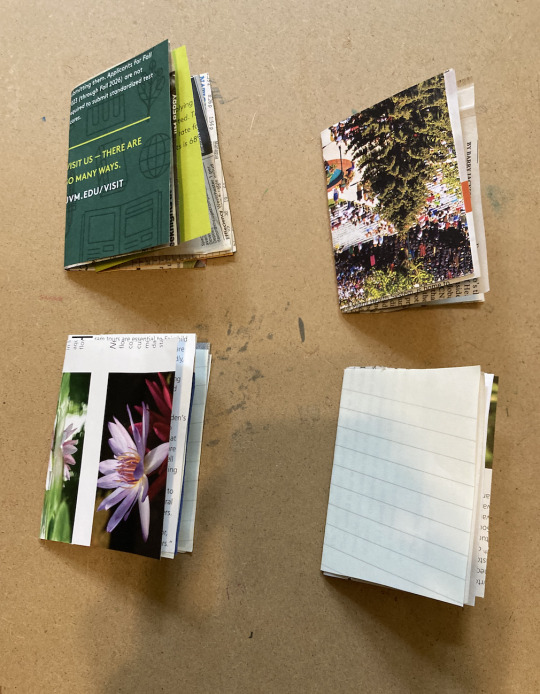
at this point i was tempted to go cut up more and make a fifth signature, but i decided against it since i didn't want the book to become too thick, and 4 sets with 4 papers each ended up being just about right. one of the tutorials i watched suggested that you group your signatures with paperclips or bobby pins, and at the time i waved off the suggestion but i totally agree now. i didn't have any clips to work with and i managed fine without them, but it definitely would have been easier if i had. so if you have them, use them! it'll make your life better lol. at this point you can stack your signatures together and itll look like a book!
oh yeah now we're cooking!!
4. preparing for binding!!
it was at this point in the process where i ventured out from knowing what i was doing to completely balling, but everything turned out okay and i'll walk you through it! our next step is to create the holes with which we will sew our signatures together. we're going to mark those off. once again i have zero clue how to do math but i managed to use my giant incredible smooth brain one more time to mark my template with a few equidistant points with which we can mark our signatures.
in case it's not clear, i kind of just counted the lines and then had to look up how much that was, but you can also just eyeball it if you're good enough. side note, i added two more holes after this, with one just below the very top and one just below the very bottom.

pardon my very unsightly nails, lol - here's how i used my template to mark the very center of each of my signature. you'll want to mark the point on the center line where you folded it while keeping the pages of each signature together. HOPEFULLY WITH A PAPERCLIP. and without further ado it's time for the stabbing!
now...here's where i got a little bit sacrilegious. you'll recall that earlier i mentioned how i don't have an awl in my possession yet? well, i managed to improvise a solution...

yes that is a sewing pin. IN MY DEFENSE it's all i had, and functionally it's basically the same as an awl! just on a much smaller scale. it worked out though - i imagine that if i'd been using thicker paper it would have posed a bit of a problem but for this project specifically, it was fine. do not kill me book binders. now it's time to get serious...
5. the binding
everyone stay calm! stay calm! it will be okay. i was lowkey intimidated by this part as this was Truly out of my depth of expertise, but i promise it's not that complicated. you're going to get your needle and thread now - i settled upon this gorgeous red color because it contrasted nicely with the playing cards, and there really wasn't much red in the papers i chose.
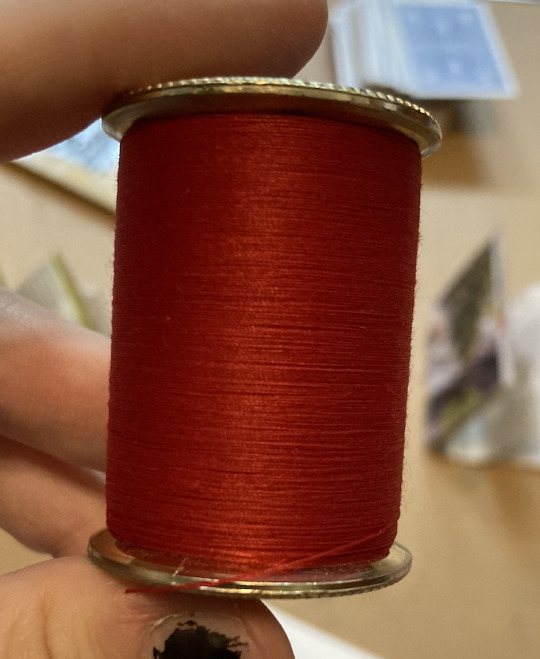
gorgeous!! tbh i always knew i'd go with the red because i've always envisioned the book with red thread anyways. like come on look at my very first drawing of negret WITH it. literally the exact same materials. i simply had to.
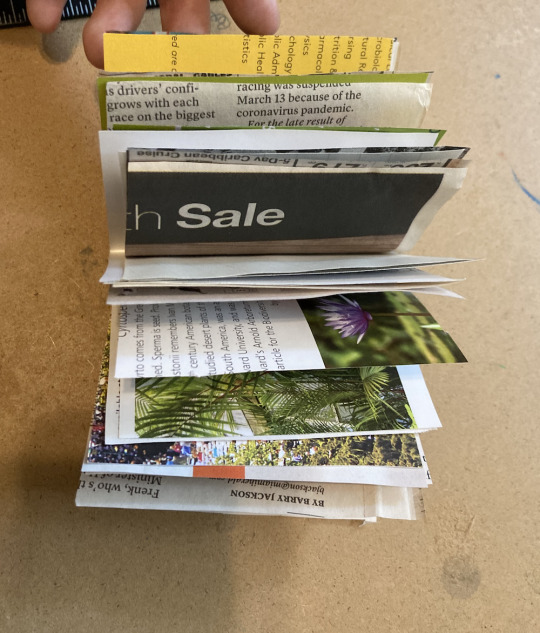
okay. now to the binding part. i don't have any real photos or insights or instructions for this whole stage because 1. i was deep in focus mode and 2. entirely relied on a tutorial for this part. here's the tutorial i used - massive shoutout to this lovely lady ! my spine didn't turn out nearly as neat as hers because i did not properly follow directions for the first bunch of knots (and i had to kind of improvise with the cover) but here's how it turned out!
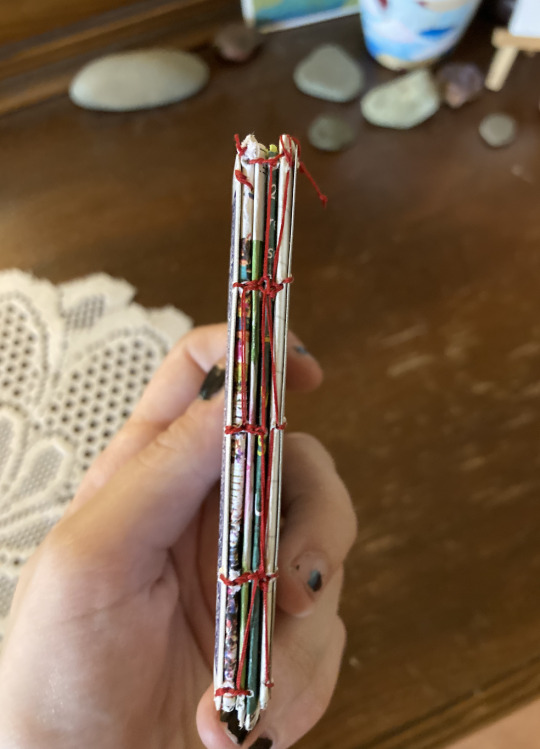
not too bad for my first book, lol. try not to stress out about it being perfect because this book is not supposed to be perfect! the imperfections give it character. worst case scenario, if you really mess up, your eclectic book is just a little more eclectic than intended. and that's never a crime :)
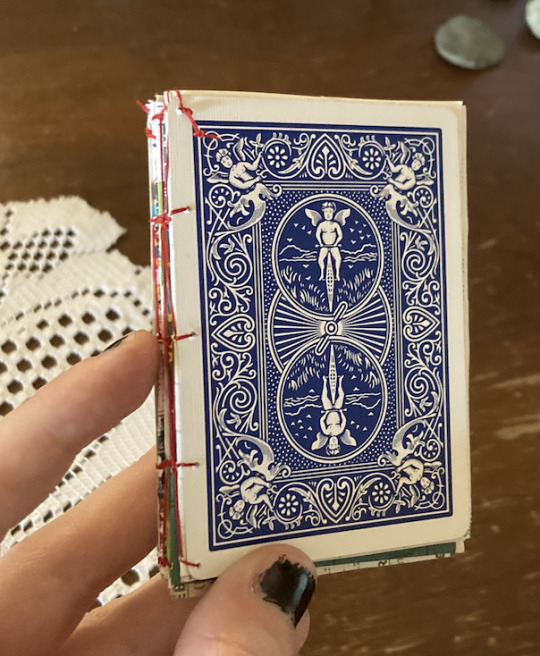
now the one problem i had to figure out on my own was how to attach the covers, since most tutorials explain how to attach actual big separate covers and not - essentially paper. i ended up just... attaching them as if they were another page or signature to the front and back. my holes on the covers were a few millimeters away from the edge, though, since there's no crease or fold to align them with. what i did was essentially do the first knots/stitching on the signature like the tutorial said, but for each hole i sewed through in the first/last signature, i also made an additional loop through the adjacent hole on the cover. you can kind of see how i passed my needle through like instructed and then took a little extra detour to stitch the card as well. in some places i ended up making new holes in the signature too that were closer to where the cards' holes lined up?? try not to do that but it worked and it looks fine so really whatever makes it attach and hold is perfect.
6. bask in your glory!!!
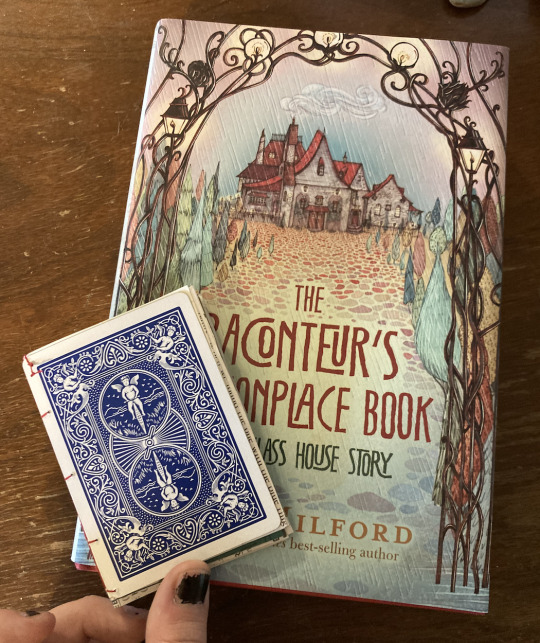
aaaand that's it!! you did it!! this was a ton of fun to work on and i absolutely loved making this little adventure into a new craft with something so near and dear to my heart. if you make one please be sure to tag me!! i would love love LOVE to see :) here's an additional picture of my little monster (+ next to the legend himself. art credit to me lol. look the books are twinning!!)

#the raconteurs commonplace book#raconteurs commonplace book#green glass house#nagspeake#roaming world#uhhhh#bookbinding#book binding#genuinely i dont know if those are separate words or not. either way LDJKGLHSDJG#crafts#crafting#arts and crafts#yippee this was actually so much fun#to quote alex of vfdiscord fame “the self blorbofication of quill”#it's too late i'm in too deep i'm literally him now#quill crafts
51 notes
·
View notes
Text
The envy Arthur and Lancelot would have had for each other must have been insane.
Because Merlin is secretive with Lancelot. He tells him things he would never tell Arthur, he opens up to him and Arthur knows he can never have that trust. Never have that closeness not while he’s king and Merlin a servant.
But to Lancelot he’s been secretive about protecting Arthur. It all resolves around Arthur, opening up about protecting Arthur, giggling over using magic to please Arthur. Lancelot knows it will never be him on the other side of the devotion not like this.
just like he will never be Gwen’s because she loved him once yes but at the end of the day it’s Arthur she chooses.
and in Arthur’s eyes Lancelot is Gwen’s first love will always be known as such and will always be looked at as such even if she loves him she loved Lancelot first and Arthur can’t help but think if she could have him she would.
Anyway I’m so sane about them and at the end of the day how they still understand why it’s like this because they would choose the other as well.
#bbc merlin#arthur pendragon#lancelot du lac#can y’all tell I’m insane#they drive me crazy#Anyway they’re all one big happy polycule rn roaming the modern world and everything is going well amen#Might delete this later when I decide I’m not making sense like I want to hope y’all get the message#guinevere#merlin#mercelot#gwencelot#merthur#arwen#Arlance kinda
500 notes
·
View notes
Text

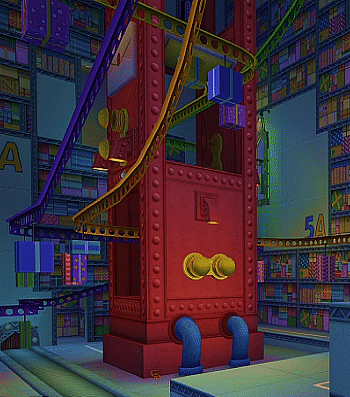
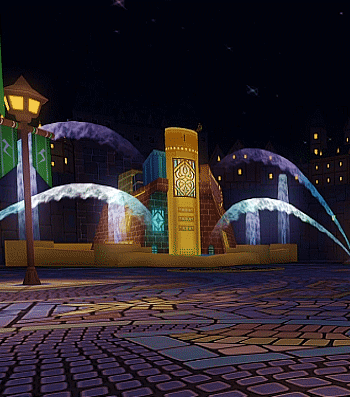

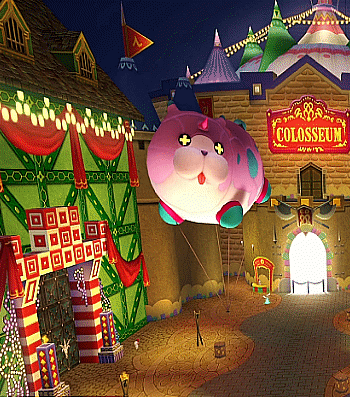

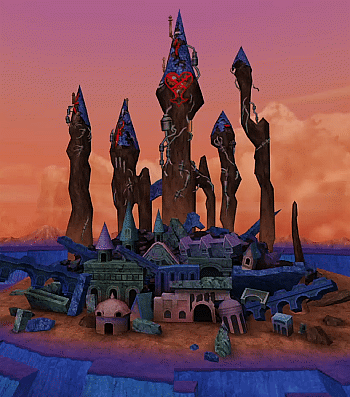
Kingdom Hearts Dream Drop Distance - Traverse Town
#kingdom hearts dream drop distance#khddd#traverse town#scenery#my gif#trying my hand at giffing the worlds of this game despite the lack of a first person view (something i'm very upset about)#so i have to obtain and edit these shots in a very awkward manner#all while constantly being shoved around by my dream eaters#i'm so serious when i say making this set was really really frustrating lol#i can't find a free roaming camera mod or anything else that would be helpful for me#but i'll keep at it because i love looking at still shots of video game environments#and being able to share it with other people who enjoy it too#ANYWAYS traverse town is so beautiful in this game they added so many gorgeous areas with pretty glowing lights#i like the wacky whimsical mail room too and how there's this entire secret workshop hidden beneath that weird mailbox haha#the world really does feel magical and dreamy especially with its updated music#just realized the stars in the first gif are moving which is strange
480 notes
·
View notes
Text
#palaeoblr#prehistoric life#jurassic park#walking with dinosaurs#nyehehehehe#dinosaurs#prehistoric planet#land before time#when dinosaurs roamed america#dinosaur revolution#prehysteria#ice age#disney's dinosaur#we're back!#dinotopia#dinoverse#jurassic world#prehistoric park#chased by dinosaurs
882 notes
·
View notes
Text
A long time ago- (orz Im so sorry it took this long)
someone requested a crossover in someway with Barbie Fairytopia and Detroit: Become Human
So here is the Karafam meeting Bibble for strawburryusagi 💖
Christmas discount for art prints on my INPRNT under the cut | speedpaint

#p.s Idk what to feel about barbie androids#never mind different versions of them roaming around the amusement park#like the actors on Disney World- but they're sentient now so Barbie and Kara can hang out <3#detroit become human#dbh#judeshottoart#feb2023artprompts#dbh kara#dbh luther#dbh alice#luthara#barbie#barbie fairytopia#barbie bibble
209 notes
·
View notes
Text
Butcher/slasher ghost au thingy: Part 1
Part.2 Part.3
Ex-military(dishonorable discharge perhaps?) Butcher simon who's this massive 6'4 wall of scarred and tattooed muscle, meeting some 5 foot nothing wimp who looks like a scare short of a heart attack.
Immediately decides yea, that one's mine. They can't figure out how to order meat for gods sake, how are they gonna survive? You look soft and kind - not good for how fucked this world is.
Cue menacing shadow at your back that you think might kill you, meanwhile he's trying to figure out what yall are eating for lunch today.
He just wants a friend!!! He's been trying to embrace the civilian life and let go of the strict structure of power hes grown used to but it's hard. Ppl don't listen so easy like they did when he was a lieutenant. :(
So now he's essentially intimidated his way into you sharing meals with him and he's just so pleased.
Just really gruff and demanding but he swears he's never been so soft, he's practically a teddy bear!!!
But uh oh turns out the guy you convinced yourself wasn't killing people actually was - but the meats still good!! Also not human so don't worry!! Simon gets to hunt down threats to safety as a reward for mainly good behavior.
#simon ghost riley#simon riley x reader#writing prompt#hes just gotten so used to guiding and even protecting those under him he doesnt know what to do with himself!!!#just an awkward guy who thought the only way hed leave the military is by a shot to the head#now hes gotta adjust to civy life and actually have a plan for the future like huh???#sees all these normal people making connections and being happy and thinking man maybe that might be nice#but the man cant just let monsters roam the streets!!! hes dedicated to cleaning this world up even if he cant do it so large scale anymore#simon riley au#ghost mw2#odd blurbs
144 notes
·
View notes
Note
Sorry I'm a bit late on this, but I just wanted to say congrats on finishing season 1 !! 🥳
LOSING MY MIND AT HOW PERFECT THIS IS!!!!!! THANK YOU PIO!!!!! B'*)
#fanart#This is so so so sweet...seriously thank you so much for everything pio#I'm ENTRANCED!!!!!! I've been ponyfied!!!! with the boots and cutie mark to match!!!!!#you're a huge inspiration in so many ways B'''*)#And the little creatures...they are so small but so perfectly shaped#Miss apple is PERCHED. Little Wangji is BRAIDING. Little WWX is living his best life (that face is..so cute)#little jing lin and fairy....aughh my HEART#and of course the lan junior duo.....standing smiling and standing silly. As they should be.#They are also height accurate to canon form <3#I was wating for someone to point it out but...there's a reason everytime I draw them next to flowers they are small B*)#all pd-mdzs characters are ~5-7 cm tall. They are like little fairies. I was serious every time I referred to the little strands as antenna#Rather they are like little borrowers. They have little mouse paws and tails. little mouse noses. Fine little whiskers. In my heart.#the more you know!#(I will draw them as the creatures they deserve to be. One day.)#On a meta level they are also very small. Each square panel is 1/4 of a sticky note. about 8 comics fit on one page.#Scrolling back up to look at Pio's art again to remember what its all for. That living is worth it.#Kissing this art gently and accidently hitting the post button to let these beautiful creatures roam the world wide web.#Maybe I should draw my sona as a horse for a bit... It would solve my problems about not having enough horses to draw....
198 notes
·
View notes
Text
Thinking furilumi thoughts rn
What if Lumine invited Furina to join her on her adventures. Of course she should let her have all the rest she wants first but Furina is what? Early 20s newly mortal and got her whole life ahead of her now, having been trapped as the archon for 500 years I bet she's never really been to another nation. I'd be awesome for Lumine take her outside Fontaine and experience everything teyvat has to offer. And I think it would be good for her mental health to not be stuck in Fontaine all her life.
Lumine showing Furina all her favourite places, introducing her friends and teaching Furina all the recipes she's learned over her travels. Lumine slowly realising that she really likes Furinas company and this is the first time she's had a long term adventuring companion (that's not paimon) and that whoops she may be a little in love with her actually.
Furina for the first time in her life being genuinely 100% happy and not feeling like anyone has any expectations of her or that she has to put up a facade and she can just enjoy herself. She learns more about herself and the places around her, I think it would take her longer than Lumine to develop feelings or realise she's feeling them in the first place.
Also think I'd be rly funny if she just sends Neuvillette bottles of random water from places she's been.
#She would write letters to her friends back in Fontaine and tell them about stuff#Anyway I kinda wished she would become like wanderer or kazuha and just roam around a bit before finding her place in the world#Furilumi#genshin impact#Neuvi getting a letter that just says 'guess where I've been :)' and a bottle of murky ass water from the bottom of the chasm#This has been sitting in my drafts for like 2 weeks and then someone posted a fic on ao3 of this exact concept I am eating good 👍
85 notes
·
View notes
Text


Forspoken • I never thought I'd see you again...
#forspoken#forspoken spoilers#forspokenedit#vgedit#gamingedit#frey holland#alfre holland#tanta cinta#tanta of love#dailygaming#gamingnetwork#userbamf#thelvadams#ilikedetectives#userwolfkissed#userairika#phoenixiancrystallist#mikaeled#games#video games#gaming#my stuff#square enix#Can we talk about cinta's expression?#because damn she looks so... so unsure almost? afraid? and that is quite understandable#21 years roaming the world as a monster and then her girl brought her to her senses only to know that this moment would come#but she knows and almost expects frey to be really upset and she is but it is so much more than that#frey almost looks like she is in awe until she realizes it#uuh i lovel them and this relationship how often do you see this?
50 notes
·
View notes
Text
Chengxian AU where there's no war BUT WWX gets de-aged Detective Conan style and while the two of them are freaking out over it and have to present a cover up for why JC's roaming around the jianghu with a child that suspiciously resembles WWX. So on one hand you have the de-aging villain conspiracy, on the other hand you have Madam Yu getting closer to a heart attack from a wholly different set of rumors.
#''why are you roaming with a child jiang-gongzi'' ''ERRRR— THAT'S MINE PUT THAT DOWN!'' ''....'' ''Jiang Cheng.......''#''fellas you won't believe this BUT—''#chengxian#wei wuxian#jiang cheng#grandmaster of demonic cultivation#mdzs#mo dao zu shi#kk's rambles tag#(xianxian really became three. That made everything worse for everyone.#wwx: I have a solution *takes out a talisman* JC: absolutely fucking not)#(*cue the talisman producing effects the cultivation world has never imagined*)#(on hindsight this probably sounds closer to the scum villain extra. Even if I am in fact thinking of actual detective work in the style of#dc such as ''saving the day by kicking things with football'' but instead it's their special kite. Yk the one JFM donated his spine to make
33 notes
·
View notes
Photo


SUBMERGED: HIDDEN DEPTHS (2022)
#submerged#submerged game#submerged hidden depths#gamingedit#indie games#submerged 2#video games#games#otheredits#this thing roaming around the open world was my favorite part of the game ngl#much spook
807 notes
·
View notes
Text
incoming!
rinharu-ist (me) is about to have a rinharu thought:
it's been 2 years since the release of free! the final stroke part 1 and i still think of that scene where we're watching haru through a viewfinder during an ?interview and when he's asked, "what changed your life?" it immediately switches up to a scene of middle schooler rin...
...and both of them are in detention over some stupid, probably disruptive argument they had during class. classic rinharu. but that's also exactly it - that's as close as we'll get to our stoic, moon-coded boy nanase haruka admitting that it was rin, specifically rin, who changed his life for the better.
i want to crawl into haru's brain and open all the rin-shaped boxes that lie there like i'm a child waking up to presents on x'mas morning. i want to open the box that hides the first thought he had of rin. i want to greedily open all his rin-shaped boxes in chronological order to piece together the way his mind processes rin's very existence; to bear witness to how the person haru initially thought of as annoying or a bother, eventually became one of the most important people in his life.
i also want to understand the inner-machinations of his mind pertaining to ALL THE YEARS haru thought he lost rin or hurt him, and how he wanted him to know he wanted to swim with him, ergo he wanted him back (in his life) at all cost.
how the entire franchise ends with a scene of them standing across from each other on opposite ends of the train tracks in, where was it, hungary? just like they had when rin first bumped into haru after moving to australia.

the first reunion at the train tracks in japan split them apart for years; this second reunion at the train tracks in hungary will keep them together forever.
even if you don't think the kind of relationship rinharu has is inherently romantic in any way, you cannot deny that it is love.
and this is why i love rinharu I REST MY CASE.
#free!#rinharu#partrin says shit#aka i am still feral for these two#am sick so i finally have time off work and can roam the world of tumblr#NOBODY MOVE IT'S RINHARU#AGAIN
42 notes
·
View notes
Text


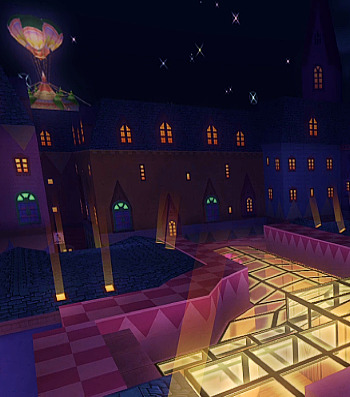
Kingdom Hearts 2 - Radiant Garden
#kingdom hearts 2#kh2#radiant garden#hollow bastion#scenery#my gif#this world is so big i did my best include as many rooms as i could#at least the most recognizable ones#i would love to be able to roam freely with the camera in this world it would have been so much easier to get better angles#it's so interesting how starkly different this world looks compared to radiant garden in birth by sleep
382 notes
·
View notes
Text
This is what Francis is starting to look like in my head. A beautiful dark-haired and dead-eyed man who gives you the unshakeable impression that he is unbelievably bored with the world at the moment


#hetalia#hws france#aph france#francis bonnefoy#also that Roman nose!!!#i can definitely see this francis roaming and wreaking havoc upon all of the known world alongside Napoleon#apparently this man is from new york and i find that very funny why does he give off such a strong french vibe 😭😭😭
26 notes
·
View notes
Text
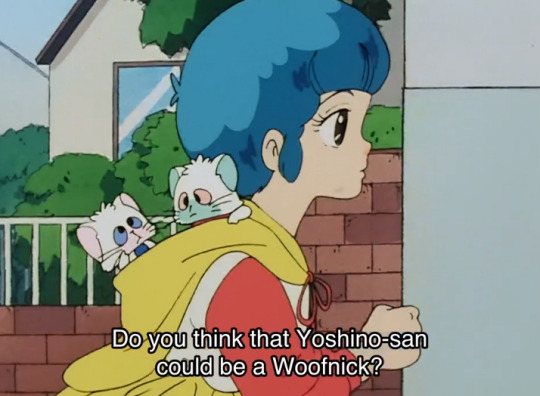


Creamy Mami is the kind of 80's cartoon that will just drop some batshit lore for one episode and never mention it ever again.
#majobun liveblogging#tbf this might be based on a real world folklore thing i just don't know about since they drop a lot of fantasy stuff in creamy mami#but still#magic creatures and aliens just kinda roam around in creamy mami land and that's neat
117 notes
·
View notes
Text
I forget about the whole Meryl seeing Vash’s literal memories, like someone directly witnessing in you pov the hell and anguish you lived in and you just gotta go on like that doesn’t auto lock a bond and your totally not anxious about what conclusions they came to. and then you find out their still chasing after you from the care in their heart?
that was moved over very quickly. How does Vash not want to pick apart Meryl's brain one night and compare her notes to thoughts and feelings his ignored, denied or just didn't have words for?
could he theoretically do it more? Just him and her at 2 am messing around accidently turn on Vash’s internal airdrop power, like that's just funny, them testing what he can and cant do with whatever plant powers left in his needle noggin
#trigun maximum#trrimax#trigun#vashmeryl#vash x meryl#meryl stryfe#vash the stampede#Damnit she just saw all that in HD vision i cant just let that roam around in the world
196 notes
·
View notes
Last Seen Blogs


heinzharaldfranzi
i’m going home

onibuscoffee
ONIBUS COFFEE
the-cursed-and-helpless-blog
The Cage

athenal21
Teenie Athenie 💕