#LouhisLusciousLarder
Text
Kreacher’s Captivity Recipes: More Good Biscuits

Since we’re all yet housebound (or have taken up baking), here’s, at general demand, one more of Kreacher’s easy-peasy quick-and-yummy biscuit recipes. For this ones, he’s aiming at emptying the pantry of all old dried and candied fruit. So with one dough you can get an immense variety of biscuits. It’s Kreacher’s version of shortbread, so it’s not shortbread, but butter biscuits.
Basic dough (Murutaikina in Finnish - crumb dough)
Makes about forty 5 cm (2 in) diameter round biscuits.
Ing List
200 g soft unsalted butter (I’ll try with half salted and I’ll keep you updated)
1-1.5 dl sugar (I’d go for 1 dl if you’re not fond of sweet stuff, or are planning to add chocolate, caramel or candied fruit)
1 egg
1 tsp baking powder
4 dl flour
If you really crave for plain sweet you can add 0.5-2 tsp vanilla sugar
Working the Magic 1: Basic Biscuits
You need to be quick, because there’s a lot of butter.
Mix together the soft butter and sugar until well combined and fluffy.
Add the egg, mix until well combined.
Add all dry ingredients (including chopped candied fruit, chocolate chips, or whatever you like) and mix quickly until smooth. It might feel a bit sticky at this point, but remember there’s a lot of butter. Don’t add too much flour over the prescribed 4 dl, because otherwise you’ll get rock cakes… and we know how those go down.
Put into the fridge to set for half an hour.
Heat the oven to 175 °C.
Roll the dough into a tube and cut into as many biscuits you want to make. Roll each bit between your palms and flatten, then put on a lined baking tray. Warning, those little devils tend to at least double in size in my oven... #bakingpowderpower but just remember to set them well apart on the tray.
Bake for about 10 minutes, or until nicely golden. Remove the biscuits from the tray and let harden and cool. Store in an air-tight container.
Working the Magic 2: How Can You Customize?
Up to 1 dl of any dried fruit or candied peel, chopped into small bits, or chocolate chips, bits of caramel, salted or not
Cinnamon
Swap 1-2 tbsp of flour for 1-2 tbsp cocoa powder (unsweetened)
Swap some flour for an equal volume of another flour (rye, spelt...) or oats
Mixed spice
Whatever comes to your mind and sounds yummy.
You can also decide to go for just topping them with icing (lemon juice + powder sugar)
I suppose matcha powder could also work (never tested though)
Or anything you feel like adding :)
Enjoy your experimentations, and tell us about them!

#LouhisLusciousLarder#Louhi#Biscuits#BasicBaking#cookies#butter#captivityfood#confinement#baking#indulgeyourself
2 notes
·
View notes
Text
Kreacher’s Captivity Recipes: Basic Breads

Since everyone at Grimmauld Place is at home, including some Ministry workers who love Kreacher’s cooking too much to abide by the rules set during captivity times, Kreacher has had to drop the fancy bread recipes to go back to something easy peasy and fast. So here are two basic bread recipes for you.
Yeast Bread (from the Finnish hiivaleipä)
For 2 loaves (top pic of the title picture):
0.5 l water (or part water part milk; a dl or so of milk helps the bread get nicely golden)
25 g yeast (some people put 35-50g)
1 tsp salt
1 tbsp sugar (or treacle; you can up to triple that amount, but I don’t like it sweet)
12 dl flour (usually 3 dl rye and the rest 'basic')
Baking the Magic
Warm the liquid to hand-temperature, and dissolve the yeast.
Stir in the salt, treacle/sugar and rye flour.
Add the rest of the flour by hand until the dough isn't sticking to the bowl or your hands. It must have a bounce though, otherwise it might end up hard as Hagrid’s Rock Cookies.
Leave to double volume under a towel in a warm and dry place without draughts.
Knead the dough well on a floured surface, divide it in two and make two loaves.
Pick the loaves with a fork or knitting needle.
Bake at 200°C in the lower part of the oven for half an hour.
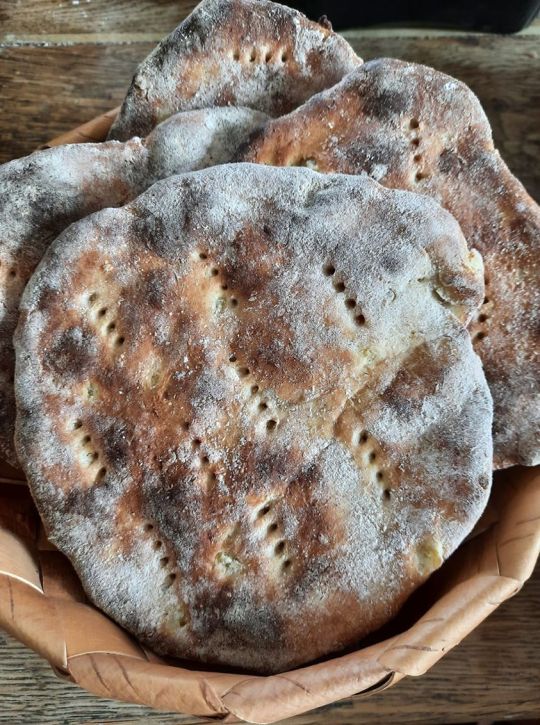
Use-Your-Leftover-Mash Flatbread (Perunarieska)
This flatbread is a traditional Finnish thing called rieska. You can make it out of flour too with the addition of crème fraîche.
For the potato ones (bottom picture of the title one -not mine, and just above, my latest perunarieska):
Makes 2-4 flatbreads
2.5 dl mashed potatoes (this must contain enough milk to make it useable)
Salt
1 egg
2.5 dl flour (-ish, meaning it roughly depends on how much potatoes you have and what variety they are) + some to sprinkle on the lining paper
Baking the Magic
Mix everything together. You might want to add the flour in batches, as the texture you want to reach depends on the potato variety and the chilliness of your mash.
Flatten the dough into 2-4 round thin rieska on a lined baking tray (I just realized most of you have never seen rieska before. They are about 12 cm in diameter and 4-5 mm thick). I sprinkle flour on the paper, and flatten straight on the paper set on the tray. You might want to use more flour to make it non sticky, depending on the variety of potatoes used.
Pick with a fork.
Bake at 250°C for 10-15 minutes until the rieska get brown flecks. In my oven, 10 minutes are enough. So check, because it would be sad to burn them.
Wrap the rieska for a short moment in a piece of cloth or towel to soften.
Serve warm with any topping you want (from jam to reindeer stew; my last batch I made because I had leftover mash and had it with leftover coronation chicken and bloody hell that was good. Unexpected meeting of cultures, I can tell you, but successful.).
Enjoy :)

#LouhisLusciousLarder#Louhi#bread#homemade bread#flatbread#potatoes#captivityrecipes#captivityfood#easybaking#baking#confinement
2 notes
·
View notes
Text
Kreacher’s Captivity Recipes: Make-Do Fried Rice, Quick and Easy and Tasty

Fried rice is a blessing. You can put whatever you want in there, a bit like pizza or kukko or pie or paella or soup. I guess every culture has their own way of using everything to make something wonderful.
Kreacher wanted us in Grimmauld Place to have something different from his usual excellent comfort food so he decided to improvise. He went for ‘only’ fried rice for lunch, but we were in for a treat. None of us was hungry after that. The ginger gave it a boost along with the garlic, the peas some freshness, altogether a taste of the outside world when you’re stuck inside.
Feel free to change anything in this recipe. That’s the whole point: what do you have in your kitchen/veggie basket/fridge/larder/pantry…. And use it.
For one person (so just do the Maths.... )
Kreacher’s ingredients
¾ dl rice (whichever you like -white, brown, red, black, long grain, round - as long as it’s not sticky)
1 big clove of garlic, finely chopped
Same volume of fresh ginger root, finely chopped
1 big spring onion, chopped
1 egg, beaten
3 slices of lardy bacon stripes, sliced (optional; gammon is a good substitute, but we didn’t have any, or stripes of tofu)
A handful or two of peas (frozen, fresh (the best obv.) or tinned)
3-4 tbsp oil (rapeseed is good but peanut is nice as well, and you might not need that much oil, it will depend on your meat and your pan)
(fresh herbs like coriander)
Working the Elf-Magic
Cook the rice as instructed on the package or the cooker or whatever you’re using.
In the meantime, chop all ings.
In a frying pan, pour some oil and add the meat/tofu if you’re using any, fry gently for a couple of minutes, then add the garlic, spring onion and ginger. Fry on medium heat until it smells nice, but the garlic is not burnt (otherwise it goes meh and gives a nasty taste to your food).
Add the beaten egg and scramble everything together until the egg bits don’t stick to each other. Add the peas and heat them, stirring regularly.
Add the rice and if necessary, oil. Fry gently for a small while, or until you reach the fryness you like.
Eat and enjoy.

#LouhisLusciousLarder#louhi#captivityrecipes#cooking#rice#friedrice#easyrecipe#quickcooking#captivity food#confinement
2 notes
·
View notes
Text
Kreacher’s Captivity Recipes: The Best Ever Chocolate Cookies
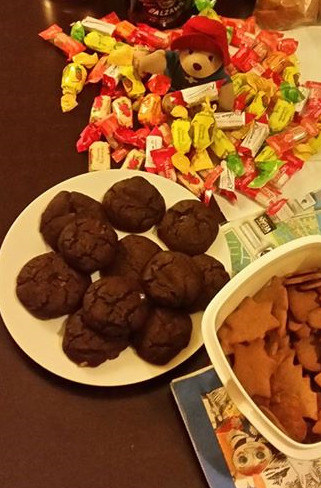
As part of being housebound, one of the things that come to mind is going through everything that’s been left unattended for ages, because usually we keep buying fresh stuff all the time, slaves as we are of consumerism. Using bits and bobs is something that make-do people have never forgotten, yet we seem to have (Kreacher has been talking about using old bits of cheese to make fondue, can’t wait!).
Kreacher has been raiding the pantry again and came back with bits of old chocolate (not TOO old. Still edible, but you know, those corners and bits you left in the package and said you’d use one day. Now’s the day.).
He decided to bake biscuits. We love Kreacher’s chocolate biscuits, because they are full lush. Scrumptious (as Gollum would say). Mainly because of the wee bit of salt that adds to the chocolaty fullness and chocolate chips that are just melted in the biscuits and make the actual chocolaty fullness.
Preparation time: half an hour
Cooking: 20-25 minutes
Serves: makes about 20 regular cookies, but I make smaller ones (1.5 inches, 5 cm), so I usually get about 30-35.
Ing list
100 g dark chocolate (don't use over 85% though, or add a bit more butter)
70 g unsalted butter
1 egg
70 g chocolate bites (or whatever you call them chips)
100 g sugar
120 g flour
1 tablespoon cocoa powder (unsweetened)
1/2 teaspoon baking powder
1/2 teaspoon soda
pinch of salt
Working the magic
1. Melt the 100 g dark chocolate on very low heat. When it's melted, add the butter, stir and let cool.
2. Add the beaten egg and the rest of the ing + a pinch of salt. Mix until the dough is homogenous.
3. Roll into a ball, wrap in cling-film or grease-proof paper and let sit in the freezer for 15 minutes.
4. Preheat the oven at 140 °C and put a baking tray in the oven.
5. Divide the dough into as many cookies you want to make. Roll the bits into balls, and place them on a sheet of parchment the size of your tray. Leave space between the balls, because they will spread during baking.
6. Slide the parchment onto the tray and put it all in the oven for 20-25 minutes, according to the size of your cookies.
7. Wait till they are completely cooled to remove them from the tray.
Enjoy.

PS: I usually make a double portion. I eat them too fast. Maybe during confinement you want to make only one portion due to lack of general exercise. Or better: make two portions and share with people who are strictly housebound :)
1 note
·
View note
Text
Kreacher’s Captivity Recipes: Mushroom pie
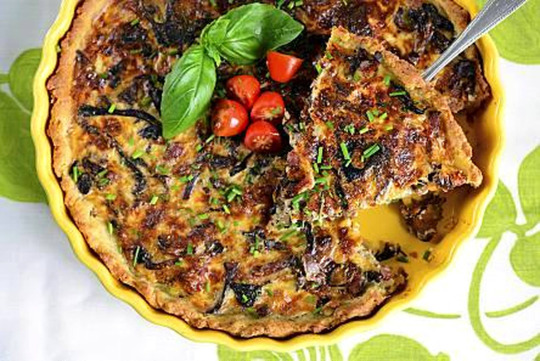
(Sorry the pic is not mine, I ate the pie… credits to is.fi (Iltasanomat), though their recipe is not like mine, but the pie looks similar)
Since most of the World (both Muggle and wizarding) are in captivity because of a leaking and fast-spreading virus (the fast spread being due to our modern ways lol), one of the ways of dealing with confinement is actually going through your preserves and pantry storage, and cook nice stuff. Kreacher decided that it was time to do that in our family home (he always cooks nice stuff, but not often empties the pantry), and he came to the kitchen one morning with huge bags of dried mushrooms, flour, butter, salt, pepper, eggs and everything that was necessary to make something that already smelled wonderful.
Have you ever wondered at how extraordinary the smell of dried mushrooms is? It’s the summer forest in Finland where they were plucked with love under birch trees along the lake, or the forest ditch slopes where they grew up next to a bear poo, along with the blueberries and wild strawberries you ate on the way. It’s the magical old forests of Northern Lapland where you can feel the age and other worlds collide and mix with ours.
Kreacher has always welcomed my return from my northern abode with eyes sparkling with excitement because he knows that when I come back, I bring along goodies that cannot be found in Grimmauld Place amidst the dog poos (see, bear poos are much better for growing mushrooms, because bears feed on natural stuff lol) and waste that people don’t bother carrying to the bin that stands a couple of yards away. So since we cannot go outside, let alone abroad, abroad must come to us.
Here’s Kreacher’s Mushroom Pie recipe:
You can buy a ready-made dough but given the circumstances you can make your own, it’s easy, quick and way better tasting. Plus you can use whatever flour you want to give a nice taste balance to your pie.
Serves 6-8
You need a 28 cm diameter pie mould (that’s 11 inches), a big bowl, a frying pan
Cooking time: 40-50 minutes
Preparation time: pastry 10 minutes with a machine, 20 minutes without, + 30 minutes in the fridge, during which time you make the filling.
Pastry
125 g chilled butter, chopped
3 dl flour (I used a spelt-rye-linen seed mix, but you can use whatever you want)
½ tsp baking powder
¼ tsp salt
50 g finely grated cheese (whatever you have, I used old mature cheddar)
2 tbsp cold water (I used the water I had the dried mushrooms soak in)
Filling
500 g fresh mushrooms
OR
200 g fresh mushrooms
5 dl dried mushrooms (I used half chanterelles and half funnel chanterelles, but again, use what you have)
OR
8 dl dried mushrooms
1 chopped onion (the bigger the better)
1 tbsp butter
2 tbsp dry white wine (a big glog lol)
¾ tsp salt
¼ tsp black pepper (I mix with white, the taste is interesting when you have tasty mushrooms)
200 g crème fraîche (I didn’t have crème fraîche due to human stupidity and selfishness in war time, so I used about 1 dl thick unskimmed cream)
3 eggs
100 g grated cheese (this can be bigger chunks than in the pastry, obviously)
1 dl chopped chives (dry or fresh)
Working the Magic
1. If using dried mushrooms, soak them in water while you’re making the pastry. The longer the better.
2. To make the dough, mix the butter, flour, baking powder and salt. If you have a suitable electronic device, use the cutter there to mix the ingredients until you get the consistency of breadcrumbs. Alternatively do it by hand.
3. Add the cheese and water (I used water from soaking the mushrooms) and mix until well combined. Don’t mix too much, it’d melt the butter and make the pastry soggy; you don’t want that.
4. Butter a pie mould (diameter 28 cm, 11 inches).
5. Roll the dough on a floured surface or on greaseproof paper and lower the pastry into the mould. Store in the fridge for about half an hour.
6. In the meantime make the filling. Chop the fresh mushrooms, and sieve and chop the dried ones.
7. Cook the mushrooms and chopped onion on a dry frying pan, until most of the moisture has evaporated.
8. Add the butter, wine and spices. Let it cook until the consistency is lush. Take off the heat and let cool.
9. Heat the oven to 200°C (390°F).
10. With a fork, pick the bottom of the pastry and blind bake in the bottom layer of the oven for 10 minutes.
11. Meanwhile, mix the cream and eggs in a bowl, add the grated cheese, chives and cooled mushroom mixture.
12. Spread the filling onto the pastry and bake it for another half hour -ish, depending on the oven, and how brown you want your pie. If you used a smaller mould and that therefore the pie is higher than the usual 2.5cm/one inch, it’ll take a wee bit longer.
Let the pie cool down a while before serving, with a salad, and/or bacon strips :P
This makes a nice captivity lunch, if you are alone you can freeze slices or share with your neighbours who cannot go out.
Enjoy!

#LouhisLusciousLarder#pie#captivity food#confinement#mushrooms#vegetarian#homemade#recipe#cooking#louhi
0 notes
Text
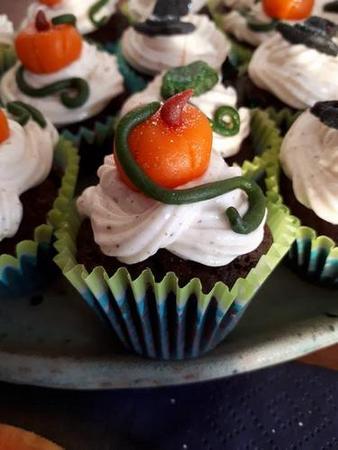
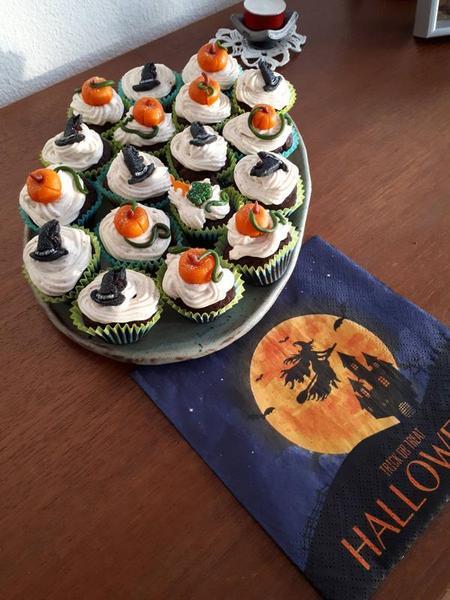
Hallowe’en Cupcakes

Hallowe’en is a special day at Hogwarts and in all wizarding families. This year I decided to help Kreacher with the preparations and started on Hallowe’en themed cupcakes. I am using three different batters (basic, chocolate and coffee and almond) and a couple of basic toppings. What makes those cupcakes really different is the decoration.
I don’t usually like the cupcakes that have so huge an amount of cream on top that it gets yucky. I favour chocolate topping or cheesecream.
I nicked the batter recipe from the Women’s Institute book (WI), because it’s the best batter ever. The pumpkin batter is credit to my imagination and some checks online to see if I was going totally the wrong way.
The pictures are from a cooking camp I had with teens aged 14, who tried their skills at making and decorating cupcakes for the first time in their lives. Be indulgent, but as Kikimora said, that shows they can do pretty well for a first time, and they are kids!
Each recipe makes 12-16 regular-sized cupcakes or 20-30 smaller ones, 30-40 nano.
Preparation time: 15 minutes + cooling
Cooking time: 18-20 minutes (less for the smaller cupcakes)
Those recipes use self-raising flour. We don’t have that this side of the Channel so here’s how to make it: Just add 2 teaspoons of baking powder for each 150g/6oz/1 cup plain flour.
If, like me, you live in a country that doesn’t sell buttermilk, it’s bloody easy to make it: for 250 ml milk add 1-2 tbsp plain vinegar or lemon juice. Let sit for 5-10 minutes to thicken. Ready! :)
This paper is built in four sections, so that you know:
A. The Batters
B. The Frostings
C. The Decoration
D. The Tools and Other Niceties Like Glitters and Colours
A. THE BATTERS
Rich chocolate cupcakes
75 g unsalted butter, softened
150 g caster sugar
2 eggs
50 g self-raising flour
100 g plain flour
½ tsp soda
40 g cocoa powder
150 ml buttermilk
50 g chocolate chips (optional)
Prepare your muffin cases. Preheat the oven to 180°C/350°F/Gas Mark 4.
Whisk the butter and sugar together until the mixture is pale and creamy. Add the eggs, one by one, whisking each time until just combined. Then add the dry ing and buttermilk (and chocolate chips if you’re using any), whisking ceaselessly until well combined.
Fill the cases to about the two thirds, bake in the oven for 18-20 minutes. Leave to cool on the tray for 5 minutes and then transfer onto a rack to cool completely.
So if you summarise, the stages of cupcake making are clear:
1. Sugar + butter, light and fluffy
2. Eggs one by one, just combined
3. Dry ing + whatever you want to add
4. Wets
5. Bake at 180°C for about 20 minutes (14-16 minutes for the small ones, 12-14 minutes for nano)
2. Now here are the ing for the almond and coffee cupcakes:
2 tbsp instant coffee, mixed in 50 ml warm milk
175 g unsalted butter, softened
150 g self-raising flour
175 g light brown soft sugar
3 eggs
½ tsp baking powder
100 g ground almonds
Use the same recipe as above :)
3. Buttermilk Sponge
175 g unsalted butter, softened
200 g caster sugar
2 eggs + one yolk, beaten
1 tsp vanilla extract
225 g flour
1 tsp baking powder
1/2 tsp soda
125 ml buttermilk
Use the same recipe as above :)
4. Pumpkin
This recipe differs from the other ones, because it’s made from oil rather than butter. I haven’t tried replacing oil with butter yet, but I will try one day because I love butter :)
220 g flour
1 tsp baking powder
1 tsp baking soda
1/2 tsp salt
1 ½ tsp ground cinnamon
1 tsp pumpkin pie spice (blend 1/5 teaspoon each of ground ginger, ground cinnamon, ground nutmeg, ground cloves, and ground allspice; I usually put more than the 1 tsp but it’s very much depending on how spicy you want it and what kind of squash or pumpkin you use for the purée.)
130 g dark brown sugar
2 large eggs
225g pumpkin purée (making it is easy. Just cook the pumpkin and mash it lol )
120ml vegetable oil
80ml milk
1 tsp vanilla extract
Same recipe as above :)
B. THE FROSTINGS
Each of the topping recipes enables you to cover the amount of cupcakes you baked following one of the above batter recipes.
Remember that if you want to prepare chocolate figures and colour them to decorate your cupcakes, you should start with them. You need the toppings to be freshly put on your cupcakes to be able to stick or place your stuff on them.
One of the easiest toppings you can use is basic chocolate ganache, again right from the WI, and the other one I don’t remember. It makes the cupcakes much easier to store because the chocolate is solid on the top, and the stuff you stick on it are less likely to fall down while you carry the cupcakes. And chocolate is just GOOD.
1. Chocolate Ganache
Preparation time: 15 minutes
75 g double cream (or thick runny cream, whatever the name it is in the part of the world you are; in Switzerland if you say double cream then your cream is so thick the spoon stands in it).
25 g unsalted butter
200 g dark chocolate, finely chopped
100 g white chocolate, finely chopped
Gently heat the whole lot of ing in a bain-marie until the chocolate and butter have melted. Stir from time to time. When the mixture is runny and homogenous, you’re ready to use the ganache.
2. Rich Chocolate Ganache
300 g dark chocolate (70%), finely chopped
125 g unsalted butter, chopped
6 tbsp double cream
Same recipe as above :)
3a. Cream cheese topping, fat version
200 g icing sugar
200 g full fat cream cheese (like Philadelphia), or 150 g cheese and 50 g quark (full fat too)
50 g unsalted butter, chopped
Combine in a bowl until you have a smooth icing. There you are.
Variations: use colours (gels are the best), use flavours (the zest of a lime or lemon or orange, or artificial flavours if you like, or the seeds of a vanilla pod).
3b. Cream cheese topping, less fat version
200 g full fat cream cheese like Philadelphia
50 g icing sugar
12 g melted butter
Mix the cheese and sugar together until firm, add the butter and mix for another five minutes.
You can add colours (a few drops), aromas (a few drops), spices (I LOVE adding cinnamon to that topping, it gives a nice warm feeling to the cupcake), lemon, lime, grapefruit or orange zest… Be imaginative!!
4. Marshmallow icing
I read that the USA version of Hallowe’en involved marshmallows. Here’s a marshmallow topping for your creepy Hallowe’en cupcakes!
1 large egg white
A pinch of cream of tartar
60 g caster sugar
75 g mini white marshmallows
Put the egg white and cream of tartar in a heat-proof bowl, and whisk until you get the usual soft peaks.
Gradually whisk in the sugar until the mixture is a glossy meringue.
Put the bowl over a pan of simmering water to create a bain-marie, and add the marshmallows. Whisk ceaselessly until the sweets have nearly melted. This takes about 5 minutes.
Remove from the heat and whisk for another 5 minutes until the marshmallows have completely melted and the mixture is thick enough.
Leave to cool for about 15 minutes, stirring occasionally, until the meringue makes soft peaks.
To use the frosting, you’ll need a piping bag (disposable or not) and nozzles, which can be star-shaped, shell-shaped, leaf-shaped. They come in all sizes and you can choose whichever you want according to the pattern you are aiming for.
If you don’t have a piping bag just use baking parchment to make one. Or you can also simply spread the topping on the cupcake to have a smooth layer on which you can add whatever eyes or spiders or ghosts you like.
C. THE DECORATION
The basic decoration tools are edible glitter, sprinkles, sweets or anything, as well as non-edible Dark Marks, Ghosts, Spiders, Bats or whatever.
The less basic ones are as follows (yet they are still really basic, the idea being that everyone can make them):
1. Chocolate figures
To do this you need chocolate lol. I tend to use dark one, namely over 60% cocoa ones. They melt nicely and are tasty plus they are easy to work with. Baking chocolate is good too, provided it tastes decent.
The second thing you need is moulds. You can use either silicone ones or plastic ones. I have a couple of silicone ones with mini figures, because they are flexible and very easy to use. You can find them online without a problem.
Easy enough, you just melt the chocolate either in a pan on low heat or on a bain-marie and you fill in the moulds and you wait. Don’t put them to cool in the fridge. They’d go white. Let the figures cool at room temperature, far from prying eyes and nicking fingers.
When the figures are cooled down completely, which can take anything from half an hour to a couple of hours, depending on the size of your figures, take them out and if you wish, use edible colours (pens, paint…) to colour them. Let them dry before you add them to your cupcakes. The result of our first try was the title pic of this paper.
I got my moulds from well-known online retailers :P
2 Chocolate shapes
You can go easier if you don’t have moulds. It’s simply piping the melted chocolate on baking parchment, giving it the shape you like. Last year I did these shapes with teenagers:

I also used cats, pumpkin faces and skulls. You can either draw them yourself or just print a template out from the internet.
The process is easy enough:
-prepare your template sheets under the sheet of baking parchment you intend to pipe the chocolate on. Note that either you put both sheets on a baking tray or chopping board or whatever flat movable surface, or you don’t move the sheets until the chocolate is dry.
- melt the chocolate as before, either in a pan on low heat, or on a bain-marie.
- when the chocolate is melted, pour it into a piping bag with the smallest circular nozzle you have, or use one of those small piping bottles designed for chocolate.
- draw the figures on the parchment paper. If there’s something you need to be really thin, you can always uses a toothpick to drag the chocolate.
- let cool.

3. Let your hands do the job with sugar paste (YUK) or marzipan!
You can build any kind of shapes with marzipan. You can cover marshmallows and transform them into Frankenstein heads. You can roll it into tentacles and make the Giant Squid pop out of your cupcake (imagine that with a white chocolate ganache you’d have coloured that murky green of still waters). You can make it into tombstones and turn your cupcake party into a graveyard hide-and-seek, you can make it into a pumpkin, a vampire fang, a Jack Skellington head, into thin and creepy spider legs, whatever. Of course, as you know, marzipan is less ‘posh, clean and tidy’-looking than sugar paste. But it’s edible. Sugar paste is not, so it’s a waste (At least imo).
You can colour both the sugar paste and the marzipan with gels. The difficulty with marzipan is that it gets warm quickly and then it’s a tad more complicated to work with. Add the tip of a knife blade at a time, because those gels are very concentrated and you can mess up your coloration badly.
Then you can decorate the marzipan to add eyes, mouths, whatever you like, with either more marzipan, chocolate, edible balls or other shapes, whatever you need. The world of cake decorating is infinite!
D. THE TOOLS AND OTHER NICETIES LIKE GLITTERS AND COLOURS
Kikimora suggested I talk shortly about the tools I’m using.
1.Cupcake Size
Well, it’s rather easy. Cupcake moulds come in basically three sizes: regular, small, nano. The regular size is that of a muffin tin. Small makes the mini cupcakes and is about 3 cm (just above an inch) in diametre. Nano is half an inch, or about 1.5 cm in diametre. The nano ones are really cool because it’s just one bite, but hard to decorate. I use those with my pupils during the cooking camp to make ‘cupcake pictures’, using each cupcake like a pixel. The result is rather stunning.
When I make cupcakes for a party I usually make the small ones. The paper tins or silicone ones are easily found in shops, while the nano ones aren’t. And the mini ones are still easy to decorate (the pumpkins I made out of marzipan - see pics - are on top of mini cupcakes), don’t require huge amounts of frosting (and thus aren’t too fat either), and have that huge advantage that you can eat many different ones instead of feeling full after just one regular-sized one.
2. Food colouring
Colouring food is fun. Many supermarkets will sell liquid food colours. They are great for some things, but definitely not for colouring toppings or marzipan or sugar paste. For those I use gels. Many brands sell them in all possible colours, including glittery ones like the usual gold, silver and copper or bronze. Some even sell glittery basic colours.
When using gels, like when using liquid colours, the focus is on the amount you use. Of course, the more you use the more coloured your stuff will be. However, don’t forget that using a lot is also loosening the dough/paste. With gel colours, if you want to colour say 50 g marzipan, it’s about the tip of a knife blade you’ll be using. Better start with small amounts and add colour.
Beware also, when using any paste, that handing warms it. Meaning it will get a bit more tricky to work with, and that is true especially for marzipan. This means that after colouring a batch of marzipan, you might want to put it in the fridge for a while to cool down so that you can use it without it being too sticky.
When using marzipan, you might face the task of cutting edges or shapes if you don’t have a cutter that fits what you want to do. In that case use a sharp knife and rub the blade with a little butter or oil, to make the cutting clean. Repeat as often as needed.
The brands I use are Wilton and SugarFlair.
3. Flakes, glitters, powders, pens
Of course, to make your cupcakes a bit more shiny or bling or barbie or whatever your taste is, you can use many other tools. There are quite a lot of stuff you can use.
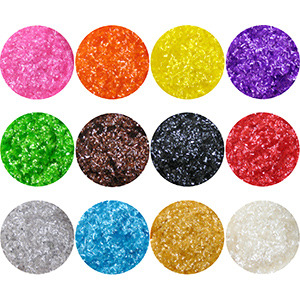
You can use edible glitter to give your creation a shiny touch (pic below). There are ‘plain’ glitters, that are just one colour, or sort of ‘holographic’ ones, that shine in different colours. Those glitter ‘flakes’ are big enough to be seen and don’t require much handling. You can spread them with your fingers, from the blade of a knife or from a q-tip.
You can use powders. That’s really powder. It’s called luster dust. You need to paint it on the actual thing. I use it on solid surfaces like marzipan. It gives a really nice finish.
If you don’t feel comfortable with painting or using those glitters as flakes, you can also get them in sprays. I have never tried it yet, because I like the painting version and the home-made look, but people get really amazing results. It looks more ‘professional’.
Pens are also an option, since there are edible inks. You can use them to colour and write and paint. Usually the pens have two brushes: a ‘writing’ one and a ‘painting’ one, so that you can choose. Those are also brilliant to colour cookies.
The brands I use are mainly Rainbow Dust and Scrap.Cooking. Those are the ones available in my country. Then of course, there are the faithful well-known online retailers :P
4. Rolling out the marzipan
Marzipan is a tricky little thing to handle because it gets warm and sticky easily. If you need to roll out marzipan I suggest you either put the bit you have to roll out between two sheets of baking parchment and then go with a rolling pin, or use flour on your working surface and on the pin. I like the first method better because flour on marzipan isn’t very sexy.
When using baking parchment to stop the paste from sticking to your pin and table, you will notice that the parchment gets folded in places. So you just want to remove the marzipan from it, and reposition it and go on again until you get the thickness you want.
However, when I’m making decos for cupcakes, I don’t necessarily use a rolling pin. I often flatten the paste in my hands. It’s a bit uneven that way, and I like it because it’s less ‘polished’, but that’s up to you. I usually roll out the marzipan only if I’m covering a cake like the Christmas cake.
If you handle the marzipan in your hands, as I said before, make sure it’s chilled. If it starts getting sticky, put it back in the fridge for a while and come back to it later. Sticky marzipan gives no good results.
5. Making stuff you put on your cupcakes stick together
If you are, like me, making jigsaws out of bits of coloured marzipan, then you might want to have them stick together if you move the cupcake. The easiest way to do that is to use a tad of jam to glue the bits together. That is also true if you want to stick the marzipan or chocolate figures on a chocolate ganache icing.
If you have used some kind of royal icing for your cake or cupcakes, you can use that too to help things stick together. It has the disadvantage of being very visible as it’s white.
Obviously, if you are sticking a single piece on frosting, there’s no need to add anything :P
Happy Baking!! :)

PS: I love the cupcakes without the frosting and all that, so usually when they come out of the oven it’s hard to resist their fluffiness…. And I eat them as muffins :P They are complete without any deco already!! :)
Sources of inspiration:
The Women’s Institute teatime collection, Simon & Schuster, 2013, 235 pp.
Bowers, Sharon, A Frightful Cookbook - Ghoulish Goodies, Storey Publishing, North Adams, MA, USA, 2009
Jones, Lily, Lily Vanilli in A Zombie Ate My Cupcake! - 25 Deliciously Weird Cupcake Recipes for Halloween and Other Spooky Occasions, Cico Books, London, 2016
0 notes
Text
A Peek into Kreacher’s Pantry

Kreacher and I have been trying some recipes lately, and looked for preserves recipes, to have with cold meat or cheese. After talking together, we decided that it would be nice to share three of the recipes we are using because they are really good. They might even have appeared at the Hogwarts Start-of-Term banquet.
The main ing lists for all the recipes are from Kreacher’s and my heads or our own traditions, but the twists are credit to others. They will be mentioned in due course, obviously.
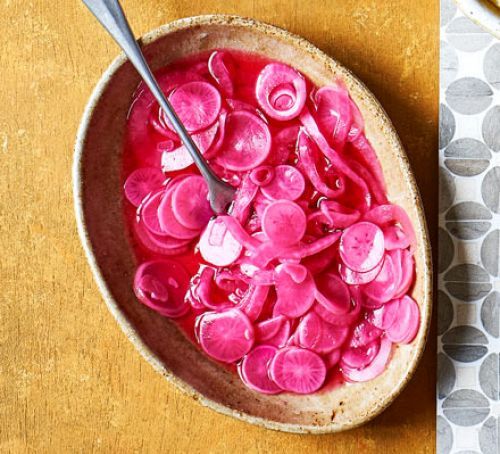
Radish and Onion Pickle
Twists by Bryan Turner (BBC Food)
This makes 1 small jar (about 2 dl). Don’t make much more unless you’re having a party, because you can keep it only a fortnight in the fridge. It is heavenly with mature Cheddar, plus the colours are unusual: reddish pink and green.
Sorry the pic was nicked from BBC Good Food… I didn’t think of taking a pic of my jar, and I ate it. Mine has parsley in it too.
Preparation time about half an hour, + 2 hours for marinade
3 dl white wine vinegar, or malt or cider (cider vinegar is the mildest if you like it so)
½ juice of a lemon (optional, depends on your liking of sour tastes, and maybe of the vinegar)
100-130 g sugar (again, depends on you :P)
1-2 star aniseed (first twist by Bryan Turner)
1-2 cloves
Pinch chilli flakes (second addition by Bryan Turner)
Half tsp white pepper grains
8-10 radishes (8 big ones), grated
4 very small onions, in half-moon slices (Turner uses banana shallots, I tried normal shallots too, and that’s really good)
1 tbsp parsley, finely chopped (or more, to your taste, third addition by Bryan Turner)
Salt
Put all the marinade ing in a pan with 8 dl water, bring to a boil, simmer for 10-15 minutes and leave to cool.
Sieve the mixture into a bowl or use a cheesecloth. Add the sliced onions and grated radishes to the liquid and leave to marinate for at least 2 hours (I used to do that for only an hour, but 2 hours is really good, thank you Mr Turner again).
Then, sieve again, add the parsley, mix nicely and put into a jar. Keep in the fridge and eat within a fortnight (can’t tell if it lasts longer, it’s the longest I’ve kept it myself).
Pickled Beetroots
Preparation: 20 minutes
Cooking time: up to an hour, depends on the beetroots
This is a pretty traditional Finnish recipe. Twists by Martta-association (https://www.martat.fi/). It was made this summer in a wonky kitchen in a rented flat in Poland out of wonderful fresh beetroots from one gran’s garden. The local Wizarding Community approved highly of the recipe :P
2 kg beetroots
Water and salt for cooking
6 dl water
4 dl spirit vinegar (10% alcohol)
250 g sugar (about 3 dl)
10-15 white pepper grains
10-12 cloves
1 cinnamon stick (that’s the addition by martat)
Some fresh horseradish slices
2-4 cloves of garlic, slices or cut in chunks or halves, to your taste
Don’t peel the beetroots. You can cut them in chunks though if you really need to. Ideally, cook them whole in salted water until soft.
Peel them and put them into sterilised jars either in slices, dices or whole, as you like.
Bring the water and spices to a boil, simmer for about 5 minutes. Add the vinegar and cook for another couple of minutes.
Sieve the mixture and pour the liquid over the beetroots until they are covered. You can leave the bits of garlic and horseradish with the beetroots. Seal the jars.
Plum Chutney
This was, in my kitchen, a really basic recipe: plums, sugar, vinegar, onion, tad of salt. However, I found a nice twist to it by Nigel Slater and I’ll share both recipes here.
Preparation: 10 minutes
Cooking time: an hour or so
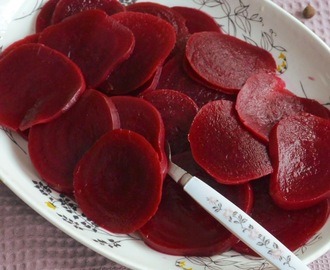
Makes about 1 litre chutney (maybe a tad more, but that means you have a nice chutney for your bread and cheese lunch!) In the pic - sorry it’s a bit blurred - the chutney is the dark red thing, and the other accompaniment is my radish and onion pickle.
750 g ripe plums (if they’re not ripe, add a tad more sugar), de-boned and cut in quarters
350 g onions, roughly chopped
3-4 dl dried cranberries (Slater uses raisins, and only half of the amount)
1 tsp dried chilli flakes (Slater uses only half the amount, but using chillies in the first place was his idea. Then again, you make it as hot as you like.)
1-1.5 tsp salt
2 tsp yellow mustard seeds (thanks Mr Slater for that one)
1.5 dl apple vinegar
1.5 dl malt vinegar (thanks the UK for malt vinegar :P )
1-2 cinnamon stick
Put all the ing into a large pan and bring to the boil. Cover and simmer for about an hour, until there’s barely any loose water at the bottom of the pan. Pour into sterilised jars.
These three are easy-to-make preserves that will have you enjoy your cheese platter or cold meat or Scotch Eggs or pies even more! :)
Happy Cooking!

3 notes
·
View notes
Text
A Start-of-Term Banquet set of recipes... Traditional Fish Pie
A new school year has begun at Hogwarts and the usual Start-of-Term Banquet was as gorgeous as ever. The Great Hall was packed with students, newbies were sorted and then Professor McGonagall stood up and declared the time right for feeding empty stomachs. As if by magic, the tables were suddenly filled with plates and bowls, all full over the brim with savoury and sweet things, all more ‘’droolative’’ than the next. Not only were the students eager to get their hands on chicken legs or steak and kidney pies, but the teachers had shiny eyes as well, because a feast at Hogwarts is always something really special.
I thought I might share some of the recipes mentioned in the books or not, so that people who aren’t acquainted with British food could give it a go.
I’ll share some easy recipes, basic ones, sometimes a bit less basic, but always ones that have made my papils and belly happy.
If any of you readers have comments, please do them, whatever house you are in, because it’s always good to have other points of view when it comes to food :).
The first thing I want to share with you is one of my favourite pies. I decided to start with it even if it’s not mentioned in the books, because it’s just perfect for a huge amount of people and could find its place through the Start-of-Term Banquet menu. My first is the traditional fish pie. A good one I ate in London was at the Old Bank of England. If you happen to walk along Fleet Street, don’t miss the place, be it only for the looks of the interiors. Besides, it’s a CAMRA listed Fuller’s pub so you can’t really go wrong. Heh heh heh ...
By the way... this pie is made of fresh or smoked fish, but it is basically, like many pies, one you make with leftovers.... :)
Serves 4
You need:
5 dl milk
750 g smoked fresh haddock (or not smoked if you don’t have it, and it can be cod, or pollock; and if you use fresh fish, you can add a bit of smoked salmon or trout when you put the fish into the pie dish, before adding the sauce.)
275 g unsalted butter
1 tbsp English mustard powder (I usually add more like 2 :P )
4 tbsp plain flour
2 hard-boiled eggs, peeled, quartered (you can of course add more eggs, or cut them into smaller bits)
1 kg potatoes (floury)
Sea salt
Freshly ground black pepper
How to Proceed:
Preheat the oven to 200°C (Gas mark 6, 400°F)
Heat the milk just to boiling point, add the fish. Turn off the heat and leave the fish to poach until opaque (do not overcook, it gets meh).
Meanwhile, melt 125 g of the butter in another pan, and stir in the mustard and flour. Remove from the heat and strain the poaching liquid into the pan.
Arrange the fish and eggs in a shallow pie dish.
Return the pan to the heat and, whisking vigorously (smoothing lumps), bring the mixture to the boil. Season carefully, particularly if you’re using smoked fish, that might be salty enough as it is. Pour the sauce into the pie dish and mix carefully with the fish and eggs.
Cook the potatoes in boiling salted water until soft, drain. Return to the pan.
Melt the remaining butter in a small saucepan, reserve 4 tbsp of this butter and stir the rest into the potatoes. Mash well and season. Spoon the mash over the sauced fish, brush with the reserved butter and put into the oven, for about 20 minutes. The mash should be nicely golden browned.
0 notes
Last Seen Blogs

misslisamiray
MissLisaMiray


amiphobic
THAT'S GOOD ENOUGH FOR ME

frogscribs
moved to sodascii
talesfromthemanholecover
Tales from the Manhole Cover