#R41
Photo
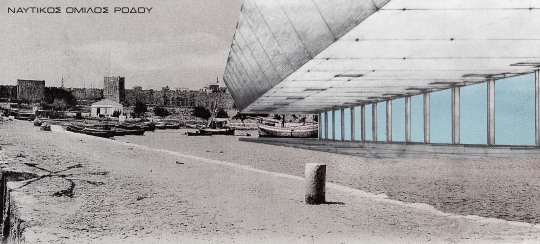


“Ναυτικός Όμιλος Ρόδου / Nautical Club of Rhodes” _ 10.09.2022 _ ΣΚ / SK
Παπαδάκη, Β. (επιμ) (2001). Αιγαίο: Εικόνα Και Ποίηση, Αθήνα: Τροχαλία, σελ. 284.
https://www.politeianet.gr/books/9789607809919-papadaki-bera-trochalia-aigaio-46356
#Ναυτικός Όμιλος Ρόδου#Ανατοπισμός#Κολλάζ#Αρχιτεκτονική#Αιγαίο#Εικόνα Και Ποίηση#Παπαδάκη#Σπύρος Καπρίνης#2001#2022#Eurostile#Font#R41#GP9#6.3mm
42 notes
·
View notes
Text
R41
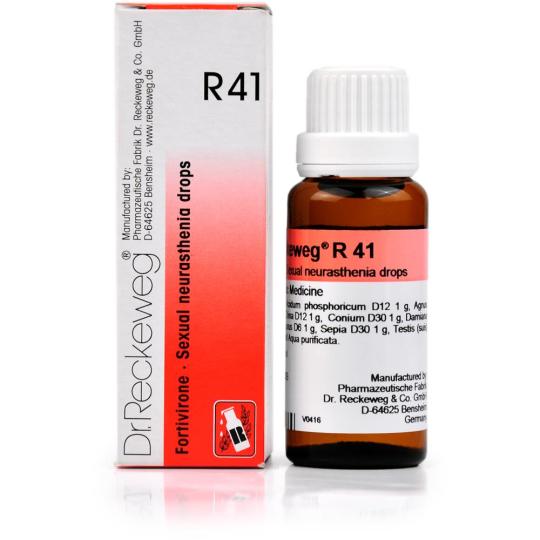
Dr. Reckeweg's R41 Sexual Neurasthenia Drops
Do you suffer from-
. unseasonable interjection?
. Erectile Dysfunction?
. Nightfall?
. General Sexual Weakness?
If yes alsoDr. Reckeweg's R41 drops are the result to your problems.
manly Sexual Dysfunction
What's manly Sexual Dysfunction?
Around 10- 15 percent of males suffer from sexual dysfunction.
Sexual dysfunction can affect males of any age but it's veritably common in men of aged age.
Sexual dysfunction generally includes problems related to-
. interjection,
. Construction,
. General weakness,
. dropped desire,etc.
Causes of manly Sexual Dysfunction
There can be colorful causes of manly sexual dysfunction- starting from low situations of testerone, some medicinal goods, alcohol consumption, smoking to depression or relationship discordances.
What's R41 drops?
Reckeweg's R41 is a homoeopathic expression especially curated to answer all the problems associated with manly sexual weakness, be it unseasonable interjection or frequent evening.
This drug has combination of different drugs which all help in maintaining your sexual health.
Why R41 drops?
After seeing an increase in number of cases of sexual sins in moment's world, R41 drops were curated to help manly population deal with their sexual issues.
This drug helps in ill goods of ageing of sexual glands which over a period of time start accumulating poisons and lose their efficacity.
This drug therefore acts on the sexual glands and rejuvenate them.
Who should take R41 drops?
People who feel that their sexual power is dwindling day by day, or feel weakened after some enervating illness, trespassed, or suffer from nervous prostration can take this drug.
It's also indicated for people who suffer from
⦁ unseasonable interjection
⦁ Erectile Dysfunction
⦁ Lack of Vitality
⦁ General Weakness
⦁ Over Excitement,etc.
ingredients OfDr. Reckeweg's R41 drops
Reckeweg's R41 drops contain combination of below mentioned drugs, all of these drugs play an essential part in maintaining the sexual health of males, keeping the germinal glands healthy.
Acidum Phosphoricum
Agnus Castus
Cinchona Officinalis( also known as China Officinalis)
Conium Maculatum
Damiana
Phosphorus
Sepia officinalis
Testes
All of these drugs round each other's action and act as a alcohol for manly sexual dysfunction and helps in treating incompetence, dropped power of construction, dropped sexual desire( libido), sexual weakness and therefore acts as a goad for the sexual organs and strengthens the genital area.
It ensures high rate of sexual productivity.
For more and Buy online r41 with special discount
0 notes
Photo
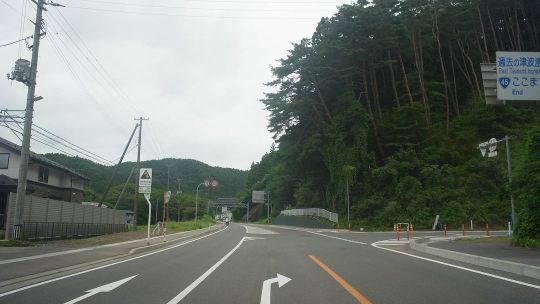
岩手県道41号 重茂半島線。本州最東端の県道でありもちろん岩手県道最東端の県道である。そして、本州最東端の「魹ヶ崎」へのアクセス路である。5枚目の地点が、県道の本州最東端地点である。 #岩手県 #iwate #山田町 #yamada #宮古市 #miyako #岩手県道 #県道 #r41 #道スタグラム #道行く路 #本州最東端 (Miyako, Iwate) https://www.instagram.com/p/CiuvOu9rZ4c/?igshid=NGJjMDIxMWI=
0 notes
Text

Icons by Mirko Credito
#mirkocredito#contemporaryart#art#arte#italy#color#mixed media#cars#vintage#dry transfer#letraset#r41#genova#villa bombrini#stupendo
0 notes
Text
ma la storyline di edoardo completamente rovinata e senza senso boh ma chi ha scritto sta cosa levategli il vino
2 notes
·
View notes
Note
hey if you write a pattern for the chilchuck amigurumi I will buy it instantly
ive gotten multiple asks about this, so ill just answer them all here in one go.
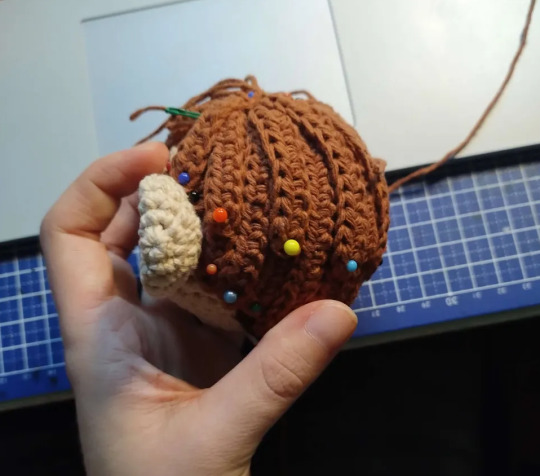
i wrote down everything while i was working on it, but i theres some stuff that i would do diffrently and i also didnt take a lot of process pics so it wont be a full proper pattern for those reasons, but ill add all that i have under the cut!
i dont want any compensation, but if you wanna do me a favor you can donate to esims for gaza, unrwa, any of these gefundme's, or another trusted charity of your choice.
now to the pattern! i would love to see the results of anyone making a squeakychuck, feel free to tag or dm me :)
the dimensions of this depend on the size of ur squeaker and yarn, i had a 4ish cm squeaker and somewhat thick 4/8 cotton yarn (kinda 6/8ish thickness). depending on ur yarn and squeaker u might need to follow a different pattern for the body.
if youre using a different body base pattern, the tunic and blouse pattern are pretty easily adjustable. ill add some notes for that at those sections of the pattern. ill also link some videos i used at relevant sections.
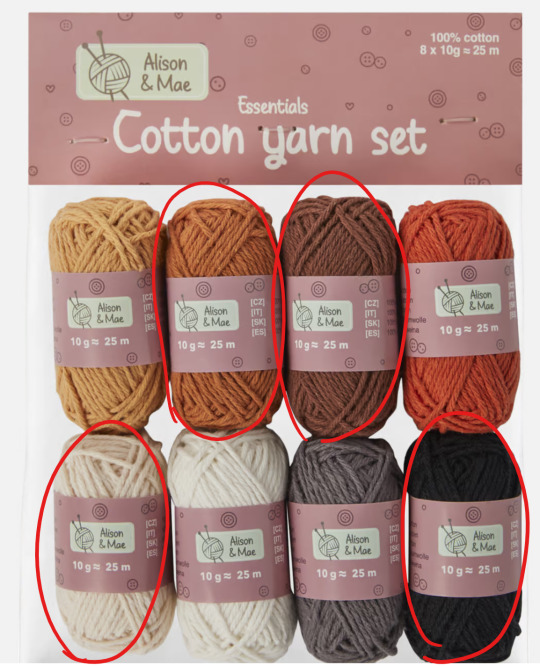
if theres an Action store near where u live, see pic below for the yarn i used for the skin, reddish brown, black and light brown. i got 3 of these but 2 packs was enough. the dark brown and creme were from my stash. i also got the squeaker from a donut dog toy from Action.
-
abreviations list (all in us terms):
mr = magic ring
sc = single crochet
hdc = half dubble crochet
slst = slipstitch
ch = chain
bobble = 5 double crochet in one stitch
BLO = back loop only
FLO = front loop only
what you need:
-skin color of choice yarn
-creme/white yarn (normal for body, thin for blouse)
-greyish creme (for boot flaps)
-black yarn
-dark brown yarn
-light brown yarn
-reddish brown yarn
-green yarn
-4 tiny buttons (for arm joints)
-cardboard (for shoe sole
-3.5mm hook
-squeaker
-needlefelt needle
-stuffing
-stitchmarker (optional, i always mark the first stitch of the round)
-
once again disclaimer, this is not a propper pattern, this is just what i wrote down while i was crochetting. it may not nessecarily be the best way to do it. i wanted most clothes to be removable, but you have to partially disassemble the doll if you want to remove them. if you dont like how something looks or works ur free to do whatever you want. big fan of fucking around and finding out personally.
if you have any questions feel free to dm me, might take me a while to reply though.
-
SQUEAKY CHUCK PATTERN 3.5mm hook
head (skin)
r1: sc 6 in mr
r2: (inc) x6
r3: (sc 1, inc) x6
r4: (sc 2, inc) x6
r5: (sc3, inc) x6
r6: (sc4, inc) x6
r7: (sc 5, inc) x6
r8-15 : sc 42
r16: (sc 5, dec) x6
r17: (sc 4, dec) x6
r18: (sc3, dec) x6
r19: (sc2, dec) x6
r20: (sc 1, dec) x6
r21: sc 12
slst, fasten off
ears x2 (skin)
r1: sc6 in mc
r2: (inc) x6
r3: (sc, inc) x6
r4-6: sc 18
r7: dec 9. slst fatsen off.
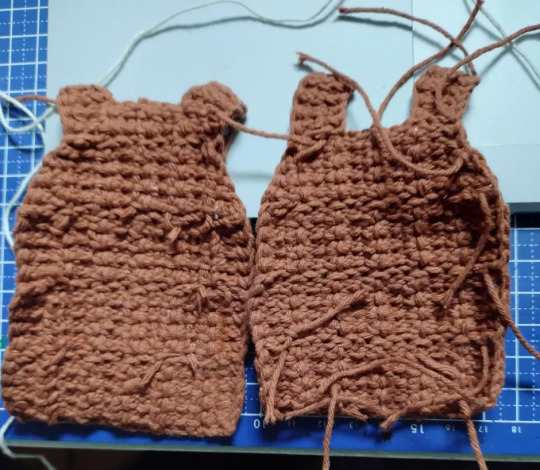
Body - leg up (skin, black, thick creme)
start with skin
r1: ch 6, inc in 2nd, sc 3, 4inc, sc 3, inc
r2: inc 2, sc 3, inc 4, sc 3, inc 2
r3: inc 3, sc 5, inc 6, sc 5, inc 3
r4: BLO sc in all
r5: sc 3, dec 2, sc 3, dec 2, sc 6, dec 2, sc 3, dec 2, sc 3
r6: sc 1, dec, sc 4, dec 6, sc 4, dec, sc 1.
r7: sc 6, dec 3, sc 6
stuff
-r8 dec, sc in all
change color to black [color change video]
r9-23: sc in all
1st leg: fasten off
2nd leg [joining legs video]:
r24: sc7, ch 1, sc join in 1st leg after last sc, sc13, sc1 in visible v loop of ch1, sc 7
r25: sc7, sc 1 in remaining v loop of ch1, sc21
r26-31: sc 28
r32: sc 7, change color to creme/white, slst 1, sc 20
r33-35: sc 29
r36: (sc 8, dec) x3
r37: (sc7, dec) x3
r38: (sc6, dec)x3
add squeaker
r39: sc21
r40: (sc 5, dec) x3
r41-42: sc18
r43: (sc 1, dec) x6
fasten off
Arms (skin, dark brown)
i made the arms movable with button joints, but after looking at some videos i discovered that what i did is not called a button joint and i dont have a video explaining it, so i hope this drawing helps.
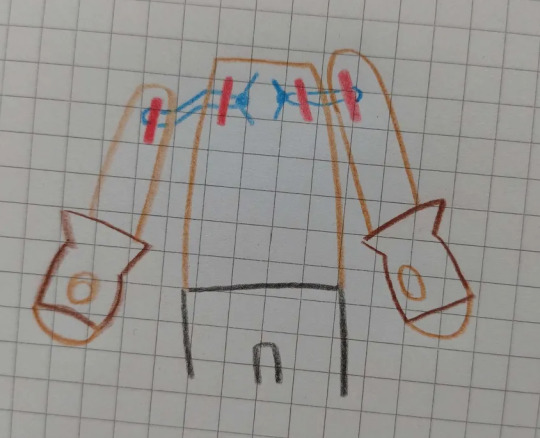
the red bits are the buttons inside of the arms and body, and the thread (blue for clarity, i matched it w the skin) should be pulled tight and finished off with a double or tripple knot inside the body.
or you could just sew on the arms that also works. but wait with doing that until youve finished the blouse as the hands dont fit through the sleeves. i have a seperate section on assembly at the end of the pattern.
start with skin
r1:sc6 in mc
r2: inc x6
r3(sc, inc)x6
r4 : sc 18
change color to brown
r5: sc 18
1st arm r6: sc 3, bobble, sc 14.
2nd arm r6.2: sc 14, boble, sc 3
[i matched the top loop to the bobble color but i think it would look better if u didnt]
r7: sc 18
r8: (sc 4, dec)x3
r9: (sc 3, dec)x3
r10 sc12
color switch to skin (you might want to do this a round earlier, i didnt initially plan on making the gloves flared, and this color change part can sometimes be seen and look kinda weird)
r11-14: sc 12
r15: (sc4, dec)x2
r16-19 : sc 10
r20: (sc3, dec)x2
r21: sc8
insert button joint
r28: (sc2, dec)x2
slst, sew shut
glove flare (dark brown)
r1: ch 15, slst join LONG TAIL
r2: (sc4, inc)x3
r3: sc4, inc, sc8, inc, sc 4
r4: sc 2, slst fasten off
sew 2 rows below thumb bobble
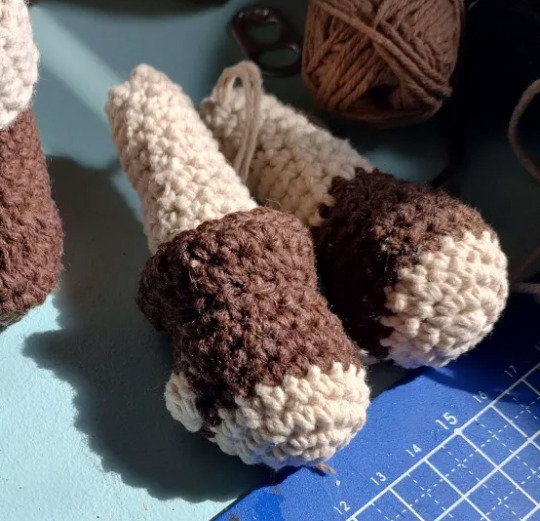
boots (light brown, dark brown, greyish creme) [video]
these are removable but they dont go on easily, so you gotta patiently massage the feet in there.
start with light brown
ch 7, start in 2nd from hook:
r1: sc 5, 3inc, sc 4, inc
r2: inc, sc 4, inc 3, sc 4, inc 2
r3: inc, sc 5, hdc inc 7, sc 5, inc 2
r4: slst fasten off. sew in holes/tails, fray ends for flat gluejob. trace onto cardboard for sole.
switch color to dark brown
r1: BLO join slst, BLO sc in all
r2-3: sc in all
glue in sole
r4: sc 8, dec 5, sc 12
r5: sc 7, dec 4, sc 10
r6: sc7, dec2, sc 10
r7-10: sc in all
switch color to greyish creme
r11-12: sc in all
r13: slst, FLO sc in all
r14-16: sc all
slst fasten off
flip the greyish creme flap over.
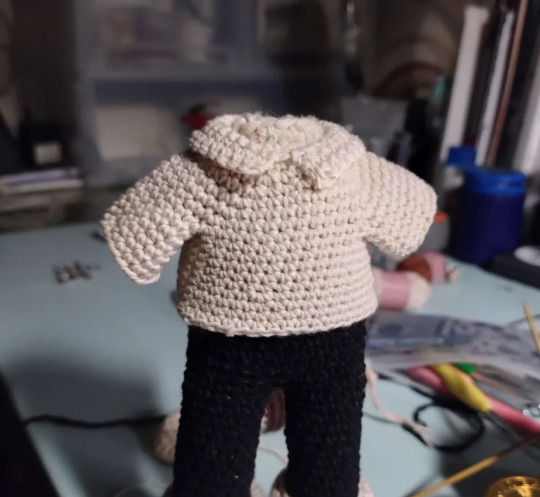
blouse (thinner creme)
this is a standard raglan pattern, if you need the whole thing bigger/smaller you need to have more/less chains at the beginning. this change also carries over to the collar. the increases are evenly spaced for me, and unless your doll has a very broad chest this shouldnt have to change.
if the arms need more space you need to either add more rows to the r3-7 part and/or add more chains in r8 (this part should fit pretty sugg around the body)
i was experimenting a bit w using BLO to minimize the gap where the sleeve and body seperate (r8). it worked p good but you can ignore it if you dont understand it and just sc in all.
r1: ch24, slst join.
r2: (sc 5, inc) x4
r3-7: inc in first of previous inc. last row should have 10 sc between increases.
r8: sc5, blo sc 1, ch 5, blo sc join in 1st of next inc, sc 11, blo sc1, ch5, blo sc join in 1st st of next inc, sc 5
r9: sc6, blo sc 1, sc 5, blo sc1, sc11, blo sc 1, sc 5, blo sc 1, sc 6
r10-13: sc in all (36)
r14: (sc8, inc)x4
r15: sc in all (40)
slst finish off
Sleeve
r1: join mid armpit, slst ,sc2, sc in the leftover bits from the BLO stitches, sc 1, sc in leftover BLO bits, sc2
r2-6: sc in all
collar
join left-middle front, sc 7, inc, sc8, inc, sc 7. turn
r2: sc7, inc, sc 10, inc, sc 7. turn
r3: sc8, inc, sc 10, inc, sc 8. turn
cuffs
r1: join mid body-facing side, FLO sc 20
r2-4: sc 20, slst fatsen off
Tunic (red brown) [tunesian entrelac crochet]
if you want to make this bigger i recommend keeping the same square layout, but making the squares bigger. its a bit of measuring and math to figure it out.
the tunic is made in tunesian crochet and i dont really know what written patterns for that look like so i hope this makes sense.
for a single square:
r1: ch4, start in 2nd back bump from hook. pull up a loop from ever back bump. you should have 4 loops on your hook total. simplestitch in all
r2-4: simplestitch in all.
r5: slst in all. fasten off
for the slanted parts i did the decrease by pulling through the middle 2 loops in one go on the back pass
this is how the full thing should look, its worked from bottom left to top right.
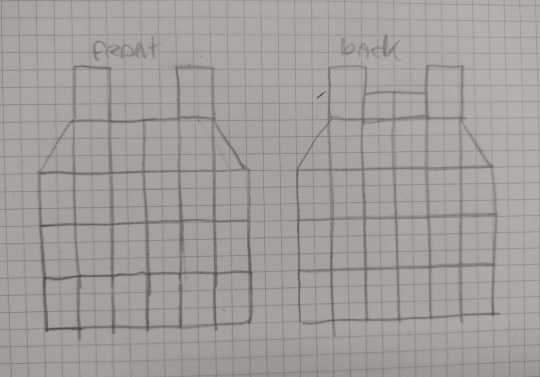
sew together the shoulders together, then sew in all of the ends
:) good luck
tunesian crochet has a tendancy to curl, so if you used cotton i def recommend blocking it
i defined the grid a little bit with a dark brown pencil.
cowl (green)
BLO sc 7, repeat till desired lenght, then BLO slst join the last row to the first.
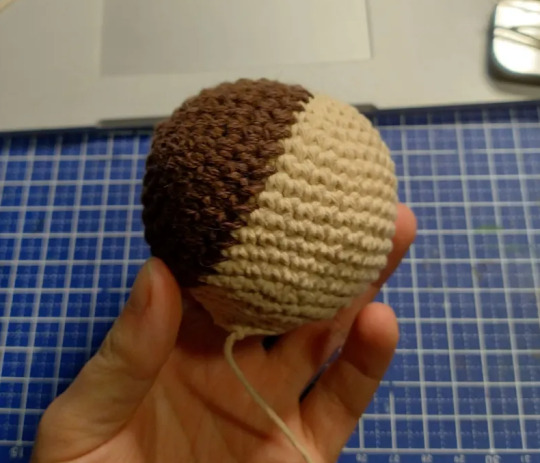
scalp undercut bit (dark brown)
r1: sc 6 in mr
r2: (inc) x6
r3: (sc 1, inc) x6
r4: (sc 2, inc) x6
r5: (sc3, inc) x6
r6: (sc 4, inc)x6
r7: sc36
sew on back of the head (recommend doing this before the ears and face, see end for more detailed assembly instructions)
hair (reddish brown) [hair video]
disclaimer, this is kind of a mess. the lenghts didnt line up the way i intended so i improvised by adding loose strands and spent a lot of time pinning every strand in place before glueing them down.
i used bison kit contact glue since its sturdy, transparant, flexible and waterproof. you can use hot glue as well, i just personally dont like it because its bulky.
r1: sc 21 in mc. join BLO slst
r2: ch 12, sc in 2nd from hook, gdc10, BLO slst join
r3: ch 12, sc in 2nd from hook, gdc10, BLO slst join
r4: ch13, sc in 2nd from hook, hdc 11, BLO slst join
r5: ch13, sc in 2nd from hook, hdc 11, BLO slst join
r6: ch 14, sc in 2nd from hook, hdc 12, BLO slst join
r7: ch16, sc in 2nd form hook, hdc 14, BLO slst join
r8: ch 18, sc in 2nd from hook, hdc 16, BLO slst join
r9: ch 18, sc in 2nd from hook, hdc 16, BLO slst join
r10: ch 14, sc in 2nd from hook, hdc 12, BLO slst join
r11: ch 12, sc in 2nd from hook, hdc 10, BLO slst join
r12: ch 10, sc in 2nd from hook, hdc 8, BLO slst join
from now on, join in the FLO's of previous round
r13: ch10, sc in 2nd from hook, hdc 8, FLO slst join
r14: ch10, sc in 2nd from hook, hdc 8 , FLO slst join
r15: ch12, sc in 2nd from hook, hdc 10 , FLO slst join
r16: ch12, sc in 2nd from hook, hdc 10 , FLO slst join
r17: ch14, sc in 2nd from hook, hdc 12 , FLO slst join
r18: ch16, sc in 2nd form hook, hdc 14, FLO slst join
r19: ch 18, sc in 2nd from hook, hdc 16, FLO slst join
r20: ch16, sc in 2nd form hook, hdc 14, FLO slst join
r21: ch14, sc in 2nd from hook, hdc 12 , FLO slst join
1x ch 6, sc in 2nd from hook, hdc 4
2x ch8, sc in 2nd from hook, hdc 6
2x ch 10, sc in 2nd from chain, hdc 8, slst in same, fasten off.
2x ch 12, sc in 2nd from chain, hdc 10, slst in same, fasten off.
3x ch14
pin all in place until it looks good, tie +glue loose strands first. then glue back pieces, crown, and lastly bangs/ top back layer. some of the lose strands go behind the ears, one is the left sideburn, and the rest is to cover up the crown. these pics are the best i can do as a guide, this was my first time doing this so i was struggling lol.
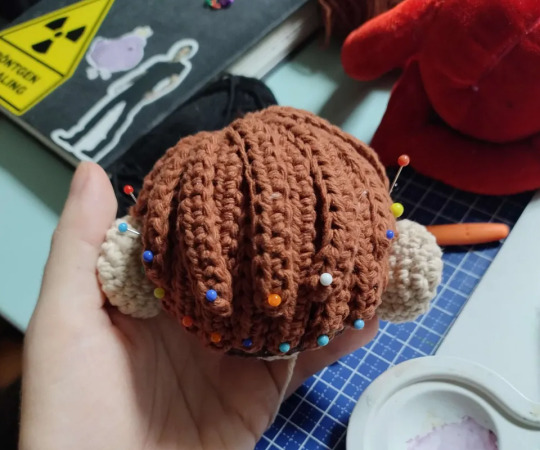
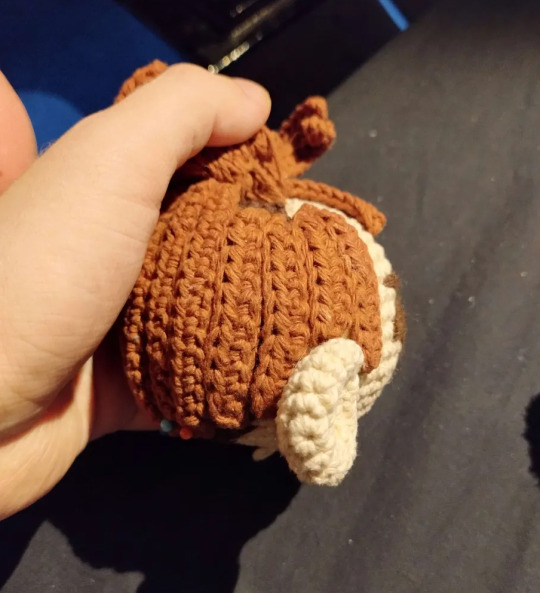
i didnt fully glue down the bangs and the top back layer bc i thought it would be fun if u could ruffle his hair, but my friend who i gave the plush to has significantly abused him (its been 2 days) and his hair is a mess so im gonna have to glue it down again lol. might as well do it all the first time if u plan on throwing him down the stairs or something.
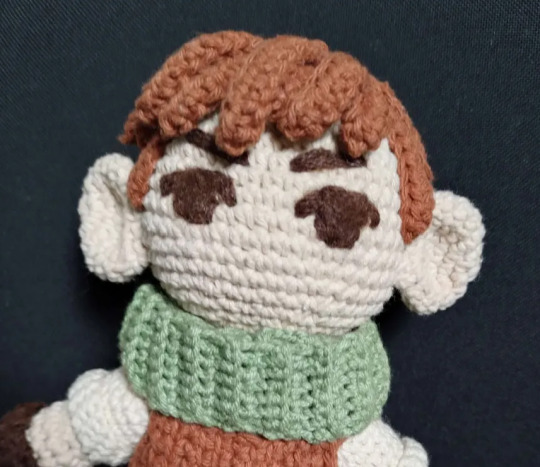
Face
for eyes + eyebrows, embroider outline with dark brown, then needle felt [video] the inner parts w unraveled dark brown fluff. the dark brown i used was probably acrylic. cotton doesnt really work well for this.
Belt and pouch (dark brown)
the belt is a 3 strand basic friendship bracelet! [video]
sew together the ends and hide it with by sewing the pouch on top.
i didnt write down the pattern for the pouch, but from the top of my head its the same start as the squares for the tunic
r1-9: simple stitch in all
r10: simple stitch 1, decrease by putting your hook through 2 vertical bars when pulling up a loop, simple stitch edge 1.
r11: slst in all, finish with a long tail
use tail to sew together the sides, and sew the pouch onto the belt. use some yellow thread to make a button.
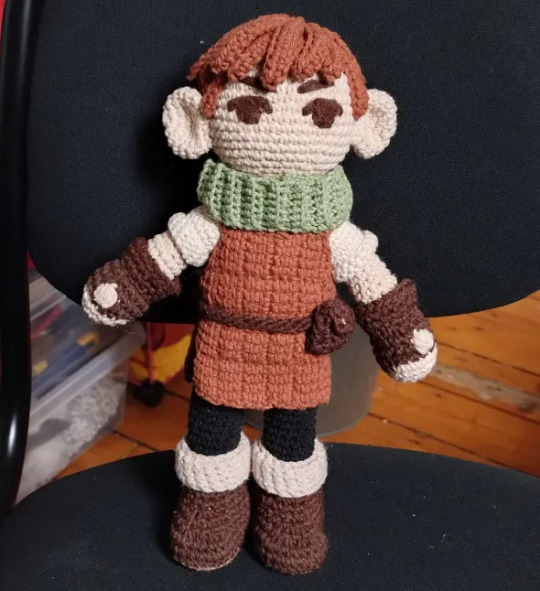
ASSEMBLY.
put on the blouse, put the arms in their place and finish the button joints.
put on the tunic, lace the sides with dark brown yarn, finish with a knot and hide the tails underneath the chest part of the tunic.
slide on the belt and boots.
sew the scalp undercut bit to the head
sew the ears to the head
tie + glue the loose hair strands behind the ears
glue the back of the hair
glue the back of the hair
glue the middle circle part of the hair
glue the top back layer and bangs
sew the head to the body
put on the cowl
i hope this is somewhat clear, feel free to dm me is you have questions.
enjoy your squeakychuck :D
134 notes
·
View notes
Text

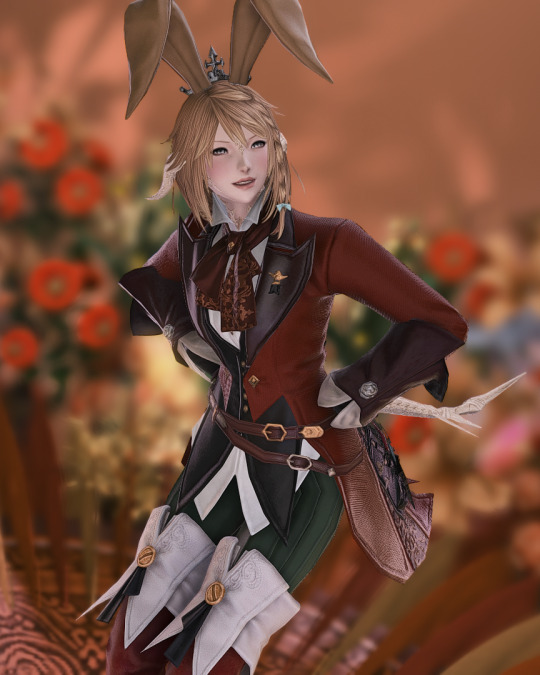
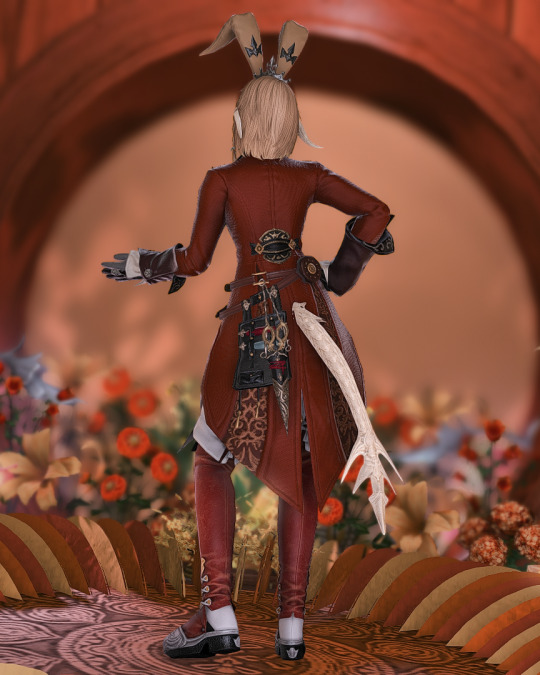
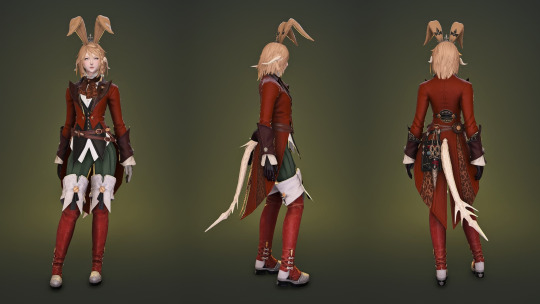
Unbirthday March Hare
Head: Bunny Chief Crown - aldgoat brown
Body: Boltfiend's Costume Swallowtail - rust red
Hands: Boltsoph's Cuffs - dark red
Legs: Salon Server's Bottoms - nophica green
Feet: Felicitous Thigboots - default
Earring: The Emperor's New Earrings
Neck: The Emperor's New Necklace
Wrists: The Emperor's New Bracelet
Right Ring: The Emperor's New Ring
Left Ring: The Emperor's New Ring
Main Hand: --
Off Hand: --
Fashion Accessory: --
Minion: --
Mount: --
Location: #studioshade - "Aurantius" - Aether/Adamantoise Goblet W28 P42 R41
Shader: Faeberry Bokeh
#ffxiv#ffxiv glamour#ffxiv au ra#ffxiv weaver#eorzea collection#valkariel ilmarë#studioshade#au ra#raen#weaver#reds/oranges/browns#greens/teals#no mogstation items#no seasonal items#cosplay glamour#vintage glamour#fantasy glamour
24 notes
·
View notes
Text
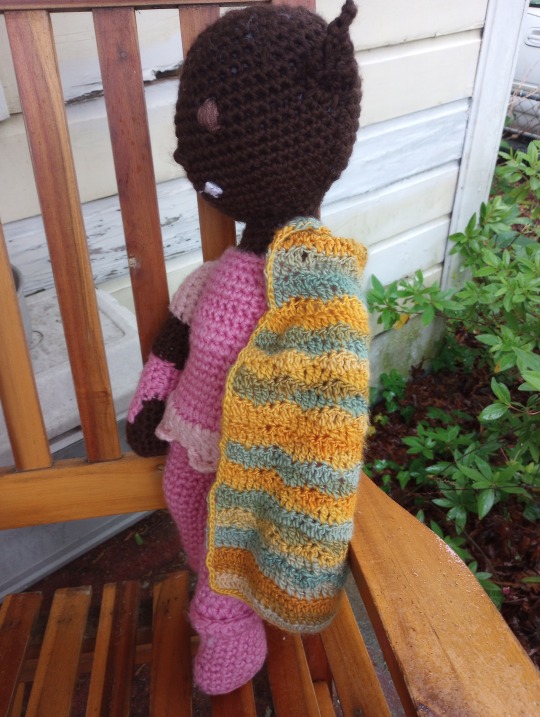
"Well, hearts are what I do."

Character Name: Azu
Fandom: Rusty Quill Gaming [Podcast]
Played By: Helen Gould
Yarn Used:
Skin: Loops & Threads Cozy Wool - Chocolate
Shoes/Trousers/Armor: Loops & Threads Cozy Wool - Petal Pink
Armor Contrast: Lion Brand Wool-Ease Thick & Quick - Rouge
Eyes - CraftSmart Value - Coffee
Mouth - CraftSmart Value - White
Cloak - Loops & Threads Facets - Coastal
Basic pattern here.
Canonically, I know Azu isn’t actually that much bigger than a human - her height is given as 6’6” in the finale before she activates her armor and doubles in height - but she’s got a big personality, so I wanted her to be bigger. Hence why I used a much thicker yarn for her. That being said, I actually went down a couple hook sizes from what the label said to use (it claims I should be using a 10mm/US 15 hook, but I did the foundation chain with a 9mm hook and then started crocheting with an 8mm, and it worked a lot better). Other ways Azu alters from the base pattern are as follows:
Shoes: The most fashionable of pink boots! Like most of the other blorbos, I made Azu’s shoes all one color, but in my defense, this yarn was only available in one shade of pink. To give her boots, I worked the pattern as normal up until row 11, then:
R12: Ch 2, hdc in back loops of each sc around, sl st in first hdc (15 hdc).
R13: Ch 1, dc in front loops of R11 around, sl st in first dc (15 dc).
R14: Ch 1, hdc in each hdc from R12 around, sl st in first hdc (15 hdc).
Trousers: I didn’t really do anything special with Azu’s pants/leggings/whatever the heck she wears between her boots and her agile half-plate, but I did stop a row earlier than in the basic pattern because reasons, so the body starts at R29 instead of R28. Basically, take away R29 and the pattern is the same as the base from R15-34.
Armor: I wanted to give Azu a little bit of a waist, and also put a kind of decoration at the bottom of the armor (not exactly a skirt or kilt, but something like that), but also kind of emphasize that she had broad shoulders. I probably made this a bit more complicated than I needed to, but:
R35: Ch 1, sc in front loops of each sc around, sl st in first sc. Without doing a chain st for height, sc in back loops of each sc in R34 around, sl st in first sc in back row (38 sc).
R36: Ch 2, hdc in back loop of front sc and front loop of back sc around, sl st in first hdc (38hdc).
R37-40: Continue as in base pattern.
R41: Ch 1, inv dec five times, sc in next 8 st, inv dec 6 times, sc in next 8 st, sl st in first st (27 sc).
R42: Ch 1, [sc in first 2 st, 2sc in next st] 9 times around, sl st in first sc (36 sc).
R43-50: Ch 1, sc in each st around, sl st in first sc (36 sc).
R51: Switch to skin color. Ch 1, [sc in first 2 st, inv dec] 9 times around, sl st in first sc (27 sc).
Continue remainder of pattern as in base pattern.
After completing her body (actually after completing literally everything else), I added on the decoration by joining the armor contrast color (Wool-Ease Thick & Quick - Rouge) to the loops standing out from R35, and then:
R1: Ch 3, dc in front loop of each st around, sl st in first dc (38 dc).
R2: Ch 1, [sc in next st, ch 3, skip next st, tc in next st, ch 3, skip next st, sc in next st] around, sl st into first sc.

Head: I embroidered Azu’s eyes with some of the regular yarn, partly because I didn’t have safety eyes big enough and partly because I forgot to put them on before I finished. For her mouth, I crocheted the single fang (she broke the other one in the battle with the Lads and Blokes) by ch 3, turn, sc in second ch from hook, sc in next st, ch 1, turn, inv dec, and then sewed it in place and embroidered the rest of the mouth. The ears were made as follows:
R1: Leaving long tail, ch 7, turn, sc in second ch from hook, sc in each ch, turn (6 sc).
R2: Ch 1, sc2tog, sc in next 2 st, sc2tog, turn (4 sc).
R3: Ch 1, sc, sc2tog, sc, turn (3 sc).
R4: Ch 1, sc in each st across, turn (3 sc).
R5: Ch 1, sc2tog, insert hook into same sc, sc2tog, turn (2 sc).
R6: Ch 1, sc2tog, turn (1 sc).
R7: Ch 1, sc, bind off (1 sc).
Stitch ears to either side of head using long tail. (I ended up getting them uneven, but I think it works for her.)
Arms: Pro tip for any yarncrafters starting or plotting a project: If the yarn you’re buying is on clearance, buy all of the yarn that is available. I realized when I got to her arms that I only had a little bit of the pink yarn left over, not enough for full sleeves, and I thought I had another ball but I didn’t…and Loops & Threads Cozy Wool was discontinued before I ever started Azu, let alone before I finished her. Thank God for yarnconverter.com, which helpfully provided me with the knowledge that Wool-Ease Thick & Quick had the exact same gauge. I used the Cozy Wool for Azu’s gauntlets. Pattern worked as normal up through R7, and then:
R8: Ch 1, sc in first 9 st. Join armor yarn, fpdc around next 6 st in R6, join with sl st (9 sc, 6 fpdc).
R9: Ch 1 using skin yarn, (sc in next 2 st, inv dec) 3 times, switch to armor yarn, (sc in next 2 st, inv dec) 2 times, join with sl st (12 sc).
R10: Ch 1, sc in back loops of first 6 st, sc in next 6 st, join with sl st (12sc).
R11-13: Continue as normal.
R14: Switch to skin yarn. Ch 1, sc in front loops of each st around, join with sl st (12 sc).
R15-18: Continue as normal.
R19: Switch to armor contrast color. Ch 1, sc in back loop of each st around, join with sl st (12 sc).
R20-25: Continue as normal.
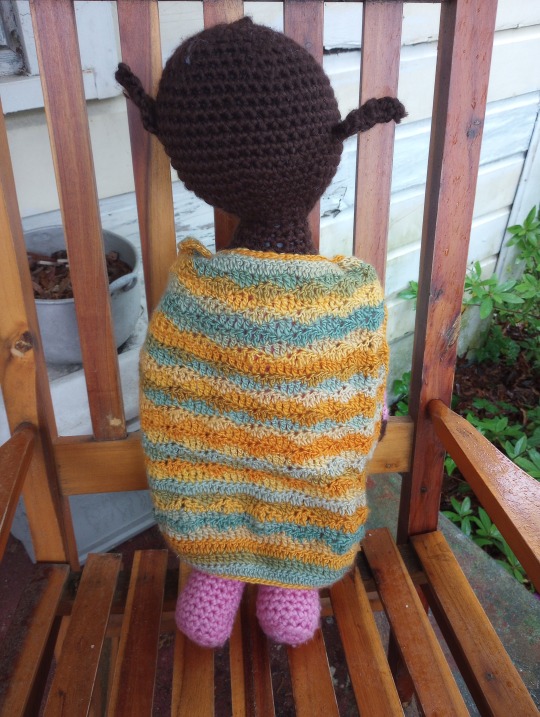
Cloak: The official art on the shirts has Azu with a cloak, so I made her one. (Admittedly, I also did it because I saw the yarn at Michael’s, thought it was pretty, and wanted an excuse to make it.) I really didn’t do anything particularly exciting with it, just made more or less a square with a fairly basic wave stitch pattern. When I decided it was long enough, I finished off with a row of sc and stitched three of them on either side directly to her shoulders so the cloak is part of her half-plate. I also edged the entire thing in a slip stitch, less for aesthetic reasons and more because I hadn’t realized how close I was to being done with it when I got to church and needed something to keep my hands occupied during the sermon. I do think it looks nice, though, and I’m going to have to start doing it more often…
11 notes
·
View notes
Text
IBO reference notes on . . . mobile suit designations
And now for some deeply useless observations on how mobile suits are labeled in Iron-Blooded Orphans.
(I’m purely looking at this ‘in fiction’; I know most of these are in fact in-jokes based on the mecha designers’ names.)
Starting with the titular Gundam frames, these are each designated ASW-G-XX, where XX is a number between 01 and 72 (or literally XX for Vidar). We have no canonical explanation for what ‘ASW’ means, but all other types of mobile suit have a similar letter string in their codes. I personally favour the idea it references the manufacturer, and that each frame family represents the work of a different group, but there’s nothing backing that up.
Interestingly, the mobile armours are *not* given identification codes. Given that they bear the same symbol as the Gundams on key components, however, we might suppose that using ASW-A or something like that would make sense, in a ‘underlining the obvious connection’ fashion. (Well, now I’ve said that, this might only apply to Hashmal and Harael; Ananel and Nemamiah look distinct enough to have come from different manufacturers.)
Valkyrja frames, meanwhile, follow a slightly more impenetrable logic:
V03-0907 Oltlinde
V04-0630 Waltraute
V07-0126 Sigrún
V08-1228 Grimgerde
We can presumably add V0_-0526 Helmwige, based on the V08Re-0526 Helmwige Reincar (AKA the Grimgerde in new clothes), although we don’t know what its prefix number is supposed to be.
Graze frame codes, by contrast, run thus:
EB-05s Schwalbe Graze
EB-06 Graze
EB-06j Graze Ground Type
EB-06N Graze Stachel
EB-06Q Graze Schild
EB-06r Graze Ritter
EB-06rs Graze Ritter Commander Type
EB-06s Graze Commander Type
EB-06t Graze Trainer Type
I don’t know if the capitalisation is meant to be meaningful. I would assume not since there’s nothing particularly special about the Stachel and Schild that would make them stand out from the pack (they’re basically different equipment sets on a standard Graze. The Schwalbe is the prototype for the frame, and is numbered straight on from the Geirail, EB-04. Currently, no model has been designated EB-07 but based on the above, we can assume it was the prototype for the Reginlaze.
The AEB-06L Hloekk Graze has a modified numbering convention, presumably because it is a modified Graze. But I’m not sure what to do with the EB-AX2 Graze Ein. It’s not really a custom (more on which later), nor does it have a proper place in this lineage, though design elements would be incorporated into the Reginlaze Julia. It’s just this weird outlier monster prototype thing.
Regardless, the two mainline Reginlaze variants follow the same schema as Grazes:
EB-08 Reginlaze
EB-08s Reginlaze Commander Type
Moving out of Gjallarhorn, the standard configuration for the Hexa frame has two versions,
IPP-0032 Gilda
IPP-0032S Gilda SAU
Which are basically the same thing with differing load-outs. We see IPP-0032 in the context of construction models hijacked for the purposes of insurrection, and the IPP-0032S fielded by the SAU military. Then we get:
IPP-18875 Enzo
IPP-66305 Hugo
The Hugo is the most prominent Hexa in IBO proper, since ‘suits of this type are used by the Dawn Horizon Corps and JPT Trust. An Enzo, meanwhile, shows up as Range’s first machine in IBO:Urdr Hunt - and I’m saying ‘an Enzo’ because while the descriptions implies it’s fairly rare/unique, the numbering suggests it’s a type rather than a custom model.
This assumption is based on the pattern that continues with the Rodi frames, where standard mass-production models have simple ‘letter string hyphen alphanumerical’ codes:
UGY-R38 Spinner Rodi
UGY-R41 Man Rodi
UGY-R41 Landman Rodi
UGY-R45 Garm Rodi
No code has been given for the Monkey Rodis used by 598′s human debris crew, though they appear to be another Man Rodi variant. Perhaps oddly, there is no distinction between Man and Landman Rodis. Most other equipment swaps see some update to the numbering, leaving this an oddity. Then again, why would Tekkadan have bothered registering them under a new classification when they redid the legs?
Then we have the Teiwaz/Io frame mobile suits:
STH-05 Hyakuren
STH-05R Rouei
STH-14s Hyakuri
STH-16 Shiden
STH-20 Hekija
All of this essentially leaves us with two ‘genres’ of base mobile suit IDs: mass production types that have a consistent form like (ABC)-(ABC123), and lines of unique ‘suits where each is identified individually: ASW-G-XX, V0X-(1234).
Conclusions? Not many, but I would propose the machine specific codes for the mass-production types (that is, say, Crank Zent’s particular Graze) might follow the Valkyrja form of ID in having an addition numerical string. There’s no obvious reason for the Valkyrjas to be numbered so precisely since the implication in various materials is that there’s only nine of them, but if it is in fact following common practice (Ahab reactor number, maybe?) we might infer a more precise machine code running ‘ EB-06-0505′ or ‘IPP-18875-7007′.
What we don’t have to infer is the convention for custom models based on mass-production ‘suits, which is usually to append a string including the letter ‘c’ to the end of the ID. Thus we have:
EB-06/tc Graze Custom
EB-06/tc2 Ryusei-Go
EB-06/tc3 Ryusei-Go (repaired)
STH-16/tc Shiden Custom (Ryusei-Go III/Riden-Go)
STH-16/tc2 Orga's Shiden (The King’s Throne)
EB-08jjc Reginlaze Julia
MPM02/AC Triaina
STH-05/AC Amida's Hyakuren
UGY-R41/H Hakuri Rodi
EB-06/T2C Regal Lily
STH-14/T2C Kallisto
UGY-R41/T2C Labrys
To take these in sets -- ‘tc’ obviously stands for ‘Tekkadan Custom’. We have one based on Crank’s Graze getting up to ‘tc3′ before being retired in favour of a customised Shiden, and the King’s Throne as the second Shdien custom commissioned for Tekkadan.
The Julia is a ‘Julieta Juris Custom’. Given this is something being produced by the R&D division, we could label it a prototype ala the Graze Ein, but since the Julia is decidedly built with Julieta in mind, custom is the better term.
I didn’t include the Triaina previously because we only ever see one of them and it’s labelled the same way as Amida’s Hyakuren (AC), which we know is ‘custom built’ in the sense of being a pseudo-prototype made with better materials. So this might be a case of a limited run rather than unique unit.
The Hakuri Rodis are scrap-heap Man Rodis with cobbled-together armour (literally Brewers’ cast-offs found in a debris zone). It’s not surprising they break the pattern.
Tanto Tempo’s customs (T2C) make a pattern of labelling by organisation. Descriptions confirm the Labrys are customised by Tanto Tempo, so they’re not a sub-type in their own right, just a made-to-order variant of the Landman Rodi. Curiously, the Kallisto suggests the existence of a STH-14 model as distinct from the STH-14s Hyakuri. Or the ‘s’ just got dropped when Gianmarco ripped off the backpack.
From all of this, we might therefore conclude that the EB-04jc4 Geirail Scharfrichter is also a custom model. Its profile describes it as a sister machine to the normal Geirail, but it being unique to the mercenary company Mossa employs feels more sensible than it being some kind of standard variant (honestly, I usually forget it even exists).
Finally, there’s the matter of customised Gundams. These don’t generally see an addition to the number codes when they are updated, which might reflect an expectation they will be reconfigured semi-regularly (Kimaris certainly came with a lot of optional extras and it’s Dantalion’s whole gimmick). But nevertheless, common practice appears to be to add extra words to the name:
ASW-G-08 Gundam Barbatos Lupus
ASW-G-08 Gundam Barbatos Lupus Rex
ASW-G-11 Gundam Gusion Rebake
ASW-G-11 Gundam Gusion Rebake Full City
ASW-G-29 Gundam Astaroth Rinascimento
Gundam Hajiroboshi Alector
ASW-G-47 Gundam Vual Yuhana
ASW-G-66 Gundam Kimaris Trooper
ASW-G-66 Gundam Kimaris Vidar
Going back to V08Re-0526 Helmwige Reincar, we see this applied here as well, so theoretically, were there another line of individually IDed mobile suits, the same thing would apply to that.
And there you have it. I have no idea why I thought this was something I should write about but I did.
Other reference posts include:
IBO reference notes on … Gjallarhorn (Part 1)
IBO reference notes on … Gjallarhorn (Part 2)
IBO reference notes on … Gjallarhorn (corrigendum) [mainly covering my inability to recognise mythical wolves]
IBO reference notes on … three key Yamagi scenes
IBO reference notes on … three key Shino scenes
IBO reference notes on … three key Eugene scenes
IBO reference notes on … three key Ride scenes
IBO reference notes on … the tone of the setting
IBO reference notes on … character parallels and counterpoints
IBO reference notes on … a perfect villain
IBO reference notes on … Iron-Blooded Orphans: Gekko
IBO reference notes on … an act of unspeakable cruelty
IBO reference notes on … original(ish) characters [this one is mainly fanfic]
IBO reference notes on … Kudelia’s decisions
IBO reference notes on … assorted head-canons
IBO reference notes on … actual, proper original characters [explicit fanfic – as in, actually fanfic. None of them have turned up in the smut yet]
IBO reference notes on … the aesthetics of the mobile frame
10 notes
·
View notes
Text
22.4.2024 | R41 Biel (Bienne) – La Chaux-de-Fonds | 12.30h
Hier sitzen nur Leute im Zug, die zu jung, zu alt oder zu arm sind, um Auto zu fahren.
2 notes
·
View notes
Text

the UGY-R41 Landman Rodi
I love this little grunt so much. How much? I built this one completely from memory; I have three others as the base model for my first custom units.
And this one is gonna painted up in Black Tri-Stars colors, should I gather the gumption!
3 notes
·
View notes
Note
Can you tell us about the Kitsun Wars?
I'll get into them a bit MORE at some point in the future, but at the beginning of the R41 Cluster Multiverse, there were only dragons from the universe called Beta, called Betans. Every other species in the cluster were artificially created by the Betans as they learned to create more universes. One universe, created as a side experiment, was designated Kitsun. It was a control universe made to test out plant life and other types of "idle" life. Somehow, a species the Betans never designed came into being on this Universe, designating themselves as Kitsune.
Betans are a paranoid and bureaucratic bunch. Unauthorized species had to be eliminated, as such behavior is not to be tolerated. What if OTHER lifeforms popped up out there, existing without explicit control or purpose?? Disgusting. They set out to destroy Kitsun and forget this whole thing ever happened. The Kitsune discovered this plot and formulated their own plans to survive.
Thus began the Kitsun Wars, the Betans fighting to destroy natural life, the Kitsune simply fighting for their own existence. These wars waged across the multiverse, it got REALLY messy, and it was almost always the Betans who escalated it. they lasted centuries, millennia, countless generations of Kitsune lived nothing but war. For a Betan, it was a blink of an eye. And mind you, a single Kitsune could live up to a thousand years alone.
Countless scars from these wars can be seen all across the multiverse. Rifts into unreality, planets in many universes forming oddly, and of course, the former universe known now as the Edge by its locals, a mass of chaos and calamity where life somehow persists despite its destruction.
There ultimately was no winner in the war, but the Betans had to call it off eventually. The Kitsune were simply too clever and persistent. By the time the war ended, other naturally-born species had emerged across the multiverse. The wars lasted so long that the initial reason for the conflict was pointless. The Kitsune were allowed to exist, and so long as the two species don't spark anything towards each other, everything is fine.
It's said that every fox in the R41 Cluster is an offshoot of the original Kitsune people. To this day, foxes are seen as a sort of boogeyman in Beta. Foxes are their scary stories.
4 notes
·
View notes
Text
Round 2 Match 1


Audio for your reference under the cut!
R48: Fondue to the Rescue
youtube
R41: Showdown with Napoleon
youtube
3 notes
·
View notes
Text
Apache Crew Accessories
R2 Miniatures has released a number of crew and upgrade kits for the Apache helicopter in 1/35 scale. Take a look!
R30-35 AH64 Apache Ground Crew with 30-mm Caliber Ammo
R31-35 AH64 Apache Ground Crew Set with Hydra 70
R33-35 AH-64 Apache Ground Crew Set with AGM-114 hellfire missile
R34-35 AH64 Apache Pilots Duo
R40-AC35 U.S Army 30-mm Ammo Boxes(4 pcs)
R41-AC35 AGM-11 Hellfire Missile…
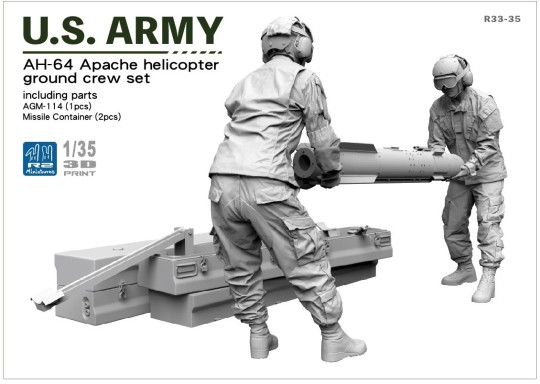
View On WordPress
0 notes
Note
Ok Anna sharing is caring che hai saputo?
niente ahah da quanto ho capito su twitter mentre cerco di saltare i tweet di guerre tra ship, é che la gente ha scoperto che *SPOILER*
mimmo se ne va come personaggio dopo queste puntate e che quindi the ship has sunk, poi ho visto che e' uscita una foto di mimmo con LA giacca addosso (quella della leggendaria foto sfocata che tutti stanno cercando di decifrare da MESI) pero la gente si e' anche resa conto che sfocandola, la sagoma e il colore della pelle non coincide con mimmo e quindi potrebbe POTREBBE /potrebbe/ essere manuel con le mani al collo di simone per x motivi, e per qualche motivo ha la giacca di mimmo addosso???? non ho saputo altro se qualcuno sa di piu MI DICA ORA
#io una mezza idea sul probabile perche POTREBBE avere la sua giacca ce l'ho#ma mi rendo anche conto che sarebbe una trama troppo elaborata per la r41 e avrebbe troppo senso per gli sceneggiatori di satana#quindi vedremo
0 notes
Link
Check out this listing I just added to my Poshmark closet: Carhartt R41 BLK Zip-to-Thigh Insulated Bib Overalls Size 44X30 Workwear.
0 notes
Last Seen Blogs

se1ze
Untitled

italianwebhead90s
Weird Zone

suizidistdieloesungblog-blog
Man Wird Zum Suizid Gemobbt .😔

gay-rich-mac
the astermind
under-thesuns
under-thesuns