#but the keyboard shortcuts are working just fine for now!
Text
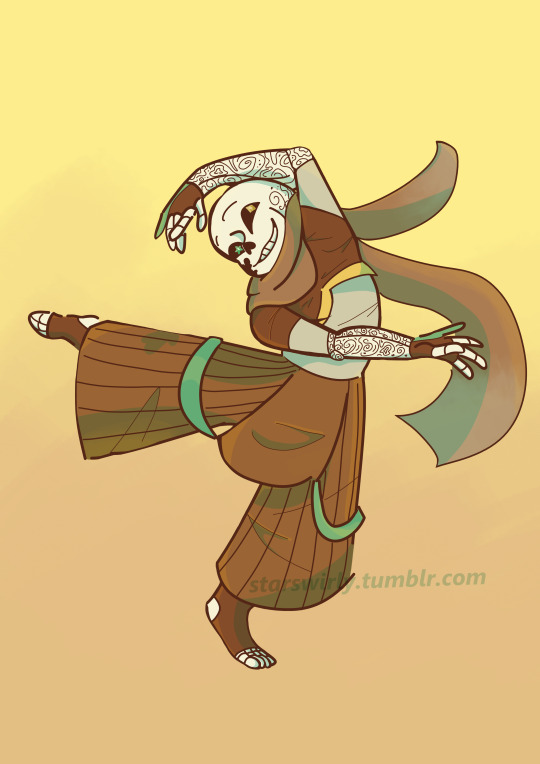
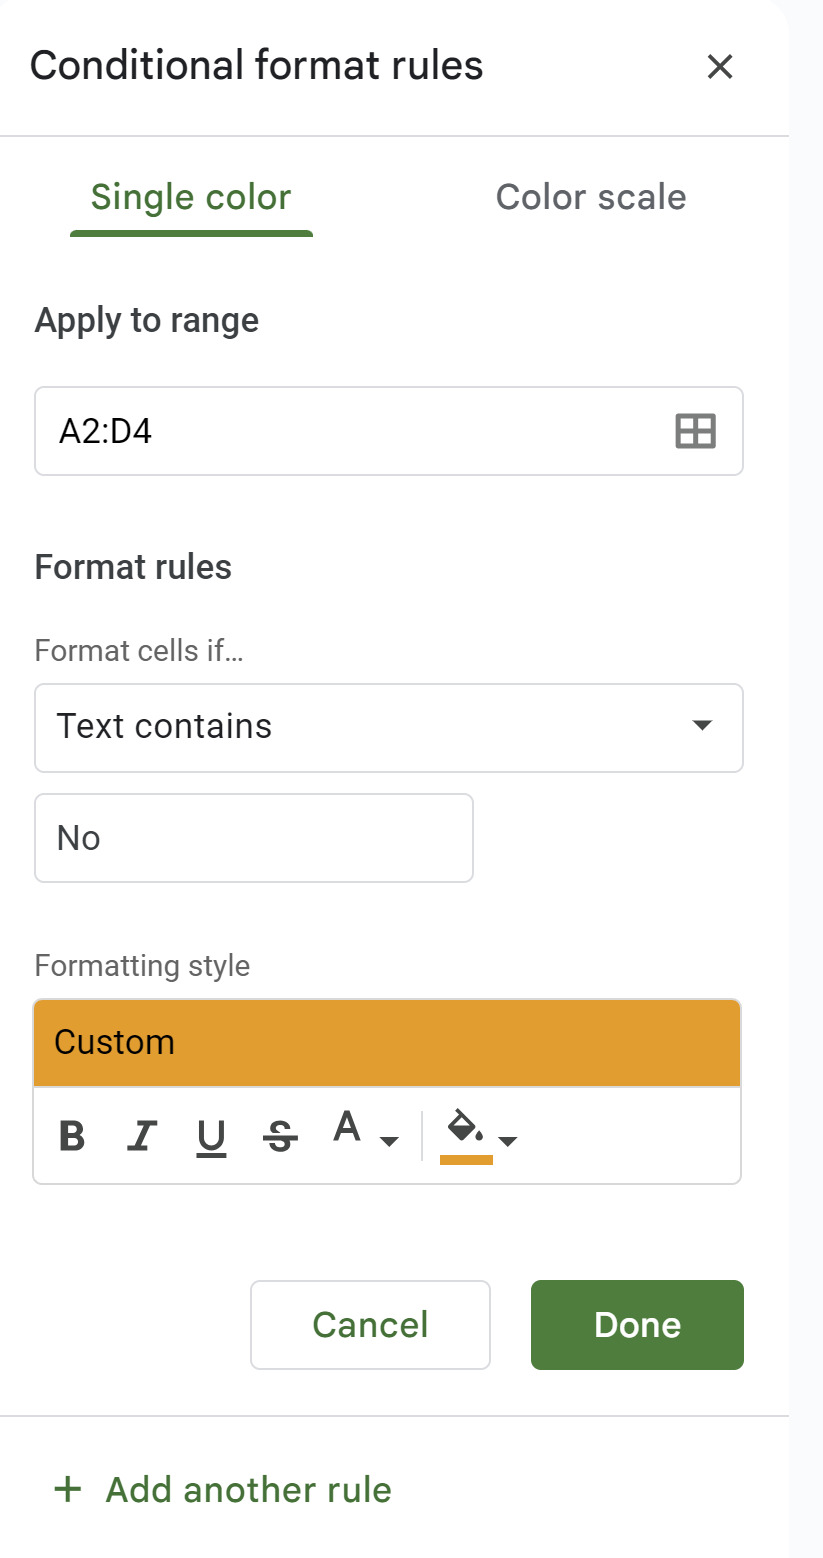
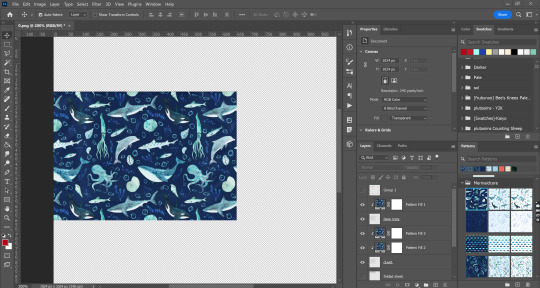
Ink -> Comyet
Ink aka my favorite drawing test subject :]
#Star's Scribbles#UTMV#Ink Sans#testing out art programs with my new laptop!#early birthday gift!! I'm really liking it so far :]#Still don't think I have a full hang of krita#(looks at the amount of times i had to search 'how to X in Krita')#but its getting there!#No idea where my undo and redo buttons went#but the keyboard shortcuts are working just fine for now!#the bigger screen is AWESOME#especially on my wrist-- I'm able to use my whole arm#rather than just my hand#sorry you came for ink art not my ramblings-#he so silly :3#QUEUE#see yall in the morning when this posts!!#:D
70 notes
·
View notes
Note
Oooo different anon but
Please do share you spreadsheets tricks! I only use spreadsheets if I have to make a table (because somehow it's easier to copy paste it from there instead of making one in documents...) but it seems like a such an useful tool that I don't have motivation to learn how to use :/
Hello! And I'll try my best! Some of these may seem more basic, but they can do absolute wonders for organization. Now this is a long post, with screenshots!, so buckle up your seatbelts.
All screenshots will be from Google Sheets. I do have and use Excel on occasion, and some of these items can be found on that program as well, although it may be placed elsewhere.
Please note, too, that all examples are done on a PC device. For mobile phones or tablets, some of these keyboard shortcuts might not work the same and may require a little more finagling to get right.
I'll start with making something called a "Header Row". Basically it's how you name your columns so you know what should be in each.
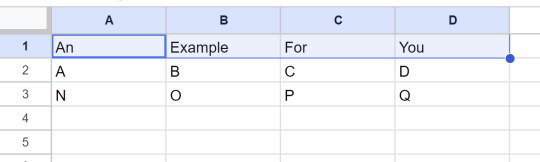
This is just an example spreadsheet, but it'll work lol. (If you don't know how to highlight those four cells, select A1, hold Shift key and use the Right Arrow key [->] until you have highlighted all the results you want for your Header Row.)
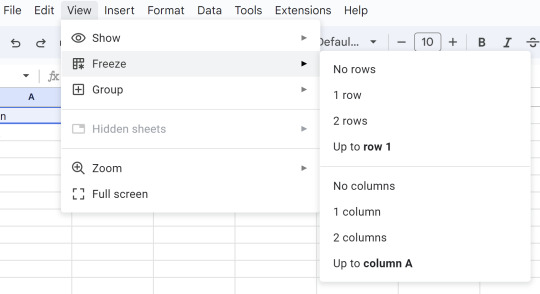
From here, you go to View on the panel and select/hover over Freeze, where you can then select "1 row". This should freeze your selected row. So no matter how far down you scroll, or how much information you have recorded, you'll always know what's supposed to be listed there.
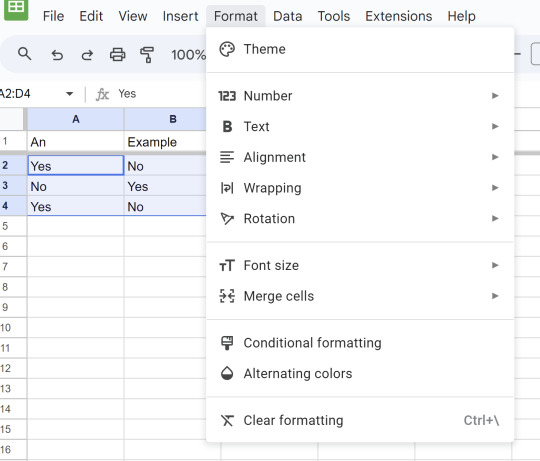
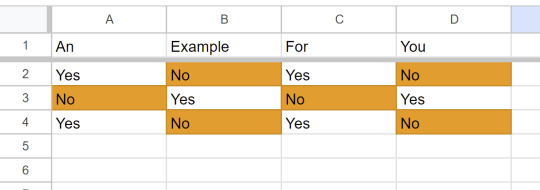
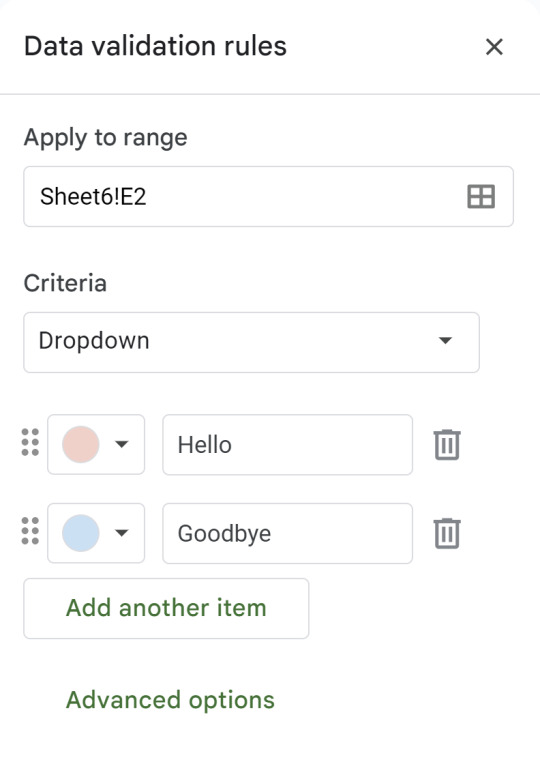
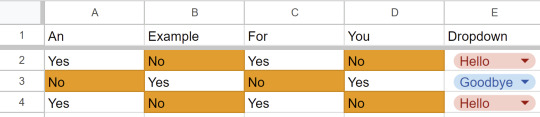
Next we have something called "Conditional Formatting". This can be really useful if for filtering data. In this example, I changed the spreadsheet to have various cells with "Yes" or "No", to show what it can do.
---
Once you've selected the cells/rows/columns you want, choose Format, then Conditional Formatting.
From there, it should give you a panel on the right side of your screen that looks a little something like this:

You can do a lot with this! You can even adjust the range here if you realize you picked the wrong ones or changed your mind for any other reason. But to format it, you need to choose the rule. Here is some examples that they offer you:

In this case, I am going to choose the Text Contains rule. From there, I pick what the text should say. I even get to pick and choose my colors. So at the end it'll look like this:
My spreadsheet will reflect this rule as well.
You can also add as many rules as you want! Just use that "+ Add another rule" at the bottom there and repeat the process.
---
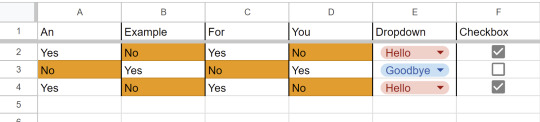
Now this next one is among my personal favorites: Dropdown menus!
This can also cover something called "Data validation", but I won't bore you with that explanation just yet.
Go back to that Insert tab and you'll see Dropdown further down the list. (Smart Chip functions in a very similar way, but it's works better for collaborative projects or scheduling needs.) We'll get to Checkbox in the next round.
When you click on Dropdown, you'll get this window:
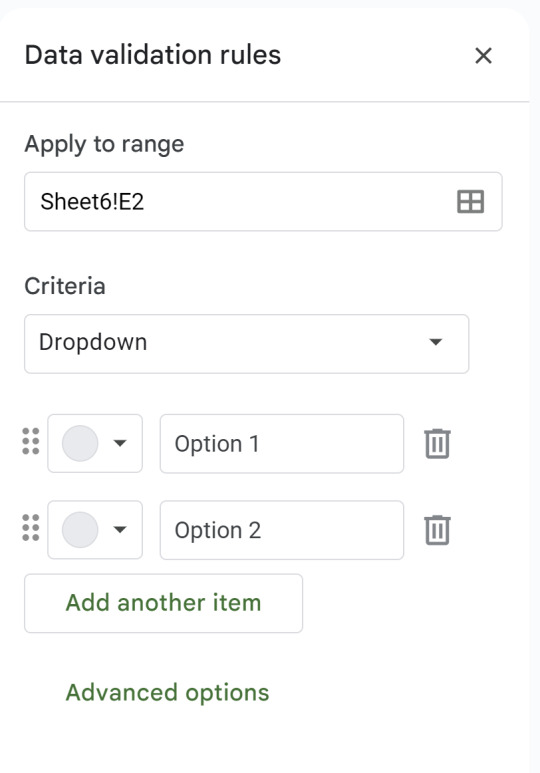
Much like with Conditional Formatting, Dropdown allows you to customize what your options are and how they're colored. I'll use some basic examples for you to get an idea.
And of course you can add or delete as many options as you need.
So when we go back to our spreadsheet, it'll look a little something like this:
---
Checkbox is fairly simple, and doesn't allow much for customization. But if you go back to the Insert tab and click on that option, you can get a little something like this:

A nice little checklist if you need it!
---
A simple trick to filling more cells is actually fairly easy. You see that little blue dot on the bottom right corner?

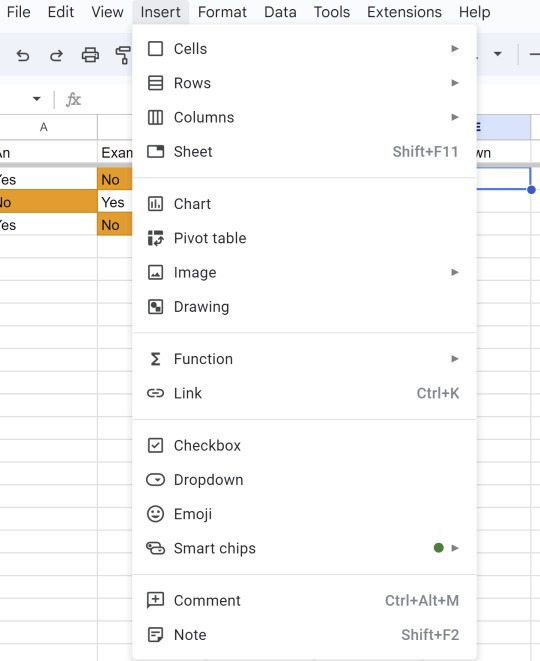
If you're using a formula, you can just double click that dot and it'll usually just fill in all the cells for you! And if you're not using a formula, dragging works just fine. You can also use the Insert Row/Column/Cell option by right clicking with your mouse, or referring to the Insert tab on the top panel.
---
If you want to make your cells/rows/columns stand out a little more, might I recommend Borders?

They give you a lot of options for what it'll look like. For this example, I'll use the fourth option of the first row. That'll make it look a little something like this:
And hmm... I don't like how they're leaning to the left. Let's fix that too.

And maybe a few more cosmetic changes...
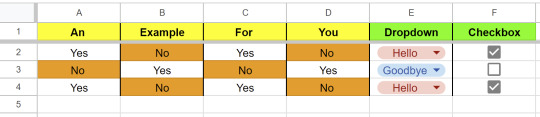
And BOOM! It already looks a lot different! At just a glance now you can tell what goes where based on colors alone! You can also customize colors if you don't like the basic ones, but I think I'll leave that mystery to you. ;)
I hope this gave you a good head's start! And don't worry if it feels overwhelming at first. I know I forgot a lot of tricks and tips (and a good number of keyboard shortcuts) when I went a long time between using spreadsheets. You're free to refer to this guide any time you want or need to, and if you have questions, I'll try my best to help!
Classes have always taught me this: never feel embarrassed to look something up. There are websites like Github or Stack Overflow for paid professionals to get help and advice. We should be allowed to do the same.
Now that I have sufficiently buried you in information, I hope you have a wonderful new year!
17 notes
·
View notes
Note
Hi.I would be grateful if you showed how you do these recolors with patterns, because although I understood what it was about, somehow it didn't turn out as it should. I better see how to do it. Thank you <3
Hi again! Sorry it took me a bit to reply, I've been swamped with work asdfghjjhgfds. No problem at all, I'll do my best to explain - I'll just put it under the cut so it doesn't clog people's dashes up. I've also done a quick video showing the process too, in case that's also helpful.
Programmes I'm using:
Sims 4 Studio
Photoshop (I use windows, so all the keyboard shortcuts use the ctrl key. If you are on mac, it will be command instead)
Additional resources:
Photoshop actions by @silverhammersims
Photoshop pattern files. If you don't already have any, you can find some easily by searching 'free photoshop pattern files', or use some of the ones I've shared here
The ~Process~
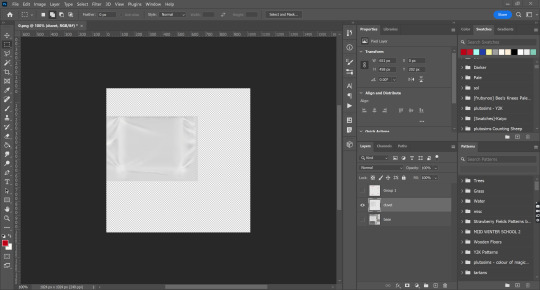
So, first things first, I find the object I want to recolour in Sims 4 Studio (S4S). For this, I'm going to use 'Modern Colonial Bed'. It has a great plain white swatch which is perfect for recolouring, but if the object doesn't have a white swatch, finding a light/pale colour swatch is also fine.

Then, I open it up in Photoshop.

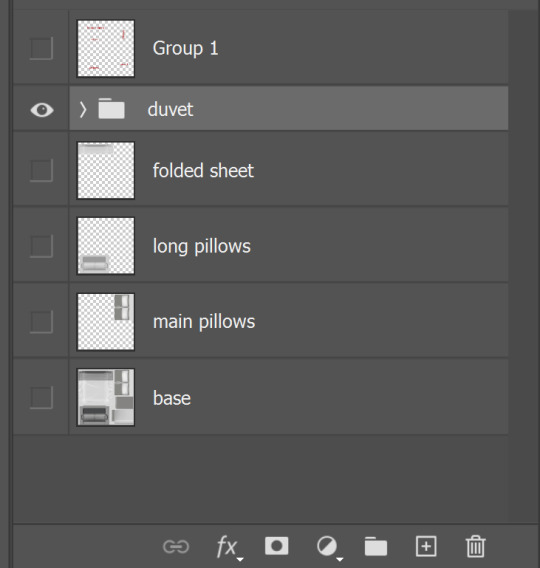
Obviously, it's one solid image, which isn't necessarily what we want. For example, when I do bedding recolours, I often do a pattern on the duvet (i think it's also called a comforter in some places?), but want a solid colour for the sheets and pillows. So, our next step is to separate each part on to its own layer so we can recolour them individually.
You can use a few different tools to do this, but for bedding, I use the rectangular marquee tool, because there aren't any curves we need to select around. The keyboard shortcut for the marquee tool is 'M'. With that tool selected, I drag a box over the part of the texture I want to separate. I'm starting with the duvet - you can see the 'marching ants' lines around it.

With that selected, I then use the keyboard shortcut 'ctrl + j'. This copies the area you selected onto a separate layer. I rename my layers so that I can easily find each one - i typically call the starting, flat texture the 'base', and rename each new layer accordingly. As you can see, if I click the eye icon next to the base layer to momentarily hide it, we still have the duvet visible.

I then repeat this process for the folded sheet, and both sets of pillows. I'll use the base layer to recolour the sheets.

Because the folded sheet and the long pillows are darker than the rest of the texture, at this stage, make them lighter. Whilst clicked on the layer I want, I press ctrl + u, where I can change the saturation and lightness.
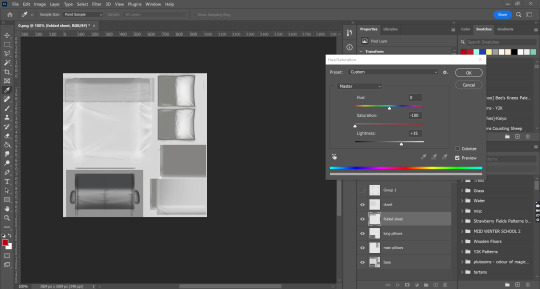
To finish adjusting it, I then add a brightness/contrast layer. To access this, you can go to layer > new adjustment layer > brightness/contrast, or click the little circle icon at the bottom of the layers panel.

When I'm happy with the adjustment, I select both the layer (in this case, the one titled folded sheet) and the adjustment layer, and merge them together. (press ctrl, click on both layers in the layers panel, right click, merge layers). I repeat this process for the long pillows.
OKAY NOW THE FUN PART I PROMISE!
AIGHT now we're gonna add the pattern onto the duvet. Firstly, I make sure I'm selected on the right layer (in this case, the one I've labelled as 'duvet'). I often hide the other layers (by clicking on the eye icon next to each layers' name). Then, I open up the actions panel; if you don't see this at first, you can go up to window > actions.
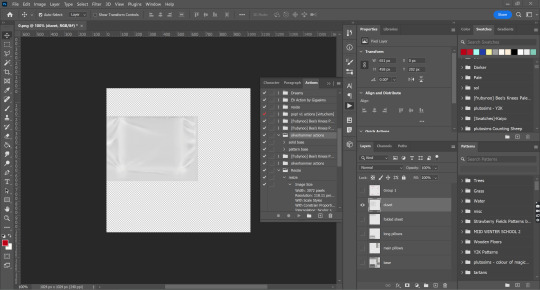
As you can see, I have a lot of actions, but the ones I'm using for this are the silverhammer ones. The names for both action sets is pretty self explanatory - if you want to use a pattern, select pattern base, and for a solid colour, select solid base. Hit the play button, and boom! It will come up with dialogue boxes, just hit the enter key for now as we'll adjust the settings after.
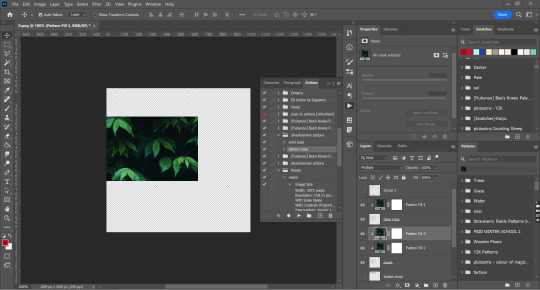
Photoshop will use one of the default patterns first; it's always this leaf one for me, I'm assuming it's the same for everyone, but if not it doesn't matter anyway because we'll be using our own pattern. Using the ctrl key, I select all of the pattern fill layers. Then, I can select the pattern I want to use for my recolour. In my workspace, it's located in the bottom right corner, but it may be somewhere else for you. If you don't see it at all, go to window > patterns. When you've found the pattern you want to use, click on it, and all the pattern fill layers will change accordingly.

Depending on the original scale of the pattern you used, it may look HUGE, or really small. That's fine, because we change the scaling. Double click on one of the pattern fill layers, and it will bring up a dialogue box. I use the middle fill layer (which will be called 'Pattern fill 3') as it has the most opacity and is therefore easier to see. Here you can change the angle, and the scale. I don't want to change the angle this time, so I'll only be focusing on the scale. You can use the slider or type in different numbers until you find something you like. This pattern was really big, so I'm going with a 17% scale. When you're happy, hit the enter key or press the 'OK' button.

You can still see where the other pattern fill layers haven't been changed, but that's fine, because we'll repeat the exact same process with them. Just make sure you use the same scale as you did for the first one you changed (in this case, 17%).
And yay, it all matches! Then I'll select all the layers I just changed and put them into a group (ctrl + g), and rename that to duvet, to keep my layers organised.
Now, I'm going to move on to the solid colours. I'm going to start with the folded sheet layer. I'll click the little box next to the layer to make it visible again. The process is the same as the pattern fill, except this time, I'll select the 'solid base' action.

As you can see, it automatically goes to this eye-hurting neon green, which isn't what I want. Just like with the patterns, I will select all of the colour fill layers using the ctrl key, and then click on the colour swatch I want. If you can't see the swatches panel, go to window > swatches. If you haven't saved a swatch, don't worry! You can do it manually. Just double click on one of the colour fill layers, and it will bring up a dialogue box where you can drag around to find a colour you want, or type in a specific hex code. Then just repeat it for the other colour fill layers.

And tah-dah! It was a bit harder to see on the duvet because of the dark pattern colour, but here you can really see how the texture of the sheet (the shading, wrinkled fabric etc) comes through and doesn't look flat.
I then do the exact same process for all of the other layers.

Aaaaand tada! All that's left to do now is save your finished texture (I use PNGs, but you can also do DDS) and import it back into S4S to make sure it looks right.
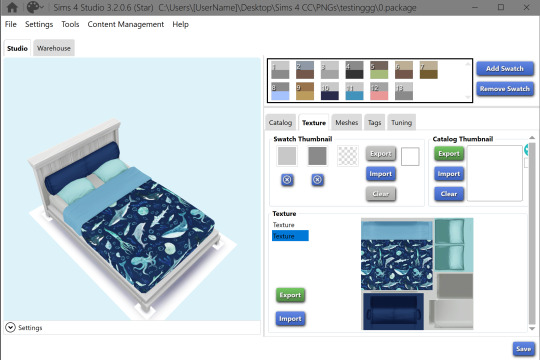
I think it looks pretty cute!
I've also recorded a quick video showing the process too, just in case that's useful (sorry there's no voice over, I've honest to god lost my voice from reading so many books over and over again to kids this week).
youtube
I'm so sorry if this was needlessly long or confusing. If I cocked anything up and didn't explain it properly, please do let me know!
#asks#replies#tutorial#sort of?#this is why i dont make tutorials because i SUCK asdghjklkjhgf#tbh its probably good ive lost my voice bc i wont subject you to my accent#THIS IS SO LONG OH MY GOD IM SORRY
22 notes
·
View notes
Photo
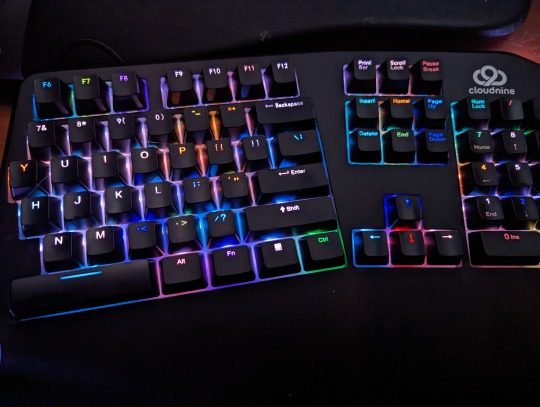


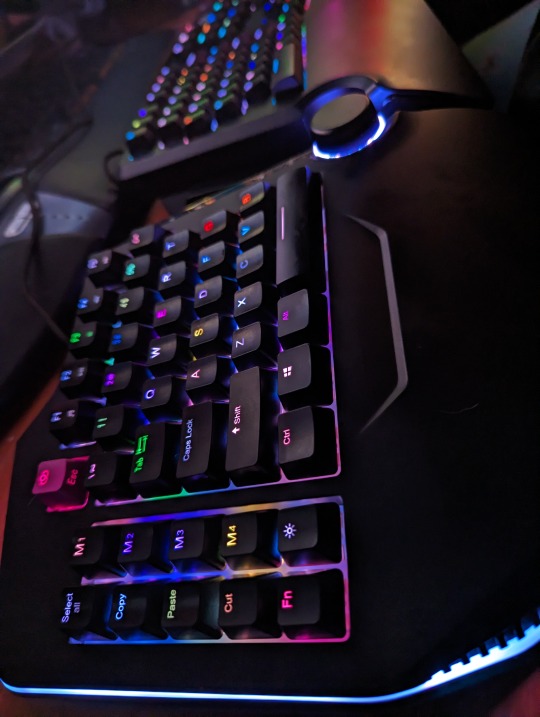
Got a fancy new ergonomic mechanical keyboard and I already love it like, a lot. Been using ergonomic keyboards for like 20+ years and could never go back. Been waiting a long time to find an ergonomic mechanical keyboard that A) wouldn’t break the bank and B) wasn’t like... Donna Megal’s Keyboard in that office shakeup episode of Parks and Rec.
Also ordered a keyboard switch today so that I can stop keeping two keyboards on my desk all the time, using one keyboard for work and the other for my personal computer. Been doing that since I started WFH in March 2020. I know I coulda/shoulda done that earlier but... meh. It’s worked fine til now. Now just just only WANT to type on this keyboard. :p
This one is really big, a whole extra two rows of macro keys there on the bottom picture which I have yet to really take advantage of (not sure if I can get used to having select/copy/cut/paste buttons instead of just using the control-a/x/c/v shortcuts) but I tried for a bit at work today. I also keep accidentally hitting that select button instead of escape (which is the pink key, and also they nicely sent a plain black escape key without the company’s logo on it) which has been annoying a few times today... something to get used to.
I also love that this one has a magnet in the center so you can easily keep it together or pull it apart. Currently typing this with them pulled apart slightly to see how I feel about typing like this and so far it’s not too bad, just gotta remember more that you can’t type any key with the wrong hand.
The keys are a tiny fraction of a millimeter farther apart than I’d like with my girly hands but I’m getting used to it. The keyboard has a great tactile feel otherwise, though the spacebars could use a different slant. So far, if I change anything, it’ll be the spacebars.
The dial in the middle is just a volume dial. It looks cool, and hey, it’s more accessible than clicking on the volume button on the toolbar I guess.
It’s also pre-programmed with liek 20 or more different lighting modes. I really like this pastel one I took the pictures with, but it also does your typical bright RGB just fine. Kind of thinking I might try to set my computer and mouse to fit this lighting scheme though because I like it so much.
Look, mostly I’m typing so much about this keyboard more to just type with it than having anything to say. I haven’t had much of a reason to type much all day with the work I was doing at work and then just doing some light gaming.
But yeah, the longer I type the more I think I’m going to replace these spacebars, if possible. :p
Otherwise, highly rec this keyboard if you’re looking for something ergonomic and mechanic that you can buy off the shelf. It’s still significantly more expensive than buying your typical Logitech keyboard off the shelf, but will probably last until just about forever and feels way better for typing than just about anything else you’re going to use. :D
*edit* Since people seem to like it, it’s this one: https://cloudnineergo.com/products/cloud-nine-c989m-ergonomic-keyboard. It’s available at other places where people often shop as well.
17 notes
·
View notes
Note
Hello there! I can no longer type the letter ç in my mac without opening a new post, I assume this is a new keyboard shortcut. Seeing that my native language is portuguese and the cedilha is very common, this is making it very hard to communicate with my mutuals. Do you have any plans to allow users to change their keyboard shortcuts or deactivate the shortcuts in some way? Or at least let me type a cedilha?
Hello there, @alicedraws-kostyalevin.
Great news! We have just deployed a fix for this, and it should now work just fine. This was actually a known bug that we have been working on for a little while.
Alternatively, a possible workaround is holding the “c” key and picking the “ç” option. That’s what I have been doing! Fortunately, you shouldn't need it now, but it's always there.
Best,
—Julia and Thierry (Tumblr Engineering)
77 notes
·
View notes
Note
12, 30, 46 & 49 for writer asks uwu
Thank you, Dim! 😊
12. Are there any tropes you used to dislike but have grown on you?
Let's see...I'm usually very open to tropes so I'm sure there's not many. The few that I dislike I'm still not touching with a 12-ft pole. 😆But I guess I've been playing with more angst/no comfort stuff that 100% didn't used to be my thing. And like YEARS ago I didn't care for m!preg/baby fics, and now we've got the Cursed!AU...so I'm sure anything is possible and I may end up having some of those grow on me too.
30. Have you ever written something that was out of your comfort zone? If so, what was it, and how did it affect your approach to writing fic thereafter?
So I've written several pairings this year that are "outside my comfort zone" just because I had never done them before. But one that definitely stuck out was the fic I just wrote for THAUC: Secrets in the Blue Mountain Apartment and it's because I was writing primarily from Dis and Vili's POV...and seeing as they don't appear in canon books or movies, it was like writing two OCs that everyone has their own HCs for. 😅 So that was tough, but I would definitely like to use more of them in my future writings now that I've at least laid some "groundwork" for myself.
46. Do you prefer writing on your phone or on a computer (or something else)? Do you think where you write affects the way you write?
Oh, computer. 100%. When I was in college, I used to keep a "writing notebook" that I would pull out during class, but yeah. Only at my most desperate do I write on my phone.
For one thing, I type faster on a keyboard than what I can text on my phone. For another, I have all my shortcuts memorized for "bold" "italics" etc., so that just takes time typing. And then writing on a phone is so deceiving to me word count wise. Luckily, I carry my laptop around with me everywhere, but I definitely do my best writing when I'm comfy at home.
49. What are you currently working on? Share a few lines if you’re up for it!
Currently, I am trying to finish up this next chapter of The Twelve Transformations of Bilbo Baggins so I can update on Saturday. 👀 Here's a small-ish excerpt. 🤣
Bilbo quickly retraced his steps, pretending to sleep as he felt Balin gently scoop him up in his arms. His heart felt like it was thundering away in his chest though. Would Thorin really leave him behind if they couldn’t find a cure? It wasn’t like he was going to be a child forever, but then again, what if the next transformation was worse? Thorin wasn’t going to risk the quest all for Bilbo’s sake.
“Thorin,” Balin’s soft voice broke through Bilbo’s worries. “Am I interpreting these proceedings correctly? You and Master Baggins…?”
Bilbo nearly broke his cover right there. What about him and Thorin? There was a long pause before Thorin answered, but it sounded half-hearted even to Bilbo.
“The wizard knows not what he insinuates. My view of the hobbit is strictly professional.”
Professional?! No wonder more people didn’t do business with dwarves if that’s how they behave in a professional atmosphere. Still it was nice to know that Thorin didn’t hate him. He just didn’t see the need to cultivate an acquaintanceship with Bilbo. That was fine. He could be okay with that. His chin trembled slightly, but he blamed it solely on his guilt of eavesdropping.
“You’re a poor liar, lad. You always have been, but I can understand not wanting to consider such things now. However, you’re a fool if you think holding him at arm’s length will make this quest easier.”
“I will handle it how I see fit.” Thorin growled. “In any case, nothing can come from him being the way he is, so I will hear no more on the subject.”
Ask me some fic questions!
#sunny answers stuff#i didn't mean for this to be this long my bad#super excited to update something soon though
4 notes
·
View notes
Text
Meeting the Glitch (W/ HexariiVT)
Uninterested, the fae taps their finger on the table in rhythm with the blinking cursor. They have officially hit a block regarding the progress with this paper. Clicking their tongue in annoyance, they let their gaze wander the room in hopes for any kind of inspiration. Instead of inspiration however they spot the android who has made herself comfortable reading.
“Hey Assistant,” Caelum calls out, instantly gaining the attention of the other. She puts her book aside without a moment of hesitation and makes her way over. “Let the higher-ups know that I´ll be needing more resources for my research soon,” they order and watch the android leave without a word. They sigh and lean their head back, blankly staring at the ceiling.
Just for a second the lights flicker. Caelum shoots them a warning look, as if that simple gesture would be enough to intimidate the light into behaving. Satisfied with the lack of further flickering they turn back towards their monitor only to freeze in horror.
Instead of the paper that they have spent the past few days working on they are looking at a dark screen. They blink once, twice, hoping that they are just hallucinating due to lack of sleep. Nothing changes except for the green lines of code flitting across the screen. “No,” the horrified whisper leaves their mouth and panic sets in.
Desperately they try to get their PC to work once again but no matter which keyboard shortcuts they try, the green lines keep blinking at them tauntingly. No amount of bargaining nor swearing gets the PC to even hesitate in its mocking.
With a little sniffle they accept the fact that there is only one more thing to try. Unplug the whole thing and hope that it gets the machine to work properly once again. They might as well give up all hope to get their paper back. With a heavy sigh they lean over to pull the plug.
Abruptly though the light from the monitor changes from green to purple. Surprised, Caelum forgets about their plan and looks back at the monitor. Staring at them is a purple loading screen, with swirls? “What the…” they start but can´t even finish their sentence in their confusion. Once again they try out one of the keyboard shortcuts. Just to be sure. Still no response from their PC.
Then for a second the screen goes completely dark only to return with a person on it. She is looking at something off screen and doesn't seem to have noticed Caelum yet. This suits them perfectly fine as they notice a second too late that their mouth has dropped open in surprise. Hastily they close it but keep looking at the other.
Her horns and swirly hair are what is drawing Caelum´s attention the most. The cone shape is something they can understand but they are absolutely clueless as to how the swirls have been attached. Honestly, they don't even look attached to anything. Shaking themself out of their stupor they clear their throat to gain the other´s attention.
Surprised, the person in the monitor looks up, golden eyes zeroing in on Caelum almost instantly. “This,” she says and takes her eyes off of them to look at what she can see of the room. “is certainly not where I'm supposed to be.”
“Yeah, I´m pretty sure I would have known about you dropping by otherwise,” Caelum shrugs, not really minding the surprise guest now that the initial shock has worn off. This is miles better than the higher-ups dropping by unannounced. Plus, this is a good excuse for a break. “Where were you supposed to be though?” They sit back at their table and muster their visitor. They are still unsure about how exactly their hair works.
“Oh, just somewhere for work,” she waves off before leaning forward, her face now a lot closer to the monitor. “But I tried and it didn't work, so I´m just gonna call it a day and go back to gaming.” She grins at Caelum, a mischievous twinkle in her eyes.
“Damn, I wish I could do that,” the fae chuckles with a regretful look towards the pile of documents next to them. Instead of dwelling on that though they turn back to their way more interesting visitor. “Anyways,” they start, leaning their head on one of their hands. “Let's just move on. You said you game?”
The other´s face brightens. “Of course, of course. Recently I´ve been playing a lot of Wenshin Impact. Not sure if you´ve heard of it?” She looks at Caelum for a second. Seeing the delighted recognition on their face she goes on. “I spent so much time grinding for my main, Xia,” she laughs, looking fond.
“Can´t believe I´ve finally met a Xia haver,” Caelum joins the happy mood, putting a hand to their chest for a dramatic swoon. “Though I'm more of a Tartagle enjoyer myself.” The person on screen nods in approval. From there the conversation between the two flows easily. They are about to get into their favorite boss fights when a short, loud beep rings out.
Startled at the noise, both of them look towards the door. Caelum is sure that it's only the android having used the wrong door code after coming back but before they can say as much the other starts talking. “Well, guess that's my cue to go,” she says, her hands busy with something off screen.
Next to their documents Caelum´s tablet lights up with something that looks suspiciously like a business card, the name Hexa written on it. “And there we go,” the person, that Caelum now assumes is called Hexa, exclaims happily, stretching her arms high above her head. “Now we can play together at any time, so make sure to contact me!” And with those final words the monitor goes dark.
No. Not dark. It goes back to the taunting green lines and Caelum lets out an annoyed breath. They rub their eyes tiredly and don´t even look when the door finally opens. Footsteps draw closer but Caelum still doesn´t check. “Your device seems to have run into a problem,” a monotonous voice beside them says. Of course it was the android.
Not receiving any answer or acknowledgement the android goes on. “May I check the device to restore it to working condition once again?” she asks, already moving closer towards the desk. Caelum lets out another annoyed breath but abandons their chair without a word, only grabbing their tablet off the table before leaving completely. Looking down at the still open business card they can´t help the slight spring to their step.
#caelum & friends#envtuber#don't mind the misspelled names#they're on purpose cuz I love stuff like that in manga & anime lol#also check out Hexa!#she's the coolest glitch demon around! :D
2 notes
·
View notes
Text
God I love keyboard shortcuts SO. MUCH.
After I found out Alt+R automatically reblogs posts, I have jsut been reblogging more?? Idk it's weird liking posts was easier before because like, you click a button and it's done. Reblogging the post means clicking the reblog button then waiting for the post to load and it opens the thing so you can add your thoughts if you want then reblog it and like, it felt like more work for some reason when it would only take a few seconds?
Now it's just. Alt R. It'll reblog the post without opening the lil thing to add your opinion to it which is fine because how often does one really add anything to a post before reblogging it anyway
4 notes
·
View notes
Text
How to use computer
a guide from someone good at using computers
TikTok or Instagram or something would probably be a better place to spread this kinda knowledge, but that’s too much effort right now.
This will mostly be windows focused.
Basic computer maintenance:
Keep dust out of the fans, and try to clean them from time to time if you can. This helps prevent overheating. Using your laptop on top of your blankets in bed is a great way to suck up lots of dust and overheat it all at once. Put a book under it or something.
Turn your computer off when not using it. Do so by shutting it down, not with the power button.
Leave automatic updates on. These are usually security updates, and they help keep you safe from viruses and such. Windows 10 is still receiving security updates last I checked.
Shortcuts
(most of these have a Mac equivalent with command instead of control)
Many of these can also be done by right clicking the relevant object or place on the screen, but shortcuts are faster in the long run.
ctrl+c: copy the selected text or object to the clipboard (invisible space for holding copied stuff. Only holds one thing at a time, so be careful!)
ctrl+x: copies the selected thing, and deletes it at the same time. Good for moving things around.
ctrl+v: pastes whatever was copied into whatever area was last clicked.
ctrl+z: undo.
ctrl+y: the lesser-known and lesser-used redo. Not every program will have this command, or will have this as the redo command, but a lot do.
ctrl+alt+delete: On Windows, opens Task Manager. Task manager can be used to see which program is making your computer run slow, and close misbehaving programs.
alt+f4: close the current window. Sometimes works for frozen programs, but Task Manager is more reliable.
alt+shift+tab: on Chrome and Firefox and probably some other browsers, reopens whatever tab was just closed. Can be used multiple times in a row.
ctrl+b: Makes the selected text bold in most text editors.
ctrl+i: Italicizes the selected text in most text editors.
There are lots of different shortcuts in lots of different programs. I recommend looking up “[program name] shortcuts list” for whatever programs you use most! “[program name] cheat sheet” is also usually a great thing to look up.
Stuff to know for school and work
First: learn touch typing. There are lots of different typing games available for free online.
It’s a good idea to try to use a map like this to guide which fingers go to which buttons:

You might not end up following this guide exactly, but this is a good place to start to make sure you don’t end up like Mumbo Jumbo, who presses shift with his thumb or something.
You may think you type fast enough now, but you’ll be able to type so much faster once you can look at the screen instead of the keyboard, and writing essays will hopefully go faster.
For programs, it’s good to have a word processor, a presentation maker, and a spreadsheet maker. You can go with Microsoft Office (often free through your school), Google docs/slides/sheets, or Libre Office.
I don’t know much about Libre Office, but it looks like a good free alternative to Microsoft Office and I may switch to it in the future.
Google’s programs have the advantage of being available on any device, easily transferred, and easy to collaborate on.
Microsoft’s programs typically have much more features, and I would assume the same of LibreOffice.
For anything that needs complex formatting, go with Word or the LibreOffice equivalent. Getting formatting just right in Word is a pain, but with Google Docs it’s worse. Otherwise, Google Docs works fine.
Most people will probably never need all of PowerPoint’s fancy presentation features, so Google Slides should be fine for almost everyone.
Google Sheets is fine if you just want to calculate some grades or sum up some numbers, but it lacks a lot in comparison to Excel. If you plan to take statistics classes, want to do any fancy calculations or formatting, or want to learn to use spreadsheets for fun or profit, I would go with Excel or the LibreOffice equivalent.
Grammarly is a grammar and spelling checker that typically works better than the default systems. It can be installed as a browser extension or Word extension, or you can paste text into the website.
Another way to check your grammar, spelling, and wording is to run text-to-speech on whatever you wrote. Text-to-speech is built into Word, and might be built into Google Docs as well. Text-to-speech is a great way to review what you’ve written and check for errors at the same time.
When submitting written documents, either assignments, resumes, or anything else, it’s usually best to export the document as a PDF and submit that rather than the document file. Document files are for editing, PDFs are for finished products.
Using the Internet
First: your web browser. Microsoft Edge sucks. Most people replace it with Chrome, but Firefox has just about everything Chrome has without letting Google’s grimy fingers get into your data (not as much, anyway).
An adblocker will make websites load faster, prevent you from seeing disturbing or annoying images, and protect you from the many ads that pose a security risk. UBlockOrigin is great. Look up “UBlockOrigin [your browser name]” to find out where you can download it.
Finding information
There’s some kind of post with a bunch of special search engines floating around. I don’t have it on hand though, so here are the typical contenders:
Google: getting worse all the time, but usually I find it gets me the best results. Tracks your search habits and sometimes censors results when governments say to.
Bing: the results often aren’t as good as Google. I’m sure it also tracks you, but at least I haven’t heard about it censoring results.
DuckDuckGo: I usually try this one first, then google if I don’t find what I want. DuckDuckGo is a tracking free search engine. It’s also good for finding piracy websites.
Once you have your search engine, what do you search?
Putting a word or phrase in quotes: “like this”
Only return results that contain that exact word or phrase. Can be helpful when trying to find a very specific source, or when the search engine keeps deciding that a very important word is actually unnecessary.
Only getting results from a specific website or domain: like this site:.edu or like this site:tumblr.com
There are usually often dropdowns and settings that allow the search to be customized further, but I’ve noticed that there tend to be less options available when searching from mobile devices compared to computers.
When the search results are clogged up with meaningless articles and other stuff that seems designed to generate views for ads or to promote products, then it’s time for
site:reddit.com
Results from reddit are hardly the most reliable, but at least they come from real humans! Never use Reddit’s built-in search though, it’s as bad as Tumblr’s.
🏴☠️
Use Firefox as your browser and have UBlock origin installed.
When downloading popular movies, tv shows, and games, I recommend using a VPN to prevent your internet service provider from tracing these downloads back to you. I use NordVPN. I haven’t been able to find a good free VPN that properly masks internet traffic when I’ve looked in the past, but other people might know of one.
Look up “r/piracy masterlist”.
You should find a Reddit post with just about everything you would ever want to download, and links to relevant websites.
Direct downloads are available for lots of things, and are the easy way to go. However, many things will only be available via torrenting.
I wouldn’t recommend torrenting without a good VPN.
To torrent, you just need a torrenting program. I use qBittorrent. Look up a quick tutorial on using it— it’s very straightforward— and have fun.
Diagnosing problems
First: restart the program, restart the computer, whatever applies to the situation. Some programs don’t actually stop running when you close them, such as discord. Task Manager can be used to take care of stragglers.
If that doesn’t apply or doesn’t work, here’s how to look up a computer problem:
Something is wrong with my program:
[best description of problem you can manage][name and version of the program][(optional) Operating System Version ex. Windows 10]
Something is wrong with my computer:
[best description of problem you can manage] [Operating System Version ex. Windows 10][(optional) Model of computer ex. Acer, Lenovo etc.]
When describing the problem, think about what things are working as expected and what things aren’t. Omit extra phrases like “why won’t” and “how come”, though sometimes adding “how to fix” can be helpful.
For old programs or operating systems that have new versions with similar names, it can sometimes be beneficial to use the search engine tools to restrict the results to before a certain date, like 2015. This will keep irrelevant discussions about modern versions from clogging up your results.
Some examples of searches using these formats:
microphone detected but no audio windows 10 Lenovo laptop
Webcam working but camera black discord
Minecraft Java Edition low framerate
Icons invisible desktop windows 10
You might need to look at quite a few search results before finding a solution to your problem, perhaps tweaking the phrasing along the way. You might also not find a solution at all. In that case, you could try contacting customer support, or see if someone with more computer experience can help you.
Anyway, I’m just about out of ideas, so I’ll end the post here.
0 notes
Text
November Week Four: Gaming And A Clingy Girlfriend
Darkurra clicked at the keys of the keyboard. The silver fox was about to wrap up her work for the day, but she had gotten caught up in bug fixing, like she always did. She paused her typing to save her work, and gripped the edge of her seat while watching the cursor spin.
Please save, please save, please save… Darkurra grew more and more desperate as the cursor kept whirling around.
Moments passed in silence, and the program finally said that her code had been saved successfully. Darkurra exhaled, letting out the breath she’d been holding for almost a minute now. She stared at the screen for a few more moments, wondering what to do next.
Should I fix the bug I found in that one area earlier? Do I fix the error with the map system? Do I fix the shortcut that allows you to skip the boss later in the game? Darkurra mentally went over every bug she knew of in the game, and felt her stomach start to churn. Why were there so many of them?
In the end, Darkurra decided to shut down her computer and leave the bugs for her future self to worry about. At least, in theory. In practice, she kept trying to figure out how she was going to fix them as she walked away from her desk. The churning in her stomach wouldn’t subside if things continued like this.
I need something to distract myself with, thought Darkurra. Oh yeah, I haven’t played that one online game in a while, I should play that.
Darkurra walked into the living room and turned on the TV. She switched the HDMI over to her console, unplugged her controller, and sat down.
“Hey Darkurra, what’re you doing?” she was startled by Inez’s voice, not realizing she was there.
“Uh, h-hello Inez…” said Darkurra.
“Oh, sorry for startling you!” The pale blue cat sat down beside her. “Anyways, whatcha up to now? It seems like you just got out of your work-cave.”
“I’m about to play this one online game I used to play regularly. I need to distract myself.”
“Oh? Can I watch?” Inez let out a mischievous laugh at the end of her sentence.
“Of course, just don’t be too much of a distraction.”
Darkurra gave her girlfriend a kiss on the forehead and turned her attention back to the screen. She didn’t even get past the title before she felt a head fall onto her shoulder. She ignored it. Instead she started her first match for the day.
Darkurra was much worse at the game than she remembered being. Maybe it was just because she hadn’t played in a while, or maybe it was because her shoulders were too tense. That, or maybe Inez constantly trying to lean in for a kiss was distracting her too much.
“Inez, please stop that, remember what I told you,” said Darkurra.
“Fine, fine, I’ll stop,” Inez gave her a dejected look and pulled away.
Darkurra kept playing, and gradually started to regain her previous skills. Inez kept trying to cling onto some part of her body, but she learned how to ignore her pretty quick. She fell into a trance, completely absorbed by all the different mechanics in the game. After what felt like a brief second, Darkurra finally won her first match in the game and found herself pulled into a tight hug.
“Yay! You did it! That’s my amazing-and-adorable girlfriend!” said Inez.
“Inez, you’re gonna crush me…”
Darkurra took on a scolding tone, but she felt her face heat up at all the love she was receiving from Inez. Still, part of her wondered why she was being more clingy than usual today. Normally, Inez would at least be able to leave her alone when she was doing something, but she seemed determined to stay latched onto Darkurra now. Had she forgotten something? Darkurra looked over at the TV and remembered that the game automatically put her into a new match after the last one ended.
“Inez, please let go, the next match is about to start…” said Darkurra.
“Aww, but don’t you like having me here?” responded Inez.
“I do, but it’s a bit hard to play when you’re blocking my view.”
“Aww, okay.”
Inez pulled away, with her energy disappearing out of nowhere. Darkurra felt regret start to stab at her, but after a few moments she got an idea.
“Alright, alright. Inez, if you can get through this match without distracting me I’ll give you a kiss,” said Darkurra.
“You will?” asked Inez, ears perking up.
“Yes, just don’t block my view, alright?”
“Ok!” Inez gave her a thumbs up.
Darkurra focused her attention back onto the screen. She realized that her opponent must’ve been waiting a while for her to confirm that she was ready for the match to start, and felt a bit of guilt stab at her heart.
“Hold on, that username looks familiar!” said Inez.
“What do you mean?” asked Darkurra.
“That username, RvSln0043, doesn’t ‘RvSln’ sound like Renevir Salnerah?”
“That’s probably just a coincidence, he doesn’t seem like the type to play online games like this.”
“Good point, guess I’ll ask Flint about it later.”
Darkurra went back to the game, not wanting to make her opponent wait any longer. Luckily, they hadn’t disconnected the match, so they were able to start playing right away. From the corner of her eye Darkurra noticed Inez fidgeting, her claws buried in the arm of the couch. Darkurra wished she’d pay more mind to not damaging the furniture. At least her plan had worked. The match continued without any interruptions, with both players racking up a lot of points. In the end, Darkurra won the match by a slight margin. She heard Inez cheering beside her, and made sure to back out of the game to fulfill her promise.
“Did I do well?” asked Inez.
“You did great.”
Darkurra cupped Inez’s cheek and closed the distance between their lips. Inez was clearly trying to stay in the kiss for as long as possible, but she eventually pulled away to gasp for air. Darkurra couldn’t help but let out a small giggle.
“Hey, what’re you laughing at?” said Inez, elbowing Darkurra’s chest.
“It’s nothing, really.” Darkurra smiled and felt her face heat up.
“If you say so.” Inez gave her a mischievous smile. “Anyways, can we cuddle now?”
Darkurra glanced over at her screen before looking back at her.
“Alright, just for you, I’ll keep playing later.”
“Yay! Thank you, Darkurra!”
The two of them curled up on the couch and started to cuddle. Before Darkurra buried herself in Inez’s chest she asked a question.
“Inez, why are you so affectionate today?”
“Our anniversary is tomorrow, silly,” Inez responded. “I might have forgotten before today, so I wanted to show you that I remembered.”
Darkurra had also forgotten before that moment. She felt her cheeks heat up while Inez stared at her with a quizzical expression.
“You okay?” she asked.
“Uh, I forgot about our anniversary before you said that,” Darkurra responded.
Inez giggled before she planted a kiss on Darkurra’s forehead.
“It’s not like I can judge you for that, hehe.”
Darkurra pouted a bit before she relaxed and allowed Inez’s warmth to consume her. She felt guilty for forgetting something so important before now, but at least her clingy girlfriend had been there to remind her. It was odd, considering that she was usually the one who remembered this stuff. Maybe she’d just been so stressed lately she forgot. Darkurra allowed herself to shift around a bit more before she felt sleep start to overtake her.
#earitei#Inez Kinehshia#Darkurra Lilvia#oc#ocs#original characters#writing#Yes I forgot to post this on Tuesday again#This is the last one anyways so nbd ig
0 notes
Text
Mastering Clipping Path Techniques: Tips and Tricks for Perfect Edits
In the world of graphic design and photo editing, precision is key. Whether you're a professional photographer, a graphic designer, or simply someone who enjoys enhancing images, mastering clipping path techniques can be a game-changer. The clipping path service allows you to isolate objects or subjects in an image, creating clean and precise selections that can be manipulated separately. In this article, we'll explore the art of clipping path techniques, offering you tips and tricks for achieving flawless edits.
What is a Clipping Path?
Before delving into the tips and tricks, let's start with the basics. A clipping path is a vector path that defines the outline of an object in an image. This path is used to separate the object from its background, allowing you to isolate it and manipulate it independently. The result is a clean and precise selection, often used for various purposes, such as removing backgrounds, creating image composites, or adding special effects.
The Importance of Clipping Paths
Why should you invest time in mastering clipping path techniques? The answer lies in the unparalleled control and flexibility they offer. Here are some scenarios where clipping paths are indispensable:
1. Background Removal: Clipping paths are ideal for cleanly removing backgrounds from images, whether you're working with product photos for e-commerce or portraits for retouching.
2. Image Composites: When creating image composites, combining multiple elements seamlessly requires accurate selections. Clipping paths make this process much smoother.
3. Selective Adjustments: Want to apply specific edits to just one part of an image? Clipping paths let you do that without affecting the rest of the composition.
4. Special Effects: Whether you're adding drop shadows, reflections, or other effects, clipping paths help maintain precision and realism.
Now that we understand why mastering clipping path techniques is crucial, let's explore some tips and tricks to help you achieve perfect edits.
Tips and Tricks for Perfect Clipping Paths
1. Start with High-Quality Images
The foundation of any successful clipping path is a high-quality image. High-resolution images with well-defined edges and good contrast make the selection process smoother and more accurate.
2. Use the Right Tools
Adobe Photoshop is the industry-standard tool for creating clipping paths. The Pen Tool, in particular, is the go-to choice for precise selections. Familiarize yourself with its capabilities and keyboard shortcuts to work efficiently.
3. Zoom In and Be Patient
Zoom in on your image to work on fine details. Take your time to create precise anchor points and curves with the Pen Tool. Patience is key to achieving perfection.
4. Combine Paths for Complex Shapes
For intricate subjects with both straight and curved edges, consider using multiple paths. Combine them using the "Path Operations" options in Photoshop to create a single, accurate clipping path.
5. Refine with Feathering and Masking
After creating your clipping path, use feathering and masking techniques to fine-tune the edges for a more natural look, especially when blending objects into new backgrounds.
6. Check Your Work in Different Backgrounds
Always view your isolated object against various backgrounds to ensure it looks seamless and realistic. Adjustments may be necessary to achieve the desired effect.
7. Practice, Practice, Practice
Like any skill, mastering clipping path techniques takes practice. Work on a variety of images and subjects to refine your skills and gain confidence.
8. Consider Automation Tools
For large-scale image editing tasks, consider using automated tools and software that can generate clipping paths with impressive accuracy. However, manual adjustments are often required for the best results.
Conclusion
Mastering clipping path techniques is an invaluable skill for anyone involved in graphic design or photo editing. With the ability to create precise selections and isolate objects with ease, you can elevate your editing capabilities to new heights. Remember to start with high-quality images, use the right tools, and practice diligently. With patience and dedication, you'll be well on your way to achieving perfect edits in no time.
1 note
·
View note
Text
finished ender lilies. time to talk about it
god damn this game is so fucking beautiful. the atmosphere, the art, the music, the backgrounds, the story of each boss and miniboss you encounter, the cutscenes. it’s all so fucking beautiful. AND SO FUCKING SAD. like i wasn’t paying 100% attention to the story and have yet to watch a video about the Lore but fuck everything about this game is just so sad. what i did get about the story was all very reminiscent of hollow knight just even sadder and bleaker since unlike in hk where despite the world going to shit there’s still people around just doing their thing and, you know, surviving, in this case there’s none of that. even blasphemous still had some people around. ender lilies? no one but you and your spirits. it is so sad
the game kind of suffers because of this, personally i like having characters to get attached to in any media i consume but in this case it’s really only lily and the spirits, and while the spirits do all have their sad-as-fuck stories and they do end up feeling like your friends by the end, it’s just. there wasn’t as much catharsis as there could have been imo. might also be bc of the lack of voice acting, which isn’t a bad thing per se, it was just very noticeable to me.
the game has a really big map, in the beginning it feels very linear like every room is just a rectangle and you’re going in a straight path but pretty much after the first two areas it opens up and you get access to two areas simultaneously, after which you get to choose between three areas. and as you go through those you just randomly find yourself in other areas - which is one of my favourite experiences in these types of games
it’s actually pretty hard to get lost in this game in my experience, because the areas and the in-game rooms all feel very distinct and the unreachable items/paths are pretty memorable but the actual map fucking sucks. like having a minimap that shows your position and incomplete areas and unchecked exits is a great concept, but the map doesn’t actually show you the location of anything and it also doesn’t reflect the layout of the rooms so it is easy to get lost if you’re trying to follow the map. basically the exploration is fun except that upgrades are often hidden and you don’t have map markers or anything so it’s super easy to miss stuff and when you have to use an online map to go from place to place and pick up all the shit you missed or can access now - that’s when it gets a lot less fun. eh that was only about an hour for me at the very end of the game so it’s not horrible but still. a better map would’ve made the exploration so much better
in regards to exploration there’s also the sheer number of enemies. it didn’t bother me while first going through an area but when backtracking or trying to actually explore sometimes there’s just so many of them and they’re hard to avoid... so annoying. i do appreciate the fast travel though, benchwarping is so cool and i never felt like the benches were too far apart even if some rooms and shortcuts did get confusing at times. bosses in particular never had a bench be more than one or two rooms away.
as for the gameplay, i enjoyed it a lot. the movement felt smooth and responsive, and i got the hang of the dodge really fast, though it felt a lot better when i finally got it upgraded into a real dash. i played on keyboard and had absolutely no issues, everything worked as intended, no complaints there.
the combat is also fine, it took a while getting used to how little impact there is when you hit something, but it makes sense because it’s basically ghosts fighting ghosts. and different weapons feel different, so that’s nice. the enemies are pretty varied, i liked all of them apart from one particular type of enemy which shows up in the bullshit area of the game and is, of course, complete bullshit. by the way the boss in that area is also bullshit - even if it didn’t take any more tries than the other bosses
i did appreciate the sheer variety of the spirits you get, but most of them felt pretty situational and i only felt the need to get creative with them until the last two bosses. it doesn’t help that you literally can’t max upgrade all of them without grinding for hours, so that was a bit of a wasted opportunity
the relics also felt a bit uninspired, sure all of them were useful but i also barely ever changed them because i had enough slots for what i needed - like with the spirits i only felt the need to get creative during the last boss - or to do the jump puzzles which... why do they even exist in the first place lmao
as for the difficulty... hm. im really bad at gauging that in general but. i wouldn’t call this an easy game, but i also wouldn’t say it’s hard. i think it’s a game you can play and beat casually, but you probably won’t have fun if you don’t put a little effort into learning some stuff. idk if that makes it hard. i actually have no idea what makes a game hard overall
but the bosses i’d say are downright easy apart from the last two. because once you realize what their telegraphs are and you start paying attention to that, you also realize that there is about a thousand year gap between the telegraph and the actual attack. if you have a basic grasp on the dodge ability it’s so easy to whale on them you don’t have to worry until they enter their third phase and go into crazy mode, but even that shouldn’t be too hard bc they only gain a tiny speed boost and like two attacks, and you can just cheese them with the right spirits. or you can just keep doing what you did until then and dodge at the right time and whale on them afterward lmao
the two bosses that this doesn’t apply to are also not actually difficult to figure out, but they are hard to defeat because they have a fuckton of health and they do a shitton of damage. the second to last boss has one particular attack that’s impossible to dodge if you don’t jump dash and land with the right timing, or keep yourself in the air for like 5 seconds. it’s fucking bullshit. and the last boss is conceptually so fucking easy, he only has three actual attacks and you avoid all of them by keeping yourself in the centre of the arena and airborne, but he does spawn adds that do a fuckton of damage and take multiple hits to kill no matter the weapon. the last boss is amazing looks-wise but as a fight it is not fun or engaging at all. def at the bottom of the list of final bosses i’ve fought
so i guess this post has quite a lot of negatives but i really did enjoy the game, i did pretty much everything the base game had to offer and never felt like quitting for any reason, it’s not the best game ever due to all of the things i mentioned above and it was also shorter than i would’ve expected and liked it to be. i do think it’s a great game, seems pretty underrated as far as i’ve seen even tho it has a lot to offer and tbh i’ll probably end up replaying it pretty soon or just more often than i’d typically consider.
#my posts#gameblogging#liveblogging ender lilies#this post is so fucking long and disjointed#guess i have a lot of thoughts about it#anyway it's worth playing just for the music and the visuals god its so beautiful#if there's ever a chance of it getting a sequel i'll be really excited tbh#long post#read more#my rambles
0 notes
Text
Fix by nesting warp stabilizer

This setting mimics the look of having set the camera on a tripod. When selected, the Crop Less Smooth More function is disabled in the Advanced section.
No motion: This attempts to remove all camera motion from the shot.
When selected, Smoothness is enabled to control how smooth the camera movement becomes.
Smooth motion (default): This retains the original camera movement, but makes it smoother.
Values above 100 require more cropping of the image. Lower smoothing values are closer to the camera’s original motion while higher values are smoother. You’ll see a tradeoff between cropping and smoothing. Start by using the sliders to adjust the degree of stabilization and cropping. Gain greater control over the intended stabilization result in your video editing by adjusting Stabilization settings. Making fine adjustments to Stabilization. If those two methods still aren’t enough, you might need to make finer adjustments. Crop Less Smooth More is much more responsive, as it doesn’t require a restabilize phase. Under Advanced Settings, reduce either the Smoothness or Crop Less Smooth More function. (Note: When selected, the Auto-scale section and Crop Less Smooth More property are disabled. Using Stabilize Only allows you to crop the footage using other methods. Stabilize Only shows how much work is being done to stabilize the image.
This displays the entire frame, including the moving edges. Inspect what the Stabilizer is doing by changing the setting to Stabilize Only under the Framing menu. If you see things that aren’t quite right, here’s what to do:

If the result is good, you’re done with stabilization. Or Warp Stabilizer might zoom in to keep your clip edge to edge in spite of these adjustments. This means your frames might rotate, lift, slide over, or lower. The Warp Stabilizer does its job by tracking different points in the frame and performing complex counter-movements to the footage. If the stabilizing caused you to lose some edge material you wanted, you can also adjust the frame to get it back. If your clip finishes stabilizing and parts of it look woozy or wobbly, it’s been over-smoothed. While the Warp Stabilizer is a smart and powerful tool, you might notice aspects in the stabilized video that you need to tweak. Once the Stabilizer has finished working, you can examine your work and make adjustments to ensure the video features everything you need to see in the shot. Step 4: Adjust the stabilization for the look you want. Now you have two clips from the same file that can be edited independently. Use the keyboard shortcut Command/Control + K (for Mac or PC, respectively) or choose Timeline › Split Clip. Then, drag the playhead to the frames where you want to make the split. Drag a marquee to select clips on different tracks that overlap at a point in time. If you want to split clips where two or more clips or tracks overlap in a timeline, you’ll need to switch to the Expert View Timeline. Splitting and moving the video without the audio may cause your audio to go out of sync elsewhere. If you want to split the audio with the video, make sure the audio track is highlighted too. Make sure the channels you want to split are highlighted. To split clips, move the playhead to the points in the tracks where you want to make a split. Then, run Warp Stabilizer only on those shortened clips. To help with this, first identify the shaky portion of the footage and then split the clip to isolate those shaky parts. Once Warp Stabilizer completes the stabilizing stage, Premiere Pro returns to the normal state. While it lets you continue working in Premiere Pro during processing, it will be a little slower. Warp Stabilizer is a memory-intensive and time-consuming operation. If you find yourself in that camp, or you just want to see the results for yourself, check out the full comparison up top.Step 2: To maintain good performance, split your clip into the smallest working area. But as more and more photographers expand their repertoire to include at least some light video shooting, these results can be very enlightening. Most of the conclusions that Stemen reaches are definitely video specific, with no application for stills shooters-after all, you can’t “warp stabilize” a still frame. OIS + IBIS + Warp Stabilizer produces incredibly steady footage, even at 400mm
Combining all of the stabilization techniques is, obviously, your best bet.
IBIS + Warp Stabilizer looks even better, making the Canon lens a viable option for handheld video shooting.
However, IBIS makes a huge difference when using an un-stabilized lens, like the Canon.
OIS alone is always better than Warp Stabilizer, and often looks better than IBIS because the sensor can only move so far, causing its own kind of “jitter” as the frame shifts abruptly.
The artifacts are incredibly noticeable, and are already apparent even at 70mm.
Warp Stabilizer by itself is often unusable.
0 notes
Text
Ableton live 11 mac mini m1

#Ableton live 11 mac mini m1 update
#Ableton live 11 mac mini m1 Pc
#Ableton live 11 mac mini m1 plus
#Ableton live 11 mac mini m1 free
Delay on the left is simple but gives you some beautiful, possibly tempo-synced overlaying of pitch – meaning you can also make a monophonic source sound homophonic or polyphonic. The subtler improvements here I find even more useful. That allows for potentially more musical use – though you can also still carefully tune in coarse/fine (which also allows for other scales). You now can do real-time pitch-aligned shifting, which works well with monophonic inputs. The big change is on the right – note “Pitch” along with Freq and Ring under Mode.
#Ableton live 11 mac mini m1 update
Shifter joins other reboots to existing devices – this one formerly known as Frequency Shifter – but this update makes it suddenly a delight. But it’s a screen capture, and they look pretty, so that’s how this game is played. You’ll need to join the beta program and sign up on Centercode to use this:īonus points if you figured out the LFO settings here might sound… very dissonant. Let us know how the beta works for you, and of course, probably wait for the final build if you have mission-critical work on deadline. If you do have an Intel Mac or a Windows machine, though, there are still plenty of worthy tweaks to keep you occupied, and the expanded Shifter is worth getting excited about.
#Ableton live 11 mac mini m1 Pc
I’m glad I have this mobile NVIDIA chip on a PC now whirring away on a render to calm me. But honestly, the existing machines are already blazingly fast, sip power, and make no noticeable heat or noise to the user. And everyone now also interchangeably calls that “M1,” which I suspect will be outmoded as soon as Apple adds another chip. In fact, if you’re an MPE maven or a heavy power user of shortcuts and whatnot, you might want to dig into the release notes to check those specifics.Īpple Silicon support is probably the big deal.
And overall, to condense a bunch of little tweaks, you’ll just find a lot of navigation and keyboard shortcuts work better.
Improved navigation and window pane adjustments.
What else have Ableton been working on? A few other recent improvements from the update cycle (11.0.10 etc., just before 11.10) – to summarize: It’s a sort of combo LFO-envelope… thing.
New MIDI Shaper, also built in Max for Live, generates modulation data with custom envelopes and loads of options.
New Align Delay compensates for lag of various types (including lag introduced by the fact that sound is not all that fast-moving) with an adjustable Device you can stick anywhere.
(That nearly makes it count as a new Device!)
#Ableton live 11 mac mini m1 plus
Shifter is the update replacing Frequency Shifter, and now adds real-time monophonic pitch shifting, plus delay, envelope section, LFO, and glide.
There are tons of little fixes and enhancements, but the ones that stand out: The other stuff in this build is also all nice to have. There’s no question that this is what you want to get the most out of Apple’s custom chips, and it follows support from some other key software. But official support should mean even better performance, which we’ll need to test. I’ve been running it on a Mac mini and barely notice performance at all – in fact, barely notice the machine is on, thanks to Apple’s fans being essentially silent and more or less never turning on. Now the truth is, Ableton Live already ran pretty darned well without any official Apple Silicon support whatsoever, thanks to the magic of Apple’s Rosetta 2 technology. New in this build – new tools for handling lag and adjusting MIDI and pitch/frequency shifting, plus much-awaited native M1 Apple Silicon support.
#Ableton live 11 mac mini m1 free
Ableton Live 11.1 is now available as a public beta free to anyone with a Live 11 license.
1 note
·
View note
Text
Osx folder icon maker

#Osx folder icon maker how to
But the classic Apple logo icon has a transparent background. For example, the TekRevue folder icon in my screenshots below is not transparent and has a square solid black background. You can use a standard square or rectangular image, but if your image has an irregular shape against a solid color background, you can try to convert it to a PNG with background transparency.Apple’s default folder and file icons have a maximum resolution of 1024×1024 pixels, so use this resolution if possible for the best image quality. Thanks to the advent of high-resolution displays, you need to make sure your icon image has a high enough resolution to look good on your Retina MacBook or 5K iMac.The custom icon will be removed and you’ll see the default macOS folder icon appear again. Now, click once to select the folder’s custom icon at the top left of the window (it will be outlined in blue again, just like when we added the custom icon) and press the Delete key on your keyboard. Just find the folder with your custom icon and use Command-I or File > Get Info to bring up its Info window. Great! But what if you change your mind and want the default macOS folder icon back? The good news is that this is a super simple process. So you’ve added custom icons to your folders. Your custom icon will appear both in the Info window as well as on your desktop (or in Finder) in place of the default macOS folder icon. Finally, use the keyboard shortcut Command-V ( Edit > Paste) to drop your picture in. You’ll see the folder icon subtly outlined in blue. Once the image is selected, use the keyboard shortcut Command-C (or select Edit > Copy) to copy it.Īfter your picture is copied, go back to that “Get Info” window and click to select the aforementioned blue folder icon at the top.
#Osx folder icon maker how to
Related: How to change which application opens a particular file type in macOS If you’d like to edit the image - for example, crop it - you can do that first before selecting it. Once you’ve found your image, open it in the Mac’s Preview app and use the keyboard shortcut Command-A (or select Edit > Select All from the menu bar) to select the entire image. To do so, we’ll need to find your desired custom image, which can be a JPEG, PNG, or TIFF file. Normally, this shows the default macOS icon for your folder or file, but we can change it by pasting a compatible image on top of it. The Info window for the folder will appear which, if you’re not familiar with it, has all sorts of cool uses such as seeing the exact size of a file or folder, determining when the file or folder was created or last modified, and viewing or modifying sharing and user permission settings.īut for the purpose of setting a custom folder icon, we’re going to focus on that little folder icon at the top left of the Info window. Alternatively you can use the keyboard shortcut Command-I. With your folder selected, head to File > Get Info from the menu bar at the top of the screen. Just find or create your folder and click once to select it. My screenshots in this article show folders on the desktop, but this process also works for folders you’re looking at in Finder. To get started with custom folder icons in macOS, first select the folder you’d like to customize. So if you’d like to use a rainbow Apple logo or almost any other custom image as a folder icon, let’s learn how to do it! And the good news is that it’s easy (and fun!) to use custom folder icons in macOS! Spruce Up Your Desktop with Custom Folder Icons in macOSĪre you tired of looking at the same old default folder icons in macOS? I mean, sure, the Mac’s default folder image is fine and all, but nothing beats custom graphics.
0 notes
Text
Gold outlinetext box

#Gold outlinetext box code#
#Gold outlinetext box plus#
You can also use these presets to give your outline either sharp, round, or cutoff corners. You can remedy this by using a round join and a round cap, highlighted in the diagram below: The Join and Cap presets are used to determine whether your corners are rounded, squared, or cut off. If you’re using text with sharp corners then you notice an occasional glitch when certain corners protrude further than others, giving your outline an inconsistent look. You can also manually set the size of your stroke with specific numeric values if you’d like, and you can also change the units of measurement to your liking: You can make your outline bigger/thicker using the Width preset.
#Gold outlinetext box plus#
You can increase or decrease the size of the stroke around your text by using the plus and minus icons next to the Width input. Use the Stroke Style tab to make the following adjustments to your outline. Look for the tab furthest to the right, labeled “ Stroke Style” and activate that tab by clicking on it. Change Outline SizeĪt the top of the Fill & Stroke menu you should see 3 tabs. It will appear on the right side of your screen as a docked menu: The Fill & Stroke menu will open up as a docked menu on the right of your screen. The menu can be accessed by navigating to Object > Fill & Stroke or by pressing Control + Shift + F on your keyboard. To adjust these properties we’ll be using the Fill & Stroke menu. Whether the outline occupies the inner edges of the text or the outer edges.Now that you’ve outlined your text, it’s time to make some fine adjustments to some of the outline’s properties, including: You can adjust that further in the next steps. This will add an outline around your text in the color that you choose: This outline is what’s known as a stroke in Inkscape.ĭon’t worry if the outline is not in the color you’d like. With your text selected, hold Shift on your keyboard and click on one of the colors in the color palette at the bottom of your screen. You will now you text object is selected when there’s a dotted bounding box around it and arrows in all of the corners: In order for the stroke to be applied, you must have your text selected as I do in the screenshot above. Grab the Select Tool (keyboard shortcut: S) and then make sure your text is selected. This is what will act as the outline around your text. Once you have your text object in place, it’s time to add a stroke. You can outline whatever you’d like using this process. So you don’t necessarily have to use text for creating your outline. And just to clarify: this method works with any vector object. If you already have a text object then you can proceed to step 2. Maybe I'm not floating correctly, but I've tried both div style=float and class="float" thus far.The text can be any font, style, or word that you’d like. However if I float, nothing is centered anymore. I know the normal solution for keeping everything in the same line is the use of float. In the event that I apply a text shadow with a div, that creates a new line. That sentence that is being pushed uses two different type of fonts, one for the words and one for the number. After I apply the outline, we have 3 different lines of text.ĬontentTitle is a legend in a Google Maps where the text align is at the center. contentTitle.push('We have 21421 asdasd') īefore I apply the outline, the string is written in one line. This is the key line where I want the outline. The bruteforce approach doesn't seem to work either. I have tried using outline within the font, as well as a class and div. LegendTitle.innerHTML = contentTitle.join('') LegendTitle = document.createElement('div') I have tried using text-outline: 2px 2px #ff0000 but this is not supported across any major browsers.
#Gold outlinetext box code#
I don't feel the need to post code as it is really just a simply request. All I want is the one line of code and the needed parameters to create an outline for text. Let's say I have white characters and I want a black outline over each character (this is different from outlining the whole text box).ĮDIT: Well bummer, I'm not asking for a whole document.
0 notes
Last Seen Blogs

thelesbianluthor
star.wind.flower.sun

international-sunrise
sunrises at the end of the world

bloodyshim
Chamiberry

carelovequotes
Care Love Quotes

ky2008
开云体育招商总经办