#it took me FOREVER to figure out how to get that png on the final frame
Text
Erron Black vs John Rambo
#gifs#my gifs#video games#gaming#I was just trying out some stuff#hopefully this looks okay#I learned a few things about export settings#blame that#it took me FOREVER to figure out how to get that png on the final frame#mortal kombat#mkxi#erron black#rambo#john rambo#Guns#Video Games#gif#distantsonata#erron#meme#i didn't know how else to end this gif#it cut off the flash I wanted to end it on
19 notes
·
View notes
Text
I just had the most amazing experience!!!
I am going to do a little back story here, because it has been quite a while since my last post...
So, my grandfather, who was the the only person in my entire 35 years of existence that I never felt the need to question if he really loved me. Any way, super long story, shortened because I don’t feel like getting into that right now, he passed away three months ago.
In the time since then, i began to question my choice of kicking spiritualism from my life. You see, since my father, i chose that purposefully, because calling him dad would insinuate that he ever truly gave a fuck about me, or my sister.... but anyway, he used and still probably does, use his religion as an excuse to punish his children for doing him wrong.... which is typical narcissistic behavior.
Which speaking of, i recently read a book called Narcissistic Father, and it literally explained him to me perfectly! It actually made the fact that he has something wrong with him mentally, make me feel so much better about myself somehow.... because well, it turns out, it really is his fault, and none of it is mine. So definitely check out that book!
So since I have all these odd feelings for him because of these things... I cast “religion” out of my life completely. I figured, religion had to be fake, because no religion would keep a parent from their child, so i cast it out 100%. It was so bad, i began to believe that when you die, you just go. I believed that when you go, there is nothing, it just ends, and that your body decomposes, giving it back to the earth you were born from, and that is that.
Then the depression came in. Because there is nothing. Nothing else. And if I couldn’t have my family back, the way i thought it should be, and that at the end of all this pain, there truly is nothing, then what is the point in being in pain forever? And contemplated suicide while laying in the floor in my art studio in complete darkness.
But i thought,” that’s stupid, you didn’t die from cancer and you’re thinking about this right now?! What the fuck, you idiot!” And i got up off the floor, switched the light back on, wiped the tears from my eye’s, and started to draw again. This eventually led to me cutting my arm open, and telling someone months later, and finally getting the help i needed to be able to get better.
Therapy was such a blessing. I truly recommend it. Talking about your problems with someone you are literally paying to listen to you, and paying to keep their opinions to themselves, is a blessing in and of itself. I also strongly suggest journaling. When ever i felt bad, i would write to myself... it helped me explain what i was feeling to myself so that i could finally start to process what was actually happening in my mind so that I could start to slowly solve my own problems.
As i did this, a strange sense of accomplishment came over me suddenly, as i realized that the saying is true, you have to create your own happiness, and also, that you have to love yourself if you ever hope to love anyone else.
So i kept working on myself, and one day, my sister mentioned to me that she had picked up a ouija board at a garage sale. Immediately, for some reason, i said, let’s do it! And we called our other sisters, and planned our first seance. The four of us went all out. We put white candles everywhere , took it very seriously, and experienced the magic of ouija for the first time.
Now, it took a while of hitting dead ends which what we were communicating with, but one day, the mother lode of insane things happened! My cousin came through the board, and after confirming neither of us were moving the planchette, and that this truly was who they said they were, i realized that the end isn’t really the end, but that there really is more, and my life started to change more and more.
I eventually decided that since I didn’t enjoy coloring any more, that I should make a coloring book instead, that way other people can color my art work, and make it their own.
Then, in the midst of this, I decided that I wanted to make my own ouija board, but not call it a ouija board.... so the google searches began.
My sister and I started a podcast, and i used that as an excuse to do an episode on the ouija board, as an excellent excuse to do deep dive research on the boards themselves.
Using this info, I knew I needed to make a spirit board, so I started to work on drawing a design, while also trying to figure out how to make it.
One day I realized “hey, i could make this design up on my ipad and turn the background off, and turn this into a png file, and cut it out with your cricut!”
So i immediately set to work on that, while still trying to figure out how to make them. Finally one day, i discussed this idea with my husband, and he suggested resin on wood. And so it began.
So far, i have made around 30 or maybe more, boards, and yet, i still do not have my own! Maybe some day! Anyway, so that was done and in progress, I left my job that was sucking me dry physically and emotionally, started pushing myself harder, was finally trying to live my life for me, instead of trying to live it the way i thought my father would have wanted me to.
I was truly happy.
And then my grandpa left us.
I collapsed hard. But I had to try to keep it together at the same time because my grandma needed me... my mom needed me.... and my sisters needed me. I fought it as long as i could.... but eventually i broke under the pressure, and re visited my therapist, whom I have decided I am just going to continue to see monthly just in case.
Turns out, I was handling grief the right way.... which I am sure surprised her a little, being as how she had diagnosed me with ptsd a few years prior.
Since his passing, i have not touched a board, or held a pendulum, and not because I am afraid he will talk to me.... but because I am afraid that he won’t. As a 100% Irish Catholic man, I am not sure if he would come through the board or not, although, i do think that he would think it would be funnier than hell to scare us.
I have however found something to believe in. Paganism. No judgements, no frills, just love, paganism, and I will never look back.
After I decided to “come out of the broom closet” so to speak, and openly declare that I am a magical being, things started changing fast...
I finished my coloring book, and most importantly, feel mentally healed. I can’t even begin to explain it, but I will try....
First, after grandpa’s passing, I realized I had learned a few things. For example, that you shouldn’t take those you love for granted, which is when i realized he was the only person who had shown me unconditional love my entire life, no matter what. I also learned from that, the passing of the person who took care of me like a dad, that all I was doing was punishing myself for something someone else did, and that I needed to stop. And you know why?! Religion!
The same damn thing that i tried so hard to keep out.
You see, my grandpa was a wonderful dude. In my entire existence, i never heard him say a negative word about anyone. And most notably, whenever he heard me say anything bad about anyone, he would tell me that I couldn’t change them, but I should say a prayer for them.
It was this phrase, which i had repeated to me over and over again, that now finally made sense after finally realizing the true power of religion. You see, I couldn’t change my father, but, I could change the way he effected me. So, i made a little testament outloud, i moved on.
But then i realized, that if that was the case with that, maybe I needed to be more open to the idea, of religion being legitimate. So i started some research again. But this time, as homework for the tribe I was planning to join. I researched goddesses, because If I was going to pick a deity to start working with, they had to be a strong female.
First up, came Athena. And i truly believe she has been with me, allowing me to get through all of my life’s battles, without me even knowing, for years.
I studied greek mythology in college because I was fascinated by it, and was floored by the parthenon, and the giant statue of Athena that stood inside, and even insisted on visiting the replica while in Tennessee for my sister’s birthday.
Coincidentally, it also turns out that she is the goddess if wisdom, arts, and crafts, so i knew she was the one for me.
Tonight, after my full initiation into the group, i went to the full moon ritual, and was asked some very prying questions by what I will refer to as the “mega crone” and I was forced to question a lot about my choices right then, in front of everyone, and ended up crying while explaining all of that to them , and not really all that well.
But i left there thinking that I needed to let go of the idea of needing to know everything, and just go with the flow.... knowledge is nice, but too much knowledge can have it’s downfalls as well. But also left me wondering how I ended up on this path.
So here i am, telling a long ass background story to get to the damn point!
I was feeling emotional after getting home, and decided to light a candle for my great aunt who is in the hospital, and try to meditate for a while.
Normally, when I try to meditate, I don’t feel anything, and also don’t normally see much, but It’s like I can envision it, even though I can’t actually see it... imagination! Which is something I had cast out of my life a long time ago as well.
So tonight i was ready. Whatever happened was going to happen.... and if grandpa communicated with me while i was meditating I would deal with the emotions and just go on. I turned on my favorite meditation video, and jumped right in... and it fuckin worked! I could feel the ground and see lights, it was so magical! I wish I could explain the trees!
Then, after i processed that I am magical, that I can truly take my own pains away, which set off a mini party if thoughts in my mind, i refocused, and realized that athena had actually been with me my whole life. She got me to grandpa somehow when he was living thousands of miles away, so that I could continue to see and feel what true love is. She was with me through the shit storm that was my youth... and stood with me as i learned to fight for myself, and get up.
It was right now that I realized I am truly magical.... i am loved.... i am perfect the way i am..... i am enough. And if anyone ever should stumble upon this ramble, and stuck with it until now.... know that you are all of those things too! And if you don’t agree, i hope maybe my path will inspire you to get to know yourself, and see what incredible, life changing things could be in store for you.
1 note
·
View note
Photo


- ̗̀ How to Make Gifs with Photoshop and KMPlayer (Very Detailed) by quirkyresources © ̖́-
♡ All my tutorials ♡
Hi! I'm no expert, but I've been making gifs for at least like four or five years, and over that time I've learned a lot, so I want to share that stuff :) Also, someone requested that I teach them how to gif. I hope this helps!
This tutorial will teach you how to create simple but quality gifs, like the ones in the gifset above! Those gifs are all from TV shows, but it should apply to giffing almost anything. I’ll be using KMPlayer and Photoshop.
This is the gif I’ll be showing how to create, as an example:
If you have any questions at all, please feel free to message me here :) And I’m somewhat new to writing tutorials, so if you notice that I got something wrong, please let me know. Thanks!
Please like/reblog if this is at all useful to you. Thank you so much if you do!
You need:
KMPlayer (link below)
Photoshop (I'm using CC 2017, but I think any version with the timeline should work)
A video to gif (recommended source below)
A sharpening action (recommendations below)
A PSD / or to know how to color gifs (recommendations & tips below)
I'll go over:
How to buy/download PS, download KMPlayer, and download a video!
Taking screencaps in KMPlayer
Importing the screencaps into Photoshop
Cropping and timing the gif, organizing layers, etc.
Adding a PSD or tips for coloring it yourself
Adding subtitles & learning font settings
Saving for web
Posting to Tumblr
Various tips along the way!
The tutorial is under the cut. Have fun and good luck! ♥
[Note: If a photo looks too small, right click it and choose "open in new tab"]
Step 1: getting Photoshop, KMPlayer, and quality videos
Get Photoshop:
I was able to buy my Photoshop, so I don’t have any free downloads to recommend, I’m sorry! But there are plenty of other Photoshop blogs on tumblr that can help with this stuff :)
And there are some deals from adobe that might help you afford it if you want to buy it instead. They had a great one for college students that totally helped me.
Anyways, if you can get it somewhere/somehow, here are the next steps...
Download KMPlayer:
Here's the link (it's free!): kmplayer.com
You can use it to watch videos, but in this case we use it to take screencaps of them to use for gifs.
Get your video:
If you’re going to download a movie or show, I recommend getting torrents from thepiratebay.org and using μTorrent to download them. (Here's a tutorial for how to download stuff with it.) Be careful with viruses and stuff, though!
When you look for a video, try to get one that's as HD as you can find, meaning one that is 720p or 1080p! That tells you what the height of the frames will be, in pixels. They are usually big files, but should be much better quality than others.
Also, try to find videos that do NOT have network logos or ads on them!! They can make gifs look pretty bad, and it takes some serious cropping to get rid of them, which then makes it look even less quality.
Step 2: taking your screencaps
Open your video in KMPlayer. (Open KMPlayer and press CTRL O.)
Get to the exact scene/clip you want to gif. (Tip: it's hard to find the exact place you're looking for, so I recommend using your right/left arrow keys to skip through a little at a time.)
Once you're at the part of the video you want to gif, press CTRL G. This brings up the "frame extraction" window. This is where, as you can probably guess, you extract the frames for your gifs! Here are the settings I use:

I use these exact settings almost every time, except for the image format section. I go between JPEG and PNG. I use JPEG if I'm making a smaller gif (like 268px width or less) and I use a PNG if I'm making a larger gif (like 540px width.) This is because (or at least I've heard) PNGs are the highest quality option, JPEGs are the middle, and bitmaps are the lowest (don't use them!!) The only downside is that the higher the quality, the higher the screencap's file size. So use PNGs sparingly if that matters to you.
You can also change the "prefix" of the screencap filenames.
After figuring out all of these settings, click "start"! Then press play on the video, play until the end of what you're giffing, and press "stop" and pause it.
Then, in the frame extraction window, click the "open" button that’s to the far right of the "extract to" bar. This will open up the folder location of your new screencaps.
Step 2.5: organizing your screencaps
What you'll want to do now is organize the screencaps into separate folders for each individual gif. This is something that's good to do whether it's all from one scene or you're doing a compilation of different clips. This is because, when you upload the screencaps into PS, it's best to have them in their own little folders!
(Tip: Personally I use 75 frames or less in each gif. This is because that’s the limit on the sharpening action I use, but I also think it's a good amount to stop at.)
Step 3: importing your screencaps into Photoshop
Next, we're finally going to move the screencaps you took into Photoshop. Yay!
Open file > scripts > load files into stacks. (Tip: Sometimes this function doesn't work on certain Photoshop downloads. If this is the case for you, here's a tutorial on how to get around that!) This brings up this window:

Click "browse" and find the folder with the screencaps you want for your gif. Select all of them and click "open". Then click "ok" and wait for them to load. Each screencap will load as its own layer in the layers panel, which is what you want to start with.
Step 4: changing the screencaps from layers into frames in the timeline
Once they're all loaded as layers, go to window > timeline. This brings up the timeline!
At this point, things should look something like this:

Now we can start using the timeline! In this method we convert the layers into frames that live inside the timeline, which we’ll use to make the gif move.
First click on the button in the middle of the timeline panel that says "create frame animation" right here:

Then click on the little three bars icon on the top right corner of the timeline. Click "make frames from layers" on the thing that pops up .
It depends, but you might need to reverse the frames (if it imports them in backwards). So just click on that three bars icon again and click "reverse frames".
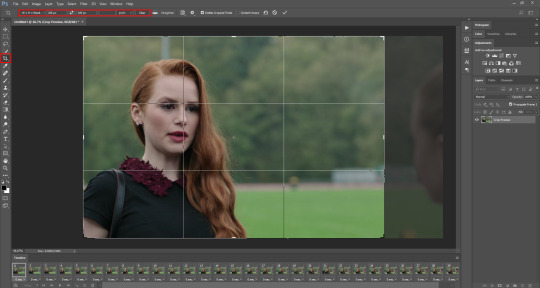
Step 5: cropping the gif
It's really important to know the Tumblr dimensions! If you have a gif that doesn't fit the dimensions most Tumblr users view it at it can get distorted.
So the width dimensions you should use are:
A row of just one: 540px wide
A row of two: 268px wide each
A row of three: 177px & 178px & 177px
A super helpful explanation of good dimensions to use is this one made by karazorel. It's very close to the way I do it.
So to crop it, go to the crop tool (duh, sorry) and enter in the dimensions you want into the area I highlighted here:
Here's what the gif looks like so far:
You'll probably notice it moves really fast and stops moving after playing once. That's because we haven't gotten to the step to fix that yet. But that's next!
Step 6: timing, looping, etc.
Timing:
Select all of the frames. You can do this by selecting the first frame, holding shift, and clicking on the last frame. Now click the little arrow next to where it says "0 secs." under any of the frame previews right here:

Click on "Other..." and type "0.14" into the text field. That represents the number of seconds, or usually the fraction of a second, that each frame will play for. (It's "0.14" in this case because of the way we entered the settings in KMPlayer in the "Frames to Extract" section. The number depends on what you enter there.) Press enter/okay.
Looping:
Next change the looping setting from "once" to "forever". Here's where I'm talking about:

Step 7: sharpening the gif frames
This step can either be done at this point (before coloring it) or later (right after coloring it.) I go back and forth on which is better, and different people say different things. So just play around with it!
I use this sharpening action. It can sharpen up to 75 frames, which is a really good amount in my opinion.
Once you have a sharpening action downloaded, go back to Photoshop and go to window > actions.
Click this little menu button, then click "Load Actions...".
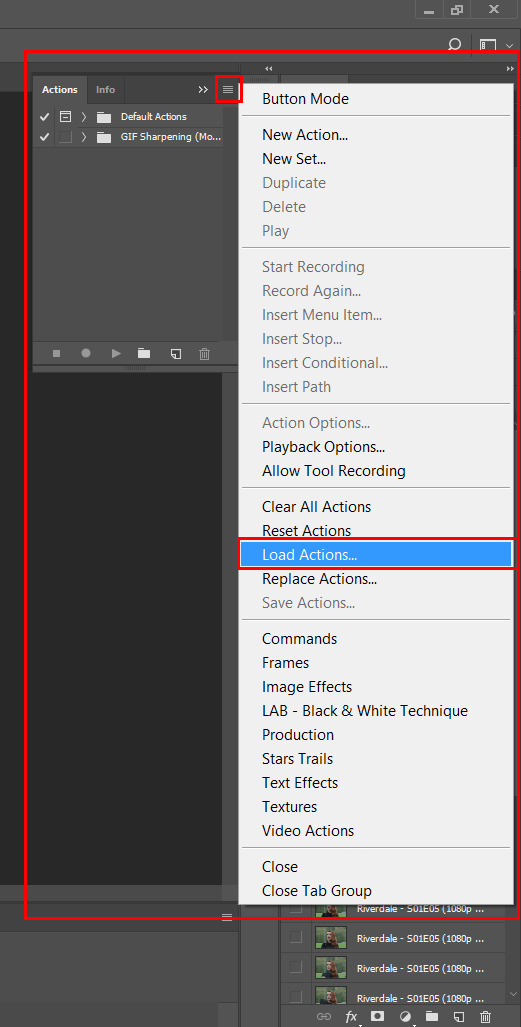
In the window that pops up, choose whatever sharpening action you downloaded and open it. This will load it into your actions panel!
Next, click the menu button on the upper right corner of the timeline panel and click "Flatten Frames Into Layers". Now there will be a new set of layers that are labeled Frame 1, Frame 2, Frame 3, etc. Keep those, and then you can delete the OLD set of layers. (That can significantly lower the file size, and it doesn’t mess anything up if you do it right!)
Now select the very first frame in the timeline, labeled "1", and select the corresponding layer, labeled "Frame 1".
Then open the sharpening action's folder within the actions panel and select the folder labeled with the number of frames you have in your gif. For example, I have 18 frames in my gif, so I selected the folder labeled "18 frames". Or at least that's the way they labeled things in the action I'm using. You may have to explore yours to figure it out.
Then click the play button on the actions panel:

Now that should have sharpened all of your frames/layers! Woohoo! Here's what the gif should look like by now, all cropped, timed, looped, and sharpened:

If this way of sharpening doesn't work for you, here are some other gif sharpening tutorials:
How to use sharpening actions in Photoshop CC by peacelovegifs
Gif sharpening tutorial by manofsteel.co.vu
Sharpening for Photoshop CC by completeresources
Sharpening all gif frames at once by thosetutorials
Sharpening masterpost by itsphotoshop
Gif sharpening action tutorial + download by themazerunnrs
Step 7.5: grouping your layers (a baby step!)
A bonus step that I recommend you do is to put all your layers into a group to keep things neat. Just select all of them and press CTRL G.
Step 8: adding a PSD and/or coloring it yourself!!
Here's the fun part! Now you can let out your creativeness with the coloring. It takes a LOT of practice to get good at this, trust me. I've been doing this for YEARS and I still hate my results sometimes. But if that happens to you, too, don't let that stop you from trying again! (God, I sound like a motivational speaker or something, sorry!)
Here’s some background on PSDs for beginners, but you can totally skip this bit...
"PSD" stands for "Photoshop document", meaning a file you make or edit in Photoshop (sorry, kind of self explanatory). On Tumblr, when people talk about PSDs, they're usually referring to a document with layers that add effects (mostly adjustment layers) to a gif/photo/graphic, etc. Also referred to as a "coloring". They usually include things like brightness/contrast, vibrance, curves, selective color, etc. People post these so you can download them and use them for your own work! (Just don't repost and claim as your own. Not cool, man.)
All you have to do is download the file, open it in Photoshop, make sure you have the layers panel open (windows > layers), and drag the PSD file's window on top of your file's window, but keep them separate so you see both at once. Then drag the PSD file's group of layers (but not the background!) over to your file.

(Then you can close the PSD window.) Then on YOUR file, mess around with the adjustment layers and stuff to change it to whatever you want it to look like. I usually edit mine like crazy!
Anyways, here are what your options are.
Finding a PSD (and then I recommend editing it to however you like it)
Here are places to find some great PSDs on Tumblr! (FYI, some are tag pages with sections for PSDs, with different types to choose from. So look around.)
QuirkyResources (Navigation) (Yup, shameless self-promo!)
QuirkyResources (My PSDs)
CompleteResources
ItsPhotoshop
ChaoticResources
YeahPS
DrunkandColoring
AresColoring
That's just a few of my favorite sources, so message me if you want more recs! :)
Coloring it yourself
I'm not going to do a full-on coloring tutorial right now, but here is my tag for those made by other people!
Basically you should learn how to use the most important adjustment layers: curves, brightness/contrast, selective color, color balance, hue/saturation, vibrance, levels, exposure, and gradient maps. At least those are the ones that I use the most and find super useful. Many of the tutorials in that coloring tutorial tag I just linked go over how to use those. So check them out!
In this case, I used my current fave PSD by dracoharry. (I’ve noticed it works on most shows I gif, so it’s super useful! I actually used it for all of the gifs in the gifset I made for this post.)
Here are the layers I kept hidden/showing:

FYI, I changed the layers' settings and whatnot a bunch.
And here’s what my result was:

Step 9: adding text & learning font settings (optional)
This is usually when I add text to the gif, if relevant.
There are various fonts and settings you can use for this, but to make things easier, here's a font PSD by adorkablelena. It’s for subtitles/quotes. I recently started using it. It's really cute! If you're not into it though, here's my tag for other font PSDs you can check out.
When you find a font PSD you like, open it and drag it into your document the same way you would with a regular PSD.
Select the text tool and replace the text with your quote. (Tip: Try not to misquote or misspell things if you can help it! I've done it and it sucks when that happens. Ugh.)
As far as colors go... For the primary quote I make the text white, and the secondary quote I usually make it yellow (#ffde00). And if there is a third I'll use some shade of orange, and anything after that I just use whatever I can make look the best. The stroke color I use varies sometimes, but I usually use black (#000000).
Finally, select the move tool (V) and make sure "smart guides" are turned on. To check this, go to view > show > smart guides, and make sure it's checked. Now when you drag around the text (select its layer first), you can see little purple vertical/horizontal guides pop up when you drag the text to the center of either direction. For the subtitle we're making, we want it to be centered horizontally and close to the bottom of the gif, but not too close. Also, if you have more than one line of text, just press enter somewhere in the text that splits it into similar-sized lines. Here's an example of all of this stuff put together:

Step 10: saving for web
There are a lot of settings to remember and play around with when saving for web, and specifically for Tumblr.
First, go to file > export > save for web (legacy).
Here you'll see a lot of settings to choose from, but they're not as intimidating as they may look!
Here are my usual settings:

Red highlight: There are multiple options in the top drop down list in the area I highlighted that are good to use. I usually use “Adaptive”, but “Perceptual” and “Selective” are good options too. In my experience, the rest make your gif look pretty gross. For the drop down list under that I choose "Pattern". This arranges the pixels in a pattern, and I like the look of that more than the two other viable options, ”Diffusion” and “Noise”.
Orange highlight: This is where you choose the number of color shades that are in the gif. I use the top amount allowed, 256, because this achieves the highest quality possible! If you need to make the gif's file size smaller, you can lower this amount, but I don't recommend it. If it's a B&W gif you can sometimes get away with using less and have it still look just as quality.
Yellow highlight: Looping options: Forever. Very important! Like I showed earlier, you can also set this setting before you get to the "save for web" option. Either way, this makes it so the gif loops forever.
Green highlight: Gif size! As I mentioned earlier, there is a limit for Tumblr. This example is a pretty small gif (592.9K) and the current file size limit on Tumblr is 3MB. Tumblr seems to change this limit a lot though, so you may want to look that up once in awhile to stay up to date.
Turquoise highlight: Always check the box next to “Convert to sRGB”. I just learned that this setting is important. It basically keeps the vibrance intact when you take it from Photoshop to Tumblr. Read a much better explanation here! :)
Then just click "Save...", choose the file location, and press "Save" again.
Step 11: uploading/posting to Tumblr
Now, last but not least, it's time to upload it to Tumblr! I probably don’t need to explain this, but I’m going to anyways. It's super-duper easy. Just go to your dashboard and click on this button:

Then the post creation window pops up, and just go on from there. Upload your images/gifs, drag them around to arrange them however you like, and add a caption if you want.
(Tip: Don't forget to add tags! It's super important to add tags if you want people to actually find your post. Only the first 5 tags show up in the main Tumblr tag-search results (ugh wtf, right?) but sometimes the other ones you add will show up on the general search page. I don't really get how to explain it or how it works tbh, sorry! But I do know that many fandoms have developed their own tagging-language to find people's posts more easily (and avoid spam) which is very useful once you figure it out. For example, if I was posting a gifset of Cheryl Blossom from Riverdale, I'd tag it with things like "riverdaleedit" and "cherylblossomedit" and maybe "madelainepetschedit". So basically the name of the show/character/actor/ship plus "edit", no spaces. Or an abbreviation of any of those, like "spnedit" or "dwinchesteredit". I hope that at least makes a little sense?
As far as the amount of tags that will show up on individual blogs, I'm not positive, but I believe you can use up to 30. After that the post won't appear on the tag's page. Grrr.)
Then, of course, just post it! I recommend saving it as a draft and then posting it at a time when a lot of people are likely to be on Tumblr. (There's research done on this timing!)
THE END! :D
I really hope that was at least somewhat helpful. Sorry if it was annoying that I went into sooo much detail, I just thought I should explain everything so it would make sense to most people, especially total beginners. Again, if anyone has any questions at all, you can absolutely ask me here! Or let me know if you think I got anything wrong, I would definitely want to fix it! Thanks for reading, and please like/reblog ♥ I’d really appretiate it!
#photoshop tutorial#completeresources#itsphotoshop#chaoticresources#yeahps#tutorials#gif tutorials#gif making#how to make gifs#gif making tutorial#mine#mine: tutorials#peachresources#riverdale#riverdaleedit#coloring tutorial#sharpening tutorial#photoshop tips#ps tips#photoshop 101#ps 101#500
626 notes
·
View notes
Text
Seamless Loading In BWC
I'd like to take a moment to explain how I achieved the single most significant effect in Banality Wars Carridin. I'm of course talking about the instant loading. The effect where you tap on a map and the camera seamlessly zooms in. As I write this I'm realizing this comes off as bragging but I am really proud of this.
Not to say it's actually that amazing. It really puts into context how much work goes into achieving certain transitions in movies because they likely employ similar techniques. This is probably child's play to them. "Oh, you did the cool transition once? We did it like 36 times in this 2 hour motion picture. Only ours were done in the real world where we couldn't control every pixel on the screen and we had to juggle various visual and practical effects."
Well... Well... It's impressive to me!
The Thinking
The main menu didn't always have instant loading. I don't have any earlier images but it originally worked a bit like the Advance Wars Days of Ruin map loading (pictured above), as that's what this game is based on. So you have this 2D grid of map icons and you select one, it fades to black, and you enter into the map.
Now this is all fine and dandy. Except if you're the developer. I think when you're the developer of a game the small problems are magnified like 100x. You may see a perfectly acceptable loading screen. After all, all games have loading screens. And as a developer I'm like, "Why is this transition 5 seconds!?! Wholly unacceptable." So, yeah, the loading screens really bothered me.
Also Unity is really bad at loading new scenes for some reason. There is always a stutter. You might have seen loading screens that are animated. They'll play like a little animation while the next level loads. Yeah, not possible in Unity. There will always be a very noticable stutter which was driving me even crazier.
The Idea
So Banality Wars Carridin was through and through a mobile game. So I took some queues from Android. Android had recently gotten a new WebOS-inspired multitasking menu joining a long line of devices to rip off WebOS multitasking including iOS and Blackberry's QNX.
I actually think the old multitasking method in Android with the cards is superior. Anyways that's not the point. I was using this multitasking menu and I was like, "Hey, I could do that. Just tap on a map and instead of loading it would just zoom right in."
And then I was immediately like, "No I couldn't, it's too complicated. I could never load in data that fast. Just the spawning of gameobjects alone would take forever."
Enter ECS
ECS stands for Entity Component System. It means different things to different people. Some may use ECS as a way of structuring data so that it is 'cache friendly'. Some may use ECS to organize data so it is easier to add to without making spaghetti code. And still others, like me, use ECS to instantly load content.
Here's the video I saw that pitched me on the idea:
youtube
The creation of a new object (like a player or a tile or an obstacle or whatever) is called instantiation. And as this video shows it takes quite some time to instantiate objects with the old system. Around 0.07ms per object according to the video. Which is fine if you're just spawning one or two. But the instant load system would require thousands to be spawned very quickly.
Looking back on it maybe I could have gotten away with the old system. Just hide all the loading behind an initial loading screen that's a few seconds longer than it had to be.
Anyways, I did some experimenting. It seemed the cost of spawning a new item is the same as creating a new Matrix4x4 (a block of 16 numbers). That is to say, basically instant. And the more I thought this instant loading thing was a really bad idea, the more I started to think maybe it could actually work.
Saving
So I had the basic framework of the system. In the editor (that is the Unity program that actually makes the game) I have to press the play button. Upon doing so the system will save a copy of the map (using a tool called Easy Save) to the Resources folder. This is the folder that is accessible after building.
Once this is done I could load the map from anywhere in the game. Of course this would require me to overhaul my system to support saving. Every object would have to be saved. Well, not every object. Just the important ones. I always intended to do this eventually, but I didn't expect to have to do it so soon.
Saving is actually surprisingly difficult. Unity uses C#, an Object Oriented Language. And one of the benefits of an Object Oriented Language is that you get to do inheritance. Basically a trick that allows you to share code between objects like units. But you can't use inheritance when doing saving so I had to rewrite a lot of stuff and 'flatten the inheritance hierarchy' as the kids say.
But this also helped in another way. Now I could use this same code to save a game in progress. Which is pretty useful. This also allows the game to display not the map we saved earlier in Resources but display the map in progress. Pretty trivially to. All we have to do is tell the game to 'load the map from our local folder, not resources'.
This is how the map appears from resources:
This is how the map appears when not loading from resources:
The Actual Hand-Off
I considered getting a more zoomed in shot but this is good enough to illustrate the point. This is being recorded from Unity's Scene View. Basically a second camera you can use to view things the player won't be able to see.
The first thing you can see is things not in the view frustum (basically the area the player can see) appears as generic black boxes (it's a bit hard to see). This is an optimization step. It's called culling. It should be handled by the GPU but for whatever reason it's not. Maybe it's a problem with ECS. Oh well.
Anyways so let's break it down.
Tap on the map
Zoom in while dragging UI components away from the visible area (this is because if we didn't do this they'd suddenly disappear on the final frame which looks weird)
Load the rest of the fucking map
Sorry. Couldn't resist. But the process to load the map is quite complex. Well, actually no, it's not that complex. Just spawn all the tiles, the buildings, the roads, the units, and then use some trigonometry to figure out where the camera should be.
And unloading the map is done similarly. Just in reverse. The only real hard part is to find the initial camera position. This actually has to be saved to a file otherwise we must use a crude approximation of the location.
The Results
So as you can see the final result is quite impressive.
Too impressive maybe.
The Future
To be honest I'm not exactly happy with how it turned out. "Why?" you ask. Well, it's all about performance. I'm not convinced that this ECS system is very performant. Oh, here's a secret: on Android the sprites are rendered using GPU instancing while on iOS they are not because iOS apparently doesn't support this. So on iOS the ECS sprite rendering method is actually slower than the traditional method. Android should be faster but I'm not 100% sure as having this many sprites has resulted in some workarounds like the culling technique earlier.
I'm always super jealous of those games that can run on a potato while my monstrosity barely hits 60 FPS on a modern mid-range device. I don't know, maybe the grass is always greener on the other side.
Also there is the aliasing problem. Aliasing is when there's super small details that appear to flicker. You can see a lot of aliasing in the map previews.
To fix this I should probably use lower resolution versions of the tiles. But then I might as well just load the maps normally. Which I could do. Also the campaign maps will sometimes have intro dialog. I could just do it like WarGroove and have a little window that pops up with the dialog.
Well, one things for sure: I have a lot of work ahead of me.
If you want to see how it works currently you can download the latest build on my Patreon.
0 notes
Text
Chiron, the Wounded Warriror
In astrology, the comet-asteriod, Chiron is referred to as the “wounded warrior”. As such, it must first face issues of low self-worth in order to learn how to make a hero’s return and help others with the same wound.
My chiron is in the Capricornian 10th House, which governs the affairs of the public self. It took me a long time to understand what that means at a personal level, and how to emerge as the “warrior”...
To me, Chiron’s pain in the 10th house feels like this: Mother taking over the father’s role...Mother acting like a militant coach, pushing me to the top disregarding my emotions; and success, fame, reputation was more important than how I felt...emotional wounding while climbing the social ladder... fear of failure, fear of authority... feel expected to perform, to excel, to achieve... pushed to public display without emotional readiness...
You get the idea.
Indeed, I felt pushed to perform when I was young, and with a South Node in 5th House, it was easy to perform at first, and I was glad I could meet mom’s expectations.
But as she pushed harder and harder & demanded more awards and medals, it became far too much to handle, and by 7 or 8, I hated to go on stage. And when I do, I was not myself. Eventually, I shut down as it was just too painful to be in the public eye. I felt I had to guard and protect my emotions --- those fear of failure, fear of my mother, fear of not meeting her expectations, fear of judgement, fear of not being good enough, fear of unworthiness if I do not perform well...
It was years later, when I began my own healing that I intuitively addressed this wound...
I volunteered to be Ray’s Chinese Translator. I just knew I could do it, and I wanted to contribute towards social good. And as it turned out, my first time doing it in public was quite a healing experience that I’ve been secretly craving for... i.e., to be able to express myself without fear in public.
And when I had more chances to do it later on, I danced between a “warrior” and a “victim”... when the fear crept in, my standard dropped, but when I focussed on getting the translation across, I only needed to open my mouth...
With Ray’s death and later on, Vincent’s death, I felt my whole world collapsed. Both of them were public figures, and I felt the stress and pain again expressing myself and my grief openly. I went into hiding. It was after all, just a personal trauma that I was going through.
I screamed and yelled and cried in desert Arizona where I stayed, where no one could hear me. I cried driving in the valley. I cried in my bed, in my chair... I thought I cried it all out already... but coming back to Singapore again, there was more pain, as I have not dealt with the fear of facing the public...
Of all, facing my mom was the hardest, as for too long, it was not okay to cry in front of her... And I held on to that old pattern of holding back my tears, putting on an okay front... but deep inside, I was not okay...
It was only recently that I understand more deeply, that the wound in the 10th house of Capricorn is directly traced back to the Cancer (inner child) that has been hurt. Without nursing my inner child, I would forever feel the sore, open wound of my social/public self.
Medical Astrology associates Cancer with nurturing organs, i.e. the stomach and the breasts; and Capricorn with skin and the entire skeletal structure, especially the knees.
My own understanding is that the bone feeds from the stomach. If the stomach/emotions are not taken care of, it will be reflected in the skin and the bones.
And no wonder, I used to have eczema... I was hiding too much stuff inside until it was spilling out to the skin!
Intuitively, I have been drawn to healing arts to help heal my emotional body, and I chanced upon the opportunity to learn singing in a group setting, which was exactly what I was looking for.
One night, it dawned on me that instead of keeping my emotions inwards, I could direct my emotions outwards. So, I started to sing and visualise every emotion brought outwards to the skin and how that felt. OMG!!! I felt like I was finally taking the first baby step to learn how to express myself publicly, i.e. on my skin!!!
I don’t know if this wound would be completely healed or not, but for sure, I am happy to share my discovery with others who share the same wound as I do.
And that’s why I am promoting the “Transform Through Singing” sessions with Anthony Png. He really offers a great platform to help us express our public self, which in turn makes us feel wholesome again.
And if anyone likes to know what their “wounded warrior” is in their astrological chart, call me for a reading.
All the very best!
Siok Khoon
2 notes
·
View notes
Text
I know Christmas is all about the jolly and the merry, but, you know… Sometimes, it’s not that simple. And sometimes, an author gets that feeling of loss and Christmas just right. As they do here – three times over.
I was offered these ARCs by Netgalley in exchange for a review. All opinions are strictly my own.
A Miracle on Hope Street, Emma Heatherington
Story
Can a single act of kindness change a life forever?
To many people Ruth Ryans has everything: the perfect job, a home to die for and a loving family. But it’s all lies. As Christmas approaches, Ruth feels lonelier than ever. Then Ruth meets Michael. A man who, on the night of her father’s death the year before, she showed kindness to during his darkest moment. That one single act, his miracle, helped change his life forever.
Can one act of kindness really change a person’s life? Ruth decides to find out and plans to make this Christmas the most perfect one ever, opening up her home to those who need her help – the lonely, the lost and the ignored.
This Christmas actions will speak louder than words and Ruth Ryans’ kindness will create little miracles for everyone … including her own battered heart.
Opinion
While this book has a happy ending, it is not a happy book. I wrote about this last year as well, but for many people, Christmas is one of the hardest periods there is. The idea that everybody should be happy, when so many people have it so hard? It can be hurtful to anyone who isn’t lucky enough to be able to fully “celebrate Christmas”.
For Ruth Ryans, that is exactly the case. Her sister is across the country, her father died almost exactly a year ago and her mother? Well, she walked out on them years earlier – just when, as Ruth put it, “she needed her most”. Faced with feeling even more alone now, as she is struggling with the grieve of her father’s death, Ruth just about breaks down. She has an advice column, but how is she supposed to help others when she’s feeling so utterly lost herself?
And then – she decides to do just that. Rather than just give people words of wisdom, of help and of comfort, she’s going to take action. Throughout the story, we’re shown fragments of 6 people’s lives as they decide to write in for Ruth’s advice column. The way Emma Heatherington set up the story so that we get to see exactly what brings these people to write to Ruth gave it a layer of depth that, honestly, I wasn’t expecting from “just a Christmas book”.
It’s been a while since I read a book that set out to be emotional. And, I was actually taken aback by how well that was done. The author manages to unveil the different layers both of Ruth’s and “the man whose life she changed” stories. The six people Ruth decides to help are all, in their own way, so incredibly deserving. And at the same time, they – along with that same man – give Ruth the framework she needs to deal with the biggest reason for her loneliness this season: her mother’s absence. The build-up of that final reveal is executed so masterfully that – even if you do figure out the last “plot twist” before it’s actually narrated (and you might, it is somewhat obvious) – it honestly left me in tears.
A Miracle on Hope Street takes place during the 8 days before Christmas and on Christmas day itself, with a prologue one year earlier and an epilogue one year later. Honestly, I would’ve been fine with 6 more epilogues. Emma Heatherington so skilfully sets up this unnamed town in Ireland, the family situation and all of the invitees (heartbreaking and hope giving all at once!) that I would’ve been happy to stay in her world a good while longer.
Rating: 4.75/5 (Goodreads)
Cupcakes for Christmas, Kate Hewitt
Story
Always the baker, never the bride…
Olivia James has always been happy running a tea shop and bakery in the Cotswold village of Wychwood-on-Lea. She’s helping her friends find their happily-ever-afters, topped by the perfect wedding cake. But as Christmas approaches, Olivia is home alone and questioning her choices while eating too many of her own specialty confections.
When Simon Blacklock, a handsome, whimsical stranger, breezes into her shop and buys a cupcake and then returns the next day and the day after, Olivia begins to dream. Can romance blossom amidst the sugar and flour? And after a lifetime of living on the side lines, is she brave enough to star in her own story?
Simon may be hiding a painful secret, but Olivia harbours secrets of her own. If they can dare to risk their hearts, this Christmas might be the most magical yet!
Opinion
Kate Hewitt has this way with emotions that means you can always count on her to get them just right. I already knew she did that beautifully in her series on The Holley Sisters of Thornthwaite but, as I’ve now discovered, it’s a universal thing for her books, apparently.
I have to admit that it took me a while – longer than with her other books – to get into the story of this one. There were these little things that just didn’t strike me as “quite right”. From the relationship between Olivia and her mother, to the way Simon was acting at times… It just made me a little… Uneasy? That’s probably the best word I can find to describe it, right now.
Of course, because, you know: this is Kate Hewitt, it turns out I was *right* in feeling a little uneasy. Right, and, on to the plot. Kind of. Whereas I could see from pretty early on what general direction Olivia’s mother was moving in, Simon kind of caught me unaware. And he certainly got me *in the feelings*.
The author certainly takes her time to set up the atmosphere and the characters of this holiday read, but seeing Olivia slowly unwind from her spinsterhood, as well as the development of her relationship both with her mother and with Simon? It made for just about the perfect cosy holiday read. Best accompanied by cupcakes – of course!
Rating: 3.25/5 (Goodreads)
The Christmas Wish
Story
Christmas is coming but it doesn’t feel that way for Esme Greenwood. Recently jilted by her cheating fiancee Warren, she’s had enough of London life and escapes to Thimble Cottage in the Peak District, home of her beloved grandmother Matilda.
While Esme mourns for the wedding she’ll never have, Matilda puts her granddaughter back together again with comforting words and generous helpings of fruitcake and together, they plan the trip of a lifetime, to Lapland to see the northern lights, somewhere Matilda has always dreamt of going.
But tragedy strikes and when Matilda dies, Esme screws up the courage to go on the trip on her own to honour her beloved grandmother’s wishes. At the airport she meets a motley crew of characters including Zach, a handsome, brooding, out-of- work actor and together they set off for an adventure.
Beneath the indigo skies of Lapland, Esme and Zach grow closer. But when Esme is bombarded by messages from Warren promising he’s changed and she discovers that Zach is hiding something very significant – will her head be turned? And when a trip to the northern lights reveals the full extent of Zach’s own secret past, is there any hope that Esme will get the happy ending that her grandmother wished for her?
Opinion
There’s something incredibly sad about someone coming to the realisation that their relationship isn’t what they thought it was. There’s something equally (more?) sad about someone realising the way they are being treated isn’t okay. No matter how much they might try and defend that other person’s behaviour.
Throughout this story, Tilly Tennant does an incredible job of not only revealing the truth of Esme’s situation, she also manages to allow her character to get beat down again and again. It’s not necessarily fun to read, but it did make for a very compelling read.
What made this even better? Well, the story just takes place in freaking Santa-country. I mean, they go visit the real Santa in his actual town with his actual elves and surrounded by actual snow. I know I mentioned this for “The Summer Getaway” as well, but the author has a way of really making a location come through life through her words.
So if you’re in need of something to make you feel more Christmassy than you have in a long while? And you’re more than willing to take some sadness and tears with that deal? Then this is your book!
Rating: 4/5 (Goodreads)
Honestly, I feel like I need to warn you that reading these may definitely end in some tears. On your part that is. I can guarantee you there’s tears in the books. So, you know, keep your tissues ready. And be sure to check out the rest of my Christmas– and this year’s blogmas-posts!
-Saar
Mini Reviews #7: Loss and Christmas I know Christmas is all about the jolly and the merry, but, you know... Sometimes, it's not that simple…
0 notes
Last Seen Blogs

cornet-shot-gun-wedding
Cornet

wyztereo
Wyztereo

ladyrashelougai
signora di Mori

eponinemylove
Checkmate, heteros
khendrix2014
k.hendrix