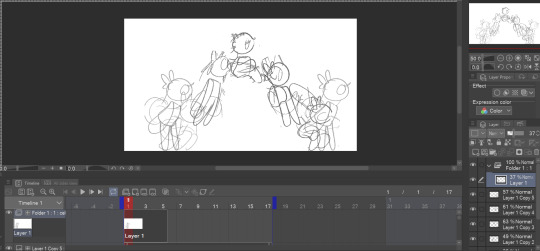
#my animation wont export
Text
I feel like my head is gonna explode :)
#im stressed cause i have my psychiatric appointment to get T#my classmate just cancelled a thing so i have to go print the final work on fucking minilab and idk if they'll even send me the images#my animation wont export#mom will shout at me if i even try to talk with her#my sense of self is ruined again cause i saw a fucking instagram post and it triggered me#FUCKING HATE INSTAGRAM WITH USELESS TAGS THAT WONT LET ME FILTER SHIT#FUCKING HATE HER AND HER STUPID HORSES#fuck#been on draft for a while and still mad maybe if i let it go it'll be better#sorry for the vent
3 notes
·
View notes
Text
i swear to god animate is like the least intuitive program in this whole wide world
#in order to enable scrubbing for audio on a video file i imported#i had to open AUDITION#so that i could change the audio to 44.1 khz 16 bit#only THEN would animate allow me to import the audio SEPARATE FROM THE VIDEO IT CAME FROM#and then have scrubbing enabled#the fact that to get audio scrubbing i had to separately download change the settings of re-export and then import the audio#is insane#i miss harmony.......#it wont run with my tablet so im stuck with animate until i go back to school#mine
1 note
·
View note
Text
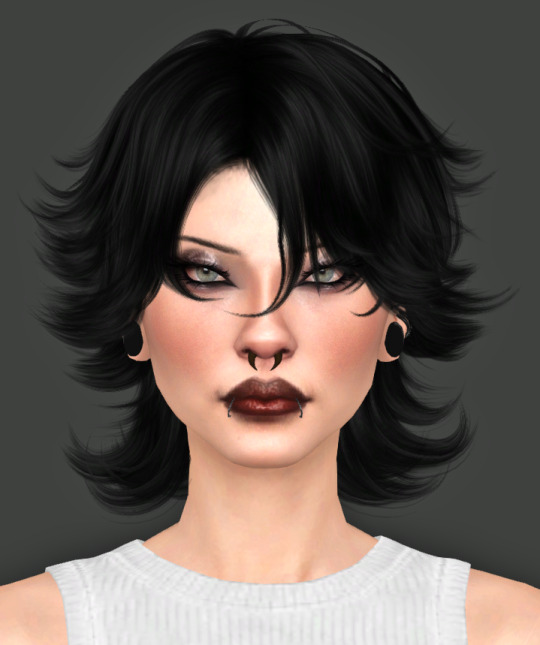
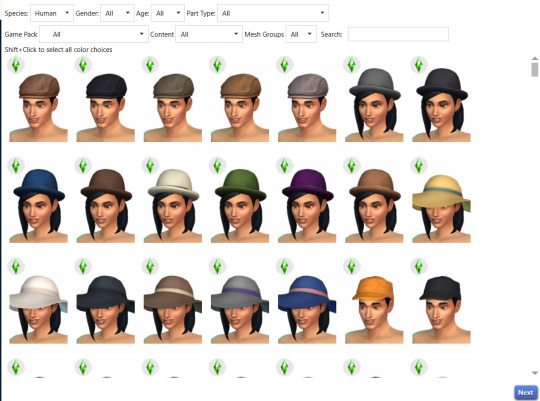
well hi :3 welcome to deja’s skinblending guide. this is my first full written tutorial so excuse me if its not very good LAWL
before we get started, here's the tools i'll be using
sims4studio
tray importer
photoshop 2022 (theres cracked version everywhere on tumblr)
blender 4.1
sims 4 ripper
blender + the ripper aren't required to make skins, plenty of people don't go that extra step, but i love using it for placement help
okay lets fuckin go gamers heres my very in depth process for making my ocs skins
miss dolly is gonna be our model today. she already has a skin but im gonna add some little details for the sake of example + some tats cause ive been meaning to anyway.
so when i first get started on making someone a skin, ill find a good base to use and then add details from other categories like nosemasks, eyebags, contours, etc.
my fav skin creators are @sims3melancholic and @thisisthem. my bases are usually thisisthem, and then i'll pick through a couple s3m skins and make notes on my phone about what parts i wanna take off of them (like, say, i like how a certain s3m skin's nose looks. i'll use that instead of a nosemask)
my goal when im gathering things i wanna add is to free up as many slots as i can. id rather add cheshire's freckles onto her skin than use up the freckle slot in skin details that i could use for something else, yknow?
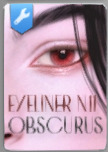
ill repeat this process for makeup next. obviously im not giving my ocs permanent full glam, but some lipsticks can add better texture, you can get highlights/blush from........the blush section LOL and i love using this obscurus eyeliner at a low-ish opacity
just adds an extra level of detail i love. i think what keeps my sims looking consistent next to each other is that i tend to use some of the same details all across the board
make sure for all makeup/skin detail/tattoo category swatches you use, you make note of what swatch it exactly is. when you go into s4s to export the file, you're gonna have to manually select it and if u cant remember what skintone u chose out it can be annoying :/
note that she is completely nakey aside from her piercings while i pick what im gonna use for her skin! no clothing but u can keep on their hair. this is so we have a clear view of everything (and i mean EVERYTHING) for blender.
after you make sure u save the sim/household to ur gallery, you can close out of cas and save ur game! i forgot to do this bc im a fucking idiot but its okay bc you will not. its not REALLY necessary to do this as long as you know exactly what packages you need to locate for texture exporting
step one is done!!!! close out ur game
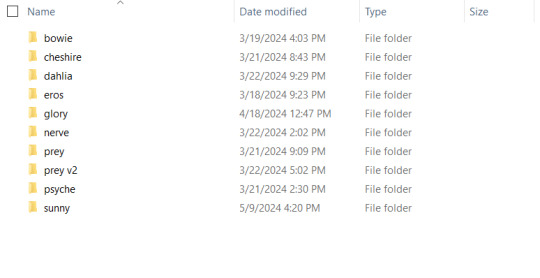
i have a million fucking characters so i made a deja senti skinblending folder to keep it all organized :-)
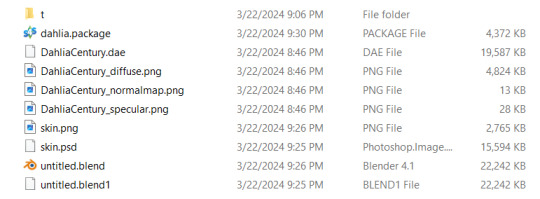
this is what it looks like inside. gives u a pretty good overview of what ur gonna be doing tbh. the 't' folder is all the textures we're about to export
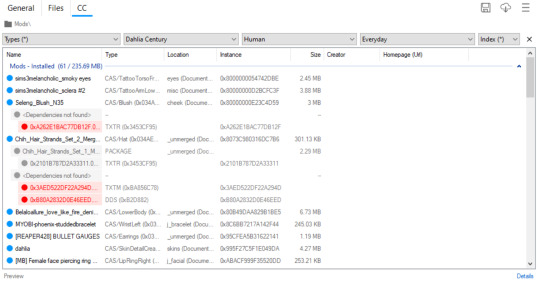
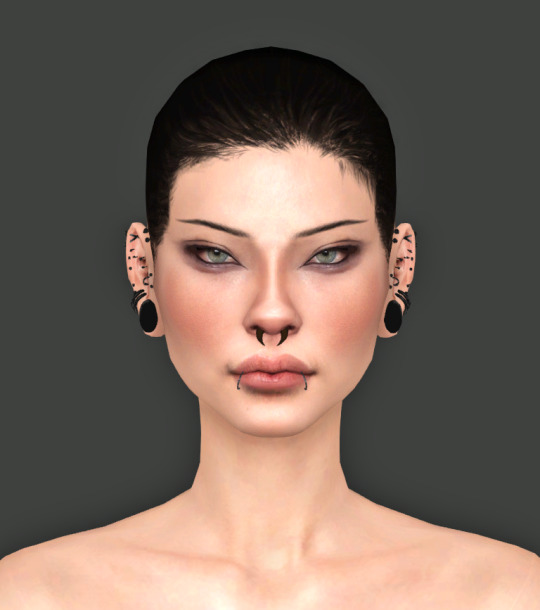
thankfully i do have a version of dahlia saved in my gallery so even tho i didnt go it before i closed my game i can still show u what to do in tray importer lol. i have multiple sims in one household, so i narrowed it down by going up top and selecting dahlia / human / and her everyday outfit.
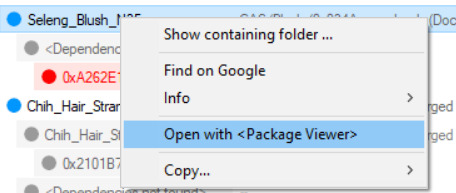
since im gonna give her this blush, i right click and hit open w package viewer so itll find it and open s4s for me
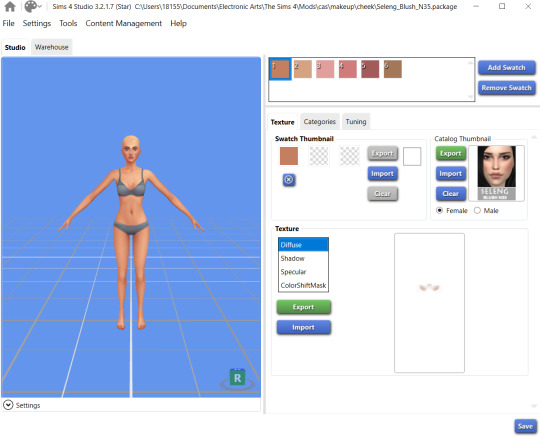
anime wow sound. im gonna change the color manually in photoshop so it doesnt matter to me what swatch i export. hit that green export button under the list of diffuse/shadow/etc (u dont need to worry about all those options, just diffuse) and save it to ur folder!
once ur done gathering ur textures ur good to close out of tray importer and s4s(we'll come back to s4s later tho)
thats step two! the quickest step lawl
this is where i start being a little extra. u dont have to rip ur sim and use blender if u dont want to, but i think it can rly help bc the default sim in s4s doesn't have ur sims facial features and can make ur skins look wonky/wont give an accurate representation of how itll look in game. this cuts out having to go in game/out of game over and over to check
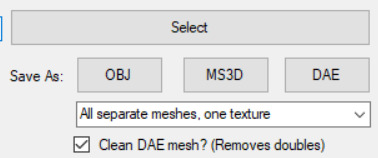
so in simripper once u load up ur sim, the important part is to make sure u have it set to export the dae with separate meshes. once thats done u can import it into blender and there's plenty of other tutorials out there how to use simripper n all that.
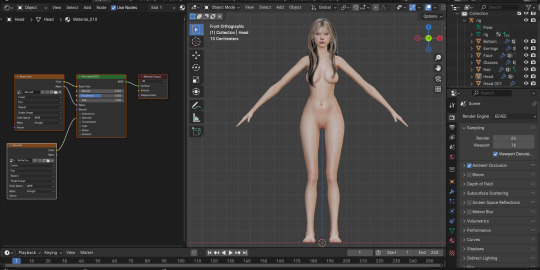
so once u get the dae loaded into blender im gonna send u on a little side quest over to this ask i answered where i explain how i separate eyes from the head mesh. next thing ur gonna open is photoshop! or whatever u have thats similar

say hi to flat dahlia. u should have ur own guy but flat open now too :-) along with everything else ur gonna combine. in my case its blush and a titty mask. im gonna start w the blush so i zoomed into her face in blender. i went into the blush file and copied, then back into my base skin file and pasted into place with crtl+shift+v
please do not be like me. make sure u rename ur layers as you copy and paste them into the main skin file. do this because it DOES matter what order ur layers are in. u dont want to put ur highlight under ur nose mask cause the nose mask will just cover the highlight etc etc. i already lost what layer the new blush i added is. what is wrong w me
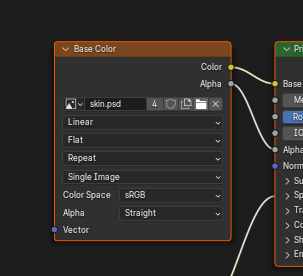
so when u have ur first detail pasted on and in place, ur gonna save the base skin file as a psd. then go into blender, and in the little textures window ur gonna replace the diffuse file ur dae came loaded with with ur new psd file
u should see the change u made but mine was super subtle so im gonna show it to u when i put on the cleavage overlay
when it comes to stuff like this, ur obviously gonna want to pick the closest to ur skintone swatch as u can. i did not do this, because again, im an idiot
mine is way too pale LAWL whoops. we can fix this tho
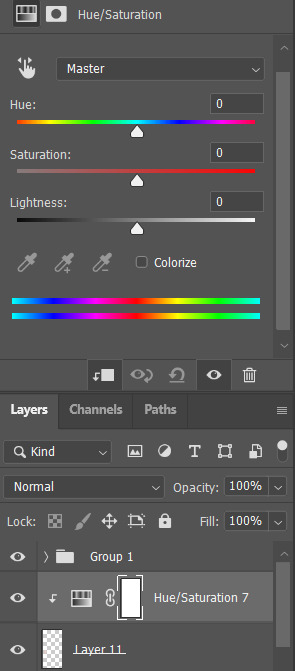
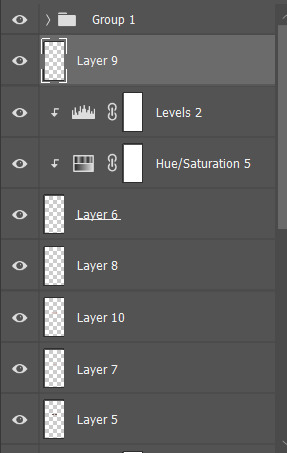
i add a hue/saturation adjustment and make it a clipping mask using that square w the arrow so the adjustment will ONLY affect the mask
from there i just make little adjustments until the color match up is as perfect as i can make it. for example for this, ik that it needs to be a little warmer and a little more saturated, so im gonna bump the hue and saturation sliders to the right and it was pretty much perfect
tiddies with no mask > with mask no adjustments > with mask and adjustments
and ur gonna go ahead and repeat that process with every single thing u wanna add to ur skin.
so as for tattoos! this is another thing ur gonna wanna rename the layers for because depending on how heavily ur sims can be tatted it can get A LOT
here's psyche's neat little tattoo folder. its separated into where the tattoo is and then
what it is
i find all my tattoo inspo on pinterest using flash sheets/keywords in the search. my ocs usually have sub-boards that i hoard inspo in for them specifically. dahlia doesnt have one bc ive never seen her as the most tattooed person, but i think she'd have some at least
this process is pretty much the same as putting on skin details! its all about adjusting to what u like. for example, i like when my sims tattoos are a little faded and a bit blurred at the edges cause it looks a little more real
when it comes to images i find on pinterest, ill save the image and first try to make it as clean as i can
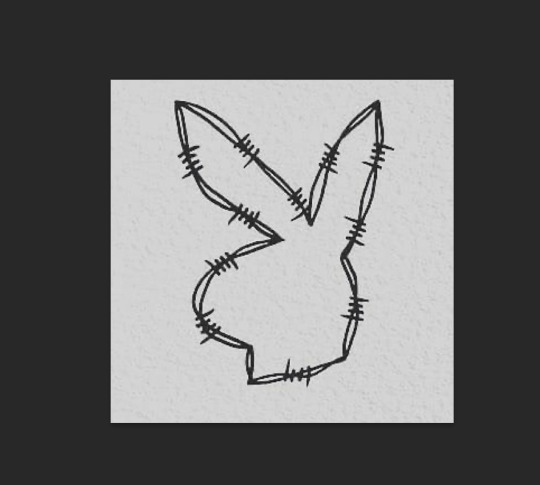
for example, this lil guy
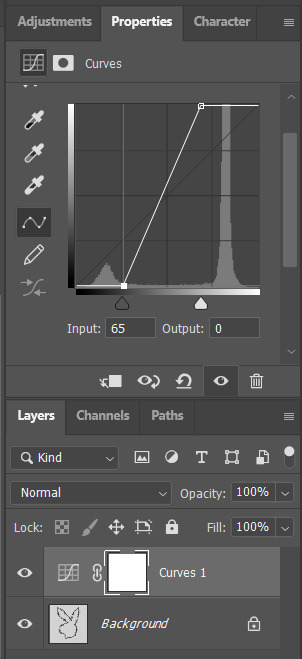
a curve mask made the whites brighter and the blacks darker as u can see. then ill go into filter > reduce noise to soften the harsh edges
then i flatten it, copy and paste to the skin file, n place it wherever i want it to go :-)

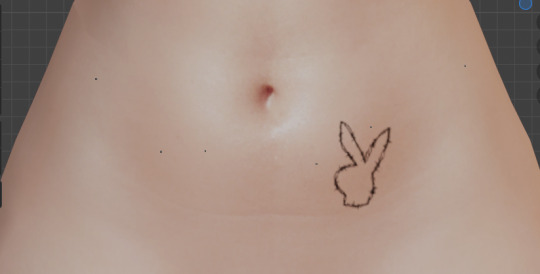
louder anime wow!!!
okay so now ur gonna want to make sure u .psd file is saved (it should be bc we've been checking our progress w blender) and then merge the visible layers (NOT flatten, merge visible. we need the transparency around the skin to be in tact)
ur done in photoshop and blender!!! good job :-)
step whatever number we're on. back into s4s!
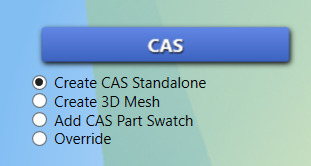
ur focus is over here. make sure the option filled is the top one, and then hit the cas button
this menu will open, ur gonna go up to part type and find the option skin details, forehead. pick the first forehead wrinkle option that appears and hit 'next.' itll prompt you to save ur new file n give it a name, i usually just make it my sim's name cause i have a folder in my mods folder for specifically my cc
remember wayyyy back when we were exporting the skin details? ur gonna go back to that same section and hit 'import' instead of export. select ur skin's .png file, and poof !

ur skin :DD it looks great man good job
this part is EXTREMELY important. go up to the warehouse tab
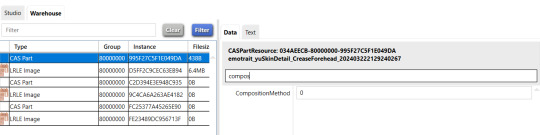
in the 'data' section ur gonna see a box at the top labeled 'filter.' thats where i typed in 'compos' just so it would show me JUST the compositionmethod section since theres a lot of shit in there lawl. yours is initially gonna say '3,' but we're gonna change it to '0' mind you, this is because MY skins are all alpha. maxis match overlays do not show up on my skins because my comp method is set to 0, meaning it has top priority essentially.
after you do that, you can hit save and place that .package file you created into your mods folder!!! and GUESS WHAT BESTIE UR DONE!!!!! U DID IT :DDDD
of course, as always, you can always dm me if youre stuck on anything or need any more clarification. i am always open to help as much as i can. i rly hope this helped :-)
20 notes
·
View notes
Text
SO i've been digging around in the benchmark files with xiv data explorer...
...and with my middling knowledge of how XIV's current texture types work, i've noticed some differences in how texture channels have worked and what data is stored where. i haven't figured out what EVERYTHING'S for yet and if you think you have an idea or any corrections, pls feel free to lmk. could help with figuring out 7.0 modding quicker! this is also decent info for figuring out what old mods can be repurposed for 7.0 graphics.
also content warning for unwrapped face textures under the cut, i know those can look kind of spooky if you arent used to 'em lol
starting off, i didn't source this info but chirp (known plugin dev) on twitter talked about finding about fifty six new bones in the facial armature specifically. this means things like sculpts will probably be unusable unless they are manually re-rigged with each one of those fifty six new bones, or else they wont animate properly.
the default UV maps for the face specifically have changed, too, and many of the uses of the old normal and multi channels have been changed or moved to a different texture. NOTE that these examples were found from au ra textures, male specifically, and the channels may or may not have different uses on non-scaled races!
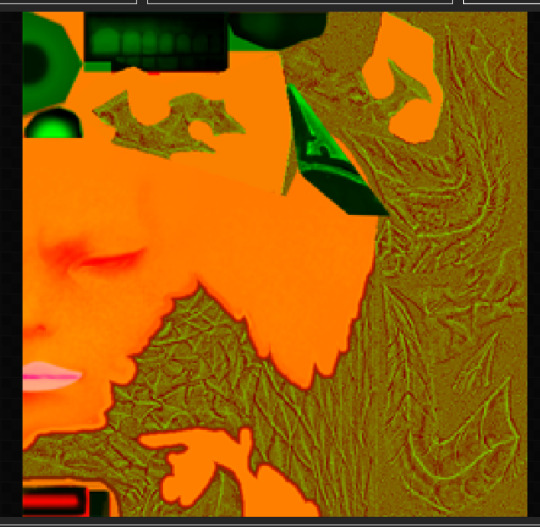
old vs new multi map. i'm fairly certain every channel here has been repurposed: for example, blue used to be for lipstick, now it seems to be for something else. so where'd the lipstick area data go? well:
it's been moved to the alpha channel on the normal map (these are both the new one). additionally, it seems like the blue channel on the normal map has been changed to signify the difference between skin and non-skin or something of the like.

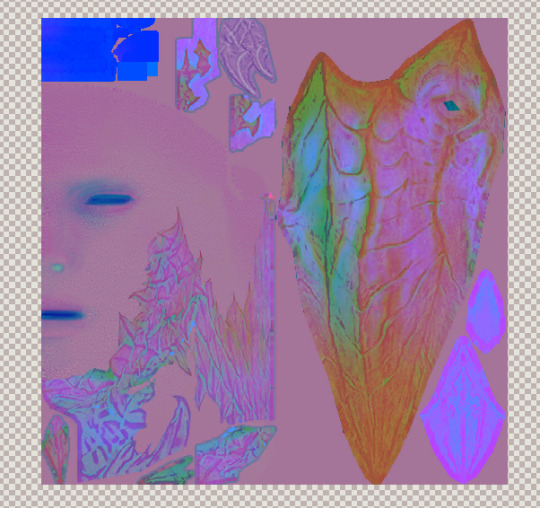
(old vs new) similarly, even though the body seems to use the same UV layout with a redefined normal map, the blue channel here also seems to indicate skin vs non-skin. but the blue channel used to be for transparency (iirc?), so where is that data stored now?
the transparency data seems to have been moved to the alpha channel of the diffuse now. this image is part of the new face diffuse.
like the face multi map, the body multi map seems to actually use the blue channel now (and looks SO much cleaner, wow!). old vs new.
so what do these changes mean for our current mods?
-due to changed UVs, existing makeups will not be usable with the new faces UNLESS someone goes through the effort of taking the old sculpt (vanilla or otherwise) and weight paints ALL the new face bones to them, or somehow adjusts the UV mapping on the new sculpt to match the old one. i don't work with sculpts so i'm not sure how feasible either of these are
-existing body tattoo mods that only affect the diffuse should theoretically still work fine, as the UVs have not been changed on the body. body scale mods that are just recolors should work fine as well, but matching face scale mods will have to be redone for the new UVs.
-however, if it's a scale mod like dragonborn that changes the placement of the scales and therefore the normal and multi maps, those will have to be adjusted to match with the 7.0 channel uses.
assuming there are no major changes to how this data is stored between now and the releases of dawntrail, you could theoretically begin working now on your own texture mods ready for whenever we get access to 7.0 modding tools. i was able to access these files (and many others) by using XIV data explorer, a program that lets you view and export (but not import!) data directly from specific XIV data indexes.
if you also want to rip textures, the index storing them, alongside skeletons and animations, is 04000.win32.index2. hit ctrl+shift+e to export individual files to a .tex format and then run them through penumbra to convert them into .dds for normals + multis or .png for diffuses for editing. i'm fairly certain that 95% of the pathings will be exactly the same as what penumbra and textools gives us now, so there shouldn't be much need to find entirely new paths.
again, if anyone sees any differences in other races for texture uses or figures out the uses for new channels, PLEASE let me know bc the sooner we get all this figured out the better! i have only been modding for a few years and don't know everything about how every texture works so i'm open to corrections.
#ffxiv modding#ffxiv mods#i just wanted other mod makers to know beforehand so id like to spread this info if possible#finding public modding resources can be a bitch! if i can make things easier i will try
9 notes
·
View notes
Text
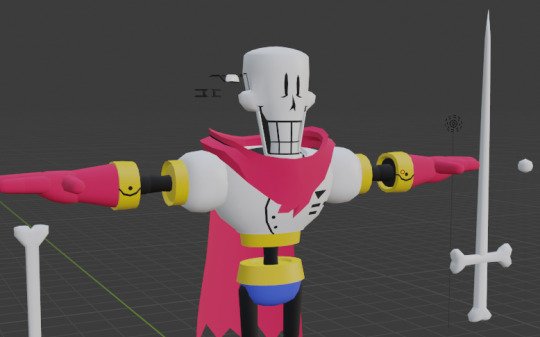
to go along with my sans model ive been making papyrus but he wouldve been done and exported ages ago if i didnt keep getting distracted and also. wanting to give him 500 expressions that i can move around in roblox for animations i probably wont even do. so heres a wip for now
#my art#rare wip post. sound the alarms#dont mind the eyes in the background#please mind the bone sword. its so cool
51 notes
·
View notes
Text
Devlog #105
Hi-ho, Wudge here! Devlog hiatus is officially over, I'm looking to go back to my weekly schedule! I took a nice long breather and am feeling much more like myself.
I know I've been posting the big two-year devlog recap - three parts down... one more to go... the dreaded Social Media section of the recap. I'm procrastinating on it, haha.
Writing recaps aside, here's a shotgun blast summation of what I've been up to:
I ACTUALLY finished the Landlord's expressions after realizing that I was missing one - and implemented them into the game's first bad ending.
Split and exported some audio files - now just need to listen through the samples.
Took detailed notes with ideas for outlining Mia's route.
Did a "flying" animation test!
Editing, coding, pecking away at a flying scene! (Special thanks to @brightoakgame who wrote a magical first draft for me in exchange for some code!)
I also added the worst ever dialogue choice (dont mind the stand-in clipstudiopaint model in the bg):

Went through and did some CODE HOUSEKEEPING; manually putting in checkpoints, save file names, menu choice reminders, hiding the sprites if they're too crowded during choice section... All very basic bits of code, all help the game feel more polished.
There was missing text from the puppy dog sprite's jacket - I fixed it.
A giant Evil Eye was showing up uninvited to a certain scene... he has been escorted from the premises:
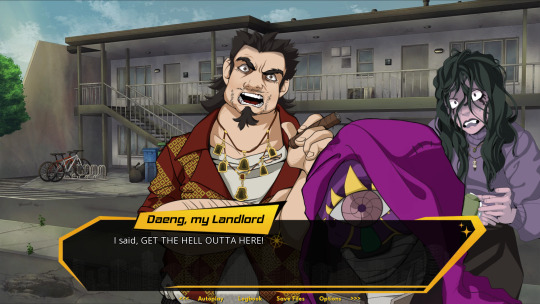
Your landlord wont stand for purple creeps prowling around his property!!!
... That's it, I think. See yall next week!
Stay safe and keep warm,
Wudge.
30 notes
·
View notes
Text
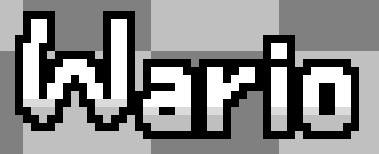
warioware styled text gifs tutorial
making this cuz someone on art fight asked me how i made these. feel free to ignore
STEP 1
download a font. the one i used was WarioWare Original !
STEP 2
its not required but its highly recommended you get Aseprite if you dont have it already! its a powerful tool for sprite animation. if you dont have the money for it though you can always use browser based sprite animation tools like Piskel ! you can also use regular art software and export the frames separately if you wish.
STEP 3
in whatever program youre using type out what word(s) you want your gif to have! the text size for the crispiest pixels is 15. once its typed out space each letter apart so that theres 2 pixels of empty space between each letter, like so:

STEP 4
after spacing them out, add the outline. warioware used sharp edged outlines, so dont leave out the corners!

STEP 5
now we'll apply the shading to the bottom of the letters. i dont have the exact colors but the ones i used are #dbdbdb (219, 219, 219) and #bfbfbf (191, 191, 191). these colors can also be changed if youd rather use a red or something, but keep in mind theyre very light colors. examples of this can be seen in my art fight global character perms!

STEP 6
this next part isnt required but unless you like redrawing the same pixels over and over then go ahead and move every other letter to a second layer! this is because during the animation, the letter's outlines will overlap each other so its best to make another layer so you wont have to redraw them

STEP 7
here's where we begin animating! the animation starts with the first letter moving up and the rest of the letters following suit, one after the other. this animation is 5 frames long so it wont be terribly long of a process. on the first frame move your first letter up by one pixel:
STEP 8
leading off from the previous frame, for the 2ND FRAME move it one pixel to the left. after that, for the 3RD FRAME, move it down two pixels. for the 4TH FRAME, move it one pixel to the right. lastly, for the 5TH FRAME, its position will remain unchanged from where it started, as seen in the 3rd image in this tutorial.
2nd frame:
3rd frame:

4th frame:

if done correctly it should look like this so far:

STEP 9
now, do the same thing to all the other letters, but remember to keep their movements one frame off from the previous letter (i.e. if the first letter moves up on the first frame, then the second letter moves up on the second frame, and then the third letter will move up on the third frame, and so on). if done correctly it will look like this:

STEP 10
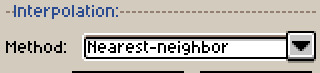
the finishing touches! the speed i use for these animations is 50ms/frame or 20fps. to make these gifs larger without them looking like complete ass i upscale them using the "nearest neighbor" method. its best enlarge by values of 100 (200%, 300%, etc.)
FINISHING RESULT

here's what the final gif should look like if everything was done correctly, but youre free to change anything about this too. this is just a guide on how i personally make these gifs. if youre wanting to make shaky text like in WarioWare, inc. and WarioWare: Twisted!, its not really something i can describe well enough to make a post about. my best advice would be to use VisualBoy Advance, open a Mega Microgame$! ROM, and use the next frame tool to look at how each letter shakes individually. anyway thats all! hope youll find this useful!
21 notes
·
View notes
Text
its like That tm because my animation app wont let me export anything other than image sequences so im basically just screenrecording it. anyhwo. he dancin
3 notes
·
View notes
Note
OH QUESTION: in clip studio how do you make the tweening squash and stretch like that? I'm pretty new to the animation part of the program so forgive me if it's like, very obvious where it is but Ive never seen a way to squash/stretch a layer like how your animation does, I've only seen how to resize a layer
SURE I CAN DO MY BEST TO HELP!!!
Just know that I am very new to this as well and this something here PROBS has a better way of doing it, but IDK THAT WAY SO. Here's how I did it.
First off I have the big boy clip studio idk if the cheaper one works with this so just know that.
MY BADLY MADE TUTORIAL TIME!
(Will also link video tutorials at the bottom that I used to help me! So if you don't wanna read my ramble explanations just skip to that LOL-)
((Also things will be broken up into like- chapters? as I don't know how much you know and want to help cover some bases that I learned that you or others may not know! But Know I am still learning so feel free to try and do things your own way! :D))
STARTING BASICS
So to start off I use the Project:Animation option in clip for this, there are preset sizes for things, which i suggest using first trying things out. I didn't really mess with anything on the right side sense tbh starting off all you need is on the left, being canvas size and the amount of blank space you want.
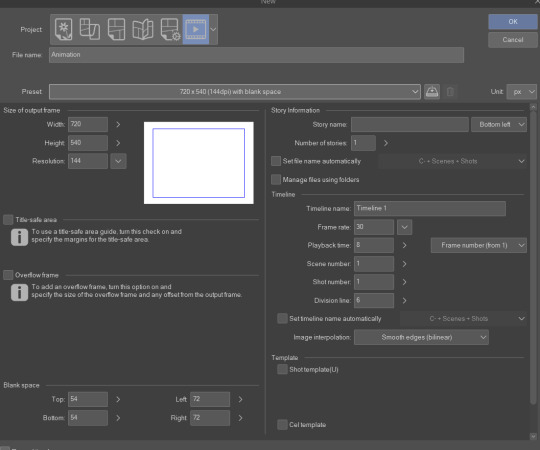
If you don't know what blank space it's like... A little secret place you can scribble down notes for animation to keep in mind, and won't show up in the animation when you're done exporting it.
This is also useful to overflow the things you want to tween as they don't get chopped off awkwardly. See how I drew her skirt and ear going past it? That's why.
So I can move them freely without fear of it ending suddenly! This is something I learned was a good tactic to do for when I did my vtuber models as it is also a type of tweening!
TLDR: Everything in the box will be seen, and everything outside of the box wont!
and if you want to change any of the blank space to add more or less go to Edit>Canvas Properties... It should be near the bottom of the list!
Correcting speed!
Clip studio does NOT actually show you the correct speed of your animation by default! To make it go closer to the actual speed of your animation go to Animation>Playback Settings>Prefer Speed! As by default clip has it set to prefer quality, which is just it trying to keep it looking nice while playing but may skip some frames! So that is something to check!
You can add music to clip studio animations!
Select the frame you'd like to add music onto, go to File>Import>Audio. BUT- make sure the audio file is a WAV file not a MP3. While MP3s work they are more likely to become off sync, while WAV's stay on sync.
Clip doesn't keep transparent backgrounds with gifs idk why but it's cringe.
---
PLACING YOUR TIMELINE
(I closed my brushes and some things to help be less distracting :D )
Personally I like to keep my timeline at the bottom of my screen as it allows the most space.
If for some reason your timeline isn't showing or you accidentally deleted it just go to Window>Timeline and it should appear! You can make it appear on non animation projects as well.
---
ANIMATION FOLDERS
So if you used clip for animating there's a good chance, your timeline may have looked something like this.

Which, isn't bad. But it's not great. (I know because I did it like this until yesterday BUT GOOD NEWS, YOU NO LONGER NEED TO DO THIS STAIRWAY TO HEAVEN. (tbh it feels more like hell but w/e)
BECAUSE WE HAVE ANIMATION FOLDERS.
Now while this just sounds like a normal folder, it's very specific and will allow you do edit things with tweens! But it can also let you turn that stairway to heaven into a hallway!
Like say you want to do a simple jumping gif?
Put all of the separate layers into the animation folder! it'll show you only the first layer at first, don't worry that's normal.

Right Click next to the Layer 1, and select the layer name of the frame you'd like to add next! And continue until all your frames are down! And

*pretend this is a gif*
Congrats!!! You did it!!! You have a little animation!!!! You did it!!!
---
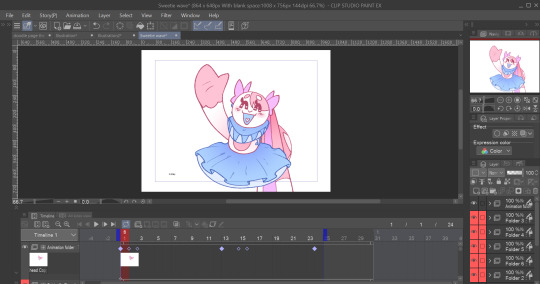
TWEENING/KEYFRAMES
(Im going to be using the Sweet Pea waving as my example here!. And to note after i drew her body parts separately, I copied it, and merged the the limbs with the lineart to their colors to make the process easier.)
So. You know how I just showed you how to put things together in animation folders? We're not doing that anymore, Unless you want 2 things to move the exact same way.
Instead your going to put each moving part into it's own animation folder.
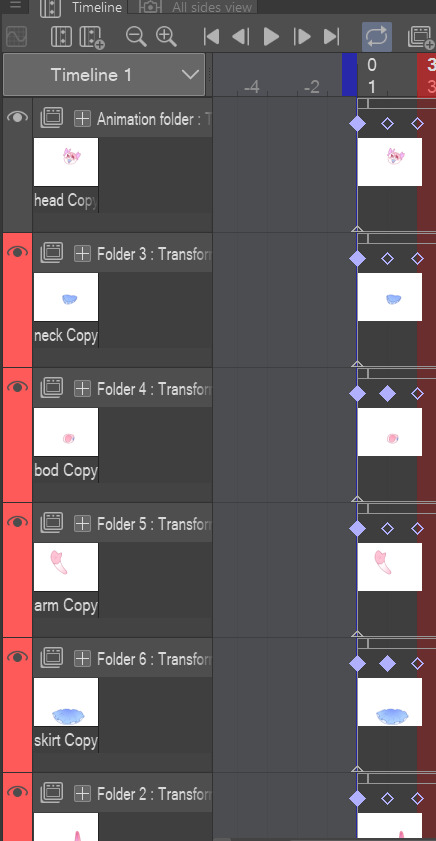
Have everything in? Good. Now what your gonna do is on the right where the layers are select them. Then you are going to press this button that looks like a zooming square.
This will allow you to add keyframes onto the layer. Note. You will not be able to draw on those layers with this on so if there is something you want to fix, you can turn it off the same way you turned it on.
There are 3 types of keyframes, yellow - hold, green - linear, and Blue - smooth. I only used blue here so that's all I'll be going over with. TLDR it does what it says, it keeps the animation from key 1 to 2 smooth.
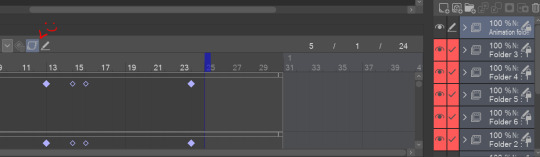
And with keyframes this is where your going to be able to squish and move things freely and how you move things is you'll click this.

and from there I suggest moving your anchor point (the crosshair) to the base (say I'm trying to move her head so I would place the crosshair where her neck is as that's where it would be anchored to the body!)
And Im going to assume you know how to place keypoints. but if you don't click on the timeline and move the head to where you would want it to be at that time, and it will appear automatically!
And once you have those down NOW you can get to the squash and stretch!

These red and green lines will be pretty much how you handle everything! They're how you can edit your keypoints by changing position, scale ratio, ect!
if you want to focus on one thing you can click the XYV to remove that color of lines, or click the eyes to view only certain types of movements!
and youll really want to just play around with slightly tilting and moving the keyframes here to try and get the tween motion you want! It's a bit tricky So i suggest starting small!!!
---
ENDING
and yeah thats pretty much it! (also tumblr wont allow me to post more image references so- hard for me to get into too much detail but hoped this helped!!! If something I said doesn't make sense or you need more detail on please ask! I'm always open to helping people out when I can!)
There are alot of resources out there to help you out and I'm happy you let me be one of them! :] Good luck!!!
AND AS PROMISED HERE ARE 2 VIDEOS I USED THAT HELPED ME OUT ALOT (and pretty much said everything I said here) but I'm a step by step learner so- this is how I explain things LOL-)
(x) - this video has some swearing but is very funny and useful!
(x) - light but straight forward!
#tutorial#uncle helps#clip studio#animation#im sorry im autistic so i write alot when i really couldve just given you the videos LOL
45 notes
·
View notes
Text
Okay so I know I haven't posted art or anything on here yet, but I do have some exciting news.
I was recently (like 2 days ago) gifted an iPad Air 2 from my aunt who lives in Florida. She didn't have a need for it anymore and wasn't using it so she sent it to me.
It's old as hell and I can't use an apple pencil with it because the software for the pencils came out 2 models later. so I need to use my fingers, a rubber tip stylus or a Bluetooth one.
BUT it's still a tablet that I can download procreate on and get back to drawing more, and I am so very extremely thankful for her sending it to me so I could use it. Instead of me spending like $600 to buy a new one.
I had to pay my mom for the shipping cost tho, but I did make "a deal/agreement" with her. We agreed that If I wanted to get a new one I could buy it with my own money, and she would pay me back the amount I paid for shipping.
Also I had a "no thoughts head empty" moment when transferring all my files from the digital art class at the end of the school year. I transferred all but like 3 files I had as a .Procreate file... So I need to open them with procreate and export them as a .png file in order to post them.
So, expect to see a fuck ton of art on the next few days. Especially since I just got back from buying an Apple gift card so I could download procreate.
So Im going to go now and start getting a bunch of my accounts like Tumblr, Netflix, etc. Onto the iPad so I wont have to use my phone for a lot of things, especially for uploading art to the Tumblr account.
Okay byyeeee!
Have some art I finnished a while back and 2 current projects that I'm working on slowly as well.
*The last one has a lot more done on it, this is the only photo i have saved on my phone tho…and was made with MendiBang Paint Pro on my PC If anyone was curious. It's a free app used for manga mainly manga and anime stuff, but I used it for this.
1 note
·
View note
Text
Development - 19/04
Todo today:
Finish UI assets
Add a death screen
Add health bars
------------------------------------------------------------------------------
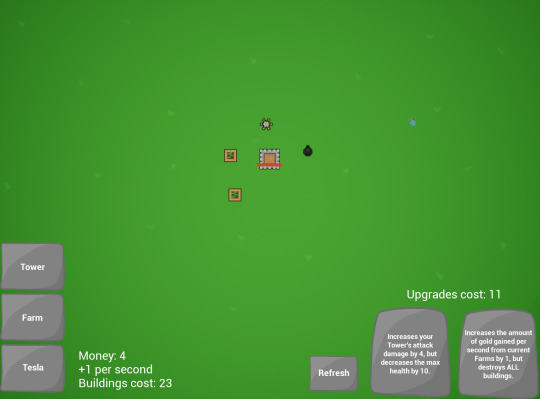
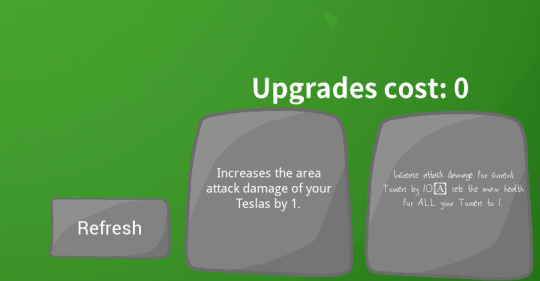
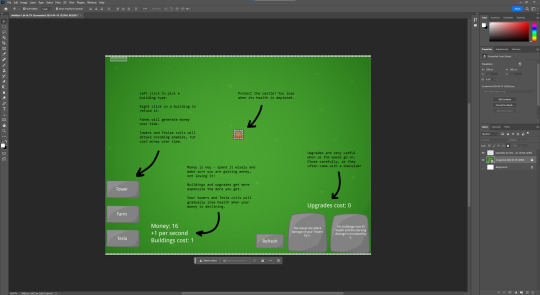
I'm trying out different layouts for my UI, I know that I will want the upgrades part to be in the bottom right. Before I do these layouts however, I'm going to remake my UI assets - as I no longer like what I had before.
Here are some variations of the UI I tried:
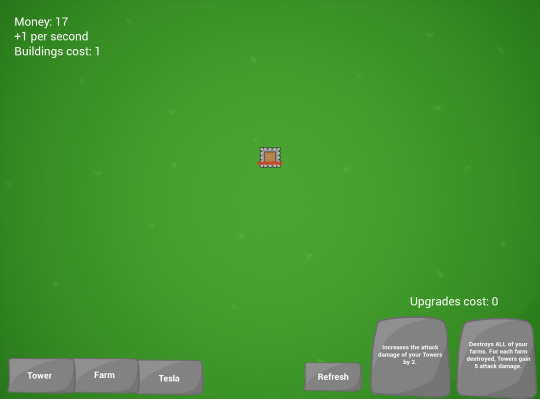
I also feel that because this design is a lot simpler and doesn't look as strange as the other one, it will work better. Now for the death / game over screen.
I start off by testing to see if my upgrade screen; which is holding all my UI; can use animations again, which it can. Now I'm going to make a simple death screen, one that I think I have used in all my previous projects so far - screen blurs, UI moves off screen and big "You Died!" text rolls in.
So as I was moving some UI to animate, Unreal Engine freezes...
Turns out it was Windows crashing...
Anyway I had to remake the UI (which was annoying as my images kept overlapping my buttons, meaning I had to move all the images first and then the buttons).
I am also adding some fonts to my UI as well, as this is my first time doing it. I got 3 different fonts from FontSpace, Dafont and Google Fonts; here they are next to each other (the refresh button is the default; robotto):
Im going to use DroidSans (left button) as the main font for this game as I like how it looks, and it kind of fits the stone look of the buttons (it also reminds me of games like Runescape and Valheim). The font, My Scrawl (right button) is very small and hard to read - also the commas get replaced by an A in a box? Also, the GenEiGothic font (the "Upgrades cost" text) looked too much like Robotto.
Now that I have done that, I can get back to the death screen.
Immediately, there were two problems: The animation straight up won't play (even though I tested it before and it worked) and the "farm" button and the "refresh" button can't be clicked.
I found out why those buttons weren't working, they were placed lower in the hierarchy (or higher in Unreal) so they were being covered by the images of the other buttons. Also I cant get the animation to work, I might substitute it by having it quit out of the game when you lose, as otherwise the game wont end.
Also also, I want to add a quick tutorial for the player (which is going to be significantly more difficult thanks to the animations not working.
I decided to make some images in photoshop and then export them into unreal where they will be disabled once any button has been pressed.
0 notes
Text
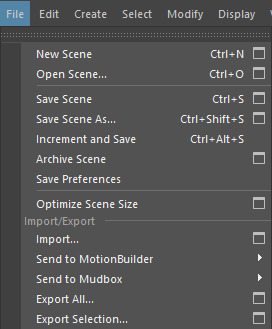
Maya: exporting to Unreal Engine
The best way to export an animation In unreal is to go File > Export All or Export selection to only export what you have selected.
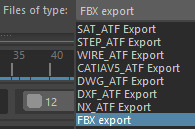
Then make sure the file type is FBX export: this is better than an .obj because all the information is contained in one file.
You can then play around with some settings but the most important part is to turn Bake Animation on as that is what actually turns it into an animation. I also put the end frame to the end of my animation instead of the much higher default.
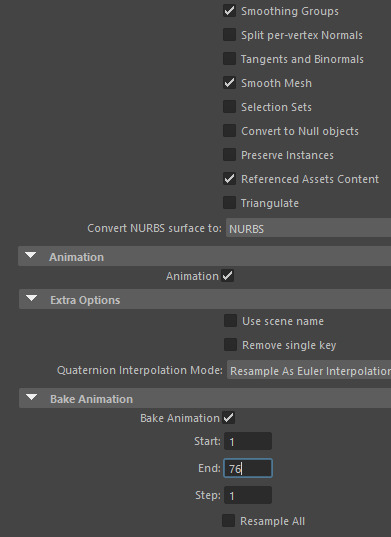
Then you can just import the file to the content drawer in Unreal. Make sure you tick "import animation" otherwise the animation wont be added.
0 notes
Text
Chapter 8: Soft Rain - Spring, Year 1
Lewis: You should expand your horizons, Elliot. I mean, shipping crops IS good but imagine how well your farm could do if you added animal produce and artisan goods to your exports.
Lewis' words were running over Elliot's head. He was right, though. She should expand her horizons.
The following day after the Flower Dance, Elliot had been busy focusing on her farm and it's performance. She thought she'd made good progress on her combat abilities so she took a break from going to the mines for now.
Various documents and lists littered Ellie's table. Her laptop opened on a spreadsheet monitoring her finances.
Elliot: Hmm. Alright, let's get a coop then.
+++++
It was a rainy afternoon when Ellie started walking to Robin's.
Robin: Oh no! You're soaked.
Ellie: Ah, sorry 'bout your floor, Robin.
Robin: No worries, Ellie. I'll just mop that later. How can I help you?
Ellie and Robin discussed the terms and process of getting a coop.
Robin: Alright, I'll get started on your new coop first thing tomorrow.
Ellie: Thank you, Robin. Would you like to have breakfast together then?
Robin: Ooooh farm fresh ingredients? Sign me up!
+++++
Ellie closed the door behind her and opened her umbrella.
Seb: You gettin'a new coop?
Ellie jumped.
Ellie: Jeez, Seb!
Sebastian laughed. He was leaning on a wall, smoking.
Seb: Sorry... You're so jumpy!
Ellie: I didn't even know you were there!
Seb: Hah, yeah I went out while you and mom were talking.
Ellie: Stop sneaking up on me!
Sebastian laughed again. He threw his cigarette on the ground and stomped on it, putting it out.
Ellie frowned.
Ellie: Man, could you stop that?
Seb: I thought you didn't like the smell?
Ellie: Yeah, but I meant littering, also.
Seb: Alright, I'll try. Headed home?
Ellie thought about what Elliott told her the night of the Flower Dance.
Elliott: Maybe you could look at my drafts and give me feedback...
Ellie: Ehhhh. Think I'm going to the beach for a bit.
Seb: Oh? I'm going there too, actually.
Ellie: Really? Didn't know you liked going there.
Seb: Yeahhh, I only go there when it's raining. Not a big fan of the sun.
Ellie: Same! Rain is so nice, don't you think? Come on, then.
Sebastian smiled and opened his own umbrella.
Seb: So, uh. Whatcha doin' there?
Ellie: Think I'm gonna visit my friend, Elliott.
Seb: I see. The writer, right?
Ellie: Mhm.
Seb: You like books then?
Ellie: Yeah, I guess. I don't read very often, though. Just when my friends recommend me something good.
Seb: Cool. What genres do you like?
Ellie: Hmmm, lemme think... Sci-fi, fantasy, mystery and horror, maybe. Sometimes I read classics, but never romance. Not really my thing.
Seb: That's nice. I like basically the same genres but I never do classics. I respect a good romance, though.
Ellie chuckled.
Ellie: Really? Didn't expect that from you, to be quite honest.
Seb: Hah, guess I don't look the part. You also into comic books?
Ellie: Yeah! Do you know Cave Saga X? One of my friends absolutely love that series.
Seb: Yeah! Have you caught up with the new volume yet? I wont spoil it for you, but oh man...
The two of them spent the entire walk chatting with each other with a lot of comfortable silence in between. A few more paces and they were nearing the beach.
Ellie: Oh man, it's cold. What do you usually do here?
Seb: Me? I guess I just hang out by the docks and enjoy the view. The sound of rain on the ocean's very soothing.
Ellie: Hmm, yeah that sounds quite nice.
Seb: ...If you want to, I guess we can hang out here sometime.
Ellie: Sure. I'll be quiet so I don't ruin your drift.
Sebastian chuckled.
Seb: Alright, deal.
They parted ways near the shore.
+++++
Ellie knocked on Elliott's door.
Elliott: Ellie! It's so wonderful to see you!
Ellie: Hi, sorry. I hope you don't mind my boots.
Elliott: Not to worry. I haven't really cleaned my cabin thoroughly anyway. Please, make yourself at home.
Ellie tried her best to remove as much sand and mud from her boots then made her way to Elliott's desk.
Elliott: Would you like something to drink? Coffee or tea, perhaps?
Ellie: I'd like some coffee, please.
Elliott: Coming right up.
Elliott's desk was littered with books and paper. It was quite a mess. A draft was sitting in the middle.
Ellie: Do you have a story in mind right now?
Elliott walked over to Ellie after setting the kettle on his stove. He pulled out a chair for Ellie to sit on, then sat on his own chair.
Elliott, sighing: To be completely honest, Elliot, I cannot decide on what genre I would like my novel to take on. I have characters and arcs in mind but I cannot seem to find a solid setting for them. Say, do you have any suggestions for me?
Ellie thought for a bit.
Ellie: Hmm. You know, Elliott, I'm gonna be honest with you. You seem like such a romantic guy, so I think if you decide to write a romance novel, you would be great at it. Um, I don't like the genre, though, so my second suggestion would be... Mystery? Maybe?
Elliott blushed.
Elliott: Well, I'm quite flattered with your words, Ellie. I'll keep them in mind.
Elliott went over the characters and plot points he had in mind with Ellie. Going over what could go together, which areas need more structure and the like. After a few minutes, the kettle screeches.
Elliott: Oh! Perfect timing.
Elliott walks over to his small kitchen and makes two glasses of coffee. He hands one to Ellie and takes a sip from his own cup.
Elliott: Thank you for the company, Ellie. It was such a lovely surprise to have you here on such a dreary day.
Ellie: You're welcome, Elliott. I hope you finish your novel soon.
Elliott smiled at her and opened a window.
Elliott: Ah, would you look at that. The rain has finally stopped.
He leaned on the window pane, sipping his coffee. Ellie walked over to Elliott to admire the scenery outside.
Elliott: Ah, Ellie. You must know what's bothering my dear companion rose over here, yes? I think it may be wilting under my care.
Ellie took a good look at the rose.
Ellie: You're not watering her with seawater, aren't you?
0 notes
Note
Hello There I hope you are well, I am having some trouble trying to export a gif from firealpaca, I made it and wanted to show my friends, but when I export as gif it just doesnt load at all and crashed my friends discord! when i try looking at it on my computer it just appears blank, Ive tried everything, updating it and my computer but it still wont work! Please if you have any advice or help any would be wonderfull, Have a Nice day! -G
Hi! I cannot tell just from this ask what the problem could be, but it's possibly a memory issue. How big is your canvas and how big is your file? How many colors did you use in your GIF and how many frames? If you check the limits for a discord GIF file (google search it), you'll see that it will automatically make the file smaller, but the limit itself seems to be 8MB for all files. You can try uploading it to an image-hosting website such as imgur or others where the limits are not that big and see if the GIF works there. if it's working on your PC and it's working on an image-hosting site, the problem may be Discord itself.
Here's a website that explains some methods to get around that: https://www.alphr.com/get-around-discord-file-size-limit/
Here's a video tutorial on how to use the animation feature by RhiZero on youtube: https://www.youtube.com/watch?v=3p0nl2he7hc&ab_channel=RhiZero%F0%9F%8E%A8
And a text tutorial on the same: https://imagy.app/how-to-animate-in-firealpaca/
What you can also try is to use the animation template that FA gives you from File>New and then reformat your animation/moving image to fit that template, or fit the template to your image.
If you tried making it properly and it doesn't work still, you may have encountered a bug and can file a report on the main Firealpaca site: https://firealpaca.com/
Make sure to follow their info guide on the bug submitting page and I believe you can also include links in your comment with screenshots (uploaded to imgur for example).
Sorry I can't help with this much but maybe one of these things will work out for you! it's also a possibility that the GIF export function just isn't that streamlined yet in Firealpaca. I have exported some bigger files myself and have noticed the loss of quality i.e when there is a very large amount of different colors or large amount of frames. This is actually fairly normal for general GIF files because the format itself only supports "up to 8 bits per pixel for each image, allowing a single image to reference its own palette of up to 256": https://en.wikipedia.org/wiki/GIF (wikipedia)
This means there's a certain limit to GIFs on their own regardless of where you post them or what PC and program you use to view them.
Limits of GIF: https://support.hopin.com/hc/en-us/articles/360056528971-Image-Size-and-GIF-File-Dimensions
1 note
·
View note
Text
Animation test (Camera movement)
For my animation I want to use tracked footage to be able to export a camera into Maya and use that for my animation. As some of my environments are slightly complex and with wanting to give the camera its own character / personality, I’ll have to get some precise movements that allow for the camera to walk against the walls in my scenes, peek round corners etc...
However I’ve been struggling with trying to theorise how I can accomplish this as my filmed footage wont include an visuals to help with the placement of objects in my 3D environments.
Therefore I’ve been experimenting in Maya to try figure out a way to accomplish this.
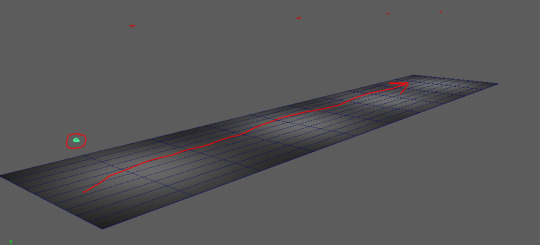
I created a simple scene where I animated a camera moving forward down the plane whilst looking around to replicate the camera of the tracked footage I will be using.

This is the timeline of the keyframed camera animation. When tracking the camera it creates lots of keyframes along the timeline which will prevent me from making direct changes to the camera. Furthermore attempting to change the camera object will lessen the effect I’m attempting to achieve by recording footage instead of animating a camera.

Simply I put my camera object under an empty group and moved the pivot of that group under the camera. This allowed me to keep the cameras original keyframes whilst also being able to move it precisely .

This is the timeline of the Group I created to animate more precise movement of the camera. As you can see it contains a lot less keyframes and is able to achieve the precision needed.
Animation test play blast
youtube
(https://www.youtube.com/watch?v=b5uX3rJmWdw)
After finishing this test I feel confident in filming my footage for my animation as I’ve been able to solve an issue that was holding me back from filming.
0 notes
Text
L'Inferno (Il Purgatorio, Il Paradiso) trdal sigA.F for Dummies
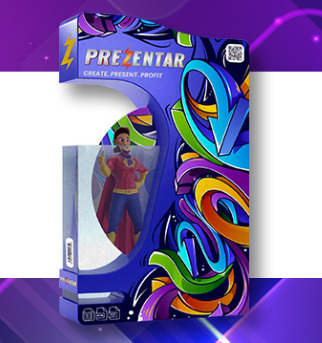
Prezentar Review - Strikingly Can Be Fun For Anyone
youtube
Instantly share on the internet, Facebook, Twitter, Pinterest, and Connected, In in seconds! Prezentar Review: Total Advance Characteristics Explained 50 stunning discussion design templates 500 created slides (by leading rated artists) Multiple niche classification develops Easy drag & drop editor Full customization Interactive slides Hot animation impacts Include videos to any slides 8000+ stock images 2000+ icons & shapes 250+ HD backgrounds Record voice over slides Integrated audio recorder In web browser audio modifying Music studio library Absolutely nothing to download Share with anybody in 1-click Export to video, html and ebook PDF Perk: Full action by step tutorials Bonus offer: Commercial license (Worth $497) Perk: Client attraction guide (Worth $97) Reward: Client getting design templates (Worth $197) Benefit: Agency website (Worth $997) Reward: Client manager control panel (Worth $147) Benefit: Client feedback tool (Worth $247) Total worth = $2,382 Low one time rate thirty days complete satisfaction assurance No regular monthly costs Prezentar Evaluation: Demonstration Video Prezentar Evaluation: [Total Pros & Cons] Pros- 50 spectacular presentation templates Zero learning curve Nothing to download or set up Newbie-friendly No month-to-month or yearly charges.
Choose the alternative that you believe will match your unique service needs, however hurry since the offer cost wont last forever. Prezentar is readily available for a low one-time rate for a brief period just. Make sure you act prior to the costs rise. The price will keep increasing every hour.
Earn money $250 to $1,000 per task! Features consist of: Car Task Finder Software application Finds you unrestricted new clients and gigs online so that you can make a profitable income using Prezentar! Saves you huge time from having to look for freelance tasks manually. Instant Profile Templates 10 x provided for you freelance profiles that you can modify and utilize instantly to assist you appear like an expert from day 1.
Functions consist of: One Huge Team Account Deal with your whole team on Discussions and work together efficiently getting work done quicker. Create Numerous Logins Create accounts for each employee. You'll never ever have to share your own logins or danger company security again! Safe & Secure Employ anyone, knowing that your discussions are safe.

The smart Trick of Prezentar Honest Review - Can you throw away PowerPoint? That Nobody is Discussing
Perk: Easy step by action tutorials Overall value = $1,164/ year Low one time rate 30 day satisfaction guarantee No regular monthly fees, one time payment Last Decision On Prezentar Review Guys, Thanks a lot for taking a look at My Truthful Prezentar Review, Here I tried to put all the details on this Presentation for Entrepreneurs.
This is the best 2022 app for discussions and clients requirements. Thank you so much for reading my Prezentar Reviews. This system is coming out with many bonuses for the early riser. Take your action ASAP for the finest deal.
In this evaluation, I'm going to be taking a more detailed take a look at Prezentar and see what all the sound in the marketplace is about. Prezentar is a brand new software application that enables you to produce remarkable discussions and videos much easier and faster than old fashioned tools like Power, Point or Camtasia Studio with minimal effort.
prezentar -review1675122621.png" alt="Prezentar Review⚠️Get 100% Honest Insights & OTOs Info >>"/>Prezentar Review- Interested In Prezentar? Read Before You Buy!
PREZENTAR affiliate - How to become a Prezentar affiliate - YouTube
It sounds like every online marketer's wet dream, however does it live up to the claim? We'll cover what it does, whether it's the very best choice for developing discussions or not, how much it costs, whether there's any upsells (and what they are) and what I did or didn't like about this brand name brand-new software.
0 notes
Last Seen Blogs
incorrectkakagaiquotes
Quotes Kakashi and Gai didn't say

natedogg1669
⚔️

monetaguru
Нумизматика, продажа монет

diarymamacom
diarymama

sohndesmeeres
Hijo del mar