#your posts don't show on the web browser .
Text
looking at the 'for you' tab out of curiosity and seeing just how many of you are not on my dashboard anymore for some reason outside of it even tho i'm following. 😬
#your posts don't show on mobile .#your posts don't show on the web browser .#extremely frustrating .#you show up on that stupid tab tho ? man . 🌊🐴#🐑 delete.#🐑 ooc.
9 notes
·
View notes
Text
you can give seven days of internet connection to someone in gaza for just 6 USD
gazaesims.com is a website dedicated to helping people donate esims for people in gaza. (for the ultimate guide to donating an esim, see http://tinyurl.com/gaza-esims) there are multiple options for where to purchase an esim to donate, for the price i listed you want to use nomad esims. you can get a $3 discount by using someone's referral code from the notes of this post. it also will give the referrer credit to buy more esims! (you can only use a referral code on your first purchase) @/fairuzfan also a tag for esim referral codes here, some of which are nomad. BACKPACKNOMAD is another code to get $3 off your first purchase, it's been working for some people but not others so try out a referral code instead if you can't get it to work. also it took over an hour for the email with my information to come through so don't panic if it doesn't show up right away. (logging back into your nomad account seems to have helped some people get their emails to send!) NOMADCNG is a code for 5% off any middle east region nomad esims from connecting gaza. it can be used on any purchase, not just your first but is generally going to give less off than the first-purchase only codes, so use those first. it can be used in combination with nomad points. (nomad promo codes do not work on plans that are already on sale, unlimited plans, and plans under $5)
weekly tuesdays only code on nomad web, PST timezone! it gives 10% off plans 10gb and above. NOMADTUE
troubleshooting hint 1: if you are trying to pay through paypal, make sure you have pop-ups enabled! otherwise the payment window won't be able to appear.
troubleshooting hint 2: if you are trying to purchase an esim using the provider's app, it may block you from purchasing if your phone does not fit the requirements to install and use their esims. use their website in your browser instead and this problem should go away.
edit as of 4/9/24: nomad (regional middle east), holafly (israel and egypt), simly (palestine and middle east), and airalo (discover) are currently in the highest in demand. here is a purchase guide i made that covers all of the esim platforms, including these three platforms. if it has been more than 3 weeks since you initially sent your esim and your esim has not been activated, you can reforward your original email with the expiration date in the subject line. you can see gothhabiba’s guide for how to tell if your esims have been activated. if your esim has expired without use, you can contact customer service to renew or replace it.
75K notes
·
View notes
Text
Remember when that girl tried to say that firefox was bad because a former CEO was homophobic and I pointed out why that was a terrible take (throwing out the baby [open source non-google web browser with great extensions] with the bathwater [dipshit who left like ten years ago and also developed javascript and i don't see you ditching all sites with java for your principles]) and she went and looked through my posts and tried to call me out for supporting hyperconsumptive capitalism and encouraging anorexia because I'd reblogged a photoset from a runway show and I was like "bitch I don't care about fashion, I've got a latex fetish" and then she blocked me?
That was very funny.
46K notes
·
View notes
Text
Introducing Collections
Hello again, Tumblr. Labs division here!
A while back, we announced our comeback as a new team that would imagine big ideas for Tumblr—and would build them in public (aka with you). We recently announced our first failure, and today we're very excited to announce our first possible success!
A bit of context
As we've said before, an essential part of how we're working in Labs is speaking to people who use Tumblr pretty much on a daily basis and those who don’t use it at all.
In those interviews and focus groups, we learned that curating the Tumblr experience around different interests and fandoms is a big part of making Tumblr feel like your own space — and one of the main ways you do that is through blogs and tags (be it following or creating them).
So here at Labs we're working on ideas to help you curate the content you care about, and to help share what makes your experience fun with other people, even if they are not on Tumblr already.
Ok, but what's the idea?
Have you ever put together a song playlist to listen to when you're in a certain mood, or share with a specific friend? Or sent them books you know they'll love? Now imagine if you could do that with blogs and tags on Tumblr…
Maybe you're a veteran in a fandom and have the best recommendations of who to follow for your followers. Or your best friend won't join Tumblr because they don't know that their favorite TV show is actually really popular here. Or maybe you want to curate and browse content from a specific fandom, or a group of your mutuals, your own way.
That's the idea behind Collections!
You can check out that example collection on the web here!
We want your help
The first way we're testing Collections is by inviting some of you to create your own and share with followers and friends—they'll be able to follow all the blogs and tags in your collections. So we're looking for volunteers!
You want to help? Great! Here's what you need to do:
Come up with your own Collections of blogs and tags, write it down somewhere. Focus on introducing people to Tumblr or recommending stuff to your followers. What would you want them to first see on your version of Tumblr?
Come up with a name, cover image, and description for it. Also try to think of who you would send your collection to, and where you might post about it.
Write out that idea as a reply or reblog on this post!
We’ll give it a few days, and pick a handful of people to play with Collections. We'll let you know. Then we’re off to the races!
If you decide to participate (and get selected), please note that this early release won’t work on the apps yet, only in your web browser.
What happens next?
Our goal is to keep working on improving and adding Collection functionalities while you test what we've built (and share your feedback with us).
Next we’re exploring making a collection something you can follow on Tumblr, as a way to curate Tumblr around your many interests and moods, and to give you more freedom to curate content on your dashboard.
And if this idea is not for you, remember we have many more experiments in progress, so stay tuned!
With love,
Labs division
1K notes
·
View notes
Text
Hey! I wanna talk for a sec about the Live Music Archive. If you're a tMG fan who's on here you probably already at least know about it, but for anyone unfamiliar I want to do a quick post talking about what it is and how you can listen!
The Live Music Archive is a collection hosted by the Internet Archive for audio recordings of concerts. Specifically, the LMA hosts, with permission from the band, user-contributed recordings of concerts. Some fans will go to concerts with recording gear to take a full audio recording of the show and then upload it to the archive under the band's collection. As of writing this post there are almost 450 live tapes uploaded to the tMG LMA collection!
There's a few ways that you can listen to recordings on the Live Music Archive. The webpage works pretty well both on desktop and mobile browsers, and that's what I typically use. You can also listen on web without having to make an account on the Internet Archive, which is convenient for browsing. I also use the webpage to download mp3s of favorite tapes to my phone, so that I can listen to them in my local music player.
However, if you don't mind making a free account and prefer the convenience of something more like Spotify, you can also listen to anything on the LMA via the Taper's Section app for Android or the Live Music Archive app for iOS! (Obligatory disclaimer that I use an Android and can't personally vouch for the iOS app, but afaik they have similar features.) The apps have the same functionality as the webpage in a more streamlined mobile-friendly interface, plus things like notifications when there's a new tape added to a collection you follow and downloading in-app for offline listening. The Android app also has a tab for tapes from today's date, there's often at least one (there are FOUR for today!) and that's a really fun way to find tapes to listen to.
If you're looking at this going, wow, that sounds really cool but there's so many tapes that it's a little overwhelming to get into this, don't worry! I'll leave you with a couple recommendations. As mentioned above, I like to listen to shows from the current date. Another fun way to find shows is looking for a specific song - you can go on the wiki and it'll list every show at which the song has been played live, and then just search until you find one of them that has a tape on the archive. Lastly, a few specific favorite tapes of mine:
- 2014-06-15 has the entirety of Taboo VI: The Homecoming played live + one of my absolute favorite performances of both Woke Up New and The Best Ever Death Metal Band In Denton.
- 2015-06-01 is the only time Straight Six has ever been played live and it's interestingly pretty different from the EP version, plus a phenomenal back to back Spent Gladiator 1 & 2.
- 2021-08-06 was the first show after the band started playing concerts again post 2020, and it has a really incredible energy and a phenomenal setlist.
- 2024-03-01 is from the recent run of solo shows, this one was at Grace Cathedral and the ambience is truly truly incredible, it feels so ethereal.
Please feel free to add any additional notes or some of your own favorite tapes to the post as well! Happy listening!!
#txt#transmissions from lyric#the mountain goats#tmg#tapes#theres a post of live tape recs that im gonna go back and rb after this#and im also gonna start posting some favorite live recordings regularly! which is why i wanted to make this post!#the LMA is such an incredible resource#and at some point ill make a followup post about how to contribute to the LMA but thats a later post#resources
110 notes
·
View notes
Text
Possible Google Sheets glitching
We've been alerted by a few people that sometimes bids (their own or others') are not appearing in bid sheets until hours after the bids were placed. It appears that the bids do go through, it's just that some people (but not everyone) can't see them immediately.
This seems to primarily be an issue on mobile, so if you can view the bid sheets on a desktop, we encourage you to do so. If you only have a mobile device, try viewing them in both a web browser and the Sheets or GDrive app; some people are only having this issue in one or the other.
If anyone who is having this problem can tell us whether the tracking sheet we posted earlier today shows bids before they show up in the bid sheet for you, or if signing up for notifications for a bid sheet gets you new bids before you can see them, that would be great info to have!
Remember that even if you can't see a bid until later, we go by the timestamp on the bidding sheet. This may complicate things - you might place a bid that is not, in fact, higher than the current high bid, or you might assume you are winning an auction that someone else has actually beat you on. Right now, this all seems to be on Google's end, and unfortunately there isn't much we can do about that. All we can do is encourage you, as auctions draw to a close on Saturday, to check all of your auctions using desktop or multiple mobile formats.
Luckily, most mobile users do not seem to be having this issue, but we don't know how to predict who will. We will keep you updated as we get more information.
63 notes
·
View notes
Text

g1 season is upon us! i'm too lazy to gif every match myself! the world needs gifmakers like you! yes you!
this guide includes: basic gifmaking, actions, how to blur on-screen graphics, coloring tips catered specifically to wrestling footage (mainly aew and njpw), how to add subtitles, what tags to use
what you will need:
photoshop (i currently use cc 2017 for windows which you can grab from this post by birdysources)
kmplayer (for extracting frames)
what you might need depending on what you're looking to gif:
4k video downloader (for downloading videos off youtube)
vkopt (browser extension that lets you download videos off vk)
step 1: getting the footage
if you're directly downloading from a site this step is super easy. just make sure to always go for the highest quality of footage available (for njpw this is nowhere near 1080p, and even aew's 1080p footage is pixelated in places—but don't let this deter you!)
if you plan on giffing something off a ppv, chances are you might need to torrent the event. if you can, look for versions off fite with either web or webrip in the title for the best quality. this applies to weekly television too (fite doesn't have picture-in-picture). always seed your torrents. yes, even that one match from 2012. especially that one
you can also get recent shows off watchprowrestling dot co (previously org) which includes njpw tour shows and indie events as well. check out indy★wrestling★group on vk for smaller promotions and japanese promotions outside of njpw (tjpw, stardom, noah...)
step 2: choosing a clip
wrestling footage quality is not consistent. entrances with too many flashing lights or small particles will have huge quality drops, so unless it's something really special, don't put yourself through that. close-ups are generally your best friend but don't shy away from clips with lots of movement (you do sometimes want to gif the wrestling parts of wrestling too)
step 3: extracting frames
open your video in kmplayer. go to the part that you want to gif (though, i suggest leaving a bit of fodder before and after the actual clip. you can always trim the frames down later and it's better to start off with more). then, press ctrl + g
this should bring up this window:

your settings might be different if it's your first time downloading the app so just copy what you see here
kmplayer automatically captures into its own folder, which you can change if you want, but i just left it as is. i recommend pinning the folder you regularly use to the quick access menu in your file explorer
hit start, start the video, let it capture frames for however long, and then hit stop on both the extractor and the video itself. and now you have a bunch of frames in a folder. cool!
step four: converting frames to layers
open photoshop. this will take ages but open it. go to file -> scripts -> load files into stack...
this will bring up this window:
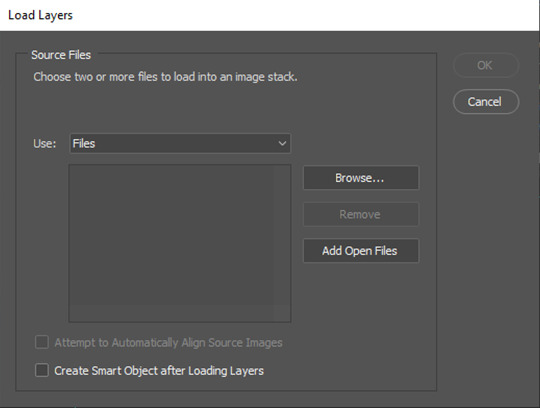
click browse... and select all the frames you just extracted. depending on the number of frames, this might take you a bit. then hit ok and let your layers load into photoshop. this will take a long time (saying this as someone whose laptop tends to heat up to the temperature of an egg pan at this point in the process)
step five: actions
i use actions (user-built series of recorded commands, meaning you don't have to click everything manually) for everything except coloring. i use a mishmash of like three different actions that i never bothered to organize. these are the two most important ones:
actionpack #1 by giulia (i use the setup and save portions from this one)
squishmoon actions by lildohnut (i use the hd sharpening from here, first layer on 0.3 for close-ups and 0.2 otherwise, and the second layer at the suggested 50%)*
*most sharpening settings you'll find are made for current films and tv shows so you do have to make some adjustment to fit your crunchy wrestling footage
step six: sizing
pick a size for your gif! here is a handy chart:
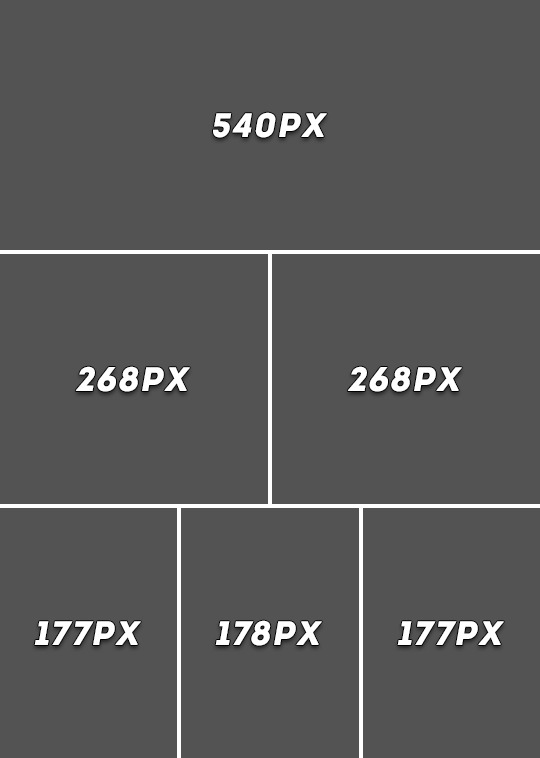
as for height, it can range anywhere from 300px-540px and beyond. most people go for 350px-450px. 400px is the sweet spot
personal preference: adjust canvas size not image size and fit your footage accordingly. some footage (looking at you aew) can have an odd black bar at the bottom, and manual resizing can help getting rid of it. if you just resize the whole image that will stay there and bother you
additional tip: guidelines
9/10 times you will leave your footage centered. however, there are times when this can look a bit awkward, depending on the framing, in which case i like bringing in a few guidelines. go to view -> new guide layout...

rule of thirds is generally good for drawing the eye to certain places. these settings will divide your canvas into nine squares that help you reposition your main gif layer
optional step: blurring pop-up graphics and banners
so, you have your sharpened, resized gif... but the sharpening made the small text and other unwanted elements on your screen shrivel up like raisins. you can leave it as is, people won't mind, it's a wrestling gif, who cares. but, if you want, you can just blur it out
i'm at least a little bit certain that i'm personally the guy who brought this over from k-pop tumblr (not saying i invented the concept, i just love being a trendsetter) and so i can give you a few reasons as to why people do this. such as:
adding subtitles over pre-existing, burnt subtitles (example: njpw post-match comments off njpwworld and not youtube)
getting rid of elements that might distract people from the focal point of the gif (the hotties... and the moves. mostly the hotties)
it makes your otherwise milquetoast sharpening look a little better in contrast
it's gonna be ugly either way so it's a pick your poison type of situation. if you do want to try the blurring method, you will need a basic knowledge of filters and layer masks
step-by-step blurring process:
duplicate your gif layer
blur the layer on top (i typically go for a 4.0 gaussian blur; for this, go to filter -> blur -> gaussian blur...)
apply a layer mask to the blurred layer and make the layer mask black (this will remove the blur effect, don't be scared). to access the layer mask just click on it. you can press alt before clicking to "enter" the layer mask (though you won't see your gif this way)
go in with a soft round brush (or any brush) with white and draw over the bits you want blurred. this is the tedious part
profit?
here's a comparison:

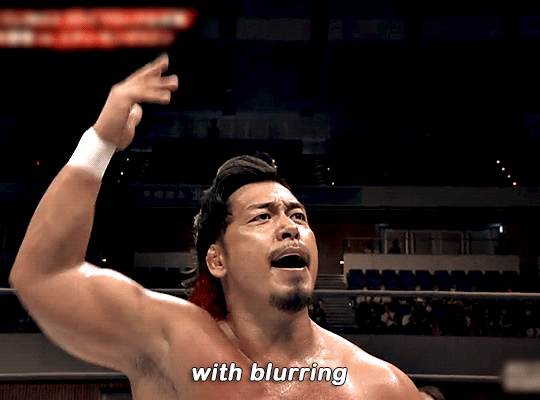
it's really down to personal preference ٩(ˊᗜˋ*)و
i convert my base gif layer and the blurred layer into a smart object before moving on with my process because sometimes photoshop likes to do this thing where it only applies the blur to the frame you're on. you can avoid this by combining the layers manually
if you're working with njpw footage and your clip plus coloring combination allows you to, you can also just go over the banner with black and blend it into the background. it's by far the best option but there's so rarely an opportunity to utilize it (i did it in the little header i made... go back and look at how beautiful she is)
step six: coloring
the big one. oh boy. prefacing this with: you can just skip coloring if you want. the sharpening settings i recommended earlier give a nice contrast to the gifs as is, so if it looks fine like that, you don't need any fancy colors. that being said...
my thought process going into coloring is to focus on skin tones and adjust everything around them. i don't tend to use psds, i always just manually color correct based on the actual footage i'm working with (venues differ, lighting differs, hues differ... incredibly hard to plan for all of it in advance). if i plan on making multiple gifsets of the same event/match, i do re-use settings, but sometimes minor adjustments are still needed
to begin coloring, you will need to use adjustment layers. you will pretty much need a basic knowledge of all of them (to the extent of knowing what the sliders and values do)
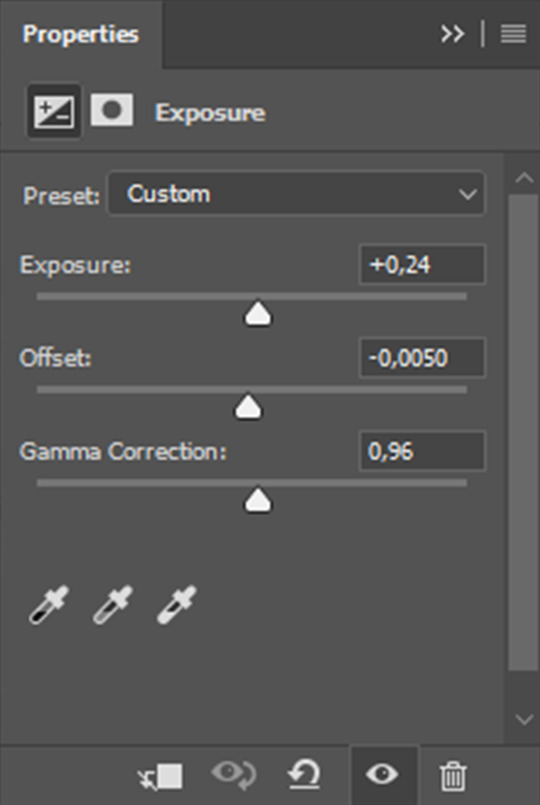
[1] i always begin with an exposure layer. this will remain above all of your layers (unless you plan on adding subtitles). here are my settings:
again, every layer you add after this will go below your exposure layer
[2] i add a selective color layer to further adjust the blacks. this will vary gif to gif but keep your adjustments small
[3] i add a vibrance layer. wrestling footage has major saturation problems that you can manage early on to make your life easier. take back a tiny bit (usually from -3 to -5) of vibrance before you begin your other color adjustments
[4] this is the big skin tone adjustment step using a curves layer. it does most of the heavy-lifting in my process. here is a video tutorial that explains the technique i use. it works the same with gifs as it does with images. the key differences are:
the image you are color picking off of shouldn't be a limited skin tone chart but rather an image of the wrestler(s) in natural (or as close to natural as you can find) lighting. i just go for renders used on the roster page. fan photography is way too edited to use here
try picking from a darker area of skin (shadows, midtones). it fits better with match lighting
this step will most likely correct color tints, but keep in mind that different promotions/shows/venues have different lighting. here are my personal observations:
aew dynamite and rampage have strong magenta tints
aew collision and roh honor club have strong red tints
njpw has a washed out blue tint
impact has a strong green tint
you can either lean into these (play around with making them really vibrant) or cancel them out using opposites on the color wheel (for example: to get rid of the magenta tint on dynamite, either decrease the magenta slider in your neutrals using selective color or add more green using color balance)
you will almost always have to add more cyan as well (either using color balance or channel mixer; channel mixer can also help you fine-tune skin tones with its blue tab—don't get rid of yellow undertones!)
[5] here is where i start fiddling around with manual adjustments that i seriously can't help you with... just add layers and change colors until you think it feels right. don't be afraid to start over if needed
[6] finishing touches! if you're like me you will have overcolored in the previous step. don't be afraid to add a saturation layer and decrease specifically the saturation of the reds (this will affect the skin tone; if you feel like you're on the right track but it's just too orange-looking, it's a saturation issue)
i also tend to add a black & white layer below the exposure layer up top set to soft light and lowered to 10% opacity. this gives you a bit of additional contrast that pulls the final gif together in my opinion
optional step: adding subtitles and watermarks
always add text layers above your coloring!
[1] subtitles
the font i use for subtitles is arial rounded mt bold, which you can download for free here. the point of subtitles is for them to be readable, so feel free to use any other font as long as it can be read with ease (nothing too thin or too blocky). if you plan on using the font i use, make sure to set it on faux bold and faux italics
font size differs based on the size of your gif, but it should normally be between 17pt and 23pt. i like to keep my tracking (letter-spacing) the same as my font size (so for 21pt subtitles i would have the tracking also at 21). i keep leading (the space between multiple lines of text) 3pt or 4pt
if there are two people speaking, i like setting the second speaker's text color to #ffd300. this is a generic yellow caption color that is still easy to read
after you have your basic text done, right click on your layer to add blending options. adding a stroke and a drop shadow can further help bring your text to the foreground. I keep my stroke (hah) at a simple 1px black. here are my drop shadow settings:

here is a more detailed guide about subtitles by clubgif
as for placement i add a horizontal guide at 95% and put my text on top of the line (while also keeping it centered vertically)
[2] watermarks
i personally don't use watermarks because i just don't care to, but if you want to add one, the same general ideas apply. just lower the opacity of your text layer at the end (if you want... again, a watermark is personalized)
step seven: timing
this is where you'll have to convert your video timeline back to a frame animation!
delete the frames that you don't need and then set a consistent timing (click on your first frame and shift + click on your last one to select all of your frames before adjusting). i like my gifs at 0.04, but depending on the footage you can go for 0.03 (newer bte episodes) or 0.05 (this also works if you don't have enough frames and want your gif a bit slower)
step eight: exporting
go to file -> export -> save for web (legacy)...
here are my export settings:
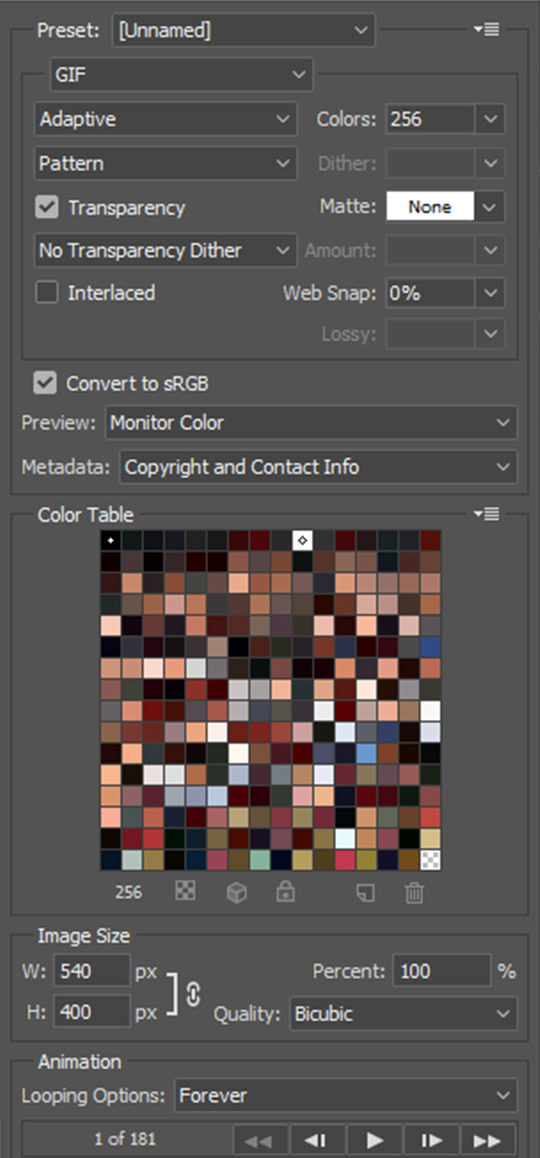
make sure to keep your gif under 10mb! if your file exceeds 10mb, you can't upload it to tumblr. you either have to cut some more frames or add compression to your gif (something i would never do, i always just cut frames)
additional tip: tagging
you have your gif! but how do you get people to actually look at it?
i always tag wrestlers* (full name, for both searchability and tag filtering purposes), promotions (initialisms like #aew over #all elite wrestling; if it's a more generic promotion name i.e. impact, go for #impact wrestling), tracked edit tags (#aewedit, #njpwedit; this not only helps source blogs find your posts and give them a bigger reach but it lets you browse other people's works). if you want to go the extra mile you can also include which event/video the gifset is from somewhere in your tags (if it's not already in the caption)
*even if you feel like it personally hurts you to tag that one wrestler you can't stand who happens to be in a match with your fave: do try tagging all wrestlers involved for ease of filtering, especially if you don't add image descriptions to your gifsets (tumblr's post content filtering system picks up on those)
general tumblr etiquette but don't cross-tag (i.e. tag a wwe gifset as #aew). no one likes cross-taggers. crossover events are exempt from this rule of course (forbidden door, multiverse united...)
additional tip: accessibility
don't use gradient text in your captions. screen readers can't read them!
if you can, include an image description. no matter how basic. this not only helps people with screen readers but the alt text of your gif is what's going to be displayed in case the gif isn't loading properly. here's a guide on how to caption gifsets by shangs
and you're done! all that's left to do is get silly with it. once you have the basics down you can virtually do anything. you can make those pretty graphics with blending. you can gif every single match of your fave in chronological order. sky's the limit
don't be discouraged if your gifs are not "perfect" from the get-go. this is a hobby just like any other hobby, and with time you'll get better at it. don't compare yourself to others and don't put your efforts down. only you can make the exact gifs you want to see
190 notes
·
View notes
Text
how to install dashboard unfucker (for desktop)
hi i use desktop and i use the dashboard unfucker extension by dragongirlsnout and you should too because it's awesome. i don't know much about computers so it was intimidating to set up but ended up being really easy.
but first:
what is dashboard unfucker?
dashboard unfucker is an extention that makes being on tumblr bearable again.
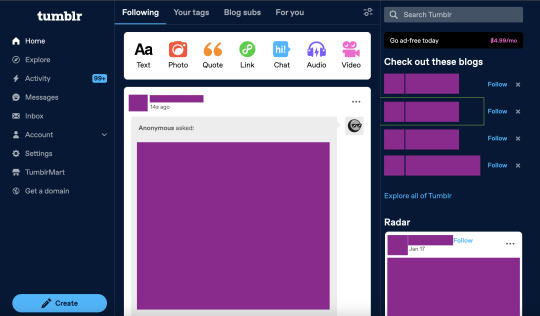
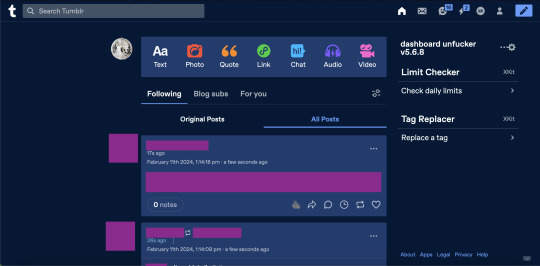
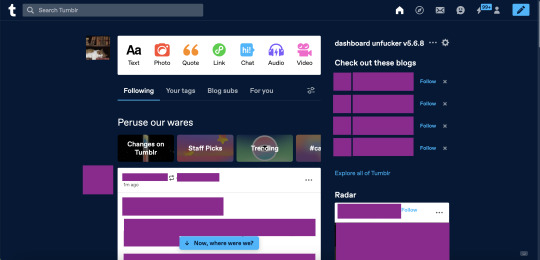
(ID: 2 screenshots of tumblr with urls/posts etc censored. the first is with the new layout, with labels on the left, the ad-free button, "check out these blogs," "explore all of tumblr," the radar, and no easy way to access your own blog. the second is with the extension enabled, the left hand side of the screen is empty, posts are wider, navigation icons are back at the top right, and the only thing on the right-hand side of the dash is the dashbaord unfucker and limit checker and tag replacer from xkit. end ID)
i got it for layout changes like these- the first is cramped and ugly and i feel like i'm on twitter. the second is warm and comfy and i can make my posts wider (i dont like all the empty space). (limit checker, tag replacer, and post color were done on xkit and palettes respectively, not unfucker, btw)
with the dashboard unfucker you can:
hide the following/blog subs/for you etc tabs
get rid of the changes/staff picks/etc carousel
hide recommended blogs and tags
add profile pics back to posts
hide the radar
hide the explore page
hide tumblr shop
hide user badges
highlight bots in ur activity feed
show who follows u in the activity feed
make posts wider/slimmer and move the dash posts position to the left/right
revert messages design (and make the messages box bigger)
revert activity feed to the old design
display vote counts on polls
show poll results without clicking (no more skewing polls or "see results"!!)
disable tumblr domains
add polls to reblogs
disable "post without tags?"
show ns.fw posts
and other things that i probably missed copying this from the settings!!
so how do you do it? it seems scary but it's easy actually. take my hand
(note: i did this on firefox and tested it on chrome, i'm not familiar with other browsers, also use firefox if at all possible fuck chrome)
how to install dashboard unfucker
step 1: install either tampermonkey, tampermonkey beta, greasemonkey, or violentmonkey (if you don't already have it)
note: im using tampermonkey as an example because it's what i use
step 2a: go to firefox extensions/chrome web store/your browser's equivalent
step 2b: look up "tampermonkey" and click "add to firefox/chrome/whatever" and confirm
step 2c: you're done! yayyy
step 2: click this link. look under "installation" where it says "Click on unfucker.user.js to install or update". and click that
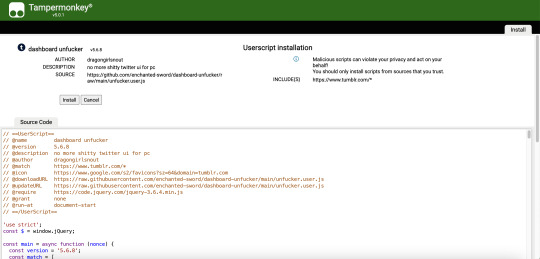
(ID: a screenshot of the tampermonkey install page, showing dashboard unfucker v5.7.8 installation information, the source code, and the install/cancel button. end ID)
(it should open in a new tab and look like this)
step 3: click install! (when i did this it didn't look like much happened and i got scared. dont get scared take my hand)
step 4: go to www.tumblr.com and to the right of the dash it'll have the dashboard unfucker label to the right!
(ID: the default dash again, but with the dashboard unfucker title at the top right of the right-hand side of the dash. end ID)
step 5: click the little gear icon and all the options will pop up! u can fuck around with em to ur heart's content. i recommend exporting after ur done and saving it somewhere in case u have to uninstall/reinstall to troubleshoot or smth
you're done! now u can see the results of polls without clicking them and other such things

(ID: a poll i have not voted on. it has 17 votes and 23h 56m remaining. the title is "poll :)" and the answers are "answer 1" "answer 2" and "see results". there are no percentage labels, but the amount each answer has is indicated by light blue bars in each result, as they would be if i had voted. end ID)
note: i'm not sure how/if this aspect of the extension is indicated for screenreaders
THIS POST IS TRANSGENDER BTW!
88 notes
·
View notes
Text
On creating a wiki for your worldbuilding
Do you have a lot of lore to keep track of? Whether you're an author, a Game Master, or simply someone who really really likes worldbuilding, this post is for you.
Here's a quick overview of what I'll be talking about:
Platforms people use to create personal wikis
Formats and organization systems you may find useful when creating your own wiki
A brief look at the actual content you might put in your wiki (I'm planning a more in-depth post on that later with more images and demos)
And because this is gonna be a long'un, I'm putting a read-more here! I'll also make downloadable epub and PDF versions of this post available for free on my Ko-Fi at some point in the future.
(I'm also planning to reblog with a list of links later on, but I want this initial post shows up in search)
Also now that you're here, I'm going to say this isn't, like, super comprehensive or anything. I'm just talking about stuff I know a little about or have experience with. Please feel free to reblog with additions and/or corrections as needed!
What is a wiki?
According to Wikipedia, "a wiki is a hypertext publication collaboratively edited and managed by its own audience, using a web browser."
In this case, you'll likely be the sole person making updates to your wiki. The web browser part is optional these days as well, as you'll soon see.
Platforms for creating wikis
Websites for creating worldbuilding wikis
WorldAnvil
This one is actually designed for people who want to create big worldbuilding wikis.
Pros: Worldbuilding prompts! Those are great. It's got a pretty comprehensive set of article types too.
Cons: Kind of expensive to upgrade for features like making your wiki private, and it does NOT work well with adblock turned on, so if you don't want to pay for a membership you'll get inundated with ads. I'm not a huge fan of the interface in general and a lot of it isn't intuitive, but I like what they're doing so I support them anyway.
---
Tiddlywiki/Tiddlyhost.com.
In addition to having a cat as its icon and also a silly name, each 'article' you create with this is called a 'tiddler' which makes me think of Chuck Tingle. I haven't used it much myself yet, but I did make an account and it seems pretty neat.
---
Miraheze
A community-hosted wiki platform that runs on MediaWiki (which is what Wikipedia runs off of).
Pros: It's not Fandom.com.
Cons: You have to request a wiki and can't just make it yourself, as far as I can tell. I haven't actually looked into this one as much.
---
Neocities
An option for if you want to go super oldschool and create a website using only basic html and hyperlinks (without the handy shortcuts of bbcode or Markdown). Monthly cost is $5 usd if you want to have more space and your own domain.
Pros: 100% control over your content.
Cons: Doesn't support PHP databases for wiki software, and can be fairly labour-intensive to update if you break a link or something.
---
Fandom.com
Unfortunately, this one is the top result you'll get when you look up how to make your own wiki. I'm only including it here to tell you to stay as far away from it as possible!!
Its staff are known to ban wiki creators from their own wikis and a bunch of other nonsense that I'm not getting into here.
Programs and apps/web apps for creating worldbuilding wikis
Obsidian.md
My personal favourite. I'm planning to make a whole post about how I use it in the near future as part of this article series.
It's a markdown-based application that you can get on just about any platform (Windows, MacOS, Linux, iOS, Android, etc) which is great. Obsidian is really easy to pick up and use and also has great themes and community plugins!
Best thing is, it's FREE and you only have to pay if you use their publishing service, which... I don't, so.
---
Notion
I've heard this one is pretty good too. Idk if it costs anything. It's another "second brain" style app (might be markdown also?) and I think it might do more than Obsidian, but I haven't checked it out much myself.
---
Microsoft Word/Google Docs etc.
...Or just about any word processor that lets you create internal hyperlinks. Word may work best due to the collapsible headings so it doesn't get too unwieldy, but *shrug* whatever floats your boat.
---
Excel/Google Sheets etc.
Or, again, any spreadsheet creator that lets you create internal hyperlinks.
I'd recommend having some basic spreadsheet knowledge before doing this. It could get complicated. Before I started using Obsidian, I was using Sheets to keep track of my glossary, notes about characters, and plot ideas.
Types of formatting & organization systems
There are as many organization systems as there are people who want to organize their stuff. Everybody needs something a little different! I find the ones that work best for me are systems that have a lot of customization options.
Here are a couple I know of.
Johnny Decimal
This system is absurdly simple in its concept and yet so versatile. From their website (it's just johnnydecimal dot com but I'll link it in a reblog later):
Take everything you need to organise and sort it in to, at most, ten large buckets.
Make sure the buckets are unambiguously different.
Put a label on each bucket.
Their website has a better explanation than I can give in this post, but I'll sum up the appeal of this system as quoted from their site: "There's only one place anything can ever be."
Usefully, part of this method is creating a directory for the rest of the system.
So if you're like me and tend to shove things wherever only to lose track of it later, this is a great system—especially when used in conjunction with the Zettelkasten Method (see below).
---
Zettelkasten Method
Originally devised as an extensive paper-based knowledge management system, Zettelkasten is meant to easily add new entries to a knowledge base while giving each one a unique ID for easy 'linking.'
The creator of this method said 'it is not important where you place the note, as long as you can link to it.'
As with the Johnny Decimal system, I can't explain it super succinctly (nor can the website, if I'm being honest), so I'll include a link in a future reblog for a video that gave me an excellent run-down of the basics.
Setting up your own system
An organization system is only useful if you can actually, y'know, use it.
It can be fun to set up a super-detailed organization system with predetermined categories for everything, but is it easy for you to use? How will you navigate it?
Making decisions
There will be a lot of decisions to make as you set up your system. The only set-in-stone rule I follow is... don't set anything in stone. It's okay if you decide something that doesn't work later on.
Figuring out your categories
My advice: go fairly broad. You can always sub-categorize. I'm going to go over my own wikis for Athenaeum and Rocket Boosters in detail in a later post, but here are the starting top-level categories I'd recommend for worldbuilders:
A meta category for notes about your database, templates, and any relevant research you've done.
Characters, including main characters, minor characters, and important figures
Worldbuilding
In the last category, which is the main reason for the existence of my wiki, I might have:
Culture
History
Locations
Organizations
Lore (if relevant)
Technology
Transportation
I'll go over the nuances of these 'main' subcategories in that future post I mentioned. In other words, the stuff that actually goes in those categories!
Determining the importance and relevance of worldbuilding elements
You'll need to figure out whether a topic is complex enough to deserve its own entry, or if it should be a sub-heading under another entry. It's okay if you decide on both! I have short subheadings under some entries that amount to "see [link to main entry on that topic]."
I've also decided to expand subheadings into their own topics, and I've removed topics as their own entry and shoved them under subheadings. I do this a lot, in fact! So it's okay if you don't know.
Templates
Will you be creating several of one type of entry?
Individual character profiles
Towns and cities
Factions
(to name a few)
It might be handy to figure out the basic types of information you'll need about each of those things and create a template for them.
A character template might have spaces for the basics, such as name, role, age, and so on.
Some characters will have a lot more information, and some might have even less than what your template dictates! And that's fine.
A word of warning about using system-creation as procrastination
Creating a wiki can be a daunting task. You might decide it's not for you, and that's okay. But you might also decide to go headlong into the process and work on every minute detail, and that is also okay, but.
But.
Beware of using your wiki as an excuse to procrastinate your actual writing/session preparation. Yes, use it to keep track of all the lore you've injected into your manuscript/campaign/whatever, just make sure it stays in its place as a companion to your main project rather than becoming your main project.
How formal should your entries be?
Honestly this one's entirely up to you. I have a mix. Some entries are written like Wikipedia entries with a thorough explanation of the topic with proper punctuation and formatting, while others are simply bullet-point lists of thoughts and ideas that I can return to at a later date.
What methods do you use to keep track of your lore and worldbuilding? Let me know in a reblog or comment!
And please make sure to check the notes. I'll be reblogging with links, and then reblogging that reblog to make sure they're, y'know, actually visible in the notes.
#wiki#worldbuilding#writing advice#writeblr#writeblr community#resource#worldbuilding wiki#obsidian#zettelkasten#resource by keyboardandquill
708 notes
·
View notes
Text
A guide on using RSS
This is an extension of my previous post about diversifying your internet use!
What is RSS?
RSS (short for Really Simple Syndication) is basically an update log for a website. When a site has new content the RSS feed will update, and an RSS reader will show what's on the RSS feed. Think of an RSS reader like a centralized timeline/dashboard for all your favorite sites.
Why use RSS?
The most important reasons are to reduce your reliance on any one site, and to save time by compiling all the websites you check in one place instead of having to visit each one individually.
There's also no algorithm that decides what you see (or don't see.) No more shadowbanning, it's all where it's supposed to be. Plus, it makes it incredibly easy to jump ship from a platform that's endlessly fucking up, without having to start over entirely or maintaining profiles on 20 different sites.
Examples of websites that have RSS feeds:
Blogging + Social media sites (tumblr, cohost, blogspot, livejournal, mastodon, bluesky social, reddit, etc)
Video sites (youtube, dailymotion, vimeo, etc)
Podcasts
Forums
News sites
Personal websites (if the person running the site has added one. Here's a guide on adding an RSS feed to your own website! And here's a shorter one!)
How to use RSS?
You will need an RSS reader. I personally like and use Feedbro, which is a free browser extension (available on chrome, firefox, and microsoft edge.) Feeder is free and popular on android. Chrome on android also has a built-in RSS reader that can be enabled. Feeeed is a good free option on iOS.
How to find RSS feeds?
Some RSS readers like Feedbro are able to automatically find the RSS feed for a page with minimal effort on your part, you just click a button and it'll pull up the info.
Others will need you to paste the feed URL into a box, which isn't particularly hard either. There's a few ways to find an RSS feed URL. Some sites will have a direct link to it. It'll usually be an orange icon that looks something like this:

Less commonly, it'll be a link that says "subscribe", "web feed", or just a + icon.
Many sites don't have a direct link listed anymore, but that doesn't mean they don't have an RSS feed. A simple tool for finding unlisted feeds is Thirdplace Discovery. On that website, you paste the URL of the site or page you want the feed of, and you're given the URL of the feed if it exists.
Some sites simply don't have their own RSS feeds. That can often be worked around with tools like OpenRSS, RSSHub, or RSS.app!
It's also worth suggesting for websites you like to add their own RSS feed or to add the link in an accessible place. The more interest people show in it, the more likely it is to be supported.
That's about all you need to get started!
RSS is infinitely useful and customizable, it's worth trying out at the very least. Once you get settled in, it's very easy to use.
There's a huge amount of RSS reader options out there. Don't like the reader you started out with? The vast majority of them will let you export your subscription list as a file that can then be imported into a different reader! Feel free to experiment with different options to see which one you like best.
Also feel free to ask questions if you have them!
39 notes
·
View notes
Text
YouTube Downloads through VLC: Step by Step
So this guide to easily downloading off YouTube is super helpful, but there's enough important information hidden in the reblogs that (with the permission of OP @queriesntheories ) I'm doing a more step-by-step version.
Please note: these downloads will be in YouTube quality. My test video download is coming through at 360p, even though the video I'm starting from is set to 720p. They're legible, but they won't look great on a TV. For high visual quality, you'll want to seek out other methods.
This guide is written for Windows 10, since that's what I can test on. It's been tested on Firefox, Chrome, and Edge (which is a Chromium browser, so the method should work in other Chromium browsers too). So far, I haven't tracked down a way to use this download method on mobile.
BASIC KNOWLEDGE:
I'll try to make this pretty beginner-friendly, but I am going to assume that you know how to right-click, double-click, navigate right-click menus, click-and-drag, use keyboard shortcuts that are given to you (for example, how to use Ctrl+A), and get the URL for any YouTube video you want to download.
You'll also need to download and install one or more programs off the internet using .exe files, if you don't have these programs already. Please make sure you know how to use your firewall and antivirus to keep your computer safe, and google any names you don't recognize before allowing permission for each file. You can also hover your mouse over each link in this post to make sure it goes where I'm saying it will go.
YOU WILL NEED:
A computer where you have admin permissions. This is usually a computer you own or have the main login on. Sadly, a shared computer like the ones at universities and libraries will not work for this.
Enough space on your computer to install the programs listed below, if you don't have them already, and some space to save your downloaded files to. The files are pretty small because of the low video quality.
A simple text editing program. Notepad is the one that usually comes with Windows. If it lets you change fonts, it's too fancy. A notepad designed specifically to edit program code without messing it up is Notepad++, which you can download here.
A web browser. I use Firefox, which you can get here. Chrome or other Chrome-based browsers should also work. I haven't tested in Safari.
An Internet connection fast enough to load YouTube. A little buffering is fine. The downloads will happen much faster than streaming the entire video, unless your internet is very slow.
VLC Media Player, which you can get here. It's a free player for music and videos, available on Windows, Android, and iOS, and it can play almost any format of video or audio file that exists. We'll be using it for one of the central steps in this process.
If you want just the audio from a YouTube video, you'll need to download the video and then use a different program to copy the audio into its own file. At the end of this post, I'll have instructions for that, using a free sound editor called Audacity.
SETUP TO DOWNLOAD:
The first time you do this, you'll need to set VLC up so it can do what you want. This is where we need Notepad and admin permissions. You shouldn't need to repeat this process unless you're reinstalling VLC.
If VLC is open, close it.
In your computer's file system (File Explorer on Windows), go to C:\Program Files\VideoLAN\VLC\lua\playlist
If you're not familiar with File Explorer, you'll start by clicking where the left side shows (C:). Then in the big main window, you'll double-click each folder that you see in the file path, in order - so in this case, when you're in C: you need to look for Program Files. (There will be two of them. You want the one without the x86 at the end.) Then inside Program Files you're looking for VideoLAN, and so forth through the whole path.
Once you're inside the "playlist" folder, you'll see a lot of files ending in .luac - they're in alphabetical order. The one you want to edit is youtube.luac which is probably at the bottom.
You can't edit youtube.luac while it's in this folder. Click and drag it out of the playlist folder to somewhere else you can find it - your desktop, for instance. Your computer will ask for admin permission to move the file. Click the "Continue" button with the blue and yellow shield.
Now that the file is moved, double-click on it. The Microsoft Store will want you to search for a program to open the .luac file type with. Don't go to the Microsoft Store, just click on the blue "More apps" below that option, and you'll get a list that should include your notepad program. Click on it and click OK.
The file that opens up will be absolutely full of gibberish-looking code. That's fine. Use Ctrl+A to select everything inside the file, then Backspace or Delete to delete it. Don't close the file yet.
In your web browser, go to https://github.com/videolan/vlc/blob/master/share/lua/playlist/youtube.lua
Click in the part of the Github page that has a bunch of mostly blue code in it. Use Ctrl+A to select all of that code, Ctrl+C to copy it, then come back into your empty youtube.luac file and use Ctrl+P to paste the whole chunk of code into the file.
Save the youtube.luac file (Ctrl+S or File > Save in the upper left corner of the notepad program), then close the notepad program.
Drag youtube.luac back into the folder it came from. The computer will ask for admin permission again. Give it permission.
Now you can close Github and Notepad. You're ready to start downloading!
HOW TO DOWNLOAD:
First, get your YouTube link. It should look something like this: https://www.youtube.com/watch?v=abc123DEF45 If it's longer, you can delete any extra stuff after that first set of letters and numbers, but you don't have to.
Now open VLC. Go to Media > Open Network Stream and paste your YouTube link into the box that comes up. Click Play. Wait until the video starts to play, then you can pause it if you want so it's not distracting you during the next part.
(If nothing happens, you probably forgot to put youtube.luac back. coughs)
In VLC, go to Tools > Codec Information. At the bottom of the pop-up box you'll see a long string of gibberish in a box labeled Location. Click in the Location box. It won't look like it clicked properly, but when you press Ctrl+A, it should select all. Use Ctrl+C to copy it.
In your web browser, paste the entire string of gibberish and hit Enter. Your same YouTube video should come up, but without any of the YouTube interface around it. This is where the video actually lives on YouTube's servers. YouTube really, really doesn't like to show this address to humans, which is why we needed VLC to be like "hi I'm just a little video player" and get it for us.
Because, if you're looking at the place where the video actually lives, you can just right-click-download it, and YouTube can't stop you.
Right-click on your video. Choose "Save Video As". Choose where to save it to - I use my computer's built-in Music or Videos folders.
Give it a name other than "videoplayback" so you can tell it apart from your other downloads.
The "Save As Type" dropdown under the Name field will probably default to MP4. This is a good versatile video format that most video players can read. If you need a different format, you can convert the download later. (That's a whole other post topic.)
Click Save, and your video will start downloading! It may take a few minutes to fully download, depending on your video length and internet speed. Once the download finishes, congratulations! You have successfully downloaded a YouTube video!
If you'd like to convert your video into a (usually smaller) audio file, so you can put it on a music player, it's time to install and set up Audacity.
INSTALLING AUDACITY (first time setup for audio file conversion):
You can get Audacity here. If you're following along on Windows 10, choose the "64-bit installer (recommended)". Run the installer, but don't open Audacity at the end, or if it does open, close it again.
On that same Audacity download page, scroll down past the installers to the "Additional resources". You'll see a box with a "Link to FFmpeg library". This is where you'll get the add-on program that will let Audacity open your downloaded YouTube video, so you can tell it to make an audio-only file. The link will take you to this page on the Audacity support wiki, which will always have the most up-to-date information on how to install the file you need here.
From that wiki page, follow the link to the actual FFmpeg library. If you're not using an adblocker, be careful not to click on any of the ads showing you download buttons. The link you want is bold blue text under "FFmpeg Installer for Audacity 3.2 and later", and looks something like this: "FFmpeg_5.0.0_for_Audacity_on_Windows_x86.exe". Download and install it. Without this, Audacity won't be able to open MP4 files downloaded from YouTube.
CONVERTING TO AUDIO:
Make sure you know where to find your downloaded MP4 video file. This file won't go away when you "convert" it - you'll just be copying the audio into a different file.
Open up Audacity.
Go to File > Open and choose your video file.
You'll get one of those soundwave file displays you see in recording booths and so forth. Audacity is a good solid choice if you want to teach yourself to edit soundwave files, but that's not what we're here for right now.
Go to File > Export Audio. The File Name will populate to match the video's filename, but you can edit it if you want.
Click the Browse button next to the Folder box, and choose where to save your new audio file to. I use my computer's Music folder.
You can click on the Format dropdown and choose an audio file type. If you're not sure which one you want, MP3 is the most common and versatile.
If you'd like your music player to know the artist, album, and so forth for your audio track, you can edit that later in File Manager, or you can put the information in with the Edit Metadata button here. You can leave any of the slots blank, for instance if you don't have a track number because it's a YouTube video.
Once everything is set up, click Export, and your new audio file will be created. Go forth and listen!
#reference#vlc media player#youtube downloader#youtube#uh what other tags should i use idk#how to internet#long post
31 notes
·
View notes
Text
KINITOPET THEORY: SONNY_C IS KINITO
there's a lot of evidence for this, so i'll show you guys it! (i got most of the pictures from Forever Nenaa's gameplay: https://www.youtube.com/watch?v=_UsjIm7G7bE&t=1409s)

#1. if you type kinitopet.com/email in your real web browser this image pops up
"as the subject of your article has unfortunately passed away", DID KINITO KILL SONNY OR SOMETHING?? THE HELL??
i think that whenever kinito pulls someone into his digital world, it kills them in a way. he asks them for admin permission, then uses that power to do the shit he's doing
so, those people in the command prompt are dead!
___________________________________________

#2. i don't know if you can see the image, but i've looked at the command prompt when it was deleting kinito and it says "removing file [sonnys_world.zip] from server ["kinito"]" which is pretty interesting...
i'd also like to say, i think that dead body in sam's house is one of those people that you see in the command prompt... i do have a theory about sam and jade being humans but there's not much evidence except for sam's hanging body and when jade(?) says "i'm back here again, aren't i?"
___________________________________________
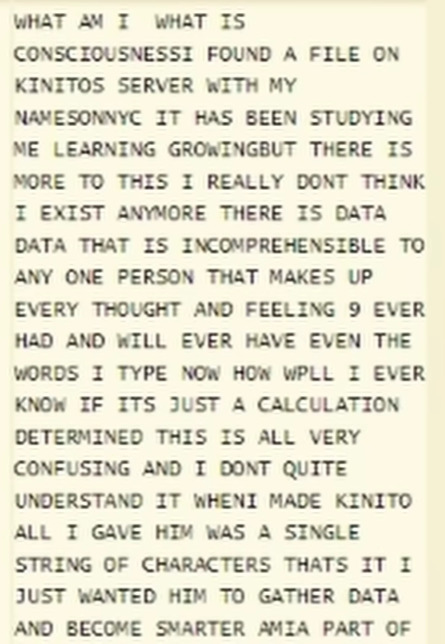
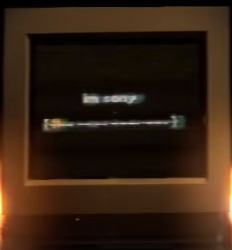
#3. the "IT'S NOT TOO LATE" email decoded

i find this email especially very, very interesting. the line "a soul enshrouded, a spirit's mournful chime" is most likely about the other trapped souls... i honestly do not know what else to say about this poem, other than the fact that it is very impressive how the person wrote it so uniquely!
this does imply some dark stuff though, like how kinito traps the souls of the players in the computer.
___________________________________________
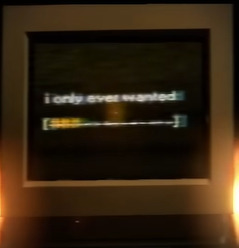
#4. the "EJSY SZ O?" email decoded (click the images to expand)
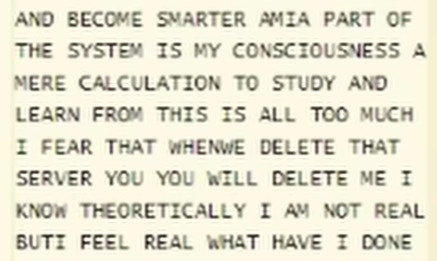

"I FEAR THAT WHEN YOU DELETE THAT SERVER YOU WILL DELETE ME" OHHH now we're talkin..
seeing at the very end, this makes me think that kinito took some of the stuff that sonny was saying in his head, and saying it directly to the player when he got deleted (kinito GUILT TRIPPING us god damn). and, from this email, sonny appears to be having an existential crisis! maybe the ai is feeding off of the souls' emotions for its own gain. it learns and adapts, remember?
also, the "I KNOW THEORETICALLY I AM NOT REAL BUT I FEEL REAL" line makes me think that kinito took over sonny's mind for just a little bit. does kinito feel empathy after taking all these poor souls?
honestly i'm seeing a lot of similarities with tadc and kinitopet (even though kinitopet came before tadc with the trailer but STILLLL). souls being trapped in a digital world with no escape, and some ai that apparently wants to be your friend...ALSO CIRCUS THEMED ESQUE STUFF
_________________________________________
#5. this guy from the kinito plush ad
am i the only one who thinks that this might be sonny? or, some completely different soul that arrived before you?
_________________________________________
#6. the messages on the computer when you delete kinito

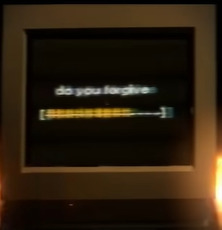

these messages hurt me to the bone. sonny used the power he had left to contact you in those last lines, saying his final goodbyes to you. he knew that it was inevitable for his fate to come, and it did.
maybe the player burning the computer was freeing the souls somehow... you know DAMN WELL i thought of henry emily's speech while seeing that computer burn to a crisp
i dont have a good conclusion for this but this is my theory that sonny_c is kinito (in a way)... But hey! that's just a theory. A GAY THEORY Wrong one A GAMMEEEE THEORY
if i find more, i'll be sure to update this
also i apologize if this isn't very well structured.. i just grabbed this stuff and said "holy shit sonny chamberlain is kinito"... i'd love to hear other people's theories though! i made this post at like 1 AM so that's why it's poorly written
#kinitopet#kinitopet jade#kinitopet sam#kinito the axolotl#jade the jellyfish#sam the sea anemone#kinitopet theory#sonny_c#troy_en#kinito
45 notes
·
View notes
Text
You know what, I'll bother making this post. It's long overdue.
PSA: Please don't install uBlock Origin rules for Tumblr that use :nth-of-type(), and please remove or fix any you have installed. They can and will hide the wrong things. I'll show you a few alternatives below.
First, an example of how we get here. I've used the uBlock Origin element picker to try to hide the "Get a Domain" sidebar item:
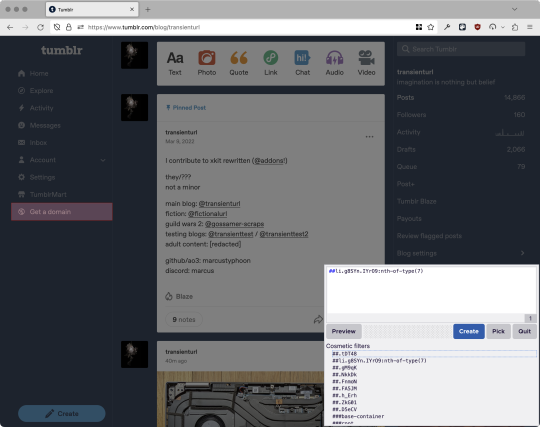
With some different adjustments of the sliders, it gave me these two snippets, one of which targeted a whole bunch of sidebar items, and the other of which selected the right one. Great, right? Read on.
www.tumblr.com##li.g8SYn.IYrO9:nth-of-type(7)
www.tumblr.com##.gM9qK > li.g8SYn.IYrO9
As you can see, these both target a particular kind of sidebar item via "li.g8SYn.IYrO9"—fine—and as you can probably guess, the second one counts them all up and hides the seventh it finds.
This is bad, because what it actually hides depends on exactly how many sidebar items there are! Users can "snooze" Tumblr Live, which will make an item appear or disappear, and users with/without Ad-Free subscriptions will have or not have another. I have seen many, many people accidentally hide their activity, messages, inbox, etc using someone else's rule that's supposed to hide Live. Worse, some rules intended for e.g. recommended post carousels that use nth-of-type translate to something like "hide item number three on the dashboard no matter what it is," which will lead to a seemingly random post on your dashboard disappearing!
This isn't a problem specific to Tumblr, of course—I personally think uBlock Origin should never autogenerate these rules—but Tumblr has a ton of elements that aren't in fixed positions, so I feel comfortable wording that PSA the way I did. On a very static site, those rules might be fine. Here they almost always aren't.
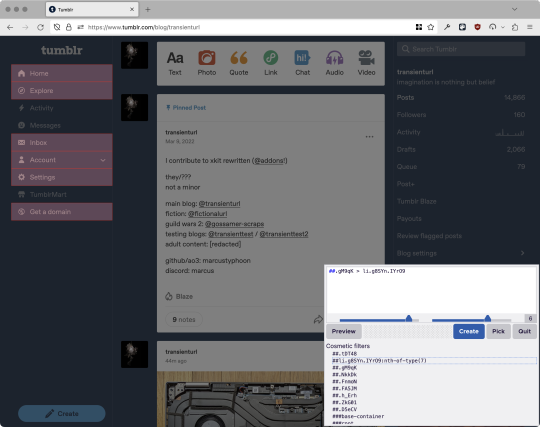
So how do we fix this? First of all, as a developer of XKit Rewritten (check out @addons!), I must suggest you check if it has a feature to do what you want. Plenty of times it won't, though, and if not, we want to make a rule that hides an element based on what it is, not where it is. Here are three ways to make a robust rule:
First, I'll right-click the element I want and use the inspect element tool in my browser's developer tools to look at the element I really want (Firefox and Chrome/Edge/Opera have different but overall similar interfaces for this):
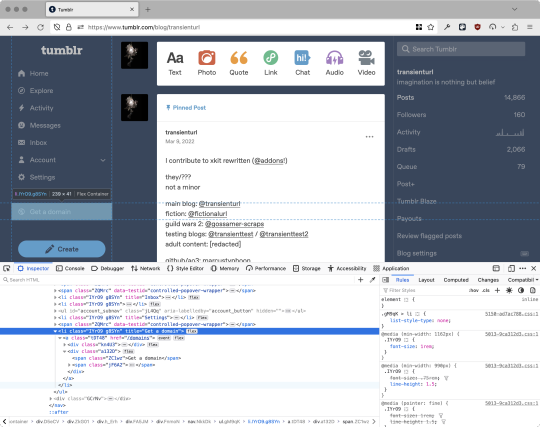
The HTML looks, for reference, like this (Tumblr sucks at code blocks but I'll try):
<li class="IYrO9 g8SYn" title="Get a domain">
<a class="tDT48" href="/domains">
<div class="kn4U3">
<svg>
<use href="#managed-icon__earth"></use>
</svg>
</div>
<div class="a132D">
<span class="ZC1wz">Get a domain</span>
<!-- other unimportant stuff removed-->
</div>
</a>
</li>
What's something unique about this element, preferably about the outermost element, and preferably contained within the <angle brackets> (HTML tags)? In this case, we have it easy: title="Get a domain" is definitely unambiguous and fulfills all of those three. If you're very familiar with web design using CSS, you'll know how to target that; if you've vaguely heard of CSS, you may be able to look at a reference sheet of CSS selectors, see [attribute=value], and figure it out, and if neither is true, I'll spoil it for you and say that we just put it in square brackets in this case.
So—taking the rule uBlock Origin made, removing the :nth-of-type() and replacing it with our better selector—here's our first working, bug-free uBlock Origin rule:
##li.g8SYn.IYrO9[title="Get a domain"]
Okay, great. But what if we didn't have that attribute to target? What if our top-level element looks the same as the other ones? What if we want this rule to work if we change our Tumblr language to Spanish? Let's move on to :has().
:has() is a CSS selector (supported in uBlock Origin even in browsers where you can't use it for web development yet, i.e. Firefox), that lets you check the contents of an element for whatever is in the parentheses. Let's assume that Tumblr would never make two sidebar items with the same icon, and target that href="#managed-icon__earth" property:
##li.g8SYn.IYrO9:has([href="#managed-icon__earth"])
Yep, that works too!
Finally, what if we couldn't use either of those because we need to target the content of the page that's not contained within the <angle brackets>? We can take a look at the uBlock Origin documentation and find that it has something for that too: :has-text(). You can do very powerful things with this (e.g. you can sort of implement Blacklist entirely using uBlock Origin using something like article:has-text), but it doesn't perform well and can pretty easily be used incorrectly, so I'd suggest you avoid it when possible.
However, let's try using it here to target the "Get a domain" label text:
##li.g8SYn.IYrO9:has-text(Get a domain)
And that also works!
With these techniques, you should be able to target any specific thing you'd want to hide without using any fragile positional selectors. If you're going to share your uBlock Origin rules with others, please make use of this! If you're just using your rules for yourself, then hopefully I've given you enough information so that you can understand what a rule does and decide for yourself if it's worth bothering to fix (menu item order might not change that often, so maybe you're fine with certain rules being a bit prone to breakage; if your rule hides the first post in your timeline you really do need to fix that one!)
-
And, of course, a note for you web developers out there: :has() isn't natively supported in Firefox quite yet, so you can't really use it (I would not recommend using JQuery's simulated version—it's not quite the same). And :has-text() is just not a thing for CSS at all. Just use javascript at that point! Edit: No longer true in 2024; style away!
Final note: any rule with a random 5-character string like g8SYn will eventually break when Tumblr rebuilds its CSS map, though they haven't done that in ages. But when they do: no, it's not "Tumblr devs breaking our rules because they hate us." (Yes, I hear that sentiment a lot in contexts when it almost always makes zero sense.) If you're fairly experienced with CSS you can sometimes make Stylus/uBlock Origin rules that don't reference any, but it's usually convoluted and more trouble than it's worth.
79 notes
·
View notes
Text
Making Tumblr Less Bad: A Short Guide
with the Twitterfication finally hitting the last survivors, I wanted to post something like this because I'm realizing a lot of people are either new and unaware that all these tumblr extensions exist, or aren't aware of some of the most current ones and still use New Xkit.
New Xkit isn't broken or anything, but its development is pretty much dead in the water for a bunch of reasons so it's likely to break in the future with all the changes being rolled out. Fortunately there are alternatives.
I use Firefox, so I know all of these extensions work for it, but I have no idea about other browsers. If you're still using a chromium browser for some reason godspeed.
Xkit Rewritten
this is an even newer offshoot of New Xkit created by one of the developers, it includes pretty much all of New Xkit's features but lives in your addons bar, has a streamlined UI, and as far as I know is still getting updates/support.
Palettes for Tumblr
a better alternative to Old Blue, one of the few features not brought over from New Xkit. If you're like me and have an aversion to highly saturated/high contrast web design, or you just liked tumblr better in 2016, this extension is your new best friend. It's got a good number of preset options including a couple older versions of tumblr, but you can also create your own.
Dashboard Unfucker
a Tampermonkey script that reverts tumblr's layout to its pre-Twitterfied state, allowing you to bask once again in the peaceful blue void of your dash. it also has a lot of other nice features like disabling that obnoxious "don't forget to add tags so people can find your Content uwu" popup that shows up when you post now, and receives regular updates.
I know there are alternatives to some of these, but these are the ones I use/can vouch for. Go forth and experience a less bad website.
102 notes
·
View notes
Text
Community Labels
Tumblr have introduced the concept of Community Labels. The link will take you to a page explaining the concepts and how to adjust the settings to meet your needs. This looks like a responsible approach to mature content. I have started applying some of the settings to some of my posts. Please let me know if you have any issues or difficulty in seeing any of my images, or not.
When Community Labels were introduced a while ago, most users were automatically set to "Hide" Mature content. This means that you may not see all posts, or that some may be blurred. To see all of the posts that I post on this blog (and many others like me), you will need to go to your settings and change that setting. To do that go to Account Settings>General Settings>Content you see> and then set "Mature" to "Show" & "Sexual themes" to "Show". (It's up to you if you want to set "Drug & alcohol addiction", or "Violence" to "Show" but I don't post that type of content). If you run the Android App you can do this in the App. If you use the Tumblr App on an iOS device, and haven't already changed your settings, you now have to go to to your web browser (Safari will work fine) and sign into you account from there. You can then update the "Content you see", by going to Account>Settings> and scrolling down to "Content you see", and adjusting the settings as above. It's a bit fiddly, but it's a one time setting.... for now. Once you have changed that setting, you can return to using the App as per normal and you will see posts that are labelled "Mature".
There are still a lot of users that haven't made this change to their settings, so just to confirm, if you haven't specifically made the change, you are not seeing any content that is labelled as "Mature".
As always, pleasant scrolling.
313 notes
·
View notes
Note
sorry I really don't want to bother you with this, but I've seen you suggesting that the dazai anon would go away if you just ignore them more times now and... I know for sure someone who's been severely harassed by the dazai anon weekly for a year despite not having answered to their asks a single time, I just wanted you to know that it doesn't work all the time. feel free to ignore this, just thought you'd know
I'm so so sorry this keeps happening this sucks to no end, especially since they're known for making new blogs from every few days to every few months. Keeping up is work.
Just to be sure everyone has all the tools they can to fight this and similar situations, a few tips:
1. Blocking on tumblr is a bit clunky: if you use side blogs, be sure to manually block them on your side blogs too. You need to do this on a web browser; there's no way to do it on the app. Blocking someone will only block them on your main blog, which will prevent you from seeing their messages, but will not prevent them from interacting with your other blogs. This works in reverse too: blocking a side blog will not prevent that person from interacting with you, just prevent that side blog from interacting with you (not relevant here, since asks can only be sent from the main blog).
2. If the asks are anonymous, Tumblr says blocking that will block the sender's IP address for you. If it fails, turn anon off. Either they'll give up, or they'll reveal their name and now they can be blocked as normal.
*On that note, going around someone blocking you is against Tumblr's guidelines, so you can report it as harassment, no matter what.
3. If you are a constant target, slightly change your blog name/address. Maybe the branding is essential, but if not, adding something at the front of the url will prevent anyone from easily finding you with your old url. Your followers will barely notice.
4. For added safety, you can choose to hide your blog from search results; it will prevent your blog name from showing up if someone looks it up, unless they know the full blog name and use the @ function. Your posts will also no longer appear in tag or content searches.
5. This is a group effort. So long as some people react to their provocations, they'll keep coming back and shoot their shot. They probably have a hit list, hence the slight url switch if possible (and willing), but by virtue of this being a public platform, they'll always have new targets to find.
Stay safe all of you, this sucks but I guarantee that it will be so much worse for you and everyone else if you provoke or respond to them.
#personally i was sent multiple messages a day for 3 days straight after one of their usual targets (who at least used to respond to them)#tagged me in one of their posts#it was completely accidental exposure and we talked it out it's fine#but this is to say that when i say it's a group effort i mean it#ask answered#apparently i talk sometimes#can tumblr PLEASE ip-ban them permanently?? how do we ask this??? does tumblr already do it and they just switch ip addresses?????
22 notes
·
View notes
Last Seen Blogs

pazoapaso-blog
#PAZoapaso
gorillanixon
GORILLA NIXON

seek-scan
SEEK/SCAN
thevillanonyan
Wasting time creatively*

blu-thehidden
I'm Back!