aph2tuck
Reference Paradise
A lot of Refs. Mostly Drawing or cooking Refs, but honestly it's a bit of everything. enjoy ~!
20983 posts
Don't wanna be here? Send us removal request.
Last Seen Blogs

marcomolecular
Macromolecular Vertigo

rautbeerfloat
A Vortex of Opinions
undyaddict
What's in your Top Drawer?

smileonparade
Untitled

amorempalavras
Com amor

Text
geekysideburns replied to your post: I’m having a hard time no…
Have you gotten to reference layers yet because OMG.
WAT IS THAT
83K notes
·
View notes
Video
DIY Stop-motion animation I did for fun last week using 2 Modibot figures, green masking tape, and 2 vegetable cutting boards.
(Hi-res version here)
I’ve been wanting to try this for a long time now. Aside from filming toy action figures, this was the first time trying to do actual stop-motion animation. It was super hard animating straight ahead without being able to go back to redo poses, but the challenge very addicting!
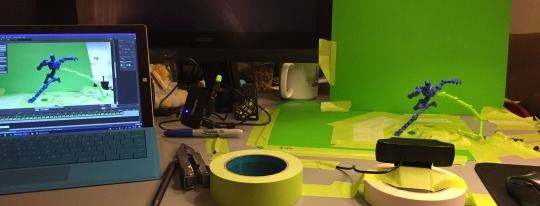
Even though the Modibot figure I animated isn’t a pro kinetic stop-motion armature, I was surprised how well the plastic figure could hold a pose.
The stock Modibot was only $10 on Amazon! At that price I definitely recommend it as a super inexpensive way to try out stop-motion. I did however buy some additional 3D printed parts from Shapeways to modify it to have clavicles and an extra spine joint for better posing.
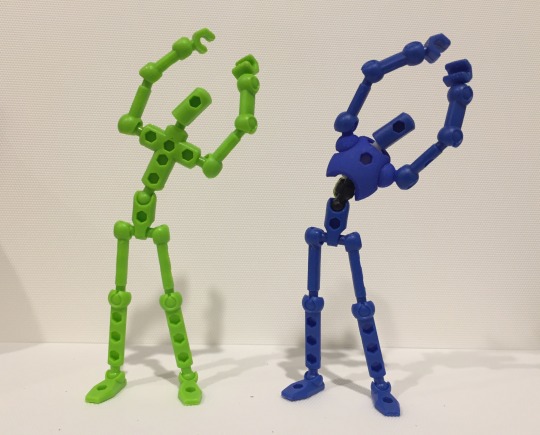
Below is the first test I did earlier last week. I used the masking tape as a sticky surface for the feet to tie-down to, and a green Modibot for the rig arm.
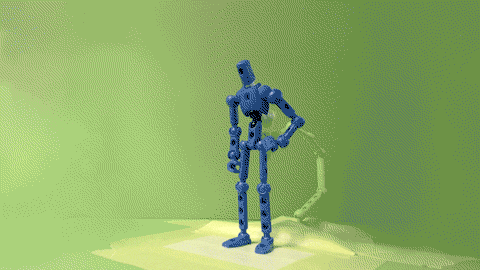
I animated the run next. Here’s the green screen version:
Shot using a 1080p Logitech webcam with TV Paint, and composited in After Effects:
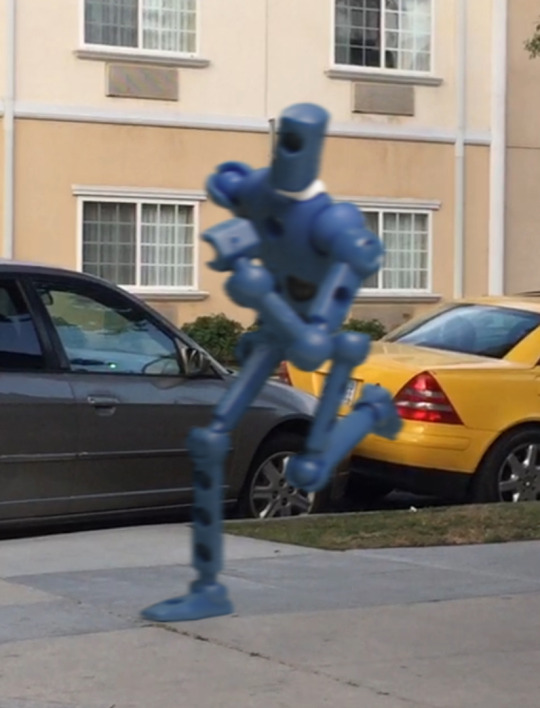
I’ll go into more detail on the figure setup, animation, and compositing process in a future post if anyone is interested. :)
39K notes
·
View notes
Photo
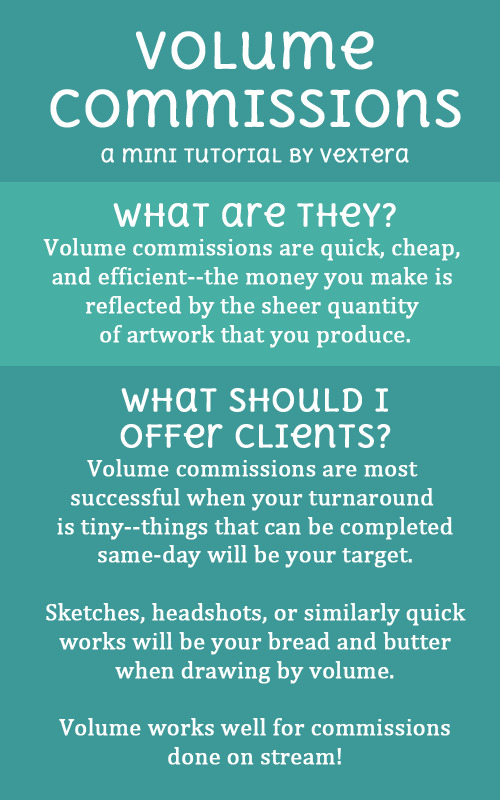
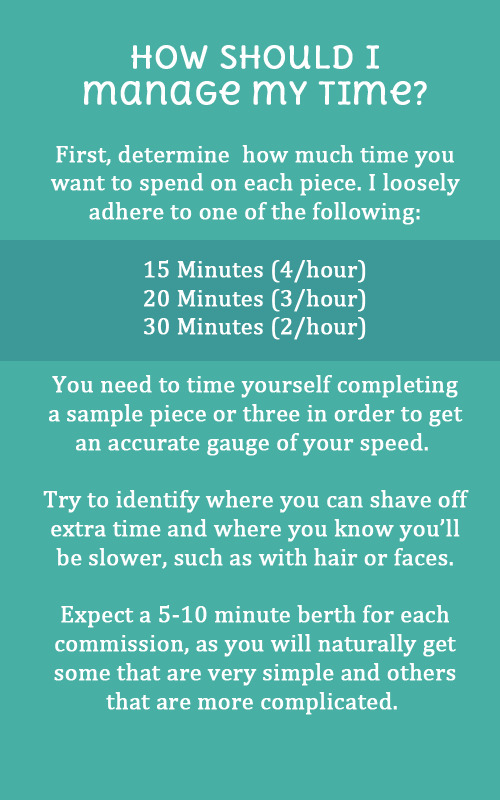
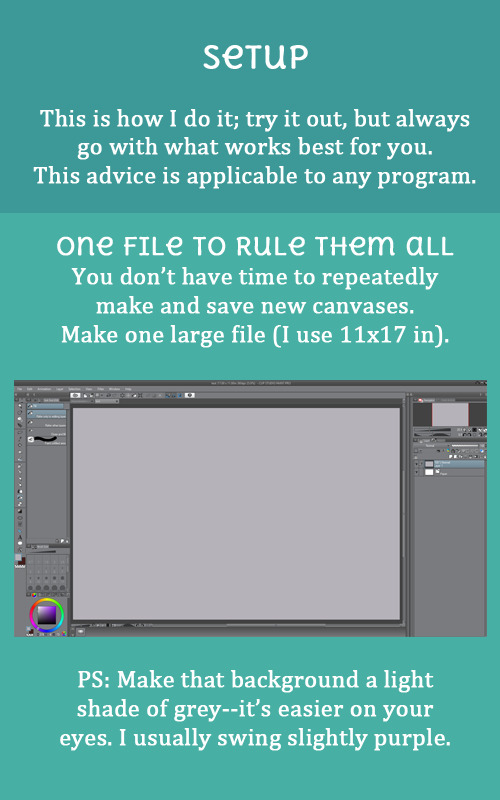
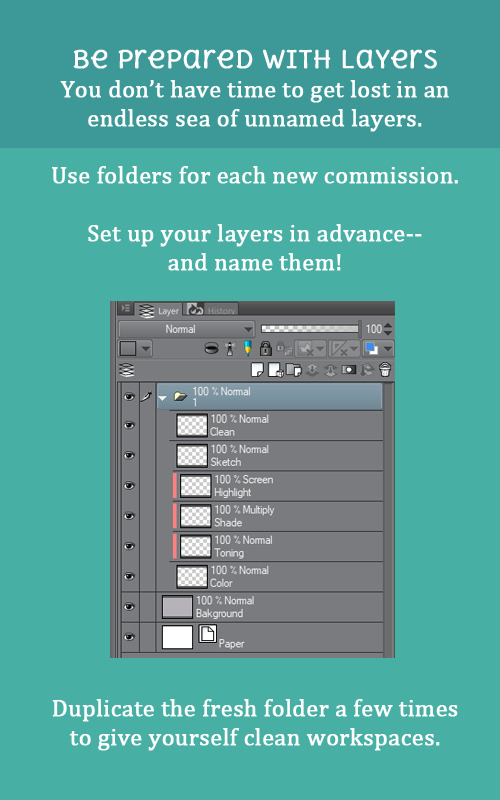
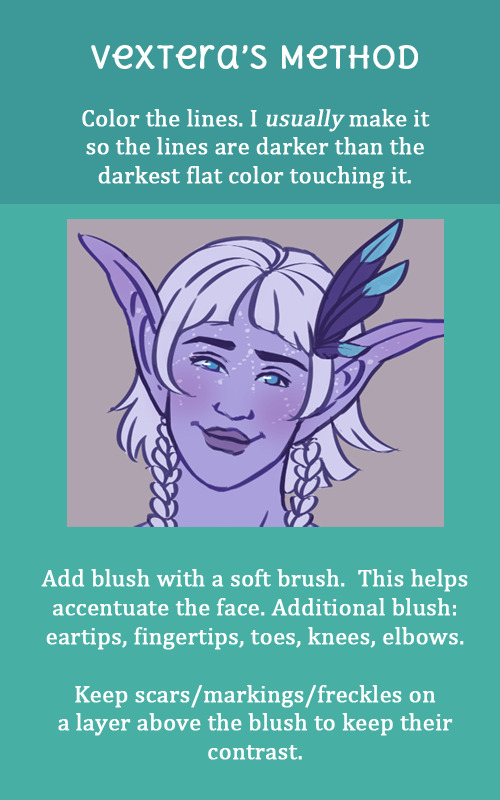

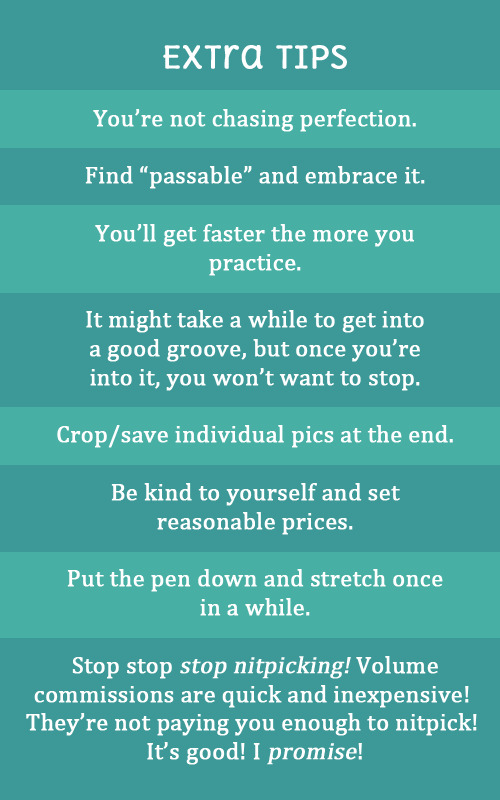

Volume Commissions Mini-Tutorial
The recent Black Panther Charity Stream I participated in was the 4th time I’ve streamed volume work, and every time I do, I get comments about how quickly I’m able to whip out pieces.
Here’s some general advice on doing volume work, and some additional information on my personal process! Hopefully some of it helps you. :D
4K notes
·
View notes
Photo
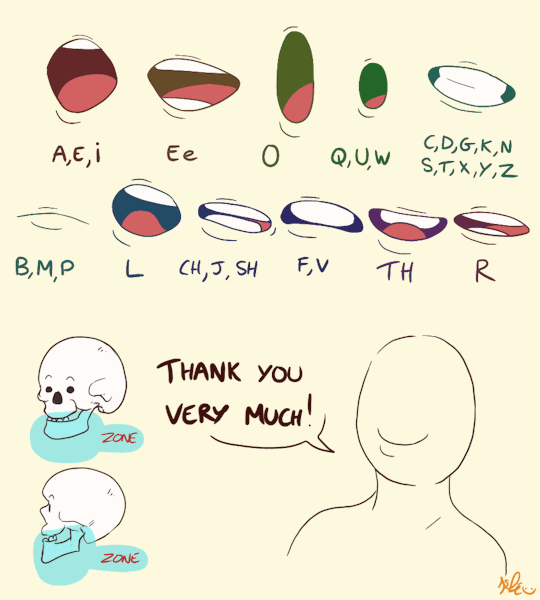

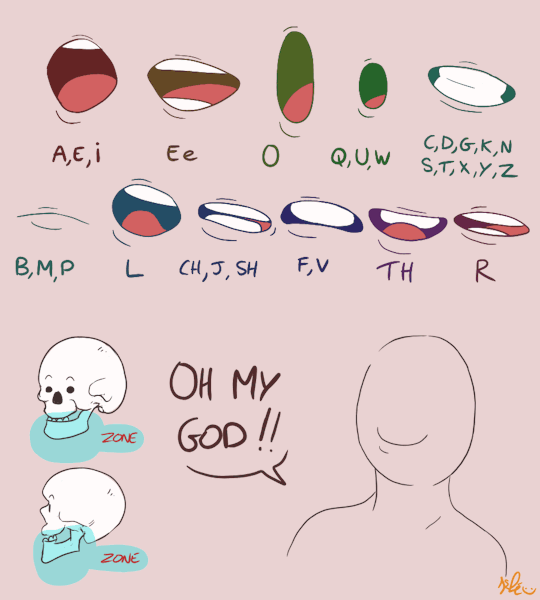
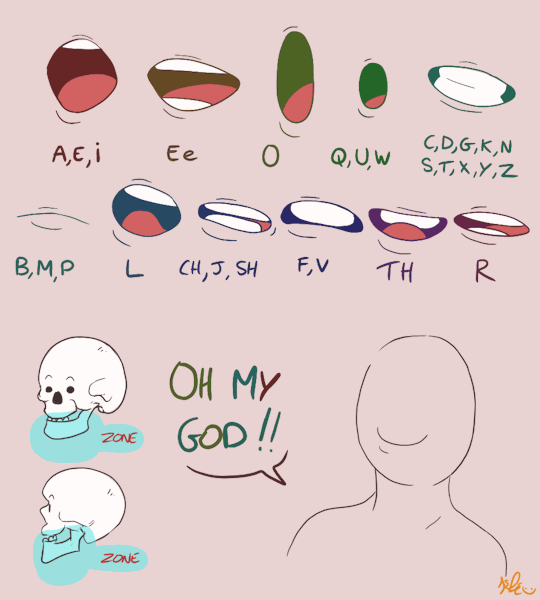
So there is the whole tutorial animated !!!
With two examples and colors for each syllabes so you can visualize even more. Larger descripion on Patreon and more tutorials there as well!
Patreon
Hope it will help you ;) (Now you also know the sassy “Oh My God !!!)
77K notes
·
View notes
Text
I MADE AN ART MASTERPOST
Bodies:
how to draw arms
*Hands*
How To Draw Hands
hands hands hands
more hands
another hand tutorial
How to draw butts&thighs
draw knees
draw feet
Kneeling + Sitting ref
Body anatomy help
The male torso
Muscular male with bow stock photos
Lots of Stuff
All about the human body
Pose studies
100+ anatomy references
Sitting poses
pose reference blo
realistic woman body ref
male body
Pose Maker
Poses
hundreds of pose references wowie
a guide to figure drawin
torso reference
How to draw penis
Penis ref
Kissing ref
Faces:
Drawing expressions
Creating expression
Avoiding same face
How to draw faces
*Heads
Heads&Angles
contouring and highlightin
drawing eyes
*How To Draw Noses
drawing ears
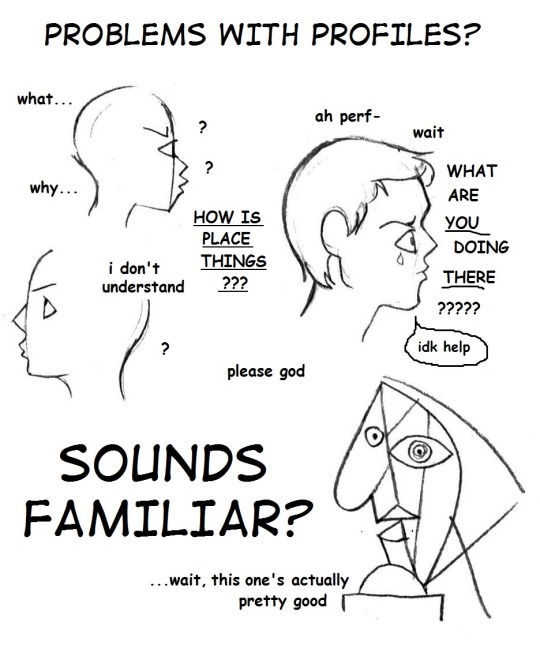
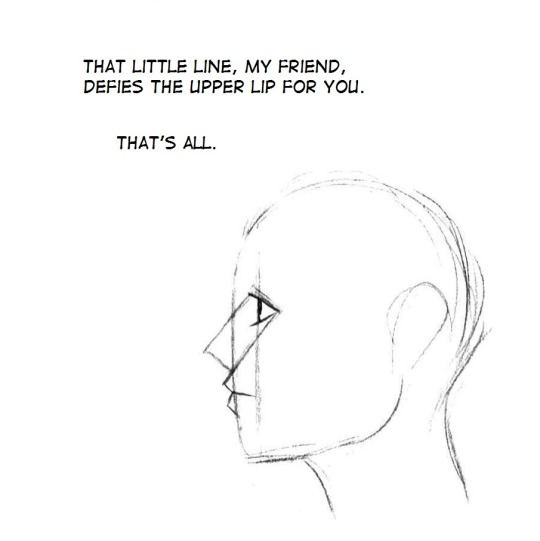
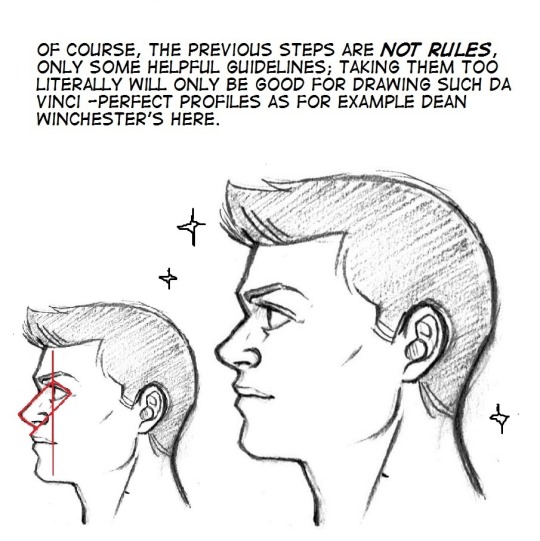
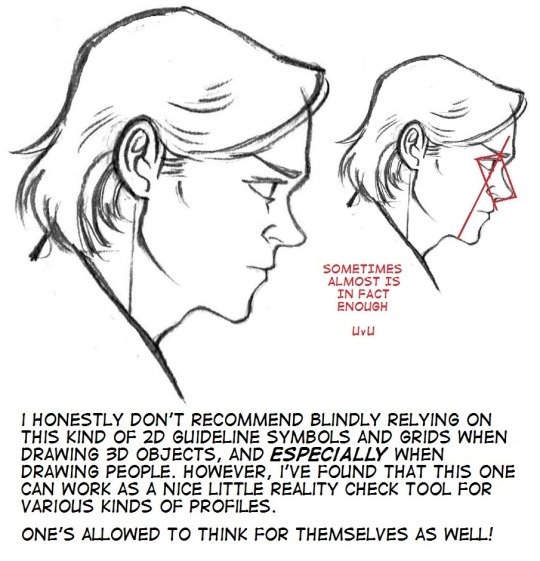
how to draw profiles
*How To Draw Lip
lips ref
lip tutorial
Hair:
Hair tutorial
Hair+Fur
how to draw curls
*How To Draw Hair
Clothes:
Drawing clothe folding
How to draw folds
Folding ref
how to draw jeans
hat ref
*How To Draw Fabric Folds/Creases
how to draw shoes/feet
hecka lot of clothing refs
Other (Person Related):
Flower crown tutorial
Drawing horse/animal legs on humans
Anatomy of mutant humans
Mass art ref
Drawing human wings
draw wings
*How To Draw Cuts And Bruises
wings
Other (non-specific):
How to draw ice
Drawing clouds
Creature design
Tutorial masterpost (100+)
How to colour
Drawing ref masterpost (10+)
paint blood
shadow help
draw grass
I made this most for my own benefit to organize this stuff, and have no idea how to make a masterpost!
185K notes
·
View notes
Photo


more mini tutorial gifsets :) for the video version check out https://www.instagram.com/p/BGZfej3R_OM/?taken-by=loisvb
26K notes
·
View notes
Photo

★ Body Type Tutorial ★
Funded by my awesome Patrons!
Patreon | Twitter
99K notes
·
View notes
Photo


Doing these was so much fun!
Feel free to share and try them yourself~
87K notes
·
View notes
Photo
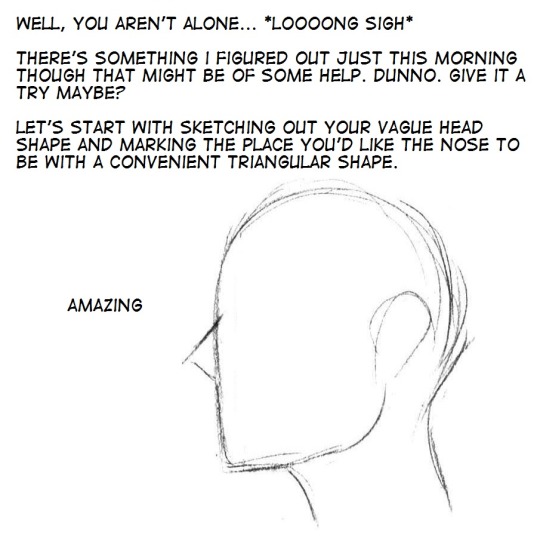
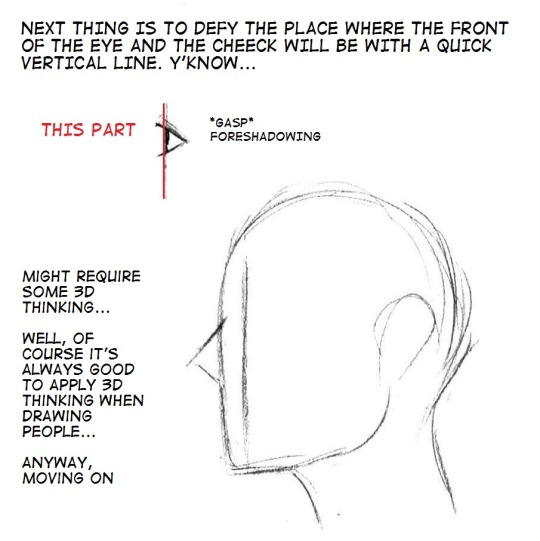
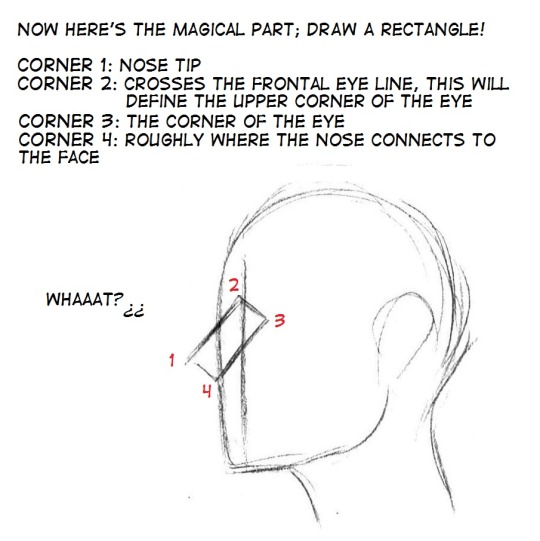
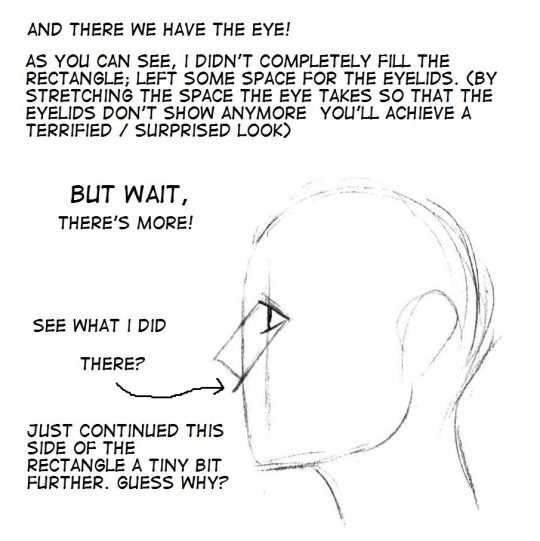
idk, this has probably been discovered by somebody smarter than me long ago already… anyway, just in case it helps!
143K notes
·
View notes


Text
fucked up how cooking and baking from scratch is viewed as a luxury…..like baking a loaf of bread or whatever is seen as something that only people with money/time can do. I’m not sure why capitalism decided to sell us the idea that we can’t make our own damn food bc it’s a special expensive thing that’s exclusive to wealthy retirees but it’s stupid as hell and it makes me angry
411K notes
·
View notes
Photo
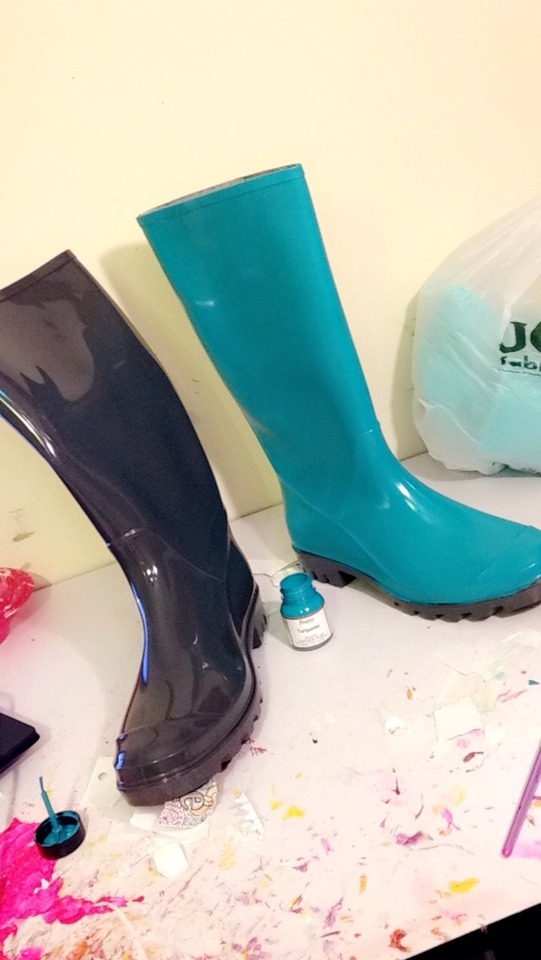

ATTENTION COSPLAYERS:
I would like to make the paint brand “Angelus” known. It is a special paint that is for leather, faux leather, rubber, and similar surfaces.
This is literally the best paint you can buy if you love a pair of shoes, but they aren’t in the right color for your character.
This stuff coats VERY well AND the coats of paint bend with your shoes. This means no cracking!!
In the photos above I took black rain boots and painted them with Angelus Turquoise. As you can see, they don’t look black any more! It’s so good!
I managed to paint two boots with a little one ounce bottle of the paint, and I still have a third of the bottle left over!
The paint dries very fast, so you can put layer on top of layer on top of layer without it streaking.
You can get the paint on Amazon and it comes in every color!
I just really wanted to make this known!! :D This stuff is amazing!
159K notes
·
View notes


Text
How to do “extra” facial expressions!
Drawing basic facial expressions is not the hardest. Most people can draw a sad face, a happy face, angry etc., but making more multidimensional expressions is more of a challenge. I have gotten a lot of compliments on how I draw facial expressions, (specifically “angsty ones”) telling me that they are very dramatic and well… expressive! And there are actually only a few things I think about when I draw faces that take them to the next level, so I thought i’d illustrate them all here!
SUPER IMPORTANT TIP BEFORE WE START: Look at your own face when you draw faces. Even making the face when you are drawing (you don’t even have to look at it), will give you some sense of how the face muscles pull and where things fold and stretch, because you can feel it. You are the best reference when it comes to facial expressions!
Angles
Draw the head in an angle that matches the expressions you want to make. It is not a requirement, but is going to add to the effect.

Symmetry vs asymmetry
A face is rarely symmetric. Unless the face the character is making is 100 % relaxed or even dissociating, the eyebrows, mouth and facial muscles will have different placements of their respective side. This image shows the dramatic impact asymmetry has on a face:
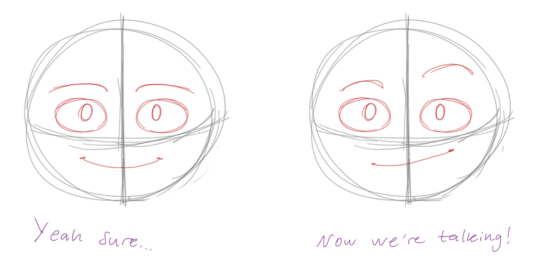
That’s the difference between a smile and a smirk!

The first one’s like “oh yeah?” and the second is like “oH YEAH??”
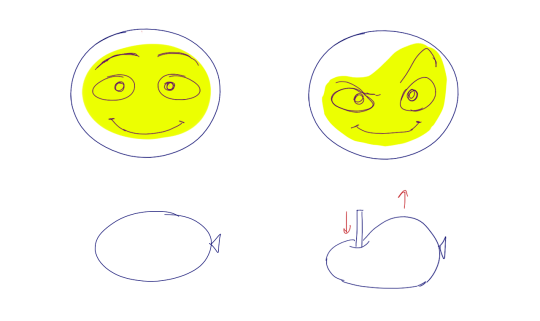
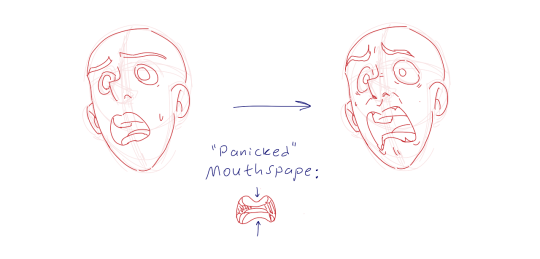
The “balloon squishing principle”
This is something I did subconsciously, and I didn’t know about until I made this tutorial. And this principle goes hand in hand with an asymmetric face. Basically, if you squish one part of the face, you need to even out the empty space by “inflating” the other part of the face so that it doesn’t appear shrunken. The picture hopefully explains it:
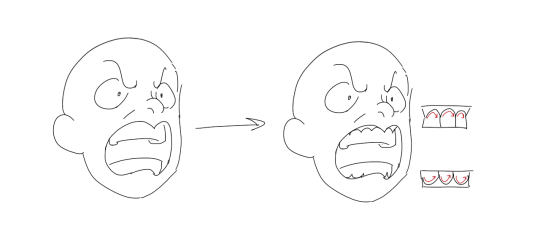
Teeth
Don’t forget to add the gum when the mouth is open to its full potential!
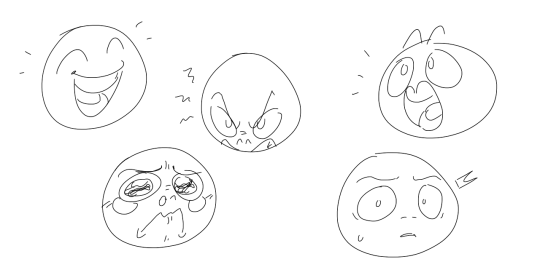
Squinting and folding
Adding folds around the eyes when a character is squinting makes a HUGE difference. It makes a smile more genuine and a growl more intimidating. Adding folds to the face in general makes your characters more lifelike and ‘visually relatable’. Like, they look human, and less plastic or fake.

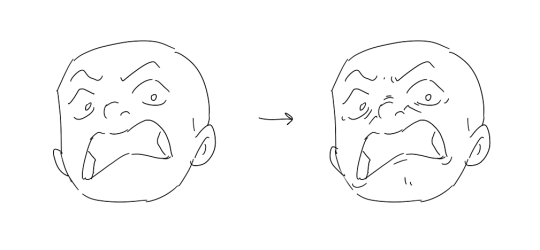
and so on..
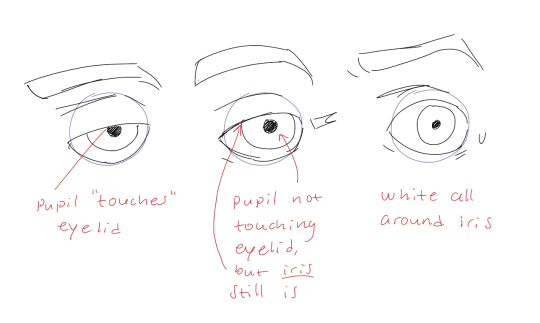
Pupils and irises
The placement of the iris and pupil in relation to the eyelids is very important! The less of the white you see, the more relaxed the character is.
And then of course eyebrows and eyes go hand in hand!


Gestures, spitting, sweating…
Adding more elements than just a face is key to making the character actually look like they are feeling what you want them to feel. Just the tiniest sweat drop adds to their anxiety, spitting adds frustration to their rage, slouching shoulders, waving hands, a double chin, extreme angles, the list goes on! Add whatever and see what kind of impact it makes! Does it do the trick? Great! Add it!
Over exaggeration!!
Remember that you can almost always exaggerate more. Don’t be afraid to do draw “too much” because you’re just experimenting. See what works and what doesn’t. What do you like to exaggerate?

Now that you know some theory, it’s time to practice!
Practicing!!
The 25 Essential Expressions (a classic! I’ve done it multiple times)

And the one I do when I’m bored:
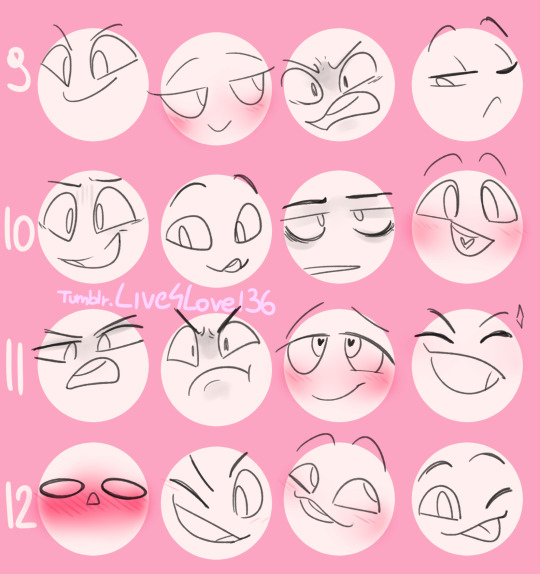
Fill a page with circles and fill them in with different expressions. Try and exaggerate as much as you can!

This is mostly for experimenting. They are quicker to draw than complete faces, but the same rules should apply!
And that’s about it!
I don’t know if I covered everything in this tutorial, since some things might be obvious for me, and this post perhaps only scratches the surface. So feel free to send me a message if you want an explanation about something more in depth! Thank you for reading! And now DRAW!!! ✨🎨
168K notes
·
View notes