
capriciouscosplayerposts
Capricious Cosplayer
A Simple Cosplayer
21 posts
Don't wanna be here? Send us removal request.
Last Seen Blogs


Text
The Kid from Bastion: Part 3
The Outfit
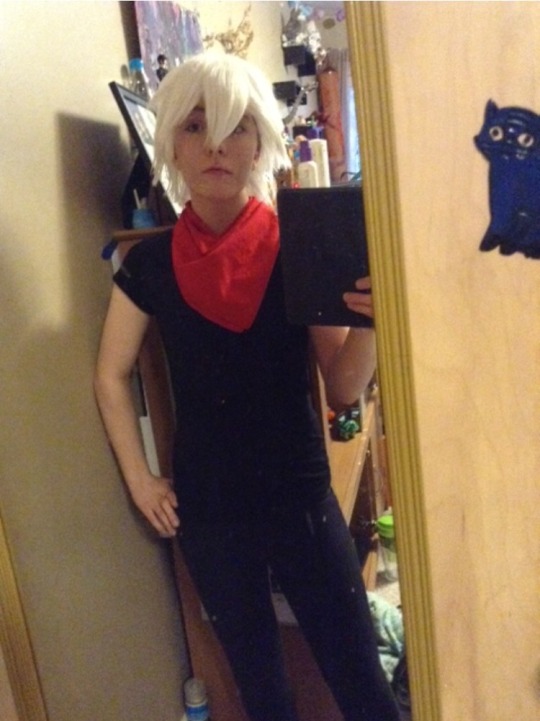
All around this outfit is super easy. You can easily put it together with basics from your closet or a friend’s closet. I have a separate post about styling the wig, so check that out if you are planning to cosplay as The Kid.
This outfit is made of a black t-shirt, black pants, black combat boots, and a red bandana. Very simple! If possible, iron the bandana to make it lie more uniformly on your neck and collarbone. I used the safety-pin, but if you plan to use this costume more regularly, I would suggest installing a button or clasp.

If you want to seem extra muscular, you can use some bronzer or an eye shadow slightly darker than your skin tone to outline your biceps I didn’t for the picture and you can see my noodley arms. This post was pretty short, but it concludes my Kid cosplay tutorial series! I hope you had as much fun as I did, there are more cosplay tutorials to come.
#bastion#bastion cosplay#bastion the kid#the kid#supergiant games#supergiant games cosplay#cosplay#easy cosplay#cool cosplay#diy#wig#foam cosplay#cael hammer#the war machete#super giant games#cosplay for summer
42 notes
·
View notes
Text
The Kid from Bastion: Part 2
The Wig
I bought mine on Aliexpress for around $9 USD. There are many other places to buy wigs, but this was one of my first cosplays so I wasn’t after the highest quality. If I was going to redo this costume I would have preferred one from Rock Star Wigs because they are much higher quality and more comfortable. It wouldn’t have been as shiny as the one from Aliexpress, so beware when buying cheap wigs. But I got a basic wig at this link from Aliexpress,
https://www.aliexpress.com/item/Ladies-and-Gentlemen-Pixie-Cosplay-Anime-Short-Full-Wigs-Curly-Hair-Tail-White-Synthetic-Wig-Costume/32686661532.html?spm=a2g0s.9042311.0.0.Pl9n2u
Here is what the site advertised:
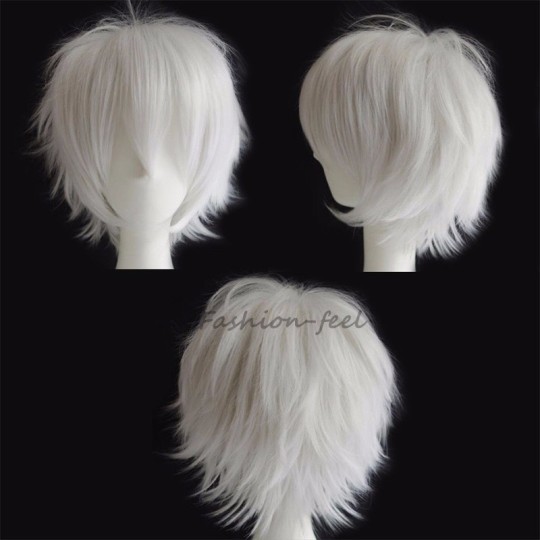
This was my first ever wig styling and I think it turned out pretty well. I trimmed the pieces in order to make spikes. I suggest following a reference picture in order to have the curves of hair in the right place. At first I tried to secure the spikes with hairspray, shown in the first selfie. As you can see, the edges do not want to stay sharp. I used Tacky Glue to make the super secure and it definitely gave me the sharper points I was looking for. You also might want to use a nude colored wig cap since the wig is so light colored. Any hair that slips out will be very obvious and if the wig moves slightly, you would be able to see a darker wig cap.
This next picture of me at at Animinneapolis playing cards with some friends. The glasses aren’t part of the costume but I was taking a break and need them to see.

Here is the completed look! Since I am biologically female I wore a chest binder and did some masculine face contouring. The wig wasn’t too shiny and the styling wasn’t crazy difficult, especially for a beginner. Everyone who recognized The Kid enjoyed my costume. This costume was tons of fun and hope you try it at home for your next cosplay!
#bastion#the kid#zuck#zia#zulf#bastion cosplay#supergiant games#easy cosplay#cosplay tutorial#supergiant games cosplay#cosplay for summer#wig#wig styling#foam cosplay#cool cosplay#cool cosplays#animinneapolis
14 notes
·
View notes
Text
The Kid from Bastion: Part 1
The Weapons And Armor
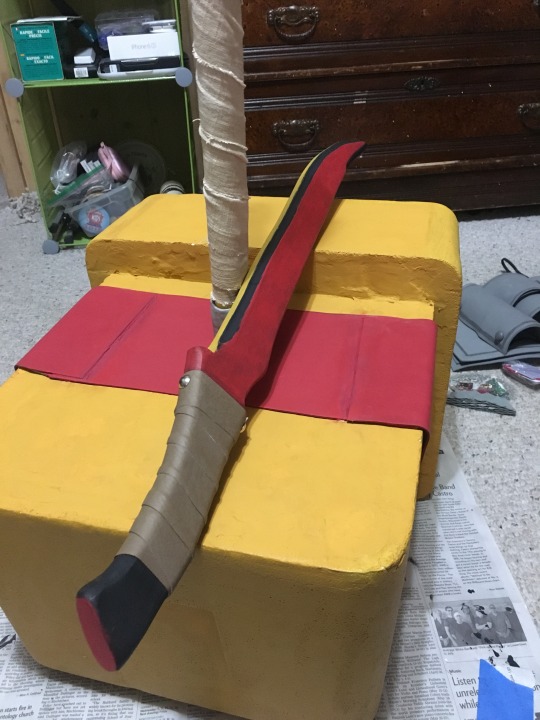
The Cael Hammer
This is the most iconic weapon from the game, so wielding this behemoth will make you seem like the brave Kid from the beautiful game, Bastion.
Supplies: A Styrofoam cooler, expanding spray foam insulation, two wooden dowels (1 inch diameter), a large sheet of craft foam, Spackle, and paint (I used the shade “Golden Sunset” by Apple Barrel paint). For the handle, I used linen fabric, coffee to dye it, tacky glue and gray polymer clay. (air-dry clay would be better)
Put the lid of the foam cooler on the side of the main body.
Clean up any holes on the outside of the cooler with some Spackle.
I found the correct place for the handle and added Styrofoam around it so it wouldn’t move around. I used scraps of foam on the inside so I wouldn’t have to use as much spray insulation.
Spray the inside with expanding insulation until it is about 3/4 full, and cover it with plastic so it doesn’t make a big mess. Make sure to spray some on the head of the hammer so it will stick to the body. Wait however long it says on the can.
I used a sharp knife and cut off everything that was sticking out, so it was a flat side. Sand it down so its super flat.
Fill the wholes left by the spray insulation with Spackle. You need a LOT of Spackle. So put it on and sand it flat when dry.
Also put Spackle in the crack between the main body and the head of the hammer (that was made out of the lid)
This is a rough picture of what the top would look like


The Next Steps
PAINTING
On the body of the hammer, you must measure out the length of space between the handle and the center of the top. This is where the red flags will go. Measure twice and cut once in order to get the correct size and make it visually appealing. So cut these flags out of thin red craft foam; I didn’t have any red so I painted mine red instead.

HANDLE
I wasn’t quite sure how to make the handle. To make it looked weathered, i soaked the fabric in coffee overnight. I washed it out and hung it up to dry. I was afraid that it would fray, so I rubbed glue on the edges of the fabric after it was done drying. I rolled out a rectangle of gray clay and put it at the base of the handle where it meets the bottom side of head of the hammer. I took it off to bake it and slid it to the base of the handle after it was cool. I used some glue to secure the clay to the wooden dowels. Then I slowly wrapped the handle in the cloth, weaving it between the two dowels. I glued that edge together so it wouldn’t unravel. Then i made an end cap out of clay and glued that down as well.
And there you have it, a complete Cael’s hammer!
The War Machete
This hammer was a very large prop, and sometimes it was difficult to bring to a convention. While I was at the Renaissance Fair, I found some wooden swords that I could re-purpose for my Kid cosplay.
What you will need for the War Machete: A very small paintbrush, black paint, red paint, and golden paint (same color as the hammer). --side note, I didn’t use any sealer, but you can use some if you want.

I painted it wrong at first because I was trying to paint it from memory. Always look up a reference! This is the only reference I could easily find that was straight out of the game.

Repainted it because I’m a scrub
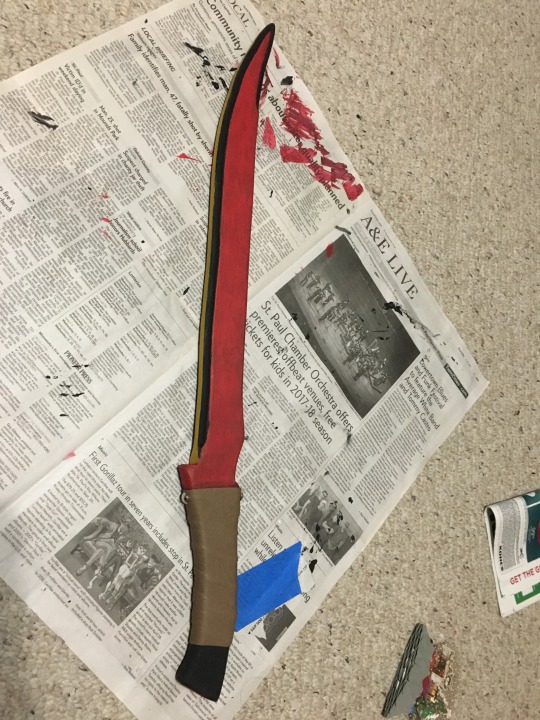
There you have it, Kid’s weapons from the game Bastion! It might be time consuming and tedious, but your hard work will pay off.
Kid’s Armor
The Kid wears a solid plate of metal riveted together on their stomach and back. Metal would have been a bit too heavy for me considering the hammer is heavy enough as it is. I substituted metal chest plates for some craft foam, but to make it more realistic I would suggest making it with some thicker EVA foam.
I used: Gray spray paint, iridescent glass gems, black elastic, and a hot glue gun
I used some thin black elastic so it will blend into my shirt, but you could also make it more sturdy by using leather straps.

Measure from slightly above your belt to your collar bone and get the width of your torso. Cut out a rectangle that fits your body for the body armor, and place your shoulder straps accordingly. For the riveted look I used iridescent glass gems that are normally used for vases and spray painted them gray. I used hot glue to attach these rivets because I wasn’t sure what glues were strong and safe to use on this foam. Go ahead and test different types of glue for foam-deterioration and strength on scraps if you have time.
For the arm and leg bands measured the circumference my arm/leg and left about two or three inches as a space to add elastic to make it easier when getting ready for a con. After adding elastic, I cleaned off the tip of my hot glue gun and gently dragged it across the foam to make outlines around the border. This added detail really brings the whole look together and makes it look more interesting.
My next post will be about the wig and clothing, so stay tuned!
And there you have it folks, two of the weapons and all of the armor for The Kid from Bastion cosplay. I would recommend this to a newer cosplayer because the simplicity of the armor and sword painting. This was a lot of fun to make and even more fun when people recognized my costume; It was a blast-from-the-past for many people. If you have any questions or would like more reference pictures, feel free to message me.
#bastion#the kid#zucks#zia#zulf#hammer#supergiant games#cosplay#cool cosplay#easy cosplay#Cosplay Tutorial#bastion cosplay#supergiant games cosplay#cosplay for summer#sword#the war machete#cael hammer#bastion the kid#props#diy#diy foam#diy weapons#weapons#weapon#foam cosplay#foam#armor#foam armor#diy armor#cool hammer
54 notes
·
View notes
Text

Sneak peak for my next costume! I will be wearing this one at Anime Fusion. The tutorial for this costume will be posted soon; it is heavily geared for people new to cosplay.
#venture bros#adult swim#cosplay tutorial#cosplay#easy cosplay#halloween costume#anime fusion#anime fusion 2019#venture bros cosplay#the venture bros#halloween#new cosplay#cool cosplay#cool cosplays
20 notes
·
View notes
Note
Hello. I ordered a cosplay online through aliexpress and it’s supposed to be custom fitted but it’s all a little too big. Do you have any advise?
Good news, it is easier to make something smaller than it is to make it bigger!
If you want to avoid sewing you can look for a local tailor to help take it in for you. This does cost a fee but is good if you don’t know how to sew and aren’t interested in learning.
If you want to do it yourself there are many tutorials for altering/tailoring a garment but they are usually specific to where on a garment you need to make the change. As a good introduction, check out this video: The Beginner’s Guide to Sewing Alterations (Episode 17): Taking In a Side Seam.
If you don’t want to get it tailored and if attempting to take it in yourself isn’t your thing, you can make minor adjustments with safety pins! Just be careful to not put too much stress on one pin, as it might pop while you’re wearing the garment.
Hope this helps! — Duckie / Admin / Support the Blog
81 notes
·
View notes
Video
youtube
Cosplay Tutorials: Arm Socks
Tutorial by: TerminaCosplay
Tutorial Link: https://www.youtube.com/watch?v=nyZynuGM2gA
808 notes
·
View notes
Text
My Basic Routine For Cross-play
Female to Male Cross-play
Face Diagram

Using make-up, you can make your face look as though it is affected by testosterone. Personally, I used eye shadow to do my contours and highlights because it easily fits in my bag and has multiple uses. I got this photo from the 2017 Hudson Public Library Anime Convention in order to show the pattern that is used. There are many Youtube videos that show this process and explain the purpose behind each highlight and contour.
Safe Binders
Using things such as Ace bandages as a chest binder can seriously hurt you, so please be safe and use an actual binder. There are many different brands to choose from, so I would highly suggest watching Youtube reviews of the binders you are considering. Here are 2 of the most popular brands:
http://www.underworks.com/
https://www.gc2b.co/
Pro tip: If you are low on cash, follow your favorite brand on social media and wait for special deals and holiday promotions
Some guidelines:
1. Never bind for more than 8 hours and never sleep in a binder! This can cause pain, trouble breathing, and long term side affects.
2. If you feel uncomfortable, take it off. Feeling pain means that something is wrong. It might make you sad that you have to change, but your health is more important that the costume.
3. Take it off if you are going to exercise. Unlike a sports bra, a binder is suppost to inhibit the movement of your chest. If you start breathing hard, a binder will restrict your lungs. And the binder will be all sweaty, smelly, and hard to take off. So just don’t do it
The One I Use:
The Extreme MagiCotton Sports and Binding Bra, from Underworks. I chose this “binding bra” because I wasn’t quite sure if my parents would be okay with me wearing a binder. It would also allow me to do exercise while in costume. Binders aren’t exactly breathable, but this one is a bit less sweaty than some other ones. This one would be best for females with smaller chests and that live in hotter climates. This is also a good choice if you don’t plan to wear it a lot. I have heard that it stretches out more easily compared to others. I haven’t noticed that in mine, but its important to be aware of. Here is the link to this specific Binder: http://www.underworks.com/extreme-magicotton-sports-and-binding-bra
#binders#crossplay#ftm#cosplay#Cosplay Tutorial#makeup#contouring#female to male#highlighting#pride#pride month#trans#2017 Hudson Public Library Anime Convention#binder#female to male makeup#hudson wisconsin
40 notes
·
View notes
Photo
Capricious Cosplayer turned 1 today!
1 note
·
View note
Text
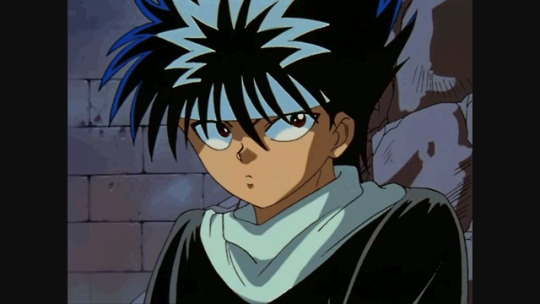
Hiei from Yu Yu Hakusho Cosplay Tutorial: Accessories
Tips: Hand wrap, acting, and Yukina’s necklace
There are many different ways to wrap your hand like Hiei, but this is the reference I used.

This is a bit complicated, so practice makes perfect! If you don’t have time, I suggest gently wrapping your hand in bandages that sticks to itself. This makes it fit snugly around your hand, but it won’t make your palms overheat.
I found a necklace that looked like Yukina’s necklace at my local Renaissance Fair this fall. Any necklace with a blue gem at the end would work. This is an image from the show that I used as a reference.
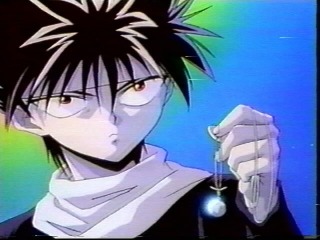
And here is the actual necklace. The gem looks pretty dark, but I think it suits the costume more than a bright blue necklace.

Let’s be honest, Hiei is a bit of a drama queen. He is the smart, cunning, and ruthless demon we have come to know and love; So act like it! One of my favorite parts of going to conventions is seeing everyone getting into the Cosplay spirit and portraying their favorite characters. Good luck and have fun.
#hiei#hiei cosplay#yu yu hakusho#yyh#yyh hiei#yu yu hakusho cosplay#short and sassy#cosplay#cool cosplay#Cosplay Tutorial#easy cosplay#foam cosplay#foam wig#diy foam wig#diy wig#anime#cool cosplays#handwrap#handwraps#yukina#yukina necklace
13 notes
·
View notes
Text
Hiei from Yu Yu Hakusho Cosplay Tutorial: DIY Foam Wig
I followed https://schmemycosplay.tumblr.com/post/143846376823/foam-wig-tutorial and used their instructions as a baseline. I made multiple of the “swim cap” base parts and chose the one I found the most comfortable.

This project will need: Scissors, paper, a pencil, a measuring tape, a wig head, and craft foam for the base. The hair is made with craft foam, hot glue, sealant (I used Elmers glue), and A LOT OF FREE TIME.
I spent hours cutting foam into the pieces of hair and I used about two sheets of craft foam that were 12 by 18 inches. It doesn’t matter what color foam it is, although I suggest trying to pick of a color close to what the wig will be in the end. I used red and white foam because that’s what I had lying around. This project is really good if you have scraps of craft foam. I started layering them at the back and tried it on to make sure it covered up the wig cap.
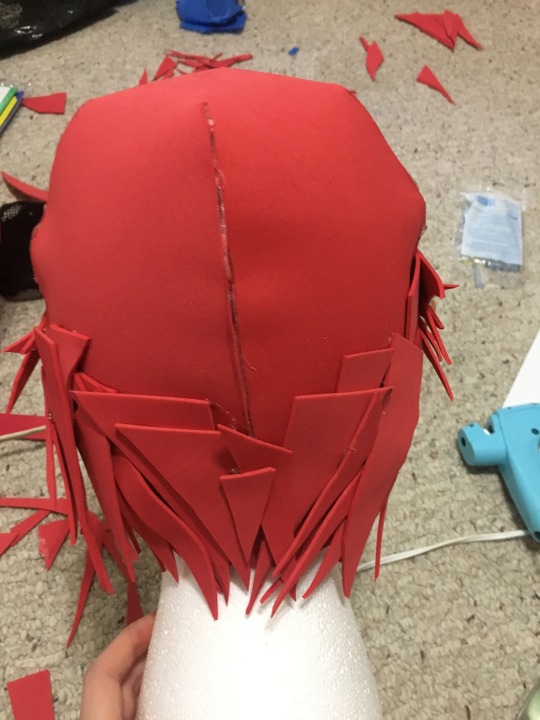
Have lots of reference pictures of your character and decide what size and shape the pieces need to be. This is one of the pictures of Hiei I used as a reference. Try to find pictures or 3D models so you can see how the hair in the back of their head lays.

Just keep cutting, layering, and adjusting. If you have parts that need to curl, gently heat them up with a hairdryer on low and shape to your desired look. Fill in empty spots with small scraps. Before painting, put multiple coats of sealant on all of the foam. Put sealant and paint in the inside as well so no one will be able to tell the original color. The paint will be absorbed into the foam and you will have to use at least twice as much if you don’t. Some paint will also eat away at foam, so I stress this, Seal your foam!

Sealing and painting was the most time consuming part of my wig. This part easily took 10+ hours. The main problem I had was the fact that i was applying everything with a paintbrush. I highly suggest finding a sealant and paint that you can spray. If you can’t find a way to spray it, I suggests finding some audiobooks. I used a tiny doe foot paintbrush to get into the corners and add the white detail in the front of Hiei’s hair.

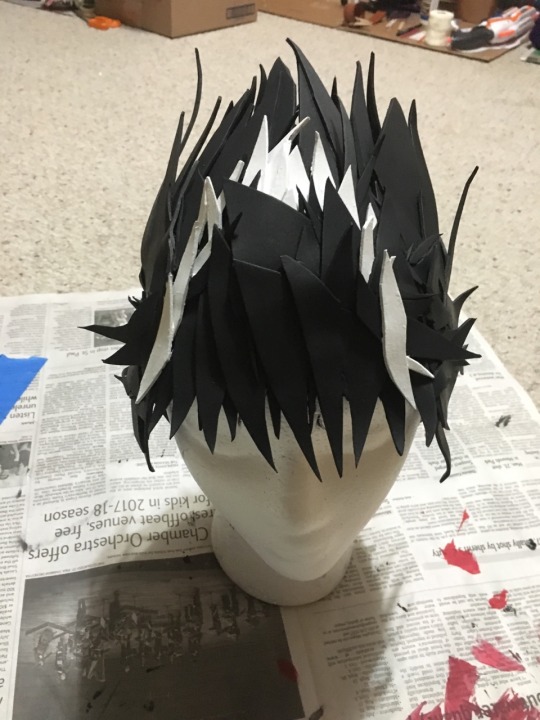


Ta Da! Get ready for some fun cosplay as Hiei from Yu Yu Hakusho. You do not need to use fasteners like bobbypins or glue because the “swim cap” base piece should fit snugly to your head.
#hiei#yyh hiei#yu yu hakusho#hiei cosplay#yu yu hakusho cosplay#short and sassy#cosplay#Cosplay Tutorial#foam wig#diy foam wig#diy wig#anime#hiei cosplay tutorial#cool cosplay#cool cosplays
13 notes
·
View notes
Text
Hiei from Yu Yu Hakusho Cosplay Tutorial: Clothing
The clothing Hiei wears it very simplistic and most of it you can find around the house. Start with form-fitting black pants, a black shirt to wear under the tunic, and a white infinity scarf. I made a white headband and it helped keep my foam wig in place. The last step is making Hiei’s signature black tunic, which is surprisingly easy.
To make the tunic, you will need: paper and a pencil, scissors, about 3 yards of black cotton fabric, black thread, and a black zipper.
https://www.youtube.com/watch?v=Dyc2utX16L4&list=PLHzZ5Ci9ekMKQWxBs-F2D-84ocRu4stug&index=40 I used this tutorial as a base and made small adjustments to make it more masculine. Some adjustments I made were:
On step #3, using an inch of hem allowance instead of 1/2 and inch because I used a non-stretchy cotton.
On step #4 making the chest area go down 3 inches instead of 2 to make it looks slightly more fitted at the waist.
I changed step #6 slightly by making the lines only 3/4 of an inch instead of 1 inch. This helped it look less like a dress and more like a tunic
I added a zipper in the back that was hidden my the scarf
Here what the pattern should look like
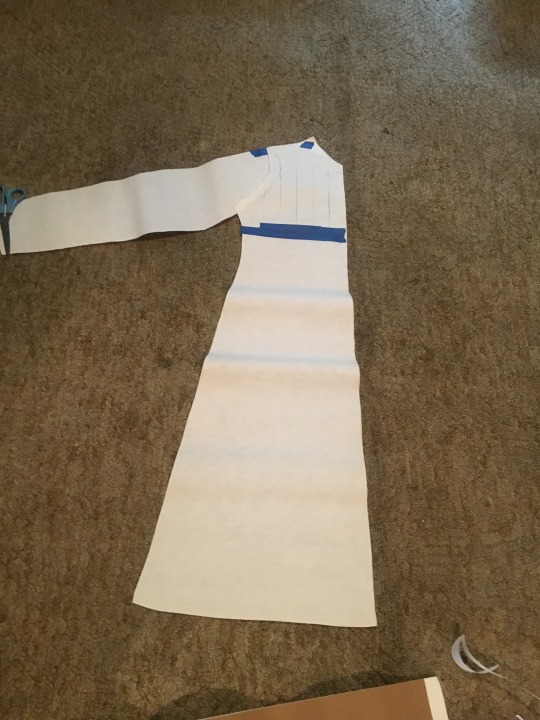
Here is the completed tunic and scarf

You can add detail by wrapping your hand (gently) in ace bandages and wearing a necklace with a blue gem at the end ( I got this one at the Renaissance festival). I used black combat boots instead of his black flats because I felt that it would make him seem slightly stronger.

Here is the finished product! It made me very happy that multiple people recognized my costume. Excuse the background, I was in a hotel room getting ready for Anime Fusion 2017. If you have any questions, comments, or witty remarks, feel free to message me.
#hiei#hiei cosplay#yu yu hakusho#yyh#yyh hiei#yu yu hakusho cosplay#short and sassy#cosplay#cool cosplay#Cosplay Tutorial#easy cosplay#foam cosplay#foam wig#diy foam wig#diy wig#anime#cool cosplays
13 notes
·
View notes


Text
Wig in Fabric Softener Experiment
Source idea https://www.youtube.com/watch?v=TxeHZzSyjFg&t=440s “How to De-shine a Wig (ft. Castiel from Supernatural)”
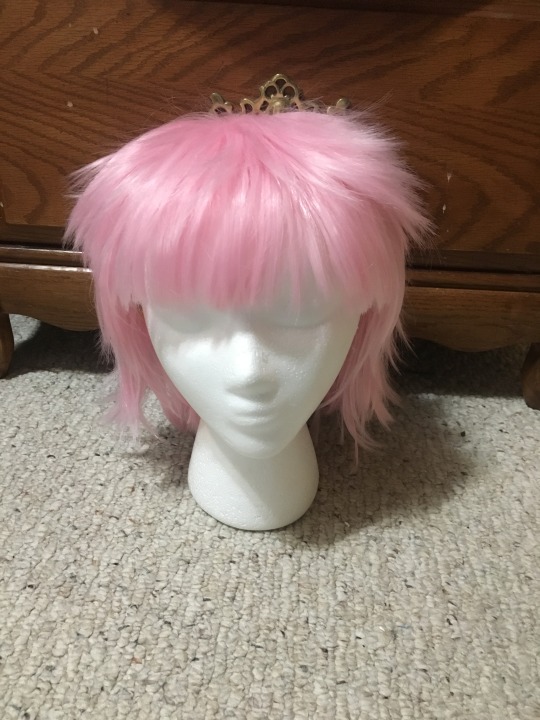
I bought this wig on Aliexpress for $9

It isn’t the best quality and is SUPER shiny, but I wanted to see if there was any way to redeem it. I tested the de-shining method of soaking a shiny wig in a bucket of fabric softener and water. The wig is a bright pink wig I was planning on using for the character Nana, from Elfen Lied. The only problem is the fact that is its so shiny and unnatural looking.

I used over a cup of fabric softener and enough water to cover the wig. I used warm water and swished it around to make sure the fabric softener was evenly mixed in.
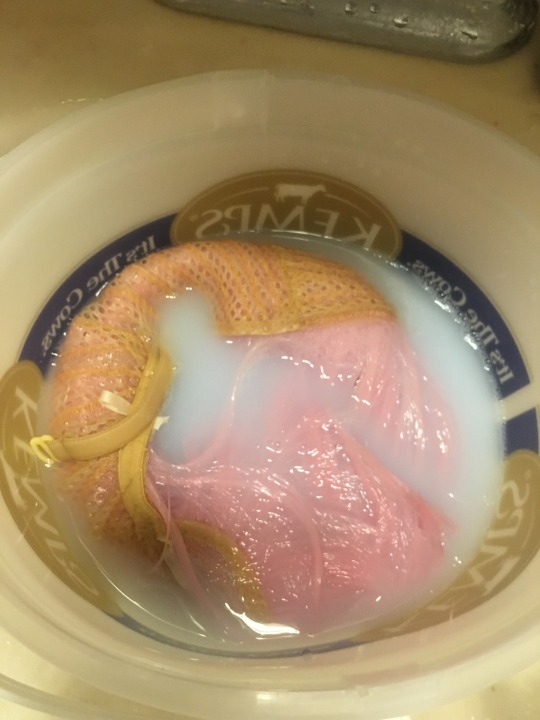
I left the wig in the solution for one week and then rinsed the wig with cold water. The final product!
Okay so this method sadly didn’t work for this wig. another I method I tried was soaking it in apple cider vinegar. I mixed 1 cup of the vinegar to 4 cups of water and let it sit for an hour. It didn’t affect the wig at all.
I have been looking into other solutions such as baby powder, and dry shampoo. Have you tried any of these and did they work?
5 notes
·
View notes
Text
Edward Elric Cosplay Tutorial Links
For your convenience, here is a list of links for all pieces of the Edward Elric Cosplay tutorial.

Black Coat: https://capriciouscosplayerposts.tumblr.com/post/163731002904/edward-elric-cosplay-part-1
Red Coat: https://capriciouscosplayerposts.tumblr.com/post/163948619924/edward-elric-cosplay-part-2
Hand: https://capriciouscosplayerposts.tumblr.com/post/164384119459/edward-elric-cosplay-part-3
Wig: https://capriciouscosplayerposts.tumblr.com/post/167912021199/edward-elric-cosplay-part-4
#edward elric#edward elric cosplay#edward elric coat#edward elric wig#edward elric tutorial#Fullmetal Alchemist#fullmetal alchemist tutorial#cosplay#cool cosplay#easy cosplay#Cosplay Tutorial#simple cosplay#simple edward elric cosplay#animinneapolis#edward elric hand tutorial#edward elric metal hand#foam cosplay#cosplay for summer#cool cosplays#plaster wrap#automail tutorial#edward elric automail tutorial#edward elric half coat tutorial#edward elric red coat tutorial#edward elric long coat#edward elric coat tutorial#edward elric clasp tutorial#full metal jacket#wig
30 notes
·
View notes
Text
Edward Elric Cosplay: Part 4
I bought “Fullmetal Alchemist Edward Elric's Wigs Long Warm Blonde Cosplay Braid Hair Wigs” on Ebay. It was $15.98 USD (including shipping costs) and the product preview looked like this.

It required some styling and it was tangled when it came out of the bag. I simply brushed it out and re braided it. Here is a reference picture that shows his hair in detail.

This is what it looks like on a wig head. I don’t have it braided because it is easier for my storage method.


This is the inside of the wig and as you can see it is a typical cosplay wig. (not a lace front wig)
It can get rather itchy and uncomfortable after wearing it for a full day so be careful. There are some ways to make it more manageable but I haven’t had time to test them. Some ways that i have heard about are sewing lace onto the headband or soaking the whole wig in a vinegar and water solution. I can’t promise that these will work so be cautious; you don’t wanna damage your wig.
I highly suggest using a wig cap that is similar to your skin color when wearing light color wigs. This wig comes with a black wig cap but it can sometimes be seen from under the wig.
#edward elric#edward elric cosplay#edward elric tutorial#edward elric cosplay tutorial#edward elric wig#Fullmetal Alchemist#fullmetal alchemist tutorial#cosplay#cool cosplay#easy cosplay#Cosplay Tutorial#animinneapolis#simple cosplay#simple edward elric cosplay
10 notes
·
View notes
Photo

It’s time for our yearly Cosplay Black Friday roundup!!! If you’re looking to stock up on wigs, lenses, makeup, or fabric for the 2018 con season, now’s a great time to do it - check out the below guide, comment with more vendors, and be sure to share with your friends to help out your fellow cosplayers!
*~*~*~*Circle Lenses*~*~*~*
Uniqso (http://bit.ly/2AkTvm1)
Fri Nov 24th onward:
Up to 50% off lenses - you can also stack an additional 10% off everything for up to 60% off with our coupon CBC along with the above link
Honeycolor (http://www.honeycolor.com)
All november: Free trial lens with every order
Candylens (http://www.candylens.com)
Fri Nov 24th onward: 40% off lenses with the coupon code BF402017
*~*~*~*Wigs*~*~*~*
Arda Wigs (http://www.arda-wigs.com)
Mon Nov 27th: 10% off the entire site. Orders over $70 receive a free factory sample wig while orders over $100 also receive a free makeup gift
Tues Nov 28th: 15% off the entire site.
Weds Nov 29th: 20% off the entire site.
All three days: 45% off discontinued wigs
Discount codes will be released to Arda’s site and social media at midnight
{More below the cut!}
Keep reading
754 notes
·
View notes
Text
Edward Elric Cosplay: Part 3
This part will contain instructions on how to make Edward’s Automail hand. I did not make the arm because my black half jacket (that I made in part one) covers it.
For this project you are going to need your pattern pieces, some plaster wrap, masking tape, some metallic silver spray paint, a clear top coat spray, thin craft foam, 1/4 inch black elastic, hot glue, and googly eyes. I wore a very thin black elbow length glove so you can’t see my arm underneath.
I printed the pattern out from this fabulous website, Amethyst Angel, http://amethyst-angel.com/armormaking_automail2.html .Simply just print out the pattern for the hand and finger pieces on some printer paper and cut them out according to the directions.
Making the Finger Pieces

After you cut out all of the finger pattern bits I suggest trying a couple of them on your fingers and adjust their size. After you find a size that fits, use some tape and secure them to your plaster wrap. This stuff is normally used for making masks or art pieces so it can be found at any craft store. Cut around them and make them a bit bigger than the patterns. Make sure to cut it big enough so the wings on either side fit around your finger. Plaster wrap comes in large amounts and is relatively cheap so don’t be afraid to make them a bit bigger than they need to be. I suggest you work with it and practice using it before making your final project.
This next part is gonna get pretty messy so you should put down newspaper or plastic bags down where you are working. Cover your fingers with plastic wrap and tape on your right hand so you won’t get the plaster stuck to you. Don’t worry about the plastic wrap being too bulky because your black glove should take up the extra space. This is why I didn’t use a latex glove to protect my hand. Make sure you read the instructions to using your plaster wrap. Now take the pattern pieces one at a time, working from knuckle to finger tip, and plaster wrap them onto your fingers. Smooth them out really well so the finish product will look like smooth metal. You’re going to have to work rather quickly because it dries rather fast.
Wait until they are all dried, a fan helps with this. I suggest watching some Fullmetal Alchemist/ Fullmetal Alchemist Brotherhood until they are dry. Wiggle off as many as you can. For the ones who won’t come off, cut a through the back and make it a little wider with more plaster wrap after it is off your finger. Be very careful and work slowly so you don’t hurt yourself. I suggest letting these set overnight before painting them.
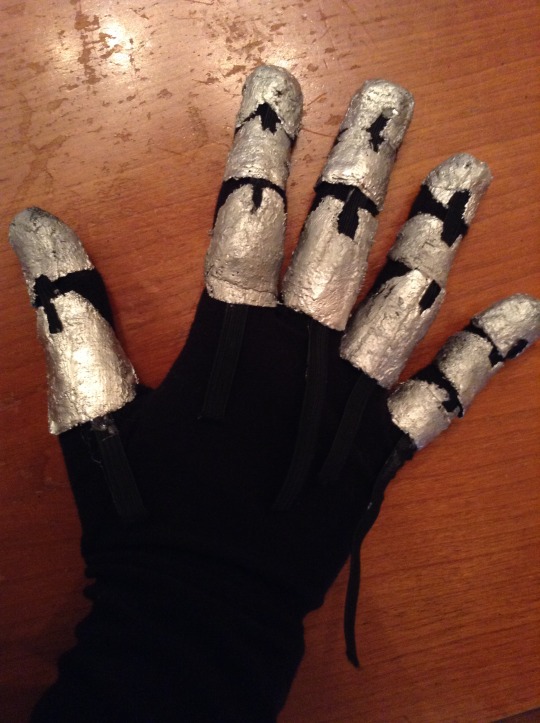
The finger pieces are gonna need multiple coats of silver spray paint, so you can recycle the newspapers or plastic bags from earlier. Follow the instructions on the can and make sure you are in a well ventilated area. The first time I wore these I only did two coats of paint, and that didn’t go well. The finger pieces would rub up against each other and slowly started to come apart. Make sure to use around 3-4 coats of paint and a clear top coat. Remember to let the paint dry before adding the next coat.
The fingers pieces need to be connected to actually form a finger so I used my black elastic. It works very well because it can stretch really easily. You can move your hands around as much as you want and it makes the fingers easier to take off after a long day at a con. Put the finger pieces on where they fit comfortably on your hand. Hold up a piece of black elastic to your finger and mark out where the middle of each finger piece is. Cut the elastic so it can go down to the middle of the back of your hand.
Making the Rest of The Hand
To make the part that covers the hand and palm, I used craft foam as the base. I used the patterns from Amethyst Angel and cut out the foam. Try on the foam around your thumb and make sure it fits comfortably. Use hot glue to secure the base pieces of foam together.
This picture was taken from http://amethyst-angel.com/armormaking_automail2.html and is not mine


This picture was taken from http://amethyst-angel.com/armormaking_automail2.html and is not mine.

The way I created the knuckles is really simple. Just cut out the indents drawn in the picture and glue a large rectangle underneath. You should glue the elastic that comes down from the fingers in between the knuckle parts. The rectangle of foam inside will protect your hand from the glue and create depth in the knuckles.

I made the larger circle out of foam and glued it in place. To create the line in the middle, I used a hot glue gun with a clean tip and slowly dragged it across the surface of the foam. To replicate the two rivets, I made the the exact same way I made the rivets for the jacket clip; I spray painted googly eyes. So the hand doesn’t slide off while you are wearing it, I suggest attaching some black elastic to the side opposite your thumb. It should blend right in with your glove.

If you put in a little work you can make Edward’s amazing automail hand from Fullmetal Alchemist. If you have any questions regarding how to make this cosplay or similar cosplays, please feel free to ask.
#edward elric#cosplay#Cosplay Tutorial#edward elric tutorial#Fullmetal Alchemist#fullmetal alchemist tutorial#edward elric cosplay tutorial#edward elric cosplay#cool cosplay#cool cosplays#edward elric hand tutorial#automail tutorial#edward elric automail tutorial#edward elric metal hand#foam cosplay#plaster wrap
40 notes
·
View notes