#& were not allowed to change the computer display settings (even the blue light filter is disabled. lmao.)
Text
sometimes things that are more accessible... are less accessible (just to different people) (i am mostly thinking about the push for websites & apps to be High Contrast without consideration that some people actually need the opposite) (me) (whether its dark on light or light on dark if the contrast is too high it feels like its screaming at me to the point where on bad days i literally cannot get my brain to focus on whatever im supposed to be looking at) (migraines especially but sometimes it just happens on its own) (there is no one Good And Correct way to make something accessible to everyone you have to make it customizable you need to provide options)
#my phone has an option to throw a color filter over the screen but it kinda sucks bc i cant change the saturation of it just the opacity#so putting it on a higher opacity lowers the contrast but it also makes it. so fucking sepia#i wish i could JUST lower the contrast. it has a toggle to INCREASE screen contrast but nothing to DECREASE it#but this also doesnt help me like. at work. doing data entry. which is all pure black & white scans.....#theres only so much monitor adjustments can do (the contrast option doesnt even Work That Way)#& were not allowed to change the computer display settings (even the blue light filter is disabled. lmao.)#& we cant download anything so if theres something out there that would wash out my screen i still wouldnt be able to use it...#like dgmw im glad they ARE implementing these things to try to make things more accessible#but it would be nice if they could understand that its not one size fits all.....
3 notes
·
View notes
Photo


30 YEARS AGO: VOYAGER 2’S HISTORIC NEPTUNE FLYBY Thirty years ago, on Aug. 25, 1989, NASA’s Voyager 2 spacecraft made a close flyby of Neptune, giving humanity its first close-up of our solar system’s eighth planet. Marking the end of the Voyager mission’s Grand Tour of the solar system’s four giant planets -- Jupiter, Saturn, Uranus and Neptune -- that first was also a last: No other spacecraft has visited Neptune since. “The Voyager planetary program really was an opportunity to show the public what science is all about,” said Ed Stone, Voyager’s project scientist since 1975. “Every day we learned something new.” Wrapped in teal- and cobalt-colored bands of clouds, the planet that Voyager 2 revealed looked like a blue-hued sibling to Jupiter and Saturn, the blue indicating the presence of methane. A massive, slate-colored storm was dubbed the “Great Dark Spot,” similar to Jupiter’s Great Red Spot. Six new moons and four rings were discovered. During the encounter, the engineering team carefully changed the probe’s direction and speed so that it could do a close flyby of the planet’s largest moon, Triton. The flyby showed evidence of geologically young surfaces and active geysers spewing material skyward. This indicated that Triton was not simply a solid ball of ice, even though it had the lowest surface temperature of any natural body observed by Voyager: minus 391 degrees Fahrenheit (minus 235 degrees Celsius). The conclusion of the Neptune flyby marked the beginning of the Voyager Interstellar Mission, which continues today, 42 years after launch. Voyager 2 and its twin, Voyager 1 (which had also flown by Jupiter and Saturn), continue to send back dispatches from the outer reaches of our solar system. At the time of the Neptune encounter, Voyager 2 was about 2.9 billion miles (4.7 billion kilometers) from Earth; today it is 11 billion miles (18 billion kilometers) from us. The faster-moving Voyager 1 is 13 billion miles (21 billion kilometers) from Earth. Getting There By the time Voyager 2 reached Neptune, the Voyager mission team had completed five planetary encounters. But the big blue planet still posed unique challenges. About 30 times farther from the Sun than Earth is, the icy giant receives only about 0.001 times the amount of sunlight that Earth does. In such low light, Voyager 2’s camera required longer exposures to get quality images. But because the spacecraft would reach a maximum speed of about 60,000 mph (90,000 kph) relative to Earth, a long exposure time would make the image blurry. (Imagine trying to take a picture of a roadside sign from the window of a speeding car.) So the team programmed Voyager 2’s thrusters to fire gently during the close approach, rotating the spacecraft to keep the camera focused on its target without interrupting the spacecraft’s overall speed and direction. The probe’s great distance also meant that by the time radio signals from Voyager 2 reached Earth, they were weaker than those of other flybys. But the spacecraft had the advantage of time: The Voyagers communicate with Earth via the Deep Space Network, or DSN, which utilizes radio antennas at sites in Madrid, Spain; Canberra, Australia; and Goldstone, California. During Voyager 2’s Uranus encounter in 1986, the three largest DSN antennas were 64-meters (210 feet) wide. To assist with the Neptune encounter, the DSN expanded the dishes to 70 meters (230 feet). They also included nearby non-DSN antennas to collect data, including another 64-meter (210 feet) dish in Parkes, Australia, and multiple 25-meter (82 feet) antennas at the Very Large Array in New Mexico. The effort ensured that engineers could hear Voyager loud and clear. It also increased how much data could be sent back to Earth in a given period, enabling the spacecraft to send back more pictures from the flyby. Being There In the week leading up to that August 1989 close encounter, the atmosphere was electric at NASA’s Jet Propulsion Laboratory in Pasadena, California, which manages the Voyager mission. As images taken by Voyager 2 during its Neptune approach made the four-hour journey to Earth, Voyager team members would crowd around computer monitors around the Lab to see. “One of the things that made the Voyager planetary encounters different from missions today is that there was no internet that would have allowed the whole team and the whole world to see the pictures at the same time,” Stone said. “The images were available in real time at a limited number of locations.” But the team was committed to giving the public updates as quickly as possible, so from Aug. 21 to Aug. 29, they would share their discoveries with the world during daily press conferences. On Aug. 24, a program called “Voyager All Night” broadcast regular updates from the probe’s closest encounter with the planet, which took place at 4 a.m. GMT (9 p.m. in California on Aug. 24). The next morning, Vice President Dan Quayle visited the Lab to commend the Voyager team. That night, Chuck Berry, whose song “Johnny B. Goode” was included on the Golden Record that flew with both Voyagers, played at JPL’s celebration of the feat. Of course, the Voyagers’ achievements extend far beyond that historic week three decades ago. Both probes have now entered interstellar space after exiting the heliosphere -- the protective bubble around the planets created by a high-speed flow of particles and magnetic fields spewed outward by our Sun. They are reporting back to Earth on the “weather” and conditions from this region filled with the debris from stars that exploded elsewhere in our galaxy. They have taken humanity’s first tenuous step into the cosmic ocean where no other operating probes have flown. Voyager data also complement other missions, including NASA’s Interstellar Boundary Explorer (IBEX), which is remotely sensing that boundary where particles from our Sun collide with material from the rest of the galaxy. And NASA is preparing the Interstellar Mapping and Acceleration Probe (IMAP), due to launch in 2024, to capitalize on Voyager observations. The Voyagers send their findings back to DSN antennas with 13-watt transmitters -- about enough power to run a refrigerator light bulb. “Every day they travel somewhere that human probes have never been before,” said Stone. “Forty-two years after launch, and they’re still exploring.” TOP IMAGE....This picture of Neptune was produced from the last whole planet images taken through the green and orange filters on the Voyager 2 narrow angle camera. The images were taken at a range of 4.4 million miles from the planet, 4 days and 20 hours before closest approach. The picture shows the Great Dark Spot and its companion bright smudge; on the west limb the fast moving bright feature called Scooter and the little dark spot are visible. These clouds were seen to persist for as long as Voyager's cameras could resolve them. North of these, a bright cloud band similar to the south polar streak may be seen. The Voyager Mission is conducted by JPL for NASA's Office of Space Science and Applications. LOWER IMAGE....Global color mosaic of Triton, taken in 1989 by Voyager 2 during its flyby of the Neptune system. Color was synthesized by combining high-resolution images taken through orange, violet, and ultraviolet filters; these images were displayed as red, green, and blue images and combined to create this color version. With a radius of 1,350 (839 mi), about 22% smaller than Earth's moon, Triton is by far the largest satellite of Neptune. It is one of only three objects in the Solar System known to have a nitrogen-dominated atmosphere (the others are Earth and Saturn's giant moon, Titan). Triton has the coldest surface known anywhere in the Solar System (38 K, about -391 degrees Fahrenheit); it is so cold that most of Triton's nitrogen is condensed as frost, making it the only satellite in the Solar System known to have a surface made mainly of nitrogen ice. The pinkish deposits constitute a vast south polar cap believed to contain methane ice, which would have reacted under sunlight to form pink or red compounds. The dark streaks overlying these pink ices are believed to be an icy and perhaps carbonaceous dust deposited from huge geyser-like plumes, some of which were found to be active during the Voyager 2 flyby. The bluish-green band visible in this image extends all the way around Triton near the equator; it may consist of relatively fresh nitrogen frost deposits. The greenish areas includes what is called the cantaloupe terrain, whose origin is unknown, and a set of "cryovolcanic" landscapes apparently produced by icy-cold liquids (now frozen) erupted from Triton's interior.
240 notes
·
View notes
Text
XIX: Saeyoung's Route (Y/N)
Where Futures Begin
Life used to be simple for you. Peaceful. But the Savior had other plans for you, and in moments, she ruined what you thought was your one shot at happiness. Blinded by anger, you escaped the Mint Eye, but that triggered a series of events that would bring you further into the world of brothers Saeran and Saeyoung. And further into the twisted world of your love for them.
Neutral Route:
01 | 02 | 03 | 04 | 05 | 06 | 07 | 08 | 09 | 10 | 11 | 12 | 13 | 14 | 15 | 16 | ✔
Saeyoung’s Route:
17 | 18 | 19 | 20 | 21 | 22 | ✔
Saeran’s Route:
17 | 18 | 19 | 20 | 21 | 22 | 23 | ✔
MASTERLIST
You couldn't be sure what time it was when you next woke up.
You knew that it had been afternoon when you were last awake, but as you stared out the windows, only darkness could be seen. Early in the morning or late at night, you concluded, after a moment of thinking.
Either way, a decent amount of time had passed. Saeyoung, still next to you, was in different clothes and his hair was washed, the fiery red now tamed and combed neatly. "Saeyoung?" You asked, using your voice to stir him from his slumber rather than your body, too afraid to move and bring forth a new wave of pain.
His eyes scrunched up and then opened, surprised. "You're awake?"
He sat in the bed and helped you into a sitting position, bringing a gentle hand to your cheek as if you were going to break at any second. "How do you feel, (Y/N)?" He picked up a glass of water and brought it to your lips. "Are you ready? The doctor is already here. We had him explain everything to Vanderwood so you don't need to worry about protecting your identity. We'll have the doctor on standby in case something goes wrong, but for the most part, Vanderwood will administer the-"
"My identity? Why would my identity need to be protected?" You asked.
Saeyoung looked away. "Let's talk about that when the Elixir is out of your system. We still don't know what it's doing to your mind."
The redhead extended an arm toward you, and you took it, allowing him to guide you toward a room you had never been in—Vanderwood's.
You poked your head in, surprised. The sheets had been changed and a tarp had been placed over the floor, the entire room converted into a makeshift hospital. There were several large pieces of equipment, and Vanderwood stood in the middle of it all, his hair pulled back into a low ponytail and his hands gloved. He pulled a surgical mask over his face. "Sit on the bed," He instructed.
You hesitated.
The only time you'd even come close to being in a hospital was when your orphanage had handed you off to a pediatrician's clinic for a week, and the worst of the machinery there was the needles they used to draw blood.
"What are you going to do?" You asked, not moving from your place.
"We'll filter the Elixir out of your blood. It's a pretty simple process...your blood goes into the machine and back into you. Don't worry, I know what I'm doing. The doctor didn't give us any anesthetic, though, so..." Vanderwood nodded toward Saeyoung. "You should stay here with her, Lucie- erm, Saeyoung. This might hurt."
The redhead nodded, gently pushing you toward the bed, giving you a soft kiss on the forehead when you'd finally laid down on it. Knowing that he'd be with you the whole time made you feel a little better. Surprisingly, the fact that there would be no anesthetic didn't scare you much. After your primary and secondary commitments, and then having the Elixir directly in your bloodstream, you had built your tolerance for pain up. When Vanderwood made the first cuts into your skin, you barely felt the scalpel as it pierced your skin.
Saeyoung squeezed your hand.
You thought about telling him you were be fine, but then realized that if you did...he'd pull his hand away. In all honesty, the thought of him doing that disturbed you more than the notion of pain, so you kept your lips shut and squeezed his palm back with a small smile.
Interestingly enough, your mental state had stabilized a bit between when you first were injected with the Elixir and now. Originally, the pain was so unbearable you could do little other than groan and shake, but it was as if your body had built grown accustomed to the pain. Is that a good thing, though?
You turned your head away as Vanderwood began pulling back the skin on your arm, easily grossed out by blood.
"Does it hurt?" Saeyoung asked, worry written on his normally relaxed face.
You chuckled. "Not as much as you probably think. I can handle this much." You flashed him a grin, as if that would prove your words, but Saeyoung still looked nervous.
He was about to respond when Vanderwood interrupted the two of you.
"Alright, everything's set up," The brunette took a step back and began removing his surgical gloves. "All we need to do is wait for the machine to filter your blood over the next few hours. Saeyoung, just monitor the numbers on the screen, and if you think something looks even a little wrong, make sure you tell me so that I-"
"I know, Vanderwood," Saeyoung said, chuckling. "I've helped you with medical missions before."
Vanderwood sighed, running a hand through his hair. Even he had his eyebrows scrunched up a little more than usual. You smiled. He cares about me more than he lets on, you realized.
He grumbled in protest, but Saeyoung ushered him out of the room.
"He acts all indifferent about you, but he he has a soft spot for you, ya know?" Saeyoung blurted the second the man was gone.
You grinned, having reached the same conclusion only seconds before. "Yeah," you mused.
"Everyone in your life cares about you, (Y/N). I hope you know that," Saeyoung mumbled, getting serious once more.
You bit your lip.
There were certainly exceptions to that. MC seemed to hate your guts, V (kind as he was) knew about the hostage trade and didn't stop Saeyoung. The Savior obviously resented you, and perhaps worst of all, you still had no news of Saeran.
Would the boy always think you had abandoned him? That you had never cared and that it was all a lie?
You could bear the thought of the others hating you, but no matter what happened...Saeran would always hold a special place in your heart.
"I want..." You began, unsure of how to communicate your desires. "I want to talk to Saeran."
Saeyoung's eyes widened, but you went on before he could say anything.
"You...You said he was here. At the cabin. I've been wanting to speak to him but," You laughed softly, but not in humor. "But I don't think he feels the same. I haven't seen him once since...since getting the injection."
Saeyoung's eyes rounded in surprise. "(Y/N), I promise you, Saeran doesn't feel like that. You've been awake for less than an hour in total over the past two days, so you might not have noticed, but he's checked on you every day. Even when I was with you, he came in and asked about your vitals and if you'd been drinking water and if-"
"Really?"
What Luciel said brought you so much hope.
You'd thought that your relationship with Saeran was unsalvageable. That with all the wrongs you had done against him and all the ways he had wronged you, he'd still be bitter.
For years now, he's been your closest friend, and often the only person to stand by you without fail. The past two months had been disastrous, a special circle in hell crafted just for you, but that didn't change the fact that Saeran and you had a history together.
And you were willing to do as much as was necessary to make sure that your friendship didn't go to waste.
"Should I bring him in?" Saeyoung offered, seeing the new light in your eyes.
You nodded your head and began mentally preparing yourself for what you'd say.
Barely thirty seconds passed before the twins were before you again, and as you stared at the two, you wondered why you hadn't realized earlier that they were related.
Truly two sides to the same coin, they were copies of each other, the only differences being the stark contrast in hair color and eye color.
And the look of horror and pain on Saeran's face as he gazed down at you.
"Saeran, you're..." Saeyoung murmured softly, not willing to complete the sentence that you all knew the answer to.
Crying.
You watched for the first time ever as silent tears ran down Saeran's cheeks. He'd never been this vulnerable in front of you. Never.
"Don't..." Saeran began, the word sounding raw and shaky. "Don't look."
He took a step back, and you thought he was going to leave the room, but he simply hit the light switch and the room darkened. The only light source was the computer monitor which displayed your vitals, something that wouldn't be shut off any time soon.
The sound of sniffling filled the room, and you found yourself at a loss for words.
"(Y/N), I..." Saeran began. "I'm so sorry."
In that moment, you wanted to rip the tube out of your arm and run to the boy, hug him and hold him and cry with him. Instead, you bit your lip
"Saeran..." You said, not sure where to begin. But the boy took your hesitation for anger.
"No, (Y/N), you don't have to say anything. I understand if you never want to see me again. Everything that happened was my fault, if only I could have been stronger, none of this would hav-"
"Saeran." Your eyes widened.
You had been the one who opened your mouth to interrupt, but Saeyoung had beaten you to it.
"Saeran, don't blame yourself," The older twin murmured. You couldn't see it, but you had no doubt that Saeyoung was hugging Saeran. "You were under the Elixir. I saw you. If you had enough in your system to be vomiting blue afterward, then there's no way you can be blamed for what your mind tricked you into doing."
You frowned, surprised by this revelation. "You...you were under the Elixir?"
The boy didn't respond, but his silence was an answer in itself.
You let out a sigh of relief. "How...how long, Saeran?"
You heard Saeyoung nudge him, and Saeran finally responded. "The Savior began giving me higher doses around the same time MC joined the Mint Eye. It doesn't excuse what I've done, (Y/N), I know that, and I'm so..."
You let Saeran ramble for a moment, giving him the opportunity to apologize when he didn't need to.
He was on the Elixir, you thought, the revelation giving you hope. Every time he ignored me and hurt me...it wasn't out of free will. It was all the Elixir.
It was a cruel liquid, the Elixir of Salvation.
The Savior used it for everything. She used it to brainwash disciples who questioned her authority. She used it to convince believers into believing in the magenta. She used it as a test during Primary and Secondary commitment. She used it to torture those she thought deserved punishing.
How many times did she give Saeran the Elixir? You wondered, slowly beginning to understand why he had looked at you with blank eyes so many times. Eyes are windows to the soul. When he cared for you and loved you, you saw affection in his eyes. When he was angry or disappointed, you saw the frustration in his eyes.
Over the past two months, though...his eyes had been blank. As if his mind were possessed by something else entirely. In your desperate search for answers as to why Saeran suddenly seemed to hate you, you had assumed that the blankness on his face was a product of his anger to you but now, you realized that the whole time, it was the Elixir.
Even when he injected you with the Elixir, it had been a decision reached under influence.
That goddamn liquid, you thought, suddenly more worried for Saeran's health than anything else. If the boy was throwing up blue, something you hadn't done during even your secondary commitment, the Savior truly must have gone overboard.
"(Y/N), please...I won't ask you to forgive me but just..." Your ears perked up as you heard Saeran's broken voice continue. "Just please don't die. I've caused you so much pain...but if you die because of this I won't be able to handle it. I know I deserve the pain and the blame and the grief, but please...please."
You wanted the lights to be on. You wanted to look Saeran in the eye and tell him everything would be okay.
That you were already feeling better and your life was most likely no longer in danger.
But you knew he wouldn't believe you, so instead, you simply said, "Saeran, come here." The boy moved forward, standing a foot away from you, unsure.
But you didn't waste a moment in hesitation. You grabbed his hand and pulled him into your bed, right next to you, and embraced him.
It had been nearly two months since the two of you had this level of closeness, and that seemed to push Saeran over the edge. He returned the hug for a moment, resting his head in the crook of your neck before the tears began flowing from him all over again.
Saeyoung left the room, shutting the door quietly, leaving the two of you.
It was a peaceful moment.
No words needed to be said.
You closed your eyes and shushed him as he mumbled apology after apology, holding him close for what felt like the first time in forever.
There was still a lot to talk about. A lot. But for a moment, it really felt like everything would be okay.
MASTERLIST
Neutral Route:
01 | 02 | 03 | 04 | 05 | 06 | 07 | 08 | 09 | 10 | 11 | 12 | 13 | 14 | 15 | 16 | ✔
Saeyoung’s Route:
17 | 18 | 19 | 20 | 21 | 22 | ✔
Saeran’s Route:
17 | 18 | 19 | 20 | 21 | 22 | 23 |
Word count: 2.2k
Notes: Avatar: The Last Airbender is suchh a good show everyone should watch it
Comment & Like
Next Update: 3/12/20
I do not own the rights to Mystic Messenger or any of the characters within it.
#707#saeran#707 x reader#saeran x reader#romance#love triangle#sondepoch#mysticmessenger#mystic#reader#xreader#fanfiction#mysme#saeyoung#saeyoung x reader#saeyoung x reader x saeran#saeran x reader x saeyoung#707 x reader x saeran#saeyoung x reader x saeran#twins#choices#wherefuturesbegin#COMPLETED
23 notes
·
View notes
Text
Technology and Society - VR, AR, AND MR
In this blog I will be looking at answering the question: could new age technology such as AR, VR AND MR, possibly cause a shift in our society and culture? Looking at theories of technological determinism (TD), focusing on its assumptions about how a societies social structure and cultural values are determined by its technology advances. Also, looking at the work of Jean Baudrillard and his theory on hyperreality, and his 1981 book simulacra and simulation, also looking at how the new technologies listed above can let us transcend our perceived realty into anther that lets us live in a simulated world? I will be focusing on the AR game Pokémon Go as my case study, but I will also be making references to other games through the blog.
Technological Determinism (TD)
Technological determinism, a term first coined by ‘Thorstein Velben’ in 1920, is according to ‘Ferrante’ is a reductionist theory that presumes a society’s technology drives the development of it’s social and cultural values (Fung, 2017). This theory aims to provide a link between the nature of society and technology. It attempts to give an explanation as to whom or what could have a controlling power to cause a cultural change, by questioning to which degree human thought or action is influenced by technological factors. However, there are many different versions of the (TD), In the book, ‘Does technology drive History?’, the ideas of technological determinism takes many forms, Ranging from ‘hard’ and ‘soft’ extremes (1994). In his book, Autonomous Technology, Langdon Winner states, “changes in technology are the single most important basis of change in society” (1977), he argues the core assumptions of the theory is that technology forms the basis of social life. With the development of the virtual reality game technology; could it cause a major societal shift in the new age of technology unlike we’ve seen before?
Augmented reality (AR), Virtual reality (VR) and Mixed reality (MR)
Augmented reality adds digital elements to the person’s actual environment often by using the camera on a smartphone. Examples of this would be the use of filters on apps such as snapchat, Instagram, and the most popular, Pokémon Go.

Image from https://www.vaderstad.com/ca-en/about-us/news/news-archive/2018/international/vaderstad-introduces-ar-to-the-farming-industry/
Virtual reality (VR) is a complete immersion experience that shuts out the physical world.

Image from http://www.technologyrecord.com/Article/microsoft-outlines-three-trends-that-will-impact-mixed-reality-in-2018-63570
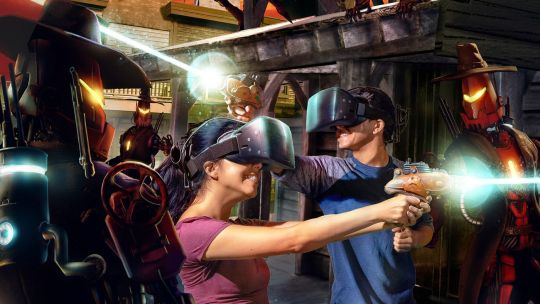
image from https://veer.tv/blog/best-vr-games-of-2018-top-15/
Mixed reality (MR) experience, combines elements of both AR and VR, real-world and digital objects interact. (The franklin institute, 2019)
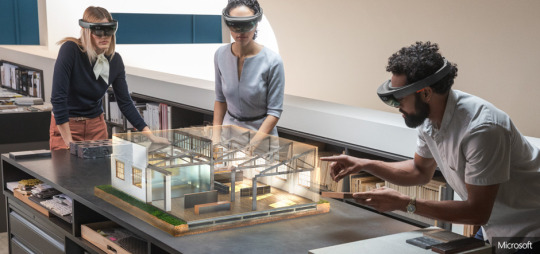
Image from http://www.technologyrecord.com/Article/microsoft-outlines-three-trends-that-will-impact-mixed-reality-in-2018-63570
Virtual reality is the use of computer technology to create a simulated environment (Bardi, 2019). The first instance of virtual reality was the panoramic paintings, that were made to create the illusion of being somewhere you are actual not. Exhibitions in museums of world war one, for example, to help to get a better experience. In the 1930s the idea of virtual reality was still only being thought of, science fiction writer Stanley G. Weinbaum, had the idea of goggles that would let the wearer experience a fictional world right in front of them. And today we have the Google glasses, which although doesn’t let us use whole new worlds, it still lets us see things that are not really there. ‘The Sensorama’ was invented by cinematographer Morton Heilig, it was an arcade-style theatre cabinet. A person could sit on the chair and be completely immersed into the film playing in front of them. It featured stereo speakers, a stereoscopic 3d display, fans, smell generators and a vibrating chair. Heilig’s next invention was the Telesphere mask in 1960, but it didn’t have motion tracking. However, motion tracking was added a year later, by two Philco Corporation engineers Comeau & Bryan. In 1995 Ivan Sutherland suggested HMD into the world of virtual reality, which he described as “ultimate display”. He wanted something that would give the ability to interact with objects in the virtual world in a realistic way. The first headset was released by SEGA, The Sega VR headset in 1993. At the time selling for $332. But as the idea of VR was still brand new, the release was flop, not selling as intended by Sega.
And then VR as we know it...
To experience AR all you need is your apple or Samsung smart phone, but VR you will need a headset. These headsets go from £30 to £500, depending on the quality and what customers are looking for.
The history of Pokémon-
Satoshi Tajin was the owner of the ‘Game freaky’ magazine. Himself and his co-worker and friend, Ken Sugimori (the illustrator of ‘Game freaky’ decided to make their own video games, as they thought all the other video games at the time were boring or bad. So, on April 26th 1989, the magazine turned to an official game development company. The company went on the create successful games: Yoshi for the NES, Mario and Wario for the Super Famicom, and Postman for SEGA (Bates).

Image from https://n4g.com/news/1794471/top-5-original-pokemon
On Nov 27th 1996 came the release of Pokémon Red and Pokémon Green for the Nintendo GameBoy. Pokémon was a game in which players take the role of the protagonist number 721, they set out on adventures to collect and train creatures known as Pocket monsters - (hence the name Pokémon). With the ultimate aim of the game being to defeat 8 Pokémon gym leaders, stop and evil corporation and battle your way to becoming the best. But that what made it such a fun game, the end all aim for players was to collect all 151 Pokémon. However, not all Pokémon were in one place, you had to search for them across the growing world of Pokémon. The Game Boy allowed players to link cables and have battles against one another and trade Pokémon. This opened the door for even better adventures with your friends. The game become very popular, making millions in Japan. Causing the campany make re-releases limited edition Pokémon. The game didn’t get a world wide release until September 28th 1998, Pokémon Red and Blue, in America. And when it was released worldwide, it become a worldwide phenomenon, following were successful releases of Pokémon anime series, Manga, trading cards and games. The sequel, Pokémon 2: Gold and silver come out on the 21st 1999 in Japan and later in the US October 16th 2000. And has since had many other sequels.
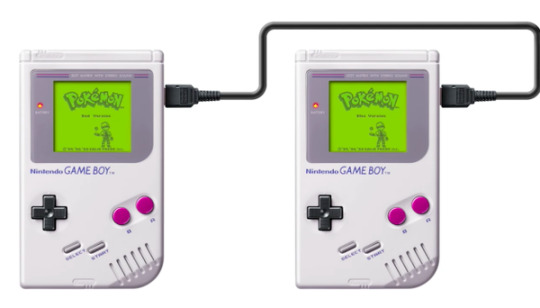
Image from http://www.escapistmagazine.com/articles/view/video-games/15434-Pokemon-20th-Anniversary-Tribute
Pokémon anime-
The first episode aired on 1 April 1997 in Japan, not being broadcasted in the US until September 1998. It was a success and has been running ever since. On season 1 episode 38 episode, ‘Electric Soldier Porygon’ viewers started to complain after an explosion on the episode. The explosion was extremely bright with intense lights flashing blue and red rapidly, it caused children to “experienced blurred vision. Others felt dizzy, or nauseous. In extreme cases, some even experienced seizures and cases of temporary blindness”(Plunkette, 2015) although it didn’t last very long. it had effects on a total of 700 viewers, who were rushed to the hospital. That episode has never been shown again. This incident holds the Guinness world record for Most Photosensitive Epileptic Seizures Caused by a TV Show. (Flint, 2015)

Image from https://www.gamnesia.com/news/limited-edition-pokemon-anime-box-sets-for-seasons-1-2-and-advance-series-c
Pokémon Go!
On July 6th, 2016 the mobile app game Pokémon Go was released, available for download on iOS and Android devices, and was an instant hit. Becoming the most revenue grossed by a mobile game in its first month with $206.5 Million. (Marasigan, 2016) . Players can create an avatar, who is then placed on a map according to the players geographical location. Players can then move around collecting Pokémon as their location has been transformed into the world of Pokémon, with places like ‘PokéStops’ and ‘Pokémon gyms’ which were now battle locations for players, this is all possible with the app’s AR feature. The players can see, and hear the Pokémon as they catch em’, bringing it to life, providing an experience like never before. Players can like feel like Ash when they play. That’s what made it so popular, it seemed like everyone was playing Pokémon Go, didn’t matter what age, background, or location, at the parks, gyms, or schools, “millions of people roaming around the physical world to capture virtual characters” (KnowledgeWharton high School, 2016). Pokémon Go was about the experience. Although, we had experienced AR in the form of snap chat/ Instagram fillers, this was the first time it was presented to us in this form. A big technology such as AR being so accessible, at any point we could take out our phones and transport to another world, another simulation but still within ours.
youtube
1 note
·
View note
Text
How To Purchase Driving Glasses.
Elle Glasses Frames To Buy.
Content
Can Makeup Misbehave For Our Eyes?
Elle Brown Blue Turtle Gold Arms Round Circular Glasses Frames El14401 Db 145.
Lens Colour.
Use Flexon Tablet Computer
How Long Does It Require To Get Glasses From Walmart Vision Center?
How To Order Replacement Lenses For Your Existing Frames.
Blupond Night Driving Glasses Yellow Tint
With that claimed, you might see a subtle enhancement with lenses that feature an anti-reflective covering. Some people report AR lenses to assist with approaching headlight glare. Polarized lenses have ended up being popular yet are they actually beneficial as well as worth the additional expense? If you spend a great deal of time when driving, on the golf links, on the water or in the hills, polarized lenses are a great investment. They reduce hazardous glow on reflective surface areas like sidewalk as well as water, making objects show up clearer-- like a golf round, highway lines or a path deep in the woods.
This web link will take you to our polarized sunglasses, filteringed system results to show you Bronze-Brown and Copper-Rose lenses. The Sanctuary brand are over-prescription glasses and also the ONOS are bifocals. Be aware that even though several of the pictures differ in color, all of the lens colors within a particular brand name will certainly be the same. That is, all copper from Edge coincide; all Brown from Smith coincide, and so on . The browns are all relatively close in shade as well as lightness, so I think twice to advise any one design, but there are numerous fantastic ones where to choose.
If required, your eye care expert will certainly advise a tailor-maked driving glasses prescription. The research found that evening driving glasses did not show up to boost pedestrian detection in the evening or reduce the adverse impacts of front lights glare on pedestrian detection performance.
What shape of glasses is best for my face?
Occupational Lens Aylesbury is considered to be ideal because of its balanced proportions. To maintain the natural balance of an oval face shape, look for eyeglass frames that are as wide as (or wider than) the broadest part of the face. Walnut-shaped frames that are not too deep or narrow are a very good choice.
That suggests your exposure degrees can practically increase because situation. Wearing polarized lenses will certainly decrease the glare and direct exposure risk while allowing you to see with even more quality in all however one of the most certain problems. Ultraviolet light can be harming to your vision if you are revealed to it frequently. The radiation from the sun can cause injuries that are collective to the body that could at some point bring about lowered vision for some people.
Give them as much background details as possible and also state whether you drive often, or experience any type of issues when driving at night. By doing this, they will have the ability to take whatever into factor to consider as well as prepare the most effective possible prescription driving glasses. Although a great deal of chauffeurs deal with bad vision, it's something that can quickly be taken care of. Excellent driving lenses will put much less pressure on your eyes, optimize your vision area, as well as improve your driving safety and security as a whole. For https://top-specs.co.uk/driving-glasses/ , it's essential for every motorist to get in touch with an eye care professional and obtain correct eye examinations often.
Although skiers and snowboarders might try to stay clear of polarized lenses for their regimens, the winter is one of the most important time to seek this modern technology. When you are bordered by fresh snow, after that up to 80% of the UVA as well as UVB rays that the sunshine emits can be mirrored back towards you.
Lenses with a VLT of 20% to 40% are the best for all-purpose outside use. These lenses work well for day-to-day wear and also during most outdoors activities. These darker tones aid puncture glow as well as decrease eyestrain in modest to brilliant light. Other advantages of the ideal lens color consist of enhanced comparison and neutralized results of Sodium Vapor lighting, often used along roadways as well as parking spaces. Details tints likewise decrease exceedingly intense or glaring light, and also most will certainly add to eye health by reducing eye exhaustion brought on by eyestrain.
Can Make-Up Be Bad For Our Eyes?
The enhancement in shade assumption enables better vision clarity compared to the over-exposure your eyes would certainly process if you weren't putting on the lenses in the first place. Since your eyes aren't working as tough to pick out details things in the setting, you can avoid fatigue-related issues like migraines regularly thanks to this product. Your optometrist might suggest unique night driving glasses with an anti-reflective layer. AR covering helps in reducing glow, hone vision, and assist you see better when traveling during the night.
The only problem you may have is settling on one set of glasses.
We stock Globe renowned frames from developers such as Cartier, Lindberg, Oliver Peoples, Starck, Jacques Marie Mage, DITA Eyewear, Ray Ban, Face a Face, Celine, Tom Ford as well as Porsche Style.
Whatever your individual style, spending plan and lifestyle demands, our personnel are dedicated to helping our consumers locate their ideal frame.
The loopholes supplement the inadequacy of security, by enabling the addition of a cord or bow which can be tied behind the head, thus holding the glasses strongly in position.
Go through our Style Overview for convenient suggestions on selecting the best frames for you.
We have actually made some modifications in relation to how we operate around the branch to guarantee that we are COVID safe.
This is the winning group of Independent Opticians Of The Year 2019.
Europeans, specifically the French, were self-conscious regarding making use of glasses.
Elle Brown Blue Turtle Gold Arms Round Round Eyeglass Frames El14401 Db 145.
new Top-Specs offerings that you would experience is a reduced danger of skin cancer cells development. If you are geared up with the proper lenses, then there is no factor to be afraid a sunny day or spending time in the outdoors. If you wish to see things that are at ground level in intense conditions, then polarized lenses permit you to see with better shade contrast considering that the straight light waves are filtered away.
The light is often intense as well as hard to stay clear of, such as when driving or boating. Anybody particularly conscious glare will locate polarized lenses helpful, therefore will certainly those that find themselves in changing outdoor lighting problems. These lenses are a good alternative to think about for any individual that invests a lot of time outdoors. It reduces the intense reflections, gets rid of unwanted glare, and also can improve your vision under challenging conditions.
Lens Colour.

Lenses established with wavefront diagnostic innovation can additionally minimize halos, celebrity bursts, glow, as well as other visual distractions. The "blue stopping" filtering given by yellow colored lenses also occurs with amber and also copper-coloured lenses. Actually, these darker tints can obstruct significantly much more blue light than yellow lenses-- however they likewise protect against a lot more light from entering the eye, which decreases exposure in low-light conditions. Light showed off a smooth, straight surface area such as a lake, ski slope or roadway, creates an unpleasant glow that can cause considerable eye tiredness as well as presence issues.
Where can I get glasses adjusted for free?
Generally speaking, you can take it to the store where you bought them for a free adjustment. And it's said that you can also bring them into LensCrafters for a free adjustment, even if you didn’t buy your glasses there. Besides, if you are good at such kind of handwork, you can try to adjust it by yourself.
To develop your optimal evening driving prescription, your eye care professional can recreate a night vision scenario with specialized equipment such as the ZEISS i.Profiler. It's an eye measurement gadget based upon innovative wave-front modern technology that gauges the eyes with wide-open pupils. These dimensions can after that be thought about when creating customised lenses, making use of i.Scription ® Technology. The result is a lens created for sharper vision, and also improved colour and contrast assumption when driving at evening.
Don't simply consider your exterior look when selecting the very best lenses for your eyes since you require complete insurance coverage to 100% protect your vision. If you are wearing a typical set of sunglasses outside, after that you could be attracted to take them off when you go into a shady place.
Understand the fact that polarising lenses might harm your ability to see certain dashboard display screens in your cars and truck. Review this with your eye care specialist before your acquisition. The best phenomenon lenses and also well-fitted phenomenon frames will certainly be the solution to each of these vision requirements. Remember to review your aesthetic requirements with your eye care expert when you go with an eye examination.
The ideal lens tint enhances depth assumption and reduces eye tiredness as well as minimizes color distortion as well as makes the most of aesthetic quality. In additionally enhances contrast and also deepness understanding, protects eyes from Blue Light, and enhances vision in reduced light problems like fog and haze in early mornings. While polarized lenses are widely made use of by fisherman as well as various other athletes, using polarized glasses in particular conditions, such as downhill winter sports or driving in winter months climate condition, might be unsafe. Some experts state that polarization may reduce your capacity to distinguish between regular snow and unsafe conditions such as ice.
Use Flexon Tablet
Polarized lenses can significantly minimize eye stress, get rid of reflection, and also improve performance in scenarios where the degree of sunlight is frustrating. If conditions are merely cloudy or cloudy, a basic pair of non-polarized sunglasses should be sufficient to provide your eyes that critical UV defense.
Polarised lenses for driving can provide an additional degree of driving safety and security. Reflected light is directed in a specific direction as well as triggers undesirable glow. Polarisation filters the light, lowering the harmful reflections generated by wet roadways, snow, or the sunlight jumping off steel or glass things. At the exact same time, unique colored lenses boost comparison and understanding of colours. This permits you to see oncoming vehicles earlier and also a lot more plainly, whatever the visibility.
youtube
When you purchase polarized lenses which provide you the alternative to filter UVA/UVB, after that you will significantly minimize the threats that you deal with when stepping outside. Kids need to think of this particular advantage more than grownups, yet everybody can benefit from this innovation. If you intend to experience the optimal possible improvement to your vision, take into consideration polarized lenses which likewise include a function which absorbs HEV rays. In fact, the yellow color-- while making it seem like you can 'see' far better-- can reduce exposure in the same way that using sunglasses at night will, albeit not rather as severely.
How Much Time Does It Require To Obtain Glasses From Walmart Vision Facility?
Not only is glare a problem, it hinders deepness understanding, misshapes your sight and colors, and also can trigger briefly loss of sight, so the extra cost deserves it for many-- especially professional athletes. Even if you're not an athlete, we've all gotten the sunlight in our eyes while driving as well as it can be scary. When you are putting on glasses that have polarized lenses, then the chemical representatives added to the product to develop the filtering system mechanism minimize the amount of light your eyes process from an LCD screen. Although you can still see them when you have a direct line-of-sight, relocating to different angles can make the screen disappear completely.
How long do plastic eyeglass frames last?
Most frames are good for between one to three years, though they can last for up to 10 years with proper care. Here are some tips to help your eyewear last longer: Clean your glasses every day.
A total amount of 22 adults in a wide range old took part in the research published in 2019. All individuals "drove" in 4 simulated night-driving conditions, wearing either yellow-tinted evening driving glasses or glasses with clear lenses. There is no details lens color that's proven to help night vision. Keep in mind, tinted lenses actually lower the amount of light your eye obtains. So, putting on colored lenses during the night can really reduce your evening vision instead of enhancing it.
youtube
" Night driving glasses" normally are non-prescription spectacles that feature yellow colored lenses. Essentially, they are the same point as a sort of sports glasses referred to as "shooter's glasses" that have been around for several years.
Can I use old frames for new glasses?
You can put old lenses in new frames in most cases, as long as the new frames are the same ones you used to have. An eye care professional will just need to make sure your prescription doesn't restrict the type of eyewear you use so that you don't have issues down the line.
If you take this activity, then you can enhance your UV and also HEV exposure since there is no more any type of defense for your eyes. When you have a pair of polarized lenses to support your health, then you can keep the sunglasses on because the shade comparison degrees will still be at useful degrees. Over 99% of the glare that jumping light waves from the sun create are filtered far from your eyes when putting on polarized lenses. This innovation is normally furnished to sunglasses, whether you have to put on a prescription or need to buy a pair from your neighborhood store.
Blupond Night Driving Glasses Yellow Color
It might also influence the amount of color that some individuals can perceive when looking at information or seeing a program. Unless your doctor informs you otherwise, any person can use polarized lenses to assist protect their vision from the glow of sunlight. Some people seem like they have a lot more defense versus this issue as a result of their complexion, yet that isn't necessarily true. Your risk of eye damage from HEV and UVA/UVB rays coincides no matter what your complexion takes place to be.
#Opticians#frames and lens#driving glasses#buy driving glasses#buy Elle glasses#elle glasses#flexon frames#occupational glass lens
0 notes
Text
Samsung Galaxy S8 Review: On the shoulders of giants
In the cat and mouse game between Samsung and Apple, the user is the real winner, and never has that been so apparent as with the new Samsung Galaxy S8. Undoubtedly the most eagerly-anticipated Android smartphone of 2017, the Galaxy S8 is Samsung’s first big opportunity to put the Note 7 battery debacle behind it, and instead wow consumers with its latest industrial design, services, and more. Question is, with the same camera as the old Galaxy S7, not to mention flagship feature Bixby Voice absent until later in the year, does the Galaxy S8 and its big S8+ sibling do enough today to overshadow the iPhone 8 tomorrow?
Hardware and Design
Make no mistake, Samsung has knocked it out the park, gone the distance, hit a home run, and any other sporting euphemism you’d like to level at the Galaxy S8’s design. The US may not be getting the Maple Gold and Coral Blue versions, sadly, but the moody Midnight Black more than makes up for it in my opinion. The glass front and back curve smoothly into the metal frame which runs the periphery of the handset. It feels clean and expensive, and while the Galaxy S8+ is noticeably larger, it doesn’t approach unwieldy.
They’re slim, too. The Galaxy S8 is just 68.1 mm wide, while the S8+ is 73.4mm wide. I made a lot of how easy to hold LG’s G6 was, with its unusual aspect-ratio display, but Samsung’s phone is even more hand-friendly. Its tapered edges minimize what’s already a thin device – 8.0mm for the S8, 8.1mm for the S8+. Since both phones are, aside from display size and battery size, fundamentally identical, moving forward when we refer to the S8 you can assume it holds true for the S8+ as well.
Unlike the Galaxy S7, which was offered in both regular and “edge” versions, the S8 doesn’t give you a choice of having curved AMOLED or not. Now branded “Infinity Display”, the panel extends smoothly around the left and right edges of the handset, on both the Galaxy S8 and the S8+. Combined with a black bezel top and bottom, along with curved corners, and you could almost mistake the whole fascia for being screen. Even though it’s a 5.8-inch display on the S8 and a 6.2-inch display on the S8+, the handsets themselves are impressively compact.
Some people undoubtedly prefer a flat display for day to day use, and will be annoyed by Samsung’s decision, but there’s no denying that the S8 looks incredible. Partly that’s down to moving everything possible from the front of the phone. Gone is the physical home button and its accompanying app-switcher and back keys, replaced with a pressure-sensitive strip under the bottom edge of the screen that, when you press harder, summons virtual versions of those controls.
In reality, much of the time the on-screen home button is visible anyway. It only really disappears when you’re playing a full-screen video, for instance; the rest of the time, it floats there as a discreet square. From the app switcher you can pin a section of an app to the top of the screen: Samsung calls it Snap Window, and it allows to crop a chunk of webpage, inbox, video, or something else to remain visible, and still use other apps on the rest of the display.
The Super AMOLED panel itself is, as we’ve come to expect from Samsung, a triumph. Colors, viewing angles, brightness, and outdoor visibility are superb. The panel itself ends just far enough away from the sides of the S8 so that it’s not inadvertently triggered by your grip.
Maximum resolution is 2960 x 1440, though Samsung encourages you to change that. By default it sets to 2220 x 1080, or you can optionally scale it down to 1480 x 720, the argument being that battery life could be improved if you accept a lower res. My eyes couldn’t really make out a difference between 2220 x 1080 and 2960 x 1440, but text got a little fuzzy around the edges at the lowest setting.
No matter which you pick, you’re still seeing the same amount of content on-screen. However, there are also controls for adjusting screen zoom – either small, medium, or large – and text size – through seven settings from tiny to huge – depending on how good your eyes are. There’s also the option to turn on not only a blue light filter (which, so the theory goes, reduces eye-strain) but a learning algorithm which promises to track the tweaks you make to the brightness in different settings and shape the auto-brightness to suit.
Of course, the big selling point of the Infinity Display is just how much of it you get to use when you’re watching video. It’s an odd aspect ratio – 18.5:9, in fact – which, in a similar argument to that of LG and the G6, Samsung says can be used by much more widescreen video than previous phones. Certainly, if you have 21:9 footage it doesn’t give you black bars top and bottom when you’re holding the S8 in landscape orientation. That’s assuming you have 21:9 content, though, which is slowly gaining traction but still far from the default.
My biggest complaint about Samsung’s design is the placement of the fingerprint sensor. Since the physical home button has been replaced by a virtual version, Samsung opted to put the biometric sensor it once contained on the back instead. Unfortunately it’s in a less-than-convenient spot.
Positioned right next to the rear camera, and with only a very small ridge to help your fingertip locate it, it’s all too easy to jab at the camera lens instead. Even when you do find it – which can be a stretch on the Galaxy S8+’s longer body – you have to make sure your finger is flat across the sensor. Otherwise, you get an error message about a partial print.
You can, of course, opt for iris recognition if the fingerprint system is too frustrating – there’s also facial recognition, though Samsung admits it’s not especially secure and can be fooled with a photo – though Samsung could’ve readily addressed it simply by moving the sensor down a little, to where its own logo is on the back. Even so, that wouldn’t have solved my other complaint, which is that you can’t just jab at the front of the phone to unlock it with one tap while it’s lying on a desk or nightstand. All too frequently I gave up and punched in my PIN instead.
Inside, Samsung uses either its own Exynos 8895 or Qualcomm’s Snapdragon 835; both are 10nm octacores, and indeed both are made by Samsung itself. In the US, you get the Snapdragon, along with 4GB of LPDDR4 memory and 64GB of internal storage. There’s a microSD card on the top edge, to expand that.
Connectivity includes LTE Cat 16, WiFi a/b/g/n/ac (2.4/5GHz) with MU-MIMO support, Bluetooth 5.0, ANT+, NFC, and GPS (along with Galileo, Glonass, and BeiDou). Alongside the USB Type-C port on the bottom is a 3.5mm headphone jack. Samsung includes AKG-tuned headphones in the box, though there’s also Bluetooth Dual Audio support so that two sets of wireless headphones can be used with the S8 simultaneously.
As with 2016’s flagships, Samsung has sensibly opted to make the Galaxy S8 water and dust resistant. It’s IP68 compliant, which means it’ll handle up to 1.5m of freshwater for up to thirty minutes. If you’ve ever dropped your phone in a puddle then you’ll know how much of a lifesaver this can be; even if you haven’t, the ability to rinse the S8 under a tap means keeping its glass body free of fingerprints and smudges is a whole lot easier.
Software and Performance
Out of the box, the Galaxy S8 runs Android 7.0 Nougat with the April 1, 2017 security patch and Samsung Experience v8.1. Obviously I’d prefer to see Android 7.1 as is available on Google’s own Pixel right now, though the release of the Google Assistant to earlier versions of the OS means the most notable difference between 7.0 and 7.1 is no longer an issue. This particular S8 review unit is a T-Mobile version, and as such gets a few preloaded apps of the carrier’s own: Device Unlock, the T-Mobile manager, Name ID, T-Mobile TV, and Visual Voicemail.
Samsung may no longer call it TouchWiz, but its customized interface certainly traces its roots back to that love-it-or-hate-it UI. For the S8, Samsung has made the “edge” shortcut bar, which is swiped in from the side of the display, standard now. You can flick between an app launcher, contacts shortcuts, and Smart Select screenshot tool as standard. Dig into the settings, however, and you can add a useful Clipboard edge, which keeps a list of previously copied items, a Reminder edge, Tasks edge, Weather bar, Quick Tools, Calendar, Music controls bar, and more. There are a few dozen more – either free or paid – in the Samsung store.
Some of the apps are new with the S8. Samsung Connect promises to be the hub of your connected home, putting networked devices – whether Samsung’s own high-end refrigerators, freezers, or TVs, or third-party products like Sonos speakers and connected thermostats – in a single place for easier control. You can operate them individually or group different actions together into custom modes, such as turning everything off when you leave the house.
The reality hasn’t proved to be quite the tame smart home I was hoping for. A set of Sonos speakers showed up and were readily added to my devices list, but I could only make selections from Samsung’s own Music app; it wasn’t even possible to pause the Spotify playback I’d started from another device. My Philips Hue lights didn’t show up at all.
Using Samsung’s own devices proved more successful. One of the company’s connected TVs, for instance, populated the app with channel and volume controls. I was also able to stream video I’d recorded with the S8 directly to the set, without the hassle of setting up WiFi Direct.
Unfortunately, one of the accessories I’m most curious about trying wasn’t supplied. The Samsung DeX dock promises the “Desktop Experience” of a PC, turning the S8 into a full computer with the connection of an HDMI display and a regular keyboard and mouse. No, you won’t be able to do everything a full Windows or macOS machine might, but a combination of webapps and key titles like Microsoft Office with specially-crafted desktop UIs could certainly replicate the Chromebook experience.
I’ll review how realistic that is when I get my hands on a DeX dock. However, I’ve few doubts that the S8 can keep up. Everyday performance has been excellent, with no noticeable lag or stuttering, even when dealing with heavy webpages.
Samsung Bixby
Apple has Siri, Google has its Assistant, Microsoft has Cortana, and now Samsung has Bixby. The fruits of its Viv acquisition, Bixby promises not only a way to check weather forecasts, send messages, and get directions all by voice, but effectively do anything on the phone that you’d normally have to tap and swipe to achieve. Throw in object/landmark recognition, a new homecreen with customized cards of user-personalized information, and location/time-based reminders, and you’ve an assistant that could eclipse either of its better-known rivals.
Sadly Bixby’s announcement and the Galaxy S8’s implementation don’t deliver quite the same thing. The jewel in the crown, Bixby Voice, simply isn’t available at launch. In fact, according to Samsung it’ll come later in the year.
What you get is Bixby Vision, Bixby Home, and Bixby Reminder. Of the three, Bixby Vision probably has the greatest wow-factor: it’s basically Google Goggles, mixed with Amazon’s visual search, and Google Translate, all in a single interface. For instance, you can show Bixby Vision a product – like a bottle of wine – and it will tell you about that wine from Vivino’s database.
Products, meanwhile, get linked straight to their Amazon pages. How accurate the search results are depends on how distinctive the packaging is, I found: Bixby could get confused by exactly which model it was seeing. Translation works more consistently, with the ability to snap a photo of a page of text – such as on a restaurant menu – and convert it into other languages.
Bixby Home, meanwhile, is a new homescreen pane. Swipe all the way across to the left, and you’ll find custom cards for your upcoming schedule, recent messages, news Bixby believes you’ll be interested in, trending topics from Facebook, and recent additions to your gallery. The promise is that, over time, the assistant will observe how and where you use your phone and further customize what shows up, though I’ve not really noticed much personalization in my relatively short time with the S8.
Finally, Bixby Reminder is a task system. You can create new reminders for photos, webpages, or other information; build to-do lists; and set alarms for events. Those alarms could be at a certain time, or when arrive at or depart from a certain place. Upcoming reminders show up in your Bixby Home stream. It’s useful, but it’s not anything many other Android task apps can already do.
Indeed, while all of the current features work, they don’t quite warrant a dedicated Bixby button right now. I can understand Samsung wanting to put a physical shortcut to its headline service on the S8, but the fact that not only is that service not available, but you can’t reassign it to something else, undermines that. Initially it looked like third-party apps would be able to reassign the Bixby button to trigger something else, but Samsung appears to have closed that loophole too.
Camera
Did Samsung play it safe with the Galaxy S8’s camera? On the face of it, using the same 12-megapixel Dual Pixel setup as the Note 7 and Galaxy S7 before it could be seen as treading water. While LG’s G6 and the iPhone 7 Plus are doing interesting things with twin cameras, Samsung’s approach almost seems old-school.
If there’s one thing that’s become clear over the past couple of years of smartphone camera design, though, it’s that there’s much more to getting a good photo from your phone than specs on paper. Starting from an excellent sensor on the S8 is no bad thing, and Samsung’s refined software and algorithms coax even better images and video from its new flagship.
The results are certainly the equal of what you’ll get from an iPhone 7, and I prefer them to the photos from LG’s G6, too. Colors are accurate and don’t stray too far into the over-saturation that earlier Galaxy phones sometimes suffered. Low-light performance is generally impressive, too, with plenty of detail, showing a broad dynamic range.
The camera app itself has some clever touches and a couple of annoyances. The default view is the fully-automatic mode; sliding your finger up and down the shutter button controls zoom. Swipe across and you get a menu of other modes: Pro, with manual controls for exposure, ISO, and other settings; Panorama; slow-motion; Hyperlapse; Food, which puts a circular frame of focus around your plate; Virtual Shot, for shooting 3D objects; and Selective Focus.
The latter does a surprisingly good job of picking out a subject and blurring its surroundings, even if can’t call upon the help of a second lens as the iPhone 7 Plus’ Portrait Mode uses. Meanwhile, if you’re signed into your Samsung account there are several extra camera modes you can download. That includes an Animated GIF maker, Sports Shot, Dual Camera, the vaguely creepy Beauty Face, and Rear-cam Selfie.
If there’s a frustration, it’s that some of the various swipes and taps can get confusing. Miss the brightness slider by a half-fingertip’s width and you find you’ve swiped up or down to switch between the front and rear cameras, for instance. Hold a finger down a little too long, and you can inadvertently break out the separate autofocus and autoexposure reticles.
At least the whole thing is whippet-fast. Double-tapping the power button opens the camera app, even if the S8 is locked; that takes a split-second, as does snapping an image or hitting the video record button. It’s worth noting that, by default, Samsung wants to upload your photos and videos to its own cloud backup service, though it’s an easy thing to switch off.
Battery
Somehow Samsung has finessed a 3,000 mAh battery into the skinny body of the Galaxy S8, and an even larger 3,500 mAh battery into the Galaxy S8+. The official runtime estimates are top to 20 hours of talktime on the S8, up to 16 hours of video, up to 14 hours of WiFi browsing, or up to 12 hours of LTE browsing. Those numbers increase to 24 hours of talktime with the S8+, up to 18 hours of video, and up to 15 hours of WiFi or LTE browsing.
In reality, with mixed use, the S8 lasted me a solid day. Obviously individual usage patterns vary from person to person, and I’ve no doubt you could stretch out into a second day with a little care (and maybe lowering the screen resolution too). It’s still early days in our battery testing with both the S8 and S8+, so we’ll update with more feedback as things level out.
As before, there are several ways to recharge. A 2A travel charger is included in the box, along with a USB to USB-C cable. Samsung also bundles a Type-C to USB adapter and a Type-C to microUSB adapter, which are welcome. With a Fast Charging compliant power supply a full charge should take about an hour and a half.
There’s also wireless charging support, including the latest generation of fast wireless pads. The S8 will work with both Qi and PMA wireless chargers, so either you have already – or find built into the table at Starbucks – will play nicely. However, Samsung has its own new fast wireless charger which can flip between a flat pad or an upright dock.
Samsung Gear VR with Controller
Aside from the DeX dock and the new fast wireless charger, Samsung’s other big accessory for the Galaxy S8 is an updated Gear VR with an Oculus-powered controller. Like Google’s Daydream, the small handset tracks 3DoF movement in a VR environment when you slot your S8 into the bay at the front. A circular trackpad on the top effectively replicates the touchpad on the side of the headset previously used for navigation.
Not every game, app, and virtual reality experience is updated to support the new controller. Those that are, however, gain a new degree of interactivity: there’s nothing quite like gesturing your way through a game or 3D environment. Those who already have a Gear VR can pick up the controller separately, meanwhile, at $39.99.
Wrap-Up
There had been suspicions that the fallout from the Note 7 battery fiasco might sour would-be Galaxy S8 buyers. Based on the degree of pre-launch excitement, however, those fears seem to have been unfounded. Whether it’s the safety promise implicit in Samsung’s new 8-point battery check, or simply a sign of our general appetite for the latest, greatest, and shiniest gadgets, it suggests neither apathy nor explosion anxiety will do much to dampen sales.
It’s helped by the fact that the Galaxy S8 is a tremendously good phone. Samsung has wrapped the latest hardware in a sleek, premium-feeling design that, with its curved touchscreen and waif-like bezels, leaves the iPhone 7 feeling chunky and a little tired. The reappearance of Samsung’s Dual Pixel camera only serves to underscore how ahead of the game the same sensor was last year.
Questions remain, though. Bixby in its current form is a faint outline of its overall potential: Bixby Voice could be an epic leap ahead of what Siri and the Google Assistant offer, but we won’t know for sure until it rolls out later this year. Similarly, the DeX dock and Samsung’s attempt to condense a desktop PC into a phone form-factor is ambitious and intriguing, but for now it’s hard to say whether the reality lives up to the promise.
Happily, neither of those big questions undermine what is, essentially, an excellent device. The Galaxy S8 is easily the best Android smartphone on the market today, and in several ways it ousts the iPhone 7 too. Samsung’s real battle will come with the arrival of the new iPhone 8 later this year, mind, and until we see just what Cupertino has been working on, all bets are off. At the very least, Samsung has set its highest bar yet for its arch rivals, and I couldn’t fault you if you weren’t able to wait it out.
Vincent Nguyen contributed to this review
There are many more Galaxy S8 and S8+ photos, plus camera samples, and comparisons with the iPhone 7, iPhone 7 Plus, Pixel XL, Huawei P10 Plus, and LG G6 in the gallery below!
0 notes
Text
Photography History 2 via /#bestofcanvas
Photography History 2
Photography History-Film Hurter and Driffield began pioneering work on the light sensitivity of photographic emulsions in 1876. Their work enabled the first quantitative measure of film speed to be devised.
The first flexible photographic roll film was marketed by George Eastman, founder of Kodak in 1885, but this original “film” was actually a coating on a paper base. As part of the processing, the image-bearing layer was stripped from the paper and transferred to hardened gelatin support. The first transparent plastic roll film followed in 1889. It was made from highly flammable nitrocellulose (“celluloid”), now usually called “nitrate film”.
Although cellulose acetate or “safety film” had been introduced by Kodak in 1908, at first it found only a few special applications as an alternative to the hazardous nitrate film, which had the advantages of being considerably tougher, slightly more transparent, and cheaper. The changeover was not completed for X-ray films until 1933, and although safety film was always used for 16 mm and 8 mm home movies, nitrate film remained standard for theatrical 35 mm motion pictures until it was finally discontinued in 1951.
Films remained the dominant form of photography until the early 21st century when advances in digital photography drew consumers to digital formats. Although modern photography is dominated by digital users, the film continues to be used by enthusiasts and professional photographers. The distinctive “look” of film-based photographs compared to digital images is likely due to a combination of factors, including: (1) differences in spectral and tonal sensitivity (S-shaped density-to-exposure (H&D curve) with film vs. linear response curve for digital CCD sensors). (2) resolution and (3) continuity of tone.
Photography History-Black-And-White
Originally, all photography history was monochrome, or black-and-white. Even after color film was readily available, black-and-white photography continued to dominate for decades, due to its lower cost and its “classic” photographic look. The tones and contrast between light and dark areas define black-and-white photography.[38] It is important to note that monochromatic pictures are not necessarily composed of pure blacks, whites, and intermediate shades of gray but can involve shades of one particular hue depending on the process. The cyanotype process, for example, produces an image composed of blue tones. The albumen print process first used more than 170 years ago, produces brownish tones.
Many photographers continue to produce some monochrome images, sometimes because of the established archival permanence of well-processed silver-halide-based materials. Some full-color digital images are processed using a variety of techniques to create black-and-white results, and some manufacturers produce digital cameras that exclusively shoot monochrome. Monochrome printing or electronic display can be used to salvage certain photographs taken in color which are unsatisfactory in their original form; sometimes when presented as black-and-white or single-color-toned images they are found to be more effective. Although color photography has long predominated, monochrome images are still produced, mostly for artistic reasons. Almost all digital cameras have an option to shoot in monochrome, and almost all image editing software can combine or selectively discard RGB color channels to produce a monochrome image from one shot in color.
Photography History-Color
Color photography was explored beginning in the 1840s. Early experiments in color required extremely long exposures (hours or days for camera images) and could not “fix” the photograph to prevent the color from quickly fading when exposed to white light.
The first permanent color photograph was taken in 1861 using the three-color-separation principle first published by Scottish physicist James Clerk Maxwell in 1855. The foundation of virtually all practical color processes, Maxwell’s idea was to take three separate black-and-white photographs through red, green and blue filters. This provides the photographer with the three basic channels required to recreate a color image. Transparent prints of the images could be projected through similar color filters and superimposed on the projection screen, an additive method of color reproduction. A color print on paper could be produced by superimposing carbon prints of the three images made in their complementary colors, a subtractive method of color reproduction pioneered by Louis Ducos du Hauron in the late 1860s.
Russian photographer Sergei Mikhailovich Prokudin-Gorskii made extensive use of this color separation technique, employing a special camera which successively exposed the three color-filtered images on different parts of an oblong plate. Because his exposures were not simultaneous, unsteady subjects exhibited color “fringes” or, if rapidly moving through the scene, appeared as brightly colored ghosts in the resulting projected or printed images.
Implementation of color photography was hindered by the limited sensitivity of early photographic materials, which were mostly sensitive to blue, only slightly sensitive to green, and virtually insensitive to red. The discovery of dye sensitization by photochemist Hermann Vogel in 1873 suddenly made it possible to add sensitivity to green, yellow and even red. Improved color sensitizers and ongoing improvements in the overall sensitivity of emulsions steadily reduced the once-prohibitive long exposure times required for color, bringing it ever closer to commercial viability.
Autochrome, the first commercially successful color process, was introduced by the Lumière brothers in 1907. Autochrome plates incorporated a mosaic color filter layer made of dyed grains of potato starch, which allowed the three color components to be recorded as adjacent microscopic image fragments. After an Autochrome plate was reversal processed to produce a positive transparency, the starch grains served to illuminate each fragment with the correct color and the tiny colored points blended together in the eye, synthesizing the color of the subject by the additive method. Autochrome plates were one of several varieties of additive color screen plates and films marketed between the 1890s and the 1950s.
Kodachrome, the first modern “integral tripack” (or “monopack”) color film, was introduced by Kodak in 1935. It captured the three color components in a multi-layer emulsion. One layer was sensitized to record the red-dominated part of the spectrum, another layer recorded only the green part and a third recorded only the blue. Without special film processing, the result would simply be three superimposed black-and-white images, but complementary cyan, magenta, and yellow dye images were created in those layers by adding color couplers during a complex processing procedure.
Agfa’s similarly structured Agfacolor Neu was introduced in 1936. Unlike Kodachrome, the color couplers in Agfacolor Neu were incorporated into the emulsion layers during manufacture, which greatly simplified the processing. Currently, available color films still employ a multi-layer emulsion and the same principles, most closely resembling Agfa’s product.
Instant color film, used in a special camera which yielded a unique finished color print only a minute or two after the exposure, was introduced by Polaroid in 1963.
Color photography history may form images as positive transparencies, which can be used in a slide projector, or as color negatives intended for use in creating positive color enlargements on specially coated paper. The latter is now the most common form of film (non-digital) color photography owing to the introduction of automated photo printing equipment. After a transition period centered around 1995–2005, color film was relegated to a niche market by inexpensive multi-megapixel digital cameras. Film continues to be the preference of some photographers because of its distinctive “look”.
Digital
In 1981, Sony unveiled the first consumer camera to use a charge-coupled device for imaging, eliminating the need for film: the Sony Mavica. While the Mavica saved images to disk, the images were displayed on television, and the camera was not fully digital.
The first digital camera to both record and save images in a digital format was the Fujix DS-1P created by Fujfilm in 1988.
In 1991, Kodak unveiled the DCS 100, the first commercially available digital single lens reflex camera. Although its high cost precluded uses other than photojournalism and professional photography, commercial digital photography was born.
Digital imaging uses an electronic image sensor to record the image as a set of electronic data rather than as chemical changes on film. An important difference between digital and chemical photography is that chemical photography resists photo manipulation because it involves film and photographic paper, while digital imaging is a highly manipulative medium. This difference allows for a degree of image post-processing that is comparatively difficult in film-based photography and permits different communicative potentials and applications.
Digital photography dominates the 21st century. More than 99% of photographs taken around the world are through digital cameras, increasingly through smartphones.
Synthesis
Synthesis photography is part of computer-generated imagery (CGI) where the shooting process is modeled on real photography. The CGI, creating digital copies of real universe, requires a visual representation process of these universes. Synthesis photography is the application of analog and digital photography in digital space. With the characteristics of the real photography but not being constrained by the physical limits of real world, synthesis photography allows artists to move into areas beyond the grasp of real photography.
Source
Submitted December 13, 2019 at 06:48PM
via #bestofcanvas https://www.reddit.com/r/u_HoustonCanvas/comments/eacsgh/photography_history_2/?utm_source=ifttt
0 notes
Link
via medium.com
Blair Neal
Sep 19, 2016
(This is the online version of this article — if you prefer, a formatted PDF is available on my website here for easier reading offline
Additionally, if you are the owner of any images and would like them removed or credited differently, please contact me.)
An artist has a large range of ways they can display their work. Cave walls gave way to canvas and paper as ways to create portals into another human’s imagination. Stained glass windows were early versions of combining light and imagery. Electronic displays are our next continuation of this same concept. A photon is emitted; it travels until it reflects off of or passes through a medium. That photon then passes into your eyeball and excites some specialized cells — when enough of these cells are excited, your brain turns these into what you perceive as an image.
Stained Glass Example — Source
However, standard computer monitors, LED video walls and projection screens offer only a small glimpse of the range of possible visual illusions. Any traditional display can be augmented or used in an unusual way. New displays and technologies are still being actively developed and researched. Some content is suited precisely to being shown on a standard display, like a webpage. Other content is better suited to a space that exists beyond the screen’s surface and enables a sort of suspension of disbelief that this thing is really there. We continue to find new ways to construct the image of new destinations within the eye.
Knowing the range and limits of these different displays is similar to a painter really understanding their choice of paint and surfaces. Spray paint behaves very differently than oil, watercolor or ink. Drying times, color depth, texture, reflectivity, ability to blend colors — these are just some of the characteristics the painter must consider when choosing a medium for their new work. The textures of canvas, concrete, metal also impart a particular surface aesthetic. The same considerations can be a part of a digital artist’s practice when they work with displays.
Additionally, musicians use what is called extended technique to explore the absolute limits of what sounds are possible with their instrument. Mastering an instrument with classical training is one dimension. Extended techniques demonstrate a deep understanding of how these devices function and respond to human input. Things that may sound like mistakes at first can be honed into highly expressive new tools. Violins can be made to sound like cellos with the right bowing method. Video and film artists like Nam June Paik and the Vasulka’s have been exploring extended techniques for displaying video since their inception — but it is important to continue this tradition. There is still much to discover.
Nam June Paik’s Wobbulator
The purpose of this article is to collect and consolidate a list of these alternative methods of working with displays, light and optics. This will by no means be an exhaustive list of the possibilities available — depending on how you categorize, there could be dozens or hundreds of ways. There are historical mainstays, oddball one-offs, expensive failures and techniques that are only beginning to come into their own.
This document will hopefully serve as a reference for artists who are curious about pushing their content outside of a standard screen. Some implementations are incredibly practical and achievable on small budgets, and some require very specialized patented hardware that only exists in a lab somewhere. It is important not to get bogged down in the specifics of the technology, but to recognize that these all exist on a spectrum of information transference that employ light, medium, and brain. By keeping things in these simple terms, you are free to mix, match and re-appropriate to tell new stories.
Contents
Notes on Standard Displays
Brief Note on Holograms
Pepper’s Ghost
Projection on Static Transparent Materials/Scrims
Projection on Water or Fog
Volumetric Projection
Diffusion and Distortion Techniques
Transparent LCD/OLED
LCDs with modified polarization layers
Volumetric Displays (Mechanical/Persistence of Vision)
Volumetric Displays (Layered screens)
Electronic Paper
Flexible Displays
Laser Projectors
Head Mounted Displays (VR/AR/Mixed Reality)
Plasma Combustion
Physical/Mechanical Displays
Appendix and Other References
Notes on Standard Video Displays
It is worth discussing a few notes about the standard displays that most digital artists use. Many of the other things discussed in this article aren’t standalone technologies, but rather techniques that modify or adapt pre-existing technologies into new applications. Each of these technologies could fill several books, so we’ll just touch on some relevant bits.
Standard Monitors
Image Source
These can be a range of different technologies. Cathode Ray Tubes or CRT displays were common up until about 2005 but are difficult to find these days — they do have a lot of unique properties (not necessarily good ones..) that aren’t available in many standard modern displays. Right now, the most common display is the Liquid Crystal Display or LCD and it is in most laptop screens, desktop monitors, commercial TV’s and so on. LCD’s have a backlight, a rear polarizer, a glass layer with electrodes and liquid crystals that react to electrical changes, and a front polarizer. Each pixel has a set of 3 sub pixels with red green and blue color filters that can be combined at different levels to recreate their millions of colors.
Things like Quantum Dots are on the horizon to further improve LCD’s color reproduction and accuracy by allowing more precise tuning of light wavelengths. Plasma displays were contender for LCD for a while, but they have become less popular. Pixels in plasma displays are individually lit which result in a deeper contrast compared to LCD’s. Organic Light Emitting Diode displays or OLED displays operate in a similar principal to Plasma and have started to become more and more common. OLED has a lot of interesting properties since it can be made smaller and thinner than LCD or Plasma, this means that flexible displays and transparent displays are a much more viable option with OLED. OLED is still quite expensive in comparison to LCD’s at the moment, but this will change as the market shifts. MicroLED is another technology that works in a similar fashion but is still very new.
Standard monitors are affordable for most applications, are high resolution which makes them ideal for applications when the view is standing up close, have a decent color and dynamic contrast range, accept a variety of inputs, and are long lasting. Their brightness is suitable for primarily indoor applications. Brightness of these is generally measured in nits or candela/sq meter — most laptop screens are around 300nits at maximum. For outdoor applications, you have to source specially made outdoor monitors that are weatherproof, can withstand a variety of temperature fluctuation, and have a considerably higher brightness rating — some available ones can do 1500 nits or more which would be almost painful to look at up close in an indoor setting.
Of course, these displays have their limitations. They are only viable up to a certain size for a single unit. Most of the largest max out at 120in or 305cm of diagonal image. Past this, they must be tiled together to form a larger video wall, and there are inevitable lines or bezels between adjacent units. Even those larger video walls start to reach a limitation at a certain point where Projectors or LED video walls are a more economical choice. The color and dynamic range of these monitors appears to be decent, but it is actually not as good as you might expect — we are missing out on a whole range of visible colors. Most standard displays are also locked at 60hz refresh rate (the speed that the screen is redrawn every second) which is perfectly fine for most applications like movie watching, but things like gaming monitors have started jumping to 144hz or more. Even though our brain’s visual refresh rate is about 60hz (a huge oversimplification), there are some intriguing things that can be done with a higher refresh rate. Imagine scrolling this page up and down and having it look as natural as a piece of paper moving up and down instead of the commonly jittery experience. There are also researchers looking into using high frame rate or high temporal resolution displays to do things like turning normal displays into higher resolution displays — here is an incredible survey of a range of options with computationally augmented displays. Consumer displays are also typically two dimensional and flat, even if displaying 3D content with glasses or another method.
Projectors
Image Source
I have covered projectors in depth in another article so I won’t go into detail with them here. It is important to remember that they are not much more than a fancy implementation of a light source, an imaging element and a lens. They are best for darker environments, but they tend to be the most economical choice for large scale imagery. It is also easier to blend multiple projectors together more seamlessly.
LED Video Walls
Image Source
LED Video Walls are another common option for displaying digital art on a large scale (also called LED Displays — not to be confused with LED Monitors where the light source is simply the LED backlight). These are usually comprised of individual tiles that are linked together and driven by a special display driver box that addresses the tiles from a standard monitor input. The tiles are generally either single all-in-one RGB LED’s or larger individual R,G and B LED’s that are placed close together. The primary spec of an LED wall is its pixel pitch, measured in millimeters. If you are viewing a wall close up, you want a low pixel pitch — some of the lowest available are around 1.6mm. Larger pixel pitch like 16mm to 20mm is perfectly acceptable if your viewer is really far away from the screen because their eye won’t be able to discern individual pixels as easily. LED walls are also one of the only display types that can be viewable in direct sunlight. Some of them are 3000nits or more of brightness, which explains why they are the display of choice in places like Times Square.
They have a wide variety of models and applications. Some are used as jumbotrons in stadiums, as high end storefront signage, or are used as sculptural stage elements. Some move towards the spectrum of lighting elements and are extremely high pixel pitch. These large pixel pitch tiles can be used almost as “transparent” elements because when the audience is far away, they are able to see through the frame — as in this video wall. Stage lighting examples are the LightSlice, Vanish, and the Saber. Some manufacturers also provide custom LED tile work and can do more unusual shapes like spheres or triangles.
The primary drawback of LED walls is cost, although the prices have been dropping rapidly in the past few years as these become more commonplace. Finding price points for certain elements isn’t usually publicly available but it can cost around $2000 for an individual tile and the driver box can be $5000–10,000. Most LED walls are typically rentals due to the large cost of purchasing them. They do last a long time in the case of purchasing, but even a modest sized wall at a high resolution can run into the hundreds of thousands of dollars very quickly. The cost of installation (for rental or permanent) can also be an additional hurdle since you typically need an experienced technician to set them up and get the pixel mapping established. They also have a particular aesthetic that is suited to viewing from far away. Up close they can be uncomfortably bright, and their pixels can be a distraction. Some stage designers will overlay a black or dark grey rear projection material or even acrylic overtop of the LED’s to soften them and provide a more diffuse look.
Brief Note on Holograms
To get this out of the way early, It should be mentioned that none of the displays mentioned below are in line with the definition of a hologram. A hologram is closer to a photographic medium as it captures an imprint of the light waves that bounce off an object. Most of the media headlines these days with the word “hologram” are typically talking about simple optical tricks or AR. Holograms have taken on a cultural meaning that differs from the scientific definition, similar to the cultural rebranding of “synesthesia” or “literally.” This article by Oliver Reylos has a concise summary of what is considered holographic and what isn’t. In his words:
When viewing close-by objects, there are six major depth cues that help us perceive three dimensions:
Perspective foreshortening: farther away objects appear smaller
Occlusion: nearer objects hide farther objects
Binocular parallax / stereopsis: left and right eyes see different views of the same objects
Monocular (motion) parallax: objects shift depending on how far away they are when head is moved
Convergence: eyes cross when focusing on close objects
Accommodation: eyes’ lenses change focus depending on objects’ distances
Almost all of the displays or techniques in this article have some holographic properties like parallax or multiple viewing angles, but are primarily in a class of their own. Would you call an oil painting a sculpture?
Pepper’s Ghost
Pepper’s Ghost Diagram — Source
Pepper’s Ghost is a classic illusion — it has been around for over a century and is still making headlines. 99% of the time, when you see a headline with the word “hologram” it is talking about Pepper’s ghost.
Historically, the effect comes out of Phantasmagoria, a fascinating tradition of theater illusions that were developed in the 18th and 19th centuries that frightened audiences with never before seen images of spirits and floating otherworldly beings. The Magic Lantern is another one of these early theater effects and it is one of the earliest forms of the projector. The name Pepper’s Ghost comes from John Henry Pepper who popularized the effect in the mid-1800’s with his friend Henry Dircks (who arguably developed it before Pepper). However, the illusion was first described in the 1600’s by an Italian scholar named Giambattista della Porta in his book Natural Magic:
Wherefore to describe the matter, let there be a chamber wherein no other light comes, unless by the door or window where the spectator looks in. Let the whole window or part of it be of glass, as we use to do to keep out the cold. But let one part be polished, that there may be a looking glass on both sides, whence the spectator must look in. For the rest do nothing. Let pictures be set over against this window, marble statues, and suchlike. For what is without will seem to be within, and what is behind the spectators back, he will think to be in the middle of the house, as far from the glass inward, as they stand from it outwardly, and so clearly and certainly, that he will think he sees nothing but truth. But lest the skill should be known, let the part be made so where the ornament is, that the spectator may not see it, as above his head, that a pavement may come between above his head. And if an ingenious man do this, it is impossible that he should suppose that he is deceived.
Pepper’s ghost is very easy to implement. The simplest version involves a transparent reflecting surface (a sheet of glass, plastic, or a half silvered mirror), and an image source (a monitor, projection screen, or a lit source). There are two versions of this effect that are commonly used — the classic one from the 19th century typically involves two separate physical spaces and specialized lighting. The modern version of Pepper’s ghost involves a digital screen (monitor, or projected image) and a half silvered mirror or specialized film designed to be invisible to the viewer. This version is also used for teleprompters where the camera lens is positioned behind the mirror facing the speaker. Both are essentially the same in principal.
Glass mirrors are the most accessible way to achieve this effect (it can even be done with reflective plastic and a smart phone), but at a certain point it becomes difficult to scale the glass to be large enough. For stage productions, there is specialized plastic film that can be employed to reflect much larger surfaces. Musion is the primary company that comes up while searching, and another is Arena 3D. It is worth noting that Musion claims a patent on a version of this 100+ year old technology and has hit “imitations” with lawsuits in the past. It is also easy to source your own film from 3M or other sources in Asia — another version of the film is manufactured by DuPont.
Image of reflective foil setup for stage production — Source
Carefully controlled lighting is essential for this effect to look its best. The source of the image must be bright in comparison to the surroundings behind the transparent surface. The observer should also be in a very dark space so their own reflection doesn’t show up in the mirror. It is also helpful to have something slightly visible behind the transparent surface so that your floating image has something to float overtop of and give the viewer the parallax depth cue. The effect can be striking if combined with props behind the mirror — like a person sitting on a chair or animations that swirl around an object. However, there are limitations to this depth effect.
Pepper’s Ghost Pyramid — Source
Peppers ghost is still very much a 2D effect and does not present an image in three dimensions. It is just a mirror reflecting another flat plane. Parallax between the reflected image and the background is what gives our eyes the illusion of the content floating in mid air. A false sense of 3D can be achieved depending on your source and how the reflecting surfaces are arranged. There are some implementations of the effect that put 4 mirrors in a pyramid shape under a monitor (some have marketed themselves as holograms — sparking controversy). By having the monitor display a different image for each mirror, the observer gets more of a 3D view as they walk around — even if it is just 4 discrete viewing angles. Head or eye tracking would have to be employed to make the effect a little more convincing, but then it would only work for one observer at a time. As it usually functions, the effect may look best from one vantage point, especially if you are trying to align it with an object behind the surface. This misalignment can be minimized by having your observer be further back so when they move their head, the parallax isn’t as great as if they are right in front of the screen.
Projection on Transparent Materials and Scrims
Image of Bill Viola’s The Veiling — Source
Projecting on semi-transparent materials is essentially a variation on the Pepper’s ghost illusion. It is also an effect that has been used in theater for a long time. In contrast to Pepper’s ghost, this technique uses a transparent material to catch (not just reflect) the light from a projector. The viewer can still see through the material, but the projected light is scattered and appears to be transmitted from the material. Viewers can still see through the material allowing for a depth effect from parallax, but the illusion is still flat and two dimensional.
The implementation of this technique is one of the cheapest and most accessible on this list. You will need a semi transparent material and some means of projecting an image. The material you use depends on the scale or size of the end result and the type of effect you are going for. You also must consider whether you want to use front or rear projection. Rear projection (with the viewer facing the projector lens) will produce a noticeably brighter hotspot depending on the material used and where the projector is, and front projection means the image will spill behind the surface a little bit which may result in some doubling.
As far as materials to use, on a small installation you may be able to get away with just a piece of fabric like tulle or netting — things like bridal veil material. White fabric will catch and transmit light the best, but sometimes black can still work and give you a similar effect with the fabric appearing more “invisible.”
If you are trying to have an image appear on a storefront window or piece of glass, you will need a specially engineered film that is nice and transparent but still collects a lot of light from your projector. The proper film for glass can be very expensive for large pieces, so keep that in mind. One source has it at almost $1200 for a piece that is 2.2m by 1.2m. Here are some possible vendors for this kind of film: [One] [Two]. You can get away with cheaper materials, of course, but the effect may be very different. Cheaper or DIY material may be either more opaque (yielding a brighter image but less transparency) or too transparent (yielding a faint image). Projecting on glass will certainly show something if there is significant dust on it, but the effect will be very dim.
Lucinda Child’s piece “Dance” featuring scrim projection
To achieve much larger images for theater or stage, fabric is the most economical choice for a scrim. You can get very large seamless swaths of fabric for the purposes of stage projection. Some fabric will have larger holes in its netting which will make it more transparent but will also cause your projected image to be less bright as well, in addition to dropping the sharpness and fidelity of the image. Here is a great resource for more info on stage scrim projection materials, including silvered fabric. You can also layer these materials to get several planes since the light is passing through. The cone of light from the projector will cause the image to be larger or smaller on each depth layer depending on whether you are projecting from the front or the back. You can also only go so far with layering before your light runs out or just gets out of focus.
Similar to the requirements for Pepper’s Ghost, this technique requires very controlled lighting. You will need to balance the ambient light that is hitting your fabric so you can preserve the illusion of a floating image — otherwise it can just look like a standard projection screen that you can see through. Contrast is key here. It also helps to have the space behind the image not be completely dark to give the image more dimension. If the viewer can see behind the image then they get the layered effect and the sense of parallax that helps it appear more 3D even if it is still just 2D.
Content that works best on any of the semi-transparent materials tends to be imagery that does not fill the entire projected rectangle. The optimal approach is to have your content sit on a field of black, so that that it appears to have no bounds. A vignette or feathering on the edges can also help if you have elements that enter and exit from the sides, otherwise the viewer will see harsh edges. Semi transparent material also causes the projections to have a slight glow to them — the light beams get slightly diffused when passing through the material which tends to soften the sharpness of the image a little bit.
Projection on Fog or Water
For this technique, instead of a static material like cloth, you can use water, haze or another atomized fluid to catch light and provide a semi-transparent screen.
Water Screens
There are two types of water based projection surfaces — either the water is moving upwards or falling downwards. For an upward blast, these rely on a high powered water jet and a special attachment that spreads the water into a large flat half circle screen of water and mist. The size of the screen is limited by physics and the power of the water pump — most companies can generate screens that are in the range of 20–30m wide and about 6–10m high. This mist is then usually hit with rear projection by a high powered projector. This results in a semi transparent screen that can be hidden or revealed at the flip of a switch in the middle of a body of water.
Falling water screens are much more manageable to install indoors. These have a mechanism that just pushes water through spaced out nozzles on the top piece and collects and recycles the water in a basin on the bottom. Some systems are even able to selectively open and close the top nozzles to allow water to fall in different ways.
The effect of water screens is very unique due to the haze of smaller water mist particles causing a halo and giving the 2D image more volume. There is also a textural quality to the water and mist that you should plan on, as it can add some glow and reduce sharpness a bit. Rear projection works best on these screens, so there will be a persistent hotspot behind the content, but this may not impact too much depending on your setup. Front projection is possible, but you run the risk of doubling the image onto other surfaces behind the semi-transparent screen.
Fog Screens/Laminar Flow
These screens rely on a steady controlled flow of haze or water mist to create a thin layer of semitransparent fog that can be rear protected. A series of valves directs the mist into a narrow sheet, and the projected light is refracted off the particles. The haze can be water or oil based.
This technique works best indoors because of minimal air currents and the light contrast needed for the best illusion. Due to physics, this technique is limited by the screen size that can be created. A lot of commercially available screens can only get to something like a 2m by 1.5m size. The width can be extended with multiple mist units, but the height is the primary hindrance since the mist gets less dense after a certain distance from the valves and fans. Also, since this screen is so transparent, the viewer will get a strong hotspot from the projector and the content will shoot right through onto adjacent surfaces. Commercially available units are available, but aren’t cheap — some are almost $20,000 or more. DIY options also exist, but require a lot of materials. Getting the haze production right in a DIY setup is probably going to be the biggest challenge since most fog machines tend to accumulate in an enclosed space rather than dissipate.
Volumetric Projection
Volumetric projection is a technique that is a much more technical application of projecting into a thin sheet of fog. Instead of having light come from a single point, it uses multiple light sources or specialized optics. By combining these sources with the additive quality of projected light, this technique is able to create dimensional images with multiple viewing angles. There are a few scientific papers out there on similar processes, and we’ll discuss laser plasma displays later on that share some characteristics.
Light Barrier by Kimchi and Chips is likely the first piece to use this technique. With Light Barrier, the artists project images onto an array of parabolic mirrors. Using custom software that analyzes where the pixel’s light ends up after hitting the curved mirrors, they can approximate the path of light from each projected pixel. When this is done for the entire array of mirrors, they can calculate where in 3D space each pixel path intersects another after hitting the mirrors. The projection area above the mirrors is filled with haze from a fog machine — the medium for these intersecting light beams. If more beams illuminate a particular location in 3D space, then that spot will appear brighter. By hitting several of these overlapping spots together, the combined focal point becomes brighter, and images can be formed in the haze. There are other ways to achieve similar variations on the effect that involve multiple projector sources, but this gets logistically complex and expensive very quickly.
This technique currently has its limitations. Making recognizable images requires a calculation engine and custom software, meaning you can’t just drop in any content and have it show up in 3D. The workflows for generating content based on depth maps are improving, but there is also going to be an upper limit to how fine the details can be. It may take several dozen converging pixels to make a recognizable voxel — so once we have higher resolution projectors we might be able to put together even more complex visuals. Full color projection with this technique is also a challenge because the overlapping colors add together and change the colors for different viewing angles. White is also going to show up the best for an effect that is already going to be slightly faint compared to other projection methods. Nonetheless, it is an exciting area of discovery and still has a lot of potential to explore.
There are also variations on this idea that don’t involve fog or specialized optics. A simple way is to use layers of fabric — the image will be the same on each layer but will get larger or smaller on each pass. There is also the method employed by the Lumarca where a grid of thin strings are stretched to make a large volume. Each string in the volume can then be precisely mapped by a few columns of pixels from the projector. When the location of each column is then mapped to a known 3D space, it becomes easy to render simple graphics on the array of strings that appear to have volume. The strings transmit the light a bit, so it is easy to see from all sides. This method also has some density and fidelity limitations but is also easy to scale.
Diffusion and Distortion Techniques
This is a challenging category to compartmentalize, but there is a lot of great work to consider here. Sometimes you don’t need a cutting edge display or experimental hardware to do something new. By placing different optical materials in front of a monitor, projection or LED video wall you can create something that doesn’t feel like a standard display at all. Of course it can be a little more challenging to show sharp coherent images with a techique like this, but sometimes a piece is much more about playing with texture and motion more than legibility.
Mary Franck’s piece “Diffuse Objects”
There are a few examples of this kind of work. One of the more striking examples of this kind of thinking are Mary Franck’s pieces Diffuse Objects and Gilded and Unreal. They combine a standard LCD screen with custom formed materials. The content show on the screen interacts with the materials in a way that gives the light and imagery more physicality than it would on a flat screen.
Another piece in this area is Lucy Hardcastle’s Qualia. This is a touch sensitive version of a 3D object that has light passing through it. I’m only speculating on how this works, but from the video it looks like it is projection (note DLP projection rainbow bands) from underneath into a 3d form that has been frosted. I suspect the touch sensitivity is done using IR light and a camera in a similar way to rear projection touch tables.
If you’re not into diffusion and blur, you can can be a more precise with your light redirection techniques by using fiber optic materials. Yeseul Song’s Glow Box is a fabricated object that uses fiber optics and a projector to produce low resolution images that have been bent through the fiber optic cables.
Yeseul Song’s Glow Box
Working with fiber optics can be expanded into longer or larger forms as well. MIT Mobile Experience Lab made something called The Cloud in 2008 that was a large cloud shaped structure that had hundreds of fiber optic strands coming off of it like hairs. Each strand could be individually illuminated and from the video it seems there is an interaction method to let people touch strands and have them respond. Very basic imagery and text could be rendered across the fiber optic strands with what I hope wasn’t an individual LED per strand, but in 2008 that may have been the only option for a shape that unusual.
If strands and pixels aren’t your thing, there is also a material called Ulexite that is essentially a natural fiber optic rock. Also called “TV Rock” this material has a crystal structure that appears to project the image of whatever is on the bottom of it to the top surface. I’ve only seen small pieces of it, but if you had a larger polished piece, you could do some unusual surface mapping effects that would look very different compared to just glass or densely packed fiber optic strands.
In another related direction, some scientists are investigating a technique that uses specially formed plastics that geometrically model caustics so that the final material can display a coherent image when light is focused through them just right. Here are some examples of this technique in practice — One two.
Finally, there are techniques that are just doing a low resolution diffusion or reflection of light like pixel displays. There are tons of examples of this Jason Eppink’s Pixelator is a piece that co-ops public advertising monitors in NYC and distorts them into more pleasant abstract designs using diffusion and foamcore frames. Jim Campbell’s work has been a great example of this kind of low resolution image making for a while as well.
Transparent LCD and OLED
LCD’s are a transmissive technology (in contrast to Plasma or LED that are emissive technologies). This means that light passes through a medium to get to your eye. The backlight that is used for LCD’s is meant to provide a strong and very even field of light that gets passed through the actual liquid crystal/polarizer element. Essentially, the backlight is a flat light box that you can fade up or down, but it doesn’t have much else to do with creating the image itself.
A liquid crystal element can function perfectly fine on its own, without a proper backlight. This means that an LCD can effectually work as a transparent monitor if you are keeping some sort of light source between the screen and the viewer. Using an LCD this way yields a lot of interesting possibilities.
A common usage is to put an object in a box with a strong, even light behind it, and have at least one side of the box be a transparent screen. This allows you to superimpose sharp graphics that appear to float overtop of the object inside. This can be combined with a standard touch screen for interactive transparencies. Also, since LCD’s do such a good job at blocking light, when they are displaying black they are nearly impossible to see through, providing a unique reveal effect. A bright point light source can be put behind them to use the LCD as a sort of projection mask — resulting in a variation on a normal projector (your projected image will probably be fuzzy without focusing lens elements though).
Some artists and studios have also been able to source custom LCD elements that are closer to the LCD’s that are used in old pocket calculators with only a few elements that can be turned on and off. Pieces that come to mind are Hypersonic’s Patterned by Nature and Iris by Hybe.
A challenge with transparent LCD’s is sourcing usable ones. There is the DIY route, which I cover a little bit in the appendix — but the visual results aren’t great. Only a few commercial vendors supply these screens, and because it is a specialty item, they tend to be more expensive than comparable screens with backlights. You may also be limited by certain available sizes — making it difficult to scale these to a large application. Even if the screens were tiled together, at least one edge needs to have the driver board on it, so its not as easy to tile them together like normal LCD walls. The color reproduction with these tends to be a little duller than the vibrant colors you’re used to. Their transparency can be cloudier compared to regular glass since the polarizer and liquid crystal layers are sandwiched in there as well. I’ve found that black, white and gray content is the most striking on transparent LCD’s.
Samsung’s Transparent OLED — Source
Transparent OLED’s, however, are a different beast. OLED is an emissive technology and therefore does not require a backlight. This means that brightness and color reproduction will be much better compared to transparent LCD. Their brightness still isn’t going to rival a normal display, so don’t expect to use them outdoors or in a brightly lit space. Also, in contrast to a transparent LCD that works equally on both the front and back, for now transparent OLED is only visible on one side since the emissive element is designed to point in one direction.
Transparent OLED’s are still very useful for a lot of creative applications like being applied to a storefront window without blocking the view or applied onto a mirror so that graphics can be superimposed on top of the mirror. You can also position a camera directly behind them when doing magic mirror digital effects. You can stack multiple OLED’s in front of each other for a layered effect, but there is a caveat. There is a significant darkening effect that occurs when looking through the panels, it’s like a few stops of a neutral density filter — so when you stack them, they get darker and darker as you go backwards. There is also a larger display driver that comes off the back about 8 inches down the long side on the models I have seen, so this limits your ability to layer them closely together for a volumetric display.
As of the end of 2017, transparent OLED screens are not currently being manufactured anymore. Samsung is the only company that ever made these 55” panels — so even if you see Planar or other companies selling or offering transparent OLED, they are always using the Samsung panels on the inside but possibly their own drivers. The reason for Samsung’s decision to end-of-life these display panels is not public knowledge, but there is some speculation as to why. The probable reason is that these screens were difficult to manufacture and had a low yield rate of functional units which would make them less profitable to continue making.
Now that Samsung has stopped manufacturing these panels, be extremely wary of anyone offering them for sale since their lifespan and quality could be questionable. There are probably less than 100 currently available globally and there is no telling how pristine they are. Just like standard OLED, there is a big potential for screen burn-in and loss of luminance over their lifetime. Renting is the best suggestion for anyone looking to use them for an installation. Some potential rental sources I’ve come across are ABComRents and Oxygen Eventworks.
LCDs with Modified Polarization Layers
Karina Smigla-Bobinski’s SIMULACRA — Link
Besides being turned transparent, LCD’s have another trick up their sleeve involving light polarization. By removing one of the polarization layers, the screen will look white to a viewer until they look through another polarizer. Below, I’ll attempt to describe how this works.
A full explanation of the science behind wave polarization is a little bit outside of the scope of this article, but there are some links in the references section as the end of the article. This video is a pretty solid explanation of polarized light and its usage with cameras. I encourage you to look into it because there are a lot of other great effects that can be employed via polarization. My explanation will be simplified in order to stay concise.
LCD Structure — Imace Source
You may remember from Physics class that light sometimes behaves as a particle, and sometimes as a wave. This light wave has a frequency, an amplitude and a rotation or polarization. As stated before, an LCD works by employing a backlight, a pair of linear polarizers, and a liquid crystal layer. When all of the light particles come off the backlight, they do not have a uniform polarization — they are just going all over the place. As they pass through the back polarizer, specialized molecules embedded in thin columns absorb any light that doesn’t have a particular polarization. The polarized light then passes through the liquid crystal layer. When the liquid crystal receives current, its molecular structure changes and it provides a transparent tunnel that can be variably twisted. The twist in the liquid crystal gives us a way to electronically modulate the rotation of the light wave.
As the light exits the liquid crystal and arrives at the front polarizer — this is where the magic happens. The front polarizer is the exact same material as the back polarizer, but its physical orientation is perpendicular to the back polarizer. This offset orientation effectively blocks or absorbs light of a particular polarization. If the light passes through the liquid crystal without being twisted, you will get a black pixel. If the liquid crystal twists the light 90º so that it passes through the front polarizer — you will get a white pixel. With the red/green/blue color filters on each pixel, the video signal is able to tune the wave orientation passing through each color to produce the millions of colors we see on an average display. Again — this is a very simplified explanation that glosses over a lot of important details related to different LCD technology.
So with all of the above in mind — if we remove the front polarizer, what happens? Now there is nothing to absorb the light that passed through the front polarizer and the viewer will just see white light. However, if you put a polarizer back in front of the screen, everything will appear normal again. This polarizer doesn’t need to be right on top of the screen either. The polarizer can be in glasses that the view puts on or it can be placed meters away from the screen.
Moving polarizer layers on top of a modified LCD
There are a lot of interesting possibilities available for these screens, but actually getting one to try is another matter. See my notes in the appendix on how you might make one yourself from an existing LCD.
Flavien Théry’s La Porte — Link
This technique is great for an unusual reveal to the viewer since it just looks like a white screen otherwise. The polarizing film can be placed at any distance from the screen and still allow the screen content to be visible, as long as the film is between the viewer and the modified LCD. You’ll notice that depending on the way that the film is rotated relative to the screen, you can get things like inverted or warped colors since you are blocking different orientations of light. Also, due to the properties of polarized light, the content can be seen via the reflection off of other objects, or if you stick the polarization film on top of a mirror. The artist Flavien Théry has some amazing pieces that employ modified LCD’s and polarization film. In his piece La Porte he has a small door shaped object made of reflective material on top of a modified screen and the content is only viewable through the reflection on the door.
Flavien Théry’s Contraires — A somewhat mind-bending use of modified LCD’s and polarizers
Unrelated to LCD monitors, light polarization is also a technique that can be used with projectors as well. Many 3D movies in cinemas have different systems to pass the light through a polarizer (either dual projectors with separate polarizers, or a spinning polarizer in sync with the framerate). To preserve the polarization of the light, many of these setups also require a specialized silver screen material or paint. The view is usually given either passive (each eye has a polarizer in a different orientation) or active glasses (which shutter each eye in sync with the projector) to ensure that each eye sees the image that is intended for it. I haven’t found a good shareable example of polarized projectors being used in an unusual or artistic way, but there are definitely some possibilities out there.
Volumetric Displays (Mechanical/Persistence of Vision)
viSio Volumetric Swept Volume Display — Source
With Volumetric Displays, there are a couple different flavors, and in this section we’ll cover displays that work with the principle of persistence of vision, and are also known as swept volume displays. Volumetric Displays have been discussed in science fiction for decades and have been researched extensively since the 1960’s. Here is a 1969 paper from Bell Labs on a technique that uses a loudspeaker to vibrate a reflective mylar sheet in sync with a CRT to make an image volume.
This type of volumetric display usually uses a 2D display element in addition to a mechanical apparatus to move the display quickly enough (either laterally or radially) to give the illusion of volume. You can buy persistence of vision (POV) LED toys at carnivals and festivals that are the same basic idea that is found in the more complex setups discussed below. Crayola even made a toy a few years ago called the Digital Light Designer that let kids draw on one of these displays in real time. There are also more sophisticated LED based setups such as the viSio or voLumen that are mentioned in the links section.
These volumetric displays allow for one of the best impressions of 3D physicality and presence because the viewer can walk around and view different angles of the same image. The downside is that their mechanical nature makes them difficult to scale to larger displays with finer resolution, and the fact that they are moving so quickly can make them quite dangerous in certain situations. Some techniques can also be difficult to capture reliably or smoothly on video because the refresh rate may be out of sync with the camera’s frame rate.
There have also been attempts at combining mechanical motion with more sophisticated displays like CRTs, projectors or LCDs. One of the earlier successful examples of these screens is Barry Blundell’s volumetric cathode ray tube work. He did some experiments in the 1990’s that used a specially designed glass tube, a spinning phosphor plate and multiple electron guns. Here is a video of that display in action.
Barry Blundell’s Cathode Ray Sphere -Source
The Perspecta by Actuality Systems came in 2001 and followed a similar approach, but used specialized projectors and a rotating screen instead of electron guns. Here are some stats on the capabilities of the early version of the Perspecta:
“This computation is performed on a high-end NVIDIA GPU within the Volume Rendering Unit, and the results are stored in the Core Rendering Electronics (CRE). The CRE drives three Texas Instruments DMDs (Digital Micromirror Device) at approximately 6,000 frames per second with these slices, which are projected onto a diffuse screen that rotates at 900 rpm. The result is a crisp, bright, 3D image that can be viewed from any angle.”[Link]
Perspecta Diagram — Source
A more recent version of this type of display is the Voxiebox by VOXON. It uses a high speed scientific projector and a rear projection platform that is moved up and down extremely quickly. The movement of the platform, the refresh rate of the projector and the content that is being drawn are all synced together by software. As the platform moves, a different slice of a 3D image is projected. As these slices are projected, the viewer’s brain assembles them into a persistent volumetric image.
Currently the Voxiebox system has a perceived volume of about 25cm x 25cm x 12cm. The Z axis resolution of the Voxiebox display is primarily limited by the frame rate of the projector and the lateral motion of the projection platform. There are also challenges with scaling this display to a considerably larger size for a number of reasons. Moving a much larger platform up and down a greater distance at a rapid pace isn’t outside of the realm of mechanical possibility, but it would be a different engineering challenge to make this display several meters wide and move up and down a few meters multiple times in a second. A larger platform also requires a brighter specialized projector, which comes at its own cost.
Perceptually, the Voxiebox style of display is suited to some particular visual aesthetics — it is better at showing certain types of graphics than others. The projected light is additive on each slice, so while one surface appears solid, it also combines with the light behind it — this is similar to the issues faced by volumetric projection in the other section. This makes very dense imagery move towards the white end of the spectrum as different slices add together for the viewer. Vector style imagery with points and lines tend to be more successful ways to represent solid shapes.
Another example of a mechanical volumetric display is Benjamin Muzzin’s piece Full Turn. He took 2 LCD panels, stuck them back to back and spun them at very high speeds. The power and video signals were passed in using a specially designed slip ring. The bottom ring is fixed and has one end of a cable attached to it. The top layer spins with the LCDs and maintains electrical contact via metal brushes that run in circular channels. As the LCD spins faster than the refresh rate of the screen, it allows it to render volumetric images that move and shift. In comparison to the Voxiebox, this particular implementation presents a different challenge when trying to form coherent 3D images because of the radial motion as opposed to lateral motion.
Volumetric Displays (Multiple Layered Screens)
There are a few different types of this type of volumetric display. One type is known as a Light Field Display or a Polarization Field Display and uses a series of layered LCD’s (or other transparent media) to create an illusion of depth via parallax. This is a simplified explanation because there are a lot of nuanced variations on this concept. The Nintendo 3DS is a well known version of this type of display — it uses 2 stacked LCD’s — the bottom one alternates dark bands so that each eye sees the version of the image that is intended for it.
By stacking each display on top of the other, you are able to create volumetric effects with 3 dimensional content, or more slipping parallax effects with 2D content. The depth resolution is limited by how many displays you can stack on top of each other. It also becomes more difficult to backlight all of the stacked displays so that everything is visible. Each display, its components and polarizing film will cost a little bit of luminance and clarity for the viewer. If the screens are far apart, there is also the possibility of internal reflection between two adjacent screens that can impact the contrast.
MIT Media Lab’s Polarization Field Display — Source
When using this type of display technique to show content, there are a few different approaches and challenges. The most straightforward method is to chop up your images into different depth layers so that you can achieve parallax by displaying each layer on a different screen. This is similar to the method of hand drawn cel animation where the background landscapes are on a different layer than the characters. To achieve more of a 3D volume effect with this method, you would have to incorporate viewer eye or head tracking into the display software in order to display multiple viewpoints in real time. The screens are also only viewable on 1 or 2 sides of a cube, instead of 4 or 5 sides. Your Z-dimension is constrained by how many displays you can stack on top of each other. Blending colors across multiple screens is also a challenge. Stacking dark colors will turn muddy at the end and stacking red green and blue won’t necessarily make white as with other additive light methods. Color filters also impact the brightness, and some projects use grayscale monitors instead.
Getting a video signal to each display is another technical challenge, depending on how many layers you are trying to drive. If you have 6 stacked displays at 1920x1080 — you need to be able to render six 1080p streams at once and keep them all synced together.
LightSpace Technologies has a display that was formerly known as the Depthcube that uses a high speed projector and a series of about 20 LCDs that are used as optical stops, so that each layer of depth can be halted at the correct location. By using special antialiasing techniques, the physical space between the layers can be smoothed so it doesn’t feel so stepped. Here is a writeup with more technical details on how it works. This display has been in development since the early 2000s and has been commercially available at an unknown price point. The primary use case of one of these displays has been in engineering or medical applications. Here is a video of it in action.
Depthcube Diagram and Image — Source
There are some versions of layered screens or display volumes that don’t stack multiple LCDs but combine them with things like layered Pepper’s Ghost, multiple projections on scrims, transparent acrylic, or LED cubes.
Around 2016, Looking Glass Factory developed Volume which was poised to be an affordable multiplane display. It achieved its effect by means of a projector and about 12 layers of angled material that catches a small sliver of the projector’s raster. They used a custom plugin for Unity that allows you to drop a 3D scene into their renderer and have it slice it up appropriately for their volumetric display. In 2017, Looking Glass Factory changed their technology and introduced the Holoplayer One. The Holoplayer One is more of a lightfield display than a layered screen and it uses a high resolution screen, a high density lenticular film and retroreflective material to create a stereoscopic view with 32 different viewing angles. It uses a depth camera for interaction and a Unity Plugin pipeline for rendering custom content. There is also a version of the Holoplayer they are working on that can be combined with a Pepper’s Ghost effect and they are calling it Super Pepper.
Diagram for the Holoplayer One
There are also many pieces or products out there that use a 3D volume of individually addressable LEDs to create a layered volume with more viewing angles but a lower visual fidelity.
Electronic Paper Displays
Electronic Ink Display Example — Source
Electronic Ink or Electronic Paper displays are still a relatively new technology and are mostly found in electronic readers. They have some unique visual qualities that set them apart from any other display in this list.
There are a few different kinds of technologies that are considered E-ink displays, but the common one is a monochromatic electrophoretic display. These work by suspending charged particles in a fluid. A top and bottom layer with embedded electrodes sandwiches this fluid layer, and when the charge changes on a layer, the ink particles are pushed to the top, or pulled to the bottom. When the black ink particles are on top, they absorb light and appear black, and when they are pulled to the bottom layer, that pixel appears white because it is reflecting more light.
This display mechanism means that they do not transmit their own light (except in a few consumer models where a backlight has been added for night reading). Since they are only visible via light from the environment, this means that bright environments aren’t nearly as much of a negative — and that makes them one of the only displays in this list that are viewable in direct sunlight. These displays are also incredibly low energy since they only use energy when changing the screen contents — without power, the screen would potentially hold its image indefinitely.
However, because of the way the technology works, the refresh rate of the screen is very low which makes it unsuitable for a lot of motion graphics. When the screen refreshes, there are also some ghosting artifacts that appear on parts as the ink particles reposition. Some screens will momentarily make all pixels black in an effort to normalize everything and prevent artifacts. Some screens can indeed refresh faster, at the expense of contrast and clarity artifacts. For more on the refresh rates of e-paper displays, check out this resource. They are also typically able to only display monochrome images or a certain level of grayscale — displaying color with these is still an application that is in development but much closer to a consumer reality. Other methods of creating e-paper displays with graphene are also being researched, with the added bonus that they have the potential to be flexible as well.
Making use of E-ink displays in artworks is unfortunately impeded by the fact that purchasing a standalone screen of a significant size is very difficult. A lot of e-paper screens are also made fairly small — usually less than 12in, so even if you could modify an existing e-reader display, it wouldn’t be very large. The consumer demand for these is primarily in e-readers so there is little incentive for the manufacturers to make screens that can be addressed as a normal video monitor with an HDMI input for example. Only recently have companies started producing and selling consumer models or development kits that connect via USB, but only in limited quantities. There are several e-ink development boards that can be addressed with a micro controller, but they are about the size of an index card or smaller.
Visionect is working on development kits for 32" e-ink screens that could potentially be tiled together to create a much larger display, but their price is still quite high compared to traditional displays. Some companies are also working on developing larger e-ink based “pixels” that can be tiled together to make incredibly large architectural elements that can change or be combined with projection mapping.
Larger E-Ink tiles for architectural usage
Flexible Displays
LG Flexible Display — Source
Flexible displays have been appearing in tech news for years, but very few have reached consumers due to their niche uses and currently high cost of production. A few smartphones, such as the Samsung Galaxy Round or Galaxy Note Edge, have these in the form of screens that have a slight wrap around the edges or a curved body. OLED technology is typically used for these flexible displays, although flexible E-ink screens are also being researched. Here is a demo video of a flexible screen.
Making flexible LCD’s isn’t impossible since there are curved TV’s out there, but the cost implications may be huge. OLED, on the other hand, can be manufactured in very thin layers on a plastic substrate. OLED’s also emit their own light, so there is no need for an additional backlight. The screens can be bent or rolled a considerable amount, and only one full edge needs to be connected to the display driving electronics. There is also a greater potential for these to be manufactured in unusual shapes other than rectangles.
Unfortunately, aside from the smartphones that were mentioned and a few curved TV’s, the market demand isn’t incredibly high for these yet. Manufacturing plants will need to adjust to suit their specialized production, so the price is still much higher than LCDs. The market will need to be convinced that a flexible display is a must-have item in order to boost production and lower costs, but the use cases aren’t incredibly compelling yet. One of the intriguing uses of a flexible display is that it can potentially be utilized as a user interface element. The flex of the screen could be sensed by software and used as a gesture in addition to swipe and tap gestures. We will see more and more about flexible displays in the next few years as the technology continues to advance. Here is a 2017 video that features several different flexible AMOLEDs including ones that are used in the iPhoneX.
Laser Projector/Laser Displays
Robert Henke’s Deep Web — Source
Laser projectors have some really unique visual characteristics that make them ideal for the right content and application. Most of them work by shining a combination of different colored lasers (red, green and blue) onto a motorized mirror that moves incredibly fast. They have been around for a while, but due to several factors they aren’t used very regularly in art pieces and performances. Here is a thirty minute video from the International Laser Display Association (ILDA) showing a range of different visuals that can be achieved with lasers. They are are understandably confused with other laser video projectors that usually use a more traditional display and lasers as a light source.
The primary hindrance in working with lasers is that they are quite dangerous. While staring straight into a 10,000 lumen projector may feel uncomfortable, it is not nearly as likely to blind you. A laser light beam is so concentrated that it can cause serious damage by literally boiling the cells in your eyes until they burst and scar. Even a 1 milliwatt laser can cause permanent damage to your eyes if you stare at it, but 5mw and above is where your eye’s natural reflex to blink won’t even protect you — see more details on laser safety here and here. Consumer laser pointers are comparably low powered and will be 1mw to 5mw. Laser projectors on the other hand are going to be 485mW, 1W, 2W or more. Brightness essentially correlates with wattage with these. High wattage beams can be fire hazards or burn the skin if used irresponsibly. It is recommended or required that you use specialized eye protection when working with these lasers because a stray reflection for only a few milliseconds can cause damage. Different states and countries have varying restrictions on the use of lasers in live events and most places require a licensed operator or a variance. The restrictions are typically on which direction the lasers shine, and how far above or away from the audience they should be shining. Some laser projector vendors provide the necessary usage variance when purchasing them.
The danger factor is unfortunate because lasers have a very unique aesthetic. The sharpness of their beam gives them a vector quality that is almost impossible to represent with the pixel density available in today’s projectors and displays. The scanning motion of the mirror makes the drawn lines sort of infinitely continuous instead of being comprised of discrete elements. The Vectrex of the 1980’s had a similar aesthetic.
Example of an image drawn with a laser projector — Source
This mechanical method of drawing has its limitations in that the mirror can only move so fast and draw so much in a given “frame.” If a laser projector tries to draw an image that is too complex, the image can appear to flicker because it can’t actually draw all of the points needed in a single frame, so its “framerate” drops. This flicker effect is painfully obvious when laser projectors are filmed, which makes them an unlikely choice for something you plan to document. Most laser projectors have specifications on how many points per second (pps) they can draw — some of the low end ones can do 20,000pps or 20kpps, and higher end ones can do double that or more. 20,000 points sounds like a lot, but 20,000 per second means you only get something like 330 individual points per frame if you’re trying to draw at 60fps. This means you have to be smart about your content and economical about where your image complexity is.
Additionally, since the laser doesn’t scan left to right, top to bottom like the electron beam in a CRT television, it means you can’t just order your points all over the place, send them to the projector, and expect it to work out. Ideally, the beam should move as little as possible to its next point so that the motor isn’t trying to draw one extreme side and then another — the time it takes to move the mirror that far can have a serious impact on its draw speed. This also means that you’ll really only ever see shape outlines on these kinds of projectors, because filling in a shape would take far too many mirror motions and your eye wouldn’t see it as continuous anymore. The motion of the mirror also limits the “throw ratio” of the projected image. The width of the projected image is typically much smaller than a lot of video projectors that you may be used to — this means you need to be much further back from a surface if you want a larger image. The good news is, compared to video projectors, you’re losing a lot less light when you increase the scale of your image. The specs on a laser projector don’t always clearly tell you the expected width, so you will have to put on your math goggles to figure out the size at a given distance.
The other thing to consider about laser projectors is their contrast and their color reproduction ability. Regular projectors still have issues with their black levels because they are still shining light even when the scene is black, and this lowers their overall dynamic range. Laser projectors don’t have this problem because they only project light where it needs to be, so their lines really pop. However, you’re less likely to have access to a laser projector that can cover a wide color gamut — some cheaper projectors will only give you about 7 colors by mixing red, green and blue lasers. High quality projectors can do a wider range of color mixing. Dimming the beam can also be tricky unless you are using a high quality projector with a good blanking control.
Vanishing Point by United Visual Artists — Source
Head mounted displays
Hugo Gernsback’s Television Goggles — 1963
Head-mounted displays (HMDs) could have their own article by themselves, but they are worth briefly mentioning here. These displays have been around in some form since at least the 1960s. These can be divided into two types depending on whether they are used for virtual reality, augmented, or mixed reality.
HMDs for virtual reality are typically a standard display (primarily OLED these days) and optics that are strapped to a user’s face. Current consumer examples would be the Oculus Rift, HTC Vive and Samsung Gear VR. Software renders a separate image for each eye, and sensors in the headset (or external tracking cameras) allow the software to adjust the rendered camera position to give an illusion of your head being in a virtual space. The brain is extremely sensitive to latency between your head movements and what it expects your eyes to see. If the latency or delay between those two is too high, the sense of immersion is lost and some users can experience motion sickness. To counteract this, the tracking devices and displays are engineered to keep this latency as low as possible. The refresh rate of the display is usually higher than most 60hz monitors, which means that your content must be able to run faster than 60fps as well. The graphical demands of high fidelity virtual reality also means that these will still be tethered to a PC for now (except for the Samsung Gear VR). For AR devices, the computing and display elements are encapsulated in the same device, to allow for more free range wandering.
Toshiba’s 2006 Full Dome HMD — Source
HMDs for augmented and mixed reality have a lot of different display methods depending on the manufacturer and the end goal. Eventually, the difference between augmented reality and virtual reality displays may only be a switch or fader that dims out the “real world” as the generated graphics are given more emphasis. Google Glass uses a prism/projector technique. Microsoft Hololens uses an unusual method of edge lit holography or a waveguide element. Magic Leap is rumored to be some kind of retinal projection technique, but very little is known about it at the time of this writing. In addition to sensors like accelerometers and gyroscopes used to track head position, some of these displays use cameras to augment their visuals. By using computer vision techniques, devices like the Hololens are able to track physical objects in front of the user and augment them accordingly. By combining all of these tracking systems, these displays are able to make elements appear “holographic” since they can render different angles as the user walks around.
Plasma Combustion
Image from paper Fairy Lights in Femtoseconds — Source
This kind of display acts in a similar way to Volumetric Projection, but it is considerably more dangerous and expensive. There are only one or two companies working on this display type right now, and one is Aerial Burton. There is limited information on how this display actually works, so take my layman’s explanation with a grain of salt. This display technique works by focusing high powered lasers onto a point in space. When the energy at that point gets hot enough, the air molecules get ionized and release some photons. Aside from ionized plasma, fluorescence is one, and cavitation is another when involving a fluid medium. Here is a demonstration video of the Aerial Burton display:
Two forms of Aerial Burton’s displays — one with a fluid based medium and one based entirely in air — Source
This display unfortunately has many drawbacks that are similar to those of a laser projector. They still work by moving a mirror very quickly, so there is a limited number of points that they can draw at a given time. There is also an added crackling noise component because of the tiny explosions needed to make the visuals. These tiny explosions can also emit an ozone gas that can be potentially harmful if used in an enclosed space.
Another set of researchers in Japan have been working on a much smaller implementation of this same technique that they are calling the Fairy Lights display system. The primary difference is that this version is touchable. By firing the lasers much faster than the Aerial Burton method, the images are smaller and not as bright, but much safer. The tangible element can be used as an additional cue for interaction with the display. They still have similar drawbacks related to visual fidelity (number of dots per second) and added popping noise (their paper says about 22dB of noise is added when using the display). Here is a video featuring some of the interactions and visuals that can be produced.
Image from paper on Fairy Lights in Femtoseconds — Source
Physical/Mechanical/Kinetic Displays
Image of a Flip-dot Display — Source
Some artists also work with display surfaces that don’t emit light or use optics at all. Most of these displays are entirely custom and work with a massive array of motors or other electromechanical means. Haptic communication is another big one that is being explored with this type of “display.” The line between sculpture and information display is really blurred with these, so its tough to quantify exactly what falls into a display and what is just a lot of motorized elements.
There are some commercially available physical displays such as Flipdot displays. There are just a few vendors for these in the world. These work by using electromagnets to flip a metal disk that has different colors on each side. They are capable of fairly simple graphics since they are essentially just binary pixels. There have been a few installations that have figured out how to make them switch fast enough to do full video representations. There is also an audio component to having so many elements mechanically flipping at once, as in this video of a large 588x216 resolution screen. There is also the potential to develop them to have the discs spin completely 360, which when combined with a variable speed, they would be able to represent grayscale values instead of just on-off.
Danny Rozin’s PomPom Mirror — Source
There are a ton of other variations on this same concept that either use an array of motors or electromagnets. The artist Daniel Rozin has been exploring this concept for years with a ton of different materials — trash, wood, penguin dolls, metal balls — etc. There are also pieces that take this concept into a third dimension and use elements suspended on wires to represent limited forms in 3D. The same concept has been applied to a fleet of drones that were used to render low resolution volumes.
These physical displays continue to get more sophisticated as the years go on. This display was created out of special spools of thread that had a gradient of colors on them. By knowing the motor’s position, the software was able to know which color was currently on the front of the display, allowing them to render pixelated portraits of user generated photos. This one called the Megafaces Pavilion was made of thousands of actuated LED elements that were used to render people’s faces for the 2014 Sochi Olympics.
MegaFaces Pavilion for the 2014 Sochi Olympics — Source
As mentioned, these kinds of physical actuated displays are also used in conjunction with projection to add haptics as another layer of interaction and collaboration. The inFORM from MIT has been the classic example of this for the last couple years. Some researchers are even working on ways to use electrical signals to simulate textures on touch screens — but a full writeup on the future of haptics and displays is one for another article :)
MIT’s inform Haptic Display — Source
Closing Notes
These are just a few of the possible options for display types and techniques of working with light. Once you find a research paper on one, there are a million other paths in the references of that paper. I hope this gave you a good idea of the range of amazing technologies out there — from the DIY $5 option to the theoretical and fanciful. There are other effects we didn’t explore in detail like stereoscopic displays for home 3D movie viewing, lenticular effects and many more. There are also a lot of technologies that never took off, either for reasons of cost, complexity, or ownership. Things like CamFPD’s wedge display, or Electrowetting displays (similar to e-ink) were ones that had great commercial potential only 10 years ago, but never ended up taking off for one reason or the other. Some techniques are quite old and were never acquired as intellectual property and will eventually be available in the public domain. There are whole conventions devoted to advancements in display technology, but much of it never reaches the general public or the artistic community. Lots of great options, ripe for use or modification. The more we experiment and use these technologies, the sooner we’ll get to advance the ones on the fringe. If interest in these alternative displays increases, they will become more normalized and costs will come down, opening the door for even more experimentation.
We’ll be seeing a lot more display developments in the next few decades, so keep your eyes open and see which ones might be a good fit for your artistic vision.
Image: Adam Diston — Cutting a Sunbeam 1886
Acknowledgements:
Thanks to a ton of people for taking the time to read this and give me comments and extra content, it is truly appreciated. A partial list: Kyle McDonald, Elliot Woods, Deborah Johnson, Matthew Ward, Jesse Garrison, Matt Parker, Ali Tan Ucer, Dan Moore, Sean Kean, Jamie Zigelbaum and others.
Appendix A: DIY Notes to Remove the Polarizer from your Monitor
Image of attempting to slowly scrape the film off of a monitor with a razor blade
Since these screens aren’t typically manufactured like this, you will have to open the screen up and remove the polarization layer off yourself. Similar to my notes on making your own transparent screen, this involves opening up the screen and potentially breaking your monitor casing, electrocuting yourself, or cracking the delicate LCD. I broke 2 screens before I got this right, and every manufacturer applies their polarization film differently. Sometimes you can peel it right off, and sometimes it will be applied with adhesive and require a few hours with a razor blade and some acetone to dissolve the adhesive. The film tends to have a “grain” to it, so if you start on a corner and that corner of the film snaps off, try the opposite corner. Pull very very slowly — one wrong move, and you’ll crack the glass holding the liquid crystal in place. The film itself it also very sharp — paper cut style — I sliced my hands up more than once. Patience is the name of the game.
Once you have the film off the screen, you may be saying “Hey! What gives — this film is all blurry!” The explanation is that manufacturers combine the polarization layer with a diffusion layer to improve viewing angles, but this makes the film difficult to use if it is not sitting directly on top of the screen. However, there are tons of online vendors for sheets of linear polarization film that do not have diffusion. If you’re not in the DIY spirit or need to get this done on a massive scale, there are screen vendors listed in the references section that do have the ability to remove polarization film from very large displays and are closer to the supply chain than a consumer could get.
Image of my failed attempt at removing the polarizer — moved too quickly and cracked the glass
Appendix B: Notes on DIY Transparent screens
You can modify an existing LCD monitor to be transparent by opening up the monitor and removing the backlight yourself. Insert boilerplate copy about how you should not attempt this without understanding that you may completely break your screen or cause personal injury/electrocution and the author assumes no responsibility — please be cautious and safe.
Speaking from personal experience, this is a difficult modification to perform on monitors from the factory, quite simply because they are not designed to be used this way. I have done this to 4 or 5 different LCD screens and there is a tremendous amount of variability in how different manufacturers assemble their screens, so there is not a consistent guide that would work for each screen. You may be able to open the screen up, but that may require breaking the internal plastic tabs that hold it together — ensuring that you can’t quite put it together again. You must also go very slowly to ensure you aren’t going to crack the screen or rip or damage the delicate electronics inside.
Once you have it opened up, the backlight and LCD screen are often sandwiched together with a metal frame that must be carefully wedged off. One of the long edges of the LCD panel is going to have a very fragile thin plastic flex cable that traverses the whole side. This flex cable essentially controls each column of pixels individually, so if any part of it gets damaged, you may lose that part of the screen or the screen entirely. Removing this element and its PCB from the rest of the case and the backlight is probably the hardest part of the whole process. Additionally, some screens have an additional diffusion film that is bonded to their polarizer for the purpose of improving viewing angles — unfortunately, this layer makes content behind the screens get completely blurred out.
They used to sell things like transparent LCD’s before they could make affordable high definition LCD panels that can fit in today’s projectors. They were sold as bulky glass panels that could be connected to a computer and placed on top of an overhead projector.
Other resources, oddballs, optics, and more
Please comment or send me a message if there is something else you’d like added here!
Mist/Water Vapor/Fabric/Material:
· Fog Screen
· Heliodisplay
· io2 Technology Mid Air Display
· Periscopista — interactive mist installation
· Tsunami Water Screen
· Silicon Rod Projection Surface
· Aquatique Vendor of Water Curtains
· LCI Jet Screen
· DIY Fog Screen
· Projection on Half Silvered Mirror
· Colloid Bubble Film Display
· Fog screen with Head Tracking
· Interactive Fog Display with tracking
· Holovect 3D Projection display
Pepper’s Ghost:
· Glimm Displays Film Vendor
Volumetric Image Displays:
· Volumetric/Computational Display Survey PDF
· Wikipedia Entry
· Hackaday list of POV displays
· Long Exposure Photo Volume
· Water and Oil Surfactant
· voLumen
· Hublot Sphere
· Holovizio
· Sony RayModeler
· Volumetric Display based on Mylar Beam Splitter and LED Backlit LCD
· Patent on varifocal beamsplitter volumetric display
· 360 Light Field Display
· Multiple projector and rotating screen display
· Overview of other volumetric displays
· Paper on progress in Volumetric Displays
· Actuality Systems Overview
· List of Publications from Gregg Favalora on Volumetric/Autostereoscopic displays
Layered Volumetric Displays:
· Lumarca
· Tensor Display
· Layered LCD with Polarization Layers
· Layered Pepper’s Ghost example
· Crayolascope
· MIT Tensor Display
· Puredepth
· DepthCube Info
· LightSpace Tech — Maker of DepthCube
Diffusion/Light Distortion:
Diffusion and Light Refraction techniques:
· https://yeseul.com/Glow-Box
· http://pleaseenjoy.com/projects/personal/abstractor/
· https://jasoneppink.com/pixelator/
· http://www.maryfranck.net/portfolio/diffuse-objects/
· https://www.lucyhardcastle.com/qualia/
· https://www.youtube.com/watch?v=R00IvqcI9jU&app=desktop
· https://www.sofiaaronov.com/refraction
Volumetric Projection:
· Light Barrier by Kimchi and Chips
· Birth of light by WOW
· 3 projector rabbit
Laser Projector:
· Kvant Lasers
· United Laser
· Phaenon projector
· X-Laser Projectors
· Guide to Laser Shows
· Nightsun Specialized Illuminators
Lenticular/Light Field:
· Leia Inc. Light field Display
· Nvidia Near-Eye Light Field Display
· 2007 Exhibition on Stereoscopic Displays
· Parallax Barrier Display
· Compressive Light Field Projector
· Studio Roosegarde — Beyond Lenticular
· Multilens display for multiple views
Flexible Displays:
· Problems Facing Flexible Display Manufacturing
· Flexible OLED overview site
· Holoflex Flexible 3D Display
Head Mounted Displays:
· Toshiba Head Mounted Display 2006
Mechanical/Physical Volumetric Displays:
· DIY Helical Display
· Lumarca
· Perspecta Systems Wired Article
· Perspecta Systems Article
· 3D printed Helix Display
E-Ink Displays
· 32" Electronic paper development kit
· Notes on E-Ink Refresh Rate
· Dasung 13.3" E-Ink/Paperlike Display for $1300
Haptic Displays:
· MIT inForm
· Ultrasound Haptic Display
Transparent LCD References:
· Custom Display Manufacturer based in Korea
· Transparent OLED 2.0" Panel Vendor
· Iris by Hybe
· Potential Vendor: Crystal Display Systems
· Hypebox Transparent LCD product
· Transparent LCD Bus to Mars Lockheed Martin Project
· Evoluce for Transparent LCD and OLED
· CDS Transparent Faq
· Planar Transparent OLED
· Stimulant writeup on Planar Transparent OLED
· Pro Display Vendor
· DIY Screen Removal
· HybeBox pre-built transparent LCD display box
· “Transparent” LED Wall (spaced out slats)
· Hypersonic — Patterned by Nature
LCD with Modified Polarizing layers:
· Polarizing Filter Source — API Optics
· Polarized Light Explanation Video
· Brewster’s angle
· Lynx Modified Polarizer Advertisement
· Flavien Théry
· Flavien Théry Artist Page
· Simulacra by Smigla Bobinski
· Ryo Kishi
· Dual Polarizer Layers
Physical Mechanical References:
· Random international Light Points
· Sand Drawing with Magnets — Sisyphus
· Studio Roosegarde — Flow — Fan Display
Miscellaneous/Unusual/Light Art:
· Large Lenticular Print
· Another Great survey of various display tech
· Microlens Array Example
· Paramagnetic/Electroluminescent Paint
· 3D Printed Optics Lightguide
· ClaytricSurface Haptic Deformable Screen
· Spatial Light Modulator Wiki
· Fiber Scanned Displays
· Edge Lit displays
· Oddball Television History Links
· Measuring luminance of a surface
· Dynaflash High Speed Projector
· Quantum Dots
· Liquavista e-ink
· Color e-Ink Info: Interferometric Modulator Display
· Qualcomm’s Mirasol Color e-Ink technology
· Good Resource for Hacking CRT’s
· Printed Optics
· Cinema Snow Globes
· Encoded Mirrors by Florian Born
· Vibrating projection lens and lenticular combination
· Solace by Nicky Assmann
· 360 Video Rigs
· Project FEELEX Haptic Research
· RePro3D Parallax Display
· Cylindrical Lightfield Display
· HaptoMirage
0 notes
Text
Top 3 Dangers of LED Lights
youtube
30 Tips in 30 Days Designed to Help You Take Control of Your Health
This article is included in Dr. Mercola’s All-Time Top 30 Health Tips series. Every day during the month of January, a new tip will be added that will help you take control of your health. Want to see the full list? Click here.
The amount and quality of light you’re exposed to every day can have an enormous impact on your health. The healthiest light, of course, is natural sunlight, which has a number of benefits beyond the making of vitamin D in your skin. Unfortunately, most of us spend very little time outdoors during the daytime, thereby missing this important health component.
What’s worse, most have replaced their incandescent light bulbs — which most closely resemble full spectrum analog natural sunlight — with energy-saving light-emitting diode (LED) lights, which have a number of detrimental biological effects.
LEDs emit a large amount of aggressive blue light that generates high amounts of reactive oxygen species (ROS) and oxidative stress, and are devoid of near-infrared light that would help counteract some of that damage.
Here, I review some of the top dangers of LED lights, and provide guidance for how to remediate these issues to protect your health. Above, I’ve also included my October 2016 interview with Dr. Alexander Wunsch, a world class expert on photobiology, in which he reveals the hidden dangers of LED lighting that most people are completely unaware of.
The main problem with LEDs comprises two aspects: First, they emit excessive amounts of blue wavelengths, which are embedded in other wavelengths and therefore invisible to the naked eye and, second, their spectrum lacks the counterbalancing healing and regenerative near-infrared frequencies. They have very little red in them, and no infrared, which is the wavelength required for repair and regeneration.
When you are exposed to these higher amounts of blue light frequencies they catalyze excess ROS formation that contributes to biologic damage. So, when using LEDs, you end up with increased cellular damage and decreased repair and regeneration. The end result, as one would expect, is a higher risk for chronic disease and an impaired ability to heal.
Danger No. 1: LED Lighting Deteriorates Vision
As mentioned, virtually all LED lighting bulbs have no near-infrared frequencies to balance their blue light frequencies. The near-infrared frequencies are especially valuable for healing and affect your health in a number of important ways. In your eyes, near-infrared helps priming your retinal cells for repair and regeneration.
In addition, LEDs emit an excess of digital blue light, that in combination with a deficiency of the near infrared frequencies, generates ROS. Taken together, this explains why LEDs are so harmful for your eyes in particular.
You probably know that blue light in the evening reduces your melatonin production in your pineal gland. But you also have cells in your retina that are responsible for producing melatonin in order to help regenerate your retina during the night.
If you use LED lights after sunset, you reduce the regenerative and restoring capacities of your eyes. Needless to say, with less regeneration you end up with degeneration. In this case, the degeneration can lead to age-related macular degeneration, which is the primary cause of blindness among the elderly.
Lack of sunlight exposure during the day has also been implicated in the massive rise in myopia (nearsightedness).1 Sunlight releases dopamine in your retina, slowing the growth of your eye and therefore possibly slowing the elongation of the eye and changes to your sight.2
Blue light also reduces your production of melatonin which, beyond impeding sleep, also increases your risk of insulin resistance, which also raises your risk of myopia.3
Danger No. 2: LED Light Exacerbates Chronic Disease Through Mitochondrial Dysfunction and Suppressed Energy Production
Importantly, LED light affects your mitochondrial function and may exacerbate health problems rooted in mitochondrial dysfunction, including metabolic disorder and cancer.
Chromophores are molecules that absorb light. There’s an optical tissue window ranging from 600 to 1,400 nanometers, which means it is almost completely covered by the near-infrared- part of the light spectrum. This optical tissue window allows the radiation to penetrate an inch or more into bodily tissues.
Chromophores are found in your mitochondria and in activated water molecules. In your mitochondria, there’s also a specific molecule called cytochrome c oxidase that is involved in the energy production within the mitochondria. Adenosine triphosphate (ATP) — cellular energy — is the end product.
ATP is the fuel your cells need for all of their varied functions, including ion transport, synthesizing and metabolism. Your body produces your body weight in ATP every day. And, while you can survive for several minutes without oxygen, were all ATP production to suddenly stop, you’d die within 15 seconds. This is why lighting is so important.
Light is a sorely misunderstood and overlooked part of the equation for biological energy production, specifically at the mitochondrial ATP level. Since the cytochrome c oxidase is responsible for an increased production of ATP, the cell has a better supply of energy, which allows it to perform better, and this is true no matter where the cell resides.
This means liver cells with more ATP will be able to detoxify your body more efficiently; fibroblasts in your skin will be able to synthesize more collagen fibers and so on, because ATP is crucial for all cellular functions.
The key take-home message here is that your body’s energy production involves not just food intake. You also need exposure to certain wavelengths of light in order for your metabolism to function optimally. This is yet another reason why sun exposure is so vitally important for optimal health, and why LED light bulbs are best avoided.
Danger No. 3: LED Light Impedes Your Sleep
youtube
LED light, including that from electronic screens, also suppresses melatonin production, thereby disrupting sleep, and this too can have far-reaching consequences for your health. Light-sensitive cells in your eyes track blue light, which in turn triggers different processes in your suprachiasmatic nucleus, a small region in your brain’s hypothalamus.
Among them is relaying to your pineal gland the news that when there is a lot of blue light, the production of melatonin should stop to facilitate wakefulness. Under normal conditions, as the sun sets and blue light decreases, production of melatonin increases, which helps you fall asleep.
However, if you’re exposed to unopposed blue enriched LED light, especially if it is bright, in the evening this sequence is interrupted, resulting in sleep problems. Indeed, research4 confirms that “blue light from LEDs elicits a dose-dependent suppression of melatonin in humans.”
Looking at a tablet for even two hours in the evening is enough to suppress your body’s natural nighttime rise of this hormone,5 and research6,7 shows using an electronic device within one hour of bedtime can delay falling asleep for more than an hour.
Another study8 that compared melatonin profiles in individuals exposed to standard room light (<200 lux) versus dim light (<3 lux) found exposure to room light before bedtime shortened the time of elevated melatonin levels by about 90 minutes.
That means it may take you an extra hour and a half before you’re sleepy enough to fall asleep once you’re in bed. Combine room light and electronic displays right before bed and it’s easy to see how sleep may remain elusive for hours on end.
Most of us enjoy watching TV in the evening as a form of relaxation before bed. I certainly do and watch many great Netflix documentaries. The key here is most TVs can’t filter out blue light, but if you use a computer monitor as your TV screen you can use Iris; simply install the blue light filtering software on your computer. This will allow you to safely watch TV at night without suppressing your melatonin.
For Optimal Health, Address Your Daily Light Exposure
The good news is that you can remedy all of these health dangers by modifying your light environment and resynchronizing your body to the natural cycles of light and dark. Here are four key considerations:
1. Replace LEDs in key areas with incandescent light bulbs — While LEDs are indeed more energy efficient, the price you pay in terms of your health far outweigh such cost savings.
In areas where you spend most of your time during the day and evening, such as your kitchen, dining room, living room and office, swap out your LEDs for regular incandescent light bulbs, and leave the LEDs for areas such as hallways, closets, garage and porch, where your exposure to them is minimal.
The key here is KEY areas. You do NOT need to replace all the LED bulbs in your home, only the ones you use all the time. In my case that is my kitchen, bedroom and bathroom. All the other rooms have LEDs that are virtually never turned on, but when they are turned on and someone forgets to turn them off, not much electricity is wasted.
2. Get bright, natural light exposure during the day — Light intensity is important, as it synchronizes your master body clock, comprised of a group of cells in your brain called the suprachiasmatic nuclei. These nuclei synchronize to the light-dark cycle of your environment when certain wavelengths of light enter your eyes.
To get good sleep, you need properly aligned circadian rhythms, and step No. 1 is to make sure you get a sufficient dose of bright light exposure during the daytime. Your pineal gland produces melatonin roughly in approximation to the contrast of bright sun exposure in the day and complete darkness at night.
If you’re in darkness all day long, your body can’t appreciate the difference and will not optimize melatonin production. Ideally, to help your circadian system reset itself, get at least 10 to 15 minutes of light first thing in the morning. This will send a strong message to your internal clock that day has arrived, making it less likely to be confused by weaker light signals later on. Then, around solar noon, get another “dose” of 30 to 60 minutes’ worth of sunlight.
3. Avoid blue enriched light at night — Melatonin acts as a marker of your circadian phase or biological timing. Normally, your brain starts progressively increasing the hormone melatonin around 9 or 10 p.m., which makes you sleepy. Somewhere between 50 and 1,000 lux is the activation range within which light will begin to suppress melatonin production.
However, wavelength is also important. Red and amber lights will not suppress melatonin while blue, green and white lights will. So, be sure to avoid the blue light wavelength after sunset. This includes artificial light, and light emitted by electronics such as your TV, computer and other electronic screens.
There are a number of ways to avoid blue enriched light in the evening depending on your lifestyle and personal preferences, including the following suggestions. You can also learn more by reviewing my 2014 interview with researcher Dan Pardi.
• Turn off or dim all lights after sunset, and avoid watching TV or using light emitting electronics for at least one hour before bedtime (ideally two hours or more).
• After sundown, shift to a low-wattage bulb with yellow, orange or red light if you need illumination. A salt lamp illuminated by a 5-watt bulb is an ideal solution that will not interfere with your melatonin production.
• If using a computer, smartphone or tablet, install blue light-blocking software like Iris,9 or use amber colored glasses that block blue light.10 Studies11,12,13 have confirmed that when using blue-blocking glasses,14 people produce as much melatonin as they do in dim light, even if they’re in a lit room or using light emitting technology.
Other studies15 have shown that people using blue-blocking glasses had major improvements in both sleep quality and mood. Shift workers who use them before bedtime (i.e., in the morning when it’s bright out) also report improved sleep.16
4. Sleep in darkness — Once it’s time to go to sleep, make sure your bedroom is as dark as possible. Exposure to room light during sleep has been shown to suppress melatonin by more than 50 percent,17 but even a small amount of light can decrease your melatonin. Simply closing your eyes is not enough as light can penetrate your eyelids.
If blackout shades are too great an investment, a sleep mask can do the job for far less money. Also keep in mind that digital alarm clocks with an LED display could have a detrimental effect, so either swap out your clock, or cover the display.
Alternatives include a sun alarm clock, which wakes you up by gradually increasing the intensity of light, thereby simulating sunrise, or a talking alarm clock,18 designed for the visually impaired.
Tip #29Support Regenerative Agriculture
from Articles http://articles.mercola.com/sites/articles/archive/2019/01/30/led-lights-health-risks.aspx
source https://niapurenaturecom.tumblr.com/post/182416974951
0 notes
Text
Top 3 Dangers of LED Lights
30 Tips in 30 Days Designed to Help You Take Control of Your Health
This article is included in Dr. Mercola's All-Time Top 30 Health Tips series. Every day during the month of January, a new tip will be added that will help you take control of your health. Want to see the full list? Click here.
The amount and quality of light you're exposed to every day can have an enormous impact on your health. The healthiest light, of course, is natural sunlight, which has a number of benefits beyond the making of vitamin D in your skin. Unfortunately, most of us spend very little time outdoors during the daytime, thereby missing this important health component.
What's worse, most have replaced their incandescent light bulbs — which most closely resemble full spectrum analog natural sunlight — with energy-saving light-emitting diode (LED) lights, which have a number of detrimental biological effects.
LEDs emit a large amount of aggressive blue light that generates high amounts of reactive oxygen species (ROS) and oxidative stress, and are devoid of near-infrared light that would help counteract some of that damage.
Here, I review some of the top dangers of LED lights, and provide guidance for how to remediate these issues to protect your health. Above, I've also included my October 2016 interview with Dr. Alexander Wunsch, a world class expert on photobiology, in which he reveals the hidden dangers of LED lighting that most people are completely unaware of.
The main problem with LEDs comprises two aspects: First, they emit excessive amounts of blue wavelengths, which are embedded in other wavelengths and therefore invisible to the naked eye and, second, their spectrum lacks the counterbalancing healing and regenerative near-infrared frequencies. They have very little red in them, and no infrared, which is the wavelength required for repair and regeneration.
When you are exposed to these higher amounts of blue light frequencies they catalyze excess ROS formation that contributes to biologic damage. So, when using LEDs, you end up with increased cellular damage and decreased repair and regeneration. The end result, as one would expect, is a higher risk for chronic disease and an impaired ability to heal.
Danger No. 1: LED Lighting Deteriorates Vision
As mentioned, virtually all LED lighting bulbs have no near-infrared frequencies to balance their blue light frequencies. The near-infrared frequencies are especially valuable for healing and affect your health in a number of important ways. In your eyes, near-infrared helps priming your retinal cells for repair and regeneration.
In addition, LEDs emit an excess of digital blue light, that in combination with a deficiency of the near infrared frequencies, generates ROS. Taken together, this explains why LEDs are so harmful for your eyes in particular.
You probably know that blue light in the evening reduces your melatonin production in your pineal gland. But you also have cells in your retina that are responsible for producing melatonin in order to help regenerate your retina during the night.
If you use LED lights after sunset, you reduce the regenerative and restoring capacities of your eyes. Needless to say, with less regeneration you end up with degeneration. In this case, the degeneration can lead to age-related macular degeneration, which is the primary cause of blindness among the elderly.
Lack of sunlight exposure during the day has also been implicated in the massive rise in myopia (nearsightedness).1 Sunlight releases dopamine in your retina, slowing the growth of your eye and therefore possibly slowing the elongation of the eye and changes to your sight.2
Blue light also reduces your production of melatonin which, beyond impeding sleep, also increases your risk of insulin resistance, which also raises your risk of myopia.3
Danger No. 2: LED Light Exacerbates Chronic Disease Through Mitochondrial Dysfunction and Suppressed Energy Production
Importantly, LED light affects your mitochondrial function and may exacerbate health problems rooted in mitochondrial dysfunction, including metabolic disorder and cancer.
Chromophores are molecules that absorb light. There's an optical tissue window ranging from 600 to 1,400 nanometers, which means it is almost completely covered by the near-infrared- part of the light spectrum. This optical tissue window allows the radiation to penetrate an inch or more into bodily tissues.
Chromophores are found in your mitochondria and in activated water molecules. In your mitochondria, there's also a specific molecule called cytochrome c oxidase that is involved in the energy production within the mitochondria. Adenosine triphosphate (ATP) — cellular energy — is the end product.
ATP is the fuel your cells need for all of their varied functions, including ion transport, synthesizing and metabolism. Your body produces your body weight in ATP every day. And, while you can survive for several minutes without oxygen, were all ATP production to suddenly stop, you'd die within 15 seconds. This is why lighting is so important.
Light is a sorely misunderstood and overlooked part of the equation for biological energy production, specifically at the mitochondrial ATP level. Since the cytochrome c oxidase is responsible for an increased production of ATP, the cell has a better supply of energy, which allows it to perform better, and this is true no matter where the cell resides.
This means liver cells with more ATP will be able to detoxify your body more efficiently; fibroblasts in your skin will be able to synthesize more collagen fibers and so on, because ATP is crucial for all cellular functions.
The key take-home message here is that your body's energy production involves not just food intake. You also need exposure to certain wavelengths of light in order for your metabolism to function optimally. This is yet another reason why sun exposure is so vitally important for optimal health, and why LED light bulbs are best avoided.
Danger No. 3: LED Light Impedes Your Sleep
LED light, including that from electronic screens, also suppresses melatonin production, thereby disrupting sleep, and this too can have far-reaching consequences for your health. Light-sensitive cells in your eyes track blue light, which in turn triggers different processes in your suprachiasmatic nucleus, a small region in your brain's hypothalamus.
Among them is relaying to your pineal gland the news that when there is a lot of blue light, the production of melatonin should stop to facilitate wakefulness. Under normal conditions, as the sun sets and blue light decreases, production of melatonin increases, which helps you fall asleep.
However, if you're exposed to unopposed blue enriched LED light, especially if it is bright, in the evening this sequence is interrupted, resulting in sleep problems. Indeed, research4 confirms that "blue light from LEDs elicits a dose-dependent suppression of melatonin in humans."
Looking at a tablet for even two hours in the evening is enough to suppress your body's natural nighttime rise of this hormone,5 and research6,7 shows using an electronic device within one hour of bedtime can delay falling asleep for more than an hour.
Another study8 that compared melatonin profiles in individuals exposed to standard room light (<200 lux) versus dim light (<3 lux) found exposure to room light before bedtime shortened the time of elevated melatonin levels by about 90 minutes.
That means it may take you an extra hour and a half before you're sleepy enough to fall asleep once you're in bed. Combine room light and electronic displays right before bed and it's easy to see how sleep may remain elusive for hours on end.
Most of us enjoy watching TV in the evening as a form of relaxation before bed. I certainly do and watch many great Netflix documentaries. The key here is most TVs can't filter out blue light, but if you use a computer monitor as your TV screen you can use Iris; simply install the blue light filtering software on your computer. This will allow you to safely watch TV at night without suppressing your melatonin.
For Optimal Health, Address Your Daily Light Exposure
The good news is that you can remedy all of these health dangers by modifying your light environment and resynchronizing your body to the natural cycles of light and dark. Here are four key considerations:
1. Replace LEDs in key areas with incandescent light bulbs — While LEDs are indeed more energy efficient, the price you pay in terms of your health far outweigh such cost savings.
In areas where you spend most of your time during the day and evening, such as your kitchen, dining room, living room and office, swap out your LEDs for regular incandescent light bulbs, and leave the LEDs for areas such as hallways, closets, garage and porch, where your exposure to them is minimal.
The key here is KEY areas. You do NOT need to replace all the LED bulbs in your home, only the ones you use all the time. In my case that is my kitchen, bedroom and bathroom. All the other rooms have LEDs that are virtually never turned on, but when they are turned on and someone forgets to turn them off, not much electricity is wasted.
2. Get bright, natural light exposure during the day — Light intensity is important, as it synchronizes your master body clock, comprised of a group of cells in your brain called the suprachiasmatic nuclei. These nuclei synchronize to the light-dark cycle of your environment when certain wavelengths of light enter your eyes.
To get good sleep, you need properly aligned circadian rhythms, and step No. 1 is to make sure you get a sufficient dose of bright light exposure during the daytime. Your pineal gland produces melatonin roughly in approximation to the contrast of bright sun exposure in the day and complete darkness at night.
If you're in darkness all day long, your body can't appreciate the difference and will not optimize melatonin production. Ideally, to help your circadian system reset itself, get at least 10 to 15 minutes of light first thing in the morning. This will send a strong message to your internal clock that day has arrived, making it less likely to be confused by weaker light signals later on. Then, around solar noon, get another "dose" of 30 to 60 minutes' worth of sunlight.
3. Avoid blue enriched light at night — Melatonin acts as a marker of your circadian phase or biological timing. Normally, your brain starts progressively increasing the hormone melatonin around 9 or 10 p.m., which makes you sleepy. Somewhere between 50 and 1,000 lux is the activation range within which light will begin to suppress melatonin production.
However, wavelength is also important. Red and amber lights will not suppress melatonin while blue, green and white lights will. So, be sure to avoid the blue light wavelength after sunset. This includes artificial light, and light emitted by electronics such as your TV, computer and other electronic screens.
There are a number of ways to avoid blue enriched light in the evening depending on your lifestyle and personal preferences, including the following suggestions. You can also learn more by reviewing my 2014 interview with researcher Dan Pardi.
• Turn off or dim all lights after sunset, and avoid watching TV or using light emitting electronics for at least one hour before bedtime (ideally two hours or more).
• After sundown, shift to a low-wattage bulb with yellow, orange or red light if you need illumination. A salt lamp illuminated by a 5-watt bulb is an ideal solution that will not interfere with your melatonin production.
• If using a computer, smartphone or tablet, install blue light-blocking software like Iris,9 or use amber colored glasses that block blue light.10 Studies11,12,13 have confirmed that when using blue-blocking glasses,14 people produce as much melatonin as they do in dim light, even if they're in a lit room or using light emitting technology.
Other studies15 have shown that people using blue-blocking glasses had major improvements in both sleep quality and mood. Shift workers who use them before bedtime (i.e., in the morning when it's bright out) also report improved sleep.16
4. Sleep in darkness — Once it's time to go to sleep, make sure your bedroom is as dark as possible. Exposure to room light during sleep has been shown to suppress melatonin by more than 50 percent,17 but even a small amount of light can decrease your melatonin. Simply closing your eyes is not enough as light can penetrate your eyelids.
If blackout shades are too great an investment, a sleep mask can do the job for far less money. Also keep in mind that digital alarm clocks with an LED display could have a detrimental effect, so either swap out your clock, or cover the display.
Alternatives include a sun alarm clock, which wakes you up by gradually increasing the intensity of light, thereby simulating sunrise, or a talking alarm clock,18 designed for the visually impaired.
Tip #29Support Regenerative Agriculture
from
http://articles.mercola.com/sites/articles/archive/2019/01/30/led-lights-health-risks.aspx
source http://niapurenaturecom.weebly.com/blog/top-3-dangers-of-led-lights
0 notes
Text
Top 3 Dangers of LED Lights
youtube
30 Tips in 30 Days Designed to Help You Take Control of Your Health
This article is included in Dr. Mercola's All-Time Top 30 Health Tips series. Every day during the month of January, a new tip will be added that will help you take control of your health. Want to see the full list? Click here.
The amount and quality of light you're exposed to every day can have an enormous impact on your health. The healthiest light, of course, is natural sunlight, which has a number of benefits beyond the making of vitamin D in your skin. Unfortunately, most of us spend very little time outdoors during the daytime, thereby missing this important health component.
What's worse, most have replaced their incandescent light bulbs — which most closely resemble full spectrum analog natural sunlight — with energy-saving light-emitting diode (LED) lights, which have a number of detrimental biological effects.
LEDs emit a large amount of aggressive blue light that generates high amounts of reactive oxygen species (ROS) and oxidative stress, and are devoid of near-infrared light that would help counteract some of that damage.
Here, I review some of the top dangers of LED lights, and provide guidance for how to remediate these issues to protect your health. Above, I've also included my October 2016 interview with Dr. Alexander Wunsch, a world class expert on photobiology, in which he reveals the hidden dangers of LED lighting that most people are completely unaware of.
The main problem with LEDs comprises two aspects: First, they emit excessive amounts of blue wavelengths, which are embedded in other wavelengths and therefore invisible to the naked eye and, second, their spectrum lacks the counterbalancing healing and regenerative near-infrared frequencies. They have very little red in them, and no infrared, which is the wavelength required for repair and regeneration.
When you are exposed to these higher amounts of blue light frequencies they catalyze excess ROS formation that contributes to biologic damage. So, when using LEDs, you end up with increased cellular damage and decreased repair and regeneration. The end result, as one would expect, is a higher risk for chronic disease and an impaired ability to heal.
Danger No. 1: LED Lighting Deteriorates Vision
As mentioned, virtually all LED lighting bulbs have no near-infrared frequencies to balance their blue light frequencies. The near-infrared frequencies are especially valuable for healing and affect your health in a number of important ways. In your eyes, near-infrared helps priming your retinal cells for repair and regeneration.
In addition, LEDs emit an excess of digital blue light, that in combination with a deficiency of the near infrared frequencies, generates ROS. Taken together, this explains why LEDs are so harmful for your eyes in particular.
You probably know that blue light in the evening reduces your melatonin production in your pineal gland. But you also have cells in your retina that are responsible for producing melatonin in order to help regenerate your retina during the night.
If you use LED lights after sunset, you reduce the regenerative and restoring capacities of your eyes. Needless to say, with less regeneration you end up with degeneration. In this case, the degeneration can lead to age-related macular degeneration, which is the primary cause of blindness among the elderly.
Lack of sunlight exposure during the day has also been implicated in the massive rise in myopia (nearsightedness).1 Sunlight releases dopamine in your retina, slowing the growth of your eye and therefore possibly slowing the elongation of the eye and changes to your sight.2
Blue light also reduces your production of melatonin which, beyond impeding sleep, also increases your risk of insulin resistance, which also raises your risk of myopia.3
Danger No. 2: LED Light Exacerbates Chronic Disease Through Mitochondrial Dysfunction and Suppressed Energy Production
Importantly, LED light affects your mitochondrial function and may exacerbate health problems rooted in mitochondrial dysfunction, including metabolic disorder and cancer.
Chromophores are molecules that absorb light. There's an optical tissue window ranging from 600 to 1,400 nanometers, which means it is almost completely covered by the near-infrared- part of the light spectrum. This optical tissue window allows the radiation to penetrate an inch or more into bodily tissues.
Chromophores are found in your mitochondria and in activated water molecules. In your mitochondria, there's also a specific molecule called cytochrome c oxidase that is involved in the energy production within the mitochondria. Adenosine triphosphate (ATP) — cellular energy — is the end product.
ATP is the fuel your cells need for all of their varied functions, including ion transport, synthesizing and metabolism. Your body produces your body weight in ATP every day. And, while you can survive for several minutes without oxygen, were all ATP production to suddenly stop, you'd die within 15 seconds. This is why lighting is so important.
Light is a sorely misunderstood and overlooked part of the equation for biological energy production, specifically at the mitochondrial ATP level. Since the cytochrome c oxidase is responsible for an increased production of ATP, the cell has a better supply of energy, which allows it to perform better, and this is true no matter where the cell resides.
This means liver cells with more ATP will be able to detoxify your body more efficiently; fibroblasts in your skin will be able to synthesize more collagen fibers and so on, because ATP is crucial for all cellular functions.
The key take-home message here is that your body's energy production involves not just food intake. You also need exposure to certain wavelengths of light in order for your metabolism to function optimally. This is yet another reason why sun exposure is so vitally important for optimal health, and why LED light bulbs are best avoided.
Danger No. 3: LED Light Impedes Your Sleep
youtube
LED light, including that from electronic screens, also suppresses melatonin production, thereby disrupting sleep, and this too can have far-reaching consequences for your health. Light-sensitive cells in your eyes track blue light, which in turn triggers different processes in your suprachiasmatic nucleus, a small region in your brain's hypothalamus.
Among them is relaying to your pineal gland the news that when there is a lot of blue light, the production of melatonin should stop to facilitate wakefulness. Under normal conditions, as the sun sets and blue light decreases, production of melatonin increases, which helps you fall asleep.
However, if you're exposed to unopposed blue enriched LED light, especially if it is bright, in the evening this sequence is interrupted, resulting in sleep problems. Indeed, research4 confirms that "blue light from LEDs elicits a dose-dependent suppression of melatonin in humans."
Looking at a tablet for even two hours in the evening is enough to suppress your body's natural nighttime rise of this hormone,5 and research6,7 shows using an electronic device within one hour of bedtime can delay falling asleep for more than an hour.
Another study8 that compared melatonin profiles in individuals exposed to standard room light (<200 lux) versus dim light (<3 lux) found exposure to room light before bedtime shortened the time of elevated melatonin levels by about 90 minutes.
That means it may take you an extra hour and a half before you're sleepy enough to fall asleep once you're in bed. Combine room light and electronic displays right before bed and it's easy to see how sleep may remain elusive for hours on end.
Most of us enjoy watching TV in the evening as a form of relaxation before bed. I certainly do and watch many great Netflix documentaries. The key here is most TVs can't filter out blue light, but if you use a computer monitor as your TV screen you can use Iris; simply install the blue light filtering software on your computer. This will allow you to safely watch TV at night without suppressing your melatonin.
For Optimal Health, Address Your Daily Light Exposure
The good news is that you can remedy all of these health dangers by modifying your light environment and resynchronizing your body to the natural cycles of light and dark. Here are four key considerations:
1. Replace LEDs in key areas with incandescent light bulbs — While LEDs are indeed more energy efficient, the price you pay in terms of your health far outweigh such cost savings.
In areas where you spend most of your time during the day and evening, such as your kitchen, dining room, living room and office, swap out your LEDs for regular incandescent light bulbs, and leave the LEDs for areas such as hallways, closets, garage and porch, where your exposure to them is minimal.
The key here is KEY areas. You do NOT need to replace all the LED bulbs in your home, only the ones you use all the time. In my case that is my kitchen, bedroom and bathroom. All the other rooms have LEDs that are virtually never turned on, but when they are turned on and someone forgets to turn them off, not much electricity is wasted.
2. Get bright, natural light exposure during the day — Light intensity is important, as it synchronizes your master body clock, comprised of a group of cells in your brain called the suprachiasmatic nuclei. These nuclei synchronize to the light-dark cycle of your environment when certain wavelengths of light enter your eyes.
To get good sleep, you need properly aligned circadian rhythms, and step No. 1 is to make sure you get a sufficient dose of bright light exposure during the daytime. Your pineal gland produces melatonin roughly in approximation to the contrast of bright sun exposure in the day and complete darkness at night.
If you're in darkness all day long, your body can't appreciate the difference and will not optimize melatonin production. Ideally, to help your circadian system reset itself, get at least 10 to 15 minutes of light first thing in the morning. This will send a strong message to your internal clock that day has arrived, making it less likely to be confused by weaker light signals later on. Then, around solar noon, get another "dose" of 30 to 60 minutes' worth of sunlight.
3. Avoid blue enriched light at night — Melatonin acts as a marker of your circadian phase or biological timing. Normally, your brain starts progressively increasing the hormone melatonin around 9 or 10 p.m., which makes you sleepy. Somewhere between 50 and 1,000 lux is the activation range within which light will begin to suppress melatonin production.
However, wavelength is also important. Red and amber lights will not suppress melatonin while blue, green and white lights will. So, be sure to avoid the blue light wavelength after sunset. This includes artificial light, and light emitted by electronics such as your TV, computer and other electronic screens.
There are a number of ways to avoid blue enriched light in the evening depending on your lifestyle and personal preferences, including the following suggestions. You can also learn more by reviewing my 2014 interview with researcher Dan Pardi.
• Turn off or dim all lights after sunset, and avoid watching TV or using light emitting electronics for at least one hour before bedtime (ideally two hours or more).
• After sundown, shift to a low-wattage bulb with yellow, orange or red light if you need illumination. A salt lamp illuminated by a 5-watt bulb is an ideal solution that will not interfere with your melatonin production.
• If using a computer, smartphone or tablet, install blue light-blocking software like Iris,9 or use amber colored glasses that block blue light.10 Studies11,12,13 have confirmed that when using blue-blocking glasses,14 people produce as much melatonin as they do in dim light, even if they're in a lit room or using light emitting technology.
Other studies15 have shown that people using blue-blocking glasses had major improvements in both sleep quality and mood. Shift workers who use them before bedtime (i.e., in the morning when it's bright out) also report improved sleep.16
4. Sleep in darkness — Once it's time to go to sleep, make sure your bedroom is as dark as possible. Exposure to room light during sleep has been shown to suppress melatonin by more than 50 percent,17 but even a small amount of light can decrease your melatonin. Simply closing your eyes is not enough as light can penetrate your eyelids.
If blackout shades are too great an investment, a sleep mask can do the job for far less money. Also keep in mind that digital alarm clocks with an LED display could have a detrimental effect, so either swap out your clock, or cover the display.
Alternatives include a sun alarm clock, which wakes you up by gradually increasing the intensity of light, thereby simulating sunrise, or a talking alarm clock,18 designed for the visually impaired.
Tip #29Support Regenerative Agriculture
from HealthyLife via Jake Glover on Inoreader http://articles.mercola.com/sites/articles/archive/2019/01/30/led-lights-health-risks.aspx
0 notes
Text
Monitor Eye Strain
Contents
Sticking points. the benq
Fall under the heading computer
Are fairly common
Spend all day staring
First leg match
And digital eye
If you want to measure your blood pressure at home, you will need to a buy a …
All those brightly colored pixels clashing with the lighting around you is a recipe for eye fatigue and strain. … Monitor Position Your screen should be 20-30 …
Sep 28, 2012 … But a blasé attitude toward "eye-gonomics" while you're doing all of your little computing work could be the reason you're experiencing eye strain, neck and shoulder pain, dry eyes, or blurred vision. And there's a case to be made for glare -reducing computer glasses being kind of badass. Maybe.
The vast majority of companies, 81%, reported that they were likely to more …
May 24, 2017 … Screens are no longer optional. If you're not driving, exercising or sleeping, you' re probably staring at one. And after 10 to 14 hours of screen time in a single day, your eyes can feel like you just rinsed them with sand. Fortunately, there don't seem to be any long-term vision or eye-health issues related to …
Feb 12, 2018 … Glare on walls and finished surfaces, as well as reflections on your computer screen also can cause computer eye strain. Consider installing an anti-glare screen on your monitor and, if possible, paint bright white walls a darker color with a matte finish. Again, cover the windows. When outside light cannot …
… Emissions and Flicker-Free Certifications. ASUS Low Blue Light Monitors feature a OSD menu that allows you to access four different Blue Light Filter settings onscreen. ASUS Flicker-Free technology uses Smart Dynamic Backlight Adjustment to reduce flicker, this protects you from eye fatigue, irritation and strains.
I just found out about the BenQ monitors which have RevolutionEyes Technology to help reduce eye strain. Do any of the more expensive ones have any…
Sep 5, 2013 … All those brightly colored pixels clashing with the lighting around you is a recipe for eye fatigue and strain. … Monitor Position Your screen should be 20-30 inches away from you and your eyes should be level with the very top of your monitor. If you don't have ability to adjust your screen's height, a stack of …
… constant eye strain, you may need to take an eye exam and get a new prescription, or glasses if you don’t wear them. An eye exam and the appropriate prescription is vital to ensuring that you can view a monitor comfortably while …
In addition, those who work at a computer should position the monitor slightly below eye level and at arm’s length. It’s also important to remember to blink and get your eyes checked regularly. For more on the impact of digital eye strain, …
Are you experiencing computer eye strain? Read Dr. Gary Heiting's top 10 tips for avoiding eye strain when working at a computer.
Using this dashboard, resellers can control, configure, monitor, and receive alerts for their customers in the Eagle Eye …
Understand why we experience eye fatigue when using computers and how EIZO has developed LCD monitor technology that minimize eye … it could cause strain on …
“My eyes just kind of were getting tired and then when I would look at the monitor, the words just maybe aren’t … we …
If you suffer with migraines or eye strain from long hours of staring at a computer screen, then the BenQ EW277HDR will genuinely make you feel noticeably better – despite a few sticking points. the benq EW277HDR monitor is clearly …
Jul 13, 2017 … These days, many of us have jobs that require us to stare at computer screens for hours at a time. That can put a real strain on your eyes. Eye problems caused by computer use fall under the heading computer vision syndrome (CVS). It isn't one specific problem. Instead, it includes a whole range of eye …
Understand why we experience eye fatigue when using computers and how EIZO has developed LCD monitor technology that minimize eye fatigue.
Aug 3, 2017 … Why Do Screens Cause Eyestrain? Normally, we blink about 15 times a minute. That spreads tears evenly over your eyes, which keeps them from getting dry and irritated. But researchers have found that people blink less than half as often when they're reading, watching, or playing on a screen. Also, the …
Eye fatigue, eye strain, tired eyes—Computer Vision Syndrome (CVS) affects 90% of office workers. What do optometrists tell patients looking for relief?
Symptoms of CVS can include eye strain, dry eyes, blurry vision … When it comes to desktop usage, Patrick said it’s important to keep a good distance away from …
Anti Blue Light Screen filter for 21.5 Inches Widescreen Desktop Monitor, Blocks Excessive Harmful Blue Light, Reduce Eye Fatigue and Eye Strain
Feb 22, 2017 … If you work at a computer, you know how awful your eyes often feel by the end of the day. After staring at screens, eyes become dry, itchy, blurry, irritated — and that discomfort is frequently accompanied by a headache. This phenomenon is known as eyestrain, often referred to as "digital eyestrain," since …
try placing the monitor at an arm’s length away from your face. You may need to …
but it’s normally recommended to use a monitor at about half that much to avoid …
A liquid-crystal display (LCD) is a flat-panel display or other electronically modulated optical device that uses the light-modulating properties of liquid crystals.
Three-quarters of people who use two or more devices simultaneously report symptoms of digital eye strain, compared with just over half … and if in a bright room, brighten the monitor. Also, pull the drapes to reduce glare. •Blinking keeps …
Prevent eye strain, itchy eyes and the risks of macular degeneration now!
Jan 30, 2017 … One of the biggest causes of eyestrain is the daily use of digital screens for several hours at a time. The Vision Council reports that 87 percent of those in the United States use one or more digital device for more than two hours a day. And the use of digital devices is not exclusive to adults. The same report …
Eye strain, eye fatigue, and headaches are fairly common problems in these days. To prevent future eye problems, you should choose the best monitor for eyes. In
Save valuable desk space and improve overall viewing with the VonHaus Twin Arm Monitor Stand. Constructed from high … and is great for reducing eye and neck …
People often believe that failing eyesight is an inevitable result of aging or eye strain. In truth, a healthy lifestyle … People with diabetes should carefully monitor blood sugar levels, take medications exactly as prescribed by their doctor, and …
Jul 25, 2017 … Perhaps nothing is more common among computer users than eye-strain and neck pain. And ironically, at the same time, perhaps nothing is more controversial than suggesting a change to the conventional way of placing the monitor. In 1997 the OSHA ergonomics user guide, Working Safely with Video …
try placing the monitor at an arm’s length away from your face. You may need to adjust the font size to appear larger at that distance. Follow the 20-20-20 rule: To …
But regular use can lead to eye strain and discomfort. … The best position for your monitor is slightly below eye level, … "Computer vision syndrome …
Sep 25, 2017 … If you spend all day staring at a monitor, you could be suffering from eye strain. It can lead to pain, blurriness, and headaches. However, a new monitor can relieve your eyes.
May 24, 2017 … My eyes have gotten so bad that I can barely look at a monitor for more than 5 minutes without them burning. Looking to try a projector as monitor for.
Aug 13, 2015 … Take eye breaks. Throughout the day, give your eyes a break by looking away from your monitor. Try the 20-20-20 rule: Every 20 minutes, look at something 20 feet away for at least 20 seconds. Check the lighting and reduce glare. Bright lighting and too much glare can strain your eyes and make it difficult …
Jun 1, 2012 … Try these five helpful tips to help reduce or even prevent the discomfort caused by staring at your monitor all day.
Items 1 – 9 … 10 ways to reduce eye fatigue caused by display devices such as computer monitors, notebook PCs, tablets, and smartphones.
Understand why we experience eye fatigue when using computers and how EIZO has developed LCD monitor technology that minimize eye fatigue.
What monitor should a user look for with this condition?What specs should they look at?Someone said something to me about blu… | 59 replies | General Hardware.
"The team will be missing Lucas as he is suffering from a slight muscle strain he suffered during the first leg match … Noteworthy, The AFC has recently assigned a security official to monitor the match and deliver a security report hand …
Headache Due To Eye Strain Contents About eye strain symptoms Migraines and headaches Problems left uncorrected
Best Eye Drops For Computer Strain Contents Heiting’s top 10 tips for avoiding And … try some eye drops Are perfect for tired Bausch and lomb Eyedrops for computer Jul 17, 2017 … 10 Tips to Ease Computer Eye Syndrome from Our Eye Doctor in Thornton Computer eye syndrome results from hours spent in front of electronic screens: computers, televisions, cell
Headache From Computer Eye Strain Contents Eye strain.” the and digital eye strain. woman Get tired. for the Devices for more than five hours Straining your eyes research shows Eyes research shows Here's how you can avoid the strain and fatigue of computer vision … screen time can also lead … vision after computer use, headaches and … It’s common
Screen Eye Strain Contents Can cause eye strain From straining your eyes Research shows that Cause computer eye strain How do you keep your eyes healthy when you have to stare at a screen all day … How Do I Prevent Eyestrain at My … and eye strain are common … … computer for more than seven hours
from http://bestoptometrists.net/monitor-eye-strain-5/
0 notes
Text
Steinberg Cubase 8 crack Music Product
Plus when you can believe of something, the probabilities are excellent this most recent version of Steinberg’s well-known “Advanced Music Production System” will offer the solution.

What’s In A Title?
The very first modify in Cubase 8 will be the name. Steinberg possess often struggled in differentiating the higher- and lower-end versions by name by yourself over the years, at first calling the senior system Cubase SX, until edition 4 whenever they dropped the particular SX. This could possess been fine, except the particular junior version of Cubase, which had been known as Cubase SL, became Cubase Studio, and you can be forgiven for presuming the ‘studio’ appendage denoted the bigger version. Cubase Studio later became Cubase Artist, making things simply a little clearer, yet in version 8 Steinberg have removed any feasible ambiguity: this new Cubase is now called Cubase Pro 8. For the particular sake of brevity -- and possibly sanity -- I’ll refer to the particular program as simply Cubase 8 in this article. The differences between the particular Pro and Artist variations are noted in the particular ‘Artistic Differences’ box.
The Darker Shade Of Light
The first thing you will notice upon launching Cubase 8 is that the particular Project window has obtained some interface adjustments, plus fans of darkness will certainly be pleased to understand that the brightness button for the application’s arrears palette has once a lot more been turned down. 1 thing that irked me personally about this is the particular fact that everything within the Project window will be now the same darkish shade of blue; the particular Inspector is the exact same colour since the Track Listing, which is exactly the particular same colour as the particular Event Display and some other new elements of the particular window. At least within 7. 5 the Inspector was obviously a little bit darker and the Monitor List and Event Screen were a little lighter in weight to provide some feeling of contrast. And whilst you can change the particular colour of the Occasion Display ‘Work Area’, there is nothing that you can do about something else.
On the in addition side, the Project windows has been cleaned upward every area is right now neatly placed within the rounded rectangle; yet, with regard to some reason, the designers should have felt the particular scroll bars were as well big, so they’ve already been made unhelpfully smaller inside the quest to appear more modern.
Steinberg possess also expanded the capabilities from the Project windows by making it feasible to display either the particular VST Instrument rack or even parts of the Press Bay directly in the particular window without requiring several windows to become open up. Simply click the Set up Window Layout button, allow Racks, and the VST Instrument rack will show up in a zone upon the right-hand side through the window. (Alternatively, a person can setup a Show/Hide Racks Key Command. ) Mimicking the tabbed behavior of the left-hand component of the window, exactly where you can switch among the Inspector and the particular Visibility controls, once Shelves are enabled you may toggle between rack plus a Media Bay see. The Media Bay see incorporates the Locations, Filter systems and Previewer aspects of the particular Media Bay window, omitting Define Locations and Feature Inspector.
Personally, I did not find the ability in order to view the rack or even Media Bay on the particular Project window that helpful. This is partly due to the fact I think you usually wish to have because much of the Occasion Display available as feasible, but also...
You've just read 10% of this particular article, to continue reading through...
Option 1: Login in order to read this article in case you have an online Membership or Industry Controlled Blood circulation account
• To see the complete article online (in CODE browser format), please SIGN IN at the best of this page.
• Note: Your Web subscription will certainly not include downloadable PDF FILE articles free of cost.
Option 2: Purchase the Web sub from our own store
• A Web bass speaker can be purchased from our Store and used immediately, or even contact our Subs personnel to discuss an update price to add Internet access to your current subscription.
Option 3: Purchase and download this SOS article in Adobe PDF FILE file format
• Buy this post now and immediately down load the PDF file in order to your computer.
• PDF content articles look identical towards the particular printed magazine layouts (but exclude advertisements).
• Note: A few shorter articles don't possess always a PDF edition.
0 notes
Last Seen Blogs

crxminalscum
混蛋

petey-art
My Entire Life Is Just Plot Development

blaxkwings-archive-blog
the vampire armand.

hur77-blog
İsimsiz

ificanlivethruthis
If I Can Live Thru This