#60px
Text

cellophane • FKA twigs
#cellophane by fka twigs#fka twigs#fka twigs lyrics#lyrics#glitter text#gif warning#flashing lights#bloggif.com#60px#why don’t I do it for you#all I do is for you#book antiqua font#book antiqua bold italic
100 notes
·
View notes
Text
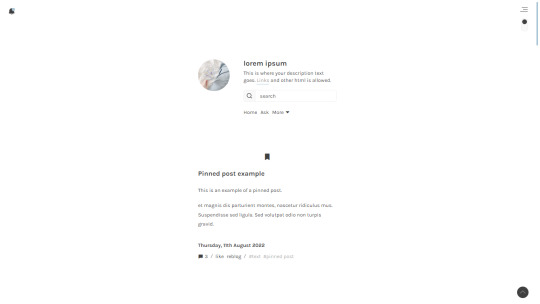
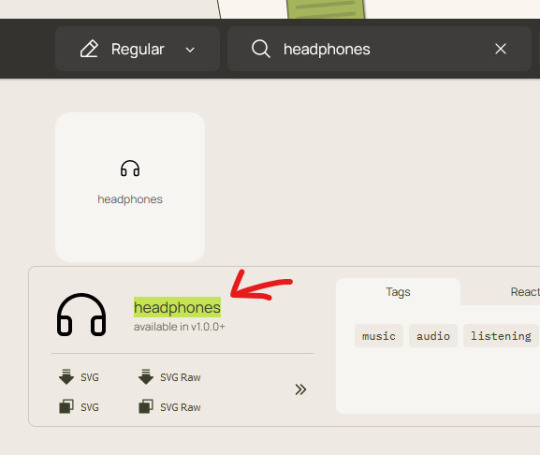
Sevens — a minimalistic and responsive, single-column theme
Static previews: - Preview (1) - Preview (2)
Download code: GitHub
This is a single-column Tumblr theme with a sidebar (header or right or left positioning), with a Google fonts of your choosing. Full support of npf posts. Optional dark/light mode toggle available.
Read features and notes below the cut
Customize colours for dark and light mode
Customizable post margin
Custom title
Custom description
Select font-size (11-18px)
Select Post-width (350-540px)
Select photoset gutter (1-4px)
Select post info displayed as text or icons
Toggle tags hidden behind a toggle
Toggle to hide tumblr controls behind icon
Toggle between sharp or round corners on content and/or photos
Toggle between displaying or hiding Tumblr controls behind an icon.
Toggle optional update tab
Navigation: An unlimited display of native Tumblr pages within a dropdown.Learn how they work in my FAQ here. Custom home archive + ask titles. If you wish to just display all links, delete the text in the toggle label text field.
Search bar: The search bar will automatically be hidden if you have the option to discourage searching your blog from search results enabled. Go to your blog’s settings to do so.
Sidebar Image: Choose between the sizes 60px, 80px or 100px. Choose a shape between shapes square, rounded, circle or blob. Separate icons for light and dark mode! But If you want the same icon, simply upload it twice.
Dark Mode: If you decide to offer dark mode, it detects if visitor’s operating system is on dark mode, and displays that choice at the first visit - of course with the option to toggle the other mode on/off.
Update tab icon change: To change the icons in the update tab, go to phosphoricons.com and simply copy the name of the icon like so:

Into the corresponding field:

Notes:
Via/source links are on permalink pages
to hide the archive link, simply delete the text in the field.
Submit-link and ask-link only shows if toggled on in your blog's settings.
Credits
#themehunter#theme hunter#tumblr themes#resourcemarket#dailythemes#themes#this is jquery free!!#codes by me
362 notes
·
View notes
Photo


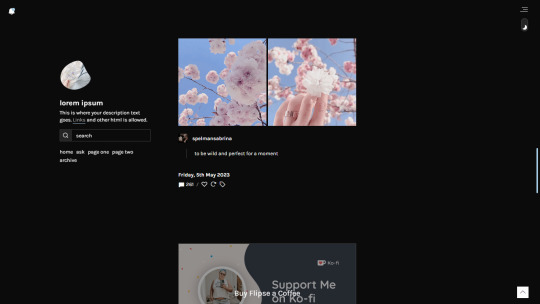
theme twenty-nine ♡ by userbru
live preview | code | support me on ko-fi?
400px, 500px, 540px posts
optional 300px sidebar
60px sidebar icon
responsive side menu with search bar
pop up about with optional 640px header
80px icon on about pop up
npf fix by glenthemes THAT SUPPORTS BOTH EDITORS (aka turns gifsets posts on beta editor into regular gifsets instead of text posts)
base code by seyche
full credits on code!
recommend doing a reset before installing this theme.
to make sure the pop up box for the about works, on the basic customizations tab in your customize page, scroll down to “About Pop Up” and type: #!” class=“click. IMPORTANT: TYPE IT OUT!! don’t copy paste.
if you want to change the icons of the side menu, you can find them at boxicons.com.
if you need any help with the customization of the theme or any issues, shoot me a message and i’ll help you!
i am accepting theme commissions. for more information, dm me on here or on @natalia-dyer.
#theme#theme hunter#themehunter#codingcabin#usersage#kosmique#ricecodes#completeresources#allresources#dailyresources#maziekeen#with about tab#responsive theme#*
616 notes
·
View notes
Photo

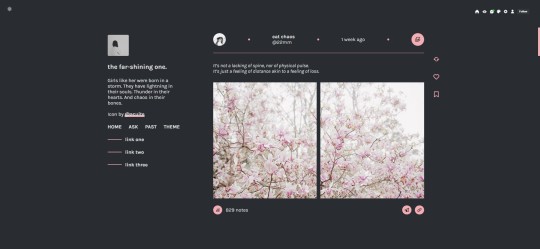
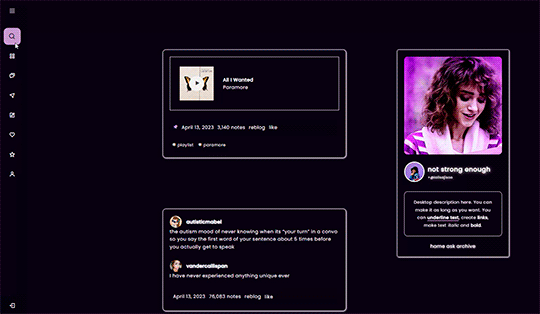
Theme #03: Theia by @pneuma-themes
Girls like her were born in a storm. They have lightning in their souls. Thunder in their hearts. And chaos in their bones.
Live Preview (Temporary) / Static Preview: [Index] [Permalink] / Get the code: [pastebin] [github]
A simple sidebar theme inspired by Twitter and aesthetics of Tumblr themes circa ~2015-2016ish. Suitable for all kinds of blogs.
Features:
Twitter-styled posts for photoset and photo posts.
Customizable post size and font size, with minimum width of 500px and maximum width of 700px. Post size can be entered on the post size field and the font size can be entered on the font size field. The live preview uses 600px post size and a font size of 14px.
Customizable photoset gutter. The live preview uses 2px photoset gutter.
Built-in light/dark mode that can be toggled with one click. The selected color mode will persist on your browser until you change the color mode.
Customizable colors for light/dark mode.
Three custom links.
One accent color and 10 color options.
Built-in lightbox for photoset posts.
Mostly NPF-friendly.
A 60 x 60px icon on the sidebar.
Notes:
As per usual specification, expect things to break or look weird for NPF.
Credits:
Icon: @acuite
Font: Karla @ Google Fonts
Dark mode tutorial: @22mm
Icon font: Boxicons.css
NPF v3.0 fix: @glenthemes
photoset.css with lightbox by @annasthms and @eggdesign
customAudio.js by @annasthms
Simple soundcloud and spotify player script: @shythemes
Responsive video script: nouvae
Please like and reblog if you like this and or are using it!
#themehunter#theme hunter#allresources#completeresources#chaoticresources#*theme: theia#*mine: theme#hey look i made something again#will probably go a long while without releasing anything after this#i do hope that is not the case#*mine: all
1K notes
·
View notes
Photo
theme 224
static previews: sidebar image / sidebar icon
code: pastebin / github
buy me a coffee?
i strongly recommend that you reset defaults before using it, so the new settings won’t have conflict with your current theme, but it will work if you don’t do it anyway
sidebar settings in the appearance
as default you can change: font type (you can pick any from google fonts. just type their name in the appearance. e.g.: Open Sans), color, size, font weight, font style, text transform, position, word and letter spacing regarding text for posts, date info, tags, and all sidebar content
8 sidebar links, option to use them or not
you can edit font style, size, position, 2 or 3 columns, text transform, word and letter spacing for sidebar title, description and links
sidebar image size 268px, option to use or not
sidebar icon 60px up to 100px, and 160px with circle or square icon style, option to use or not
option to disable show more click also change the text
option to use left sidebar and position top or center
option to hide description
use or not sidebar title
use or not switch theme color, if disabled light theme is default
posts settings
sizes 540px, 500px, 400px
option to choose a photoset gutter
option to define space between posts, posts and sidebar
tumblr dashboard captions or regular captions (with blockquote). also have an option to use custom icon in front of the username or tumblr’s user avatar
also an option to use the original post username
change background color, border, and box shadow of the sidebar and posts
option to disable the “show tags” click
show or not post notes
show or not like and reblog links
show or not reblogged from
show or not source link
box-shadow, and customize color and opacity
dark mode customization
in the appearance you’ll see the colors of the theme, light is default for the theme (the first one). if you scroll down a bit, there will be the dark option for them, all with “Dark” in front of their name. dark or light will be used accordingly on your computer theme color
other options
custom controls on click or use tumblr’s default
option to use images black and white
add background image
anything else you need you can send me an ask or message
#dearindies#dark mode theme#tumblr themes#simple themes#responsive theme#sesamepancakes#snow0nthebeach#themes#FINALLY tumblr allowed me to use js
343 notes
·
View notes
Text

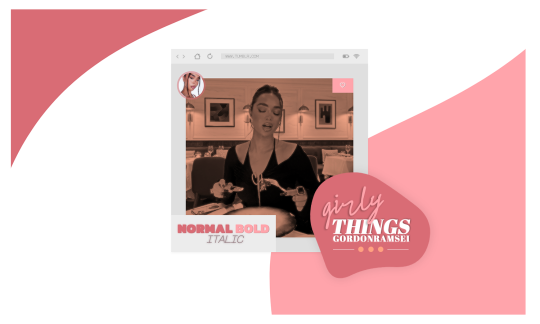
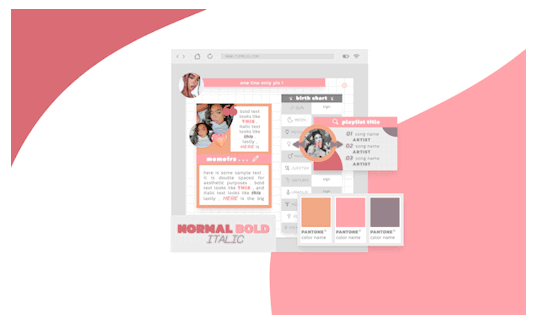
꒰ ͙ ❄ girly things. ꒱
wake up , babe ! a new gordonramsei code just dropped ! it is my pleasure to introduce to u all girly things , a javascript free muse bio page ! she has some super unique features such as a transitioning cover image , a birth chart , a pantone color section , a bio box , and a cute lil mini playlist ! i heavily annotated this code to make editing as easy as possible but this code isn't recommended for anyone who isn't at least familiar with html . as per usual , let me know if u encounter any errors and i will do my best to troubleshoot asap !
if u intend on using this theme or just want to be a supportive hottie , please give this post a like and a reblog ! stay hydrated and be sure to pet a cute animal today ! mwuah ! 🤍 🤍 🤍

ⅰ. PAGE FEATURES .
x. 100% javascript free !
x. browser ui styled container
x. cute background wave design
x. animated transitioning cover images ( 3 ) , sized at 380px x 400px
x. animated pulsing icon sized at 60px x 60px
x. single modal ( tab ) with several content boxes
x. grid paper design for modal background
x. bio section complete with a quote box and two images sized at 90px x 90px and 70px x 70px , respectively .
x. optional bio section sticker sized at 60px x 60px
x. birth chart box that appears upon hovering over it , complete with all planet alignments to be easily filled in by the user
x. playlist box with three different spots for songs and a ui - centric design with a cover image sized at 70px x 70px
x. pantone box with three pantones to show off the colors that inspire u for ur muse
x. for a more detailed compilation of credits and features , please see the google doc containing the code

͙ ❄ this page is a patreon exclusive : want access ? consider signing up to join the fam - a - lam to get ur hands on this theme as well as my entire coding catalogue . click here to learn more !
source link directs to a live preview of girly things .

#rph#rp theme#rpt#indie rp theme#premium rp theme#muse page#supportcontentcreators#mine#for patreons#for patrons
29 notes
·
View notes
Note
Tell us your secret! What’s your process for making such gorgeous gifs?
hi!! first of all thank you SO much for the compliment 🫶🏻🫶🏻 it means the world to me that you guys like the things i do!
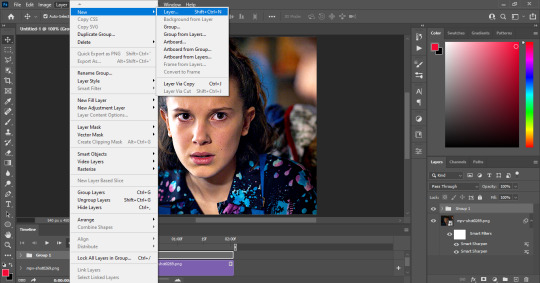
Now for the process: How i make the basic gif
I get my source material from the best quality i can! (1080p or 2160p if im lucky) I wouldn't say that this is a *must do* and that you can't gif things of lower quality and make it look good bc that would be a lie! But the more pixels the better!
I choose the scenes trim them down and select on photoshop -> archive -> import -> video to frames
When I have the frames (the amount of frames truly varies if you have more than 90 frames you would probably need to make your gif more small in terms of size, or with less light/colors, etc) i set the time of the frames to 0,05 (if it's a really short gif i put it at 0,1 or sometimes if it's a really short gif at 0,2 - usually if i want to use it in an edit and i need to make it last longer to have multiple gifs of the same time-)
Then I convert to the frames to timeline and select all the layers of the gif and convert them to smart object
MOST IMPORTANT PART: It doesn't matter if your gif is 1million pixels or 2 the sharpen is and will always be your best friend and it is a little tricky at the start but once you find the way you like it it would be the love of your life! I will give you my sharpening adjustments: I select the smart object i have and then I go to filters-> sharpening -> smart sharpen Here i go with amount: 500 and reduce noise: 0,5 or 0,3 (the first one really works with lower quality things and yt videos!). Then I duplicate the smart object with the filter and change the sharpening to 60px and 10, and to finish it of this one I reduce the opacity to 60% or 70%
Then here comes my fav part that is coloring and making your gifs feel alive! I use curves and base all the rest in this adjustment layer. I usually take the thing in letter D and place it in a lighter place so then the curves make the gif brighter and changes the colors (for the color part if you have a gif that the predominant color is more to the warm colors then this tool will make the blue curve more prominent and the other way around). I usually don't like my gifs to be in the red side, specially the red that comes with warm lighting like with candles so when i click on the lighter part of the gif that it's on the res hue it will bring my blues and greens more prominent than the red one. Then I just play around with the curves. The RGB curve is for all lights, where the H is signally is the lighter part of the gifs, the I is the like kind of all lights combined, and the J is the dark parts (shadows and those things).

Then I add a Brightness and Contrast adjustment layer and I put the contrast to 100%.
And then I make colors pop out with selective color (This also helps when you make a dark gif v light to play with the black parts to prevent their pixels to show, by adding % to the black, this also helps with the size of the archive, it usually brings it down that it's important sometimes bc tumblr has a limit of 10mb :/) and if it is not enough I use Hue and Saturation!
And last but not list I export the gif (export-> save for web) and the configuration where it says usually diffusion by default i change it to pattern! And then I save it! C'est Fini!
That's the most basic thing I do, specially when I need yo make quick gifs! But I do tend to add more things if I have the time, or it's a more complex gif. But this is how I made the last riverdale ones!
#ask#anonymous#tutorial#ps tutorial#photoshop tutorial#gif tutorial#im so sleepy sorry if this is a little bit of a mess#i can clarify things if you send more asks!
23 notes
·
View notes
Text
TEMPLATE: simple splash border, edit and add onto however you like.
DIMENSIONS: 540px with 60px icon.
FONT: ernest.
✧ please do not claim as your own work, do not redistribute or resell, do not include in paid content or packages. CREDIT IT MANDATORY!
✦ colors may be adjusted as needed. or i can re-edit the template for an extra fee.
✧ PSD IS NOT INCLUDED WITHIN THIS TEMPLATE!
available for purchase on ko-fi for $ ??, pay as you can.
#sylveon. icon border.#sylveon. paid.#icon border#icon template#rp templates#free template#rp resources
9 notes
·
View notes
Note
hi! as someone who has a decent knowledge about giffing but is still having trouble with elaborate coloring, could I ask you how you do this kind of coloring? (/post/686802785408352256/stranger-things-ladies-character-profiles-insp) not asking for a tutorial if it's too much, but like, do you use gradient maps or...?
Hi! And sure! Quick tutorial under the cut:
Since you already know the basics of giffing (proper gif size, speed, sharpening, and basic coloring), I'm just gonna focus on the colorful background part. After you've sharpened and applied some basic coloring, just create a new layer (layer> new> layer):
and then select the brush tool (shortcut B key):
I recommend using a big brush, so your coloring looks smoother (I usually set the brush to anywhere between 60px-100px), here are the settings I used for this gif in particular:

now it's time to start painting until it looks this:

and then you can switch the layer's blend mode so the coloring looks more natural, for this gif in particular I used "color" (I recommend using "color" for scenes with a dark/neutral background and "multiply" for scenes with a very bright/white background):
and here's the final result:
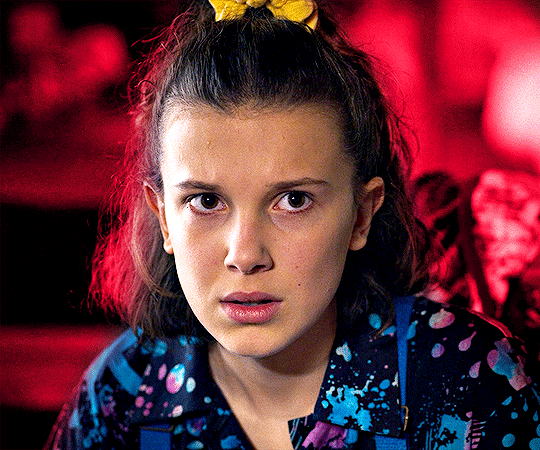
I recommend using scenes where the character doesn't move much, if you want to avoid having to color frame by frame (which I can do a tutorial on, if you're interested). Hope this helps and if you have any questions feel free to ask!
#asks#anonymous#ps help#tutorial*#userkenny#tuserjackie#usersnail#usercroft#coloring tutorial#gif tutorial
49 notes
·
View notes
Text
cellophane - FKA twigs
#fka twigs#gif warning#glitter text#cellophane by fka twigs#fka twigs lyrics#lyrics#purple#bloggif.com#60px#monotype corsiva font#why don’t I do it for you#all I do is for you
104 notes
·
View notes
Photo

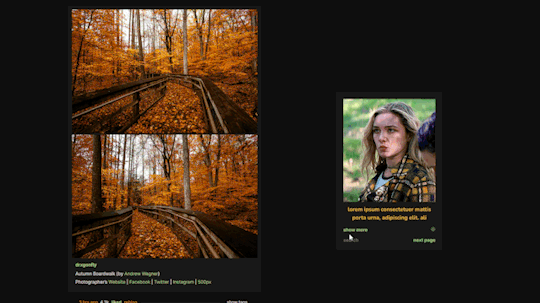
Broek — a responsive, single-column theme
Updated October 2023: Version 2.0.0
Static previews: left sidebar, right sidebar
Download code: GitHub
This is a single-column Tumblr theme with an option between left or right sidebar, with a Google font of your choosing. Optional dark mode and update tab is included. Full support of NPF posts. Features and notes below the cut.
Features:
Customize colours
Custom text for home + ask + archive link
Endless Tumblr integrated pages (see my FAQ on how to implement the links)
Custom title box
Custom description box
Custom post margin (set to 100px)
Select font-size (11-16px)
Select post-width (350-540px)
Select photoset gutter (1-8px)
Select (optional) sidebar image size (60px/80px/100px)
Select optional update tab
Select post info displayed as text or icons
Select displayed tags or upon a toggle
Toggle for round corners on content
Toggle for round corners on photo posts
Toggle to center post column
Search bar: The search bar will automatically be hidden if you have the option to discourage searching your blog from search results enabled. Go to your blog’s settings to do so.
Sidebar Image: Choose size between 60px/80px/100px. Choose between shapes square, rounded, circle or blob. Separate icons for light and dark mode! But If you want the same icon, simply upload it twice.
Update tab icon change: To change the icons in the update tab, go to phosphoricons.com and simply copy the name of the icon like so:
Into the corresponding field:
Dark Mode: detects if visitor’s operating system is on dark mode, and displays that choice at the first visit - of course with the option to toggle the other mode on/off.
Via/source link are on permalink pages
to hide the archive link, simply delete the text in the field.
Submit-link only shows if toggled on in your blog settings.
Credits
1K notes
·
View notes
Photo


(60LED/60pxのLEDバー Super ScenografixをTouchDesignerから使う|池田航成 / IKEDA Kousei|noteから)
2 notes
·
View notes
Photo

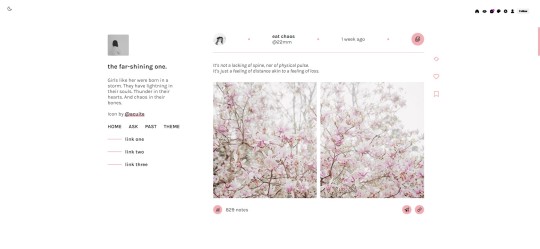
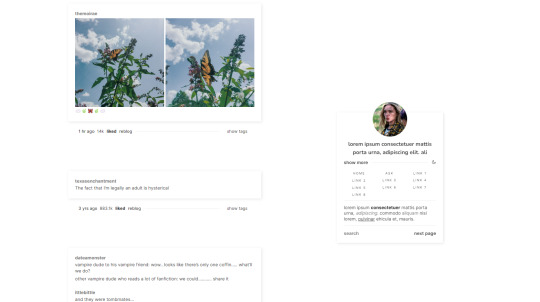
Sumire: About Page #02 by @pneuma-themes
I confess I do not know why, but looking at the stars always makes me dream.
Live Preview / Get the code: [pastebin] [github]
A very simple, contained about page. This is a homage to one of my oldest designs, Lonely Day. Notes are included inside the code itself, so do consult the notes before asking me a question.
Features:
One accent and 4 color options.
Four custom links.
An unlimited space to write as short or as long as you like.
A 60 x 60px icon.
A header that will automatically resize, though for the best results it’s advised to use a header with the size of: 70% of the width of your screen x 150px (W x H).
A customizable somewhat pseudo “Currently” tab above the body.
A sidebar with space for short description/quote, and a space to write short biodata about yourself.
Notes: To change your icons, go to https://lucide.dev/ and then pick the icon you want. In code, find icon-name=“” and replace whatever is inside the quotes with the new icon’s name.
Credits:
Icon font: Lucide
Fonts: Lato by Google Fonts
Icon: @acuite
Header: @snnns
Please like and reblog if you like or are using this!
#themehunter#theme hunter#allresources#dailyresources#completeresources#*mine: page#*mine: all#*page: sumire
900 notes
·
View notes
Text
Some ppl wanted me to post my css but it kinfa sucks ass but here it is
FIRST HALF
/* CSS is how you can add style to your website, such as colors, fonts, and positioning of your HTML content. To learn how to do something, just try searching Google for questions like "how to change link color." */ body { width: 960px; margin-left:auto; margin-right:auto; position: relative; background-color: white; background-image: url("/img/bg.png"); color: #02005B; font-family: ms gothic; font-size:16px; text-align:justify; } h1 { font-size:25px; font-weight:bold; } ::-moz-selection { /* Code for Firefox */ color: white; background: #02005B; font-family:comic sans; } ::selection { color: white; background: #02005B; font-family:comic sans; } a:link { color:#EC417F; text-decoration: none; font-weight: bold; text-shadow: -1px 1px 0 #E3FF6E, 1px 1px 0 #E3FF6E, 1px -1px 0 #E3FF6E, -1px -1px 0 #E3FF6E; } a:visited { color:#EC417F; text-decoration: none; font-weight: bold; text-shadow: -1px 1px 0 #E3FF6E, 1px 1px 0 #E3FF6E, 1px -1px 0 #E3FF6E, -1px -1px 0 #E3FF6E; } a:hover { color:white; background-color: #02005B; text-shadow: none; cursor:help; } /* width */ ::-webkit-scrollbar { width: 10px; } /* Track */ ::-webkit-scrollbar-track { background-color:#02005B; border: #02005B inset; } /* Handle */ ::-webkit-scrollbar-thumb { background: #EC417F; border: #EC417F outset; } /* Handle on hover */ ::-webkit-scrollbar-thumb:hover { background: #EC417F; border: #EC417F inset; } /* Tooltip container */ .tooltip { position: relative; display: inline-block; cursor:crosshair; border-bottom: 1px dotted; /* If you want dots under the hoverable text */ } /* Tooltip text */ .tooltip .tooltiptext { visibility: hidden; width: 120px; background-color: black; background-image: url("/img/whitecheck.png"); color: #fff; text-align: center; padding: 5px 0; border-radius: 6px; /* Position the tooltip text - see examples below! */ position: absolute; z-index: 1; bottom: 100%; left: 50%; margin-left: -60px; /* Use half of the width (120/2 = 60), to center the tooltip */ } /* Show the tooltip text when you mouse over the tooltip container */ .tooltip:hover .tooltiptext { visibility: visible; } /* Divvies */ .header { width:100%; height:200px; margin-top:0px; padding-top:10px; padding-bottom:10px; border: solid 4px #02005B; background-color:#E3FF6E; background-image: url("https://media.discordapp.net/attachments/986455059485323335/1090034155221434529/ooooo_haha.png"); background-position: right; background-repeat: no-repeat; background-size: 500px; } .footer { width:100%; height:auto; border: solid 4px #02005B; background-color:#E3FF6E; text-align:center; } .scrolly { width:100%; background-color:#02005B; border: solid 4px #02005B; height:20px; color:white; text-shadow: -2px 2px 2 white, } .section { width:100%; height:600px; border: solid 4px #02005B; background-color:#E3FF6E; } .linkbar { width:100%; height:850px; border: solid 4px #02005B; background-color:#E3FF6E; background-image: url("/img/greentile.png"); } .blinkbar { width:100%; height:285px; overflow:hidden; text-align:center; } .smoopy { width:100%; height:600px; border: solid 4px #02005B; background-color:#009C63; color:#E3FF6E; overflow-y:auto; } .smoopy2 { width:100%; height:500px; border: solid 4px #02005B; background-color:#009C63; color:#E3FF6E; overflow-y:auto; } .yellowsection { width:90%; height:200px; border: double 4px #02005B; background-color:#E3FF6E; color:#02005B; margin:auto; background-image: url("/img/greentile.png"); } .yellowsection:hover { box-shadow: -5px 5px 0px #02005B; margin-top:-5px; margin-left: 20px; } .lucky { width:85%; height:auto; border: ridge 4px #02005B; background-color:#009C63; color:#E3FF6E; } .secondpart { width:100%; height:400px; border: solid 4px #02005B; background-color:#E3FF6E; color:#02005B; overflow-y:auto; }
2 notes
·
View notes
Note
bettyyyy, ¿cómo le haces para que las imágenes de los icons se centren y no se salgan del margen? ando aprendiendo a codear pero esto me tiene estresada :c fan de tus códigos desde hace años <3
Hola ❤️ muchas gracias!!
Mira, espero estar entendiendo bien. Yo para centrar cosas uso muchisimo flex. Por ejemplo:
<div class="icon"><i class="fa-solid fa-home"></i></div>
Entonces en el css pongo:
.icon{
display:flex;
align-items:center;
justify-content:center;
Width:60px;
height:60px;
}
Yyyy si la hora de contestar esto no me falla JAJAJA debería centrarlo por sí solito. Recuerda cambiar las comillas que tumblr siempre los cambia.
Si esto no soluciona tu problema, coméntame más al respecto o mandame una fotito del problema ❤️
3 notes
·
View notes
Text
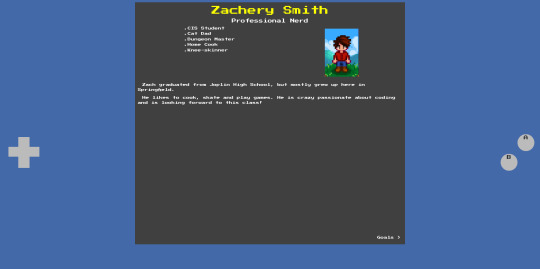
About Me - Commit #1 - NameBoy and Homepage
I've gotten to grinding out the code for my About Me page design, which I've decided to call the NameBoy. The challenging part was building in responsiveness where Bootstrap's features weren't helpful. This happened a lot because I was making a design that does not look like a Bootstrap app. Maybe I need to learn Tailwind.
Here's what it looks like!
Desktop:
Mobile:

The left and right D-Pad keys work! They switch between the pages. I'll show ya how.
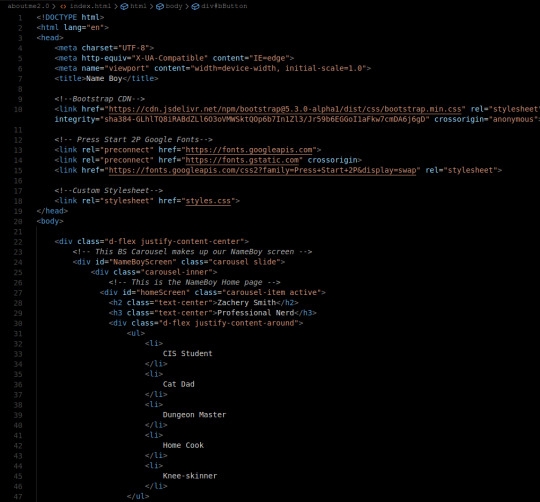
The HTML:
First we have a pretty basic head tag but we cdn Bootstrap and add a font.
Our NameBoy consists of 2 main parts: the screen and the controls. The screen is a bootstrap carousel with controls mapped to the virtual d-pad.
Within the screen, we've written a home screen with centered headings and a flexbox containing my list of titles and a picture of my Stardew Valley character. We use justify-content-around so that it spaces well on all sizes of NameBoy screen.
The navhint at the bottom of the "homepage" has a class because the custom CSS there will be used later-on as well.
The controls are mapped using the relevant bootstrap classes and targeting the #NameBoyScreen. The data-bs-slide attribute tells it what direction to move the carousel.
The middle, A, and B button are just cosmetic.
And, of course, we have our Bootstrap script.

Now time for the fun part
The CSS:
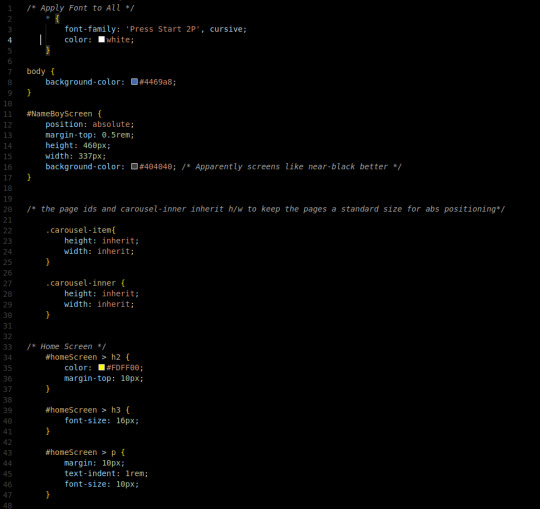


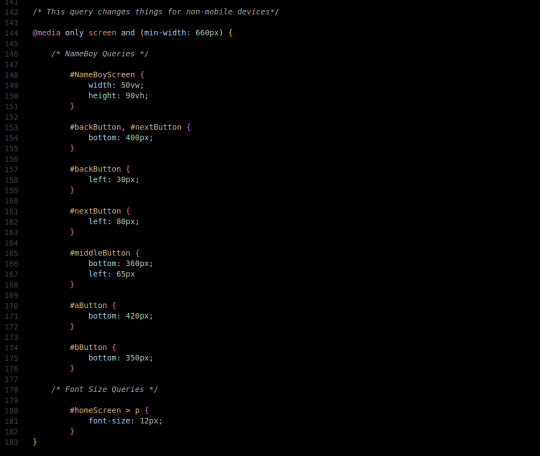
First, our basic font will be white Press Start 2P. It's retro, fun, and free.
Our background color is blue, like the GameBoy color I would emulate on my $20 android phone when I was younger.
Our screen is positioned Absolute, so that it's children can be too. A small margin on top, with a fixed-pixel height and width based on our Figma ratios. A non-jarring black color is used for the background of the screen.
We use inheritance so we can pass that fixed pixel size down through the carousel for convenience with absolute positioning.
The home screen has some basic text formatting. The yellow is a kind of Pac-Man yellow.
The image of my SV avatar has a fixed pixel size as well.
Our navhints will be absolutely positioned near the corner of the screen.
The controls were fun to figure out. They're positioned with fixed positioning on the edges of the screen. The next and back buttons are 60px wide and 35 pixels tall.
They are overriden to be opaque because BS wants their controls to be translucent but I disagree in this situation.
The middle button is a plain rectangle positioned toward the middle of the actual, functional, sideways controls.
The A and B buttons are circles (border-radius: 50%) positioned with the same technique as the other controls and set up so that the text labeling them will center.
Our query changes button positioning, font-sizes, and screen sizes to turn our NameBoy Color into a NameBoy Advance when the controls move too far to the sides of our NameBoy's screen.
Conclusion:
I love when I have a fun idea, and it works. It's been happening more lately with CSS. I also feel that this is a very cumulative project of last semester's skills. I'm excited for it.
The github repo for the project is here, if you wanna look: https://github.com/Xacheri/aboutme
4 notes
·
View notes
Last Seen Blogs

luckyunicornsparkle
Just an uninspired Artist

rohitkansalimarc
Rohit Kansal

malaycumshot
18SX

redneckmedic1
Untitled
scaredappliances
Scaredbathtub