#at least my weekend starts now
Text
Just got home from my 85th plasma donation. I just wanna flop down on my bed between J and Eddie, hold their hands, know they are both okay and maybe watch the new episodes of JoJo until I doze off. I'm growing so tired, my cheeks get hot and red. Again.
#I know this is super random#but anyway#at least my weekend starts now#kinda#there's still so much to do#and I'm thinking of you my friend#I'm sorry for making you wait so long#you better expect the longest rambling ever#you gave me the fluffiest most wonderful boost of serotonin ever talking about your love omg#if I don't manage to answer you today I promise to take enough time to do this tomorrow#I miss and love you so much#self shipping#J and Sue#Sue Napier#Eddie & Sue
1 note
·
View note
Text

Why is it always rats.
| First | | Previous | | Next |
[[ All Croissant Adventures (chronological, desktop) ]]
[[ All Croissant Adventures (app) ]]
#and it's funny every time LMAO#thank goodness for Gale and his AoE spells with the safety on#bg3#baldur's gate 3#bg3 spoilers#act III spoilers#croissant adventures#tav#the emperor#comics#saying this on Jan 1st but I think I'm going to start pausing weekend posts now#I've slowed down my playing and I think we're getting closer to end-game so the backlog can take some time off from posting#that said I'm sure I still have at least 40 hours of playtime left lol this game is so massive ty Larian
388 notes
·
View notes
Text


BOYFRIEND MATERIAL 🫠🫠
Bonus:
THAT FINE ASS 🍑
THE SLUTTY WAIST 🫨

AND THE BITEABLE NECK 😌
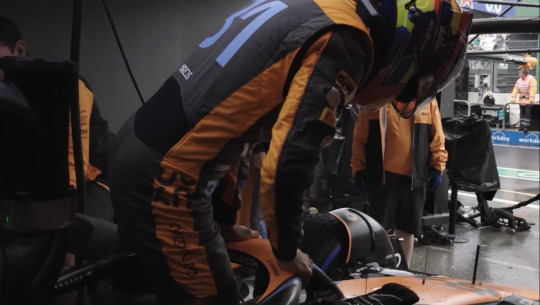
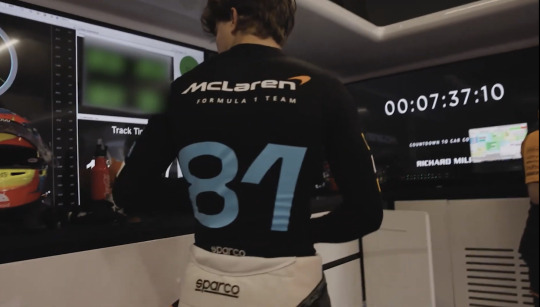
#f1#oscar piastri#dutch gp 2023#screaming from the top of my lungs 😭😭😭#so damn handsome and adorable 😮💨😮💨#pi🍑tri#oscass#hyperventilating just by looking at him 🫨#imagine running into him in the paddock when you least expect it#I’d be on the floor melting into a puddle#HIS HAIR ON THURSDAY!!!#that’s everything it needs to be appreciated 😍😍#ARMS ON THIRD… @jackie are you here? alive? cuz I’m not#calling the ambulance right now my heart beats so fast I might die 🙃#okay I’m (ab)normal again… 😌#Oscar yt era beloved!!#he has to continue filming behind the scenes 🫶🏼🫶🏼🫶🏼#also he was so quiet about this and dropped the bomb just before the next race weekend starts…#smug little bastard#THIGHS THIGHS THIGHS 🤤🤤#forgot to include the neck pic 😨#I wanna **** **** on that neck 🤤
70 notes
·
View notes
Text
due to things lining up Horribly, no stream this weekend! and maybe not the next, either!
#i got too much shit happening this weekend </3#and then i might not have the next off... i still havent gotten my schedule!#i got a sticky note for two days and thats It so far!#oh man im sorry about the lack of Update posts too#im. so tired.#i have No spoons like... at all....#i want to curl up in bed and sleep for a decade but! cant!#i have a 9 hour shift to do again! and again! and again! and again. and again. and again. and again. and agai-#absolutely unprompted#yk i thought having Limited free time would give me motivation to do things i want to#nahhhh its just making me Sad lmao#my brain before: we have all the time in the world so we can do it later#my brain now: we have no time at all so why bother#man. i dont want to get into a groove and then have to either cut it off or be prematurely Exhausted at work.#by the end of the day i already feel dead... cant feel dead at the start or i wont make it...#wow look at me complaining. its been Two Days.#gonna bring a sketchbook so that i can at least doodle during my breaks + lunch#brush up on my traditional skills....
36 notes
·
View notes
Text
I got a job as a bookseller!!!
#nat talks#listen. it's not the dream bc I've already worked in a bookstore and it's actually terrible at times#but I only really worked during holidays and people were just so rude#BUT I do have higher hopes for this location#also I tentatively know two people who work there so it will be fun!#it's a sub role and a little unclear if I'll only work during christmas and the book sale in feb or more#it depends on if the people who are on sick leave will return and when#but I can keep freelancing and apply for corporate jobs I want in the meantime#at the very least I can work during december either way and if I end up finding something else maybe I can work weekends during the booksal#so to not let them down too much#I honestly am just looking forward to getting out of the house and meeting people and working with my body more#because my mind is very fried#I have a short shift tomorrow to train#then I'll see when I'll officially start but it will probably be soon!#I've had a very busy few days so I wish I had said I could do my training shift next week#bc they gave the option of this wednesday or next#but I didn't want to turn it into a “thing” by letting too much time pass bc I might get anxious about it#but now I wish I had lmao I'm tired#also forgot I was gonna be home alone with the dog tomorrow#had been looking forward to it tbh#oh wellll#work stuff
46 notes
·
View notes
Text
What if I just developed social skills to be able to actually make new friends in person and then used those skills to get a new phone number and pack my bags and run away to a place where no one knows me and all my past mistakes and fuckups and started over there without going into social isolation
#i needed to hand my expose in in february and got an email about it this weekend and agreed to hand it in on tuesday#it is now sunday evening and i just got another email about it but thinking about opening it makes me want to throw up#she's so nice and i don't want to see her scolding me for AGAIN not sticking to a deadline#what if she tells me that was the final deadline and i won't receive a grade for that class and so i won't be allowed to write my thesis#until next january? I wanted to graduate this autumn. it's april and i haven't even started on my thesis and i have like three bullet point#for the expose; and idek if I'll be able skillwise and mental health wise/adhd wise to actually write the stupid thesis#like what if i can't do it and then i've spent the last one and a half years on a degree i won't get in the end and then i won't be able to#apply to a lot of the jobs i thought actually looked good#@god give me some social butterfly skills and I'll give or throw most of my stuff i don't absolutely need away so i can just..#go somewhere new. start over. and not become even more socially isolated than i already am.#does anyone know what a panic attack feels like because i'm having suspicions that i might have finally gotten them this year#but didn't recognise them as such because it could be worse#so anyway. god grant me some social friend making skills#if you can't do that at least throw in some adhd and depression treatment. i am sick of this.#and by this i mean the way i've been living my life at least since i left high school; probably even while still in high school#vent posts#mine#i love my online friends so much but i can't meet them outside to sit in the sun or chat about anything at all or go have coffee together#or or or you get me
9 notes
·
View notes
Text
I finished my lightsaber bag last weekend, but work has been so hectic that I haven't really had the time to take photos and write up a post about it until now.

The finished bag, when closed like this, is 39" long and 5" wide. It fits my lightsaber (hilt with 28" blade attached) just perfectly, and it's so nice and soft and padded inside that I feel like my saber is protected from most things it would encounter either at home or out in the world. I wouldn't check it as airline baggage in just this bag, but short of that it feels pretty secure.
The top flap closes with a large strip of brown velcro, which makes it quick and easy to get my saber out when I need it. That faux-suede fabric I used for the lining is a bit grippy, and the interior of the bag is too narrow to get even my tiny raccoon hands into, so it takes just the right amount of force (no pun intended) to draw the lightsaber out of the bag. Even with the flap open, there isn't much risk of the saber just falling out of the bag.
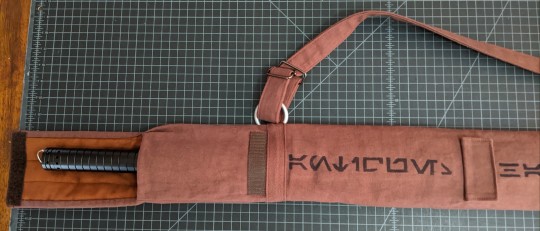
The fake pocket flap in the middle of the bag, near the right edge of the above picture, hides another bit of velcro, which allows me to close off the bag at a slightly shorter length by folding the top flap down even further, until the velcro on the left side of the picture meets up with the underside of that flap. I didn't get any pictures of that, since it's really only usable when I separate the hilt and blade of my saber, which is just fiddly enough that I prefer to keep them attached when I can. But it does give me the option, say for a Disney trip, to remove the hilt and wear it on my belt, and then have just the blade in the bag, with the bag being a little bit shorter and lighter and easier to carry onto rides and such.
The pocket at the lower end of the bag is sized for carrying the hex wrench and little screws needed for attaching the blade to the hilt, and also has enough room to tuck the charging cable in there as well.

I've taken to storing my fingerless leather gloves clipped onto the bag, just so they're handy for practicing with the saber every evening. I've built up a good repertoire of flow arts combinations, training on both hands pretty equally, and find that my frequently achy wrists and shoulders are much happier for the routine. I'm hoping to get video of it soon.
When I'm not using my saber, it lives in the bag hung from a hook on the wall. I might like to eventually have a dedicated hook at something closer to waist level, but for now this higher up coat hook works just fine.

The carrying strap took a little bit of fiddling around with to figure out what was most comfortable (even though the whole thing is easily under 5lbs, probably closer to 3), but looped through the top ring and then clipped at the bottom seems to be the winning combination. I can pull the bag on over my head, but the easier thing is to unclip the big S carabiner from the lower ring. The strap isn't permanently attached to the bag anywhere, so I can experiment with other arrangements or even other straps in the future, if I want to.
The chalk guidelines from when I put the lettering on are still showing up somewhat in these photos, but in person they're hardly noticeable. I may do another erasing pass on them at some point, and I still haven't decided if I want to do some weathering with fabric paints or just leave it as is. Generally I'm really happy with how it turned out, but it's nice to know that I can easily make a few more adjustments to it if I feel like it.
But the next thing I want to spend some time working on is the lightsaber hilt itself. I picked out this particular combination of pieces knowing that I wanted to do some practical weathering on it. The hilt is made from aluminum with a nice matte black finish over top, and I've seen lots of examples online of the difference that sanding that surface makes to the overall look of the saber. Now that I've gotten to know the saber and figured out where my hands naturally want to hold it most often, it's just going to be a matter of getting in there with some sandpaper and starting to take off that black paint in a few places.
I've also been toying with the idea of adding a bit of heat bluing to the emitter using paints, and I think all those details will really help it look more like the 'fragile antique' that the bag proclaims it to be. Modifying my saber like that is a bit daunting, but I have a pretty good idea of what I want the hilt to look like when it's finished, so it's really just a matter of carving out some time to take pieces of the hilt apart and strategically attack them with sandpaper.
And besides that, the only thing I still need for Star Wars Nite is the actual tickets to Star Wars Nite, lol. We're coming up on the end of our third week with our new client, and we have a better idea of when the major milestones and deadlines are in April and May, so hopefully Jack and I can sit down soon and figure out when we want to head back to Batuu.
#my sewing#lightsaber bag#Batuu Bounding#Aurebesh#which reads:#'fragile antique: handle with care'#and when the flap is attached to the lower bit of velcro it instead reads:#'fragile handle with care'#it's such a tiny silly detail but I'm glad I was able to make the text line up like that lol#I think I will try to get through the weathering this weekend if I can#or at least make a serious start on it#pictures of that once there's something to look at#I have a list of other sewing projects I want to tackle but this might be the last of my Star Wars sewing for now#we'll see#2024 mood
7 notes
·
View notes
Text
hahaha hey you guys guess what. you'll never believe it. got the guy who's in charge of my fraud case on the phone and he was like "who'd you give one-time security codes to yesterday" and i was like "the guy who called me from the fraud department after they noticed a weird login in florida??" and he was like "that was the fuckin hacker. you got got. IDIOT!!!!!!!!!!" i handed my entire savings over to a fucking guy on the phone on a silver platter. like some kind of fuckin rube. bro
#IT IS OK THOUGH I HAVE BEEN SORTING IT OUT#account is LOCKED DOWN! card is DELETED! fraud paperwork has been FILED! i have requested a fraud alert AND credit freeze#from the NATIONAL CREDIT BUREAU!#a friend of mine is taking me to MAINE next saturday to go to the BANK! i sent an email to my landlord asking if i can pay rent by CHECK!#i went to my other bank and deposited my BONDS! so i have some MONEY! to pay RENT!#i also got a new debit card from them. and made sure i could use my old checks.#i also bought some STAMPS while i was out and a BIRTHDAY PRESENT for a FRIEND#now i am going to start switching over some auto deposits#so when i get my paycheck on tuesday i will actually get it.#i feel so STUPID but i think i have done all i can to fix this. i am feeling better about it#by next weekend i will have my money again. it's all fine#and hopefully next time i will not get got so easily. lol.#anyway dont get got by people pretending to be your bank i guess. i did think it was weird how many questions they asked but..#they ALWAYS ask lots of questions at the bank!!!!!#i got a text message FROM the bank saying they would be calling me soon and then the next call was from the scammer#and then like a half hour later got one from the bank and was confused bc they'd just 'called me'#anyway. it'll be fine. scary for a while but at least i have things i can do to make it better. it's all good#genuinely feeling like i ought to take out like a thousand bucks cash and keep it in my desk to replace my bonds tho tbh hahah#just in case something like this happens again. you never know. what would i have done if i DIDNT have those yknow#ok thank u all for being along on this journey with me
21 notes
·
View notes
Note
Wait u draw aip with jsut ur left hand????
asddshfjg yeah so i injured my hand like 2 ish days after starting askinsuffereableprick,,,,,
i pushed through the pain for like 3 or so posts(not smart), in total there have been 8 posts on that blog that were done with my right hand, everything after oct 7th is left handed lmao
#the hand injury was partially cus of the blog yes#it was mainly hyperfocusing at school for weeks straight but going from that into an intense weekend of dave arting........................#may not have been the best idea lmao#at this point with stabilizer there isnt a Huge difference between my left n right art#but its more noticeable traditionally#mainly if i use a pen then its still shaky as hellllll#my main complaint now is its still much slower And i cant use keyboard shortcuts :(#which slows me down extra much and limits what i can do in some instances#but fcking hell like at the start?? i was filling out a character sheet and there was a 5 minute laughing session cus it was like....#literally incomprehensible#so ive come a long way >:)#the hannd is also maybee kinda getting better a bit#im giving it another month of rest at Least#probably like 2..... hopefully it wont need more then that................................................................#ask#anon#rambles
13 notes
·
View notes
Text
Ignore
#delete later#in typical birthday fashion i am now exhausted snd overwhelmed and battling a meltdown#i stubbed my toe and now cant put any fucking weight on it#im exhausted from performing appropriate birthday excitement. i dont think i understand birthdays correctly#to me the only relevance of ppls birthday is that i can show that i care about them and give gifts that make them happy or#spend time with them. other than that its just a day. in my head my birthday is just a day but it's a day rhat im expected to be#ecstatic over. i dont understand that. i spend the day worried im not feeling the correct feelings or displaying them right#and worried bc the normal day routine is broken and im anxious bc i don't know what will happen#too much uncertainty. abd rhat anxiety makes me feel guilty. but at the same time bc to me birthdays are avout showing the#person that you care. if everyone ignored it i would start to assume they dont care. idk how to fix my brain on this#at least its only once a year. plus the whole still being alive at 24 thing freaks me out. so when i inevitably have my#meltdown or shutdown it comes with not fun things#i get the same way at christmas except its slightly more socially acceptable for me to hide at christmas.#meltdowns make me angry abd emotional so i know im being a bitch in my head but logic is hard so im just upset and angry#and confused on how im supposed to feel and act. i fucking hate my brain.#i have ordered good comfort food abd have weighted blanket abd new piercing. life is okay#i dont want to see mu parents this weekend but it will be what it will be. im so fucking tired
5 notes
·
View notes
Text
you know it's exam season because i'm questioning all my life choices
#you know i don't mind going to classes actually but studying and taking exams makes me feel like i'm a cog in a machine#as i got older i started caring less about school actually not because i don't think it's important#but because it makes me feel like a product of capitalism#why did i choose this major?#do i even still like it?#do i want to work in this field later?#like i think that no matter my feelings on my major i'm not gonna change it#bc 1 i already got this far 2 i don't know what else i would wanna do and 3 i couldn't live with the feeling of failure#i just have to make it through another 2 and a half years of uni at least#and right now i just have to make it through the next week and a half#god i want exams to be over#i don't have any motivation anymore and i don't care about the classes i have to study for that much#anyways can you tell that my last exam didn't go well ?#i should be nicer to myself bc it's weekend and i am never that productive for uni in weekend anyway#anyways thanks for coming to my rant#kj post
7 notes
·
View notes
Text
Nothing like being ill twice in a month….
#took a weekend trip last week and now all four of us are sick lol#sigh!!!#oh to breathe properly thru my nose again. help#gonna try to sleep some more….my head feels full of fuzz#and snot. ugh#text#at the start of the month I had a mysterious infection where I lost my voice for a few days#that didn’t happen this time at least but. bleh
4 notes
·
View notes
Text
fuck fuck fuck fuck fuck
#tw sh related#me when listening to so long london is giving me flashbacks the the worst most toxic friendship of my life#the relationship i attribute to most of my bad habits and fucked up shit i picked up from her#and she just moved on so quickly and i was left picking up the pieces for two years#and im still trying to mend them i havent even gotten there yet#and its fucking me up i cant think about it anymore#and i cant relapse right now i really really cant#im staying the weekend with my friend and we've been talking about this shit and god its supposed to be in the past#but its not and ive been lying so much#because she thinks its been two years when really its closer to maybe a month#god i cant relapse fuck fuck fuck shit dude#and my dumb stupid idiot ass keeps a fuck ton of pins with me because i like them on my bag#even tho thats how this shit started three years ago#i mean three fucking years how can i not be over it#this isnt the same girl i tried to kms over btw#i had a lot of toxic fucked up relationships in my suicidal era#ok i feel a bit better after having gotten that all out#im also wearing short sleeves rn to fully convince myself i cant relapse#ok im stable now i think at least i can breathe#alex says shit
5 notes
·
View notes
Text
tried to answer an ask, got lost thinking about the sublime
#been wanting to answer it for days and now I've started a draft at least#alas the physical world is demanding my presence at the moment#goal: answering this weekend
7 notes
·
View notes
Text
god i hate 18th century english writers theyre not old enough to be interesting and not recent enough to be exciting i hate those self contradictory little twits with their cheeky little satires and mock poems that require the memorising of a fucking phonebook to be enjoyable i dont KNOW who youre talking about leave me out of it i dont care about your incomprehensible double entendres and i dont like your so called wit and whatever happened to brevity anyway
#my post#no your 20 page poem isnt 'rewarding' to work through a) i didnt care in the first place b) youre an asshole#and i still havent read gullivers travels.. it's thursday i need the handout by the weekend at the latest#time to break out the old audibook i guess. it has the downside of me not conprehending half of ot but at least i'll get to the end of it#stop making me read things!! i dont compute any of it!!! i think ive said this before. like two weeks ago#i cared up until shakespeare and now i dont. wasnt it enough. perhaps i'll start caring again around the 1950s but count me out until then#*comprehending
10 notes
·
View notes
Text
it hit me what makes me the most miserable abt my work week is how it’s just school all over again. just hanging in there until the weekend. repeat. repeat. repeat
#5 outta 7 days im at work. 2 days of freedom#2 days to do chores n run errands n relax n sleep n draw n catch up w/ friends n go places#and if u gotta reschedule itll be weeks before ur available again#like for months now ive tried to get together w/ friends but our days off dont match n shit keeps coming up#not to mention im fucking tired! im exhausted! i want to sleep in and then draw the rest of the day!#i think the worst part is that back in school.. at least it didnt matter as much? because it all led to an end aka graduation?#like i didnt mind the wait for next weekend as much cuz it was temporary#like eventually ill graduate and then ill have freedom! (i thought? for some reason??)#but now its like.. the weeks are going by so fast this year is already almost over i turn 26 in 2 weeks#and this is.. the rest of my life? like youre kidding right? this cant be it?#i get off work n then i have to take care of the cats n chores n then eat dinner n then shower n then its late and i gotta sleep#before work the next day. i dont have time nor energy to rly do anything#and ill get that feeling of like. oh well at least it brings me closer to the next ‘weekend’#but i dont wanna live weekend to weekend#i mean im thankful to have a job n coworkers i love like i truly hate it there sometimes but i also am happy and thankful for it#but yknow.. it shouldnt have to be like this#i worded this so much better in the shower but im tired of feeling like school part 2 like what the fuck man#ive had work every single day since we came back from our trip n i just dont have time/energy for anything#i need to open commissions back up but i havent even gotten around to starting one a friend asked for#not to mention this years christmas card ive barely got the sketch done for#and again. my favourite holiday. halloween is on tuesday and while we did plan halloweeny stuff it just has not felt like halloween#i havent had any ideas/energy/time for any halloweeny art#+chores n errands etc lmao we havent even been to the grocery store yet (calling us out here)#it just. suuuuucks aaaaaass man the world is so beautiful life is a gift i dont wanna spend it like this
15 notes
·
View notes
Last Seen Blogs

amersed
boundary.

ego-radio
Ego-radio Illustrations

fabriziocambiasi
Bacco tabacco e Venere

chowhound-gta
ChowHoundGTA

victoriaderegus
Victoria Deregus