#but so many tutorials are just. copy someone else's code and edit it
Text
kind of unbelievable how every single toyhouse code tutorial is so astonishingly bad
#m#the most useful thing ive found so far is a link to another website that teaches the very basics of css#but so many tutorials are just. copy someone else's code and edit it#or a list of resources like fa icons and stuff#nothing about how to build a (simple) code from scratch#so annoying 🙄 i guess i'll just look at people's code and do trial and error till i get it
1 note
·
View note
Text
Archaea mudlet scripts

#ARCHAEA MUDLET SCRIPTS UPDATE#
#ARCHAEA MUDLET SCRIPTS CODE#
#ARCHAEA MUDLET SCRIPTS DOWNLOAD#
#ARCHAEA MUDLET SCRIPTS FREE#
You are more than welcome to use, modify, or redistrubute anything you find on this site as long as no monetary (or in-game credit) gain is received.
#ARCHAEA MUDLET SCRIPTS FREE#
I provide all of my scripts free of charge, but only limited support is available as a result.
#ARCHAEA MUDLET SCRIPTS CODE#
It has been my goal for some years now to bridge the gap between those who can and those who cannot code in Mudlet for Achaea. If your game settings folder is not titled WoTMUD then you will need to edit the file path for each button in the script to have the images display.
#ARCHAEA MUDLET SCRIPTS DOWNLOAD#
The same goes for npc's and their loyalties to whether they are m or mx to any given person. Welcome to the new home of Mosr's scripts and tutorials for Mudlet. Download Key16.zip file extract the folder and place a copy inside the WoTMUD folder in your zMUD directory. The x is only for mobs loyal to you or your faction, if you are in a room with two turrets, one that is yours and another that is someone elses, only yours will be have the mx attribute, the other will be m despite that it is loyal to someone. You probably shouldn't be going into new areas and hitting everything that moves without scouting the area and probing everything first. And then also pretty early on we decided that hey, we should have a mud client, a little have a 3D mapper cause thatll be awesome. I do plan to do some sort of database that gets updated once per level and highlights relative power, as well as detect and prioritise aggressive mobs. As far as i can tell, all quest givers are 'loyal' to some faction, so all have "mx" attributes. This is the 1990s/early 2000s World of Pain MUD, originally based on CircleMUD 3.0, resurrected in 2018 and updated with many new modern things like Mudlet and Grapevine GUIs via GMCP, MXP for clickable stuff, and in-game maps via Mudlet and an ascii map command. Someone might post the exact aliases and triggers you need here, though.A blacklist is also good to have for the cycle targeting, whether it be quest givers, or just a mob that is a little too tough to take on and you want to temporarily blacklist it until after getting a couple levels, etc.Ĭurrently this only targets mobs with the "m" attribute - ones that you'll want to be hunting. What you're wanting to do seems pretty simple. Inkmilling script Vivisect curing mode (manual restoration salve use) Sign in. You can use Achaeas built-in serverside system without a client-side system, but with WunderSys it will deal with things serverside doesnt, like changing priorities or refilling pipes. Defences - captures your defences and displays them in an organized, more visual. WunderSys is a Serverside system for Mudlet. Makes some use of server side curing, and the sipper might work. Medic - adapted from my Lusternia curing system of the same name, mostly useful for the chaser. If no one posts a response to this soon, I can help you IG. A collection of Mudlet packages for Achaea and Lusternia. Lather, rinse, repeat, if possible, on the first button-press. I get to a bashing area, activate all of my bonuses, and want to go 'Alright, here's what we've got.'Ģ) Eyeball whether or not there are mobs and if starting a fight would be a survivable prospect.ģ) Press a button to bash them down. So, I thought I'd post what I'm looking to do here.ġ) Numkey movement. I have to read what these things are supposed to do to get an idea -of- what they do, and I'm still left scratching my head trying to figure it out. I have -literally- no aptitude for any of it. I am not a programmer, I don't know programming language.
#ARCHAEA MUDLET SCRIPTS UPDATE#
As a new installation, an in-place update of an existing profile, or creating a new profile with all the. Percentage to sip is configurable by editing the SIPAT variable fractions.
TRACK works just find for Meta users.
TRACK ON turns tracking on TRACK OFF turns it off, and TRACK toggles. It doesnt seem to be very dynamic either, like Achaea is. Discworld is totally free, and probably offers a better exploration than Achaea.but it is very grindy, a lot more so than Achaea. Once installed, the script can be bypassed and anything sent direct to the mud by typing the first letter of the command as a capital letter. freeload Features: Autosipping health and mana. Other MUDs I like or tried are Discworld (best MUD in terms of world design) and Medievia and Materia Magicka have tons of features and an ascii based map. I looked through the thread, and I.got lost when I saw the first set up scripts. DOWNLOADING: Click on the above link to download the script package. I just cold-downloaded Mudlet, picked up Demonnic's tabbed chat, and I'm trying (and failing) to get a half-decent bashing setup.
0 notes
Note
all prime numbers in the Misc section and all multiples of 10 in the other sections
we shall go backwards as the question list was posted backwards...... (and also why i rbed it.... why is it backwards? i dont know but i love it. edit: now that ive seen question 1 it looks to me like one of those forum profile copy pastes where you fill out the entire thing and put it in your profile.)
200: My crush’s name is: hmm...... well. i would rather not say!!!! they could see this post!!!!!!! and we do not want that happening.......
190: My 1st job was: lifeguard in the summer after 9th or 10th grade i think? it was decently fun. i grew up swimming competitively so the swimming part was a breeze. the remembering what to do if someone is drowning part? a bit harder. memory bad. what to do if someone has a potential broken spine/head injury when they’re in deep water? i don’t know bud. but it involves 3 whole people to get them out. 2 in the water, one person at all times holding their head in line with the rest of their body, the other one strapping them to the board (these two people in the water switch off, too) and then one person standing on the side of the pool looking very concerned. also don’t tell anyone but sometimes if i had like a 6 am shift i would get really groggy and almost fall asleep on the stand.
180: Marriage is: whatever people make of it but unfortunately bogged down with like a lot of societal expectations. to me it just sounds like hanging with your “best” friend until you die but a lot of other people interpret it differently.
170: What did you do yesterday? LOL wouldn’t it be nice if i remembered. wait no i do remember. i woke up “early” and watched a dnd livestream and struggled through buffering from my shit wifi. then i took a nap. then i had a chipotle burrito that was way too spicy. and i played a lot of minecraft. and i wrote a bit. and i also did like another 2-3 pages of the codecademy html intro course im working on.
160: Soul mates: nope. [taylor mason voice] i don’t believe in the concept of a soul. you are compatible with some people more than others and that’s based on your values and interests and personality. nothing Soul about it. it’s fun in fanfic and fiction though, but that’s because it’s fiction.
150: Blondes or Brunettes: brunettes..... i like brown hair! but blonde is nice too.
140: Mac or PC: clown face emoji. mac. It’s A Unix System. more convenient for me. my current mac is a giant piece of shit though. though i think that’s my own fault for keeping all my old files from my old mac. shoulda started over. i think i might try to get this one factory reset or something.
130: Wal-Mart or Target: idk walmart. i go there a lot during college. walmart just has a larger selection. i used to go to target a lot as a kid though because my mom liked it more. i think it’s like slightly more bougie?
120: Gay Marriage: fuckin go for it pals. sad that it took as long as it did to become legal.
110: My Neighbors: they are nice i think. the ones to the right are teachers or something. the ones to the left are.... idk. their kids were like maybe 5 years older than me and my brother when we were growing up though and sometimes they would indulge in us tiny annoying kids and hang with us
100: Cried in front of someone: when the finale of the clone wars came out a few months ago and i was sobbing and i ran into the living room to tell my roommate and friend that i was sobbing. i was sobbing. i also recorded myself watching the entire eps and i Sure Was Sobbing.
90: Texted: actual sms text, yesterday in response to a friend who texted me a tik tok. instant messaging like 20 minutes ago to milo. i havent responded yet because im answering this and i cant multitask for shit.
89: Who makes you laugh the most: me obviously. i think i’m fucking hilarious. me aside, @redvsblue is the funniest person on this planet. also my friend holly irl who shares my incredibly dumb sense of humor. also you!
83: The most difficult thing to do is: hmm........ in general or for me personally? idk..... a lot? i am not a very courageous person. so i guess being brave.
79: First time you had a crush: >:( not appreciating this line of questioning that lines up with the prime numbers/mult of 10. i will not be saying as they ALSO follow me on tumblr. though they don’t use it often. shout out to middle school.......
73: Tomorrow: hopefully wake up around 1 pm at the latest. make a plum smoothie. play some more minecraft and get more netherite (new update slaps). do more coding tutorials. get some writing done. the same ol same ol.
71: Next Summer: hopefully i will have a job lined up for the fall and the pandemic is Over. i would like to just [do nothing] for the last summer Ever before job starts. if i don’t have a job then it’s Job Hunting Time.
67: The person that makes me cry the most is: what the fuck...... like in a bad way? good way? cry of laughter? sadness? me, probably. my own damn brain be like “well it’s time to think about Yourself and be sad!” i know. very narcissistic of me. also dave filoni (director, producer, writer on clone wars).
61: My Car: not really mine. i just use it. beige 201? toyota camery. my brother tried to convince my dad he needed it more than i did last school year. my brother, who lived on campus in boston and flies to school from nc when he goes there, needs the car more than me, who lived off campus and drove to and from school to get back to nc, thinks he needed the car more than me. what a guy.
59: The movie I cried at was: last movie huh......... when was the last time i saw a movie? idk probably the rise of skywalker when leia died. i don’t know. i sure as hell didn’t cry at cats.
53: How do you like your steak cooked: i am vegetarian.
47: Who’s your best friend: @worthyghouls i guess. but also concept of “best friend” is so weird. No Best Friends. just lots of people i am good friends with. feels weird to all my other friends to pick One of them and be like “well i like you more than everyone else” :)
43: Do you have a 5 year plan: only in the vaguest vaguest vaguest sense. i would like to graduate with my bs degree. i would like to live in a city (doesn’t have to be a super big one. where im at rn is fine). i would like to have my first or second job i feel comfortable doing related to the degree i am getting. i would like to live in my own apartment (with roommates)/not with my parents. i would like to not be rent burdened. i would like my roommate to know how to take care of a cat or be okay with helping me learn how to take care of one. i would like to have a cat with said roommate. and that’s about it tbh. not very ambitious, i know. i just want a simple life......
41: Have you pre-named your children: bold of you to assume i will have children. no. if i ended up with child it would be like that tag on ao3 called “accidental baby acquisition” and i would name it on the spot.
30: Actress: hmm..... lauren marcus. lauren lopez. does fiona nova count if she’s going to be in rvb zero? also lindsay jones. aubrey plaza. idk. not many actresses i follow from project to project. it’s more i will see them in something and appreciate them in that role immensely.
20: Holiday: halloween is pretty chill. just getting candy from strangers? dope. scary aesthetic? amazing. i also like christmas just for the sole fact that i get time off from [life].
10: Restaurant: a favorite restaurant??? who has one of those???? i sure don’t. and i’m not gonna say something cringey like olive garden or mcdonalds. i simply do not have one.
#not rt#teresa answers stuff#tyty for sending in#soph with the primes as always...#nothingunrealistic1
7 notes
·
View notes
Photo

hello hello so i’m no expert in graphic designing, making edits, whatever you wanna call it, but i thought i’d share some tips on how you can start!
please note that this is just a very broad guide & not everything mentioned has to be followed, it’s your own journey ✨
*i am speaking from personal experience and every designer has their own style & method on how they work
INSPIRATION:
tumblr’s a very creative platform and there’s a ton of incredible works out there that can spark inspiration! if we’re sticking strictly to tumblr, i like to dig around the following tags:
#army gfx: self explanatory, but content created by bts’ army
#bts gfx or btsgfx: interchangeable to the previous one, but it doesn’t hurt to go through a second tag. the second is a blog that’s dedicated to reblogging content under that tag (makes for easier tracking on the newest posts)
#carat gfx or caratgfx: content created by seventeen’s carat & a blog that’s dedicated to reblogging content under that tag
#svt gfx or svtgfx: an alternative tag & gfx blog
#monsta x gfx: this tag is a mix of gifs & graphics, but you’ll still find gems here
#nct gfx or nctgfx: content created for nct
nctinc: a network for content created for nct
#skgfx or skgfx: content created for stray kids & a blog that’s dedicated to reblogging content under that tag
#stray kids gfx: an alternative tag
if you want to explore other platforms, i’d recommend checking out the following:
#graphicdesign: instagram has a plethora of great still graphics, branding concepts, ui/ux designs, etc.
dailywebdesign: this instagram account shares a lot of web designs for different concepts & ideas
kalypsodesigns: this instagram account shares lots of tips & advice in very easy to understand posts/collections
behance: this is a great place owned by adobe that features different projects from so many designers. what’s great about behance is that designers can list which softwares they’ve used in order to make their project and some may include a very detailed step-by-step on how the final project came to be (very insightful)
dribbble: another great platform to see professionally done projects, but opposed to being owned by adobe this is just a global community & a network of designers
RESOURCES — softwares:
once you’ve gotten your inspiration and that initial drive to work, now what? you’ll most likely have to have a software of preference to work on (either photoshop, illustrator, canva, or etc.) i know that adobe softwares aren’t ideal for everyone, but i’m aware that they do sell them for a discounted price if you’re a student and such and if necessary, crack the free trial file, but these are some links:
5 photoshop alternatives: a youtube video that shows 5 alternatives & walks you through the different softwares (i haven’t personally used any of these softwares except for pixlr)
adobe photoshop: a great photo editing software that can double for minimal animation (giffing)
adobe illustrator: a great software for illustrating (duh) and can be used for your foundation if you’re making vectors (vectors can be used & edited in photoshop, premiere pro, indesign, and xd) [*when starting fresh, learning illustrator first can be more beneficial since it’s easier to apply techniques & skills into photoshop, opposed to vice versa since illustrator can then seem pretty daunting to users more familiar with photoshop]
canva: a user friendly & beginner friendly tool/website if you want to start. they provide templates, stock images, vectors, fonts for non-designers & designers to simply drag-and-drop and create
download photoshop: this is a short reddit thread (march, 2019) that has a few ways on how to download ps for free (i know a few people personally that have cracked their photoshop and it still works!)
RESOURCES — fonts:
there’s a whole lot of places that has neat fonts and here’s a few of them:
dafont: this has a huge collection of custom fonts that you can easily download & use, really easy filtering system so that you can find what kind of font you want to use
google fonts: another huge collection of custom & free licensing fonts
whatfont: this is a chrome extension that shows you what font a page is using, that way you don’t have to read through the page source lol
font squirrel: yet another library of high-quality free licensing fonts
1001 fonts: similar in interface as the last one listed; free fonts that can used for commercial use
fontspace: lots of unique fonts and has a neat “random” tab that’ll send you to a random font
RESOURCES — colour palettes:
i’ve gotten lots of comments & compliments for the colour palettes that i use and here’s a few of the places that i get them from:
color hunt: lots of trendy, curated palettes with a really neat filtering system (sort through their popular colours, seasons, tones, and from new to popular palettes)
coolors: is an app & website that quickly generates a new palette every time you refresh it, you can also lock a colour down as you generate a new one if you want to keep that shade. you can also link it to your adobe softwares so that it’s easier to access your palettes
mr.pugo: an instagram account that features really pretty palettes; swatches, gradients, different shades, etc.
colourlovers: a community of people that submit palettes, patterns, colours
palettab: a chrome extension to help you discover colour schemes
colours.cafe: another instagram account that shares various palettes with the hex, rgb, hsl, cmyk, and pantone codes
Author’s Note:
editing, making graphics, creating — whatever you’re doing, it’s a really challenging task, but don’t beat yourself up if you find yourself stumped & can’t achieve what you had envisioned. if you find yourself lacking the knowledge in order to do something, take the time to watch or read a tutorial on how to do it, you may apply those skills in the future on another project. there’s no such thing as a “bad edit” or “bad project”, they’re just stepping stones in order for you to brush up on your skills. practice makes perfect, and while there’s also no such thing as a “perfect” project, the more you practice & work, the easier you’ll find editing.
every designer has their own style and that’s the hardest part of being a graphic designer. when starting out, you may heavily rely on someone else’s design, but please remember: there is a difference between being inspired by someone’s work and blatantly copying their entire work. after a while, you’ll be able to find what you’re comfortable doing and be able to craft your own style: minimalistic, branding, web design, 3d, illustrations, ux/ui, bold, soft, harsh, pastel, etc.
the only limit is your imagination & your screen is your canvas.
please let me know if there’s anything that i’ve missed & feel free to reach out if you have any questions! it doesn’t have to be me, i know that many content creators are more than willing to answer questions about their art.
good luck and feel free to tag me so that i can see your works! 💖
216 notes
·
View notes
Photo

9k FOLLOWERS CELEBRATION: GIF TUTORIAL by winston-wilson
In this tutorial, I’ll try to show you the basics of making a gif. Of course, there are many ways for this joyful and absolutely not stressful part-time hobby slash addiction, but this is how I’ve been doing it for a couple of months now, and it’s worked out pretty well so far. I’ve learned a couple of tricks, created my own shortcuts, and at this point it’s just something that comes naturally.
I use Photoshop CS5 Portable (you can get it here)
for taking caps, I’m using KMPLayer (get the 4.2.2.22 verison, the .23 one is screwed up - you can get it here)
please, like / reblog if you find this useful
feel free to hit me up with any questions.


1. Don’t beat your laptop with a baseball bat. Yet. Use your chair.
1.1. Videos/clips/movies.
I explained that part in this tutorial. What I want to add is that if you want the highest quality of a trailer, get QuickTime, wait a day or two after it comes out, and get the trailer here.
Find a trailer you’re interested in, play it, choose the highest quality option, press ctrl+shift+i, and you’ll get this:

Click anywhere on that html codes and press ctrl+f. This will show up:
Put that brandy away. Search for ‘source’, find this:
Clink on the blue link using the right-click of your mouse, choose open in new tab, and a download window should show up.
Save the video where you want to.
You can use videos from YT or movies you have on your computer or get those movies. Those movies also should be in the best quality possible. I suggest the ones with quality of 1080p and bit rate at least 6 Mb/s for best gifs.
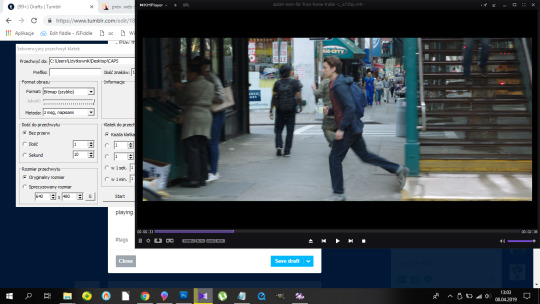
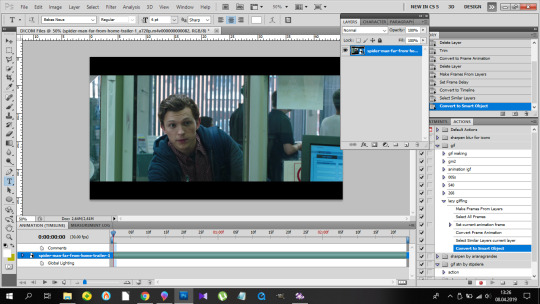
In this tutorial I’ll be using the trailer of Spider-Man: Far From Home. Because all my movies are on another disk and I, uh...
2. KMPlayer + taking caps.
Before you open a video and take caps, I suggest you create a folder that’s easy to find and use on your desktop. I have one called ‘CAPS’.
- Open your video in KMPlayer. Pause it because this version of KMPlayer stinks and you have to pause the clip in order to start taking caps. So pause it and press ctrl+g. When the caps window shows up, set it to those (red) options and choose your folder (yellow) where your caps will be stored. You have to choose that one thing every time you open that window. [Sorry for the language, but it doesn’t matter. Just choose them settings.)
- Play the video & make sure your caps window is somewhere on the side like this:
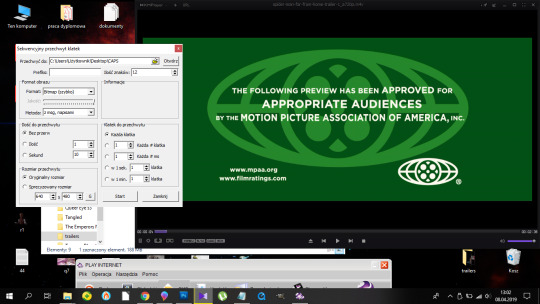
Find the part that you want to gif. You can pause before it, press start on the caps window and then play the video or just start taking caps while the video is playing. I’ll do it using the first way.
pause:
click ‘start’ on the caps:
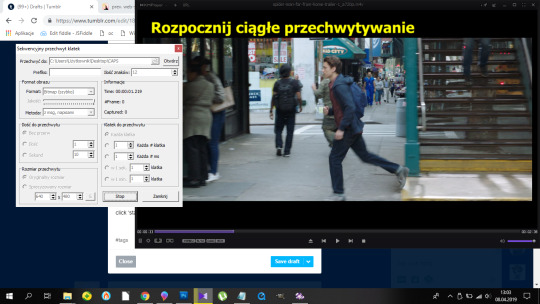
and then play the video until I get the caps I want and click stop on the caps window first, the video second.
Close that thing if you have what you want.
- Open your CAPS folder.
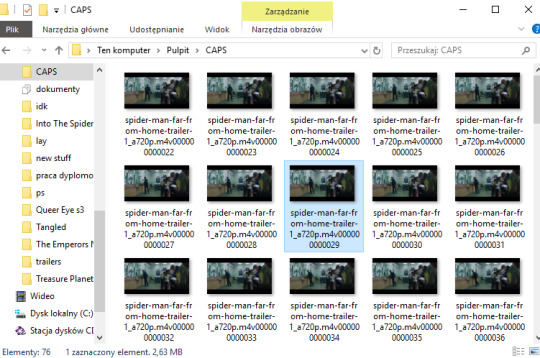
Get rid off the caps you don’t need. They’re trash and should be treated as such.
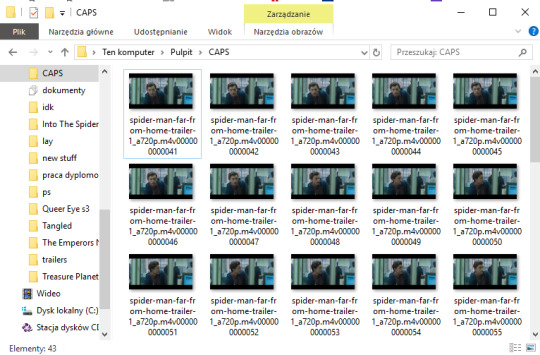
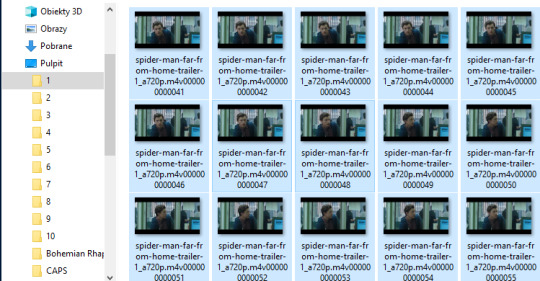
If you’re giffing more than one scene, you can sort them caps to folders. I have 10 folders named from 1 to 10 where I sort mine. And because for now I’m making just one, I’ll move those caps to folder ‘1′ on my desktop.
Time to make a gif. You good out there? If the answer is no, take Vicodin. No worries, when you’re done learning the basics, you’ll make gifs with Britney Spears playing in the background. Now shhh, focus.
3. Photoshop, aka that scary part.
- When you install it, you’ll get a folder, and in that folder there’s the app.
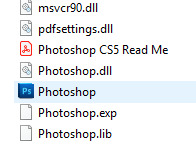
- Open that thing (and maybe copy on your desktop).
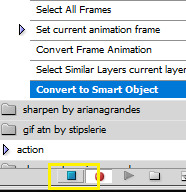
What you need is the layers window, the actions window, the adjustments window, the characters window, the animation window, the paragraph window, the history window... It... It sounds horrifying, I know, but cool your pits. It’s just this:
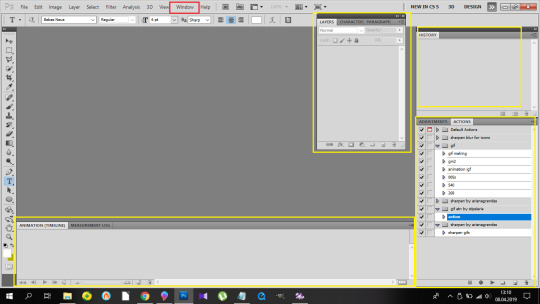
If you’re not laughing, take another Vicodin. Use this if those windows aren’t on display automatically:
And sort them. Now, I use my own keyboard shortcut for gifs. I suggest you do the same. Trust me, you don’t want to do this:
every time you make a gif. As you can see, I use alt+ctrl+p. You can set your shortcuts using the ‘Edit’ window at the bottom of which you’ll find the ‘Keyboard Shortcuts’ thingy. Then it’s a bit of digging but it all makes sense, ok? Ok. Yeah, no, it’s a lot of digging but I believe in you.
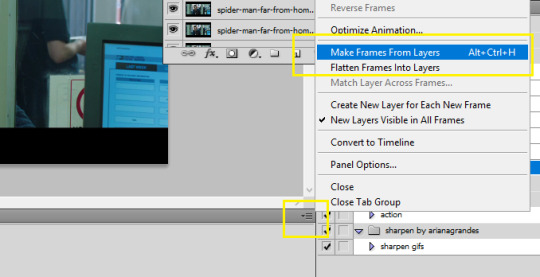
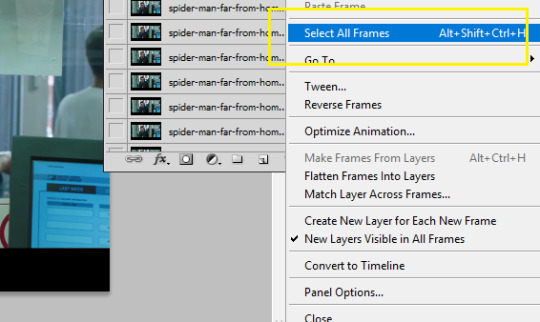
So you load them files, and this shows up:
so choose your folder where your caps are, and click OK. Ta-dah:

- This is the ‘make gif’ part. Click this:
so you can get this

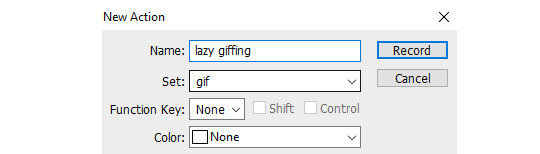
at the bottom. I have this whole process made into an action, and if you want it in an action too, at this point you should click this:
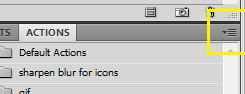
and choose ‘New Action’. Name it. Click record.
and now 1)
2) take Tylenol
2.1.)
3)

4)
5)
(you should be here now:)

6)
7) (right-click mouse)
8) stop the action recording here:
And this is how you should be looking right now:

Oops, not this. This:
Fine? Fine. Go smoke a cigarette.
You back? K.
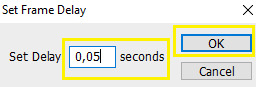
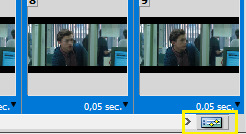
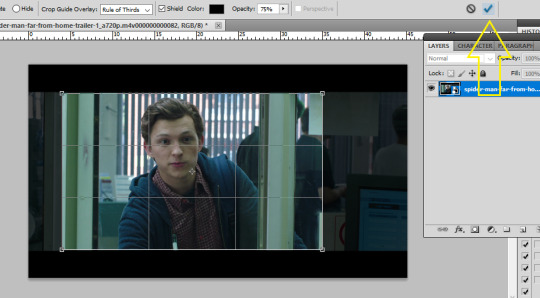
- Dimensions. Very important. Like, 10/10 important. Don’t cross the 3Mb size.
Fitting into the tungler dimensions means your gifs will be posted in the highest quality. This is a visual of those dimensions (depending on how many gifs per row):
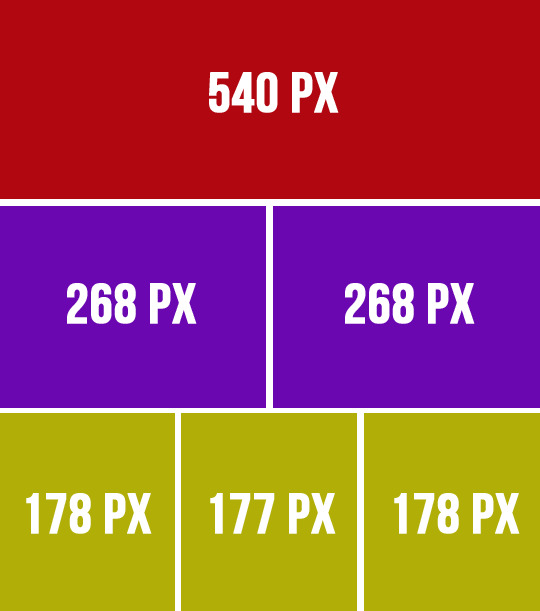
If you don’t do that, your gifs will look like blurred filmography of Zack Snyder’s.
I’m gonna make a 253px gif so it won’t stretch in that post. Gifs over I think 268px stretch on normal posts as in posts and look ugly.
So that brings us to the next steps.
- Cutting, resizing. Easy. Don’t panic.
choose that tool:

set your... this:
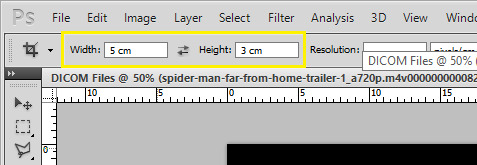
(make sure it’s ‘cm’, otherwise you’re screwed) and crop, baby, crop. I suggest the biggest area you can, of course without the black parts.
Also, depending on gifs, the dimensions can be different. For my 540px gifs I use 5x2 or 2x1 or 16x9. For my 268px gifs I use 11x7, 11x8, 5x3, 1x1. For the 177/8/7px ones, I usually use 3x5 or something. Just make it look nice. Not too thin, not too high.
Ok, so I’m cropping.
And now resizing. Crtl+alt+i.
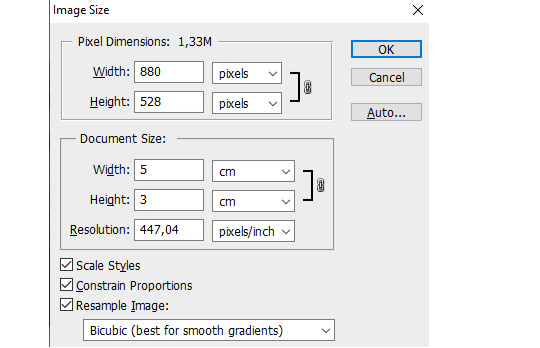
Make sure this thingy looks like that:

My width will be 253px, you make it 268, alright? Or something. Just don’t cross 540px. And put that beer away.
So I have this now:

Doesn’t look appealing, huh? Yeah.
Also click ctrl+’-’/’+’ to zoom in/out the gif.
- Sharpening.
Some people use actions, some do their own thing, I use an action. I’m lazy. And I don’t look forward to just... You know. Clicking a lot. So I use this action. Download it, make sure you like or rb that post, and upload the action using this:
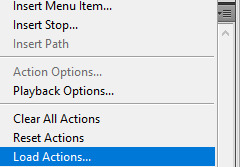
Find your action. Load. Choose it, click play.
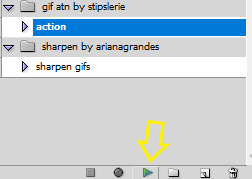
So this is how the gif looks without:

and with the sharpening:

Magic, I know. Okay, you can have that beer. Or no, don’t mix alcohol with pills.
- Coloring.
This is the fun part. That’s where vodka comes in. The part with 390248 times you get frustrated and your laptop is in danger because it can never know when it will join the doves behind your window in a short fly. Anyhoo.
Start from brightness. This is one little trick I learned. You can use these options:
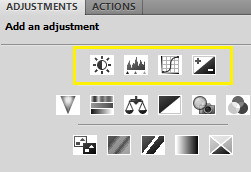
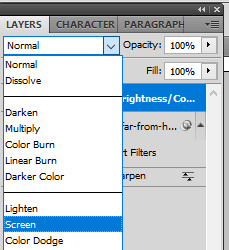
I start off with doing something else. I choose the first option, aka Brightness/Contrast, and when it appears on my layers window, I choose the ‘screen’ option.
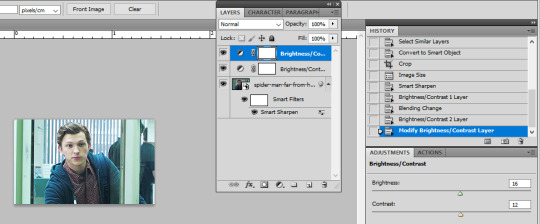
So I’ve gone from this

to this

It’s clean. It’s cute. Brightens the whole gif.
Of course, you can do it traditionally and/or adjust the opacity of that ‘screen’ layer. I think I’m gonna brighten it just a tiny bit more and add some contrast.
Now cooolors. I’ll make a standard gif, nothing crazy. You can go crazy if you want to, just don’t make someone’s skin orange. It just... doesn’t look good, kay?
Kay.
Those are my options:
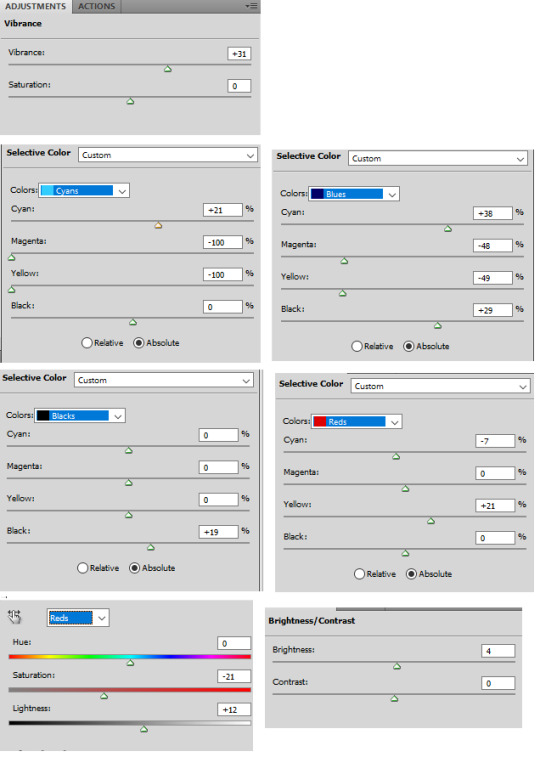
And this is the result:

Save your gif using this (once again you can see my shortcut)
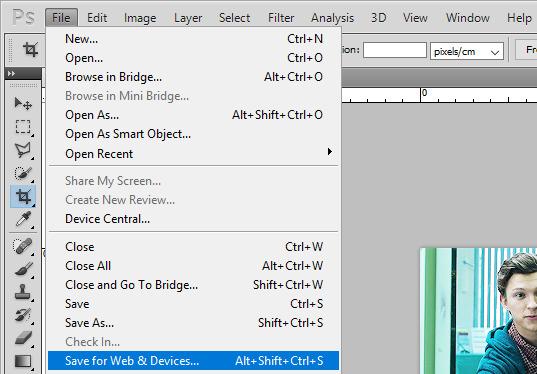
and your settings should look like this:
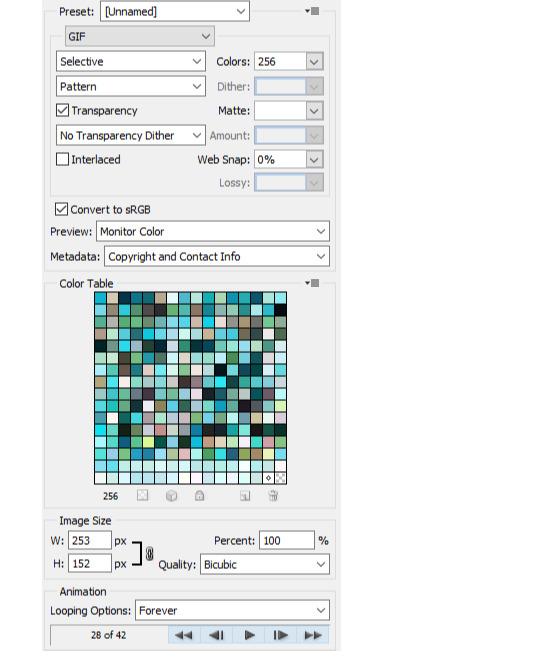
Click save, name the gif, save it wherever you want. And it’s done.
As a bonus we’ll go through...
4. Text on gif.
I use Arial Rounded MT Bold. You can use Calibri, it’s the one I used to use.
Choose this:
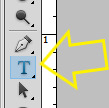
Click on the gif. Write your text. It looks like crap.
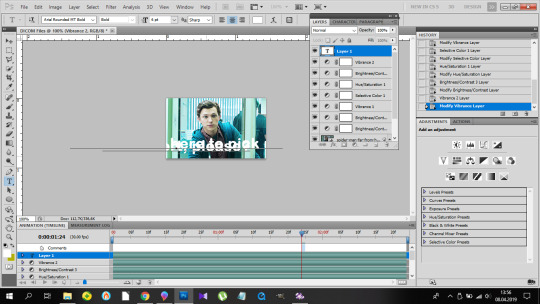
No worries. Choose the text (ctrl+a). Choose your character window. And manipulate until you get the result you’re happy with. Change the size of the font, the distance between letters and paragraphs (and choose the paragraph window to make the text centered).
My options:
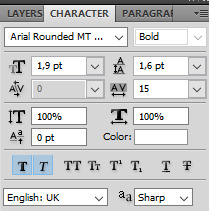
and result:

Doesn’t look nice, we want it nice and clean and all that jazz. So. Back to the layers window. Choose that text layer and find this button
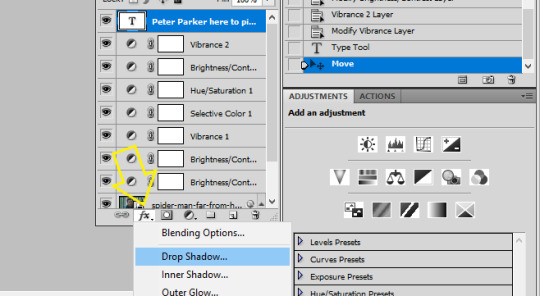
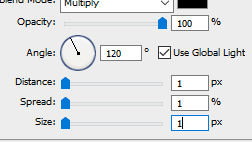
and choose drop shadow. When a window pops up, choose those settings (those are the ones I use:)
Then go to Stroke on your left and set it like this:
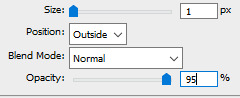
And click ok, and that’s the result:

Tips:
- create shortcuts. saves time,
- make gif actions. saves time,
- make sure you use the tumblr dimensions,
- don’t do orange faces, ok?
- when setting the text on your gif, you can do this little trick so it’s in the center:
x if my gif is 253x wide, the center is in 126,5, I make it 126px.
(make sure to write that ‘px’). click twice on your text layer, and this is the middle of that layer:
while moving that layer you should be able to see that tiny square and it’s the center of your text. Set it on the guide and you’re done. It’s centered.
- use these


to cut your gif.
- play with the opacity and layer settings. for example, if you use color selection or saturation, you can set the layer’s option to ‘color’ and have it 70% opacity.
- you can save the text layer only and reuse it by using ctrl+shit+s and saving it as psd

and then just open it again anytime with ctrl+o and duplicate it to the gif.
- have fun with it. don’t throw your laptop out of your balcony, they’re expensive.
If you have any questions or want me to make a different tutorial on coloring or something, don’t be scared, I don’t bite (for real, I have braces, biting hurts).
I hope I helped and making gifs doesn’t look like magic to you anymore.
#completeresources#fyeahps#userlance#userjessie#biafrnc#userariella#photoshop help#ps help#making gifs#gif tutorial
390 notes
·
View notes
Text
Coding Basics: A Do It Yourself Guide
Jumbled Links Tutorial
I’m late to this trend and I’m aware of other tutorials, but we all have our own coding styles and I wanted to share mine with you all, so here goes another basic tutorial by Jess.

To follow this tutorial you’re going to need beginner’s level theme coding or editing experience. using a base code by yourself or someone else who allows editing is recomended for ease of navigation through uncomplicated and simply labled coding.
For those unfamiliar with the term jumbling links is what Tumblr has been calling the look of having your links scattered around an aesthetic theme (typically contained themes) for a more artsy look that blends them into the graphics, something like these snowflakes, for example.

In the theme this was taken from the links are snowflakes but you can keep them as titles or numbers until we get to the styling portion of the tutorial. This styling can be used in a variety of ways to create unique and fun layouts.
Let’s get started!
Step #1
To achieve it you start with your css which is going to look something like this in any theme you’re working with:
#links {
width:250px;
position:fixed;
margin-left:900px;
margin-top:300px;
padding:8px;
}
#links a {
min-width:100px;
background: #546a88;
color: #eee;
border: none;
margin:4px;
font-size:12px
font: font-family: ‘Playfair Display’, serif;
text-align:center;
text-transform:uppercase;
padding-top:2px;
line-height:120%;
}
What we want to do is duplicate this css code so we have as many different links blocks to work with as you’re planning to have links and re-label as each as .link 1, .link 2 and .link 3. changing their title from # to . also changes what we’ll be doing in the div in a moment so keep this in mind.
You’ll want to arrange them like so:
.link 1 {
width:250px;
position:fixed;
margin-left:900px;
margin-top:300px;
padding:8px;
}
.link 1 a {
min-width:100px;
background: #546a88;
color: #eee;
border: none;
margin:4px;
font-size:12px
font: font-family: 'Playfair Display’, serif;
text-align:center;
text-transform:uppercase;
padding-top:2px;
line-height:120%;
}
.link 2 {
width:250px;
position:fixed;
margin-left:900px;
margin-top:300px;
padding:8px;
}
.link 2 a {
min-width:100px;
background: #546a88;
color: #eee;
border: none;
margin:4px;
font-size:12px
font: font-family: 'Playfair Display’, serif;
text-align:center;
text-transform:uppercase;
padding-top:2px;
line-height:120%;
}
.link 3 {
width:250px;
position:fixed;
margin-left:900px;
margin-top:300px;
padding:8px;
}
.link 3 a {
min-width:100px;
background: #546a88;
color: #eee;
border: none;
margin:4px;
font-size:12px
font: font-family: 'Playfair Display’, serif;
text-align:center;
text-transform:uppercase;
padding-top:2px;
line-height:120%;
}
Step #2
Now that our css is changed we need to adjust the divs in our html acordingly. Below {CustomCSS}</style></head><body> you’ll find a links section of html that looks something like this:
<div id=“links”>
<a href=“/”>title</a>
<a href=“/”>title</a>
<a href=“/”>title</a>
</div>
You’re going to make each of those links into their own div and change them from id=“link 1” into class=“link 1”, like this:
<div class=“link 1”>
<a title=“title” href=“/”>title</a>
</div>
<div class=“link 2”>
<a title=“title” href=“/”></a>
</div>
<div class=“link 3”>
<a title=“title” href=“/”></a>
</div>
Have more than three links? Just make as many div sections as you need per links.
It’s time to go back to our css for some customization but go ahead and update your preview and save your changes beforehand.
Step #3
This is the fun, easier part of our project. You’ll notice your links are stacked on top of each other, to fix this you need only adjust their left and top margins to place them on the theme where you feel they look best to you. Lke with any css you’re able to change the fonts, colors, sizes, etc to fit your preferences. You can keep them as numbers/titles or replace your link title with an image by inserting <img src=“imageurl”> in it’s place in the html for a more artistic look that can blend into the background artwork.
Sidenote: Make sure to replace the quotations where applicable or some parts may not work properly if you’ve used copy-paste from my coding examples.
As always if you have any questions or notice an error while following this tutorial you’re welcome to message me and I’ll do my best to help you. If you learned something new here and want to see more please give this post a like and a reblog so I know people want to see more tutorials from me.
#coding tutorial#theme tutorial#coding resources#theme resources#coding things#my tutorials#end the gatekeeping 2k20
6 notes
·
View notes
Text
phpstorm 2018 1.6 crack
Though Google ranks websites according to in excess of 200 different factors, offer recently announced that page speed turn out to be a a part of those ideas. They do state that page speed will not carry tons of weight in the rankings. However, it's still important to listen to Google and follow along.
Replace PHP with HTML where imaginable. This one is the easiest way cut down your HTTP requests. jetbrains phpstorm crack thing us possess a top navigation bar it doesn't change so much. Instead of using the PhpStorm that tells WordPress to list the pages, simply list the pages in Html document. Also, in your h2 tags.php file you will find that your links to look sheet, rss feeds, and whatever else use the fishing line of phpstorm that consists of your blog URL. Replace these lines of PhpStorm with your actual blog URL. Applies to for your footer.php file as better.
However, what happens if you run across issues which usually are beyond your scope of knowledge. When you do there can be a well attended User Support forum that is moderated actively.
These are what make use of to handle a regarding styling predicaments. Usually you'll have one main style sheet that sits within root folder of your website. jetbrains phpstorm full crack controls many aspects of your design with regard to font size, colors, positioning, background images, margins, padding, and much more.
The fastest way drive an automobile traffic for your site is wireless pay per click (PPC) advertising. Both Google and Yahoo offer programs that enables you to pay a certain amount each time someone clicks an advertisement they show on their search returns. PPC campaigns can drive traffic because the paying money to have your ad shown more than a first page of outcomes for specific keyword is searching. The downside is that Ad-words can get pretty expensive, especially if you do not do an efficient job of tracking dividends.
One more thing before we start: ALWAYS Make a BACKUP! Copy the code you are about to edit into notepad as well before setting up. I also don't recommend playing around with PHP unless you're sure of your work. You could break your WordPress installation. Word of mouth how to look for your FTP server, Furthermore recommend creating a backup of one's WordPress installation directly, just in case.
So why keep paying jetbrains phpstorm free license per little tiny simple website or much more for a complex website? Test pay the tiny price tag for residence PHP tutorial, spend a Saturday learning it, start off making cash with your own PHP website's projects. Really can get it done.
1 note
·
View note
Text
Design your own blog
Blogging: how to start a blog, I added another layer and then used the link tool. It's also advisable to play around with the font to determine which one suits your personality. I used AvantGarde BK BT here. I changed the font color and used the same styling effects that I often tried for light bulb. Simply right click the light bulb layer then "Copy Layer Style" then right pick your text and "Paste Layer Style". Don't forget to preserve!
Submit your website to online directories - submit goal to free SEO friendly website directories for quick way to start building one-way links to your web page.
Hand tools you’ll realize that having both a hand shovel also hoe often makes it simpler for you to achieve gardening nirvana. When how to find handy items such these, closely scrutinize the strength of the tool exactly where metal meets the do something about. Many cheaply-made gardening hand tools fall apart within the original hour of serious gardening.
Ah, but what if you do bring something unique into the table as an affiliate. Visualize you might bring in regarding visitors from feed sites and so on. What if you own Rotten Tomatoes and want to list movies from The Amazon website? Well, you don't want to link up with the affiliate network program. Instead, you want to contact the site in question and hammer out a distinct agreement that applies only to you. This agreement is regarded as a strategic alliance agreement could be officially used on a case-by-case basis.
And, we are not even referring to a person here! We're talking with regards to a WordPress manager software may easily be avoided make life simpler by furthermore creating associated with domains for you in only click; and also even aid you organize numerous one convenient location!
Don't rather than "sell" anything, but just let people know you've something fulfill their standards. If they don't yet realize have got that particular need, then give these folks the information to allow them to understand their need. Community wanted to buy, they'd go to at least of at this point online retailers and research it. But someone wants information, they will search the web and that they happen locate you, supply the customer what they expect. Search engines love content and techniques your leads! Fresh content will keep your visitors coming back to your website at their very own will and you will definitely naturally get higher results at search engines. As the saying goes," Content articles are king" as well as your ally how to create a blog wordpress guide for beginners when discussing traffic generating.
Map your calendar into the content. Because you created themes for each month during your marketing plan development, now you can start plugging in content through message method. What features or benefits are better to market inside summer, spring or fall? You will begin to have something to speak about and inspire prospects!! This is goodness friends!
Many consumers are beginning create blogs utilize a service which doesn't have numerous for choices. They simply give you to create the options which enable you to truly customize website. You can break through absence of options by finding and installing some blogging software off the web. You will have the opportunity to of the software to customize your blog, adding whatever you are looking. You will have a way to produce decisions on what your site looks. You are control internet site however such as. When you are done you may have a unique and hopefully very stylish looking blogs. You will be placement update it with ease using blogging software.
Tags: how to create a blog, start a blog
Setup Free blog: free blog setup, Download and open the Kubrick header (kubrickheader.jpg). Note the proportions of the graphic- 760px wide by 200px high. It's very important support the dimensions exactly tennis shoes when changing the graphics but not messing together with stylesheet or the HTML. Add another amount. Save as "kubrickheader2.jpg" (in Photoshop use "Save for Web.")."Save" after each cycle.
Imagine ahead of time write regarding favorite series and post it regarding your blog simply get setup your wordpress blog for free individuals your webpages? It can be that easy and easy if you now what you are actually doing.
There is and its called Joomla and Holly Mann is keen on Joomla blog sites. In fact is actually so keen that she offers on edition of her book that I purchased and in her website in the time of writing this review, to install a CMS for you.
This is a simple script or laptop or computer. It extends the associated with WordPress than its developers aimed. It is usually installed at the plug-in manager in your WordPress dash. It can be done automatically or manually. You can choose from two kinds of WordPress plug-in - free and premium plug-in. With premium plug-in, code tweaks and cloning of your WordPress site can do.
Tags: free WordPress blog setup, setup free wordpress blog
Add Google Webmaster tools: how to add Google webmaster tools in WordPress, You programs have 2 different associated with sites atlases. One is an html page listing all of the pages on a website. This serves as the type of "table of contents" for your user. This becomes increasingly important while your website becomes more elaborate. Concerning type of site map is an xml site map. The xml sitemap is an coded site map which make it easier for the search engine spiders to index all of the pages of one's website. Pay a visit to Google webmaster for seo to join up your XML sitemap.
If in comparison to use online tools, then do a search inside your favorite search engine for "free sitemap generator". You might also visit is proven to work Tools section at Google for an inventory of scripts and software they refer.
Tags: add Google webmasters tools to blog, add Google webmaster in WordPress blog
Install wordpress manually in cpanel: How to install wordpress manually in cpanel, What happened if you have a hot DP to market and during the night 500 people have purchased your lotion? You will spend the full day manually sending 500 emails! Oh dear!
When you transfer your overall website to WordPress, home page of one's website will be replaced a person have how to install wp manually their root of your domain, therefore it is critical that you make sure to copy all the information had been on that home page, before installing the application, ready to put back after. Alternatively you can how in order to wp manually in a folder of your site, so avoiding problem.
What other Web a pair of.0 marketing strategies will help? Firstly, it is well worth creating a blog, it is possible to regularly post content - search engines love the continual updating and blogs get well ranked to that end. Install wordpress manually at Ning.org - if your hosting service offers 'Fantastico' that is a huge help. Or your might will want to hire a coder that can you, effortlessly.
Utilize PPC (pay-per-click) to get started. You won't develop a massive income off from the right away, but absolutely easily make 5-10 bucks a day in given it. That may not sound like a lot. it can be enough with regard to meal just about or airfare after a month, along with the number only gets bigger as your website grows in readership.
Tags: how to install WordPress manually beginners guide, setup wordpress blog manually in cpanel
Install wordpress plugins : How to Install WordPress plugins, Your blog postings can be easily shared on LinkedIn, Facebook, Twitter any other social newspapers. This gives you a potentially greater audience without in order to do any further work.
Once I complete one project, I immediately ask myself "What's next?". Standing still will kill or else you business. Just like a shark, you need to keep moving to stay alive. Our brains are always searching for one more accomplishment, the other challenge.
Tags: Install Wordpress plugins step by step guide, Install Wordpress plugins tutorial for beginners
Install wordpress themes: How to install Wordpress themes, Now the focus with if you are was demonstrating how any WordPress theme will help out with sales and opt ins. We should get directly into how these regarding today are completing the opening.
So see the "upload" area and mouse click on Head to. Now search through your hard drive to an individual have your images, select one you want, and then click upload.
You will obtain a specific quantity of flexibility in customizing a how to install wp themes to extremely needs. This relies on the particular theme you are using. For a lot of of the free themes, you should to stuck to the basic default height, widths and colors etc. Using the premium themes a person more electricity to do as you like.
Once you've found a subject matter you like simply click on the "Install" link and the theme often be installed with your site. You are activate the theme truly live using the net. Easy, right?
Tags: Install wordpress themes step by step, how to install WordPress themes for beginners
Best Website Hosting: Website hosting, Always end your answer with "Thanks for writing in. Please contact us if may help you further." Couch an unforgettable first impression on the client.
Disk space refers to your amount of space you're renting on a server and bandwidth pertains to the volume of data managing is that may move out onto the online market place in specific time. My suggestion is a hosting account which offers unlimited numbers of both with your hosting checking account. It's a common benefit that is not totally necessary but offers piece of mind. To acquire a newer website you probably will not using high of either however, with unlimited bandwidth and disc space, you just won't need to worry about any surprise overage charges.
Tags: best wordpress website hosting companies, top website hosting companies
Wordpress: What is WordPress, Here there are several choices in accordance with where your music is. The tab that will open tend to be upload from computer. Click browse and find your audio file on your laptop. Upload it then, put in a title and click insert. When the music or audio file is already online click, From Web. You will need the web address also called URL in the audio and you then can gave it a championship. If you have already uploaded it to your site then Media Library just what you be needing. Click that and insert it. If you click insert it include it in the blog weblog.
When you launch a blog, you may get only many times hits a month, then after a long time there the many multitudes of find a month. Google highly respects blogs since offer unique contest more often. Start your blog and talk about whatever you sell. Individuals will actually begin reading it. It's free and it's easy. Click on the WordPress platform to build website and fill the blanks.
Tags: learn wordpress, wordpress tutorials
Setup Wordpress SEO: how to setup wordpress SEO, Previous a person can upload your website clone several new domain you actually initial of develop a database on your new web-site. In this stage you may use the MySQL Database work in your new domain page host's cpanel, to come up with a database together with database web surfer. As soon a person have designed the database and person, you allows the consumer full entry privileges to the database, the total amount is needed by the Setup wordpress SEO up (i.e. WordPress demands to entry the database by logging on being a database user).
To do on-page SEO you want some light technical ability. The reason is that you need to actually make modifications to you html computer code. Here is a list of changes you is capable of doing to help improve your site ranking.
Tags: WordPress SEO setup, SEO for WordPress blog
Best Wordpress plugins: Wordpress plugins, It furthermore useful commence examining your 'bounces'. Fat reduction visitors which left your own website without going to a second search page. Be on the look out for occasions when the bounce rate arises. It could be a specific search term which you are getting traffic for that is irrelevant, which probably does not matter. But dig deeper into telephone and seeing uncover specifics about visitors' browsers and browser settings, when they've JavaScript enabled, the resolution of their screen and other detailed stats.
Optimization: An overview of SEO also impact the Talk. You are necessary to add keywords to titles and insert relevant Meta tags and optimize links and images. You also make your URLs SEO friendly. Strategies several essential wordpress plugins to start a blog for optimizing your blog, which can increase blog traffic.
Tags: Best wordpress plugins for small business website, most important wordpress plugins for beginners, get more info
2 notes
·
View notes
Text
Web Design & Hosting Bonus Package
Web Design & Hosting Bonus Package
Learn more here: http://mattmartin.club/index.php/2018/05/26/web-design-hosting-bonus-package/
Welcome To MattMartin.Club!
Includes Many Bonuses About Affiliate Marketing & eCommerce & It’s Yours!
Scroll down & Check it now! [We Always Keep Updating Bonus Pages]
ALL is Yours
NEWEST PRODUCTS
4 SIMPLE STEPS TO CLAIM YOUR BONUS PACKAGE
1. Clear Your Cookies in your Web Browser (Ctrl + Shift + Delete)
2. Purchase Products Through My Email/Website
3. Contact Me Here with the receipt of your purchase
4. ALL Bonuses in General Internet Marketing Bonuses Package is Yours & You will receive them within 12-48 hours.
I Will Always Update New Bonus
Now, Check your bonus below!
BONUS #1: Premium Domain Buying And Selling Secrets
64 pages step by step guide book to make $10, $100, $200 daily.
How I sold a premium domain for $2000 & made $600 as profit just in 45 days.
Taught this method to many newbies and got amazing results.
BONUS #2: Domains To Cash
While all of the sales shown above generated amazing profits, there will ALWAYS be many, in fact most of the domains I register that never get sold. Shocked? Don’t be. REMEMBER: Each domain name registration is only $1 to $10. If I sell just ONE domain out of every 10 I register, the cost is a drop in the bucket.
The cost of registering 10 domain names will be between $10 and $100. By selling just one of those domains for $500, the profit is a very nice $400 minimum. Where else can you FAIL 90% of the time and still see outrageous profits?! That’s why I love the domain flipping business so much and have been passionate about it for 12+ years.
BONUS #3: Niche Site Project
The NSP Video Course provides the exact blueprint to follow for a successful Amazon Associate niche site. Imagine what it would be like to wake up each morning and see the new sales you made overnight without giving it a second thought.
BONUS #4: Make Money as a WebHosting Reseller.
Do you want to make money on the internet promoting web services for another company? Have you recently joined a web hosting or domain reseller program but aren’t sure what to do next? Have you already started your business but aren’t sure how to get more visitors? If you answered yes to any of these questions, you’re in the right place!
BONUS #5: 101 WordPress Tips and Strategies
If you want a WordPress blog that helps you really connect with your readers on a personal level… and makes money in the process… then my new 101 WordPress Tips report will show you how. A blog is the best way to express your ideas and attract people to your product or service. The search engines love WordPress and will reward you with fantastic rankings if you optimize it correctly.
In addition to being by far the best blogging platform for the search engines, it’s the best for end users too because, once you learn the ropes, it’s easy to use and maintain.
A blog that looks professional with the right content in the right niche means you’ll be perceived as an expert very quickly and can quickly start making cash online. Imagine getting up in morning and posting content on your blog that fans eagerly read every day. You’ve built up enough trust with them that they click on your ads and/or buy the products you recommend.
BONUS #6: WordPress Success Simplified
What Will I Learn?
Boost your ROI by making optimal use of technology
Get a deep insight into the best practices for making offline profits
Develop an excellent understanding of Niche site research and design
Use time-tested freelance techniques to showcase your expertise
Make the best use of WordPress and become a success story
Get best results in a cost effective manner
BONUS #7: Business Growth System 2.0
What I’m about to share with you in my program are the strategies I’ve accumulated to help build my own multi-million dollar businesses as well as help others do the same. These are the exact strategies you always wished someone would reveal to you but no one ever did.
BONUS #8: Plugin Blueprint
This no-fluff, to-the-point, detailed blueprint reveals…
3 places to get inspiration for your plugin and how to make sure that your idea will be profitable
Why a simple plugin that solves ONE problem is much easier to create and sell than a plugin that’s too complicated
The easiest method for designing your plugin and creating the project description (I even give you my copy-and-paste template)
4 ways to position your plugin differently and destroy your competition
A little-known website where you can license plugins for under $50 (hint: it’s not the Warrior Forum)
Where to find free software you can use to design your plugin’s interface (I even show you an example)
4 questions you need to ask in your project description to weed out the programmers you don’t want
How to post your project and make sure it gets approved (follow these steps to avoid rejection)
5 things to consider before you accept a worker’s bid
How to create milestones to keep your worker motivated
Why you should always beta test your plugin before releasing the final payment
Where to outsource your plugin’s video tutorials for under $50
My 7-step sales copy formula specifically designed to sell plugins
The hidden profit multiplier that’s easy to implement
BONUS #9: WP Scarcity Builder
ScarcityBuilder was designed to add urgency to any page on your WordPress sites. Use on Sales Pages, Affiliate Promotion Pages, Squeeze Pages, One-Time Offer (OTO) Pages, Pre-Launch Pages, the list goes on…
Creating time sensitivity into your sales material changes how the visitor approaches your site. They now realize that there is NO coming back, NO “I’ll take a look when I have more time”, NO bookmarking to check out later or to forget the next day.
BONUS #10: WordPress Site Building Simplified
With WordPress Site Building Simplified Video Series, you can:
Quickly and easily create any kind of site you want
Manage and update your site without fiddling with complicated codes
Increase visibility and be accessible 24/7 for your customers
Generate high-quality leads and convert them into loyal customers
Reach widely scattered audience through mobile, tablet, desk top or laptop
BONUS #11: Create Your Own Lifestyle Business
Here’s just a fraction of what we’re going to cover…
WHY you should start your OWN lifestyle business in the first place
The FOUR key elements to success online
How to spot COSTLY mistakes (avoid these like the PLAGUE!)
How to start on a BUDGET without cutting corners
Why it’s perfectly ok NOT to be a tech genius
BONUS #12: How I Made 1,000,000 Reselling Software
So Luther Landor’s new product How I Made 1,000,000 Reselling Software has just been released and after going through this huge PDF training I have to say that this will be THE game changer for a lot of people, myself included!
As always Luther has a sales page for How I Made $1,000,000 Reselling Software that is not some blind sales copy that you have no idea what you will be buying but instead he has explained the exact method of what you will be doing in this course…now the thing is after reading the sales page of How I Made $1,000,000 Reselling Software I thought what a great idea I am going to try that but trust me when you actually open this packed eBook you will see that without the actual product you would have no idea where to start or how to do this.
BONUS #13: Blogging For Dummies, 6th Edition
Best of all, you’ll discover how you can make real money from your passion and become a professional blogger.
Choose a blogging topic and platform
Use your blog to build your personal brand
Monetize your blog through advertising and sponsorships
Create content that easily integrates with social media
Blogging is a great way to express yourself, build and audience, and test out your ideas, and Blogging For Dummies will help you jump in with both feet!
BONUS #14: All Themes & Plugins From Mythemshop (Official)
24×7 Helpful Support
Something not working the way you want it to? No problem. Our 24×7 support is always there to ensure 100% satisfaction.
Fully Responsive Designs
In 2015, mobile will dominate the web, and with a MyThemeShop theme, you can be assured that your website will provide a great user experience on any device.
Make Your Site Load Fast
Amazon CEO Jeff Bezos says it perfectly – Nobody wants to look back and wish they had spent more time waiting for a website to load.
Narrated Video Tutorials
Are you unsure how something works with your theme? No problem, we have you covered with our narrated video tutorials.
BONUS #15: WP Rocket Plugin (Official – $199)
Page Caching
Caching creates an ultra-fast load time, essential for improving Search Engine Optimization and increasing conversions. When you turn on WP Rocket, page caching is immediately activated.
Cache Preloading
Because our crawler simulates a visit to preload the cache, the indexing of your website by search engines is instantly improved.
Images on Request
Images are loaded only as your visitor scrolls down the page, improving the load time of the page. YouTube, Facebook, Yahoo and other major websites are using this technique. Now yours can too.
Static Files Compression
WP Rocket reduces the weight of your HTML, JavaScript and CSS files through minification. Lighter files means faster load time!
Developer friendly
WP Rocket’s code is developed according to WordPress best practices. It is clean, commented and has loads of hooks so developers can easily make advanced customizations.
BONUS #16: All WordPress & HTML Themes from TeslaThemes (Official – $199)
Join now one of the most powerful and satisfied WP theme club in the world with over 25273+ happy TeslaThemes’ members!
BONUS #17: All themes from Theme Junkie (Official)
Start with one of our most latest WordPress themes, or browse our full theme collection. Whether you’re a business, creative professional, writer, freelancer, or someone wanting your own online presence, we’re here to help you make it amazing! All our themes come with support from our professional team, so you’ll have someone to help you get started, every step of the way.
BONUS #18: All Themes & Plugins From Elegant Themes (Official)
Our Visual Drag & Drop WordPress Themes Are Changing The Game
Download 87 beautiful WordPress Themes for the price of one, including Divi, the ultimate theme and visual page builder. Take Divi for a free test drive today.
Build And Promote Your Websites With Our Suite Of Premium WordPress Plugins
Harness the power of the Elegant Themes plugin suite, including Bloom and Monarch, the best tools for gathering leads and building your social following online.
BONUS #19: KingSumo Giveaways (Offcial – 594$)
Giveaways have been the #1 cost-effective method we’ve used to grow AppSumo to 700,000 email subscribers. We figured it was time to give you the technology we’ve spent 1 year perfecting.
BONUS #20: ULTIMATE SALES PAGE WP PLUGIN
Use Built-In Flash Graphic Creators to Create Custom Graphics & To Build Professional Sales Pages Instantly With Ease In WordPress!
BONUS #21: WP POP BOX PLUGIN
Short Description: Create easy customizable video popup,social popup,local pop for local business in a minute
BONUS #22: WP SOCIAL LOCKER PLUGIN
Short Description: Unleash The Power Of Viral Traffic To Your Blog And Watch In Amazement How With One Single ‘WP Hack’ You Can Drive Hordes Of Traffic – Quickly And Easily.
BONUS #23: AMAZON S3 VIDEO WP PLUGIN
Short Description: This ‘Point & Click’ WP Plugin Makes it Super Fast and Easy to Get Your Videos to Show Up On Your Blog Pages & Posts!
BONUS #24: COMMENT PROMO WP PLUGIN
Short Description: Capture Your Readers’ Attention And Guide Them Into Your Sales Funnel By Making Use Of The Most Ignored And Overlooked Real Estate On Your Blog.
BONUS #25: WP EZ Launcher
Short Description: If you are a niche marketer, affiliate marketer or online entreprenuer that have lots of wordpress websites to launch on, having a tool that will automate the launching process would be a huge help to save more time.
BONUS #26: WP Login PRO
Short Description: WordPress is HOT and more and more designers and marketers are providing their offline clients or building membership websites with WordPress, but with more on the rise …This super simple to use wordpress plugin enables anyone to change their generic wordpress login pages to look like it’s built on an expensive professional CMS solution….even if you’re just trying out WordPress for the first time!
BONUS #27: WP Checkout Maximizer
Short Description: WP Checkout Maximizer is the definitive WP plugin that will help you by increasing your conversion sales, enhance your buyer’s experience and also to drive social viral traffic to your blogs.
BONUS #28: WP Email Countdown
Short Description: A Powerful And Crazy Profitable WordPress Plugin That Allows You To Inject Scarcity In Your Emails With Effective Countdown Timers That Will Make People Do Your Bidding And Generate RESULTS For You.
BONUS #29: WP iAsk
Short Description: Instantly Create Surveys That Will Give You Important Information About Your Visitors!
Effortlessly Create Insightful And Engaging Surveys, Gather Critical Data Such As Statistics And Answers From Your Visitors…All In One Place.
Brand New, Powerful WordPress Plugin Now Allows You To Get Insight As To What Your Visitors Are Thinking, So That You Can Make Better And More Informed Decisions…For MORE Profits.
BONUS #30: Video Affiliate Pro WP Plugin
BONUS #31: WP Timeline Plugin
BONUS #32: WP Easy Optin Pro Plugin
BONUS #33: Scarcity Demon
BONUS #34: FB Webinar WP Plugin
BONUS #35: WP Call Directory Plugin
BONUS #36: Spark Engine WP Plugin
BONUS #37: FB Tube WP Plugin
BONUS #38: Optin Fire WP Plugin
BONUS #39: Easy Builder WP Plugin
BONUS #40: WP Video Optin Plugin
BONUS #41: Internet Marketing Plugin
BONUS #42: Three WordPress Themes
Since your users are actively posting content to their blog, why not give them a PROVEN theme to use? We’ve taken inspiration from three top viral sites – Viral Nova, Upworthy, and IFL Science and built a theme that’s easy to use and is already battle tested by millions of users every month.
BONUS #43: Package Of 18 Plugins (Worth 697)
BONUS #44: WP Local Business Plugin
Description: An easy to use system that creates social-powered business landing pages in seconds. This system is designed for anyone who wants to get a full business landing page site up and running in minutes without installing a big bulky cms, or doing any hardcore techie stuff.
BONUS #45: WP Sell Anywhere Plugin
Description: With this simple plugin you can create a PayPal button and alternative payment button for those countries where Paypal is not accepted so you don’t miss any sales! You can add unlimited products to any WP post or WP page.
BONUS #46: WP Cash-O-Matic Plugin
Description: A WP plugin that allows you to create product pages or affiliate offer pages. Be it affiliate marketing, product creation, everyday blogging, website owning or webmastering, the product can increase your profits and streamline your product page creation.
BONUS #47: WP Protector
Description: This simple and high utility plugin that acts as a Web Application Firewall, detecting and preventing against vulnerability exploits, unethical intrusions and additionally strengthens your WordPress installation so your WP site remains guarded against security hazards.
BONUS #48: MemberPal WP Membership Plugin
Description: Create Fully Protected Membership Websites with Paypal Verified Members that only lets verified PayPal customers access your content.
BONUS #49: Back Control WordPress Plugin
Description: Helps you maximize your marketing efforts by redirecting your visitors to any url, when they click the ‘Back’ button to return to the previous url and there you can recapture / monetize your lost traffic.
BONUS #50: WP Swift Page Plugin
Web page loading time is the most crucial factor to reduce bounce rate. Keeping this in mind, here’s an exciting plugin that provide an easy way to instantly increase the speed of WordPress site while drastically reducing bounce rate and makes visitors to stay longer.
It is an easy to use plugin that boosts your WP site and make it load lightning fast. When combined with immense power of VidMozo, this package becomes a WIN-WIN situation for business owners.
BONUS #51: Marketing Minisite Template V2015
Website designing plays a huge role in increasing sales and if you are not familiar with designing, that it can cost you big. Keeping this in mind, this booster provides easy to customize Minisite templates to resolve your designing problem. You can easily setup websites and landing pages for your clients and you can use it too for promoting your own products.
BONUS #52: WP EZ Launcher
This amazing WordPress plugin helps to quickly set up your WordPress blog and get it up and running in less than 30 seconds. This allows you to easily Install and activate plugin all at once, add new themes, delete unwanted sidebar widgets, etc.
BONUS #53: WP Notification Plus
This WP plugin would help you grab attention of your visitors and make them check messages by notifying them. This WordPress plugin easily allows you to create your own attention-grabbing notification box in less than 3 minutes. Stop thinking and get into active mode to surpass your competitors forever.
BONUS #54: WP Page Takeover
To intensify its benefits, here’s an incredibly useful and profitable WP Plugin you can create an entire Promo Page or even promo widgets to any normal WP page or post.
Now, with just a few clicks you will be able to hijack your visitor’s attention, and create awareness of your products & affiliate offers.
BONUS #55: Premium Wallpaper Site WordPress themes.
Instantly create Wallpaper sites for any niche. Get your wallpaper sites setup in minutes and start profiting from any niche. Easily monetise them with adsense widgets. All themes come with full tutorial showing you how to use them
BONUS #56: WP Left Behind
Using this plugin for Dual Launches Brings You More Sales. Use two platforms like Jvzoo and WarriorPlus for your product launch and use this plugin to direct traffic to the right pages and order buttons.
BONUS #57: WP IM marketing Graphics
No more will you have to pay huge money to buy graphics for your marketing. This plugin lets you instantly Add marketing graphics to any WordPress page or post.
BONUS #58: WP Sales Robot
Can you double or even triple your income from the same traffic? Yes now you can. This plugin will dramatically Increase Your Sales Conversions on any sales page created using WordPress.
BONUS #59: WP Checkout Maximizer
A huge percentage of people add products to their carts but never checkout, its a big problem in ecommerce and this Plugin Will Help You To Dramatically Increase Your Sales Checkouts using its technology.
BONUS #60: WP Feedback Pro
Getting the right feedback from your customers can take your product or website to new heights. This plugin lets you capture effectively the right Feedback from your customers that will become the key your success!
BONUS #61: WP Review Me
People buy based on friendly recommendations, thats why its extremely important to have reviews on your website. This plugin will increase your sales and commissions by skyrocketing your conversions.
BONUS #62: WP Cash-O-Matic
Want to earn more cash from your offers? Or want to make more commissions from affiliate offers? This plugin creates cash-o-matic product pages for your own or affiliate offers instantly.
BONUS #63: WP Profit Page Creator
Churning out pages that make you profits in the holy grail of internet marketing. This plugin Instantly Creates Money-making Pages That Are SEO Friendly and help you make money.
BONUS #64: WP Reports Plugin
Want to know how active your content is? Want to see detailed reports that WordPress does not show you? This plugin Displays post and comment activity per blog and per user so you can track which content is more effective for you.
BONUS #65: WP Bot Blocker Plugin
With this software you will be able to: Everyday, 100s of hackers try to get into your site. They use BOTS to attack your wordpress sites and you need to be protected. This plugin blocks all bot attacks keeping you secure your hackers
You can Install on Unlimited Sites + CLIENT SITES
BONUS #66: WP Simple Geo
One of the easiest and fastest way to generate money online and boost commissions is to make your content reach your target audience.
Keeping this in mind, here’s an exciting package that enables you to deliver relevant content to a specific group of people based on their geological location. Ultimately, people will see relevant content on a specific areas or country.
BONUS #67: WP Viral Click
Getting content viral on the streams of internet is every marketers dream. But it takes time, skills and sometimes a bit of luck and doesn’t seem to be everyone’s cup of tea.
To bail you out from these issues, here’s a GOLD package that automatically generates content for your site from an external web page. Furthermore, you can customize the page by adding custom elements like modals, info bars and slide in to promote user engagement to your offers.
BONUS #68: WP Slideshow Master
Slideshows are the best way to give lots of visual content to site visitors. But making them interactive allows visitors to participate with your content…
WP Slideshow Master is a brand new and powerful WordPress plugin which allows you to create eye-catching, high impact flexible slideshows to impress your visitors.
You can also add beautiful and eye catchy sliders to your WP blogs and drive Subscribers into your list.
BONUS #69: WP Visitor Chat
Multiple studies have proven that Live-Chat brings a 20%+ increase in conversion rates, and increases sales and profits hands down.
So, this exclusive WP plugin creates a live chat widget on your website allowing site visitors to directly interact with the administrator in real-time or offline mode. With this plugin, visitors can send short messages to you on your website, and get prompt replies of their queries.
BONUS #70: WP Amcom Pro
Blogging is one of the hottest ways to make money online without spending a dime. Most of the business owners are using blogs to increase income and boosts their list easily.
Keeping this in mind, I am offering this amazing tool which enables you to add self-updating Amazon bestseller ads to your blog posts and make more money from it in a hassle-free manner.
BONUS #71: WP BayCom Pro
Blogging is one of the hottest ways to build your list without spending a dime. Most of the business owners are using blogs to increase income and boosts their list easily.
Keeping this in mind, I am offering this amazing plugin which enables you to add self-updating Ebay Auction Feed Ads to your blog posts and make more money from it in a hassle-free manner.
BONUS #72: WP Notification Bar
This WordPress plugin easily allows you to create your own attention-grabbing notification box in less than 3 minutes. So, you can easily grab attention of your visitors and get them engaged by notifying them with various offers.
Stop wondering and get into active mode to surpass your competitors forever.
BONUS #73: WP Email Timer Plus
Countdown timers are the best drivers that compel website visitors to take action and boost sales and profits. So, to achieve these benefits, this package includes an amazing plugin that allows you to create beautiful countdown timers even INSIDE your emails.
This will help to increase conversions, sales and also click-through rate inside your emails because the moment someone opens your email, they immediately see the timer ticking to zero and urging them to take action right away.
BONUS #74: WP EZ Viral Contest
Contests and sweepstakes keeps your visitors engaged on your site, and they have taken a new life with the growth of the social Web.
EZ Viral Contest is a subscriber-increasing WordPress plugin that allows you to access quick, easy and responsive contest pages. You can publish your contest and share it via Facebook, Twitter, email and much more! Also, when people enter the contest in your blog, they will be added to your list and motivated to share with others to get more entries.
BONUS #75: The Marketing Minisite Template
If you are still wondering how to get quality targeted traffic to boost sales of your offers, then surely this is the right product for you. Whether you are an affiliate marketer, product owner or a network marketer, marketing your product and services is necessary. And to market your goods, you need to have a good and professional looking webpage that convinces your leads into buyers.
BONUS #76: 25 Squeeze Page Templates
Spending time and money to generate leads proves to be a futile effort unless you can convince the people visiting your site to join your list or buy your product.
To help you overcome this menace, I am providing this package that includes 25 Brand New pre coded, sliced and optimized Video/Squeeze Templates, Ready to use – just copy/paste your own sales letter and you’re done. Moreover, you can modify them and sell them to your list and keep 100% of the profits.
BONUS #77: WP Video Focus
92% of B2B prospects consume online videos and top marketers are taking advantage of it to get in touch with widely scattered customers. With this bonus WordPress plugin, you can clip your video that serves as a widget to any corner on your page. Moreover, this also allows your videos to visibly continue playing when a user scrolls down a page, so they are still able to see the video instead of only hearing audio of it.
Ultimately, you can position your videos anywhere you want and even customize them to get best results.
BONUS #78: WP Copy Guard
Your blog content is the most precious asset that you don’t want to get stolen. If you also fear that your blog content can get into wrong hands, then it’s time to take a breather.
With this bonus, you will now be comfortable posting things in your blogsite without being stolen. You will be secured 24*7! Now you can stop your valuable WordPress blog content being stolen and copied onto other peoples’ sites and save your traffic.
BONUS #79: WP Slideshow Master
Slideshows are best way to present content to site visitors. But in order to get best results from it, you must ensure it gets shared on social platforms.
Keeping this in mind, here’s a brand new and powerful WordPress plugin which allows you to create eye-catching, high impact flexible slideshows that impresses your visitors.
4 SIMPLE STEPS TO CLAIM YOUR BONUS PACKAGE
1. Clear Your Cookies in your Web Browser (Ctrl + Shift + Delete)
2. Purchase Products Through My Email/Website
3. Contact Me Here with the receipt of your purchase
4. ALL Bonuses in General Internet Marketing Bonuses Package is Yours & You will receive them within 12-48 hours.
I Will Always Update New Bonus
Now, Check your bonus below!
#Blog, #Bonus, #Bonus_Packages, #Bonuses, #MattMartinSIMClub, #Web_Design_Bonus, #Web_Hosting_Bonus
2 notes
·
View notes
Photo
How to Create a Landing Page in WordPress
What You'll Be Creating
A landing page on your WordPress site is an invaluable tool if you want to sell something or get visitors to sign up. In this post you'll learn how to create a landing page in WordPress for free, and encourage people to buy or sign up to your service.
We'll be creating a landing page by customizing a third-party WordPress theme. That is the best way to create WordPress a landing page for free, and gives you the greatest flexibility, but it requires some coding know-how. If you want to create a landing page without coding, check out some of our other posts.
Landing Pages
How to Create a Landing Page in WordPress Quickly
Brenda Barron
Landing Pages
Top 25 Landing Page WordPress Themes for 2020 Websites
Brenda Barron
WordPress
Create a Responsive Landing Page With WPBakery (Visual Composer)
Ashraff Hathibelagal
A landing page is a key page, designed to get users to take action. What that action is depends on your business, but it’s likely to be one of two things:
buy something, probably a big ticket item as you’d be using product pages for smaller products
register for something, which might be a subscription to a service or course, or a mailing list
You’ll need to get as much traffic to this page as you can, as it’ll be an important one for your site. You might do that via SEO, advertising or direct marketing. Or maybe a combination.
But once people have arrived at that landing page, you need to make sure they buy or sign up.
The content of the page will be part of how you do this—not only the content itself, but the way you lay it out. Generally, the more expensive the item, the more text and the more calls to action you’ll need.
But it’s not just about the content. You also need to make sure that when someone lands on that page, the only option available to them is to click the buy button. If there’s a navigation menu, or some widgets, or a clickable logo, there’s a chance they could click away to investigate the rest of your site, and never come back to the landing page.
Which is where creating a landing page in your theme comes in. A landing page will have no links outside the content. There’s be no menu, no widgets, and no clickable links in the header, footer, or anywhere else. It’ll normally be full width (as you won’t need your sidebar widgets) and it’ll have a clean layout designed to focus attention on the content.
In this tutorial, I’ll show you how to create a landing page template for your theme. This consists of three things:
creating a page template for your landing page
creating a header for the landing page with no links
creating a footer for the landing page with no links
using the template to create your landing page
So let’s get started. I’m going to create this landing page template for the twenty twenty theme, and that means creating a child theme so I’m not editing a third party theme.
WordPress
How to Create a WordPress Child Theme
Rachel McCollin
What You’ll Need
To follow this tutorial, you’ll need:
a testing or development installation of WordPress
a code editor
a theme installed
So let’s get started.
Create a Child Theme
If you’re working on your own theme, you can skip this section. But if you’re using a third-party theme you downloaded from the theme directory or that you bought from ThemeForest or another source, you’ll need a child theme.
Follow our guide to creating a child theme and save your new theme in the wp-content/themes directory in your site.
Create a Landing Page Template File
Now you need to create a page template which will be your landing page template. You’ll need to duplicate whatever template is being used for pages in your theme and rename the new file. For many themes, that’s page.php. For twenty twenty, that’s singular.php. You can use the WordPress template hierarchy to work out which template file is being used.
If your working with a child theme, you’ll copy your duplicate to the child theme. If you're working in the main theme, save the duplicate in the main theme. Note: don’t do this on your live site!
If your theme has a full width page template, use that instead of page.php, as the layout will be already set up for the page to have no sidebar, and the sidebar will have been removed.
I’ve named my file landing-page-template.php. Don’t give it a name that begins with page. If you then create a page with that name, WordPress will automatically assign the template to that page. Better to keep things manual so you have more control.
Here’s the full content of my new landing-page-template.php file. Yours will look different if you’re working with a different theme.
<?php /** * The template for displaying single posts and pages. * * @link https://developer.wordpress.org/themes/basics/template-hierarchy/ * * @package WordPress * @subpackage Twenty_Twenty * @since Twenty Twenty 1.0 */ get_header(); ?> <main id="site-content" role="main"> <?php if ( have_posts() ) { while ( have_posts() ) { the_post(); get_template_part( 'template-parts/content', get_post_type() ); } } ?> </main><!-- #site-content --> <?php get_template_part( 'template-parts/footer-menus-widgets' ); ?> <?php get_footer(); ?>
Now it’s time to edit the file. Start with the commented out text at the top. Replace it with the text needed for page templates:
<?php /** * Template Name: Landing Page * */
The next step is to remove any call for the sidebar or footer. How you do this will depend on your theme and on whether you used a full width template to start with.
In twenty twenty there’s no call to the sidebar, so I don’t need to remove that. If you have this line in your template, you’ll need to remove it:
<?php get_sidebar(); ?>
Note: You might find once you’ve finished editing this template file that the layout leaves a gap where the sidebar should be. Edit the CSS for the template or change the classes in the content section to make it full width.
Now for the footer. You don’t want to remove the footer altogether as you still need your colophon and your call to wp_footer, so instead of removing the get_footer() call, you’ll leave it there and create a new footer file for your landing page.
In twenty twenty, the footer doesn’t work in the standard way. There are two calls in my template file:
<?php get_template_part( 'template-parts/footer-menus-widgets' ); ?> <?php get_footer(); ?>
The first one calls an include file that has nothing but widgets. The second one calls the footer which I need, but we’ll be editing it later. So I’ll just delete this line:
<?php get_template_part( 'template-parts/footer-menus-widgets' ); ?>
Now save your file. We’ll come back to it shortly.
Create a Header for Your Landing Page
Now it’s time to create a header for your landing page with no navigation, widgets, or links.
Make a duplicate of your theme’s header.php file (either in the main theme or the child theme) and call it header-landing.php.
Remove the Link in the Logo or Site Title
Find the site name or logo in your header file. Mine consists of a function:
twentytwenty_site_logo();
Instead of trying to edit that function, I’m going to replace it with a call to the logo:
<img src="<?php echo get_stylesheet_directory_uri(); ?>/images/xxx.jpg” >
Replace xxx.jpg in the code above with the name of your own logo, and make sure you use the correct path.
If your site doesn’t have a logo image in the header, but a site title, instead, use this:
<div class="site-title faux-heading"> <?php bloginfo( 'name' ); ?> </div>
Note: the classes I’ve used above are specific to twenty twenty. Edit them to reflect your theme.
If your theme works in a more standard way than twenty twenty, you’ll probably find that this code is already there. All you have to do is remove any <a> elements surrounding it, so that site title or log is still there, but they don’t act as links.
Remove the Navigation Menu h3
Now it’s time to remove the navigation menu. Find the code for it in your header filer. In twenty twenty it’s inside an element that looks like this:
<div class=“header-navigation-wrapper"> </div><!-- .header-navigation-wrapper —>
If you’re working with twenty twenty, remove that and everything in it. If not, you’ll need to find a div, aside or section with a similar name.
Twenty twenty also has two toggle navigation buttons for mobile, inside these elements:
<button class="toggle search-toggle mobile-search-toggle"> </button>
<button class="toggle nav-toggle mobile-nav-toggle"> </button>
Remove those, making sure you don’t remove the site title and description which is between them. If your theme has anything similar, remove that.
Remove Any Widget Areas or Other Code with Links
Twenty twenty also has code for search, which I’ll remove as well. Your theme may have this in a widget, in which case remove any widget areas in the header file.
And finally, in twenty twenty there’s a modal menu at the end of the file which I also want to remove. Again, your theme may not have this—twenty twenty is more complex than many!
My header-landing.php file now looks much simpler:
<?php /** * Header file for the Twenty Twenty WordPress default theme. * * @link https://developer.wordpress.org/themes/basics/template-files/#template-partials * * @package WordPress * @subpackage Twenty_Twenty * @since Twenty Twenty 1.0 */ ?><!DOCTYPE html> <html class="no-js" <?php language_attributes(); ?>> <head> <meta charset="<?php bloginfo( 'charset' ); ?>"> <meta name="viewport" content="width=device-width, initial-scale=1.0" > <link rel="profile" href="https://gmpg.org/xfn/11"> <?php wp_head(); ?> </head> <body <?php body_class(); ?>> <?php wp_body_open(); ?> <header id="site-header" class="header-footer-group" role="banner"> <div class="header-inner section-inner"> <div class="header-titles-wrapper"> <div class="header-titles"> <?php // Site title or logo. bloginfo( 'name' ); // Site description. twentytwenty_site_description(); ?> </div><!-- .header-titles --> </div><!-- .header-titles-wrapper --> </div><!-- .header-inner --> </header><!-- #site-header —>
Save the file and go back to your template file. Find the line that calls the header:
get_header();
Edit it so it calls the new header file:
get_header( ‘landing’ );
Now save your file.
Create a Footer for the Landing Page
Now it’s time to create a footer for your landing page.
Make a duplicate of footer.php and call it footer-landing.php. Open your new file.
Find any code for widget areas and remove that. Twenty twenty doesn’t have widget areas in the footer.php file, they’re in an include file which I already removed the call to.
You’ll also need to edit the colophon, to remove links. Here’s the colophon in twenty twenty:
<div class="footer-credits"> <p class="footer-copyright">© <?php echo date_i18n( /* translators: Copyright date format, see https://www.php.net/date */ _x( 'Y', 'copyright date format', 'twentytwenty' ) ); ?> <a href="<?php echo esc_url( home_url( '/' ) ); ?>"><?php bloginfo( 'name' ); ?></a> </p><!-- .footer-copyright --> <p class="powered-by-wordpress"> <a href="<?php echo esc_url( __( 'https://wordpress.org/', 'twentytwenty' ) ); ?>"> <?php _e( 'Powered by WordPress', 'twentytwenty' ); ?> </a> </p><!-- .powered-by-wordpress --> </div><!-- .footer-credits -->
Remove any links in the code. Mine now reads like this:
<div class="footer-credits"> <p class="footer-copyright">© <?php echo date_i18n( /* translators: Copyright date format, see https://www.php.net/date */ _x( 'Y', 'copyright date format', 'twentytwenty' ) ); ?> <?php bloginfo( 'name' ); ?> </p><!-- .footer-copyright --> <p class="powered-by-wordpress"> <?php _e( 'Powered by WordPress', 'twentytwenty' ); ?> </p><!-- .powered-by-wordpress --> </div><!-- .footer-credits -->
Now save the footer file and go back to your template file. Find the call to the footer:
<?php get_footer(); ?>
Edit it to call the new footer file:
<?php get_footer( 'landing' ); ?>
My template file is now stripped down and reads like this:
<?php /** * Template Name: Landing Page * */ get_header(); ?> <main id="site-content" role="main"> <?php if ( have_posts() ) { while ( have_posts() ) { the_post(); get_template_part( 'template-parts/content', get_post_type() ); } } ?> </main><!-- #site-content --> <?php get_footer( 'landing' ); ?>
Save your template file and if you’re working with a child theme, activate it in the WordPress admin.
Use the Template to Create your Landing Page
Create a new static page for your landing page, giving it a title that’s appropriate to what you want it to do.
Create the content and then in the Page Attributes section of the Document pane on the right, select Landing Page in the Template dropdown.
Publish the page.
Now when you visit it in the front end, you’ll find that it has no links or navigation and that the only thing people can click on the page is your call to action button.
Summary
A landing page is much more powerful if you make sure that the only action people can take when they arrive at it is to click your ‘buy’ button. By creating a landing page template in your WordPress theme, you’ll make your lading page more effective and get more sales or subscriptions.
Follow this guide and you’ll have a powerful landing page for your theme!
Landing Pages
How to Create a Landing Page in WordPress Quickly
Brenda Barron
Landing Pages
Top 25 Landing Page WordPress Themes for 2020 Websites
Brenda Barron
Landing Pages
Landing Pages and Drip Campaigns: How They Work Together
Tomas Laurinavicius
by Rachel McCollin via Envato Tuts+ Code https://ift.tt/2AdFGrg
0 notes
Text
Super ContentCal Ifragilisticexpialidocious
ContentCal is much more than a social media scheduling tool. I will go as far as to say that it’s got it all.
Let me start by saying that I had tried many tools before finding and falling in love with ContentCal. I was trying to remember how many apps I’d used the other day. Here are a few:
Hootsuite
Meet Edgar
Buffer
Social Oomph
Post Planner
TweetDeck
SmarterQueue
RecurPost
I know there are others but I can’t remember what they are called and I’m sure some don’t exist anymore too.
So you see when it comes to social media apps I’ve been around the block a bit.
No more!
Since I’ve found ContentCal I no longer have or need spreadsheets (numerous) or Word documents. Some of my spreadsheets were works of art in themselves. But keeping track of what I had or had not used was a nightmare. And I don’t have scraps of paper all over the place now either with bright ideas for blog posts either. And I’ve given away lots of work notebooks as the chaos they caused me did not make me happy (p.s. disclosure – I’m not saying I’m a tidy person now

)
Let me explain why I’m using ContentCal:
Social Media Scheduling
The first thing a tool like ContentCal has to do is let you easily schedule content to go out to your audiences on Facebook (pages and groups), Twitter, LinkedIn (profiles & company pages), Instagram and other platforms. You can schedule for any date and time in the future; you can preconfigure a set time to post on set days or you can post at random times.
Posts can be added as “approved” and go out at the time you’ve chosen. If you work as part of a team, or with a VA perhaps, content can be set to need moderation before it is published. If you run a social media management company you can schedule posts and receive feedback from your clients before the content goes out.
Planning Channels
It is the ContentCal planning channels that have rescued me from spreadsheet paralysis. A planning channel is viewable on the calendar but the content is only there for you to plan ahead. So, I have a blog planning channel where I have the titles of my posts assigned to a specific date. If you are running email marketing campaigns you can have another channel for that. You can use a planning channel for anything – vlogs, podcasts, interviews etc….and see the plans for the week or the month all in one view.
Campaigns
Campaigns hold the essential information for each of your social media campaigns. As with the planning channels you can be flexible with how you use the campaign feature. You could have a campaign to fill the places at a workshop for instance. Or a themed campaigned like my Confessions of a Website Designer series or Tosca’s Wicked Words.
For each campaign you set a start and end date and then write up the brief. The brief has anything in it that you want to remember about the campaign. For my email marketing campaign I have saved the links I will use to source reliable information. I also have a section in the brief to record metrics like how many subscribers I gain or lose in that period.
App
The app is what saves my house from bits of paper lying all over the place. When an idea pops into my head I add it straightway via the app. I don’t type up all the content of course – I just add enough text to remind me of the gist. Then when I’m at my computer I open ContentCal and write up the idea fully. Your bright ideas are never lost.
Integrations
ContentCal have started releasing some integrations that you setup using Zapier. For example you can connect ContentCal to Google sheets which creates a copy of your post into a Google Sheet. Or you could create a Google Form and when someone fills in the form Zapier creates a post in ContentCal. And an integration that I’ve not tried is between ContentCal and Pinterest. Zapier is a great tool to connect all sorts of apps but you may need a bit of patience as sometimes getting two apps connected is a bit temperamental. But once your Zap is setup then on the whole it’s smooth sailing.
Content Hub
The Content Hub is I think my favourite feature. This is where you put all your content, assign it to a category and use and reuse as appropriate. I create a post once and then if I want to use it again I can edit the content each time it gets published. The hub will let you know how often you’ve used a particular post. The hub is the place you keep your evergreen content.
Easy to Use
The user interface is perhaps the one reason that ContentCal tops the charts for me. It works for me visually. I get that the interface may not appeal to everyone. Much thought has gone into how the various features join together. As with anything new you need to give it time and use it regularly to see how it feels to you.
Customer Support
If I could give 5 stars for the level of support I would give 10. As I’m writing this I’m having 3 webchats with Ben. Here are the main reasons why this app beats the other social management systems I’ve tried before:
There is a bank of video tutorials to get you going at the start.
If they don’t have a video tutorial already to answer your particular query they will record one just for you – they have for me anyway.
They are very responsive to questions asked via their web chat facility.
If like me you are based in the UK it is a significant bonus to get help during our standard working hours rather than having to wait to get a response from someone across the globe.
Innovative
All I’m going to say here is that I look forward to reading their emails to see what new features have been added.
In summary, you can see that I really do think that ContentCal is supercalifragilisticexpialidocious.
If you would like a walkthrough of the app click this link to ContentCal and they will arrange that with you. Use “wicked spider” as the promotional code. You will receive $30 off your first bill if you decide to sign up with them. If you just want to give the trial ago you can still use that promotional code.
p.s. Someone said to me the other day that they were apprehensive about putting all their content in someone else’s system and asked what would happen if they went bust or they lost all the content. That is a very good question and I can understand where it comes from. Firstly there is an option to export your content into a CSV file where you get the text content and a link to any images or videos you have uploaded. You could run the export on a monthly basis if you wanted to take a belts and braces approach. I have asked about the backup and restore policy at ContentCal just now via the webchat. When I get a reply I will update this post. I’m confident enough in their data recovery options to be using this app myself.
Some of the links in this post are affiliate links and if you go through them to make a purchase I will earn a commission. Keep in mind that I link to these companies and their products because of their quality and not because of the commission I receive from your purchases. I only recommend products and services that I have used myself. The decision is yours, and whether or not you decide to buy something is completely up to you

The post Super ContentCal Ifragilisticexpialidocious appeared first on Wicked Spider.
from Wicked Spider https://wickedspider.com/super-contentcal-ifragilisticexpialidocious/
0 notes
Text
Super ContentCal Ifragilisticexpialidocious
ContentCal is much more than a social media scheduling tool. I will go as far as to say that it’s got it all.
Let me start by saying that I had tried many tools before finding and falling in love with ContentCal. I was trying to remember how many apps I’d used the other day. Here are a few:
Hootsuite
Meet Edgar
Buffer
Social Oomph
Post Planner
TweetDeck
SmarterQueue
RecurPost
I know there are others but I can’t remember what they are called and I’m sure some don’t exist anymore too.
So you see when it comes to social media apps I’ve been around the block a bit.
No more!
Since I’ve found ContentCal I no longer have or need spreadsheets (numerous) or Word documents. Some of my spreadsheets were works of art in themselves. But keeping track of what I had or had not used was a nightmare. And I don’t have scraps of paper all over the place now either with bright ideas for blog posts either. And I’ve given away lots of work notebooks as the chaos they caused me did not make me happy (p.s. disclosure – I’m not saying I’m a tidy person now

)
Let me explain why I’m using ContentCal:
Social Media Scheduling
The first thing a tool like ContentCal has to do is let you easily schedule content to go out to your audiences on Facebook (pages and groups), Twitter, LinkedIn (profiles & company pages), Instagram and other platforms. You can schedule for any date and time in the future; you can preconfigure a set time to post on set days or you can post at random times.
Posts can be added as “approved” and go out at the time you’ve chosen. If you work as part of a team, or with a VA perhaps, content can be set to need moderation before it is published. If you run a social media management company you can schedule posts and receive feedback from your clients before the content goes out.
Planning Channels
It is the ContentCal planning channels that have rescued me from spreadsheet paralysis. A planning channel is viewable on the calendar but the content is only there for you to plan ahead. So, I have a blog planning channel where I have the titles of my posts assigned to a specific date. If you are running email marketing campaigns you can have another channel for that. You can use a planning channel for anything – vlogs, podcasts, interviews etc….and see the plans for the week or the month all in one view.
Campaigns
Campaigns hold the essential information for each of your social media campaigns. As with the planning channels you can be flexible with how you use the campaign feature. You could have a campaign to fill the places at a workshop for instance. Or a themed campaigned like my Confessions of a Website Designer series or Tosca’s Wicked Words.
For each campaign you set a start and end date and then write up the brief. The brief has anything in it that you want to remember about the campaign. For my email marketing campaign I have saved the links I will use to source reliable information. I also have a section in the brief to record metrics like how many subscribers I gain or lose in that period.
App
The app is what saves my house from bits of paper lying all over the place. When an idea pops into my head I add it straightway via the app. I don’t type up all the content of course – I just add enough text to remind me of the gist. Then when I’m at my computer I open ContentCal and write up the idea fully. Your bright ideas are never lost.
Integrations
ContentCal have started releasing some integrations that you setup using Zapier. For example you can connect ContentCal to Google sheets which creates a copy of your post into a Google Sheet. Or you could create a Google Form and when someone fills in the form Zapier creates a post in ContentCal. And an integration that I’ve not tried is between ContentCal and Pinterest. Zapier is a great tool to connect all sorts of apps but you may need a bit of patience as sometimes getting two apps connected is a bit temperamental. But once your Zap is setup then on the whole it’s smooth sailing.
Content Hub
The Content Hub is I think my favourite feature. This is where you put all your content, assign it to a category and use and reuse as appropriate. I create a post once and then if I want to use it again I can edit the content each time it gets published. The hub will let you know how often you’ve used a particular post. The hub is the place you keep your evergreen content.
Easy to Use
The user interface is perhaps the one reason that ContentCal tops the charts for me. It works for me visually. I get that the interface may not appeal to everyone. Much thought has gone into how the various features join together. As with anything new you need to give it time and use it regularly to see how it feels to you.
Customer Support
If I could give 5 stars for the level of support I would give 10. As I’m writing this I’m having 3 webchats with Ben. Here are the main reasons why this app beats the other social management systems I’ve tried before:
There is a bank of video tutorials to get you going at the start.
If they don’t have a video tutorial already to answer your particular query they will record one just for you – they have for me anyway.
They are very responsive to questions asked via their web chat facility.
If like me you are based in the UK it is a significant bonus to get help during our standard working hours rather than having to wait to get a response from someone across the globe.
Innovative
All I’m going to say here is that I look forward to reading their emails to see what new features have been added.
In summary, you can see that I really do think that ContentCal is supercalifragilisticexpialidocious.
If you would like a walkthrough of the app click this link to ContentCal and they will arrange that with you. Use “wicked spider” as the promotional code. You will receive $30 off your first bill if you decide to sign up with them. If you just want to give the trial ago you can still use that promotional code.
p.s. Someone said to me the other day that they were apprehensive about putting all their content in someone else’s system and asked what would happen if they went bust or they lost all the content. That is a very good question and I can understand where it comes from. Firstly there is an option to export your content into a CSV file where you get the text content and a link to any images or videos you have uploaded. You could run the export on a monthly basis if you wanted to take a belts and braces approach. I have asked about the backup and restore policy at ContentCal just now via the webchat. When I get a reply I will update this post. I’m confident enough in their data recovery options to be using this app myself.
Some of the links in this post are affiliate links and if you go through them to make a purchase I will earn a commission. Keep in mind that I link to these companies and their products because of their quality and not because of the commission I receive from your purchases. I only recommend products and services that I have used myself. The decision is yours, and whether or not you decide to buy something is completely up to you

The post Super ContentCal Ifragilisticexpialidocious appeared first on Wicked Spider.
source https://wickedspider.com/super-contentcal-ifragilisticexpialidocious/
from Wicked Spider https://wickedspideruk.blogspot.com/2020/05/super-contentcal-ifragilisticexpialidoc.html
0 notes
Text
ConvertFlow: Content Marketer

Headquarters: Miami, FL.
URL: https://www.convertflow.com/
What if your work had an impact on millions of online shoppers around the world?
Imagine if you could improve the experience your friends, family and millions of others have when shopping online, so that each time they purchase a product or service from a brand's website, they feel understood and have a shopping experience that's completely personalized for them and their needs.
Ultimately, that's what we're trying to do here at ConvertFlow.
The challenge is the marketers, who are in charge of creating those tailored shopping experiences, are limited technically. Running promotions and launching personalized experiences on their websites means ridiculous amounts of time spent coding or waiting on developers.
As ConvertFlow's Content Marketer, you'll be able to help thousands of marketing teams use a platform that eliminates their need to code, unlocks their performance and gives them the power to create personalized shopping experiences online, as well as drive massive growth for the companies they work with.
At the same time, you'll be able to help shape marketing strategy, author educational content that inspires thousands of companies, connect with brilliant marketers at leading brands, as well as become a recognized leader in your field.
Since launching at Techstars in 2016, ConvertFlow has quickly grown to a passionate community of over 10,000 marketing teams, entrepreneurs and agencies. See some of our customer reviews on Product Hunt.
We need your help to scale ConvertFlow's impact and take it to the next level, on the journey to becoming an industry leader.
Why this role?
Make a huge impact on the company: Since our launch in 2016, ConvertFlow has grown into a platform used by 10,000+ marketing teams and agencies around the world – all without having its own dedicated marketing team. All of our growth so far has come from word-of-mouth, co-marketing, and a bit of SEO. You'll have the opportunity to scale what's worked, as well as drive growth through brand content, user education, co-marketing and SEO.
Grow a product people love that solves big problems: Every hour, about 100,000 people around the world are engaging with personalized campaigns crafted in ConvertFlow by marketers at small businesses, agencies and industry-leading companies. By eliminating the need for marketers to code or wait on developers, we're giving them the power to create better buying experiences for online shoppers and drive massive growth for the brands they work with.
Become a leader in your field: ConvertFlow's success depends on our ability to produce extremely good content that influences and inspires marketing strategies and campaigns at thousands of companies around the world. Not only will you learn fast, you'll also have a platform to make a name for yourself and establish key relationships in the industry.
Master your craft + gain new super powers: Everyone here wears multiple hats. This means that you'll have to the opportunity to double down on your strengths, as well as learn new skills outside of your expertise that take your ability to drive growth to new heights.
Join us at a magical time: We're a small team serving thousands of enthusiastic marketers and running a profitable company. Fortunately, we're in the position where our customers pay the bills, not our investors. This give us the opportunity to grow thoughtfully, have fun, take big swings and focus on serving our customers above all. We also have the privilege of being a Techstars-backed startup, which means we're able to access exclusive startup resources, a network of industry experts and world-class mentorship when needed to help us grow.
Work with an ambitious, resourceful team: We're taking on a big problem, in a big market, in creative ways. Because we play the long-game and tackle hard problems head on, we've been able to achieve the scale of teams many times our size, without pouring money into customer acquisition or throwing investor cash at problems.
About ConvertFlow
We're on a mission to help companies thrive by giving marketers the superpowers they need to drive massive growth.
ConvertFlow is the all-in-one platform for converting website visitors. With our platform, marketers can create, personalize and launch campaigns across their website that generate customers and grow revenue. Today, over 10,000 marketing teams use ConvertFlow to take campaigns from idea to launch, without coding. This includes small business entrepreneurs and agencies who want to execute like a team twice their size, as well as marketing teams at enterprise companies that want to launch campaigns with the speed and agility of a startup.
Life at ConvertFlow
We're a small team that loves great marketing, design and products that make our lives easier. We're building ConvertFlow as a distributed company. This means working together online, outside of a central office, is our default.
We collaborate on projects using Notion. Most team communication happens over Slack, and meetings are done via Zoom video calls.
Being a distributed company gives us the freedom to work where we are most comfortable, as well as optimize our own schedules around a healthy routine, focused work and work/life balance.
About this role
So, what will you do as ConvertFlow's Content Marketer?
As ConvertFlow's Content Marketer, you'll help ConvertFlow and its customers succeed through the following...
Develop and improve a sustainable content marketing and SEO strategy.
Create useful content that will help ConvertFlow become a go-to resource for our target customers and communities – you'll produce educational content, scripts for video, copy for landing pages, written tutorials, email copy, social posts, and other collateral.
Package content and distribute it across social media, email, our website, video, and more. Figure out how to remarket it to our audience to motivate, educate, and drive more people to use our platform.
Plan, prioritize and coordinate the creation of ConvertFlow templates by collaborating with our product team, partners and growing network of designers.
Work closely with ConvertFlow's community, as well as support and product teams to learn about our users, what they want to see, how they understand ConvertFlow, and how they can get the most out of the platform.
Devise experiments with new types of content and formats that help attract and onboard users. We want your help on strategy, not just execution.
Develop and maintain a content marketing engine, which may involve managing and editing contributions from other employees, freelancers, partners, and community members.
Identify all the touch points in our users' lifecycle where we can use content to help deepen their understanding and engagement, as well as help them become evangelists.
Partner with other publications and produce guest content for them.
Help us learn, measure and grow through performance reports and analysis. Our content and growth strategies are always rooted in specific business and quarterly goals.
Work on the conversion optimization of the website, funnels, onboarding sequences and blog content.
You might be a good fit if...
You love writing and are passionate about the craft of writing, in all its forms – short copy, long copy, stories, scripts, and more.
You can explain complex concepts clearly, tell compelling stories, and write with personality. Most business content is boring. Your work will need to educate, entertain and inspire our audience.
You enjoy editing, word-smithing and taking content, whether your own or someone else's, from good to great.
You have experience with content marketing for B2B/SaaS companies and/or startups. We’re looking for someone who can show how they’ve been directly involved in building an audience, helping customers succeed, educating, and using content to motivate readers and earn more customers.
You value visual storytelling and have the ability and interest to work with designers, and create graphics, videos, gifs, screenshots, etc. to complement your writing.
You invest in deeply knowing your audience before writing for them, and understand why the content you're creating serves them. You're curious, ask questions, share your learnings, and enjoy talking with your audience. You think being your audience, or at least being close to your audience, is critical to the success of your work.
You have enough experience to be strategic and opinionated when it comes to making decisions about content, the role it plays in the customer journey, and its alignment with a company's long-term goals and quarterly objectives.
Requirements
You have strong writing skills in English — both short form (messaging) and long form (product guides). You pay attention to details and love to get creative with words.
You can speak clearly and enthusiastically when producing audio or video content.
You thrive when you can direct yourself. In this role, you'll have a lot of freedom over how you work and will be measured based on your impact. Therefore, you need to be well-organized and good at managing yourself.
You can develop and explain a basic B2B content strategy, and the role a content piece plays in an overall plan.
You have a good understanding of technical SEO and know how to do on-page SEO for content you write.
You've managed relationships with customers, partners and other parties who may be involved in contributing to content.
You have a good understanding of how marketing online works. For example, content marketing, advertising, SEO, email marketing, social media marketing, conversion rate optimization, and how they can work together to get results. You don't need to have domain expertise in all of these functions, but you need to have a basic understanding of how they work.
Your daily work schedule can overlap with Eastern time business hours (minimum of 4 hours).
Bonus points for the following...
You're already an active ConvertFlow user
You have experience using popular email marketing tools like MailChimp, HubSpot, ActiveCampaign or Infusionsoft.
You have experience using a popular CMS like Wordpress or Shopify.
You have experience with basic HTML and CSS, website themes and plugins.
You're enticed by the eventual opportunity to manage a team.
You're based in the US
You're based in the South Florida area
You have run your own agency/successful freelancing business.
Experience using SEO tools like Ahrefs, SEMrush or similar.
Experience reporting on content using Google Analytics and creating posts optimized for search.
You've managed other writers.
You've created video and audio content in the past.
You have experience working remotely and managing your own schedule
Benefits
Work from anywhere (we're a distributed team), as long as you have daily overlap with Eastern Time business hours
Work with a small team that's ambitious and punches above its weight.
Competitive salary
Flexible vacation policy
Flexible work schedule
Culture of learning and development with a training allowance
Monthly co-working stipend
To apply: https://apply.workable.com/convertflow/j/DC62833DCE/
from We Work Remotely: Remote jobs in design, programming, marketing and more https://ift.tt/39au9Vp
from Work From Home YouTuber Job Board Blog https://ift.tt/2OyfsDs
0 notes
Text
AO3 Podfic Posting Guide
Hooray! You've made a podfic! Maybe you followed Paraka's guide, thedragongirl's guide, one of many other wonderful How To Podfic tutorials, or maybe you figured it out on your own. But now, how do you share it? Posting your audio to tumblr, youtube, or a fandom-specific community are all decent options. But chances are, if the fic you recorded is from AO3, you'll reach the largest and most receptive audience by also posting to AO3.
The archive welcomes all types of fanwork, but is really structured and built primarily for written works. Posting podfic can be confusing or complicated if you're unfamiliar with it. This guide will cover both the basic mechanics of posting podfic to AO3, as well as the typical conventions used by the podfic community so that people who want to listen can easily find your audio.
(Under a cut because it’s full of screenshots. Also posted on AO3 if tumblr is giving you any issues with the images)
Note: I'm writing this assuming you have a general familiarity with AO3 and know what the basic tags mean, but maybe have never posted there before. Don't let the long size of the guide scare you! It isn't difficult. I just made it very detailed because I was super nervous about getting something wrong when posting my first podfic, and I hope this will make others less uncertain.
It's very easy to navigate to the new post screen. While logged in click "Post" and then "New Work".

First section: Tags

The nice thing about podfic is that you're usually working off an existing text. If that text is on AO3, then the writer has done this step before, and you can just use the same inputs for Rating, Archive Warnings, Fandoms, Category, Relationships, and Characters. Most of the time I will just use the exact same inputs that the text used, but sometimes I'll disagree with the author and make a change. For example, rating can be difficult to judge and recently I made a podfic Teen when the author marked it General Audiences.
Additional Tags is the place where you really want to add things that are specific to podfic.
Definitely use the "Podfic" tag. That's going to be the easiest way for someone seeking out audio fanworks to find your post.
Other common additional tags:
- "Podfic Length: X" Select the tag that matches the length of your podfic
- "Audio Format: X" Select the tags that match the formats you're going to include.

These types of tags useful because if people are looking for a certain length or a specific way to listen it helps your podfic be more easily found
Other less common additional tags:
- "Podfic Cover Art" This tag indicates that your work comes with cover art. I don't see it used very frequently though.
- "Podfic Cover Art Welcome" This tag indicates that your work doesn't have cover art, and that if someone wanted to make you some, you would welcome it. I don't see this tag used very frequently either. (But I think it's a fabulous idea and have it on like 6 of my podfics and I live in HOPE that someone will make me cover art one day, and everyone should definitely use it)
Tags not to use:
- "Podfic Available" This tag is used on text works to indicate that there is a podfic version of that text. It doesn't belong on the podfic itself.
And then you can add any other additional tags that apply to the story. Again, I typically use the same tags as the writer. Maybe choosing to add more if they were sparse with their tagging, or maybe choosing to leave some off if the tags seem unnecessary.
Next section: Preface
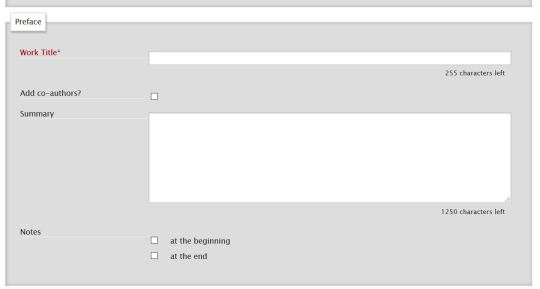
Work Title
Most podficcers will indicate in the title in some way that this work is a podfic. It helps users to know at a glance that your work is audio when browsing through AO3.
I personally prefer the style: [Podfic] Title
But I've also seen:
Title [Podfic]
Title by Author [Podfic]
[Podfic] "Title" by Author
(PODFIC) Title
[Podfic of] Title / written by Author
And many other variations involving the title, the word podfic, various brackets or parentheses, quote marks, or the writer's name.
Personally, I like to use [Podfic] Title because it's straightforward. When you start adding in the writer's name, I think it starts to look cluttered and more difficult to read. But other podficcers prefer including the author name as a way to credit to the writer in a very obvious way. Feel free to decide for yourself!
Add co-authors?
Some podficcers choose to give credit to the writer by making them a co-author on the podfic. I personally do not, and would recommend against it, but again this a place where you can decide for yourself.
Pros: Gives credit to the writer in the header of your post. If the writer is well known, it can help drive more traffic to your podfic.
Cons: Can be confusing and make it seem like the writer was directly involved in making the podfic. Adds more clutter to the header. The writer then has co-control over the work and can edit, delete, etc. (The last con is why I recommend against doing this!)
Summary
Similarly to the tags, another place where you can copy and paste from the text version. Nice!
I also like to add [Podfic Version] to the end of the summary. I've seen similar additions, such as Podfic of "Title". Many podficcers don't put anything extra in the summary. Again, you can decide what you like best. For eye-catching purposes, it's more important to have the word podfic in the title than in the summary, so it's totally reasonable not to add anything here if you don't want to.
Notes
Nothing podfic specific here! Check the box if you want to put in some notes.
Next section: Associations
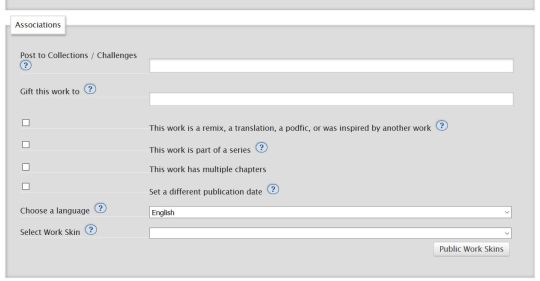
The two parts of this section relevant to podfic are "Gift this work to" and "This work is a remix, a translation, a podfic, or was inspired by another work"
Gift this work to
Similarly to making the writer a co-author, some podficcers will gift the work to the writer as a way of acknowledging them. When you gift a work to someone, their username appears in the header.
Personally, I have seen this practice less frequently lately and don't do it myself. I didn't make the podfic for the writer! I made it because I loved the story and wanted to record it, and wanted to listen to it, and because I hoped others would want to experience it in audio form as well. If the writer is one of the people who wants to listen, that's amazing! But if they don't, that's totally okay too. To me, posting the podfic as a 'gift' makes it seem like the writer is obligated to listen, and I don't want them to feel like they have to. Audio might not be their thing, you know?
This work is a remix, a translation, a podfic, or was inspired by another work
Definitely check this box!! This is AO3's official mechanism for crediting the writer and linking your podfic back to the original text.
You will then get a menu that looks like this:

If your podfic is of a text work posted on AO3, all you have to do is enter the URL. For works not on AO3, fill out all the boxes.
The end result is a note on your work that says "Inspired by Title by Author" (with automatic hyperlinks and everything!)
If you have more than one text work included in your podfic (for example, a story that was posted in two parts but which you're combining into one podfic), you'll need to enter the first text work, save your work as a draft, and then "edit" in order to enter the next text work.
Next section: Privacy

Nothing really podfic specific here! Decide what you want to do with those three privacy checkboxes.
The only thing I will caution is, if you made a podfic of a locked work (one of those works that has an image of a padlock next to the title), it's probably best to also lock the podfic (aka check the "only show your work to registered users" box), or to ask the author if they're okay with the podfic version being unlocked.
Last section: Work Text
Almost done! This is the real important part.

The only thing you really need to have here is a link to your audio, everything else is extra. And if the only thing you want to do is put a link, that's totally fine!
Many podficcers though, including myself, will put additional information and formatting to make the post look more appealing and to add clarity.
Here is the code I use. Feel free to take this code and copy it, or edit it to suit your needs and preferences.
<p align="center">
<img src="ART URL" alt="STORY NAME Cover Art" width="400" height="400" /><br />
<i>cover art by <a href="ARTIST URL">ARTIST NAME</a></i>
</p>
<p align="center">
<strong>Listen</strong><br />
<embed type="application/x-shockwave-flash" flashvars="audioUrl=MP3 URL" src="http://podfic.com/player/audio-player.swf" width="400" height="27" allowscriptaccess="never" allownetworking="internal"></embed><br />
<i>(or click <a href="MP3 URL">here</a> for mobile streaming)</i>
</p>
<p align="center"><strong>Text:</strong> <a href="TEXT URL">STORY NAME</a></p>
<p align="center"><strong>Author:</strong> <a href="AUTHOR URL">AUTHOR NAME</a></p>
<p align="center"><strong>Reader:</strong> <a href="PODFICCER URL">PODFICCER NAME</a></p>
<p align="center"><strong>Length:</strong> LENGTH</p>
<p align="center"><strong>Downloads:</strong> <a href="MP3 URL">mp3</a> | <a href="M4B URL">m4b</a><br/>
<em>(right click to save-as)</em></p>
Make sure you're in HTML mode when you paste in the code.
If you want to include a streaming player (that's what the "embed" part of the code above is for), you'll need to have a direct download link for your podfic. Audio hosting services where you have to click-through, like mediafire, won't work. For help with streaming podfic, blackglass has put together a great tutorial.
And you're done! Yay! Time to post! I highly recommend clicking "Preview" instead of "Post Without Preview" so that you can double check and make sure everything looks how you want it and that your audio links work.

I hope this helped. If you have questions, feel free to drop me an ask!
102 notes
·
View notes
Text
Game Review - Risk of Rain 2 - Early Access (2019)
A plunge into another dimension of roguelike action with ever electric music and infinite hardships – now in Early Access.
Please note that this review represents my thoughts on the game, based on its initial patch on Steam Early Access. Everything mentioned may and will probably be subject to change in future versions of the game and should be taken as simply a matter of the current state of the game. I will endeavor to follow up this review with and errata and final review of the game upon full release, which is announced to be in about 12 months. Thank you.
Risk of Rain 2 released on Steam Early Access just a few days ago with little to no fanfare beyond the mention of the initial release window of Q1 2019, announced by developer Hopoo Games late last year. However, the game is already boasting massive player numbers, running at about 70,000+ concurrent players on March 30th, 2019 (according to SteamSpy); with hundreds of Twitch broadcasts, peaking at around 28,000+ viewers.
One could say it is a good time to be a Risk of Rain fan, as Hopoo Games’ partnership with Gearbox Publishing has aided the game in reaching a wider audience than the original.

Instead of being somewhat barred behind requirements of technical knowledge, the addition of Steamworks multiplayer, compared to the somewhat archaic peer-to-peer multiplayer of the original, now allows players to experience its co-op roguelike action with ease. That no doubt will play a massive part in Risk of Rain 2’s success among its playerbase, as it will move the game from the original’s frantic singleplayer roguelike chaos to even greater and more frantic roguelike chaos, which one can now share with friends or other players around the world via quickplay lobbies.
The initial 48 hour sales period also featured a promotional “buy one, get one free” deal, which I may add was a brilliant way to emphasize the new multiplayer suite, allowing you to not only purchase the game at a reduced cost, but also gift a copy to a friend, so that one may join the game’s co-op experience and be acquainted with Risk of Rain 2 without the need for an initial financial investment. This however lead to what I can only describe as a lot of ‘e-begging’, as my dives into the Risk of Rain community on Twitter and on the game’s official Discord server uncovered an incredible amount of people just sitting in wait for loose copies of the game. That in itself is not necessarily a bad thing; however, it pollutes the conversation around the game, as even I was so helpfully instructed in the replies of my tweets containing my first impressions for the game, that I should be aware that I own an additional copy and that it would be lovely if I were to trade it for some of their other Steam games or simply charitably donate it to them. This however should not be seen as the fault of the developers or publishers, as they cannot be responsible for the actions of the amorphous mass that is the ‘not-even really-the-game’s-playerbase-but-really-want-to-be’. My reason for pointing this out is simply as a word of warning on the effect of such promotional deals, as I believe that would usually not be talked about and I have seen many members of the community express their disdain for such beseechment.

So far, my issues with the multiplayer are that due to the nature of quickplay, I am often put into groups with people that are geographically far enough from me as to create massive amounts of latency, which for an action roguelike is usually fatal, as most shots appear to miss, even if standing right next to an enemy. Chests and lunar coins appear to take almost 30 seconds to open or pick up – by which usually someone else has already come and picked them up, leaving you with little to no items and more likely to be waiting out the next teleporter event as a spectator.

But, I digress – let us talk about the elephant in the room:
Risk of Rain is now in 3D. A jarring shift from the pixel-art platforming of the original to fully three-dimensional flat-shaded environments, switching out the GameMaker engine for Unity. For those of us who have been following Hopoo’s blog on Tumblr, seeing his experiments with 3D modeling, the announcement that Risk of Rain 2 would be in 3D came as something of an “aha” moment. That said, the core concepts of the series translate very well, leading many to jokingly say that Risk of Rain 2 has “more depth” than the original.

Items you pick up during gameplay now even display on your character, making the end result of your runs look visually distinct from how you began, reflecting the increase in power and your new abilities; a features that was long talked about, I believe ever since the original game came out.
The addition of full mouse aim and 360-degree movement have increased the skill cap of the game tremendously: as well as the difficulty of now having to aim, enemies can now sneak up on you, or attack you from above, or below, or anywhere really. Most of the enemies from the original make a return, but have changed from simply making melee attacks, to appropriating projectiles and lasers into their arsenals, making the predominant strategy in the original of “just jump and shoot” into something that requires a bit more thought and involves some calculated risk. So pray to Hopoo you don’t get c l a p p e d by the Magma Worm.
But it is not only the enemies who have adapted: The playable characters, or “survivors”, have been retooled for the new gameplay, featuring some of their most memorable skills and abilities along with some new ones. The one that sticks out in my mind is The Huntress’ new ability, which launches her into the air, raining armor-shredding arrows in a small circle on the ground, which replaces her explosive incendiary bolt from the original.
The starting lineup of characters features the iconic Commando, a HAN-D type robot named MUL-T, Huntress, Mercenary, Engineer and an entirely new class, named the Artificer, which I am yet to unlock, but I have a hunch on how to do so.

As it stands, one of the main complaints that people have gameplay-wise is the newfound difficulty in finding the teleporter, which now can hide in all sorts of nooks and crannies. However, I believe this is mostly due to the to the lack of tutorialization, as the difference between aimlessly wandering for 10-30 minutes and finding it almost immediately, came when someone pointed out that there are unique particle effects surrounding the teleporter, which are colored brightly orange/red, but are not immediately noticeable if you don’t know what to look for. I suppose that is a communication issue, but in their latest blog post Hopoo Games have noted the problem and will be working on making exploration easier.
Another new addition to Risk of Rain 2 is Prismatic Trials, which can be considered something akin to a weekly challenge, where everyone plays on the same seed, meaning that all items and teleporters are in the same place. In addition, there are mutators, such as more gold at the very start of the game or the sequence of levels becomes random, ensuring that each week is different from the last and makes it different from the default game experience. The end goal is to just beat the game, as you usually do, but with the added incentive of getting a faster time than everyone else. Currently there is no reward for being among the top players for the week, but the wording on the menu indicates that in the future there may be something beyond just bragging rights.

On another note, the music for the game, provided by the wonderful and talented Chris Christodoulou, who previously worked with Hopoo games on the original Risk of Rain and Deadbolt, has succeeded yet again to provide the haunting and alien atmosphere of the game, mixing ambient synth soundscapes with hard-hitting distorted guitars and bass. The track “Evapotranspiration”, featured in the first trailer for the game encapsulates this the best in my opinion, beginning with a somewhat celestial motif, slowly distorting as time passes and the difficulty of the game becomes higher and the action ramps up, layering on an echoey guitar and heavy drums, creating a sense of pressure, only to finish off with a bang, by adding a distorted electric guitar and a frantic semi-drum-and-bass rhythm, that sound as much out of place as exactly on signature, creating this uneasy tension.
But – real talk Chris – where the fuck is Coalescence 2? There’s creative pursuits and the need for the new and different, but you just can’t not…that tune was electric.
The so called Early Access OST is now available on Chris’ Bandcamp page for a discounted price of 4€ (or your regional equivalent) and features a total of 11 tracks. Purchase of the album is also considered a pre-order for the final album, said to be released later in 2019 (according to the PDF included with the purchase of the album). Your purchase also nets you discount codes for the original Risk of Rain soundtrack (which is amazing and you should own, if you don’t already), along with the so called Engineer Editions, featuring the sheet music, stems and other goodies for both games (the Engineer Edition for the sequel pending release, stated to be around Q1 2020).
Overall, Risk of Rain 2 looks and feels like a worthy successor for the franchise. The new 3D gameplay and visuals may alienate some of the fans of the original, but I believe that most will agree, that as of its current state, Risk of Rain 2 shows massive potential and will probably stand as an example of sequels done right. The new art style is appealing (even though there is something to miss in the pixel art of the original), the animations are fluid, the landscapes and level designs are diverse and colorful, the music is more of what was great before and more nuanced than its predecessor’s, the gameplay is more action-packed and difficult than ever. The issues with the game are not on the core level and will probably be fixed in future content updates. Risk of Rain 2 has something for both fans of the original and newcomers alike and with the promised future content updates, featuring more survivors, items, enemies, bosses and levels, one could expect hours of fun gameplay upon release. Highly recommended.
All that’s left to say is – what’s the forecast today?
See you on the planet.
#games#video games#review#game review#game journalism#risk of rain#hopoo games#risk of rain 2#unity#gamemaker#multiplayer#roguelike#3D
0 notes
Text
How to Update Your PHP Version to Keep in Line with WordPress Recommendations
When a WordPress website is loaded, it runs on code. Once upon a time, that code was strictly HTML. Now, it’s a few different things, typically CSS, HTML and JavaScript.
That’s the front-of-the-house, though. The waitstaff that all visitors see. Back-of-the-house runs a bit differently; there are different cooks in the kitchen, and they influence a little bit of everything.
When it comes to WordPress, the programming language PHP is what’s really running the show. You’ll find PHP in everything from your WordPress dashboard (back end) to your website page templates (front end). PHP is also in your plugins, your theme… basically, your website doesn’t exist without it.
What is PHP?
PHP is an open source, free-to-use programming language, and because it’s so accessible, it’s one of the most-used programming languages in web development (Facebook uses it, too).
Here’s how the back-of-the-house impacts the front-of-the-house: PHP essentially takes information from your database, packages it as CSS and HTML, and then creates your gorgeous site for visitors to see.
PHP exists on the server end of things. To compare, something like JavaScript is processed on the client-side of the website, in the browser when someone visits your site. If a website problem is due to a PHP issue, you have to be the one to fix it (or your host does, at least) – even a super fast computer can’t quickly process PHP from a slow server.
The moral: PHP is pretty damn important, especially if you have a WordPress site – at least a WordPress site that you want to perform well.
PHP Requires Updates
Since PHP is central to WordPress, it’s always being tweaked and improved – there have been a lot of versions over the years. As of the writing of this article, you should have at least version 7.0, though 7.3 is the most recent version. By upgrading, you’ll access the newest PHP version, which also means the fastest, safest and just plain better version.
Source: php.net
The biggest changes with PHP 7 are that it’s approximately twice as fast as the last version, PHP 5.6; code is easier to read and support; script problems are resolved smoothly; and its applications are more difficult to hack.
P.S. If you continue using an older PHP version, you won’t be able to access active support any longer, and security support will eventually run out, too. Translation: your website won’t be safe and you won’t be able to get any help with it should something go wrong.
Let’s Check Your WordPress PHP Version
Before you update your PHP, find out if you even need to by determining the PHP version you have right now. There are two simple ways to do this:
Check With Your Host
This is what I did. Actually, what I technically did was email DreamHost to say, “Umm, my website seems to hate me lately.” And they were like, “Yeah, it’s mad at you for having out-of-date PHP.”
If you can’t get a hold of your host’s customer service, you can probably check the version yourself. Look for something like “PHP Settings” or “PHP Version,” or “Manage Domains.”
In DreamHost, you can find out the version on the Manage Domains page.
Use a PHP Version Plugin
You can use a plugin like Display PHP Version, which is possibly the easiest thing I’ve ever done when it comes to WordPress.
You just install, activate and then see the version you’re using in the At a Glance section on the Dashboard:
Is it Time to Upgrade Your PHP Version?
You found out the worst news possible and it’s time to upgrade your PHP. I’m going to assume your host will let you upgrade – if they don’t, it’s time to break up with them.
It’s always a little risky to upgrade because it’s possible that your website contains code that the new PHP version won’t be compatible with. If that happens, some or all of your website could behave strangely post-upgrade.
Let’s go over how to prevent that from happening.
You can do this on your live website, but an even safer solution is to make a local copy of your website and go through the process on that first as a test run.
Upgrade Everything (but Backup First)
Since PHP issues usually have to do with old code, it’s best to upgrade your plugins, theme and WordPress version before you do anything else. Also, you probably know this already, but you should always backup your site before updating anything.
We’ve written a lot about backing up your WordPress site:
Duplicator: An Easy Way to Back Up, Copy, or Clone Your WordPress Content
How to Create a Google Drive Backup of Your WordPress Website
The Ultimate Guide to UpdraftPlus: How to Backup, Restore, or Migrate Your WordPress Website
Double-Check Compatibility
Upgrading everything that’s out-of-date is a good first step, but it’s not foolproof. Luckily, they make a plugin for that. (There’s also the PHP Compatibility Checker from WP Engine, but it’s untested with recent WordPress versions.)
Install, activate, click the SG Optimizer link in the left-hand sidebar of the Dashboard, then click on Environment Optimization. Partway down the page, you’ll see the recommended PHP upgrade and a link to “Check Compatibility.”
It took under 10 minutes (for my simple website, at least), and then I get this notice, so it looks like I’m good to go:
Upgrade Your PHP
Guys, it’s time to take the plunge.
There are a few ways to upgrade your PHP. Some are pretty advanced, like using SSH commands – but if you know how to do that, then you don’t need me or this article.
Instead, we’ll do this the easy way – by using that hosting service I get billed for every month. As you know, I use DreamHost – here are the directions for upgrading your PHP through them. If you use another host, you shouldn’t have trouble finding their directions, and it’s likely not going to be too different from how I’ll upgrade mine.
I go to Manage Domains, click “Edit” near the one I need to upgrade, then find the PHP upgrade options under Web Options.
DreamHost suggests PHP 7.2, so that’s the one I choose. Then I save the changes and get a notice that the changes should take place in about 10 minutes. I go back to WordPress, clear the cache and the PHP is updated – two minutes, tops.
Make Sure Everything Looks Right and Functions Correctly
Even if you’ve done your due diligence, websites are known to be imperfect. Once your PHP is updated, head over to your site to check it all out. Click each page, test the features and plugins, etc.
Wrapping Up
Upgrading your PHP version is part of WordPress best practices, just like upgrading your plugins and theme. That said, I have had “update PHP” on my calendar for a month. Maybe two months. Every Monday, I move the date. “Nah, next Monday.” Had I known how simple it would be, I wouldn’t have dreaded it so much. And isn’t that applicable to so many things, WordPress and beyond? The safety and performance of your website rely on these small tasks – keep on top of them, get them over with and get on with creating content people love.
Did this tutorial give you the development bug? Check out 10 PHP Tutorials Aspiring WordPress Developers Should Walk Through.
The post How to Update Your PHP Version to Keep in Line with WordPress Recommendations appeared first on Elegant Themes Blog.
😉SiliconWebX | 🌐ElegantThemes
0 notes
Last Seen Blogs

hitde2h
H I T H L E R ✨

godascha12
Учитель истории Бычкова Дарья
godascha12
Учитель истории Бычкова Дарья

asaaki95
Aki, Full Time Fangirl💖

xomissdaniellexo
Danielle Victoria