#coding tutorial
Note
For those of us who are new to twine/find it daunting. What would be the easiest way to set side character genders? I know if statements will likely come into play I just find it so daunting. Any information would be helpful.
hi friend! apologies this took me several months to answer--askbox was on lockdown for a little bit, hope you're still curious.
i'm actually in the process of writing/scripting a couple new videos that I'm going to post next week (because a year later I don't really like how the old video looks) so--if it's easier, I'll cover it in video form for visual/audio learners there--but for now--this is what I'll say.
the best way to set genders for any character is to use variables, this is true across all different languages of twine, but i'm most familiar with sugarcube twine.
for example, in my game, larkin, i have two characters Ace and Hollis that the player can select the gender/pronouns of in the beginning of the game.
setting their genders is something as simple as creating links with <<set>> macros in them. you can do that a couple of ways. my favorite way is the bracket method, but I know there is like, annoying discourse in the coding community (because what other kind of coding discourse is there, if not annoying) over which method is better--so I'll show you both.
say I wanted to set Ace's gender at the beginning of the game. I'm going to first go into my StoryInit passage in twine--you won't have this when you first open your twine game, so you'll have to create it--by simply creating a new passage and labeling it 'StoryInit' exactly as written there, with the capital 'S' and the capital 'I' no spaces.
from there you're going to create a gender variable to keep track of your character's gender throughout the game. because ace's name starts with an 'a' i'm going to simply call my variable '$agender' it is important that a '$' or a dollar sign proceeds the title of your variable--in order for the game to keep track of the variables value throughout the game.
so basically, in StoryInit I'm going to create a set statement--this is done by typing out the following:
<<set $agender to "male">>
right now, i've set ace's gender to male. this doesn't really mean anything--I'm just using male as a default for right now--you can make it anything you want really, female, non-binary, or even just 'null' for the moment. but know that whatever you set their gender to now, if you type out $agender for it to print in the text of your game, it's going to say "male" or whatever else you've set their gender to.
this isn't really a necessary step but I've found that giving my variables some sort of value before I really set them has always helped me keep organized, and allow the game to run a little smoother.
now onto setting their genders.
if I want to give the player an option to select their gender choosing from the options male/female/non-binary, I'm going to set up my links either like this:
[[set ace's gender to male | 2.0][$agender to "male"]]
[[set ace's gender to female | 2.0][$agender to "female"]]
[[set ace's gender to non-binary | 2.0][$agender to "non-binary"]]
or like this:
<<link "set ace's gender to male" "2.0">><<set $agender to "male">><</link>>
<<link "set ace's gender to female" "2.0">><<set $agender to "female">><</link>>
<<link "set ace's gender to non-binary" "2.0">><<set $agender to "non-binary">><</link>>
both of these essentially accomplish the same thing: they create three links, all that lead to a passage entitled '2.0' and depending on the link selected, they set the gender of Ace to either male, female or non-binary.
To go a little deeper into explanation:
[[set ace's gender to male | 2.0][$agender to "male"]]
<<;link "set ace's gender to male" "2.0">><<set $agender to "male">><</link>
the pink text is what the player will see in the text of the game, the blue text is the destination to which the passage is taking you, and the yellow text is the value that's being set. the purple, for context is just coding language that's necessary for the links in that format to function.
with that, you could have a sentence structured like this in the passage labeled '2.0' to demonstrate which gender you've selected for ace's character.
'Ace identifies as $agender'
$agender in this case will print with whatever you've selected for their gender.
as for pronouns, that's a simple as setting multiple variables in one link. in this case, I do find the <<link>> method much easier, as it's a lot less complicated to set multiple variables with this one--((to be strictly honest with you, i haven't found a good way to do that with the bracket method))
say you want a male identifiying ace to go by he/him pronouns and a non-binary Ace to go by they/them--all you have to do is make links that look like this:
<<link "set ace gender to male" "2.0">><<set $agender to "male">><<set $a_he to "he">><<set $a_him to "him">><</link>>
<<link "set ace gender to non-binary" "2.0">><<set $agender to "non-binary">><<set $a_he to "they">><<set $a_him to "them">><</link>>
in this example I've got variables for each time I'd use the subject and possessive adjective pronouns for ace--again, he/him in the variable name are just because it's the simplest convention for me to remember--you can name your variables whatever you like. you can also add more variables for the different types of pronouns (ex. he/him/himself/his)
you can do a lot more with this, of course, setting multiple pronouns for the characters, for example would be something as simple as creating a variable like $secondarya_he so that your character could sometimes go by "he" and sometimes by "they" -- it's really up to what you want to do with your characters. also i should note, you could also create like separate links for pronouns and gender ((as gender doesn't automatically define your pronouns in the Real World))
as for how they present in the game, it's as simple as typing out the variable and including it in your text.
for example if I have this in my text, and Ace's gender is set to nonbinary it'd look like this on my end:
Ace was over there, $a_he sat at $a_his desk.
would come out looking like this in game:
Ace was over there, they sat at their desk.
now of course, this can sometimes be tricky with grammar, because there's going to be different cases in english where you'd use one word to proceed or follow he or she but a different word to proceed/follow they--this is a simple fix too--just use if statements.
if I wanted to say 'he was doing something' for the male version of ace, but I wanted to say, 'they were doing something' for the non-binary version--I'd simply set it up like this:
$a_he <<if $a_he is "he" or $a_he is "she">>was<<elseif $a_he is "they">>were<</if>> doing something.
and my text would be fixed according to the different pronouns!
all that said, I hope this helped--and if you or anyone else has any coding questions feel free to send them here--plus look out for the video component of this lesson coming next week.
44 notes
·
View notes
Text
my first medium article is live now! we will be going through how to create the most bare-bones discord.py bot out there. this is a tutorial for very new beginners of discord.py, so if you have made a discord bot before, this may not be the tutorial for you. i will have more coming out in the coming weeks, so please stay tuned!
here are some code snippets from the tutorial :


there weren't many to choose from unfortunately...but in future tutorials i will definitely have quite a few!
well anyways guys. i'm glad i could tear myself away from my new red dead addiction to get this out there for you. i will be teasing the next tutorial soon...and that will be a lot more fun than this simple old bot here. we love tobey though, he's a good bot.
thanks for checking it out! consider giving my github and medium a follow if you're interested in these discord tutorials. i'll be linking them here on tumblr, but will be posting those on medium.
thanks for checking it out! i'm off for some apex.
#discord bot#discord#discord.py#python#pythonprogramming#coding#codeblr#learn to code#coding tutorial#programming tutorial#progblr#comp sci#studyblr#vscode#visual studio code#coding blog#medium writers#tutorials#pips tutorials
39 notes
·
View notes
Video
youtube
Sims 3 Beginner’s Modding Tutorial
Shows you how to set up a visual studio project and a basic overview on your first interaction.
52 notes
·
View notes
Link
heyyyyyyy fools & ghouls ! i had a request on how to properly install popup muse pages , so here i am with a walk - through + codepen for those of u who are visual learners ( aka me lmao ) .
#indie rph#rph#coding tutorial#coding cabin#html tutorial#css tutorial#for patreons#for patrons#mine#rec
8 notes
·
View notes
Note
hi morri!
you talked about doing a page for your WIP, and I'd like to ask how do you do them?? I've tried to make pages for my WIP before but coding is not a language i understand sadly T-T
do you have mayhaps some tips? or general advice? or something because I've tried for ours and i never end up doing anything and I'm so tired T-T
thanks, love
(@/ink-fireplace-coffee)
Hi Carmen!
NOTE: This is kinda gonna assume that you have never touched a custom code in your life and have no idea how html works. I tried my best to make it simple, but also cover as much as possible. Be warned, it's a REALLY long post. But hopefully it's helpful!
Ah, okay, well, there's a lot to get into here. But I will try my best to explain it all!! First off, if you've never made a custom page before, you need to ask staff to add JavaScript support to your blog. You can do that really easily, and it should only take them about 24 hours to get back to you.
Once you have JS enabled on your blog, you need to actually make the new page, like you would any other page. (Open your blogs theme editor on desktop, scroll down on the sidebar until you see "pages" and hit the plus/new page button.)
Once you've done that, click where it says "default layout" (or something similar) and change it to "custom layout". Choose a url for your page (for example, my page for ATQH is just "memento-morri-writes.tumblr.com/atqh".) You only need to put anything that would come after the /. (So in my case, I'd just put "atqh" in that box.
Okay, now you need a theme. There's not a lot of them out there when it comes to ones built specifically for written WIPs. @bebewrites has some amazing ones on her blog! (05 and 02 are my personal favorites.) Also, this page by @/seyche is gorgeous!
Once you've chose a theme, open the link to the code hosting site (github, pastebin, etc.) and copy all of the raw code. (You can highlight and copy it manually, or sometimes there's a button that says "raw" that makes it easier.)
Paste all of that nonsense into where it says "html here" on your blog. Hit "update appearance". You should see a little, sort of squished preview of the page.
Now comes the hard part. Editing the html. I'm gonna go into detail about this under the cut, since it'll get long.
Firstly, a lot of codes have some degree of instructions written in them. Any text that looks slightly greyed out is "comments" or code that doesn't do anything, but is there to give you guidance. Keep an eye out of those as you go through the code!! They'll often tell you where new sections begin or end, so you know what you're editing!
Firstly, start at the very top of your code. Nearly the very first thing on there it's going to say <title> [some kind of text] </title>. This controls what shows up on the browser tab! So make it descriptive, but short and to the point. (I usually just do the story name or it's abbreviation.)
Next there's gonna be a very long section called <style>. Most of this you don't need to worry about, unless you really know what you're doing, but there are some important bits.
Directly under where it says <style> is where you should look for this next bit. It should look something like this, but it might look different depending on the code. There are hundreds of "right" ways to code a page, it's all up to preference.
Alternatively, if there's not a nice, neat section for all the colors and fonts, you can hit "ctrl + f" and type in "color", and you can arrow through the results until you find one that mentions background/text/heading color.
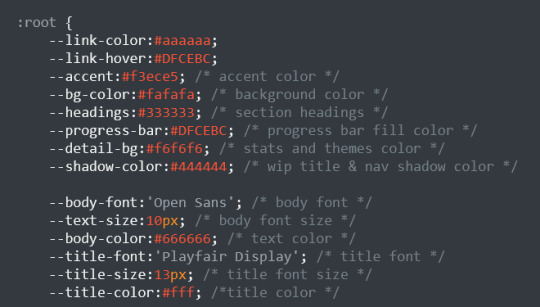
The important thing here is the numbers and letters in red. Those are Hex Codes!! (hex cause there's 6 digits.) They're just a way for the computer to know what color you're talking about.
You can use a website like htmlcolorcodes to find any color you want. When you have one you like, click in the top box on the website and copy the 6-digit hex code. Paste it in place of the one in the code.
NOTE: You need to keep the #. Otherwise the code won't recognize it as a hex code.
Some Quick Hex Codes:
- Pure white is #fff
- Pure black is #000
- #eee is a very lovely off-white that is much easier on the eyes than pure white.
Keep acessibility and legibility in mind when choosing colors!! Don't put white or off-white text on a pastel pink background! Conversely, some people have a hard time reading super high-contrast stuff, especially bright text on dark backgrounds. So try and avoid something like pure white text on a pure black background. (Light and dark is generally fine, but go for "softer", less saturated colors.) If people are getting a headache reading about your OCs, they're gonna decide it's not worth the trouble.
Okay, back on track. You can also change the font size for the headings, subheadings and body text. If it's not neatly given to you, you can do a "ctrl + f" and search for "size". That should help you find it.
Sizes are shown in pixels (px). This is the default measurement for font sizes, and really the only one. Sometimes referred to as "points". So if you hear someone say "12 point font", they mean a font that's 12 pixels tall. Pixels and points mean the same thing, so don't worry too much about it. But for html, you need to use the "px" after the number. This functions a bit like the "#" before the hex codes. It tells the computer what you want done and why. (Kind of.)
NOTE: I'm not going to talk about changing the fonts in this, since it's already getting really long. However, I will gladly answer an ask about it!
Now, onto the fun part!! Adding your information! Scroll down, or do a search for where it says "<body>". This should also be pretty clear cause the text will go from lots of colors to largely white with some green. This is where the actual content of the page starts. Or at least the content you care about.
From here on out, things could be arranged in any one of thousands of ways. So, I'm just going to walk you through the basics of html content.
First things first: basics. In html, every "type" of element or content has a symbol. That's what the stuff between the <> is. And for every one of those symbols, you need an end piece. A set of <> without a slash starts an item, while a set with a slash ends it. So a complete set would look something like this:
<[symbol]> [content] </[symbol]>
Exactly what those symbols are varies, and that's what I'll get to in a minute. Keep in mind that when you make a set of starting <> (ie no slash), tumblr will automatically add a closing set. However, it's not always the smartest, and you can end up with double ending sets. So double check that you only have one starting set and one ending set.
Now, no to the specifics.
Links:
Links are kinda wonky when it comes to html. The symbol for a link is "a", but you can't just go "<a>" and be done with it. A complete link looks like this:

Yes, you have to put the space, and the equal sign, and the quotation marks. So what does all that stuff mean?
Well, the space between the quotation marks is where you put the url. If you're linking outside of your own tumblr blog, you need the full url, copied and pasted from your browser bar, including the http nonsense. (It's not nonsense, but-) If you're linking something within your own tumblr blog, you only need to include what would come after the / in the url. For example if you wanted to link someone to your wip tag, which is "wip: cos", then you would put "/wip: cos" inside the green quotation marks.
NOTE: When you're linking outside of your own blog, get rid of that slash!! It's left there as a courtesy/spacer by most coders since they assume most people will only be linking within their own blogs. If you leave it with outside urls, things will not work.
Okay, but you don't just want a giant URL showing up in your pretty text. And html knows that. That's where the space between > and < comes in. What you put between the starting set and the ending set is what will actually show up on your blog. Just like when you highlight and link something via text on tumblr.
Here's an example of a "complete" link in html:

What this will actually do is when someone clicks on the words "wip tag" in your blog, it will take them to the tag "political fantasy wip" on your blog.
Text Changes:
So, earlier I mentioned being able to bold, underline, italicize text. Yep, you can do that!! In order to do that, you just put starting and ending sets around the text you want to be changed, like this:

The symbols are different for every type of text change, but here's a quick list:
Bold -
Italics -
Underlined -
Emphasis (looks different depending on the code) -
Strikethrough -
Images:
Images are also kind of weird. You can't just upload them from your computer. If they're images from unsplash, etc., you can just right click and click "copy image address". If they're ones you made, or that are on your computer, you'll have to upload them to a hosting site like imgur, and then right click and copy image address.
NOTE: Pay attention to image ratios and dimensions when using codes!!! If you put in an image of the wrong ratio (say, 5:7 rather than 4:5), the code will force it to fit and you'll end up with a very ugly picture! So just pay attention. If it's not obvious (1:1 (square)) or specified in the code, trial and error is fine!
So what do I need those image addresses for anyways? Well, here's a complete image code.

That bit in the green quotations is that image address you copied earlier.
PHEW!
That was a really long post! But I hope it answers some questions people on writeblr might have about editing page themes!!
If you have any questions, feel free to send me an ask or DM!
10 notes
·
View notes
Text
🎮 HEY I WANNA MAKE A GAME! 🎮
Yeah I getcha. I was once like you. Pure and naive. Great news. I AM STILL PURE AND NAIVE, GAME DEV IS FUN! But where to start?
To start, here are a couple of entry level softwares you can use! source: I just made a game called In Stars and Time and people are asking me how to start making vidy gaems. Now, without further ado:
SOFTWARES AND ENGINES FOR PEOPLE WHO DON'T KNOW HOW TO CODE!!!
Ren'py (and also a link to it if you click here do it):
THE visual novel software. Comic artists, look no further
✨Pros: It's free! It's simple! It has great documentation! It has a bunch of plugins and UI stuff and assets for you to buy! It can be used even if you have LITERALLY no programming experience! (You'll just need to read the doc a bunch) You can also port your game to a BUNCH of consoles!
✨Cons: None really <3
Some games to look at: Doki Doki Literature Club, Bad End Theater, Butterfly Soup
Twine:
Great for text-based games! GREAT FOR WRITERS WHO DONT WANNA DRAW!!!!!!!!! (but you can draw if you want)
✨Pros: It's free! It's simple! It's versatile! It has great documentation! It can be used even if you have LITERALLY no programming experience! (You'll just need to read the doc a bunch)
✨Cons: You can add pictures, but it's a pain.
Some games to look at: The Uncle Who Works For Nintendo, Queers In love At The End of The World, Escape Velocity

Bitsy:
Little topdown games!
✨Pros: It's free! It's simple! It's (somewhat) intuitive! It has great documentation! It can be used even if you have LITERALLY no programming experience! You can make everything in it, from text to sprites to code! Those games sure are small!
✨Cons: Those games sure are small. This is to make THE simplest game. Barely any animation for your sprites, can barely fit a line of text in there. But honestly, the restrictions are refreshing!
Some games to look at: honestly I haven't played that many bitsy games because i am a fake gamer. The picture above is from Under A Star Called Sun though and that looks so pretty
RPGMaker:
To make RPGs! LIKE ME!!!!!
NOTE: I recommend getting the latest version if you can, but all have their pros and cons. You can get a better idea by looking at this post.
✨Pros: Literally everything you need to make an RPG. Has a tutorial inside the software itself that will teach you the basics. Pretty simple to understand, even if you have no coding experience! Also I made a post helping you out with RPGMaker right here!
✨Cons: Some stuff can be hard to figure out. Also, the latest version is expensive. Get it on sale!
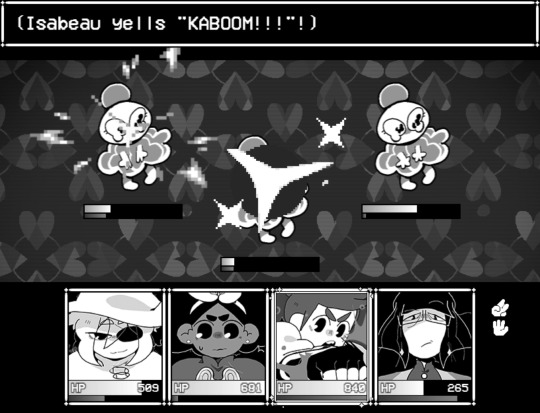
Some games to look at: Yume Nikki, Hylics, In Stars and Time (hehe. I made it)
engine.lol:
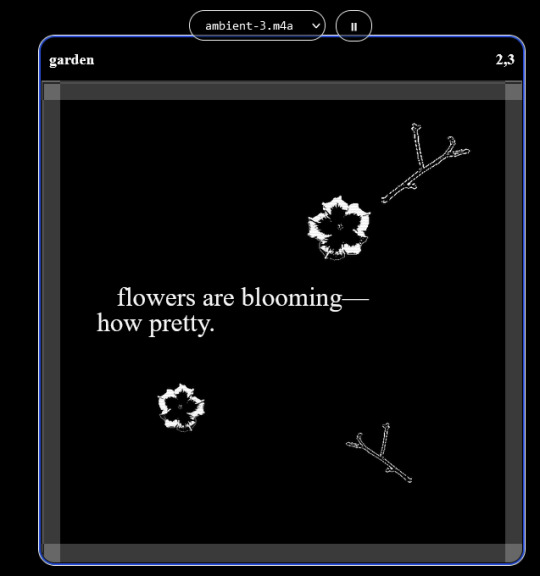
collage worlds! it is relatively new so I don't know much about it, but it seems fascinating. picture is from Garden!
NOTE: There's a bunch of smaller engines to find out there. Just yesterday I found out there's an Idle Game Maker made by the Cookie Clicker creator. Isn't life wonderful?
✨more advice under the cut. this is Long ok✨
ENGINES I KNOW NOTHING ABOUT AND THEY SEEM HARD BUT ALSO GIVE IT A TRY I GUESS!!!! :
Unity and Unreal: I don't know anything about those! That looks hard to learn! But indie devs use them! It seems expensive! Follow your dreams though! Don't ask me how!
GameMaker: Wuh I just don't know anything about it either! I just know it's now free if your game is non-commercial (aka, you're not selling it), and Undertale was made on it! It seems good! You probably need some coding experience though!!!
Godot: Man I know even less about this one. Heard good things though!
BUNCHA RANDOM ADVICE!!!!
-Make something small first! Try making simple: a character is in a room, and exits the room. The character can look around, decide to take an item with them, can leave, and maybe the door is locked and you have to find the key. Figuring out how to code something like that, whether it is as a fully text-based game or as an RPGMaker map, should be a good start to figure out how your software of choice works!
-After that, if you have an idea, try first to make the simplest version of that idea. For my timeloop RPG, my simplest version was two rooms: first room you can walk in, second room with the King, where a cutscene automatically plays and the battle starts, you immediately die, and loop back to the first room, with the text from this point on reflecting this change. I think I also added a loop counter. This helped me figure out the most important thing: Can This Game Be Made? After that, the rest is just fun stuff.
So if you want to make a dating sim, try and figure out how to add choices, and how to have affection points go up and down depending on your choices! If you want to make a platformer, figure out how to make your character move and jump and how to create a simple level! If you just want to make a kinetic visual novel with no choices, figure out how to add text, and how to add portraits! You'll be surprised at how powerful you'll feel after having figured even those simple things out.
-If you have a programming problem or just get confused, never underestimate the power of asking Google! You most likely won't be the only person asking this question, and you will learn some useful tips! If you are powerful enough, you can even… Ask people??? On forums??? Not me though.
-Yeah I know you probably want to make Your Big Idea RIGHT NOW but please. Make a smaller prototype first. You need to get that experience. Trust me.
-If you are not a womanthing of many skills like me, you might realize you need help. Maybe you need an artist, or a programmer. So! Game jams on itch.io are a great way to get to work and meet other game devs that have different strengths! Or ask around! Maybe your artist friend secretly always wanted to draw for a game. Ask! Collaborate! Have fun!!!
I hope that was useful! If it was. Maybe. You'd like to buy me a coffee. Or maybe you could check out my comics and games. Or just my new critically acclaimed game In Stars and Time. If you want. Ok bye
#reference#gamedev#indie dev#game dev#tutorial#video game#ACTUAL GAME DEVS DO NOT INTERACT!!!1!!!!!#this is for people who are afraid of coding. do not come at me and say 'actually godot is easy if you just--' I JUST WILL NOT.#long post
27K notes
·
View notes
Text

Learn how to get real-time forex rates with our step-by-step tutorial! https://www.youtube.com/watch?v=6NZjOI_T4r8. Discover the power of WebSockets with NodeJS as you craft your first WebSocket Client. No prior NodeJS knowledge required.
0 notes
Text
youtube
Insights Sequential and Concurrent Statements - No More Confusion [Beginner’s Guide] - Part ii
Subscribe to "Learn And Grow Community"
YouTube : https://www.youtube.com/@LearnAndGrowCommunity
LinkedIn Group : https://www.linkedin.com/groups/7478922/
Blog : https://LearnAndGrowCommunity.blogspot.com/
Facebook : https://www.facebook.com/JoinLearnAndGrowCommunity/
Twitter Handle : https://twitter.com/LNG_Community
DailyMotion : https://www.dailymotion.com/LearnAndGrowCommunity
Instagram Handle : https://www.instagram.com/LearnAndGrowCommunity/
Follow #LearnAndGrowCommunity
This is the Part ii of last Video "VHDL Basics : Insights Sequential and Concurrent Statements - No More Confusion [Beginner’s Guide]", for deeper understanding, and it is very important to have deeper insights on Sequential and Concurrent statement, if you are designing anything in VHDL or Verilog HDL. In this comprehensive tutorial, we will cover everything you need to know about VHDL sequential and concurrent statements. Sequential statements allow us to execute code in a step-by-step manner, while concurrent statements offer a more parallel execution approach. Welcome to this beginner's guide on VHDL basics, where we will dive into the concepts of sequential and concurrent statements in VHDL. If you've ever been confused about these fundamental aspects of VHDL programming, this video is perfect for you. We will start by explaining the differences between sequential and concurrent statements, providing clear examples and illustrations to eliminate any confusion. By the end of this video, you will have a solid understanding of how to effectively utilize sequential and concurrent statements in your VHDL designs. This guide is suitable for beginners who have some basic knowledge of VHDL. We will go step-by-step and explain each concept thoroughly, ensuring that you grasp the fundamentals before moving on to more advanced topics. Make sure to subscribe to our channel for more informative videos on VHDL programming and digital design. Don't forget to hit the notification bell to stay updated with our latest uploads. If you have any questions or suggestions, feel free to leave them in the comments section below.
#VHDL basics#VHDL programming#VHDL tutorial#VHDL sequential statements#VHDL concurrent statements#VHDL beginner's guide#VHDL programming guide#VHDL insights#VHDL concepts#VHDL design#digital design#beginner's tutorial#coding tutorial#VHDL for beginners#VHDL learning#VHDL syntax#VHDL examples#VHDL video tutorial#VHDL step-by-step#VHDL Examples#VHDL Coding#VHDL Course#VHDL#Xilinx ISE#FPGA#Altera#Xilinx Vivado#VHDL Simulation#VHDL Synthesis#Youtube
1 note
·
View note
Text
#dotnet development#dotnet#dotnet core#csharp#coding tutorial#coding#coding life#programming#code#programming life#dependency injection#shorts
0 notes
Text
Chifuyu thinking he broke you after giving you a shaking orgasm.

"Chifu'...fuck, a-ah!"
Chifuyu sat behind you with his knees planted on either side of your hips.
His blonde bangs fell across his forehead, tongue lolled out of his mouth as he rubbed his thumb faster and faster in circles on your engorged clit.
Two fingers slipped inside you with very minimal resistance due to how wet you were.
"You're so wet, baby. Couldn't wait for me to get off of work so I could come fuck you, huh?"
His aquamarine eyes settled on the juncture between your spread ass cheeks and the creamy translucent substance coating your inner thighs.
"Mmm, Fuyu...feels s-so good..."
You murmured with your cheek pressed against the cool silk of the pillow. Your bonnet had slid halfway off of your head, but Chifuyu fixed it for you and laid a soft kiss upon your tawny cheek.
It was almost embarassing how close you were to cumming just from Chifuyu's fingers playing with your swollen clit, but he was so good at it that he'd often make you come several times from his fingers alone before he even put his cock in you.
"That's right, baby. You close to cumming all over my fingers, aren't you?"
He sped up his actions, thrusting deeper with the two inside and pressing his thumb down directly on top of the little button, moving it from side to side.
Your thighs enclosed around his hand and began to quiver which made Chifuyu grin like a Chesire cat.
"Come on, open up for me, babe. Trying to get you there, sweet girl."
"'Fuyu, I can't! You're about to make me cum, you-!"
A soft gasp left your parted lips as a harsh shiver raked through your entire body. Chifuyu's hand was definitely stuck between your legs now as you shook and convulsed.
His eyes widened in shock. Usually, you might shiver a bit while cumming but you'd recover quickly.
Panic began to sink into his chest and he ripped his hand from between your legs like he'd been burned when you didn't stop shaking. Your head twisted to the side and you drew your knees up towards your chest.
"Shit! Oh shit...baby? You okay? Y/N?"
Baji often spoke to Chifuyu about all the women Baji himself had fucked with and how he always had them shaking and cumming all over themselves, but Chifuyu just took his words with a grain of salt, attributing it to simple "locker room talk."
He didn't actually think that a 'shaking orgasm' was a real thing, which is why he was so horrified at your body's reaction.
Poor thing was getting ready to grab his phone and call an ambulance when you opened your eyes and smiled up at him sweetly.
"Y/N! Are you alright?!"
"Mhm. That was amazing, 'Fuyu. Why are you looking so scared?"
He grabbed your hand and pressed a chaste kiss to the back of it.
"Because I was. You should have seen the way you folded in on yourself like you were in pain. I thought I hit the wrong thing and made you have a seizure or something."
You couldn't stop the giggle from leaving your lips as you looked up into his wide baby blue eyes.
"Oh, Bunny, you're so cute. I don't know if what you just said is possible but that was one of the best orgasms you've ever given me."
"Really?" He bit his lip shyly, cheeks warm and as red as cherry tomatoes.
"...Can I maybe try it again?"
#chifuyu matsuno#chifuyu smut#chifuyu x black reader#chifuyu x reader#tokyo revengers x black!reader#chifuyu x black!reader#chifuyu matsuno x reader#tokyo revengers x reader#black coded reader#black fem reader#x black reader#tr chifuyu#tokyo revengers chifuyu#divider made using cafekitsune's tutorial#bunny fufu🐰💚#chifuyu brainrot#𖢇rose.petals🌹🗒
404 notes
·
View notes
Text
ham sandwich
#my violet trainer during the first encounter tutorial#she’s monster hunter coded#trainer aoi#pokemon scarlet and violet#pokemon sv#pokemon
154 notes
·
View notes
Text
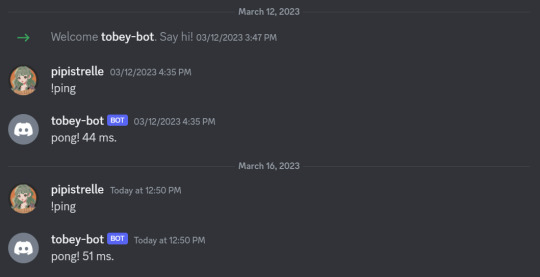
It is time! My tutorial has been live since this morning but i have finally crawled out of bed for coffee and am now functioning.
once again i am just so proud and excited to show this tutorial to you. it is based off of just one function i have built in my personal tarot bot named grimalkin. if this tutorial is any fun to you, let me know and i’ll write more on the other commands grimalkin-bot has!
thanks for all of your support. i will see you soon with a new one!
#codeblr#studyblr#progblr#medium writers#pips tutorials#pips coding#learn to code#comp sci#python#python programming#python projects#discord#discord bot#discord stuff#coding tutorial#programming tutorial#coding tips#programming tips
14 notes
·
View notes
Video
youtube
Part 8 of my custom interaction tutorial
Check it out! Shows you how to use sim selection menus.
19 notes
·
View notes
Text
ᝰ ⁺ 。 glowing animations tutorial / base
hey my loves , in the source link u will find a link to a my patreon where i have created 4 different animations ( 2 for texts and 2 for boxes / containers / shapes ) that are cute and super customizable . this tutorial is very easy and as long as u have basic css knowledge i think u all will have a blast playing with these . enjoy !
7 notes
·
View notes
Text
Guys, I've managed to connect to my mongoDB database at last! Databases and express apps are kind of a new world to me tbh so I'm so excited to be learning all these new concepts!
My app is coming along ;) yay 🌱
#the tutorial I'm following is a life saver#I'm really excited guys#i know this is very early stages but it's progress ya know#coding#studyblr#study#codeblr#mongodb
471 notes
·
View notes
Text
Convert HTML to Image: A Step-by-Step Guide ✨

Do you want to turn some HTML code you've made that's on your website and have a way to convert it into an image for you to save?
Well, look no further! I too wanted to do the same thing but funny enough, there weren't any straightforward tutorials out there that could show you how! After hours of searching, I finally discovered the solution~!
This is an old tutorial I made 🐼

💛 Set your environment
Before we dive into the conversion process, I'll assume you already have your HTML code ready. What you want to learn is how to turn it into an image file. You should have a good grasp of HTML and JavaScript. For this tutorial, we'll use the following HTML code example:

We won't include the CSS code, as it doesn't affect this tutorial. The JavaScript file (script.js) at the bottom of the body element is where we'll add the functionality for the conversion.
Your page should resemble the following:

As you can see, the "Click me" button will handle the conversion. We aim to convert everything within the div.info-div into an image.
💛 Using the html2canvas JavaScript Library
The html2canvas library allows you to take screenshots of webpages and target specific elements on a screen. Here are the steps to include the library in your project:
The steps to put the library in your project:
Visit the html2canvas website for more information.
Copy the CDN link from here

and include it in a script tag in your project's head tag in the HTML file:

That's it for including the library on the HTML side. Now, let's move on to the JavaScript code.
💛 JavaScript Functionality
Here's the JavaScript code to handle the conversion:

In this code, I want to turn the whole div.info-div into an image, I put it into a variable in const div = document.querySelector(".info-div");.
I also put the button into a variable in const button = document.querySelector("button");
I added a click event listener to the button so when the user clicks the button, it will follow the code inside of the event listener!
You can find similar code like this in the documentation of the html2canvas library:

What is happening here is:
We add the div (or what the element we want to take an image of) into the html2canvas([element]).then((canvas)
Added the image file type url to a variable = const imageDataURL = canvas.toDataURL("image/png"); - You can replace the png to other image file types such as jpg, jpeg etc
Created an anchor/link tag, added the href attribute to imageDataURL
The download attribute is where we will give the default name to the image file, I added "dog.png"
Perform the click() function to the anchor tag so it starts to download the image we created
And that's it!
💛 The End
And that's it! You've successfully learned how to turn your HTML into an image. It's a great way to save and share your web content in a unique format.

If you have any questions or need further clarification, please comfortable to ask. Enjoy converting your HTML into images! 💖🐼
#my resources#coding#codeblr#programming#progblr#studying#studyblr#programmer#html#html css#javascript#neocities#coding tips#html5 tutorial#html tutorial
86 notes
·
View notes
Last Seen Blogs

officialynzway
MY PAIN YOUR GAIN
angelofthenight
𝕵𝖊𝖊𝖕𝖊𝖗𝖘 𝕮𝖗𝖊𝖊𝖕𝖊𝖗𝖘
talsonmars
Runnin' a dojo of coolness


elegantsuitfun
Sem título