#i found a free kimono pattern online
Text
If someone ever makes a version of Freddie Mercury's kimono to buy and wear I will love and cherish them forever
#sorry i've just been thinking about this for a while#i don't care how much it costs i will still get it#for context i'm talking about the one he first wore at the hammersmith 1975 concert during the encore#it's SO beautiful!!!!#heck i could even try to make it myself!#i found a free kimono pattern online#how all i need to do is learn how to sew with silk#also PAINT on silk#unless I find a fabric with that pattern on spoonflower or something#because it's so busy and intricate i don't know if i'll be able to paint it without it looking awful#queen#freddie mercury#kimono freddie#random thoughts from angie
4 notes
·
View notes
Text
Tutorial for my OFMD Breakup™/Bird Robe
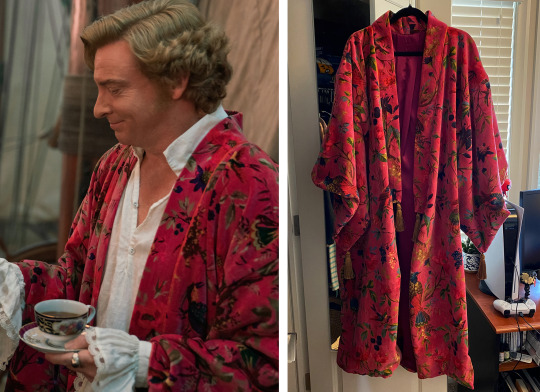
Disclaimer: I’m not a professional sewer or costumer, so any weird methods of execution are entirely due to my own (mis)adventures in sewing. Also all of the links for the fabric and research are in the replies bc I have no idea if tumblr is still ~suppressing~ posts with links.
The basic design for my Breakup Robe™ was based on
heathervanderstitch and
hannahgreenecostumes‘s instagram posts (two of the costume designers on OFMD) who said that their bird robe was a modified 1940′s kimono pattern with a box pleat in the back to give more movement at the bottom without being too baggy at the top. So I took that info and essentially worked backwards by comparing screenshots from the show and a bunch of online kimono patterns. (The most helpful ones were Ralph Pink’s free Satchi kimono pattern and The Tailoress’s Giselle Kimono).
--- 🦜 ---
I found a helpful starting place for pattern piece sizes was a twitter post from another fan (fiftyfathomkinit), however I ended up making my own modifications because I found her drafting slightly confusing (she includes armhole cutouts in her back panel which i could never figure out). I also adjusted the sizing to better fit my own measurements and I added an extra seam on the sleeves so one side of the pattern wouldn’t be upside down.
On a personal note, don’t be afraid of making mistakes! I didn’t realize I needed to adjust the pattern measurements until after I’d started making the lining - which was an oopsie on my part and could have saved me a little bit of money on fabric for my lining. You can get around this error by making a mockup in cheap fabric, or you can do it like me and start off with larger pieces and make them smaller as you adjust to your own fit.
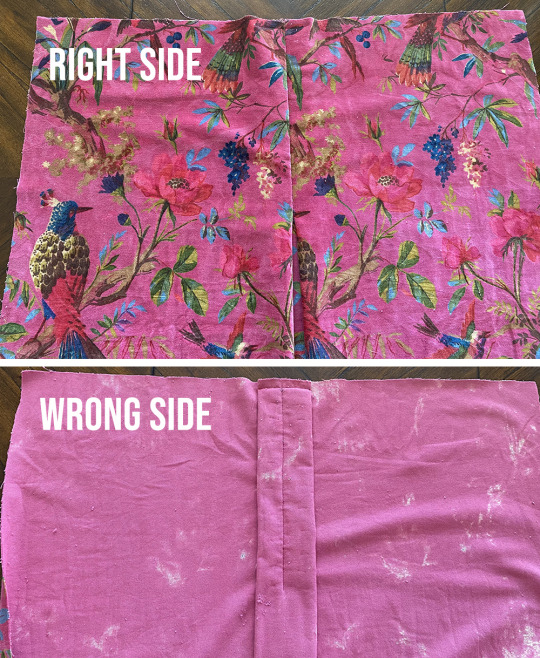
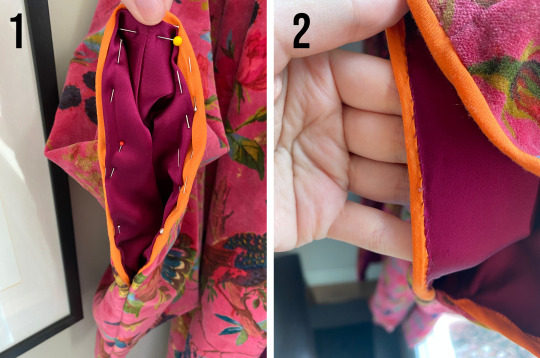
Speaking of the lining, the original robe has a fuchsia dupioni (coarse) silk lining and a hand dyed, block printed 100% cotton velvet outer shell. I found the velvet from (I believe) the same seller on Etsy. It’s a little pricey, but they also have a regular cotton version for those who want a cheaper option.
For the lining, I wanted silk to match the original, bc it breathes better than polyester satin, and I believe it’s longer lasting. But I wanted something softer than the dupioni, so I went with... literally the smoothest silk in the closest colour I could find at a local fabric store. (I literally just rubbed my fingers against every fuchsia silk they had). But you can go with whatever lining you’ll be most comfortable with (satin, cotton, etc).
I got tassels from that same fabric store and the thread and orange bias tape from Fabricland, but you can make your own tassels with yarn if you prefer.
I bought 5 yards of the bird velvet (bc they don’t do half yards) and 4.5 metres (5 yards) of the silk. I ended up using most of the silk and about 4.5 yards of the velvet.

--- 🦜 ---
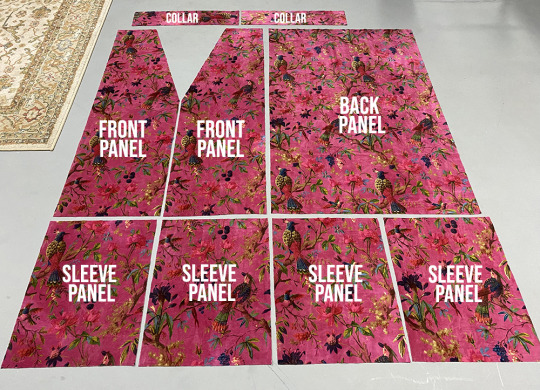
I started by making my own patterns from some super cheap brown wrapping paper with gridlines on the back, which I got from the dollar store. You could also probably just measure and cut your fabric directly, but having paper patterns made me feel better.
Your own measurements will vary (I’m 5′7″ and 120 lbs), but I wanted it to be quite oversized, with the sleeve shoulder seam hitting a little ways down my arm, and the overall length sitting just above my ankles, the same way it does in the show robe.

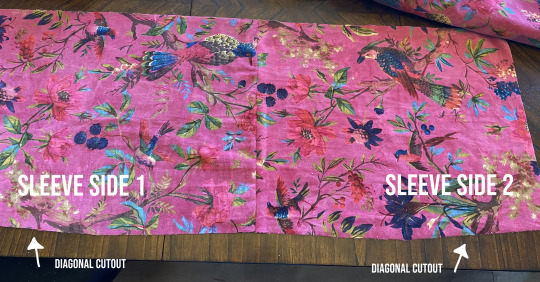
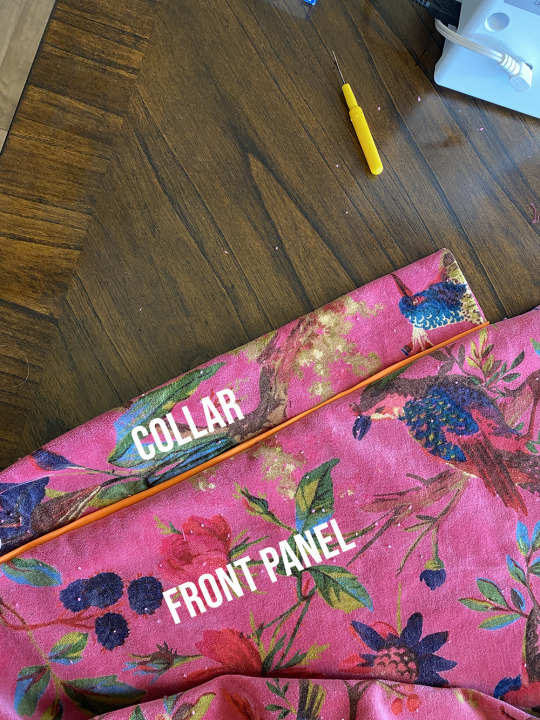
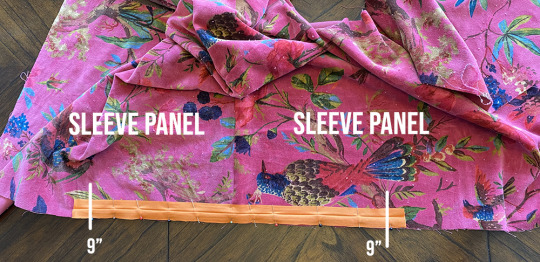
You can see in the above graphic I have a neck opening cut into the front panel that ends halfway down - this is how long I’m also making my collar. (Pro tip - cut the collar longer than you think you’ll need). Meanwhile, the sleeves have an 11″ x 1″ diagonal cut on the sides that will be attached to the main body of the robe, as used in a lot of kimonos.
Here are my pieces cut out (minus the sleeve diagonal bc I forgot to do it while I was cutting everything - but that was a very easy error to correct later):
--- 🦜 ---
For the inverted box pleat, based on screenshots and insta posts, I went with 3″ on either side of the centre point and guestimated that it ended a little lower than the armpit. So mine ended about 10″-11″ from the top of the back panel.
I basted some stitches along the three points (centre back, 3″ to the right and 3″ to left, so it was easier to keep both sides equal). Then I pulled the two sides of the fabric together so they met in the middle at the centre point of the back panel. I pinned them together, stitched the sides together by hand with a ladder stitch, and then machine stitched a line across the top of the panel at my ½” seam allowance.
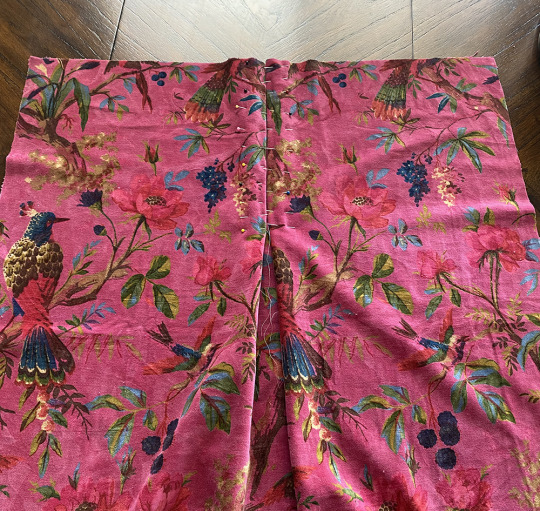
I then machine stitched the sides together down the middle with a really small zigzag stitch to make sure it was extra secure.
I cut a 1″ x 7″ inch neck dip after doing the box pleat, which is probably not the proper way to do it, but it worked out for me!
I didn’t take a picture of it, but this graphic is an approximation of how you’d go about it:

--- 🦜 ---
To sew the actual robe, it requires very simple straight line sewing to connect all these rectangles.
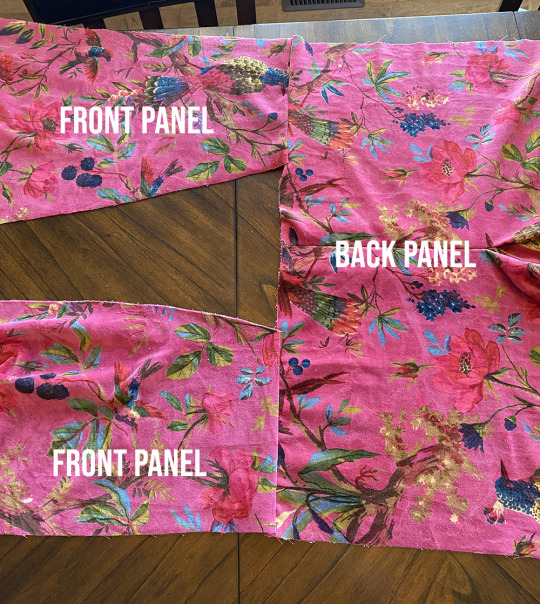
Firstly, you’ll want to attach the front panels to the back panel at the shoulders (right sides together).

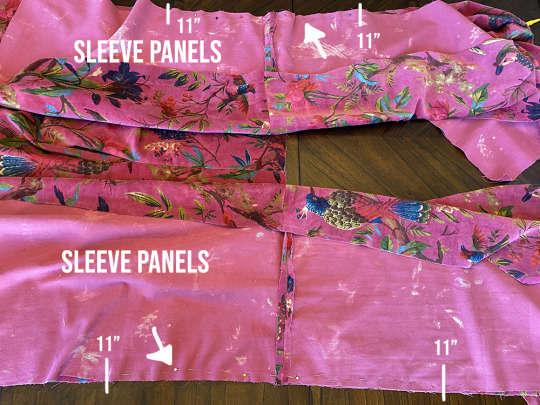
Next, you’ll want to sew across the top of the sleeve panels (right sides together). Make sure you’re matching the diagonal sleeve indents so that when you open up the sleeve panels, it looks like this:
Then you’ll open up your robe body so the right side is facing up:
You’ll then attach the sewn sleeves to the front panels (right sides together), ensuring you’re matching the sleeve seam with the shoulder seam. Make sure you’re sewing the side of the sleeves with the diagonal cutout so when the garment is flipped right side out, the diagonal is next to your body. You’ll sew from the marked line to the marked line.
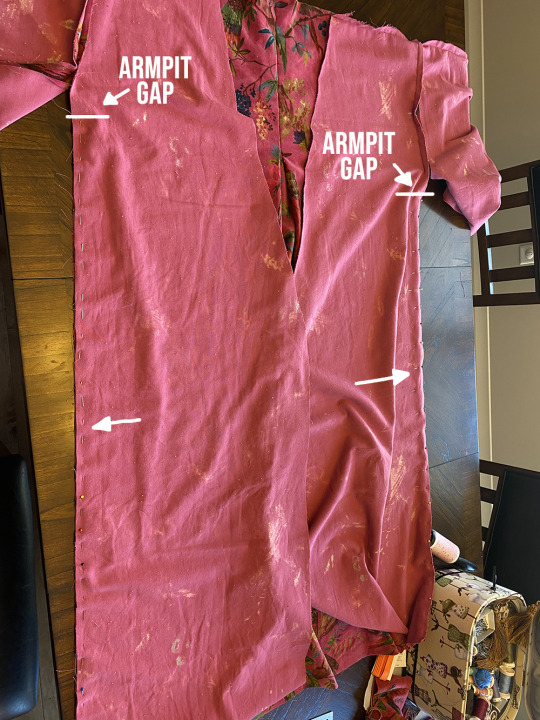
Next, you’ll want to sew the sides of the robe together to close it. However, this was a tricky part for me, because I had tried to sew the body and sleeves at the same time when I was doing my lining, but the armpits ended up bunched and slightly twisted around. So I tried getting around this issue by stopping about 1″ from the armpits, leaving a gap, while sewing the sides together. (You’ll close this gap at the very end of your project).
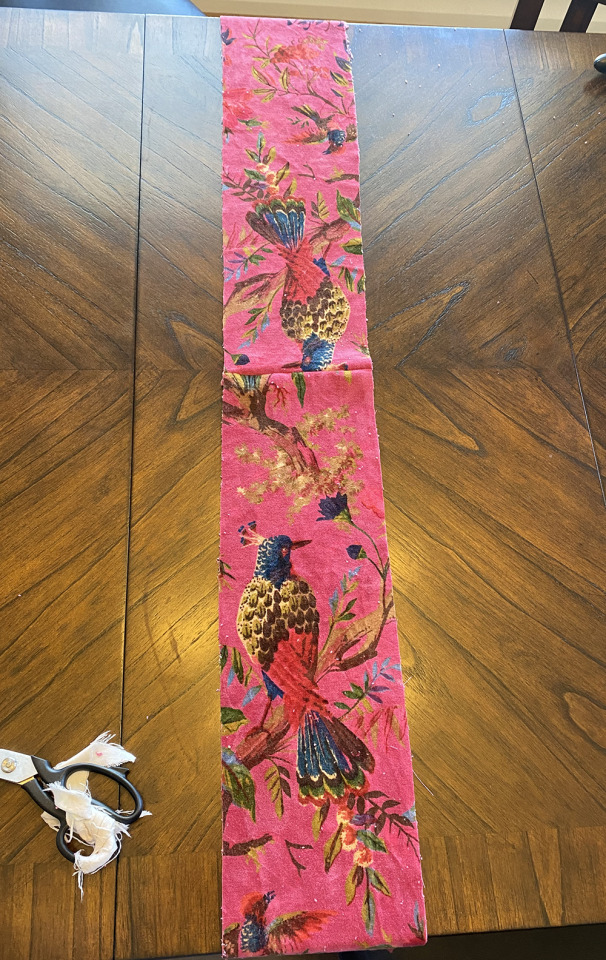
For the collar, attach both pieces together at one end, right sides together, to ensure the pattern isn’t upside down on one side. Once done, the right sides of the attached fabric should look like this:
Then, take the collar and fold lengthwise so the right sides are together. Sew a straight line across the two bottom ends. Then, flip the collar inside out so the wrong sides of the fabric are together and the bottom edges are nicely hemmed. It should look (more or less) like this:
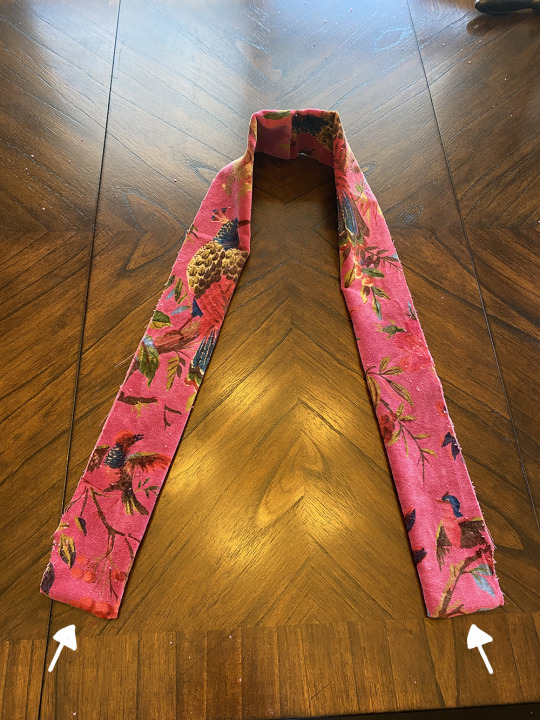
(Ignore the weird cuts on the bottom right and left hand corners - this was my first attempt with a collar that I realized was too short. [Pro tip - cut the collar pieces way longer than you’ll think you’ll need!] I forgot to take a pic of my second attempt, but you get the general idea of what it’s supposed to look like).
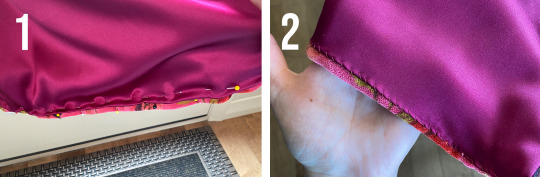
For the bias tape, this is probably not the proper way to go about it, but it was the only way my CFS brain could figure it out and it worked for me! (As the disclaimer said, I’m not a professional sewer - I’m more concerned with whether something works than whether it’s the 100% professional method of execution).
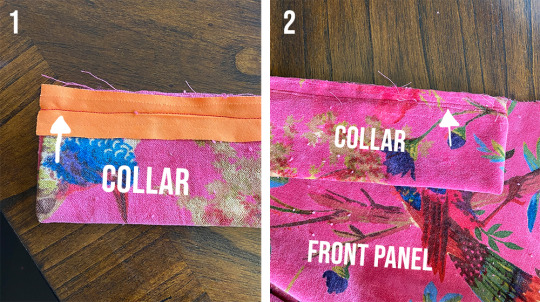
So, take your bias tape, open it up, and pin one edge against the raw edge of your collar. Sew these together a little bit lower than your seam allowance (1). Then you’ll want to fold the bias tape up so both edges are facing the sewn edge of your collar. Then pin and sew your collar, bias tape side down, to your robe (2). (When doing so, make sure to match the seam at the back of the neck on the collar with the middle of the back panel).
This way, when you attach the collar using your seam allowance, you’ll still be able to see a small amount of the bias tape peaking through around the collar when it lays flat against you, like so:
For the bias tape on the sleeves, I attached one edge of the bias tape to the right side of the fabric, stopping an inch past the 9″ marking on both sides of the sleeve. (I sewed this about 1/4″ from the edge).
I then flipped each sleeve inside out (right sides together) and sewed it together, stopping about 1/2″-1″ away from the armpit (as previously mentioned) and at the 9″ measurement on the opposite side. For the side with the bias tap, I flipped the bottom part of the tape over onto the wrong side of the fabric and sewed it down as I was sewing the entire sleeve.

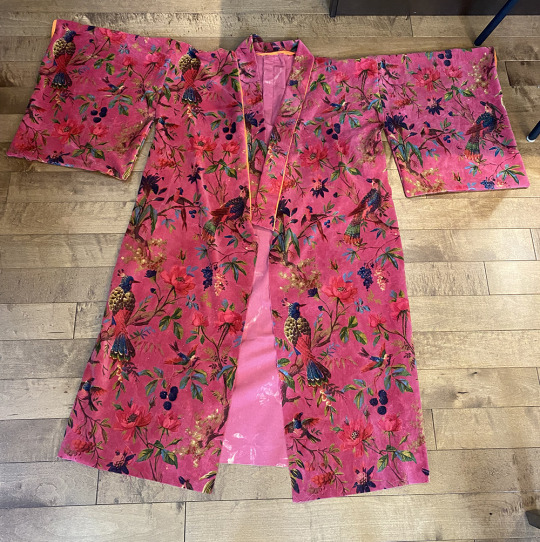
At this point, if you flip the entire robe inside out so the right side is facing outwards, it should look like this:
--- 🦜 ---
For the lining, follow the same steps as you did for the velvet (minus the collar). But when you do the box pleat, make sure the inverted side (the side you pull together) is on the wrong side of the fabric.
Once the lining is fully constructed, you’ll want to attach the lining to the velvet, right sides to right sides, along the collar and centre front.

Once you’ve sewn the lining and velvet together, flip your robe inside out so both right sides are showing.

As you can probably see in the photo, I already started the next step. Which is hemming the bottom of the robe. I’d recommend doing so while it’s hanging (either on a hanger, dress form, or another person), to ensure you don’t have any weird spots where the lining is pulling up on the velvet. I attached the lining and velvet by hand stitching.
For the sleeves, I folded the bias tape down onto the wrong side of the fabric, folded the lining under itself to make a nice little hem, and sewed both together. I did so by hand with a really simple stitch. (As with the bottom hem, make sure you’re only picking up the bias tape and lining so you don’t poke through to the other side).
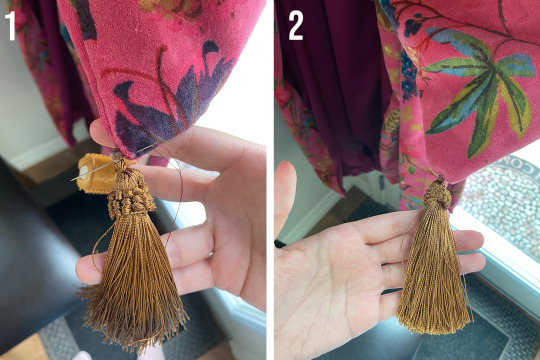
Then for the final touch - the tassels! Mine came with a large loop that I had to remove. I cut it off and then encased the shorn ends in hot glue to ensure the entire thing didn’t somehow unravel.

I let the glue harden and then attached the tassels by hand to the corners of the sleeves and collar.
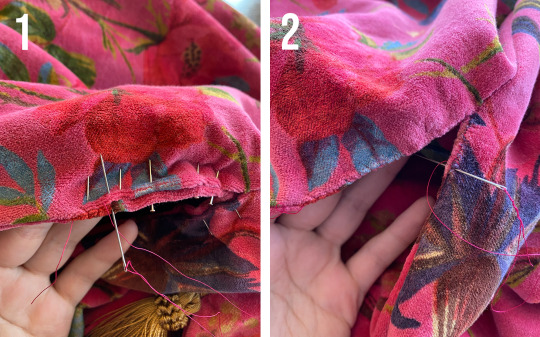
Now we’ll finally close those ~1″ gaps under the armpits. I did this with a very simple hand stitch, making sure I grabbed a bit of fabric from each side of the fold and pulled the thread taught.
--- 🦜 ---
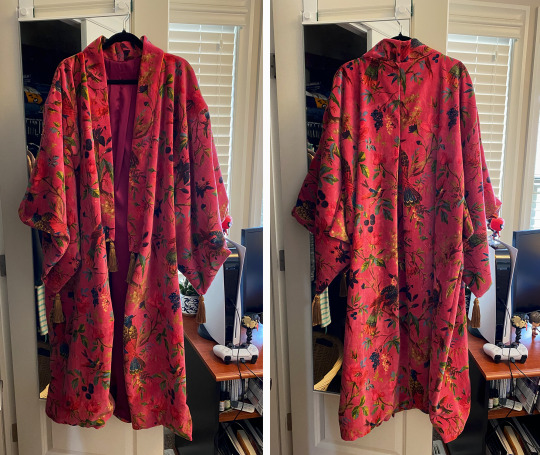
And voila, you should now be the proud owner of the infamous breakup/bird/wrap robe.
--- 🦜 ---
And that’s it! Hopefully this all makes sense and if anyone has any questions either send me an ask or add a reply to this post and I’ll do my best to answer!
On one final note, not to be That Person™, but this took quite a lot of work (both the robe and this post) and I’m a chronically ill freelancer who’s income was hit hard by COVID. So if anyone wants to throw some change at my KO-FI if you found this helpful, I’d be very much appreciated.
#sewing#our flag means death#text post#ofmd#ofmd costuming#ofmd cosplay#ofmd tutorial#long post#banyan robe#mine [wb]#bird banyan#seriously this post is quite long but i wanted to be thorough so I can save at least one person the headache i've been dealing with#namely the headache of trying to figure this whole thing out#also if anyone's curious the colour of this robe changes drastically depending on how it's photographed#which is why it looks red in some pictures and more pink in others#it's the exact same roll of fabric and it's WILD
487 notes
·
View notes
Text
Memoir Of A Moment
AO3
I guess the good thing about being an idiot and DELETING ALL YOUR FILES is that you're forced to go through your handwritten notebooks and rediscovering stuff you never fleshed out on the computer.
I love Mononoke, the art style is wonderful and the stories tickle me just right. I would've loved to write a casefic, but I just couldn't come up with a good mononoke, and also I'm terrible at writing action and mystique, so I never finished it - and now I think that even incomplete, it could work as a Missed Opportunity type of story. Just imagine the adventure Kayo could've had if she stayed!
--
Figured it would be raining on the one day she was able to check out Harajuku. She had been planning this trip for almost a year, and took it well before rainy season for this exact reason! Now there were only a lousy few people on the streets, and barely any of them worth photographing! And with such shitty lighting the photos would’ve turned out terrible anyways. Why had she even bothered leaving home? She’d seen the forecast...
Well, at least the trip wasn’t a complete failure. Despite the bad weather, some scattered groups and inidividuals were still around, and let Kayo take pictures. The gothic lolitas had been largely unbothered by the rain under their black, lacy umbrellas and safe from the puddles with their high platform shoes. The small group of ganguros had tried not to look bothered, not very successfully though... With their shorts and miniskirts you could see the goosebumps from the cold right away. Kayo had even seen a few angura kei girls, smartly dressed in kimonos to shield them from the chill. The cafes also let her take photos inside, as long as she also bought something - she was starting to feel ill from all the tea she'd been forced to consume and the excorbitant prices those places charged for absolutely everything.
Who knew when she’d be able to make a more successful trip? With her financial situation, it had been hard enough to scrounge up the funds and free time even for this one-day trip. In the morning, it would be back to work, back to scrolling through fashion blogs and online stores. Never contributing to those blogs or buying anything from those stores.
-o-
As midnight approached, Kayo finally decided it wasn’t worth the effort to keep looking for more subjects - she only had a few hours before her early morning train back home, and she needed the sleep more than she wanted the photos. Sighing, she put away her camera - her most prized possession, a genuine professional-grade DSLR, bought used from a relative who ran a photography studio - and headed for the capsule hotel. Leaving behind the chic, neon-lit fashion highway felt like such an appropriate metaphor for Kayo’s life - ever the visitor in such splendid places, never allowed to stay for longer than a few hours. The dim side streets were much more her place, getting dingier and smellier the further she walked.
Only some hundreds of meters from the hotel, Kayo stopped. Ahead of her stood someone with a large wooden backpack, and a colorful haori. Perhaps she had found another subject, after all! Must’ve been making their way back home from Harajuku, like her, another sorely disappointed fashion fan. Not old-school, with such unorthodox patterns and garish color combos, but clearly taking inspiration from traditional garments. A paper umbrella and geta, paired with what might have been an exceptionally long heko obi, since the ends were long enough to dangle past the knees. Kayo didn’t know that much about obi knots, not being all that into kimono herself, but she knew the backpack had to digging the knot uncomfortably into the person’s back. The only style she ever wore was karuta musubi because it was so easy and flat.
Digging out her camera again, she took one candid photo - only one, that she would ask permission to keep - because the composition of the figure standing in the middle, faintly haloed by the rain and streetlights, the street stretching out behind him, well... it was just too photogenic to pass up. The shot even turned out well despite the dismal lighting, and some color correction on photoshop would fix the values. She would send a printed copy to her subject, if they wanted.
“Excuse me!” she called out and started jogging up to her target. They must’ve been wearing earphones, not hearing her, since they didn’t turn around. Well, at least they stayed still - a man, it turned out, and a beautiful one at that. But not wearing earphones, and talking to himself silently - so, a weirdo. But definitely a beautiful weirdo. A cosplayer, surely, from the markings on his face and the pointed ears. Very good quality prosthetics, looked completely real. The blond wig was just as good, a naturally plucked hairline and very fine mesh to hide the edges perfectly. This person had a lot of time and made good money. Also pale, flawless skin, and long, elegant fingers, and mesmerizing blue eyes. They didn’t even look like colored contacts, the look in them wasn’t uncomfortably staring at you with pinprick pupils. It might have even been his natural eye color. Half Japanese? If that was the case, then the hair might have been real, as well. His nose also suggested non-asian heritage, as long and pointy as his ears.
It felt like Kayo had been taking in the stranger’s appearance for minutes, him never acknowledging her until he finished his silent monologue. Only his eyes turned to look at her, a small, knowing smile on his already makeup-smiling lips.
“Good evening.”
His voice was pleasingly low and steady, his speech calm and slow. He kept looking at Kayo from the corner of his eye. The markings under his eye and on his nose intrigued Kayo, what was the story behind the character’s design? And the lavender smile, not something Kayo remembered seeing on any other -
“Ah - good evening!”
How rude, she had just kept staring! Even if he was dressed to be stared at! So embarrassing, getting caught up in her thoughts! Just because someone looked good and strange was no excuse for bad manners. Thankfully the man did not seem to mind, just kept smiling faintly, and slowly lowered his eyes to the camera Kayo was still holding tightly in her hands.
“You are a photographer now?” he asked, not really making it sound like a question, and the now part bothering Kayo. She didn’t think they had ever met before, she was sure she would remember eyes like his even if his appearance otherwise had changed completely.
“Well, yes, not professionally - I came to take photos, but the weather - could I take your picture? Fashion is a hobby of mine.”
“That never changes.”
Kayo was almost regretting talking to the guy, he might have been high. He was acting weirdly enough, and his halting speech wasn’t exactly helping dispel the thought, either. It was oddly hypnotic though, with his quiet voice you had to stop and listen, and with the slow rhythm you had to keep listening, and with the weird pauses mixed in he sounded otherworldly.
“A photo in exchange for a favor, perhaps?”
He was still calm, the half-lidded gaze not threatening in the least, but no matter how unassuming a guy looked, Kayo was not stupid enough to agree without knowing the terms. She steeled her face, trying to appear as someone you couldn’t bend.
“Depends on the favor. I’m not desperate so don’t even dream of anything pervy!”
The man chuckled softly, his eyes crinkling in amusement. He finally turned to face Kayo directly.
“Some things do change”, he commented cryptically. Kayo decided not to question it, the guy was clearly either on drugs or having a psychosis. Why did he keep thinking he knew Kayo? Maybe she resembled someone he did know, or used to know?
He lifted a finger, pointing with it’s sharp claw to an alley. “Can you see anyone on that street?”
A quick look revealed the two of them were alone, everyone else having opted for the better-lit main streets, and Kayo was starting to feel more nervous. Not that the guy was looking or acting any more threatening, but being alone with a male junkie on a deserted street in the middle of the night tends to make a girl jumpy.
“No, seems empty to me”, she said in a confident tone, like she wasn’t even thinking of the possibility of being assaulted. A strong girl like her? No one would attack her!
The stranger made a non-committal noise, and his eyes turned more serious. He looked at the alley thoughtfully. “A most troublesome form, indeed. I wonder, why do some see it while others don’t.”
“Was that the favor? Can I take that photo now?”
The amused smile came back.
“Take as many as you like. But I must keep working, do not disturb the scales.” And with a small gesture of his finger, a drawer in the backpack slid open and something flew out.
Okay, it was official - Kayo had gone nuts. First going on this trip even knowing it would fail, then talking to a total stranger in an empty street at night, then not walking away when it turned out the guy was on drugs. Now her madness had extended to seeing hallucinations.
At least the hallucination was polite - a metal thingamajig that looked like an art deco butterfly bowed to her before continuing on its way further down the abandoned alley. Its friends soon followed, a veritable swarm of metal butterflies - scales, the man had called them. Kayo couldn’t possibly say what they measured, or how.
By the time she shook off her stupor, odd paper charms had also appeared on the walls out of nowhere. A staticky hum filled the hair, raising the hairs on Kayo. Some form of electricity, maybe.
“Kayo-san, is it? You came here to take photos, and your time is limited.”
A cold wave washed over Kayo. She knew for a fact they had never met in their lives, and there was no way he could know her name. They had come across each other by pure accident... It just wasn’t possible...
“Do you know me from somewhere?” she asked, stupefied, heart skipping beats here and there. This was so odd, scary, and yet she was not nearly as scared as she felt she should be.
“We know each other from several places, but we have never met before.”
“How does that even make sense! What the hell do you mean by that? Which one us has gone crazy here, I don’t understand anything anymore...”
But even so, she lifted her camera and started taking pictures. Of the man, of the scales, of the empty alley. She didn’t even care about angles, lighting, composition, she just pressed the shutter. She ended up with nearly a hundred photos, majority of them incomprehensible, before the man directed her to keep going on her way. She had obeyed without question - the atmosphere had gotten oppressive, the feeling of a storm encroaching.
-o-
All her life, Kayo often thought back to that night. It felt unreal, but the photos were undeniable evidence of the opposite. Sometimes she thought she really had experienced some sort of short-lived psychosis, but mostly she had no idea what to think of the event - of the one time something strange happened in her life, something intriguing. She only talked about it to someone twice on her life - once to her husband, and once to her daughter. She did eventually develop one of the photos into a print - the one she had taken first. The nameless man, standing alone on an empty street, rain streaking the lens. A beatiful picture, a strange memory, and a lifelong regret.
She should have stayed.
8 notes
·
View notes
Text
Elma (Kobayashi san chi no Maid Dragon)
So, this was the very first cosplay I actually made by myself from scratch and took to a convention, in December of 2019 before pandemonium times. (?) It's not the best Elma cosplay in the world (it's very far from it lol), but little me was very happy with the results, and I got a lot of picture requests, so I thought it would be okay to show how I did it at the time!
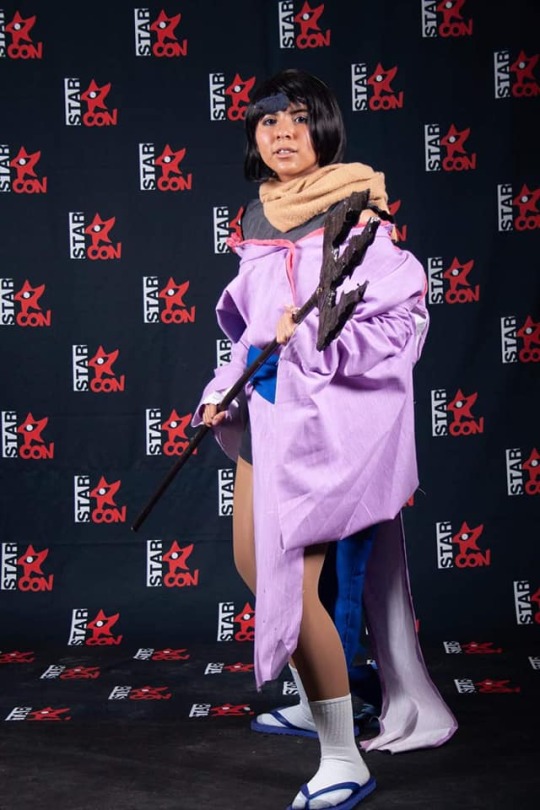
These are the materials that I used...
Kimono(ish): Lavender fabric (2m), royal blue fabric (1m), pink shirt or pink fabric (less than 1m), red, blue, and black acrylic paint.
Tail: Royal blue fabric (1m), a light blue swimming suit or light blue fabric, pillow filling, and black shorts or a belt to attach the tail to, as well as a piece of thick wire for the boning.
Trident: 2 or 3 pieces of cardboard (about 1x1 meters each), brown spray paint, and an old broomstick.
I also got a pair of blue slippers at the supermarket and a short brown wig online for about 12 dollars.

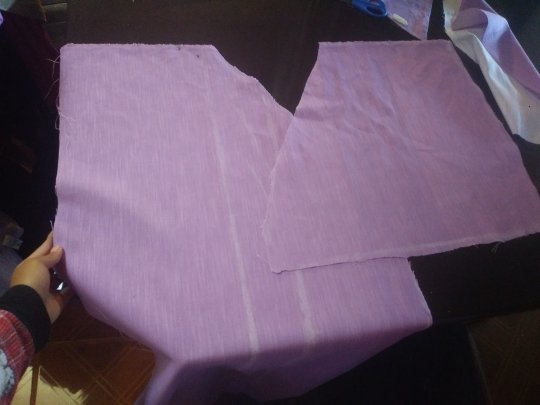
First, I cut out 4 pieces of the purple fabric; 2 front pieces and 2 back pieces. I recommend cutting 2 layers of each piece (4 front and 4 back) in order to give the costume thickness and resistance, but this fabric was already thick and I didn't have much of it so I just didn't do it. I also followed a kimono pattern I found for free on Google Images, which I modified into what I thought would be the exact Elma's kimono design from the show, by cutting the bottom part off of one of the front pieces... But I do not recommend doing this, since it just makes the sewing part more complicated than it should be. Sewed the 2 front pieces and 2 back pieces together, then joined all 4 pieces from the shoulders as well.
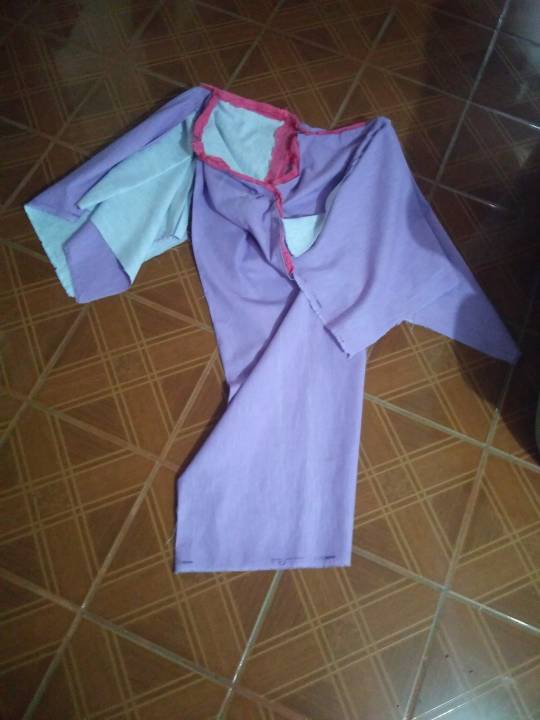
Secondly, I grabbed my hot pink shirt and cut a couple of strips out of it (I do recommend ironing it down first though!), to resemble those pink details on the edges of Elma's kimono, and sewed them where they belonged like so.

As you can see in this entry and in several others, I have made a lot of mistakes as a cosmaker, and certainly, I might continue to do so! It's all part of the learning process, and I do enjoy pointing them out because anyone who's reading this will learn from my wrongdoings too (without having to go through them), and that makes me happy!
Then, I cut 2 large rectangles that were my arm's length plus a few inches, and double the length from my armpit to my waist, off the rest of the purple fabric. Folded each one in half, and sewed close the longest opening to make the sleeves, which I sewed onto the kimono, right below the shoulders, later on.
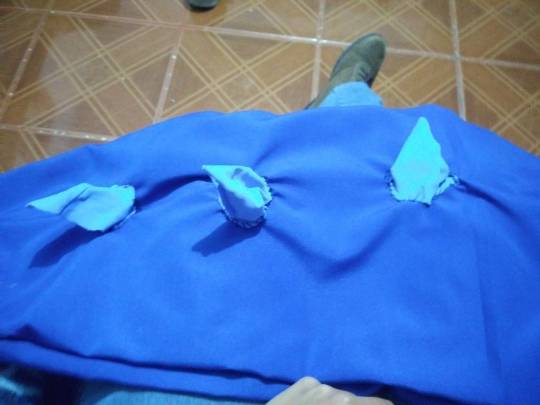
After, I cut a rectangle of blue fabric, my waist's length plus 5 centimeters, and double the distance from under my chest to my belly button of width. Folded in half from the shortest side, and added buttons to the ends of it to create the blue waistband. For this part, I recommend using velcro instead of the buttons, I just used what I had on hand at the time!

To finish with the kimono, I grabbed my acrylic paints and a brush and mixed them until I had a color that I liked. To break it down for you, I started mixing 2 parts of blue and 1 of red, then added the black paint little by little and just added bits of each color until I got it right. This was mostly an empirical process, but it was fun. I used that shade to paint the three big spikes at the bottom parts of the front and back of my kimono, let them dry, and it was done!

Making the tail was probably the hardest but the most fun part of doing this cosplay, simply because I just love wearing props!
I started by tracing a large teardrop-ish shape in my blue fabric folded in half, it was about 60 cm long and 15 cm wide, but its measurements will depend on your height. Then, I marked out where I wanted the spikes to be on and made them using a light blue swimming suit I wasn't using anymore, simply by cutting triangles and rolling them a little bit to make cones (I made about 7 spikes). I then sewed them where I had marked on the tail using the ladder stitch method. - There's a link to hand-stitching methods at the bottom of this page! Since I don't have a proper sewing machine, I hand sew all my cosplays. (●'◡'●)
Using that same light blue cloth, I cut out a duck foot shape and painted a couple of blue straps on it, to make the bottom tip of the tail.
Finally, I cut a piece of wire that was just as long as the tail, folded and taped the tips so that it didn't poke me or someone else, and inserted it to make the tail adjustable, along with lots of pillow filling to give volume. I attached the whole thing to some black shorts, and the tail was finished!
For the trident, the last part of this project, I cut out a couple of pieces of cardboard, following pictures of the actual trident and doing my best to escalate it to real life. I also traced the pattern onto a thick piece of foam, but the spray paint was way too heavy and it dissolved ಥ_ಥ, so I recommend just layering two or three pieces of cardboard together, gluing them to a broomstick or any other solid and long stick or tube using a strong adhesive (I strengthened the attached area using the adhesive and craft paper to mold it!), and spray paint the whole thing brown. I used about two layers of spray paint.

Crafting the horn was the easiest part of this; I cut a square of fabric (it has to be brown fabric, but I didn't have so I just painted it after), then put a wood stick just about the size of it, corner to corner diagonally, surrounded it with a bit of pillow filling, and rolled it to make a cone. For the twisted effect, I glued a piece of cord to the bottom of it and started rolling it around all the way to the tip. To keep it on my forehead, I attach it using eyelash glue.

The big day...
I did my makeup, put on grew on a tail, slipped into my kimono, socks, and slippers, attached grew on my horn and did my hair it was a wig, grabbed my trident, and I was ready to go look for my fellow dragon maids!
I remember this cosplay with so much love, and I had a blast with all my friends at the convention. <3

Here's the link to the stitching methods that I use! Props to this beautiful content creator, she's so talented. (❁´◡`❁)
Thank you for reading, I'll see you at my next one!
#cosplay#cosplayer#cosplay girl#anime#diy#miss kobayashi's dragon maid#elma#kobayashi san chi no maid dragon
2 notes
·
View notes
Text
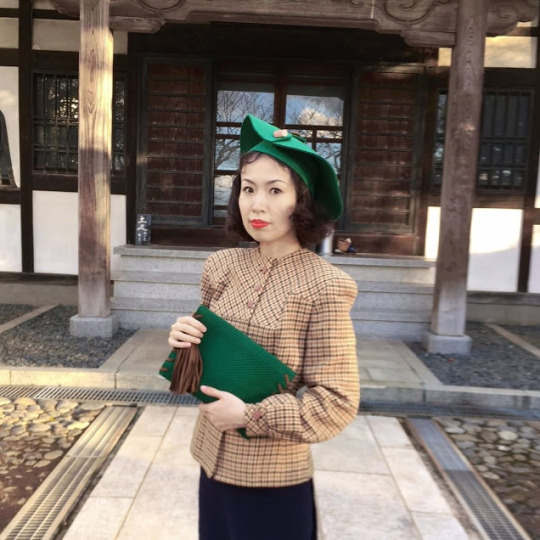
Around the World with Vintage - Tanaka Kiyomi (Akanesasantique)
The best thing about being a vintage girl in the modern world is having the internet and finding other kindred souls from other parts of the world. This month on the Around the World with Vintage series we visit the coastal Yokohama in the beautiful Japan.When I came across Kiyomi whose wardrobe constantly turns me green with envy I just had to learn more about her. The way she puts together her outfits is artistic and detailed and now that I know what she does for living it totally makes sense. She graces my Instagram feed regularly with her posts at Akanesasantique and we chatted about the vintage trends in Japan and how the World War II affected the fashion movement there.
Tell us about yourself
I’m a 38 year old vintage enthusiast, pianist, lover of art. I was born in Tokyo and spent my childhood, in the late 80s, in Los Angeles. I studied classical piano at a collage in Tokyo, and a conservatoire in France. I lived near Versailles for 5 years. During that period, I encountered early 1960s fashion that inspired me to start wearing vintage clothing. I used to frequent booksellers along the Seine river, and bought a lot of old magazines such as ELLE and Modes et Travaux.
Do you live in Yokohama? As a seaport town people are probably dressed more casually do you think there’s a big different between Yokohama fashion to Tokyo or Osaka/Kyoto?
No. I don’t think that people in Yokohama dress more casually than people in other towns. Yokohama has always been an elegant town rather than casual. There was a fashion movement called HAMA TORA(=YokoHAMA TRADditional style) which encouraged classic and elegant dressing. It originated in a university in Yokohama in the late 1970s but this specific style lost popularity in the 90s when the university moved location. In addition, as fast fashion become popular, Yokohama loses is individuality like other cities. Unfortunately, I’m not very familiar with Osaka/Kyoto fashion though I have heard that Osaka fashion is bolder than Tokyo.
Japan is a very fashionable country and vintage has gained popularity but mostly people combine vintage with modern pieces or go for a specific style like rockabilly rather than wearing vintage authentically. You have however chosen to stick to a more authentic style. Why have you chosen to do so and how do people react to your looks?

My closet mainly consists of clothing between 1930s and 1940s.The 1930s is important era in cultural history of 20th century. Replacing culture of 19th which had been ruled by aristocrats and landlords, new cultural trend had arrived.
Through this era, the base of contemporary fashion style and dress code had been matured. I really did not want to be a COSTUME player who turns away from the modernity of after WW1. At the same time, recklessness of today’s fashion, which is not constrained by any dress code, brings discomfort to me.
Meanwhile, there are many kinds of clothing in my closet. The dress used to be owned by a duchess, casual homemade dresses in war time era, and an old stock dress of mail order catalog company, .etc. I love everything of these dresses, the fabric, the sense of colors and the delicate sewing details are amazing. I enjoy mixing and matching them but I’m not concerned with those original value. So, my way of wearing vintage is absolutely free and based on modern spirits not obeying customs in past. I feel like that is a real pleasure of dressing vintage in our modern time.
My vintage looks often attract attention of others, especially on historical tourist spot like a classic hotel. Sometimes I get compliments from fashionable elderly persons and kids.
What do you think about vintage shopping in Japan? I mostly see 1960s and 1970s Japanese vintage clothing but never found any older pieces. Why are they so rare?
There are many vintage shops in Japan. However, I don’t often go to local vintage shop in recent years so I don’t know a lot of them. All I can say for sure, most of vintage items in those shops are clean, easy to wear for vintage beginners. Though they seem more pricey than other countries.
It’s actually impossible to come across the true Japanese vintage as most was destroyed in the WW2. The life of Japanese people was hard for several years after war. For these reasons Japanese vintage before ready-made clothes became popular (before 1960s) very rarely exist in fact.
Are vintage clothes are popular in Japan? Is there any particular style that is more popular than others? I often see rockabilly vintage girls but not as many from earlier decades like you?
No. not really popular. Certainly we see many second-hand clothing stores for re-use, but they are not so fashionable. There are also no one specific popular styles among vintage lovers in Japan. Why not earlier decades? In my personal opinion, modern people tend to prefer loosely clothes with stretch material rather than tightly fit. The vintage clothing before 1950s is cut closer to body. I guess it would be hard to accept its characteristic silhouette.
How do you feel about mixing vintage with modern clothes? I have seen numerous times Japanese women wearing vintage bed jackets as summer cardigans with jeans but rarely see head-to-toe vintage pieces.
That actually seems difficult for me. I feel that mixing vintage and contemporary clothes is more difficult than mixing different eras of vintage together. Modern mass-produced clothing doesn’t easily match with vintage. There is a great difference in fabric, pattern and sewing method between them. In contrast, I wear sometimes tailor-made clothes, they are also modern clothes and not are vintage reproductions, though they go well with vintage.
What do you think are the most sought after vintage pieces in Japan?
That’s hard to say. Because vintage lovers in Japan have respective originalities and strong tastes. Some like rockabilly vintage, some wear American or European vintage with antique kimono, and others mix 1970s vintage and modern jeans, etc. The list is endless. Their needs are too various, more complex than general people. So, I can’t think of any right answer.
Is there a lot of WWII memorabilia still around in Japan? What about WWII-related clothing such as uniform? What is the general sentiment regarding these pieces?
Nowaday we can’t really see WW2 memorabilia. Japan is a defeated country. Most of Japanese are conscious of a feeling of negative heritage about WW2. However, the prewar memorabilia remain even now. For example “Sailor fuku” (=sailor style uniform) for high school girl and graduation gown for female university student, consisting kimono and overskirt called “Hakama” were born in this era, they are still generally worn today . The pre-war Japan was very rich in culture.
We don’t see a lot of Asian vintage girls around, why do you think that is and do you have any advice for any other Asian girls who want to start wearing vintage?
In Asia, there used to be no role models of western fashion because of the undeveloped mass consumer culture. As an exceptional case, in Japan, western fashion lifestyle has become accepted ever since the prewar era . Nonetheless, for many Asian people, vintage clothing is still new culture.
If I was to give some advices for Asian girls who want to start wearing vintage: find a good quality shop and with knowledgeable owner. For beginners, it is not easy to buy vintage online, better to getting advice from experts . I myself havelearned many things from them.
If there is one thing that you want people to know about you, what will that be?
Since I started Instagram and etsy shop in 2016, I’ve met many vintage lovers all over the world. I’ m very content with my vintage fashion life. Furthermore, I’m thinking that I would like to embody the composite art that combines the fashion and music of olden times. Because the base of my aesthetic always presents in the music, though I am attracted to a lot of fields.
#around the world with vintage#atwwv#tanaka kiyomi#akanesasantique#interview#vintage girl#japan#japanese#yokohama#vintage
8 notes
·
View notes
Text
Fashion Tips: Designing at Home
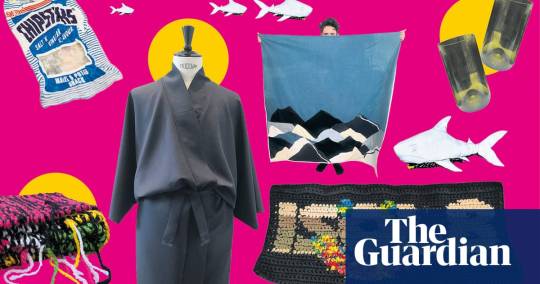
Sew a patchwork quilt with Next in Fashion’s Daniel Fletcher
Creative director and star of Netflix’s Next in Fashion, Daniel W Fletcher has plenty to get on with while in social isolation, designing a collection for Fiorucci as well as one for his own brand. In his down time, he is taking up a DIY challenge to make a patchwork quilt based on a dress he made during the filming of Next in Fashion, using other designers’ leftover scraps. The design – inspired by concerns over the melting polar ice caps – is an arctic landscape.
Facebook Twitter Pinterest
“Ever since the show, I’ve been inundated with requests to make similar quilted items, so I thought this was a good opportunity to show people how they can do so themselves.
“You can make it from any leftover fabrics you have. This time, I used some leftover damaged denim from my studio as the quilt base. I don’t imagine everyone has that lying around so use what you have.
“Heavier is better for the base so it can hold the appliqué – maybe some old curtains or an existing blanket that needs some love. If you don’t have enough to do a blanket, you could use the same technique to make a cushion. For the appliqué, it could be old clothes, tablecloths, tea towels – anything you can get your hands on.
“I went quite abstract with my pattern, but you could come up with a more elaborate design.
“Mine took me five hours on a sewing machine. You could hand sew it instead. It’s going to be a much longer process but could be very therapeutic, which is something we could all do with right now.”
Facebook Twitter Pinterest
Difficulty level: intermediate
Equipment needed: an old blanket (or similar), scraps of fabrics, thread and needle
How to:
“For the nitty-gritty, head over to my Instagram – my wonderful sister captured the whole process.”
A post shared by DANIEL w. FLETCHER (@danielwfletcher) on Mar 27, 2020 at 12:52pm PDT
Crochet a small rug with menswear designer Liam Hodges
Facebook Twitter Pinterest
Liam Hodges has recently moved house, so his time in self isolation has been spent unpacking and making rugs.
“I learnt to crochet last October and have found it really relaxing. For our AW20 collection, we crocheted a lot of squares as embellishments. I’ve kept it up and even tried to make a skipping rope when I first went into isolation.
“I had been wanting to make some rag rugs and started working out how to crochet graphics into them. I made the graphic in Photoshop so that each pixel represented each crochet stitch.
Facebook Twitter Pinterest
“I thought doormat-size was perfect. I have mine by the door to remind me to keep positive and take the [government] advice about staying in seriously.
“It took me around two and a half hours to complete and is made up of old, shredded T-shirts for the coloured section and yarn made using Wool and the Gang offcuts for the main black areas, so it is entirely made from waste.”
Difficulty level: intermediate
Equipment needed: an old T-shirt, a crochet hook, yarn and scissors
How to:
“Use our how-to digital zine on Instagram, which has the pattern as well as instructions on how to crochet.”
A post shared by LIAM HODGES (@liam__hodges) on Mar 27, 2020 at 4:56am PDT
Sew a shark mascot with designer Christopher Raeburn
Facebook Twitter Pinterest
Designer Christopher Raeburn’s team are adapting to the current situation by releasing weekly creative tasks via their #RaeburnAtHome initiative.
“This project is to make one of our shark mascots. We have always featured animals in our collections, initially as a way to highlight and support endangered species through our WWF UK partner. The Shark is one of our most popular animals; we keep it in our collections each season, but it always evolves.
“You need no more than one square metre of fabric – even less if you are conscious of pattern placement for waste reduction. Using a variety of smaller cuts of fabric is encouraged though as this adds pops of colour and texture to the final shark.
“Not only is reusing and repurposing old fabric a more interesting way of working, but extending the lifetime of garments is instrumental in reducing planetary impact. When people are spending more time at home than ever before, now is the chance to pull out those bits that we no longer use and give them new life.
“Unless you are an absolute master, it should keep you busy for about 10 hours. We only recommend a sewing machine for ease and speed – top marks for effort go to anyone tackles it by hand.”
Difficulty level: advanced
Equipment needed: a sewing machine, fabric, scissors, thread and paper.
How to:
Sew a kimono-inspired garment with designer Edward Crutchley
Facebook Twitter Pinterest
Designer Edward Crutchley’s lockdown aim is to set himself a project each day. His first was to cut a pattern for and sew a one-piece kimono-inspired garment. Next up is making miniature sculptures of the kings and queens of England using modelling clay.
“How to make Japanese clothes by John Marshall is a book I have on my shelf that I thought it would be great to lose myself in during isolation.
“I love traditional Japanese clothing and now is the perfect time to study. What I love about kimonos is that they are traditionally dictated by the fabric – they are the width they are because that is how wide the looms could weave. For a fabric geek like me, that’s a dream.
“A traditional kimono pattern looks like some different-length rectangles put together, but nothing is ever that simple and it takes a lot of skill to construct a traditional kimono properly. The one I made is much, much easier.
“I used three metres of fabric left over from the last collection, but you could make it with two metres if it’s 150cm wide, or you can easily add seams to the patterns or patchwork fabrics together. Repurposing old curtains or a bed sheet would be perfect.
“It took me around four hours to complete – there are only three seams and three hems. I tried to make it as simple as possible.”
Difficulty level: advanced
Equipment needed: a sewing machine, two to three metres of fabric, thread, scissors, paper and dressmaking pins.
How to:
“The pattern I made is available to download for free here. The step-by-step sewing guide is saved on my Instagram highlights.”
Make a shrunken crisp-packet necklace with Tatty Devine
Facebook Twitter Pinterest
While social distancing, Rosie Wolfenden and Harriet Vine, the designers behind Tatty Devine jewellery, are doing daily making challenges.
“It’s amazing for your mental health and the perfect antidote to these strange and unsettling times. This so-called shrinky necklace is something we did as kids. We first made one as Tatty Devine in 2001. It was very early days, when we made jewellery from whatever we could get our hands on. We enjoyed having to eat crisps.”
Difficulty level: beginner
Equipment needed: old crisp packets (not foiled or metallic, such as Chipsticks or many supermarket own brands); a chain necklace (whether new or something you already own); greaseproof paper, a baking tray, a damp tea towel (for safety reasons), an old tea towel, a hole punch, a regular jump ring and two pairs of flat-nose pliers.
How to:
Set your grill to medium.
While the grill is warming, fold the greaseproof paper to make it into rough envelope shapes and pop your empty food packets inside – one wrapper per envelope.
Put the envelopes on a baking tray under the grill. The packet will start to shrink and curl up. You don’t want them to burn or blister so watch closely.
As soon as they are shrunken enough, remove the baking tray, quickly place a folded tea towel on top of the envelope and slam your hand down to flatten your “shrinky”.
Use a hole punch to make a hole somewhere on the packet.
Open a regular jump ring with the pliers and thread the packet on to the jump ring, then put the jump ring on to the necklace and close it.
You can stop with one pendant or layer up for a charm effect.
Knit a scarf with dancer Meshach Henry
Facebook Twitter Pinterest
Despite having no previous knitting experience, dancer Meshach Henry has made three scarves in as many days, documented on Instagram by his partner, the Radio 1 DJ Nick Grimshaw.
“I always said I would learn a new skill like plumbing or plastering if I ever had a lot of time on my hands. But they aren’t ideal skills to practice in this current situation. So, having seen knitting supplies in a craftshop window recently, I thought, ‘Here’s my new hobby.’
“I purchased a thick wool because it looked easier to use and less fiddly. I bought 10mm knitting needles, which I thought were an average size but later found out are strangely big – but I’m really happy with the chunky effect they produce.
“What I like about knitting is that you can see your physical product. As a dancer, I rarely get to see my own work, so to be able to see and hold this tangible thing is a whole new world for me.
“My intention is to move on to knitting jumpers. I want to create a matching jumper for every scarf, just to keep things interesting.”
Difficulty level: beginner
Equipment needed: knitting needles and wool
How to:
“I taught myself by watching an eight-minute Knitting for Total Beginners tutorial on YouTube. The tutorial taught me how to cast on in the first instance. Then there are follow-up links to a second video that teaches you how to change knitting style and how to cast off.”
Facebook Twitter Pinterest
Make drinking glasses with former British Vogue fashion director Lucinda Chambers
Facebook Twitter Pinterest
Lucinda Chambers is co-founder of fashion brand Colville and online shopping platform Collagerie and was fashion director at British Vogue for 25 years.
“I was in Paris six months ago having a glass of water in the Bon Marché and I noticed the glass looked suspiciously like the end of a wine bottle.” When Chambers investigated she found a world of home crafters making their own tumblers from pre-used wine bottles.
“I found an inexpensive kit on Amazon,” she says. “Each glass is a labour of love as I sand them by hand; it’s strangely therapeutic.”
Difficulty level: medium
Equipment needed: empty glass bottles, a glass cutter kit (available online, for instance from Amazon).
How to:
“The kit has everything you need to make the glasses: a stand, saw and markers that you place on the empty bottle at the height you require your finished glass to be. You can make French-style low tumblers or something taller. Once you’ve cut the bottle you need to sand the cut edge smooth.”
The internet is full of videos, such as this one, that show you more details.
This content was originally published here.
0 notes
Photo

Hong Kong is a treasure trove of sorts given its culinary delights, bustling skyline, dynamic culture, rustic charm, and rich landscape among many others. With that in mind, you would need a lifetime in order to experience just about everything — however, with just this post, I can get you started with the top 10 fun things to do in Hong Kong to help make your stay a memorable one!
Naturally, I won’t be discussing most of the typical must-do’s in the city such as visiting Victoria Peak, Victoria Harbour, Lan Kwai Fong, etc. because you can refer to my Hong Kong itinerary guide for that.
» MUST-READ: DIY Hong Kong Itinerary (with Macau Day Trip)
Instead, I’ll be listing below some exciting city activities that you, your friends or your family can enjoy for the remainder of your stay!
.title-bar:after, .title-bar:before, .title-bar:after, .title-bar:before, h2{ border-color: }
Things to Do in Hong Kong
1
Say goodbye to dark, skewed or ‘out of focus’ vacation photos that are taken by strangers! With SweetEscape, you can finally capture your travel experiences perfectly with the help of professional photographers — no matter if you’re traveling alone, with your friends or with your family.
To date, if you book via Traveloka, you can choose between an exclusive 2-hour or 1-hour photo shoot session. Once that’s done, you will receive up to 40 high resolution photos that you can download online!
If you ever need some location ideas, other than the typical spots, do consider the following ‘Instagrammable‘ places in Hong Kong:
Yik Cheong Building or ‘Monster Building’ and Montane Mansion at Quarry Bay
Cho Hung Estate’s rainbow-colored estate buildings
Western District Public Cargo Pier, often called as ‘Instagram Pier’
Street art at Graham Street, Sheung Wang, or Rich View Terrace at Tank Lane
Lok Wah South Estate’s round structures
2 .
Renting traditional dresses is an activity that has been gaining popularity in the recent years. In fact, Japan and South Korea are well-known for their respective kimono rental and hanbok rental shops.
Nowadays, Hong Kong has a similar service through a shop called ‘Yan Shang Kee‘. For a fee of about HKD 400, they rent out qipao or cheongsam — a tight-fitting traditional Chinese dress — for a whole day. This price already includes hairstyling, accessories for rent, as well as the freedom to choose your qipao of choice.
It helps to note that the shop offers qipao in different sizes, lengths, patterns and number of buttons. True enough, this will certainly be one of the fun things to do in Hong Kong that you must NOT miss out on!
3
What better way to explore Hong Kong’s nightlife scene than to go on a pub crawl with experienced local guides, right? The best part is that you’ll get to enjoy this all with like-minded people from all over the world who are also looking to have some fun!
Hong Kong Pub Crawl is the top provider for this; after all, their ‘crawl’ is famous for its off-the-beaten track venues and excellent drink deals. Basically, their signature LKF (Lan Kwai Fong) Crawl in Central runs every Thursday and with it, you’ll get to try free shots at different bars, enjoy free VIP entry to the hippest club in the city, as well as be accompanied by a professional photographer who will document the epic night!
So gather up your friends — it doesn’t even matter if you’re going solo — and enjoy the night away!
4Photo from nomadsteam/Shutterstock
Not a lot of people know that there’s so much more to the city’s urbanised center because 2/3 of Hong Kong is actually made up of the countryside, countless small mountains and several islands. As such, hiking is a must that you should do on your list of things to do in Hong Kong!
Lion Peak Hill is one of the most popular hikes and this website even sums up all of the trails in the country (labeled accordingly with difficulty, time, etc.). But if you want something that’s out of the bustling area, head on over to the famed Dragon’s Back.
With this hiking tour, you can go through the trail with a professional guide. You will get to witness mountain ridges and forest trails as it leads up to the white sands of Tai Long Wan (Big Wave Bay) — where you can also try surfing!
5Photo from SAHACHATZ/Shutterstock
The vibrant city is a paradise for foodies, that’s why dining out is a must on your things to do in Hong Kong — better yet, you must go on a guided street food tour!
With the help of a local, you can try out authentic dishes and fare as you wind through culinary places, bustling markets, and dai pai dong (food stalls) in Causeway Bay and Wan Chai among many others.
Some of the many things you’ll get to try are Hong Kong’s well-loved puffy egg waffles, milk tea, clay pot rice, and youtiao (deep-fried breadsticks) — food choices that will surely leave you wanting for more!
6
Tai chi or taiji is a Chinese martial art that’s not only practiced for its defense training but also for its health and meditation benefits. More recently though, it is mostly practiced as an elegant and peaceful form of exercise that can be enjoyed by just about anyone.
So, why not give it a try? After all, it will surely be one of the most fun and unique things to do in Hong Kong that will make for a memorable experience for you!
For this, I highly recommend signing up with Taichi Place. All of their instructors are certified local masters with more than 10 years of teaching experience and they have developed an easy way to help non-Chinese people discover the essence and history of tai chi. In just an hour, you will learn beginner hand forms, proper stances, and Qigong breathing exercises that will leave you feeling better in both body, mind and spirit.
(NOTE: Classes will be done outdoors and the masters can all speak English).
7
Step into the spotlight and meet over 100 incredibly lifelike wax figures in the 10 interactive zones that are found at Madame Tussauds™ Hong Kong! Besides, the personalities are not only limited to Western stars but also those who are famous in the East as well such as Jacki Chan, Yaoi Kusama, Miss Universe Pia Wurtzbach, and more.
Found on top of Victoria Peak, you just can’t miss out on this attraction when you’re already riding up the Peak Tram or visiting the Sky Terrace 428. After all, this might just be the closest we can get to these famous people! (*fingers crossed*)
8
As the largest theme park in the city, Hong Kong Disneyland is definitely one of the top fun things to do in Hong Kong! To date, it features seven (7) themed areas namely Main Street, USA; Fantasyland; Adventureland; Tomorrowland; Grizzly Gulch; Mystic Point; and Toy Story Land.
Of course this isn’t just a place for children because it caters to people of all ages with the number of attractions, rides, shows and parades that the park offers. Just always stay on your toes though when you’re up and about because a lot of Disney characters are open for meet-ups and pictorials!
9
If you rather want crazier rides, Hong Kong’s OceanPark is your next best bet! It helps to note though that this is an amusement park, animal theme park, marine park and oceanarium all rolled into one — so there is LOTS to do in this place.
Some of the usual favorites are the the Polar Adventure, Old Hong Kong, Thrill Mountain, Rainforest, and Aqua City among many others. If you’re one for views, don’t forget to cross OceanPark via a cable car to get an amazing bird’s eye view of it all.
10
Step it up a notch and do a helicopter tour in Hong Kong! It’s quite luxurious, I know, but if you’ve got the budget for it or if you want to celebrate a special occasion, then this is a must on your itinerary.
The Peninsula Hotel currently offers varying packages for helicopter tours in Hong Kong such as the following:
18-minute Group Tour: You will share a 6-seater helicopter with other booked passengers and it will fly over the Victoria Harbour skyline and the beaches or bays at South Hong Kong Island.
18-minute Private Tour: For something more personal, this can be a private flight for two (to a maximum of six persons) and it will already include lunch or dinner. The route will be the same as the former.
30-minute Private Tour: Want to do it longer? This option goes to Kowloon City, Sai Kung, and the Hong Kong Geopark on top of the former stops.
45-minute Private Tour: If you also want to head over to the New Territories, Big Buddha and Lantau Island, then this should be your choice of tour.
.title-bar:after, .title-bar:before, .title-bar:after, .title-bar:before, h2{ border-color: }
Overall
There are absolutely a ton of other top things to do in Hong Kong that you must include in your itinerary, but like I said, this is a start.
All in all, I hope that this will help make your trip an experience of a lifetime.
How about you?
What do you think of these things to do in Hong Kong?
Which activity would you like to try the most?
Or have you done any of these before? How was it?
Did you like this article? Follow me on Facebook, Twitter, Instagram, or YouTube and be notified about my newest posts and updates!
The post Top 10 Fun Things to Do in Hong Kong appeared first on I am Aileen.
#>.</span></p>#bxtitle_123874655.box-title.box-title-line-middle#bxtitle_123874655.box-title.box-title-line-around#ed2665#ed2665;#>.</span><br#ffffff;#>.<br#>4</span></span><strong><span#>.</span></strong></p>#878686;#>5</span></span><strong><span#>6</span></span><strong><span#>8</span></span><strong><span#>10</span></span><strong><span#bxtitle_1439560255.box-title.box-title-line-middle
0 notes
Text
Talk about my work - The Knit Monster
Knit Monster
Towards the start of my exploration I decided to experiment with random pieces of wool, from different kinds of fibers and blend them together to create an unusual piece. This was mainly inspired by two aspects. First was this advert by net-a-porter with the women wearing a fluffy coat and secondly was the unusual nature of Japanese street fashion.
At this point I knew for sure I wanted to incorporate wool.
I gained a fascination in Japanese street fashion and through research I discovered a Japanese street fashion known as 'Lolita'.
Lolita holds a controversial name due to the 1955 novel by Vladimir Nabokov which explores dark themes. However I've understood that Subculture share the same name, for the Japanese have merely expanded and adapted the idea of Lolita as their own. And that there is no sexual connections.
A brief understanding of Lolita consists of outfits full of frills, lace, bows and they wear primarily pink. Their outfits incorporate childlike aesthetic such as bonnets and carrying dolls. Lolita is a blend of three main influences, number one being Marie Antoinette and the rococo period which is an 18th century artistic movement and style with its big billowing gowns.
Secondly it is inspired by Victorian clothing which is from 1837-1901 the style is particularly interested with children's clothing for they wore puffy skirts to the knee and bonnets. And thirdly Lolita is inspired by the Meiji era which was from 1868-1912, this was a time when Japan was introduced to western style clothing. So Japan started to blend their own culture into the clothing such as the patterns and the general aesthetic of the outfits.
With this very limited amount of information on Lolita it lead me to being really interested in this subculture. I wanted to create a piece of clothing from this fashion by using knit and sewing. I instantly made a pink lightweight kimono jacket with short sleeves and a belt. I trimmed it off with lace and ribbon. However I felt it too bland, it looked like I was trying to make a outfit for Lolita rather then being inspired by it which enables me to incorporate elements into something my own. Sadly I can't find my photos of this jacket. I also looked into Lolita through books however this one was more picture based with no back ground information.
I wanted to explore the traditional kimono be seeing how it was first established to how it has evolved through time. Short jacket kimonos are used in Lolita and are modernized to fit the Lolita style. I also looked into kimono designers such as Jotaro Saito who seeks to free the kimono from the confines of tradition by making them more modern and accessible.
I then researched the Lolita rules. Such as skirt length and sock height all being so strict and refined. People in the community call those who don't look up to scratch as being lace monsters. As soon as I discovered that I was hooked I immediately wanted to work with that terminology and wanted to create something using the already made kimono jacket and infuse knitting to make an interpretation of this so-called lace monster. I discovered this by reading the gothic and Lolita bible which is a magazine that explores what people are currently wearing and places Lolita's can hang out. I then understood that Lolita's who wear kimono jackets are called Wa Lolita. I also began to understand the Lolita brands. A Lolita online helped me also understand Lolita and this post shows what she explained to me I also showed the emails she sent me in the post. She also linked me a video to watch and it's called sugar coated a short documentary which I also posted, it highlights westerners trying to emulate the Lolita style and what they think of the culture.
With a fuller amount of knowledge I made a small prototype of the wool mixed together with lace to see if this would work, the only thing I decided to take out was the sewing aspect. Simply due to the fact I'd need a industrial machine to sew the thick wool. I did have an induction at the school of fashion with the industrial machines but sheepishly didn't enjoy it due to the environment being very strict and ridged and I didn't feel they understood why on earth I need to crazily stitch wool in an abstract manner. So I dropped the stitch aspect which saves me time and I can focus on the wool. This post shows the patterns I used to create my jacket, I used them to create my own pattern by hand and some knitting element for the belt which I am unsure on whether I need it. I liked the idea of the term monster. So I knew this wording was what I wanted to create.A knitted monster which hinted to a kimono style.
I've been knitting nearly everyday for hours on end since October I madly didn't stop till Christmas Eve. Within that time I had a mental plan of how I wanted to make this however being as I can't exactly draw it for I don't know what the ending will look like I found it hard to exactly get my point across. I wanted to cover this jacket with my knitting pieces to create a knitted monster.
My knitting consists are three main knit styles, knit purl and a wrap stitch. Combining all three contorts the wool so it pulls the wool into many directions rather then in being flat. To put it simply so those who don't knit I can understand. To make the knit curve, let's say I have ten stitches on the needle I only knit a few so I don't complete the line then swap the needles around so I knit back to wear I started. I do understand that what I said is confusing that's why I tend to watch YouTube to understand then read patterns.
I didn't start fully applying the wool onto the garment until the beginning of December. So that meant I had two months worth of knitting to play around with. At this stage I created big sleeves and it covered the jacket entirely. Paula gave me her mannequin with arms which works great to demonstrate the large bell sleeves. Which for me give a more Japanese vibe to the abstract garment. To attached the wool to the garment a sewing machine is to fragile to do it and would break the needle so everything is all done by hand.
Whilst knitting I haven't necessarily looked into depth. However I have been researching and understanding knitting styles and techniques on how to construct and contort wool. I found visual knitting mood boards incorporating different artists. My favorite is mariannne moodie who's combination of thick and thin wool giving a fluffy appearance. I also looked at knitwear designers. Such as Tiffany Godoy who knits in an abstract style.
I left researching late for I was originally looking at a subculture on a whole and now I'm more confident in what I'm making I can now look at artists who have explored wool in a similar manner.
For now my garment or whatever it will be for who knows how my wool will evolve, Has turned into something on its own rather being solely Lolita. I still have to knit into the garment, I have to add more beading, sequins, lace and ribbon. I like how light catches it to just give it that extract individual style.
I will also like to incorporate into my work my knitting and to select a few pieces I have knitted, photograph them and just explain a bit on how it looks. I didn't do this for I was honestly just so focused on making and pulling everything together to see if my idea worked to photograph more of my progression.
And finally For future display I am interested in hanging the garment but I am not to sure how to go about that giving the age of the building. Also if I choose this I would need to neaten the lining. Or for display I could put the garment on a mannequin from a height to it can fall down to the grown and swoop around the floor.
1 note
·
View note
Text
Best Selling Products for Online Business Owners
The blog post Best Selling Products for Online Business Owners is from heartmade.es.
Hi flower!
This week I’m talking about Best Selling Products for Online Businesses. I’ve been thinking a lot about it lately and I decided to do a video (my very first video recording myself talking…) to give you my advice and help for your online businesses.
So in this video I’m talking about:
The most incredible fact I discovered about best selling products online
How you can take advantage of that
How to not repeat my mistakes
How important they are for your branding
Ready? Here you have the video:
If you want me to help you find you ideal clients (aka butterflies), I just need your name & email and I’ll send you all my tips. Find out more about how to join my garden of blooming businesses, or just fill this form:
Now, for the ones who like better reading than listening or watching…
1. There will always be a best seller:
I still feel impressed by this fact, but it keeps happening to me. The first time was when we created Heartmade Soaps. It was my first “serious” time opening an Etsy shop and what we enjoyed the most was creating the concept behind each collection.
Because I’m crazy about travels, I wanted to have a soap collection inspired by places around the world… And one of the products was a deep purple-fuchsia soap smelling like India.
We took an amazing photo of it and we designed the tag and the wrapping as we did for all the rest of our soaps.
And guess what? That product sold much more than any other! Why? I guess it’s because the photo was so bright and stunning that people felt tempted to smell that weird soap
Then the second time I had an experience with a “best seller” product was when I quit my job and started creating handmade products again. At that moment I was learning how to sew, so I started with the basics: pencil cases.
I went to my favorite shop and found a fabric perfect for me: a colorful world map atlas.
I couldn’t do anything else than buying it (even though it was 5 times more expensive than the average fabric price).
Then I took also a great picture of the pencil case and two days before my birthday I made the first sale of my map pencil case. From there, things kept growing until years after when I was so bored of that product that I even did not wanted to renovate the item in Etsy to avoid dealing with sewing it again.
Yes, I know I should had hired someone to sew it for me but I’ve always been against stock…
Anyway, continuing with my examples of bestsellers: When I launched my kimono line, this two were the best sellers: they both are neutral and appealing to both men and women. I found other fabrics from the same collections and bought them to create new products and they sold perfectly too.
I could keep telling you examples, but I’m gonna try to make it quick because I don’t want to bore you with my stories…
You may be thinking this only happens with physical products but no… From my watercolor desktop wallpaper, there’s also a best seller: this one.
And from my wedding stationery suites too. Here you have it:
And from my digital clip arts… this one: http://ift.tt/2mREOBa
So yes, that’s the first fact I wish I knew before starting selling products, because knowing that you can be clever and take advantage of the situation, which is the next point of my list.
2. Take advantage from your best sellers:
What I wish I would have done before, back in my Etsy days, is to create a full collection of products from my best selling map pencil case.
It’s not a mystery. Actually, all my friends, boyfriend and family kept telling me to do it and I kept ignoring them…
Why?
Because I was blind by my passion and creativity. I have a huge problem: I get tired of things very quickly. I’m always searching for new ideas, always want to try something new… And working on new products using the same fabric all over again was against my happiness.
Then few years after I discovered several brands doing what I was supposed to do. There was an infinity of products made from “my” best selling fabric.
But of course I don’t blame them. I admire them!
They were clever, they saw an opportunity and took advantage of it.
I couldn’t even prove that I started using the fabric before or think that they saw my success and tried to imitate it… Thinking like that would be so naif… The fabric was there, at the most famous fabric store in Barcelona, ready to buy and use.
So they had simply more success than me because they put their business before their hearts.
But hey! I’m not sad for that, I know myself and what I’m always ultimately looking for is my happiness… So I knew that in that moment creating new things with different fabrics was my happiness, and I chose that, and I’m happy for that
Buuuuut I still want to tell you that story because if you want to do things right, then I recommend you to not follow my steps. If I could talk with my self me 4 years ago I would tell me:
“Claudia, listen to everybody. Please find few hours and create 3-4 new products. You can enjoy it a lot! Think about designing new patterns, searching for the materials you need, getting inspired by styled photography… You will love it more than you think, come on! Let’s do it together!”
And actually, two or three years after I finally did it. I created an iPad sleeve, a clutch and a wallet from the same fabric. And guess what? I got featured in ELLE Magazine and many other magazines and blogs just for those products!
So yes, my friend… Listen to me and try to take advantage of your best selling products
Now is your turn to take action:
Brainstorm and list ideas for new product creations following your best seller strongest points. It might be using the same fabric or design as I did with my pencil case, or it could be finding similar materials like I did with my kimonos, or just follow the same design style like I did with my wedding invitations.
Take your agenda or planner and find a spot to create 3 new products. Then take stunning pictures and share them with me! I can’t wait to see your new line
3. It’s all about the branding:
I can’t say this is a mistake I did because my designer veins always pushed me to do it… But I see many handmade & online businesses ignoring the fact that their brand must be as stunning and original as their products.
The best thing you can do is find out what’s making your best selling products so appealing to your clients and make it part of your branding.
I want you to understand that the most important thing in a brand is to know your ideal client, or (how I like to call him) your butterflies.
If you have no idea of what I’m talking about I recommend you to join my free course on how to find your ideal butterflies.
For me, you are like a plant. Your business is a flower and your clients are butterflies.
Are you ready to find more butterflies?
The first step is to know how well do you know your butterflies, and you can do it using my checklist.
Fill out this form and you’ll be ready to download my checklist!
Can’t wait to help you find more butterflies and bloom your business
xo,
Claudia
The blog post Best Selling Products for Online Business Owners is from heartmade.es.
from Best Selling Products for Online Business Owners
0 notes
Last Seen Blogs

sunshine28blogs
Sunshine28

sigmaticsx
SigmaticsX's Stufferonis

franksimmspa
Frank G. Simms II, P.A.

supplementupdatescom
Dietary Supplements and Minerals News | Supplement Updates