#i made these on ezgif don't at me
Text
Wayne Sermon & Dan Reynolds | Mercury World Tour - Buenos Aires, Argentina
#i made this with ezgif don't judge me all my versions of photoshopbroke#wayne sermon#dan reynolds#imagine dragons#my gifs*
13 notes
·
View notes
Text


People liked to act surprised that they had ended up finding each other. As if it didn't make complete sense that these two girls, lost and broken so many times that they sometimes forgot who they'd been to start off with, would find a home in each other's touch. It's more surprising that it took them, the self-proclaimed geniuses that they were, so long to see what was right in front of them.
#strangerdale#nancy x betty#lads please do not ask me how long this took me#please ignore the colouring i was working exclusively with ezgif and i also don't know what im doing#this is unhinged right? i've lost sight of what that word even means anymore#bonny this is once again your fault#i need to go to sleep right now but what if i made some cheryl and steve gifs... what then
5 notes
·
View notes
Text
GIFMAKING TUTORIAL: PHOTOPEA (for Windows)

Screencapping
Gif Width/Size Limit/Ezgif
Loading Frames
Cropping and Resizing
Rasterize/Make Frames
Sharpening
Coloring (not detailed. Links to other tutorials included)
Exporting
Obligatory Mentions: @photopeablr ; @miwtual ; @benoitblanc ; @ashleysolsen
Definitely check out these blogs for tips, tutorials and resources, they're a gold mine. Finally I recommend browsing the PHOTOPEA TUTORIAL / PHOTOPEA TUTORIAL GIF tags.
DISCLAIMER: English is not my first language and I'm not an expert on what I'm going to discuss, so if anything's unclear feel free to drop another ask.
1. SCREENCAPPING -> PotPlayer (the one I use) or MVP or KMPlayer
INSTALL PotPlayer (tutorial)
Play your movie/episode and press Ctrl + G. The Consecutive Image Capturer window will pop up. Click Start to capture consecutive frames, Stop when you got what you needed.
Where it says "Image Type -> Format" I recommend picking PNG, for higher quality screencaps.
To access the folder where the screencaps are stored, type %appdata% in windows search, open the PotPlayerMini64 folder (or 32, depending on your system) and then the Capture folder. That's where you'll find your screencaps.

Admittedly MVP is a lot faster but I prefer Potplayer because it generates (at least in my case) higher quality screencaps. MVP kind of alters the hue and it made it harder for me to color my gifs. Still, if you're interested in how to use it, I recommend this tutorial.
As for KMPlayer, every tutorial out there is outdated and I couldn't figure out the new version of the software.
2. GIF WIDTH/HEIGHT, SIZE LIMIT, EZGIF OPTMIZER
At this point you should already know how big your gifs are going to be. Remember the ideal gif width(s) on tumblr are 540 px / 268 px / 177 px. These specific numbers take into account the 4 px space between the gifs. No restrictions on height. Here are some examples:

You can play around with the height (177x400, 177x540, 268x200, 268x268, 268x350, 268x400, 540x440, 540x500, 540x540 etc) but if you go over the 10 MB limit you'll either have to make your gifs smaller/delete some frames.
OR you can go on ezgif and optimize your gif, which is usually what I do. The quality might suffer a little, but I'm not really (that) obsessed with how crispy my gifs look, or I'd download photoshop.

Depending on the gif size, you can decrease the compression level. I've never had to go over 35. It's better to start at 5 (minimum) and then go from there until you reach your desired ( <10mb) gif size. Now that I think about it I should have included this passage at the end of the tutorial, I guess I'll just mention it again.
3. LOAD YOUR FRAMES
File -> Open... -> Pick one of your screencaps. The first one, the last one, a random one. Doesn't matter. That's your Background.
File -> Open & Place -> Select all the frames (including the one you already loaded in the previous passage) you need for your gif and load them.
(I recommend creating a specific folder for the screencaps of each gif you're going to make.)
WARNING: When you Place your screencaps make sure the Crop tool is NOT selected, especially if you've already used it and the width/height values have been entered. It will mess things up - I don't know why, could be a bug.
You can either select them all with Ctrl+A or with the method I explained in the ask: "when you want to select more than one frame or all frames at once select the first one, then scroll to the bottom and, while pressing Shift, select the last one. this way ALL your frames will be selected".
WARNING: Depending on how fast your computer is / on your RAM, this process may take a while. My old computer was old and slow af, while my new one can load even a 100 frames relatively fast, all things considered. Even so, I recommend ALWAYS saving your work before loading new frames for a new gif, because photopea might crash unexpectedly. Just save your work as often as you can, even while coloring or before exporting. Trust me, I speak from experience.
Now you can go ahead and delete the Background at the bottom, you won't need it anymore.
4. CROPPING AND RESIZING
Right now your screencaps are still smart objects. Before rasterizing and converting to frames, you need to crop your gif.
Technically you can rasterize/convert to frames and then crop, BUT if you do it in that order photopea will automatically delete the cropped pixels, even if you don't select the "Delete Cropped Pixels" Option. Might be another bug, unclear.
Basically, if you crop your gif and then realize you cropped a little too much to the left or the right, you can go ahead, select the Move Tool (shortcut: V) and, after selecting ALL YOUR FRAMES, move them around on your canvas until you are satisfied. You won't be able to do this if you rasterize first and then crop, the excess pixels will be deleted. I don't know why, I found out by accident lol.
CROPPING
(Cropped pixels: the gray/opaque area outside of the selected area. That area disappears once you press enter and crop, but the pixels are retained, so you can move the frames around and reposition them as you like. In this case I could move the frames to the left and include Silver's figure [curly guy in the foreground] in the crop)
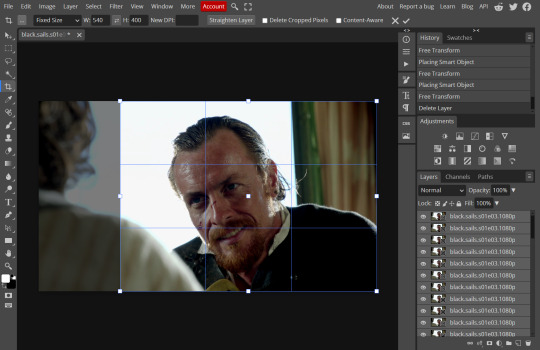
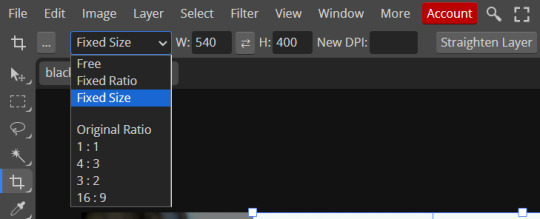
After deleting the Background, you will need to select all your frames (using the Shift key), use the C shortcut on your keyboard to choose the Crop tool. Or you can click on it, whatever's more convenient. Once you do that, a dropdown menu is going to appear. You need to select the "FIXED SIZE" option, as shown in the following screencap.
Once you do that, you can type in your desired width and height. Do not immediately press enter.

Your work area should now look like this. Now you can click on one of the white squares and enlarge the selected area until the edges are lined up. You can then move it around until it covers the area you wish to gif.
WARNING: to move the big rectangle around, you're gonna have to click on a random point of the work area, PREFERABLY not to close to the rectangle itself, or you might accidentally rotate it.

See? When your cursor is close to the selected area it turns into this rotating tool. Move it away until it reverts to your usual cursor, then you can start moving the rectangle. Press Enter when you're satisfied with the area you selected.
RESIZE
This isn't always necessary (pretty much never in my case) - and it's a passage I often forget myself - but it's mentioned in most of the tutorials I came across over the years, so I'd be remiss if I didn't include it in mine. After cropping, you'll want to resize your image.
IMAGE -> Image Size...

This window will pop up. Now, should the values in the Width and Height space be anything other than 540 and 400 (or the values you entered yourself, whatever they might be) you need to correct that. They've always been correct in my case, but again. Had to mention it.
5. RASTERIZE & MAKE FRAMES
Now that your screencaps are cropped, you can go ahead and convert them.
LAYER -> Rasterize (if you skip this passage you won't be able to Sharpen (or use any filter) on your frames at once. You'll have to Sharpen your frames one by one.
Photopea doesn't feature a timeline and it's not a video editor, which makes this passage crucial. When you select all your smart objects and try to apply a filter, the filter will only by applied to ONE frame. Once you rasterize your smart objects and make them into frames, you can select them all and sharpen them at once.
Unfortunately this also means that you won't be able to - I don't know how to explain this properly so bear with me - use all smart filters/use them in the same way a photoshop user can. For example, you can sharpen / remove noise / add noise / unsharp mask... but you can't act on those filters in the same way a photoshop user can.
When you work on smart objects you can change the blend mode - which is critical if you decide to use a filter like High Pass. If you simply apply a high pass filter on photopea you won't be able to change the blend mode and your gif will look like this (following screencaps). Or rather, you will be able to change the blend mode by clicking on the little wheel next to "High pass" (circled in green in the 2nd screencap), but you'll have to apply the filter to each frame manually, one by one.

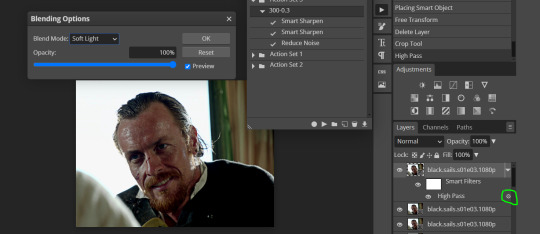
Then you can rasterize/make into frames, but it's extremely time consuming. I did it once or twice when I first started making gifs and it got old pretty soon haha.
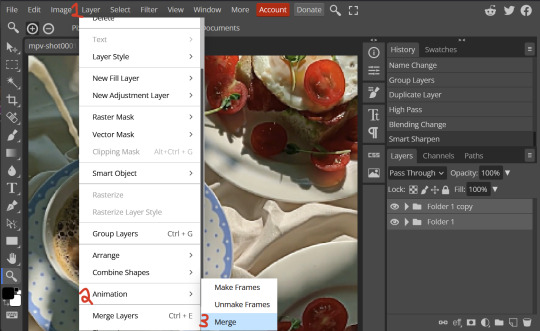
Layer -> Animation -> Make frames. This passage will add "_a_" at the beginning of all your frames and it's what allows you to make a (moving) gif. As I said in the ask, if you skip this passage your gif will not move.
6. SHARPENING
Some people prefer to color first and sharpen later, but I found that sharpening filters (more or less) dramatically alter the aspect of your gif and already brighten it a bit (depending on your settings) and you may end up with an excessively bright gif.
Now, sharpening settings are not necessarily set in stone. The most popular ones are 500/0.4 + 10/10, which I use sometimes. But you may also need to take into account the quality of the files you're working with + the specific tv show you're giffing. I've been using different settings for pretty much every tv show I gif, especially in the last couple months. Some examples:

followed by
OR
AMOUNT: 500% RADIUS 0.3px
followed by
AMOUNT: 20% (or 10%) RADIUS 10px
You'll just need to experiment and see what works best for your gifs.
Some gifmakers use the UNSHARP MASK filter as well (I think it's pretty popular among photopea users?) but it makes my gifs look extra grainy, makes the borders look super bright and it clashes with my coloring method(s), so I use it rarely and with very moderate settings. Something like this:

Again, depends on the gif and on what you like. I've seen it used with great results by other gifmakers!
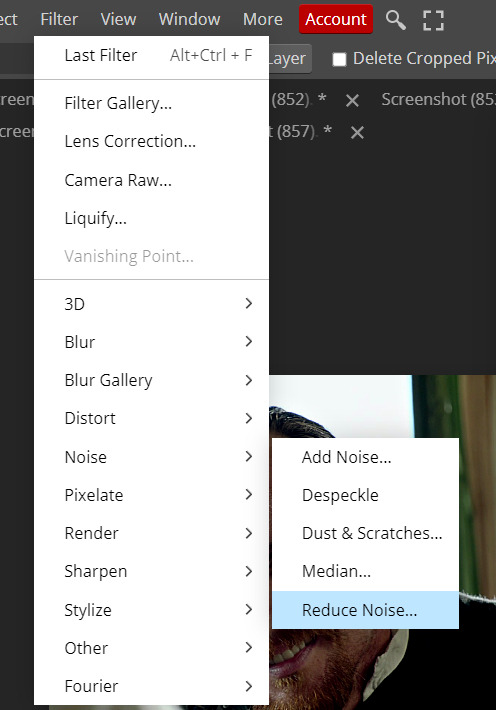
REDUCE NOISE
Sometimes - and this is especially the case for dark scenes - your gif may look excessively grainy, depending on how bright you want to make it. Reducing noise can help. Keep it mind, it can also make it worse and mess up the quality. BUT it also reduces the size of your gif. Obviously, the higher the settings, the more quality will suffer.

These are my standard settings (either 2/70% or 2/80%). It's almost imperceptible, but it helps with some of the trickier scenes.
ADDING NOISE
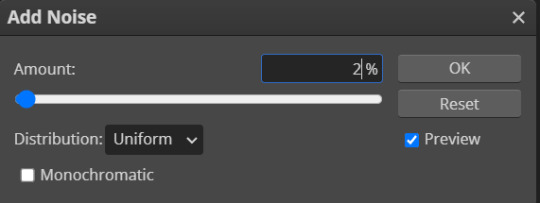
Adding noise (1% or 2% max) can sometimes help with quality (or make it worse, just like reduce noise) but it will make your gif so so so much bigger, and occasionally damage the frames, which means you won't be able to load your gif on tumblr, so I rarely use it.
You'll also want to create ACTIONS which will allow you to sharpen your gifs much faster.
HOW TO CREATE AN ACTION ON PHOTOPEA
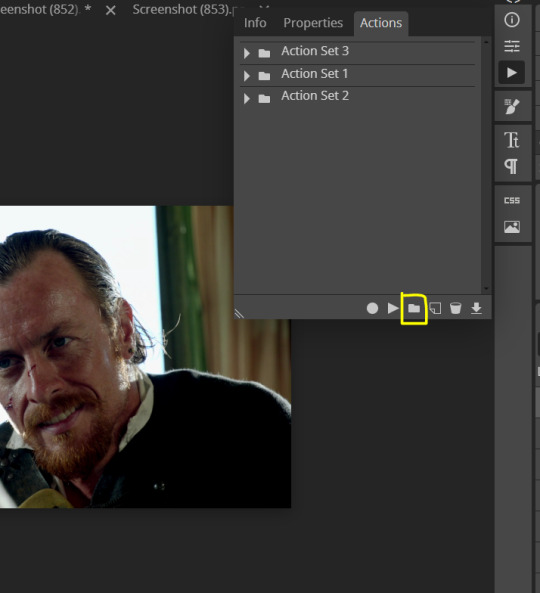
The Action Button (shaped like a Play button as you can see in the following screencaps) may not be there if you're using photopea for the first time. If that's the case click on the magnifiying glass next to "Account" (in red) and type "actions". Press Enter and the button should immediately show up.
Once you do that, click on the Folder (circled in yellow)

and rename it however you like.

now click on New Action (circled in red). now you can press the Recording button (circled in green)

Now
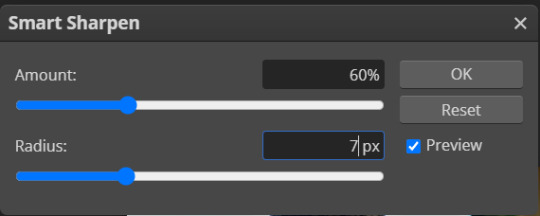
FILTERS -> Smart Sharpen
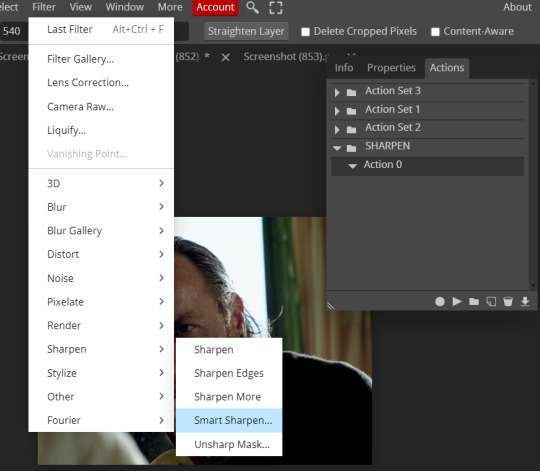
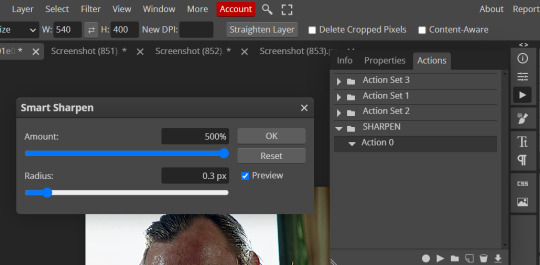
and you can enter your values. Then you repeat this passage (WITHOUT pressing rec, WITHOUT pressing new action or anything else, you just open the smart shapen window again) and, if you want, you can sharpen your gif some more (10%, 10px, or anything you want.)
Maybe, before creating an action, experiment with the settings first and see what works best.
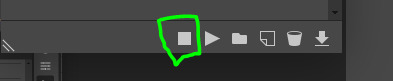
When you're satisfied, you can PRESS STOP (it's the rec button, which is now a square) and you can DOWNLOAD your action (downwards facing arrow, the last button next to the bin. Sorry, forgot to circle it) .
You need to download your action and then upload it on your photopea. When you do, a window will pop up and photopea will ask you whether you wish to load the action every time you open the program. You choose "Okay" and the action will be loaded in the storage.
When you want to sharpen your gif, you select all your frames, then you click on the Play button, and select the Action, NOT the folder, or it won't work.

Actions can also be created to more rapidly crop and convert your frames, but it doesn't always work on photopea (for me at least). The process is exactly the same, except once you start recording you 1) crop your gif as explained in step 4, 2) convert into frames. Then you stop the recording and download the action and upload it. This won't work for the Rasterize step by the way. Just the Animation -> Make Frame step.
7. COLORING
Now you can color your gif. I won't include a coloring tutorial simply because I use a different method for every tv show I gif for. You normally want to begin with a brightness or a curve layer, but sometimes I start with a Channel Mixer layer to immediately get rid of yellow/green filters (there's a tutorial for this particular tool which you will find in the list I mention in the link below)
[Plus I'm not really an authority on this matter as my method is generally... fuck around and find out. Two years of coloring and I still have no idea what I'm doing. 70% of the time.]
Simple Gif Coloring for Beginners -> very detailed + it includes a pretty handy list of tutorials at the bottom.
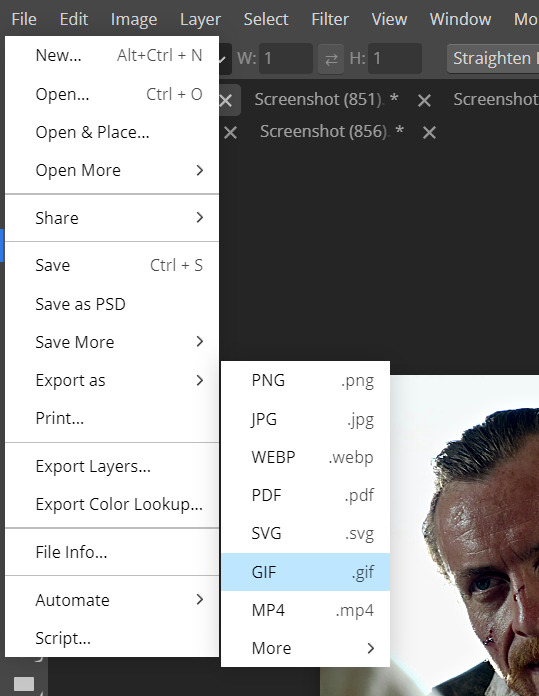
8. EXPORTING
Now you can export your gif. Some gifmakers export their (sharpened) gifs BEFORE coloring and then load the gifs on photopea to color them. I'm not sure it makes any difference.
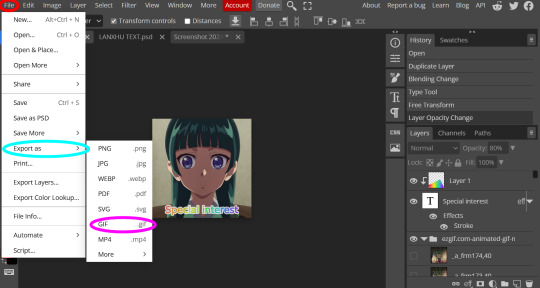
FILE -> EXPORT AS -> GIF
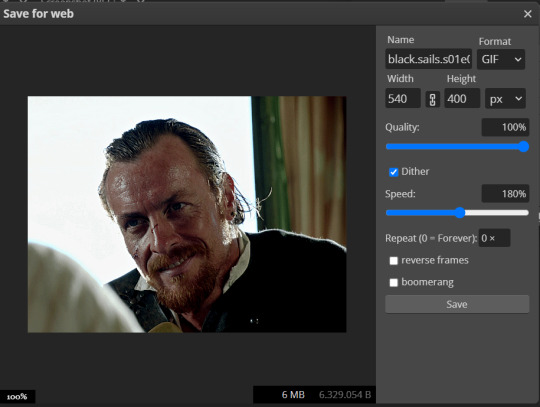
(not colored, just sharpened)
As you can see, unlike photoshop the exporting settings are pretty thread bare. The only option available is dither - it sometimes help with color banding - which, and I'm quoting from google for maximum clarity:
"refers to the method of simulating colors not available in the color display system of your computer. A higher dithering percentage creates the appearance of more colors and more detail in an image, but can also increase the file size."
SPEED
When you export your gif, it will play at a very decreased speed (100%). I usually set it at 180/190%, but as for every other tool, you might want to play around a little bit.
GIF SIZE/EZGIF OPTIMIZER (See Step 2)
And that's it.
P.S.: worth repeating
Save your work as often as you can, even while coloring or before exporting.
#photopea#my inbox is open if you have any questions <3#image heavy under the cut#photopeablr#tutorials#gif tutorial#allresources#photopea tutorial#completeresources#gifmaking
81 notes
·
View notes
Note
hi!!! i really love ur graphics /gen! and you inspired me to kind of want to start a blog and post graphics n stuff, yet i really don't have an idea of how to, if you can. could you please teach me? /nf 💗

Hihi !! I’m so sorry for the late reply. I didn’t know how to explaim but kio has made a pretty good tutorial here . If you mean the non-gif 1s kio has also made this tutorial (( stan kio ty )) !! I don’t personally use photopea for rentry graphics but i do want to start using it and i recommend it. But I use ezgif && ibis paint x to do my animated gif graphics. I followed this tutorial i found on rentry < 3


#♡ 。 OO6⠀︵︵⠀talking#♡ 。 OO7⠀︵︵⠀faqs#tutorial#tutorials#rentry graphic#rentry png#rentry#rentry graphics
60 notes
·
View notes
Note
How do you make your graphics? :O Always tried to but never knew the right dimensions or brushes to use, the pixel brush I have is kinda choppy XP (Don't have to disclose any of this if you don't wanna!!)
myyy pixel graphics ? i don't really change my image dimensions , i tend to just use my regular one ( 1500x1500 ) and work inside of it , regardless of how small the graphic is x)
for animated things i use ezgif n put all my frames in there . as for brushes ? here is theee main pixel brush ( not made by me ! ) i use usually :
at least i think it is . . woof , my other main brushes can be found here
42 notes
·
View notes
Text
stim gifs in photopea
[PT: Stim gifs in photopea /End PT]
Hello! This is my (lengthy) tutorial for how I make GIFs for stimblr using Photopea. It's not going to be as extensive as how I make for shows, celebrities, etc, because I have different processes for both, however I'm still aiming to cover everything I think necessary!
It'll be split into multiple sections with headers, so feel free to skip whatever you want if you don't find it necessary :•] Reblogs appreciated if you found it useful, but no pressure obviously!
Sections:
Getting your video
Importing into Photopea
Making the GIF
Sharpening the GIF
Coloring
Exporting & Optimization (in EZGIF)
End results, and misc tips and comments
1. Getting your video
[PT: 1. Getting your video /End PT]
Short section! These are the ways I download and source videos for use
Youtube - yt-dlp (installation instructions)
Instagram
Tiktok (Allows without watermark)
Pexels
For yt-dlp, check out this basic list of commands I made solely for downloading material to GIF! If you have further questions, either send me an ask or refer to the github page.
2. Importing into Photopea
[PT: 2. Importing into Photopea /End PT]
There are two ways to import into Photopea, the first is importing footage directly, and the second is screencapping (which I won't cover in detail, but this tutorial is for installing the program I use on mac & how to use it, and this is for installing on windows)
Option 1: Importing footage directly (see end for comments)
On the home page of Photopea, you'll want to click "Open from computer", and select your clip, upon selecting you'll be presented with a popup like below

All that really matters here is where you see "30 FPS", that's the videos native frame rate. I always put whatever that number is as my frame rate because I find it to be the best, but you can use different presets (Like ezgif, which gives you 12, 20, etc). The less frames you have, the chopper it will be. If you plan to slow it down later, I'd also recommend having more frames so it looks smoother after slowing.
Now you just have to wait for it to load all the frames, then you're set!
Option 2: Importing screencaps
This is my personal way of doing things, so this is assuming you've installed a screencapping program and already have your frames ready.
For this, when you click "open from computer", select the first frame and open it by itself. Once that's loaded, look in the top left at the "File" tab, select "Open & Place", then ctrl + shift to select the rest of your frames. Once they've all loaded in, you can either rasterize them now, or wait until after cropping and resizing (goes faster then).
What's important though, is ctrl + shift to select all your layers, in the top left open the "Layer" tab, hover over "Animation" at the bottom to expand it, and select "Make frames". With your frames still selected, hit the folder button in the bottom left.

Without this, Photopea won't recognize this as an animation, therefore you'll be unable to export it as a GIF.
3. Making the GIF
[PT: 3. Making the GIF /End PT]
3A. Cropping
To begin with cropping, select the crop tool, which is the fifth one down on the left bar (if you hover over, it will say the name), or the "C" key on the keyboard.
Along the top now, you should have some new options. The dropdown menu that says "Free" is going to be how you select an aspect ratio or fixed size, and I always set to 1:1 since most people on stimblr use square GIFs, but you can do whatever works for you! Make sure to leave "Delete uncropped pixels" unchecked, because that lets you move stuff around later without having to recrop.
Crop your animation down as you see fit, then either hit the enter key, or the check button along the top bar. If you're unhappy with the placement, you can undo it OR, select all your layers, then use the move tool (First icon on the left, or the "V" key) and drag it around as you see fit.
3B. Resizing
With all your layers selected still, open the "Image" tab in the top left, towards the bottom select "Image Size", then select what you want to resize to.
Tumblr's exact GIF sizing
1 per row: 540px
2 per row: 268px
3 per row: 177px
HOWEVER. For stim GIFs, I find the quality difference so negligible, you can resize to what you want. It's also better for it to be bigger and scale down, then smaller and scale up. For this reason, I typically do 268px no matter what, or 300px.
As far as resampling goes, leave it turned on, and I personally leave it on bilinear, but the different options vary slightly, so experiment and see what works for you!
If you're happy at this step, go ahead and skip down to exporting! But when doing this way, I do recommend sharpening for better quality at smaller size.
4. Sharpening the GIF
[PT: 4. Sharpening the GIF /End PT]
The fun thing about this section is you get to experiment and find what works for you! I'll give you my personal method, but you can play around, add and remove bits, etc until you get something you're happy with!
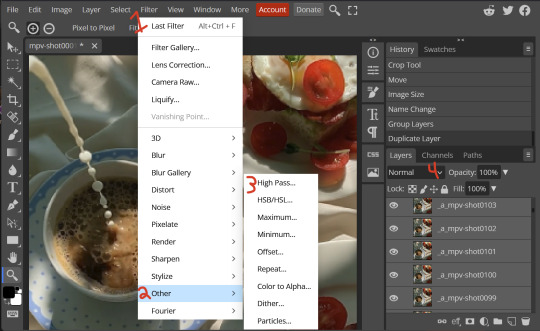
4A. High pass
High pass is my personal favorite way to sharpen GIFs, and for stim GIFs I'll often use only this.
(Steps 1-3 in image) To do, start by right clicking the *Folder* all your frames are in, and select "Duplicate Layer". Select all the frames in Only the folder on top, then go to the "Filter" tab along the top left, hover over "Other", and select "High Pass". The grey look is entirely normal! I normally set my high pass at 2-4, but play around with this step and find something you like!
Select the *Folder* all your high pass frames are in, and change the blending mode (fourth step in image) to "Soft Light", it should be on "Pass Through" initially. With that done, you've used high pass on your GIFs! If you're content here, skip the next section about smart sharpening, and see about merging animation folders under it.
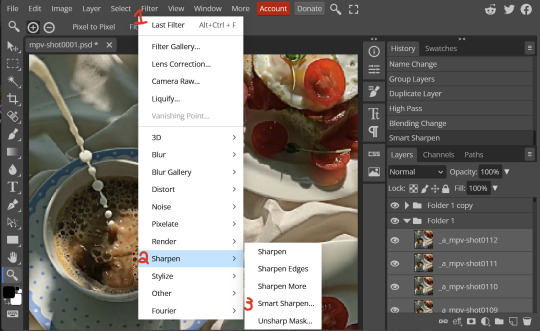
4B. Smart Sharpen
Note: I recommend testing your sharpening settings on one layer BEFORE applying them to all layers, as it will be easier on your computer.
I utilize this in addition to high pass usually, but you can do it all by itself as well! To begin, select all the frames in your folder (if you used high pass, select the frames in the *Bottom* folder). Open the "Filter" tab on the top left, hover over "Sharpen", and select "Smart Sharpen". Now find what you like!
For stim GIFs, if I used high pass, I'll go for 75-110% amount, and a .1 radius. I personally don't like the look of an over sharpened GIF, so I only use smart sharpen if I want to enhance some small details high pass didn't touch enough, which is why I use so little. If you don't like high pass, you might use more here!
4C. Combining animation folders
If you used high pass, you'll notice you have two animation folders. To fix this, select both folders using ctrl + shift, open the "Layer" tab, hover over "Animation", and select "Merge". It will give you a popup to confirm, and you can go ahead and accept!
If you don't merge these, Photopea will think they're two GIFs in one document, rather than only one, which is why this step is so important.
As a note, once you merge these folders, you can no longer shift the frames around to change where they are in the crop like you could earlier.
5. Coloring (Image Heavy)
[PT: 5. Coloring (Image Heavy) /End PT]
This section is going to be less of a tutorial and more a basic rundown of the adjustment layers and what they do. Coloring will change from GIF to GIF, and you can do light or intense coloring, so this is just a guide to begin with, but really just play around and find what you like!
To access the adjustment layer menu, in the bottom right where "New Folder" was, the one directly next to it that looks like a circle made of two half-circles, will bring up your adjustment layers.
As a note, I always group my adjustment layers in a folder above my animation, for ease of hiding to compare with and without.
5A. Levels
Levels is one I almost *Always* use on a GIF because it makes it look cleaner to me. In the first box, sliding the black square on the left *increases* the blacks, sliding the white square on the right *increases* the whites, and the one in the center changes the general brightness up or down.
Sliding the black box on the bottom bar *decreases* the blacks, sliding the white box *decreases* the whites.
If you change the channel from RGB to another option, you can change the balance of reds/cyans, greens/magentas, or blue/yellows, I personally don't touch this for stim GIFs. In the RGB channel, I set the top black box at ~10, and the top white box at ~245 usually.

5B. Curves
This is another way of adjusting brightness, blacks and whites, or color balance. By adjusting the dot in the bottom corner you adjust blacks, the top corner adjusts whites, and if you make a dot in the center, it adjusts general brightness! You can also make multiple dots to separately adjust some values. By changing the channels, you adjust color channels rather than white/black.

5C. Exposure
This is another way of adjusting the lights and darks of the GIF. Sliding the exposure up and down will add/take away light from the lighter parts of your images. Adjusting the gamma correction up and down will add/take away shadow from the darker parts of your image. Offset increases/decreases the brightness of the whole thing but I almost never use it.

5D. Vibrance
Vibrance is what I like to think of as a "softer" way to increase intensity of colors, instead of using a Hue/Saturation layer. It affects warmer colours more intensely than cooler colours, whether you use the vibrance or saturation slider. The saturation slider here is more intense than the vibrance one, but less intense than saturation in a Hue/Saturation layer.

5E. Hue/Saturation
This one is simple! Sliding the hue slider changes the colour, sliding the saturation slider increases/decreases saturation, and sliding the lightness is basically like directly adding black/white to a color. I use lightness only sparingly.
What's cool here, is you can adjust the range to target a specific batch of colours! If you find your reds are too bright compared to everything else, you can target the saturation of them specifically.

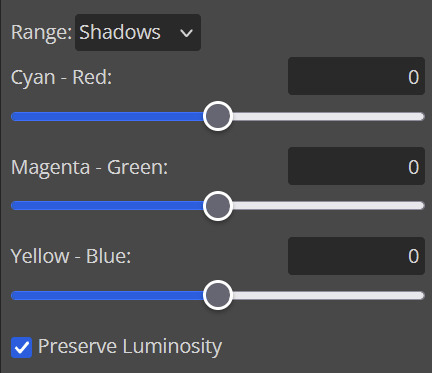
5F. Color balance
This is a simple way to adjust the base colors of an image, by changing it to be more cyan or red, magenta or green, or yellow and blue. This can be useful for making a GIF appear warmer or cooler!
I almost only touch the shadows & midtones, and highlights sparingly. "Preserve Luminosity" preserves the highlights and shadows of the image, so by unchecking it, you can achieve some more intense results.
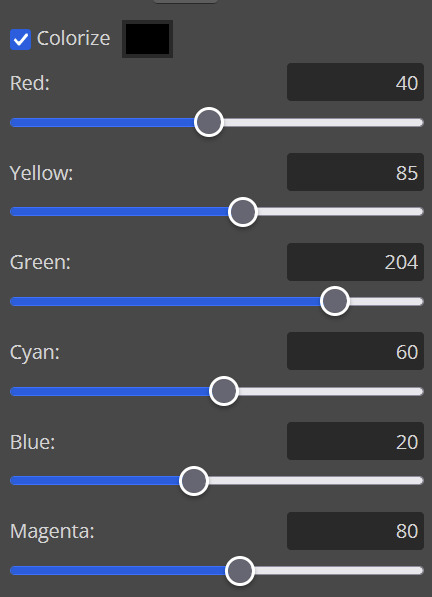
5G. Black & White
The black and white layer is useful because you can change exactly how light or dark a color appears after making it black and white. For that reason, I prefer it over a gradient map if I need to make something black and white.
5H. Photo filter
Photo filter is a simple way to add a color filter over the entire image, and adjust how strong or weak it is. "Preserve luminosity" once again just keeps the darks and whites of the original GIF.

5I. Channel mixer
I couldn’t even begin to cover channel mixer here, but this is for very intense color edits (I typically use it when I'm trying to make a GIF fit a board). However, here's another tutorial solely about channel mixer if you're interested in taking a crack at it!
5J. Selective color
Finally, selective color allows you to adjust the amounts of color or lightness/darkness of a specific batch of color.
By changing the color channel, you can affect different batches of color. The cyan slider controls cyan/red, the magenta slider controls magenta/green, the yellow slider controls yellow/blue, and the black slider controls black/white.
Checking the "absolute" is essentially like "Preserve Luminosity" in the other layers. With absolute, it's like shifting the color one way or the other, and without absolute, it's like adding to the pre-existing color.

6. Exporting and Optimization
[PT: Exporting and Optimization /End PT]
6A. Exporting
With all that done, we're ready to finish it up! To finish your GIF, open the "File" tab in the top left, go to "Export As", and select GIF!
Here you can rename, adjust the size (WILL ruin the sharpening you did), the quality (I leave at 100%), and the speed.
Another important thing to note is the "Dither". If you leave dither off, you can potentially encounter color banding, which is where (typically gradients) with look like strips of color, rather than smooth. This is because GIFs only have 256 colors they can render, so if something has too many, it bands.
By checking dither, it can get rid of color banding, at the cost of dots on the image (around where the worst color banding is usually). Sometimes the dots aren't noticeable and this is the better option, however it will Also increase your file size. It's up to you if you want to use it!

6B. Optimization
This is technically an optional step, as tumblr's GIF size limit is 10mb, so as long as you're under that, you can post, however, smaller GIFs load faster and I personally find are better for use in stimboards where you're loading a lot of GIFs! So to help this, let's head on over to the optimize section of ezgif. My personal goal is UNDER 4.5MB, ideally under 4MB.
The two main things I recommend are Lossy GIF, or removing frames, and I always start with Lossy GIF. I do anywhere from 5-15, and usually this will bring down GIFs a lot if you made them in Photopea! My example GIF was 6.7 MB to begin with, and afterwards it was 4.2MB.
However if you find that to be not enough, you can remove frames. When you remove frames, it speeds the GIF up, so I also recommend slowing it down (this is why I set my frames high in the beginning as well). I typically do "Remove every 4th frame" and slow it down to 75%-85%.
7. End results, and misc tips and comments
[PT: 7. End results, and misc tips and comments /End PT]


(source) The first GIF is without sharpening/colouring, the second is with sharpening but no colouring, and the third is with sharpening and colouring. I didn't color it much besides making it slightly warmer, but I hardly ever do much anyways!
As for misc comments:
In firefox, when you import footage directly, sometimes it glitches and tries to load 4000 blank frames, which is extremely resource intensive on a computer. The solution is import the footage in chrome, save as PSD, then open the PSD in firefox. (Or work in chrome but why do that /half silly). The other solution is screencap which I do since I do this often, but both work fine.
In firefox, sometimes you're unable to slow the GIF down upon export and it will export faster than it actually is. Slowing the video down to 50% restores it to native speed I've found, and you can do this in ezgif before other optimization.
When colouring, my number one tip is slide something all the way up first, then adjust down! By seeing it at max, you have a better idea of what's getting adjusted.
If you have any questions, drop me an ask :•]
And that concludes our tutorial! My apologies for the length, but I wanted to cover every possible thing here. It definitely seems like a lot, much more than working in ezgif, but when you get used to what you're doing, it goes extremely fast (even if you spend extra time screencapping). I personally find it worth it for the ability to sharpen GIFs alone, but as well as more detailed coloring opportunities.
Thank you for reading, I hope this has been useful!
#i did it :•]#not stim#stimblr#gif tutorial#photopea#big thanks to talos for proofreading this :3 🖤💚🖤💚🖤💚🖤
51 notes
·
View notes
Text
How to make headcanon GIF's


What you will need
VLC media player
A video/edpisode/series/ect of the character you're making headcanons for
EzGif
Photopea
What you should probably have (not required)
A VPN
The whole series of whatever you want to GIF
An Adobe account so you can use Abobe express
A hard drive (this shit takes up a LOT of space, especially if you're batch downloading a series)
Now that you have all the basics let's get started!
Step one: Choosing a character
Obviously this process will vary from person to person, sometimes a headcanon is hard to prove with canon, sometimes it's easy.
For this we're going to go easy so we will be making GIF's of Maomao from the Apothecary Diaries displaying autistic symptoms.
She's basically a cat so this won't be too hard (does anyone else remember the autism cat or am I just old?)

Step two: Downloading the source
This can be a difficult process and (while I'm more than happy to help) I won't be sharing where I download anime from (Loose lips sink ships) although a quick google search into how to torrent anime will work.
Anyway I have the whole series downloaded for this, it's much easier to do the whole series.
Step three: Cutting the video/finding a scene to GIF
Best way to do this? Get your autism glasses on and pick up on all the details that make you think this character is autistic.
For me, one of the 'signs' is the way Maomao is obsessed with poisons and herbalism, so a good scene for me to GIF is when she's allowed into the doctors medicine draws.
But how do you clip a scene from a whole vedio?
Simple, you record the scene you want to GIF with VLC! Just hit the red dot (circled in red here) and let the scene play out!
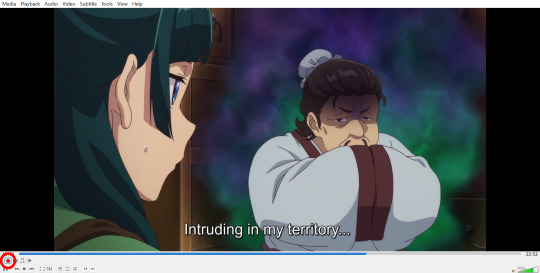
I would personally allow a few seconds before the specific scene and a few seconds after to play, because sometimes the video can glitch.
Step four: Making the GIF
Next you'll need to go to EzGif and upload the clip you made, if the clip you made is too long you can use Adobe Express to trim it.
When your video is uploaded (it can take a while sometimes) you need to trim the length to the closest second that shows what you want to GIF, then you need to edit the GIF size so it's not too big for tumblr.
Here are the measurements we use!

Hit confirm and now you have a GIF!
Step five: Cropping and trimming
At the bottom of your GIF you should see a row of options of what to do with it.

Personally I would crop the GIF first and then do frames because frames takes longer to load larger GIF's.
To crop I hit the square option and drag out the edges, then process the GIF. Then I hit frames and press skip for any frames I don't want in the end GIF.
Then save it.
Step six: Adding Text
Now you will need Photopea where you will need to open the GIF.
I have a file saved for the text so I can copy and paste what I want it to say so it looks the same, for you though you need to type the text out.
Hit the text button (red) and then type out what you want it to say, change the font with the blur circled and the outline/font color with green.
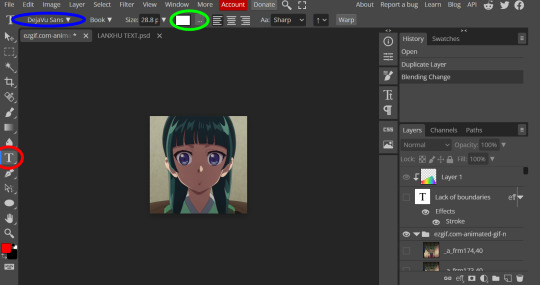
I personally use a rainbow overlay for the text because I'm ~fancy~ and the autism symbol is mostly represnted as a rainbow.
Step seven: Exporting as a GIF
After typing out what the scene represents, you need to save the GIF.
Go to File > Export as > GIF
Step eight: Repeat eight times
And then you stick them all together and make a board
This is the finished GIF set for this tutorial!
43 notes
·
View notes
Text
On a final note, if making gifs is so easy and simple that you don't think gif makers need any credit, do it yourself! Seriously, learn how to make gifs! I don't even mean this aggressively or passive aggressively; I love making gifs and I think you'd like to, too! By being able to make your own gifs, you can have full control over what your stimboards look like, and believe me when I say it's way more fun that way.
The easiest way to get started is to use ezgif.com. With enough practice, you can make gifs that look almost as good as gifs painstakingly made in photoshop. I use ezgif to make gifs, colour correct them, remove unnecessary frames, speed up/slow down gifs, and way more. It DOES take practice to get good at using the tool but I promise it's worth it.
Don't know where to start? Try finding a pretty Instagram vid or Tiktok you like, download the video, and plug it into ezgif (short videos are easiest to start with because there's less to work with and ezgif only takes videos up to 100mb) and... make a gif! You can mess with the framerate options, cropping and size and length until you get a gif you like, and from there you can make all sorts of edits to it. You could try making meme gifs out of funny videos if you'd prefer.
Make gifs. Post them if you'd like, too. I promise it's fun and there's a reason we care so much about them.
20 notes
·
View notes
Text
i've received a couple asks for a tutorial of how i create gifs. i know there are really great tutorials out there already. personally, i find photoshop too tedious, time-consuming, unstable, and with varying end results due to file size constraints for tumblr.
so, what's my secret for saving time and not jumping through hoops for clean gifs? i cheat. honestly, ezgif does most of the work for me.
for my step-by-step process, see below!
record your gameplay using geforce experience. another free option is obs studio. if you use reshade/gshade, then you'll need one of these programs to capture the game as you see it.
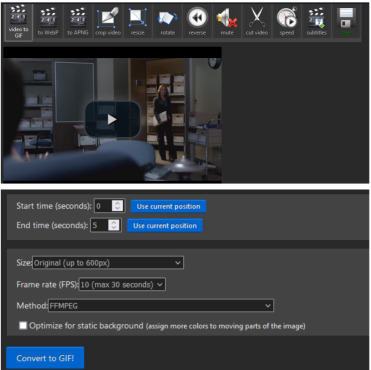
next, upload your video to ezgif and trim the it down to roughly 10 seconds (or less). this is the start time and end time you see just below the video preview. you can use the video controls to see where you want to start and stop in real-time.
then, change the image size to original (up to 800px) and frame rate to 10 (max 30 seconds). you can push the frame rate higher for shorter gifs, but i've found it's unnecessary and this frame rate keeps the file size down.
method should automatically load up as ffmpeg and doesn't need to be touched. directly below that, check the option to optimize for static background.
your settings should look like this once you've uploaded the video and made the adjustments listed above:
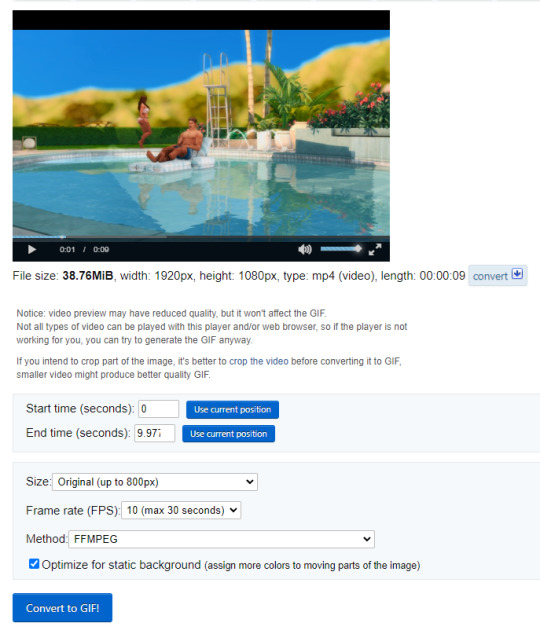
now convert to gif! it may take a few seconds, but your gif will appear below this button. notice the file size, width, height, and frame total? we need to keep the file size under 10mb for tumblr. i generally try to keep it under 9.5mb because tumblr can be finnicky about it and sometimes rejects anything close to 10mb.
if you're already under 10mb (9.5) and like the current aspect ratio, then you can right-click and save your gif as-is. if you're still over the maximum file size or want to change the image ratio, let's continue!
optimization
under your new gif, you'll see the crop feature. click through so we can change the aspect ratio. this is up to your preferences, honestly. you can select from the automatic ratios (a lot of folks like 1:1) and then center the box freely. personally, i prefer a 5:4 ratio that isn't listed on the site. since i know the ratio in pixels to fit tumblr's dashboard width, i type my custom dimensions into the fields. (width: 540, height: 430) but you can input whatever you like.
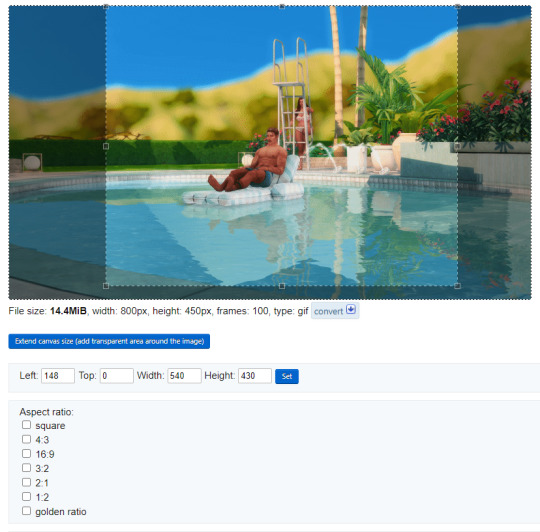
convert your gif again for the cropped dimensions. this should hopefully have you around the 9.5mb file size.
if not, click the optimize link below your gif. from the drop down list under optimization method, select remove every 4th frame, then convert one last time for the smallest file size without losing quality.
if you're still over because you have a lot of shifting colors or you're using a gif longer than 10 seconds, then you can either keep dropping frames off or resize the gif to smaller dimensions.
when you're done, right-click and save your gif so you can then upload it to tumblr. never, ever direct-link from ezgif. these previews you see on their site self-destruct after a few minutes and i can't guarantee that tumblr will publish them. always save and upload.
note: a lot of shifting colors in your original video may create unwanted pixelation. the image is having to move colors around in an attempt to stay smooth. even with that pixelation, i've found this method maintains an overall smoother texture than photoshop.
that's it! i hope this helps making gifs easier and faster for everyone since you don't really need any fancy or paid programs. if you have any questions or find errors in this tutorial, send me an ask!
happy simming!
490 notes
·
View notes
Text

Welcome to my page! I’m Anakin and I like making old web related things like blinkies, glitter graphics, and gifs in general!
I made some templates for the blinkies.cafe, you can see all the ones ive edited/created here.


Please Note: I'm dyslexic and their will be typos ahead! Corrections are appreciated but please don't be rude about it.
This blog runs mostly on a queue!

Sites I use: Ezgifs, Blinkies.cafe, Photomosh[Glitch], Online Image Editor [Glitter]
Check out: My Neocities, Website theme, MBAV blog, art blog and Tip me!
How to credit me!
On tumblr: @ or source link my neocities
Off tumblr: source link to this account or my neocities! Using my button is appreciated!


198 notes
·
View notes
Text
I came up with some improved and more fair rules for the ArtFight Discord server, and if someone would be able to message these rule proposals to a member that'd be greatly appreciated. I REALLY think the moderators of that server need to reconsider some of their rules, as they are extremely restrictive and have led to severe backlog in the different help channels which could easily be solved if non moderators could assist:
-In the different help channels, if the question is not directly related to the site itself (eg, how to convert a gif, how to resize an image, what does x art term mean, etc) it is allowed to be answered by anyone and is not considered minimodding due to it not being possible to "spread misinformation"
-people are allowed to give their personal experiences with bugs, and their personal solutions to bugs, as long as they aren't doing obvious alt F4 pranks.
-questions which are asked extremely frequently (how to submit an attack, how to block a user, do chibis count as fullbodies, etc) or have on site answers (such as things that can easily be answered through the rating guide) can be answered, especially if a mod answered the question recently. Directly quoting a mod's response can't cause misinformation as a mod themselves confirmed it
-people are allowed to make a single comment on art in the help channels, but further discussion must be taken to DMs or other channels
-if a mod answered the same/a very similar question recently, non moderators can quote the mod's response (which is especially easy with Discord's built in reply feature) without getting a minimod alert
--
a MAJOR issue I found with the Discord server is that the mods are EXTREMELY strict about minimodding, so much so that just recommending someone use ezgif can get them a warning. even if "rules are rules", being this strict regarding answering questions in the help channels leads to severe backlog and MANY questions - some urgent - being unanswered
I think some of the rules being loosened or adjusted would benefit the server - and the people in the server - greatly
Some particular moderators in the server can have especially power tripping like responses, and be extremely rude when someone points out that what they said seemed a bit harsh and what they did really wasn't minimodding. When I pointed out that the way a mod was acting felt very powertripping and rude they ended up muting and later banning me without taking my criticism in account
It really seems like the mods don't accept criticism well, and if someone points out an issue with the rules or a moderator action they get EXTREMELY defensive and refuse to admit any mistakes and try to improve upon them. This leads to a very toxic and stressful environment to the server and the site as a whole.
Additionally a lot of the rules are very vague and can easily be interpreted in many different ways, and when someone expresses confusion about the rule and says "maybe it could be made a bit clearer" and gives advice on how to make it clearer, mods insist that the rules are "Very clear", even when multiple people state that the rules are confusing to them. A lot of the rules only fully make sense when a moderator answers a question about them, which really shouldn't be the case to begin with. It's not very neurodivergent friendly if you ask me (and many others agree)
If you are able to in any way, PLEASE find a way to let the AF moderators be aware of this post. We really need the Discord server's rules adjusted to be more accommodating and the server be less stressful for people like me who have trouble understanding rules, and make the rules less restrictive to prevent backlog in help channels
#ArtFight#Artfight Discord server#apologies if anything in this sounds rude#I'm genuinely VERY pissed off at the moderators#they have been extremely rude towards me and others when pointing out concerns regarding their vague rules#and they have made many comments that can come across as ableist and when people point out how they sound rude they come up with excuses on#why its okay#additionally the rules specifically state to point out loopholes when you see them#so I point out loopholes#and they claim the rules are “very clear”#the whole server enviornment just seems very toxic
15 notes
·
View notes
Text
Gif tutorial by Alinelovelace
Alright, I'll be doing 3 things here today:
1.) Sharing the programs and websites I use
2.) Showing y'all a tutorial on how I make my gifs (this is my first tutorial, so if anything doesn't make sense, don't hesitate to message me, send me an ask, or comment on this post!!!!!)
3.) Sharing some resources by insanely talented gif makers (because I learned how to make gifs by following tutorials)
It's probably important(?) to mention that I use a Windows laptop
A.) Programs and websites:
ezgif: to make my gifs and do light editing
You can make gifs with video clips or screen caps. I'm not advanced enough to use screen caps, though they're supposed to make gorgeous gifs. I use ezgif to make the actual gif and edit the timing (which I end up having to tweak on Photoshop but...)
I also like ezgif because no watermarks!! I will do anything in my power to get rid of watermarks from websites and editing programs because they bother the hell out of me!
Photoshop: for the rest of my editing
This is where I recolor and add text.
A great alternative to Photoshop is Photopea, which I've used before I "obtained" Photoshop. It's FREE and online, so you don't have to download anything! I highly recommend it if you really want to get into gif coloring !!!!
Currently, I get my videos from torrents (bc I have a wide selection for my family to watch on our tv). But I used to use the Xbox game bar on Windows to record the clips I wanted on online streaming sites (unfortunately there's not a whole lot up and running anymore), then cropped and cut them. If anyone's interested in that, I could probably post a separate tutorial for that another time :)
There's also screen cap websites out there and YouTube. And probably dozens of other ways to get videos that I don't know about!
Video cutter
If you use full length episode videos and don't know how to crop them on your laptop (like me)
★★★★★★★★★★★★★★★★★★★★★
B.) Tutorial:
I'll be remaking the first gifset I ever made since I've learned A LOT since then! It should be pretty simple since there's only one set of subtitles.
Another time, I could do an edit tutorial like my That 70s Show ones. It's just taking the same concepts as this tutorial though, and playing around with colors, fonts, and font placement.
1.) Find your video/screen caps:
Since I no longer have the video from my first gifset, I just googled "Mulder throwing pencils season 10" on YouTube. After finding the video, I copied the link and pasted it into a YouTube to MP4 site ((this site has never given me popups or tried to get me to download something that isn't my video file)).
2.) If your downloaded video clip is short enough, you can just stick it into ezgif. If not, you may have to cut it using a website or a computer program.
Ezgif.com -> video to gif -> browse -> select your file -> upload video
3.) After clicking upload video, you should find yourself on this page:
If you need to do any kind of video editing (cropping, rotating, resizing, etc) this is the place to do it! This is also where you make your gifs.
For the first gif, I don't need to change the start time, since I'm starting at the beginning of the video. 0 seconds is fine. But for the stop time, I'm going to play the video, pause where I want my first gif to end, then press "use current position" by end time.
I don't usually touch the settings for size, FPS, or method. If the gif doesn't have a lot of movement, I check "optimize for static background"
Then press convert to gif.
Here's the product I got. Since it's such a short clip, it moves a little fast for me.
I'm going to click "speed" which is below the gif. You're brought to this page:
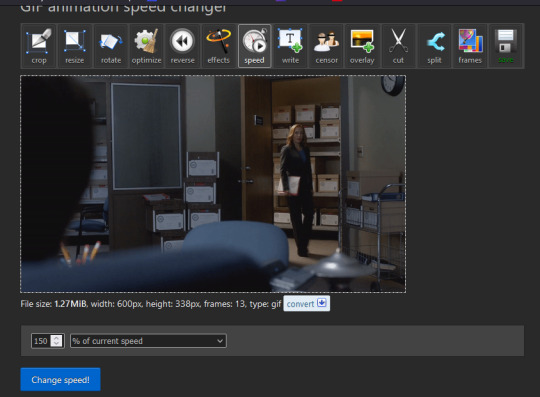
This is completely up to you for speed, but I find that between 60% and 85% end up looking good. If you don't like it, just change the number in the box and press "change speed".
I ended up with mine at 65% of current speed.

A little better, right?
The gifs that turn out best are 3 seconds to 10 seconds in my experience. This one is 1.5 seconds, so it's a little fast.
After that, rinse and repeat for every gif you need to make.
4.) Editing time! This is for Photoshop (if you use Photopea, I very much recommend this tutorial. It's very well explained!)
Go ahead and open all of your gifs once Photoshop is booted up. Then click window -> timeline
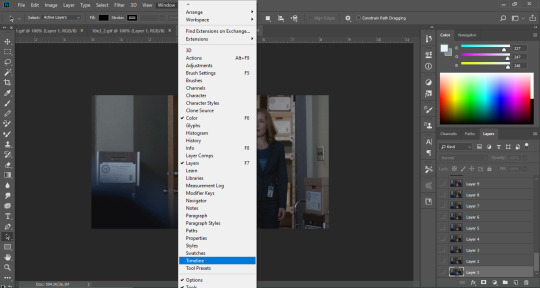
Now you have a handy dandy little timeline on the bottom.
The first thing you're going to do click play and decide whether or not your gifs are running at the speed you want. If yes, move on to next step.
If not: click on the three lines -> select all frames -> little drop down arrow. You should have a variety of times available to choose. Usually, I click other, then put somewhere between 0.04 and 0.08 seconds. Click play again. If you don't like it, try this step again.
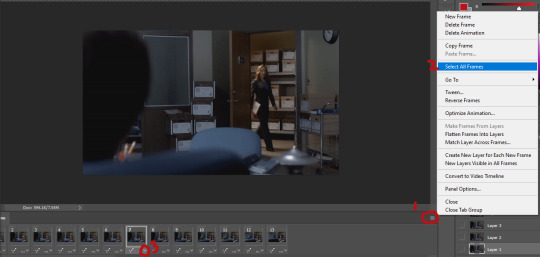
If you need to crop your gif, three lines -> select all frames. Press "c" on your keyboard and crop accordingly.
4a.) Color editing
This is where things get complicated. Just remember coloring is subjective and everyone does it differently. This is just an intro to the different tools most gif makers use to alter color.
You don't have to use all of these! I definitely pick and choose depending on how I want the coloring to look. When I'm making a gif set, my coloring isn't as adventurous as when I'm making an edit. It doesn't feel worth it to give away my settings for this gifset since it changes depending on the coloring and lighting of the scene.
All of these tools can be found under "create new filter adjustment layer"
• Brightness/Contrast
This one is the easiest in my opinion. It's pretty straightforward. The more you drag brightness the right, the brighter your gif gets. The more you drag contrast to the right, the higher the contrast is.

• Curves
This adjusts lighting with color values. It's another tool that's hard to explain. I just drag the little circles on the chart until it looks good

• Color Balance
Like every other setting, exactly what you do with this tool is up to you. Color Balance adjusts the overall tint of your gif. I recommend editing highlights, shadows, and midtones for the best results.
• Channel mixer
This one is one of the most complicated tools when making gifs in my opinion. It's best for getting rid of weird colored tints (think the blue coloring in Twilight). I'll just link a tutorial here for it. I don't make enough gifs to know how to explain it.
• Selective color
Hands down my favorite tool, though not only specifically for gif making. This tool allows you to select a color (reds, yellows, greens, cyans, blues, magentas, whites, neutrals, blacks) and edit each color group. For example: my skin in photos usually has a weird red tint. I can edit the reds in my photo using this tool to make it look less abrasive.
You just play around with the different colors and bars for each color until each color group looks good. I recommend hitting the highest value to see how the color changes/what parts of the gif are affected by the change.
In the instance below, I wanted to see how magenta affected the blue colors, so I dragged magenta to 100. Now, knowing what kind of color changes magenta will make to blue, I can adjust accordingly.
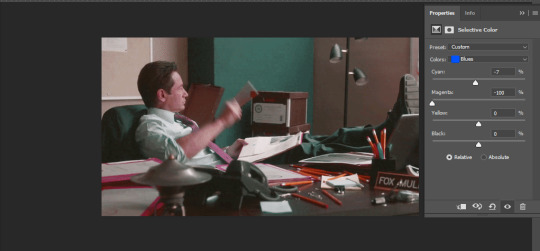
Messing around with the each color put me here:
• Vibrance
Another pretty self explanatory tool! Vibrance and saturation bars make the gif colors more colored and vibrant.
• Applying the filters to all frames
Shift click to select all the filters, and drag them above all the layers. They should now be applied to all the frames.
If not, select all frames with the three lines menu drop down like before -> click the little eye to turn off visibility, then click it again to turn it back on. You should be able to see everything now.
In order to carry the same colors from gif to gif, I take pictures of each setting and edit each filter adjustment layer accordingly. I side by side compare and make adjustments if the coloring doesn't match quite right. I'm sure there's a better way to do this, but I'm not experienced enough yet.


4b.) Subtitles
This part isn't too bad. For subtitle text, I use Calibri. Myriad pro bold italic and Arial are also really good options though!
• Text
Go to the sidebar and select text. Drag yourself out a box approximately where you want your subtitles. Type whatever you want. If you don't like where it is, click the move tool and drag it wherever you'd like.
Here are my text settings:

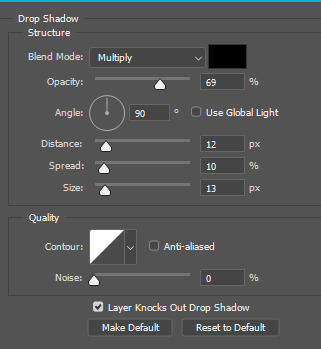
• Blending options
Right click your text layer and select "blending options" at the top. I edit stroke, which adds an outline. I also edit drop shadow, just because it adds a little depth to the text

• Applying to all frames
Drag the text layer to the top, just like you did with the adjustment filter layers when coloring. The same troubleshooting applies.
5.) Exporting
I know there's other ways to do this, but this is the way that makes the most sense to me.
Select all frames on the timeline -> file -> export -> save for web (legacy) -> save
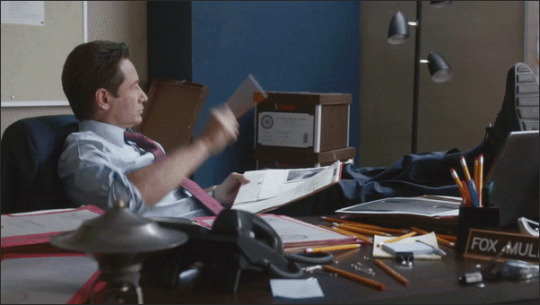
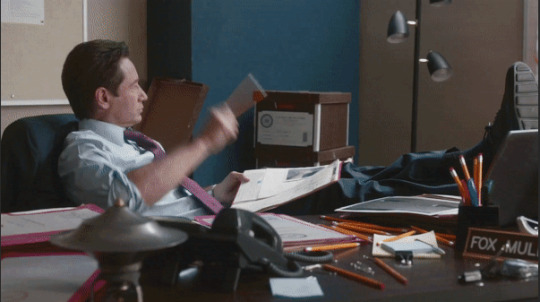
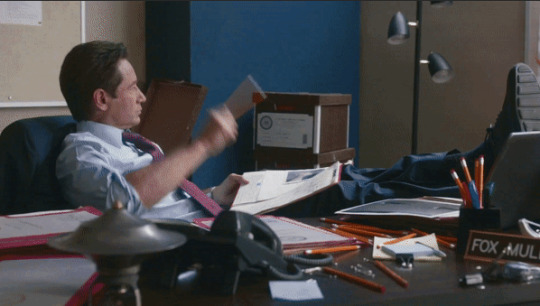
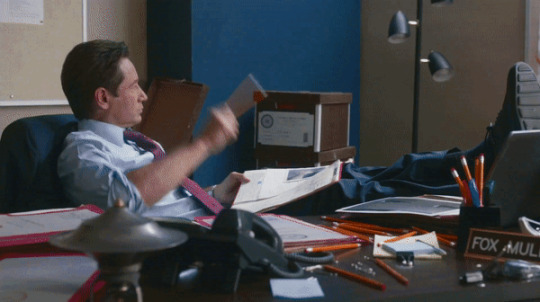
With everything together, you go from:
To:

I had the subtitles in two parts because my first one had the subtitle in two parts (consistency).
Happy giffing!~~
★★★★★★★★★★★★★★★★★★★★★
C.) Resources:
This is a collection of resources both for Photopea and Photoshop
Photopea Resources:
Photopea giffing tutorial by @heroeddiemunson
Photopea gif coloring tutorial by @heroeddiemunson
Photopea removing yellow tint tutorial by @lacebird
Photopea gif making tutorial by @aragarna
Photopea gif making tutorial by @ashleyolsen
Photopea changing background color of gifs by @benoitblanc
Photoshop tutorials:
Giffing tutorial by @dqmeron
Subtitle tutorial by @itsphotoshop
Blurring gif backgrounds by @clubgif
Inverted colored text tutorial by @spaceslayer
Gradient text tutorial by @tawaifeddiediaz
Gif coloring tutorial by @logangarfield
Color consistency tutorial by @clubgif
Channel mixer tutorial by @zoyanazyalensky
11 notes
·
View notes
Note
Hi there! Can I ask how you made your cute sun fnaf gif using Procreate Dreams? I’ve had a heck of a time trying to import the “Export Frames As Pictures” into regular Procreate to make a gif….since it seems like it has to happen 1 by 1… Any tips would be super appreciated. Thanks for sharing ur stuff, I love security breach’s vibes!!
Hello, thank you! Sorry if this is like super late, I don't usually check my inbox or check tumblr at all.
What I basically did was just quick exported 'sun wave' as a normal video then used Ezgif (link for website). It's a great website to convert any mp4 file to a gif and vise versa. I don't know if it has ads i use an ad blocker on my computer, but that's basically what i did. Very easy! Though I wished Procreate Dreams had an export as gif option in the first place instead of relying on websites, but what can you do in this situation.
Hope this helps, if you need more info I'd be happy to help, dm me or send another ask, I don't mind it's no problem. I don't know how much help I can give since I'm still figuring out Procreate Dreams but I'll try my best.
3 notes
·
View notes
Note
I 100% wish I knew how to edits gifs or pictures (add characters into them, or change someone’s face) so I could make fighting for (and other fics) edits🤣 but unfortunately I’m useless at it!
I thought the same thing when I was first starting! I'm gonna put under the cut what I use to make edits.
So, before I started messing around on tiktok, I would use ezgif. You can put multiple gifs together to make 1 longer gif or you can put words on it and you can edit the gif size and compress it because dumblr doesn't like files bigger than 20 if I remember correctly. I used ezgif to make this post (most of my gif edits I used ezgif) I would also use the apps Gif Maker-Editor and YouCut Video Editor to add a gif on top of gif. Gif Maker, I would use to change the gif to a video so I could edit it on YouCut, similar to this post. Sometimes dumblr would say file to big, so I would use ezgif to compress the file.
I use picsart to edit photos and combine photos. I've found that if I use picsart on my laptop I can use the erase background feature whereas on my phone I have to do it manually or pay for it- which frick that. As for changing someones face, I used to use a site that would morph the face to whatever you chose, but they got shut down and I haven't found anything similar to it, but picsart works relatively good for that too if you mess around with the tools. All of my FF headers were edited with picsart and then I made the header itself with canva. Which I use sometimes for font becuase picsart has a limited font selection (and if you use laptop they have none) and canva has a lot of different options.
Since I've been posting on tiktok, in the beginning I was just using tiktoks editor. Which is how I made this edit. And then I found CapCut which has helped with all of my newer video edits like this one. I didn't know you could use gifs on capcut, I thought it had to be videos so I was going and changing the gifs to videos before I found out that you can use gifs and pictures.
A lot of it was just trial and error and finding what works best for me to use.
I kinda hijacked this ask 😂 but I hope this helps! I remember wanting to make edits and such but unsure how and I didn't want to bother anyone with asking. Please don't take this as me trying to get FF edits I just wanted to help
2 notes
·
View notes
Text
I've made something like this before so I'll redo it
---------
when it comes to creating stimboards, it's a pretty easy process to do
I usually research stims on tumblr, where I search it up like this
sometimes I'll write gif instead of stim if I can't find anything which unfortunately can lead you to seeing fanfics and unrelated things so it's difficult

when I need to find specific colours, I write another hashtag of said colour which helps narrow down but sometimes it doesn't work
sometimes searching up stims can lead you to finding stimboards unrelated to the search or really questionable stimboards/stimblogs which I've found a bunch of times
---------
if on pc, I would recommend opening two tabs. one for the stimboard you're working on while the other is for all the research you'll do to get the gifs
I will also recommend saving your board as a draft so you don't lose credits or even the entire board if you're on the mobile app since the app can easily send you to other posts
for getting the gifs onto the board on pc, drag the image over or you can copy paste the gif link. sometimes the gifs don't work where it either didn't register properly [link is visible, just keep adding it over until it becomes a gif] while other times it becomes something else which you can't fix
dragging around the gifs is simple, you can either choose to drag it via the top left button or by grabbing the image directly then moving it to the correct spot

---------
personally I avoid using non-official art without permission if it isn't my own art. if you do want to use fanart, I would recommend asking the user first and also properly crediting. I usually will credit the post that I found it on instead of the user so that people can see the official post
for image sizes, I put them at 500 x 500 or smaller if I need to resize them. cropping is easier since I just choose the main focus. I use ezgif which can help you recolour gifs, crop, resize and more
---------
if anyone has any questions, you're free to ask me but I can't promise I'll have a correct answer to help you in making stimboards
0 notes
Note
this ask is on your side dw!! i am just complaining. i think it's annoying when people are like "i don't think people should get credit for just running a video through a gif converter" as if that's what all of us are doing. me personally i make all my gifs in photoshop and have had to spend a lot of time learning how to balance quality with optimization for use, color correcting without overcorrecting, etc etc.
some people use ezgif, like you, and spend time doing those same corrections, balancing optimization and quality, etc.
and either way, gif makers are making gifs so you don't have to! if you don't want to put in the time finding footage and making gifs, that's the service gif makers provide! without them, if you're not doing them yourself, the whole gif-based community falls apart. so maybe put a little respect on that... idk :c it just sucks all around 👎
Literally there's been less and less gifmakers over the years BECAUSE people do not respect gifmakers. I remember when the second a movie came out there'd be multiple gifsets of it before most people even have a chance to see it in a theater; that's how much people cared about and loved to make gifs. Nowadays a movie can be out for months and I'll only see an old gifset or two made from the trailer and nothing else (ofc this depends on the movie, but I remember almost every new release got this treatment, not anymore).
There are still plenty of movie gifmakers, but not nearly as much as there used to be. I think the same can be said for stim gifmakers; there are far more abandoned ones than active ones, and gif theft and general disrespect is one of the biggest reasons why. We're definitely the most vocal about this issue from what I've seen, and I think that's one of many reasons why the stim gif-making community is still going strong. I've thought of no longer making gifs after feeling exhausted seeing them stolen or miscredited so often, but I don't think I could stop for long; I love making gifs too much. I think many of us feel the same way.
I think the people who don't respect us either genuinely have no idea what it takes to make a nice gif and have never tried, or know they're in the wrong but are too ashamed to admit it so they double down.
7 notes
·
View notes
Last Seen Blogs

freenbeckstan
FreenBeck
certaincroissantwinnerkid
International-legal documents
jet-ur-fav
Jet:) (fandoms)
vndrevshd
𝖘𝖍𝖊𝖈𝖈𝖎𝖉 𝖕𝖊𝖗𝖊𝖟
thissying
i ain't here on business, i'm only here for fun