#not stim
Text

x
239 notes
·
View notes
Text
So recently, Tumblr broke their ability to follow a reblog chain. This is a problem.
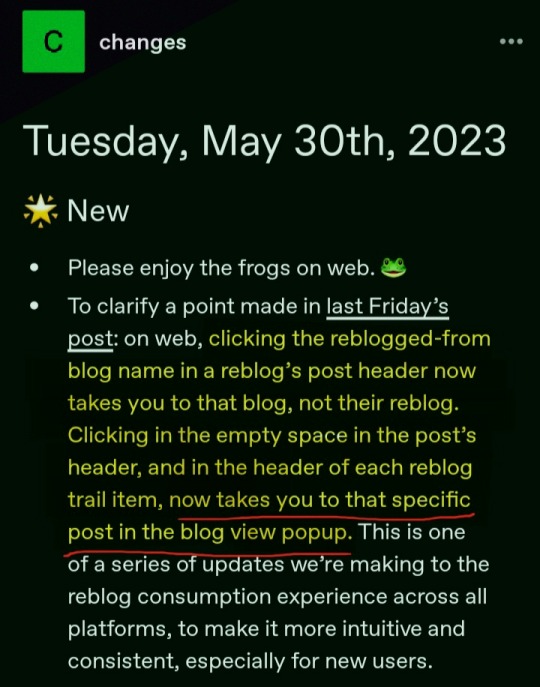
Following a reblog chain now takes you to a popup of that post alone on web, and a permalink view of it alone on mobile.
This is not only a stupid update that nobody asked for, but it also removes a core function necessary for my work here as an archiving blog.
As a blog who collects gifs from deleted blogs, I rely on the ability to go back to people's reblog and then continue to scroll back in time through their blog, where they've likely reblogged more gifs from other deleted blogs! I need this function to do my archiving work, and they've removed it!
And for what? To make things more "intuitive and consistent"?
@staff @changes Please, I am begging you to reverse this update. I can't do my work properly like this. I'm not the only one who's unhappy about this...

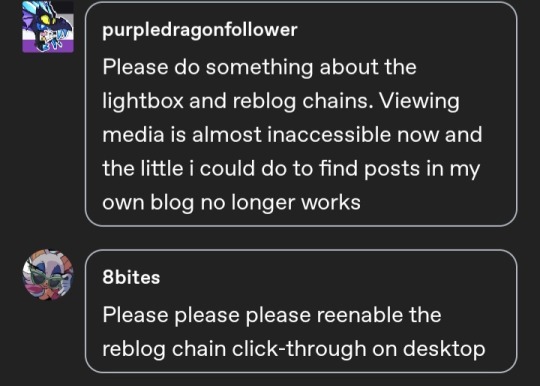

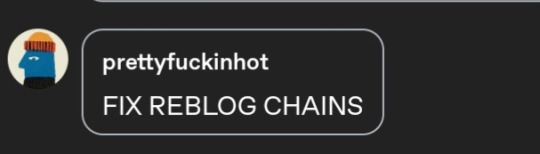

[ID a series of screenshots of various Tumblr users commenting asking Staff to fix the reblog chain]
#tumblr update#not stim#not a stim#txt#tumblr#tumblr updates#tumblr staff#bad tumblr#help#wordpress#screen reader friendly#image described#image description in alt#described#id in alt text#id in alt tag
314 notes
·
View notes
Text
people with niche and random fixations bring so much to the stim gif community...
#not stim#scopo speaks#if you make gifs and you're like 'this is too specific idk if anyone needs these' thats the devil talking. post the gifs#inspired by i just saved a fuck ton of videos to gif later when i have free time. of one specific topic#youll see dw
190 notes
·
View notes
Text
Getting diagnosed with one neurodivergency: relief, I'm not broken bless
Getting diagnosed with a second: okay that makes sense, good to know
Getting diagnosed with a third: come the fuck on this is getting ridiculous
2K notes
·
View notes
Note
Trick or Treat!
garfield :]
92 notes
·
View notes
Text
please wish me luck today friends. i will explain when it’s finished. 💕
92 notes
·
View notes
Text
Lavandee's Stimboard Ask Game
Here's how it works! By reblogging this post you welcome your friends and followers to submit numbered prompts to your inbox which you can then use as inspiration for a themed stimboard or gifset!
1. An obscure favourite character
2. Your first OTP
3. Your strangest kin
4. Your favourite colour
5. Your favourite song
6. Your favourite band
7. Your favourite Pokemon
8. An obscure hyperfixation
9. Your favourite food
10. A recurring dream
11. A childhood memory
12. A plush from your childhood or the current day
13. An old OC of yours
14. The first anime you ever watched
15. What you last ate
16. A song from your childhood
17. A character who's birthday you share
18. A hobby you enjoy
19. Your biggest fictional crush
20. A series you plan on getting into
21. A game you never finished
22. A series you have a love/hate relationship with
23. Gifs from your favourite stim blog
24. An interesting moment in history
25. An old hyperfixation or special interest
26. The AMV in your head
27. A defunct website you used to frequent
28. A fandom you're not in that looks like fun
29. An instrument you can (or wish you could) play
30. Create a crack ship!
31. Your zodiac
32. The decade you were born in
33. An overplayed song you unironically love
34. A remake/remix/reboot that's better than the original
35. A meme that makes you laugh
36. Your favourite animal
37. Your favourite sport or game
38. Your favourite holiday
39. Your current OTP
40. WILD CARD! Asker, send in a character that the stim blogger reminds you of. Blogger, make a stimboard of them!
74 notes
·
View notes
Text
Sourcing gifs shows you actually have standards and don't see stimming as some kind of fad btw. It shows that you respect others in the stimblr community and deserve that same respect in turn.
41 notes
·
View notes
Text
Due to some issues in my personal life as well as severe mental health issues that I'd rather not get into here, I will be taking a break from this blog as well as my discord server.
I will still answer asks when i recieve them (and i encourage you to send some since distractions are very welcome) but requests and original content will be put on hold indefinitely until I feel I am stable enough to produce gifs again.
Queued reblogs will be sporadic. I have one set in the queue now but after that I don't know when I'll feel up for refilling it.
If you want to keep up with me on my other blogs while I'm gone, my main is @kuchipatch1 (please be 18+ to view and follow) , and my art blog is @funhouse-arts . I also post mental health positivity and ocd related things at @ocd-bunny . If any of my mutual stim bloggers want to know my discord just send me a dm or an ask and I'll send it.
this isn't a permanent goodbye, I'm not leaving or deactivating or anything. I just need some time to get better and focus on myself.
Stay safe out there.
24 notes
·
View notes
Text
Hey everyone, I know this blog hasn't really been active for a while and I haven't made any gifs in a while. Well, I'd like to announce that I now have a new gif blog!
Don't worry, I won't be deleting this one, it will still be archived for anyone who wants to reblog or use my old gifs. The new blog is called @fuzzygifs and I'm calling it that because I want to make gifs for a variety of things rather than just "stimmy" things, but most of what gets posted there will probably still fit within the "stimmy" category. I could've just changed this blog's url but I didn't want to break all the links people had to the posts on this blog when they used my gifs, so I just made a new blog instead.
I probably won't be posting five gifsets a day like back when this blog was most active since I'm working 40 hours a week now and I'm trying to make time for some of my other hobbies as well, but it should still be more active than the radio silence that has been coming from this blog for the past few months.
40 notes
·
View notes
Text
it’s not required of anything but if anyone wants to support me, heres a link. I’d really appreciate even a little bit and if you send me something I can try and put a stimboard together for you
49 notes
·
View notes
Text
btw it's worth saying here! I'm pro-palestine, and my content isn't for anyone who thinks this isn't a genocide or that "peaceful protesting" was ever an option.
#zchat#not stim#palestine#seriously people who push for reform via peaceful protesting are ignorant at best malicious at worst#peace DOES NOT WORK!!! every big movement in history is founded on the back of MAKING A SCENE. anyway#justice for palestine.#(do not use this post to be antisemitic either. im Watching)
19 notes
·
View notes
Text
stim gifs in photopea
[PT: Stim gifs in photopea /End PT]
Hello! This is my (lengthy) tutorial for how I make GIFs for stimblr using Photopea. It's not going to be as extensive as how I make for shows, celebrities, etc, because I have different processes for both, however I'm still aiming to cover everything I think necessary!
It'll be split into multiple sections with headers, so feel free to skip whatever you want if you don't find it necessary :•] Reblogs appreciated if you found it useful, but no pressure obviously!
Sections:
Getting your video
Importing into Photopea
Making the GIF
Sharpening the GIF
Coloring
Exporting & Optimization (in EZGIF)
End results, and misc tips and comments
1. Getting your video
[PT: 1. Getting your video /End PT]
Short section! These are the ways I download and source videos for use
Youtube - yt-dlp (installation instructions)
Instagram
Tiktok (Allows without watermark)
Pexels
For yt-dlp, check out this basic list of commands I made solely for downloading material to GIF! If you have further questions, either send me an ask or refer to the github page.
2. Importing into Photopea
[PT: 2. Importing into Photopea /End PT]
There are two ways to import into Photopea, the first is importing footage directly, and the second is screencapping (which I won't cover in detail, but this tutorial is for installing the program I use on mac & how to use it, and this is for installing on windows)
Option 1: Importing footage directly (see end for comments)
On the home page of Photopea, you'll want to click "Open from computer", and select your clip, upon selecting you'll be presented with a popup like below

All that really matters here is where you see "30 FPS", that's the videos native frame rate. I always put whatever that number is as my frame rate because I find it to be the best, but you can use different presets (Like ezgif, which gives you 12, 20, etc). The less frames you have, the chopper it will be. If you plan to slow it down later, I'd also recommend having more frames so it looks smoother after slowing.
Now you just have to wait for it to load all the frames, then you're set!
Option 2: Importing screencaps
This is my personal way of doing things, so this is assuming you've installed a screencapping program and already have your frames ready.
For this, when you click "open from computer", select the first frame and open it by itself. Once that's loaded, look in the top left at the "File" tab, select "Open & Place", then ctrl + shift to select the rest of your frames. Once they've all loaded in, you can either rasterize them now, or wait until after cropping and resizing (goes faster then).
What's important though, is ctrl + shift to select all your layers, in the top left open the "Layer" tab, hover over "Animation" at the bottom to expand it, and select "Make frames". With your frames still selected, hit the folder button in the bottom left.

Without this, Photopea won't recognize this as an animation, therefore you'll be unable to export it as a GIF.
3. Making the GIF
[PT: 3. Making the GIF /End PT]
3A. Cropping
To begin with cropping, select the crop tool, which is the fifth one down on the left bar (if you hover over, it will say the name), or the "C" key on the keyboard.
Along the top now, you should have some new options. The dropdown menu that says "Free" is going to be how you select an aspect ratio or fixed size, and I always set to 1:1 since most people on stimblr use square GIFs, but you can do whatever works for you! Make sure to leave "Delete uncropped pixels" unchecked, because that lets you move stuff around later without having to recrop.
Crop your animation down as you see fit, then either hit the enter key, or the check button along the top bar. If you're unhappy with the placement, you can undo it OR, select all your layers, then use the move tool (First icon on the left, or the "V" key) and drag it around as you see fit.
3B. Resizing
With all your layers selected still, open the "Image" tab in the top left, towards the bottom select "Image Size", then select what you want to resize to.
Tumblr's exact GIF sizing
1 per row: 540px
2 per row: 268px
3 per row: 177px
HOWEVER. For stim GIFs, I find the quality difference so negligible, you can resize to what you want. It's also better for it to be bigger and scale down, then smaller and scale up. For this reason, I typically do 268px no matter what, or 300px.
As far as resampling goes, leave it turned on, and I personally leave it on bilinear, but the different options vary slightly, so experiment and see what works for you!
If you're happy at this step, go ahead and skip down to exporting! But when doing this way, I do recommend sharpening for better quality at smaller size.
4. Sharpening the GIF
[PT: 4. Sharpening the GIF /End PT]
The fun thing about this section is you get to experiment and find what works for you! I'll give you my personal method, but you can play around, add and remove bits, etc until you get something you're happy with!
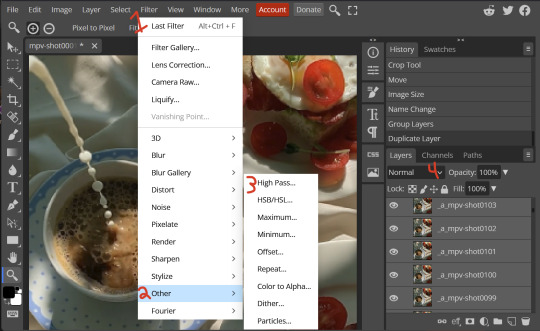
4A. High pass
High pass is my personal favorite way to sharpen GIFs, and for stim GIFs I'll often use only this.
(Steps 1-3 in image) To do, start by right clicking the *Folder* all your frames are in, and select "Duplicate Layer". Select all the frames in Only the folder on top, then go to the "Filter" tab along the top left, hover over "Other", and select "High Pass". The grey look is entirely normal! I normally set my high pass at 2-4, but play around with this step and find something you like!
Select the *Folder* all your high pass frames are in, and change the blending mode (fourth step in image) to "Soft Light", it should be on "Pass Through" initially. With that done, you've used high pass on your GIFs! If you're content here, skip the next section about smart sharpening, and see about merging animation folders under it.
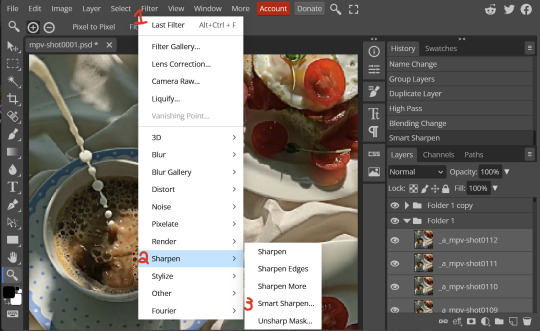
4B. Smart Sharpen
Note: I recommend testing your sharpening settings on one layer BEFORE applying them to all layers, as it will be easier on your computer.
I utilize this in addition to high pass usually, but you can do it all by itself as well! To begin, select all the frames in your folder (if you used high pass, select the frames in the *Bottom* folder). Open the "Filter" tab on the top left, hover over "Sharpen", and select "Smart Sharpen". Now find what you like!
For stim GIFs, if I used high pass, I'll go for 75-110% amount, and a .1 radius. I personally don't like the look of an over sharpened GIF, so I only use smart sharpen if I want to enhance some small details high pass didn't touch enough, which is why I use so little. If you don't like high pass, you might use more here!
4C. Combining animation folders
If you used high pass, you'll notice you have two animation folders. To fix this, select both folders using ctrl + shift, open the "Layer" tab, hover over "Animation", and select "Merge". It will give you a popup to confirm, and you can go ahead and accept!
If you don't merge these, Photopea will think they're two GIFs in one document, rather than only one, which is why this step is so important.
As a note, once you merge these folders, you can no longer shift the frames around to change where they are in the crop like you could earlier.
5. Coloring (Image Heavy)
[PT: 5. Coloring (Image Heavy) /End PT]
This section is going to be less of a tutorial and more a basic rundown of the adjustment layers and what they do. Coloring will change from GIF to GIF, and you can do light or intense coloring, so this is just a guide to begin with, but really just play around and find what you like!
To access the adjustment layer menu, in the bottom right where "New Folder" was, the one directly next to it that looks like a circle made of two half-circles, will bring up your adjustment layers.
As a note, I always group my adjustment layers in a folder above my animation, for ease of hiding to compare with and without.
5A. Levels
Levels is one I almost *Always* use on a GIF because it makes it look cleaner to me. In the first box, sliding the black square on the left *increases* the blacks, sliding the white square on the right *increases* the whites, and the one in the center changes the general brightness up or down.
Sliding the black box on the bottom bar *decreases* the blacks, sliding the white box *decreases* the whites.
If you change the channel from RGB to another option, you can change the balance of reds/cyans, greens/magentas, or blue/yellows, I personally don't touch this for stim GIFs. In the RGB channel, I set the top black box at ~10, and the top white box at ~245 usually.

5B. Curves
This is another way of adjusting brightness, blacks and whites, or color balance. By adjusting the dot in the bottom corner you adjust blacks, the top corner adjusts whites, and if you make a dot in the center, it adjusts general brightness! You can also make multiple dots to separately adjust some values. By changing the channels, you adjust color channels rather than white/black.

5C. Exposure
This is another way of adjusting the lights and darks of the GIF. Sliding the exposure up and down will add/take away light from the lighter parts of your images. Adjusting the gamma correction up and down will add/take away shadow from the darker parts of your image. Offset increases/decreases the brightness of the whole thing but I almost never use it.

5D. Vibrance
Vibrance is what I like to think of as a "softer" way to increase intensity of colors, instead of using a Hue/Saturation layer. It affects warmer colours more intensely than cooler colours, whether you use the vibrance or saturation slider. The saturation slider here is more intense than the vibrance one, but less intense than saturation in a Hue/Saturation layer.

5E. Hue/Saturation
This one is simple! Sliding the hue slider changes the colour, sliding the saturation slider increases/decreases saturation, and sliding the lightness is basically like directly adding black/white to a color. I use lightness only sparingly.
What's cool here, is you can adjust the range to target a specific batch of colours! If you find your reds are too bright compared to everything else, you can target the saturation of them specifically.

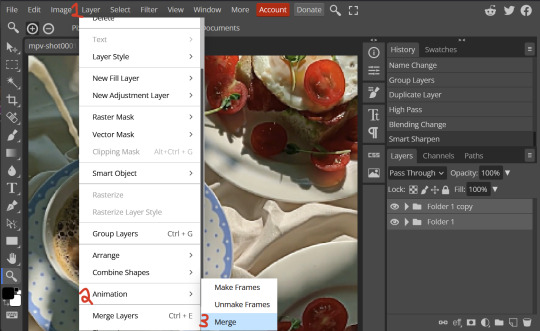
5F. Color balance
This is a simple way to adjust the base colors of an image, by changing it to be more cyan or red, magenta or green, or yellow and blue. This can be useful for making a GIF appear warmer or cooler!
I almost only touch the shadows & midtones, and highlights sparingly. "Preserve Luminosity" preserves the highlights and shadows of the image, so by unchecking it, you can achieve some more intense results.
5G. Black & White
The black and white layer is useful because you can change exactly how light or dark a color appears after making it black and white. For that reason, I prefer it over a gradient map if I need to make something black and white.
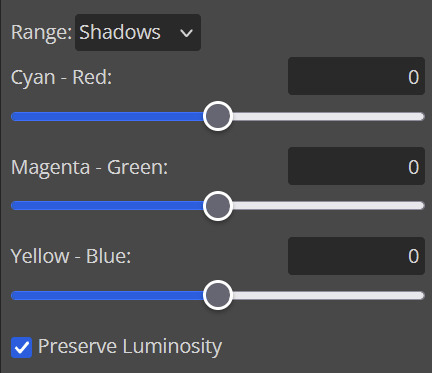
5H. Photo filter
Photo filter is a simple way to add a color filter over the entire image, and adjust how strong or weak it is. "Preserve luminosity" once again just keeps the darks and whites of the original GIF.

5I. Channel mixer
I couldn’t even begin to cover channel mixer here, but this is for very intense color edits (I typically use it when I'm trying to make a GIF fit a board). However, here's another tutorial solely about channel mixer if you're interested in taking a crack at it!
5J. Selective color
Finally, selective color allows you to adjust the amounts of color or lightness/darkness of a specific batch of color.
By changing the color channel, you can affect different batches of color. The cyan slider controls cyan/red, the magenta slider controls magenta/green, the yellow slider controls yellow/blue, and the black slider controls black/white.
Checking the "absolute" is essentially like "Preserve Luminosity" in the other layers. With absolute, it's like shifting the color one way or the other, and without absolute, it's like adding to the pre-existing color.

6. Exporting and Optimization
[PT: Exporting and Optimization /End PT]
6A. Exporting
With all that done, we're ready to finish it up! To finish your GIF, open the "File" tab in the top left, go to "Export As", and select GIF!
Here you can rename, adjust the size (WILL ruin the sharpening you did), the quality (I leave at 100%), and the speed.
Another important thing to note is the "Dither". If you leave dither off, you can potentially encounter color banding, which is where (typically gradients) with look like strips of color, rather than smooth. This is because GIFs only have 256 colors they can render, so if something has too many, it bands.
By checking dither, it can get rid of color banding, at the cost of dots on the image (around where the worst color banding is usually). Sometimes the dots aren't noticeable and this is the better option, however it will Also increase your file size. It's up to you if you want to use it!

6B. Optimization
This is technically an optional step, as tumblr's GIF size limit is 10mb, so as long as you're under that, you can post, however, smaller GIFs load faster and I personally find are better for use in stimboards where you're loading a lot of GIFs! So to help this, let's head on over to the optimize section of ezgif. My personal goal is UNDER 4.5MB, ideally under 4MB.
The two main things I recommend are Lossy GIF, or removing frames, and I always start with Lossy GIF. I do anywhere from 5-15, and usually this will bring down GIFs a lot if you made them in Photopea! My example GIF was 6.7 MB to begin with, and afterwards it was 4.2MB.
However if you find that to be not enough, you can remove frames. When you remove frames, it speeds the GIF up, so I also recommend slowing it down (this is why I set my frames high in the beginning as well). I typically do "Remove every 4th frame" and slow it down to 75%-85%.
7. End results, and misc tips and comments
[PT: 7. End results, and misc tips and comments /End PT]
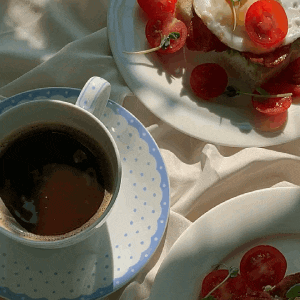


(source) The first GIF is without sharpening/colouring, the second is with sharpening but no colouring, and the third is with sharpening and colouring. I didn't color it much besides making it slightly warmer, but I hardly ever do much anyways!
As for misc comments:
In firefox, when you import footage directly, sometimes it glitches and tries to load 4000 blank frames, which is extremely resource intensive on a computer. The solution is import the footage in chrome, save as PSD, then open the PSD in firefox. (Or work in chrome but why do that /half silly). The other solution is screencap which I do since I do this often, but both work fine.
In firefox, sometimes you're unable to slow the GIF down upon export and it will export faster than it actually is. Slowing the video down to 50% restores it to native speed I've found, and you can do this in ezgif before other optimization.
When colouring, my number one tip is slide something all the way up first, then adjust down! By seeing it at max, you have a better idea of what's getting adjusted.
If you have any questions, drop me an ask :•]
And that concludes our tutorial! My apologies for the length, but I wanted to cover every possible thing here. It definitely seems like a lot, much more than working in ezgif, but when you get used to what you're doing, it goes extremely fast (even if you spend extra time screencapping). I personally find it worth it for the ability to sharpen GIFs alone, but as well as more detailed coloring opportunities.
Thank you for reading, I hope this has been useful!
#i did it :•]#not stim#stimblr#gif tutorial#photopea#big thanks to talos for proofreading this :3 🖤💚🖤💚🖤💚🖤
51 notes
·
View notes
Text
Behold, a creechur
109 notes
·
View notes
Text
recommendations for avoiding dead links
reblog and/or draft the original post that has the source. helps to bring attention to the original post and has the original source somewhere. also helps to re-find stim sources if you don't remember where you found them.
avoid putting the links elsewhere in a post, such as in a google document, pastelbin, or under a read more. the first two aren't as time sensitive as a read more. read mores, when the original blog is deactivated, works as a redirect to the blog but since it's a dead link, it goes nowhere and you cannot access it.
if you cannot embed the links in the post, link the sources without embedding and/or reblog them.
pinterest is your worst enemy. a lot of reposted content is on there. also tumblr aesthetic blogs too if they don't credit their content.
old stim blogs (2016-2019ish) often have reblogged from a lot of now deactivated blogs.
gif stealers should be avoided as they take effort from the original giffers. stealing gifs from someone you don't like is pointless and a waste of time.
14 notes
·
View notes
Text
leavin this up for a week! ^^
i’m gonna tag polls with “ishy polls” so that all that i make can be found again easily!!
104 notes
·
View notes
Last Seen Blogs