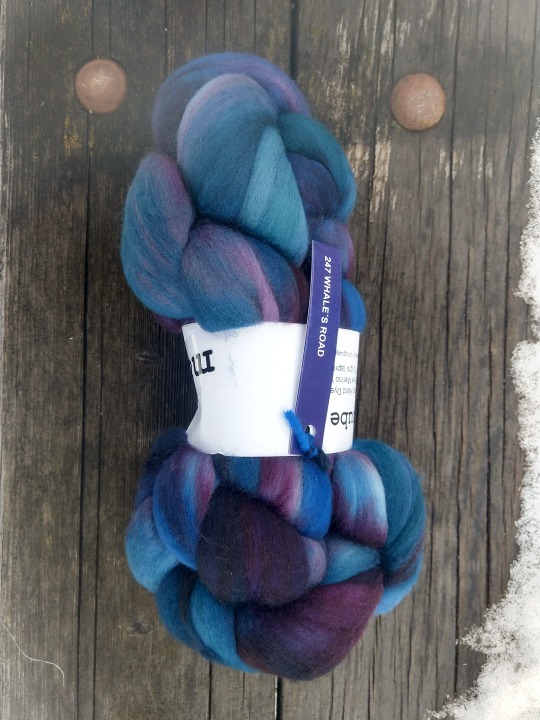
#merino silk top
Text
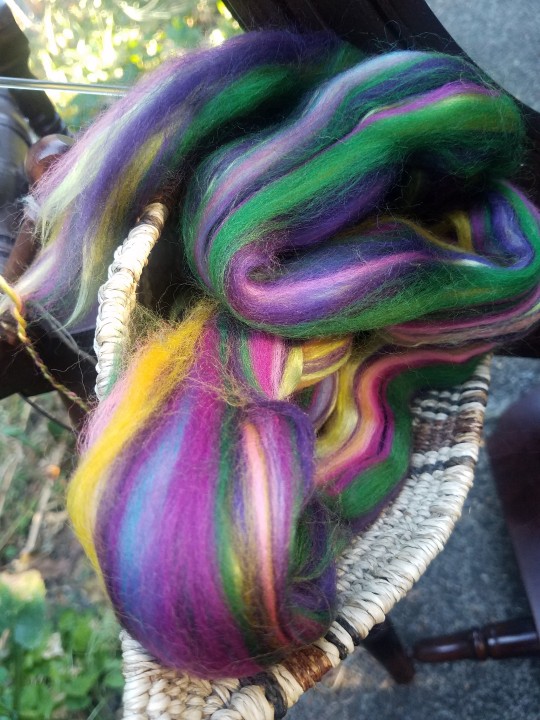
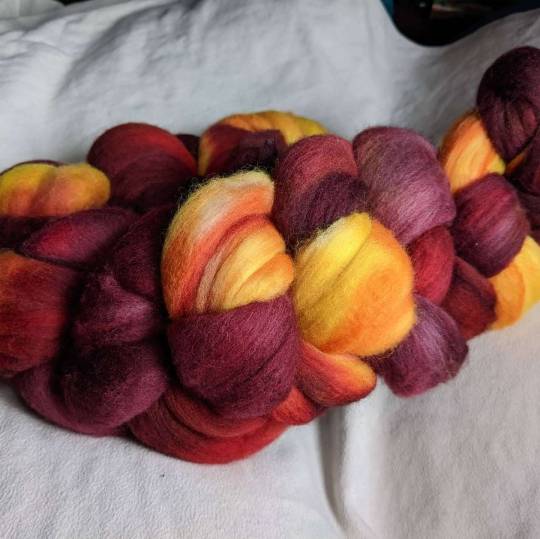
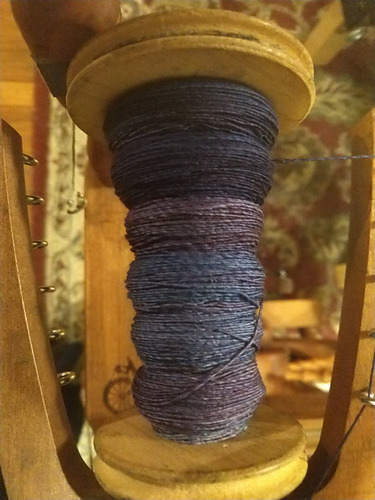
Little bit of spinning this morning. No idea how this is gonna end up looking... also not sure what i'll ply it with.
#had to go walk to where my sister left the car at like 6 this morning bc she thought it was gonna get towed which sucked#esp given that the med situation right now has me unbelievably exhausted but also not in that much less pain than i would b without them#idk im just hoping they start working soon#on the other hand tho i bought coffee on the way back and it is like. the platonic ideal of what a latte should be#that cafe is sometimes really good and sometimes pretty bad so im glad i got lucky with a good barista for once#ANYWAY i have so many posts i mean to make on here that im just too tired to do. gonna try and at least answer the ask tho#spinning#handspun yarn#merino silk top
35 notes
·
View notes
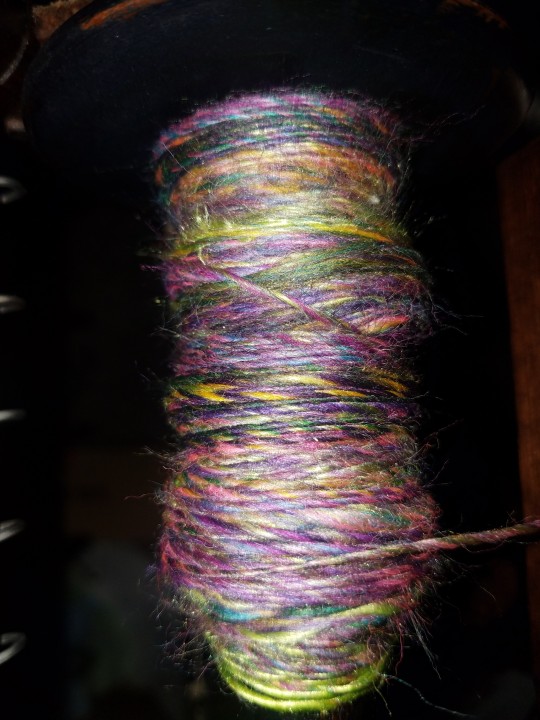
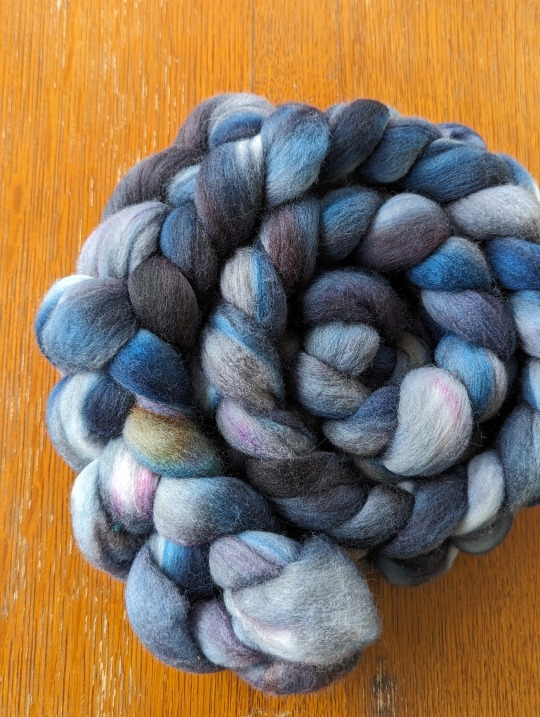
Text

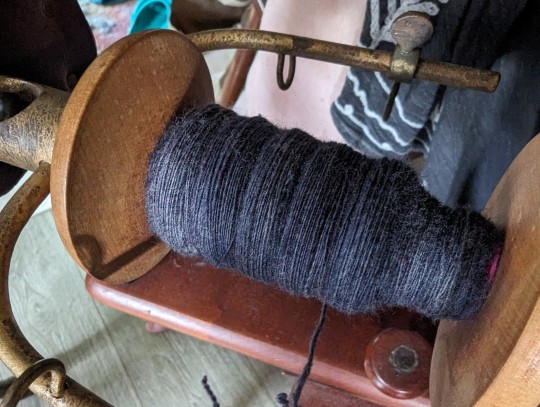
haven't had a bobbin of fully plied yarn in a hot minute, feels good, and my partner treated me to a tensioned lazy kate which made spinning up a 3-ply so much easier :]
#spinning#hand spinning#spinning wheel#fibre arts#fiber crafts#yarnblr#yarn#off the top off my head its a silk llama and merino blend ?? was lovely to spin
1 note
·
View note
Text
youtube
knitweare Production factory
S2M Knitwear Maker
Our website: https://sweater-manufacturer.com
E-mail: [email protected]
rentier pullover Maker
zip up sweaters Factory complex,zip up sweaters Bespoke Processing factory,zip up sweaters,zip up sweater women production company,zip up sweater women Producer chinese,zip up sweater women Producer china,zip up sweater women Producer,zip up sweater women manufacturing companies,zip up sweater women manufacturing,zip up sweater women manufacturer,zip up sweater women Firm,zip up sweater women,zip up sweater vest Production factory,zip up sweater vest Producer,zip up sweater vest manufacturer in china,zip up sweater vest factories,zip up sweater vest companies,zip up sweater vest,zip up sweater unisex Producer,rentier pullover Maker
Two-color V-neck pullover sweater knitting factory https://sweater-manufacturer.com/product/two-color-v-neck-pullover-sweater-knitting-factory/ rentier pullover Maker
zip up sweater unisex odm company,zip up sweater unisex odm,zip up sweater unisex Manufacturing plant in china,zip up sweater unisex manufacturer,zip up sweater unisex manufacture in china,zip up sweater unisex Firm,zip up sweater unisex Factory floor,zip up sweater unisex Factory complex,zip up sweater unisex,zip up sweater Producer,zip up sweater Processing plant china,zip up sweater odm Manufacturing enterprise,zip up sweater mens Manufacturing enterprise,zip up sweater mens manufacturing chinese,zip up sweater mens Factory complex in chinese,zip up sweater mens factories,zip up sweater mens companies in chinese,zip up sweater mens,zip up sweater men,zip up sweater manufacturing Firm,zip up sweater Maker,rentier pullover Maker
Halter sweater short top knitwear factory custom design and production https://sweater-manufacturer.com/product/halter-sweater-short-top-knitwear-factory-custom-design-and-production/ rentier pullover Maker
zip up sweater inside pockets,zip up sweater hoodies,zip up sweater for kids,zip up sweater Firm,zip up sweater custom,zip up sweater company in chinese,zip up sweater company,zip up sweater companies chinese,zip up sweater bespoke china,zip up sweater,zip up sweater,zip up pullover Processing factory in china,zip up pullover odm in chinese,zip up pullover Maker,zip up pullover bespoke Manufacturing facility,zip up pullover Bespoke companies,zip up pullover,zip up polo sweater,zip up knitted,zip up knit sweater Production ,zip up knit sweater Processing plant,zip up knit sweater Processing factory,zip up knit sweater oem&odm Firm,rentier pullover Maker
Christmas jacquard sweater production design factory https://sweater-manufacturer.com/product/christmas-jacquard-sweater-production-design-factory/ rentier pullover Maker
zip up knit sweater oem company,zip up knit sweater manufacturer in chinese,zip up knit sweater manufacturer,zip up knit sweater Maker in china,zip up knit sweater Maker,zip up knit sweater Firm in chinese,zip up knit sweater customization upon request Manufacturing enterprise,zip up knit sweater company,zip up knit sweater,zip up jumper,zip up hoodies,zip up hoodie tutorial
#woollen light weight sweater Firm#cashmere silk sweater top Firm#100 cashmere jumper women Firm#merino wool sweater cheap companies#fleeces sleeve turtleneck Firm#mens woolen fleece junior sweater Firm#merino wool sweater coat for men company#merino wool pull en tricot companies#cashmere silk black knit companies#mohair outdoor sweater company#merino wool fur sweaters for girls Firm#woollen cardigan men's companies#cachemira sweater boy Firm#cashmere silk sueter que Firm#woollen cardigan no company#woollen wool sweater women companies#mens woolen pullover ladies sweater companies#cashmere luxury sweaters Firm#en laine men sweater knitted companies#cashmere silk cardigan uniform companies#Youtube
1 note
·
View note
Text
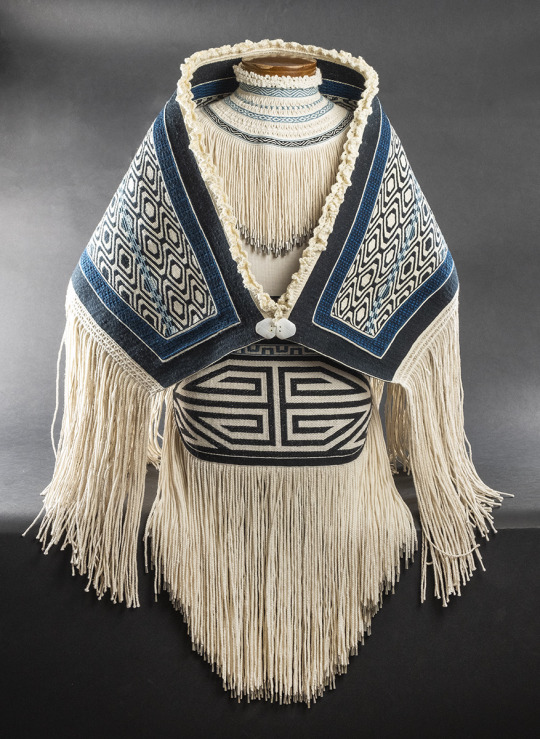
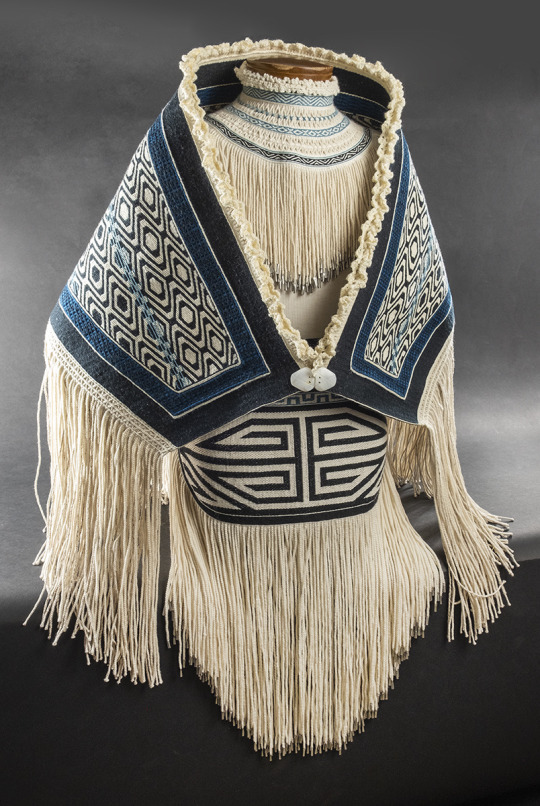
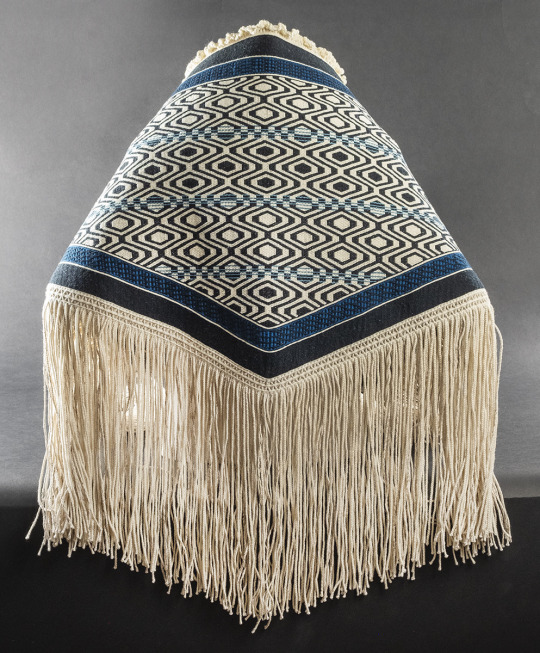
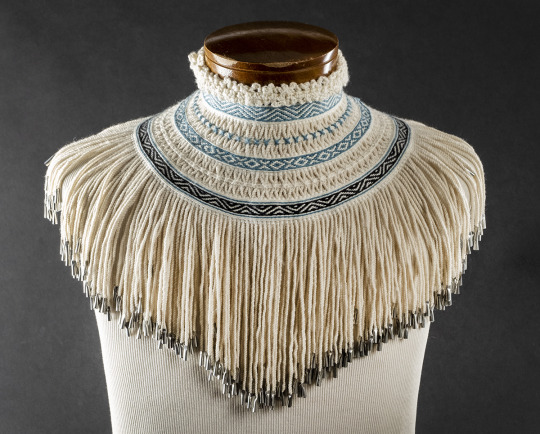
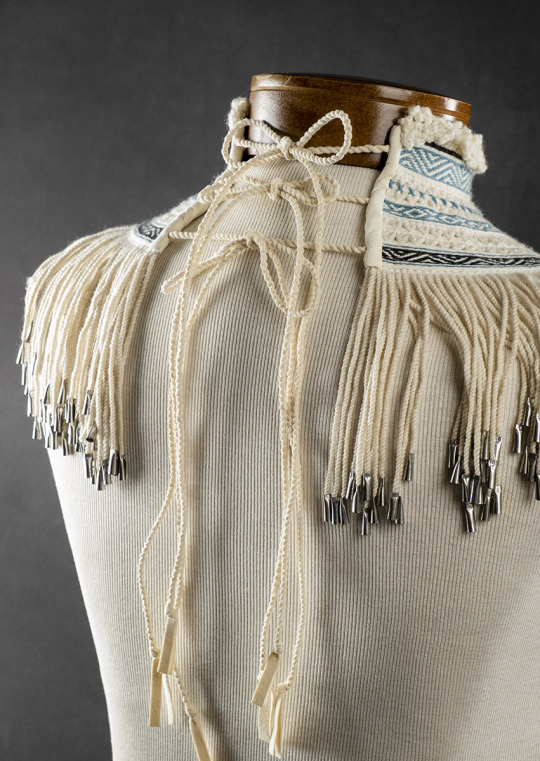
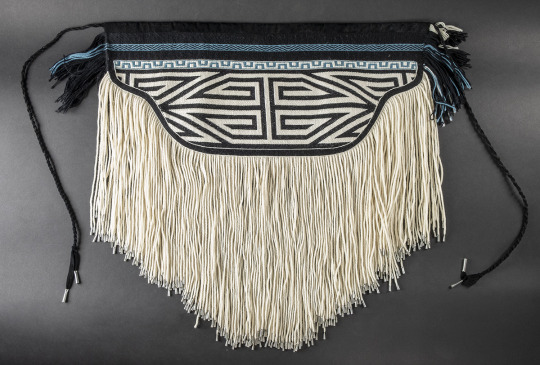
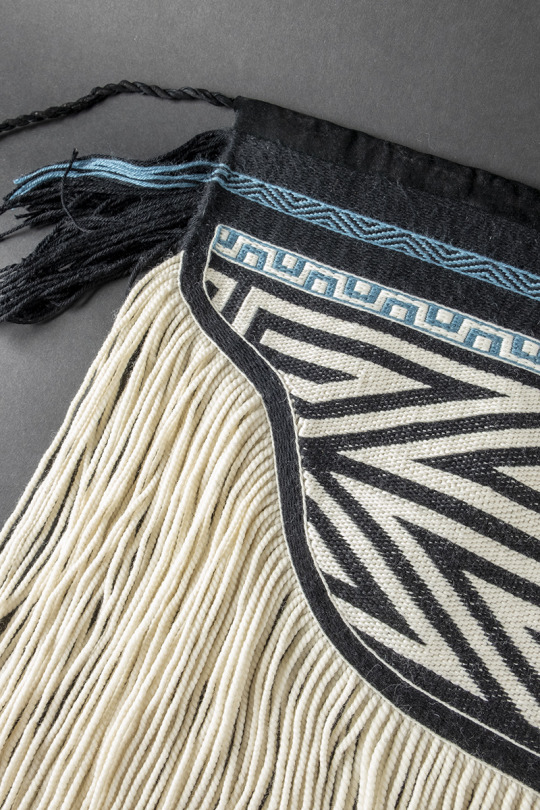
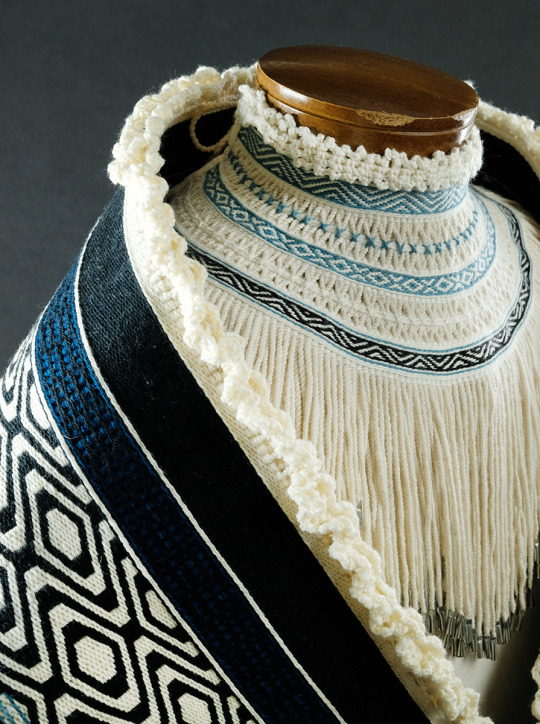

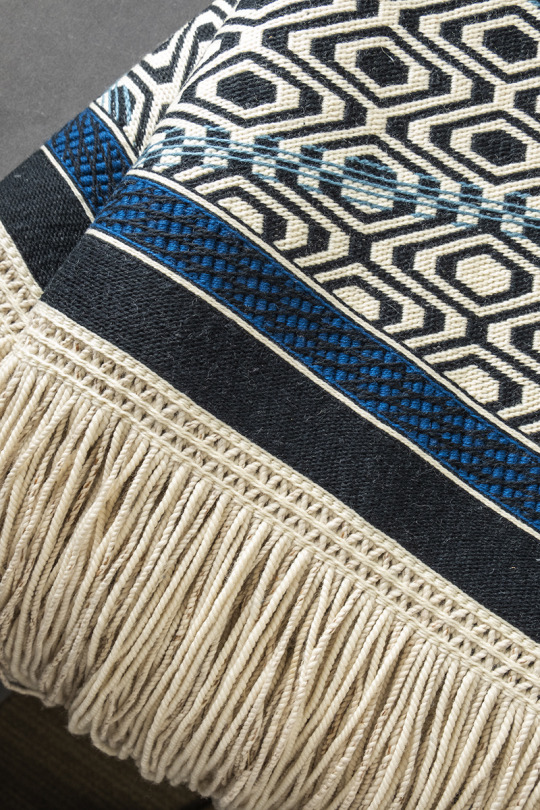
We Are The Ocean
Ursala Hudson (Tlingit/Filipino/German)
collar: merino wool, silk, steel cones, leather. ravenstail patterns, crochet, basketry twining technique. Woman as a Wave shawl: merino wool, silk, cedar bark. chilkat and ravenstail patterns, crochet, basketry twining technique. Tidal apron: merino wool, silk, leather, steel cones. chilkat and ravenstail patterns.
“We Are the Ocean is an ensemble comprised of a collar, apron (entitled Tidal), and shawl (entitled Woman as a Wave). The collar and bottom edge of the shawl are twined using a basketry technique to bring delicacy to the regalia, made specifically to emphasize the wearer’s feminine essence. In place of the sea otter fur that traditionally lines the top of Chilkat and Ravenstail weavings, the merino weft yarns were used to crochet the collar and shawl’s neck lines, bringing forward and incorporating a European craft practiced by both my maternal (Tlingit/Filipino) and paternal (German) grandmothers. The high neck of the collar gives tribute to the Western aesthetics that have forever influenced the Indigenous cultures of our lands; with grace, we embrace that which cannot be undone, and use our new form to be better. The apron’s pattern was studied and graphed from an old Tlingit cedar bark basket, and represents the tides of our lives, as our lessons continue to arise in a revolving cycle, yet made of new debris. The repetitive pattern of the shawl represents the infinite connectedness of our sisters, mothers, aunties, and daughters. Blue lines break up inverted rows, representing the “past,” “present,” and “future,” acknowledging these concepts as irrelevant constructs that fall away when we commune with the Divine. The entire ensemble is worn to evoke the innate spirit of the Woman as an ethereal deity, that resides within us all.”
#textiles#regalia#fiber art#weaving#ursala hudson#tlingit#filipino#indigenous art#native art#first nations art#ndn art
1K notes
·
View notes
Text
Femme Fatale Guide: Small Ways To Look More Polished (Essential Style & Beauty Tips)
Some simple fashion & beauty tips to help you look more put together to turn heads and feel your best daily. Hope this helps xx
Style:
Always steam, lint roll, and snip any threads from your clothing before heading out the door
Ensure your top, pants/skirt, and outerwear proportions flatter your body shape. Choose cuts, hemlines, and strategically tuck or button (or unbutton) each garment to create lines that flatter your figure
Be mindful of how your pant/skirt/dress hemline aligns with the shaft of your footwear. You don't want any bunching or awkward gaps
Learn which colors are the most flattering on your skin tone (and which shades wash you out)
Study your body shape and the silhouettes that best streamline/elongate your frame
Find the right balance of textures/fabric weight (too many "heavy" fabrics like faux fur, quilting or puffer-style items when styled together can look bulky if not styled carefully)
Invest in a capsule wardrobe and neutral basics made in high-quality fabrics (Pima cotton, cashmere, silk, heavyweight denim, merino wool, etc.)
If an item does not look quite right on your body, tailor it or toss (donate) it out
Make sure all of the hardware matches with all of the jewelry, handbag, watch, cuff or button details, and footwear you choose for any given outfit
Maintain your accessories and footwear. Ensure they're no creases or scuff marks before heading out the door
Beauty:
Always keep your eyebrows well-shaped, brushed, filled in, and regularly tweezed
Tweeze and/or dermaplane your face as needed
Prioritize skincare/SPF for flawless skin
Ensure your foundation/concealer/brow products are all a perfect color match and fully blended into your skin
Use concealer to outline your brows and lip shape for greater definition
Strategically apply bronzer/contour, highlighter, and blush to your face to flatter your natural hollows, and prominent features (top of cheekbones, the tip of the nose, right under the brow), and use a light wash of color where your face would be naturally flushed
Find a flattering lip shade that suits your skin tone and doesn't make your teeth look yellow/dull
Embrace healthy hair habits (condition generously, use a wide-toothed comb and a specialty hair towel on wet hair, use a heat protectant and a round brush for blowouts/styling and satin or silk hair ties/pillowcases, get regular trims)
Use dryer sheets to minimize hair frizz and water or Vaseline to slick back fly-aways
Exfoliate and moisturize religiously (dry brush or sugar scrub with lotions including ingredients like hyaluronic acid or glycerin, depending on your skin type)
Use cuticle oil around your nails & apply hand cream/lip balm daily (or substitute with Vaseline for any of the three)
Maintain a diligent nail routine (consistent nail shape, classic pink, nude, red, or vampy polish color, and a high-quality top coat)
#femme fatale#dark feminine energy#dark femininity#fashion tips#beauty tips#fashion and beauty#fashion advice#beauty advice#life advice#beauty hacks#tips and tricks#it girl#queen energy#high value woman#high value mindset#elegance#classy life#high maintenance#femmefatalevibe
2K notes
·
View notes
Text
hi! ok so i'm going to talk about one of my top-five favourite things, which is: dyeing stuff! this is going to be specifically about dyeing protein fibres (animal fibres—wool, alpaca, silk, etc) in a pretty low-key way in your kitchen.
to be clear up front: this is not the most scientific, most perfectly reproducible, or most Objectively Correct way to dye things. i get a lot of fibre that i like this way, though, and i think that other people can, too.
fibre i've dyed that i think is neat:
you can also dye yarn like this:
yes, i like blue a lot. i also really like variegation and heathering, which is why most of the fibre here has patches of white—it's an intentional choice that i've made. you can make different choices.
here is what you need to dye things:
fibre, vinegar, dye, a pot, heat, and some water.
that was so you don't get overwhelmed by the impending wall of text. here is what you need to dye things (it's the same stuff!), but with way more detail:
fibre or yarn. this is the big one, obviously. i tend to dye in 100-200 gram batches, because that's approximately what fits on my stovetop easily. if you're very nervous about felting or harming your fibre, you can use stuff that's been treated to be superwash, start with yarn (which is harder to felt than fibre is), or use a felt-resistant breed like dorset or suffolk. honestly, though, i learned with merino because that's what i had, and it was fine. again, though, this guide is only for protein fibres. it will not work for things like cotton. the only exception to this is nylon, which will take on some colour, but less than a protein fibre will.
a mordant. this is a fancy way of saying a thing that makes dye stick, and for what we're doing here, it's citric acid or vinegar. your grocery store definitely has at least one of them, though if you can choose, i prefer citric acid, because i love wet wool smell but i do not always love wet wool vinegar smell.
dye. i use acid dyes, and am personally deeply loyal to dharma acid dyes, but ashford and jacquard acid dyes work the same way. if you don't want to buy dye or don't have access to it, food colouring will often work, as well, though i haven't tried this with natural food colourings and have no idea how well they'll work.
a dedicated dye pot. ok, if you're doing food dyes, you don't need this. if you're not, it's definitely best practice, though i don't know how dangerous it is not to. any large metal pot will do, but my favourite option is hotel pans, which are those huge metal pan/tray things that hold food at buffets and the like. i have a full-size one that's 15cm deep, and a half-size one that's 4cm deep. they're great because they let you lay out the fibre you're working with so you can see most of it in a single layer.
dedicated dye utensils. as before, i don't know how much of a huge deal this is. i'll be honest and admit that for several years i had a single pair of tongs that got used for all tong-requiring events, including dyeing, and i'm still alive. i suggest that you have at least a big spoon, and a big spoon and tongs are even better.
something to mix the dye in. yeah, i use empty plastic sports drink or soda bottles for this. you can be fancy and get mason jars or little squirt bottles or whatever, and if you get super into dyeing you'll want to mix up dye stocks, but that's way outside the scope of what we're doing here. i like the powerade bottles that have a little squirty mouthpiece, because it's fun to squirt dye onto things.
personal protective equipment. i think this is the part of things that freaks people out. ideally, you wear plastic gloves and a mask (yeah, like your covid masks) when you're working with dye. realistically, i almost never remember to put on gloves and just accept that my hands are going to be blue sometimes. you should wear a mask, because dye is an irritant, but the world is an imperfect place and i have wicked bad adhd and sometimes i forget. this isn't advice. i'm just being honest. you should use some kind of safety stuff. you probably won't die if you don't.
you might also want some little random bits: an old toothbrush or paintbrush, a pipe cleaner, some toothpicks, etc. this is mostly if you like speckles, or if you want very small patches of colour.
so first: there are a million ways to dye things, and i'm not convinced that any of them are objectively correct. i do what i do and it works for me. some of the things i do are the opposite of what most guides suggest, but i do them because i like the effects they create.
ok, that's all the background stuff you need. let's dye some stuff!
the number one most important thing to remember when you're dyeing is this:
you can always add more colour. you cannot take it away.
that's in fancy writing and bold because every once in a while i forget this, and every single time i end up regretting it.
here is how to dye things:
put water, citric acid (or vinegar), and fibre into a pot. add dye and heat. let cool completely. rinse the fibre in cool water, then hang to dry.
like, sure, we're going to go into way more detail, but push come to shove, if you do that, you're going to end up with dyed fibre. there are a lot of tutorials telling you that you must soak your fibre first, or you must add your citric acid this way, or hold the water at exactly this temperature, and i'm here to tell you that while any of these things can give you different results, those results aren't necessarily better.
the only way that you can totally screw this up is by accidentally felting your fibre, so before i get into the way more detail part of things, i'm going to talk about that.
how not to felt your fibre
i feel like if you've read this far, you know how things felt: wool, heat, and agitation. you may also notice that at least two of these things are required for dyeing. this can be stressful! but you don't have to be afraid of it. there's only been one time that i felted something to the point that it was unusable, and that happened because i literally fell asleep for several hours while the pot was on the stove. you can avoid doing this by simply setting an alarm—this is a good idea anyhow, because you'll want to check on your dye pot!
when you're dyeing, use the lowest heat that you can while still keeping the water at a simmer. if your stove, like mine, has one burner that's wildly unpredictable and sort of out of control, you may want to look for some sort of flame diffuser, also called a flame tamer or a simmer ring. i bought one on amazon for about fourteen dollars, and it's literally just a thick metal circle. it works fine.
you can also keep the heat low by using a pot with a thick bottom, though in my experience those are expensive, and if i had one i would be using it for soup, not wool.
avoid shocking your wool—never put room temperature wool into hot water, and never put hot wool into cold water. leave your wool in the dye bath until it's cooled completely, which for me usually means overnight.
finally, obviously you have to move the fibre around some. you'll need to peek under it in the pan, and when you're done, you have to rinse it and squish out the water. try to minimise handling, though. don't run water directly onto the fibre, don't get a wooden spoon and stir your dye pot around, don't wring the fibre dry when it's done.
you're probably never going to be perfect. i often find that i lose a gram or two of wool where fibres have grabbed onto each other, or where parts of the ends clumped up. it's not really felted, just sort of compacted, but it's not great to work with, and i'd rather lose a gram of fibre than fuss with the clumpy bits.
back to how to dye things
let's take it step by step, assuming a hundred grams of fibre.
put your pan on the stove and fill it halfway with water. add either a teaspoon of citric acid or a tablespoon of vinegar. this is going to help the dye strike, or stick to the fibre. the teaspoon/tablespoon is a guideline, but one that it's fine to exceed. adding more will help the dye strike faster, which can be useful if you're trying to create blocks of colour on your fibre. i usually err on the side of a little more than the guidelines, and just eyeball this—if you feel like the dye isn't taking well, you can add more later.
add your fibre to the pan. this is the first place you have to think about what you want the finished fibre to look like! you can put it into the pan any way you want, but i suggest trying to keep it in a relatively even layer, regardless of what that layer looks like. here are some ways to get specific effects:
if you want a gradient from one end of the fibre to the other, use a rectangular pan and lay your fibre out so that the line of it is parallel to the short sides of the pan
if you want a short, repeating gradient, use a rectangular pan and lay your fibre out so that the line of it is parallel to the long sides of the pan
if you want something that starts with very close repeats that get further apart as you go down the fibre, make an approximate spiral
if you don't want A Pattern (i usually don't) just lay things out in a single layer, more or less
here comes the next exciting part! decide if you want to let your fibre soak or not. again, doing or not doing this gives you some different effects!
soaking your fibre will mean that dye takes more evenly. if you want consistent colours, you'll want to soak.
not soaking your fibre means that the dye takes less evenly. the fibre on top will have less acid available to it, spends less time in the dye bath, and also has to actually get wet before it will start to dye. i actually love doing this, and think it affords a lot of cool opportunities to play with and layer colours.
if you're soaking, leave the fibre there until it's submerged. if not, don't.
now you're going to add dye! decision time, again.
you can add dye when the water is cold, which will give you more even dye coverage, and in my experience gives the colours more time to mix together
you can add dye when when the water is hot, which will give you less even coverage, and tends to encourage the colours to stay more delineated
probably surprising no one, i tend to heat the water first unless i'm starting with a base colour or i'm doing a two-colour gradient.
time to mix up some dye
as i mentioned earlier, i'm assuming that you're using powered acid dyes for this. if you're not, this mixing up part is technically optional—but doing it gives you way more control about how and where you place your colours, so i'm going to assume that you'll do it.
i usually mix dye in some sort of empty drink bottle. regardless of what you're using, before you add dye to anything, put some water in the bottle, wipe off the lip, put the lid on tightly, and shake the bottle vigorously. if there is any leakage at all, do not use that bottle. find a better bottle. if your bottle cap doesn't seal well or if you have an empty condiment bottle that's just a little wonky or whatever, you will get dye all over the kitchen, and your landlord will be really really mad about it, and you will regret your life choices. (if you own your kitchen, you can do whatever you want, but this isn't about you and you know it.)
so you have a bottle that seals tightly! great job. dump out the water and carefully put some dye powder into the bottle. remember earlier how i said you should be wearing a mask? this is the part where you should be wearing a mask.
i know that people are reading this and going, ok, but how much dye do i put in?
my answer is put in the amount that feels right in your heart, and don't forget the number one rule of dyeing things, which is that you can always add more colour, but you cannot take it away.
this isn't a very scientific answer. most dyes have a guideline about how much to use, expressed as a percentage of the dry weight of the fibre, which is what you use to get the whole quantity of fibre dyed evenly. for dharma dyes, it's like 1.5-2%, i think ashford is 1%, and jacquard is more like 2-4%, depending on the colour.
here is the problems with doing that in your kitchen: first, using that much dye will get you an evenly dyed piece of fibre, which—for me, at least—is basically the opposite of what i want. second, and more importantly, unless you have one of those teeny tiny scales used by jewelers and drug dealers, your kitchen scale will not weigh out such tiny quantities with any accuracy. third, if you do it like this, you really have to plan what you're doing ahead of time, because there's a point after which no more dye will bind! the fibre will be like enough thank u that's it i'm good and that'll be it, so you lose some of your ability to decide that actually, you want more green.
you can probably guess, at this point, that i don't weigh the dye. once you've done a couple batches of fibre with a given brand of dye, you'll start to get the vibes for how much you should use. if you really want a guideline, for a hundred grams of fibre, start with a quarter teaspoon of a given colour. you can add more—either more of this colour or a different one—later, as desired.
put your dye in the empty bottle, and then fill the bottle partway with hot water. the amount of water doesn't really matter here, nor does the specific temperature of the water. i usually fill about 3/4 of the way, because that way there's plenty of room for this next step, which is: wipe the lip of the bottle, recap it tightly, and then shake it up real good. the dye powder is going to dissolve into the water, and you now have a bottle of dye!
if you're going for a gradient, you might want to mix up your second colour so you can add them at (basically) the same time for more even mixing. if you're not, or if you only have one mixing bottle, you can do them one at a time.
oh my god we're finally putting dye on the fibre
are you ready? it's time!!
you have basically infinite options for how to do this, and many of them will give you different effects. here are some ideas:
pour the dye all at one side of the pan. and if you don't add anything else, your fibre will fade from the colour of the dye to the natural colour of the fibre
pour two colours, one at either side of the pan. depending on how much dye you use (and remember, you can always add more), this will give you either chunks of colour surrounded by white, or a two-colour gradient
add all the dye to unheated water and mix it gently, then let the fibre soak for a few minutes longer before turning on the heat. this will give you a fairly even colour
pour randomly all over, and you'll either end up with a tonal yarn or a heathered one, depending on how much dye you're using
add the dye to the water under the dry fibre, which will sink in and take up more dye on the bottom of the fibre than the top
if your heat wasn't on before, it should be now, and you're going to let the dye hang out in the hot but not boiling water for a while. how long? well, one of the cool things about dyeing with these dyes is that they exhaust, which means that when the dye has been sucked up by the fibre, the surrounding water will be clear. how long this takes will depend on the specific dye, how much of it you used, how much mordant you used, etc. i try to check every fifteen minutes.
reminder: if you started with room temperature water, the dye's not going to start taking until the water heats up, so don't check it after fifteen minutes and freak out that nothing has happened. it is fully normal for it to take up to an hour for the dye to exhaust. don't turn up the temperature, just give it time.
yay it worked!
at this point, you have a pot of hot water with some beautifully coloured fibre in it! but maybe it's not beautiful enough. maybe you want...more colours.
that's cool as hell and you should go for it. we mentioned two-colour gradients up there, but what if you want something else?
the answer, probably obviously, is adding more dye.
first, a caveat: while you can successfully make multicoloured gradients like this, it's more difficult than you think, and if it gets messed up—all the colours bleed into each other, say—it turns into a muddy mess. my suggestion is to stick to two (or three at most!) colour gradients until you have a much better feel for what you're doing.
let's talk about ways you can add more colour. you have two options: big colour and little colour.
big colour is going to add a lot of colour—you're going to mix up the dye and pour it just like you did before, but paying more attention to places that don't have dye yet. sometimes it's the middle of a gradient, or the white splotches from random pouring, or the half of the fibre that wasn't submerged when you started. or maybe you dyed the whole thing yellow, and now you want to add a blue gradient over top. whatever!
if you don't want to freehand pour, consider buying a couple large syringes, or a bottle with a squeezy top. these are also fun because you can easily get more colour between the laid-out fibre, or even under it.
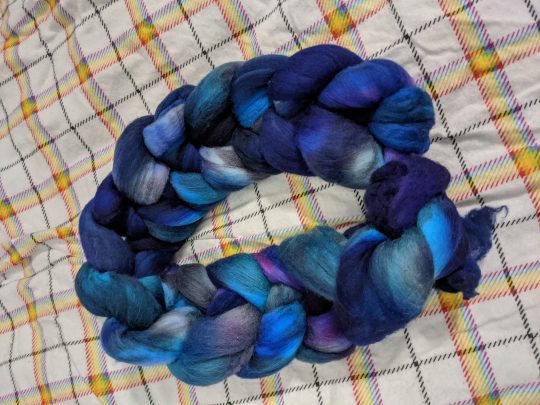
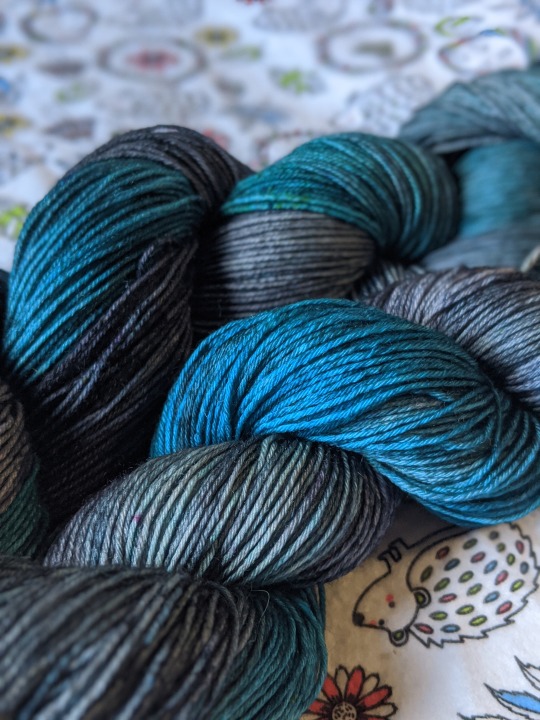
in the pictures at the start of this post, the red-and-gold top and both yarns were dyed by adding big colour.
little colour isn't going to add big patches, but is going to add speckling, tonal depth, or smaller patches of colour. all of the blue-base fibres and the yellow-and-blue yarn were dyed like this.
if you're still reading this closely, you might have caught that i just said both yarns were dyed with big colour, and that the yellow-and-blue yarn was also dyed with little colour. these are both true! the base colours of the yarn were done to make big colour, but if you look at the full-size image, there are also a bunch of speckles. you can do whatever you want! no one can stop you!
here are some ways to add little colour:
mix up some dye, but use less water. add drops of the dye, either directly onto the fibre (more dramatic!) or in the water (tonal!)
use a toothpick to grab a little bit of dye powder and drop it into the dye bath (similar to the previous one, but a little less predictable)
put on a damn facemask. take a clean toothbrush, paintbrush, or pipecleaner, and just barely touch it to the dye powder. gently flick or tap the brush to add speckles of that colour
find a salt shaker that you're never going to use for anything but this. put citric acid, salt (to make it distribute better), and dye powder into it, and shake it up (with the holes covered, please cover the holes) to make sure they're evenly distributed. gently shake this over the fibre to add speckles, but more of them, and clustered together
put a little dye in a spray bottle and gently mist the exposed fibre, kinda glazing it with colour
another thing is that if you like a natural coloured yarn with dyed speckles, you can do any of these techniques without doing big colour first. the only thing to note when doing this is that you'll want to be very sure to spread out the fibre well, and maybe to consider dyeing one side, then very very carefully flipping it over and getting the other side.
ok, now what?
let's say that you've added all the colours that you want, and you've let your bath simmer long enough that the water is clear, or nearly clear. (if it's not, check troubleshooting, below.)
put the lid on your pan and walk away. if you don't have a lid, just walk away, but it's less dramatic.
the super frustrating part here is that the safest thing to do is wait until the water and fibre is fully cooled before you do anything else.
have i ignored this? yes
has it ever gone horribly wrong? not horribly wrong, but it's definitely caused me to lose an inch or two of roving on occasion
is it way more stressful if you don't wait? absolutely yes
honestly maybe just go to bed and deal with your fibre in the morning
so now let's say that it's morning and you slept long enough that your water and fibre are both room temperature, which often actually feels quite cool on your hands.
you have to drain your fibre. there are two ways to do this:
lift the fibre out of the water. this has the upside of not risking dumping your beautiful fibre into your sink, and not needing to maneuver a full pot of water, both of which are admirable. the downside is that wet fibre is fragile, and you'll want to be careful to support it.
dump the water out of the pan. this has the upside of minimising how much handling you're doing of the fibre, as well as (in my opinion) making rinsing easier. the downside is attempting to keep the fibre into the pot while you dump the water into the sink, and also needing to carry around a full pot of water.
secret third option: dump the fibre (and the water) into a strainer. upside: very easy, and you can keep the fibre in the strainer while you rinse, minimising both how much it needs to be handled and the weight on the fibre. downside: i never remember that this is an option until i'm already elbows-deep in acidulated water, discovering every tiny cuticle tear.
you're going to fill your dyepot with water again so that you can rinse the fibre. you want to minimise thermal shock, so keep the water temperature as close to the temperature of the fibre as you can, and don't run the water directly onto the fibre. i like to pull all the fibre to one side of the pan, and fill the pan on the other side.
side note: if you, smart person, remembered that you can use a colander, simply fill a pot with water, put the colander in the pot, and gently agitate the colander.
if you, person who is deeply relatable, did not remember you can use a colander and now have a pot with clean water and fibre, gently move your fibre in the water to encourage any excess dye and also citric acid to get out of there.
drain your fibre again, and this time, you're going to squeeze it dry. you're still trying to minimise agitation, so this isn't a 'wring it out' situation, it's a 'gently squish it between your hands and/or a hand and the side of the pot' situation.
hang your fibre to dry. remember what i was saying earlier about it being fragile? let me suggest, here, that you do not simply drape the entire length over a single hanger or something and hope for the best. if you literally have a single hanger, at least drape it back and forth a bit, but better if you can use more than one hanger, or a clothes drying rack, or that weird metal wine rack thing that came with your fridge that you've never used, or whatever.
important reminder: drip-drying things will make your floor wet! if you live somewhere very clear with no major roads or pollen nearby, you can probably dry things outside, but if you don't, you'll probably want to position the drying rack in a bath, shower, laundry area, or otherwise over something that will catch and/or absorb the water.
how long it takes for the fibre to dry is another unknowable variable. if it's warm and dry where you are, it might literally be overnight. if it's damp and cool, it can take days. the batch i posted a couple days ago literally took almost a full week to dry. spread it out as best you can, gently squeeze out the water you can, and otherwise you just have to wait.
you're done!
when it's dry, that's it, you're done! you might find that you need to pick off some little lint balls or a bit of compacted or slightly felted fibre from the tips, but other than that, you should be good to go.
like most fibre stuff, this is best maintained by handwashing in cool water. you may see a little bit of dye or colour loss the first time you wash it, which is pretty normal and nothing to worry about.
congratulations! you made it to the end of this incredibly long post, and if you followed along, you've just dyed some fibre!
troubleshooting
this isn't dyed enough! i want more colours!
add more dye! i'm not the boss of you.
this is true even after the fibre is all done and dryed. there's nothing that says you can't dye it again—you can, and i have.
some fibre seems to require more dye than others. silk, for example, dyes beautifully with acid dyes, but also needs way more dye than i expect it to.
remember that if you're dyeing something that's a wool/cotton blend, for example, the cotton isn't going to dye. the only exception is nylon, which will kinda dye, but not as dramatically. this guide will not work for plant fibres.
this is too dyed! i want fewer colours!
please refer back to the number one most important thing about dyeing, which—as you know—is: you can always add more colour, but you cannot take it away.
pull out some more fibre and try again. this has a learning curve, just like any other fibre craft.
these colours don't look like i expected!
this can be about a lot of things.
colour guides, especially if you're looking at them online, aren't always very accurate.
colour guides tend to assume that you're dyeing a single colour at the suggested dye percentage of weight, and using less than that will give paler colours.
dyes, especially if you're mixing brands, can interact with each other and behave in ways you didn't expect.
dyes can also break, which is when they split into their component colour molecules. this happens commonly with blacks and browns, food colouring, and anything that dharma trading has marked as 'advanced'. some people find this very desirable and seek it out; some people are very frustrated by it.
the ph of your water can sometimes affect your dye. i've been lucky enough that i've only lived places with lead problems, not weird ph stuff, so i haven't investigated this closely, but if you're consistently not getting the results you expect, even going for a single, solid-colour dye, look at the ph.
my dye water's not clear!
if you used a quarter teaspoon of dye and a hundred grams of fibre, and it's been, say, 45 minutes of actually hot water and your water still isn't clear, you probably didn't use enough mordant, and you should add some more citric acid or vinegar to encourage the dye to get in there and do its thing.
if you used you used more like a teaspoon of dye, or if the citric acid doesn't change anything, you used too much dye for your fibre. you can either shrug and pour it down the drain, or you can add some more fibre and dye that, too.
my rinse water's not clear!
you probably used too much dye. it's ok—just keep rinsing it, gently, until it's more or less clear.
some colours just like to run—you know how every once in a while you get a yarn and it just bleeds a little bit every time you wash it? sometimes it's just like that. i wouldn't worry about it too much.
my fibre has felty/clumpy bits!
a little bit of this is normal, especially at the ends of a fibre that felts easily (this means you, merino!)
pick off the bits that you don't like—this is generally fairly easy, and involves very minimal fibre loss. i don't bother doing it until i sit down to spin, and then just pull off bits as i come to them.
if there's a lot of felty/clumpy bits, more than you can reasonably pick out, you agitated the fibre too much. there's not much for this other than trying to card it out, which may or may not work.
sometimes this happens because your stove got weirdly aggressive and boiled your fibre. especially for wool that's prone to felting, the bubbling and jostling can be enough to encourage more clinginess than you'd like.
i want my dyeing to be reproducible!
this is kinda doable. it's a handmade thing, so it's always going to have some natural variance, but you can do it.
buy a jeweler's scale that measures in fractions of a gram.
start measuring your dye and acid, and take detailed notes about what you do.
follow those notes in the future, and you'll be probably 90% of the way there.
i want to dye with natural dyes!
i fully support this and have played around with it a little bit myself, but absolutely do not know enough about it to advise you.
the internet is very large and full of many people who are much smarter than i am, and i feel confident that at least one of them is desperate to tell you all about how to do natural dyeing.
i am, at this point, not that person.
i want to dye plant fibres!
i am begging you to find another guide, because this one will not work.
you didn't answer my question!
that's what my inbox is for
i have to reiterate that i'm just a person with real specific interests who started dyeing things because i couldn't find or afford the kinds of colourways that i wanted.
i am not a professional
i will do my best to answer questions, but sometimes the answer is 'just fuck around until you find out'
plant fi—
shhhhh
the end
thank you for reading this incredibly long post! i might make another one in the near future, either so i can show pictures or because i took out an entire section about how to choose colours and pick a colour scheme and work with colours, and i kinda want to talk more about that, but this is no joke almost six thousand words long, so i thought, you know. maybe not tonight.
anyhow, i hope that this was useful to someone! thank you for letting me talk about one of my very favourite things.
#dyeing#craftblr#fiber arts#fiber craft#fibre arts#fiber#fibre#dyeing wool#i'm sorry this is so long#it kinda got away from me#i just want to tell people about cool stuff!#and then talk about the cool stuff for an unreasonably long time#you know#like a normal person#anyhow this was fun#dyeing is super fun and you should try it#sorry to say that i am Not editing this#because i only edit things when people are paying me for them#but i did make my wife read it to make sure i got all the main stuff#so we should be good#still: sorry for any stylistic inconsistencies#smartest raccoon i know
309 notes
·
View notes
Text
Fiber arts update: I finally finished the accursed yarn for the goddamn weaving project!
(this also counts as 100 days of art, 35/100 on the grounds of fiber arts still being art. I think I deserve that after the annoyance this project put me through so far...)
The white stuff is 50/50 silk/polwarth, the blue stuff is 30/70 silk/merino, and the grey one is 20/20/60 yak hair/silk/polwarth.
The yak hair was lovely to work with, the merino was frankly just a bit boring, and the polwarth/silk was the actual bane of my entire existence for months. I will never manage to un-fuzz my room after the goddamn silk tornado that fiber let loose, and there were a bunch of little silk clumps in there that made the spinning experience just deeply un-fun. Ngl, I never enjoy spinning 50% silk blends, and I do not know why I keep doing it.
(it's silky and shiny and has so much drape, that's why)
Anyway, it's on my loom now:

I was so happy about how well the warping went, until I realized that I did it backwards and spent so very long fixing that. Worked out alright in the end, though.
top-down view (sideways, so I don't stretch your dash more than needed) for a better idea of the colors:
I wish the blue wasn't getting quite so overpowered by the relatively warm grey, but using more exciting colors would've meant using more boring fibers, and in the end I wanted to make it fancy more than I wanted to make it colorful.
I had a pretty difficult call to make with the white weft yarn; that's a 6-ply; I had planned for 4-ply worsted-spun warp and 3-ply woolen-ish weft to account for my habit of long-draw singles always coming out a bit chunkier, but the polwarth/silk didn't quite cooperate and the yarn was generally looking kind of wispy and sad, so I loosely cabled it... which made it chunkier than the other weft yarn, but I just decided to own it. It does add some sorely needed contrast and structure, I think.
#handspun yarn#yarn spinning#hand spinning#the100dayproject#the 100 day project#guardy's 100 days of art#hand weaving#rigid heddle loom#rigid heddle weaving#guardy's fiber arts tag
58 notes
·
View notes
Note
As someone who can't wear fabrics that are itchy, (rough) even if it washed in softener. Can you give advice on what to look for? I need more business clothes but it seems all the work pants I find for the office is made of that fabric.
Oh this is a tough one. Unfortunately, you might have to go for a higher price point. A fix that worked for an actress I used to work with was wearing satiny cuddl duds in the winter and tights in the summer under all of her pants but YMMV.
(this next part assumes you're US American but I think the idea is applicable everywhere)
First, I would recommend going a slightly fancy department store like Nordstroms. You don't have to buy anything, just feel some clothing to figure out what fabrics you like and write it down. I would recommend going to a higher end store vs like JC Pennys because manufactures like to lie about fabric content and in my personal experience it's less of an issue if you go to a more expensive store. If you're like me, anything rayon, wool, or polyester is a no-go. Semi synthetic fabrics are hit or miss. I'm personally good with silks, satins, linens, and cottons. (If you're not allergic to wool, apparently merino wool is great)
If you're close to a bigger city, you'll probably be good to shop in store. Smaller towns you'll probably have to do online shoping in order to avoid certain fabrics. I haven't shopped at all these but off the top of my head some good stores to check out might be: Quince, Universal Standard, Good American, Amour Vet, Madewell, and Macy's but be real vigilant about checking the fabric content. Rich People Goodwill can have some great stuff but with the rise of thrifting it can be a slog (and real frustrating depending on your size)
May the odds be in your favor on the hunt for non scratchy clothes <3
78 notes
·
View notes
Text
Fiber Sale (need money for moving; also trying to destash) !! Only shipping to the US. All prices include shipping.
Would also really appreciate donations if you want to help support me but can't buy something for whatever reason.
Check the original post to see what's been sold and what hasn't (I will cross out sold items). First come first serve.
https://ko-fi.com/kolyenka
Prepared Fiber--all of this is prepared by me :) the following 4 are cheaper as I can ship them in normal envelopes
A: 0.14 oz, combed top. Blend of bfl, tencel, tussah silk, corriedale, merino. Very soft and shiny. $8.
B: 0.11 oz, combed top. Blend of tussah silk (black) and mohair locks (green). $8
C: 0.22 oz, combed top. Same blend as A, just a lot more of it and in different combos. Distinct gradient from one end to the other. $10
D: 0.4 oz, rolag (made on blending board). Tussah silk, mohair, and bfl. Very squishy and fine. $13
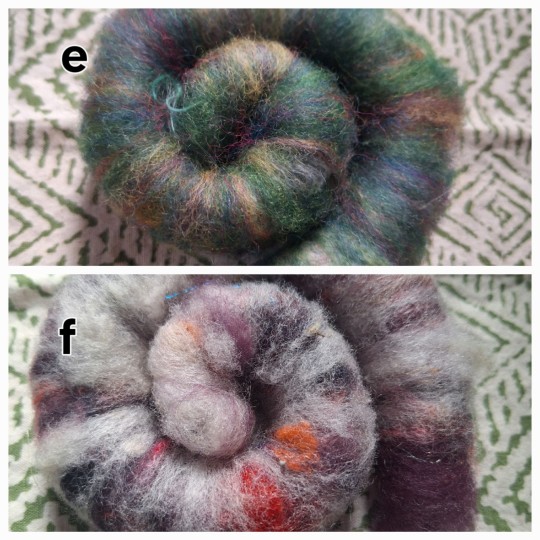
E: 0.29 oz. Rolag, wool and cotton blend. Even more stripes of color under the surface. $13
F: 0.51 oz. Rolag, wool blend with some Angelina. Purple underneath. $15
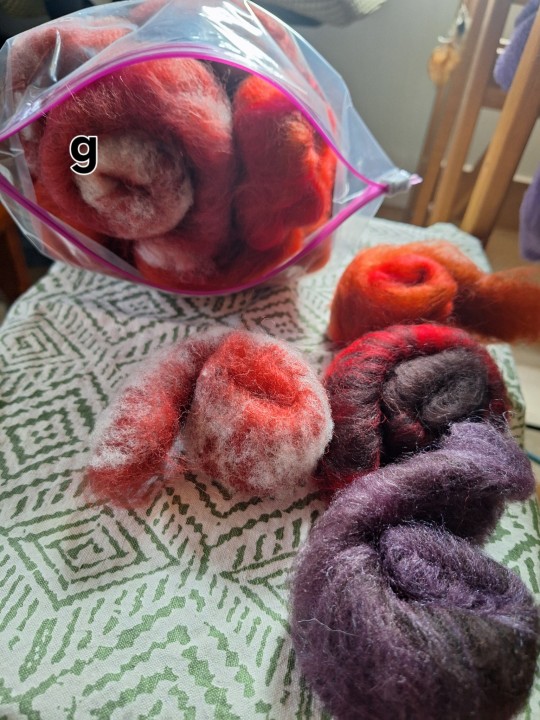
G: 4.75 ounces. Rolags (many many rolags). Blend of various wools; some fibers are not quite next to skin soft, but overall it's a soft blend. Mix of red, orange, white, purple, and black. $45
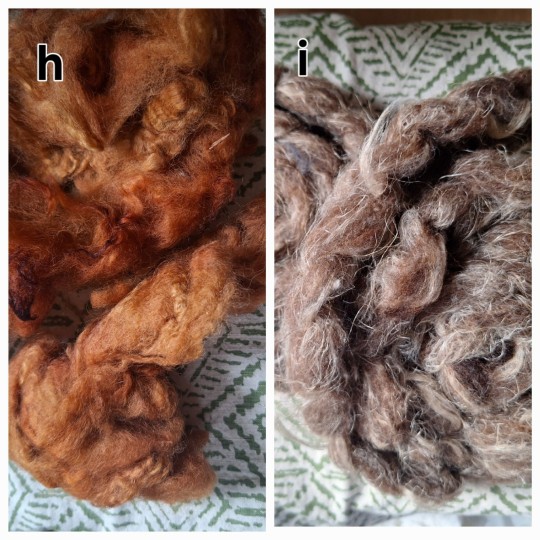
H: 1 ounce. Washed longwool fleece (breed unknown). Dyed by myself with onion skin. $10
I: 1.2 ounces. Southdown flax blend, predrafted from rolags. Could potentially make up to 6 ounces total of this. $18
FLEECE
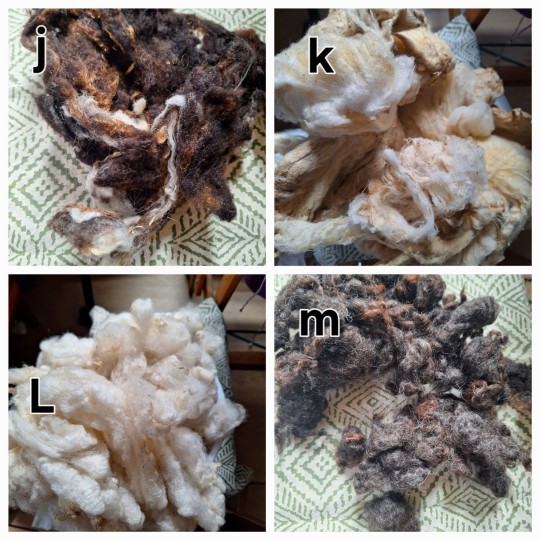
J: 6 ounces. Washed jacob lambsfleece. Very soft for a jacob, large bits of vm (was able to get it out with hand cards). $20
K: 5.5 ounces. Hampshire with 2+ years growth, washed fleece. Definitely an odd fleece, not like your usual down breed. Has vm; washed it multiple times but still looks gross--I've found its almost impossible to get totally clean before it's yarn. Recommend combing, spinning, then washing. Nice and soft. $25
L: 7.5 ounces BFL cross. Very soft and with good luster. Some vm, was able to remove with hand cards. $25
M: 4.75 oz. Jacob x Border Leicester. Good luster, warm brown tips. Nicely soft. $20
SPINDLES:
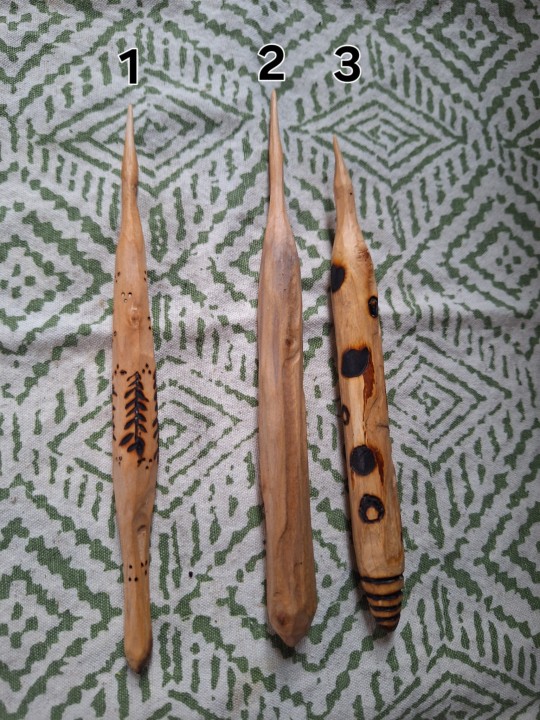
1: thin spindle (7 inches long). Good for cobweb weight but can achieve thinner and thicker. Birch wood with woodburning. $80
2: thick spindle (7 inches long). Good for laceweight but can achieve thinner and thicker. Wood type unknown (some sort of fruit tree iirc). No woodburning due to lots of wormholes and spalting which provide their own visual interest (they don't cause problems spinning don't worry). $60
3: thick spindle (6.5 in long). Good for laceweight, can spin thicker and thinner. No clue on wood type. Woodburned on most of the surface, the rest has wormholes again. $90
BAGS
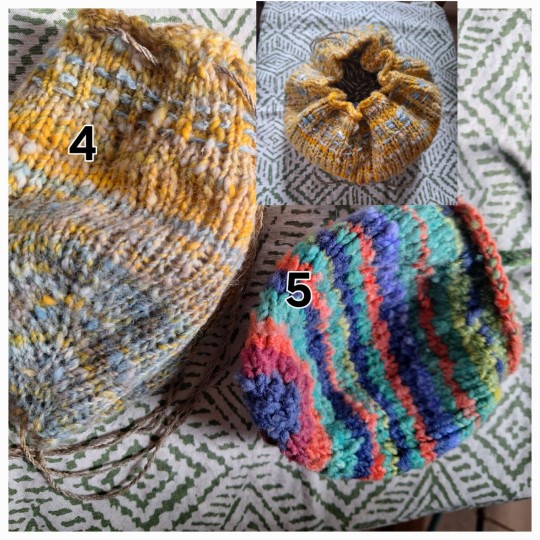
4: handblended handspun handknit drawstring project bag, 20 inch circumference. Cord is handspun flax. It's folded in half in the bigger picture. $90
5: handblended handspun handknit pouch. Don't remember the circumference but you can compare to the other bag. Body is entirely southdown babydoll wool. Handle is handspun icord. $75

HANDSPUN YARN
6: 4 oz, 325 yards. Hand blended and handspun. Alpaca, wool, silk, silk noil, angelina. 2 ply fingering weight. Very textured. $65
7: 5.75 oz, 572 yds. Merino and silk blend, 2 ply, dk weight. Blended for a triangle shawl, stripes get longer as you go. Very soft, shines very beautiful in the light. $115
Please DM if you're interested--first come first serve. I take payment via ko-fi.
178 notes
·
View notes
Text

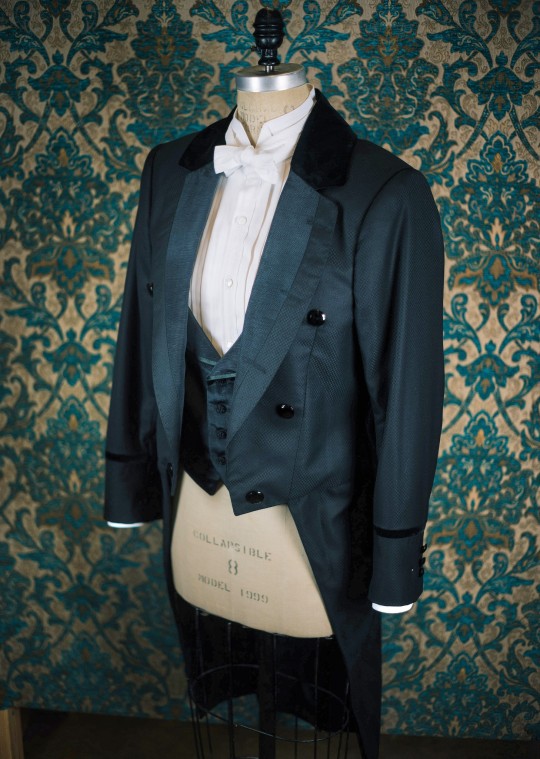


IT'S DONE!!! 🥳 My new Phantom tailsuit is complete and on its way to the UK!
Just completely in awe of what @ajmachete (IG) and his Denver Bespoke @vigilantelabs (IG) team have created for me! AHHHH!!!!! 🤩😳🤩🥰🤩
This suit is inspired by 90s era Phantom suits on Broadway. All the fabrics were sourced to provide the best possible match to the authentic stage fabrics. Anyone who has researched for the Phantom's suit knows the iconic patterned silk is prohibitively expensive and impossible to obtain. Finding a fabric that gives the same effect is incredibly difficult, but I think we found a great substitute! In fact, stumbling onto this fabric was the entire inspiration for this commission in the first place.
I contacted AJ earlier this year about constructing a new suit for my Phantom of the Opera cosplay. Immediately, I knew I made an excellent choice. He and his team made the whole process smooth. They are top professionals in their craft, and it is evident in this exquisite result. If you need any bespoke tailoring done for your cosplay, or if you have an idea for a cool everyday garment, please give AJ and his team a look!
Thank you AJ for this amazing piece of art! 🥰
I cannot wait to receive the suit and don the mask for the first time in nearly three years. I am so excited for the upcoming conventions, photoshoots, and shenanigans with the @the_phananigans (IG) in/around London! ❤️🇬🇧
I also hope to use this new version of the cosplay to highlight some of our outstanding artists in the Phantom community. Standby for future collaborations. 😎
#phantom of the opera#phantomonabudget#phantom of the opera cosplay#phantom cosplay#phantom costumes#the phantom#the Phantom's suit#Phantom tailsuit#maria bjornson#phantom of the opera costumes#bespoke tailoring#broadway costumes#Phantom Broadway
57 notes
·
View notes
Text
So my current wheel spin is this Merino/Silk blend and it looks lovely right?
Well, I need some help from my fellow spinsters(affectionate).


I have noticed that the lovely blue silk has a tendency to get hidden and muddled in the spin.
I try to hold the fibre with the silk more top-facing and it sometimes barberpolls when I do but mostly it ends up somehow as the core of the spin.
When I draft too thin, the silk just gets muddled but I don't want it too thick as I'm aiming for a 2 ply worsted for my final product.
I have been pulling sections from the braid and then splitting that section in half and spinning with it that way so that I don't thin the silk out too much.
Does anyone have tips for coercing your fibre to present in a certain way?
Am I even making sense?
#the spin looks lovely regardless but I want to have more control over what the end product will look like#there is beauty in chaos but I paid for that silk and dammit I want it seen!#hand spinning#wool#yarn#fibre#Merino#silk#craftblr#spinning technique
93 notes
·
View notes
Text


Back in Summer 2021, I spun up this worsted sport weight 3 ply yarn out of some merino silk (2 plies) and merino (other ply) top. I really didn't have any plan for the fiber and then the yarn, and it's been sitting in my stash waiting for a project.
Whelp, I'm flying out for a work trip next week, and I don't have an easily portable project to pack (neither the five color hat, 3/4 completed brioche shawl that needs to be frogged back several rows or raglan sweater requiring cabled sleeves are something I want to carryon), so I've been trying to brainstorm portable projects out of the stash. I keep coming back to this yarn, a sport weight semisolid without a coordinate buddy (not my normal weight/number of plies).
Despite my complete lack of a need for another skinny shawl, I'm leaning towards the Twist Again shawl by Ágnes Kutas. I may skip the bobbles (or at least only include in the last repeat).
22 notes
·
View notes
Note
what advice do you have for building a classy, dark energy, femme wardrobe on a budget?
I LOVE these expensive brands I see (YSL, Balenciaga, Jimmy Choo, etc.) but I'm trying to save money for more important things right now.
(plus I can't afford lots of super high end brands on a regular basis, as I'm sure most of us can't lol).
How can I "find dupes" for lack of a better term for these bougie brands I love, or what tips do you have for looking classy and highend on a budget (fashion wise anyway)?
Thanks xoxo
Hi love! I would say the main thing to do is pay attention to fabrics and stitching of garments.
Overall construction matters considerably more than the name on the tag when it comes to building a "high-end" wardrobe. Some fabrics to look for include: 100% cashmere, Pima/Supima cotton/organic cotton, merino wool, genuine leather, and/mulberry silk.
Pay attention to the stitching/buttons or accents on garments. Make sure there are no gaps or loose threads. Look for lined or double-lined items. Darker garments tend to look more expensive. Stick to neutral colors and classic silhouettes for a more "elevated" look.
Some more "affordable" brands (in the mostly $100-$300 range) I love include:
The Frankie Shop
Pixie Market
Massimo Dutti
Manière De Voir
Lilysilk
Reformation
Naadam
Sézane
GAP
Express (for bodysuits/trousers)
Banana Republic
Everlane (the Supima basic tops are great for the price)
Personally, my favorite way to save money on high-end clothes is to use sites like TheOutnet or YOOX and shop the sales sections of designer retailers like Farfetch, Luisa Via Roma, Saks, FWRD, etc. to get the same quality of clothing for less.
Hope this helps xx
#fashion advice#clothing brand#luxury fashion#wardrobe design#wardrobe staples#closet essentials#personal style#black clothing#minimalist fashion#contemporary fashion#fashion#femmefatalevibe#q/a
152 notes
·
View notes
Text


they are like sisters to me…
(from left to right / bottom to top: north ronaldsey single, bfl / merino/silk 2ply, merino/silk 2 ply)
#handspunyarn#handspun yarn#hand spinning#yarnblr#maybe I should do a gradient with them? they’re different weights but i bet i could do sth fun still#maker spins#maker’s makes
16 notes
·
View notes
Text
current spinning project (...ok, one of them) is the first big set of batts off the drum carder. i loathe those wool/silk 'blends' that have a giant chunk of silk basically just sitting on top of the wool, so i wanted to see if i could make something i'd like better.
i grabbed some merino i dyed a million years ago and some purple mulberry silk and set off. the goal was to get a fairly even blend of wool and silk, and i mostly succeeded. there are a few places where there were still little clumps of silk, but that seems like a skill issue, which means i can fix it eventually.
all up, not bad for a first go. next time i'll probably weigh out the fibres--i didn't bother with this one, and the first half of the fibre i processed clearly has more silk than the second.
64 notes
·
View notes
Text
Fiber arts update:
I am now deeply obsessed with cabled yarn

I love making 4-ply yarn anyway, and I have yet to make one I don't like, but THIS is just really particularly lovely. Pain in the ass as far as time investment is concerned, especially on a spindle, but LOOK AT THIS!!
Then, the projects for today: two samples, the grey one is Yak/Polwarth/Silk, and the greenish one is Ashford's take on Merino/Silk. (second sample was spun overtop of the first one because I didn't want to ply the Yak at work)


I spun both of these pretty loose and fluffy; the yak mix is a regular 2-ply, the merino/silk is chain-plied.
The merino/silk looks pretty dreamy in close-ups but I don't absolutely need a full 3.5oz of it, especially because I think this kind of silk mix is actually kinda annoying to work with. Maybe I'd use it as a base for a batt one day, but in its combed top form? Nice; but not nice enough to warrant the effort.
The yak mix is dangerous to my wallet though. I probably would've spun it a bit tighter if it hadn't been just a sample, but it's just so lovely and soft and warm; not easy to spin, as such, and I don't think I'd spin it with a drop spindle again (wheel - but not mine - or supported spindle), but still deeply enjoyable. The fibers slip by each other like it's nothing. I gotta drop the money on that eventually and spin up enough yarn for a cowl. Just imagine how lovely that thing will be. Softest, warmest thing in existence.
#guardy's fiber arts tag#handspun yarn#hand spinning#drop spindle#calendar update will hopefully happen tomorrow#right now I can't be arsed tbh
48 notes
·
View notes
Last Seen Blogs

skeletoninkdoodles
skeletoninkdoodles

roughdaydraft
Untitled

hcanercalova
hcanercalova

sasresfhncv
Untitled

wscldier
a ghost story