#slst
Text
Recruitment scam: নিয়োগের দাবিতে এবার কিড স্ট্রিটে বিধায়কদের হস্টেলের সামনে SLST চাকরিপ্রার্থীদের বিক্ষোভ | ABP Ananda LIVE
ABP Ananda Live: নিয়োগের দাবিতে এবার কিড স্ট্রিটে বিধায়কদের হস্টেলের সামনে SLST চাকরিপ্রার্থীদের বিক্ষোভ। মেয়ো রোডে গান্ধী মূর্তির নীচে ৮৭১ দিনে পড়েছে নবম থেকে দ্বাদশ ২০১৬-র SLST চাকরিপ্রার্থীদের ধর্না। নিয়োগ নিয়ে বিধানসভায় বিধায়করা চুুপ কেন, প্রশ্ন তুলে এদিন কিড স্ট্রিটে এমএলএ হস্টেলের সামনে বিক্ষোভ দেখাচ্ছেন SLST চাকরিপ্রার্থীরা।
Source link
View On WordPress
0 notes
Link
Online coaching for WBCSSC SLST in Kolkata. If you are a SLST Aspirant for 2022, then follow our YouTube channel .
1 note
·
View note
Text
Aww hi guys :'))
LOL checked if she was owl xDD
AWW y'all 🥰🥰
Good for them :'))
Lol the lights :'D xD
XDD Jay lol
Sam SLFKJGS
"Good for them" AYY SLFKDS THAT'S EXACTLY WHAT I SAID
Legitimately out loud I said "good for them" lol
My dad also asked if the lights flickered when they got emotional and I'm like nah it's just his thing lol
Luckily as I was explaining it the promo came on which even mentioned ghost powers so that helped me explain it xD
Which by the way AAAHHHHHH WHAAAT??!? PETE CAN LEAVE THE PROPERTY :OOO?!??
And he looks so scared help 😭😭🥺 xDD poor guy lol :( <33
Anyway :) back to the end of the episode slfjds
Awww that was cute <33
Aww the suicide message at the end :'(( ❤️❤️🥺😭💔 it always gets me when shows have something like that after a serious topic <33
AAGH that episode was so good :'DD 😭😭🥺💔❤️ glad I watched this one live :))
It was absolutely WILD but amazing :)) post coming later!!
#ghosts#ghosts cbs#cbs ghosts#oasis's ghosts chatter#got a bit distracted but I've finished the backlog now :))#glad I decided to liveblog!!#an eventful episode lol#also auogh the slst episode already 😭😭#ah wait no second to alst okay good that makes more sense lol#and yeah that puts it at 10 xD#oof I'm gonna miss them :((#anyway yeah!! great episode :DD#loved it so much 🥰🥰#I'll probably make a longer and more in depth post later#maybe not tonight idk but later at some point and probably (hopefully) soon lol#anyway yeah :D!!#I love you all :DDD ❤️❤️❤️❤️!!!!#byeeee :))) 🥰🥰🥰 <333!!!!
4 notes
·
View notes
Photo


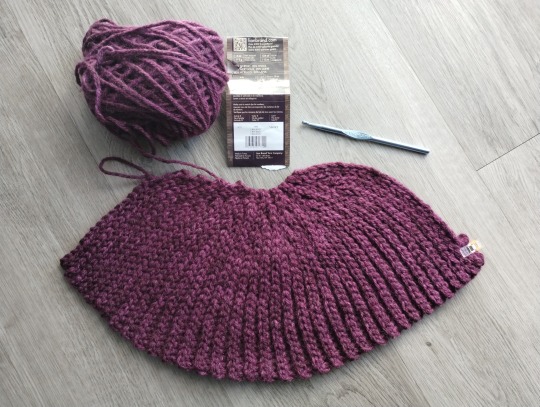
This winter hat is made with BLO SLST and shaped using short rows for a snug and warm fit. And I added a tassel because why not!
Yarn is Lion Brand Wool-Ease Tonal in "Cabernet", worked with a 6.5mm hook. This hat was finished in a weekend.
#crochet#crocheted hat#toque#winter hat#winter accessories#winter hats#crocheted toque#crocheted toques#wool hat#BLO SLST#chunky yarn#warm#quick crochet#weekend crochet#hat spree 22
2 notes
·
View notes
Text

i found a Creature in my kitchen today
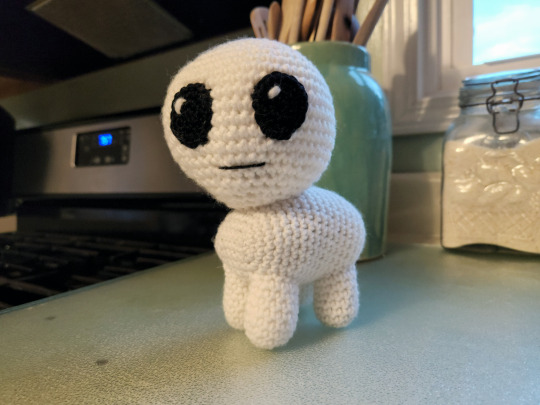
this is my child now
(free pattern below the readmore!)
TBH/Autism Creature Pattern
Materials
White yarn (Any weight)
Black yarn (1 weight size smaller than white yarn)
Fiber fill
Hook sizes appropriate to your yarn and tension style (I reccomend at least one hook size smaller than what is reccomended on yarn label.)
Optional:
Poly pellets
Panty hose
Pattern Terms
SC: single crochet
R#: row #
MR: magic ring
INC: increase (i.e. two SC in same stitch)
3INC: three SC in same stitch
DEC: invisible decrease
CH: chain
SLST: slip stitch
[#] # of stitches at end of row
Ultimate Finish: See tutorial
Invisible Finish: See tutorial
Eyes [x2] (Black Yarn, Smaller Hook)
R1: 6 SC in MR [6]
R2: (INC) x 6 [12]
R3: (1 SC, INC) x 6 [18]
SLST, Invisible Finish, and leave long tail for sewing.
Head [x1] (White Yarn, Larger Hook)
R1: 6 SC in MR [6]
R2: (INC) x 6 [12]
R3: (1 SC, INC) x 6 [18]
R4: (1 SC, INC, 1 SC) x 6 [24]
R5: (3 SC, INC) x 6 [30]
R6: (2 SC, INC, 2 SC) x 6 [36]
R7: (5 SC, INC) x 6 [42]
R8: (3 SC, INC, 3 SC) x 6 [48]
R9: (7 SC, INC) x 6 [54]
R10-R15: SC around (6 rows) [54 x 6]
R16: (7 SC, DEC) x 6 [48]
R17: (3 SC, DEC, 3 SC) x 6 [42]
R18: (5 SC, DEC) x 6 [36]
R19: (2 SC, DEC, 2 SC) x 6 [30]
(i): Begin stuffing with fiber fill.
R20: (3 SC, DEC) x 6 [24]
R21: (1 SC, DEC, 1 SC) x 6 [18]
R22: (1 SC, DEC) x 6 [12]
R23: (DEC) X6 [6]
(ii): Finish stuffing.
(iii): Sl St, bind off with Ultimate Finish.
Legs [x4] (White Yarn, Larger Hook)
R1: Ch 4, 1 SC in 2nd Ch from Hook, 1 SC, 3 SC in last Ch, 1 SC along other side of starting chain, 2 SC in turning chain [8]
R2: 3 SC, 3INC, 3 SC, 3INC [12]
R3-R8: SC around (6 rows) [12 x 6]
(i): SLST, leave long tail for sewing, and stuff with fiber fill, taking care not to overstuff and stretch the legs.
Body [x1] (White Yarn, Larger Hook)
R1: Ch 7, INC in 2nd chain from hook, 4 SC, INC, then working along the opposite side of chain, INC, 4 SC along opposite side of chain, INC [16]
R2: 1 SC, INC, 4 SC, INC, 2 SC, INC, 4 SC, INC, 1 SC [20]
R3: 2 SC, INC, 4 SC, INC, 4 SC, INC, 4 SC, INC, 2 SC [24]
R4: 3 SC, INC, 4 SC, INC, 6 SC, INC, 4 SC, INC, 3 SC [28]
R5-R17: SC around (13 rows) [28 x 13]
R18: DEC, 6 SC, DEC, 4 SC, DEC, 6 SC, DEC, 4 SC [24]
(i): If you want to add some weight and balance to your creature, stuff according to the instructions below. Otherwise, stuff as normal with fiber fill.
(ii): First make a pellet packet. Cut a length of pantyhose, making a tight knot in one end. Fill the pocket with enough poly pellets to give weight to the body, but avoid overstuffing at this will stretch out and make gaps in the body. Close the pocket with a knot on the open end of the pantyhose and cut away any excess material.
(iii): Stuff some fiberfill into the front end of the body before inserting the pellet fill packet, then lightly stuff fiberfill between the packet and top inside of the body.
R19: DEC, 4 SC, DEC, 4 SC, DEC, 4 SC, DEC, 4 SC [20]
R20: DEC, 2 SC, DEC, 4 SC, DEC, 2 SC, DEC, 4 SC [16]
R21: 2 DEC, 4 SC, 2 DEC, 4 SC [12]
(iv): Leave long tail for sewing body closed.
(vi): Finish stuffing, squish sides of end row together and sew closed.
Assembly
(1) Pin the legs to the body with the long side pointed forward and parallel with the body. The left and right leg of each pair should be 2 to 3 stitches apart. Pin the front legs between R4 and R9 of the body. Pin back legs between R12 and R17. Sew to attach, hide thread ends in body.
(2) Pin the head to the body, connecting R3 and R10 of the body to the R22 and R19 of the head, respectively. Sew to attach, hide thread ends in body.
(3) Pin eyes 3 to 4 stitches apart between R10 and R16 of the head. Sew to attach, hide thread ends in head.
(4) Use a long length of white yarn to embroider highlights in the upper left portion of each eyes. Hide thread ends in head.
(5) Use a length of black yarn to embroider mouth 2 to 3 rows below the eyes. Hide thread ends in head.
(6) Fluff up your scrungly little creature (they will be a little squished from all the sewing) and enjoy!
8K notes
·
View notes
Text
Crochet Prawn
For Christmas my (marine biologist) dad wanted some prawns and I could not find any free patterns anywhere so I ended up drafting my own pattern. It has since been approved by my dad despite having no rostrum or antennae (I found these too hard to look good - if anyone has any tips please let me know!).

Also this pattern is NOT made in the round and so does require sewing and has a few fiddly bits. In order to make the legs smaller than the rest of the body without changing the colour, I separated out smaller sections of the ply, much like when using embroidery floss. I'm not sure if proper crochet-ers do this but I've found it works for me as long as it is 2-ply or greater.
Full Pattern under the cut:
INGREDIENTS:
3.5mm and 2mm Crochet Hooks
6mm Safety Eyes
Pinky Yarn (Colour A)
Darker Yarn (Colour B)
METHOD:
Note: ch1 and turn between each row. inc= 2 sc in same stitch. sc2tog= sc 2 together. blo= back loops only
Changes in colour will be denoted using A! (change to colour A) and B! (change to colour B)
MAIN BODY
Using colour A and a 3.5mm hook:
Ch4
sc 3
sc 1, inc 1, sc 1
sc 1, inc 2, sc 1
sc 2, inc 2, sc 2
sc 2, inc 4, sc 2 (eyes will be inserted between row 6 & 7)
sc 12
sc 5, sc2tog, sc 5
sc 11
sc 11
sc 11
sc 11
sc 11
sc 11 in blo (this ridge separates the head from the body)
sc 11
sc 2, B! sc 7, A! sc 2
sc 5, inc, sc 5
sc2tog, sc 8, sc2tog
sc 2, B! sc 6, A! sc 2
sc2tog, sc 2, inc 2, sc 2, sc2tog
sc 10
sc 2, B! sc 6, A! sc 2
sc2tog, sc 6, sc2tog
sc 8
sc 2, B! sc 4, A! sc2
sc 8
sc2tog, sc 4, sc2tog
sc 2, B! sc 2, A! sc 2
sc2tog 3 and finish off
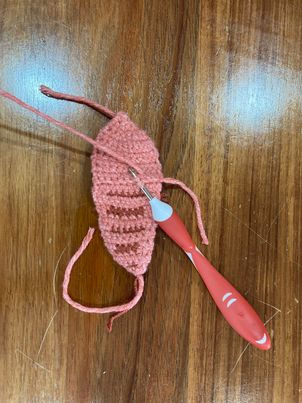
Now using the ridge created by the blo row (shown in picture above), slip stitch across the surface of the prawn to enhance the ridge and accentuate the difference between the head and the body. Your prawn should now look like this (folded):

TAIL x2
Note: all stitches within [] belong in same stitch
The tail might be a bit tricky as it goes up and around the foundation chain like this:
Using colour A and 3.5 mm hook:
ch 6
from 2nd chain - slst, sc, hdc, hdc, [dc, hdc, dc], hdc, hdc, sc, slst then finish off
PLEOPODS (Back Legs) x10
Separating colour A to create a 3-ply yarn and using a 2mm hook:
ch 11
from 2nd chain - sl st 10 then finish off
PEREOPODS (Front Legs) x10
Separating colour A to create a 2-ply yarn and using a 2mm hook:
ch 15 then finish off
ASSEMBLY
Secure eyes between rows 6 & 7 and weave in ends to the inside of the prawn (don't bother clipping the yarn as this can be used as extra stuffing!).
Attach tail at a slight angle at the end of prawn to get the positioning to look more realistic.
Start attaching the pleopods approx. one row back from the head ridge and one stitch in from the side, continuing attaching them ~1 row each until five are attached per side.
Attach the pereopods approx. one row forward from the head ridge and one stitch from the side, continuing to attach them every 1/2 row until five are attached per side.
Whip stitch the prawn together using colour A until you reach the end, stuffing as you go.
Congratulations, you now have your very own prawn!!
Please reblog with pictures if you make your own! And any tips and tricks to make them look even better :))))
290 notes
·
View notes
Text

Invader zim crochet pattern
IMPORTANT INFO (PLEASE READ BEFORE YOU GO ON TO THE PATTERN):
THIS PATTERN IS WRITTEN IN U.S. TERMINOLOGY
PLEASE DO NOT SELL MY PATTERN ON ETSY, RAVELRY, OR ANY STORE OF THE LIKE, BUT YOU CAN REPOST IT AS LONG AS YOU LINK IT TO MY BLOG (millys-craft-corner) OR TIKTOK/YOUTUBE (fiestywyvern) FEEL FREE TO SELL ANY FINISHED PRODUCTS. Be sure to link me if you post your Zims as I’d love to see them.
Zim stands at about 5 inches tall or 12.7 cm, not including antennae
Techniques used
Sc
Inc
Dec
Triple dec
Triple inc
Magic ring
Chain
Basic embroidery and sew techniques
Not so well known techniques used
Triple inc- an increase with 3 stitches in one stitch instead of 2
Triple dec- a decrease going across 3 stitches instead of 2
Materials
3.5 mm crochet hook
size 3 or light worsted or light yarn weight in these colors light green, black, deep ruby red, light grey, and light pink
aluminum wire in size 14 or pipe cleaners
black embroidery thread
a medium sized sewing needle
tapestry needle
pliers if you’re using wire
hot glue
light pink felt
stuffing
Head and torso (make 1)- start with green
R1: 4sc in mr (4)
R2: triple inc around (12)
R3: 1 sc, (triple inc, 2sc)x3, triple inc, 1sc (20)
R4: 2sc, (triple inc, 4sc)x3, triple inc, 2sc (24)
R5: 3sc, (triple inc, 6sc)x3, triple inc, 3sc (36)
R6: 4sc, (triple inc, 8sc)x3, triple inc, 4sc (44)
R7: blo
R7-16: sc around (10 rounds) (44)
R17: blo- 4sc, (triple dec, 8 sc)x3, triple dec, 4sc (36)
R18: 3sc, (triple dec, 6sc)x3, triple dec, 3sc (28)
R19: 2sc, (triple dec, 4sc)x3, triple dec, 2sc (20)
R20: sc, (triple dec, 2sc)x3, triple dec, sc (12)
R21: dec around (charge to light pink at the end) (6)
R22: inc around (charge to red at the end) (12)
R23: sc around (12)
R24: inc, sc around (18)
R25-30: sc around (6 rounds) (18)
R31: blo- dec, sc around (12)
R32: dec around (6)
F/o, leave a long tail and 3 embroider stripes, using black yarn, so they cut the torso into thirds
Use the tail to close up piece
Shoulder pads (make 2)- light pink
R1: ch 5 and sc down from the 2nd chain from the hook, ch 1 and turn (4)
R2: 2 dec, ch 1 and turn (2)
R3: dec
F/o and leave a long tail for sewing
Arms (make 2)- start with black
R1: 3sc in mr (3)
R2: sc around (3)
R3: inc around (6)
R4: sc around (6)
R5: dec around (3)
R6: sc around (change to pink at the end) (3)
R7-10: sc around (4 rounds) (3)
F/o leave a long tail for sewing and embroider stripes using sewing needle and black thread
Legs (make 2)- black
R1: 4sc in mr (4)
R2: inc around (8)
R3-7: sc around (5 rounds) (8)
F/o and leave a long tail for sewing
Feet (make 2)- black
R1: 3sc in mr (3)
R2: sc, inc, sc (4)
R3: sc, inc, 2sc inc (6)
R4: 2sc, inc, 2sc, inc (8)
F/o leave a long tail for sewing
Pak (make 1)- light grey
R1: 4sc in mr (4)
R2: inc, sc (6)
R3: 2inc, sc, inc, 2sc (9)
R4: 2sc, 4inc, 2sc, slst (13)
R5-6: sc around (2 rounds) (13)
F/o leave a long tail for sewing
Big pak spot (make 1)- light pink
R1: 4sc in mr (4) Sl st into 1st stitch
f/o and leave a long tail for sewing
Small pak spot (make 2)- light pink
R1: 3sc in mr (3) sl st into 1st stitch
F/o and leave a long tail for sewing
Eyes (make 2)- red
R1: 6sc in mr (6)
R2: inc around (12)
R3: 4sc, 2inc, 4sc, 2inc (16)
R4-5: sc around (2 rounds) (16)
Antennae (make 2)- black
R1: 3 sc in mr (3)
R2-19: sc around (18 rounds) (3)
Assembly
Sew arms to shoulder pads
Sew bottom of feet to the sides of the legs so they create an “L” shape
Sew pak spots to the pak
Sew pak to body
Sew arms to body
Sew legs to body
Sew eyes to the lower left and lower right sides of the head
Cut out eyeshine out of light pink felt and hot glue it or sew it to the eyes
Cut 2 pieces of 5 inches of pipe cleaner/wire and fold in an inch on both sides so it’s 3 inches long. Insert them into each the antennae and sew antennae towards the back of the head. Fold back 1/4 of the antenna so it creates a right angle.
Congrats you just finished your irken invader, now go take over the earth!


232 notes
·
View notes
Text
crochet octokitten❗️❗️❗️
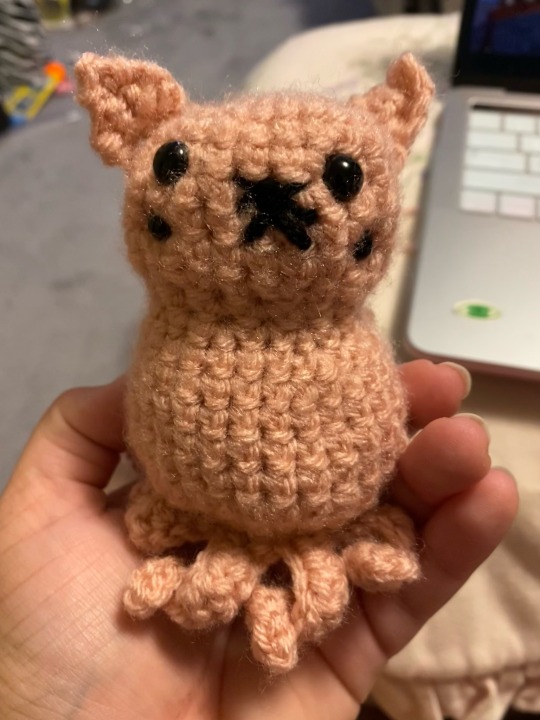
i made this pattern on my own, posting below the cut 👇👇 tumblr keeps eating the video i'm trying to add for clarification on how to make the tentacles.... i'll keep trying though! if you use this pattern pls pls share i wanna see :)
EDIT: i reblogged this post with a link to the video! here is the link
r1: magic circle, sc x8
r2: increase in each stitch, sc x16
r3: increase every other stitch, sc x24
r4-8: sc x24
r9: decrease every 2 stitches, sc x16
r10: sc x16
(btw, anywhere from here onwards should be good to add facial details like eyes, nose, mouth)
r11: increase every other stitch, sc x24
r12: increase x4, sc x28
r13-18: sc x28
r19: decrease x4, sc x24
r20: decrease every 2 stitches, sc x16
tentacles / r21: (front loops only) c10, slst x2, sc x4, hdc x4
start with the first stitch, after a tentacle slst into the next stitch, then sc into the stitch after and start a new tentacle (basically, tentacles start with sc, slst between tentacles)
in the leftover back loops- sc in between the tentacles, basically until you feel it's closed enough (btw- put stuffing in around this step) (but dont tie off or stuff yet if you want to be able to reach the inside of head when attaching ears)
ears- c5, sc in decreasing rows until you're left with a triangle, attach to head
#feel free to message me or ask in the notes if anythings confusing#again ill try to rb with the video i made#the mechanisms#the mechs#octokittens#crochet#crocheting#crochet pattern
158 notes
·
View notes
Text
নিয়োগ নিয়ে বিধানসভায় চুুপ কেন বিধায়করা, MLA হস্টেলের সামনে বিক্ষোভ SLST চাকরিপ্রার্থীদের
পার্থপ্রতিম ঘোষ, কলকাতা : নিয়োগের দাবিতে কিড স্ট্রিটে বিধায়কদের হস্টেলের সামনে SLST চাকরিপ্রার্থীদের বিক্ষোভ ঘিরে ধুন্ধুমার। বিধানসভায় যাওয়ার পথে আটকে পড়েন বিধায়করা। ‘বিধানসভায় মণিপুর নিয়ে আলোচনা হচ্ছে। আলোচনা হচ্ছে অযোগ্য প্রার্থীদের নিয়ে। অথচ যোগ্য প্রার্থীদের নিয়োগ নিয়ে বিধানসভায় চুপ বিধায়করা। আজই বিধানসভায় নিয়োগের কথা তুলতে হবে’, এই দাবিতে MLA হস্টেলের গেটের সামনে বসে পড়েন SLST…
View On WordPress
#ABP Ananda#Breaking News#Job Seekers Agitation#Job Seekers Agitation : নিয়োগ নিয়ে বিধানসভায় চুুপ কেন বিধায়করা#MLA Hostel#SLST#প্রশ্ন তুলে MLA হস্টেলের সামনে বিক্ষোভ SLST চাকরিপ্রার্থীদের
0 notes
Text
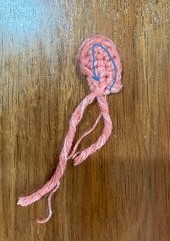
Mini Sea Slug Pattern
I hope this is followable, It's not complicated but I don't know how to word things

You can make this with bigger yarn and hook but for micro ones I used one strand of dmc embroidery floss and a no.14 (0.50mm) crochet hook
Top
1.) Ch10
2.) On one side of the chains, sc in each stitch except last (8), in last stitch double inc (make 3sc in same stitch), then sc in the other side of the chains till last stitch (7), inc in last stitch
3.) [Place stitch marker to mark beginning of round] inc, 7sc, inc, sc, inc, 7sc, inc, sc
4.) Sc, inc, 7sc, inc, 3sc, inc, 7sc, inc, 2sc
5.) Sc in every stitch
6.) Sc in every stitch, slst, cut yarn and pull thru
Bottom
1.) Ch10
2.) On one side of the chains, sc in each stitch except last (8), in last stitch double inc (make 3sc in same stitch), then sc in the other side of the chains till last stitch (7), inc in last stitch
3.) [Place stitch marker to mark beginning of round] inc, 7sc, inc, sc, inc, 7sc, inc, sc
4.) Sc, inc, 7sc, inc, 3sc, inc, 7sc, inc, 2sc, slst, cut yarn and pull thru
Stalks x2
1.) Ch4
2.) Slst into second ch and across, ch one, cut and pull yarn thru
3.) Use ends to sew into place on slug top
Gills
1.) Ch6, slst into first stitch
2.) Ch4, slst stitch back down and into ch you made other ch from, slst into next ch
3.) Repeat step 2.) 5 more times, cut yarn and pull thru, use ends to sew onto slug top
Foot
1.) Line up top and bottom, (working on both loops of top stitches, and only front loop of bottom stitches) starting from stitch at top of the head, [sc, inc]* around (remember to stuff before finishing round)
2.) [2sc, hdc inc]* repeat around, slst, cut yarn and pull thru
Weave ends
@cinnamolmorten @mothmads here ya go <3 feel free to message me if somethings confusing (this goes for anyone)
472 notes
·
View notes
Text
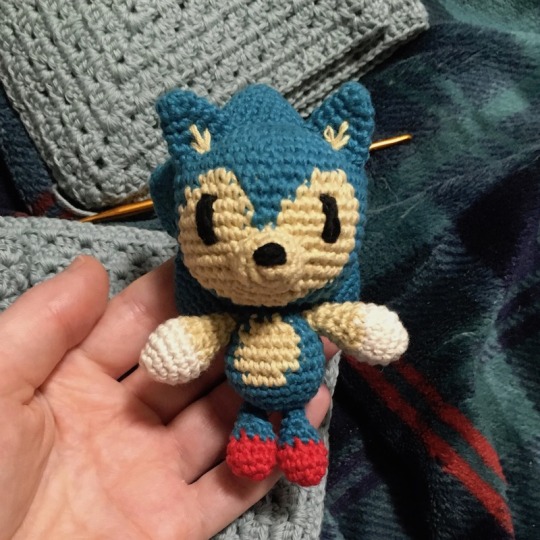

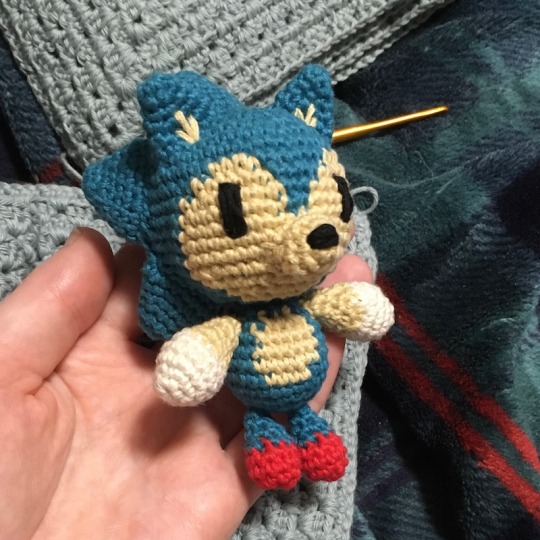
gotta go fast!!!!
i wanted to make a really cute, really simple sonic amigurumi; i think he's a success! pattern below the cut
head, working DOWN to the neck
in blue:
1: 8 sc in mr (8)
2: inc x8 (16)
3: (sc, inc) x8 (24)
4: (sc, inc, sc) x8 (32)
5: (sc x7, inc) x4 (36)
6: (sc x5, inc) x6 (42)
7: (sc x3, inc, sc x3) x8 (48)
8: blue sc x17, tan sc x4, blue sc x6, tan sc x4, blue sc x17 (48)
9: blue sc x16, tan sc x6, blue sc x4, tan sc x6, blue sc x16 (48)
10-11: blue sc x15, tan sc x8, blue sc x2, tan sc x8, blue sc x15 (48)
12-14: blue sc x15, tan sc x18, blue sc x15 (48)
15: (sc x4, dec) x8; stitches 1-13 blue, 14-28 tan, 29-40 blue (40)
16: (sc x3, dec) x8; stitches 1-12 blue, 13-22 tan, 23-32 blue (32)
17: (sc x2, dec) x8; stitches 1-10 blue, 11-16 tan, 17-24 blue (24)
18: (sc, dec) x8; stitches 1-8 blue, 9-10 tan, 11-16 blue (16); stuff
19: dec x8 (blue) (8); cut & fix off w/ tail for sewing
body, working UP to the neck
in blue:
1: 8 sc in mr (8)
2: inc x8 (16)
3: (sc x3, inc) x4 (20)
4: (sc x2, inc, sc x2) x4 (24)
5: (sc x5, inc) x4 (28)
6: blue sc x15, tan sc x4, blue sc x9 (28)
7-8: blue sc x14, tan sc x6, blue sc x8 (28)
9: (sc x5, dec) x4; stitches 1-12 blue, 13-18 tan, 19-24 blue (24)
10: (sc, dec) x8; stitches 1-9, blue, 10-12 tan, 13-16 blue (16); stuff
11: dec x8 (blue) (8); cut & fix off w/ tail for sewing
use the tails from the head & body to attach the pieces securely. try to align the centers as best you can.
snout
in tan:
1: 6 sc in mr (6)
2: inc x6 (12)
3: sc x6, hdc, dc x4, hdc (12); slst & cut w/ tail to sew to face.
arm (make 2)
in white:
1: 5 sc in mr (5)
2: inc x5 (10)
3: (sc, inc) x5 (15)
4-5: sc x15 (15); switch to tan for the rest of the arm
6: (sc, dec) x5 (10)
7: (sc x3, dec) x2 (8)
8: sc x8 (8)
9: (sc, dec, sc) x2 (6)
10: (sc, dec) x2 (4); cut & fix off w tail for sewing to the body. recommend to attach the spikes to the head before attaching the arms.
leg (make 2)
in red:
1: 6 sc in mr (6)
2: inc x6 (12)
3: sc x12 (12)
4: (sc x2, dec, sc x2) x2 (10); switch to blue for the rest of the leg
5: (sc x3, dec) x2 (8)
6: (sc, dec, sc) x2 (6)
7: sc x6 (6); cut & fix off w tail for sewing to the body.
spikes (make 3 full size, make 2 that leave off the last round)
in blue:
1: sc x6 in mr (6)
2: (sc, inc, sc) x2 (8)
3: (sc, inc) x4 (12)
4: sc x12 (12)
5: (sc, inc, sc) x4 (16)
6: sc x16 (16)
7: (sc x3, inc) x4 (20); flatten in half, cut & fix off w tail for sewing to head. the three larger spikes are on the top/center of the head, with the two smaller ones being the lowest ones on either side. make sure not to place the spikes too far forward, bc you need room for the ears too.
ears (make 2)
in blue:
1: 6 sc in mr (6)
2: (sc, inc) x3 (9)
3: sc x9 (9)
4: (sc, inc, sc) x3 (12)
5: (sc x3, inc) x3 (15); flatten in half, cut & fix off w tail for sewing to head.
tail
in blue:
ch 4, turn & slst back down the chain. cut & use both tails (they should be on the same end of the chain now) to attach to body.
embroider details for inner ears, eyes, & nose.
351 notes
·
View notes
Text
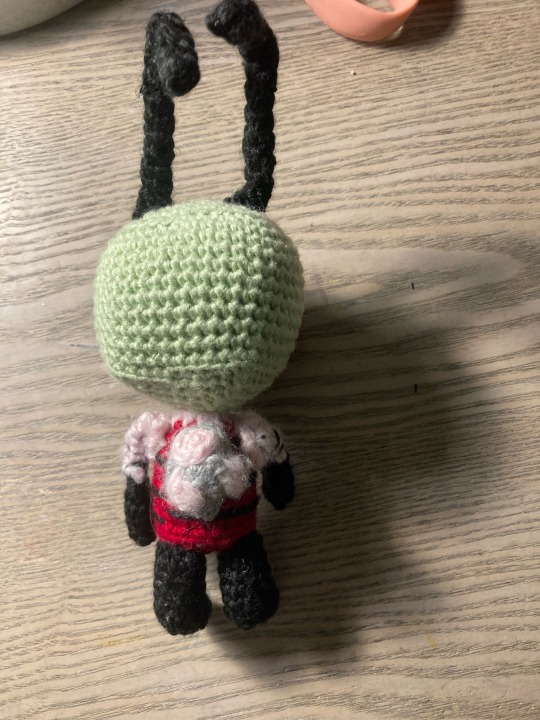
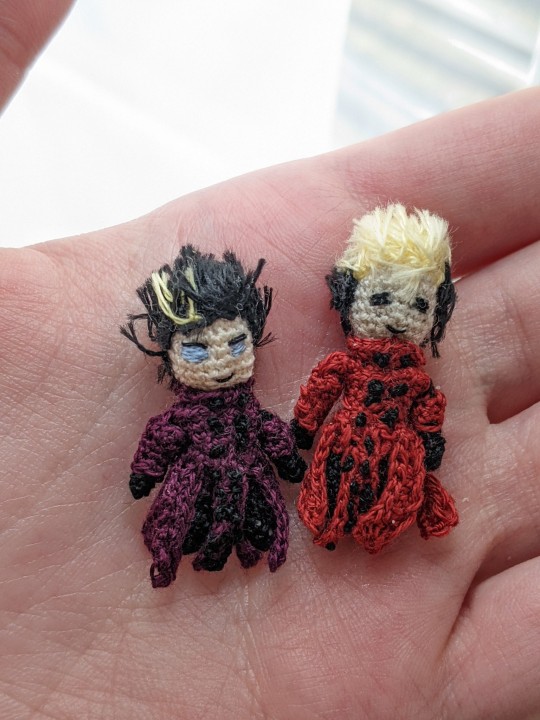
Mini Crochet Vash the Stampede Pattern
Mini crochet Vash the Stampede
This one is the dark palette but it works for any colors

None of this is done in a round as in you have to slip stitch after each round.
I used DMC thread for all of this, but I could not tell you what specific colors just: pale yellow, red, black (or for dark Vash, a dark purple instead of red). I used a 1.15 mm hook for this whole thing and a quilting needle, which is just a really short sewing needle (an inch or so long).
Mc = magic circle
Sc = single crochet, American terms
Sl st = slip stitch
Head: *I used a pale white thread color for this you can obv use whatever* start with a magic circle || sc 6 in the circle, sl st to first stitch (6) || ch 1, sc 2 in each stitch to increase to 12, sl st (12) || ch 1, sc 1, sc 2 in same stitch, repeat 5 times, sl st (18) || ch 1, sc 2, sc 2 in same stitch, repeat 5 times, sl st (24) || ch 1, sc 24, repeat 3 times for a total of 4 rounds of 24 scs, sl st (24) || ch 1, sc 2 dec 1, repeat 5 times, sl st (18) (you can start to stuff it here, I used less than a cotton ball for the whole thing) || ch 1, sc 1 dec 1, repeat 5 times, sl st (12) || ch 1, dec every stitch, sl st (6) || cut the thread but leave enough so you can sew it to the body *Do NOT pull the hole closed. It’s going to be the neck hole where you attach to the body.
Legs: *in black thread* mc || sc 4 in the circle, sl st (4) (Tip: I would recommend waiting to close the hole until the next step because it makes it easier to see where the stitches are) || ch 1, sc1, sc 2 In same stitch, repeat again, sl st, (6) || ch 1, sc 6, sl st, repeat 2 more times for a total of 5 rows (6) || cut the thread and stuff it || you can also hide the thread ends here if you want I just stuffed them at the bottom when putting in the stuffing. For the second leg just repeat the above steps.
Body: *change to red thread* connect to one of the legs anywhere that feels secure | ch 2 (this just gives some distance between the legs), sl st to the other leg, ch 1, sc 5, sc 2 in one side of the ch 2 from before, sc 5, sc 2 in the other side of the ch 2, sl st (14) ||ch 1, sc 14 (14) || ch 1, dec to 11 it doesn’t really matter where you do it as long as they’re evenly spaced, sl st (11) || ch 1, sc 11, three more times for a total of 4 rows of 11, sl st (11) || ch 1, dec to 9, again, it doesn’t matter where, sl st (9) || ch 1, sc 9, sl st (9) || cut the thread and hide the ends
Arms: *change to black thread* mc || ch 1, sc 4 in the circle, sl st (4) (I recommend not pulling the hole closed yet because it is hard to see) || ch 1, sc 4, three more times for a total of 4 rows of 4, sl st (4) || cut the thread and hide the ends. repeat the steps for the second arm. You don’t have to stuff these because they’re so little :D
Decorations (using red thread):
Arm 1- ch 5, sl st to make it a circle || ch 1, sc 5 for two rows, sl st (5) || cut the thread but leave enough to sew securely to arm.
Arm 2- ch 5, sl st to circle || ch 1, sc 5 for four rows, sl st (5) || cut thread and leave enough to sew to the shoulders.
Chest- ch 12, sl st || ch 1, sc 12, slst (12) || ch 1, sc 2 in same stitch (1st and 2nd stitches), sc 6, sc 2 in same stitch (8th and 9th stitches), sc 5, sl st (14) (this is to make the shoulders point out a little) || ch 1, sc 2 in same stitch (1st and 2nd stitches), sc 6, sc 2 in same stitch (9th and 10th stitches), sc 6, sl st (16) || ch 1, sc 2 in same stitch (1st and 2nd stitches), sc 7, sc 2 in same stitch (10th and 11th stitches), sc 7, sl st (18) || sew to the main body by stabbing through the waist line, cut thread

Shoulders- (this one goes in the empty spot between the main body and the chest piece from above) ch 5, turn, sc 2, skip a chain, sl st to last chain, pull through and cut thread (2 ½) || sew into the empty space on the shoulder. You can also attach the arms after finishing this, hopefully I will remember to include a photo to show where to attach them.

Legs? Train? - ch 9, sc 8, sl st (8) || ch 1, sc 8, sl st (8) || repeat 4 more times for a total of 5 pieces and attach to chest piece, one centered around the front, two on either side of that, and two in the back. If there is extra space in the back, you can make a sixth one and space the pieces more evenly in the back.
I would recommend attaching his head at this point, but we will add hair and the face later
Collar- ch 11, sc 15 (inc every other) (15), sew to the neck of the jacket.
Buttons- (using black thread) sew 2 french knots on the collar (you can hide the thread by either going through the back of his head or through his chest), then maneuver the needle to the jacket and sew either 6 or 4 french knots (depends on how much room you have), three on both sides, and then finally, on the train of his jacket, make 12 french knots with 6 on both sides.
Hair: his hair is a little complicated to explain but I’ll try my best. Using a light yellow and black thread, tie a whole bunch of knots to his head wherever you want his hair line (I was just pulling the thread through until it got close to the end, and then tying a knot and cutting it quite long so make sure you have plenty of thread) You shouldn’t be making it too thick at the front because then his hair won’t lay right. It can be a little thicker at the back of his head because we will have to cut it quite short when we get to that point. I don’t know how many knots I tied or where because it really just depends on the shape of his head. But once you’re finished tying all the knots try to press the hair down and shape it a little before cutting it (remove knots if you have to it happens all the time). When everything looks good then go ahead and start cutting. It may take a while to get the shape as you want it but go slow.
Face: I started with a light blue this time (because with the first Vash I gave him black eyes). It just takes some trial and error to get the eyes right because this also depends on the shape of the head but definitely make sure they’re evenly spaced lol. I think I did 4 sets of lines for each eye to get the size right. After that I used black thread pierced through the back of his head to make… eyelashes, I suppose… and the mouth.
#phew this one was hard lol#please be nice to me ive never written a pattern before#this is all for that one person who asked for it 😙#and any in the future#vash the stampede#trigun#crochet#mini crochet#handmade
34 notes
·
View notes
Photo
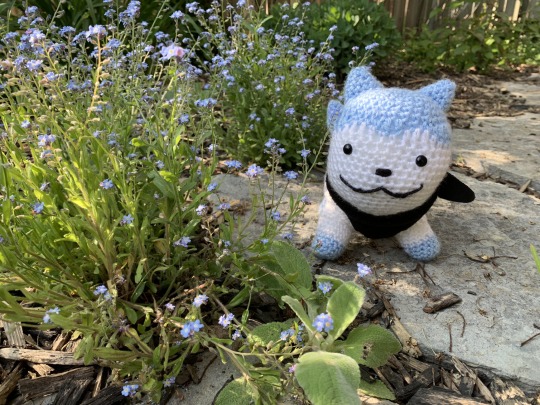
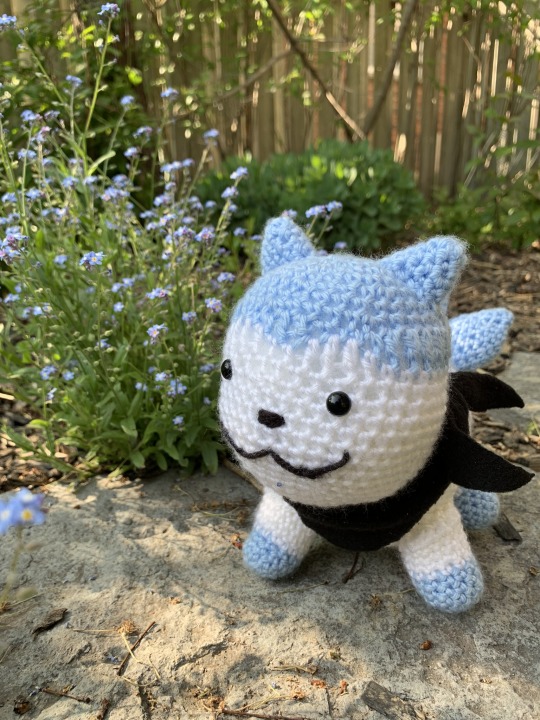
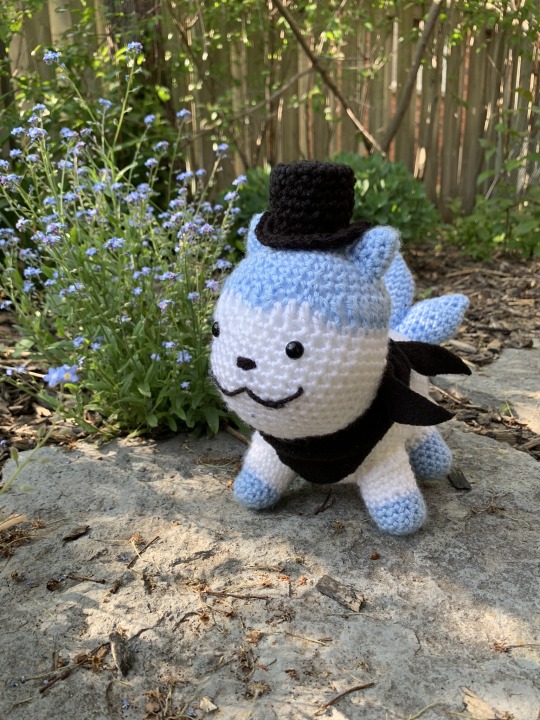


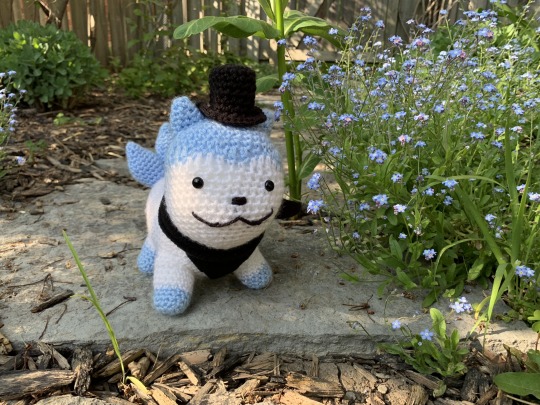
Sommie from Fire Emblem Engage!
I made the pattern myself. See under the cut
HEAD
using blue
round 1 - magic circle 6st
round 2 - 2sc in each (12)
round 3 - (2sc in first st , sc)* repeat (18)
round 4 - (2sc in first st, sc, sc)* repeat (24)
round 5 - sc in each (24)
round 6 - (2sc in first st, sc in next 3 st)* repeat (30)
round 7 - sc in each (30)
round 8 - (2sc, sc in next 4 st)* repeat (36)
round 9 - ch 1, dc in next 4st, sc, slst, slst, sc, dc, dc, sc, slst, slst, sc, dc in next 9st, tc, tc, dc, slst, slst, dc, tc, tc, dc in next 5 (36)
switch to white
round 10 - sc in next 4st, hdc, dc, dc, hdc, sc, sc, hdc, dc, dc, hdc, sc in next 9st, slst slst, hdc, dc, dc, hdc, slst, slst, sc in next 5 (36)
round 11 - sc in each (36)
round 12 - (2sc, sc in the next 5 st)* repeat (42)
round 13, 14, 15 - sc in each (42)
round 16 - (sctog, sc in next 5 st)* repeat (36)
round 17 - sc in each (36)
round 18 - (sctog, sc in next 4 st)* repeat (30)
round 19 - sc in each (30)
round 20 - (sctog, sc in next 3 st)* repeat (24)
round 21 - (sctog, sc in next 2 st)* repeat (18)
** stuff head, put in eyes if using plastic eyes **
round 22 - (sctog, sc)* repeat (12)
round 23 - (sctog)* repeat (6)
bind off, tuck in ends
EARS (make 2 in blue)
round 1 - magic circle 4st
round 2 - (2sc in first, sc)* repeat (6)
round 3 - (2sc in first, sc, sc)* repeat (8)
round 4 - (2sc in first, sc, sc, sc)* repeat (10)
round 5 - sc in each (10)
bind off, leave tail for attaching to head
BODY (in white)
round 1 - magic circle 6st
round 2 - 2sc in each (12)
round 3 - (2sc, sc)* repeat (18)
round 4 - (2sc, sc, sc)* repeat (24)
round 5 - (2sc, sc in next 5 st)* repeat (28)
round 6 - (2sc, sc in next 6 st)* repeat (32)
round 7 - (2sc, sc in next 7 st)* repeat (36)
round 8 - (2sc, sc in next 8 st)* repeat (40)
round 9 - sc in each (40)
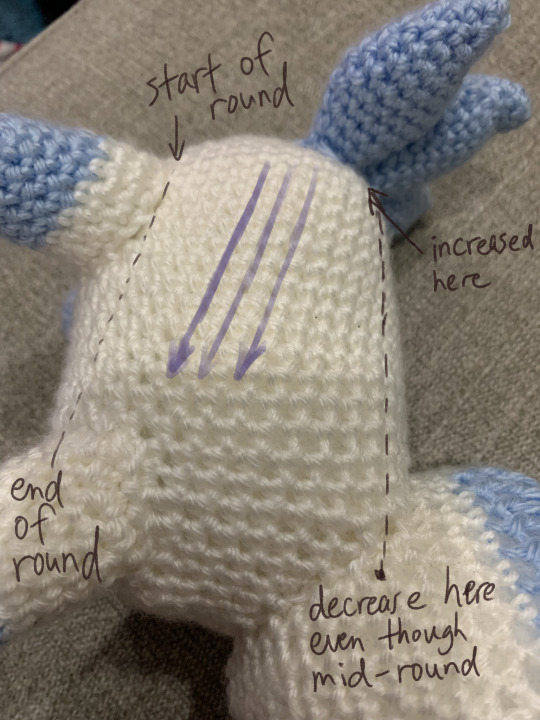
repeat round 9 until his body is long enough (I think I did 16 rounds), then decrease the same way 4sts at a time [see note1]
ie: (sctog, sc in next 8st)* repeat (36)
(sctog, sc in next 7st)* repeat (32)
[.....]
untill you're down to 24 sts, stuff, then decreasing 6 sts at a time (18, 12, 6). bind off, tuck in tail
[note1: if you crochet in the round like I do, then each round is actually going to go up diagonally. Since increasing by 4 makes it kind of square, if you start decreasing after doing full rounds, it won't line up. So instead of doing a full round on the last round, start decreasing when it matches where you've increased. See image below (I also forgot to take it before I sewed everything together, sorry)]
FEET (make 4)
start with blue
round 1 - magic circle 6st
round 2 - 2sc in each (12)
round 3-5 sc in each (12)
round 6 - switch to white, sc in each (12)
round 7 - (2sc, sc, sc, sc)* repeat (15)
round 8-9 sc in each (15)
TAIL (in blue)
Large spike, make 1
round 1 - magic circle 4st
round 2 - (2sc, sc)* repeat (6)
round 3 - (2sc, sc, sc)* repeat (8)
round 4 - (2sc, sc in next 3 st)* repeat (10)
round 5 - (2sc, sc in next 4 st)* repeat (12)
round 6 - (2sc, sc in next 5 st)* repeat (14)
round 7-9 - sc in each (14)
round 10 - (sctog, sc in next 5)* repeat (12)
round 11 - sc in each (12)
round 12 - (sctog, sc in next 4)* repeat (10)
round 13 - sc in each (10)
round 14 - (sctog, sc in next 3)* repeat (8)
round 15 - sc in each (8)
round 16 - (sctog, sc in next 2)* repeat (6)
Small spikes, make 2
Same as the Large spike, up until round 10
round 11 - (sctog, sc in next 4)* repeat (10)
round 12 - (sctog, sc in next 3)* repeat (8)
round 13 - (sctog, sc in next 2)* repeat (6)
-----------
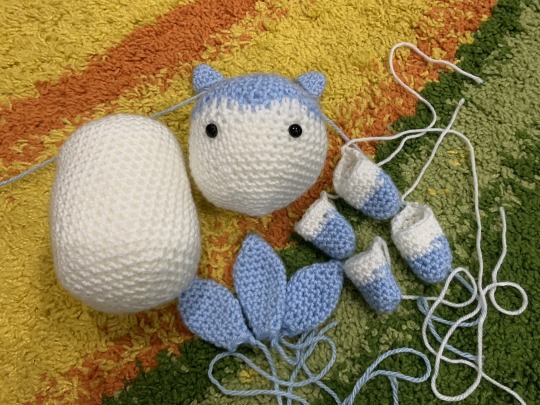
Now time to assemble everything. I've lightly stuffed the ears, tails spikes, and the legs to make them more full-looking and structurally sound (for the legs). I also sewed the tail spikes together before sewing the whole thing onto the body.
With black, sew on a nose (or you could use plastic nose if you have some), and a face. Don't forget to sew on an X on the butt!
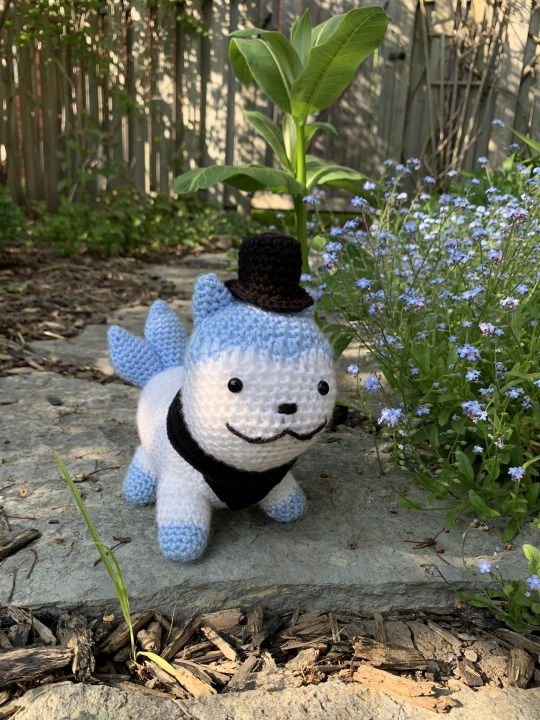
For the bandana, I just used a piece of spare fleece. You can crochet it if you want, basically just make a long triangle, then tie it to his neck.
I also made him a top hat. It's pretty simple:
TOP HAT (in black)
round 1 - magic circle 6st
round 2 - 2sc in each (12)
round 3 - (2sc, sc)* repeat (18)
round 4 - (2sc, sc, sc)* repeat (24)
round 5-12 - sc in each (24)
round 13 - 2sc in each (48)
bind off, tuck in ends. Shape the hat by pushing in the sides and flip up the brim, then apply watered-down glue or mod podge to make it stiff and hold the shape.
156 notes
·
View notes
Text
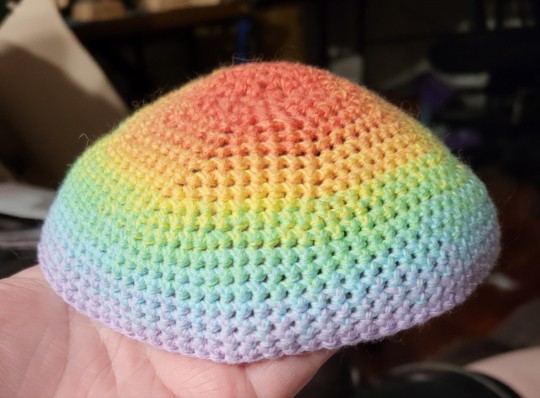
Someone asked for my kippah pattern.
The pattern is so basic. What makes this kippah so pretty is the yarn.
https://hobbii.com/sultan-deluxe, color way Martian Pink. I do the first 3 rounds in the red and then each successive round is one step in the long gradient
Pattern under the cut
Magic circle, ch1, 8 sc into the circle, slst to join, ch1
2sc in each stitch around, sl st to join, ch1
1sc in first stitch, 2sc in next stitch, repeat around, sl st to join, ch1
Continue, adding one sc per round, to round 11: sc in first 10 stitches, 2sc in next st, repeat around, sl st to join, ch1
Round 12: sc in each stitch around, sl st to join, ch1.
Repeat chain 12 until you have the size you want. Tie off and weave in ends.
73 notes
·
View notes
Last Seen Blogs