#mini crochet
Text
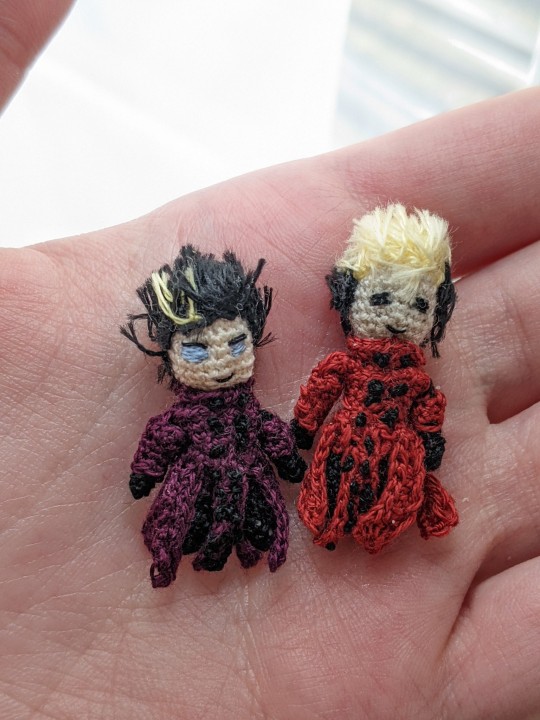
Mini Crochet Vash the Stampede Pattern
Mini crochet Vash the Stampede
This one is the dark palette but it works for any colors

None of this is done in a round as in you have to slip stitch after each round.
I used DMC thread for all of this, but I could not tell you what specific colors just: pale yellow, red, black (or for dark Vash, a dark purple instead of red). I used a 1.15 mm hook for this whole thing and a quilting needle, which is just a really short sewing needle (an inch or so long).
Mc = magic circle
Sc = single crochet, American terms
Sl st = slip stitch
Head: *I used a pale white thread color for this you can obv use whatever* start with a magic circle || sc 6 in the circle, sl st to first stitch (6) || ch 1, sc 2 in each stitch to increase to 12, sl st (12) || ch 1, sc 1, sc 2 in same stitch, repeat 5 times, sl st (18) || ch 1, sc 2, sc 2 in same stitch, repeat 5 times, sl st (24) || ch 1, sc 24, repeat 3 times for a total of 4 rounds of 24 scs, sl st (24) || ch 1, sc 2 dec 1, repeat 5 times, sl st (18) (you can start to stuff it here, I used less than a cotton ball for the whole thing) || ch 1, sc 1 dec 1, repeat 5 times, sl st (12) || ch 1, dec every stitch, sl st (6) || cut the thread but leave enough so you can sew it to the body *Do NOT pull the hole closed. It’s going to be the neck hole where you attach to the body.
Legs: *in black thread* mc || sc 4 in the circle, sl st (4) (Tip: I would recommend waiting to close the hole until the next step because it makes it easier to see where the stitches are) || ch 1, sc1, sc 2 In same stitch, repeat again, sl st, (6) || ch 1, sc 6, sl st, repeat 2 more times for a total of 5 rows (6) || cut the thread and stuff it || you can also hide the thread ends here if you want I just stuffed them at the bottom when putting in the stuffing. For the second leg just repeat the above steps.
Body: *change to red thread* connect to one of the legs anywhere that feels secure | ch 2 (this just gives some distance between the legs), sl st to the other leg, ch 1, sc 5, sc 2 in one side of the ch 2 from before, sc 5, sc 2 in the other side of the ch 2, sl st (14) ||ch 1, sc 14 (14) || ch 1, dec to 11 it doesn’t really matter where you do it as long as they’re evenly spaced, sl st (11) || ch 1, sc 11, three more times for a total of 4 rows of 11, sl st (11) || ch 1, dec to 9, again, it doesn’t matter where, sl st (9) || ch 1, sc 9, sl st (9) || cut the thread and hide the ends
Arms: *change to black thread* mc || ch 1, sc 4 in the circle, sl st (4) (I recommend not pulling the hole closed yet because it is hard to see) || ch 1, sc 4, three more times for a total of 4 rows of 4, sl st (4) || cut the thread and hide the ends. repeat the steps for the second arm. You don’t have to stuff these because they’re so little :D
Decorations (using red thread):
Arm 1- ch 5, sl st to make it a circle || ch 1, sc 5 for two rows, sl st (5) || cut the thread but leave enough to sew securely to arm.
Arm 2- ch 5, sl st to circle || ch 1, sc 5 for four rows, sl st (5) || cut thread and leave enough to sew to the shoulders.
Chest- ch 12, sl st || ch 1, sc 12, slst (12) || ch 1, sc 2 in same stitch (1st and 2nd stitches), sc 6, sc 2 in same stitch (8th and 9th stitches), sc 5, sl st (14) (this is to make the shoulders point out a little) || ch 1, sc 2 in same stitch (1st and 2nd stitches), sc 6, sc 2 in same stitch (9th and 10th stitches), sc 6, sl st (16) || ch 1, sc 2 in same stitch (1st and 2nd stitches), sc 7, sc 2 in same stitch (10th and 11th stitches), sc 7, sl st (18) || sew to the main body by stabbing through the waist line, cut thread

Shoulders- (this one goes in the empty spot between the main body and the chest piece from above) ch 5, turn, sc 2, skip a chain, sl st to last chain, pull through and cut thread (2 ½) || sew into the empty space on the shoulder. You can also attach the arms after finishing this, hopefully I will remember to include a photo to show where to attach them.

Legs? Train? - ch 9, sc 8, sl st (8) || ch 1, sc 8, sl st (8) || repeat 4 more times for a total of 5 pieces and attach to chest piece, one centered around the front, two on either side of that, and two in the back. If there is extra space in the back, you can make a sixth one and space the pieces more evenly in the back.
I would recommend attaching his head at this point, but we will add hair and the face later
Collar- ch 11, sc 15 (inc every other) (15), sew to the neck of the jacket.
Buttons- (using black thread) sew 2 french knots on the collar (you can hide the thread by either going through the back of his head or through his chest), then maneuver the needle to the jacket and sew either 6 or 4 french knots (depends on how much room you have), three on both sides, and then finally, on the train of his jacket, make 12 french knots with 6 on both sides.
Hair: his hair is a little complicated to explain but I’ll try my best. Using a light yellow and black thread, tie a whole bunch of knots to his head wherever you want his hair line (I was just pulling the thread through until it got close to the end, and then tying a knot and cutting it quite long so make sure you have plenty of thread) You shouldn’t be making it too thick at the front because then his hair won’t lay right. It can be a little thicker at the back of his head because we will have to cut it quite short when we get to that point. I don’t know how many knots I tied or where because it really just depends on the shape of his head. But once you’re finished tying all the knots try to press the hair down and shape it a little before cutting it (remove knots if you have to it happens all the time). When everything looks good then go ahead and start cutting. It may take a while to get the shape as you want it but go slow.
Face: I started with a light blue this time (because with the first Vash I gave him black eyes). It just takes some trial and error to get the eyes right because this also depends on the shape of the head but definitely make sure they’re evenly spaced lol. I think I did 4 sets of lines for each eye to get the size right. After that I used black thread pierced through the back of his head to make… eyelashes, I suppose… and the mouth.
#phew this one was hard lol#please be nice to me ive never written a pattern before#this is all for that one person who asked for it 😙#and any in the future#vash the stampede#trigun#crochet#mini crochet#handmade
35 notes
·
View notes
Text

I finally finished my first attempt at mini crochet! It is this Little Rustic Pumpkin by Yarn + Chai which I actually made regular-sized a few years back. It was a nice challenge adjusting it to miniature! I think there is going to be a lot more miniature crochet in my future! 😍
16 notes
·
View notes
Photo

https://www.etsy.com/listing/1083467837/pumpkin-earrings-cottagecore-micro
#scribbles' knots#scribblesandknots for sale#witchcore#goblincore#micro crochet#mini crochet#etsy#shop small
14 notes
·
View notes
Photo

#brooches#brooch#crochet brooch#flowers#crochet#miniature#Mini Crochet#crochetminiature#mini flower#miniature crochet#handmade#rose#Crochet Rose#roses#lunashobbies#crafts
10 notes
·
View notes
Text


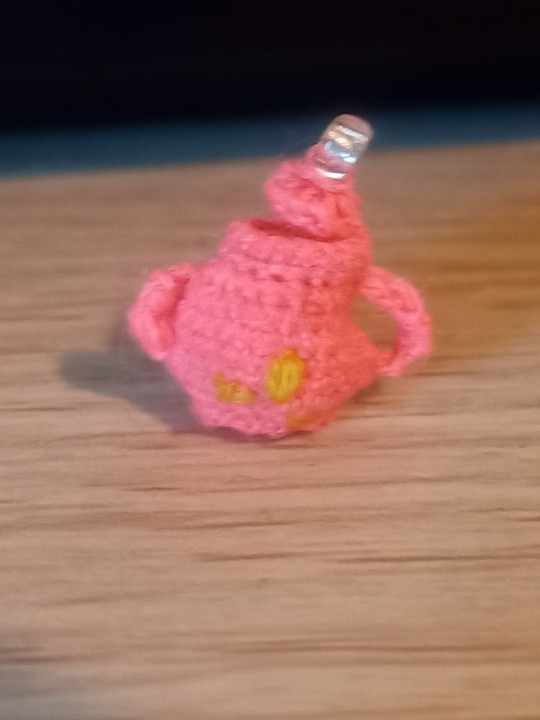
My first attempt at the tea pot pattern. Gonna do it again and try to put a dragon in it.
#crochet#hand crafted#hand crocheted#crochet doll#handmade#micro crochet#tea pot#tiny crochet#so tiny#mini crochet#tiny things#microcrochet
3 notes
·
View notes
Text
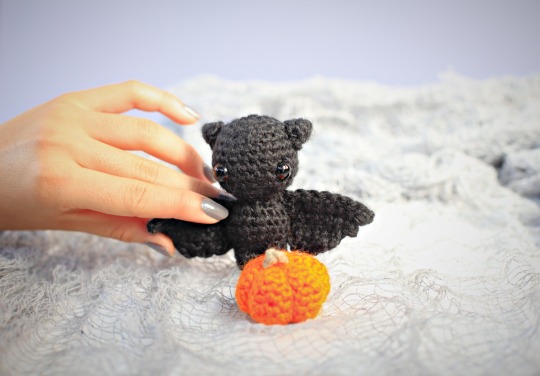
🎃 Bat and Pumpkin Crochet Pattern Pack! 🎃
Buy the pattern here!
#crochet ideas#crochet pattern#crocheting#crochet#etsy#amigurumi#halloween#pumpkin#mini crochet#art#Etsy shop#etsy seller
8 notes
·
View notes
Text

🐳 tiny boi 🐳
i used a 1.65mm (size 7) hook
I used Le Poan embroidery floss
Mini Crochet Whale Pattern

9 notes
·
View notes
Text

0 notes
Text
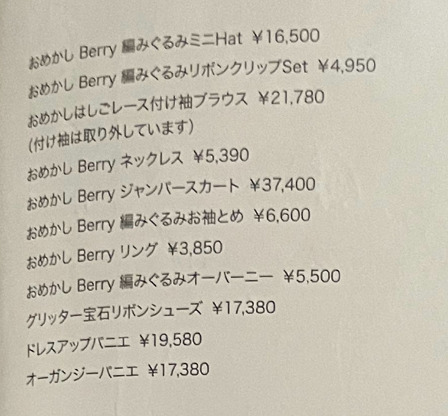
there's a MINI HAT and matching KNITTED STRAWBERRY accessories (ribbon clips, wrist cuffs, OTKs are listed) in the spoon volume 81 AP 2024 S/S lookbook page 26 & 27....... we're so back
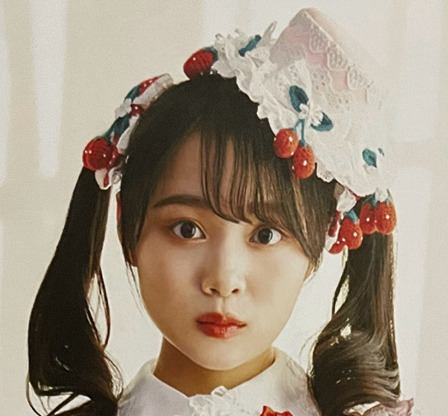
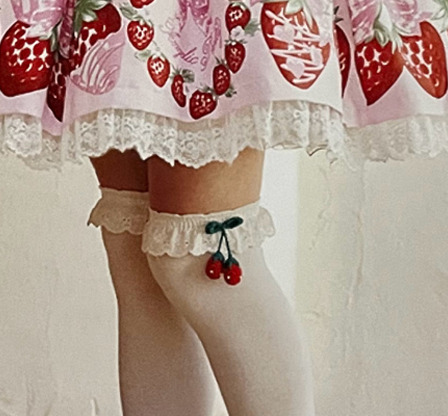
#i am both a mini hat enjoyer and crochet strawberry superfan... my two favorite things combined is a force too powerful for this world#angelic pretty#spoon magazine#2024 S/S#lolita fashion#egl#egl fashion#egl community#sweet lolita
283 notes
·
View notes
Note
Omg your art is so cute 💖💖💖

ty!! heres more cute art
#homestuck#terezi pyrope#my art#i so badly want to crochet the dragon cape#or at least mini dragon plush keychains
2K notes
·
View notes
Photo

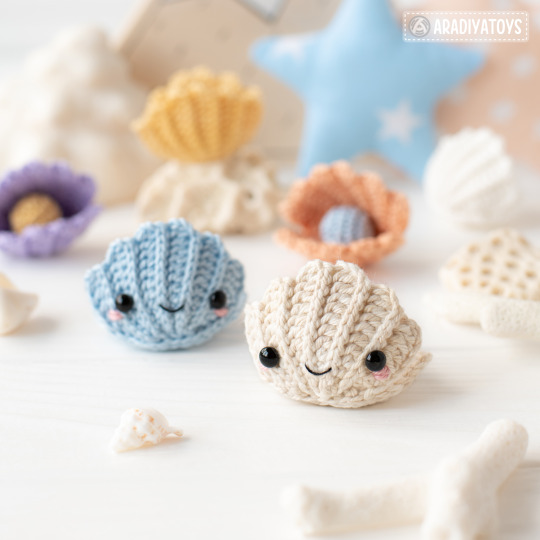
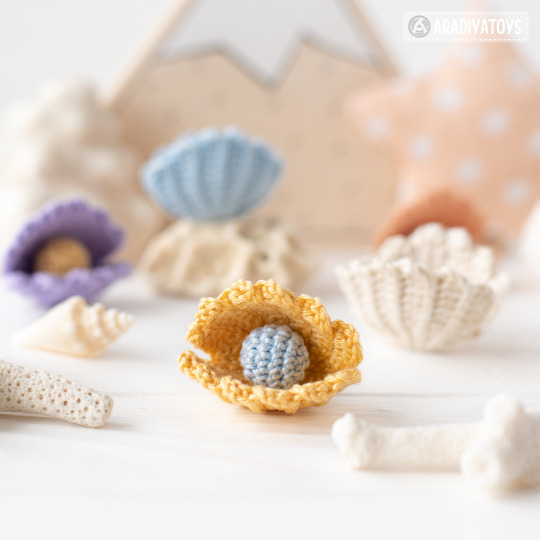
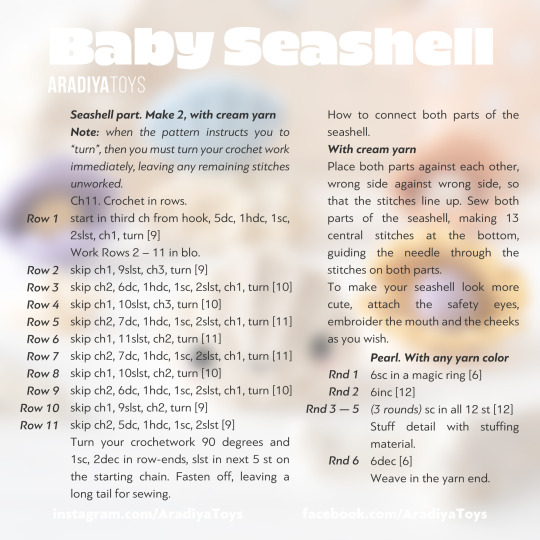


🚨[FREE BABY SEASHELL PATTERN!]🚨
Once upon a time, in the deep blue ocean, there was a tiny Baby Seashell. She lived among the mermaids 🧜🏻♀️ crabs 🦀 and octopuses 🐙 in a beautiful underwater world 🌊 The Baby Seashell loved to play hide-and-seek with her octopus friends and listen to the beautiful songs 🎶 of the mermaids. She would also often explore the nearby coral reefs 🪸 marveling at the vibrant colors and the exotic sea creatures that called it home. Despite being small, the Baby Seashell had a big heart ❤️ and always looked out for her friends, whether it was helping a crab mend a broken shell or sharing a tasty seaweed snack with the mermaids. Life was full of adventure and wonder in the deep ocean, and the Baby Seashell couldn't wait to see what each new day would bring! 🥰
Baby Seashell is a FREE addition to my Kawaii Ocean Minis crochet pattern that includes Mermaid, Triton, Octopus, Hermit Crab and Seahorse and is available here -> https://etsy.me/41Oz4GU 😊
FREE Crochet pattern for amigurumi Baby Seashell is available in English, Spanish, French, Italian, Dutch, Portuguese and Danish, browse through the gallery to see all of these languages! 🤗
Happy crocheting and have a wonderful weekend, dear friends! 💛💙
#AradiyaToys#olka novytska#amigurumi#crochet#handmade#crochet pattern#free crochet pattern#free crochet tutorial#free#free amigurumi pattern#kawaii#seashell#ocean world#kawaii ocean minis#DIY#cute#adorable
1K notes
·
View notes
Text


It's been a long time since I've posted any of my own projects lately, but this one has hit my hyperfixation for the moment. Started this last night, and I think I'm maybe a third of the way done?
The pattern is the Little Rustic Pumpkin by Yarn + Chai, which I've made normal-sized before, but this time, I went miniature!
In an attempt to get back to my mini-making, I decided to finally try some micro crocheting! Size 10 crochet thread and a 1.3mm hook. I've never done ANYTHING this small! (I don't even like sock-weight yarns!) But I think the fact the whole thing is tiny helps.
#crochetblr#crocheters of tumblr#mini crochet#my wips#yarnblr#minis#miniatures#miniature#my handiwork
2 notes
·
View notes
Photo
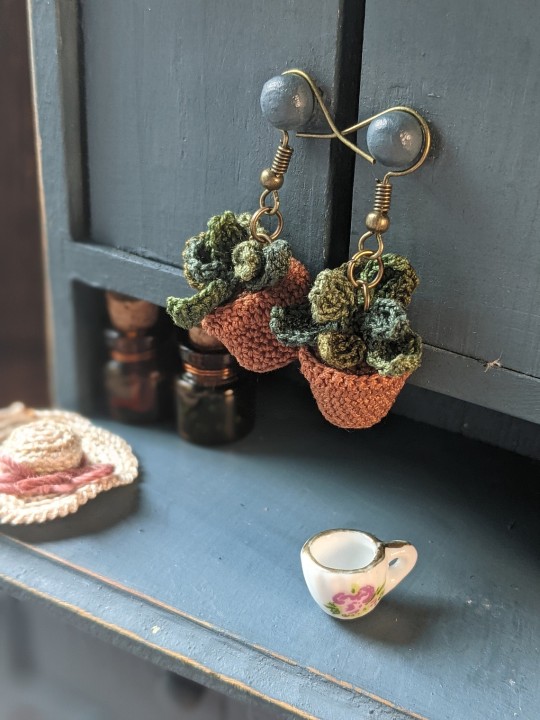
https://www.etsy.com/listing/995936456/leafy-plant-earrings-cottagecore-micro
#scribbles' knots#scribblesandknots for sale#micro crochet#mini crochet#cottagecore#etsy#shop small#witchcore#green witch
4 notes
·
View notes
Text
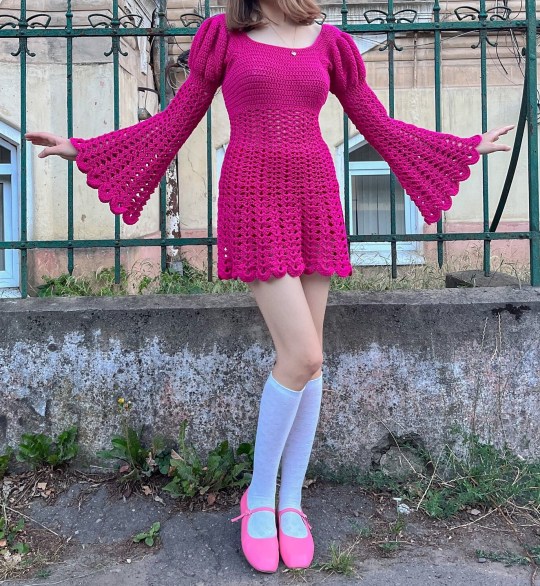
I love crochet mini dresses. They're so pretty, dainty and feminine. Especially so with shoulder, sleeve and hem styling like this one.
105 notes
·
View notes
Photo

Happy New Year
#Happy new year#hny#crochet#knitting#lunashobbies#handmade#flowers#roses#snowflake#crochet snowflake#mini crochet#2022#2023
5 notes
·
View notes
Text


I made mini shorts <3
85 notes
·
View notes
Last Seen Blogs

blueeyesfilledwithpassion
Lover of the sensual side. Male | 40 Something | Aspiring Writer

bugjjuice
Bugjjuice

paramorehearts
Ce Comme Ca

thedevilspet
Pet's Play Place

rvvnn
Sin título