#also 2px pencil tool too . this is like the most i could do. on a phoen 💔
Text
DUEL
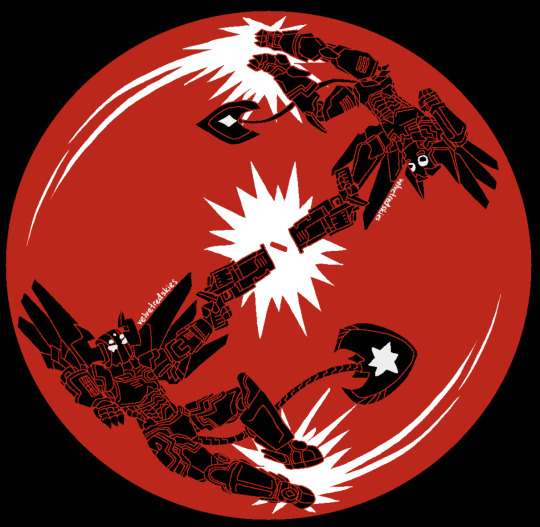
#woah no way velvet actually draws what he says he will .......#bet2graft and v1graft are like ocs now i guess ? i like their designs . kind of proud of it toobbut ehhhh#also this isn't centered. ny eyws hurt . i wnat to die. sorey abt thwt#also not as detailed as the previous ones vut magma wouldn't work properly if i made a canvas biggee than i already have so uh .#also 2px pencil tool too . this is like the most i could do. on a phoen 💔#ok ok i'll put the actual tags now#phighting#phighting!#phighting roblox#phighting fanart#roblox phighting#phighting art#biograft#biograft phighting#phighting biograft#betagraft#betagraft phighting#phighting betagraft#roblox#roblox art#roblox fan art#mecha#mecha art#robots#velvet red's art#waw tags r plentiful
71 notes
·
View notes
Photo

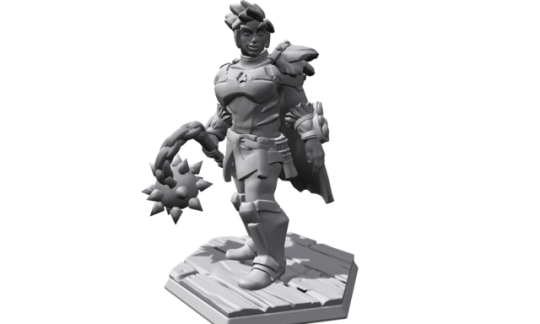
How to: Character portraits from Hero Forge designs
Here’s a quick look at how to make an avatar or color character sheet portrait from a Hero Forge design. You could also use this process to
design enemies
generate NPC portraits
come up with general character illustrations
If you don’t want to use Hero Forge, any grayscale 3D rendering will work. I may do a more in-depth pictorial guide later.
Steps
Get the source image - Use Hero Forge’s built-in screenshot tool to get a grayscale image with no background. If the lighting is wrong, try flipping it horizontally in the “pose” menu; you can flip it back in photoshop. Just be careful not to save it flipped.
Set up the outline - Open it in photoshop. Create a duplicate layer with 4px stroke and 0% fill to outline the image. This will always be frontmost.
Prepare for flatting - Do 4px linework to separate the regions of color. Shadows and highlights don’t need to be isolated because they’ll come back in from the mode overlay in a later step. I use two copies of this; one will be final linework, and one will be the basis for flat color layers.
Do flat colors - Fill the outlined areas with flat color. Be sure to extend your selection by 2px, so that final linework will overlay it completely. Depending on the lighting of the mini, you may need to use different levels of saturation for the colors. This may take a while, as you work through colorways for your character.
Reintroduce 3D - Set up the original grayscale screenshot as an overlay of the color layer.
Add texture - Add masked texture overlay layers to areas that would be textural IRL, or those which seem flat. In this example, I used images of brass to overlay parts of the armor.
Add detail - Add any illustrative details, like eyes, hair coloration, freckles, and fur texture.
Add shadows - Set up a threshold of the screenshot for deep blacks, and color it sun-shadow blue. Play with the blending until it feels right.
Add highlights - In particular, specular highlights and subsurface reflections will need attention. Most simple shadows will be handled by #4. I approach this as if I were working with an eraser, or a white conte crayon/colored pencil.
Clean up colors - The overlays slightly distort them, and while they may or may not be accurate, they may not communicate well. Her face is still a little too red and doesn’t read as brown as I’d like. (Ruth Negga was the skin color reference model)
Clean up lines - Remove unnecessary lines from the flat and linework layers. Clean up lines that are too uniform or jagged. I don’t have a drawing tablet anymore, so I was pretty lazy about this.
I made this character for a new fourth edition (4e) Zeitgeist campaign. I really liked the mini design. I won’t receive it in the mail for a few weeks, but I wanted to use a similar image for my character sheet. I’m sure many of you are better illustrators than I, but the process is solid.
I don’t work for Hero Forge and they have not endorsed this post. Still, they offer great tools for free, so do them a solid and buy a mini or two.
7 notes
·
View notes
Text
I first came across Erin, when BBC America shared a piece of art that Erin did on their official instagram. It was a picture she created of Bill Potts from the television series Doctor Who. But I didn’t really start to pay attention to Erin, who is better known by her handle @butternut_gouache, until the news broke about who was cast as the 13th Doctor. I was writing an article on the fan’s reactions to the news. I shared a piece of art work that she made in tribute to the first woman to be cast as The Doctor. At that point I took the time to really check out her page. I fell in love. Her art work included so many of the fandoms that I loved. From Star Wars, Guardians of the Galaxy to Doctor Who. She even seemed to share my love for Taylor Swift and great fashion. I have shared her art as part of several different Fan Art Friday posts, that we host weekly on our blog. And since we had featured her art so often, I figured it was time to get to know her a little better and share her story as well as her art with our audience.
Tell us about yourself.
Hi there! My name is Erin Lefler, and I’m a New York based freelance character designer and illustrator. I’m an all around nerd, so a lot of the times when I’m not doing illustration and character design work, you can usually find me doing fan art or cosplay!
How long have you been making art and how did you get started?
Oh that’s a tough one! I can’t put my finger exactly when I started making art, but I’ve been drawing for pretty much as long as I remember. As soon as I was able to pick up a pencil, I just doodled in pretty much anything I could. But I started really taking it seriously when I met a Disney fine artist by the name of Greg McCoullgh, and he encouraged me to keep drawing. I was really thinking of giving up at that point with my art, so if it wasn’t for his encouragement I don’t think I’d be where I am today with art.
What tools do you use to create your art?
Well I do most of my art digitally, but when I do paintings I use gouache paint! It’s by far one of my favorite mediums. I also have been getting into doing ink drawings, in preparation for inktober which I’m so excited to participate in again this year. When I’m out and about I use my iPad and Wacom stylus as well, which allows me to do digital art as well!
What is it that inspires a design?
Oh just about anything I lay my eyes on! I find life so inspiring! There’s so many beautiful things in life, that it’s hard not to find inspiration from it! A lot of the times I’ll just type the words ‘people’ or ‘fashion’ on Pinterest or google and I typically will combine some photos I find to make a piece. Or sometimes I’ll just draw people I see out and about as practice. Cosplay is also a very huge inspiration for me. I love finding different cosplayers and drawing them. Also music is VERY key for inspiring me. More often then not when I’m working, you’ll find me with over the ear headphones or my laptop playing playlists that I create for each piece. It really really helps me get inspired for sure.
How long does it take to make one of your creations?
That typically depends on how many things I’m drawing in the piece. But normally, it takes me around 3-5 hours to do one piece.
What has been the reaction to your designs been like?
Oh the reactions have been the best! I just love getting to see and hear how happy my art has made people. I’ve had people tell me that my art has made them so happy that they’ve made it their phone screens, that they were so touched by a piece I’ve done that they’ve started crying, and it’s things like that that really make my work worth it.
You have a website that showcases your art and where people can purchase your art, what lead you to put up your website?
I always wanted to have a place where I could keep my art organized, like a bit of a portfolio. So that led me to sitting down and completely coding my own website. And I always get asked about owning a piece I’ve done, so that led me to adding a shop where people could get their own print of whatever piece I’ve done.
What are your hopes for your art and yourself in the future?
Well first, I hope I get to keep doing this for as long as I can. It’s been one thing that’s brought me great joy, and I hope I never stop getting to do it.
Do you have any highlights from your artistic career so far?
Oh I have several! One of my very favorites, is getting to do sketch cards for topps Star Wars Episode VIII Sets. I grew up watching Star Wars so it’s been a childhood dream to get to do something like this. And now that it’s happening, it feels so unreal! Another thing that’s been a real highlight for me is having some of my favorite actors and actresses reposting my art on their social media accounts, and even getting to give some of my art to them in person. I never ever expect that my art will get reposted by an actor or actress, but when It does, I kinda fangirl! I mean it’s really really cool, and I just feel so honored that they actually took the time to look at it!
Are you interested in other types of art?
Oh their are so many different types of art that peak my interest, but the one that REALLY interests me is paper cutting art! I’m trying to do some paper cutting pieces, and it really requires a TON of patience. So hopefully I’ll be able to share some paper cutting pieces with you all soon!
Are there other makers who inspire you?
Oh there’s so many, it’s hard for me to list them!!! But if I had to name a few, I’d definitely say that Brittany Lee, Mary Blair, Liana Hee, and Lorelay Bove have been HUGE inspirations for me. I absolutely adore their work, and they all are such lovely ladies who have helped pioneered girls being in the animation and art industry. Another favorite of mine, I’d say is Glen Keene. He just is an absolute Wonder with concept art (and art in general!) and he has got to be one of my all time favorite artists.
What would you say to someone who is first starting out as an artist? What advice do you have from them?
Good question! I think the best advice I could give is never give up, draw everyday, love what you do, and do it for the right reason. So many people today just do what they do for the likes or the comments, and if they don’t get what their hoping they give up on it. Or when people put them down about doing what they love, they give up. DON’T!!! One of my favorite artists is Vincent Van Gogh. And one of the reasons is because Vincent Van Gogh was hated when he was alive. People mocked him, and yelled at him, just because of what he painted. They said his paintings were rubbish. But he kept on painting because it was what he loved. He never gave up, despite the hate and the anger thrown his way. And now, Vincent Van Gogh is one of the most widely known artists! His work is featured in museums such as the Louvre, the Guggenheim, and he even has his own museum! If he had given up, so many beloved paintings would disappear from these museums. The people who mocked him, well they aren’t even known by name today. So yeah, people will always have something to say about what you do. But DO NOT give up on your art. If you love what you’re drawing, that’s all that matters! If others like it too that’s just an added bonus! And do it for the right reason. Don’t do it for the likes. It’ll just get you discouraged if you do it for that reason. And finally, draw everyday. It’ll give you great practice and will help you to improve little by little. And don’t think it has to be perfect. That’s the great thing about art, each persons art is their own perfect. So don’t compare yourself to others. Practice everyday. Don’t do it for the likes. And love what you do! I think that is the best advice I can give to anyone just starting out as an artist. That advice was given to me when I first started and I think it’s what’s kept my focus in the right place with my art.
#gallery-0-5 { margin: auto; } #gallery-0-5 .gallery-item { float: left; margin-top: 10px; text-align: center; width: 25%; } #gallery-0-5 img { border: 2px solid #cfcfcf; } #gallery-0-5 .gallery-caption { margin-left: 0; } /* see gallery_shortcode() in wp-includes/media.php */
Artist Spotlight: Erin Lefler I first came across Erin, when BBC America shared a piece of art that Erin did on their…
0 notes
Text
The title of this post might seem a little redundant, but a dollar can really add up if you are not careful. When you end up buying everything your heart desires, you will no longer be saving money!
We all know that teachers’ incomes are more on the light side and whenever money can be saved we save! Thankfully, in my area of the world, we have a HUGE Dollar Tree. I shamelessly spend unhealthy amounts of time in this dollar den, thinking of any way possible to use the random item on the shelf.
I have to stop myself from buying everything I want because though there are a ton of helpful items, not all are cheaper than buying them elsewhere! They have often times have mini versions of larger name brand items but at $1.00, the price per ounce/pound/etc. ends up costing MORE than if you got the normal sized item.
Disclaimer: The following list consists of my personal staples used in the classroom. These might not be the favorite for everyone else or your district may not allow the use. Also, Dollar Tree is NOT compensating me in any way for this post, I felt the need to help other teachers through the use of their items!
• teacher’s corner•
I have a love-hate relationship with this little area of the Dollar Tree. I love that it is ever growing and hate that most of the items are ALMOST what I need in my classroom, but not quite. The Dollar Tree is starting to align more of their items with the Common Core Standards, this will allow more teachers to justify the usage in their classrooms and that is awesome.
The following are my favorite items from this little corner, I focus more on items I can give to the students and not what I can use to decorate my room. I find the decorations to be a bit on the small side, not able to really be used on more than a bulletin board.
These little erasers are comparable to those in the Target Dollar Spot. I love that they usually come in packs of 30+ and {hopefully} that is more than enough for each student in your classroom. These are also awesome for lower grades for counting and sorting purposes.
The above pencils, like the erasers, are some of my favorite little gifts to give my students. I love that they are in groups of 12 so {again, hopefully} you only need to buy 2 packs at most. Now, if you have a local teacher store SOMETIMES it is cheaper to buy them there, but really you can’t beat ~9¢ per pencil.
My only complaint with these pencils is that they are usually a basic white pencil with a plastic decorative wrapping. When using an electric sharpener, there have been times when this plastic covering has gotten tangled in the sharpener and I have had to dig it out. On the other hand, there have been times when the pencils are not like this and they are fine. It really doesn’t happen often enough for me NOT to buy them, I just take my chances, ha!
I am not much of a sticker-giver but for those who are, these are for you! There are always different options for only a dollar!
I also wanted to point out the purple and gold border to the left, this comes back to how the items are almost what I need. The border is shorter than normal so that it ends up costing more than visiting your local teacher store.
• office supply aisle •
If you are not into fancy, decorated folder tabs these are for you! I work in a school where I am usually buying some of the school supplies for my students for multiple reasons and these are my go to. There are others {see below} that are more decorative and/or made of plastic, but these have the most tabs for when I am attempting to organize my many data and resource binders.
Read More: READING DATA BINDERS: THREE SECTIONS YOU NEED!
As some of you may know, I worked most of my educational career with students either receiving Response to Intervention {RTI} services or in Special Education. I have seen my fair share of students with multiple needs and have sometimes been in the air at how to address these. One of these is often when a student is unable to focus on words, often leaves out or reverses letters, etc. and we tried applying colored overlays. Now if you quickly search these on Amazon {HERE} you might be in sticker shock at the price…this is where the above picture comes into play.
These Dollar Tree, clear plastic dividers are WONDERFUL as a cost-effective and seemingly helpful alternative. I currently have these in my guided reading area and pull them out when students are having the above issues. Sometimes these have helped, and other times they have not.
I use these by cutting off the tab, though you could leave it on if you’d like, and either sticking the paper passage in the folder pocket or simply placing the sheet over the book.
Read More: RESPONSE TO INTERVENTION {R.T.I.}: THE GOOD, THE BAD AND THE UNKNOWN…
Unless you are needing a quick art supply or a limited supply Dollar Tree is an okay place to get these from. Like their Teacher Corner, their crafting area is growing each time I go in. There are many options, but in the long run, they actually end up costing you more. On the other hand, if you are here and don’t want to drive or possibly do not have a craft store, by all means, these are great.
Books! I cannot express my love for the book section. I am admittedly one who likes to “dig” for deals and I think most of my time in Dollar Tree is moving {and often times straightening} their books to find {and sometimes not find} amazing titles. I would estimate 6 out of 10 times I look in the books I find at least one awesome book.
The downfall of this section is that there is no real organization, but it is a dollar store, not a library. This picture if a great example of the chaos, but I love it. There are romance novels, children’s’ books, puzzle books, and a never ending supply of Bibles. On my last visit, I found a Scholastic book about dragons {one of my students is obsessed} and a leadership book for me to read this summer.
Aside from teen fiction, self-help, and other genres, they do have educational resources, mostly for lower grades and coloring books for those indoor recess mishaps.
• beauty aisle •
These two are not necessarily education related, but both have helped me as a teacher in the classroom.
There are going to be girls {and maybe you} who will break a ponytail holder, need a bobby pin, or some other hair crisis. I teach third grade and at this age, they are starting to care more about what they look like…help them out!
If you have students with glasses {or if you wear them} in your classroom, this is a must! I cannot tell you how many times I have had students come to school with one of the tiny screws missing from their glasses. Thankfully, this kit comes with these screws and the equally tiny tools that help fix it.
• hardware aisle •
The next two items go hand and hand and I cannot imagine my life without either. When I am walking through stores {and anywhere really} I often think that it takes thinking out of the box to really organize what is inside it.
This year, I bought all 20 of my students a pair of the nicer looking earbuds {as you can see in the picture they have more than one kind}. Of the 20 pair bought from the dollar store, as of the 175th day of school, only about 5 are no longer working. These are pretty good odds for the frugal teacher and I plan on doing this again next year.
20 pairs of earbuds is asking for 20 pairs of knotted chaos. These amazing little containers are how we semi-contain the knotting. I have assigned each students a numbered section {that aligns with their number in “lunch line” order} and they know that is where they stay when they are not being used. I also made sure to attach a small piece of tape with this same number so we will not have any mishaps of who’s earbuds belong to who.
These are also great for many other uses: storing money {if you teach those standards}, brag tags, dice, game pieces, the list really can go on and on!
• healthy & beauty aisle •
Can we take a minute to give the school nurses the proper praise they deserve?! I know I am guilty of sending way too many of my students to the nurse, but sometimes I have to tell them it will be okay and but on the nurse’s hat. Dollar Tree has made it possible for me to help keep my students well both from a scrape or other germs in the rooms.
#gallery-0-9 { margin: auto; } #gallery-0-9 .gallery-item { float: left; margin-top: 10px; text-align: center; width: 50%; } #gallery-0-9 img { border: 2px solid #cfcfcf; } #gallery-0-9 .gallery-caption { margin-left: 0; } /* see gallery_shortcode() in wp-includes/media.php */
If you live anywhere that bounces from hot to cold, you know the look of a chap-lipped little one. It truly makes my heart hurt to see the rash-like redness above a student’s lip or the cracking of their actual lips.
When I was student teaching, my mentor teacher told me she was known as the teacher to go to in 4th grade if either of these 2 things were ailing you. She simply had a tub of petroleum jelly and case of cotton swabs. This is a genius way to make sure all students have relief and is still sanitary.
#gallery-0-10 { margin: auto; } #gallery-0-10 .gallery-item { float: left; margin-top: 10px; text-align: center; width: 50%; } #gallery-0-10 img { border: 2px solid #cfcfcf; } #gallery-0-10 .gallery-caption { margin-left: 0; } /* see gallery_shortcode() in wp-includes/media.php */
Speaking of sanitation, can I get an AMEN for the invention of hand sanitizer? We all know there have been times when you have been rushed to get to lunch {or anywhere really} and you cannot have all 20+ students wash their hands…in comes this miraculous liquid.
I make it a point to wear my lanyard, with attached sanitizer for the above situation. The Dollar Tree really gets the need for different kinds of sanitizer and it amazes me how large the bottles are to keep them cost efficient when the first day’s of school supplies dwindle.
When we are not rushed {which is almost never}, these are wonderful for hand washing. Dollar Tree has a great assortment of scents and can we talk about those large refills?! I buy the large ones and skip the cute little dispensers.
Other life savers are disinfecting alcohol wipes and band-aids. I love how there are different designs but also the generic “flesh colored” are available. You usually get more in the basic band-aids than the decorated ones, if you are not having a crazy amount of injuries though, it is all in the same.
• kitchen & home aisle •
If you use dry-erase boards, you know the struggle of each student having their own marker and eraser. One way I have seen teachers address the eraser issue is to use a sock. I, on the other hand, take the pictured microfiber kitchen towels and cut them into sizeable squares. I usually can get about 12-16 squares out of each rag and they come in packs of 2!
Containers…there is no getting around our need to organize, sort and straighten as teachers. It never ceases to amaze me as to how Dollar Tree knows what teachers need AND the amazing colors that are on trend. My classroom is filled with these containers and I cannot imagine not having them, these are possibly {other than the books} one of the best buys at Dollar Tree. That being said, they are from the dollar store…they will hold up as well as you treat them.
Chapped lips and sniffles…the two things that can get any muggle down. I don’t know about you, but the tissues issued to us by our district are not the softest so I resort to providing my own. Thankfully these are MUCH softer and last quite a while!
This is one item that your district may not allow, air fresheners. If you ask anyone who knows me, they know my classroom is “flatulation station” this year and when the kids leave the room it gets a good spray down. We all know kids can be stinky and Dollar Tree offers so many options to keep your classroom fresh!
• I want to hear from you! •
Do you use any of these in your classroom? What other items should I add to this list? I would love to hear from you in the comments below!
Read more from entirely erika on Teaching {HERE}
A Teacher’s Guide to Save Money at the Dollar Store The title of this post might seem a little redundant, but a dollar can really add up if you are not careful.
#advice#choice#choose#frugal#help#love#opinion#organize#pinterest#small group#student#students#teacher#teaching#teaher#tips
0 notes
Last Seen Blogs

apsvlogs-blog
APSVLOGS

saturnsoiree
bb. gatus🪐

writersmess
i'm gonna rip your throat out

arrwyn
The Gathering

meloramylin
𝖒𝖊𝖑𝖙𝖞 𝖎𝖒𝖕