#cotton twill fabric
Text
#organic fabrics#khadi fabric#khadi fabrics#kala cotton fabric#banana fabrics#muga silk#fabrics organic#khadi silk#winter fabrics#bamboo cotton#cotton twill fabric#terry cotton#khadi handloom#gauze cotton#cotton fabric#printed fabrics#ahimsa silk#satin fabric#pashmina fabric#khadi cotton fabric#cottony fabric#cotton knit#bamboo fabrics#recycled cotton#satin silk#bamboo cotton fabric#wool fabrics#sustainable clothing brand#recycled fabric
1 note
·
View note
Text

realized my pitiful little supply of linen tape was NOT going to hold up to the number of books i want to bind :p fortunately burnley and trowbridge Provides
#the trashcan speaks#sidenote. it is kind of hard to search for non-sticky fabric tape. just in general#and NO i dont want cotton twill tape#and no i also dont want book tape!!#i already have that!!#devil venerable also wants to exploit the memoir class for evil purposes#*sigh* next thing you know i’ll be buying 11x17 paper so i can get the grain to go in the right direction on my signatures…#i have a wide format printer i wouldnt even have to cut it to shape first…#(on the other hand. the emotional Toll of trying to figure out how in the fuck the signature is laid out.)
14 notes
·
View notes
Text
i simply Do Not Believe in cross grain / straight grain <3
#a joke but i do think that most of the time it doesn't honestly matter#yeah theres like. a fractional difference but its so small it wont matter for like. a lot of things#also like. Most fabric you get is a little offgrain anyway so?????#like if youre working with directional fabrics. or satins or design-y weaves (twills etc) it matters but like. your bog standard cotton???#nah im not fucking arnd with that ill place my shit however is most efficient#sewing
4 notes
·
View notes
Text
https://www.artexoverseas.com/super-lycra-fabric-230-gsm--9065165.html
Introducing the Super Lycra Fabric, a fantastic product specifically designed for the garment industry. Made with high-quality Lycra material, this fabric is extremely versatile and offers a wide range of benefits. The width of 60 inches makes it perfect for various garment designs while the plain style adds a touch of simplicity and elegance. Not to mention, it is also washable and light in weight, making it easy to care for and comfortable to wear. The fabrics weight can be customized as per your requirements, ensuring that you receive the perfect fabric for your specific needs. Its plain texture gives a smooth and polished look, making it suitable for a variety of garments. And with a strength of 240 GSM, you can trust in its durability and quality. As manufacturer and supplier of this exceptional fabric, we guarantee that you will be satisfied with the results.
#fabric#textile#fabric manufacturers#textile fabrics manufacturers#fabric mesh#clothing manufacturing#cheapest fabrics#textile fabric buyers#Wholesale fabric buyers#lycra fabric#sportswear fabric#ottoman fabric#twill cotton
0 notes
Text

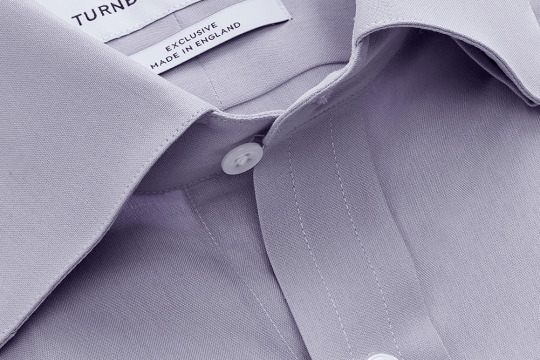
Choosing the Perfect Fabric Unveiling the Best Material for Men's Dress Shirts
When it comes to dress shirts, there are a variety of materials and fabrics to choose from. The type of fabric you choose can make a big difference in the overall look and feel of the shirt. So, let's dive in and take a closer look at some of the most popular options.
Twill Twill is another great option for dress shirts. It has a diagonal weave pattern that adds depth and texture to the fabric. It's also a durable fabric that's resistant to wrinkles.

Oxford Oxford is a classic fabric that's often used for dress shirts. It has a basket weave pattern that gives it a unique texture. It's a versatile fabric that can be dressed up or down.

Poplin Poplin is another popular fabric for dress shirts. It's a lightweight, tightly woven fabric that has a silky finish. It's perfect for warm weather.

Sea Island Sea Island cotton is a luxurious fabric that's made from extra-long staple cotton fibers. It's incredibly soft and silky to the touch.

Linen Linen is a lightweight, breathable fabric that's perfect for warm-weather dress shirts. It has a natural texture that adds depth to any outfit.

Silk Silk is a luxurious fabric that has a soft, silky feel. It’s perfect for formal dress shirts, and it drapes beautifully on the body.
Wool Wool is another great option for dress shirts. It’s a durable fabric that’s perfect for cooler weather. It has a natural texture that adds depth to any outfit.

The fabric you choose can make all the difference. When selecting a fabric, consider the occasion, the weather, and your personal style. Choose a fabric that makes you look and feel your best
#articles#Style Details#How can you tell if a dress shirt is high quality#What's the difference between a dress shirt and a casual shirt#What dress shirt material is the best#What makes a shirt expensive#What is the highest quality of shirt#How do I make my shirt look classy#What is the best material for a men's dress shirt#What type of fabric is a dress shirt made of#What fabric are mens shirts made of#How do I choose a dress shirt material#What are premium shirts made out of#Should dress shirts be 100% cotton#What is the best dress shirt material for hot weather#What are business shirts made of#Which cotton is best for formal shirts#How can you tell a quality dress shirt#Is twill or poplin more formal#What material of shirt keeps you the coolest#What shirt material is best for sweat#What is the coolest shirt material#Is poplin scratchy#What is a twill shirt vs a poplin shirt
0 notes
Text
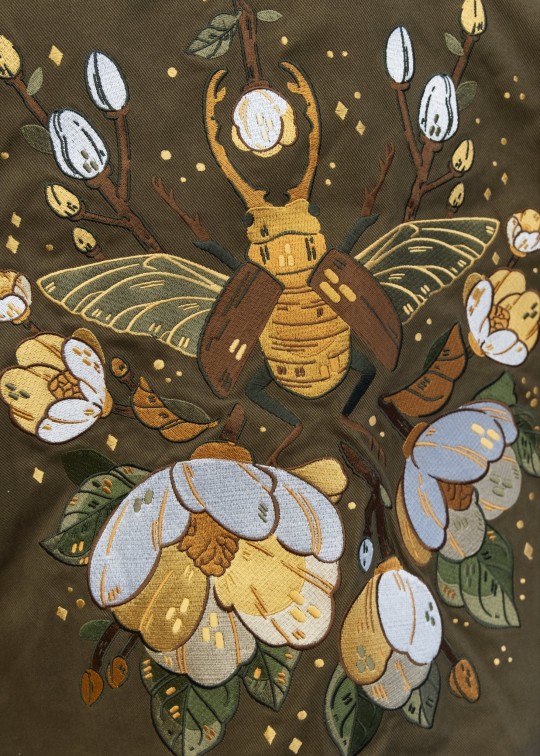
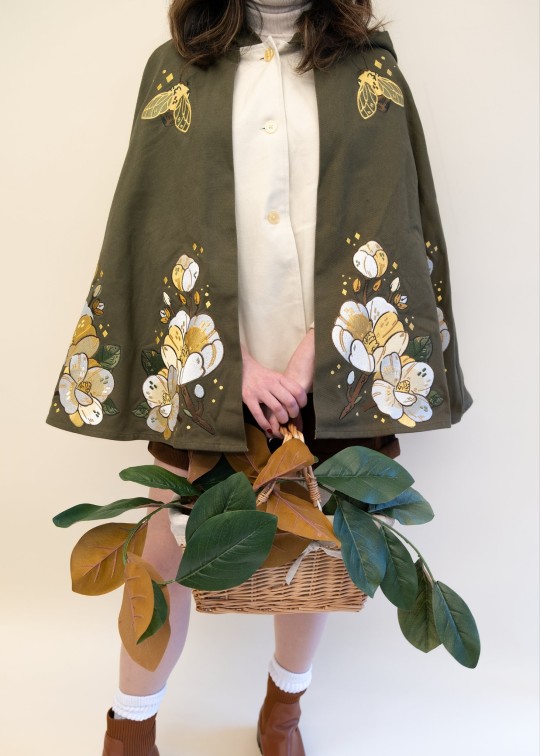
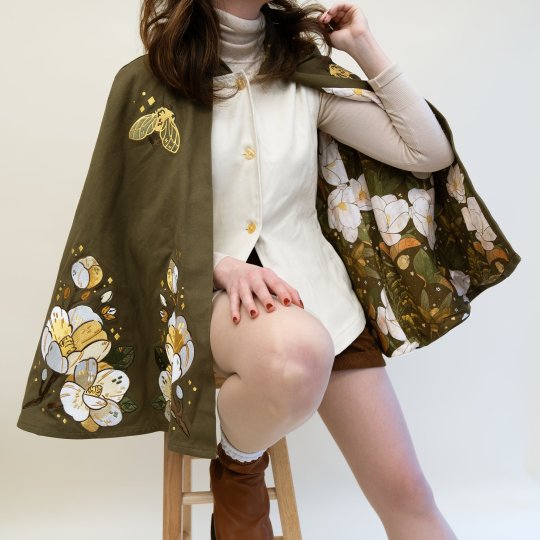
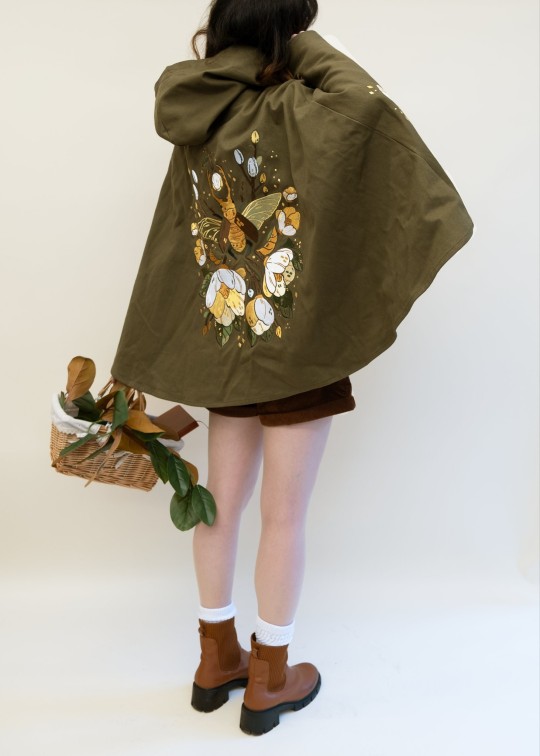
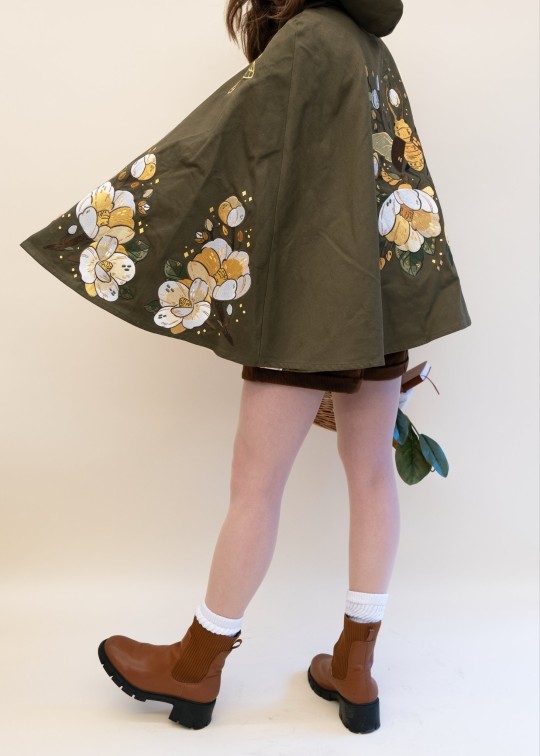
are you guys ready for some ✨ whimsy ✨ presenting: the magnolia cloak!!
✶ cotton twill exterior fabric, tencel inner lining. the (non detachable) inner vest also has 2 zippered pockets and may have an optional waist belt in the final version.
✶ for now the sizing will probably be s-3xl - this will be our own sizing, which is unisex, and ill have the size chart soon!
✶ gauging interest for this is super important so if youd like one, please consider signing up for a restock notification so we can see how many people are interested! dont worry about which size youre signing up for right now, the total number is whats important at the moment :)
#botanical#artist brand#nature fashion#illustrator on tumblr#cottagecore#indie fashion#magnolia#beetle#artists on tumblr
4K notes
·
View notes
Text
FABRIC ACQUIRED
#sewing#took me a while#had to get from school city to home city then take a 2nd bus up to where i needed#tried to get a perscription and walked in right as the pharmacy was closing for lunch#walked back up to store 1 (no fabric but cheap school supplies) then store 2 (no fabric and no shoes for some reason???)#then finally store 3!#almost didnt go but im glad i did bc while they didnt have my black i was planning for they did have grey#and its actually better#i thought this was satin but i keep forgetting and rediscovering that its an extremely fine twill#nonetheless its very smooth and will make a nice hat liner :-) no charmeuse or satin or polyester!!!!#thank god lol#it ended up between buying new sheets or trying to use my literal current pillowcase OR plainweave or a jersey#the latter two id have to fucking dye#2 yds of squared fabric for $6 please thank you very much lol#theyre broyhill cotton pillowcases btw
0 notes
Text
Singer iron on patch instructions how to
nds! No sewing required! ; Embellish & Repair. Multi-sized patches in assorted
Grab a clothing iron, ironing board, your iron-on patch(es), and a thin piece of fabric. Use an old t-shirt, pillowcase, or cotton fabric sheet to protect the
Use dry iron only - no steam. Instructions: 1. Preheat iron to "High" or "Cotton" setting for 5 mins. 2. Heat fabric where patch is to be applied by running
Turn the article inside out. Ironing it to get the area warm than placing the patch on the area warmed up and ironing again until the patch has adhered to the
</p><br>https://puwamutadik.tumblr.com/post/694451854400225280/meditator-s-handbook-for-the-new-paradigm, https://puwamutadik.tumblr.com/post/694451854400225280/meditator-s-handbook-for-the-new-paradigm, https://puwamutadik.tumblr.com/post/694451854400225280/meditator-s-handbook-for-the-new-paradigm, https://puwamutadik.tumblr.com/post/694451854400225280/meditator-s-handbook-for-the-new-paradigm, https://puwamutadik.tumblr.com/post/694451854400225280/meditator-s-handbook-for-the-new-paradigm.
#http://vk.cc/c7jKeU#nofollow#<p> </p><p> </p><center>SINGER IRON ON PATCH INSTRUCTIONS HOW TO >> <strong><u><a href= rel= targe#<br> how to iron on patches on backpackhow to use iron-on patches for holes#<br> how to iron on a patch without an iron#<br> do iron-on patches go on the inside or outside#<br> how to use iron on patches for jeans#<br> how to iron on patches on polyester#<br> how to put a patch on a shirt with an iron#<br>#<br> </p><p> </p><p> </p><p>The SINGER Iron-On Dark Colored Twill Patches are perfect for fixing or embellishing light colored pa#jackets#shirts and skirts. Ten twill patches in navy#Instructions · 1. Preheat iron to high or cotton setting for 5 minutes. · 2. Heat fabric where patch is to be applied by running iron over
1 note
·
View note
Text
Minoan Kilt
The large, structural skirt worn by Minoan women in art is instantly recognizable, and when I made my own I combined current best guesses with my own personal tastes.

My kilt shape follows the hypothesis laid out by Bernice Jones in her book Ariadne's Threads: The Construction and Significance of Clothes in the Aegean Bronze Age. She describes the shape of that of a labrys, a double-headed axe with apparent ceremonial significance in Ancient Minoan culture. This garment may be depicted in Linear-B logogram *166 + we, we-being the backwards-s-shaped squiggle in the center which identifies the piece as a garment.

See pages 336 and 341 in Marie-Louise B. Nosch, The Textile Logograms in the Linear B Tablets
Actual details on construction and materials below the cut:
Construction:
The top and bottom edges of the kilt are concave, so the sides are longer than the middle. This gives the chevron-shape seen on layered kilts in art. In addition, the curved top half makes the skirt flare out, accommodating the hips and giving more freedom of movement to the legs. My kilt measured from my waist to my anklebone at the longest point, and about 1.5 times around my waist.
I chose to make a flounced kilt, with smaller strips of fabric and trim applied to a large base piece, rather than a tiered kilt, in which multiple kilt shapes of varying length are layered one on top of the other, so you end up wrangling 3 layers of fabric around the waist. The flounced kilt saves fabric and gives you a lot more freedom with whatever trim you might want. Jones' diagram for a flounced kilt is seen below:

Unlike the version in the diagram above, I chose not to attach ties to the garment itself both because the linen I used was very heavy and I was concerned about weight, and also because folding the skirt and securing it with a separate tie worked just fine for my tastes. In total I had four flounces: 2 alternating rows each of fabric and fringe.
The vertical edges of most kilts are left plain, probably representing either the selvage or an edge otherwise finished off to prevent fraying. For my kilt, however, I ended up with a couple inches of self-fringe on either side as I adjusted the fabric to the correct width. At least three examples of kilts with fringed vertical edges are known, all three from the so-called "House of the Ladies" in Akrotiri
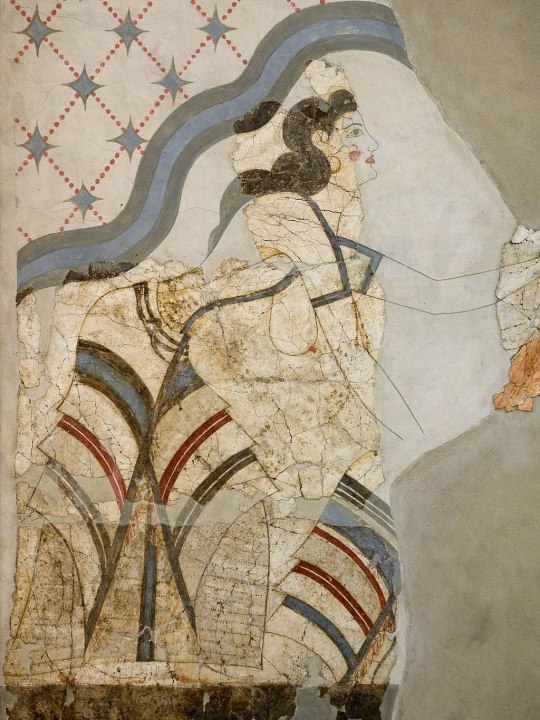
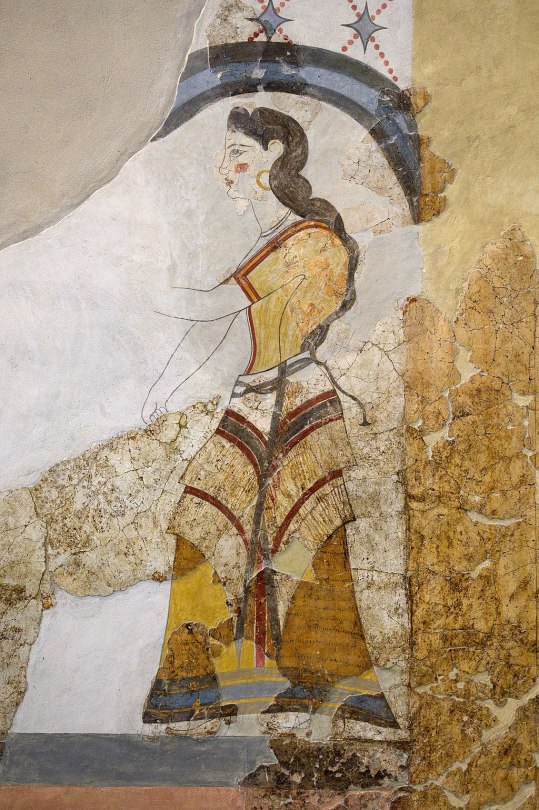
Photos from Wikimedia Commons. Image 1. Image 2.
The vertical edges of these kilts are reinforced with a colored band or tape, probably to keep the garment from unintentional further fraying. Accordingly, I did the same on my kilt. I also like that it gave a nice vertical diagonal to counterbalance the horizontal ones.
Materials
I tried to use mainly linen and wool, the fibers most available on Ancient Crete, but some of my trim was cotton because sometimes you just have to use what's cheap and available in the today times.
The base of my kilt is a heavy, patterned linen in what's called a diaper weave, meaning that a repeating diamond pattern is woven into the pattern itself. A lot of the Minoan textiles depicted in frescoes are characterized by repeating geometric patterns, likely woven into the fabric itself, and that was something I wanted to capture in my own piece. My linen is woven with both cream and natural colored threads. The heavy weight is important to give structure to the garment--otherwise it would be kind of limp. My linen was from Burnley & Trowbridge (shameless plug), as was the plain cotton twill tape I used to bind the top and bottom edges of the kilt, and the dark red wool twill tape I used along the vertical edges.
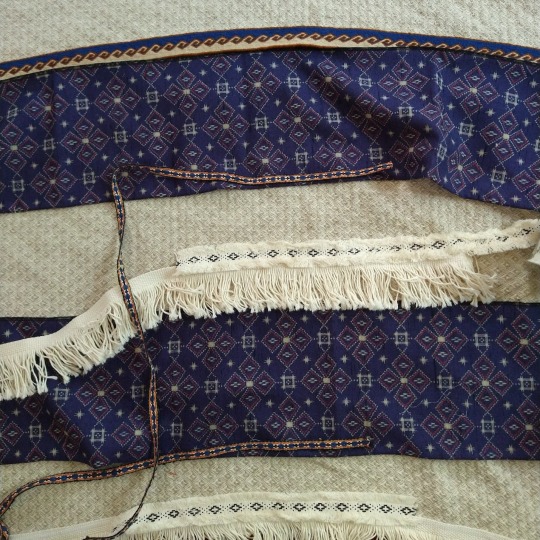
I bought my cotton fringe from a rug supply store. I had to search a while to find a fringe that would work for me, and I ultimately chose fringes with a woven header rather than the more common knotted one, so that it would lay flat against the kilt. I hid the woven header under a layer of cotton fringed trim from Michaels (yes, Michaels) with this really great diamond and dots pattern woven in black.
The blue layers are from a bolt of vintage wool Kimono fabric. Blue appears frequently in frescoes, likely achieved with indigo or woad dye, or even murex/mollusk dye. The fabric is printed with an imitation ikat pattern of diamonds and squares that made me think "the vibes seem right!" because quite frankly, you aren't going to get "historically accurate" Minoan textiles (which there probably isn't enough archaeological evidence to definitively describe) without, like, hand-weaving it yourself or paying someone hundreds of dollars to do it for you (and that price is if the weaver really likes you). Neither of which appealed to my desire to just make a fun, low stress project. Good enough is good enough.
The narrow trim on the bottom of the blue flounces is vintage cotton/poly woven trim. This trim, while narrow, was quite thick and stiff, which was great because it added more weight and structure to the end of my flounces since the wool fabric itself was quite thin.
The top layer is a custom tablet-woven wool trim that I commissioned from MAHTAVAhandicraft on Etsy. I imagined this as the "centerpiece" of my kilt, and I'd arrange everything to complement it.
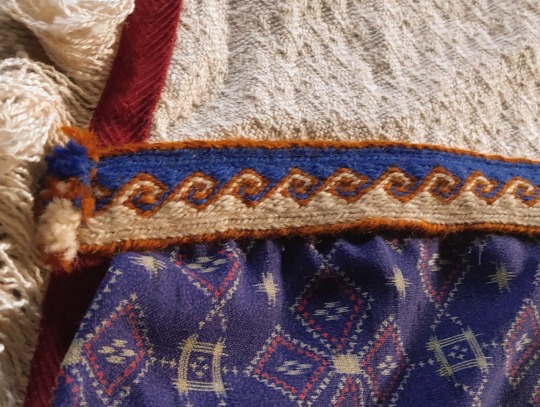
It's a kivrim pattern, which has itself only been traced to 19th-century Anatolia, but I didn't care. The way it looks like waves reminded me of how central the sea was to life in the Ancient Aegean and Mediterranean and it captured the idea and aesthetic I was pursuing. I mean, doesn't it remind you of these dolphins?
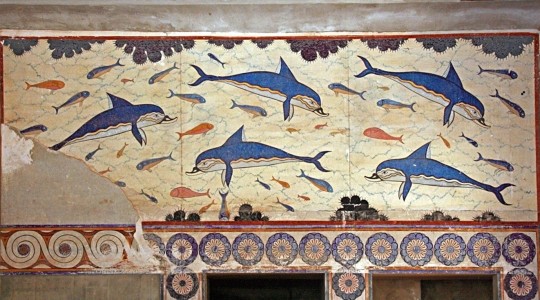
(I like the dolphins)
The whole thing was machine sewn with the exception of hemming and adding trim to the blue flounces. If you were to look at it from the back, you'd see lots of zigzag stitches, because i wanted to be fast! and have fun! not chase some unreachable ideal of "accurate."
As for wearing it, I chose to wear it with the top part folded/rolled down over a belt, so I have a thick tube of fabric around my waist. Many images, like the frescoes above of women with fringed kilts, appear to just show the kilt being tied closed. Other images are so fragmented or stylized that it's unclear what kind of skirt closure was used. Sculptures and figurines definitely show some kind of SOMETHING around the waist, whether this is folded fabric or a kind of belt is unclear. Different art could show different things!

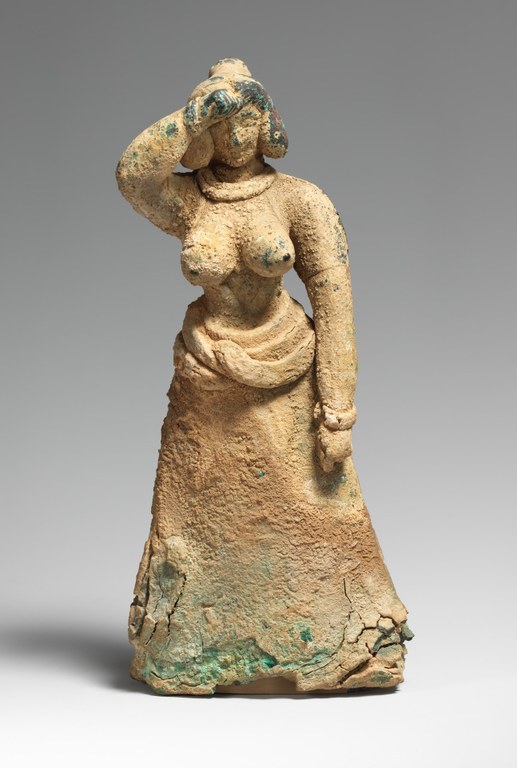
I think I see evidence of a continuous line from the skirt to the waist-roll on the figure on the left, found in Troas, which I think indicates some kind of skirt-folding situation. The woman on the right, found in Crete, looks more like she's wearing some kind of long coiled belt, or perhaps snakes. Who knows? I don't! For my own part, I found the combination of rolled waist + tie belt the most secure for doing things like kneeling, stomping around, and wading into rivers to rescue bees. I also liked that it gave me the bulk around the hips that gives Minoan figurines such a powerful silhouette, and proportionally gives more of an hourglass shape. If you wanted to do something more firmly grounded in the sources, stick just with the waist tie or belt, wrapped around a couple times and tied in back. If you want to be like me, just say "well we don't KNOW it didn't happen" and just do whatever you want. Have fun! Whatever happens, it should be fairly easy to move around in the kilt--this is not a restrictive garment, just a heavy one.
815 notes
·
View notes
Text


Dress
1893
Conventional in style for its time, with a close fitting boned bodice, defined yoke, tight sleeves with epaulettes and full puffed top sections, this two piece dress nevertheless shows the influence of artistic dress on the materials from which it has been made. Originating from the attempts to reform ugly aspects of women’s clothing, artistic dress favoured muted colours and softly textured fabrics, and by the 1890s some of these preferences had found their way into more mainstream fashion worn by middle class women with cultural interests. The fine silk twill of the dress’s body, the velvet and soft wool of its sleeves, collar and hem, and the ‘antique’ lace of its yoke were all favoured components of artistic dress, as were its simple grey shell buttons that celebrated the unpretentious beauty of natural materials. Sludgy shades of green such as olive and sage were a reaction against the brashness of synthetic dyes, and both greens have been used in the silk’s printed design of ‘faded’ pink and yellow honeysuckle with light sage foliage on a dark olive ground. This design, albeit on a different scale, evokes some of the textiles and wallpapers produced by the firm of Morris & Co, set up by William Morris to provide items of interior design that accorded with his artistic and socialist principles. One such example is the block printed cotton ‘Honeysuckle’ of 1876, depicting pale flowers and foliage on a dark ground.
John Bright Collection
#dress#fashion history#historical fashion#1890s#19th century#turn of the century#1893#victorian fashion#victorian#silk#wool#velvet#green#brown#john bright collection
1K notes
·
View notes
Text
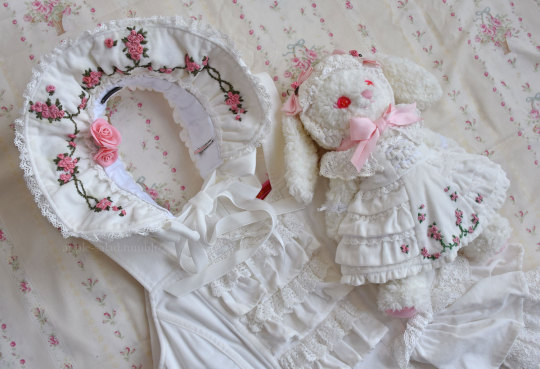
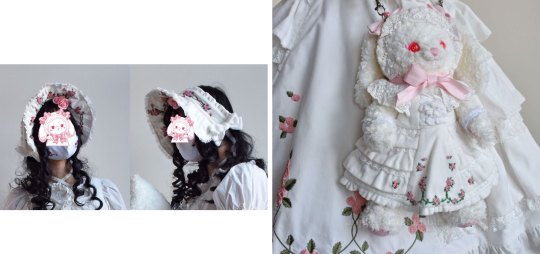
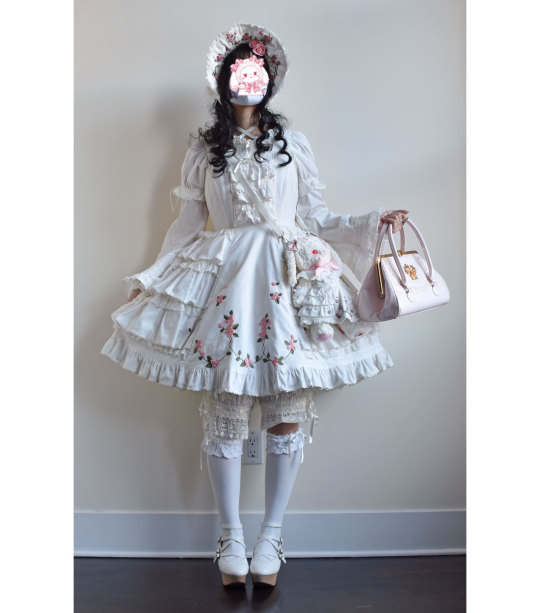
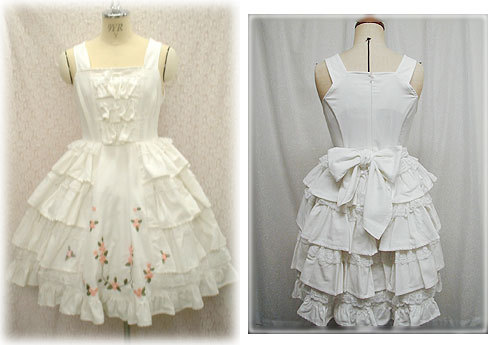
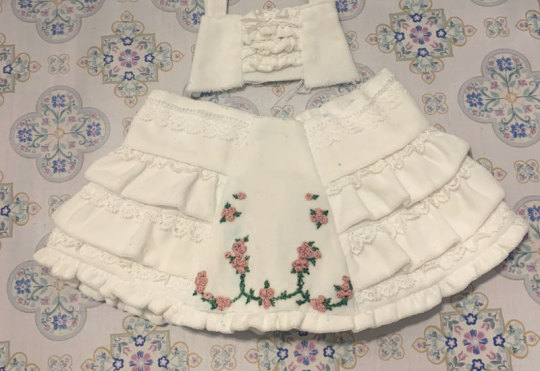
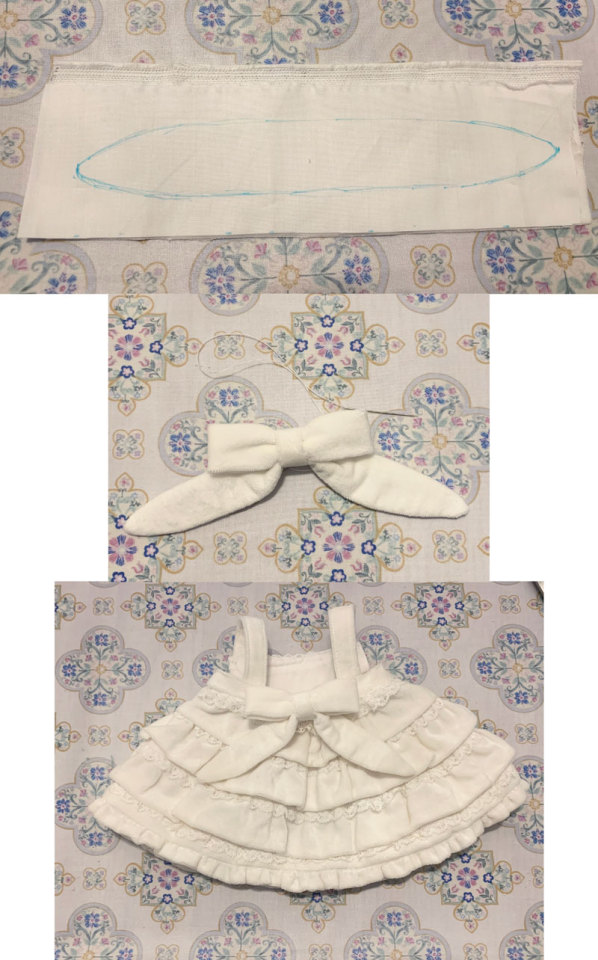
Rose Ribbon Embroidery "Mini" Projects (for BABY NYFW) Part 1: Kumya JSK
I decided semi-last minute to attend BABY's fashion show at NYFW!
BABY had mentioned in their NYFW brand description that their newest collection would be a return to their origins, as well as presenting archival items.
You have to dress to impress for NYFW, right? So of course, I had to pull out all the stops and wear my Rose Ribbon Embroidery.
Also at the last minute, I decided to make a few extra complementing items...
A matching RRE kumya JSK, and a bonnet.
What follows is more of a sew-along/journal rather than a tutorial or guide, mainly for my own memory's sake. But if you enjoy looking at my process (sometimes sloppy), I'm happy!
Also feel free to take a look at the more romantic process video I edited.
Part 1: Kumya JSK
Part 2: Bonnet
To make a matching kumya JSK, I first had to investigate the original dress a little! This I found actually very fascinating because I had never bothered to take a very careful look at the construction details of this JSK (it was, and still is always a precious item that I am afraid will get dusty or dirty if I look at it wrong...)
I actually even found a spot where it looks like the material was torn and someone roughly repaired it by hand (laugh). I have a feeling this was a factory mistake/fix (either from fabric manufacture or sewing) because it's hidden beneath some lace ruffle and I don't really think it's something that an owner would let happen, but who knows.
So here's a few details of RRE~
Many people don't know that RRE is made of velveteen! And further, there is sometimes a misconception that it came in a "cotton" and "velvet" version. As far as I know, there is only one version made out of cotton velveteen.
So the white can get dirty and attract dust super easily :')
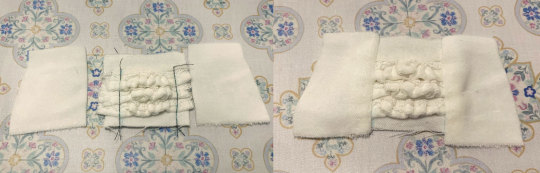
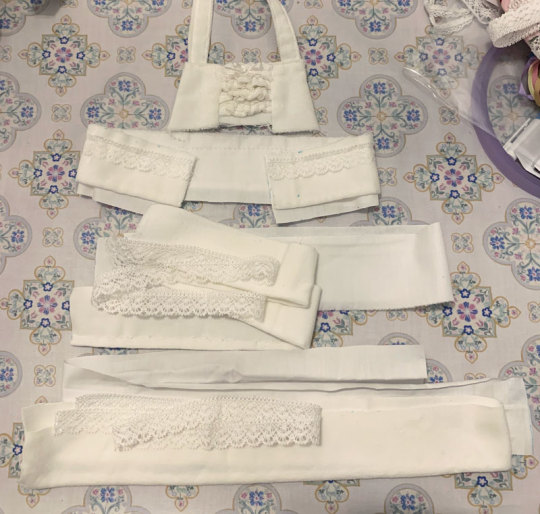
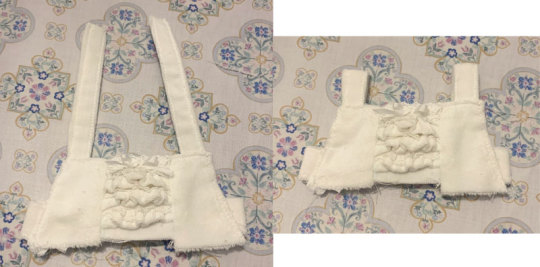
The bodice has a panel of 3 ruffles + upper "hashigo" (ladder) lace part with ribbon. It is also boned (BABY's crap boning with sharp edges and no channels, meh...) but obviously I can skip that for kumya.
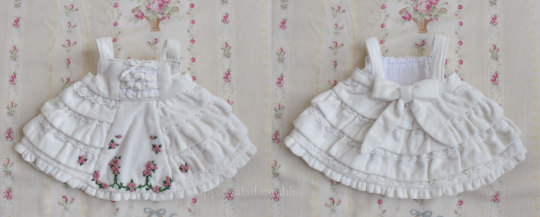
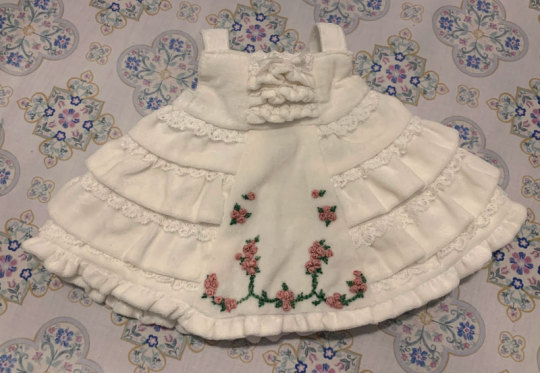
The skirt has a trapezoidal embroidered panel, the star of the show, surrounded by 3 tiers of ruffles that extend all the way around the back. The last "tier" is not gathered and has a smaller ruffle all around the skirt.
While thinking about how to construct something similar in kumya-scale, I found it fascinating that the under-material the ruffles are attached to are cotton! Makes sense to reduce bulk, plus you can't tell when the ruffles cover it.
The density of ruffle starts out quite concentrated, and then reduces as the bottom ruffle is reached. The cotton under-material also seems to have less material gathered than the main velveteen ruffle. This also makes sense to not only reduce material usage but also because having a huge amount of gather on the bottom tier can make the skirt look too heavy.
Knowing this, I fussed out some semi-arbitrary ruffle multipliers for each tier (and lining) in my notebook. Very important to keep tabs on how many fabric strips I need and their exact widths!
Also since everything is in kumya-scale the gathering is generally reduced by a lot. Kumya doesn't need much to have a very full skirt, and with such tiny tiers the effect of the gathering can easily look like overkill. The kumya elizabeth OP gathered lace/tiers very lightly:
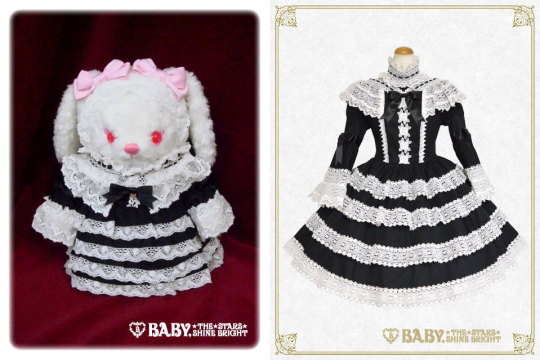
As reference dimensions for kumya, I have these two kumya dresses which I used lightly (mostly the sugar bouquet one because it's a JSK). I also have the babydoll kumya, but as it was out of commission for a while (on my christmas tree!😅) I didn't use it for checks at all.
The sugar bouquet "bodice" is about 3cm long. I decided to extend it one more cm to 4cm to make it easier for me to calculate for the ruffles and also leave enough space so the ruffles would be visible and not potentially buried.
I use a cotton velvet fabric and a mixture of cluny and torchon lace I have on hand. This velvet has a noticeable twill weave to it and is thinner than the velvet BABY usually uses, but the thinness is perfect for this purpose. I was originally going to just use cotton sateen but remembered I had this!
You can't see the weave from afar so I tolerate it. I wouldn't have wanted to use polyester velvet/suede-like/minky, I think.
Since the material is still a velvet and does have a thickness compared to cotton, I decided to roughly hem any ruffle edges by hand with a simple once-turned whip stitch. it kind of seals the raw edge and hems it at the same time. Note that this is not a great idea for something that would be worn and washed a lot, but this piece in this specific case won't be.
In general, when it comes to mistakes with this piece I mostly ignore them because it's kumya-scale and not only will most people not notice, but as stated above it's also not a piece that will be worn and washed often so quality of construction isn't much of a concern.
Mentally deconstructing and calculating the construction of the ruffle part was a bit of a pain. My lace was wider that I needed so I had to roughly mark out where it should be sewn into the ruffle, not always with great success.
I'm also not great with working at small scale...much respect to doll clothesmakers.
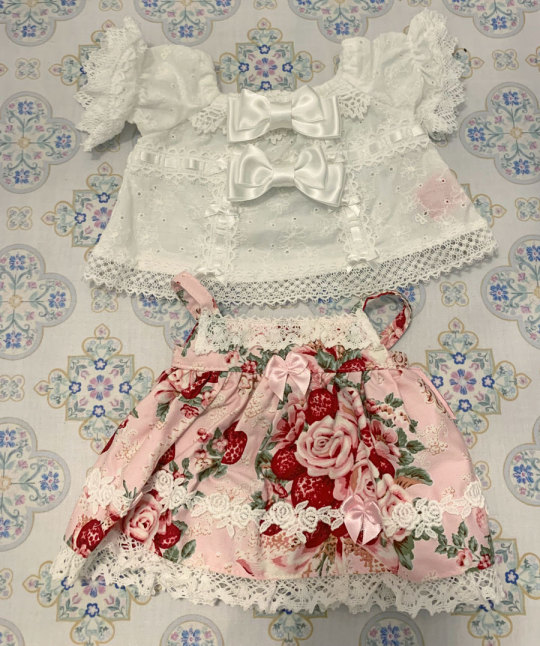
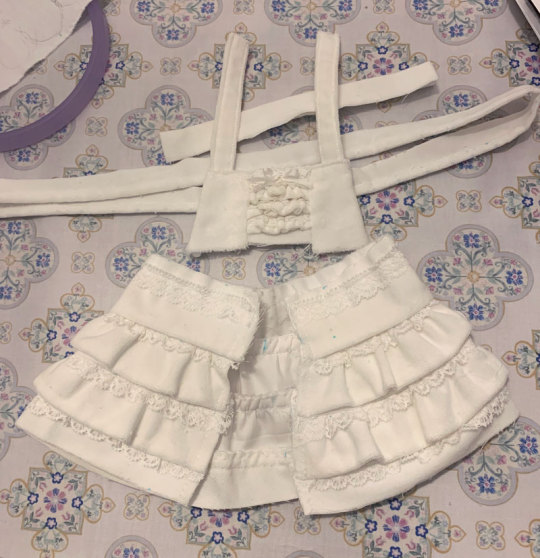
The bodice of the sugar bouquet kumya JSK is made from a front trapezoidal panel with a strip of fabric attached to the sides that extends all the way around the back, and the skirt attached to that. So I cut some slightly angular side panels to attach to my rectangular/square-ish front ruffle panel.
(I threadmarked approximately where I wanted the seam to go because I don't trust myself to attach the side panel in the right area/dimension otherwise with such a wonky panel)
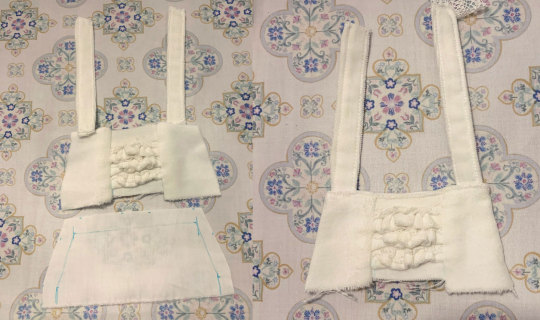
Simple straps made from strips of fabric. I make these slightly thicker than a regular kumya JSK as well because I feel like RRE has thicker straps too (well, the entire construction of the bodice is a bit different, but ignoring that...)
And a facing layer of ordinary cotton is sewn to the front panel.
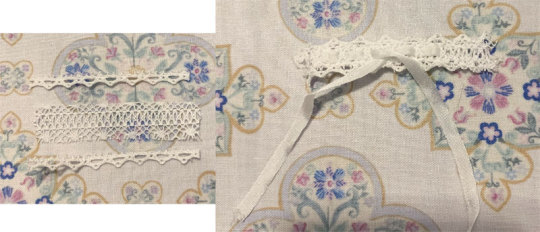
For the section of lace at the top, I frankenstein together 2 types of lace that I trimmed to look more like the lace used on the original JSK. It seems the original JSK also has this lace sewn through the lining layer, so the stitching is visible from the inside.
I use the thinnest ribbon I can find--some silk ribbon in this case. It actually works really well because silk ribbon is very thin/flimsy and can be tied and threaded in nicely with relative ease.
By the way, if you aren't aware already, a yarn needle works very well for threading ribbon through lace.
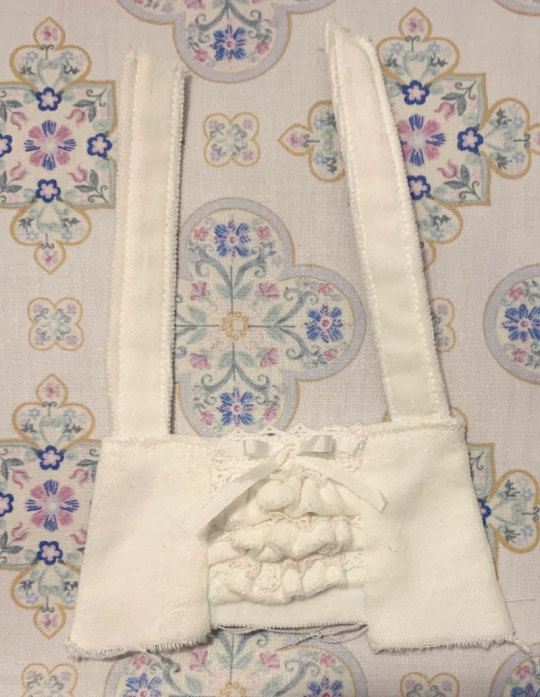
Bodice portion finished. This took way longer than I was hoping, an entire night. Hopefully the results are worth it.
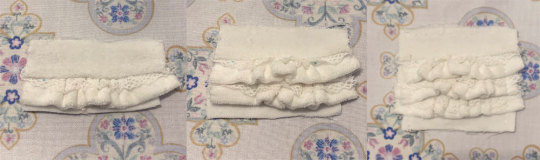
Next I fuss out the skirt. At this point I am working out the calculations and investigations already mentioned previously. I did make a few mistakes and had to re-cut a couple tiers!
I use a different lace from the bodice for the tiers because I thought the shape of this one was closer to what was originally used (it's actually the bilateral ladder lace used for the bodice, but instead of cutting off the lace edges and using the thread-through part, it's just cut in half)

After hemming the ruffle, I attach the lace to the velveteen ruffle with a single gathering stitch (too lazy to use 2, and the thick material makes it hard to gather anyway). The under cotton layer is gathered separately and sandwiched between the cotton layer of the previous tier.
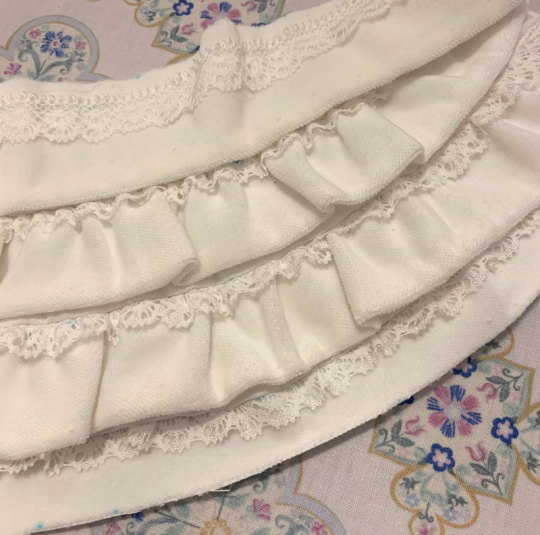
Coming along. I think the lace length for these ruffles is a bit off/uneven/less than ideal, but oh well, can't be bothered to fix it...
After the third tier, a non-gathered velveteen tier is attached with gathered lace.
I also prepare the bottom ruffle, but that will be attached to the completed skirt.
Next, the most exciting but also potentially the most taxing part must be done--the embroidery!
I know that the top of the embroidered panel is basically the same width as the bodice ruffle (referencing the original dress), but the width of the bottom is a bit arbitrary (about 3x the width of the top of the trapezoid)
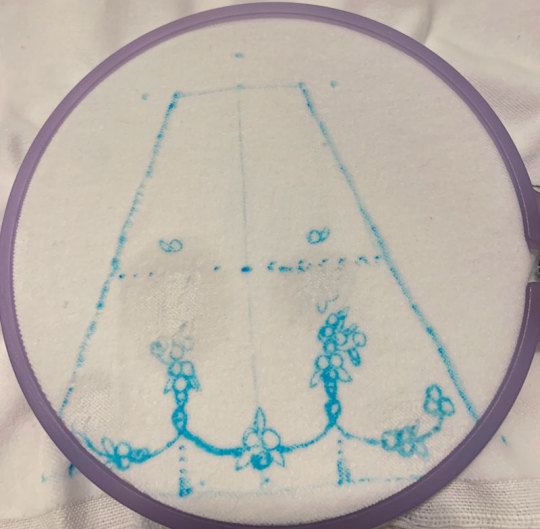
I mark out everything roughly with water soluble marker (the darker patches are where I messed up and used some water to erase, waiting for it to dry...)
The midlines of the panel as well as the 1/3 lines were marked because I 100% do not trust myself to make the embroidery symmetric without doing so. I'm a beginner and not nearly skilled enough in embroidery to freehand...
I carefully investigated the original embroidery and copied the locations of roses and leaves to my mini-panel. Once I have the general shape that I'm happy with, I start embroidering.
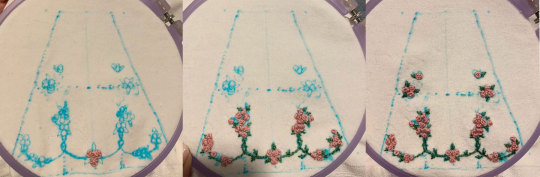
I didn't take too many progress photos of the embroidery, but I also don't think you need them. Because the scale was small, this took an entire evening/night which I think is not too long?
For the roses I use a combination of the "pinwheel" rose method and french knots (+ some additional plain stitches where I wanted more volume).
The nice thing about ribbon embroidery, I think, is that the ribbons add so much texture that even if it's a bit messy it looks very impressive anyways. Plus your mind will mentally interpret some random puffy ribbon lines as a flower anyways.
I use regular DMC 6-strand embroidery thread (split in half, so 3 strands used here) for the vines and leaves. Because I also suck at embroidery and have never embroidered a real project/learned real techniques I mostly kept the leaves simple and slightly abstract with 3 branchlike stitches. I think I currently can't fuss with making nice rounded miniature leaves without messing up every second stitch...
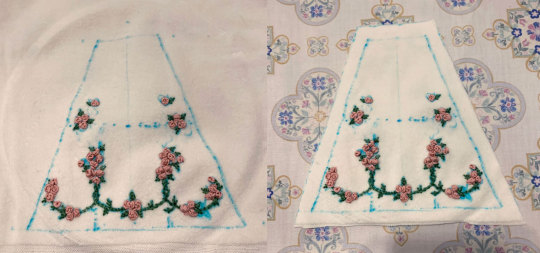
Finished.
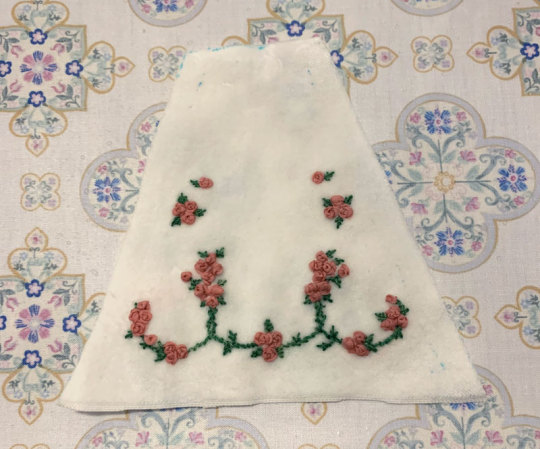
I spray water to remove the marker marks and let dry.
Attach embroidered panel to ruffles. I should have double checked where the panel was aligning with the ruffles on each side since it's uneven, but whatever.
Gather bottom ruffle and attach to skirt.
I attach the bodice strip to the front bodice panel as well, and sew the straps down.
I basted the front of the bodice to the skirt by hand because I wanted to make sure they were aligned. Because I messed up sewing the ruffle tiers to the embroidered panel and they are somewhat misaligned, I tried to adjust where the top of the skirt was sewn to the bodice to compensate, it didn't work that well but eh, it's alright.
Gather the skirt and sew to the bodice portion. This was very fiddly and I had to redo some parts several times because the lace wasn't getting sewn down properly. It's still not great but I'll fix any egregious parts by hand.
The gathering is also pretty uneven, but I'm ignoring it...
Looks almost done but not yet!
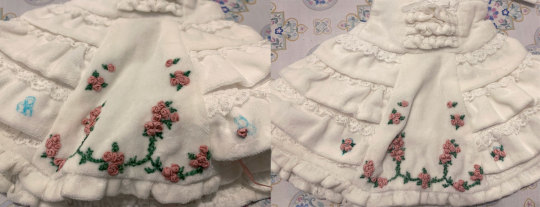
There is a tiny bit more embroidery on the edges of the middle ruffle tier. I marked approximately where I wanted the roses to be and roughly embroidered them (without a hoop because it's too complicated to figure out alignment before construction, although embroidery is always easier with one).
I also add a back ribbon to simulate waist ties, a detail I notice on a few other BABY kumya JSKs. The waist ties on RRE have a slightly rounded/pointed shape to them, so I freehand this shape for the bow "tails" (because I'm getting tired and lazy, I didn't really measure although I did check that the width was approximately the same throughout). The backside of the waist tie is another layer of cotton, which reduces bulk when turning the shape inside out (the backside of the original JSK is also just lining material). I also folded a long strip over itself and basted it down, creating a loose tube shape to use for the bow part.
It's pretty hard to create defined folds in the bow with such thick fabric, but I tried my best...at least it's likely the back will rarely be seen.
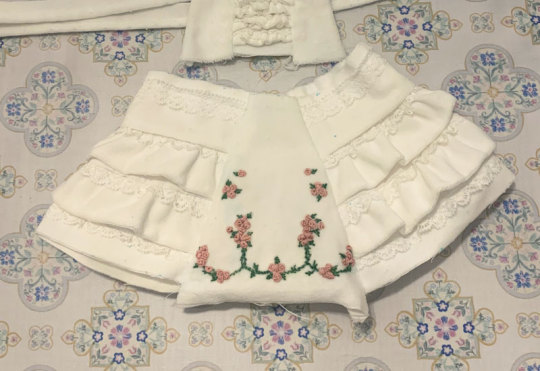
I gave the dress a final allover spray with water to hopefully erase any remaining soluble marker. Also, some interior hand finishing needed to be done (mainly tacking down some unruly seams)

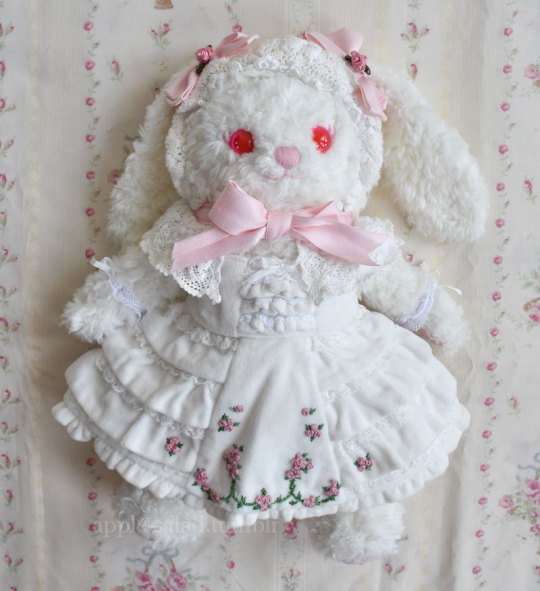
And finally, actually finished. The embroidery thankfully turned out decent enough to distract from any weird spots of construction and so on. It looks quite remarkably like the actual dress, so goal achieved I think!
Extra contents:
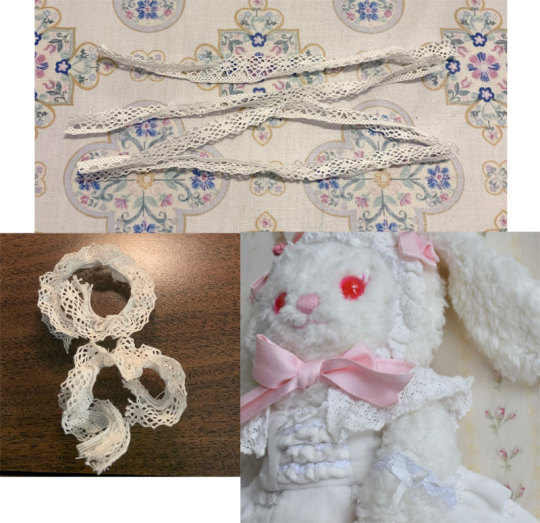
I make kumya little wrist cuffs because some of the kumya variations (such as babydoll kumya) come with them, and that's really cute.
BBD kumya seems to use a type of lace that's already elasticated, but I don't have that on hand so I just sew two pieces of the same lace used for the bodice ruffles together to make it bilateral and stitch on an additional elastic with a stretch stitch. And add on a little ribbon bow (I only have silk ribbon in this narrow width, but I think a ribbon with more body such as poly satin or cotton satin would work better)
And I also make two of those little applique ribbon thingies (you can buy them cheaply from craft stores and so on, but whatever) and stitch them temporarily to kumya's bows for an extra accent.
I'm lazy so I use the bloomers that came with the hawase kumya set underneath (I'm sure making a similar pair of bloomers wouldn't be too much work but I have no idea if these are patterned with some kind of shaping/rise and I don't want to deal with that)
This is actually yuefii's kumya that I am still hoarding for whatever reason and has its eye and mouth fur already trimmed.
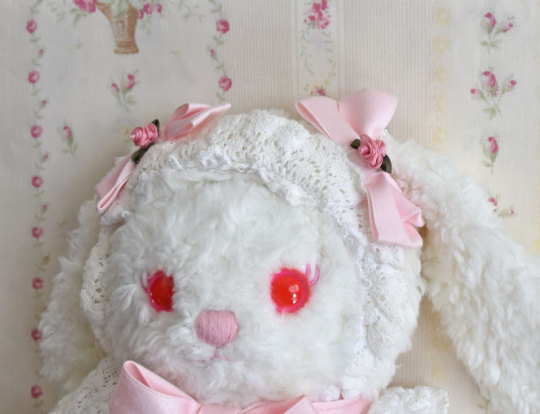
And now Usakumya is ready to see the runway :)
Part 2 (bonnet making) is here.
Thank you for reading! If you ever decide to take up a similar project, I'd love to see it!
201 notes
·
View notes
Text
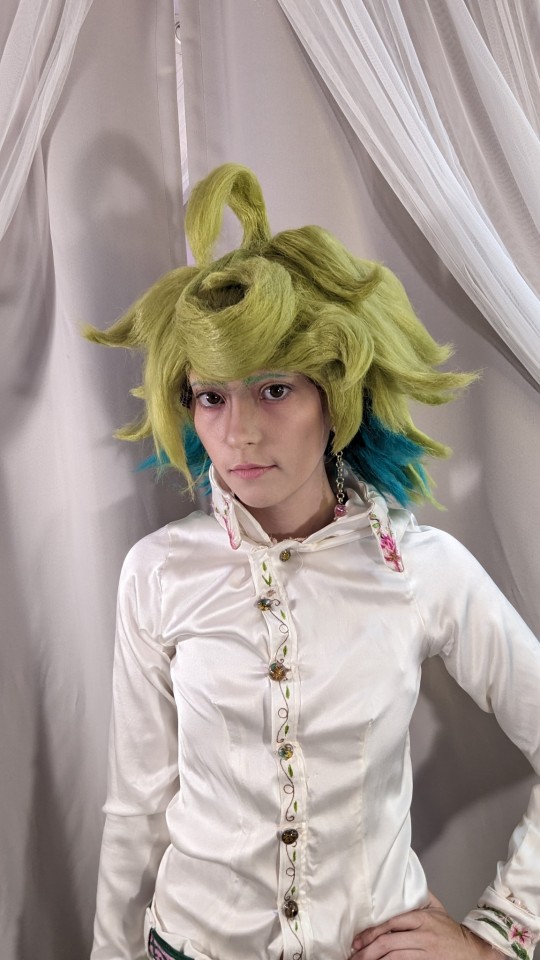
Pst! You know what time it is? New cosplay time! I decided to remake one of if not my favorite cosplays in my collection, Naven Nuknuk from Epithet Erased


This has been by far my most time consuming build (as well as expensive). this cosplay took a total of 279 hours over the span of roughly 8 months to make. That time doesn't include redoing sections or details that didn't make it into the final look.
And now for a detailed look at this whole outfit because dang, I put so many tiny details in.
Starting off with the earring and beads, I used a tequnic called lampwork to make them. The best way I can explain lampworking is like miniature glassblowing
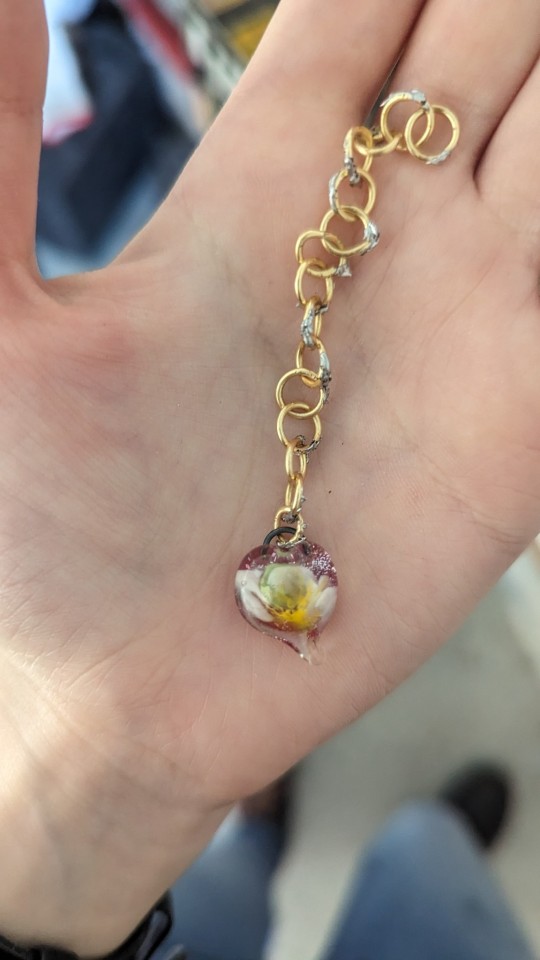
Lampwork uses glass rods heated in a flame to create generally small pieces like beads or buttons. Lampworking can be incredibly detailed. While I'm still fairly beginner at all of this I was able to learn a tequnic called implosion to make the flowers look more 3 dimensional. I also used lampworking to make the buttons on the undershirt!
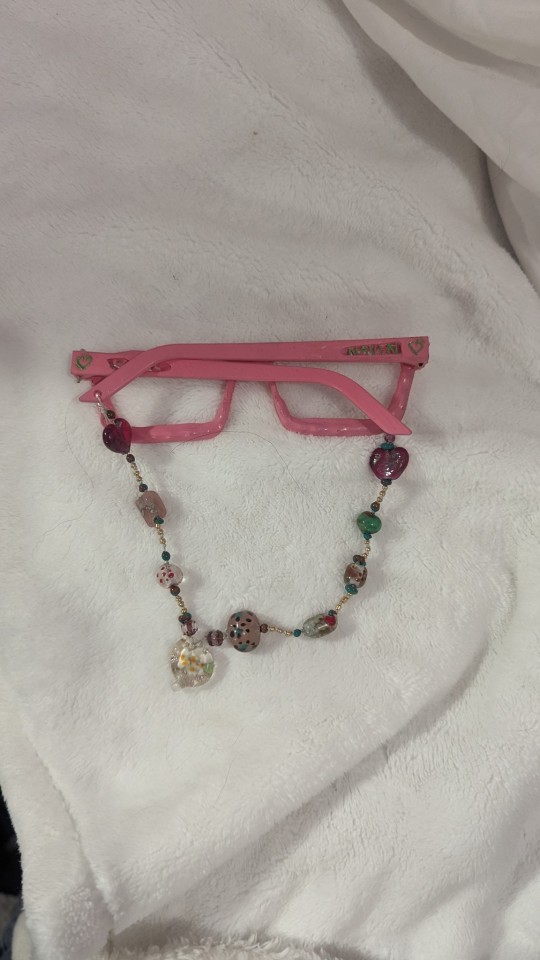
I did all the 3d modeling for parts like the glasses and the belt buckle. (Stealing pictures from my Instagram because the progress tracker i use corrupted my images)
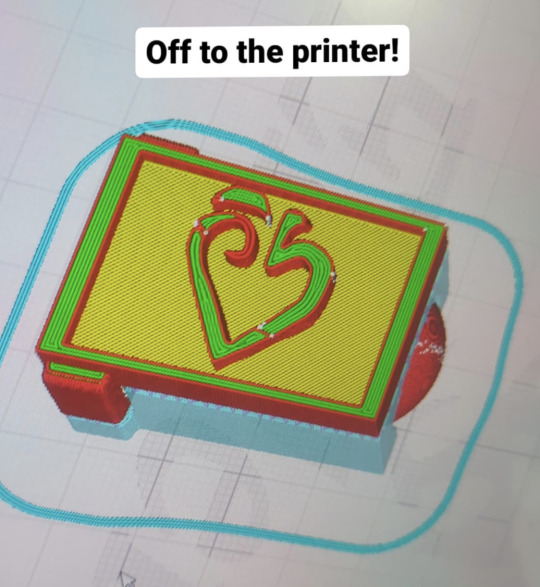
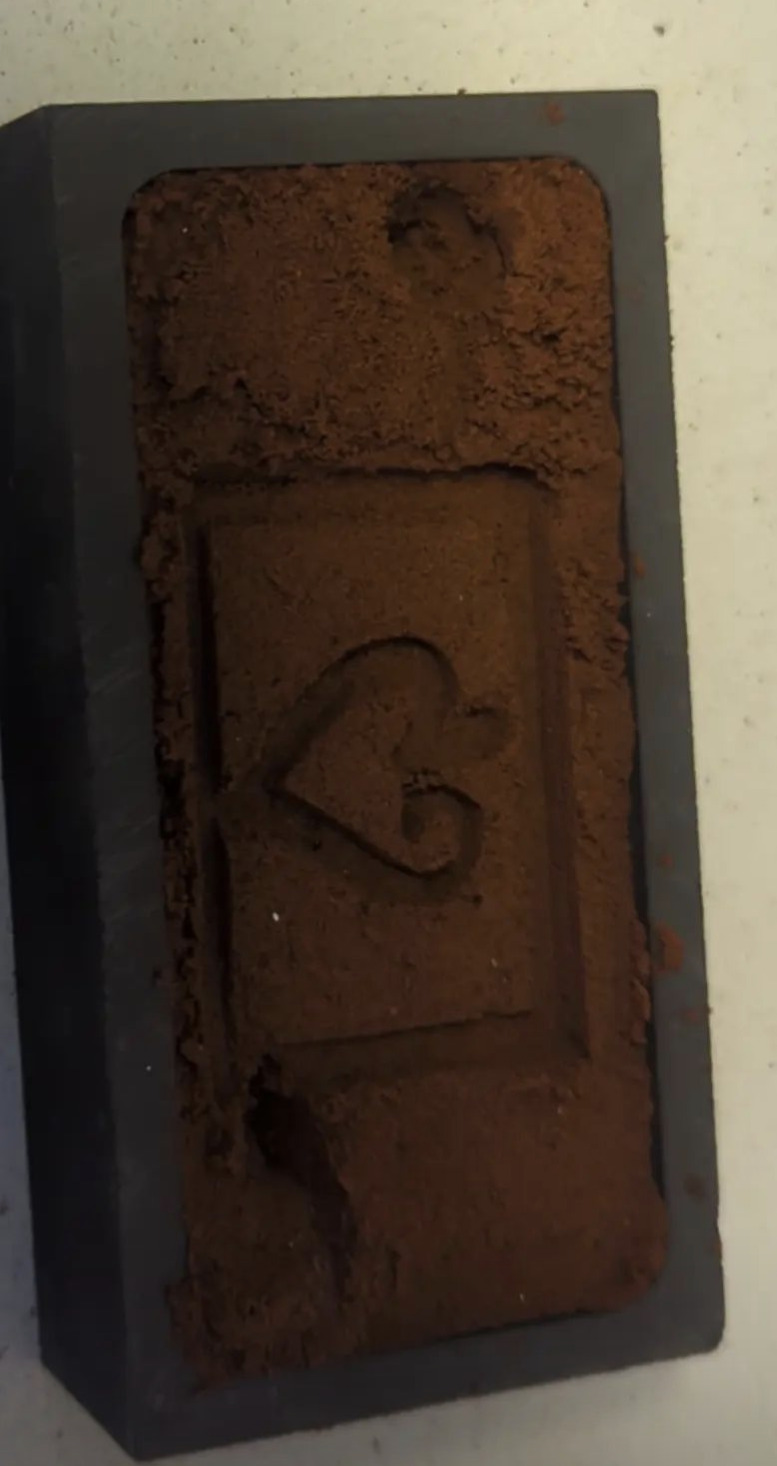
While I don't usually focus on the 3d modeling in my builds it's a huge passion of mine. After making a model of the belt buckle I put my 3d print into casting clay. After carefully removing it I poured tin in to make the final belt buckle.
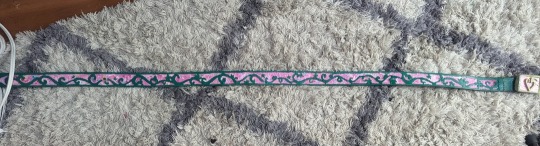
I also taught myself basic leather working and tooling to add some apple blossom inspired designs onto the belt and painted it.
Next thing I think I should talk about is the embroidery. I wanted to incorporate more details about naven into his outfit. After asking jello some questions we came to the conclusion that the embroidery should be lillies and carnations. Because of my constant insanity I hand embroidered everything. I also did some embroidery on the pants and used an embroidery floss that changes colors in the sun for fun.
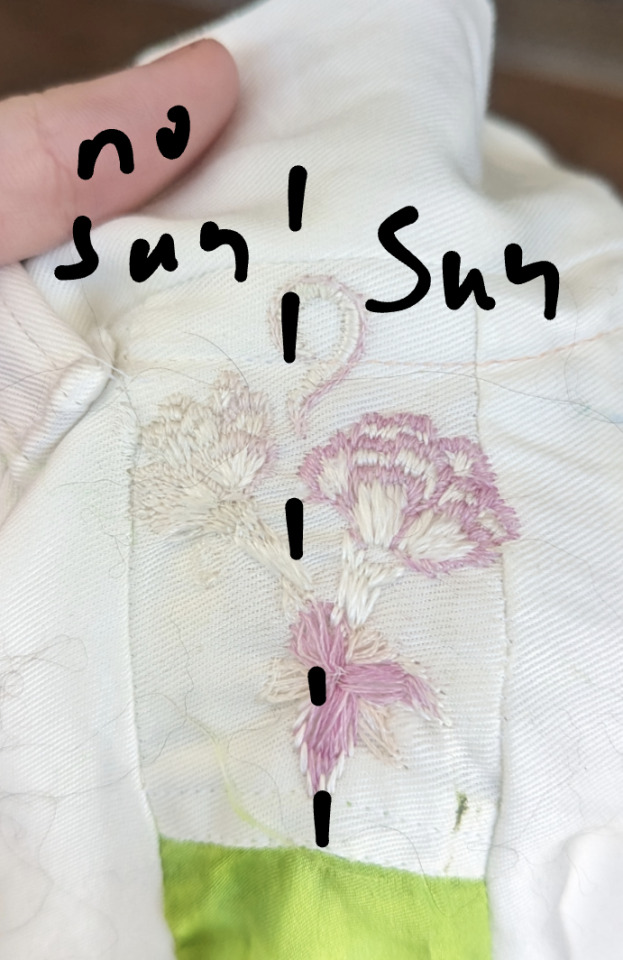
Before I get any questions about materials I'll add in, the white shirt and embroidery are both silk. I struggle to embroider with cotton dye to the sound and feeling it makes, and I felt like being fancy so silk shirt too. The pants are a cotton twill (pretty much jean fabric without the indigo) and the green strips are silk. A perfect Segway into the tatting and knitting!
For those who don't know tatting is a traditional form of lace making found in many different places around the world. There are 2 main forms of tatting, needle tatting and shuttle tatting, I tend to use shuttle tatting due to how nice and portable it is. I thought tatting would be fitting to add to navens outfit due to it's other name, farmers lace.
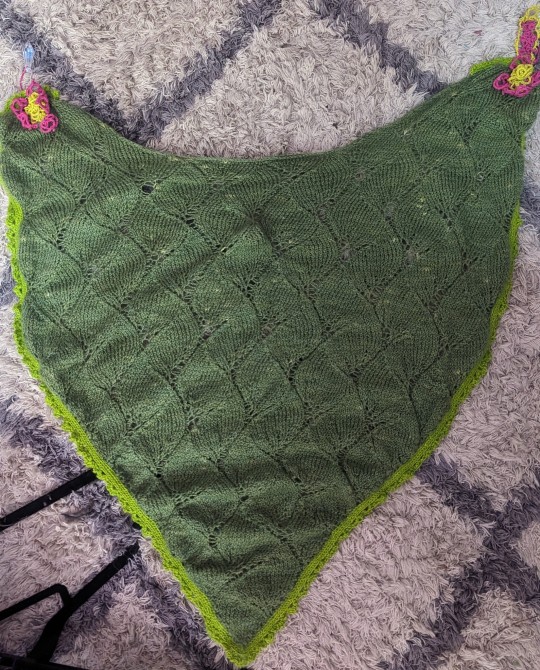
And now for the big beast of this outfit, the knitting. Like with everything else in this outfit I dyed the yarn myself. It's 80 percent wool to 20 percent silk blend.
Huge thanks to jello for suggesting so many ideas, this outfit wouldn't be nearly as cool as it is otherwise.
Anyways I hope all y'all like the outfit! I had so much fun making this insanity
#naven nuknuk#naven nuknuk cosplay#ee naven#epithet erased#epithet erased cosplay#prison of plastic#prison of plastic cosplay#anime campaign#anime campaign cosplay#cosplay
474 notes
·
View notes
Text
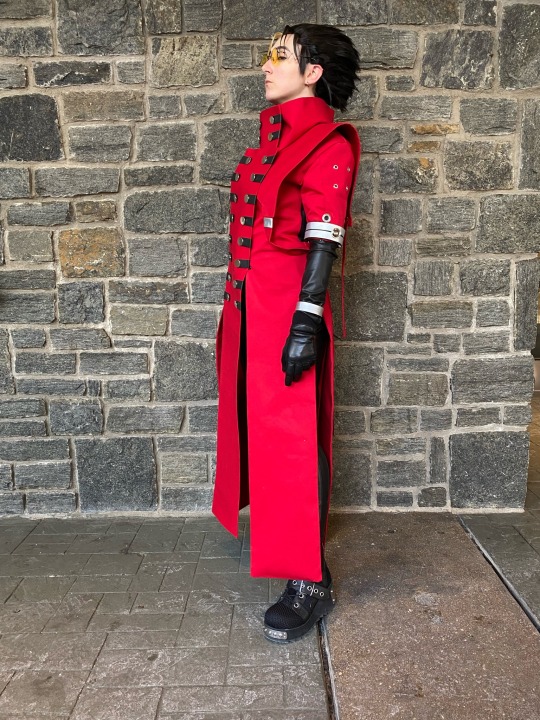
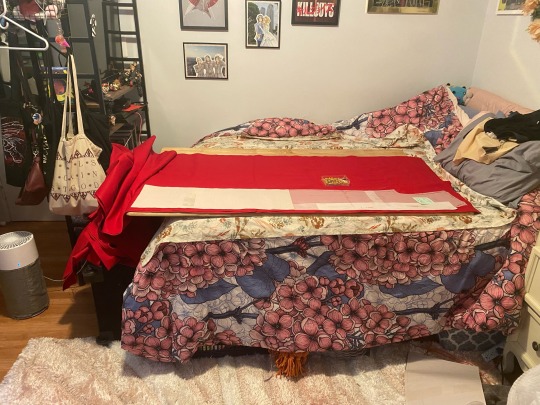
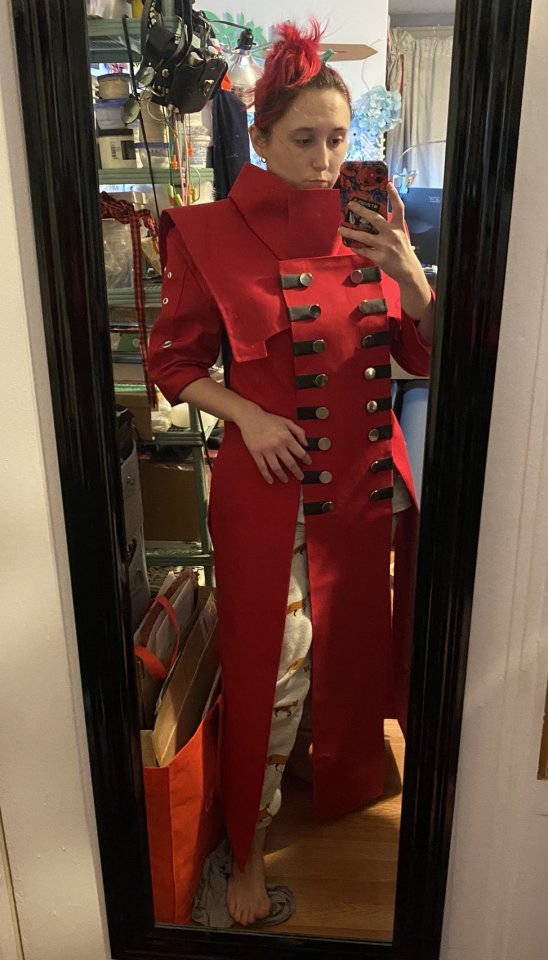
I made a volume 10 trimax vash cosplay for MAGfest and I am SO proud of how it came out :) Some process stuff below! Warning for image and text heavy.
Truthfully this cos is only about 85% complete—I’d purchased a bunch of hardware to really go in on a volume accurate version of his undersuit and belts, but simply ran out of time before the con. It was the first cosplay I’ve sewn since 2017 and the first wig styling I’ve done since 2020, so I’m not gonna beat myself up too much!
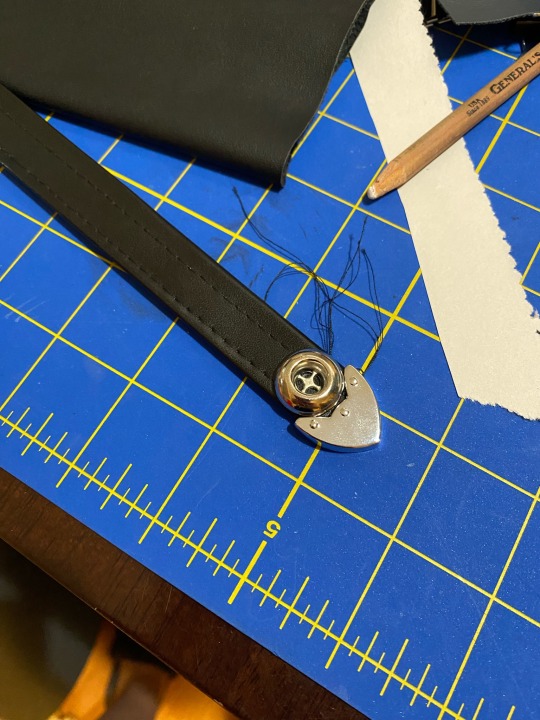
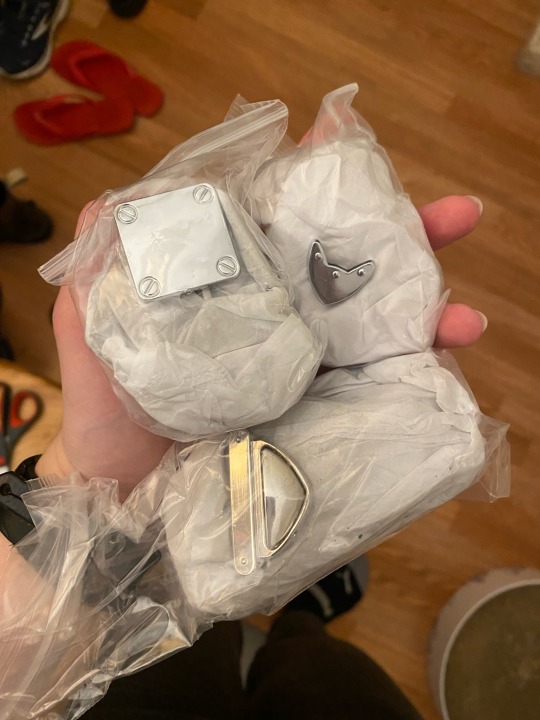
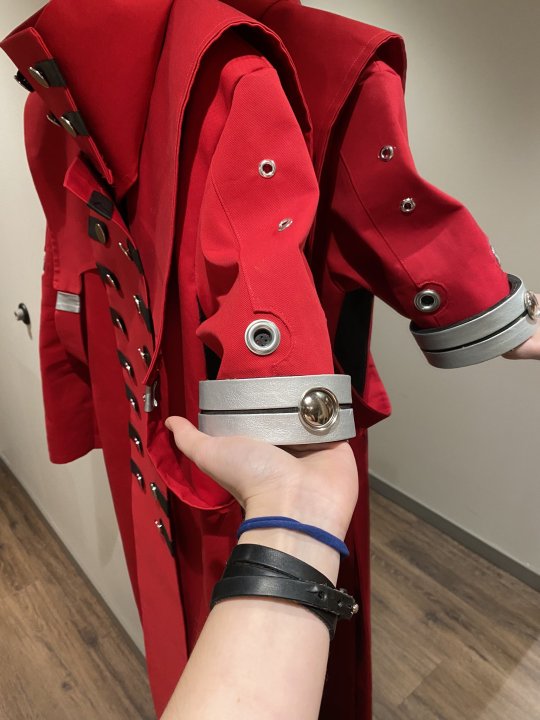
(This is all purse hardware off Etsy and some buttons from M&J trim)
This was my first time ever making a muslin mock-up, but I knew it was going to be necessary to get the coat to lay the way I wanted it to. I really wanted to try and create proportions that elongated the legs/torso and widened the shoulders by placing the coat tail splits appropriately and raising up the shoulders with some padding. And of course arm and leg details that I’ll get to someday lol.
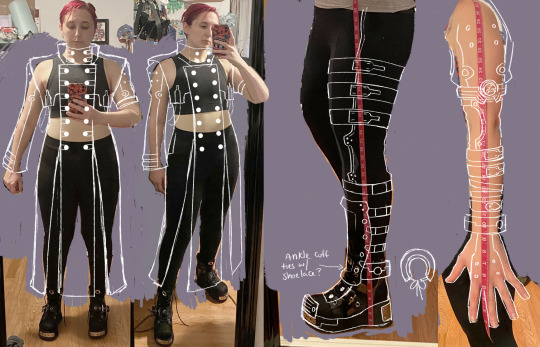
I created two mock-ups. One of basic muslin that helped me go from an existing pre-bought pattern to something more Vash-shaped, then a second one on a slightly sturdier scrap fabric with my finalized torso proportions with padding so I could accurately pattern out the sleeves and collar.

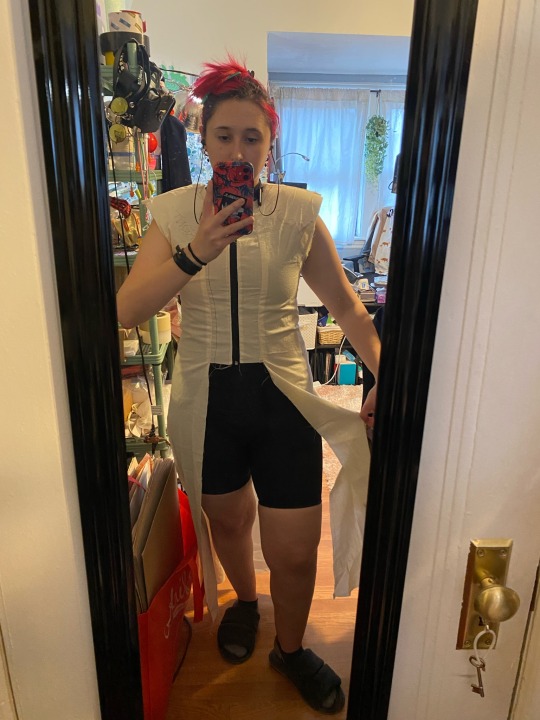
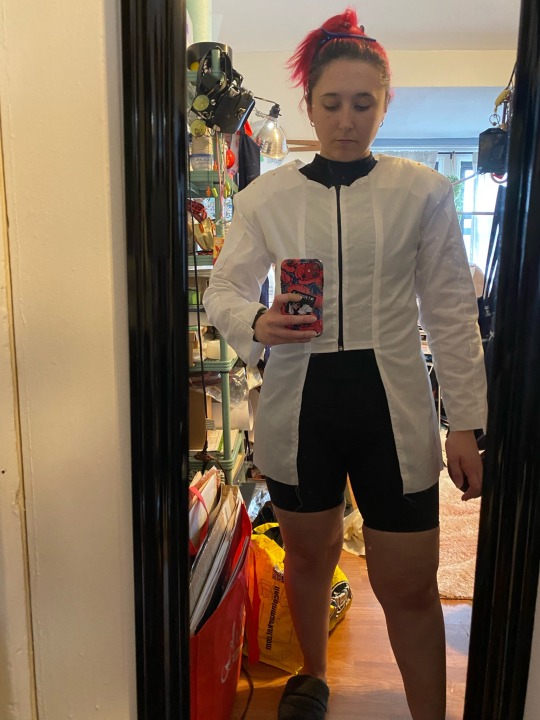
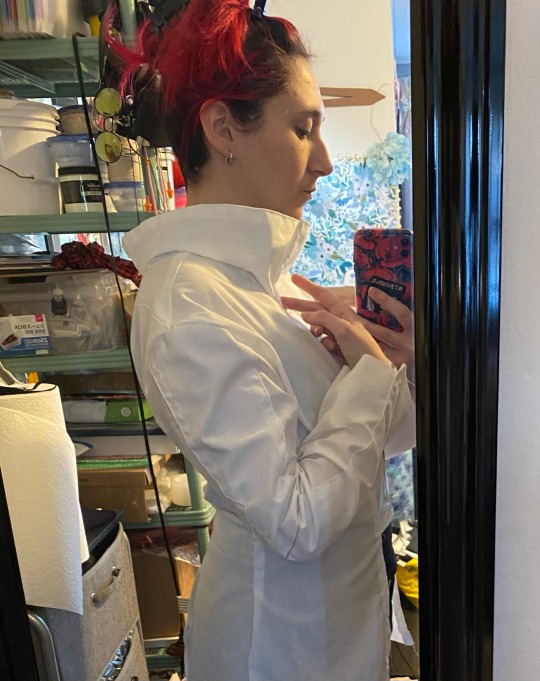
I was tracing my pattern pieces onto newsprint and vellum as I went, so once all of those were finalized, it was time to cut my fabric! I used a heavy cotton twill from B&J fabrics and two kinds of fusible interfacing from Mood (I’m spoiled by being local to the fashion district these days). A smarter person would have bought a thinner fabric to line the inner torso with, but I did not feel like getting that complicated with my first ever muslin-drafted AND lined project, so I simply cut double of every pattern piece in order to create a lining.
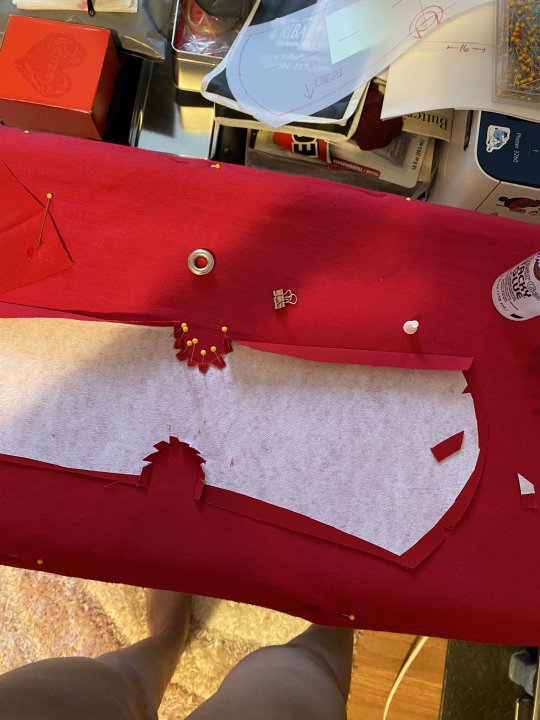
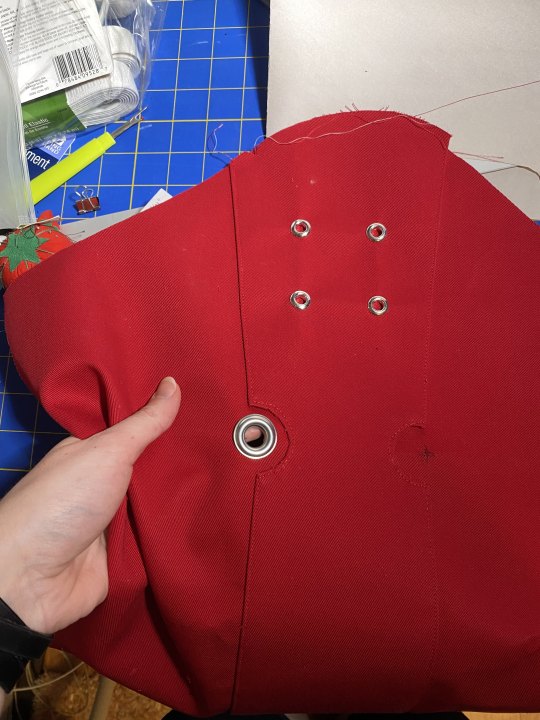
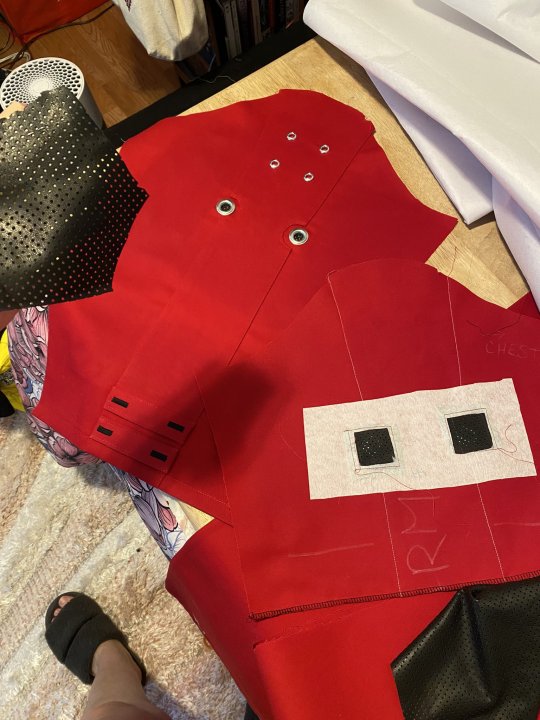
Sleeves were done by interfacing and cutting into a top panel, carefully snipping at the cutout portions, ironing and fabritacking in place, and then top stitching the whole piece to the main sleeve. I later added some leather backing squares and interfacing behind the larger eyelets for aesthetic while keeping the ventilation in tact. Ideally in the future I'll also add a strip of fabric to the gun arm that creates a slight bunching effect since that sleeve is a little more ruffled over the cuff. Photos below also include three shoulder pads pinned together on each shoulder, but I ended up forgetting not using them on my final wear.

Unfortunately at this point I was approaching con time, so I started cutting some corners that I made easily replaceable for future upgrades. The coat tabs are just painted craft foam cut to the size of the buttons, tacked in place where the button pierces through the tab and where it wraps around the edge of the front panel. The straps that attach to the lapel and wrap under the arms also were just decorated with some silver trim instead of hardware, and I skipped the side button panels at his hips for pattern-making simplicity and time. They'll be added later! I'd also love to do some weathering, but don't think I can quite bring myself to riddle the coat tails with bullet holes as some people do haha.
Gun arm attachment was also a quick and dirty addition, just some vinyl trim on eva foam attached with contact cement and a decorative button. First time working with contact cement somehow, but I look forward to also being able to upgrade this at a later date to a more accurate shape with the full belt attachments!
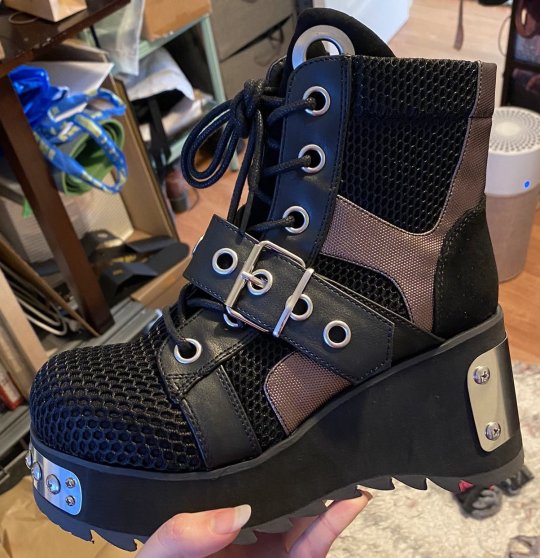
I was also hoping to update the shoes a bit by making some boot covers for them and rub-n-buffing the soles to disguise the platform a bit, but I love my pick for the cleat-look that Vash has! Some good ol' Demonias in classic vash fashion :)
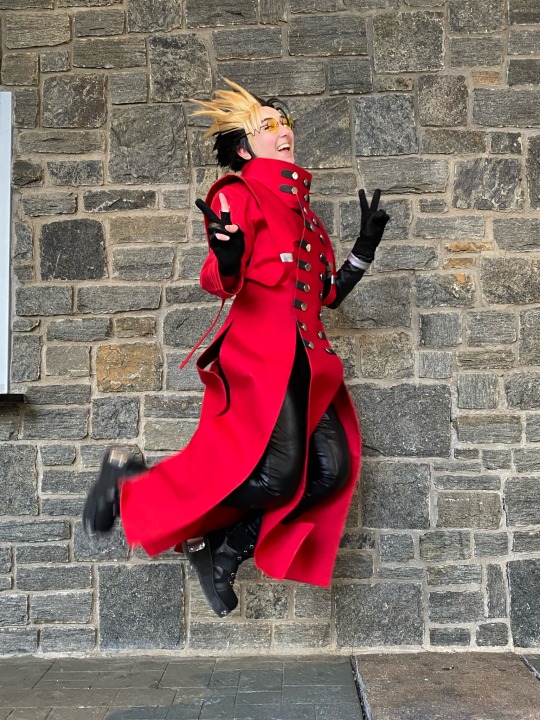
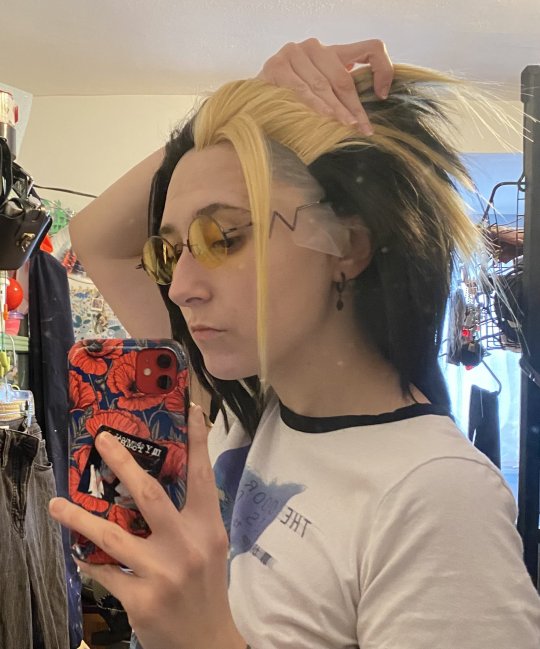
Last but not least: The Wig. My pride and joy.
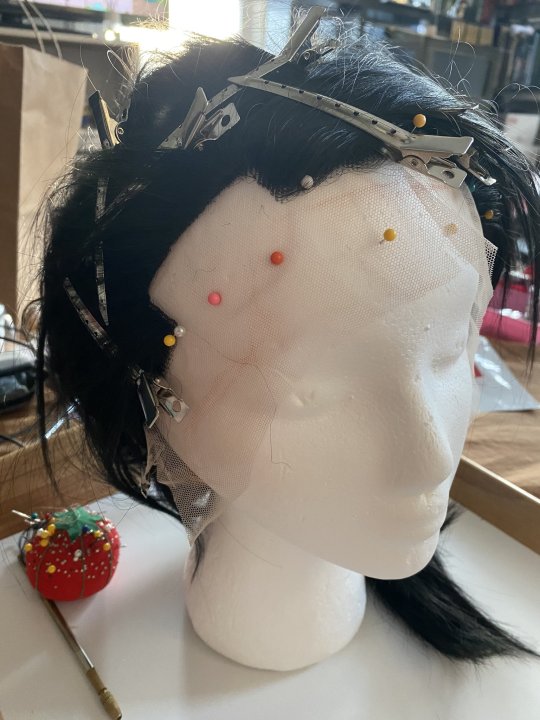
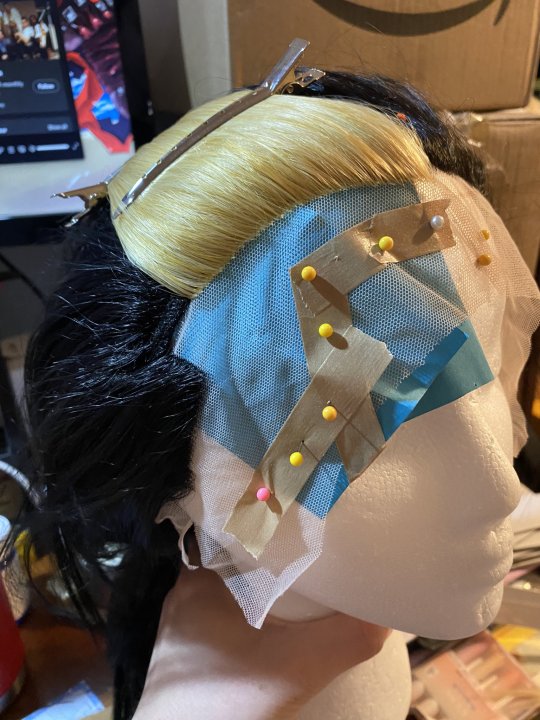
I got lucky enough to nab an Arda sale, I think right before Halloween, and picked up the Morpheus lace front in black, along with some extra wefts in pale blonde. (I also bought a whole separate pale blonde Morpheus wig, boldly thinking I could swing a normal trimax vash wig lol. It made for a convenient Eriks wig in the mean time.)
Since I was aiming for the end of volume 10 post-Wolfwood death look, I started by trying on the wig, roughly tracing out my hairline, then gently unweaving that portion of black in order to re-ventilate it with blonde.
After I replaced that whole strip of plucked hair, I tried on again to finalize where I needed to ventilate to cover my own hairline, and completed my outline with both blonde and brown-black wefts (i had them on hand lol). All in all, I ventilated more than 4 square inches of blonde, and at least a solid centimeter extension of the black hairline across the whole front of the wig. Probably close to 30 hours of work in the ventilating alone, but I am a little slow since I haven't ventilated in a few years and didn't keep clear track of time.
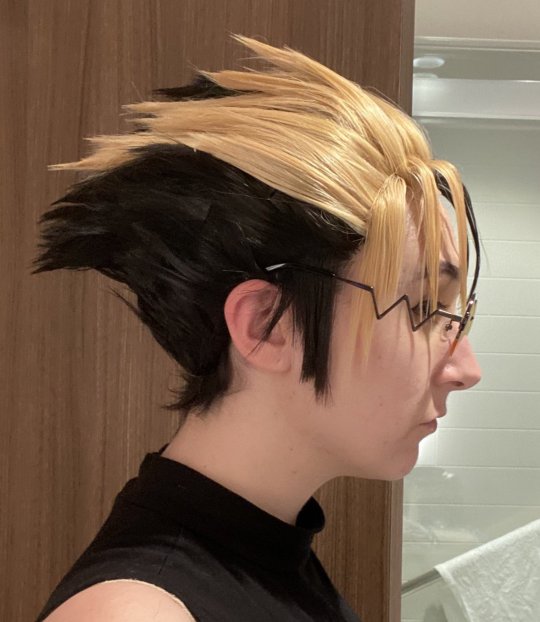

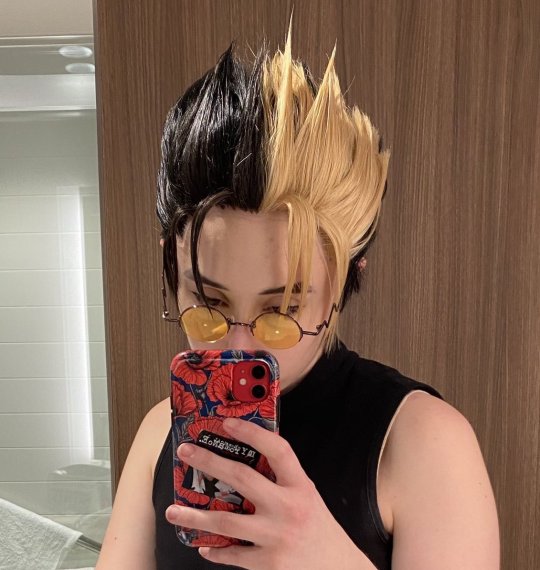
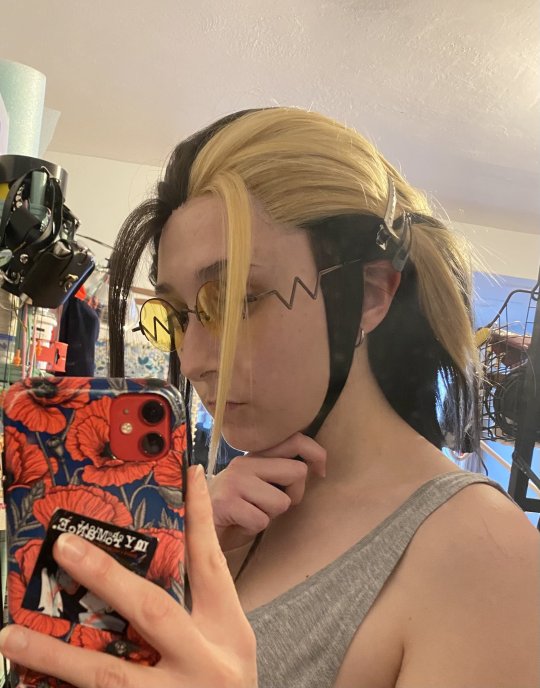
If there's one thing I should be used to by now about Arda wigs, they are THICK. There is zero teasing in this wig. None. Just got2b, a blowdryer, and a prayer. And a good load of bobby pins. The wig was also sadly a last minute hotel room mad dash, and I do hope to restyle it under less duress, but I do think I successfully achieved the Trimax swoop and am very proud of it! It was unbelievably windy on the walk from our hotel room to MAGfest, so the photos in the start of this post show a bit more droop than my initial styling, but I think I'll be able to touch things up next wear.
And of course, shoutout to my partner for gifting me the official glasses for Christmas :) And thank you to my roommates who barely saw me for a month and a half except for when I needed help with a hem lol.
All in all, I am unbelievably proud of this cosplay, I can't wait to put some more love into it and wear it again!
159 notes
·
View notes
Text
Dress, circa 1883-1885, Scotland
Silk, cotton, linen, metal


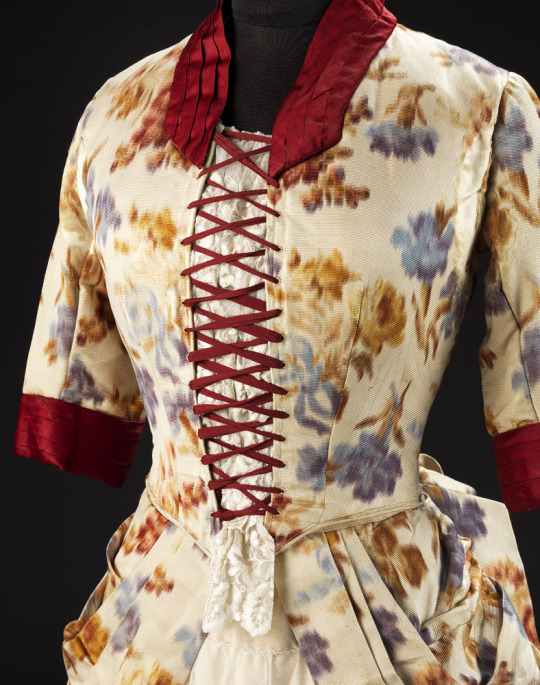

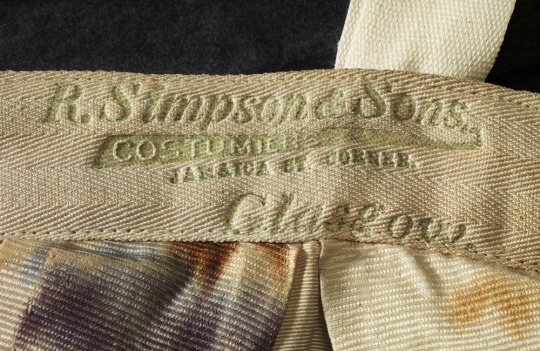
Description: Woman’s dress in cream corded silk chine printed with abstract floral design in red, blue, brown and yellow, with small, rectangular neckline with facing in pleated red silk satin, fitted bodice constructed in six panels, fastening centre front with red cord lacing through fourteen pairs of eyelets over a stomacher-style panel of horizontal cream machine lace frills. Elbow-length sleeves with pleated red silk satin cuffs. Skirt, full-length, fastening on left with five metal hooks and eyes, chine overskirt pleated into waistline at front and over hips at side, side panels trimmed with vertical border of cream machine lace and frill of cream machine lace extending into lower side edges of train, centre back cut-in-one with bodice with additional width in skirt to go over bustle, extending into a long train, red silk satin frill under hem. Petticoat-style underskirt revealed in front in cream silk satin underskirt decorated with six slightly asymmetrical horizontal rows of cream machine lace. Bodice lined in printed cotton, fitted with eight metal bones and waistband. Skirt front lined with linen and printed cotton, sides and back lined with printed cotton, integral thirteen-inch wire mesh bustle with two sets of twill weave tapes to pull fullness to back to create train, balayeuse around hem of skirt and train. Waistband printed in light green ‘R. Simpson and Sons Costumiers Jamaica St. Corner Glasgow’.
Worn by Ann Smith, the wife of Robert Kirk Simpson of R Simpson and Sons.
This romantic dress is printed with roses and has machine-lace frills on the skirt. In the 1870s and 1880s fashion looked back to the late 1700s, with its flamboyant fabrics, for inspiration. The blurred effect on this evening dress is created by printing the warp prints before the fabric is woven. This ikat technique originated in Asia and was introduced to France in the mid-1700s, where it was known as chiné. Here, it’s use, together with the laced bodice and open over-skirt draped back over the hips and into the bustle, reflect the historical revival style with its imitation of an eighteenth-century open gown.
Glasgow Museums Collection Online
130 notes
·
View notes
Text
sportswear polyester knitted fabric manufacturers in delhi
Artex Overseas Pvt. Ltd.’, established in 2009 and situated at Jahangirpuri Industrial Area, Delhi, India, are a private limited firm that is a prominent manufacturer and importer of a wide array of fabrics, including matty Fabric, Scuba Fabric, and Polyester Fabric. We design these fabrics according to the latest market trends and deliver them to our users’ premises within the scheduled time frame. Under the supervision of our CEO, Bikash Sarawagi, we have achieved tremendous success in this field. We have in-house manufacturing facility with our plant located in Sikandarabad
#fabric manufacturers#textile fabrics manufacturers#fabric mesh#clothing manufacturing#cheapest fabrics#textile fabric buyers#Wholesale fabric buyers#lycra fabric#sportswear fabric#ottoman fabric#twill cotton
0 notes
Text
I made Aziraphale’s waistcoat about two months ago and boy it was a journey


Rant about the process under cut!
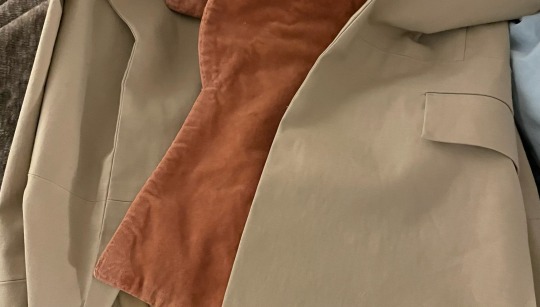
First thing to do was pick a fabric. For the visible fabric on the front and collar, I knew I definitely wanted to use something piled. I also did not want to use a synthetic fabric, which would have been cheaper but miserable to wear. I settled on cotton velveteen which would be more comfortable, slightly cheaper and easier to work with than silk velvet, and generally less shiny than silk. I was able to order some beautiful cotton velveteen from someone local.
Unfortunately it was not even in the same ballpark as the color I needed. This was due to a combination of reasons including the lighting in the photos they had (they were online only and didn’t have a storefront I could walk into), piled fabric in general being nigh impossible to accurately photograph the color of, and probably also some variations between dye batches. This is why we buy swatches when we can, folks.
The fabric itself was absolutely lovely though. So. No biggie I’ll just dye this myself what could go wrong

The dark brown here is after the first dye; the scrap laying on top on the right is the original color; the beige coat underneath for color reference. Note that even the colors in this picture looked quite different from irl. I did dip a scrap in first to check the color, but because Dyeing Is Weird and also I made some mistakes the final dye did not end up the same. I can write several more paragraphs on why this probably happened. We’d be here for a while.
But maybe it’ll be fine right? The color’s not exact but not offensive, maybe I’ll just start sewing and it won’t bother me that much.
Here’s a bit of that process, where you can see the interior of the waistcoat with interlining and twill tape, following some 19th century construction techniques. Lots of tedious but relaxing hand sewing. (Also, real pockets!)
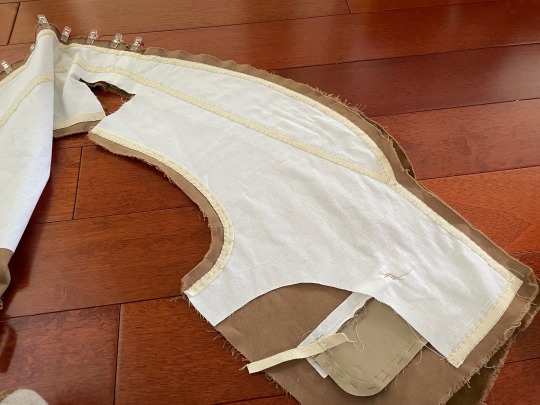
I chose broadcloth for the interlining rather than a more typical canvas, because I wanted a more soft and aged look rather than crisp and new.
(I made another mistake here using cotton twill tape straight off the roll, which shrunk later in the process. You can see this later in how the edges pucker a bit. Oops. Oh well.)
(I also have no other photos of this stage because I went into the hyperfocus zone and forgot about everything except the task in front of me)
Turns out I was not ok with the color. It bothered me a lot.

So I tried to bleach it a tad to lighten the color, but Bleaching Is Also Weird and doesn’t always give you back the same color but lighter.
I got back something extremely orange tones, which bothered me even more. Had a minor breakdown until reboot papped me and helped me talk through how to fix this.
This ended up going through another round of light bleaching, and two rounds of dyeing over with blue to cancel out the orange. Finally I got something I was happy with!
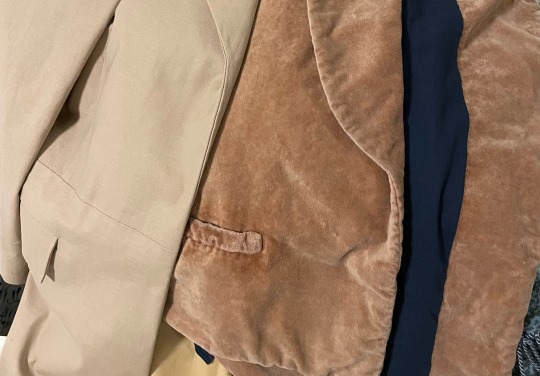
You can very clearly see the puckering here caused by the shrinking tape..thankfully a good steaming was able to get rid of the worst of it.
The color is also slightly uneven if you look very closely, because rounds of the dyeing/bleaching happened after it was sewn together rather than as fabric pieces. Oh well. I can chalk this up to an “aged” look.
Time to finish it off with some buttons and 19th century style hand-worked buttonholes! The buttons aren’t accurate but I just went for ones that were the right size and vibes.


Last step was to add the wear around the buttons, hem, and collar. I’m sure there’s some faster way to do this, but I did it with a pair of eyebrow tweezers to pluck out the pile and a bit of sandpaper to finish off.

And that’s it! For the waistcoat at least. I also made the outer coat, the bow tie, and the blue shirt because I couldn’t find one for purchase that fit me. I still need to make other things. But that’s for another time.
107 notes
·
View notes
Last Seen Blogs