#i've been gifmaking for a while and even now i'm like ... but do my gifs actually look ok
Note
As a fellow gifmaker (only not quite as skilled as you are) I've been struggling and your gifs always look so amazing and nice and colourful so I was wondering if you could share some tips on how do you colour tinted scenes like in MoTA? thank you Jess you are amazing 🤗
heey there!!!! First of all sorry for taking so long to reply to this, I was so happy with your nice comments that I wanted to give you a proper insight on how I do it, but unfortunately I'm quite HORRIBLE at explaining things?
I'll put it under the cut because it's gonna be a long post! but if you have any doubts my askbox is always open!!!!

So first of all I already gave some tips on how does my process with coloring gifs work so you can check it on my resources and tips tag
As you said you are also a fellow gifmaker so I'll take it from there as I assume you already know gif 101, but if you are new to this you can again check my tag for some beginners tips
Also want to point out this lovely tutorial by @ajusnice that might be even more helpful, since I learned a lot from it
Disclaimer: i'm colorblind, I can see all the hues, just not all the shades and I tend to struggle with greens, oranges and yellows so apologies for any mistakes or if this turns out looking weird!

HOW TO COLOR TINTED SCENES????
So at this point I hope you already have you gif all cut down to the size that you want and used your fav action/sharpening presets ( I use this or this actions to sharpen my gifs
Now I'll use the footage down bellow as it is really blue tinted and I worked with it for this gifset (MoTA SPOILERS AHEAD!!!!!!!!!) so it looks like this
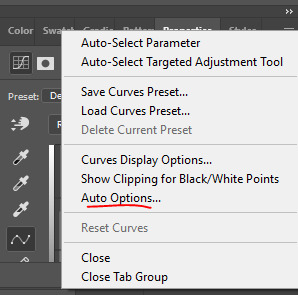
3. So the first thing I do is work with curse as it gives me a better grasp of what I have and how do I want to go with it. I have been using this method where you go to Curves >> Click on the top right menu >> Auto Options
4. Now a new window thing will open up and then I click on the option Find Dark and Light Colors, as you can see my gif already looks a lot brighter and now so tinted
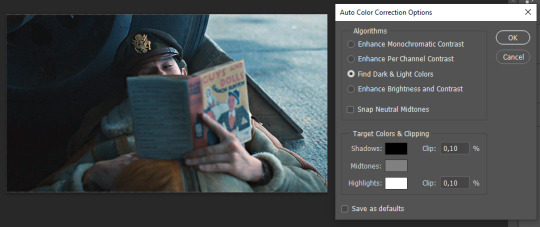
5. this is how my gif looks like I selected that option
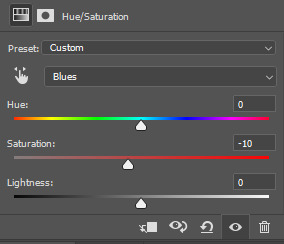
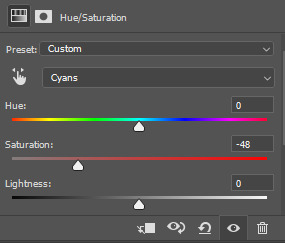
6. still does look a little blue-ish doesn't it? Okay so now I'll go to some adjustment layers, the first thing I do is work with hue/saturation. I'll go to the cyans and blues first and I want to remove some of the blue tint of my scene. I prefer to decrease the saturation of those colors so it looks a bit like this
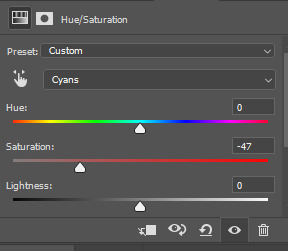
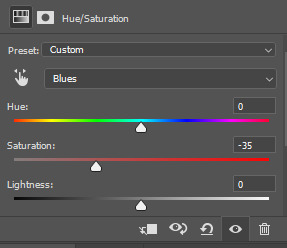
and my gif looks like this
7. So here is our first problem, while I took away the blues my gif now looks a little dull as the scene was delivered to us in such a different color scheme, It wasn't supposed to look like this so now we need to color correct!! For this I work my way around vibrance/saturation so my menu looks like this
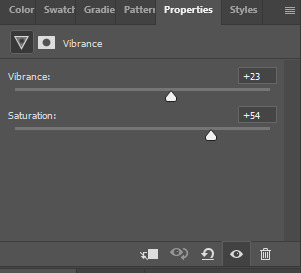
And my gif looks like this
8. Problem #2 because now it looks too blue tinted AGAIN! so I just repeat step 6 again so my menus look like this
and my gif looks like this
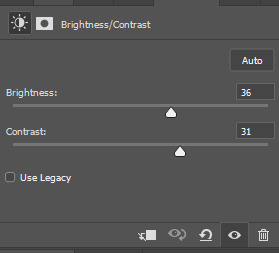
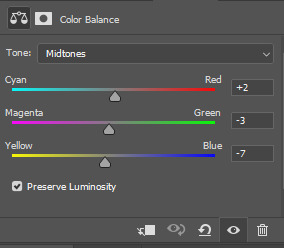
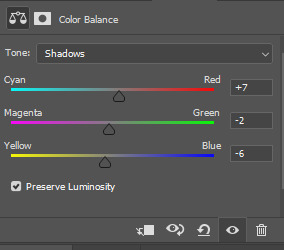
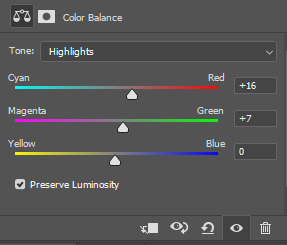
9. from now on it's only about some details such as correct the brightness/contrast of the scene and I personally like to use the color balance adjustment layer, I'll leave it all here
10. finally one of my fav adjustment layers -> SELECTIVE COLOR i just mess around until it looks nice to me, I'll leave the configs I used down bellow

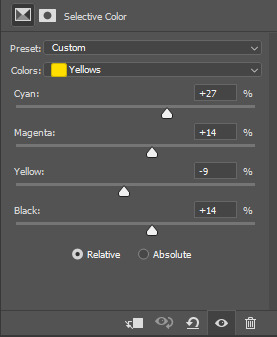
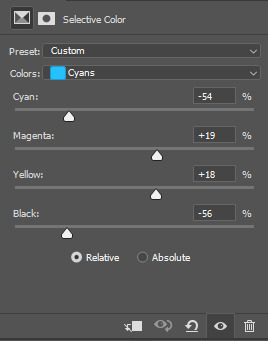
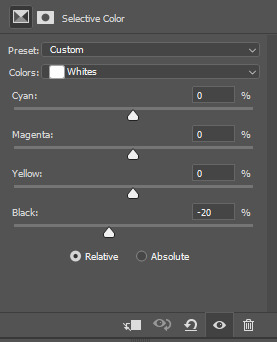
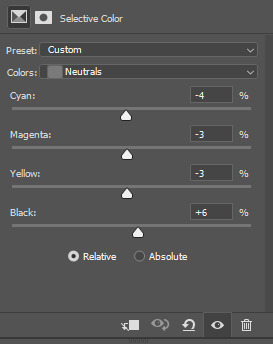
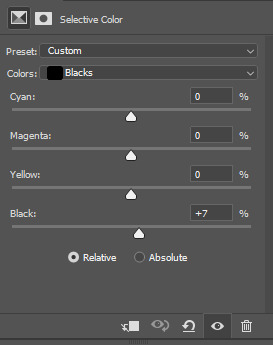
Finally after all those steps my gif looks like this
#asks#anon#mr*#requests#coloring tutorial#usergif#allresources#chaoticresources#gif tutorials#gif tutorial#psd tutorial#completeresources
140 notes
·
View notes
Text
Poe's Giffing Tutorial (From One Beginner to Another)
Hey, everyone! So, I've been thinking about this for a while, and decided to finally make it happen. This post aims to be a giffing tutorial that isn't a bunch of technical jargon that nobody except experienced giffers understands. This is for the person that I was when I first started out: someone who wants to make gifs, for free, without having to learn the entirety of a new program. As such, if you're already familiar with the basics, this probably won't be super helpful to you.
In this, I'll cover the basics of actually capturing a gif, the how-to of color correction (though without getting into the nitty-gritty detail of it), some basic text effects, and some more decorative effects like overlays and ~fancy coloring. I'll also show you the program I use to resize gifs.
I don't have a fun quip to lead us into the next part, so, uh, let's just dive in.
Tools*:
A PC capable of handling heavy processor loads (I use a mid-range gaming laptop; it's a little slow sometimes, but it works)
Whatever you're giffing (obviously...)
ScreenToGif (a free, basic screencapture program)
Photopea (a free, in-browser Photoshop dupe)
RedKetchup (a free file resizer/converter)
*Note: These are not the end-all, be-all of gifmaking. They may not even be the best tools for the job! But they're free, they work well, and they're relatively intuitive.
Step 1: Capture your gif.
I'm going to use ScreenToGif for this. The first thing I do is open the program and click Recorder, which opens the recording interface.

I click and drag (or manually input dimensions in the boxes next to the recording button in the lower right corner) to set my dimensions, and then I press record. The red "Record" button will change to a blue square that says "Stop," and a timer will appear in the upper right corner, showing how many seconds your gif is.
Generally, I'll pause the video 5-10 seconds before my desired start time, to give myself a buffer (you'll be able to delete those frames later), start the recording, and then start the video. You'll probably find a system that works for you once you do it a few times.
Once the scene that I want to capture is done, I'll click the blue "Stop" button, and the overlay will close itself. A few seconds later, depending on how long/complex/large your gif is, the program will pop up with a new window where you can edit. Here's what it looks like:
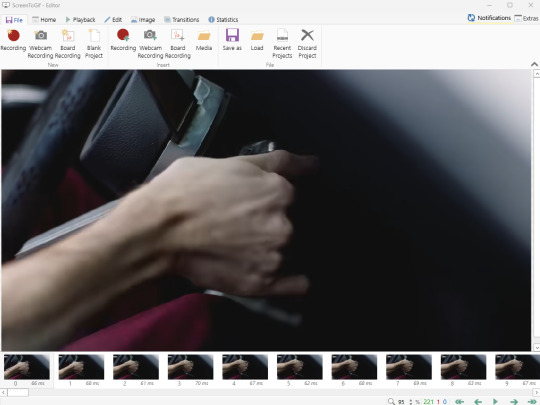
You can do a lot with ScreenToGif, but we'll be using the dead simple stuff today. Click the "Edit" tab, fourth from the left, and this will show up.

"Delete All Previous" and "Delete All Next" are our friends here. Go to the FIRST frame that you want in your gif, using either your arrow keys or just dragging the slider, and select it. Then hit "Delete All Previous." This will make that frame the first frame of your gif. Then, go to the LAST frame of your gif, and hit "Delete All Next." This makes the last frame of the scene that you want the last frame of the gif. You can also use the "Delete" option to delete frames by selecting them with your cursor if you want a more manual option.
Now you have your raw gif! Go to the "File" tab, the first one on the left, and select "Save As" from the menu. You want to make sure that it's saving as a .gif file, not an .mp4 or .apng --- you can check this up at the top. Don't worry, though, as .gif is the default, so unless you change it, you should be golden. Select whatever folder you want to put it in, name it, and save it.
You could absolutely stop here. It is by no means required to color your gifs or slow them down or any other number of things associated with giffing. But if you want to, here's how I do it.
Step 2: Edit your gif.
Head on over to Photopea. You'll see this:
What we want is the "Open From Computer" option. Click it, and your File Explorer will show up. Navigate to whatever folder you saved your gif in and select it by double clicking or clicking once and hitting "Open."
It'll open in a new workspace that looks like this.
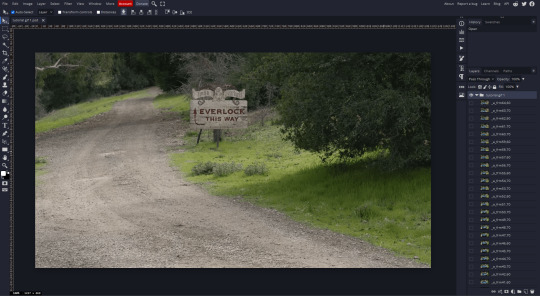
You may be saying, "Gee, Poe, that sure looks a lot like Photoshop!" Yes, it absolutely does. If you're familiar with Photoshop, you will most likely be able to find your way around Photopea just fine, and can probably go from here. But if you're not familiar with Photoshop, here's the basics.
First thing's first: gifs are frequently pretty fuzzy/blurry. Luckily, sharpening them is easy.
Select all your frames (the list on the right with all the numbered layers) by clicking one end, scrolling up/down, holding Shift, and clicking the other end. Then go up to the tabs and do Filter > Sharpen > Smart Sharpen. This will automatically sharpen each frame using a percentage; the default is, I believe, 150%, and this is usually what I use because I am fundamentally lazy.
If you don't select all your frames, only the one that you're currently on (the one highlighted in a lighter color) will get the effect applied to it. This goes for basically anything you do, so it's good to get in the habit of selecting all.
Now that it's sharpened, we can color it. Go up to the tabs again, and go to Layer > New Adjustment Layer > [whatever you want to adjust]. Most commonly in Escape the Night, you'll have to adjust brightness, because there's a lot of dark, moody scenes; Season 3 is also especially yellow/orange tinted, so you'll probably want to color correct it, too, using the Color Balance adjustment layer. This is a total guessing game based on the exact scene you're doing and my method is just selecting random things and adjusting sliders until it looks good (remember: fundamentally lazy). Honestly, I'm not an expert in coloring gifs, so I won't pretend to be — especially since people can and do write entire posts just dedicated to it. For this gif, I'm just lightening it a little.
And if this is all you want to do — no text, no effects — you're done! Go to File > Export As > GIF. It will take a few moments to load, so don't panic when your page freezes. A new window will pop up that allows you to do things like set looping, time, etc. but you can also just "Save" and you're done!
But let's say you want something fun. Maybe you'd like to overlay a quote or make it a cool color. If that's the case, continue on...
Step 3: Make your gif shine.
Three parts in this: text, fun colors, and overlays. You can combine these three to do some awesome things, and they're all very simple to do, once you know what you're doing. Think of them less like steps and more like a mix-and-match deal. You can use one, two, or all three!
So, here we go.
Option 3a: Add some text.
The easiest option of the three, this one works exactly like you think it does. The uppercase T symbol on the sidebar will create a new text layer where you can type something and set a font, size, and color.

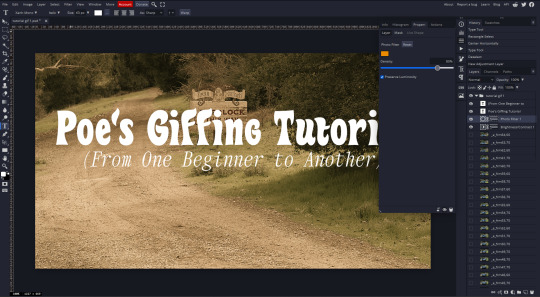
I'll spare you the lecture on typography that I could give you — you can find better ones than I could make. Generally, though, you have a decorative/display font for headings and emphasis, and then a different, more generalized font for subheadings and other things. In this, the display font is Heavy Heap, which was used on the Season 3 tarot cards, and the general font is a relatively generic serif font.
(Sidenote: you can load fonts into Photopea! Just go to a font website like Dafont, download the font you want, and then open it as you would any other file by going to File > Open and selecting it from your files. You should get a message that says "Font [Your Font Name Here] Loaded," and then you'll be able to use it in your design. That's how I got Heavy Heap in there.)
You can change size and color with these, which will show up at the top when you select the text tool. Keep in mind that if you're making changes after you type something out, you will need to select (highlight) the text you want to change — it won't do it automatically.

I will admit that Photopea's text editor is not the cleanest, simplest, or nicest to use, especially at first. I came from Canva where it was much faster and easier. The downside, of course, is that Canva is highly limited with what you can do.
There are also ways to warp the text, change the blending, and do outlines, but I'll leave that for another time as to avoid making this any longer than it already is.
Option 3b: Make it a cool color.
You have a couple different ways to do this. Probably the most intuitive is to go to Layer > New Adjustment Layer > Photo Filter. Select the color box, pick the color you want using the picker or a hex code, select your desired density, and click OK. Boom, color over your gif.
It defaults to this vintage-y orange, but you can pick whatever color your heart desires.
However, I usually use a different method using Gradient Maps. This is also pretty easy; Layer > New Adjustment Layer > Gradient Map. If you leave it black and white, by the way, you get a B&W gif (you can also just select the Black and White option in the Adjustment Layer menu). Click on the gradient, select the white square on the right side of the gradient line, and then select the square down at the bottom of the window and change it to whatever color you want.

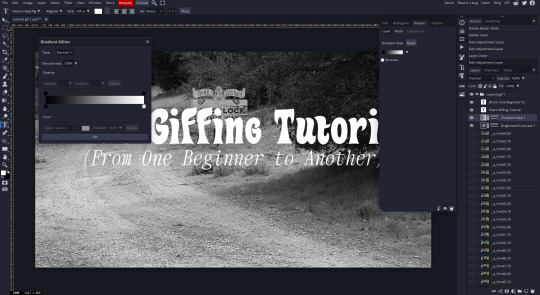
For this gif, I'm leaving it B&W.
(You can have a lot of fun with gradient maps. Play around with them!)
Option 3c: Overlay another gif on top.
Ooookay, so, this is the most advanced and tedious of effects to do (at least of the ones documented in this post), but it's worth it, I promise. For this, you'll need at least one other gif. I usually use a base gif that's relatively neutrally colored, oftentimes B&W but sometimes just faded or pastel, plus one (or more than one) colored, brighter gif. These are, of course, just guidelines — combine whatever gifs you want. The only real requirement, per se, is that they have the same amount of frames. If they don't, it'll look weird. (But if you do end up with two gifs that have different amounts of frames, you can delete the difference right in Photopea, so I don't stress about it too much.)
You also generally want to add text after this step, so if you're planning on doing this, save the text for last.
First things first: color your gifs the way you want and then save both of them. Then re-open them both in Photopea. Yes, this is annoying. I did say it was tedious.

So now I have both of them in my navbar, labeled as "tutorial base" and "tutorial overlay."
Go to your overlay gif and right-click on the gif folder. This is the top layer with a little arrow and folder icon next to the name of the gif.

Select "Duplicate Into" and then pick your base gif in the popup. In my case, it's named "tutorial base."

Now you'll click over to your base gif, and you'll see that your accent has been put on top of your base. Now you get to have fun with blending!
Right click on the overlay gif's folder again. Then, select Blending Options, which is the first menu item. It'll bring up a popup with all sorts of options for styling your layer.

The default setting is Pass Through, which is what we see here. If you want, you could just change the opacity to get your desired effect.
You could also play around with blending options such as Overlay, Color Burn, Lighten, and Screen. Every gif is different, and every gif will look different with different options, so experiment and see what looks best! You may have to go back and recolor it a few times, so I recommend just keeping the project open in your navbar for easy access.
For this gif, I think I'll go with Darker Color at 67%.
One last step, and then you're done with blending!
Go to Layer > Animation > Merge. This will merge each frame of your animation (the gifs) with each other, meaning that they'll play at the same time. If you forget this step, as I do frequently, you'll go to save your gif and find that it plays as a sequence.
Once you've merged your gifs, you can add texts, more effects, PNG overlays, whatever you want! Congrats! You did it!
Step 4: Resize your gif (if necessary).
Maybe you've made a gif, and it's beautiful, and it's amazing, and you wanna show everyone...but it's five million megabytes and you can't send or post it anywhere. Tumblr's max file size is 10 MB, while Discord's (standard) max file size is..7 MB, I think? Either way, if you try to upload something bigger than that, you'll get an error message and the familiar taste of disappointment.
Never fear, Redketchup is here!

This is Redketchup, and it's super simple.
Go to "GIF Resizer" under Animation Tools. Upload your gif, then scroll until you see the Resize GIF section. Input the percentage you'd like to reduce it by (presets are 25%, 50%, and 75% smaller, but you can set it manually, as well).
This is also the step where you can slow it down if you desire if you didn't do it in Photopea — it's in the next section down. Set the speed, if you'd like, and then go down to the bottom and hit Download.

It'll take you to a preview tab where you can check if your gif is small enough. If it is, hit Download again up in the top left, and that's that! Go share your gif with the world!
Conclusion:
Thank you for reading! I am by no means an expert gifmaker, but I want to spread the love and give other people the option to do it. I wouldn't know any of this stuff without the people who taught me, and I'll put a list of tutorials down at the bottom that I referenced when I was first learning to make gifs.
At any rate, if you use this post to make a gif, feel free tag me or send it to me so I can see! And for those of you who are on the fence about learning or starting to gif...
Do it. I double-dog dare you.
:)
References:
Blending Gifs by @the-mother-of-lions
Photopea Coloring Tutorial by @heroeddiemunson
Merging in Photopea by @bellamyblakru
And, though not a specific reference, I frequently browse @usergif for inspiration (they have tutorials there, as well, but I haven't checked them out yet).
#gifset#giffing#gif tutorial#how to gif#how to make a gif#photopea#escape the night#etn#I wrote this instead of socializing at my family's thanksgiving dinner#because that's just who I am
98 notes
·
View notes
Text
The Conflicts of Disney's Hercules (Part 1): Meg vs Hades
Long post y'all.
I promised my diva of a sponsor to get to this and since my last post gained steam, I thought I'd finally talk about one of my favorite Villain vs Heroine conflicts in Disney's canon. This will be a bit of a mini series as I break down and explore the conflicts in the movie, think Hades vs Zeus vs Hercules, Hercules/Hades vs the Fates, etc. As I continue the series if you have a suggestion for one you want me to deep dive I would love to hear it!
That's the fun part about Tumblr, the opportunity to hear voices and begin discussion about little things no one mentions in a 20+ old film. Also, bare in mind I will be exploring other Disney films eventually, but I've just spent too long digging in the Hercules trenches i can't help but gush about it even if it is far from my favorite Disney film.
Also fair warning ahead of time but there is a CW in one section of this post that can be easily circumvented if you so wish. There will be a space and *** symbols to indicate when it starts and when it ends as we discuss some dark themes and symbolism.
Now on to the evening's entertainment!
The history of Disney hero(ine) vs villain goes all the way back to Disney's very first animated film: Snow White and the Seven Dwarfs. In this film, we are treated to a classic clash between good vs evil with well-established background that fully explains the animosity the Queen has towards Snow White and to a lesser known extent of myself when I was 3. However, keep in mind, the Queen interacts with Snow White through indirect sources like the Huntsman and when the Queen disguises herself as a hag.

To summarize in case you haven't seen the movie, Snow White finally gets to the ripe old age where a person can finally be considered fair, which I suppose is 14 years old. The queen gets so frazzled her hair falls out and turns white and ages about seventy years or something.
Anxiety, hits at every age y'all. Even for the wickedly beautiful.
And so ensues the assassination plot of an abused princess who manages to escape and finally gets the love and life she dreamed about for so, so long.
The reason I'm using Snow White as a jumping off point is because we have the very first example in Disney's canon of a deal being offered to an otherwise naïve young girl.
And that naïve young girl accepts out of her own volition, no forcing, no pressuring, at the end of the day, taking a bite of a poisoned apple or in Meg's case taking Hades' hand sealing both Heroine's fate.
Now, while Disney's Hercules touches on how Meg got ensnared in Hades' plans, let's review what we do know:
Meg was at the end of her rope when her ex died. So much so that she was willing to do anything to get him back, and she meant it. While we do not know exactly how healthy Meg and her ex's relationship was before his untimely demise, the fact that her Ex ran off with another girl soon after tells me a lot on what the relationship was really like. It wasn't as steadfast or true as Meg had previously believed.
Oh yeah, weird side note, but we're completely ignoring Twisted tales: Go the Distance. Yeah, way to go. You took away Meg's chance to shine and connect with an unspoken minority in the audience. Do you know how many friends of mine found so much connection with Meg because she had been in a prior abusive relationship and still found love despite all the trauma she went through? Meg's iconic. Having Hades be the reason her ex took off is such a dumb move. I don't think he was that invested in her personal life to ruin it even further just to mess with her. He could care less, he's focused on taking over Olympus rn.
"Priorities, Jafar," - hey gifmakers of the world???

Anyway, tangent over.
So Meg's whole life revolved around her ex, and she was willing to put in the sacrifice and effort to be with him, but he snubbed her. The movie is very clear that the reason Meg is so cynical when we meet her is b/c she used to be a very openly sweet and loving person back when everything was beautiful and nothing hurt. And in that period, when she was so enamored with this Joe Schmo, she was probably starry eyed and saw everything in rose-colored glasses and thus didn't see the red flags of this chump. But she grew up and learned from her mistakes, but in a path that stopped her from ever trusting or loving someone else.
It's interesting, but Meg's ex comes up again at least referenced in I won't Say(I'm in Love), in the line:
"I thought my heart had learned its lesson..."
But when Meg sings that line, do you know what part of the garden she's in?
***CONTENT WARNING: R*pe. We will be discussing the setting of where I won't say (I'm in Love) takes place and picking apart at the various statues littered about in the Greek courtyard.
.
.
.
.
.
Now the garden is filled with statues of lovers and other symbols of love, but some that are not examples of love, specifically ones that revolve around scenes of r*pe.
The reference to her ex by the aforementioned lyric is when Meg's surrounded by scenes of r*pe: We have a centaur carrying off a lady and a satyr chasing after a girl. A common theme in greek myths, and I can't help but feel this was intentional on the writer's part. They are shouting and screaming at us that Meg's ex was a bad dude. Why would the only reference to her past dating life be when she's surrounded by the only sexually perverse imagery in this entire scene? Of males taking advantage of women? Carrying them off when they are not at all interested based on their body language?
-
-
-
***
I think that's why when Meg and Hades talk after her fake dating AU with Hercules their whole conversation is filled with so much substance. The song pushes so much character development for Meg that it enables her to face her trauma head-on and accept the past and still have the courage to move forward and try again with this budding new relationship now that the Muses helped support her- as her back-up chorus and her conscience lol.
But there's still one problem. One overhanging problem that's give or take 7 feet tall of abandonment and anger issues, permeating with the stench of sulfur and brimstone.
When the song ends, Hades almost immediately appears in the most on the nose way. By ripping apart a pair of young lovers as he emerges from the Underworld like the extra edgelord he is.
Thus begins my favorite scene of the movie. Songs don't count.
Now we've seen Meg and Hades interacting before and I will touch upon the scene after Zero to Hero later, but its poignant to get to the only time they really have a true clash first. The garden scene is the first time Meg is facing Hades as a heroine and not a reluctant minion.
Gosh, I love it when a girl goes feral, and Meg goes all out here. The interchange between Meg and Hades is written so tightly and neatly, everyone is dripping with so much character I just adore it.
But the most ironic part that isn't given much thought is why Hades says his most iconic and memeable line:


You bet this line is hilarious, but look at Hades' expression in the gif before. The exaggerated eyeroll, the sagging shoulders of disbelief as Meg is full of so much love and hope she almost forgets who's she's saying all this to.
The irony of Meg gushing about Hercules to Hades is this: Meg and Hades have had this exact conversation before. But now the guy in questions isn't her ex, it's Hercules.
And this time around, Hades is done beating around the bush and pretending everything is hunky-dory. Last time, he was fine with her going on about her ex and gushing about how "great" of a guy he was b/c he just wanted to take her soul. Hades probably had to fish her Ex out and knew what kinda guy he was once he read his record. In fact, I'm willing to wager, Hades has had multiple women similar to Meg who had done the same as her for some deadbeat.
And that's why Hades comes across as so annoyed by her being back in the same position.
Didn't she learn her lesson? Hell, even Hades knows guys can be pigs. And a small part of me has always wondered if his annoyance is also springing up b/c he knows that Hercules is a son of Zeus. While I don't think Hades ever had a soft spot for Meg- went lenient with her, etc, I can't help but wonder if Hades saw Hercules as someone who got around like Zeus and had a reputation like Zeus' other sons, ie, Apollo, Hephaestus, and even Hermes(yes Hermes had a lot of kids with tons of women). So Hades might legitimately be trying to warn her. I mean he's about to set her free, he's trying to pass on some good advice here before he disappears from her life
Btw, Ares is the only son of Zeus and the only god in Greek mythology who ever had a 100% confirmation rating of consensual relationships.
Be like Ares.

As the scene continues to play out, we start to see that as Meg continues to resist Hades' attempts for her to spill about Hercules' weakness, we see Hades for the first time lose it at Meg instead of his imps.
What little control Meg thought she had in her servitude comes crashing down and I think it's at that moment she realizes how much Hades had been holding back or really how good he was at pretending. He had been manipulating her into thinking she had a platform/control in her life. When Hades takes off his mask and Meg realizes when he had "convinced" her to seduce Hercules in a classic Samson and Delilah situation, it was never her choice. And now she's second guessing if Hades really intended to free her for the information she was undercover for.
He has all the leverage in the world after all.
That's why despite the threat Hades made on her life, she doesn't budge one bit. B/c she loves Hercules more than her own safety. And Meg triumphantly declares to Hades that he lost b/c Hercules can't be beaten b/c of his lack of weaknesses.
Only to realize too late that Hades possesses far more emotional intelligence to understand what's going on. Villains who understand that love is a motivator for people and don't dismiss it as a stupid chemical imbalance are some of my favorite. Not only does Hades understand that if someone like Meg had fallen so quickly then the other party had to have been a genuine person who sought her in the same way she wanted to seek him. Sure, he's taking advantage of it, but he's been around enough to know how much love can be used against people.
And I think that's why when Hades finally meets Hercules, old flame head decides to spill the beans to Hercules about Meg and her role in Hercules' downfall.
Yes, he wanted to hurt Hercules and taunt him and torment him with thoughts on how deep Hades and Meg's relationship went, but he did so to hurt Meg too.
Her show of loyalty to Herc was the last straw and Hades wanted to make sure she could never salvage a relationship with him for her slight against him. But also doing it in a way that broke her spirit and put her in a terribly guilty position that she would feel so undeserving of being with Hercules right as she is freed by him. And ensuring that she never faces Hercules again- maybe split town so she could avoid being harmed, idk.
And that makes Hades revealing Meg's complicity all the more personal. Bc Hades knows how much Meg wants to love and be loved again.
So when a powerless Hercules crumbles beneath Pain and Panic's taunting we see the first time this stubborn, hard-hearted girl cries. Not for her sake, but his.

We have seen throughout this movie that Meg and Hades have the most conflict, the most interactions, and the most character heavy scenes in the movie. They are very similar characters. Both are awfully cynical and sarcastic, both want to be free from some higher power's hold on them, and they're both bitter, bitter people who hate how their lives fell apart at the hands of someone who didn't care for them: Zeus and Joe Schmo.
Now, I'm going to backtrack and move to the Hades scene right after Zero to Hero.

Here, we get another facet of their relationship.
Hades finally realizes that he'd been sending so many beasts after Hercules, so to not be labeled insane, this time around he decides to send in a beauty. *Insert Susan Egan played Belle on Broadway joke here*
Which let's be real, should've been his first approach based on who Herc's daddy is.
But Hades doesn't try to convince Meg with yelling and screaming like he does with the boys, instead, he levels with her. Homeboy puts all his cards on the table, but does so by first empathizing with her and reminding her who helped put her in this situation.
For one second of this film, Hades shows some degree of humanity. And that is super scary. Out of the disney villains, Hades displays a huge, huge depth of emotional intelligence. I don't think any other villains compare and that's what makes him such a compelling villain. Most villains don't have that, and his ability to read the room and know how ppl work that really explains how he's able to manipulate ppl so easily. Even someone like Meg who's been putting up with him for quite a while was persuaded by him. And he does it by turning off the used car salesman persona and acting like an empathetic human being, albeit a flamed hair one.
Maybe that's why he doesn't bark orders to her, he has to appeal to her to let her be more agreeable for a better success rate. Or maybe Hades really is one of the few gods who uses consent.

When I first watched this movie as a kid I never saw the implications of Meg and Hades' relationship until I got older and watched the movie Casino (1995). James Woods, the voice actor for Hades, plays a pimp and that had a kind of whiplash for me when I realized why his role in Casino felt eerily familiar. In Meg's first scene, Hades had sent her out to recruit a centaur knowing full-well that centaur's really dig chicks. We all remember a certain statue in Meg's iconic song, I'm pretty sure the writers knew what was going on.
And that has some super dark implications right there about what Hades expected the scenario to come to and why he sent HER of all people to recruit Nessus without some kind of backup. Whether you agree on my analysis about this is something I really won't argue about. I don't personally see Hades as a pimp, but he does take on characteristics of one mostly b/c of his conman persona since they are rather similar in their manipulation tactics.
Just thought I'd put it here to give some food for thought and since I don't want to make a post on it.
In the end, after reviewing the most important scenes between Meg and Hades you can start to understand my perspective of why the conflict, the clash, and the antagonism feels the most vivid when its centered on Meg vs Hades. Far, far more so than Hercules and Hades ever had. And dare I say it? Even more than Zeus and Hades.

We only get the implications of Hades and Zeus, we don't see them at the forefront.
Everything boils down to Meg. In fact, b/c Hades drags her in, b/c she saves Hercules when he was powerless that Hades ever had the slightest chance of winning, but on the flipside, so did Hercules. If Hercules had remained a deity, he would've been lounging about too along with his parents and unprepared for the oncoming attack.
Throughout this film, Meg grows from being an unwilling participant to someone who's willing to risk it all, overcoming her fear and trauma to get the band back together to save Hercules and ends up helping him get his powers back. So it wasn't so much Hercules' actions that save the day, but Meg's.
At the end of the day, the conflict between Meg and Hades has always felt like the central conflict in Hercules more than what Hades vs Hercules was ever like. Every scene, every biting interchange, its quite obvious the two had a heated past and I can see why some ppl have shipped them even if I personally never did.
It's why I really don't see Hercules as the main character. After zero to hero, we start to lose focus on him since he has no bearing on the overall plot of stopping Hades. To me, Meg has the most growth, the most courage, and the best development in the film and that is because of how well she works as a foil to Hades, the film's antagonist.
If you made it this far, thanks for sticking around.
It's been a real slice.
#disney#disney hades#disney megara#disney hercules#hercules#hades#my rambles#greek myth#greek mythology#kinda
21 notes
·
View notes
Note
Hi! I was wondering how you get such high quality gifs? Do you have Topaz or maybe sharpen in Premiere/After Effects? I’m new to making gifs; I’ve been exporting 1080p clips from Final Cut and recoloring + turning into gifs in Photoshop at the 540p width for tumblr. The results are passable but nowhere near the quality you’re producing. Even exporting 1080p gifs for Reddit, while lovely, don’t compare. Yours must be 4k or even 8k. If you don’t mind sharing, I’d love to know your process!
Hi! Gosh, really, thank you for the kind words ♡ That means a lot!
I don't do anything special with mine, I just use the same files that are in 1080p. I do have an upscaler but that can only upscale any photo to x4 the size. I think I can probably upscale gifs, but I'd have to manually upscale every frame and then make the gif in Photoshop, but ngl.... I'm a lazy gifmaker hahahaha.
My sharpening process is very simple. I only use Photoshop in making gifs. I've pretty much used this process in all types of media/fandoms (Anime, dramas, tv shows, kpop, etc.) Feel free to experiment on your style as it varies with everyone else. You can find the full tutorial under the cut.

Edit: Maybe I shouldn't have used such a dark gif as an example hahahaha oops
I use the timeline method in Photoshop to make my gifs. Here is a tutorial that's a bit similar to how I make gifs. For Arcane, the frame speed I use is either 0.04 or 0.05.
I've based my sharpening process on a tumblr tutorial years ago by another blogger but I can't seem to find their blog post :(((( if anyone knows it, please let me know!
My sharpening process are as follows:
First, I duplicate the base gif in photoshop

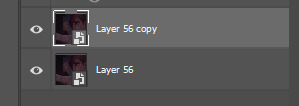
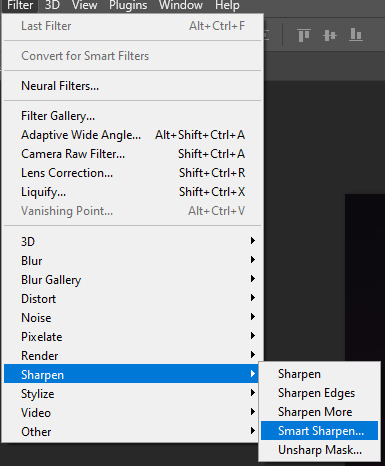
So now, I have 2 copies of the gif. Then, I'll be sharpening the duplicate layer, so go to Filter -> Sharpen -> Smart Sharpen
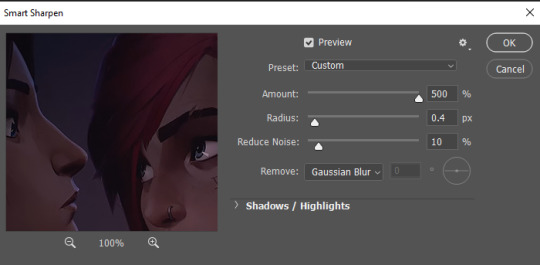
Here are the settings I use to sharpen gifs:
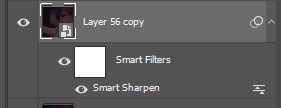
Click okay, then you will see this under your layers
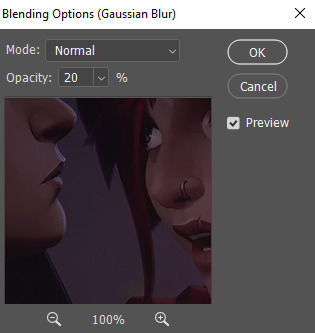
Some people stop there and then color their gifs, but I prefer to add another layer of Gaussian Blur to make the gif less noisy.

Here are my gaussian blue settings:

Click okay, then your duplicated layer will look like this:
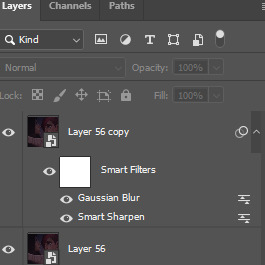
Next, make your layer opacity to 80%.

Then, double click the right adjust icon on the gaussian blur settings

Set the opacity to 20%, but you can adjust as needed.
And you're done sharpening the gif! You can color and add PSDs to it right after. As always, dark scenes are going to be difficult to sharpen and color, so try to experiment and tinker around.
Hope this helps! If you have any questions, feel free to send an ask/message!
#answered#littlewildbouquet#maybe i shouldnt have used such a dark scene sdkfjskfsf oops#ofc im gonna use caitvi as an example tho LMAOOOOOO#tutorial
48 notes
·
View notes
Note
Hello Sky! I've been following you for years, thank u so much for your work. BUT, and I don't know how to tell u this without sounding rude.. I really miss your oldstyle gifs. The current ones are too big and sometimes too cropped, and on PC don't look that good. Sometimes they're so big that take too long to load, especially in a large set. I wish that, once in a while, u would do a set like old times (I can't put a link here to show an example, but 2018-2019 setgifs)
hi ♡ you are mentioning 2018, 2019… so you really follow me for a long time 😭 thank you so much for putting up with me for so long SLASLASKALS
ok, now lets talk about my gifs~ 2019 was the year I came back from my hiatus and I had literally forgotten how to gif. I was on hiatus that year focusing on my studies so I didn't even think about make gifs.
my gifs had nothing "special" about them. it was just a regular gif. it didn't have something that represented me. I felt that I wanted to have something special in my gifs that could make even other people look at it and instantly identify that the gifset was mine. so for me to do that i kept changing my colouring and my sharpen style. but I was never satisfied, i wasn't happy with how my gifs looked. so i remembered about topaz clean and denoise and i decided to install them and use them in my gifs, but as always, i didn't go after tutorials. I was just using it on my gifs as I thought it would look nice but it didn't and I didn't realize it until much later. the topaz effect was too extreme.

so after doing that i thought i would then make a base colouring that i could use and then just change a few things. but that I could always use this base to have a ~gif style~.

but again i wasn't happy with my gifs. so i started to think, maybe i could get some inspiration from other accounts. I've always been very passionate about the style that most movies gifmaker have. and what they most have in common is big gifs, and then I started trying to make big gifs too. but it's not as easy as it seems. as most bangtan videos have a 1080p quality and it's not always that good, making big gifs wouldn't always look nice. but still I tried. i thought with topaz i could try to fix the quality of my gifs. so i did.
what i wanted to make clear in my gifs was that they were only focusing on the person i was giffing. so I always cropped as much as I could to make the person very centered in my gifs. that the person was my gif and not part of the gif, do you understand what I mean? 😅
but i still wasn't so happy with my gifs. I still thought that I was overdoing the topaz too much and that my colourings weren't that nice. so I'm still testing what I could do to change that and be more satisfied with my gifs. I love topaz but it doesn't always bring the result I want. but it helps me a lot in videos that the quality is much lower that even 480p. like here:
without topaz the quality of these gifs would look terribly ugly. but I still didn't feel like I found a setting that I really liked.
but after a long time trying to find it, i reached a point where i started to be happy with my gifs. I started to see that I don't need a "ready" setting, that each video's setting has to be different, that I don't need to make a colouring base, but work on the gif from scratch.


now i look at my gifs and i'm satisfied with how they look. don't think they look as ugly as before. and even with different settings and different colourings style, i think i have my own style. they look different but still got my style on them. I think that even without looking at my watermaker there are people who do recognize my gifs. I think I have my own style now.
I wish you could somehow send me the link to the gitsets you're talking about so I can have some examples of them. maybe like this jung-koook (.)tumblr(.)com/post/713740586334732288?
I am really happy that you came here to talk to me about this, but i really like how my gifs look now. maybe i might not make big gifs anymore when i add more than 10 gifs because in the app its really hard to reblog that kind of set, right. most of my gifs from 2019 are extremely ugly in my opinion. namjoons set example is one of the few that doesn't look ugly. so it's not something I wanted to go back to. :/ but again, thank you for coming here to share your opinion about my gifs in a nice way without being rude. constructive criticism is always good, right? again, if you can show me the example of this right here "sometimes too cropped" I will be very grateful. ♡
25 notes
·
View notes
Text

so i hit 5k followers a while ago, and i've been thinking of something fun to do to celebrate it but i decided to make a little post to say thank you for following, thank you for liking + reblogging + being kind to me 💜 i actually started this blog just over eleven years ago but i didn't really follow or interact with anyone until late 2018 but i've met some of the coolest people, and i've made friends for life 💜
i hope you'll stick with me for the rest of my time here—however long that may be! 💜
everyone i'm mutuals with, everyone who follows me, i love you so much 💜 i hope you'll follow the wonderful ccs below 💜
☆ to the gifmakers i have mentioned below—WOW I LOVE YOU! 💖 your creations are absolutely beautiful and the time & effort you put into creating amazing things is so appreciated. i admire you & adore you lovely souls so much, you're honestly the sweetest bunch 🌸 please forgive me for any time i have gone crazy over your gorgeous colouring in the tags 😂
☆ @97chwe @loserline @hueningkai @choiyeonjuns @pvrtyrock @jaywon @inhypen @kyoungjo @dokyeomblr @wonublr @booseungskwan @soonhoonsol @hooned @jaeyunsim @minzbins @junsite @yukuz
☆ my mutuals & friends—thank you for being my friend, thank you for being in my life, i love you 💎
☆ @its-madi @starryjakey @hoshranghaes @jaylaxies @hee-pster @end-hyphen @cosmic-railwayxo @angelwonie @spilledtee @hyukaheart @criceofpain @wooyoung-a @princewonwoo @seobseobs @nar-nia @jaehunnyy @shuatm @forjongseong @fylithia @maiverie @hyungseos-cafe @honeyhuii @dreamyeyes26
if i forget anyone, please don't be sad :( i love all of you. and you're all the nicest people <3 i kinda hate tumblr sometimes because i'm so close to some of you that i consider you my best friends and most of you are countries away from me 😞
☆ thank you to everyone who's supported me in my gifmaking 💎 even if my gifs look like they've been dragged through a hedge, you still leave the nicest comments and it's so appreciated 💜 i hope you'll continue to fall in love with the pretty idols that ruin my life when i gif them 😂
i hope everyone has the most amazing of days, and thank you again 💜 i'm going to stop being soppy now!! and go make some gifs 💜
#hev.txt#5k follower celebration ☆#i love all of u sm!!#THANK YOU FOR EVERYTHING 💎💜#long post tw#tw long post
49 notes
·
View notes
Note
Hi!!!! No worries if you don’t want to tell me or respond lol. But I really like the colour grading you did on that most recent Joel Miller gif set. I do photography and I’ve been struggling for ages to find a way to bring out the warm sort of brown tones without making things feel too muddy or red. Just curious about what HSL adjustments you made / what colour grading helped you get that look?
ohhhh my god thank you so much??? this might be a convoluted answer/unnecessary rant so i apologize in advance lol but i tend to keep the colorings/psds i use for gifs saved in a folder so every gif i make in a set is consistent with color/lighting/shading/whatever. i get anxious if there's even a little bit of difference per gif lol
a lot of what turned out in those gifs has to do with the lighting/coloring that's already in the show/that specific episode/scene. i've got the rest of the episodes' gifsets made and finished but i can try and kind of show what i'm talking about. they all look different color-wise, at least in my opinion, because of the differences in each episode's lighting. if that makes sense.
the goal with any gif i make, regardless of show/movie, is to make them either
1) better than what was there before (for example, if the movie is INCREDIBLY blue/yellow then i try and color correct that blue or yellow to be more neutral)(i'm looking at you triple frontier and your dark, blue ass scenes dfjkdflh)
and
2) not whitewash pedro. this is incredibly important (at least in my opinion) because i've noticed a lot of gifmakers (or least they used to) went for a really pastel/pale look and it whitewashed poc so dramatically and it was ~problematic~ to say the least. (i used to make gifs for a band that consisted of all mexican band members and i got hate a few times/people policing how i should color my gifs so the band wouldn't get whitewashed, so it's something i've been hyper aware of ever since)
so, even if i'm going for a more moody/darker aesthetic like i am with these gifsets of tlou, i never try and diminish the color pedro has in his skin tone. he's got a lot of color in his skin and i want to be able to see it, y'know what i mean?
basically, that boils down to keeping a lot of the warmer tones while also going for an ~aesthetic~ and it can be really hard sometimes. sometimes a show or movie, in this case the last of us, every episode is lit a little differently since it takes place over the course of a year.
i'll put some examples under the cut:
ok so i'll use episodes 2 and 8 as my examples.
to begin with, the last of us has, what i call, a "post-apocalyptic filter" over the top of it so i kinda have to work with that from the start. lots of greens/earthy brown tones and stuff.
this is with only sharpening applied and no color or anything:

and this is with my previously mentioned ~dark and moody~ psd applied on top of that sharpening:
now, this is the same color grading i used on that gifset you were mentioning.
this is also the same color grading i used on episode 8, which takes place in the winter/snowy areas so the coloring to begin with is going to reflect that:
and now with the coloring:
the big thing between these two scenes is that in the winter one, he's also recovering from actively dying and being deathly pale so any color he had in his face is really minimal lmao
so this is already way too fucking long and i don't think i even actually answered your question i am so sorry lol
to start, i ALWAYS start with an automatic curves layer and then adjust accordingly.
the actual color grading part mostly consists of vibrance, hue/saturation, selective color, channel mixer, gradient map, and level layers. i'm willing to give you the psd privately if you'd like to have a closer look at them!
thank you so much for asking and for putting up with my ranting lmao
#toointojoelmiller#asks#i really hope i answered this jfc#if i didn't i'm really sorry#it felt like i was trying to explain like 7 things at once lmao
3 notes
·
View notes
Note
I've been wanting to this but I've been too shy for too long hahahaha
I've been making verivery content for a while but I really want to improve my gif sets, and your gifs are mighty beautiful TT_TT may I ask for advice? Like do you use your laptop or your phone? Do you use photoshop??
oh feel free to ask me anything ! :D and yes of course ! gifmaking is actually fairly complex on tumblr ;-; so i'll try my best to include the basics and all the important stuff !
for gifmaking i use photoshop 2018 and so i use a laptop >.< i’ve seen a lot of asks where people ask about what apps gifmakers use... and to put it nicely ... there is no easy way to get nice gifs T-T the reason gifmakers on tumblr have such nice gifs, is bc there’s a lot of patience, learning, and practice involved in creating gifs for this platform... you can’t just plug in a video clip to a gif converter and expect it to spit out an hd gif for you ... unfortunately ...
before beginning i’ll recommend this tutorial ! it’s the tutorial i used when i was first learning... and my best advice is to have lots of patience ;;;; tumblr is a hard platform to make gifs for and learning how to make nice gifs will not happen overnight
Photoshop and other resources
i personally downloaded ps 2018 and that works fine for me but i’ve noticed that ps cs5 or earlier tends to have a broken ‘import frames to layers’ action so i’d suggest newer versions for gifmaking ! to download i basically looked up youtube videos and checked comments to make sure the tutorials actually worked,,, but if you want you can try these posts ! (1, 2) i’m not sure if they work but usually there’s a lot of posts made on tumblr + other sites for downloading it for free !
About video processing programs
i also use avisynth to process my frames... this might be a really complex bit to learn and it’s not 100% necessary so i’d say you can skip over it when you’re first learning photoshop and everything but if you are interested ! basically programs like avisynth and vapoursynth reduce the video file size down to tumblr’s preferred image size without reducing the quality as much as resizing in photoshop does :o ! additionally it helps process torrents (these are the ts and tp files for live performance stages that are super hd !) but again it’s somewhat complicated i’d recommend this tutorial for download and use if you ever want to ! (vapoursynth additionally has sharpening and denoising options, but since i’ve never used vs it’d be easier to look up a vs tutorial than to ask me >.<)
Where to get videos
this part is CRITICAL !! for gifmaking,,, you could be the best gifmaker on this whole site but if you have a video with poor quality... no matter what,,, your gifs will not come out nicely T-T so when downloading any vlives or youtube videos, they should be at least 1080p in quality ! or as high quality as possible ! this is bc you need to reduce the file size down by a lot for tumblr’s dimensions and this means you need the best quality :o ! i typically just screenrecord videos these days bc downloading whole hour long vlives / long youtube videos is a strain on my laptop hhh ;;; for live perfo stages you should always download torrents to use but this means you need video processing programs like i said above >.< there’s a resource here to help find them !
these are the basic tools you’ll need hhhh there’s a lot more including sizing, sharpening, coloring, frame rate delay, exporting, saving, etc... and i don’t want to make this too long but !
essentially tumblr has size dimension restrictions for image files, a pixel too big or too small will cause tumblr to stretch or compress your gifs making them blurry... the dimensions are optimally:
a.) 540pixels (width) for one gif in a row
b.) 268pixels (width) for two gifs in a row
c.) 177pixels / 178pixels / 177pixels for three gifs in a row
for sharpening many people use topaz etc. and i’ll point you to other tutorials if you want to use it but tbh ! i use photoshop’s smart sharpen options and those work just fine for me... (plus topaz takes forever to render and i h8 its guts so)
coloring - okay so this is probably THE MOST time consuming part for gifs for me.... idk if you’ve noticed but lots of times, gifmakers’ gifs have pretty colors and nice lighting when you compare to the original video ! that’s bc we add layer adjustments in photoshop to make them look nice ! these include brightness, saturation, exposure, vibrancy, etc. but knowing how to use adjustments is a whole post on its own >.< there’s lots of coloring tutorials out there as well if you want me to direct you to them !
for frame rate delay, i use 0.05 seconds for 30fps (so your normal videos) and 0.03 for 60fps (if none of that made sense that’s okie ! it’s just basically how fast you set frames to play in your gif !)
when exporting - tumblr has a 10mb gif limit but honestly anything above 8mb starts making me anxious or takes too long to load .... so most my gifs are like ... 3-7mb only
but yea these are just some basic tips and stuff ?? i’m sorry it took me so long to respond and it wasn’t as nicely organized as it could be... there are a lot of really good gif tutorials out there ! you just have to look a little ! if you have any additional questions tho feel free to let me know ! i just didn’t have the heart to type out the literal process i have to go through everyday when making just one gif :p i’m sure a lot of gifmakers can relate haha,,,, happy gifmaking !~
#one day when i'm about to d*e i will release a comprehensive gif tutorial#but for now .... even i am astounded still on how much work making content is sigh#me and my cc moots should be getting paid .... ngl T_T#bonknanab#asks#🌱.text#resources#the way this doesn't even go over sharpening all that well sigh ....#there's just so much#and sorry if this sounds?? like salty in any way LMAO#idk how many times i've seen asks where people are like ??? what app do you use on your phone#and bro .... there is no app it is all my blood sweat tears and avisynth#like the frustration i feel#when people repost and are like ? what's up it's just a video anyone could make gifs#and i'm like ??? then make your own and stop reposting mine ???#sigh#anyway i hope this was helpful ;;;;#i've been gifmaking for a while and even now i'm like ... but do my gifs actually look ok#or am i making it up in my head and they're ugly ;((#fjhdgkfjghdkf#do people even want to hear gif things from me LOL
18 notes
·
View notes
Last Seen Blogs
choppedgiverbird
无标题
buffalobonvivant
Buffalo Bon Vivant

eddiemunsxns
A Stranger Things Sideblog

hgemilio
Sin título
borderlinitely-blog
Borderlinitely