#youtube keyboard shortcuts
Text
YouTube Keyboard Shortcuts
YouTube has keyboard shortcuts:
Tap 'f' to toggle full screen on and off.
Tap 'j' to rewind 10 seconds.
Tap 'l' to fastforward 10 seconds.
Tap 'k' to toggle play/pause.
Tap 'm' to toggle the mute button (on and off).
Tap 'c' to toggle subtitles/closed captions on and off.
Tap the left arrow to rewind 5 seconds.
Tap the right arrow to fastforward 5 seconds.
Tap the up arrow to increase the volume.
Tap the down arrow to decrease the volume.
Tap numbers 1 to 9 to jump to equivalent points on the timeline of the video (10% to 90%).
Tap the number 0 to jump to the beginning of the video (0% of the timeline).
Tap '.' (full stop/period) while the video is paused to move forward one frame.
Tap ',' (comma) while the video is paused to move backward one frame.
Tap '>' to speed up the video.
Tap '<' to slow down the video.
19 notes
·
View notes
Text
instead of skipping ahead on youtube sponsor spots i like to set the video to 2x speed to make it feel like i'm fast-forwarding a VHS
25 notes
·
View notes
Text
my most important take away from today's class is that I need to get rid of distractions again
#a really roundabout way of saying that it's so good and so much fun to be actually focused on what's in front of me#instead of having like 60 open tabs YouTube or music running and my phone beeping notifications at me constantly#that is one of the things I've really lost track of#my second take away is that I'm really not an apple gal 😭#at least we were using the same Wacom cintiq i have#but i was noting down all the keyboard shortcuts knowing that i can trash them after this workshop lmaoooo
2 notes
·
View notes
Text
Oh shit, apparently on desktop, you can click and hold on a YouTube video and it'll play at double-speed??? WHY HAS NOBODY TOLD ME THAT BEFORE, THAT'S FUCKING COOL
3 notes
·
View notes
Text
So does tumblr just not let you embed videos in reblogs any more?
#I want to add a clip from earthday birthday to a post#and I was able to use a keyboard shortcut to bring up 'add a video'#but the video refuses to load properly#and screenshots don't convey the right feeling#I don't want to upload the clip to youtube just for that#but I might have to
3 notes
·
View notes
Text
youtube
0 notes
Text
youtube
0 notes
Text
#cancer#help#cure#it consulting it support keyboard shortcut#business#design#youtube#gaming#photography#my writing
0 notes
Video
youtube
How to show keyboard shortcuts helper on itel S15
0 notes
Text
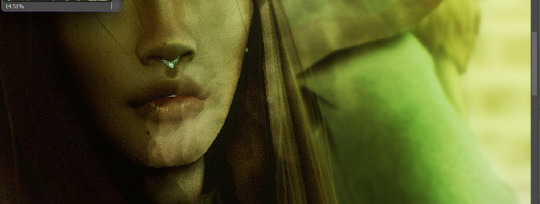
Updated: How I edit my sims 4 screenshots (night-time edition)
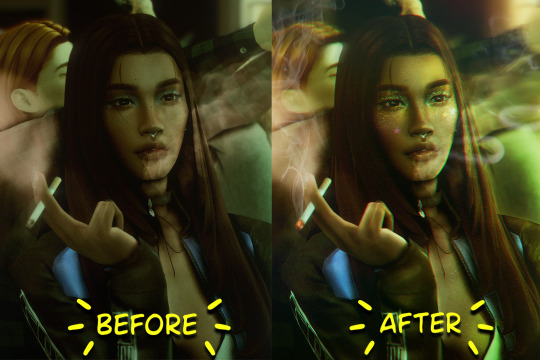
A more detailed editing tut so you can understand my process as it may help you, i edited this relatively quickly and usually spend about 1-2hrs editing something...so let's goo.....
Before taking screenshots:
Help yourself as much as you can in-game, I always make sure there is some sort of light source in my pictures or something interesting that I can add to enhance something already there
Understand good/bad composition and add variety by using different angles
I take LOTS of photos just to end up with 1 or 2 good ones

I'll just be using photoshop for this, but i also like to use the procreate app as i'm more confident w it.
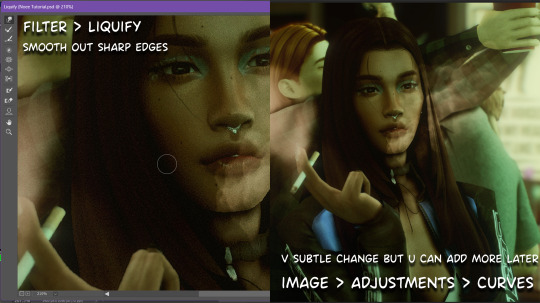
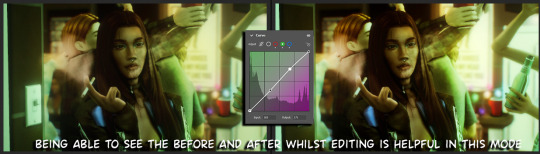
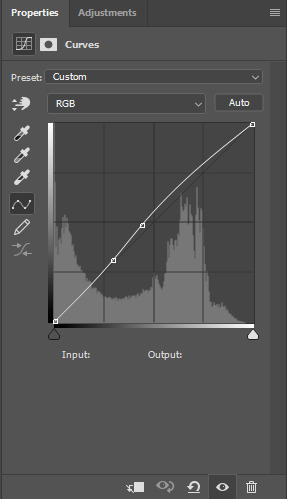
step1: I check if there are any major glitches or hard areas e.g, fingers elbows etc.. that have sharp points and pull them in liquify so they are smooth. Then use curves to change the contrast.
step2: *duplicates image* using the dodge and burn tools (keyboard shortcut: o ) i'll add emphasis to highlights and shadows (be careful with these as the dodge tool can ruin the image if used in excess) *merges image* (i duplicate and merge as i go, utilise using lots of layers so you can go back if you mess up/ want to change the opacity of an effect.)
step3: making light sources POP. *new layer* change blending mode to overlay or soft light and choose a colour you like.

step4: *new layer* draw hair strands. i just use a basic round brush in photoshop and change the hardness or i'll use a sharp caligraphy type brush depending on my sims hair type. (i try not to overdo it as i like maxis hair and don't want it to look too realistic)
step5: i would then add a new layer and set the blending mode to multiply to add more shadows, but i don't feel like i need to at this point.
step6: *duplicates image* go to filter > camera raw filter, i change the "light" and "curve" panels, i like green tints in my screenshots especially the night ones. (this is where all the magic happens really so just adjust all the channels to your liking, lightroom is also really good to use)
step7: *create new layer* blending mode: screen or linear dodge (add) / makeup and finishing touches! - for this look i'll get stars and glitter pngs off google or unsplash same for the smoke, though if i'm using procreate they have free brushes for that :')

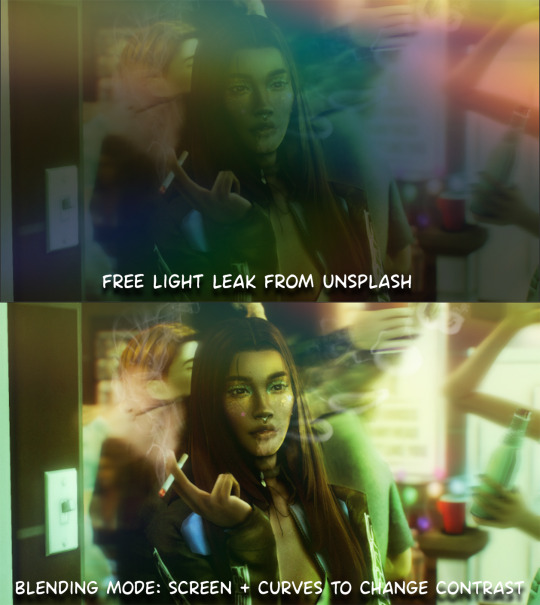
step8: add light leaks as they add some fun dynamic lighting and textures to your screenshots. (i also flip my image horizantally [image > image rotation > flip canvas horizontally] whilst editing as it's like a "fresh pair of eyes" when you've been editing for a while so you can see what looks off)
final step: merge all the layers (though i do merge along the way once i'm happy with something) go to filter > sharpen > smart sharpen. I leave it as the default setting.
extra step if u want: for party pics i might add chromic abberation here is a 60 second tutorial on youtube it makes the pic look cool and trippy.
And you're done!! congrats on surviving. if you have any questions please send them in my ask box so others can see and get help too.
125 notes
·
View notes
Text


It's been requested so here it is: my gif tutorial! I hope to make this very simple as I've made gif making very simple for myself with the help of .atn made by myself and others. More under the cut!
First, what you'll need.
Photoshop (here's a link to a masterlist of free photoshop resources from birdysources)
KMPlayer, to get your screencaps.
These PS actions. (My gifmaking one, and this sharpening action from insomniacgifs.)
Some understanding of how to color gifs (I'll be linking my psd shown here, as well as including the process of making one.)
Next, how to get the videos that you want to gif.
I personally source my videos from Youtube, Twitter, and streaming services. (Firefox browser is your best friend, as it doesn't black out the screen that some services have.) If a Youtube Video Downloader isn't working, or if I'm capturing my own footage, I use the Xbox Game Bar's recording feature (windows + alt + r) to capture footage. There's also applications like OBS Studio. For Twitter, I use twittervideodownloader.com
Now, making the gif.
I use Photoshop CC 2018, but any PS with a timeline will work. But first, we gotta take our screencaps. Open your video in KMPlayer, and press alt+v. This will open up this second screen

These are my settings, with an easily accessible folder that I save my frames to. Find the scene you want to clip, and hit start & play your video, then stop when you have the frames you want.
Next up we're going to open up Photoshop. I changed my keyboard shortcuts so all I've got to do is hit ctrl+alt+o, but for you guys, you gotta go to File -> Scripts -> Load Files Into Stack

Select your screencaps of the scene you want to gif. Now that Tumblr allows gifs up to 10MB, the amount of caps you want is totally up to you. I stick to around 45-50, but sometimes there's a scene I need that's up to 150+ caps, and it still fits under the size limit. It all depends on the dimensions and coloring of your gif. I'm loading up 51 frames as the sharpening .atn deletes the final frame of your gif once it reverts back to frames, so I'll have an even 50 framed gif.
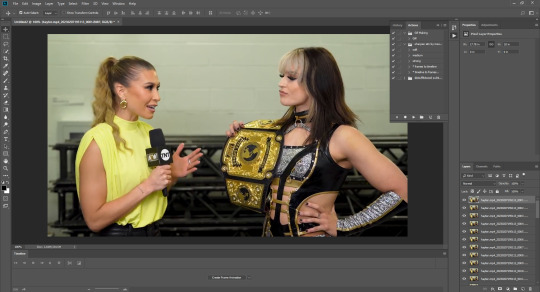
Your PS should look like this. Here comes the gif making itself. You want to hit Create Frame Animation at the bottom, where your timeline is. If your timeline isn't already open, click your Window tab up top, and find timeline in the dropdown.

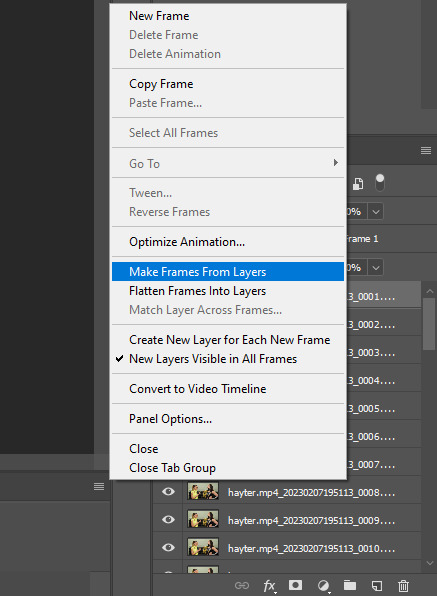
After you hit Create Frame Animation, you want to Make Frames From Layers, which you'll find when you click the three lines on your timeline.
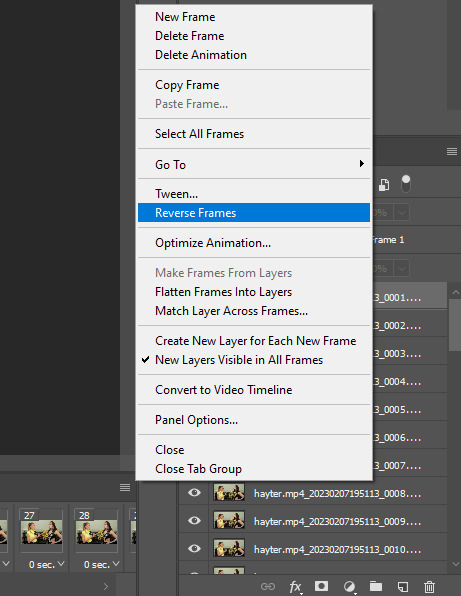
Then, reverse your frames.
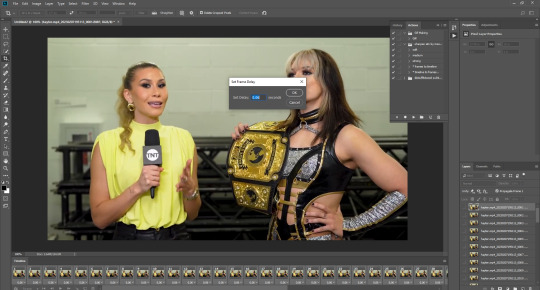
Finally, Select All Frames, click the arrow on the frames, and change the frame delay to .06 seconds.
Way to go! You've made a gif! Now, if you're like me, you'll get tired of having to do that over & over when making a gifset. So, I recorded and uploaded an .atn, which means all you gotta do is load up your frames, hit play on the .atn, and your gif is good to go. I'll link it again so you don't have to lose your place in the tutorial.
So you've made your gif, now what? Now we crop, sharpen, color, and save for the web. Let's get to it.
Tumblr dimensions can be tricky, but they're easy to remember. (I even made a little graphic for it!)

For my tutorial, my Jamie gif will be 268 x 268 :)

Here is my unsharpened, unedited gif of Jamie Hayter. I believe this clip was snagged from YouTube, but it's been awhile since I saved it. I use insomniacgifs' gif sharpening atn, as I hate manually sharpening gifs. So let us run that real quick. (I'll be using the Strong option. Don't forget to delete the final frame.)
Onto coloring! The example I whipped up for this tutorial is super simple, so let's go!
I typically edit the curves first. I'm not sure why, just something I picked up from my photo journalism class back in HS.

Next, I add a little brightness. (+10)

Then, I mess with Selective Color, just a bit. (Neutrals, Black +10. Blacks, Black +5.)
Now, I don't know exactly what Channel Mixer does, but it's fun. Here's my settings.


Some Saturation (+5)

And lastly, I edit the Color Balance!

Aaaaand here's my final product! I also uploaded this as a PSD for you to save and use yourself!

Once your gif is all done, we need to save it properly. File -> Export -> Save for Web (Legacy). Here are my settings.

Note: Make sure your looping options is set to forever so your gif doesn't loop once and freeze!
And that's it! I hope this helped, and if you have any questions, my ask box is open!
#tutorial#gif tutorial#photoshop tutorial#wweedit#wrestlingedit#aewedit#*tutorial#keyara.gif#she's here!!#long post
206 notes
·
View notes
Text
YouTube Downloads through VLC: Step by Step
So this guide to easily downloading off YouTube is super helpful, but there's enough important information hidden in the reblogs that (with the permission of OP @queriesntheories ) I'm doing a more step-by-step version.
Please note: these downloads will be in YouTube quality. My test video download is coming through at 360p, even though the video I'm starting from is set to 720p. They're legible, but they won't look great on a TV. For high visual quality, you'll want to seek out other methods.
This guide is written for Windows 10, since that's what I can test on. It's been tested on Firefox, Chrome, and Edge (which is a Chromium browser, so the method should work in other Chromium browsers too). So far, I haven't tracked down a way to use this download method on mobile.
BASIC KNOWLEDGE:
I'll try to make this pretty beginner-friendly, but I am going to assume that you know how to right-click, double-click, navigate right-click menus, click-and-drag, use keyboard shortcuts that are given to you (for example, how to use Ctrl+A), and get the URL for any YouTube video you want to download.
You'll also need to download and install one or more programs off the internet using .exe files, if you don't have these programs already. Please make sure you know how to use your firewall and antivirus to keep your computer safe, and google any names you don't recognize before allowing permission for each file. You can also hover your mouse over each link in this post to make sure it goes where I'm saying it will go.
YOU WILL NEED:
A computer where you have admin permissions. This is usually a computer you own or have the main login on. Sadly, a shared computer like the ones at universities and libraries will not work for this.
Enough space on your computer to install the programs listed below, if you don't have them already, and some space to save your downloaded files to. The files are pretty small because of the low video quality.
A simple text editing program. Notepad is the one that usually comes with Windows. If it lets you change fonts, it's too fancy. A notepad designed specifically to edit program code without messing it up is Notepad++, which you can download here.
A web browser. I use Firefox, which you can get here. Chrome or other Chrome-based browsers should also work. I haven't tested in Safari.
An Internet connection fast enough to load YouTube. A little buffering is fine. The downloads will happen much faster than streaming the entire video, unless your internet is very slow.
VLC Media Player, which you can get here. It's a free player for music and videos, available on Windows, Android, and iOS, and it can play almost any format of video or audio file that exists. We'll be using it for one of the central steps in this process.
If you want just the audio from a YouTube video, you'll need to download the video and then use a different program to copy the audio into its own file. At the end of this post, I'll have instructions for that, using a free sound editor called Audacity.
SETUP TO DOWNLOAD:
The first time you do this, you'll need to set VLC up so it can do what you want. This is where we need Notepad and admin permissions. You shouldn't need to repeat this process unless you're reinstalling VLC.
If VLC is open, close it.
In your computer's file system (File Explorer on Windows), go to C:\Program Files\VideoLAN\VLC\lua\playlist
If you're not familiar with File Explorer, you'll start by clicking where the left side shows (C:). Then in the big main window, you'll double-click each folder that you see in the file path, in order - so in this case, when you're in C: you need to look for Program Files. (There will be two of them. You want the one without the x86 at the end.) Then inside Program Files you're looking for VideoLAN, and so forth through the whole path.
Once you're inside the "playlist" folder, you'll see a lot of files ending in .luac - they're in alphabetical order. The one you want to edit is youtube.luac which is probably at the bottom.
You can't edit youtube.luac while it's in this folder. Click and drag it out of the playlist folder to somewhere else you can find it - your desktop, for instance. Your computer will ask for admin permission to move the file. Click the "Continue" button with the blue and yellow shield.
Now that the file is moved, double-click on it. The Microsoft Store will want you to search for a program to open the .luac file type with. Don't go to the Microsoft Store, just click on the blue "More apps" below that option, and you'll get a list that should include your notepad program. Click on it and click OK.
The file that opens up will be absolutely full of gibberish-looking code. That's fine. Use Ctrl+A to select everything inside the file, then Backspace or Delete to delete it. Don't close the file yet.
In your web browser, go to https://github.com/videolan/vlc/blob/master/share/lua/playlist/youtube.lua
Click in the part of the Github page that has a bunch of mostly blue code in it. Use Ctrl+A to select all of that code, Ctrl+C to copy it, then come back into your empty youtube.luac file and use Ctrl+P to paste the whole chunk of code into the file.
Save the youtube.luac file (Ctrl+S or File > Save in the upper left corner of the notepad program), then close the notepad program.
Drag youtube.luac back into the folder it came from. The computer will ask for admin permission again. Give it permission.
Now you can close Github and Notepad. You're ready to start downloading!
HOW TO DOWNLOAD:
First, get your YouTube link. It should look something like this: https://www.youtube.com/watch?v=abc123DEF45 If it's longer, you can delete any extra stuff after that first set of letters and numbers, but you don't have to.
Now open VLC. Go to Media > Open Network Stream and paste your YouTube link into the box that comes up. Click Play. Wait until the video starts to play, then you can pause it if you want so it's not distracting you during the next part.
(If nothing happens, you probably forgot to put youtube.luac back. coughs)
In VLC, go to Tools > Codec Information. At the bottom of the pop-up box you'll see a long string of gibberish in a box labeled Location. Click in the Location box. It won't look like it clicked properly, but when you press Ctrl+A, it should select all. Use Ctrl+C to copy it.
In your web browser, paste the entire string of gibberish and hit Enter. Your same YouTube video should come up, but without any of the YouTube interface around it. This is where the video actually lives on YouTube's servers. YouTube really, really doesn't like to show this address to humans, which is why we needed VLC to be like "hi I'm just a little video player" and get it for us.
Because, if you're looking at the place where the video actually lives, you can just right-click-download it, and YouTube can't stop you.
Right-click on your video. Choose "Save Video As". Choose where to save it to - I use my computer's built-in Music or Videos folders.
Give it a name other than "videoplayback" so you can tell it apart from your other downloads.
The "Save As Type" dropdown under the Name field will probably default to MP4. This is a good versatile video format that most video players can read. If you need a different format, you can convert the download later. (That's a whole other post topic.)
Click Save, and your video will start downloading! It may take a few minutes to fully download, depending on your video length and internet speed. Once the download finishes, congratulations! You have successfully downloaded a YouTube video!
If you'd like to convert your video into a (usually smaller) audio file, so you can put it on a music player, it's time to install and set up Audacity.
INSTALLING AUDACITY (first time setup for audio file conversion):
You can get Audacity here. If you're following along on Windows 10, choose the "64-bit installer (recommended)". Run the installer, but don't open Audacity at the end, or if it does open, close it again.
On that same Audacity download page, scroll down past the installers to the "Additional resources". You'll see a box with a "Link to FFmpeg library". This is where you'll get the add-on program that will let Audacity open your downloaded YouTube video, so you can tell it to make an audio-only file. The link will take you to this page on the Audacity support wiki, which will always have the most up-to-date information on how to install the file you need here.
From that wiki page, follow the link to the actual FFmpeg library. If you're not using an adblocker, be careful not to click on any of the ads showing you download buttons. The link you want is bold blue text under "FFmpeg Installer for Audacity 3.2 and later", and looks something like this: "FFmpeg_5.0.0_for_Audacity_on_Windows_x86.exe". Download and install it. Without this, Audacity won't be able to open MP4 files downloaded from YouTube.
CONVERTING TO AUDIO:
Make sure you know where to find your downloaded MP4 video file. This file won't go away when you "convert" it - you'll just be copying the audio into a different file.
Open up Audacity.
Go to File > Open and choose your video file.
You'll get one of those soundwave file displays you see in recording booths and so forth. Audacity is a good solid choice if you want to teach yourself to edit soundwave files, but that's not what we're here for right now.
Go to File > Export Audio. The File Name will populate to match the video's filename, but you can edit it if you want.
Click the Browse button next to the Folder box, and choose where to save your new audio file to. I use my computer's Music folder.
You can click on the Format dropdown and choose an audio file type. If you're not sure which one you want, MP3 is the most common and versatile.
If you'd like your music player to know the artist, album, and so forth for your audio track, you can edit that later in File Manager, or you can put the information in with the Edit Metadata button here. You can leave any of the slots blank, for instance if you don't have a track number because it's a YouTube video.
Once everything is set up, click Export, and your new audio file will be created. Go forth and listen!
#reference#vlc media player#youtube downloader#youtube#uh what other tags should i use idk#how to internet#long post
27 notes
·
View notes
Text
youtube
1 note
·
View note
Text
giffing tutorial
hiii so here's a walkthrough on how to make your gifs clean, crisp, and colorful :-) it's literally so much fun, it's one of my favorite hobbies, i hope y'all enjoy too!!
first off here's what you're going to need
photoshop
this gif sharpening automation
a clip you want to gif! preferably in the highest resolution you can find, 1080p is generally my minimum
adobe premiere (optional, but nice to have only for step 1)
let's get started!
step 1: creating your clip
first off, we need a shorter clip than the average tv episode or movie length. choose a scene or shot you'd like to gif. for this tutorial, i'll be giffing a scene from NOPE (2022) as an example.
now, this next part is semi-optional, it just depends on how smooth you want your gifs to be and what access you have to other platforms.
most movies and TV shows are filmed at a framerate of 23.976 frames per second, while youtube and other online videos tend to be 30fps. you can check the framerate of a video file by right clicking > properties > details

however, if i clip out a scene using the built-in windows video trim tool, it will create the clip at 30fps, causing it to lose some smoothness and look just slightly choppier. and giffing is all about trying to minimize choppiness one small step at a time.
here's where premiere comes in. if you have premiere, go ahead and open it up and create a project. i have one just for gif clip exports. if you don't have premiere, you can either retain the framerate by importing the full original file into photoshop (step 2) or clip it and just work with it in 30fps. no worries either way, in the grand scheme of things it's not that big of a difference and we can still make the gifs super pretty.
open up the full file in premiere's source monitor and locate the section you want to clip. use the mark in/mark out buttons (or the "i" and "o" hotkeys) to select your clip range

then hit ctrl+M or File > Export > Media to export your clip. premiere will automatically set the export settings to match the framerate and resolution of the source clip unless you've used a different preset recently, so make sure the preset menu says "Match Source - Adaptive High Bitrate," name your file, decide where you want it, and hit export.
step 2: importing into photoshop
you're going to import your clip into photoshop by selecting File > Import > Video Frames to Layers, then picking which clip you want to gif. as you can see in my screenshot, i have this set as a keybind* to alt+shift+ctrl+i to make it faster

this will cause a menu to pop up where you can select the part of the clip you'd like to import into photoshop. now that the maximum gif size is 10mb, you can do pretty long gifs, depending on how much movement is in the clip. generally each gif can be a few seconds, but it's up to your discretion.
the clip markers aren't very precise, so don't worry about getting too perfect with the clipping here, you can shave off frames as you please throughout the rest of the process. when you have your range determined, hit OK and it'll bring us into photoshop proper!
*to set a keybind, go to Edit > Keyboard Shortcuts
step 3: prepping for coloring
each frame of the clip will be imported as an individual layer. it's subjective, but i've come to like my gifs having a range of about 40-140 frames, depending on how long i need them to be.
you want to make sure your workspace setting is set to "motion," so you can see the frame timeline across the bottom of your screen, like this:

you can select this workspace setting with the dropdown menu in the top right corner.
next up, scroll to the end of your timeline and shift click the last frame, selecting all the frames. click the carrot next to the number under the frames (the number in my example is "0.04") and select "other" to change the frame delay. i normally use 0.05 or 0.06, depending on how slow and dramatic i'd like the gifs to be. for this one, we'll do 0.06.
now hit "C" to open your crop tool. if you want those nice big gifs people make a lot, i'd recommend putting in 4:3 into the ratio bar at the top. you obviously don't have to crop at all; it depends on how you want it to look. hit enter when you have your crop how you like it to complete the action
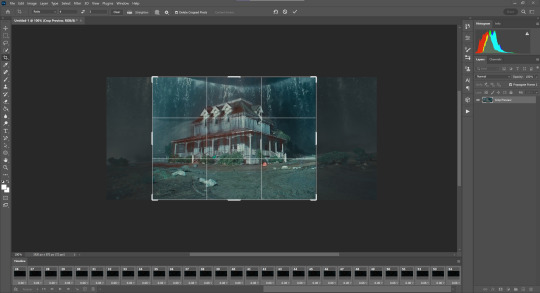
select Image > Image Size or hit alt+ctrl+i to change the size of your gif. no matter what cropping you have, the width of your gif (if you want it to be the only one on its horizontal row in the tumblr post) MUST BE 540PX!! this is tumblr's ideal width for an image post** and will keep it from stretching or compressing when you post it. so go ahead and type "540" into the width column and hit enter.
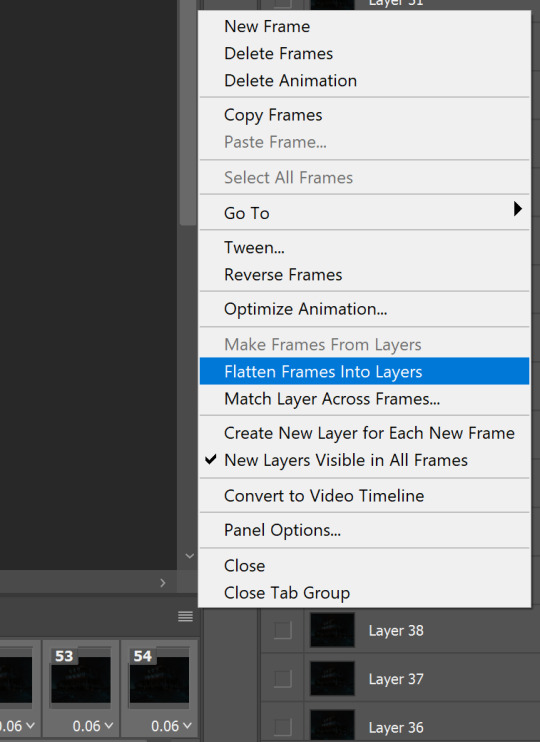
now, make sure all of your frames on the timeline are still selected, go to the hamburger menu on the top right of the timeline, and select "Flatten Frames Into Layers"
go to the layer panel on the right (NOT the timeline), scroll past all the layers labeled "Frame [1, 2, 3, etc]" until you hit the first one labeled "Layer [number]." click the first layer, then scroll down and shift click to select all the layers labeled "Layer," and hit backspace or the little trash bin icon to delete them. we only want the ones labeled "Frame" now.
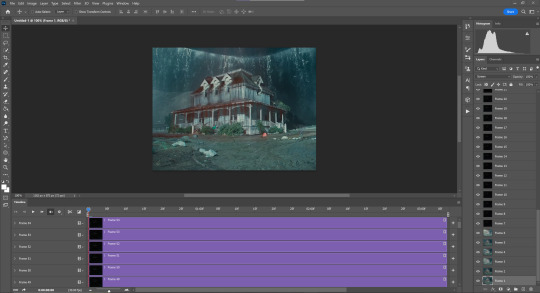
click the "Convert to video timeline" button on the bottom left of the timeline, right under the first frame!

so your screen should now look like this:
shift click the last frame (at the top) to select all your frames, right click any frame in the layer panel on the right, and select "Convert to Smart Object." this will compress all your frames into one dynamic layer photoshop knows is supposed to move.
**540px is ideal for one image in a row, 268px if you're putting two gifs next to each other, and 160px for three in a row.
step 4: COLORING <3
if you downloaded that gif sharpening tool i linked at the top, find it in the folder it downloaded to and double click to import it into photoshop. this should open the "Actions" tab, which essentially allows users to program in a series of actions in a certain order that they can make photoshop execute when you hit "play" on the action. for example, i had one that essentially did all of step 3 for me before my computer died last winter.
anyway, make sure your smart object is selected in the layer panel, open up the actions tab, select "glossy sharpening," and hit the play button. this is a nice sharpening tool i like that takes out a very difficult step, but if you'd like to play around with your own sharpening settings and get it how you like go ahead!

here's what it will look like after executing the actions.
now, remember what i said about the framerate in step 1? here's where that comes in. if your clip is in 30fps, you can skip this part because photoshop defaults to 30fps motion editing. if your clip (like mine) is in 23.976fps then click the same hamburger menu we clicked for "Flatten Frames Into Layers" before and click on "Set Timeline Frame Rate." Choose the correct framerate from the drop down menu and hit OK.
now for the best part: customizing your coloring!! go ahead and click the folder icon in the bottom right to create a group in your layer panel, but don't put your base layers in here. this is going to be for your color editing layers.
the icon right next to the group icon, the circle with a clear half and an opaque half, is now your best friend. this gives us our adjustment layers. the first one we're going to use, and by far the best one, is levels. levels is magical.
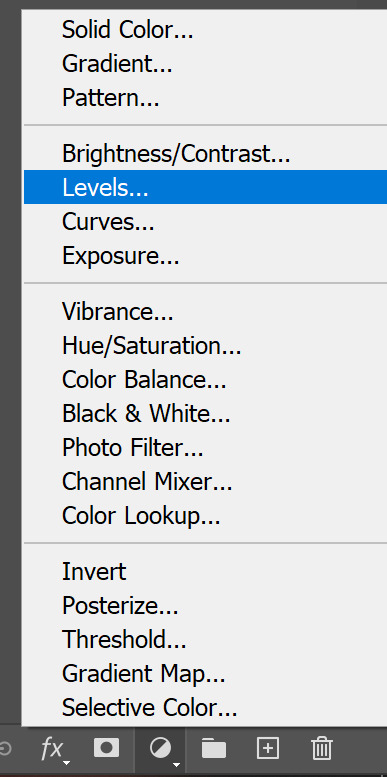
levels basically works by you telling it what "white" and "black" means by selecting pixels in the image. generally you want to use the "white" eyedropper to select the brightest pixel you can find and the "black" eyedropper to select the darkest.
this has the amazing power of being able to smoothly lighten or de-fog or clarify images. now, darker images are always going to be harder to make look good, and there's only so much you can do. but that "so much" is endlessly expanded if you mess around with levels, especially if you layer levels layers on top of each other, then right click > Blending Options > and mess with the fill opacity.
note: the levels layer i'm editing is at 28% fill opacity and 71% regular opacity, which is why it didn't entirely deep-fry the image when i clicked on a mid-grey with the white selection eyedropper.
after messing around with levels until i'm satisfied, i'll add a "vibrance" layer and boost it until it looks good. i also like adding a "color balance" layer and playing with it. for this one i'm adding a bit of blue to the shadows and a bit of cyan and red to the highlights. it's also been trendy lately, especially in gifs of people talking, to add a "hue & saturation" layer and desaturate the yellows by a lot while emphasizing other colors, like here:
after you have your colors how you like, i recommend toggling the visibility of the group a few times to see what you've done! it's so satisfying to look at the change between the base layer and the coloring you've made.
step 5: text
i try to keep my text pretty standard, but you can get creative with it as you please. to add text you can hit "T" to toggle your text tool or select it from the left tools panel. when you click to add the text it'll create the layer starting from wherever your playhead is, so make sure you move it on the timeline to line it up with the start of the gif. drag the end of the text layer on the timeline to make sure it's the same length as the gif so you don't get empty frames when you export. i like 18pt text, and i use the font Gadugi, but i've also used Calibri before.
caption colors for gifs come from broadcast caption colors, meaning that the first person to speak is given white captions, the second person is given yellow, and the third is given teal, although you can do whatever. i normally use:
1st person: #FFFFFF
2nd person: #fcbe11
3rd person: either a more muted orange or a soft teal
you also want to make sure your text is centered by clicking the center paragraph toggle on the top of the screen while your text layer is selected. using the move tool ("v" or the tool on the top of the toolbar) you can center on the guidelines photoshop gives you. i generally like my text pretty much as close to the bottom as it can get without getting cut off.
once all that's sorted, go over to the "fx" button on the same row as the adjustment layer and group/folder buttons. we're going to add a stroke and drop shadow.
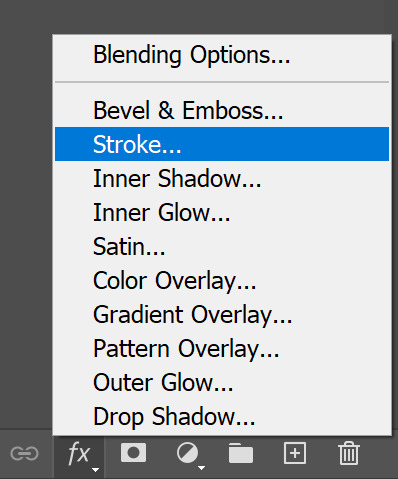
the stroke adds an outline. i do 2px, postition set to outside, normal blend mode, 100% opacity and solid black (#000000)
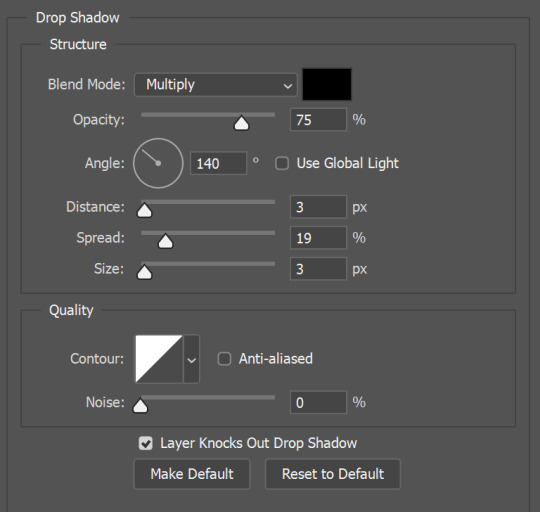
the drop shadow is more malleable because it depends on how the text looks based on the scene it's overlaying. i tend to change it up to make the text the most legible i can, but here's the settings i start from:
step 6: exporting
to export as a gif, go to File > Export > Save For Web (Legacy) or ctrl+shift+alt+S. this will bring up a menu to configure your export settings, and will tell you how big the gif is going to be (in megabytes) after the export. as mentioned earlier, you want it to be less than 10mb. if you use the beta post editor, try to keep it under 9.8mb because for some reason the beta post editor tends to thing gifs that are almost 10mb are actually over the limit.
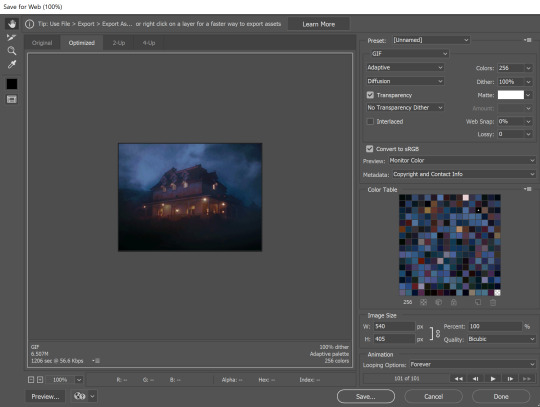
you can see the gif size in the bottom left, 6.507mb, so we're good to go. if your gif IS to big you can go back into the timeline and shorten it by dragging the edges of the timeline layers. if you drag the base layers (the ones labeled "Frame [x]" and "Frame [x] copy") the group above it will conform to that length, but the text layer will not, so you have to manually drag that layer too.
make sure the settings in the top right panel match mine to avoid export errors, and in the bottom right make sure it says "Looping Options: Forever" or you'll have a gif that will only play once.
to double check that you like your gif and see it properly, you can click "preview" in the bottom left. this will open a tab in your browser to view it in its final size and playback speed. if you don't like it, you can go back and tweak it however you want.
so that's that! we've got a gif.

i know this may seem like a lot, but once you get in the groove (or make some automations or keybinds!) it gets a lot faster and the satisfaction of making a good, pretty gif is so nice. i happened to choose a really dark scene to gif for this one so it's not my best work but it was just an example lol.
#cricket gifs#i guess#gif tutorial#giffing#gif making#if you have questions about other specific things feel free to ask!
190 notes
·
View notes
Text
kronk is so good at youtube watching. he knows so many keyboard shortcuts i cannot for the life of me find.
how far ahead into my video did you fling me, sweetie.
9 notes
·
View notes
Last Seen Blogs

wild0moon
(the '0' is silent)

thintila
Obsession

eczile
vas normandy

coldcoffeedreamland
Like
mystistyx
mystical