
Last Seen Blogs

illsadboy
𝓣𝓱𝓮 𝓑𝓸𝔂 𝓸𝓯 𝓢𝓪𝓭𝓷𝓮𝓼𝓼

shitpostermcloserface
shit posts and stuff

superacidinlove
Allegro ma non troppo.

xinyl-l
ae

noyanali-blog
Noyaan
Text
Game Scripting 12 - I’m Finished!
What I’ve Created
Over the course of the last few months I’ve been learning programming. Along the way I have made some small projects to practice my skills. And now finally I have something to show for all that time. These last couple of weeks I got to work in a provided unity framework to try and make a first person puzzle game similar to SEUM. Here’s what I came up with:

It’s ugly. But it’s mine. I implemented new game objects, new traps, new code to make said things work, and a win state. The game is just a proof of concept and until I decide to flesh it out it will stay just a little private thing. But nonetheless I am very proud of it.
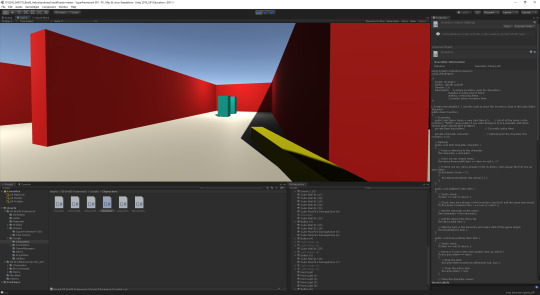

You shoot little fireballs to activate switches and traps, like SEUM, but less of a finished game.
What I’ve Learnt
I learnt a lot during this process. I learnt what classes are and how they work. I learnt about UML and how to use it to understand your games from a top down perspective. I learnt about how C# works and most usefully I wrote code within C# on my own that worked.
What I’ve Learnt About My Own Practice
To make my dream game all I’ll have to do is muscle through it. If I have a problem I’ll solve it, and even if I don’t know something now, eventually I will by figuring it out. Funnily enough the easiest way to learn something is to learn it. Not by giving up before you try. I am excited by this prospect. I know that in making a rhythm game I’ll be able to learn so much about the way unity works, and I’m confident that given enough time I will be able to complete my goal.
How Can I Improve In The Future?
Just to work at it. That’s a bit of a cop-out of an answer, but it’s true. During this journey I’ve done very little of my own self-motivated practice, so from now on that’s something I really should do regularly. I will also be sure to find time for unity and game development. Just small little projects that can one day give me enough skills to be able to do the project I want to do.
How Would I Be Graded?
So, the question that’s on everyone’s minds is: how would I be graded on this? Well I think that within a university context and considering the requirements of a programming module such as this, I think I deserve a credit. I have met all the requirements, made good progress and achieved an end product I’m very proud of.
And Thus...
And thus ends our journey into programming. I didn’t teach you much, but I sure had a good go on my end. In the future I’ll provide the odd update on my projects as well as updates to my music. As some of you are aware I make music under the name Bxkrug, and under the name A Beautiful Word. I will continue to pursue these ventures and will work towards making that game I always spoke about in these posts. For some of you who’ve joined me along the way I suppose you won’t be reading or looking at anything else I ever do. And to you I say farewell.
Until we meet again,
Bxkrug
4 notes
·
View notes
Text
Game Scripting 11 - Let’s Make A Puzzle Game
What I Did
In this week I began work on a first person puzzle game inspired by SEUM. I did this with a framework I’ve been supplied with that includes some assets and scripts and the general basis for a basic FPS game. I have had to do some scripting in C# and some problem solving along the way but I am confident this will turn out well.
What I Learnt
Every week I get reinforced how important it is to practice the scripting language you’re trying to learn. The more work I do with C# the better at it I get. It turns out when Peppy (osu!-Peppy, you know him) told me to just play around with a scripting language in order to learn it he was actually very right. Also, I learnt a lot more about how unity runs, how classes work, and how to use them in your own work.
1 note
·
View note
Text
Game Scripting 10 - Particle Systems
What I Learnt
Arrays are essentially sets of values, and code that can be passed into other lines of code easily. I learnt that while the term “var” when defining a variable can be used, it leads to a lack of clarity and can often cause problem in the code if and when it is called elsewhere. We also went through raycasting and how it is used to construct particle systems.
What I Learnt About My Own Practice
In creating a rhythm game the impact of certain hits and notes is extremely important. The player needs that feedback. I learnt that this is actually easier to achieve then I thought. The abundance of unity particle systems on the asset store and the ease with which they can be tweaked allows for a very useful starting place. I will be sure to use this when I begin work on this project.
0 notes
Text
Game Scripting 9 - Debugging
What I Created
This week I worked on a card game style battle system and then fixing any issues that arose with it. This was amazing to do because it allowed me to actually practice what I’ve been learning and get familiar with C#’s new way of functioning.
What I Learnt
I learnt how to understand the syntax of C#. I learnt how to use strings more effectively through the use of “+” to pass in other variables as string values. This was super interesting and will probably come in useful later. I also learnt how to use the C# game systems to logically resolve a battle which could be used for score manipulation and calculation in my rhythm game.
5 notes
·
View notes
Text
Game Scripting 8 - Arrays & Lists
What I Learnt
Methods was interesting to learn but extremely hard to understand. We did go through how different types of methods access the code within their parenthesis.
In unity and C# “this.[x].[x]” means the line of code is referring to the current instance of the class.
With arrays, we learnt that you can write a lines of code like:
“int[] myNewArray = new int[5];”
“string[] myNewStringArray = new string[5];”
in order to create an array. An array is a set of values starting at the integer 0. It can be used as a storage system to store strings of text, other lines of code or number values.
While I’m not clear on how to use lists, they seem to serve a similar purpose. Arrays are fixed in size, they have a smaller amount of memory but are easier to iterate over, and can be used in a multidimensional way. Lists are newer and contain ways of sorting the values contained within, as they don’t have a fixed size one can easily add or remove elements in the list.
What I Intend To Do Next
Work through the GDD technical document this week and next week and get as much done as I can. Use this opportunity to work with arrays and lists and figure out how they work.
https://docs.google.com/document/d/1QdzRBbzcDEhWXRHw2_vjDSyQE7Hl8TFGnQbxuq67r5I/edit?usp=sharing
1 note
·
View note
Text
Game Scripting 6 & 7 - Reflecting on Transferrable Skills
Introduction
This time I would like to reflect on some personality traits I’ve been told are important for a professional environment. This will be a bit different, but I hope some will find it interesting anyway.
Work Ethic
So far while learning about coding I think I’ve shown a passable work ethic. I have got done what I need to, though maybe not in as quickly a fashion as I should have. Throughout the rest of my time learning programming I will endeavour to work harder and more efficiently on what tasks I need to get done, as well as practicing my programming skills more.
Communication Skills
I feel my communication skills have been shown to be good too. While not necessarily perfect I have kept good communication and contact with both course facilitators and my peers. I do think I could be more formal during communications though I’m not aware how necessary that is.
Problem Solving Skills
While weak at the beginning of my learning, I am growing in my ability to problem solve within the frameworks I’m learning. This is because with an increased knowledge of the systems comes an increased knowledge of how to fix them when they go wrong.
Critical Thinking
Due to my limitations in terms of what I know, looking outside the box for a solution to a problem is hard for me, but I think when I have the means I am able to do this effectively. I hope this will improve as my understanding of the programming languages improves.
Cognative Outsourcing
I think of all of the transferrable skills this may be what I do best. I am keenly aware of where I fall short, and of what I do not know. Looking for ways of getting around this is what I tend to do to mitigate these limitations. Overall I think this is something I can improve but I already do pretty well.
Conclusion
Going forward my main priority is learning more about programming, specifically growing my vocabulary in C# in order to be able to solve problems quickly and effectively and in order to be able to put forward interesting solutions to problems.
0 notes
Text
Game Scripting 5 - Source Control, Repositories & Classes
What I Created
This week I created a repository for my dance battle game which involved the creation of a github account and the installation of the github desktop program. I also practiced working in a pair programming methodology to complete the dance battle game. This was really good fun and taught me a lot about working in pairs.
What I Learnt
This week we went through some methodologies including pair programming. This was great because it gave me some ideas for how game development may go in a professional setting. I may consider using something like this for my own project, if I can find someone. Creating a repository was a great experience as it will likely be something I’ll need to be familiar with, especially when it comes to using the OSU! framework which is stored entirely on github.
What I Learnt About My Own Practice
Learning OOP was extremely useful. OOP is a class based system of programming in which the creation of objects helps to inform the contents of their scripts and functions before any programming is done on them specifically. This was extremely useful because it gave me some ideas about how note generation could work in the context of the unity engine. Using a class for notes, and sub-class for catch notes and another for pressed notes I can easily see the programming of each notes functions being much easier than I previously thought.
What I Intend To Do Next
I will continue to practice and learn, this has been a useful week for information and I look forward to applying some of it.
https://docs.google.com/document/d/1QdzRBbzcDEhWXRHw2_vjDSyQE7Hl8TFGnQbxuq67r5I/edit?usp=sharing
2 notes
·
View notes
Text
Game Scripting 4 - Documentation, Objects & Methodologies
What I Created
This week we worked on implementing the code we wrote in week 3. We went over some methodologies and we spoke about variables, operators and conditional statements. We also worked on a shoot ‘em up, specifically getting some new assets imported.
What I Learnt
Most of this week was revising what I’ve already learnt about different kinds of variables and different kinds of operators. That said it was good to reinforce what I have been learning
https://docs.google.com/document/d/1QdzRBbzcDEhWXRHw2_vjDSyQE7Hl8TFGnQbxuq67r5I/edit?usp=sharing
2 notes
·
View notes
Text
Game Scripting 3 - Flowcharts, Assets & Game Objects
What I Created
This time we worked on understanding how code works without going into syntax. We used a flowchart to take some pseudocode we had written and understand it better through a visual medium. This was a good way to understand game logic.
We also took a pre-assembled project and added assets to it in order to understand the process of importing assets into unity.
What I Learnt
This whole excersise was ok for me but wasn’t quite as useful as it may have been for some people. The use of flowcharts to visualise code actually made it harder for me to understand the code. That said, I do really like the blueprint system within unreal engine, but I find the endeavour of using flowcharts that don’t actually do anything a tedious and largely unproductive affair. In the future I will probably work largely in code and only use flowcharts when necessary, or when the code becomes too bulky, busy or complicated to understand at a glance. That said let me know if this is a good idea or not.
The excersise in understanding assets was really useful to me in understanding game objects and how they work. There are certain ways within unity you need to do things in order to avoid them breaking especially when you start using parents, object spawners and so forth. I enjoyed this process and I’m sure this will help me with my future work.
What I Learnt About My Own Practice
My goal to make a 2D rhythm game seems closer than it used to. I can visualise now the changes in code I’ll need to make in order to patch a C# framework like the Osu! level editor framework or the rhythm game framework on the unity store into a useable state for my purposes. I have figured out aspects of making 2D assets appearing to move in a 3D way and I’ve come up with some ideas for how to use spawners to make notes appear on screen. If I come up with any solid ideas or if I end up making some kind of early version of this game any time soon I’ll let you all know.
What I Intend To Do Next
I intend to keep working on what we’re doing. Soon I will begin work on my own game, I just need to catch up with a backlog of other work before I have time to do that. Working on my own game will provide myself with far more experience within unity and C# and I’ll learn a lot more about programming and the engine through doing my own problem solving. That said I’m feeling good about what we’re doing and I’m excited about the direction of my work. Thanks so much for reading. New update will be here soon.
https://docs.google.com/document/d/1QdzRBbzcDEhWXRHw2_vjDSyQE7Hl8TFGnQbxuq67r5I/edit?usp=sharing
2 notes
·
View notes
Text
Game Scripting 2 - Variable, Operators & Conditionals
What I Created
This week we worked on making a dance battle game. Doing this helped me to learn the ins and outs of variables and operators. As I’ve had experience with variables in GML this wasn’t too hard, but it was good to have all the terminology defined for me.
What I Learnt
Boolean “bool” = on/off (1/0)
Integer “int” = Whole Number (1,2,3,4,5,6...)
Float “float” = Decimal Number (0.1,0.2,0.25...)
String “string” = Text Characters (”you win”)
Public = manipulable in unity
Private = not manipulable in unity
What I Learnt About My Own Practice
Learning these few things will help with developing my programming abilities. Now that I have the bedrock foundations I can begin to build upon it to work towards my goal of making a rhythm game for mobile in unity.
What I Intend To Do Next
Continue to develop my knowledge of the C# language and begin to implement it into some of my own projects for the sake of practice.
I thank you all for coming along for this journey with me. I hope to begin doing some more interesting things soon. Just trying to codify what I’ve been learning.
3 notes
·
View notes
Text
Game Scripting 1 - Unity Game Loops & Future Goals
What I Did
We first went through a brief rundown of unity and C# scripting. We played around with unity and learnt the basics of unity’s “game loop”.
What I Learnt
Unity functions on a set logic loop for all scripts. As I’m used to working in GML this is a new thing for me to get used to. But after these first few exercises I think I’m getting the hang of it. All unity scripts have three main parts to worry about, the startup (what happens when the game/object is initiated), the main loop (frame by frame or otherwise time initiated events), and teardown (what happens when the object or game ceases). Overall I think this will be easy to get the hang of, it is more restricting than being able to define variables at any point throughout the script but it’s not too different to what I’m used to.
Going Forward
In the future I’m going to practice C# more. My goal is to make a rhythm game next year using the ‘Osu!’ framework, which uses C#. This will make this time spent learning C# and unity invaluble. Each week I’m putting in some time into unity and programming and I can see myself slowly getting more fluent.
https://docs.google.com/document/d/1QdzRBbzcDEhWXRHw2_vjDSyQE7Hl8TFGnQbxuq67r5I/edit?usp=sharing
2 notes
·
View notes
Text
Synecdoche: New York - Project Post-Mortem
Introduction

This trimester in our university Bachelor of Audio course, we were tasked with creating all of the foley and soundtrack for a film clip. I chose the film Synecdoche: New York, and tried to find a group to help me, keeping an open mind in case someone else had a better idea than me.
Goals + Team Roles
Our goals for the final product was to make the scene believable and enjoyable to watch. Unfortunately the scene was quite quiet meaning we would probably need to find ways of adding interest in regards to audio. We would need to record an instrument for our soundtrack and would need to record foley. Soon we assembled as a team and we discussed which roles we would take. We generally agreed on some roles which looked as follows:
Tristan - Mastering and Mixing Lead
Jehmal - Foley & Soundtrack Recording and Mixing Assistant
Michael - Foley and Mixing Assistant
Welland - Soundtrack Recording, Mixing and Production Lead
Troubles Faced
We had a couple of problems off the bat. I feel that my leadership could’ve been better, but as I’m not used to taking the lead on these kinds of projects I feel this will be a good learning opportunity. From the get-go it was clear that our group was a little fragmented with some of our group members not knowing where we were in terms of progress and not putting a whole lot into the projects completion. These same group members stepped up and really showed themselves to be extremely valuable members of the team later in the trimester. I feel that had we made quicker progress as a team early on we would’ve had a more polished product at the end of trimester due to us having more time to perfect it. I also want to make it clear that had I taken more responsibility for my team I think they would’ve stepped up earlier. It didn’t help when Jehmal’s Pro-Tools stopped working or when team members, myself included, forgot to back-up certain important pieces of data, but these were issues we, on the most part, overcame. We had troubles with recordings being noise-heavy due to their recording being done away from a noise isolated space like a studio.
Overall I think that my choice of film-clip may have been one that presented its own troubles down the line. Because none of my team members had seen the film they had no investment in its completion or quality. Also the clip is quiet and minimalistic. This means the sounds are all front and centre in the clip and there is little to no room for error, this exacerbates our problems with noisy recordings. I feel this is partially my fault but I would’ve happily changed film-clips if another presented itself. I think that with hindsight some of these problems could’ve been avoided.
What I Learnt
I learnt first-hand the importance of backing up all of your work. Not bits and pieces here and there but all of it. I also learnt the importance of getting all team members on board from the start and not letting anyone fall to the wayside. I also learnt some great techniques for creating soundtracks including the use of chorus and phase cancellation to create the impression of a large orchestra. Many thanks go to Tristan for his help in that regard. Another thing I learnt is that much of the foley that was recorded in the studios was much better quality than the foley recorded away from them. I also think that the techniques Michael found and researched to make the sounds of fire and water I will be remembering due to their effectiveness. I also learnt some important things about talking with artists as this trimester marks the first time that I’ve invited an artist in to a studio and recorded, mixed and mastered some tracks for them. For this project I needed to direct them as to what I wanted and record their instruments for the soundtrack. This went very well and I am happy with the outcome of the recordings. On top of this I implemented the impact markers and the subsequent beat alignment tools in Ableton Live’s sampler for the first time outside of class work. This was great experience and I am now set to use this tool in my own music and my future professional work for processing of music and sound effects.
What I’ll Do Differently
Next time I’m tasked with creating the sound for a film clip I will be getting on top of it earlier. I will be making sure my team is completely aware of not just their roles but also their deadlines. I will also be more mindful of the realism of my soundtrack, especially an orchestral one. I also think that I will make sure that the foley is recorded in a proper studio instead of away from one.
https://drive.google.com/file/d/1eaeH9CjuWEz-JxtKjcxHg2-1wLPIsXfb/view?usp=sharing
Final Product
I am happy with the final product. It has its flaws. Its flaws are painfully clear to me. Some of the mixing could be cleaner and some of the soundtrack sounds fake. However all of these things are things that would’ve been fixed with more time and I feel that next time I undertake a project like this I will have some hindsight to help in the selection of the clip, the problems with leadership and group togetherness. Despite all those things though I am very proud of the work we have put into this project, and I am especially proud of my team-mates for the amount of work they put into this project and the amount they stepped up towards the end of trimester.
This trimester has tought me the most of any so far. I have learnt so many interpersonal skills in regards to team management and talking with an artist in the studio but I have also learnt so many technical things such as the importance of space to foley recording and the ins and outs of beat allignment. I think this self-directed approach to this trimester has been difficult but the most rewarding so far and that I have learnt alot that I will always be able to implement professionally.
Personal Work:
https://soundcloud.com/bo_krug
https://soundcloud.com/bxmb-tek
1 note
·
View note
Text
How To Set Up A Basic Live Sound System
Introduction
In working through live sound at university this trimester we spent time setting up a live sound system. With the help of my classmate Jehmal Pitt I’ve put together this step by step process to set up a live sound system. To this end Jehmal has assisted me by providing me with some visual aids to help with visualising this system.
Setting Up Equipment
Firstly you’ll want to set up the equipment. And in the signal-flow diagram below you can see the parts of the system you’ll need. For our setup specifically a behringer EQ with a crossover function is reccomended. You’ll want to place the subwoofers first. But before you do this you’ll need ratchet straps. Ratchet straps are relatively easy to operate but it is reccomended that someone who is familiar with them show you how to use them prior to when you attempt their use. Place the ratchet straps lengthways along the area you’ll be placing your subs. Now lay your sub down on top like this:
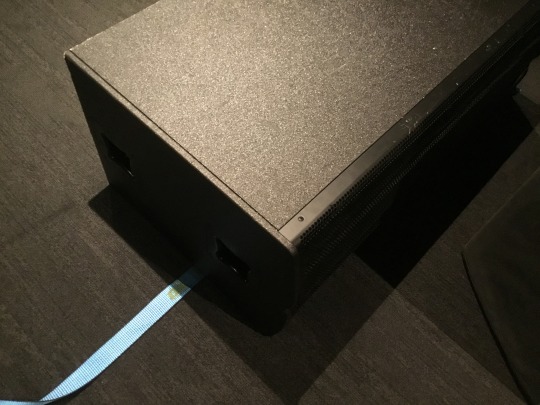
Now you can place your speaker on top of your sub and then fasten the two together using the ratchet straps; making sure that the clip is on the far side from the performers to avoid injury and that it is done up very tightly. Now you can take out the amps, EQ rack, mixing desk, foldback monitors, microphones and DIs that you’ll be using.
Here’s our signal flow diagram:

First of all we applied the system with power. The left and right foldbacks needed to be supplied with power. The desk was also supplied with power. Then we took 2 XLR cables and plugged each one into the left and right outputs of the desk.
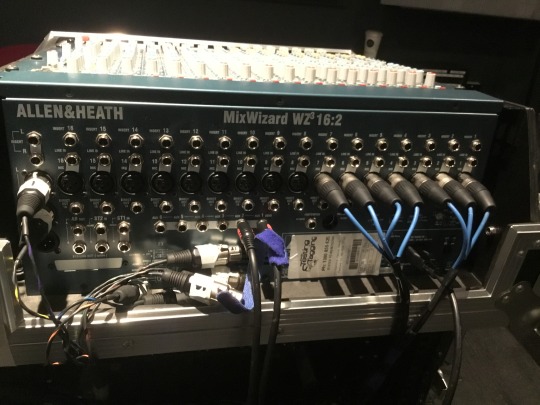
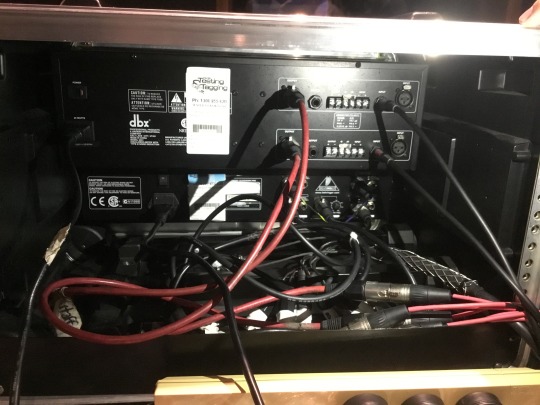
These two cables were then run into the Behringer graphic equalizer. At the equalizer we set it to perform a crossover and thus split the signal into lows, mids and highs. This is done via a knob on the back of the EQ. (See the bottom EQ below).
We set the low cutoff to 100 Hz thus allowing us to send only these frequencies to the subwoofer. We then plugged in 3 XLR cables to the outputs of the EQ. These were then plugged into the snake, in inputs 1, 2 and 3 (or at least the first three working inputs). The snake was now to send this signal down to our 2 amps. The corresponding outputs for inputs 1 & 2 were then plugged into the first amp, this amp being the one for our normal speakers and thus will be handling our mids and highs. We then sent 2 Speakon cables from the output of the first amp and into the 2 front of house speakers. Finally we sent the corresponding output of input 3 on the snake into the second sub with an XLR. We then also sent 2 Speakon cables from the output of the second sub into the inputs of each subwoofer.
In our next step we setup 2 auxhillary sends on the desk and using 2 unbalanced 6.5mm jack cables sent these auxhillary sends to the DBX equalizer (top EQ pictured above).
We then ran 2 XLR cables from the DBX equalizers output into inputs 5 & 6 on the snake. We then sent the corresponding outputs of 5 & 6 (on the snake) into the inputs of the left and right foldback monitor respectively. As the foldbacks are active no amplification is necessary.
We then used the DBX equalizer to EQ the foldbacks and get them room-tuned to avoid noise and feedback. We also used the DBX 166XL Compressor/Limiter/Gate as an insert to channel 1 of the desk, we used this to compress the signal directly from the mic but one could use these inserts for any number of things. To setup this insert we plugged a 6.5mm TRS to TS cable into the insert of channel 1 and plugged the other end into the input of the DBX 166XL. We then returned the output of the 166XL to the return of the insert.
We also setup some send effects. We ran 2 unbalanced 6.5mm jacks to XLR cables from the 5th and 6th auxhillary channels into the left channel of both the A and B input channels of our Lexicon unit. We then sent the outputs of A and B on our Lexicon unit to channel 15 and 16 on our desk, respectively. This allowed us to control the wetness of the return signal using the channel 15 and 16 volume faders.
Now all we need is some microphone input. We plugged the microphone into the snake and then that corresponding output into the channel 1 input of the desk. We then sent the microphone signal to auxhillary 5 & 6 to apply reverb.
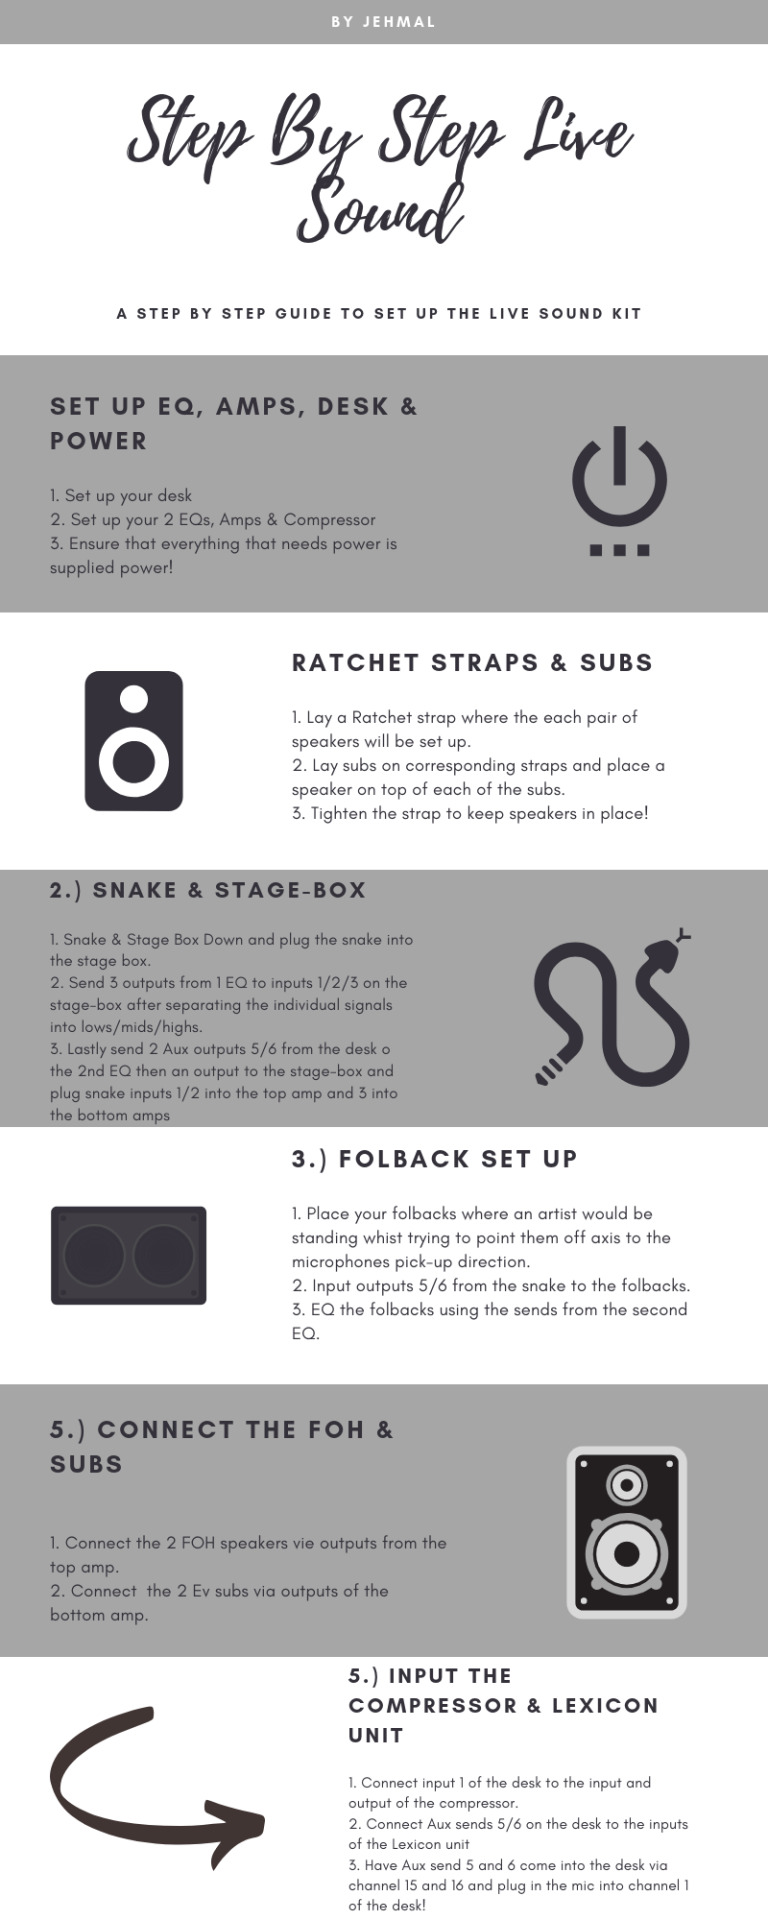
And here’s a handy visual aid to help with understanding what has to be done in setting up this system, once again produced by my friend Jehmal.
You should now have everything you need to set up a simple live sound system. While the equipment can be expensive once you have it these steps will ensure they will be setup with an easy to understand signal flow.
See attached a video of me tuning a room so you know what that entails as well as a video of me running through the signal flow of the LS9 live digital mixing desk.
https://soundcloud.com/bo_krug
https://bxkrug.bandcamp.com
youtube
youtube
1 note
·
View note
Text
I Wrote a Dark Psychedelic Soundtrack - Here’s How
In the last couple of weeks I have been working on a dark ambient soundtrack for a short animation that may interest some of you. The soundtrack is made with the intention of making someone uneasy, especially considering the unsettling visuals it will ultimately be paired with. On the topic of the visuals, I will be unable to show any of them to you due to their being incomplete and thus inappropriate to distribute at this time. I will do my best to convey exactly how and why I made the decisions I did in the construction of this piece, however.
Here is the track for reference: https://soundcloud.com/bo_krug/animation-soundtrack-demo/s-ZNuHM
I’ll first go through how I designed the sounds in the piece.
Here’s the main piece of software I used for the purpose of sound design:
http://hypermammut.sourceforge.net/paulstretch/
It is a free download so make sure to make good use of it.
It is one of my favourite tools for the creation of dark ambient and vapor-ambient. The majority of the sounds are stretched sounds I either recorded myself or have purchased from sample packs.
Firstly, here’s the project files with some examples of the sounds I created pointed out:
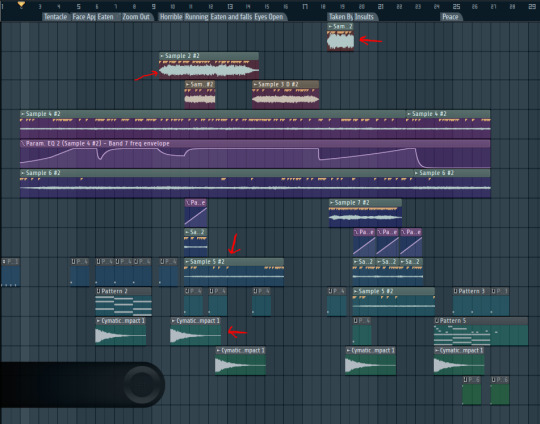
Sound Design
I pulled in various sounds to Paulstretch and edited them to my taste. I made sure they were eerie. My greatest successes were the stretching of a laugh and a scream to make some of the more impactful sounds within this soundtrack.
The sounds are of varying amplitude but this is typical of paul stretch. I mixed them and compressed them differently based on their differing volumes and then tuned them to the key of the song using FL Studio’s default tuning software.
Interesting Arrangement
I layed out the new eerie sounds as seen above, and then proceeded to add some interest. I have been making ambient music for little over 3 years now and ever since I started I have had a saying: add interest or its not interesting. In all of my ambient music I aim to add little points of interest that may seem percussive or melodic in order to keep the listener interested. This is a technique I employed heavily on my two ambient albums listed below:
https://bxkrug.bandcamp.com/album/pt-i
https://bxkrug.bandcamp.com/album/the-darkness-in-all-things
In this soundtrack the main point of interest was the use of the 8 bit sounding pluck that I added ping-pong delay to, and the use of impact sounds from cymatics to add some impact to the things that appear suddenly on screen.

You can see above I have pointed out some examples of the interest points and where I included them. They are scattered relatively sporadically, but know that they appear only when they are required by an event on screen. If you are making a dark-ambient track, feel free to add interest points at any point throughout your song, where you feel they fit. On the left of the picture (”Pattern 2″) you can see a chord progression I made in order to add impact to a certain scene.
A Sound Design Aside
The following paragraph is in relation to the design of the following synth:

The synth pictured above was made using FL Studio’s ‘Harmless’, which incidentally is my favorite FL Studio VST. I wanted to make a chord stack that would add some impact to the presence of a certain creature on screen. The sound therefore acts as this creatures theme, in a way. I left the sound as a saw wave and added some sub. I made sure to remove the “amt” knob completely on the left, as this messes with the filter frequency and makes the sound harder to control precicely. I cut the harsh highs and removed the release so the sound was less intrusive. I then added a phaser to add some more movement to the sound that was removed with the ‘amt’ knobs removal. I also worked to this end with a chorus set to classic and with the mix wetness of 25% or so. This is just an example of how simple you can go with a sound and get it sounding good in a track like this.
tl;dr: A synthesizer doesn’t have to be complex, only well processed and mixed.
Movement in Arrangement
My favorite way of adding movement to a track’s arrangment is probably also the easiest way: add automation, especially of filter cut-offs.

As you can see here, the majority of the movement in the track is coming from bringing new sounds in and automating old sounds, either to make room for the new ones, or to reflect the intensity of the visuals. In ambient arrangement, automation is the simplest and (arguably) most effective way of creating movement.
Conclusion
And with that you have at least some of the tools required to make an ambient mix of your own. At least, to start. If you enjoye ambient music I reccomend my bandcamp: bxkrug.bandcamp.com, and another small independant artist driftmark: https://soundcloud.com/driftmark/daymark.
I hope you all have a wonderful, productive day.
- Bxkrug
https://soundcloud.com/bo_krug/
1 note
·
View note
Text
Soundtrack Analysis - The Great Gastby
youtube
Today I will be giving some of my thoughts on the soundtrack to this scene from The Great Gatsby, and how it uses the subversion of genre to convey a mood and a theme.
The genre of music.
The genre is the most important aspect of this part of the score, because, for all intents and purposes, there is almost no genre to be found. Not consistently, anyway. The scene starts off with loud big-band, swing and jazz music to guide you into the context of the film: 1920s New York. As soon as the character enters the door, however, the scene changes into a combination of club music, house music and pop music. These genres are the most common at parties and dance-clubs you’d go to in the modern day. These genres are what most people will instantly think of when they think of a party the size of one of Gatsby’s. I think its fair to say that had the music stuck exclusively to period appropriate genres it wouldn’t have denoted the same level / type of emotion than music they are already contextually familar with does.
Instruments used.
The instruments change from horns to more modern day synthesizers. Which may be the biggest difference between the period appropriate music and the music that was used in the later part of the scene. Synthesizers were not even thought of in the 1920s and thus should have no right to work in such a scene. The cultural significance of the sound of a synthesizer in the head of a modern day audience member is what allows this scene to work so well.
The drums too are pumping thick house drums. This is also a cultural piece of donotation as well, but works two-fold. The drums are associated with house music and clubs, yes, but they are also naturally pumping, driving and dance-worthy. The use of such drums in both settings can be seen as a testament to how well they correlate with dancing even without the cultural significance they imply. The use of them here, therefore, is more complex than cultural denotation, though that is a huge part of why they were used. The party has to seem huge, has to have hundreds of people dancing all in a very large house. The idea of having something like big band playing while supposedly hundreds of people are losing their minds may make sense to someone from the '20s but it doesn’t make sense to someone raised in the modern world. The difference in contextual musical discourse means that in order to have the scene translate for a modern audience, a different musical and instrumental choice needed to be made even if the inclusion of instruments like synthesizers and synthesized drums are not period-accurate.
In fact, throughout the piece the use of a sampler is employed as well. Both for the inclusion of the baroque organ playing and the inclusion of swing and big-band samples throughout the latter part of the piece. This helps to keep the underlying historical period lightly in the minds of those watching as to not entirely draw them out of the experience.
How does the music contribute to how the audience feels during the scene?
In essence the music is trying to convince the audiences brain of the size and feeling of the parties at Gatsby’s. The use of generic subversion is used exclusively, as far as I can tell, to this end.
Is the music effective?
I think it is. That said, it would depend on who you are. I think that even though I picked up on this and it took me a bit out of the film, I still couldn’t change how I saw Gatsby’s parties. They just seemed bigger because of the song selection. I also think that an audience member who may not be as familiar with soundtracks, film, or post-production audio, may not notice the change due to how well the film blends the genres and instruments together in order to create the mood they’re going for.
It is essentially one of the best examples of post-modern soundtrack composition. Its something that Baz Luhrmann excels at and another example of his is Moulin Rouge.
Thanks for reading, more soon.
- Bxkrug
7 notes
·
View notes
Text
What I’m Working On - Audio Update
Major Post-Production Project Progress:
This trimester I’ve decided with a group of people to do a full recreation of the sound from the final scene of Synecdoche: New York. I’ve undertaken this with Tristan Boor, Jehmal Pitt and Michael Bowers. Jehmal worked quickly to complete the foley and ambience and Tristan worked to get a session secured for recording the dialogue. We have most foley, the instruments for the soundtrack and the ambience track recorded. There are a few things that need to be re-recorded but we are on track to be finished the project in time with more than enough time to have it fully polished.
Shattershield Post-Production Progress:
Shattershield is a small game project I am doing the sound and music for. My part of the games creation is almost complete. I have to do my final mix of the last two songs and edit some of my sound effects and then the sound will be essentially complete. The list of tracks and sounds I’ve done for the game can be found below:
- Charge Sound
- Charge “Ding”
- Flesh Hit (Sword)
- Flesh Slice (Sword)
- Shield Bash
- Shield Break
- Shield Hit (With Sword)
- Menu Purchase
- Menu Select
- Combat Song
- Loading... Song
- Menu Song
Foley For Trespassing Progress:
The foley for a short film called Trespassing will be something I work on before the end of next week. I will be recording and helping mix the sound and foley for this film.
CIU Audio Project Progress:
We have alotted a slot to record dialogue for our CIU project which will be a radio play. The script I have written can be found here:
https://docs.google.com/document/d/1BEOVzMFBSW7bYPchxwEs9VanITcXG5eiOBfxw9nRh-0/edit?usp=sharing
Personal Music Progress:
I have a new album releasing in under a week along with another album in the works. I have released a few new songs this trimester and will of course be releasing a bit more over the coming weeks. I’ve been branching out into other genres such as Jump-Up, Hybrid-Trap and Melodic Dubstep recently, and while none of it is released, it has been a great learning experience for me. I’ve also been designing my own album covers with the help of John Saxon, here is some examples:


https://soundcloud.com/bo_krug
https://bxkrug.bandcamp.com
Thanks for reading and expect another update soon
1 note
·
View note
Text
Use of Reverb in Constructing Space
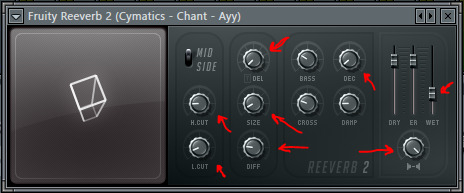
When doing sound design and mixing for post-production one thing that is very important is the construction of a realistic sounding reverb. The sound has to sound like it is within a space, and no matter where you are in the world you will hear some reverb, however quiet it may be. A sound without reverb, especially one in film or games, sounds artificial and wrong. Today I’m going to give you a brief explanation of some of the setting on the default plugin for FL Studio “Reeverb 2″ and how these settings can be tweaked to achieve the sound of the room on screen. Make sure to play around with these settings at home, and try these on your own favorite reverb plugin.
First of all lets run through the reeverb 2 plugin and what all the different knobs do.
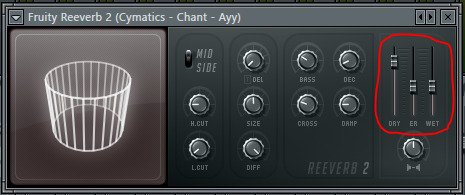
Above we have the dry, wet and “ER” faders, these essentially act as volume faders for different points of time within the overall sound of the reverb signal. First of all dry is the fader that controls the volume of the initial sound. Turning this down will decrease the volume of the initial signal and thus can be used to emphasise the wetness of the reverb or in some music can be used for the pursuit of non-linear reverb, though this is a discussion for another time. The “ER” fader controls the early reflections of a sound, this means the volume of the first actually reverberated noises from your initial signal. The wet fader controls the final tail of the sound and most greatly effects the volume of the overall reverb effect.

This above is the stereo separation of the reverb tail, this can help give the feeling of size in a room by simulating the reverb being around the listener as opposed to it being in-front of the listener. To the right is more mono, and to the left is more “wide” or stereo.
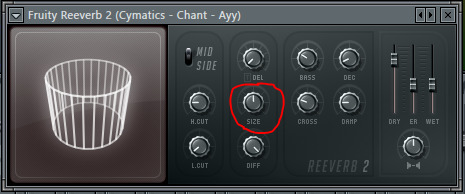
“Size” is a setting that controls the amount of time between the initial sound and the early reflections, while not affecting the rest of the reverb. This is used to increase the size of a space. A cathedral has a larger amount of time between the initial sound and its first reverberated reflections due to the walls being further apart.
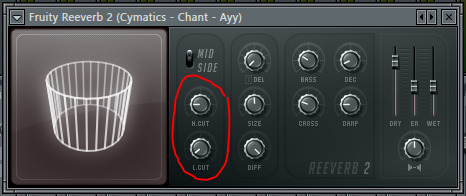
High and low cut are two setting that can be used for mixing in a song, but of-course this is not its only use. In sound design for post-production the high and low cut can be used to tweak the sound to be more realistic. First of all the shape and diffusion of a space will affect how many high frequencies are present. The more diffusion surfaces, ie. furniture, acoustic treatment, carpet etc. are present the less high frequencies there will be in the reverb, hence you can dial this to the left a tad to remove some higher frequencies. The high cut can also be used to achieve an illusion of great distance from the character or camera. The further away something is the quieter its higher frequencies, this effect is exponentially exaggerated at greater distances. In a scene involving a monster rampaging through a city, maybe a long shot would contain some less high frequencies while a close-up may contain more. The reason this happens in terms of physics has to do with the length of bass frequencies waves when compared to higher frequency waves. To think of another example imagine standing outside a club with the door closed, probably the only thing you can hear is the bass or kick thumping, this is due to the same effect. A similar effect applies in larger rooms, though for a different reason, the larger a room the lower a critical frequency is, therefore the lower the peaks and combs of a treble reverb are. For this reason in larger rooms I tend to lower the high cut just a little to add some realism. The low cut can be used to remove any unsavory “boomy” sounds from the reverb, and is more often used in mixing than post-production, though it does have some uses.
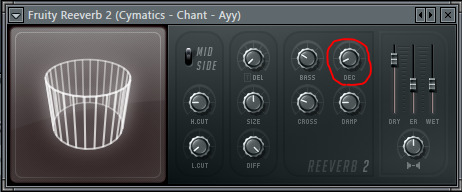
Finally we have decay, decays (as pictured above) is a setting that controls the length of the reverb tail. This is mostly determined by the material the sound is reverberating off, the more solid and dense the material is, the more reflective. A wooden wall will be less reflective than a brick wall, but more reflective than a wall made of carpet or foam.
Think about the room you are currently looking at in your post-production project. Think about these characteristics and then begin constructing the reverb to fit the room. Also remember levelling and mixing as we are still producers after all, but don’t get carried away and end up with something sounding fake, it can really pull someone out of a film when it isn’t done right.
Here are some examples of different reverb types to inspire you
Here is the default sound, its simply a free vocal chant from cymatics:
https://drive.google.com/file/d/1Kp37DhhABsZsvIgkXiQFwIzp3vOrqoa_/view?usp=sharing
Here is the sound with the reverb preset pictured in all the above presets:
https://drive.google.com/file/d/10EEZ5bt9KPvdnNomyc7kYKQosnqH_3Jv/view?usp=sharing
First of all I decided to go for a kind of preset I’ve been using for a game project I’m working on called “Shattershield”. Now “Shattershield” is set in a medieval dungeon kind of setting so the reveb has to sound like a large stone room. Here’s the sound I got:
https://drive.google.com/file/d/1ndQJdjv1FScQJdLBOqukAZVfMlj7_PWm/view?usp=sharing
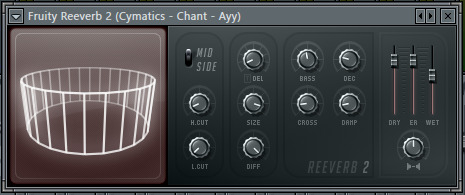
And here’s a picture of the preset I made:

I set the high cut as rather low to emphasise the size of the crypt and lowered the low cut to also add some distance to the sound. The delay is higher than default to add some size once again. The size is all the way up and so is the diffusion. Now you may be thinking “but diffusion is about whats in a room and surely a dungeon is just stone with nothing in it.” You’re right, but as producers and mixers we still need to use our ears and in this case the diffusio knob made the reflections sound fake and robotic so I left it where it was. The decay I turned up to emphasise size and the stone reflective surfaces and the ER and wet faders were turned up to increase the volume of the reverb. The stereo separation is once again all the way up to increase the size of the room.
Here’s the cathedral preset for Reeverb 2:
https://drive.google.com/file/d/1gEKWaiiGAZ0sZNcMzFaHHQZ_PvK502LZ/view?usp=sharing
This time I wont mark out where everythings different but you can see that size and reflectiveness is being emphasised. Listen to the demonstration and see if you can mark the differences.
Here’s finally an example of a small room reverb I made:
And here’s what it sounds like:
https://drive.google.com/file/d/15-BrOYbSwPfRD91zVKj_71Dy5ApbD2bL/view?usp=sharing
You can see all the things I used to emphasise size before I’ve dialed back. The reverb is now entirely mono, very low cut due to the size of the room, it is completely undiffused creating what is essentially a square room, the size is right down, and the wet also is right down as the room is not big enough to produce a very noticable reverb effect. This is quite similar to the reverb in most rooms you would come across in a school or university, especially because of their relative emptiness compared to ones house or apartment. Note that in post-production of a small room space there is still reverb, it is almost completely unnoticeable and the effect is barely there, however it will put the subconcious part of our mind that expects reverb at ease.
This realistic application of reverb and other delay effects can really take a film to the next level, so next time you are editing your or a friends film, remember to apply some of these techniques and watch how it improves the quality.
Until next time friends,
bxkrug.
https://soundcloud.com/bo_krug
1 note
·
View note