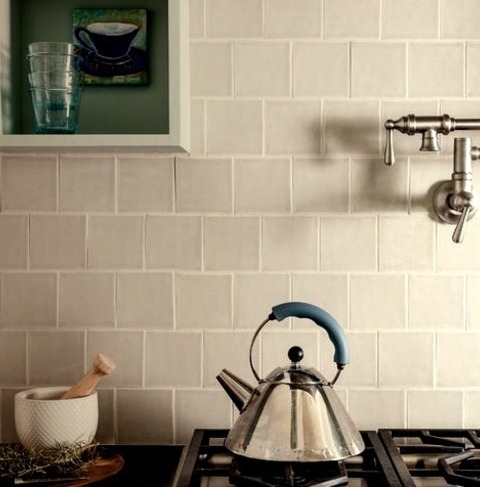
#4x4 tile
Text

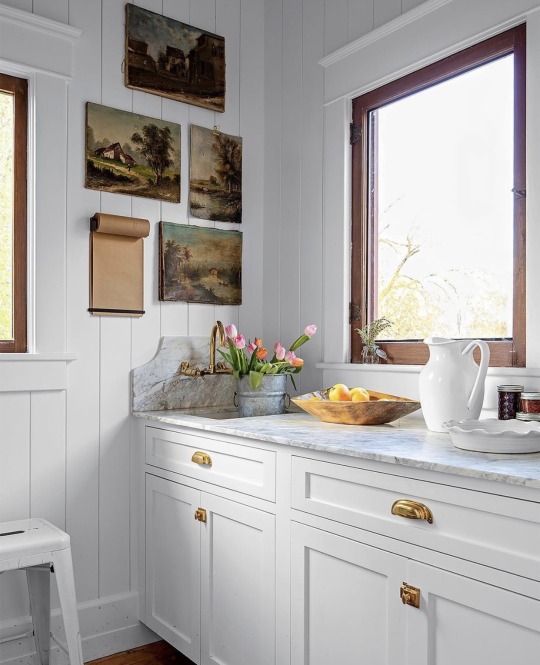
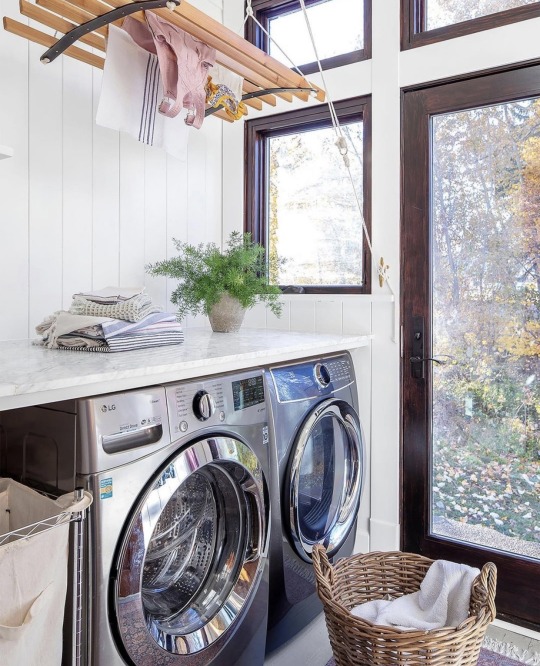

IG betterhomesandgardens - @thegritandpolish, 1912 foursquare farmhouse.
#kitchen#wall hood#farmhouse sink#open storage#4x4 tile#brass hardware#pantry#marble#tongue & groove#look laundry room#beadboard#hooks#laundry room
39 notes
·
View notes
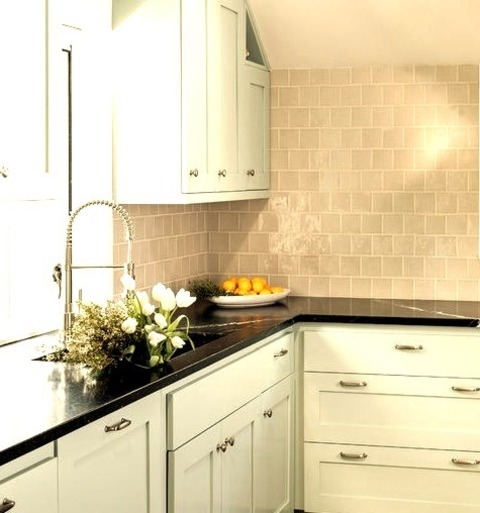
Photo

Great Room San Francisco
An illustration of a small, traditional, open-concept kitchen with a light wood floor, a single-bowl sink, beaded inset cabinets, white cabinets, soapstone countertops, a green backsplash, a ceramic backsplash, white appliances, and an island is shown.
0 notes
Photo
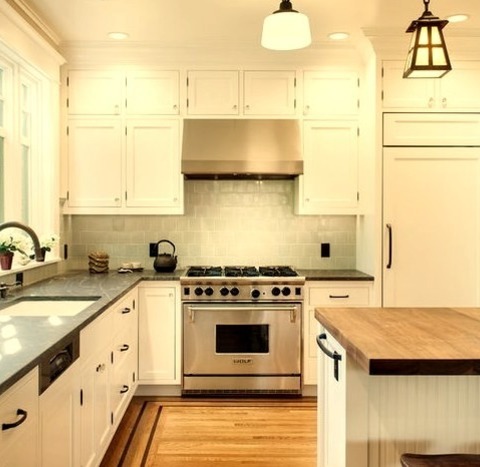
Great Room Kitchen San Francisco
An illustration of a small, traditional, open-concept kitchen with a light wood floor, a single-bowl sink, beaded inset cabinets, white cabinets, soapstone countertops, a green backsplash, a ceramic backsplash, white appliances, and an island is shown.
0 notes
Text
waoh
its some of the gym leader cards
#pixel art#my art#aseprite#pokemon#pokemon tcg#game boy color#kinda but not really actually#didn't stick to the 4 colors per 4x4 tile#but i dont care either#they still look good
265 notes
·
View notes
Text
There’s a post in my drafts that I *know* I finished ID-ing last night and added to my queue, but it is currently sitting unfinished in my drafts instead. It deleted my description of two whole photos and most of a third and they weren’t *hard* but it was still time and effort that is gone now.
#behind the scenes#that post maybe be what gets me back into rubiks cubes though#it is from the good ship kilburn tbi show i think#and they used a ghost chbe for the black box#and ive never seen a ghost cube irl but i have worked with one with non square tile shapes#it was the mirror one#thats all to say that the ghost cube is just a fucked up 3x3#i can solve standard and void 3x3s#i still need to memorize 2x2 and 4x4#maybe i shall drop hints to my brother that if he gets me a birthmas gift this year it should be another cube…………………….
2 notes
·
View notes
Text
Converting a cross stitch pattern to a crochet pattern is surprisingly fun
#lav rambles#i should make a crochet tag#it is easier bc the cross stitch pattern was for a mosaic#so its all 4x4 tiles#theres almost 800 of them tho#gonna be a loooooooot of granny squares#and a very big blankey
1 note
·
View note
Photo
Traditional Kitchen
#Small elegant u-shaped white floor and painted wood floor enclosed kitchen photo with shaker cabinets#blue cabinets#stainless steel appliances#no island#black countertops#soapstone countertops#an undermount sink#beige backsplash and ceramic backsplash 4x4 tile painted floors#painted kitchen#interior designer#kitchen#shaker style#pot fillers
0 notes
Photo
Sacramento Enclosed
#A small#classic kitchen remodel featuring a u-shaped white floor and painted wood floor#shaker cabinets#blue cabinets#soapstone countertops#stainless steel appliances#no island#black countertops#an undermount sink#beige backsplash#and ceramic backsplash is shown in the illustration. kitchen#4x4 tile painted floors#simple#interior designer#sacramento designer
0 notes
Photo
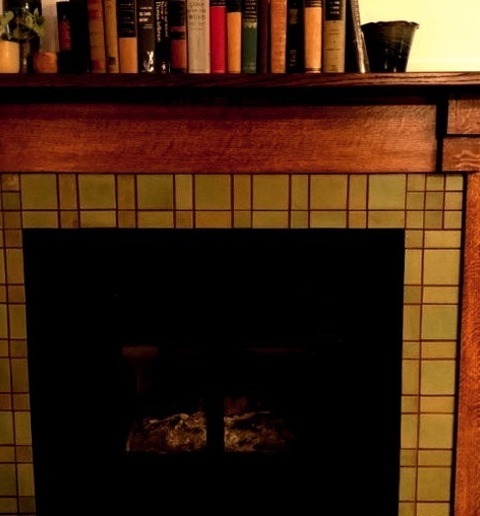
Craftsman Living Room
#Photo of a mid-sized living room in an arts and crafts style with yellow walls#a tile fireplace#a standard fireplace#and a medium tone wood floor. patina#2x2#green#4x4#2x4#mission style
0 notes
Text
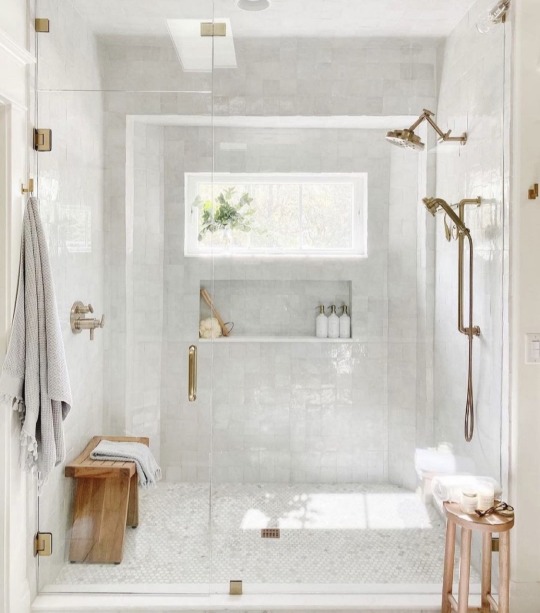
IG @interiordesignassistantuk
#shower#wet room#pearl subway tile#penny tile#cudstom glass enclosure#brass fixtures#soap niche#interior design#4x4 square tile
185 notes
·
View notes
Text


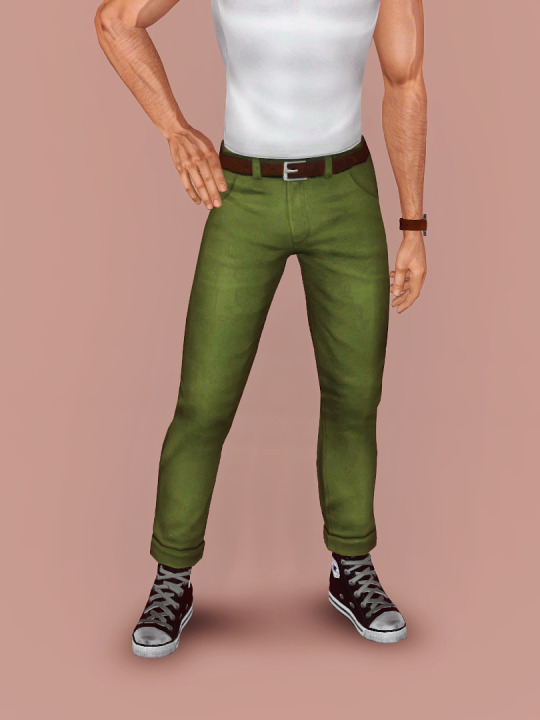
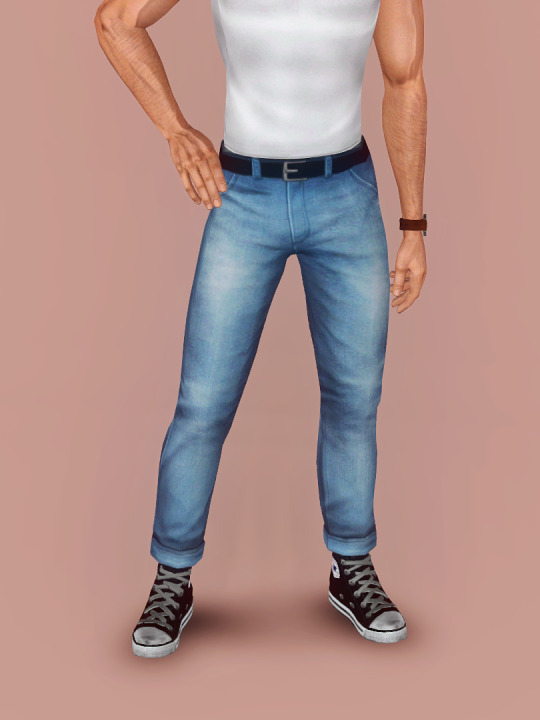
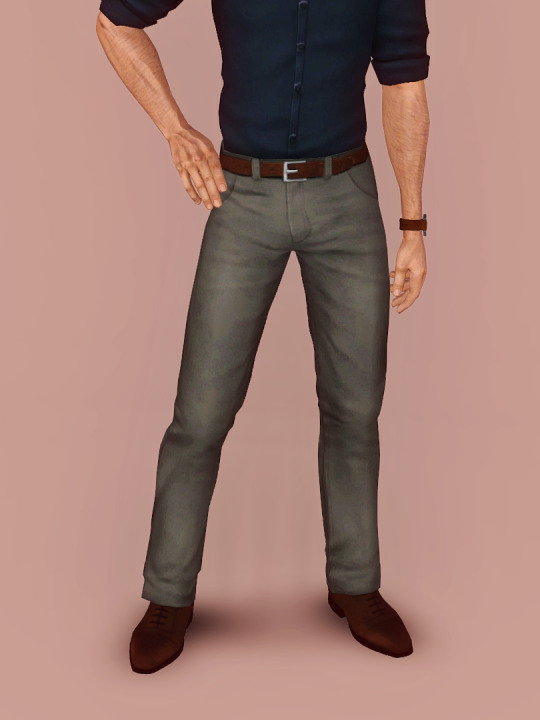

4t3 Conversion: Rope's Jeans and Chinos
I've converted both the regular versions and the rolled up versions. I'm so pleased with how they turned out.
Original here.
Chinos
Fully recolourable: belt / belt buckle / pants / pocket buttons
First preset is 4x4 pattern tiling, second preset is 8x8 tiling
Jeans
Fully recolourable: belt / belt buckle / jeans
First preset is 4x4 pattern tiling, second preset is 8x8 tiling
Other presets are Rope's denim textures (semi-recolourable)
Low poly count: the meshes are only about 1000 poly.
I would like to credit @simtanico 's 4t3 Cropped Pants which I used as a reference when positioning the waistline to the TS3 torso, and when assigning bones and creating smooth morphs.
Download: simfileshare / mega
653 notes
·
View notes
Text
TILE TRANSITION TUTORIAL

a couple of people have asked me for a tutorial on how I did the penultimate gif in this set, so here goes! this is my first tutorial, so please feel free to reach out with further questions if anything's unclear.
note: this tutorial assumes you know the basics of gifmaking, can create the base gifs, and are familiar with timeline mode.
STEP ONE: create the base gifs! I'd recommend staying between 25-40 frames for each gif, since the transitions we'll use later tend to increase gif sizes. these are the ones I'll be using for this tutorial:


STEP TWO: create the guide layouts for both base gifs. for this panel, I chose a 4x4 grid — I would recommend keeping the number of "tiles" low because it can get tedious, but have a minimum of 9 (3x3 grid).


now your canvas should look like this:

STEP THREE: create the tiles. this is where the going gets rough; there might be easier ways to do this that I couldn't think of 😭 if there are any please send me an ask!
essentially, in this step we'll cut up the base gifs into smaller squares so that each tile can be manipulated separately when we put both gifs together. to do this, first create a square using the rectangle tool and the guides. then duplicate the base gif, move it above the square, apply a clipping mask, and then convert the clipped gif and square (selected in the image below) into one smart object.


ALTERNATELY: you could duplicate the original base gif and use layer masks to isolate tiles. create a layer mask for the duplicated gif layer and, with the layer mask selected, drag your mouse over a square (using the guide layout) and press delete. then press ctrl/cmd + i to invert the layer mask so that the gif only shows in the square of your choosing.
now repeat until you've got the entire gif in tiles, and do the same for the other gif!
since the transition effect is achieved by staggering the crossfades for each tile of the final gif, you can cheat by having multiple tiles "flip" at a time, ideally no more than four. this means you need to cut the base gif up into fewer pieces. to do this, simply draw multiple squares instead of one and then merge the shapes, before duplicating and clipping the gif onto them.


if you do this, it's essential to remember that you have to divide both gifs up in the exact same way. each piece of the b/w gif has to correspond to a piece of the purple gif!
this is what the layers look like for each gif once I'm done:


I have them lettered so that it'll be easier to match them up in the next step.
STEP FOUR: this is the complicated bit that took me two days to figure out. I'll do my best to explain but don't hesitate to reach out if something isn't clear!
to begin, open up a new psd and import both base gifs into it. (remember to click "create video timeline" and ensure that your gifs are all in order before proceeding.)
now, the trickiest part about this transition is ensuring that all the little tiles sync up so that the larger gif is coherent. so first we'll create some markers (just empty layers) to ensure that everything lines up as it should.
— marker 1: at about halfway through the first gif (b/w in this case)
— marker 2: at about a quarter of the gif length
— marker 3: close to the end of the gifs

at this point we're ready to start bringing in the tiles. I'm going to delete the base gifs from this new psd just to keep things cleaner!
first thing to do is import my b/w tile. move the timeline slider over to marker 1 and split the first gif. (if it helps, rename the split gifs and add (start) and (end) to the two halves.) then, move the (end) half to the beginning of the timeline, and the (start) half to line up with marker 3.
the purple tile is easier to manage. simply import it into the psd and line it up with marker 2.
your timeline should now look like this:

notice the overlap between the gifs at their beginnings and ends — this is where you'll be able to cascade the tiles flipping, so it helps to have a significant amount of overlap.
crop the three gifs for this tile as you see fit! since this is the first tile I want to flip from b/w to purple, I'll crop gif 1a (end) all the way to the current position of the timeline slider (red line with blue tip) and leave the beginning of gif 2a uncropped. for the flip from purple to b/w, I'll crop both gifs a bit.
once that's done, drag all three gifs onto the same level in timeline so they form a video group. your timeline should look something like this:

now you just repeat the process for all the other tiles! as long as you made sure that all the tiles in one gif correspond with tiles in the other gif in step three, this should be a fairly painless process. make sure to crop the starts/ends of the gifs separately so that they don't all flip together.
this is what my layers look once I've done all the tiles:

and the gif!

STEP FIVE: transitions! click on the half-white square (top right of the left column in the timeline, beside the scissors) and select the crossfade transition, then drag it between two gifs in a video group. it should create a two-triangle symbol and shorten the overall length of the video group.


apply the transition to all the tile flips, ensuring that the duration of all transitions is constant. this can sometimes be tricky because ps likes to change the duration of each transition, so right click on the transition symbol and manually change all your transition durations to be the same.
your layers should now look something like this:

STEP SIX: draw the grid. bring back the guide layout from step two and using the line tool (I like 2px thickness), trace the grid. adjust opacity as you see fit (50-80% is usually a good idea), so that the canvas looks like this:

STEP SEVEN: export and celebrate! you're done!
I hope this tutorial made sense and was easy to follow, and happy giffing! my inbox is always open for any questions <3
#tutorial#ps help#ps tutorial#userace#alielook#userabs#usercats#userhella#userfaiths#tuserabbie#usershreyu#usertreena#tuserlucie#uservivaldi#usertj#usergiu#userroza
615 notes
·
View notes
Text

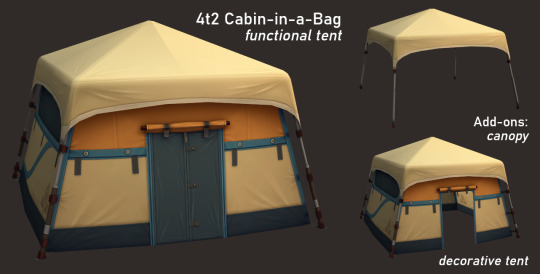

Cabin-in-a-Bag Tent from Outdoor Retreat | 4t2 conversion
I've wanted this tent for so long! but I think no one converted it so far? So I did it, with a bit of help from @littlelittlesimmies who kindly extracted the resources for me
It ended up being a mini-set of 3 objects:
Cabin-in-a-Bag tent
A functional, fully animated tent sitting on 4x4 tiles. It can only accomodate 2 sims like Maxis' BV tent, but has better comfort and sleep stats.
§1070 | Comfort - Misc
Decorative Canopy
Repo'd to the functional tent
§300 | Decorative - sculptures
Decorative Tent
Sims can access the inside and will not walk through the walls. Repo'd to the functional tent
§650 | Decorative - sculptures
Comes in the 7 original recolors
**DOWNLOAD (SFS)**
This is definitely one of the most complex projects I've worked on so far, and not having to create the mesh and textures from scratch I could focus on other more advanced aspects of object editing. I learned a lot of new SimPE skills in the process!
Thanks in particular to @crispsandkerosene and @blueheavensims for the tutorial on editing object footprint. I also figured out how to properly change motive settings thanks to this explanation by rebecah. I was actually shocked to discover that editing catalog ratings does not have any effect on gameplay... I somehow never checked in game before :')
1K notes
·
View notes
Text
Skylights 001

Published: 1-31-2024 | Updated: N/A
SUMMARY
Add a skylight to your build! Combine with invisible flooring to prevent rain/snow from falling through it (Simmons, 2024). Sources: Nooks & Niches (BuggyBooz, 2012), Skylights (Cas H, 2022 via Cities Skylines).
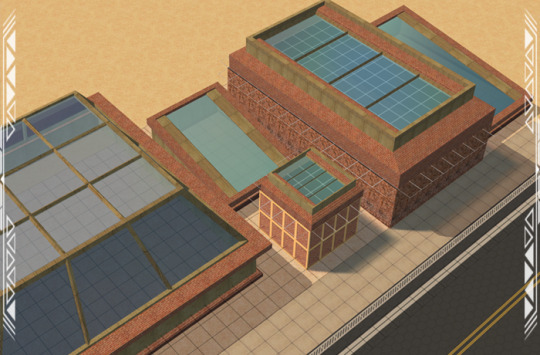
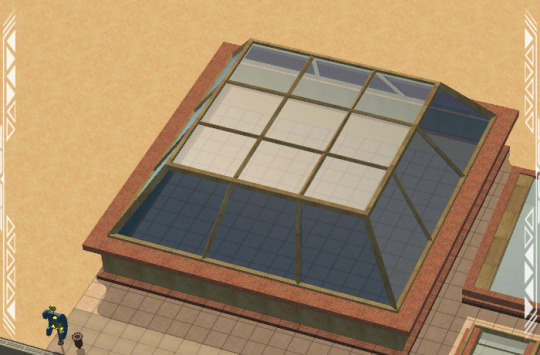
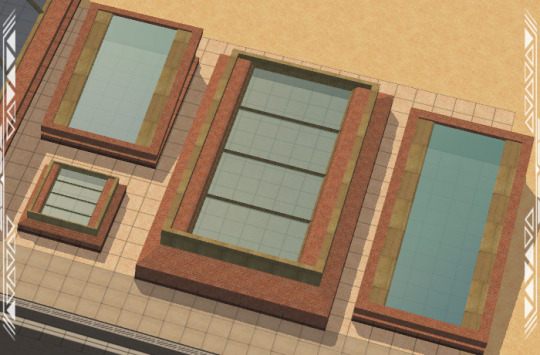

DETAILS
Requires all EPs/SPs.
§1000 | Build > Architecture
You need the BBNiche1Master (Buggybooz, 2012) and Glass Repositroy from the Repository Pack (Simmons, 2023). These are 1-tile objects, skewed slightly towards the front of the tile (so use move objects on/off and grid on/off cheats if you want it perfectly aligned). When playing with high-altitude camera mods, zooming extremely far out will cause the glass to fade from view (see pic below).
ITEMS
Skylight 001 (6x8) (476 poly)
Skylight 002 (17x17) (452 poly)
Skylight 003 (9x15) (398 poly)
Skylight 004 (6x12) (476 poly)
Skylight 005 (4x4) (414 poly)
DOWNLOAD (choose one)
from SFS | from MEGA

CREDITS
Thanks: Cas H, The “Midnight Crew,” and the Simming/Cities Skylines fan communities. Sources: Beyno (Korn via BBFonts), Cities Skylines (Paradox Interactive and Tri Synergy, 2015), EA/Maxis, Nooks & Niches (BuggyBooz, 2012), Offuturistic Infographic (Freepik), Skylights (Cas H, 2022 via Cities Skylines).
Converted content is for non-commercial use only. EA/Maxis own all content derived from their games, as do other game/content publishers whose work appears on this site in derivative form. Per the Valve Developer Community TOU, CS creators control their custom content – contact this site via private message re: TOU violations.
181 notes
·
View notes
Text
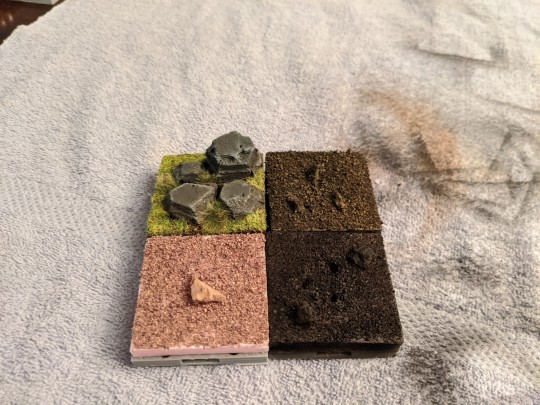

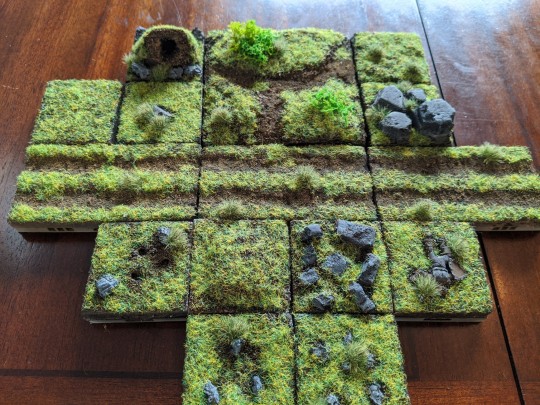
I liked the openforge system enough that when I decided to make some more natural terrain, I carved up the foam board and attached individual squares to the bases so I could attach them with magnets and rearrange the battlefield to be different each time. After that, just followed a basic guide to grassy mini bases.
While the lines between tiles are quite distinct, I've found I rather like that as it's easy to judge distance without having to mark a grid or pull out a tape measure. Keeping tiles from 2x2 to 4x4 inches makes it easy to tell how many squares across it is without losing room for detail within the lines.
68 notes
·
View notes
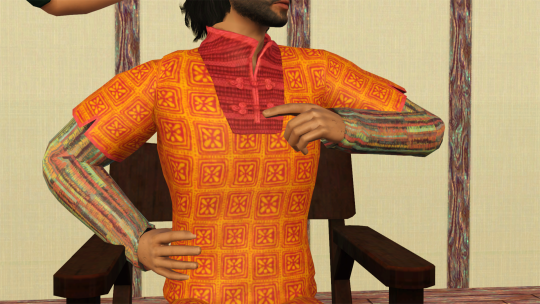
Text
Maxis-Match Medievaloid Miscellany, Part 1: Young Adult and Adult Male Clothing


Item 1: The Al-Andalus Tunic Skirt. A retexture of EA's Large Belted Kilt mesh with editsims' Tara Skirt textures, this tunic is a simple and classic tunic-style bottom. One recolorable channel at 4x4; available for too many categories to list, but it is fully morphed.
Item 2: The Dalriada Tunic Skirt. Another retexture of the EA Large Belted Kilt mesh, this time using PoppySims' pleated skirt textures, this tunic has pleats (or gores) for extra flair. One recolorable channel at 4x4; available for too many categories to list, but it, also, is fully morphed. Works well with lower-slung belt accessories.

Item 3: The Danelaw Tunic and Trousers. This is editsims' Disparate Youth skirt layered over EA's Kung Fu pants; suitable for the more active (or cold) individual. Three recolorable channels at 4x4 tiling. While it's available for quite a few categories, it doesn't have a pregnancy morph.
Item 4: The Byzantium Top. This is EA's World Adventures Chinese Sophisticate top layered over Supernatural's Top With Infinity Scarf. It's a very fancy top, in my opinion. Four recolorable channels at 4x4 tiling; available for Everyday, Formalwear, Career, Makeover, and Maternity to make it more ~exclusive~ than the others.
Download them all here (package file only): http://simfileshare.net/folder/196853/
Or download them at simblr.cc here.
Credits, in alphabetical order:
@aprilrainsimblr for holding my hand through morphing the Danelaw bottom, as well as providing Alasdair's top | @camoflash004 for the bones and morphs from their TS4 skirt conversion, which I used as a reference | @club-crimsyn for Kiran's hosen | @danjaley for the Bayeux Tapestry, Standing and Talking, and Temple of Aphaia poses | EAXIS for their textures and meshes | editsims / littlecat for their skirt textures and meshes | MograSims for Alasdair's and Bruno's shoes | @nectar-cellar for walking me through Mesh Toolkit about a year ago now; additionally, for Kiran Prasad, who I Maxis Matchified and used as a model | @ninjaofthepurplethings for Karl Melton, who I also Maxis Matchified and used as a model | OneEuroMutt for Alasdair's and Bruno's hosen | PoppySims for their skirt textures | @simlicious for the patterns (your wool fabrics save my life every time) and for providing Bruno's top | @sweetdevil-sims for Kiran's shoes
95 notes
·
View notes
Last Seen Blogs
remusawoooo
🐺💫

ray-the-sad-cat
ray the sad cat

room6twelve
Room6twelve

sfde8871
What An A(i)Hole
stingykei
soup