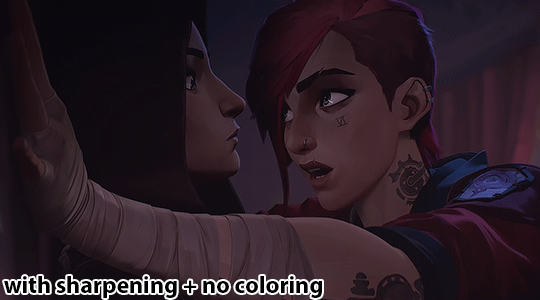
#540p no rights
Note
question. how do i watch that beatles rpf movie. please advise
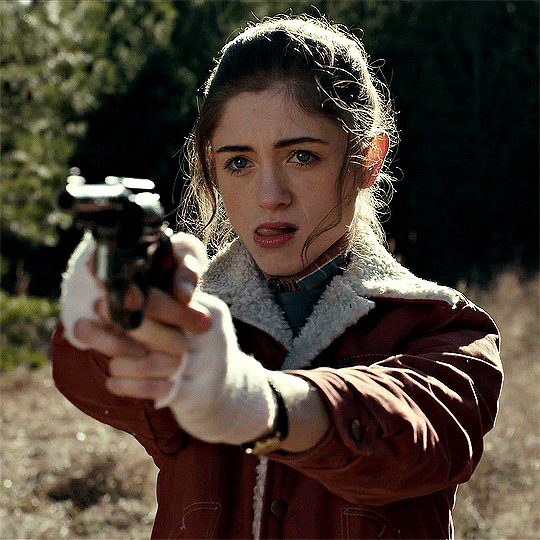
TWO OF US 2000? YOU WANT TO WATCH TWO OF US 2000? look no further brother youve come to the right place. here you go you beautiful soul
vimeo
unfortunately there are no versions i can find with subtitles + the best quality is 540p but you know what? that's the only way to experience it. it's a low budget tv movie so bad quality is its true form❤️ hope you have fun. it's good actually.
13 notes
·
View notes
Note
Hi! I was wondering how you get such high quality gifs? Do you have Topaz or maybe sharpen in Premiere/After Effects? I’m new to making gifs; I’ve been exporting 1080p clips from Final Cut and recoloring + turning into gifs in Photoshop at the 540p width for tumblr. The results are passable but nowhere near the quality you’re producing. Even exporting 1080p gifs for Reddit, while lovely, don’t compare. Yours must be 4k or even 8k. If you don’t mind sharing, I’d love to know your process!
Hi! Gosh, really, thank you for the kind words ♡ That means a lot!
I don't do anything special with mine, I just use the same files that are in 1080p. I do have an upscaler but that can only upscale any photo to x4 the size. I think I can probably upscale gifs, but I'd have to manually upscale every frame and then make the gif in Photoshop, but ngl.... I'm a lazy gifmaker hahahaha.
My sharpening process is very simple. I only use Photoshop in making gifs. I've pretty much used this process in all types of media/fandoms (Anime, dramas, tv shows, kpop, etc.) Feel free to experiment on your style as it varies with everyone else. You can find the full tutorial under the cut.

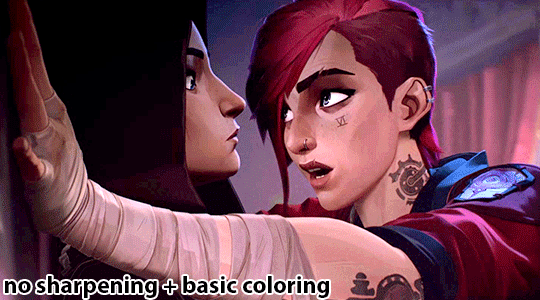
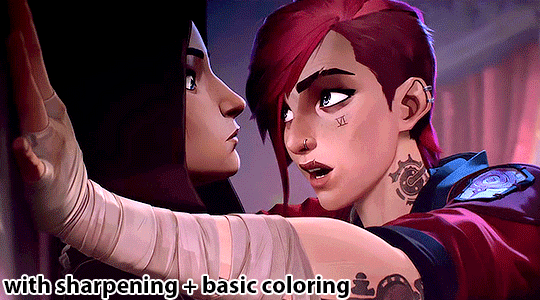
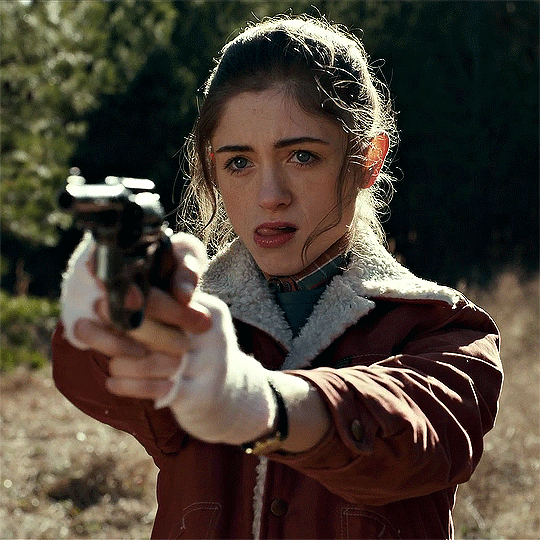
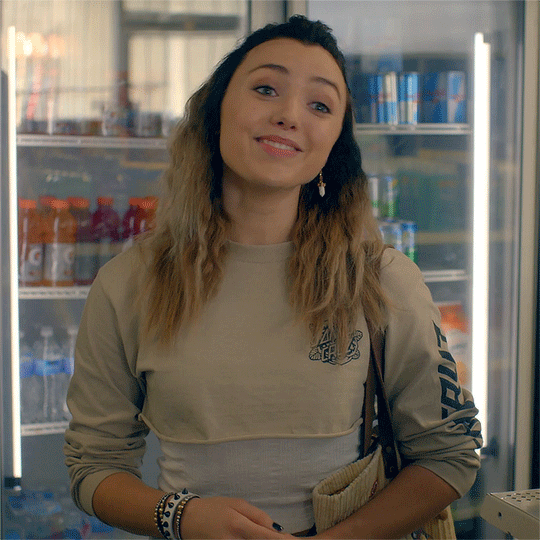
Edit: Maybe I shouldn't have used such a dark gif as an example hahahaha oops
I use the timeline method in Photoshop to make my gifs. Here is a tutorial that's a bit similar to how I make gifs. For Arcane, the frame speed I use is either 0.04 or 0.05.
I've based my sharpening process on a tumblr tutorial years ago by another blogger but I can't seem to find their blog post :(((( if anyone knows it, please let me know!
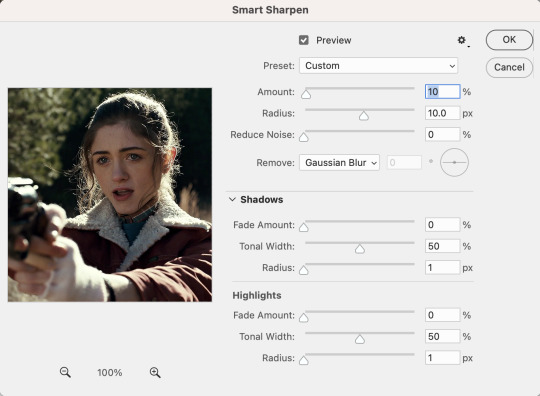
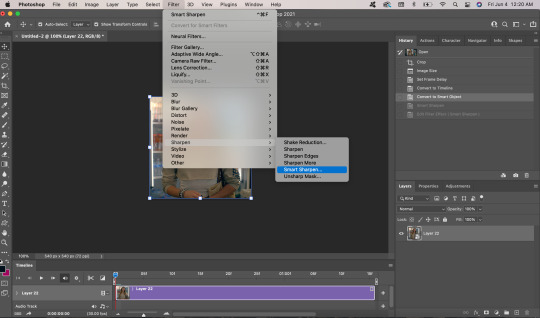
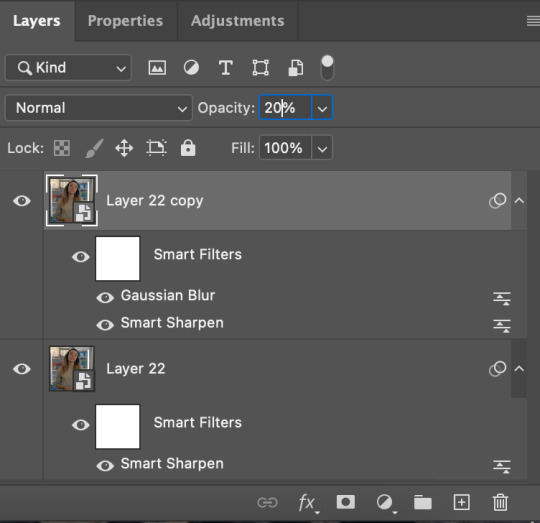
My sharpening process are as follows:
First, I duplicate the base gif in photoshop

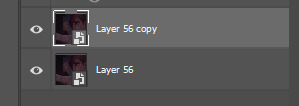
So now, I have 2 copies of the gif. Then, I'll be sharpening the duplicate layer, so go to Filter -> Sharpen -> Smart Sharpen
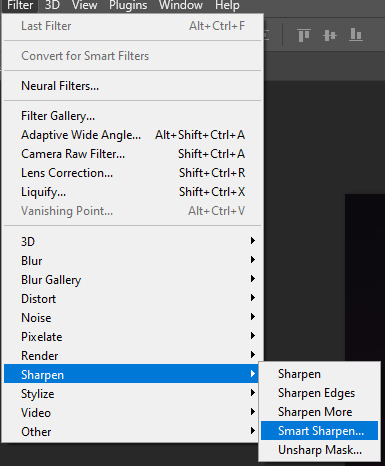
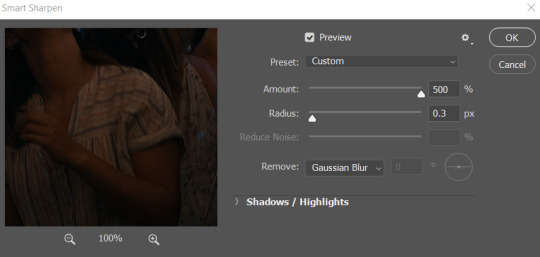
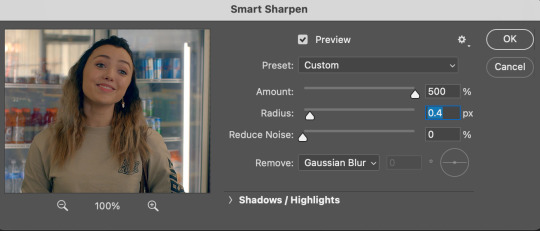
Here are the settings I use to sharpen gifs:
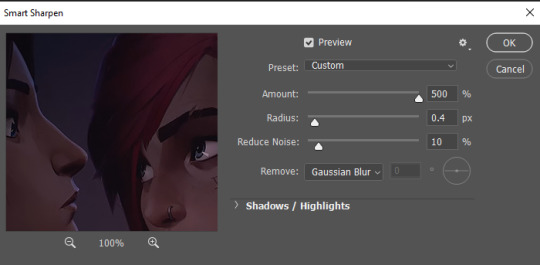
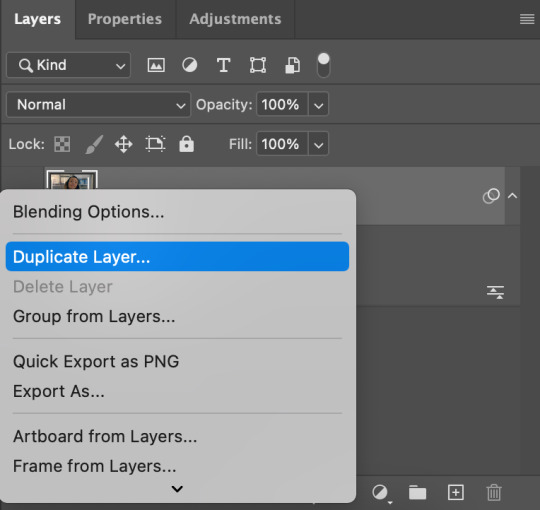
Click okay, then you will see this under your layers
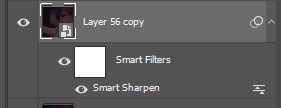
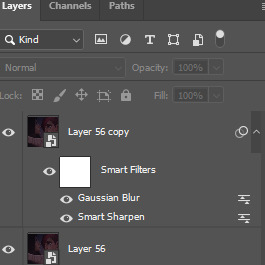
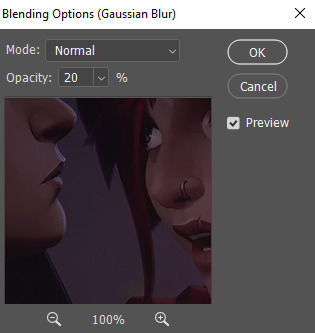
Some people stop there and then color their gifs, but I prefer to add another layer of Gaussian Blur to make the gif less noisy.

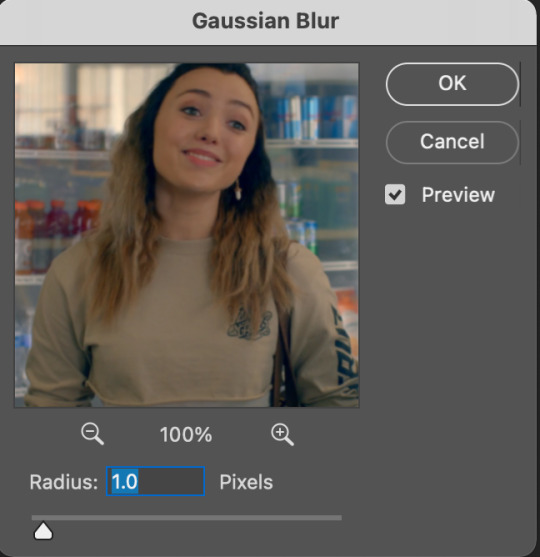
Here are my gaussian blue settings:

Click okay, then your duplicated layer will look like this:
Next, make your layer opacity to 80%.

Then, double click the right adjust icon on the gaussian blur settings

Set the opacity to 20%, but you can adjust as needed.
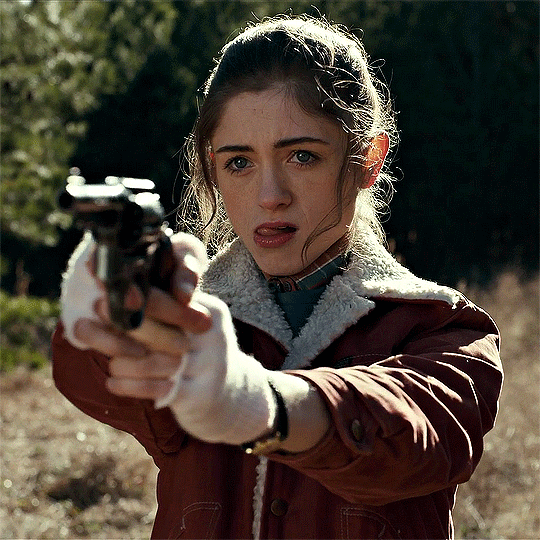
And you're done sharpening the gif! You can color and add PSDs to it right after. As always, dark scenes are going to be difficult to sharpen and color, so try to experiment and tinker around.
Hope this helps! If you have any questions, feel free to send an ask/message!
#answered#littlewildbouquet#maybe i shouldnt have used such a dark scene sdkfjskfsf oops#ofc im gonna use caitvi as an example tho LMAOOOOOO#tutorial
49 notes
·
View notes
Note
please feel free to ignore this, but if you have a sec—how do you get your gifs so crispy? they’re so clear compared to a lot of the others I see around. would you mind sharing any tips? sorry if you’ve already answered something like this before (i’m a newbie). and no worries if you want to keep them to yourself. i just thought i’d ask. thanks for creating so many amazing gif sets!! this fandom is super lucky to have you ❤️
Hi! First of all thank you very much!!! ❤️
I did answer this before tho i cannot find my own post (thanks tumblr) but i dont mind doing it again!!
First thing is really to use the source video in the best quality available. Preferably youtube videos and i really download them in 4k if i can (this does kill my pc but its worth it).
To minimize the loss in quality when resizing them to fit the perfect tumblr format sizes (540p, 268px or 167 px) i use vaporsynth. it's not that intuitive at first but there are good tutorials on here in the #vaporsynth tag that explain it way better than i can. it can also denoise your gif which helps a bit if the source is not that good in quality!
The rest is done in Photoshop! I know it's kinda expensive but it really works the best for me (there are tutorials on here to get it for free too)
I'm doing gifs for a while now but if you just start you can search on here for pre-set sharpening and coloring settings (psd files)! However theres tons of things you can do in photoshop really and i'm not an expert... if theres something specific u saw in my gifs and u wanna know about, feel free to ask! Otherwise I'd say just play around with the settings to get a feeling for it, especially for the coloring part i feel like there's no real right or wrong way to do it!
Most importantly tho: If you make gifs please share them with us!! And don't worry if they're not "perfect"! I did my first ones in an gif converter and then slowly learned over the years (and i'm still not happy with the ones i make sometimes), you'll find your own gif style! c: ❤️
#i hope this helps a little bit#i kinda learned everything i know over.. wow...8 years??#if you have more questions or specific ones u can ask me ofc! i try my best to explain#u can dm me anytime i love talking about gifs :D
12 notes
·
View notes
Note
잔 ── hello ੭ ask
ᰋ ː ՞ hello everything is fine? first I would like to say that: your tumblr is amazing and beautiful!
ᰋ ː ՞ second I would like to know if you could tell me how you make your gifs and the quality of them. please. 🪺
hi!! im doing good, hope you are as well. and thank you <3
sorry it took me a few days to get everything together. but here's a basic tutorial of how i make gifs:
to start, i explained here what programs i use and how i choose source videos to gif. that link is actually an old tutorial I put together about my gif making process, but ive changed a few things since then that i think improve quality so i figured i would explain everything instead of just the changes . for the things that have stayed the same ill just be copying and pasting
so there's a few parts that ill go over here:
importing frames
converting frames to layers
sharpening
coloring
saving
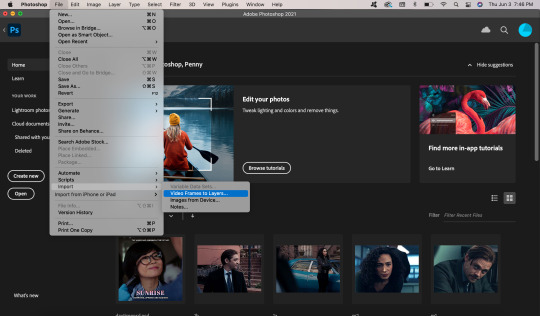
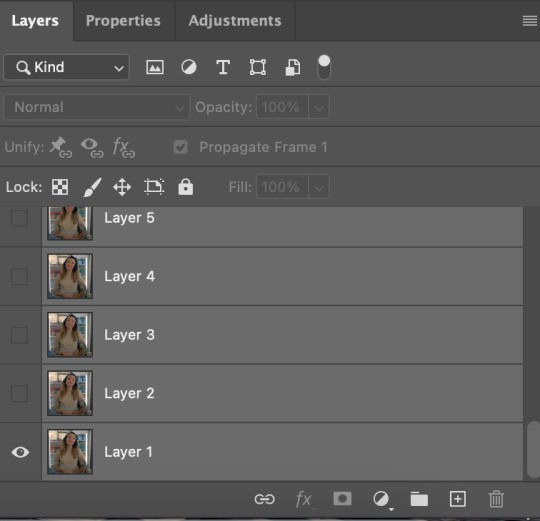
STEP ONE: IMPORTING FRAMES
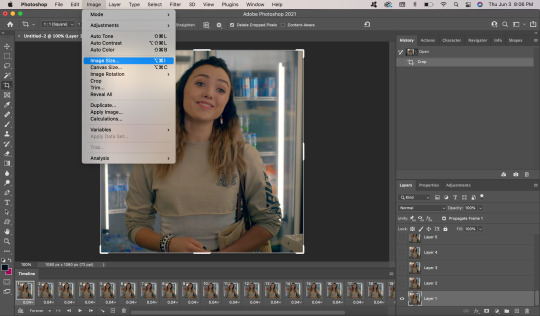
to start, go to file>script>load files into stack
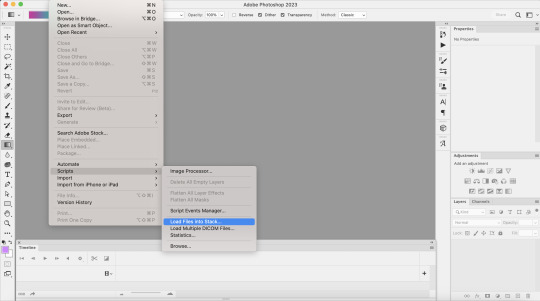
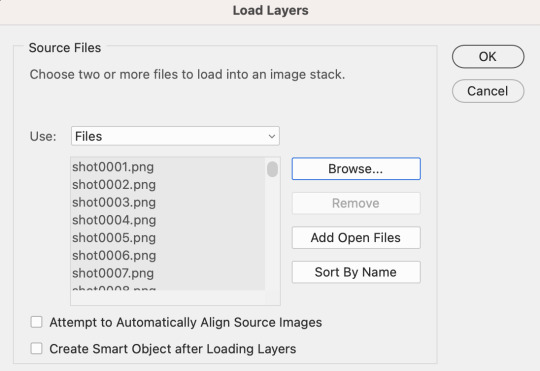
this is where you’re going to load in the screencaps you just took. go to browse, then select the first screencap and hold down shift until you select the last screencap, then hit ok
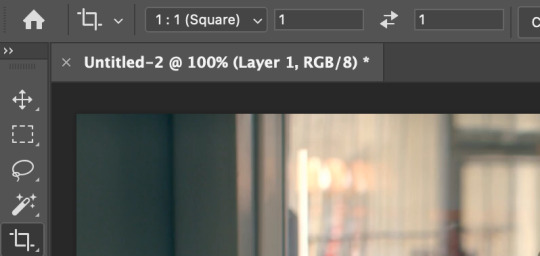
after that, i crop my gifs using the crop tool on the side of the screen. on the top of the screen i usually select square, but the exact size and shape depend on what exactly im making
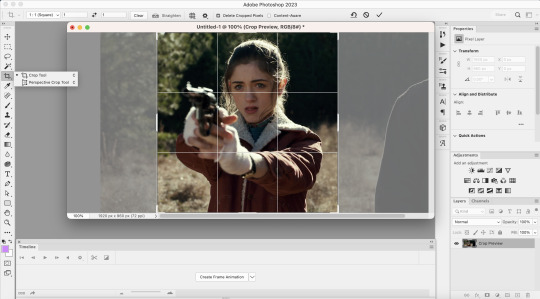
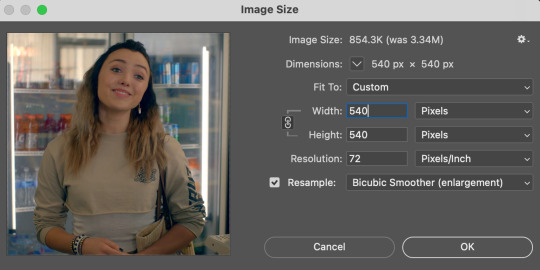
next I go to image > image size. tumblrs standard width for single gifs is 540p, so thats almost always what you'll use for width
STEP TWO: CONVERTING FRAMES TO LAYERS
so here's where we actually start to make the picture move. to begin, click "create frame animation" at the bottom of the screen. this is what it looks like once you've done that

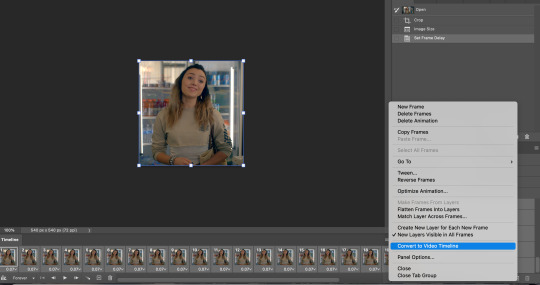
next, go to the three horizontal lines across from the word “timeline” at the bottom. once that menu opens, click “make frames from layers” at this point the gif is backwards, so you’ll want to go back to that same menu and click “reverse frames.” I forgot to take a screenshot of this point, but you should see more individual frames in the timeline now - however many you imported during the first step
now that your gif’s frames in the correct order, you can set frame delay. select all the frames in the timeline, then right click. i almost always set frame delay to .05, but if i have less than ~20 frames ill set it to 0.06
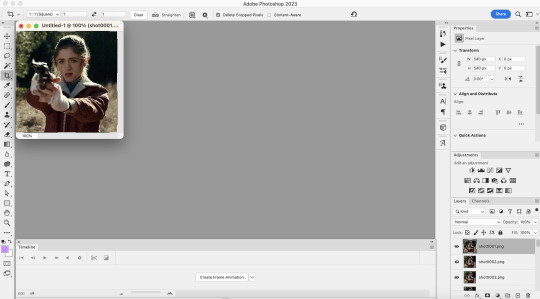
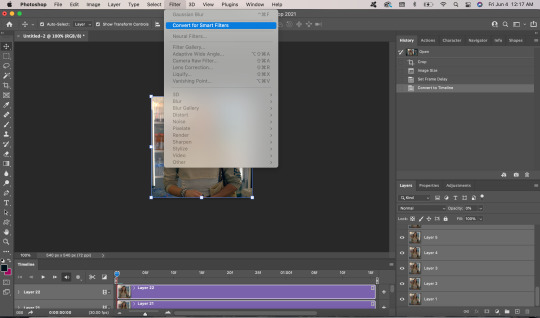
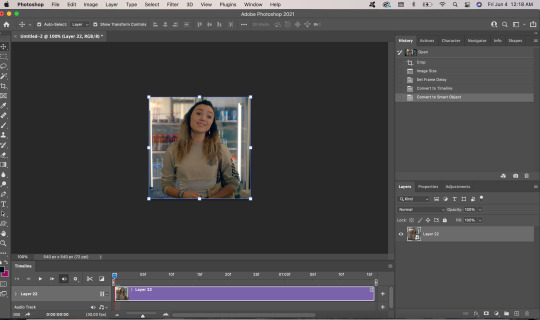
next, click the symbol in the bottom left corner (you can see it in the photo above) to convert the frames to a video timeline. after this, on the bottom right side, select each layer of the gif under the “layers” tab. right click, then select “convert to smart object.” this is what your screen should look like before converting:

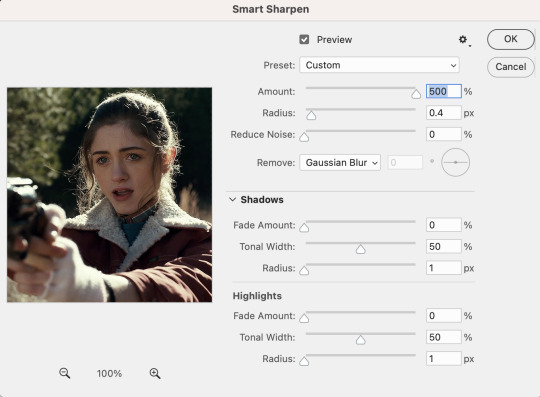
STEP THREE: SHARPENING
once you've converted your layers to a smart object, you can begin sharpening. this is the stage that can really improve the quality of your gif, especially if the source itself wasn't great.
for example, this is what my gif looks like before i begin:

i personally sharpen my gifs four times. to start, my settings are 500% at 0.4px:

next, i repeat the same steps, except my settings are 10% at 10px
i then repeat those two steps again, so my third sharpen is 500% at 0.4px and my fourth sharpen is 10% at 10px. here's what it looks like after the third:
STEP FOUR: COLORING
so theres really two parts to coloring. first is adjusting the lighting, and second is adjusting the color. the amount of adjusting you do will depend on what exactly you're working on. for example, for this, im not really adjusting the colors, just fixing the lighting.
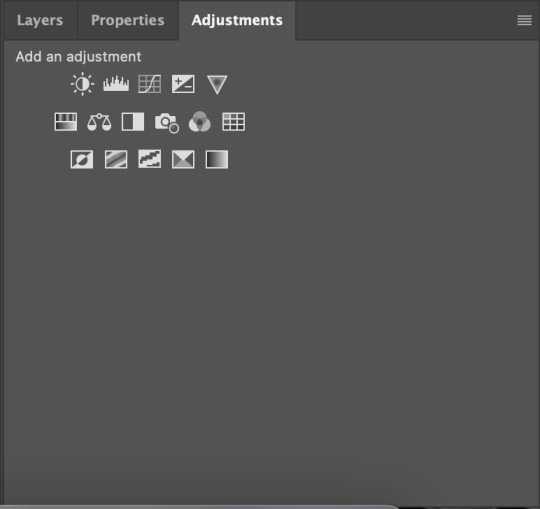
to add adjustment layers, you can either
1. go to layer>add adjustment layer>select the layer type
2. pick a layer type from the icons on the right side (above the layer list)
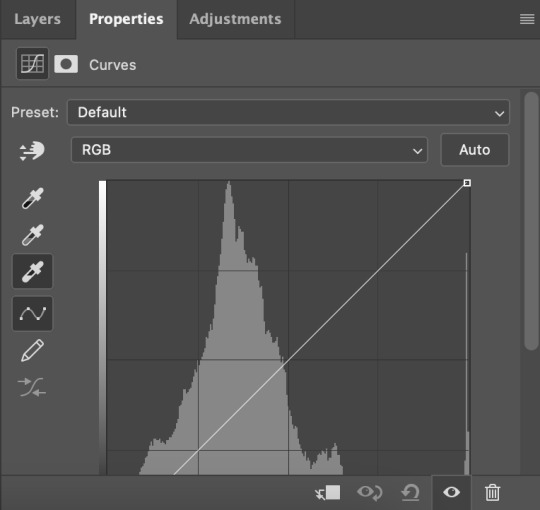
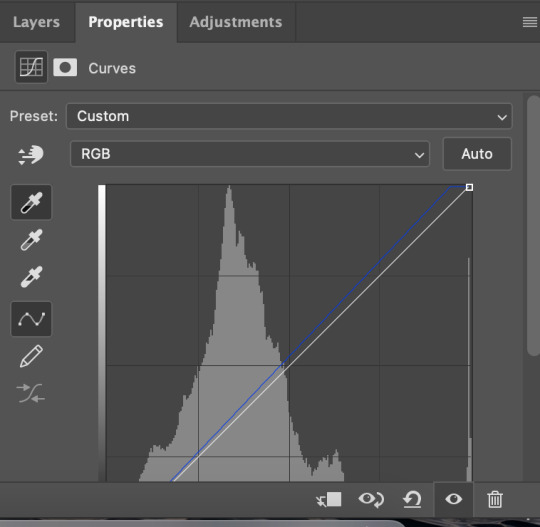
i always start with a curves layer. the key to this is using the bottom dropper tool on the right side (see below image) to select the lightest layer in the gif. personally, i always zoom in on the characters eye, because theres usually a white speck from the reflected light. your other option is just clicking "auto" and photoshop will make the adjustment for you.
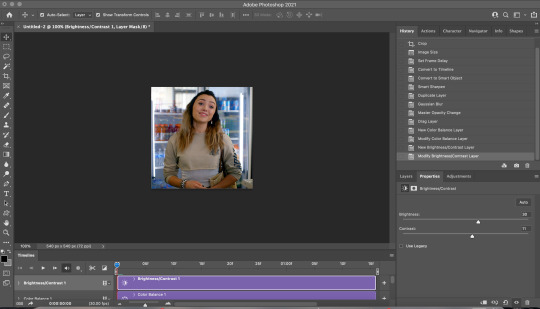
next is brightness. for this, i almost always just hit auto

next is layers, and i use the same technique mentioned under curves

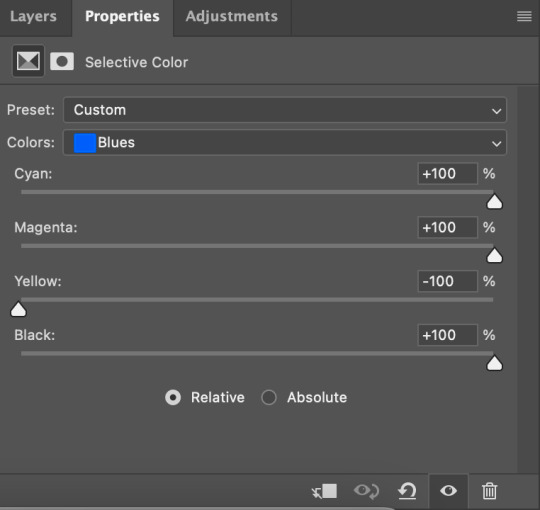
once these are done, i add a selective color layer specifically to increase black. to do this, i create the layer, go to black, and then increase black to whatever i think looks best. this is another way to try to improve quality, as it can kinda make the gif look sharper
next i added a vibrance layer. for this, i increase both the vibrance and saturation to make the colors stand out more.
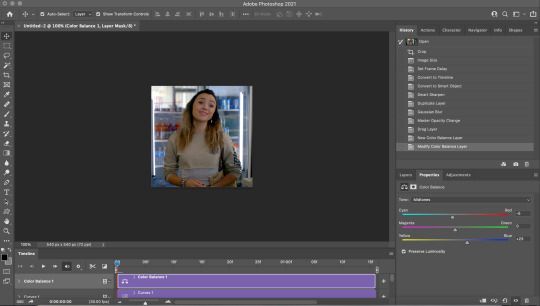
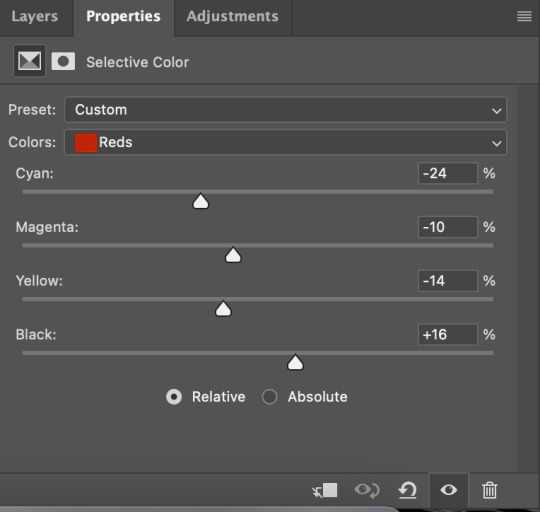
after i added the vibrance, i realized that her face looked a little too saturated compared to how i wanted it, so i corrected it with an additional selection color layer in which i went to red and decrease the magenta and yellow a little, and then did the same under yellow. when you gif people, a lot of times you'll have to play around and figure out how to correct skintone, because sometimes adjusting lighting can make it look a little unnatural. in my experience, the easiest way to do this is by adjusting the red and yellow tones either under hue/saturation or selective color.
next, i added an exposure layer to the gif to brighten it a little more. ill usually always add this at the end because so many shows are so dark that giving it that final additional brightness can make a difference
STEP FIVE: SAVING
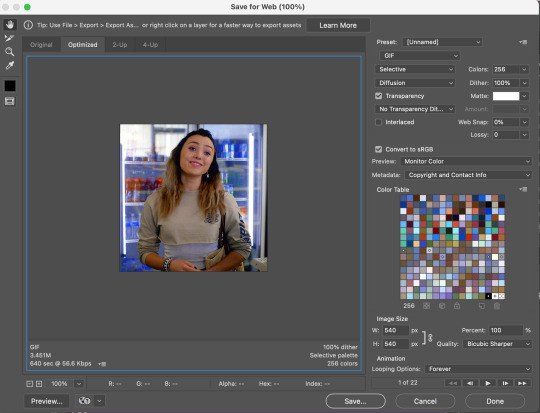
once you’re done coloring, you can save your gif. to do this, go to file>export>save for web (legacy)
the save settings i use are perceptual, diffusion, colors: 256, dither: 100%, quality: bicubic sharper
also, the gif size limit for tumblr is 10M, so make sure your gifs are all under that size. if they’re too big, you can either adjust the image size on the save page (or while making the gif) or shorten the gif. i would recommend shortening the gif because adjusting the image will decrease the quality
i hope this was helpful!! i tried to explain everything as much as i could, but let me know if theres anything you'd like me to explain more :)
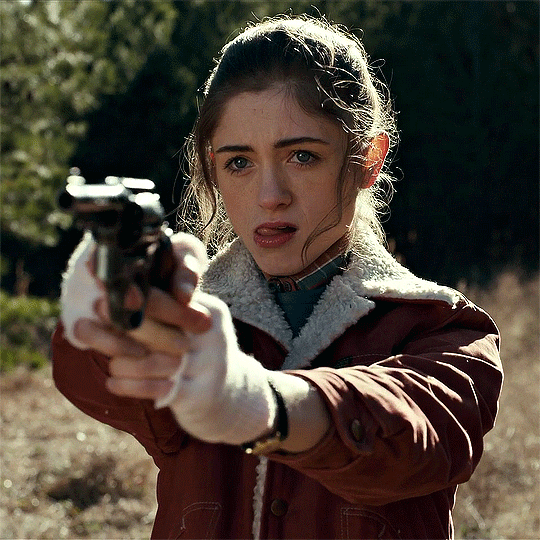
and here's the first and last version of the gif, so you can see them side by side:
(also, i created the "tutorial" gif at the top way after i made the rest of the examples, so i dont have the full tutorial for it. but basically this is what i did:
selective color 3: green > +100% cyan +100% yellow -100% magenta, yellow > +100% cyan +100% yellow -100% magenta, then used the brush tool in black to paint over her face, getting as close to her surroundings as possible to remove the excess yellow
hue/saturation 2: green saturation +45
hue/saturation 3: green hue -60
the text effect i explain here
and the box is made by hitting "command" + clicking on the base layer of your gif > adding a new layer > "stroke" (edit > stroke) > choosing your settings, and then adjusting to the size you need)
2 notes
·
View notes
Note
hii 💗 love ur gifs! could u share your sharpening/exporting settings or some tips of how u prevent heavy gif compression on mobile?? because i use 540p sizing, sharpen after resizing, only using 1080p footage and above but unfortunately my gifs on mobile are quite blurry. sorry this is long but thank u in advance!
omg, thank you! 💜
i think we pretty much have the same process – 540p sizing, sharpening after resizing + only using 1080p files and above (for huge gifs, i tend to stick with 2160p files). but, here are my sharpening and export settings ✨ (this one's for a 540x650 set so its quite big)
i tend to like sharp, grainy gifs. so, i do a first round of resizing and sharpening before coloring, then duplicate the colored layer and do another round of sharpening (if that makes sense?). ps. sharpening settings is really up to your personal tastes, imo


as for gifs appearing blurry on mobile: do they appear blurry even after you upload and click on them? sometimes, gifs do appear blurry on dash but look okay when i click on them (though if i reload my app, they end up looking okay again as is lol)
i think this has more to do with a person's connection than your gif settings? all my gifs tend to push the 10mb limit (my gifs are almost always at 9mb+) so they're quite heavy and i understand they wont always load properly immediately for everyone. ultimately tho, i think using 4k files, proper sizing, getting the coloring right + having lesser frames will help gifs load better even on mobile
ps. everything i know when it comes to gif sharpening, i learned from this tutorial by the amazing @anya-chalotra ✨
#asks#L.answers#gif making#i hope this made sense!!#i didnt go in-depth when it comes to sharpening since i assume you're a gifmaker too#but yea i hope this helps 💜#gifs appearing blurry on mobile is such a pain tbh ugh#even gifs from some AMAZING creators i know sometimes look blurry on my dash (unless i click on them)#but that's because of my shitty connection probably and nothing to do with the quality of their gifs lol#also this got a bit long sorry asdkjghasdg
3 notes
·
View notes
Text
Random stuff
Good afternoon Alex, and today I’m feeling lazy and I have no topic soooo here goes :P
Potato gaming
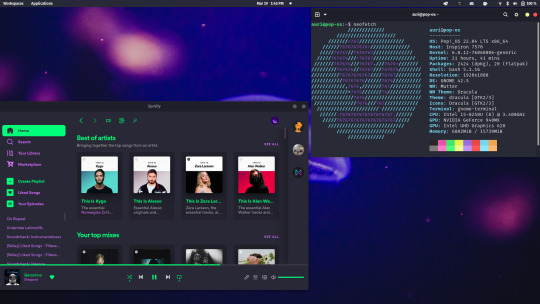
As you know, I have a 6 year old potato of a computer with performance worse than integrated graphics nowadays (i5-8250U, 16GB RAM, 128GB SSD, 500GB HDD, NVIDIA 940MX). Also, for fun, I checked how it compares to the best GPU right now. The RTX 4090 has 16384 CUDA cores and the 940MX 384, so that’s like 42.667 times the cores. Enough numbers, into gaming. So, I use Linux, specifically Pop!_OS, you don’t want me to get into it, but it’s a better in every way to Windows (I will provide a few fields tho :P)
As Linus Torvalds, creator of the Linux kernel once said,
“A computer is like air conditioning – it becomes useless when you open Windows.”
Allow me to flex my desktop
I haven’t even customized it fully yet. Windows is much more restricted when it comes to customization, and I'm a customisation freak.
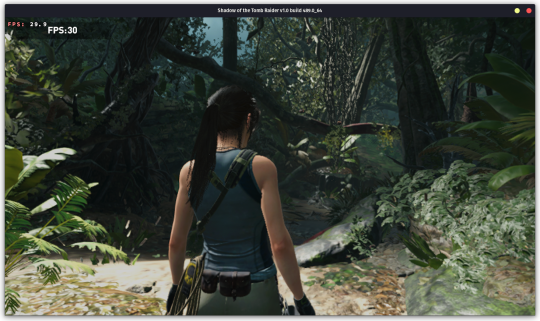
Okay, right, gaming. As a Linux user I obviously prefer open-source software, so for most games I use the awesome Heroic Games Launcher for games I own on Epic Store (sidenote: I would never buy from Epic Games, they are a crappy company and do not support Linux, even for games like Shadow Of The Tomb Raider, which has a linux native port for god’s sake, but they do offer free games every week and I am broke so :P). I discovered however, that SOTTR would not run on Linux because of DRM (Digital Rights Management, a software thing that stops you from doing anything the service provider does not approve of, a la linux gaming without the use of the epic store :P). So, I decided to switch to Windows and try it there. So, first thing I did, download NVIDIA drivers for the GPU. Big mistake, you can’t install drivers without an NVIDIA account which is like so dumb, I JUST NEED MY GPU TO RUN YOU DRICKIGN AJFD. sorry, I hate nvidia. Okay, next, install Epic Games Store, and the game itself. I ran the game. I got an average 15 FPS, with a lot of stuttering with crappy graphics. This is coming from me, who plays games at 960x540 with FSR Sharpening at 1, I am very generous to graphics, but look at this
Bleugh. Then, I installed Epic Games on Linux using Wine, instead of using Heroic, and the results were shocking. The game ran at 33 AVERAGE FPS. Rich gamers will look at this and go “33 fps? Makes me puke, why is this girl so excited about that” and they’re right, 33 is low, but I am running on a potato. And also, I started playing the game with V-sync set to half refresh rate so it was locked to 30 fps, it barely ever dropped below that, and the visuals looked like this.
Sure, it didn’t look the best, but it is waaaaaay better than how it looked on Windows, and at a better framerate!
For reference this is how it looks with ray traced lighting.
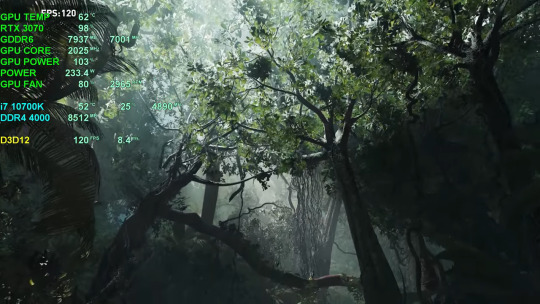
And here's how it looks on my laptop:
I could even play at Medium settings at a higher resolution. I don’t know how a Windows version of a game ran better on Linux, but that is how it performed on my laptop.
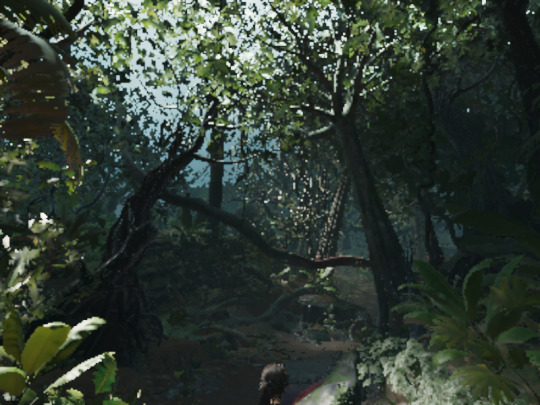
I also played Control, another 2019 game at 60 fps at low settings, 540p render, upscaled to 4k, yes, 4k. Although, the game is set is a much smaller are and has much less to render, so it’s apples to oranges.
Control
I know the post is getting extremely long but I just need to talk about Control. Control is a game made by Remedy Entertainment in 2019 as part of their Remedy Connected Universe. They're known for the critically acclaimed Max Payne series, Alan Wake, the first game in the Universe and Quantum Break. From this we see that Remedy is pretty much known for exceptional games with interesting topics. So, Control. Control follows the story of Jesse, a girl from a town called Ordinary searching for her brother. The game is set in the Oldest House, the headquarters for the Federal Bureau of Control. The atmosphere is awesome, really fun gameplay, the game hands you supernatural powers which are really fun to play around with, and the game has the best destruction physics ever seen in video games. The story and the characters are really captivating and even the characters you don't really directly interact with turn out to be a fan favorite. The game is inspired by the SCP Foundation, a fictional secret organization dealing with the paranatural. If you like SCP stuff, you'll love this. The soundtrack, while almost non-existent, has it's moments, especially in one of the best levels in video game history, the Ashtray Maze (i'm not the best person to comment on that, since I've not played many PC games, but I did play the Arkham series soooooo). And the graphics, god it looks phenomenal even on lowest setting and upscaled from 960x540

My music listening habits
As you may know, I have this habit of switching favorite artists every so often, so I tried to find my favourite artists for each week since I got a spotify account. Here's a pastebin if you're interested:
You can see the exact point where I became obsessed with Avicii. Also I was not aware that I was into DC Comics in 2019???
American Pie
In 1971, Don McLean released a song called “American Pie”. 52 years later it inspired me to write this small segment of this post. This song lyrics are so complex, there’s a whole website dedicated to the meaning of the song. https://web.archive.org/web/20200118091340/http://understandingamericanpie.com/vs1.htm
McLean has also famously said "It means I don't ever have to work again if I don't want to." and "You will find many interpretations of my lyrics but none of them by me… Sorry to leave you all on your own like this but long ago I realized that songwriters should make their statements and move on, maintaining a dignified silence." which is like, you know that meme,
> Drops banger
> refuses to elaborate further
> leaves
Although he did auction of his notes so ¯\_(ツ)_/¯ (also sidenote to brag about Linux, there’s this feature called the Compose Key, so I can press Alt and two corresponding characters and get any symbol or letters from other languages, like ß, å, č ø or ©, ™, ¯ or even type unicode so I can get ツ in 5 keystrokes okay sorry I go off on tangents sometimes, forgive me.)
There’s also an awesome Weird Al parody of it that you can’t watch because you haven’t watched Star Wars >:(
McLean himself praised the parody, even admitting to almost singing Yankovic's lyrics during his own live performances because his children played the song so often.
I love stuff like this, with a lot of hidden and complex stuff. The first ten minutes of the Pixar movie Up is so important it has its own Wikipedia page. Like, how wild is that. The iconic music in that scene, “Married Life”, is scored by Michael Giacchino, whom you may know I adore for The Batman, Spider-man’s MCU Trilogy, Jurassic World, Coco, okay I’ll stop right there, but he’s scored a lot of awesome movies. He is even in the Top 10 most listened artist for the past 6 months, so that’s an achievement, considering how many artists I listen to.
Okay that’s it, I thought I’d need more but hey. Okay, cya!
#linux gaming#unixporn#linux#popos#tomb raider#shadow of the tomb raider#sottr#lara croft#american pie#don mclean#control 2019#control game#remedy entertainment#control remedy
0 notes
Text
Oceanhorn 2 pc download


You need to extract downloaded x360ce ZIP file to folder with your game executable file. In the example picture they are located in Binaries / Retail subfolder. 20 Nintendo eShop Gift Card Digital Code (Software Download) Xuan Yuan Sword 7 review for Xbox One, PS4 Call Of Duty: Vanguard review for PC, PS5, Xbox. Now you need to find the folder with Oceanhorn 2: Knights of the Lost Realm executable. Navigate to “Local files” tab and press “Browse local files.” button.Ĥ. Here's a mod to unlock and target 60fps in Oceanhorn 2 Knights of the Lost Realm Resolution is tweaked for a dynamic 720p in docked and dynamic 540p in handheld. If you choose the Steam variant, right click the game name and select “Properties”.ģ. You can easily do this by looking into game shortcut settings or finding the game in your Steam library list. Now we have to find the installation folder of your game. SET SAIL AND EMBARK ON AN EPIC JOURNEY Grow from a boy to a legend. x360ce 64-bit Download – for 64-bit gamesĢ. Download Oceanhorn and enjoy it on your iPhone, iPad, and iPod touch.x360ce 32-bit Download – for 32-bit games.If you don’t know the version of your game or download wrong one accidentally, you will be notified later and have a chance to use another version. Oceanhorn 2: First gameplay video and screenshots Since many of you cant make it to the Nordic Game conference in Malmö, Sweden we decided to capture a video of our demo The video is unedited footage that is captured on an actual iPhone 7 Plus. Can I Run it Test your specs and rate your gaming PC. You have to select 32 or 64 bit version (same as the version of Oceanhorn 2: Knights of the Lost Realm you use). Check the Oceanhorn: Monster of Uncharted Seas system requirements. The first step is to download x360ce zip file from official site. Emulator allows your controller (joystick, wheel, gamepad, etc.) to operate as the most common device, recognized by most of the games without any additional settings and workarounds.ġ. This method also works with any game – just do the same easy steps, no special skills needed to make any controller work as an Xbox 360 gamepad. In this tutorial you will find steps to make x360ce work with Oceanhorn 2: Knights of the Lost Realm. Since many of you cant make it to the Nordic Game conference in Malm, Sweden we decided to capture a video of our demo The video is unedited footage that. Download Oceanhorn app for windows PC Laptop / Desktop or Mac Laptop 2021. Not only can you effectively play games that cover the entire history of PC games on modern machines, you can also get games at incredibly low prices. Collect powerful items, wield the Caster Gun, solve the mysterious puzzles of the ancients, and discover all that Arcadia and its neighboring kingdoms have to offer! Accept the challenge and become a true hero.How to use x360ce emulator with Oceanhorn 2: Knights of the Lost Realm on PC Oceanhorn 2 pc download PC games has never been in a better place than it is today. Contextual commands will allow you to direct these allies into battle, or have them help you with the solution of the game's most clever puzzles! FIGHT, SOLVE, EXPLOREīigger, better, and packed with new features – Oceanhorn 2 is not only one of the best-looking adventure games out there, but it also builds a unique experience on the shoulder of classic video games. Trin, the granddaughter of Arcadia's leader Archimedes, and Gen, a mysterious robot wielding an old samurai weapon, will join forces with you, and fight at your side against Mesmeroth's Dark Army. You will not be taking this journey alone. Will our hero be able to unite the Owrus, Gillfolk, and men in a fight for the fate of the world? THIS TIME YOU'RE NOT ALONE A young Knight faces an impossible challenge, as Warlock Mesmeroth has returned with a formidable Dark Army. Oceanhorn 2: Knights of the Lost Realm, set a thousand years before the events of the first chapter, takes you on a magical journey across the vast world of Gaia, brimming with mythology and lore. Oceanhorn 2: Knights of the Lost Realm is an open-world action-adventure video game developed by Finnish studio Cornfox & Bros.
0 notes
Video
vimeo
Lower Thirds Motion Design from Antony Parker on Vimeo.
✔️ Download here:
templatesbravo.com/vh/item/lower-thirds/15918124
Minimal Lower Thirds / 4K Resolution
Exclusive & Unique Original Lower Thirds
Duration Control – Drag the layer to set the time you need, simple and easy!
Change Text (Logo), Color, Size (Zoom) with few clicks !
540p, 720p, 1080p (1920×1080), 2K and 4K (3840×2160) resolutions.
Video tutorial included (Full HD), with detailed tutorial it’s never been easier
Universal Expressions
No plugin required, you don’t need 3rd party plugins
16:9 Square Pixels
Compatible with After Effects CS5, [information on project page], CS6 and CC
Easy to customize project
Well organized
Very Fast Render
Links to download the font included in the package
Music Evolution, not included in project.
© All Rights Reserved JoelStarling
- Contact the Envato Market Help
0 notes
Photo


⋘ saskia’s 200 follower celebration gifsets ⋙
for @veerledejaegers ➢ zoënne + light blue
#zoë loockx#senne de smet#zoënne#wtfock#shameinflemish#wtfockedit#dailyskam#dailyskams#skamdaily#dailyreblogs#this must be the most lowquality gifset ive ever made asdlkfjskd i haaate wtfock#540p no rights#but look at them!! theyre so cute i love them#i hope u like it soph!!#also the bottom right gif is more purple than blue but shhhh#*#*wtfock#*sas200
70 notes
·
View notes
Photo

jung hoseok x airplane pt 2 mv shooting
#bangtanarmynet#btscreatorsnet#bangtannet#hyunglinenetwork#jhope.network#thebtstown#hoseok#m:gifs#540p#bw#HELL NO U WRONG ME RIGHT JAL BWA DDAENG#mv shooting#airplane pt 2 mv shooting#HOBI WHAT THE FUK ARE U DOING I FEEL SO ATATCKED I CANT WATCH BEHIND THE SCENES VIDS CUZ U R RUDE AF BOI
780 notes
·
View notes
Photo


#birds of prey 2002#barbara gordon#helena kyle#bopedit#testing how bad the standard definition from the cw site looked as a 540p gif lol#'u have the dvd right there' listen...
96 notes
·
View notes
Photo
Hello! I was asked to make a tutorial for how I make gifs. I’m going to try and explain everything as best I can, but please don’t hesitate to reach out if you have questions :)
What You’ll Need
A video to gif
Photoshop with a video timeline option (I use creative cloud)
Step 1: Uploading frames to layers
Once you have your video ready, you’re going to import it on photoshop through the file > import > video frames to layers.
After you select which video you want to use, this screen will pop up.
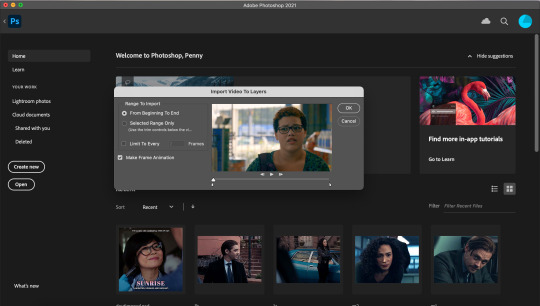
Click on “selected range only” and use the little tick marks to shorten the video to the frames you want. TIP: The shorter the video, the easier it is to find the frames you want, so if the video I’m using is longer than about 5 minutes, I shorten it. My macbook allows me to shorten videos, but I used to use this program to shorten them when I had a windows computer.
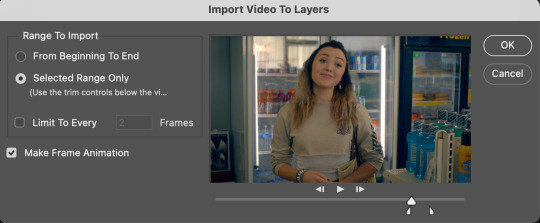
Click okay and photoshop will open your video clip as layers!
Step 2: Cropping, sizing, sharpening, and making the gif
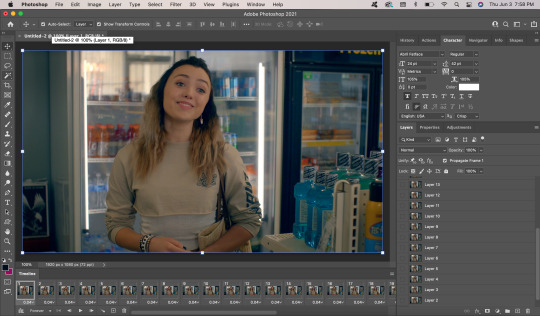
First thing I do in photoshop is crop my gif. Click on the little square icon on the panel on the left side of your screen (highlighted below). You can either enter the dimensions you want the gif to be, or click on a premade option. Since I want my gif to be square shape, I selected “Square.”
Next, I go to image > image size.
This box will come up, asking you to enter the width and height. Make sure the width is always 540p because that’s the dimensions for tumblr, but the height can be anything you want.
Next, you want to select all your frames. Do this by clicking on the first one, then clicking on the last one while holding the “shift” button.

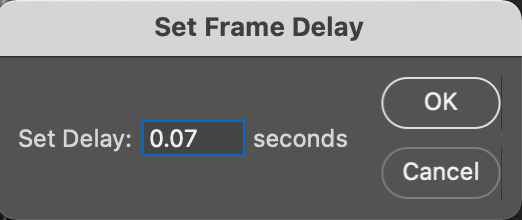
Click on the part that says the time (in this case, 0.04). A box will pop up. Change the time to some time between 0.06-0.08, depending on how many frames there are (the more frames, the shorter the time). This gif only has 22 frames so I’m going to put it at 0.07.
Next, you want to go to the side of your screen and select the layers. Do the same thing you did with the frames; click the first layer, then click the last layer while holding “shift.”
After all your frames and layers are selected, click on the little button that has four lines, on the top right of your frames. Click on “convert to video timeline.”
Next, go to filter > convert for smart filters.
Your screen should now look like this.
Now it is time to sharpen your gif! I use a sharpening action because it’s quicker, but I’ll show you how to do it manually. I used this tutorial to learn how to sharpen my gifs! Go to filter > sharpen > smart sharpen.
These are my smart sharpen settings, but you can play around with whatever looks good!
Next, I right click on the layer (that is now sharpened) and click “duplicate layer.”
Then, I go to filter > blur > Gaussian blur. These are my settings for it, but again, you can play around with them.
The last step for sharpening is to change the opacity to 20%. Go to your layers section and enter “20″ into the opacity box.
Here is the gif so far.
Step 3: Coloring
Now the fun part! I color every gif differently depending on the lighting in the scene, but I’ll do an overview of the things I usually do when coloring. All of the tools you need for coloring are in the “adjustments” tab, next to the layers.
I start with curves. I use the white eye drop tool (selected in the photo below) and use it to click on the whitest part of the gif. In this case, that was the bar of light in the fridge.
Next, I use the black eye drop tool to select the darkest part of the image. I used the black in Tory’s hair.
Next, I go to color balance, since the gif looks pretty yellow. I upped the cool tones (blue and cyan). Here are the settings I used.
Afterwards, I go to brightness/contrast and up both of those.
Then I go to selective colors and adjust the reds to make her skin tone look brighter, and the blues to make the background more vibrant.
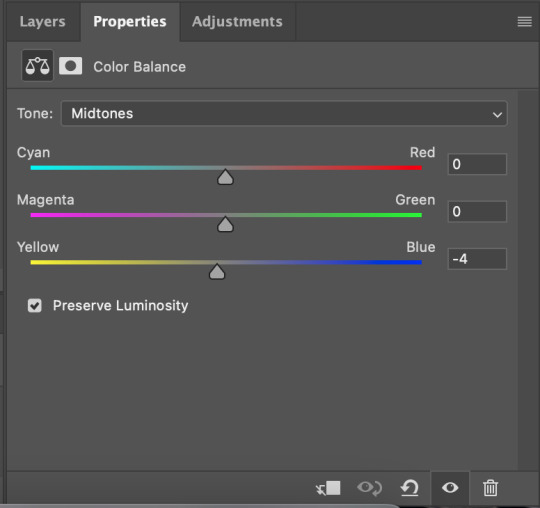
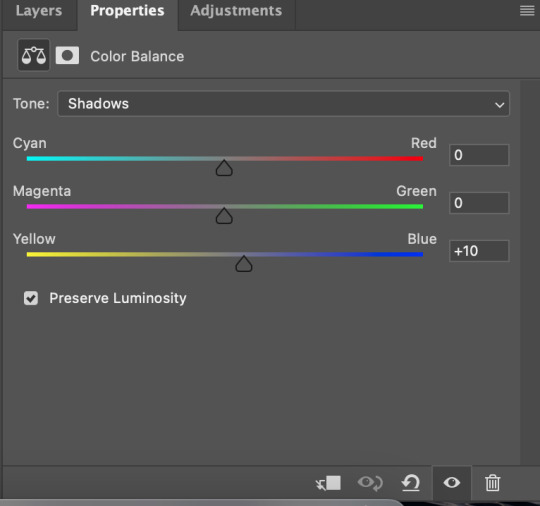
Finally, I go back to color balance and up the yellow in the midtones a bit to level out the blue. Then I go to shadows and up the blue in the background.
Step 4: Saving your gif
This is the final step! To save your gif, you go to file > export > save for web (legacy).
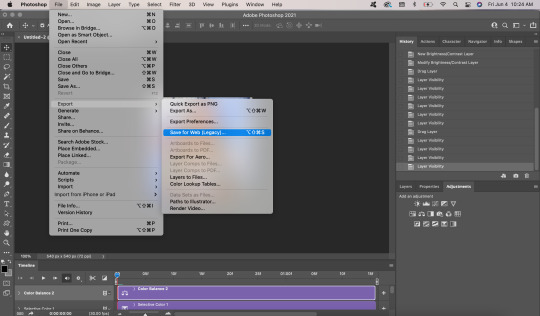
These are my save settings. Then you just click “save” and you’re done! Make sure your gif is under 10m (you can see how big it is in the bottom left hand corner under your gif).
That’s it! Here is your final gif:

Thanks for reading :) Feel free to reach out if you have questions!
#gif tutorial#tutorial#ps tutorial#ps resources#resource#coloring tutorial#mine#my gifs#click on the photos for best quality!
199 notes
·
View notes
Video
#LooksLikeMeatIsBackOnTheTable
This is the sound that we hear in the valley when the Raven Family, 6 members, finds some meat for lunch.
The original video is bigger, longer and with higher quality but due to the restriction of Tumblr, I have to cut most parts and reduced it to the lowest quality which is 540p. You can still see one of them at 00:46sec mark on the upper screen and 2 others at the right bottom of the screen at 01:06 mark.
#raven#Northern Raven#common raven#Canadian big crow#crow#passerine bird#corvids#flock of birds#wilderness#undisturbed#wildland#wild animals#ghost recon wildlands#way of living#the north face#Canada#The RavenKeeper
48 notes
·
View notes
Note
Hi I was wondering what are usually your dimensions for your gifs? Thanks!!!
.
🌸 🌸 🌸 🌸 🌸 🌸 🌸 🌸 🌸 🌸 🌸 🌸 🌸 🌸 🌸 🌸 🌸 🌸 🌸 🌸 🌸 🌸 🌸 🌸 🌸 🌸 🌸 🌸 🌸 🌸 🌸 🌸 🌸 🌸 🌸 🌸 🌸 🌸 🌸 🌸 🌸 🌸 🌸 🌸 🌸 🌸 🌸 🌸 🌸 🌸 🌸 🌸 🌸 🌸 🌸 🌸 🌸 🌸 🌸 🌸 🌸 🌸 🌸 🌸 🌸 🌸 🌸 🌸 🌸 🌸 🌸 🌸 🌸 🌸 🌸 🌸 🌸 🌸 🌸 🌸 🌸 🌸 🌸 🌸 🌸 🌸 🌸 🌸 🌸 🌸 🌸 🌸 🌸 it depends on my mood and the video file quality like netflix dramas I lOVE to gif the dramas that drop on netflix (either produced or co-produced or just are available there) because they got the best HQ files so i make the gifs BIG and other dramas i make them smaller...... especially the ones that viki subs......... terrible 1080p quality..............
anyway I’m not an expert and just do them how you feel like it and don’t feel pressured into making big 540p gifs just because everyone makes them now and use the right tumblr dimensions
https://kimwoobinseyebrows.tumblr.com/post/139232304438/width-in-pixels-268-268-177-178
#frage#hugs you hope this helps and again I'm not the best in those things just try and experiment!#cutie
1 note
·
View note
Text
Vidding Process: Proxy Workflow
alpharatz and corbae put together a really great presentation on getting started vidding. It includes examples of a lot of different ways of doing things, and that plus people sharing some of their processes, tips, and tricks at vidukon_cardiff made me think it might be useful to share how I do things. I'm going to try to put some stuff together and tag it all "vidding process".
Today I'm going to talk about using proxies when vidding.
Let me know if you have any questions, or a better way of doing any of this.
What's a proxy?
A proxy is a decompressed and/or lower-resolution version of a source file that's easier for your computer and/or editing program to handle.
Why are proxies necessary?
Well, they may not be! If your computer and program seem to be working fine with high-res source, you don't need to mess with anything. However, if you have problems with rendering source while you're editing -- there's a big lag when you scrub through footage in the Source Monitor, the video in the Program Monitor stutters, it's hard for you to manage precise timing because of video lag -- then it may be a good idea to use proxies.
The source of the problem is two-fold:
Your video source is probably compressed and encoded for viewing, rather than editing. This means that your editing program needs to decompress it on the fly in order to work with it.
You're probably using a computer designed for a consumer end-user, instead of hardware specially designed for video editing, which can handle much more intense processing. (The good news is, now so do a lot of professional video editors -- which is why proxy editing workflows are built into most editing programs used by professionals.)
Proxy file size and hardware constraints
Because proxies are uncompressed, they are much larger than the original source files, even though they are a lower resolution. Right now I'm working with source where the original files (at 1080p) are 2GB each and the proxies (at 540p) are 6GB each.
I work around the space constraints by putting the source (both the originals and the proxies) on external hard drives. This works fine and without any noticeable hiccups or lags, but it's not free. Right now a 2-TB drive costs around $60. I don't have any great budget suggestions for this, sorry. :(
Proxy workflow
Proxy workflow is pretty simple:
You create proxies for the source files.
The editing program uses the proxies instead of the source while you're editing.
The editing program uses the original source when you're rendering your video output file.
Most editing programs have proxy workflows built in so that they will do a lot of this work for you -- once you tell them to create the proxies, they will create the proxies for you and then automatically use the proxy while editing and the original when producing an output file without you having to make any manual switches. I'm including instructions for the two editors I've used, but you can probably find the instructions (and video tutorials!) for any program by googling "[name of program] proxy editing".
Both of the programs I'm going to talk about come with their own media converters to make the proxies, but if yours doesn't, you can use free programs like Handbrake or, well, a lot of GUIs slapped on top of Handbrake to do the conversions. I use Vidcoder for conversions that DaVinci or the Adobe suite can't do, like lossless repackaging of mkvs as mp4s.
Proxies in Adobe Premiere
I'm giving instructions for Windows but they should work for Macs with the usual shortcut key substitutes.
Set up Project panel
You may find it helpful to set up your Project panel to display proxy information by default.
In the Project panel, click the menu icon and select Metadata Display.
Search for "Proxy", then select Proxy (this tells you whether proxies are attached or offline) and Proxy File Path (this tells you where the files are).
Click Save Settings to save this as a custom metadata display you can switch to, or OK to save it as the default metadata view.
Set up Source and Program Monitors
Make sure that the Toggle Proxies buttons appear in the Source and Program Monitors beneath the video display. The button names appear in tooltips when you hover over the buttons. If you don't see Toggle Proxies, click the plus sign to choose from more buttons.
The toggle is blue when you're viewing proxies and white when you're viewing full resolution media.
Create the proxies
Open Premiere and import your source files (Ctrl+I or drag them from Windows Explorer).
In the Project panel, select your source files, right-click, and select Proxy > Create Proxies.
Select a format. (My recommendation is Quicktime instead of H.264.)
Select a preset. (My recommendation is "ProRes Low Resolution Proxy".)
Set a destination for the proxy files. (I usually select Next to Original Media, in Proxy folder, but you can select anywhere. It doesn't need to be the same drive as the original media or the Premiere project file.)
Click OK. Adobe Media Encoder opens up and begins transcoding.
How long this takes depends on your computer specs and the quality of the original media. For me, it usually takes about thirty seconds to transcode each minute of 1080p source. You can edit using the original source files in Premiere as the proxies are being made, but this can be slow or frustrating if your computer doesn't have a powerful processor, so I usually just set the encoding to run overnight as soon as I know I want to make a vid.
Edit with proxies
When the proxies are complete, they'll be attached automatically the next time you open Premiere, but you can also attach them manually by right-clicking on the original source file in the Premiere Project panel and selecting Proxy > Attach Proxies.
To edit with the proxies, make sure Toggle Proxies is selected (blue) in the Source Monitor. To view the output with proxies, make sure Toggle Proxies is selected in the Program Monitor.
You have a lot of customization options available -- you can set up Premiere to automatically create proxies for any new video files, or create your own proxy if you don't like the default ones. (I set up one for a 1024x540 resolution, for example, because I didn't think I needed 720px for editing.) For more information, see Adobe's documentation on Ingest and Proxy Workflow.
Proxies in DaVinci Resolve
Again, I'm giving instructions for Windows, but they should work for Macs.
Everyone else in the world calls LQ files for editing "proxy media", but DaVinci Resolve calls them "optimized media".
File Location
Resolve doesn't offer you a choice of where to save the optimized files; they will be saved in the same location as the originals. Make sure the original media is saved on a drive with plenty of room.
Optimization Settings
Go to File > Project Settings and select Master Settings.
Scroll down to the Optimized Media and Render Cache section.
Set your preferred optimized media settings. These are the ones I use:
Optimized Media Resolution: Quarter for 1080p, one-eighth or one-sixteenth for 4K.
Optimized Media Format: DNxHR HQX
Optimized Render Format: DNxHR HQX
If you try this and you're still seeing slowness in rendering on the timeline, try a different media format and render format.
Smart Bins
I find it useful to have smart bins for optimized and non-optimized media. To create them:
In the Media Pool, right-click in the Smart Bin area and select Add Smart Bin.
Name the bin "Optimized Media" and give it the following settings:
Match all of the following rules
From MediaPool Properties select Optimized Media
Set the comparison to "is not"
Set the final value to "Original Resolution".
Click OK.
Repeat for "Non-Optimized Media", but set comparison to "is" and the final value to "None" ("Original Resolution" seems like it should work, but doesn't).
Create optimized media
On the Edit Page or in the media pool, select your source files, right-click, and select Optimize media.
How long this takes depends on your computer specs and the quality of the original media. For me, it usually takes about thirty seconds to transcode each minute of 1080p source. You will not be able to edit in Resolve while the media is being optimized, and your computer in general may be slow. I usually set up Resolve to optimize a batch of media overnight.
Enable optimized media
In the Playback menu, select Use Optimized Media If Available. While you're there, I also recommend setting Proxy to Half or Quarter Resolution. (For Resolve, "Proxy" means the playback resolution rather than ... using anything that fits the general definition of "a substitute for something else enabled of authorized to perform some of the original's actions or responsibilities". I have no explanation for this.)
See the DaVinci Resolve User's Manual (pdf) for more information.
3 notes
·
View notes
Text
Mycroft to Youku for Sherlock 10th Anniversary
Activity Page; Original Video Page
Youku is a Chinese local commercial video platform working with Hartswood & BBC like Netflix.
Interstingly and strangely, under the GFW (Great Fire Wall of China) and local video regulations, there are still millions of crazy Sherlcok fans more than other countries. Audience rating was such an irresistible power, so their platforms always can get some special gifts from official…
But as for language problems, just like Russians prefers to dub, these platforms prefer to the video burnt in Chs & Eng subtitles, it’s not friendly to DVD\Bluray collectors like me, I perfect videos with soft subtitles… Luckily, beyond these platforms there are a few uncommercial fan groups in China still working on collecting News, translating Q&As and so on.
When unregistered the default video is in SD (540p) with the watermark, you can use you-get and other tools to download the 1080p without watermark.
Transcripts:
Good evening Goldfish. Or indeed, good morning.
With all of us had to make sacrifices, we've all had to get used to Zoom calls and to step off the pavement to avoid strangers and totally to avoid friends and family.
This has become known as social distancing, or as I prefer to call it, paradise.
It has fallen to me to say some few words during this unprecedented global crisis.
It's long been a maxim of mine that not engaging with any other human being in any way whatsoever is bound to lead to the maximum of... What is that word? Oh yes. Happiness.
This is a lesson I am afraid my younger brother Sherlock has yet to heed. In fact, rather thatn using his considerable powers for the right purpose, he continues to get involved in all sorts of strange adventures and to form allliances and friendships and to... mingle. Now it's come to my attention that it is ten years since a highly fictionalised account of my brothers' adventures were brought to the screen. This was a mistake. Detection is or should be an exact science and should be treated with the same cold and unemotional manner. These programmes have attempted to tinge it with romanticism which has rather the same effect as if one were to work a love story or an elopement into the fifth proposition of Euclid.
However, in their defence, the one who plays me is very handsome.
So if you want to see these programmes again and if you do, there must be something wrong with you, then tune into... (put on glasses) Youku. (put down glasses)
Some of us have re-read Proust during lockdown or learned another three languages, but if you choose to vegetate on the sofa watching the televison, that is entirely your concern.
Goodbye.
Or indeed, go away.
3 notes
·
View notes
Last Seen Blogs

pkbi
utatane

blacxlupin
I am with you.

theroseateganges
The Roseate Ganges

queenripper
Fresh off the Bus

ayalaraki
Aya Laraki