#Knitting advice
Note
Hi!! I’m just getting into knitting things like garments (I’ve only really done little things like scarves or hats or toys) so I don’t really understand what blocking is? Or why to do it?
oh, yeah, okay!!
first of all, congratulations on getting into knitting, i hope you're having a ton of fun with it!
second of all, my local yarn shop has a whole article about blocking basics, which is super helpful, but i'll give you my spin on it too
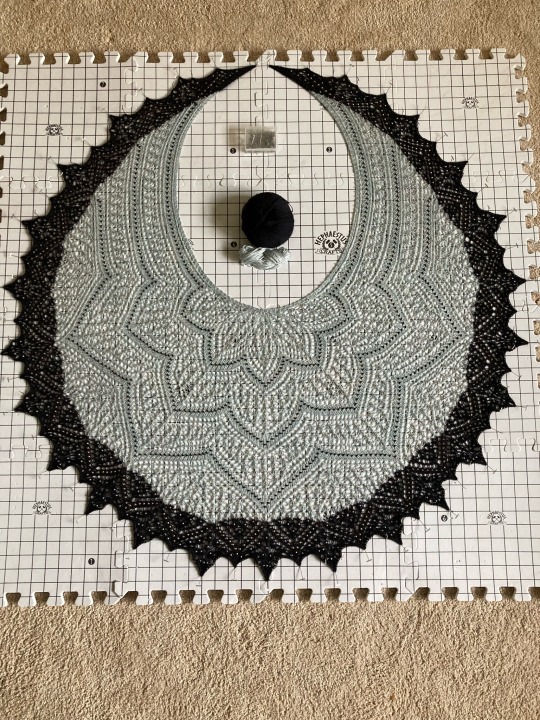
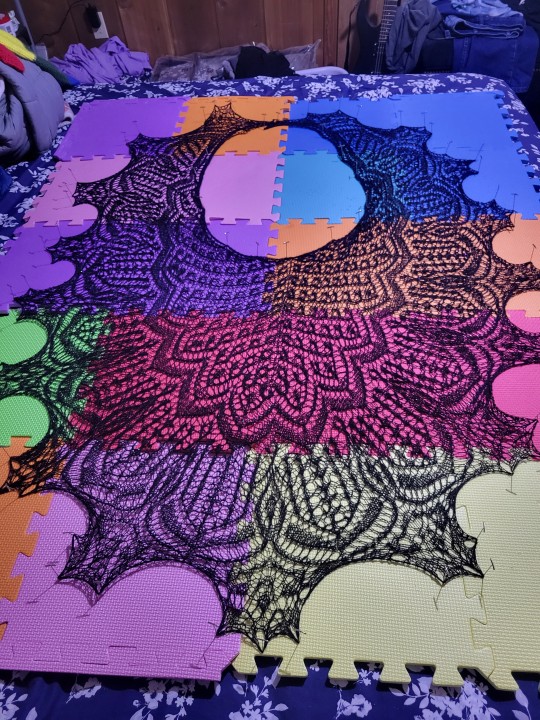
so there's a couple different methods of blocking, but the one i use the most is called "wet blocking," which is where you soak your thing in lukewarm water (with a bit of no-rinse-needed wool wash like Eucalan or Soak, if you have any!) for a while, squeeze it out gently until it's still heavily damp but not dripping, and lay it on a mat to stretch it out and pin it in place to dry like that. this is the method that gives you the most dramatic change in both shape and fabric density, because soaking the knit relaxes the fibers in the yarn and lets you really haul away at it to open up the design, and that's important for lace knitting because basically all lace just looks like a sad yarn lump when it's fresh off the needles. when you block it, though...


this was a past project i finished - see how much nicer that looks?
for lace (and cabling, to a different extent), the way your fabric tensions itself as you do all the texture work makes it scrunch up weirdly, and blocking it is how you get it to smooth itself out and look pretty. for lace, it means you can also get some dramatic shaping going on at the edges that you wouldn't have been able to see otherwise, like those pointy curves in the one up above, or the little bats in this other one!

it's also important for doing fitted garments like sweaters, because it gives you more control over how big the fabric you're making is actually, ultimately going to be.
it's a great safety check against a sweater getting awkwardly stretched out in the wash, because if you knit a test swatch and block it, you get a preview of how the fabric is going to behave later, and use that to inform your sizing choices now. it can also give you some wiggle room on a pattern gauge that you can't quite match with the yarn/needles you're using! if you're trying to do a sweater and your gauge is just a little bit smaller than what they say will give you your pattern size, try blocking a swatch and seeing what it looks like when you stretch it to match the pattern gauge.
if you're doing anything with seams, i would also strongly recommend blocking the pieces before you seam them together! it makes it a hell of a lot easier to get at the selvedge stitch when you start sewing, and it also lets you ensure that all your pieces are the exact size you want them to be before you put them all together. especially if you're knitting with wool (and i think other animal fibers like alpaca?) and you use steam blocking, like they said in the article - that will physically change the shape of the fibers and lock your piece in place at the exact size you want it to be.
i would also recommend getting some blocking mats to do it on? you can just pin it to a towel, it's what i used to do, but believe me, it's SO much easier with a set of blocking mats. you can see how they have those gridlines marked on them, right? that helps you keep track of how your work is lining up with itself, and whether one side is proportionally the same as the other side! it's not crucial, but it's definitely a quality-of-life upgrade.
i have three sets of the hephaestus crafts ones, they come with a box of pins, a tape measure, and nine interlocking foam squares with a 1" grid printed on them that you can set up however you want. they cost about $30, and i've been pretty happy with them, even if one of them did come with the gridlines printed on the wrong side ;P
anyway, i hope this answered your question!! tl;dr,
#knitting#lace knitting#knitblr#knitting advice#blocking#somehow i suspect that this kind of blocking isn't the kind of blocking that most people on tumblr are talking about XD#still though i hope it helps!! feel free to ask anything else and i'll do my best to answer#dawnasks
24 notes
·
View notes
Text
If I may offer a bit of advice to the beginner knitter, as a relative beginner myself:
Learn how to read patterns. Rewrite anything you want to make, and even those you have no intention of making. Rewriting patterns helps to get a better understanding of the pattern and how it works. Familiarizing yourself with the pattern beforehand means you can see any techniques you may need to learn or brush up on before starting and otherwise gives you more confidence in your work. If you make a mistake, you can see where you went wrong and have a better start on how to fix it for this or another project
Oh, and keep notes and reminders to yourself, done in a way that makes sense to you
Personally, I’m an advocate for knowing how to mirror a pattern too, but I’m an unconventional back and forth knitter so that may just be a Me thing
10 notes
·
View notes
Text
on choosing ease for your sweater
most knitting patterns provide full bust measurements and recommended ease for knitters to pick the size they are going to knit.
once in a while someone comes along and suggests that we should use our upper bust measurement to ensure the sweater is not too big.
I don't fully agree with either. I think the key is to know your main body measurements, understand how positive and negative ease work, and what type of fit you prefer. you can then select a size based on your body and preferences.
for example, on crop tops, I prefer no or very little positive ease at full bust, because for my body this translates to my preferred ease at the waist - about 6", which is the different between my full bust and underbust measurement.
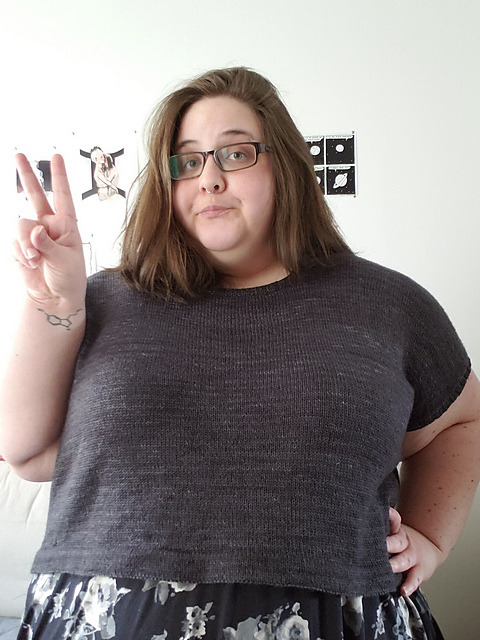
here is an example of a top I frogged because I did not like the fit. it had something like 10" of positive ease at the bust, which resulted in way too much fabric around the waist, it was not the type of fit I like on me. this photo only shows the front, trust me, it was not cute in the back.
on full length sweaters, I prefer 4-6" of positive ease at the bust, as this means it will have zero ease at the hips for me. alternatively, I can knit a size that has zero ease at the bust and increase on each sides for the hips if it works with the pattern.
when I made my Zweig I followed the recommended size for my measurements and ended up increasing after the waist to accomodate my hips. the result is moderate ease throughout the sweater.

so if you don't know what you like yet, how can you figure it out without knitting a ton of different sweaters?
one method that a lot of people suggest, and for good reason, is to measure store bought cloths you already have and love. make notes, compare them, try them on, take photos - understand which parts of the garment are looser or tighter on your body, how the fabric behaves in these parts, what you like and don't like. this method is free, easy and very good for people who need visuals to learn.
another thing you could try, and to be honest I never tried it myself, only needs a t-shirt that is too big for you and a couple binder clips. use the clips to pinch the fabric in different places (sleeves, bust, waist, hips) to change the fit of the t-shirt. try different combos, take away more or less fabric, play around with the clips. and of course, make notes of what you like.
with this knowledge, it is easier to understand how the measurements of a garment would work for your body and you can make a more informed decision when it's time to pick the size you will knit.
167 notes
·
View notes
Text
Fixing mistakes in lace
So you are knitting your first lace project, and you've got the wrong number of stitches and you're stuck and you don't want to frog. I'm here to help. But! My advice depends on you being able to read your stitches on the last patterned row (whether that's every row or every other row depends on the pattern). If you don't know how to do that, try knitting a swatch and putting in some decreases, double decreases, yarn overs, etc and then look at your work to locate those stitches and see how they look.
First advice: if your pattern is repeating, put a stitch marker in between each repeat. It's possible these stitch markers will move, but you need to know which repeat(s) you've made a mistake on and this makes that much easier because you'll realize you made a mistake when you get to the end of the repeat instead of the end of the row. I know not everyone does this, but I've been knitting 15 years and I see no shame in taking all the help you can get. All the advice here assumes you are doing this.
So after you've separated out all your repeats, and you get to the end of a repeat and are missing a stitch! What to do? Missing stitches are usually either 1) forgot a yarn over somewhere 2) dropped a stitch.
Forgotten yarn overs are an easy fix if you can find where the yarn over was SUPPOSED to be. Tink (un-knit, knit spelled backwards, means to undo your stitches one at a time as opposed to just ripping them all out.) back to the stitch before the missing yarn over (YO). If the missing YO is in the row you're knitting, simply add the YO and keep going. If it's in the row before (or second row before if every other row is plain), tink back to right before the missing YO, and insert the left needle into the bar between stitches as if to do a make one increase (there's YouTube tutorials out there). Knit the stitch without twisting it. This is your new Jerry rigged YO.
If your missing stitch is NOT a missing yarn over, it's time to start looking for dropped stitches. Sometimes these are just impossible to find because they rip down to whatever YO they came from and that can be really difficult to spot. If your pattern is symmetrical, look for missing symmetry. If it isn't, look for differences between this repeat and other repeats of the pattern.
Now, finding these missing stitches and then knowing what to do with them are two different things. Ask yourself: if I use a crochet hook and go slowly, can I fix this? If the answer is no, please don't give up. Let me tell you a secret. I make. So. Many. Mistakes. When I knit. And sometimes you just have to fudge. Pick a spot that works best for the pattern and just add another stitch. I prefer knit front and back (kfb) but you can also make 1 left or right (m1L/m1R). I promise it'll be hard for anyone besides you to spot.
But what if we have an extra stitch? These either come from missing decreases, forgetting part of a double double decrease, or an extra yo hanging out where it has no business hanging out.
Go back and read your work. First look for any extra YOs. If you notice an extra YO, tink back to it and just drop it. It'll mess with your tension but that's what blocking is for.
Once that's ruled out, look at any double decreases you have. If you are doing a decrease where you slip stitches and pass them over other stitches and off the needle (pass slipped stitch over or psso), did you remember to do the psso part? I forget this sometimes even tho all I knit is lace.
This is my personal most frequent decrease mistake. If you made that mistake on your current row, tink back and pass the stitch like it's supposed to go. If it was a previous row, tink back to where you made that mistake, and either knit two together (k2tog, right leaning decrease) or slip slip knit (ssk, left leaning decrease), whichever leans the correct way.
So there's no extra YOs and your double decreases are good? Time to look at your normal decreases. Do you have any decreases that you missed? Tink back and do them. If they were missed on the current row, just knit as instructed. If they were a row ago, you might have to do some analyzing to figure out where the right place is, but go back and decrease as close to where it was supposed to be as possible.
I cannot begin to tell you how forgiving lace is of mistakes. Hell. I spent 18 months knitting this
And when I got it all laid out, IT HAD TWO HOLES IN IT. I'm still mad about it but I fixed them well enough that I could block it aggressively. Can you see where I missed stitches, my tension was weird, I had extra stitches for some fucking reason, etc? No! You can't! This is what blocking is for.
Blocking is the heavenly primordial being who wipes away all your mistakes and knitting sins and says "You worked hard on this, and it looks heavenly, good job." You should block everything, not just lace. It evens your tension and can give you a little leeway if something is just a little bit too small. Got a sweater with two slightly different sized sleeves? Blocking.
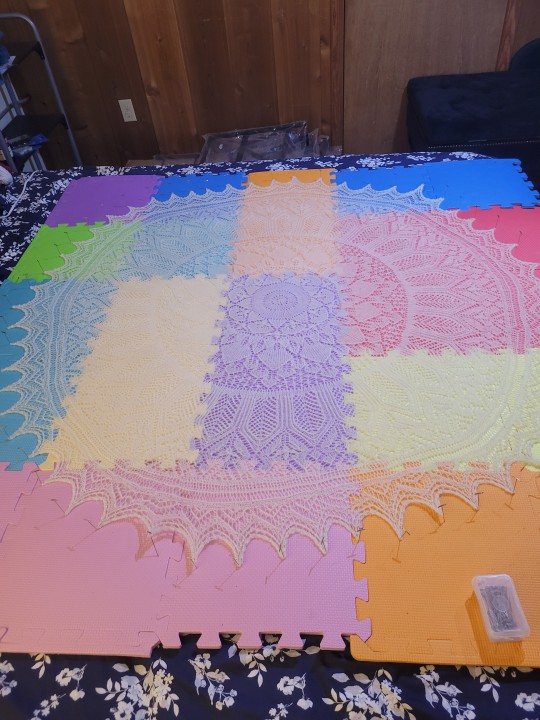
And if you really don't believe me that blocking fixes almost anything, take a look at this:
You can't see the beads in this photo, but this shawl has somewhere around 1500 beads. I decided right off the batt I wasn't going to be frogging beads. So this became a YOLO project. I gave myself permission to make mistakes and just fudge the solutions. Can you see my dozens (literally dozens) of mistakes? No!!
So don't be afraid that your lace isn't going to turn out right. Cuz only you can see that spot where you dropped a stitch completely or that double decrease you forgot to do or whatever other mistakes you may have made. Blocking will fix a lot. And even if there's still a glaringly obvious hole somewhere (I have one that drives me nuts in the white shawl but no one else can spot it), I promise it's not glaringly obvious to anyone else and also everyone here on knitblr doesn't care and if someone gives you a hard time tag me and I'll scold them for you.
In conclusion
198 notes
·
View notes
Text
I'll get a finished picture of the strawberry sweater up here eventually, but now that it's done I gotta say, drop shoulder sweater made in pieces? That's a really good beginning sweater project.
It's not my first sweater, though it is the first one I've made for myself, and it is probably my best adult sweater. This would be a good place to start, for anyone who can knit some but hasn't tackled a big, important garment. I know lots of knitters hate and/or fear seaming, but there are serious advantages over working in the round:
Seams add structure, so your sweater is less likely to sag or twist or stretch. It's good to practice the technique you fear, too, so you can use it later when you need to. (Also seaming is v satisfying, when it all lines up just so)
Super easy to add colorwork or other decorative features, to all or just part of the garment. I had to do it this way for the intarsia, but do you want fun stranded colorwork on the back but not the front, or just one front panel of a cardigan? Much easier when you work in parts.
In-the-round sweaters almost all have some flat work anyway, so if your purl tension's different from your knit tension, it's gonna show. Working it all flat eliminates that problem (and lets you work on your purling, too!)
The whole thing's not so dang huge in your lap while you work.
Most important: It's all rectangles.
Now that last depends on you wanting to actually wear a garment that's oversized/not fitted to the shape of your body, but luckily that's in style rn. But look. I didn't have to figure out exactly where to split for armholes when I was working on the body. Didn't do any armhole shaping at all. Back neck shaping? Optional. Shoulders? Bound off straight across. I didn't even do normal sleeve shaping - they're just big rectangles, after the dramatic increase above the cuff.
Since I wanted a V-neck cardigan, I had to figure out when to start those decreases & how many to do, at what spacing, but a crew neck pullover would be at least 60% simpler than that.
1 rectangle for the back, 2 rectangles + taper for the front, 2 rectangles for sleeves, and 1 long skinny rectangle for the button band: That's the whole sweater.
9 notes
·
View notes
Note
Not meant critically or as though you're doing something wrong! I noticed the way you hold your yarn is how I used to but it would start cutting off my circulation just a bit and leaving indentations in my pointer finger. How do you avoid that? (I also have very tight tension, knitting and otherwise lol)
Hey this is a really great question because as a Tight Tension Knitter I do also have this problem! Usually when working with bulkier weights (the one in the video is DK, about the smallest this works for), I can usually get away with shifting the specific point of the wrap on my finger at the end of each row to avoid the yarn cutting in. In smaller weights where that doesn't work, I have a ring I bought off Etsy I use:
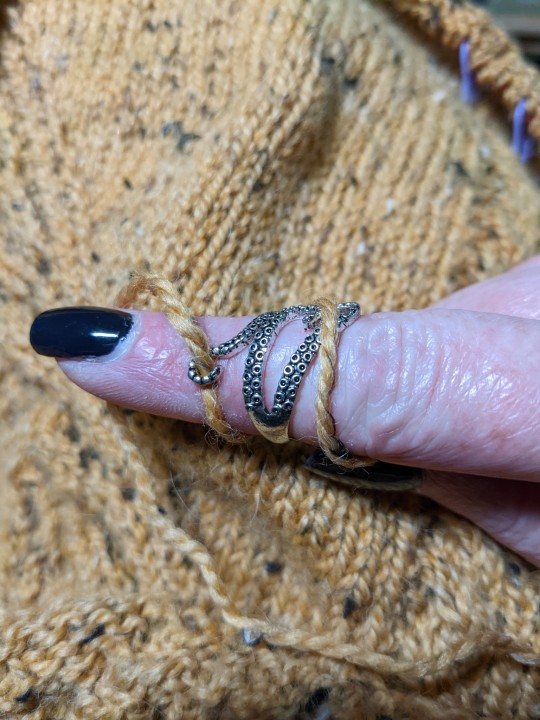
Which allows me to wrap the yarn around something solid and avoid having it cut in. A drawback to this method is that there are extra steps to getting "into" and "out of" the knitting, so it takes a tidbit more dedication; but on the plus side 🤷♀️ that's a kraken on my finger how cool is that!
#and before anyone comes out to say 'just hold the yarn with your left hand'#i do occasionally work the yarn in my left hand#i end up wrapping it the same way#and end up with the same problem#anyway#as usual#if anyone else has any other useful tips they'd like to share#please feel free#knitting#knitblr#ask#reply#anonymous#knitting gadgets#knitting advice
87 notes
·
View notes
Text
@ people who have experience with knitting and with babies: what items are better home-knit than store bought?
And: any favourite patterns?
38 notes
·
View notes
Text
I'm a super slow knitter so I've been working on this cardigan for over a year, I think possibly two, and today I realised that I have cast on everything far two wide and the one piece I have finished (the back panel) is defiantly longer than it should be.
I'm gonna go put my head in the sand about it and pretend it doesn't exist while I contemplate my options.
#knitting#knitting pain#knitting chaos#fibre arts#fiber arts#slow knitter#knitting mistakes#knitting advice
4 notes
·
View notes
Text
Hey has anyone ever knit with knitpicks chroma? It says it’s a superwash wool blend that can go in the washer and dryer but my gut instinct is that it absolutely should not do either of those things. Is it one of those superwash yarns that *has* to go in the dryer? I have knit with superwash that gets really weird and huge if you don’t expose it to the heat of the dryer.
I ask because I’m making shawl kits to donate to a charity bazaar and I have some patterns that chroma would work well in but need an accent color. I would normally not mix superwash and non-superwash wool but chroma doesn’t seem like it should be put in the washer or dryer anyway. Has anyone experienced what it’s like post wet block? Does it grow a ton?
#adventures in knitting#knit picks#knitting advice#I’m doing two shawl kits and I could technically put superwash wool in both#but there’s only one superwash skein I actually want to give away#I suppose if worst comes to worst I can just find a pattern that does not need an accent color#for the second basket
2 notes
·
View notes
Text
How do yall block your blankets, if you even do?
3 notes
·
View notes
Text
QUESTION: Um so my knitted trans flag I made it in pieces so like every color is it’s own scarf essentially right. I’m looking it up rn but wondering if um anyone might have advice. Should I construct the flag THEN block the entire piece or should I block the pieces individually and then sew them together? Im leaning more towards putting it together first but idk
#also my concern is since I did different stitch patterns#the colors are different row counts (around 200 but some are less)#so I’m worried once they lock they’ll be completely different lengths????#can u tell I’m the kind of knitter that just does whatever works and not proper#knitting#knitting advice#knitblr#ummmm#idk what else to tag#knitted pride flag
4 notes
·
View notes
Text
Ok I need some advice on socks. I found some knitpicks palette in my stash and I wanna make socks out of it but since it isn’t the strongest yarn I ever met I was thinking about knitting it together with a thread of handspun Icelandic outer coat. However my issue is that I only want Icelandic on the sole, toe and heel; and idk how to knit circularly and only get the yarn in those spots. I was thinking I might just snip the thread each round since palette felts pretty readily and it will hopefully felt around the Icelandic with wear and hold it place. That said I’ve never done anything like this and would love to hear if anyone has any better ideas. I have also thought about anchoring it in the back of cabled insole like color work but the Icelandic is pretty rough and I would like to minimize contact with skin that isn’t callused to hell. Also I don’t have enough Icelandic to knit the whole thing in that way and also that would cause the same issues as anchoring the thread.
So yeah tldr: what is the best way to carry a thread that’s only being knit in parts through the other parts of circular knitting?
(Ps: the pattern is a fairly straight forward toe up affair so splitting it to knit flat is not entirely out of the question. Side seams are not a sensory issue for me. I think.)
2 notes
·
View notes
Text
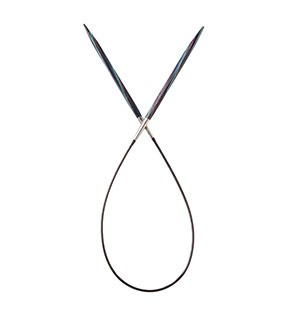
Himiko’s Very Unofficial Review of Circular Knitting Needles
hey hey a friend of mine has been getting into knitting and I decided to pull out my smattering of needles and compare them to each other
Susan Bates Fixed Needles ($5-10)
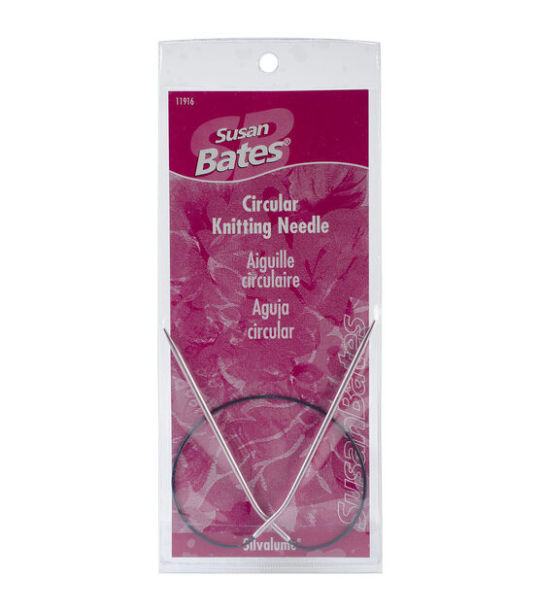
Okay we’ve all seen these at Joann Fabrics before and I don’t think they’re so bad. They come in a small range of cable lengths and needle sizes- so you need to buy a new pair for every size you want and need to loop them in order to knit anything smaller than 29″ (I think that’s the only length). They are very lightweight and smooth, though the join between the cable and needle can catch on your yarn sometimes.
-Available in chain craft stores and online
-Light weight and cheap
-Not Sharp
-Cable would crease very easily and stay creased, so knitting small objects can cause bends in your cables that are hard to remove
HiyaHiya (fixed needles $5-10: interchangable sets $80-250)

I’ll be honest, I have not had first hand experience with their interchangable sets but the general consensus is that their interchangables have a smooth taper and tight fit (very good). I’ve had generally positive experiences with their fixed length needles. Their needles come in stainless steel or bamboo and regular tips and sharps: what you like in this regard is a personal preference, but Hiya Hiya offers sharp versions of all their needles which a lot of people swear by. They have a full range of fixed needle cable lengths and needle sizes. Their needles are very very smooth and their cable is a very thin nylon. The cable is very thin and bouncy and resists kinking or bending, however they do have a slight memory so you’ll occasionally need to run them under hot water to smooth them out.
-Available in specialty yarn stores and online
-Very light weight and single sets are cheap
-Exceptionally smooth
-Available in sharps and non-sharps
-Cables available in many sizes and very bouncy
ChiaoGoo (fixed needles $10-20: interchangable sets $120-250)

Ah yes, the iconic red cables.
I’ve purchased some of their fixed needles and demoed their interchangable sets in stores- both are good! The join for their interchangable needles is a little shorter but they fit very tightly (good). Their needles come in stainless steel or bamboo and short and long tips: again needle length is very much a personal preference but some folx find they are more ergonomic if you are prone to hand strain and I believe they also offer a slanted join line of needles for people who need that accommodation. They have a full range of fixed needle cable lengths and needle sizes. Their needles tend to have a slight... grip(?) in my experience, so your stitches are less prone to slipping around the needles. The cable is a little more firm than the HiyaHiyas but has a strong core which resists the kinks Susan Bates get.
-Available in specialty yarn stores and online
-Very light weight
-Bamboo and steel needles have slight grip on yarn
-Single needle sets are slightly more money
-Available with shorter and longer needle tips
-They’ve expanded into a few different cable types- generally flexible
KnitPicks (fixed needles $8-11: interchangable sets $50-125)
I own two sets of these interchangable needles, I have 0 experience with their fixed length needles. The join for their interchangable needles is a good length but I’ll occasionally have to tighten the join. They have a somewhat limited range of fixed needle sizes- they offer 16″ cable length with most needle sizes and more cable lengths for small needle sizes- but offer a full range of interchangables. Their needles come nickle plated or bamboo with non-sharp tips: they do offer their bamboo needles in a few bright colorways and short tips for their interchangable sets. They also offer squared needles which some knitters find more comfortable and even out gauge issues. Their needles are smooth and their cable about the same level of firm as ChiaoGoo but will occasionally need to be unbent if you’re doing magic loop for too long.
-Available online, not widely available in stores but they offer “tester” kits
-Different colorways for bamboo needles
-Interchangable sets are on the cheaper side
-Available with shorter and longer needle tips for interchangables
-Available as a more square shape
Final Thoughts
I’ve shopped around needles quite a while before I settled on my current set of interchangables. Since I put down and pick up so many different projects, I’m loath to part with any of my sets of needles and I don’t regret trying out different brands- when I bought fixed length needles from different brands they were each perfect for my projects so you should really think what you prioritize for your needles. Susan Bates were a fair price for trying out and I could get them at a lot of stores. HiyaHiya had the best cables for me and I liked the sharps as an early tight knitter. ChiaoGoo had the most sizes available in knitting stores and you can pick the most ergonomic option for you. KnitPicks was middle of the road between those brands but the price point matched my interest at the time (plus I was recently gifted a set of purples which I love to look at).
.
Got some thoughts? I’d love to hear them
#knitting#knitting needles#knitting advice#chiaogoo#hiyahiya#hiya hiya#susan bates#knitpicks#knit picks#knitblr#my post
5 notes
·
View notes
Text
knitting socks for wide calves
this might be news to some people, but some of us have calves that are too big for most sock knitting patterns. I started modifying the socks I knit for myself from the very first pair and I know many people are not sure how to do it. I believe these mods should be accessible to everyone so I decided to share one of my methods.
for the record, I have three sock patterns for sale on Ravelry, two of them can be very easily adapted for wider calves and include the instructions to do so. the other one is from a period of my life where I was still dealing with a lot of internalized fatphobia and while it would be possible to adapt it, it wouldn't be as easy so I prefer not to recommend it to people who need more width on the calf.
here are the two patterns, and after this little bit of shameless self-promo you'll find the method I use most of the time for my socks.
Jude

Fixing a Hole
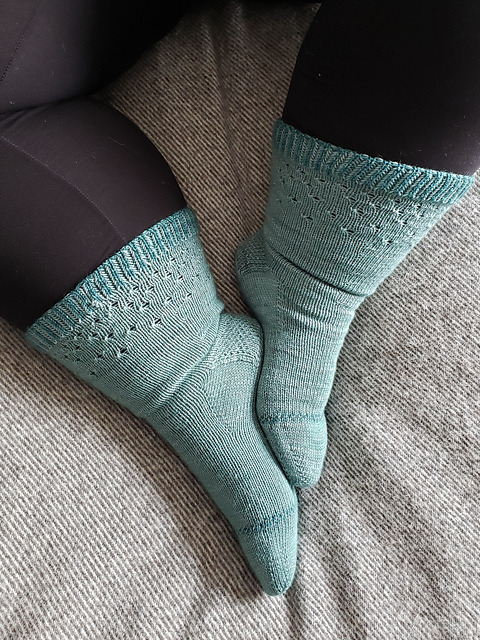
I am using bits from my Fixing a Hole pattern to write this, so you can refer to the photo above to see how it looks (pretty insivible, hehe). This method assumes you are knitting toe-up socks in Magic Loop and the leg of your socks is plain stockinette. Unfortunately, some stitch patterns will need more work to adapt them, but you can use my method as an inspiration. Honestly I didn't invent anything, this is just something I figured out by myself and experimented with over many pairs.
Method
Knit at least one round around after your heel before working the increase rounds.
Increase round: k10, m1l, k to 10 stitches before end of needle, m1l, k to end of needle, repeat on second needle
Repeat this round as many times as you need to have enough stitches to fit your legs. I recommend knitting straight for 10 rounds or about an inch between each increase round. I was able to fit three increase rounds in 4 inches on my socks, with 10 rows between each.
You can measure your ankle and calf to figure out the difference and how many stitches that is according to your gauge. For example, if I need to add 2 inches in width and my gauge is 8 sts per inch, then I need to add 16 stitches. That means I would need to work 4 increase rounds. Knowing that, it is easier to plan how to space them apart.
Alternatively, knit one increase round, then plain for one inch, then one increase round, then plain, until you're satisfied with how it looks and fits. Play around and figure out what works for you - I know I say that for everything, but really it's the best way to tailor your knits.
If you're knitting socks with a motif only on the front leg and top of the foot, you can add increases only on the back of the leg, I did that in Jude. You just need to knit your increase rounds closer to one another, and only on half the stitches, so do not "repeat on second needle".
You could also increase only on the sides of the legs, so you would k1 instead of k10. That could work for an all-over motif.
Have fun knitting socks that fit!
12 notes
·
View notes
Text
If somebody in your life offers to knit or crochet or, really, create anything for you, please be an active participant in the creation of the piece they are making. I adore making and gifting things, but nothing bums me out quicker than a person who passively just goes "okay," to my ideas about what I'm making them - it can send the message that they won't like it, or that they don't care, even if they're happy about my offering. The back-and-forth feedback is a great way to make sure that you are being gifted something that was truly worth the time, effort, expertise, and money that will inevitably go into the gift!
I know it's really hard to be an active participant, believe me, I'm an anxious ball of horror, but it will only do good for both parties to interact in this situation. It is a big deal to be offered a hand-crafted gift, but it's also something we want you to love and use, and that can only happen if you tell us what would make you fall in love with what we create.
#advice#relationships#art#fiber art#knitting#crochet#i always try to remember that some people's responses to something big is to clam up and become more passive...#..i just want to remind you that you aren't in danger of Ruining Everything by suggesting things or asking questions or saying what YOU wan#like i asked my dad specifically how he would feel if i made him items SPECIFICALLY so i could gauge if he would like them for instance#i don't just want to create something i want the recipient to actually LIKE it#which is why i typically (not always) ask how somebody would feel about me giving them a specific gift#i know some people genuinely don't care in the sense that they would appreciate ANYTHING but sometimes that doesn't always translate i gues#im crocheting a set of coasters for my dad and i really hope hell truly like them because i'm not sure based on how he responded to my ideas#it makes me so happy to gift things but it's with the caveat that the recipient will think it is An Amazing Gift That Is SO Good And Useful
485 notes
·
View notes
Text
I see a lot of memes about refusing to knit gauge swatches and they hurt my heart a little bit. Like. I get it I've been there. But you're actively working against your own interests. Please just knit a swatch.
@tattinglacework said in the tags of my post about yarn substitution that a gauge swatch is the knitting/crochet equivalent of "measure twice cut once" and I'm stealing it forever now because it's so true. I've had to frog weeks worth of work because I needed to go up two needle sizes and I didn't do a swatch. But it was better than having a finished shawl that was way too small to be useful.
And listen, eventually if you keep refusing to do swatches and being all "teehee I'm such a rebel" about it, you're going to come to a project that you're super excited about, really looking forward to, spend time planning, maybe even buy really nice yarn for it... and you hate the finished product and never use it. Which makes all that work a waste of time.
I know it seems like knitting a swatch is a waste of time but knitting for a week only to have to frog it all is more of a waste of time than the hour I would've spent knitting a swatch. Even with cobweb lace knitting where a proper gauge swatch takes several hours (I've spent 10 hours on a gauge swatch before and I am glad I did cuz it saved my ass), it's a looooot better to knit for several hours and know the next 100 hours will not have been in vain.
A swatch can also help you see whether you like how that yarn works up, and can give you an idea of how that yarn drapes and works up. This is important if you are knitting with a different fiber yarn than what the pattern calls for. Some fibers have a lot more stretch than others. Wool is nice and stretchy but silk is not. Cotton isn't very stretchy. Acrylic stretches and drapes differently than wool or cotton. A swatch will tell you if a fiber is suitable for a pattern.
Some pattern swatches are stockinette stitch and some are in pattern, and an in pattern swatch is going to tell you a LOT about how that yarn will work with that pattern. For example: I like to buy the occasional indie dyed yarn that's got pops of color and multiple colors per skein. But those yarns are hard to find patterns for because the color change/variegation is so quick that it ends up being very busy fabric. A gauge swatch in pattern will tell me if a pattern will show well or get lost in the variegation. Indie dyed yarn is expensive and I am poor so I want to make something I actually like, is the right size, and I will actually use because looking at it doesn't make me miserable.
I'm begging you, just make a swatch. At worst you've lost a little bit of time confirming your needle and yarn choices work for the pattern. At best, you're saving yourself from spending dozens of hours on something you'll never use because it didn't turn out the way you want, doesn't fit, and you hate looking at it now.
Also this is important and I've deeply regretted not doing it before: treat your finished swatch how you're going to treat the finished object. Block it if you're going to block the finished item and then unpin it and let it rest for a while (your swatch WILL lie to you if you do not) before taking any data from it. If you're not sure how a yarn is going to survive the wash, chuck your swatch in the washing machine to see! Better to felt a swatch than a pair of socks you just spent a week knitting.
I used to be very "no gauge swatch we die like men" so I Get It. I really do. But I have also been in the "didn't swatch, spent eighteen months and 3,000 beads on a project only to block it and have it be almost exactly a foot too small" boat and let me tell you that'll change you as a person. Just knit a swatch. It takes so much less time than being wrong does.
945 notes
·
View notes
Last Seen Blogs

ask-sora-and-roxas
Ask us!

nguyenluan1909
Anthony Nguyen

nikitamearsgifs
wildflower

hianyoon
hianyoon stuff

weedpika
Untitled