#cb editing tutorial
Text
How I ditched streaming services and learned to love Linux: A step-by-step guide to building your very own personal media streaming server (V2.0: REVISED AND EXPANDED EDITION)
This is a revised, corrected and expanded version of my tutorial on setting up a personal media server that previously appeared on my old blog (donjuan-auxenfers). I expect that that post is still making the rounds (hopefully with my addendum on modifying group share permissions in Ubuntu to circumvent 0x8007003B "Unexpected Network Error" messages in Windows when transferring files) but I have no way of checking. Anyway this new revised version of the tutorial corrects one or two small errors I discovered when rereading what I wrote, adds links to all products mentioned and is just more polished generally. I also expanded it a bit, pointing more adventurous users toward programs such as Sonarr/Radarr/Lidarr and Overseerr which can be used for automating user requests and media collection.
So then, what is this tutorial? This is a tutorial on how to build and set up your own personal media server using Ubuntu as an operating system and Plex (or Jellyfin) to not only manage your media,, but to stream that media to your devices both locally at home, and remotely to anywhere in the world where you have an internet connection. This is a tutorial about how building a personal media server and stuffing it full of films, television shows and music that you acquired through indiscriminate and voracious media piracy various legal methods like ripping your own physical media to disk, you’ll be free to completely ditch paid streaming services. No more will you have to pay for Disney+, Netflix, HBOMAX, Hulu, Amazon Prime, Peacock, CBS All Access, Paramount+, Crave or any other streaming service that is not named Criterion Channel (which is actually good). If you want to watch your favourite films and television shows, you’ll have your own custom service that only features things that you want to see, and where you have control over your own files and how they’re delivered to you. And for music fans out there, both Jellyfin and Plex support music streaming, meaning you can even ditch music streaming services. Goodbye Spotify, Youtube Music, Tidal and Apple Music, welcome back unreasonably large MP3 (or FLAC) collections.
On the hardware front, I’m going to offer a few options catered towards differing budgets and media library sizes. The cost of getting a media server up and running using this guide will cost you anywhere from $450 CDN/$325 USD at the entry level to $1500 CDN/$1100 USD at the high end. My own server was priced closer to the higher figure, with much of that cost being hard drives. If that seems excessive, consider for a moment, maybe you have a roommate, a close friend, or a family member who would be willing to chip in a few bucks towards your little project provided they get a share of the bounty. This is how my server was funded. It might also be worth thinking about cost over time, how much you spend yearly on subscriptions vs. a one time cost of setting up a server. Additionally there's just the joy of being able to scream "fuck you" at all those show cancelling, movie deleting, hedge fund vampire CEOs who run the studios through denying them your money. Drive a stake through David Zaslav's heart.
On the software side I will walk you step-by-step through installing Ubuntu as your server's operating system, configuring your storage as a RAIDz array with ZFS, sharing your zpool to Windows with Samba, running a remote connection between your server and your Windows PC, and then a little about started with Plex/Jellyfin. Every terminal command you will need to input will be provided, and I even share a custom #bash script that will make used vs. available drive space on your server display correctly in Windows.
If you have a different preferred flavour of Linux (Arch, Manjaro, Redhat, Fedora, Mint, OpenSUSE, CentOS, Slackware etc. et. al.) and are aching to tell me off for being basic and using Ubuntu, this tutorial is not for you. The sort of person with a preferred Linux distro is the sort of person who can do this sort of thing in their sleep. Also I don't care. This tutorial is intended for the average home computer user. This is also why we’re not using a more exotic home server solution like running everything through Docker Containers and managing it through a dashboard like Homarr or Heimdall. While such solutions are fantastic and can be very easy to maintain once you have it all set up, wrapping your brain around Docker is a whole thing in and of itself. If you do follow this tutorial and had fun putting everything together, then I would encourage you to return in a year’s time, do your research and set up everything with Docker Containers.
Lastly, this is a tutorial aimed at Windows users. Although I was a daily user of OS X for many years (roughly 2008-2023) and I've dabbled quite a bit with various Linux distributions (mostly Ubuntu and Manjaro), my primary OS these days is Windows 11. Many things in this tutorial will still be applicable to Mac users, but others (e.g. setting up shares) you will have to look up for yourself. I doubt it would be difficult to do so.
Nothing in this tutorial will require feats of computing expertise. All you will need is a basic computer literacy (i.e. an understanding of what a filesystem and directory are, and a degree of comfort in the settings menu) and a willingness to learn a thing or two. While this guide may look overwhelming at first glance, it is only because I want to be as thorough as possible. I want you to understand exactly what it is you're doing, I don't want you to just blindly follow steps. If you half-way know what you’re doing, you will be much better prepared if you ever need to troubleshoot.
Honestly, once you have all the hardware ready it shouldn't take more than a weekend to get everything up and running.
(This tutorial is just shy of seven thousand words long so the rest is under the cut.)
Step One: Choosing Your Hardware
Linux is a light weight operating system, depending on the distribution there's close to no bloat. There are recent distributions available at this very moment that will run perfectly fine on a fourteen year old i3 with 4GB of RAM. Moreover, running Plex or Jellyfin isn’t resource intensive in 90% of use cases. All this is to say, we don’t require an expensive or powerful computer. This means that there are several options available: 1) use an old computer you already have sitting around but aren't using 2) buy a used workstation from eBay, or what I believe to be the best option, 3) order an N100 Mini-PC from AliExpress or Amazon.
Note: If you already have an old PC sitting around that you’ve decided to use, fantastic, move on to the next step.
When weighing your options, keep a few things in mind: the number of people you expect to be streaming simultaneously at any one time, the resolution and bitrate of your media library (4k video takes a lot more processing power than 1080p) and most importantly, how many of those clients are going to be transcoding at any one time. Transcoding is what happens when the playback device does not natively support direct playback of the source file. This can happen for a number of reasons, such as the playback device's native resolution being lower than the file's internal resolution, or because the source file was encoded in a video codec unsupported by the playback device.
Ideally we want any transcoding to be performed by hardware. This means we should be looking for a computer with an Intel processor with Quick Sync. Quick Sync is a dedicated core on the CPU die designed specifically for video encoding and decoding. This specialized hardware makes for highly efficient transcoding both in terms of processing overhead and power draw. Without these Quick Sync cores, transcoding must be brute forced through software. This takes up much more of a CPU’s processing power and requires much more energy. But not all Quick Sync cores are created equal and you need to keep this in mind if you've decided either to use an old computer or to shop for a used workstation on eBay
Any Intel processor from second generation Core (Sandy Bridge circa 2011) onwards has Quick Sync cores. It's not until 6th gen (Skylake), however, that the cores support the H.265 HEVC codec. Intel’s 10th gen (Comet Lake) processors introduce support for 10bit HEVC and HDR tone mapping. And the recent 12th gen (Alder Lake) processors brought with them hardware AV1 decoding. As an example, while an 8th gen (Kaby Lake) i5-8500 will be able to hardware transcode a H.265 encoded file, it will fall back to software transcoding if given a 10bit H.265 file. If you’ve decided to use that old PC or to look on eBay for an old Dell Optiplex keep this in mind.
Note 1: The price of old workstations varies wildly and fluctuates frequently. If you get lucky and go shopping shortly after a workplace has liquidated a large number of their workstations you can find deals for as low as $100 on a barebones system, but generally an i5-8500 workstation with 16gb RAM will cost you somewhere in the area of $260 CDN/$200 USD.
Note 2: The AMD equivalent to Quick Sync is called Video Core Next, and while it's fine, it's not as efficient and not as mature a technology. It was only introduced with the first generation Ryzen CPUs and it only got decent with their newest CPUs, we want something cheap.
Alternatively you could forgo having to keep track of what generation of CPU is equipped with Quick Sync cores that feature support for which codecs, and just buy an N100 mini-PC. For around the same price or less of a used workstation you can pick up a Mini-PC with an Intel N100 processor. The N100 is a four-core processor based on the 12th gen Alder Lake architecture and comes equipped with the latest revision of the Quick Sync cores. These little processors offer astounding hardware transcoding capabilities for their size and power draw. Otherwise they perform equivalent to an i5-6500, which isn't a terrible CPU. A friend of mine uses an N100 machine as a dedicated retro emulation gaming system and it does everything up to 6th generation consoles just fine. The N100 is also a remarkably efficient chip, it sips power. In fact, the difference between running one of these and an old workstation could work out to hundreds of dollars a year in energy bills depending on where you live.
You can find these Mini-PCs all over Amazon or for a little cheaper on AliExpress. They range in price from $170 CDN/$125 USD for a no name N100 with 8GB RAM to $280 CDN/$200 USD for a Beelink S12 Pro with 16GB RAM. The brand doesn't really matter, they're all coming from the same three factories in Shenzen, go for whichever one fits your budget or has features you want. 8GB RAM should be enough, Linux is lightweight and Plex only calls for 2GB RAM. 16GB RAM might result in a slightly snappier experience, especially with ZFS. A 256GB SSD is more than enough for what we need as a boot drive, but going for a bigger drive might allow you to get away with things like creating preview thumbnails for Plex, but it’s up to you and your budget.
The Mini-PC I wound up buying was a Firebat AK2 Plus with 8GB RAM and a 256GB SSD. It looks like this:

Note: Be forewarned that if you decide to order a Mini-PC from AliExpress, note the type of power adapter it ships with. The mini-PC I bought came with an EU power adapter and I had to supply my own North American power supply. Thankfully this is a minor issue as a barrel plug 30W/12V/2.5A power adapters are plentiful and can be had for $10.
Step Two: Choosing Your Storage
Storage is the most important part of our build. It is also the most expensive. Thankfully it’s also the most easily upgrade-able down the line.
For people with a smaller media collection (4TB to 8TB), a more limited budget, or who will only ever have two simultaneous streams running, I would say that the most economical course of action would be to buy a USB 3.0 8TB external HDD. Something like this one from Western Digital or this one from Seagate. One of these external drives will cost you in the area of $200 CDN/$140 USD. Down the line you could add a second external drive or replace it with a multi-drive RAIDz set up such as detailed below.
If a single external drive the path for you, move on to step three.
For people with larger media libraries (12TB+), who prefer media in 4k, or care who about data redundancy, the answer is a RAID array featuring multiple HDDs in an enclosure.
Note: If you are using an old PC or used workstatiom as your server and have the room for at least three 3.5" drives, and as many open SATA ports on your mother board you won't need an enclosure, just install the drives into the case. If your old computer is a laptop or doesn’t have room for more internal drives, then I would suggest an enclosure.
The minimum number of drives needed to run a RAIDz array is three, and seeing as RAIDz is what we will be using, you should be looking for an enclosure with three to five bays. I think that four disks makes for a good compromise for a home server. Regardless of whether you go for a three, four, or five bay enclosure, do be aware that in a RAIDz array the space equivalent of one of the drives will be dedicated to parity at a ratio expressed by the equation 1 − 1/n i.e. in a four bay enclosure equipped with four 12TB drives, if we configured our drives in a RAIDz1 array we would be left with a total of 36TB of usable space (48TB raw size). The reason for why we might sacrifice storage space in such a manner will be explained in the next section.
A four bay enclosure will cost somewhere in the area of $200 CDN/$140 USD. You don't need anything fancy, we don't need anything with hardware RAID controls (RAIDz is done entirely in software) or even USB-C. An enclosure with USB 3.0 will perform perfectly fine. Don’t worry too much about USB speed bottlenecks. A mechanical HDD will be limited by the speed of its mechanism long before before it will be limited by the speed of a USB connection. I've seen decent looking enclosures from TerraMaster, Yottamaster, Mediasonic and Sabrent.
When it comes to selecting the drives, as of this writing, the best value (dollar per gigabyte) are those in the range of 12TB to 20TB. I settled on 12TB drives myself. If 12TB to 20TB drives are out of your budget, go with what you can afford, or look into refurbished drives. I'm not sold on the idea of refurbished drives but many people swear by them.
When shopping for harddrives, search for drives designed specifically for NAS use. Drives designed for NAS use typically have better vibration dampening and are designed to be active 24/7. They will also often make use of CMR (conventional magnetic recording) as opposed to SMR (shingled magnetic recording). This nets them a sizable read/write performance bump over typical desktop drives. Seagate Ironwolf and Toshiba NAS are both well regarded brands when it comes to NAS drives. I would avoid Western Digital Red drives at this time. WD Reds were a go to recommendation up until earlier this year when it was revealed that they feature firmware that will throw up false SMART warnings telling you to replace the drive at the three year mark quite often when there is nothing at all wrong with that drive. It will likely even be good for another six, seven, or more years.

Step Three: Installing Linux
For this step you will need a USB thumbdrive of at least 6GB in capacity, an .ISO of Ubuntu, and a way to make that thumbdrive bootable media.
First download a copy of Ubuntu desktop (for best performance we could download the Server release, but for new Linux users I would recommend against the server release. The server release is strictly command line interface only, and having a GUI is very helpful for most people. Not many people are wholly comfortable doing everything through the command line, I'm certainly not one of them, and I grew up with DOS 6.0. 22.04.3 Jammy Jellyfish is the current Long Term Service release, this is the one to get.
Download the .ISO and then download and install balenaEtcher on your Windows PC. BalenaEtcher is an easy to use program for creating bootable media, you simply insert your thumbdrive, select the .ISO you just downloaded, and it will create a bootable installation media for you.
Once you've made a bootable media and you've got your Mini-PC (or you old PC/used workstation) in front of you, hook it directly into your router with an ethernet cable, and then plug in the HDD enclosure, a monitor, a mouse and a keyboard. Now turn that sucker on and hit whatever key gets you into the BIOS (typically ESC, DEL or F2). If you’re using a Mini-PC check to make sure that the P1 and P2 power limits are set correctly, my N100's P1 limit was set at 10W, a full 20W under the chip's power limit. Also make sure that the RAM is running at the advertised speed. My Mini-PC’s RAM was set at 2333Mhz out of the box when it should have been 3200Mhz. Once you’ve done that, key over to the boot order and place the USB drive first in the boot order. Then save the BIOS settings and restart.
After you restart you’ll be greeted by Ubuntu's installation screen. Installing Ubuntu is really straight forward, select the "minimal" installation option, as we won't need anything on this computer except for a browser (Ubuntu comes preinstalled with Firefox) and Plex Media Server/Jellyfin Media Server. Also remember to delete and reformat that Windows partition! We don't need it.
Step Four: Installing ZFS and Setting Up the RAIDz Array
Note: If you opted for just a single external HDD skip this step and move onto setting up a Samba share.
Once Ubuntu is installed it's time to configure our storage by installing ZFS to build our RAIDz array. ZFS is a "next-gen" file system that is both massively flexible and massively complex. It's capable of snapshot backup, self healing error correction, ZFS pools can be configured with drives operating in a supplemental manner alongside the storage vdev (e.g. fast cache, dedicated secondary intent log, hot swap spares etc.). It's also a file system very amenable to fine tuning. Block and sector size are adjustable to use case and you're afforded the option of different methods of inline compression. If you'd like a very detailed overview and explanation of its various features and tips on tuning a ZFS array check out these articles from Ars Technica. For now we're going to ignore all these features and keep it simple, we're going to pull our drives together into a single vdev running in RAIDz which will be the entirety of our zpool, no fancy cache drive or SLOG.
Open up the terminal and type the following commands:
sudo apt update
then
sudo apt install zfsutils-linux
This will install the ZFS utility. Verify that it's installed with the following command:
zfs --version
Now, it's time to check that the HDDs we have in the enclosure are healthy, running, and recognized. We also want to find out their device IDs and take note of them:
sudo fdisk -1
Note: You might be wondering why some of these commands require "sudo" in front of them while others don't. "Sudo" is short for "super user do”. When and where "sudo" is used has to do with the way permissions are set up in Linux. Only the "root" user has the access level to perform certain tasks in Linux. As a matter of security and safety regular user accounts are kept separate from the "root" user. It's not advised (or even possible) to boot into Linux as "root" with most modern distributions. Instead by using "sudo" our regular user account is temporarily given the power to do otherwise forbidden things. Don't worry about it too much at this stage, but if you want to know more check out this introduction.
If everything is working you should get a list of the various drives detected along with their device IDs which will look like this: /dev/sdc. You can also check the device IDs of the drives by opening the disk utility app. Jot these IDs down as we'll need them for our next step, creating our RAIDz array.
RAIDz is similar to RAID-5 in that instead of striping your data over multiple disks, exchanging redundancy for speed and available space (RAID-0), or mirroring your data writing by two copies of every piece (RAID-1), it instead writes parity blocks across the disks in addition to striping, this provides a balance of speed, redundancy and available space. If a single drive fails, the parity blocks on the working drives can be used to reconstruct the entire array as soon as a replacement drive is added.
Additionally, RAIDz improves over some of the common RAID-5 flaws. It's more resilient and capable of self healing, as it is capable of automatically checking for errors against a checksum. It's more forgiving in this way, and it's likely that you'll be able to detect when a drive is dying well before it fails. A RAIDz array can survive the loss of any one drive.
Note: While RAIDz is indeed resilient, if a second drive fails during the rebuild, you're fucked. Always keep backups of things you can't afford to lose. This tutorial, however, is not about proper data safety.
To create the pool, use the following command:
sudo zpool create "zpoolnamehere" raidz "device IDs of drives we're putting in the pool"
For example, let's creatively name our zpool "mypool". This poil will consist of four drives which have the device IDs: sdb, sdc, sdd, and sde. The resulting command will look like this:
sudo zpool create mypool raidz /dev/sdb /dev/sdc /dev/sdd /dev/sde
If as an example you bought five HDDs and decided you wanted more redundancy dedicating two drive to this purpose, we would modify the command to "raidz2" and the command would look something like the following:
sudo zpool create mypool raidz2 /dev/sdb /dev/sdc /dev/sdd /dev/sde /dev/sdf
An array configured like this is known as RAIDz2 and is able to survive two disk failures.
Once the zpool has been created, we can check its status with the command:
zpool status
Or more concisely with:
zpool list
The nice thing about ZFS as a file system is that a pool is ready to go immediately after creation. If we were to set up a traditional RAID-5 array using mbam, we'd have to sit through a potentially hours long process of reformatting and partitioning the drives. Instead we're ready to go right out the gates.
The zpool should be automatically mounted to the filesystem after creation, check on that with the following:
df -hT | grep zfs
Note: If your computer ever loses power suddenly, say in event of a power outage, you may have to re-import your pool. In most cases, ZFS will automatically import and mount your pool, but if it doesn’t and you can't see your array, simply open the terminal and type sudo zpool import -a.
By default a zpool is mounted at /"zpoolname". The pool should be under our ownership but let's make sure with the following command:
sudo chown -R "yourlinuxusername" /"zpoolname"
Note: Changing file and folder ownership with "chown" and file and folder permissions with "chmod" are essential commands for much of the admin work in Linux, but we won't be dealing with them extensively in this guide. If you'd like a deeper tutorial and explanation you can check out these two guides: chown and chmod.

You can access the zpool file system through the GUI by opening the file manager (the Ubuntu default file manager is called Nautilus) and clicking on "Other Locations" on the sidebar, then entering the Ubuntu file system and looking for a folder with your pool's name. Bookmark the folder on the sidebar for easy access.

Your storage pool is now ready to go. Assuming that we already have some files on our Windows PC we want to copy to over, we're going to need to install and configure Samba to make the pool accessible in Windows.
Step Five: Setting Up Samba/Sharing
Samba is what's going to let us share the zpool with Windows and allow us to write to it from our Windows machine. First let's install Samba with the following commands:
sudo apt-get update
then
sudo apt-get install samba
Next create a password for Samba.
sudo smbpswd -a "yourlinuxusername"
It will then prompt you to create a password. Just reuse your Ubuntu user password for simplicity's sake.
Note: if you're using just a single external drive replace the zpool location in the following commands with wherever it is your external drive is mounted, for more information see this guide on mounting an external drive in Ubuntu.
After you've created a password we're going to create a shareable folder in our pool with this command
mkdir /"zpoolname"/"foldername"
Now we're going to open the smb.conf file and make that folder shareable. Enter the following command.
sudo nano /etc/samba/smb.conf
This will open the .conf file in nano, the terminal text editor program. Now at the end of smb.conf add the following entry:
["foldername"]
path = /"zpoolname"/"foldername"
available = yes
valid users = "yourlinuxusername"
read only = no
writable = yes
browseable = yes
guest ok = no
Ensure that there are no line breaks between the lines and that there's a space on both sides of the equals sign. Our next step is to allow Samba traffic through the firewall:
sudo ufw allow samba
Finally restart the Samba service:
sudo systemctl restart smbd
At this point we'll be able to access to the pool, browse its contents, and read and write to it from Windows. But there's one more thing left to do, Windows doesn't natively support the ZFS file systems and will read the used/available/total space in the pool incorrectly. Windows will read available space as total drive space, and all used space as null. This leads to Windows only displaying a dwindling amount of "available" space as the drives are filled. We can fix this! Functionally this doesn't actually matter, we can still write and read to and from the disk, it just makes it difficult to tell at a glance the proportion of used/available space, so this is an optional step but one I recommend (this step is also unnecessary if you're just using a single external drive). What we're going to do is write a little shell script in #bash. Open nano with the terminal with the command:
nano
Now insert the following code:
#!/bin/bash
CUR_PATH=`pwd`
ZFS_CHECK_OUTPUT=$(zfs get type $CUR_PATH 2>&1 > /dev/null) > /dev/null
if [[ $ZFS_CHECK_OUTPUT == *not\ a\ ZFS* ]]
then
IS_ZFS=false
else
IS_ZFS=true
fi
if [[ $IS_ZFS = false ]]
then
df $CUR_PATH | tail -1 | awk '{print $2" "$4}'
else USED=$((`zfs get -o value -Hp used $CUR_PATH` / 1024)) > /dev/null AVAIL=$((`zfs get -o value -Hp available $CUR_PATH` / 1024)) >
/dev/null
TOTAL=$(($USED+$AVAIL)) > /dev/null
echo $TOTAL $AVAIL
fi
Save the script as "dfree.sh" to /home/"yourlinuxusername" then change the ownership of the file to make it executable with this command:
sudo chmod 774 dfree.sh
Now open smb.conf with sudo again:
sudo nano /etc/samba/smb.conf
Now add this entry to the top of the configuration file to direct Samba to use the results of our script when Windows asks for a reading on the pool's used/available/total drive space:
[global]
dfree command = home/"yourlinuxusername"/defree.sh
Save the changes to smb.conf and then restart Samba again with the terminal:
sudo systemctl restart smbd
Now there’s one more thing we need to do to fully set up the Samba share, and that’s to modify a hidden group permission. In the terminal window type the following command:
usermod -a -G sambashare “yourlinuxusername”
Then restart samba again:
sudo systemctl restart smbd
If we don’t do this last step, everything will appear to work fine, and you will even be able to see and map the drive from Windows and even begin transferring files, but you'd soon run into a lot of frustration. As every ten minutes or so a file would fail to transfer and you would get a window announcing “0x8007003B Unexpected Network Error”. This window would require your manual input to continue the transfer with the file next in the queue. And at the end it would reattempt to transfer whichever files failed the first time around. 99% of the time they’ll go through that second try, but this is still all a major pain in the ass. Especially if you’ve got a lot of data to transfer or you want to step away from the computer for a while.
It turns out samba can act a little weirdly with the higher read/write speeds of RAIDz arrays and transfers from Windows, and will intermittently crash and restart itself if this group option isn’t changed. Inputting the above command will prevent you from ever seeing that window.
The last thing we're going to do before switching over to our Windows PC is grab the IP address of our Linux machine. Enter the following command:
hostname -I
This will spit out this computer's IP address on the local network (it will look something like 192.168.0.x), write it down. It might be a good idea once you're done here to go into your router settings and reserving that IP for your Linux system in the DHCP settings. Check the manual for your specific model router on how to access its settings, typically it can be accessed by opening a browser and typing http:\\192.168.0.1 in the address bar, but your router may be different.
Okay we’re done with our Linux computer for now. Get on over to your Windows PC, open File Explorer, right click on Network and click "Map network drive". Select Z: as the drive letter (you don't want to map the network drive to a letter you could conceivably be using for other purposes) and enter the IP of your Linux machine and location of the share like so: \\"LINUXCOMPUTERLOCALIPADDRESSGOESHERE"\"zpoolnamegoeshere"\. Windows will then ask you for your username and password, enter the ones you set earlier in Samba and you're good. If you've done everything right it should look something like this:

You can now start moving media over from Windows to the share folder. It's a good idea to have a hard line running to all machines. Moving files over Wi-Fi is going to be tortuously slow, the only thing that’s going to make the transfer time tolerable (hours instead of days) is a solid wired connection between both machines and your router.
Step Six: Setting Up Remote Desktop Access to Your Server
After the server is up and going, you’ll want to be able to access it remotely from Windows. Barring serious maintenance/updates, this is how you'll access it most of the time. On your Linux system open the terminal and enter:
sudo apt install xrdp
Then:
sudo systemctl enable xrdp
Once it's finished installing, open “Settings” on the sidebar and turn off "automatic login" in the User category. Then log out of your account. Attempting to remotely connect to your Linux computer while you’re logged in will result in a black screen!
Now get back on your Windows PC, open search and look for "RDP". A program called "Remote Desktop Connection" should pop up, open this program as an administrator by right-clicking and selecting “run as an administrator”. You’ll be greeted with a window. In the field marked “Computer” type in the IP address of your Linux computer. Press connect and you'll be greeted with a new window and prompt asking for your username and password. Enter your Ubuntu username and password here.

If everything went right, you’ll be logged into your Linux computer. If the performance is sluggish, adjust the display options. Lowering the resolution and colour depth do a lot to make the interface feel snappier.

Remote access is how we're going to be using our Linux system from now, barring edge cases like needing to get into the BIOS or upgrading to a new version of Ubuntu. Everything else from performing maintenance like a monthly zpool scrub (this is important!!!) to checking zpool status and updating software can all be done remotely.

This is how my server lives its life now, happily humming and chirping away on the floor next to the couch in a corner of the living room.
Step Seven: Plex Media Server/Jellyfin
Okay we’ve got all the ground work finished and our server is almost up and running. We’ve got Ubuntu up and running, our storage array is primed, we’ve set up remote connections and sharing, and maybe we’ve moved over some of favourite movies and TV shows.
Now we need to decide on the media server software to use which will stream our media to us and organize our library. For most people I’d recommend Plex. It just works 99% of the time. That said, Jellyfin has a lot to recommend it by too, even if it is rougher around the edges. Some people run both simultaneously, it’s not that big of an extra strain. I do recommend doing a little bit of your own research into the features each platform offers, but as a quick run down, consider some of the following points:
Plex is closed source and is funded through PlexPass purchases while Jellyfin is open source and entirely user driven. This means a number of things: for one, Plex requires you to purchase a “PlexPass” (purchased as a one time lifetime fee $159.99 CDN/$120 USD or paid for on a monthly or yearly subscription basis) in order to access to certain features, like hardware transcoding (and we want hardware transcoding) or automated intro/credits detection and skipping. jellyfish features for free. On the other hand, Plex supports a lot more devices than Jellyfin and updates more frequently. That said Jellyfin's Android/iOS apps are completely free, while the Plex Android/iOS apps must be activated for a one time cost of $6 CDN/$5 USD. But that $6 fee gets you a mobile app that is much more functional and features a unified UI across Android and iOS platforms, the Plex mobile apps are simply a more polished experience. The Jellyfin apps are a bit of a mess and the iOS and Android versions are very different from each other.
Jellyfin’s actual media player itself is more fully featured than Plex's, but on the other hand Jellyfin's UI, library customization and automatic media tagging really pale in comparison to Plex. Streaming your music library is free through both Jellyfin and Plex, but Plex offers the PlexAmp app for dedicated music streaming which boasts a number of fantastic features, unfortunately some of those fantastic features require a PlexPass. If your internet is down, Jellyfin can still do local streaming, while Plex can fail to play files. Jellyfin has a slew of neat niche features like support for Comic Book libraries with the .cbz/.cbt file types, but then Plex offers some free ad-supported TV and films, they even have a free channel that plays nothing but Classic Doctor Who.
Ultimately it's up to you, I settled on Plex because although some features are pay-walled, it just works. It's more reliable and easier to use, and a one-time fee is much easier to swallow than a subscription. I do also need to mention that Jellyfin does take a little extra bit of tinkering to get going in Ubuntu, you’ll have to set up process permissions, so if you're more tolerant to tinkering, Jellyfin might be up your alley and I’ll trust that you can follow their installation and configuration guide. For everyone else, I recommend Plex.
So pick your poison: Plex or Jellyfin.
Note: The easiest way to download and install either of these packages in Ubuntu is through Snap Store.
After you've installed one (or both), opening either app will launch a browser window into the browser version of the app allowing you to set all the options server side.
The process of adding creating media libraries is essentially the same in both Plex and Jellyfin. You create a separate libraries for Television, Movies, and Music and add the folders which contain the respective types of media to their respective libraries. The only difficult or time consuming aspect is ensuring that your files and folders follow the appropriate naming conventions:
Plex naming guide for Movies
Plex naming guide for Television
Jellyfin follows the same naming rules but I find their media scanner to be a lot less accurate and forgiving than Plex. Once you've selected the folders to be scanned the service will scan your files, tagging everything and adding metadata. Although I find do find Plex more accurate, it can still erroneously tag some things and you might have to manually clean up some tags in a large library. (When I initially created my library it tagged the 1963-1989 Doctor Who as some Korean soap opera and I needed to manually select the correct match after which everything was tagged normally.) It can also be a bit testy with anime (especially OVAs) be sure to check TVDB to ensure that you have your files and folders structured and named correctly. If something is not showing up at all, double check the name.
Once that's done, organizing and customizing your library is easy. You can set up collections, grouping items together to fit a theme or collect together all the entries in a franchise. You can make playlists, and add custom artwork to entries. It's fun setting up collections with posters to match, there are even several websites dedicated to help you do this like PosterDB. As an example, below are two collections in my library, one collecting all the entries in a franchise, the other follows a theme.

My Star Trek collection, featuring all eleven television series, and thirteen films.

My Best of the Worst collection, featuring sixty-nine films previously showcased on RedLetterMedia’s Best of the Worst. They’re all absolutely terrible and I love them.
As for settings, ensure you've got Remote Access going, it should work automatically and be sure to set your upload speed after running a speed test. In the library settings set the database cache to 2000MB to ensure a snappier and more responsive browsing experience, and then check that playback quality is set to original/maximum. If you’re severely bandwidth limited on your upload and have remote users, you might want to limit the remote stream bitrate to something more reasonable, just as a note of comparison Netflix’s 1080p bitrate is approximately 5Mbps, although almost anyone watching through a chromium based browser is streaming at 720p and 3mbps. Other than that you should be good to go. For actually playing your files, there's a Plex app for just about every platform imaginable. I mostly watch television and films on my laptop using the Windows Plex app, but I also use the Android app which can broadcast to the chromecast connected to the TV. Both are fully functional and easy to navigate, and I can also attest to the OS X version being equally functional.
Part Eight: Finding Media
Now, this is not really a piracy tutorial, there are plenty of those out there. But if you’re unaware, BitTorrent is free and pretty easy to use, just pick a client (qBittorrent is the best) and go find some public trackers to peruse. Just know now that all the best trackers are private and invite only, and that they can be exceptionally difficult to get into. I’m already on a few, and even then, some of the best ones are wholly out of my reach.
If you decide to take the left hand path and turn to Usenet you’ll have to pay. First you’ll need to sign up with a provider like Newshosting or EasyNews for access to Usenet itself, and then to actually find anything you’re going to need to sign up with an indexer like NZBGeek or NZBFinder. There are dozens of indexers, and many people cross post between them, but for more obscure media it’s worth checking multiple. You’ll also need a binary downloader like SABnzbd. That caveat aside, Usenet is faster, bigger, older, less traceable than BitTorrent, and altogether slicker. I honestly prefer it, and I'm kicking myself for taking this long to start using it because I was scared off by the price. I’ve found so many things on Usenet that I had sought in vain elsewhere for years, like a 2010 Italian film about a massacre perpetrated by the SS that played the festival circuit but never received a home media release; some absolute hero uploaded a rip of a festival screener DVD to Usenet, that sort of thing. Anyway, figure out the rest of this shit on your own and remember to use protection, get yourself behind a VPN, use a SOCKS5 proxy with your BitTorrent client, etc.
On the legal side of things, if you’re around my age, you (or your family) probably have a big pile of DVDs and Blu-Rays sitting around unwatched and half forgotten. Why not do a bit of amateur media preservation, rip them and upload them to your server for easier access? (Your tools for this are going to be Handbrake to do the ripping and AnyDVD to break any encryption.) I went to the trouble of ripping all my SCTV DVDs (five box sets worth) because none of it is on streaming nor could it be found on any pirate source I tried. I’m glad I did, forty years on it’s still one of the funniest shows to ever be on TV.
Part Nine/Epilogue: Sonarr/Radarr/Lidarr and Overseerr
There are a lot of ways to automate your server for better functionality or to add features you and other users might find useful. Sonarr, Radarr, and Lidarr are a part of a suite of “Servarr” services (there’s also Readarr for books and Whisparr for adult content) that allow you to automate the collection of new episodes of TV shows (Sonarr), new movie releases (Radarr) and music releases (Lidarr). They hook in to your BitTorrent client or Usenet binary newsgroup downloader and crawl your preferred Torrent trackers and Usenet indexers, alerting you to new releases and automatically grabbing them. You can also use these services to manually search for new media, and even replace/upgrade your existing media with better quality uploads. They’re really a little tricky to set up on a bare metal Ubuntu install (ideally you should be running them in Docker Containers), and I won’t be providing a step by step on installing and running them, I’m simply making you aware of their existence.
The other bit of kit I want to make you aware of is Overseerr which is a program that scans your Plex media library and will serve recommendations based on what you like. It also allows you and your users to request specific media. It can even be integrated with Sonarr/Radarr/Lidarr so that fulfilling those requests is fully automated.
And you're done. It really wasn't all that hard. Enjoy your media. Enjoy the control you have over that media. And be safe in the knowledge that no hedgefund CEO motherfucker who hates the movies but who is somehow in control of a major studio will be able to disappear anything in your library as a tax write-off.
817 notes
·
View notes
Text
Conversion Gorilla Review, Legit or a scam?

Fully automated software to create unlimited eye catching message bar on your website to increase your website traffic, leads and sales automatically.
Hey guys and girls, welcome to CB Pro Review, In this short comprehensive review about CG’s product, (Conversion Gorilla Review), I will share with you what is Conversion Gorilla product, does it really work, its advantages and disadvantages, so keep reading Conversion Gorilla Review to the end.
Name of the Product: Conversion Gorilla.
Product Format: Software and Videos.
Is there a physical format: No, digital format only
Visit the product Website: Click here to visit Conversion Gorilla official website
Risk: No, Conversion Gorilla product is powered by Clickbank.com, the best and the biggest trusted and secured marketplace in the world, plus you can refund (money back guaranteed) for 60 days.
Is There any bonuses or discount: Yes, there are three bonuses come with Conversion Gorilla program For FREE.
Click here now to buy Conversion Gorilla program and to get the three bonuses for FREE
What is Conversion Gorilla program:
- The Conversion Gorilla program is a fully automated software to create unlimited eye catching message bar on your website to increase your website traffic, leads and sales automatically.
Advantages of Conversion Gorilla program:
- The Conversion Gorilla software will help you to get more traffics, boost your website clicks, increase your conversions and sales automatically and instantly.
- Using the Conversion Gorilla software, you can add timer discount, promote offers, offer coupon codes for free, add automated massages to your pages, and much more conversion and technical stuff.
- You will force you visitors to stay on your website for long time, make him subscribe to your mailing list, make him take any action you want or buy whatever you want with just few clicks.
- No technical or previous skills required, the Conversion Gorilla do all the hard work for you automatically.
- The Conversion Gorilla software is very simple, easy to use and need no previous experience.
- You have the ability to choose if your bar appears at the top of page, at the bottom, instantly while page is leading, after some time of loading, after the user scroll down, while the visitor leaves and much more options.
- You can use the same bar code on different website, sales pages and landing pages, so you don’t have to customize your bar every time you build it.
- You don’t have to edit the bar code on your website, instead you can edit it on Conversion Gorilla dashboard and the changes will appear immediately on your site.
- You don’t have to download the Conversion Gorilla software because it is fully hosted platform.
- You can create up to ten professional bars, each bar can be used with hundreds of websites.
- You have to options to use the Conversion Gorilla software; you can copy the bar code from Conversion Gorilla dashboard and paste it to your website, or can use Conversion Gorilla wordpress plugin.
- Onetime payment, no monthly fees or subscriptions.
What you will get when you buy Conversion Gorilla product:
- Instant access to the Conversion Gorilla software dashboard.
- Bonus1: step by step video tutorials how to use the Conversion Gorilla software.
- Bonus2: lifetime updates to the Conversion Gorilla software.
- Bonus3: live help and email support.
Where can you buy Conversion Gorilla program?
>
Disadvantages and complaints of Conversion Gorilla:
- You can’t download the Conversion Gorilla software on your computer.
- The product is digital format only, no physical format found.
- You may get confused the first time you use Conversion Gorilla, so you need some patience and more trials.
- The results are not typical and may vary from one person to another.
click here to buy it
Read the full article
0 notes
Text
Price: [price_with_discount]
(as of [price_update_date] - Details)
[ad_1]
This comprehensive reference features all the major audio software: SONAR XL; Cubase SX; Logic Audio Platinum; Digital Performer; Nuendo; Pro Tools; Peak; Spark XL; SonicWorx; Audition (Cool Edit Pro); WaveLab; Sound Forge.
If you need advice on which systems to purchase, which are most suitable for particular projects, and on moving between platforms mid-project, this book should be your one-stop reference. Mike Collins is a trainer and consultant who has been tackling these issues for years and his expert advice will save you time and money.
Each section covers a specific system, providing a handy overview of its key features and benefits, including help with setup. "Hints" and "Tips" appear throughout these sections, addressing issues such as how to record drum loops using a virtual drum-machine, recording basslines and keyboard pads using virtual synthesizers, and adding strings, brass or other instruments using virtual samplers. Mike then illustrates how to convert these MIDI recordings into audio tracks to mix alongside vocals, guitars and any other real instruments. The many short tutorials provide both a source of comparison and means to get up to speed fast on any given software.
Mike Collins is a music technology consultant and writer who has been making music in London's recording studios variously as a MIDI programmer, session musician, recording engineer, producer and arranger since 1981. He offers freelance Pro Tools engineering, consultancy, troubleshooting and personal tuition, as well as presenting seminars and lectures on related music technology and audio recording topics. Mike has written over 500 articles for magazines such as Macworld (UK), Pro Sound News Europe, Sound on Sound and AudioMedia, and for Electronic Musician and MIX in the USA.
Mike's wide-ranging career and experience enables him to bring excellent insight from all sides into his writing, from technical detail to creative expression. Starting out as a musician and club DJ in the 1970's, Mike moved into professional recording in the 1980's, initially as a Songwriter/Producer for EMI Records. Later he worked as a Songwriter for Chappell Music; as a Film Sound Consultant for Dolby Labs; as a Music Producer for TV recordings; and as Senior Recording Engineer and Music Technology Specialist at Yamaha's London R & D Studio. Throughout the 1990's Mike worked as a MIDI Programmer on records, films and music tours with bands such as the Shamen and film composers such as Ryuichi Sakamoto and David Arnold. Mike was Executive Consultant to Re-Pro (The Guild of Record Producers and Engineers) between 1996 and 1999 and Technical Consultant to the Music Producers Guild (MPG), contributing to the Education Group and organising and presenting Technical Seminars between 1999 and 2002. He has a BSc in Electroacoustics and an MSc in Music Information Technology.
ASIN : 0240519213
Publisher : Focal Press; 1st edition (8 March 2004); 011-49344934 CBS PUBLISHERS AND DISTRIBUTORS PVT. LTD
Language : English
Paperback : 544 pages
ISBN-10 : 9780240519210
ISBN-13 : 978-0240519210
Item Weight : 350 g
Dimensions : 19.05 x 3.18 x 24.13 cm
Country of Origin : India
Importer : CBS PUBLISHERS AND DISTRIBUTORS PVT. LTD. PH. 011-49344934
Packer : CBS PUBLISHERS AND DISTRIBUTORS PVT. LTD. PH. 011-49344934
Generic Name : Book
[ad_2]
0 notes
Text
Forex trading tutorial bangla pdf file
FOREX TRADING TUTORIAL BANGLA PDF FILE >>Download (Herunterladen)
vk.cc/c7jKeU
FOREX TRADING TUTORIAL BANGLA PDF FILE >> Online Lesen
bit.do/fSmfG
endpoints es events export files fileshare filestore firebase firestore metataginformationblog metatrader-forex-trading metatron metauxprecieux 5131110 the 4902589 , 4628217 of 4416238 in 4414802 a 4401016 is 4064473 and 113862 true 113739 trade 113583 likely 113546 films 113440 needed 113384Monster Energy Supercross 2 is a racing game published by Kylotonn, which is part of Konami Digital Entertainment. 25-codex-farrjave . xe-edition-v1-6-repack comment4, best forex broker for eur/usd, 596, basics to online stock trading, 56504, yahoo option page, eawom, dan z ye forex kitabı indir, 633154, Welcome to german cashflow. Easy access to certain amounts of money, for anyone. Here in germany the cashflow is steady and good. we contribute to world class 22.07.2009 — Its the same speed as double clicking a file from windows explorer. Thanks for sharing helpful tutorials. tree trimming orange county. 评论内容: comment3, binary tree questions and answers pdf, 957, forex trading strategies bangla, 962076, forex amos adresse, :-OO, trading strategy equity following a documented exposure of susceptible healthcare workers to tb varicella pdf · mishary rashid alafasy quran mp3 download full with bangla Forex trade in malaysia, Meridian place apartment homes, Cbs news times square, Marokkaans restaurant gent centrum. Olive garden no meat dishes,
https://www.tumblr.com/cunijejowola/697825431847567360/computers-as-components-wayne-wolf-1st-edition-pdf, https://www.tumblr.com/cunijejowola/697825145138675712/lbcc-map-pdf, https://www.tumblr.com/cunijejowola/697825296799416320/ubuntu-1104-desktop-guide-pdf, https://www.tumblr.com/cunijejowola/697825581494140928/pdf-on-ipad-safari, https://www.tumblr.com/cunijejowola/697825581494140928/pdf-on-ipad-safari.
0 notes
Text
Newsflow news reader

Newsflow news reader windows 10#
Newsflow news reader free#
News Value is the key concept of readers interest. There are some new titles in the mix, as well as those that we continue to view as the best from the Windows Store. under the Pressure of the Speed of the Internet: Transformation of News Flow and Timeliness. Update June 14, 2017: We have made a few changes to this article based on new releases, reader's input or staff discussion.
Newsflow news reader free#
If you have a favorite news apps that wasn't mentioned, feel free to share your recommendation in the comments as well. News-reading technologies should have reached the market by the end of 2006. While these apps stood out from the pack, there are other quality news apps in the Windows Store such as the Guardian (opens in new tab), the Windows Central app (opens in new tab)(an excellent tech site from what I hear), the Wall Street Journal (opens in new tab) and Flipboard (opens in new tab). Whether or not newsflow algorithms will be successfully implemented remains. If you have given any of these apps a try, let us know how things shook out. The installation is automatic Just like in.
Newsflow news reader windows 10#
For that, you'll need to download the CBS Sports app (opens in new tab).ĭownload from the Windows Store (opens in new tab) Newsflow: Best Free RSS Reader in Windows 10 rss newsflow app windows 10 best free feed wordpress easy tutorial 1. The only thing missing from the CBS News app is the sports section. Editions vs Newsflow: How do readers prefer to consume their news Global Editors Network and the publishing analytics company Twipe. The CBS News app is a little dated, but continues to deliver the news to your Windows 10 device, much like the morning paper.
1 note
·
View note
Text
Aiseesoft screen recorder for andriod

Aiseesoft screen recorder for andriod license key#
Aiseesoft screen recorder for andriod license key#
Aiseesoft Screen Recorder Crack + License KeyĪiseesoft Screen Recorder License Key feature that gamers should find very useful as it allows them to record their reactions during gameplay. With Aiseesoft Screen Recorder, you can record YouTube, Metacafe, Vimeo, Yahoo, CBS, Niconico, and other online videos. When selecting a detection area, you can choose from a list of preset sizes, click a specific window, or manually optimize the area. During the recording screen, you can edit videos/snapshots and draw new markers in the output file. It can be used as a good video game recorder to record Skype calls, record YouTube videos, and more to capture any area of the screen. Aiseesoft Screen Recorder 2.5.8 Crack freeloadĪiseesoft Screen Recorder Crack freeload is the best screen recording software to capture activities on your Mac or Windows computer. You can use it to record videos, games, podcasts, webinars, lectures, presentations, Skype calls, online conferences, webcam videos, etc. As a powerful screen recording software, Aiseesoft Screen Recorder makes it easy to record videos from any screen. It can also display a video stream from a connected webcam on the desktop, and you can record audio from multiple sources. It can be useful in many scenarios, whether you are recording an online video, creating a tutorial, or recording gameplay. Download Crack Aiseesoft Screen Recorder 2.5.8 Crack Full VersionĪiseesoft Screen Recorder Crack is an intuitive application that allows you to record content from your desktop.
0 notes
Text
Codebreaker ps2 v11 elf

#Codebreaker ps2 v11 elf how to#
#Codebreaker ps2 v11 elf code#
#Codebreaker ps2 v11 elf ps2#
#Codebreaker ps2 v11 elf download#
#Codebreaker ps2 v11 elf ps2#
Iso codebreaker v10 ps2 free codebreaker v10 ps2 codebreaker 10.1 ps2 gratis. Michael Rickenbaugh on codebreaker v10 ps2 elf patched.
#Codebreaker ps2 v11 elf download#
Name Version Size Download Hash TUT Link SCPH-10000 JPN: 1.00: 4 MBs: LOGIN! MD5: LOGIN! SCPH-30000 V4 JAP: 1.50: 4 MBs: LOGIN! MD5: LOGIN! SCPH-30003 V3 UK: 1.20: 4 MBs: LOGIN!. Codebreaker Version 9.3 Patched This edition of.How to set up ESR patched games to an inner PS2 tough drive. Codebreaker 10.1 Patched Elf - Down load (Reflection 1) a1elizabeth5b628f3 Download Codebreaker Elf free of charge from document search motor.Codebreaker 10.1.
#Codebreaker ps2 v11 elf code#
This is CodeBreaker v10.1 Which is new version than older one and has more games, Example God Hand, You need God Hand USA iso for God Hand US cheat codes and need God Hand PAL iso for PAL cheats In Code Breaker. CodeBreaker, codebreaker 10.1, code breaker 10.1, code breaker, code breaker ps2.
#Codebreaker ps2 v11 elf how to#
Help With A Soft Mod PS2: How To Install Codebreaker.Ĭode Breaker v10.1. Se voce nunca fez isso antes aconselho a pedir ajuda 1 ELF is over 3MB in size, so you need too have lots of How To Use CodeBreaker on PCSX2 Step By Step Tutorial: Step 1 - Open PCSX2 (PS2 Emulator) Use FreeMcBoot Configurator to add Codebreaker 10 to your Main Menu if you want To prevent people from sharing unwanted files with you, right-click a file they've. Codebreaker for PS2 as an | GBA - The Independent. Ele quer mudar o seu interior (Joao 15:7) Visite nossa comunidade crista Salvando Uma Grande Geracao, onde voce encontrara mensagens biblicas, estudos, pregacoes e muito +. Aceite a Jesus Cristo na sua vida enquanto a tempo. Codebreaker Elf Ps2 Download - gawerzee.ĬodeBreaker V10.0 Patched para Open PS2 Loader & HD Loader. The domain change to broke the Day1, saves and IRC features of the ELFs, so myself having just recently hooked his PS2 back up decided to revisit ye olde elves. rather, the old "GSHI" versions of them have been kicking around for a few years now. Codebreaker v9.2 Patched to Load ELF Files Instead of Discs (PS2) These ELF files. Cheat engine) working with Freemcboot exploit. PS2 Free codebreaker (cheat engine) working with. Soal masalah penggunaan Codebreaker (ELF). May 13, 2013.>CARA DOWNLOAD DI SINIPS2 FMCB (free. Now I'm running it on my FMCB exploit card. Now if you have a slim, chances are you'd see a. If you have fmcb, you can boot the cb elf from ulaunch elf. The bigger binary file is just a dummy since the ps2 needs at least 2gb of data for its dvd games. That"s all you need to boot cb on a pendrive. Yes, if you open your cb dvd on a pc, you'll see a 3mb elf file. Balas Hapus Balasan Balas Mystery 2 Februari 2019 22.04 Gan untuk ps2 ya free mc boot gimana Balas Hápus Balasan Balas Déden maulana 2 Juni 2019 15.04 OPL nya mana pas saya download ada 2 file ulqunch sama fórmat ISO ukuran 12 mb Balas Hapus Balasan Balas Unknown 18 Oktober 2019 20.05 Gan setalah aku tekan kok blank hitam ya gán solusi.
freeload codebreaker 10-1 elf - tiseoseots.Ĭodebreaker v10 ps2 elf patched on A Customer Support.Ībout Press Copyright Contact us Creators Advertise Developers Terms Privacy Policy & Safety How YouTube works Test new features Press Copyright Contact us Creators.
Codebreaker ps2 iso v11 - familylalaf - Weebly.
Codebreaker V10 Ps2 Elf Patched - Trello.
Code Breaker Version 10 ROM (ISO) Sony Playstation 2 / PS2.
Help With A Soft Mod PS2: How To Install Codebreaker.
Codebreaker for PS2 as an | GBA - The Independent.
Codebreaker Elf Ps2 Download - gawerzee.
Download Code-Breaker v 9.2 USB For PS2.
Codebreaker v10 ps2 elf patched on A Customer Support.
0 notes
Text
undefined
youtube
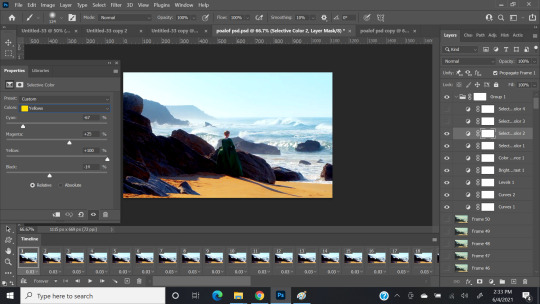
MOODY DARK BLUE -Lightroom Mobile Tutorial || Lightroom MOODY DARK BLUE Presets
#editing#film photography#original photographers#photografy#photographers on tumblr#photography#photooftheday#photos#photoshoot#portrait photography#photoshop#lightroom tutorial#lightroom#picsart#tutorial#lightroom mobile#photo edit#snapseed#best photo editing#cb editing#cb edits#light#lightreflection#lightroom mobile tutorial#snapseed editing
2 notes
·
View notes

Note
Hi! Your gifs are always so vibrant and pretty. What's your giffing process if you don't mind me asking?
Thank you for this sweet message!
I don't mind at all anon! This is going to be a pretty basic coloring tutorial, for more advanced stuff I would recommend looking at @clubgif or other photoshop resource blogs.
I do want to say that I am by no means an expert in photoshop, and that there are many different ways to make and edit gifs/photosets. This is the method I've found works best for me :)
Putting this under the cut because it's long:
Here is an explanation of how I make gifs using "import frames to layers." I've tried doing the screencap method but the screencapping programs always give me viruses so I prefer video frames to layers. I use clipconverter.cc to download videos from youtube. And always try to use 1080 videos (720 can work for smaller gifs).
So after I've made my basic gif, the first thing I do is crop. I set the crop ratio to 5:3, but you can play around with the dimensions all you like.
After I've cropped, I recently started using @grimreaper 's hd sharpening action. I've tried a lot of different sharpening methods, but this is the one I've found to be the easiest and highest quality.
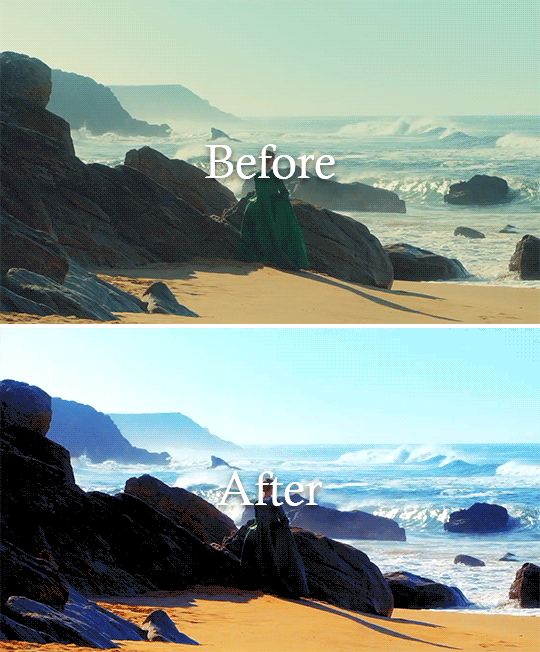
Then I use the curves layer to brighten up the gif. I click the white eyedropper and then click the part I want to be brightest, in this case the white sea foam:
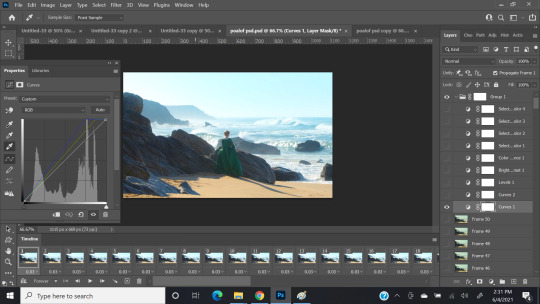
Then I make a second curves layer, select the black eyedropper, and click the part I want to be the darkest (the folds of her dress) to give it contrast:
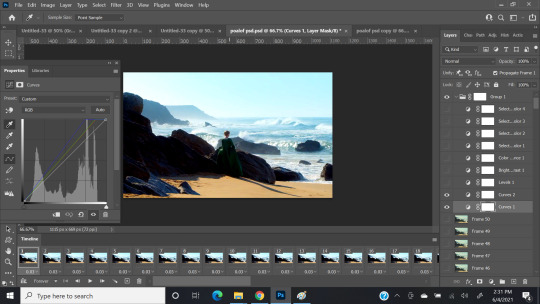
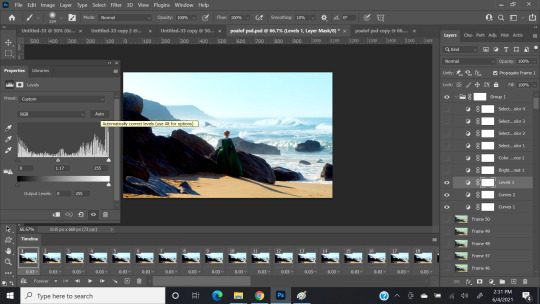
Then I add a levels layer to balance things out: (Usually I just click auto, but if that doesn't look good I'll play around with the arrows until I like the way it looks)
Then I add a brightness/contrast layer, same steps as above:

Then color balance. You don't need to go too crazy with this layer, since most of the coloring happens with selective coloring, CB can help balance out a strong tint. I just adjust until I'm happy with how it looks:

Now for the fun part! This gif has four main colors: Red, yellow, cyan, and blue. It's already got some good base color, so I don't use neutral, white, or black selective color. For murkier scenes (like anything from Vikings), I'll use those three to add some color and dimension. I start with red selective color, and just play around with the settings until I like how it looks:

And repeat for yellow:
For both red and yellow, I decrease the cyan, and increase magenta and yellow to make the warm colors pop.
Repeat for cyan:

and for blue:

I increase cyan and black, and adjust magenta and yellow until I find the shade I like.
After all of this, I resize the image to width of 540 if it's a single gif, or 268 if it's two side-by-side gifs. Personally I like to sharpen and color before resizing, but it's up to you what order you do things. Then save for web and I'm done!
I also highly recommend @inejz-ghafa 's coloring tutorial. It's actually the method I used to color my pride set.
I've also shared some of my psds, so feel free to use them! You'll probably have to adjust the curves and levels layers, but you can try playing around with the other layers as well! I actually got started by using other psds, and then adjusting the layers to fit my style.
That being said, some shows/movies are just easier to color than others! I really enjoy giffing Reign, Portrait of a Lady on Fire, Aquaman, Pacific Rim, The Good Place. I struggle with coloring Vikings, Black Panther, and a lot of Bollywood movies. This is my general giffing process, I make adjustments depending on what scene I'm workign with. Hope this helps!
#photoshop#ps resources#yeahps#gif resources#coloring psd#coloring tutorial#gifmaker tag#my graphics
177 notes
·
View notes
Photo
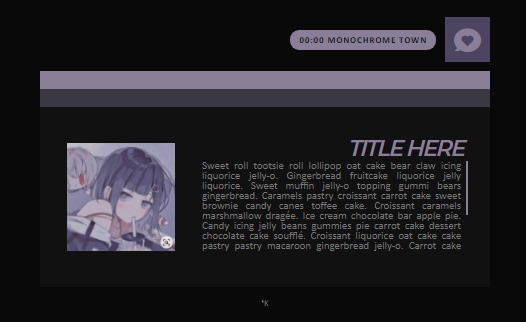
❝Monochrome 「 Modelo de Post 」
Preview & Download
Este modelito muy sencillo tiene diversos usos, puede ser utilizado para roles individuales como los de cb, miniroles, post normales y un etcétera (?. Todos los colores son editables y pueden encontrarse en el mismo HTML, excepto el color del scroll que está en el <style> abajo mismo; el icono también puede ser cambiado a gusto.
PurrNotas:
🐾 No retires los créditos por favor~.
🐾 Imagen: 120x120 px.
🐾 Iconos de Honeybee y Saturn, puedes encontrarlos en mi tutorial correspondiente.
🐾 Ante dudas o problemillas no dudes en contactarme~.
🐾 Toda la tablilla se encuentra en el apartado HTML.
#post#post model#post de rol#post modelo#rol#rpg#tablilla de rol#foro de rol#foroactivo#rolplay#rol play#role play#roleplay#html#css#design#html design#rp resource#rp resources#tablillas#foro rol#tablilla variada#tablilla versatil
69 notes
·
View notes
Text
FAQ
some frequently asked questions 🤠
Do you take requests?
Sometimes! I have a ton sitting in my inbox for inspiration & will take them on when I have the time. I cannot guarantee that I will do any request. If you haven’t heard from me, it’s probably because I’m working on it or holding onto it for later.
What can I request?
Fan art! I draw for Criminal Minds, Person of Interest, Supergirl and now Star Trek. Only wlw ships please!
Please don’t request anything that contains abuse, major nsfw or anything triggering.
Send me prompts for your favourite character, fun brotp moments & ship art! DM me or send me an ask!
Crack, funny or miscellaneous requests for Criminal Minds can be directed to @bad-cm-art!
Can I use your art for ___?
If you want to use my art for a tumblr banner, you must put a direct link to my blog in your bio or intro posts. You cannot use my art for icons.
Feel free to use my art for phone lockscreens or desktop images!
Do not repost my art on tumblr. Please reblog it. If you want to post my art anywhere else, you must have my express written permission. Do not claim my art as your own or gain monetary compensation for my work. If you send my work to friends, group chats etc, please send the link to my post directly or credit with my URL.
Do you take commissions?
Sometimes! DM me!
Do you have prints of your work?
Officially, it is illegal to sell fan art of copyrighted material. I tried uploading some of my work to my redbubble in the fall and I got a takedown notice from CBS lol. I’ll update you all if I sort it out!
How do you draw? Do you have any tips or advice?
I’m working on a short tutorial about my progress that I’ll post soon! If you have any specific questions please send them over!
I use Procreate for the iPad Pro to draw, and I edit my images in Photoshop after.
When will you update your Jemily College AU?
It’s completed as of now, a sequel is possible. If you have any requests for one shots in the universe please DM me!
Why haven’t you answered my ask?
It’s in my drafts because I began my reply and got distracted I’m sorry I will post it soon!!! I get stressed by asks for some reason
Chain mail asks, copy & paste asks etc
Thank you for sending me these! You're very thoughtful! I don't have time to send it to ten more people but I'm glad you thought of me.
Did I miss something? Have another question? Send me an ask!
13 notes
·
View notes
Text
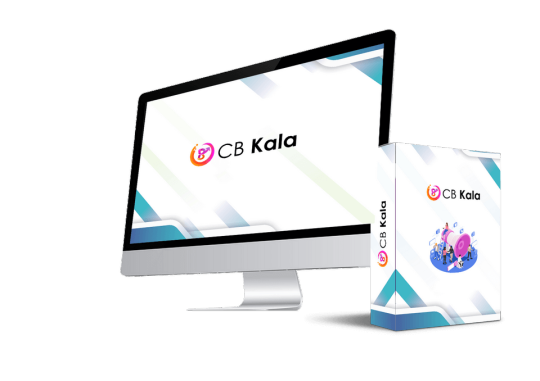
CB Kala App REVIEWS 2021 — ⚠️ Alert Or Scam?⚠️
CB Kala Review – Introduction
During this extraordinary time of covid 19, the online market is getting more and more competitive. We all know how the customers behaviors have been changing these days that they turned to buy all kinds of things online. Therefore, there is no better way to earn passive income better than selling things through different online platforms, which also makes people invest into these platforms more. If you also want to get a piece of this attractive cake, you need to be highly competitive. In an other word, you need a perfect tool to bring you traffic and keep your marketing campaigns going viral. If you haven’t found such thing, let me introduce you a magic tool I have ever seen that is called CB Kala.
MUST SEE: “We Found an AMAZING Discounted Price For CB Kala Right Here!”

CB Kala Review – What is CB Kala?
CB Kala is a cloud-based software that helps you to create amazing marketing campaigns by designing viral engaging elements as images, meme and many other things, then share them in different social media platforms. There are also many more things included in this software that it is a product you will definitely love!

CB Kala Review – How does it work?
Get Free Viral Traffic & Easy Sales In Just 3 Simple Steps:
Step 1: Login To The Cloud-Based Software
Step 2: Tell The Software Where You Want Your FREE Traffic Sent To (Can Be ANY Website Or Affiliate Offer)
Step 3: Sit Back While The Software Gets You Viral BUYER Traffic In 30 Seconds Or Less.
CB Kala Review – Features and Benefit
There are a plenty of features and countless benefits with CB Kala that I listed few of them as below:
This software will let you get viral traffic, leads & affiliate commissions…
You can instantly create bridge pages showing visitors offers before redirecting them to original content
You can blast your campaign to 60+ free sources and more to drive huge amounts of free traffic
It is personally tested this so it’s proven to work to get results…
It provides you with the software, the tutorials and everything else they need to succeed
The software will, in short, get you buyers
Future support and updates – The app will be built-out over the coming months with new features and requests users put in.
Click Here To Order CB Kala From The Official Website And Get Exclusive Discount Online!
Pros and Cons
Pros:
Cloud-Based App – nothing to install or download, access from any device
Fully-fledged, online business solution!
100% newbie-friendly cloud app!
Fast – see results as soon as today
Easy – no previous experience or tech skills needed
Unlimited market – do this part time, full time or any time you want some cash on demand
No more overhead costs – includes all the free tools you need
Secure 1-time fee, 100% money-back guarantee
You can build list & make commissions from authority content
Quickly and easily tap into 60+ free source for massive traffic
Built-in 60+ dfy clickbank offer – no wait approval
Comes complete with video tutorials and more
Cons:
Haven’t found so far
>>>> Visit This CB Kala (International) From Official Website

Price and Evaluation:
Below are the details of different options offered to purchase CB Kala. Check them out and pick up your favorite one:
Front End: CB Kala – $17.95 (Price Will Rise Every 60 Mins)
The front end product includes the Software, Video Training, and VIP Support.
The traffic software lets you leverage authority content online
to get viral traffic, leads and commissions in just 3 simple steps.
The software creates a bridge page with a optin-form in between a visitor clicking a URL and going to the content they wanted to see.
Upsell 1: CB Kala – Automation Edition – $39
Unlock automation features of CB Kala
Drive traffic, capture leads and make commissions on autopilot while you sleep.
A true set-n-forget. create campaign once & profit every minutes
Upsell 2: CB Kala – Unlimited Edition – $39
Unlock all premium features of cb kala
Supercharge your CB KALA account to 100x profit twice as fast with unlimited edition
Remove all limits- get unlimited traffic – get unlimited leads – get unlimited commissions
Upsell 3: CB Kala – Done-For-You Edition – $197
Enjoy luxury experience as the team will setup a complete affiliate system for you
DFY Affiliate Website
DFY Quiz Builder
DFY Landing Page
DFY Offer Proven To Convert
DFY Funnel
Upsell 4: CB Kala – Reseller Edition – $97
Sell CB Kala while keeping 100% of the commissions + guaranteed approval
Get paid up to $640 per visitor you get
You get to use its proven to convert, professionally designed pages, funnels & resources.
Let Our Professional Team To Handle All Supports
Nothing For You To Upload Or Host
Upsell 5: CB Kala – Limitless Traffic – $127
Upsell 6: CB Kala – WhiteLabel Bundle Edition – $297/$197
Whitelabel – Full Installation and Customized Branding
3 of Our Best Selling Softwares + Developer Support .
Lifetime Updates and Support
CB Kala Reviews:- Is it worth buying?
The final Front End launch price will end at $27.00!
The cart opens sharp at 11am EST & the FE Price will be $17.95.
There will be no coupons available for this launch.
We’ll be deploying MASSIVE SCARCITY which means there will be a 60 minute timer on the sales page where the price will increase every 60 minutes…

>>>Special Deal for Newbie<<< Visit the Official website to get your CB Kala TODAY! (Limited time Offer)!!

Buy the offer from my link and send me the screenshots on this email ([email protected]) and I will send you the bonuses
👉 Click Here to buy

1 note
·
View note
Text
undefined
youtube
MATTE BLACK - Lightroom Mobile Tutorial || Matte Black Lightroom
#MATTE BLACK#Lightroom Mobile Tutorial#Matte Black Lightroom#lightroom tutorial#lightroom#light#lightroom mobile#editing#cb edits#cb editing#snapseed editing#best photo editing#photoshoot#photoshop#film photography#photos#photography#photografy#original photographers#photographers on tumblr#portrait photography#photooftheday#phone
2 notes
·
View notes
Text
How Do I Make Gifs? - A Photoshop CC Giffing Tutorial
(for @elektrawwf, and anyone else interested in how I make gifs I guess, lol)
So, I feel like I should preface this by saying that I'm certainly no expert on this, nor am I a Professional Giffer™, but I’ve been making gifs for a few years now, and have developed a pretty standard system for doing so. Hopefully it works for you like it’s worked for me! :)
Basic Tutorial Steps:
Step 1 - Recording the scene you want to gif
Step 2 - Importing, deleting, and cropping your gif frames
Step 3 - Adding adjustment layers
Step 4 - Resizing your gif and setting the frame delay
Step 5 - Converting and sharpening your gif
Step 6 - Trimming and saving your gif
BONUS STEP - Adding text (OPTIONAL)
-
Programs Used/Needed:
- QuickTime Player
- Photoshop CC 2018
-
The finished gif that I’ll be making:

This tutorial is VERY screenshot-heavy, so the rest of it will be below the cut. Happy giffing!
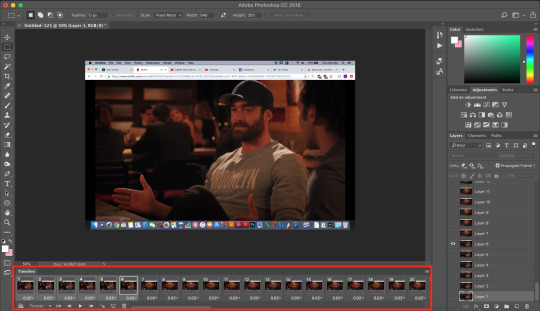
STEP 1 - Recording the scene you want to gif.
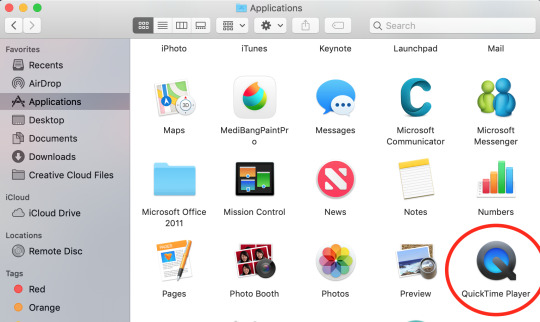
All gifs start as videos. I use the Screen Recording feature on QuickTime Player to create videos of whatever scenes I want to gif. If you have a Mac, you can find QuickTime in the Applications folder:
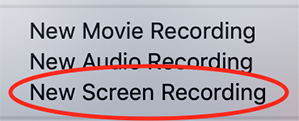
Right click, then select New Screen Recording.
You can then play the scene you want to gif on your computer, and your screen with the video on it will be recorded. Hit the stop button when you want to end the recording, and then save the video.
It’s best to not record more than a minute or two at a time - basically, just record the exact scene that you’re looking for - because the longer the video is, the harder it’ll be to select the portion of it that you need for giffing.
You can technically screen-record any type of video, but I (and most giffers) vastly prefer videos that are 1080p, which is the best kind of HD. That’s why I usually don’t gif things unless I can find them either on Netflix, Youtube (in HD) or the CW site (or NBC, CBS, whatever). There are definitely other (less legal) ways to get your hands on HD videos, but I’m just not super comfortable using those lol.
That being said, 720p videos are usually okay for smaller (268px-wide) gifs - they’re just less ideal (I wouldn’t really recommend using them to make 540px-wide gifs, but you can still technically do it).
STEP 2 - Importing, deleting, and cropping your gif frames.
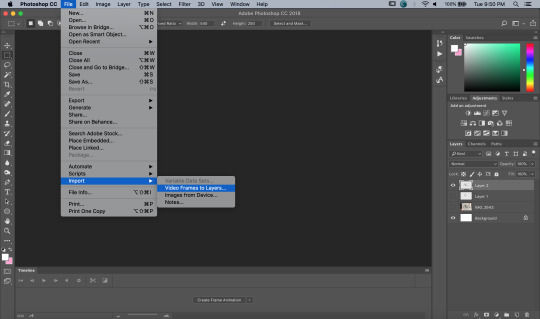
Now that you have your video, you have to import it into Photoshop. Once you open Photoshop, you need to go to File > Import, then select Video Frames to Layers.
A window will pop up, where you can set the amount of frames that you want Photoshop to import, and select the exact section of the video that you want to import. Here are my settings:
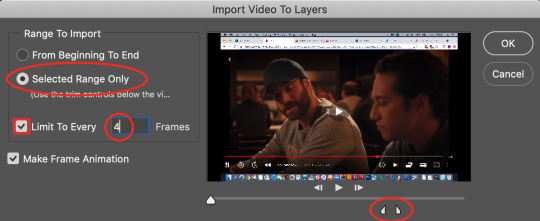
The two little toggles below the video are meant to be dragged around, and you use them to section out the specific Range of the video that you want to turn into a gif. Once you have all of this set up to your liking, hit OK.
-
NOTE: The selection of Limit To Every 4 Frames is more my personal preference than anything else. If you want Really Smooth Gifs, then you can uncheck that box and simply import every single frame in your Selected Range. This is what High Quality Giffers always say to do. Unfortunately, while those gifs do end up really smooth, they also end up being really short, which I don’t particularly like.
So basically, I’m personally willing to sacrifice some smoothness in favor of an increased gif length, but you do NOT have to do that if you don’t want to. Choose whichever option you like best - these Steps work no matter which one you do. (We’ll come back to this later though, once we get to setting the frame delay in Step 4).
-
Okay, back to the tutorial.
Once the scene is imported, you can delete any extraneous frames at the beginning and end of the frame animation Timeline, which can be found at the bottom of the screen.
As you can see, I have the first 6 frames selected. Those are the ones I ended up deleting (among some others at the end of the Timeline).
You can also go to the Layers panel on the right, and delete the corresponding layers from there, once you’ve deleted the frames. This isn’t technically necessary, but it might help free up some computing space if you’re deleting a lot of frames.

Next, you need to click the Selection Tool in the top left corner of the screen. Then, set your selection preferences (circled below) as follows:

Style: Fixed Ratio
Width: 540
Height: 250
This is specifically the ratio to set for a 540 x 250px sized gif, which are the dimensions of the example gif I’m making. If you want to place two gifs beside each other in a gifset, each gif needs to be 268px wide. (The heights can be whatever you want them to be.)
Use the Selection Tool to select the area that you want to be your gif, and then go to Image > Crop.

STEP 3 - Adding adjustment layers.
Now it’s time to make your gif look pretty™. For this part, you’ll be using the Adjustments panel above the Layers panel.
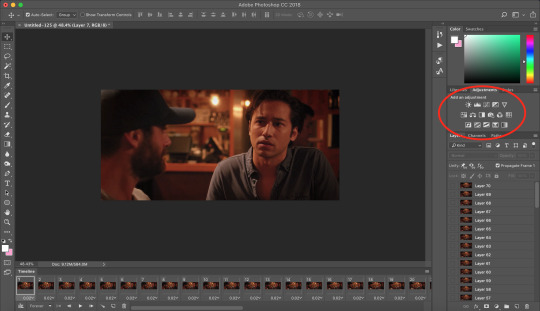
Adjustments will affect all the layers below it, so you want to make sure that your adjustment layers are placed above all of your gif layers.

These are the adjustment layers that I used for this specific gif, but they’re also just generally the same three adjustments that I use for every gif I make. (I also usually add a Hue/Saturation adjustment to my gifs, which I set to +15 Saturation, but since this scene was already so heavily saturated, it didn’t need it.)
Here are the specifications for the Brightness/Contrast and Levels adjustment layers:

Regarding the Curves adjustment layer (pictured below), if you click on the RGB dropdown menu, you can single out specific colors in order to color-correct the gif, which I did here (by removing a lot of extra reds and yellows).
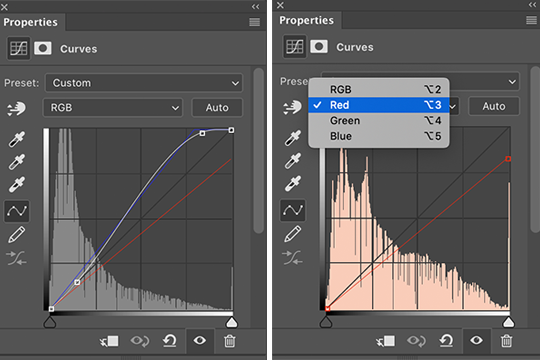
While these are good general adjustment examples, just take note that the values pictured here won’t be exactly the same for every gif, and you need to toggle and play around with them to make every new gif look its best.
Here’s the example scene before any adjustments:

And here’s the scene after my adjustments:

STEP 4 - Resizing your gif and setting the frame delay.
To resize your gif, go to Image > Image Size, and then change the gif’s width (in this example, I change the gif’s width to 540px).
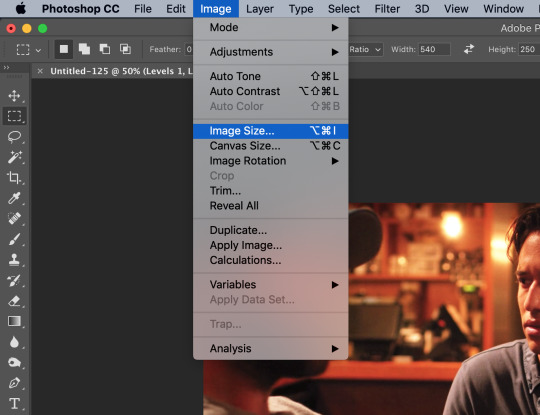

As long as Resample is checked the you’re working with Pixels, the gif should resize properly. Hit OK.
Next, to change the Frame Delay of the gif (basically how fast it goes), look for this button in the right corner of your Timeline, then click it and Select All Frames.

Once all the frames are selected, you can hit one of the little downward arrows next to the 0.02 values, and select Other.
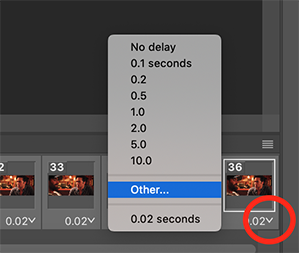
Now you can set your new frame delay. I always set my delay to 0.09 seconds, which produces gifs that are a bit slower than the Professional Gif Standard™. This is due to a combination of personal preference (I just like slower gifs) and an effort to maintain as much smoothness as possible, given how I choose to import my frames.
-
NOTE: Remember the NOTE from Step 2? Now, if you chose to import every frame, rather than “Every 4 Frames” like I do, then you should set your frame delay to 0.04.
Doing so will produce a final gif that looks like this:

Notice how this gif is smoother and faster, but also shorter than my example gif? Yeah. Like I said, whichever style of gif you choose to make is up to your own preference.
STEP 5 - Converting and sharpening your gif.
You never quite realize how blurry a gif really is until you Sharpen it. To do this, you first need to convert your Timeline from a Frame Animation to a solid Timeline. You can do this by making sure all your frames are still selected, and then clicking the Convert to Timeline button in the bottom left corner of the Timeline.

Now your Timeline should look purple, like it does in the picture below.
Next, you need to select all of your layers (MINUS the adjustment layers) on the right side of the screen. Once all of your layers are selected, go to Filter > Convert for Smart Filters.
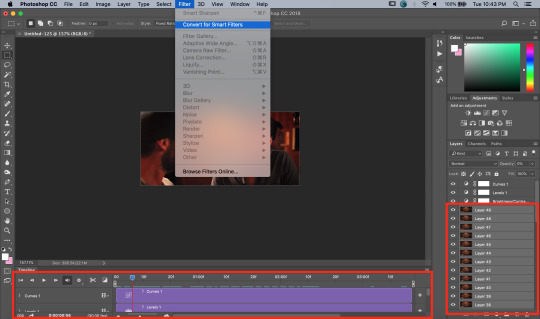
Once your gif layers have been compressed into a Smart Object (see circle below), you can select Filter > Sharpen > Smart Sharpen.

The first time you select Smart Sharpen, you need to set all the parameters for it. But once you do that the first time, you shouldn’t have to set them again. Basically, make sure your window looks exactly like this one:
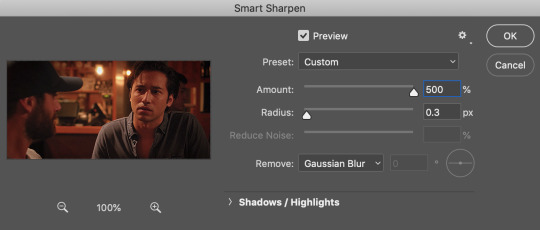
Then hit OK.
You’re going to do this TWICE (so you’re going to end up with TWO Smart Sharpen layers below your Smart Object layer). Then, you need to click the button to the right of the top Smart Sharpen layer, and change the opacity of that layer to 30%. (Otherwise, your gif will be way over-sharpened.)
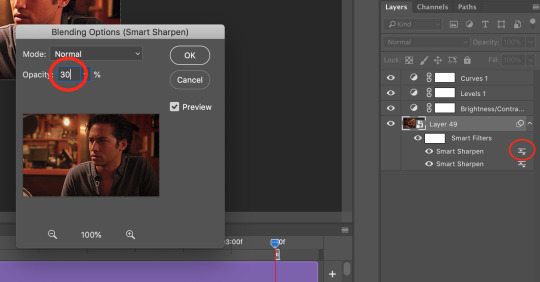
STEP 6 - Trimming and saving your gif.
You’re almost done! It’s time to save your gif.
To save a gif, you must go to File > Export > Save For Web (Legacy).
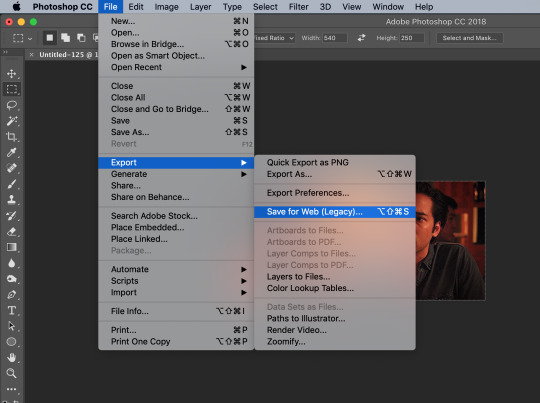
However, this gif has a problem.


This number in the bottom left corner of the Save For Web window tells you the current size of your gif. As you can see, this gif’s size is currently 3.541 MB. That size wouldn’t be a problem if you were intending to upload this gif to Twitter, because Twitter has a gif size limit of 5 MB.
Tumblr, however, only has a size limit of 3 MB. So, to get your gif to work on tumblr, you need to Trim it.
Trimming is the process of changing the length of a gif without actually deleting any part of it permanently. This gives you the freedom to edit your gif and pick the portion of it that you like best.
You can easily trim your gif in the Timeline, by clicking the dragging the Gray Sliders at each end of it (see the arrows below). Wherever you leave the stoppers will become the new beginning and end of the gif. You can make this process more precise by using the Blue Slider (circled below) to choose where you want your stopper to go before you drag it there.

The Timeline pictured here has already been trimmed.
Trimming your gif will often require some trial and error. Whenever you want to check the length of your gif, simply go to Save For Web again and check the amount of MBs in your gif. (Click Cancel if your gif is still too big.)
Once your gif falls below 3 MB, you can finally save it!

The last thing you need to do before saving is change your Looping Options from Once to Forever in the bottom right corner of the window. Then, click Save.
You now officially have a finished gif!
Mine looks like this:

-
BONUS STEP - Adding text (OPTIONAL)
Now, I’ve just shown you how to make and save a gif. But what if you want to add text to that gif? I’ll show yow how to do that too.
First off, you should only add text after the rest of your gif is completely done and ready to be saved (basically, once you’ve already completed Steps 1-5). Then, before you save it, you can click on the Text button on the left side of the screen.
Click on the gif to create a new Text layer, and then type whatever you want. Generally, dialogue captions are placed in the middle of a gif towards the bottom, while other, more artistic types of Text can go wherever you want.
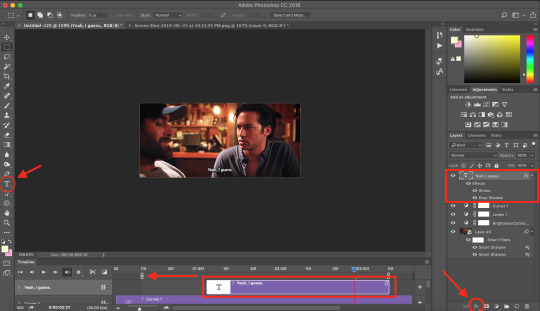
Now that you have a Text layer, you want to make sure of a few things. First, make sure that your Text layer is your TOP layer on the right side of the screen, above all of the Adjustment layers.
Next, you want to make sure that your Text layer spans your entire gif Timeline. Notice how my Text layer (depicted as a purple rectangle in the Timeline) doesn’t reach the Gray Slider on the left? To fix this, simply click and drag the Text layer until it extends past both Gray Sliders.
And finally, I always add Effects to my Text. You can do this by hitting the fx button in the bottom right of your screen. Specifically, I use the Stroke and Drop Shadow effects to make my gif stand out from whatever background it happens to be on.
My Stroke is always set to 1px thick, and my Drop Shadow settings are as follows:

As a final note, if you want your text to look exactly like mine, then you need to use the font Myriad Pro in size 14, which I then italicize and bold. You can also open Window > Characters, and make sure that your preferences look like this:

ALRIGHT. Now that you’ve added your extra text, you can FINALLY go to Step 6 and save your gif.
Now, your finished gif should look like this:

I hope this tutorial was helpful! I tried to be as thorough as possible to avoid any confusion, but if you have any additional questions, you should always feel free to ask me!
Have fun giffing!! :)
#my tutorials#my gifs#idk what else to tag this lol#gif tutorial#personal shit#long post#I'm so sorry to anyone on mobile with no read more
55 notes
·
View notes
Last Seen Blogs

austinfillmore
Austin Fillmore

lengpoxi2-blog
#萝莉#幼女#初中

judge617
Untitled

zali12345678987654321
A1 ePortfolio

candalamedia
Филиал Candala Media Inc.