#clearing out the Flickr
Text

Getting all your ducks in a row: a batch of souvenir rubber duckies in a baechle in Freiburg-im-Breisgau, Germany. (April 23, 2010)
ETA for those who might be wondering what's going on with that paved channel full of water: Freiburg's Bächle are a much-loved remnant of the city's medieval water system, and can be found in many streets in the old town. Legend says if you accidentally step in one, you'll marry a Freiburger. In warm weather, people sit around with their feet in them, and children play in them and sail boats down them. Because of the Bächle, all of the old town in Freiburg is alive with the soft song of running water. So, briefly: they're terrific. :)
(More info about them from the city is here.)
430 notes
·
View notes
Photo
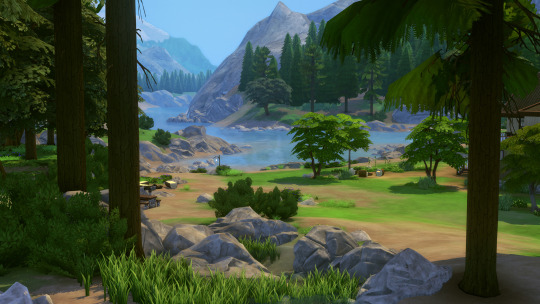


FOUNDATION - balancing reshade for TS4 by amoebae
The Sims 4 suffers from very strong blue shadows in a lot of worlds, and generally has a blue or teal-green haze cast across the screen. This means things that should be white are blue or teal, greys have a blue tone to them, and shadows look out of place. I've generally tried to counteract this and make things more neutral in most of my presets, but it's annoying to have to do it each time from scratch, and I've never found a really good method that still preserves everything else that happens to be coloured blue.
Until now!
Foundation at its core is a simple multilut that removes the blue/green haze and neutralises shadows and things that should be neutral to begin with. It doesn't alter any other colours or contrast so menus stay usable and clear. The result is a game that looks exactly like the Sims game you know and love, but more balanced.
You can see an album of example screenshots here, including lots of splitscreen comparisons showcasing what the multilut does: https://imgur.com/a/Ic271u1
---
You can use the Foundation multilut alone, you can drop it into a preset you already use, or you can use it to build your own preset around.
- If using the Foundation multilut alone:
while playing the game open the ReShade menu and choose from one of the 5 luts included in the Foundation multilut depending on which looks better for your current world/neighbourhood/season/time of day/weather
- If using the Foundation multilut with an existing preset:
open the ReShade menu and drag the multilut so it's either above or below your current used shaders - if you drag it above them it'll neutralise the blue cast *first* and your other settings will apply afterwards; if you drag it below them it will also neutralise blues in your current settings
- If using the Foundation multilut to build your own preset around:
I recommend keeping the Foundation multilut above any other colour grading shader effects in the load order so that you're working on a properly balanced base
If you want to use the Foundation multilut alone because you like how the game usually looks but just want to banish those obnoxious blues, I've built a full ReShade preset around it if you want something a bit extra.
The only colour grading is the Foundation multilut, but it adds in other 'bells & whistles' shaders like MXAO, RadiantGI, DoF, Adaptive Fog, Depth Haze, SMAA, Sharpening, Deband, and several flavours of Bloom to choose between. You can play the game with just the Foundation multilut enabled, and turn on any of the other effects when you want to take more polished screenshots.
This preset is ideal for someone who likes how TS4 looks but wants a better version of that. It's also ideal for CC creators who want to take nice screenshots of their CC but don't want to alter how it looks in a vanilla game.
---
Ultimately, Foundation is meant to be a tool to help you get the best from your game, whether you just want to play with colours looking how they're meant to, or if you want to build your own preset without having to do battle with the blue shadows and colour casts all the time.
You have two download options:
Just the Foundation multilut (includes the multilut png and the corresponding shader that requires the Prod80 package)
or the Foundation ReShade preset (includes the multilut, the amoe - Foundation.ini preset file, and some additional shaders/textures you'll need)
There are full installation instructions included in both downloads.
DOWNLOAD NOW @ PATREON (free)
---
Find me here:
pictureamoebae @ tumblr
amoebae @ twitter
amoebae @ patreon
amoebae's TS4 screenshots @ flickr
amoebae's cc, builds and ReShade presets in one place @ flickr
amoebae's amoebas discord server
#reshade#reshade for ts4#ts4 reshade#ts4cc#ts4 cc#s4cc#s4 cc#ts4 lighting mod#the sims 4#ts4#sims 4#s4#the sims#sims#foundation reshade#my ts4 cc
934 notes
·
View notes
Text
Turns out it's been a while since I've talked about Rachel's medical fetish art so it came as a shock to people when I mentioned it in the last post (I've got quite a few asks about it lmao) So I'm gonna enlighten y'all real quick on what I'm referring to, and yes, it's probably exactly what you're thinking of when you hear the word 'medical fetish'.
CONTENT WARNING: DISCUSSION OF MEDICAL FETISH ART AND DEPICTIONS OF NEEDLES!!!!
So the name "used_bandaid" is one Rachel started using back in the early to mid 2000's. She went by a LOT of different pennames back then, including but probably not limited to:
Pepper_maid
madame_issue
Usedbandaid/used_bandaid
Rach Alex
Rachel Royale
Raquel
Medical Tophat/Medical_Tophat
Frill_house
Gingerbreadcoffin (? this one's kinda weird because the link itself with this username just goes back to her used bandaid MySpace account , so idk if she ever actually used it or if it was even affiliated with her lol)
Now you're probably about to ask, "Puff, how do you know these are all her?" and that's because Rachel still had all of these accounts interlinked through her projects, primarily The Doctor Pepper Show. She seemed to change up usernames often just for the hell of it.
Anyways. I'm not gonna show much of it here because I do think it's better to leave certain things in the past, but there's a LOT of her old work that implies the stuff that's questionable/problematic in LO has always been a part of her identity as an artist (DDLG, hot pink self-insert MC, etc.)
One such example is "madame issue":
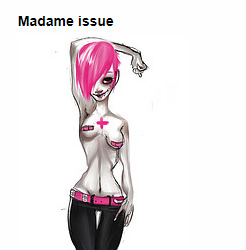
This is such a 3-in-1 smoking gun for everything we see in LO. The reference to bandaids (see: used bandaid, which was part of her URL slug for her old flickr where this drawing comes from), the hot pink color palette, and of course, the fact that this character is almost DEFINITELY a self-insert of Rachel, thanks to that shared name.
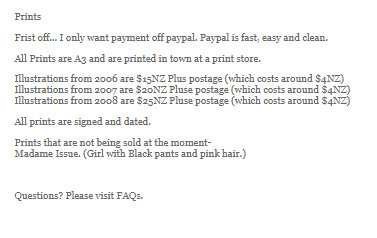
She's also stated in old commission/print posts that Madame Issue was the one print she wouldn't sell.
She doesn't explicitly say why but I think it's pretty safe to assume it's because Madame Issue is her.
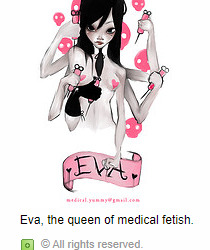
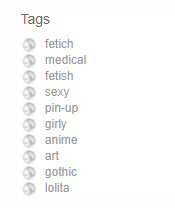
We also have Eva, "the queen of medical fetish". And the tags are... pretty self-explanatory.
That said, that's as much as I'm gonna go into with her old art, because a lot of it does get quite personal with her and I don't really think it accomplishes much more to continue digging up old skeletons, at least not unless they can be seen as parallel to LO (which some of them are and I'll likely be sharing more of those ones in a later post).
That said, there ARE still pages that are accessible without the use of the Wayback Machine that advertise her as a medical fetish artist without the need for extensive digging. If you search up The Doctor Pepper Show on Google, you'll actually find a reddit thread asking what happened to Rachel's old work, and there are comments with loads of resources to access her pre-LO content. You'll also find the listing for The Doctor Pepper Show on The Webcomic List, which literally describes it as a medical fetish comic: "This is a comic set in a world where evil doctors rule, girls wear frilly underpants and people use their manners. *May I please blow your f**king head off?* This comic features Gothic dandys, EGL (Gothic lolitas) and medical fetish fashion. (Neo victorian setting)"
I'll let y'all do your own digging from here, there's a LOT to unpack honestly and while I can't keep you from doing your own research, practice due diligence with what you choose to share. Again, I don't think it's a crime in and of itself for Rachel to want to distance herself from her past as a medical fetish artist, so I think it's only really relevant to show the things that are clearly still influencing LO (like her love for the movie Lolita or the very clear sexualization of youthfulness). While we can try to leave the past where it is, she does still write LO with a lot of the most problematic features of her former identity, and it makes it all the more bizarre that if she is trying to distance herself from it all, then why would she stick with one of the pennames that's the most easily tied back to medical fetishism?
TL ; DR: Rachel started off online with medical fetish and gothic lolita art (at least as far back as we can trace it) and elements of that past are still present in LO today. Use that info responsibly lol
#lore olympus critical#lo critical#antiloreolympus#anti lore olympus#ama#ask me anything#anon ama#anon ask me anything
156 notes
·
View notes
Photo
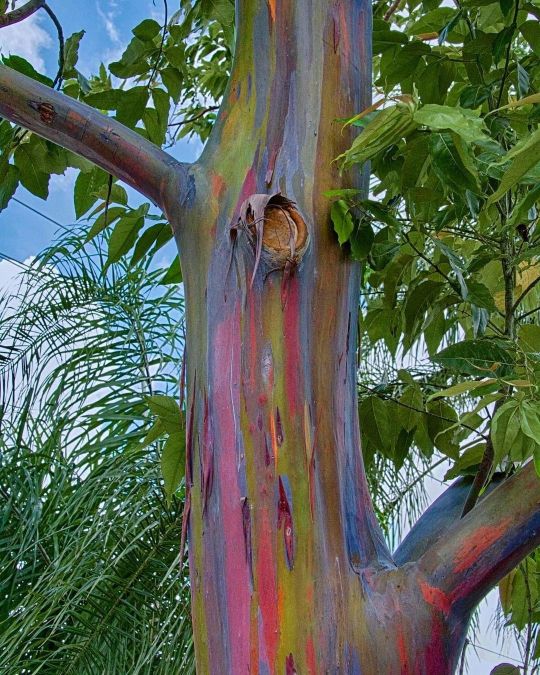
🌈Have you ever seen the colorful bark of a rainbow eucalyptus (Eucalyptus deglupta)? 🪵When strips of its bark peel off, they change in color: bark starts out in shades of green, then transitions into purple, red, and orange as time goes on. Continuous peeling helps the tree keep its trunk clear of other plants. This large evergreen tree grows up to about 60 meters (197 feet) tall and might be spotted in the Philippines, New Guinea, Indonesia, Hawaii, and Southern California. Photo: ucumari photography, CC BY-NC-ND 2.0, flickr #RainbowEucalyptus #dyk #nature #trees https://www.instagram.com/p/ChhfErprDSR/?igshid=NGJjMDIxMWI=
1K notes
·
View notes
Video

flickr
Breaching Humpback Whale (Megaptera novaeangliae) by Gregory "Slobirdr" Smith
Via Flickr:
On this summer's trip to Alaska, we were again fortunate enough to have calm seas and clear weather out of Seward on a Kenai Fjords tour.
#Humpback Whale (Megaptera novaeangliae)#whale#breaching#Common Murre and Humpback Whale#Kenai Fjords National Park#Northwestern Glacier#marine mammal#nature#wildlife#flickr
48 notes
·
View notes
Video
Euclid’s view of the Horsehead Nebula by European Space Agency
Via Flickr:
Euclid shows us a spectacularly panoramic and detailed view of the Horsehead Nebula, also known as Barnard 33 and part of the constellation Orion. At approximately 1375 light-years away, the Horsehead – visible as a dark cloud shaped like a horse’s head – is the closest giant star-forming region to Earth. It sits just to the south of star Alnitak, the easternmost of Orion’s famous three-star belt, and is part of the vast Orion molecular cloud. Many other telescopes have taken images of the Horsehead Nebula, but none of them are able to create such a sharp and wide view as Euclid can with just one observation. Euclid captured this image of the Horsehead in about one hour, which showcases the mission's ability to very quickly image an unprecedented area of the sky in high detail. In Euclid’s new observation of this stellar nursery, scientists hope to find many dim and previously unseen Jupiter-mass planets in their celestial infancy, as well as young brown dwarfs and baby stars. “We are particularly interested in this region, because star formation is taking place in very special conditions,” explains Eduardo Martin Guerrero de Escalante of the Instituto de Astrofisica de Canarias in Tenerife and a legacy scientist for Euclid. These special conditions are caused by radiation coming from the very bright star Sigma Orionis, which is located above the Horsehead, just outside Euclid’s field-of-view (the star is so bright that the telescope would see nothing else if it pointed directly towards it). Ultraviolet radiation from Sigma Orionis causes the clouds behind the Horsehead to glow, while the thick clouds of the Horsehead itself block light from directly behind it; this makes the head look dark. The nebula itself is made up largely of cold molecular hydrogen, which gives off very little heat and no light. Astronomers study the differences in the conditions for star formation between the dark and bright clouds. The star Sigma Orionis itself belongs to a group of more than a hundred stars, called an open cluster. However, astronomers don’t have the full picture of all the stars belonging to the cluster. “Gaia has revealed many new members, but we already see new candidate stars, brown dwarfs and planetary-mass objects in this Euclid image, so we hope that Euclid will give us a more complete picture,” adds Eduardo. The data in this image were taken in about one hour of observation. This colour image was obtained by combining VIS data and NISP photometry in Y and H bands; its size is 8800 x 8800 pixels. VIS and NISP enable observing astronomical sources in four different wavelength ranges. Aesthetics choices led to the selection of three out of these four bands to be cast onto the traditional Red-Green-Blue colour channels used to represent images on our digital screens (RGB). The blue, green, red channels capture the Universe seen by Euclid around the wavelength 0.7, 1.1, and 1.7 micron respectively. This gives Euclid a distinctive colour palette: hot stars have a white-blue hue, excited hydrogen gas appears in the blue channel, and regions rich in dust and molecular gas have a clear red hue. Distant redshifted background galaxies appear very red. In the image, the stars have six prominent spikes due to how light interacts with the optical system of the telescope in the process of diffraction. Another signature of Euclid special optics is the presence of a few, very faint and small round regions of a fuzzy blue colour. These are normal artefacts of complex optical systems, so-called ‘optical ghost’; easily identifiable during data analysis, they do not cause any problem for the science goals. The cutout from the full view of the Horsehead Nebula is at the high resolution of the VIS instrument. This is nine times better than the definition of NISP that was selected for the full view; this was done for the practical reason of limiting the format of the full image to a manageable size for downloading. The cutout fully showcases the power of Euclid in obtaining extremely sharp images over a large region of the sky in one single pointing. Although this image represents only a small part of the entire colour view, the same quality as shown here is available over the full field. The full view of the Horsehead Nebula at the highest definition can be explored on ESASky. [Image description] This square astronomical image is divided horizontally by a waving line between a white-orange cloudscape forming a nebula along the bottom portion and a comparatively blue-purple-pink upper portion. From the nebula in the bottom half of the image, an orange cloud shaped like a horsehead sticks out. In the bottom left of the image, a white round glow is visible. The clouds from the bottom half of the image shine purple/blue light into the upper half. The top of the image shows the black expanse of space. Speckled across both portions is a starfield, showing stars of varying sizes and colours. Blue stars are younger and red stars are older. Credits: ESA/Euclid/Euclid Consortium/NASA, image processing by J.-C. Cuillandre (CEA Paris-Saclay), G. Anselmi; CC BY-SA 3.0 IGO
#ESA#European Space Agency#Space#Universe#Cosmos#Space Science#Science#Space Technology#Tech#Technology#Dark Matter#Dark Energy#Dark Universe#Euclid#Euclid Mission#Stars#Horsehead Nebula#Nebula#Barnard 33#Orion#Alnitak#Stellar nursery#InfraRed#IR#flickr
37 notes
·
View notes
Note
📿for rizzler,💄+👗 for scara, like do u think he likes dressing up? bc i think on one hand hes very attention seeking and likes feeling superior\wanted, but hes also self-hating and "dont look at me", curious what u as scara scholar think on this. 🚬 for zhongli
rizzness - 📿 faith-themed headcanon
oh wow right to the gut... i don't think he believes in gods in any way. he explicitly doesn't believe in the prophecy, and while he respects furina, he doesn't treat her as a god (or even a celebrity) like the rest of fontaine does before the trial. i think his childhood trauma really dashed any beliefs he could have been taught/couldve had. and then furina as god walking out of his trial and him interpreting it as her finding his trial "boring" didn't help matters either.
for where he is now, i think he's like. well the gods exist, but they're not going to help me in any way, so i should help myself and others like me. he worries about the people of meropide and on the surface, and the main quest shows us that he'd rather take things in his own hands than relying on the archon.
i do think he trusts in neuvi more than he trusts in any gods and he likely figured out neuvi wasnt just some immortal a long time ago etx, but he's still staunchly independent and his deep respect for neuvi doesn't translate to like. religious faith as we know it in teyvat. especially because neuvi is someone he can actually communicate with and talk to compared to how distant archons are portrayed.
scara - 💄 makeup +👗 clothes-themed headcanon
i agree that he's torn between the two extremes of wanting attention and hating when people look at him ("you dare gaze upon me" etc).
for me, he was definitely the one who picked out his fatui and wanderer outfits (like they do say and show that he was the one who chose to start wearing a big hat after his villain origin story), which shows that he's very particular about his outfits and prefers to dress in familiar clothes aka inazuman inspired fashion. (compare dottore, who is from sumeru, but is wearing something nobody in sumeru is shown wearing.)
for the fatui outfit, this is really interesting because his big hat + sort of veil references uchikatsugi, which was worn by noble women to protect from the elements and also to protect their anonymity/purity.

from Melissa Rose Chasse on flickr
so in a sense, it's like. he wants to show off his status, while also hiding himself from others. so for me, he goes out of his way to pick out beautiful, high-quality clothes for himself, and then remembers "oh fuck people are going to look at me because i'll stand out" so he tries to obscure his face in any way.
as wanderer, he (originally) doesn't have that trauma/complex, so the uchikatsugi influence is more like. thin banners behind his head, versus the wider covering in his fatui outfit

wow i'm rambling so much JSHDGKHSDJKGHSKJG. one of these days i'll make a longer post about scaras fashion etc.
as for makeup, i like to think his eye makeup was actually painted on. either by ei, as a rare moment of her caring, or by someone in tatarasuna, as like. actual proof of people caring about him. since he's still technically a doll/puppet, he doesn't really see the point in putting on other makeup. (this also means in like modern aus i think he's one of those people with annoyingly clear skin who only puts on eyeliner, if anything LMFAOOOO)
zhongli - 🚬 headcanon about a bad habit
funny that the emoji used in theme is a cigarette bc i just knoooooow zhongli is on that opium/nicotine to relax JKSHGKLSDHGJKSHGSJ. while he has the image of a proper gentleman and doesn't like doing things in excess, i think he deserves a smoke break. maybe he's even tried naku weed idk i don't smoke myself bc of asthma lmfao. he's also a "collector" but more like. he buys random things and justifies it to himself and others with some long-winded explanation and then goes home and puts it on a shelf overflowing with other random ass things he barely uses. he's always impulsively buying some trinket smh
9 notes
·
View notes
Photo

Summer is on the way, and the first volunteer group of the season has already been out on the trails! Last Saturday the Mount Rainier National Park Associates assembled for their first of at least six volunteer projects this year, this time at Carbon River to repair winter storm washouts along the Carbon River Trail. A large group split up into smaller teams to work on spots spread out across the first three miles of the trail, filling in holes and clearing routes through stretches temporarily reclaimed by the river.
For more photos from the event, go to our Flickr page at https://www.flickr.com/gp/mountrainiernps/17w4op487X, and to MRNPA’s Facebook page, linked above. Thank you to our friends in the blue helmets for their hard work on behalf of Mount Rainier's hikers!
#volunteers#MRNPA#Mount Rainier National Park Associates#Mount Rainier National Park#Rainier Volunteers#trail maintenance
36 notes
·
View notes
Video
flickr
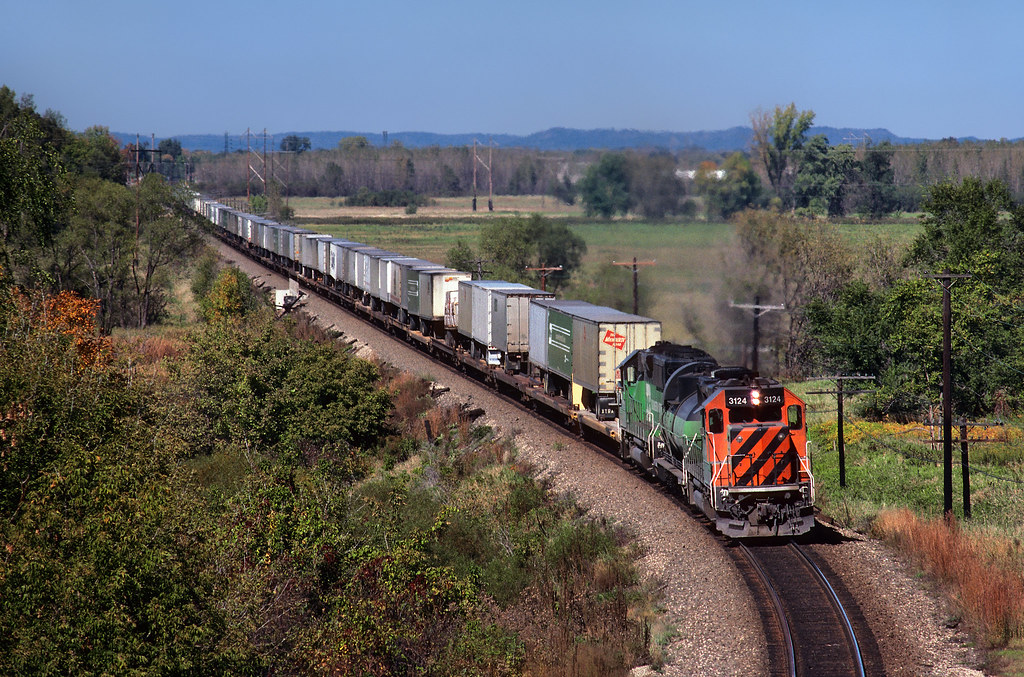
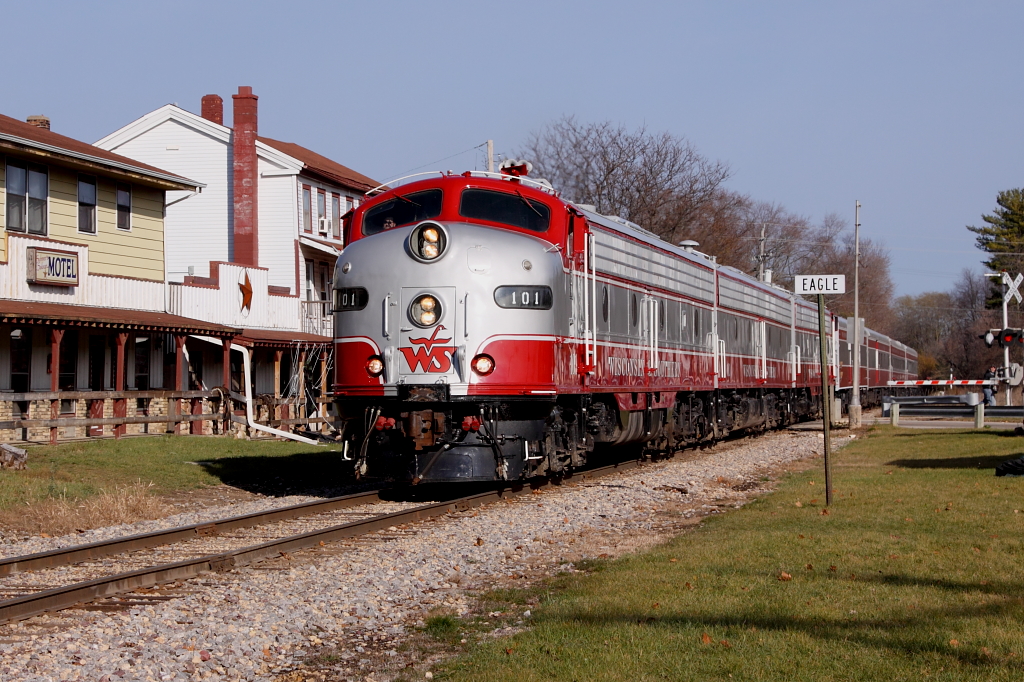
Tigers and tender on BN 34 by Mike Danneman
Via Flickr:
A pair of tiger-striped Burlington Northern GP50s, splicing a fuel tender, power BN train 34 east out of the division point of North La Crosse, Wisconsin, on the clear autumn day of October 3, 1987.
#bn#burlington northern#milw#milwaukee road#1987#trains#freight train#history#north la crosse#wisconsin
10 notes
·
View notes
Text
listen. i was clearing out my storage like a good little iPhone 11 user. i just had to look at diamondgeyser’s flickr to date some pics i’m moving into storage. i didn’t intend to find mark in this state,


but i have.
#mark watson#stan#that’s basically katya#i wonder if he knows#who katya is#no more jockeys#2018#dated for my sake#may 6 2018
9 notes
·
View notes
Text
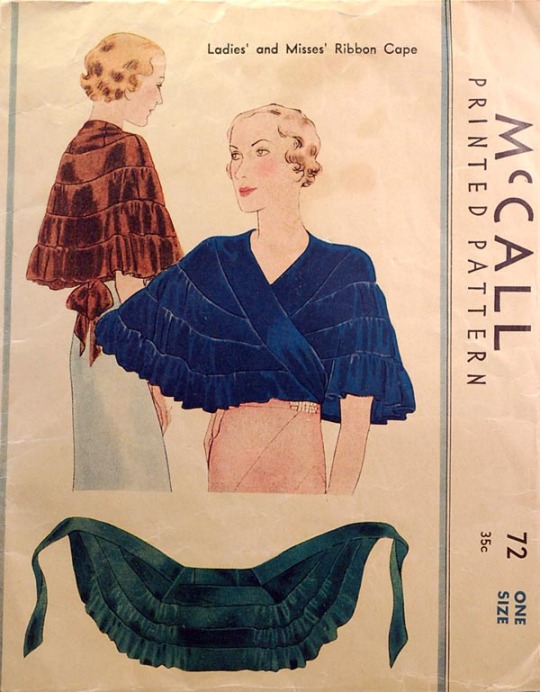
This is my grail garment. A 1930s cape that I stumbled upon on Pinterest and fell in love with. The original image is from wondertrading over on Flickr (check them out! They have oodles pictures of gorgeous vintage pattern).
Unfortunately, I cannot find the pattern itself anywhere.
Solution? Make my own!
I have lots of courage and little skill. Started sewing clothes this summer and I still haven't finished a single one (though to be fair, I only need to hem the two skirts and modify the blouse slightly to be done. Unfortunately I don't want to, so we're doing this instead!)
Step 1: How It's Made:
I have made Barbie clothes from drawings before, so I have a method. Is it the most efficient method? No, but it works for me.
The first step is always to get the best possible picture of the garment and figure out how it's made.
Since this is the only image I could find of this pattern, I need to improve it on my own.
I'm using Paint Tool SAI's linework layer to draw on top of the image with my mouse. The result is this:

The point here is not realism, but simply to make it clear how each layer of ribbon is formed into the cape. The white lines are drawn on top of the more subtle highlights of the original drawing, to help me figure out where I need to ruffle the three bottom layers.
Clearing up the image and removing the original, I end up with this:

(The numbers were added in Paint, since SAI don't have a writing tool.)
We have five layers of ribbon-
Ok, let's stop there. The cape is clearly named "McCall Ladies' and Misses' Ribbon Cape", and while I have absolutely no clue about 1930s fashion, that doesn't look like ribbon to me.
That looks like strips of fabric. Velvet fabric, to be specific.
I will have a different blog post on what material I think this is made from (tl;dr: silk velvet) and what I will use instead (I am poor and not skilled enough to sew silks). Stay tuned for that later.
But let's get back to the "how it's made". At the middle back (where the numbers are on the drawing) the strips of fabric seem to be equally wide, possibly narrowing somewhat where layers 2-5 meet layer 1. I will assume that the layers are equally wide all the way around, since that's easy to do, and it will be obvious in the finished product if I was wrong. It will also be easier to figure out where I should narrow the strips of fabric down, and how much, once I've made the first mock-up. So this is a "mañana" problem, aka. "make a note, but ignore for now".
Also, my method leads to the need for multiple mock-ups. That is because I would rather make it twice than spend days figuring out each step and still be wrong. Cheap cotton fabric is absolutely worth investing in if you follow my "fuck it, good enough" method of sewing.
From the original drawing I can see that the cape goes from the neck and down to about the shoulders, so I measure this area to figure out how wide each ribbon should be.
On me (a short woman with no shoulders) this is about 46 cm.
46 / 5 = 9.2 cm = 9.5 cm
(I'm rounding up to 9.5, because I am not fiddling about with millimetres when I'm making clothes for myself. Half a centimetre is close enough!)
But I can't just add on some seam allowance and start sewing. From the image, it looks like the top layer envelops all the other layers. Doing that will make it a lot easier to sew, and make the finished garment look better.
Therefore layer 1 will be width + width + seam allowance.
Layer 1: 9.5 + 9.5 + 2 = 21 cm
I set the seam allowance to a centimetre at each end, therefore 2, since one centimetre is clearly marked on my sewing machine. You can change this number to whatever you prefer. Main rule: if the fabric is thick or unravels easilly, make it wider, if it's thin or tightly woven you can make it smaller. For clothes to myself, I never go beneath 1 cm, but I am also a beginner.
Layer 2 - 4 are quite simple. Width / 5 + seam allowance.
Layer 2 - 4: 9.5 + 2 = 11.5 cm
Layer 5 is slightly different, since you need to hem the bastard. Hemming with a single centimetre seam allowance is possible (and can make a nice finish), but it's a pain so I won't.
Doubling the seam allowance on the hem makes the total seam allowance 3 cm, and the calculations:
Layer 5: 9.5 + 3 = 12.5 cm.
So now I have the width of each layer. Next step is how long each layer is. Unfortunately, this is something I will have to try on my body to figure out. The top layer will need to be tied in a bow at the back, so cutting that out and finding the right length should be easy-ish.
But I also need to keep an eye on how each layer is sewn.
Because layer 1 and 2 are both given shoulder seams on the drawing, while layer 3, 4 and 5 are all ruffled around the shoulders, but with unruffled backs and sides. That means that layer 3 will be quite a bit longer than the second layer, but how much is impossible to know until I've made the mock-up.
Also? Different fabrics ruffle differently. So if you sew this from a stiffer material, you might need fewer ruffles, while a more drapey fabric will look better with more. Since I'm making my mock-up from woven cotton and my garment from velvet, this will be something I have to keep an eye on when making the actual garment, since velvet and woven cotton drapes and ruffles differently.
So now all I have to do is cut meters upon meters of strips of fabric.
Start a podcast, put on the TV or phone a friend to keep you company, this will take a while to do.
12 notes
·
View notes
Text
(June 2014)
126 notes
·
View notes
Video
flickr
101 Passing Through Eagle por Kevin Madsen
Por Flickr:
WSOR 101 passes through Eagle, WI with the four car passenger deadhead move from Horicon to Madison behind the Wissor's A-B-A E-units on 11/11/11. Left Superior on Veteran's Day morning and drove about 5 hours, almost non-stop to Eagle for this shot. Got out of the car while the chasers were arriving and as the clouds were clearing the east. Five minutes later we were treated to this. Good timing for me going to my first Beecherfest, shooting this train on the way. First time I have shot the WSOR E-units. The buildings along the tracks in Eagle remind me of towns further north, like Champion, MI in the U.P.
9 notes
·
View notes
Text


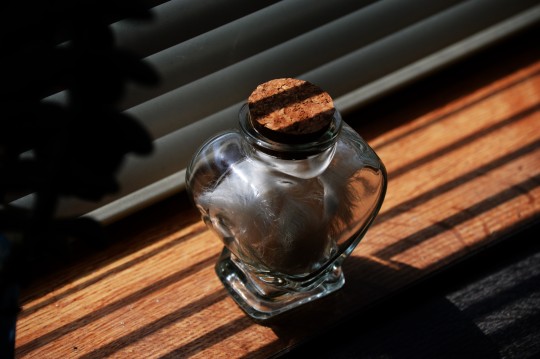


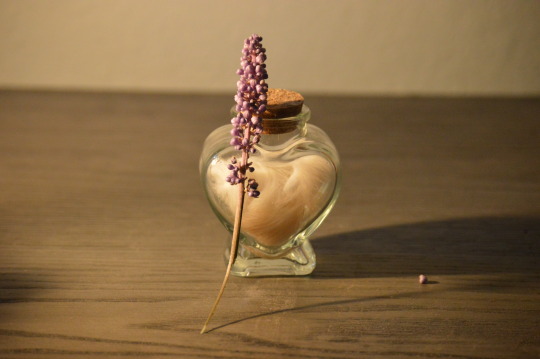


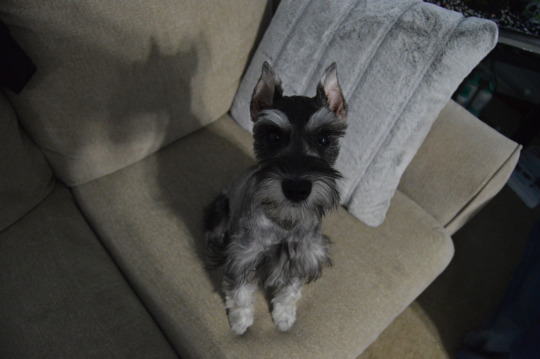
Hello, my name is Ashlyn Rowland. This is a collection of the best work that I have photographed and edited into one module. What I have learned throughout this class was that anything can be photographed, it is just how you put the camera in focus and if you edit it. I have learned to adjust the focus to make the subject of the picture clear, I have learned how to change out the camera lense to capture things near and far, as well as what setting to put the camera on according to what you are photographing. The subjects that I have captured in this collection are a bunch of different subjects, floral, outside as well as me and my partner and my dog's hair in a heart glass jar that I gathered when she passed away, I also included a picture of my puppy, she has been my rock lately and has kept me above water. I enjoy having diverse images because it gives someone a sense of who this person is. If you would like to see more of my images, go to Ashlyn Rowland | Flickr .
4 notes
·
View notes
Photo
[from my flickr riles]
* * * * *
The Lanyard
BY BILLY COLLINS
The other day I was ricocheting slowly
off the blue walls of this room,
moving as if underwater from typewriter to piano,
from bookshelf to an envelope lying on the floor,
when I found myself in the L section of the dictionary
where my eyes fell upon the word lanyard.
No cookie nibbled by a French novelist
could send one into the past more suddenly—
a past where I sat at a workbench at a camp
by a deep Adirondack lake
learning how to braid long thin plastic strips
into a lanyard, a gift for my mother.
I had never seen anyone use a lanyard
or wear one, if that’s what you did with them,
but that did not keep me from crossing
strand over strand again and again
until I had made a boxy
red and white lanyard for my mother.
She gave me life and milk from her breasts,
and I gave her a lanyard.
She nursed me in many a sick room,
lifted spoons of medicine to my lips,
laid cold face-cloths on my forehead,
and then led me out into the airy light
and taught me to walk and swim,
and I, in turn, presented her with a lanyard.
Here are thousands of meals, she said,
and here is clothing and a good education.
And here is your lanyard, I replied,
which I made with a little help from a counselor.
Here is a breathing body and a beating heart,
strong legs, bones and teeth,
and two clear eyes to read the world, she whispered,
and here, I said, is the lanyard I made at camp.
And here, I wish to say to her now,
is a smaller gift—not the worn truth
that you can never repay your mother,
but the rueful admission that when she took
the two-tone lanyard from my hand,
I was as sure as a boy could be
that this useless, worthless thing I wove
out of boredom would be enough to make us even.
“The Lanyard” from The Trouble With Poetry: and Other Poems by Billy Collins, copyright © 2005 by Billy Collins. Used by permission of Random House, an imprint and division of Penguin Random House LLC. All rights reserved.
#The Lanyard#Billy Collins#mother#mothers#mothers day#poetry#poem#flickr#Ruth#words and writing#my favorites
11 notes
·
View notes
Video

flickr
Proxy Falls by Liang Li
Via Flickr:
My journey to visit Proxy Falls in Oregon wasn't an easy one. It was on the third day of the Oregon solo road trip. The day before this day, I camped at a place that is about 1.5 hours away from this waterfall, and my original plan was to shoot a sunrise near where I camped, and then headed out here. However, because the weather was clear blue sky for the entire duration of my trip, and I knew that if I stuck to my original plan, I would made it to this waterfall probably around noon, and the sun would be high on the sky casting harsh light onto the waterfall -- a nightmare to photograph waterfalls. So I then made the decision to give up my original sunrise shooting plan, but instead left my campsite at around 5:20 so I made it to Proxy Falls before 8am. You can still see in this photo that the upper portion of the waterfall was lit up by the sun, but not too bad to ruin the shot. Glad I made the right decision in the field and captured this image.
#proxy falls#Oregon#oregon waterfall#waterfall#pnw#roadtrip#nikon#long exposure#water#landscape#flickr
2 notes
·
View notes
Last Seen Blogs
theycallmejaula
hiroana's messy sketches

trollmaker
Robert Boguško

naiveblogger
Sportingbible

manifestmoons
Manifestmoons | The Pagan Witch
kiuikai
Welcome in!