#even when resizing the animation. SO cropping these 4 times means I have no way to say where are the lines of the actual video because ther
Photo

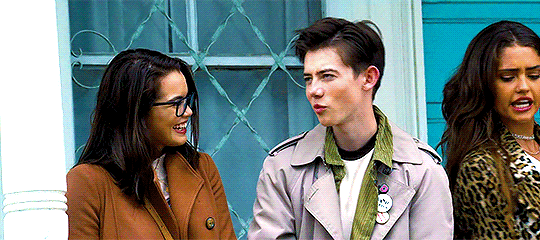
A little gifset I just had to make because of reasons.
#die ärzte#belafarin#fub#my gifs#my posts#do not copy nor repost - reblogging of course always allowed and recomended too#still using my decades (literally decades) old animation software#I downloaded another one because this old one runs out of memory too fast but I guess I'm too loyal after all...#I know it's not perfect but couldn't crop the full video without running out of memory#so I had to add the avi there twice and then cut and paste the half of the frames cos it would still run out of RAM.#So had to crop them 4 times (because the original video is way too big#this can't even do 300 frames of this at once so I have to first use a screen capture program to capture a clip and that always thinks the#whole screen needs to be captured so I have the black background of the video player there when I open the avi in the animation software#and I need to crop the video out of that.) And I need to crop before I can resize because of reasons above and sometimes it runs out of ram#even when resizing the animation. SO cropping these 4 times means I have no way to say where are the lines of the actual video because ther#is no edges and everything is black so... no can do. Idk if it bothers anyone else or just me but might rerecord this clips with another#program idk... I'm a perfectionist and... yeah.
54 notes
·
View notes
Photo

@beomgyutie was asking me about giffing with topaz and i couldn’t find a tutorial that was similar to how i gif and me being me i decided to be Extra and just make a whole tutorial for it! tutorial under the cut
things you will need:
photoshop (i’m using photoshop cc 2018, but i’ve used this same/similar process on cs6)
topaz plug ins clean and denoise downloaded and installed
downloaded video to gif in the highest quality you can find
side note: i’ve seen people say “don’t bother giffing something if it isn’t at least 720p”, but like that isn’t always practical or possible. so just find the video in the highest quality you can
.ts files are the way to go for giffing live stages! you can find a really great guide for how to find .ts files here.
one of the main things that determines gif quality is the video quality of what you’re giffing, so it’s important to use the highest definition you can!
if you’re interested in seeing my vapoursynth process you can see it here! the tutorial i used to learn how to use vapoursynth has been deleted, so if you would like a more detailed explanation let me know!
also i did not include how to add text or how to blur out part of a gif, so send me an ask if you’d like help with it!
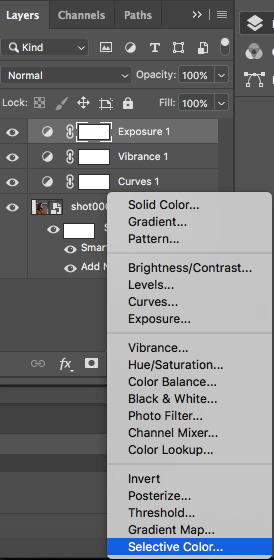
all right so here we go:
1. figure out which part(s) of the video you’d like to gif! people do this in lots of ways; i usually watch the video through then make notes of what time stamps i want to gif.
2. open up photoshop and go to file -> import... -> video frames to layers
3. this window will pop up with your video! use the little slider things i’ve circled in red to select where you want your gif to start and end. don’t worry about it being too exact; we’ll narrow it down further in a minute. make sure that the limit to every x frames box is NOT checked!

4. it will create a frame animation from the clip you’ve selected. now you can trim the gif down even further and get the exact moment you’d like to gif by deleting frames from the beginning and/or end of the animation. i usually aim to have between 60-80 frames in a gif. keep in mind that bigger gifs mean bigger file sizes, so if you’re going for a big gif it might be best to go with fewer frames. (ex. if you’re making a gif that’s 540px by 400px, aim for 60 frames to help keep the file size down)

5. tbh it doesn’t matter when exactly you crop your gif in the process, but i usually crop and resize it at the beginning. i ended up cropping this gif again at the end too, so it really, truly doesn’t matter when you crop it.
you’ll also want to make sure your gif fits the current tumblr sizes for photosets which you can find by googling. the main ones i keep in mind are 540px wide for one gif per row and 268px wide for two gifs per row. for posting purposes, the height is not as important as the width, so don’t worry too much about the height.
you can crop the gif to whatever looks good to you then go to image -> image size and change it to the appropriate width. make sure you’ve clicked the little chain/handcuff looking button so your height will also be adjusted to maintain the height to width ratio!

6. next we’ll need to convert the frames into a smart object in order to sharpen and use topaz. click on the three bars just above your frame animation to select all frames, and also select all of your layers by using shift + click on the first and last layers (you can see the layers in the bottom right corner of the second image). you’ll want to make sure every single layer and frame is selected, otherwise part of the gif won’t be converted into a smart object.

7. convert frame animation to timeline animation by clicking this button i’ve circled in the bottom left corner

you’ll want to make sure the blue play head button thing is at the very beginning of the gif before continuing

8. click filter -> convert for smart filters and your smart object will be made!
9. next we’ll use smart sharpen to sharpen the gif. go to filter -> sharpen -> smart sharpen, and this window will pop up. these are the settings i use for every gif, unless it is a lower quality video in which case i will turn down the amount percent

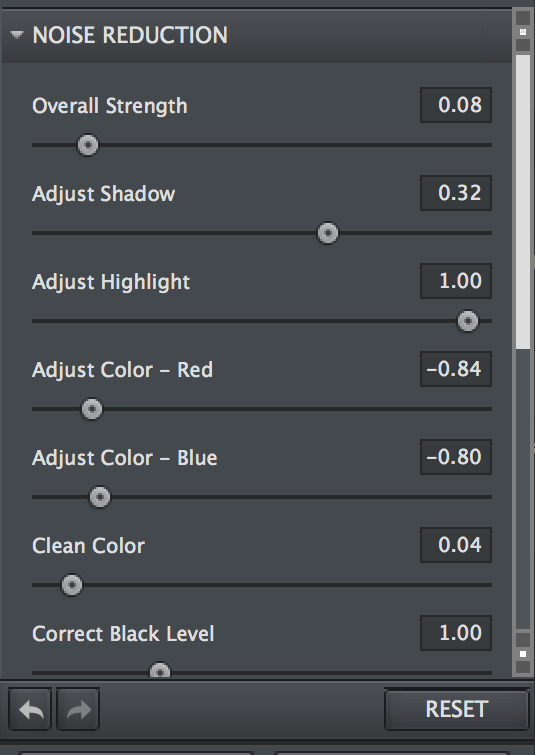
10. now it’s time to use topaz! i always start with topaz clean for whatever reason, but regardless you’ll go to filter -> topaz labs -> topaz clean. there are two settings i choose from that i’ve saved as presets. for this handong gif i chose the first settings. you can compare the settings with the unedited version by clicking the original button at the top of the preview window.


11. next up is topaz denoise! same process as before: filter -> topaz labs -> topaz denoise. i always use these settings but adjust the overall strength. i usually end up somewhere between 0.03 and 0.05.

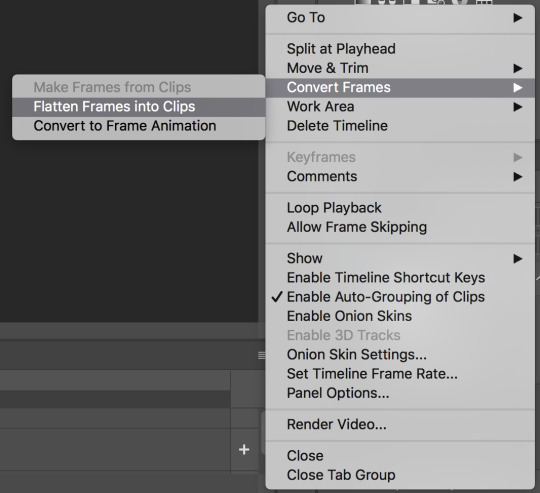
12. now we’ll click on the three bar menu again and select convert frames -> flatten frames into clips. do NOT touch your computer while it’s processing!! topaz is a finicky creature, and we cannot upset it while it’s working. there’ll be a progress bar so you can have an idea of how far along it is in the process. it does take a while, so be patient!
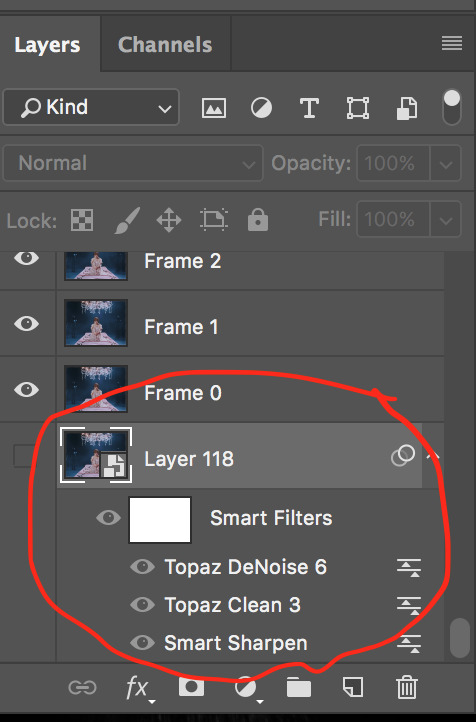
13. the process of flattening frames back into clips creates an extra layer that we don’t need, so go ahead and delete the layer where you can see all the smart filters we’ve just applied listed. it will be at the very bottom of the layers list, and also the only one labeled layer (you can see the rest are called frames now) as well as the only one that’s hidden (aka it doesn’t have the little eye icon to the left of its name)
14. for the moment we’ll still be in timeline animation, so we’ll want to click on the three squares in the lower left corner to go back to frame animation

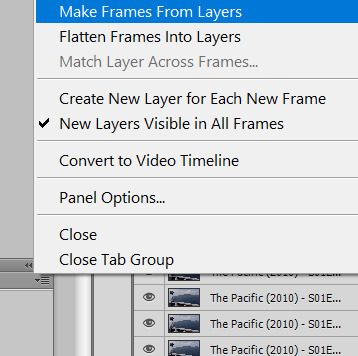
15. you should only see one frame in the animation window for now. click on the three bar menu again and select “make frames from layers” and we’ll have all of the frames we started with back except this time with sharpening and topaz-ing!
16. using the three bar menu again, you can select all frames then adjust the delay between frames (aka the timing!). once the frames are selected, click on the little arrow next to the number underneath one of the frames (doesn’t matter which one as long as they’re all selected). then you can choose a preset time or enter your own. my gifs are usually 0.04, 0.05, or 0.06. for this handong gif, i went with 0.05.

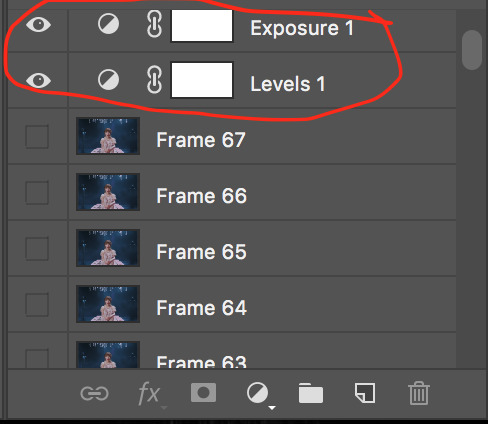
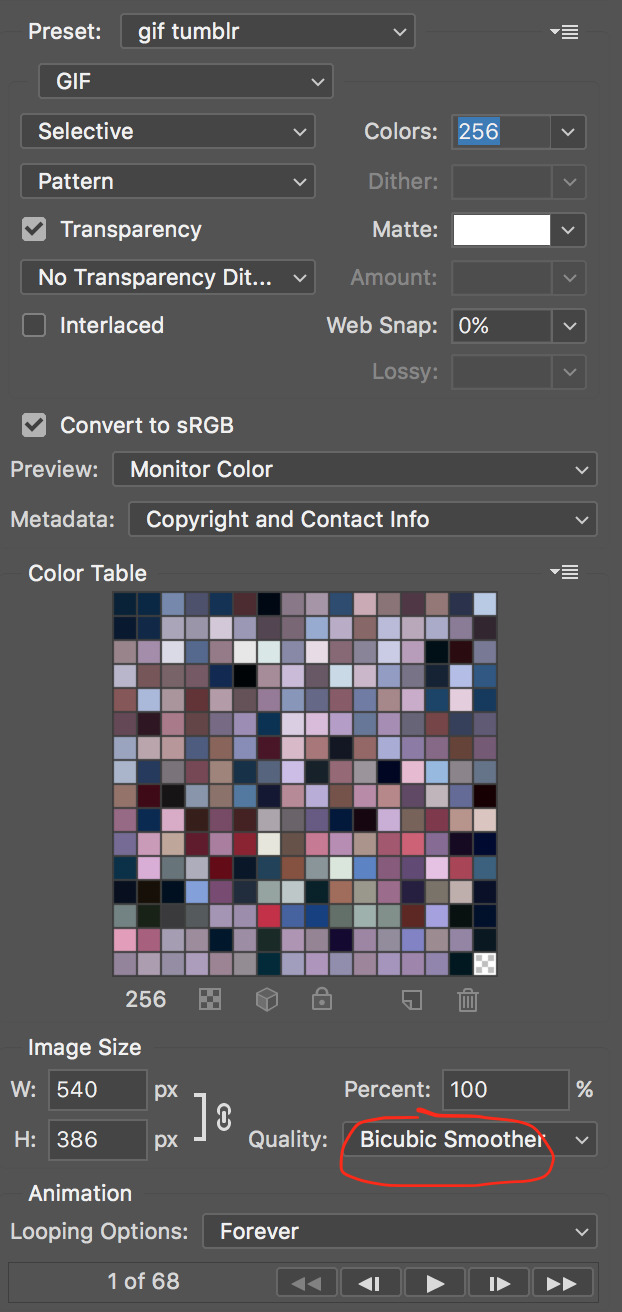
17. now you can add coloring! i’m not really going to get into how to color, but you can either find psds (aka premade colorings) that creators have shared on tumblr as a starting point or just mess around with different editing layers (like levels, selective color, curves, etc) until you land on something you like. when coloring while in frame animation make sure you drag the editing layer to the top of the layer list so the coloring is applied to all the frames!
18. now we can export the gif! i use save for web and these settings. sometimes i will change the quality (circled in red) from bicubic smoother to bicubic sharper, but i usually leave it on bicubic smoother
19. and now you can upload it to tumblr and you’re done! here’s the final result without text

let me know if you have any questions!
#gif tutorial#mine#tutorial#i'm not the best gif maker in the world but i'm pretty happy with how my gifs turn out so yeah#also i am v sleepy so i hope this makes sense ;alksdjf;aslkdjfas#giffing info
57 notes
·
View notes
Text
Easy editing software for beginners.
Let’s define ART.
Art is defined by a lot of people but the best definition that I’ve read is that it was “something that is created with imagination and skill” which means that anyone is capable of being an artist by making their own craft.
There are different categories of art such as literature arts, visual arts, graphic arts, plastic arts, performing arts, architecture and also music, everything that surrounds us is a form of art. Art can help us in so many ways we can imagine. Most people use art to express their thoughts, as their hobby and even as their job, like for example a painter. A painter creates a different world of expressing thousands of thoughts using random colors, it creates a magnificent art. To some people, art can also help them reduce their stress and anxiety. Some of us might not be aware if it but each and every one of us has our own contribution in art, in any form of it and not just by painting or drawing. It could also be by sculpting, knitting, making handicrafts, graphic designs, editing videos and etc. We have a thousands of thoughts that kept in our minds, drowned by the deep thinking can also lead to a thousand possibilities. Just focus and let your imagination work. Sometimes, you will be surprise on what you can do, because sometimes, even without knowing it, we surpasses our limits.
As a fellow photo and video editor, let me share you some art weapons on what editing software you can use to try to serve as your own weapon in producing arts. Try to explore and bring your imaginations to life.
This list includes editing software for both photos and videos that you can use for whatever equipment you are using.
1. Adobe Photoshop CC
Photoshop CC has many features that you can explore. Even though it does come with an affordable monthly cost, it is an impressive photo editing application and probably the best out there!
2. Adobe Lightroom CC
This software has the ability to store images on your computer and your other devices. It also gives you the ability to spice up the colors of your photos and make dull-looking shots more vibrant.
It also comes with a cost but with its features, it is all worth it!
3. Figma
This software is the second-best photo editing software out there! It is a collaborative interface design tool that allows the whole team to process, test and create better designs faster, only in one tool!
And might I add, it’s FREE!
4. Fotor

Fotor is a free photo editing software that comes in mobile, web and desktop. It features a full package of tool that should cover most of your basic essential needs in photo editing.
It can help you do an instant fix and if you need more control, you can find tools to resize, crop, rotate and straighten your images. It also has a feature where you can remove the background.
I have given you the top 4 photo editing software that is out there. Now, let’s move on and see a list of top video editing software!
1. Adobe Premiere Pro
This software is a paid-for video editing software used by top professionals when it comes to making YouTube videos, advertisements, short films and even TV commercials and movies.
It is the best video editing software of all. It can be used to import video, audio and graphics. It can also be used for all basic video editing tasks necessary for producing high-quality and high-definition video.
2. Final Cut Pro
Final Cut Pro is a professional video editing software for Apple devices. It is a one-time payment and is a subscription-free software.
Its features include 360-degree video, HDR and advanced tools for color correction.
It is also EASY TO USE. Most of the professional video editors have been loving this software because of its innovative Magnetic Timeline, grouping tools, wide range of effects, good organizational features and the simple ways to add and edit audios. If you are an Apple user, you should definitely try this one!
3. Filmora
Filmora is the suggested video editing tool for enthusiasts. This is also easy to use.
There are so many options for titles, effects and filters designed for YouTubers and filmmakers. It also has a library where you can choose royalty free sound effects and music. This is a paid tool but the free version includes all the same features and tools as the paid one. The only difference is, your videos will have a brand watermark on them.
4. KineMaster

There is also a professional video editing software on your smartphone or tablet that doesn’t require money. KineMaster is one of them! This software is available for all Android devices and Apple devices.
This has a smart and easy-to-use system and also lag-free. It allows you to edit multiple layers, add texts, add animations, play with the audio tracks and edit frame by frame.
These are the photo and video editing software that you can freely use to start making your own craft. At the beginning of pursuing your passion in editing it might not be a easy path to take, however, always remember that we only truly learned on the path that brought us the pain and sacrifices as it will give us the experience in life that will make us stronger and better than our past self. To learn, to seek for new things are what made us grow as a person. Always look for something to learn and something to practice to, and you may always start by what you've learned today.
- Felierica
4 notes
·
View notes
Text
basilone’s gif tutorial (part I)
I have been getting so many lovely comments on my gifs (thank you!) that I feel like I can give something back to all of you who want to create that sort of thing but have no idea on where to even begin. A lot of people have mentioned the colouring of my gifs in particular as something they really like, so I wanted to do a little tutorial on how to achieve it!
Part I of this tutorial will focus on how to go from absolutely nothing to the most basic of gifs. Most basic, in this case, means entirely unaltered: all this part of the tutorial will talk about is how I create a gif. (Other people may have other methods but this is the one I’m most familiar with.)
Part II will include how to go from the basic gif we created in the first part to the kind of gif you see me publish in my gifsets, with all the colours and sharpening settings and all that jazz.
If you have any questions or need clarification on anything, please drop me an ask and let me know!!
What you need for this first part:
A video file of whatever you want to gif
KMPlayer
Photoshop (I use CS6, other versions are cool too)
A little bit of patience
My end result once I have followed all the steps of part I looks like this:

Step 1
Open your video in KMPlayer. I used episode 4 of The Pacific for this tutorial! Search in the video until you find the exact scene you want to make a gif of. (For the sake of part II of this tutorial, I’ve chosen a scene with lots of daylight and colours.)
Step 2
Pause the video, if you haven’t already, and then click CTRL+G. You will now see this box appear:
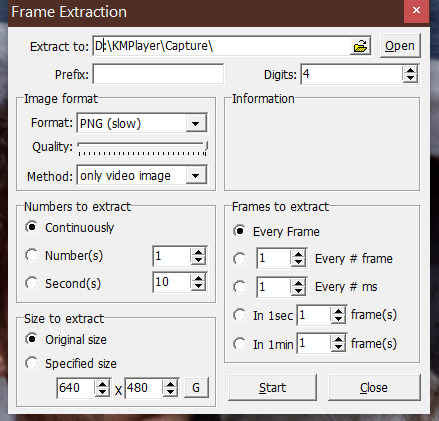
Use my exact settings (shown above) for this one. In Extract to, choose the folder you want the screencaps to land in. Make sure the option Every frame is selected. Now click ‘start’.
Step 3
Play the video until the scene you want to gif is done. Pause it again. Click CTRL+G once more and press ‘stop’.
Step 4
Go to the folder on your PC that you saved the screencaps to. You’ll likely have hundreds (if not thousands) of them, but please don’t panic! Delete all the screencaps that don’t belong to the part of the scene you want to gif.
Important rule of thumb! How many screencaps you need depends on the size you want to make your gif. For gifs that are 540x304px, use no more than 50-60 screencaps tops. For gifs that are 268x151px, use no more than 80. For 151x85px (please love yourself what are you doing), just go crazy – you can easily use more than 100 for that. (You don’t wanna be in the situation where you’ve created and coloured your gif, only to find out when saving it that it exceeds Tumblr’s petty 8mb size and you have to go back to delete some frames.. believe me. :’))
Step 5
Start up your Photoshop (yay!) and go to File → Scripts → Load Multiple DICOM Files. Select the folder your screencaps are in, then click ‘ok’.
Make sure you’ve got all the tools open that you’re gonna need for both parts of this tutorial. You do this by going to Window in the Photoshop menu bar and selecting the following:
Actions
Adjustments
Layers
Navigator
Timeline
Step 6
Timeline is gonna be your new best friend! Click on Create Frame Animation. Then click on the little downward arrow that has three small stripes next to it, which is gonna make this next menu appear:
Select Make frames from layers and watch how all the individual frames are loaded into the timeline. Good, right? (You can see the individual frames in the Layers box as well, which we’ll get to in a hot moment.)
Step 7
Select all the frames on the timeline and click the little arrow next to where it says 0 sec below the frames. We don’t want to set our gif to 0 sec. We want to set it to 0,08. So, we select Other and type in 0,08 and then click ‘ok’ like we know what we’re doing.
That’s the movement part of the gif done, believe it or not, so we must be doing something right!
Step 8
So, yeah, we got it to move. Now what, you might ask? ;) Now it’s time to actually make sure that Tumblr doesn’t freak out about us uploading it. Here’s how we’re gonna do that.
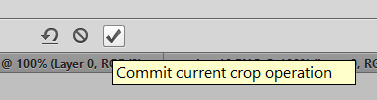
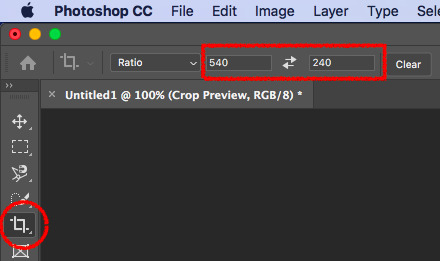
Make sure all the frames are still selected on the timeline. Now select the Crop tool, set it to 540 px by 304 px or whatever size you want your gif to have, and start fiddling around with the corners of the image. You can select the part of the frame you actually want in your gif that way. Double-click on your selection once you’re satisfied with it or click the check mark that appears on screen. Tadaa! Gif is resized!

Step 9
Now, I assume that you’re like me in this case but if you’re not please feel free to skip past this step. I always have more frames than I technically need. I start off with about 70 screencaps/frames for big gifs, which I then need to select down to ideally 40-50 screencaps/frames total!
What I personally do is that I will make the gif the way I just described with all 70 frames in place, and then I will play it a couple of times in the timeframe mode to see which sections can feasibly be cut away. You can do the same thing, try it! (And you get to see how nifty the gif is gonna look, too!)
Select the frames on the timeline that you want to get rid of and click the little garbage can on the timeline. That gets rid of half of the trouble, but now you gotta do something else. Remember me saying something about the Layers box? That’s gonna be your other best friend in this first part. Go to that box and select the layers you just deleted from the timeframe.

How do you know which layers you’ve deleted? Select all the frames you’ve still got on the timeline. Those layers will get a little eyeball in front of them in the Layers box. Any layer that does not have the eyeball is one you’ve deleted.
Select those layers and delete them by simply pressing delete on your keyboard or clicking on the garbage can in the Layers box.
(Alternately, as shown in the screencap above, select the first frame on the timeline. It will get an eyeball in front of it. Delete everything below that layer in the Layers box. Select the last frame on the timeline. Delete everything above that layer in the Layers box. NEVER delete frames in the middle, it’s gonna disrupt the flow of your gif like whoa!!)
Step 10
Almost there!
Click the button on the bottom left of the Timeline box, which will say ‘convert to video timeline’ when you hover over it.

Now select all your layers in the Layers box and right-click on them with your mouse. You’ll see the following pop-up. Select Convert to smart object.

Step 11
Save your gif as follows. Go to File → Save for Web. Use these settings:

Click ‘save’, give your gif a name, and you’re all set!!
#gif tutorial#ps tutorial#basilonetutorial#eesh I hope Tumblr uploads this properly and that y'all understand my step-by-step instructions#and I hope it'll be inspiring for folks? like half of PS is just experimentation tbh#just try to do things and click on stuff and watch/read tutorials from people cos honestly you don't have to reinvent the whole wheel#wait until we get to part II omg y'all are gonna die over the change between this basic gif and the finished product lol
19 notes
·
View notes
Note
How do you make a gif?
What a fantastic question.
This will be a full-blown tutorial, and I’m going to do my best to keep this as beginner-friendly as possible, but if anyone has any questions, feel free to ask via inbox or DMs or whichever way suits you.
You will need Photoshop to be able to follow this tutorial. I will be using this particular gif as an example:
The rest of the tutorial is under the cut.
Step 1. Download
First we download the video we’re going to gif. It always has to be in HD quality, preferably 1080, but sometimes 720 can work too, but no less. Gifs will not look good if the video you’re giffing is in bad quality.
The idea is to use torrent as little as possible because of the consequences, so, depending on what I want to gif, my method of download will vary. If it’s a relatively recent and well-known movie/tv show, then I usually check out this website for movies, and this one for tv shows.
If it’s something more obscure than that - say an old movie - you’ll have to use torrent, unfortunately.
For youtube videos, I use this app.
Step 2. Screencaps
Now that you’ve downloaded your video, you’ll need to make screencaps. The app I use is MPlayer OSX Extended - it works only for Mac. For both Mac and Windows, you can use MPEG Streamclip, but I prefer the former because it can be used for any format, whereas MPEG Streamclip only works with mp4.
I actually don’t have MPEG Streamclip anymore, so this tutorial will only show how I personally make screencaps, so with MPlayer.
The steps are simple:
Open the video
Find the scene you want to capture
Pause the video
Hold ‘command + shift + S’ until the scene ends
Make sure you choose a folder in which you want your screencaps to save (before you start capturing). To do this, while your video is open, go:
Mplayer OSX Extended > Preferences

This window will open:
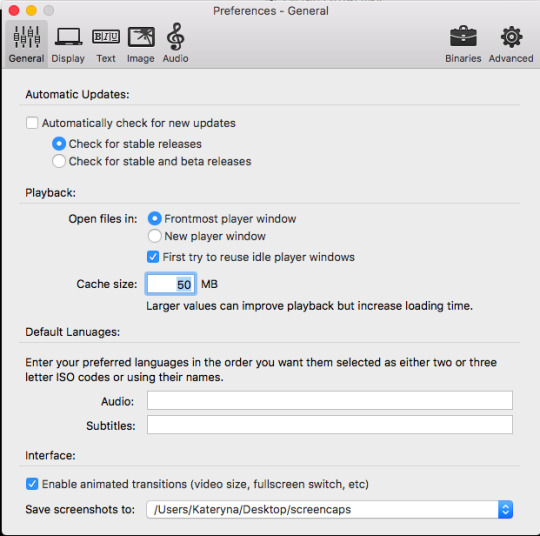
At the bottom, where it says “Save screenshots to”, you can choose your location.
Step 3. Importing Screencaps
Once the screencaps are done, we open Photoshop and go: File > Scripts > Load Files into Stack

Next it’ll open a browsing window, and you find the folder in which you saved your screencaps. At this stage I like to make sure I only upload the shots that will be on my gif, leaving out the extra ones I may have captured (like the beginning of the next scene, for example).
Use Shift to choose a lot of shots at the same time:
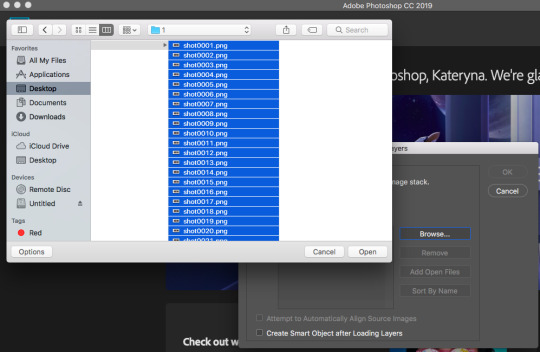
Then click OK.
While they’re uploading to photoshop, make sure you don’t click anywhere until the process is finished because otherwise it might not upload all the shots.
Step 4. Editing
Once your screenshots are in, the first thing you need to do is decide on the size of the gif. There are specific sizes which tumblr supports so that your gifs don’t appear blurred. I’m going to make a list of all possible combinations that I know. This will go from largest possible size a gif can be to the smallest and will show how it will look in gifsets (all the gifsets will be mine, sometimes from sideblogs).
Any number of gifs, one in a row:
540x540 (example)
540x450 (example)
540x320 (example)
540x240 (example)
An even number of gifs, two gifs in a row, side by side:
268x404 (example)
268x350 (example)
268x300 (example)
268x268 (example)
268x220 (example)
268x192 (example)
268x150 (example)
9 gifs:
177x177 for side gifs and 178x177 for the middle gif in each row (example)
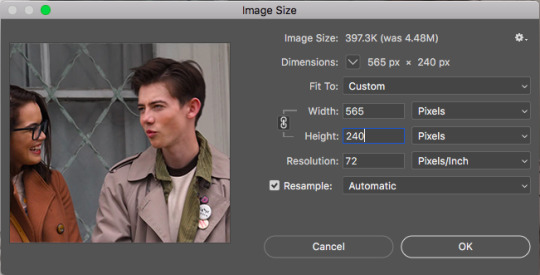
In this case, I will be making a standard 540x240 gif.
First we resize the image. Because these are caps from a movie and not a TV show (resolutions are different for TV), the cap is wide but short, that means that I change the size of the image by height. To do this:
Image > Image Size

This window opens:

Where it says “height”, we type in 240 and click OK.
Then we zoom in to a 100%.
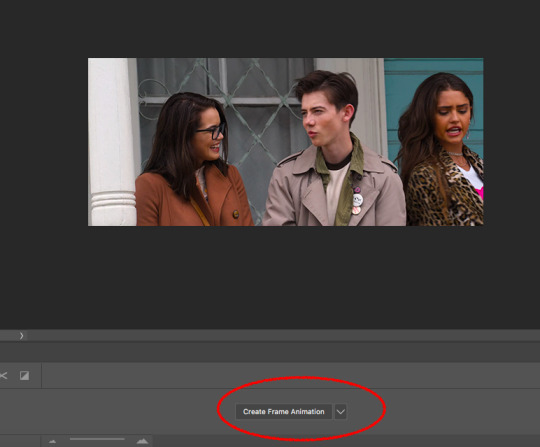
Next, we make sure the timeline is open. To do this:
Window > Timeline

Once that’s done, down at the timeline, we click “Create Frame Animation”:
At the right of the timeline, right under the layers, we click on this little thing:
And choose “Make Frames from Layers”

The frames will now be in reversed order because that’s how the layers always upload, so we click on that little four lines thing in the upper right corner of the timeline again and choose “Reverse Frames”:

And now is the time to have a look at your frames and see if you need to delete any. Make sure that if you delete a frame, you delete a corresponding layer as well. The gif will have to be under 3mb for tumblr to display it correctly, so make sure there aren’t too many frames. But this isn’t a huge issue because once you’ve saved the ready gif, you can always reopen it and delete some frames.
In this case I have 36 frames, and I’m going to take it down to 34 just to be safe. This is what the gif looks like at this stage:

Once that’s done, the next step is to set the delay. Every giffer does this according to their personal preferences, but I personally do this. If your gif doesn’t involve any talking - so you won’t be adding text, then set the delay to 0.07. If it involves adding text later, don’t touch the delay at all at the moment, it’ll have to be done later.
Because this gif doesn’t involve adding any text, I’m setting the delay to 0.07. Again, hold Shift to choose all the frames.


The slowed down gif looks like this:

Now it’s time to crop! Choose the cropping tool and type 540x240 where it says “ratio”:
Choose the crop positioning to your liking and press enter.
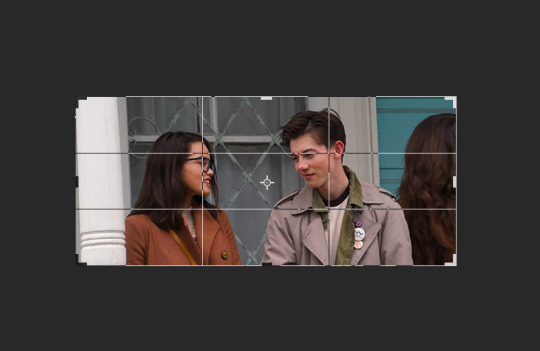
The gif at the moment:

Now we do last preparations before colouring. For this, click at the little four lines again:
And choose “Convert to Video Timeline”.
Then choose all the layers and go Filter > Convert for Smart Filters.

Then go Filter > Sharpen > Smart Sharpen:

Which will open the window for smart sharpening, and here are my settings:
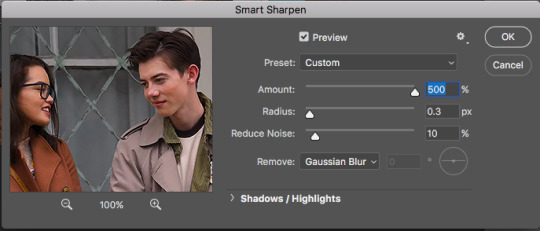
This is another one of those things that is down to each giffer, but what I usually do is, if it’s a really small gif, like 268x150 for example, I set radius to 0.2. If it’s a huge close up to a person’s face or a really big gif, like 540x540, I set the radius to 0.4. For all other gifs I always keep it on 0.3.
Then click OK.
Next, go Filter > Noise > Add Noise. Here are my settings for this:

Then, move the noise layer under the sharpening layer (I don’t know if this changes anything, but I always do it this way lol):
The gif ends up looking like this:

Now the editing is done, and it’s time to colour!
Step 5. Colouring
This is by far the hardest thing a giffer has to do, so if you don’t immediately get the hang of it, don’t be upset. You’ll learn eventually. I’m still learning, personally.
Again, all of this is very much down to each giffer, but here’s the way I do it.
Press the little “fill layer” button and choose Curves:

So the way I use curves is to even out the entire shot’s colouring. So if the scene is too red or too green or too blue or too yellow, it gets rid of the excess of that colouring and brings it down to normal. Can help so much in some cases.
What you do is choose the middle pipette in the window, which is to sample image to set grey point.

There’s also the option to set white point (bottom pipette) or black point (top pipette), but I don’t use those because it screws with your lighting too much.
To choose a point, I usually use the person’s eyebrows or hair. Sounds ridiculous, but it does work. In this case clicking on Dunkleman’s eyebrow makes the image too green:

So what I do instead is click on his hair, where it’s reddish brown, somewhere here.

This makes the image noticeably less red compared to the original:

But also, it made the image less vibrant, so we’re fixing that next. Fill layer > Vibrance:
And then I set Vibrance to 100, always. If the image is still not vibrant enough for my liking, I set saturation (in the same window) to 10 or 25 in some cases. And for this gif, I will set saturation to 10.
Here’s how the image ends up looking (just make sure it doesn’t make their faces ridiculously red or something, but if there’s some excess of colour, don’t worry):
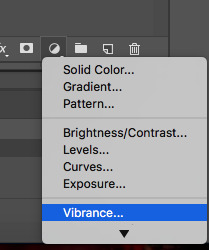
Now go Fill layer > Exposure.

Here are my settings for this gif:
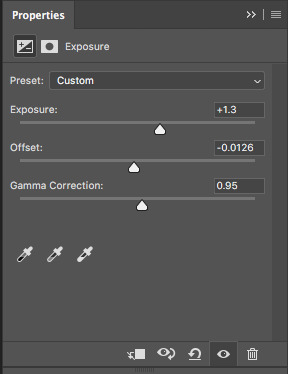
With exposure, it’s just a matter of keeping that balance between lightening it as much as possible but without their faces or bodies looking as bright as a christmas tree, and then adding offset and gamma correction to return normalcy to the picture.
Here’s what the image looks like now:

It’s obvious right now that their faces are a little too red and too yellow, so we’re going to fix that. Go Fill Layer > Selective Colour:
The task here is to make their faces appear as if they’re stood in normal daylight with no other filters. So as close to normal skin colour as possible. Be careful when giffing people of colour so that you don’t whitewash them.
In this case, I’m adding cyan in reds:

And taking down yellow in yellows:

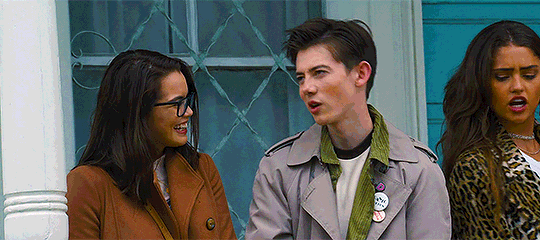
And here’s what the image ends up looking like:
I’m quite satisfied with this result, so I’m going to leave it how it is, but sometimes I will tweak things more and use colour balance and other things.
Step 6. Add Text
Make sure you group your colouring layers at this point and then add your text as the top layer.
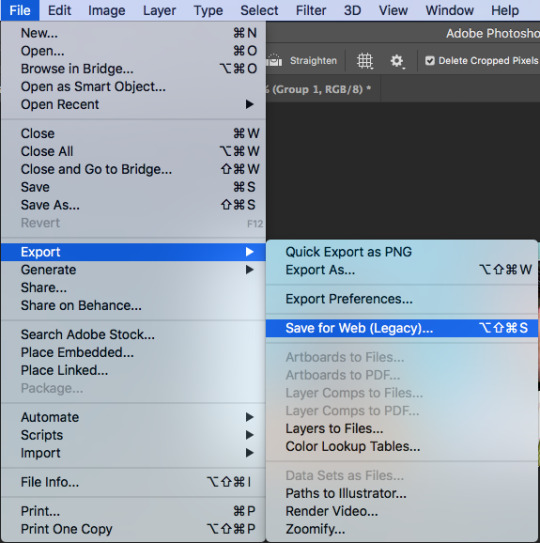
Step 7. Save the gif
To save a gif moving, you go File > Export > Save for Web:
This window opens up, and make sure that in the bottom right corner, where it says “looping options”, it’s set to “forever”:
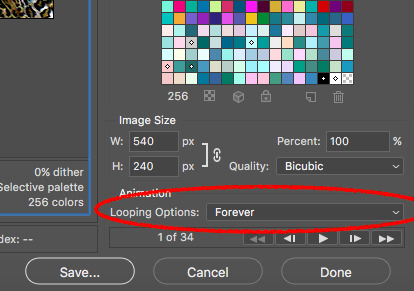
As the last step, I add dither because it evens out the edited colours in the background. I tend to use “pattern”:

Then we press “save” and our gif is done!
Step 9. Reopen
If you added text to the gif and followed my advice, you wouldn’t have touched the delay back at the beginning. This is because converting to video timeline kicks the delay either into 0.03 (too fast) or into 0.07 (too slow for speaking gifs). So you have to reopen the gif now and set the delay to 0.06 (that’s the speed I like for my gifs where someone’s talking on them).
This is also a good time to delete some frames if your gif is 3mb or over. Remember it won’t move if it’s not under 3mb!
Hope all of this makes sense, and let me know if you have any questions!
145 notes
·
View notes
Note
I saw on someone else's post that you offered to show them how to make gifs? I am super interested in making The Magicians gifs so I was wondering if you could teach me as well? Or even make a public post or tutorial or something? Thank you!!!!
Yeah, of course! There are a lot of ways to make gifs, some of them undoubtedly better than what I do. But, for me, I have a couple methods I generally use, one with Photoshop (when I want very specific control over the colors, composition, type styles, etc.), and the other with just a free tool (when I just want to make a gif that looks decent and not sink a ton of time into it).
I’ll go over the free tool method here; it’s more straightforward and limited, but wayyyy friendlier for someone just starting out. Also, again: it’s free. (But lemme know if you wanna talk Photoshop and I’m always happy to open that giant can of worms.)
One nice thing about gifs becoming the one true currency of the web is that a lot of gif-oriented sites have built gif-making tools in the past couple years and made them free and easy to use, so we can all become gif-producing worker bees, constantly toiling to keep up with the internet’s insatiable demand for gifs.
I use Gif Brewery 3 for mac, built by Gfycat. (There’s also Giphy’s GIF Capture which I’ve used a few times and didn’t hate.) So for the purposes of this tutorial, Step 0: Download and install Gif Brewery 3
So! Now let’s make a gif. Let’s say I want to make some gifs of Margo taking her throne as high king.
Step 1: Open Netflix in Google Chrome (i.e. not Safari because it blanks your screen if you try to record your screen while a video’s playing) or play a DVD on your computer, or pull up the scene you want on YouTube. Basically get a video of the scene you want playing on your computer screen in whatever fashion you prefer.
Step 2: Open Gif Brewery and select “Record Screen.” Resize the window that Gif Brewery then opens up so that it frames the video, hit record, and then play the part of the video you want to gif.

Step 3: When you’re done with video, click “Stop.” Gif Brewery will then open the video clip that you made in their interface. You can close your browser and the blue frame window. You can see the full clip you just recorded in Gif Brewery. Trim the extra bits off of the clip by dragging the green bar to define your start point and the red bar to define your end point.

Step 4: Resize! Tumblr’s main content box is 540 pixels wide. So if you’re making a gif that’s meant to be full width, you can size down to that width. Make sure “Maintain Aspect Ratio” is checked. (Now’s a good time to also crop if you want to, say, gif only Margo’s face without the space to her left and right.)
Step 5: So now we have something that’s the size and shape of a gif. If you want to add text, now’s a good time to do it. Use the “Text” button at the top of the window to open the Text box. Here you add your text, adjust the font weight, size, color, and border if you’re using one. I’m going to use a Billie Eilish lyric for this example because I’m cliche as hell.
If you’re making a standard-style gif with a text caption, you’ll use a bold san serif font like Helvetica, with a black border around it to make sure it’s readable, and then keeping it small and centered at the bottom of your gif, like so:

But! if you’re feeling Artsy, go nuts with your font choice and placement. Find a font that captures the tone your message and clip are conveying. You can find a wide range of free fonts on Google Fonts or good old DaFont. I want that badass Margo ‘tude, so I’m using a grungy font and Margo’s signature bright fuschia. Drag the text box to move and resize it until you’re happy with it.

Step 6: Time to fix your colors! Screen captured images basically always look more dark and muted than they should. The fix is to fuss and fuss and fuss and then fuss some more over the colors. Gif Brewery has limited color controls, but as I’ve learned, you can still spend an inordinate amount of time fussing over them. The Magicians makes this an especially good exercise in finding the limits of your patience because they’re always backlighting scenes in a way that blow out your brightness when you try to make even small edits. (Which is why I’m switching over to a different shot that’s easier to work with for this example. Margo’s hella backlit in our gif.)

Exposure Adjust: Increase exposure to make your brights brighter
Gamma Adjust: Increase gamma to make your darks richer
Saturation: Increase to make the colors as rich as they can be
Vibrance: I also like increasing vibrance for even more of a pop of color
Hue Adjust: their hue controls are funky, but you can make some minor adjustments if at this point your gif looks weirdly too red or yellow.
Play around until you find what looks good to your eye. For a gif that’s meant to look like it’s colored normally, watch out for things like: the whole thing looks too dark and you have to squint to see the details; you overbrightened and now the white is blown out and blinding; or you oversaturated so much things look pixely and glitchy.
Step 7: Open the Settings panel with the button at the top right. Time for more fussing to make sure the timing, frames, and settings are how you want them.

HERE’S THE THING: Tumblr does NOT let you upload gifs larger than 3mb. So everything you’re doing in this panel is a balancing game to keep your gif under 3mb without letting it look like trash. These are the settings you’ll fiddle with most often:
Speed is set to 100% by default. But you may want to slow it down, especially if your clip is only a couple seconds long. Slower means it’s easier to see the subtle changes in a character’s expressions and it makes the action look less jerky. The slower you set your speed, the more frames will be added to the gif, so keep an eye on that.
Frames per Second is what it sounds like. The lower you set this number, the fewer frames you’ll use, but the animation will look jerkier. You want enough frames per second that your animation looks as smooth as a hot knife sliding through butter. 12 is their default. I try to not go lower than 10. When I’m feeling particularly luxurious, I’ll set this to 15.
Color Count: Gifs can use as many as 256 colors and as few as 2, if you don’t care about your gif being an offense to nature. You can set it to the low 200s without compromising on quality, though, so that’s what I did here.
Step 8: Hit “Create” and wait an inordinate amount of time while your gif renders. When it finally, finally does, check the filesize on the bottom right. In the above gif, you’ll see my gif was 2.1mb. Perfect. So I can hit save and it’s done. But if it had said anything larger than 3mb, I’d have hit “Cancel” and then fiddled with the settings some more to get the number of frames down.
Alt-Step 6B: If I want to do anything fancier/artsy-ier/more unique than this kind of gif, this is when I’d usually crack open Photoshop. But there is some room for creativity within Gif Brewery. Let’s go back to Margo and look at some of our options:
In the Filters menu, you can see there are a number of bre-built Photo Effects to play with. Sometimes they look awesome; sometimes they look like trash. So experiment! There’s also rando filters like Halftone effects. And the Color Effects can give you options like adding a vignette, fading the colors to old-timey sepia tones, or creating a duotone like I ended up doing.
Have fun with it and look for effects that will support the tone you’re setting with clip and text you chose. So like for this Margo example, going black and white, or dark and heavy, etc. would not have been tonally consistent with the badass vibe I’m going for.
And I… think that’s it? At least to get started. Hopefully that helps, let me know if you have any questions! Or want to talk about anything beyond the basics. I’m always happy to dive into the specifics of how a particular effect was made, or how to add more advanced refinements.
#bookster-lover#tutorial#pls don't judge my gif-making abilities based on#the shitty gifs I had to make to capture my screen
49 notes
·
View notes
Text
Free Video Editing Software For Mac Without Watermark

Struggling to find a free video cropper? There are no native ways to crop a video on Windows, and for Mac and mobile users, the built-in croppers have limited functions. It might sounds counter-intuitive, as we thought cropping a video would be as easy as cropping an image.
The minute you start to fumbling around on your device, you will realize (and moan) why a seemingly simple cropping requirement is so hard to fulfill. To make things worse, many tutorials on cropping a video are in fact showing ways to trim a video.
Hitfilm Express free video editor interface and workflow is very similar to Adobe Premiere Po CC, a well-known video editor you may heard about. Like above mentioned software, Hitfilm Express is free to use without watermark on the output. Free software may not add a watermark on output videos, but it usually lacks advanced video-editing tools. If you’re interested in creating fascinating videos with various special effects, we recommend you Movavi Video Editor Plus. Even inexperienced users can use all of the program’s features, thanks to its simple interface. However, Wondershare Free Video Converter ( Free Video Converter for Mac) is an exception. No watermark, no time limitation and completely free. No watermark, no time limitation and completely free. It supports all popular audio (up to 14) and video formats (up to 16), say, MP4, M4V, AVI, MOV, MKV, VOB, DivX, DV, MPEG-1, MPEG-2, 3GP, 3G2. This is a default video editor for all Mac OS X users, and it comes with a mobile version that works well as a video editor app without a watermark. As for its appearance, it somewhat resembles the Mac version that is shrunk into a smaller device. In this article, I am going to share with you 5 best free video editing software without watermark for Windows, Mac and Linux users. These are my best picks after reviewed more than 30 different free video editors I found on the internet. These free video editors are great alternatives to expensive video editing suites out there.
There is another headache:
While cropping a picture simply deals with the still image, cropping a video has more to do with motion objects.
Let's say you shoot a landscape video of skiing in Breckenridge, where the skier keeps moving from the right side to the left side. When you crop it to a square video, the skier might go out of the scene from time to time.
That's where Motion Crop comes to help.
What is Motion Crop?
Motion crop is a handy feature to enhance the editing and cropping of a video by keeping the key action (sporting, pets running) in the frame. To illustrate, it allows you to set keyframes and move the cropping frame to track the key action as you wish.
If you want to create multiple versions of a video in different aspect ratios, say, landscape, portrait and square video, you can use cropping frame in different sizes, and use keyframes so that the 'camera' always follow the subject within the original clip.
So, are there any video editor that supports Motion Crop?
Our R&D team is working on a beginner friendly video editor, NLE in nature. When it's done, the powerful Motion Crop feature will be included, and that's just the start of what this free video editing software can do. Stay tuned (and get excited).
Based on the above demands for cropping, we present you all our picks of best video cropping software for Windows, macOS, iOS, Android as well as those online video croppers. On whatever platforms, we try to make sure you get the tools that fit you the best.
Best Free Video Cropping Software for Windows
#1. VideoProc – Drag and Crop Easily without Limits
VideoProc is a one-stop video editing tool, with recorder, converter and downloader built-in too. Powerful yet lightweight, it runs smoothly even on old computers. The cropper is easy to find on the editing panel. All you need is to drag videos into the software, click crop, adjust area and done. You can crop the video into any size, or use handy presets to crop 16:9 to 1:1. The high quality engine ensures the output file to maintain highest quality.
There is no limit of video size, and thanks to its support of hardware acceleration, you can crop even an hour-long movie and export at high speed without freezing. Besides, VideoProc allows you to cut, trim, zoom videos, adjust speed, and apply effects.
Key features:
No video size or duration limits.
Advanced algorithm to retain high video image quality after processing.
Presets to crop while maintaining same aspect ratio, or crop to another aspect ratio.
Also allows free cropping by simply drags the cropping frame to any size.
More than just a video cropping tool.
How to Crop a Video Easily on Windows and Mac with VideoProc?
It's nonsense to make do with a video cropping software that requires 10 steps or more to simply crop a video. If you only want to crop unwanted area, you should be able to do it as simple as cropping an image; if you prefer to crop it and fill the image to full screen, an automatic process are more preferable to save time. Let's see VideoProc in action.
Step 1 (0:19) Go to Video panel from home screen and drag your videos.
Step 2 (0:31) Select output format, and click Crop on the editing bar.
Step 3 (0:40) Drag the cropping frame (dotted lines), adjust pointers to indicate the area you want to keep.
You can have a real-time preview of the cropped video from the monitor on the right side. This preview window is handy to check how the cropping goes, so that you can play around and adjust it to the desired result. After cropping unwanted area, you can hit done and click Run to export the video.
Our website provides a free download of Bamboo 3.0.1 for Mac. The unique identifier for this app's bundle is com.wacom.BambooSetup. The actual developer of this Mac application is Torus Knot Software Ltd. The following version: 3.0 is the most frequently downloaded one by the program users. Bamboo Scribe For Mac Software Express Scribe for Mac OS v.4.31 A free audio transcription player for typists using Mac OS X. Features variable speed playback, foot pedal control and can automatically load audio files from email, FTP or network. Bamboo scribe download mac.
Can I Use Windows Movie Maker to Crop a video?
Windows doesn't come with a native cropper for videos. The deprecated movie maker has never been programmed with a cropping tool, and the closest function would be the animation zoom in. Plus, it is true that you can crop a picture easily with the built-in photos app on Windows 10, but for cropping a video, there is no luck, either.
With the tools listed in this article, you shall find one that suits your needs. For detailed tutorial with pictures and steps, go on reading: how to crop a video on Windows 10 >>
#2. VSDC – Use Cropping Guideline or Set Border Numbers
VSDC has a free version of video editor. It allows you to crop, trim, and cut videos with advanced options. If you are struggling with other basic tools, which only allows you to set numbers to crop from four edges, VSDC is a life-saver. You can actually drag the frame to decide the area to be kept, and borders to be chopped off. Plus, this cropping tool also automatically enlarges the cropped scene to fit the full screen. That means, if you have a 1920x1080 video, after cropping the unwanted borders, you can still maintain the same resolution.
Besides selecting desired area by manually changing the size of the cropping frame, you can also set number of pixels to crop. However, as it is a feature-rich NLE aiming for advanced video editing, you might take some time to set up the project to get started.
Pros:
Crop borders with an adjustable frame.
Free yet powerful enough for hobbyists.
'Set the original size' button is handy to crop video without changing resolution or aspect ratio.
Cons:
It's not a lightweight tool if you simply want a cropper.
Less friendly for beginners or people who never uses an NLE.
Limited support of input and output format.
#3. Olive Video Editor – Alpha but Promising Tool
Olive is an open-source video editor designed to be a free alternative to professional NLEs. Like most timeline-based editors, the cropping tool can be found in the Effects panel. It offers you parameters such as Left, Top, Right, and Bottom so that you can decide how many pixels you prefer to crop from each side. You can also tick Feather to create a blurring edge of the cropped clips. The best thing is, you can keyframe the cropping to animate the process, so that you can create filmic effect such as crop opening transition.
If you want to simply drag and resize the crop frame to decide the area, this cropper might be complex for you. It is not designed as a basic tool to 1-click select aspect ratio or to drag-n-crop. If you are comfortable with cropping videos in Premiere, then this is a promising free alternative.
Pros:
Lightweight, open-source and free.
Support proxy workflow to deal with high-res large video files.
Support keyframe animations to create a cropping transition.
Cons:
In alpha stage, meaning it could be less stable and lacks features.
Less desired to render drone videos as the output file might have dropped frames.
No preset for the output, making it harder for beginners to manage export settings.
#4. Animotica – Crop and Fit with Blurred Background
Animotica is a popular video maker available on Microsoft Store. The cropping tool it offers is slightly different from other programs. It won't change the original resolution and aspect ratio of the output video, but it works like this: cropping as you required, and at the same time fill in the missing area with blurred background. This mechanism works nice if you plan to share the video to YouTube or Instagram. You don't need to worry about image distortion, or unsightly black bars.
There is no cropping frame for you to crop out an area, instead, it presents you dial buttons to crop top, bottom, left and right. In addition, you can change the cropping area into heart-shape, stars, and many more. Basic editing such as change speed, add filters and music are available too.
Pros:
Modern design with easy to understand interface.
Stock background styles to choose from after cropping the video.
Frame by frame editing with a smart wheel to wind backward and forth.
Cons:
Might not be the kind of cropping function you are looking for.
Free version only allows you to export video from 360p to 720p.
Watermark on output files in free version.
#5. Cyberlink PowerDirector – Crop, Pan and Zoom
PowerDirector is a prosumer video editing tool. Don't worry, Beginner would find it straightforward to use too. It integrates the cropping tool together with Pan and Zoom, and that makes sense. For simple cropping task, you can quickly adjust the cropping box to indicate the area to keep or crop. To spice up the video, you can also zoom in and create panning effects. For instance, you can crop a 4:3 video to a widescreen, and then add keyframes and grab the crosshair to move the frame. It's nice to have pointers and frames to simply drag, or make it smaller to crop.
Pros:
Visualized way to crop a video with built-in crop designer.
Robust features for other editing tasks such as cut, adjust speed, or rotate video.
Crop frame can be set at a fixed aspect ratio (4:3, 16:9, 9:16, 1:1) or freeform.
Cons:
Require some learning curve for the novices.
Free version only allows you to export video from 360p to 720p.
For quick cropping without learning curve, free download VideoProc:
Free Video Cropper on Mac
#1 Hidden Video Editor in macOS Big Sur
Though macOS Big Sur is still in its beta version, there are some existing features on the way. The largest change in the Photos app is the adding of editing tools to deal with videos. Besides utilizing the same tools you use to edit photo, now you can also add filters and crop video right within the Photos app.
The cropping feature on macOS Big Sur works the same as you crop a video on iPhone. You can select standard aspect ratio to crop or use the Freeform. Meanwhile, you can flip the clip or convert landscape to portrait mode. The editing is non-destructive and you can save your copy safely.
The 10.16 update makes it super quick and easy to crop videos with the default Photos app. Yet it is designed to handle a single footage. If you need to assemble multiple clips, add transitions or layovers, you still need dedicated video editors.
Pros:
It is quick to crop a small video clip for instant share.
Free and default app.
Cons:
No batch processing.
Cannot merge video clips together.
#2. iMovie – Mac Built-in Tool
iMovie on Mac is either pre-installed or free downloaded in the App Store. For almost every Mac user, iMovie is the first choice to do easy edits like cropping. In iMovie, there are 2 crop options, Crop to Fill and Ken Burns. By default, they always crop your video at 16:9 automatically. You can adjust its position by moving the frame box, or you can drag a corner handle to change the scale of the crop. Ken Burns is to make the camera appear to zoom in/out by setting the crop at the beginning and end of the clip.
iMovie also satisfies other simple editing needs, e.g. trim, merge, overlay, add subtitles, filters, green-screen effects, etc. Debuted on Apple devices, any edits you did on Mac can be synchronized to your iPhone, and iPad via iCloud. And you can share cropped videos directly in this software.
Pros:
No download.
Easy and free.
Shares the cropped video on social media directly.
Features other basic video editing functions.
Cons:
Can't crop video at specific aspect ratios freely like 4:3, 1:1, 4:5, etc.
Crashes sometimes.
#3. Final Cut Pro X – Professional Video Cropper on Mac
As for cropping videos, Final Cut Pro is pretty similar to iMove, featuring 2 options, basic cropping and Ken Burns style. But Final Cut Pro X does cropping more precisely. Besides the crop windows and four corner handles, you can also adjust each edge of the clip individually by setting parameters in the video inspector.
As a professional video editor on Mac, Final Cut Pro X is applied to edit large and high-quality films like The Social Network, The Girl with the Dragon Tattoo, etc. So as long as you are skilled with great editing ideas, it absolutely helps you make them come true.
Auto Reframe for Final Cut Pro? Here is the Smart Conform Tool.
Update – Aug. 25, 2020 – Apple just released Final Cut Pro 10.4.9, with social media cropping tools that can intelligently analyze your video clips, and crop to square, vertical and other aspect ratio for Instagram and popular social media. This Smart Conform tool is FCP's catch-up of Premiere's Auto Reframe, though it still requires manual adjustments and are less intelligent comparing to Auto Reframe.
Pros:
Easy and precise to reframe a shot.
Crops multiple clips at once.
Retains the high quality of the cropped clips.
Cons:
It automatically adds black background to fit the original aspect ratio in Trim mode.
It takes some time to pick up basic editing skills in FCP X.
Expensive. You don't need to invest too much if you just want easy cropping.
What is the Ken Burns effect?
You might notice that iMovie and FCP X both feature a crop mode called Ken Burns. What is it? It is a crop style named after an American documentarian who applies this style to all of his works.
In Ken Burns mode, you can crop out any two parts of the frame, and it auto transits from one to another gradually. This is how vloggers zoom in the footage to show their facial expressions in post-editing. Wanna have a try? Read this tutorial of video cropping in macOS >>.
#4. QuickTime Pro – Crop Associating with Photoshop on Mac
Crysis 1 game download. In fact, the built-in QuickTime Player can't crop videos, but the paid QuickTime Pro can do it. Although cropping is a simple function in most video croppers on Mac and requires nothing but simple dragging, it is a little complicated in QuickTime Pro. To remove annoying borders or unwanted parts in the frame, you need to create a mask in Photoshop first. And then apply this mask to the video to crop out redundant parts.
As the advanced version of QuickTime Player which can only play, rotate, and trim videos, QuickTime Pro empowers users to crop and resize, compress and apply FX to videos, and create slideshows with music.
Pros:
More versatile than QuickTime Player.
Cons:
Complicated to crop videos with a Photoshop mask.
Apple no longer sells QuickTime Pro. So this is only workable for users who have already installed it.
#5. macXvideo – First Free Video Cropper for 4K UHD on Mac
macXvideo is designed exclusively for macOS and serves Mac users crop features with both entry-level operations and advanced options like parameter customizing. You can utilize the crop feature to remove unwanted parts in the frame and adjust its position by dragging the cropping window, or by setting different aspect ratios including 16:9, 4:3, and 1:1. During the process of video cropping, it allows you to preview the cropped video in real-time so that you can modify the clip accordingly.
Besides cropping and basic video editing, this all-in-one video editor also comes with a robust video converter to transcode incompatible videos and compress large files to meet various playback and sharing needs perfectly.
Pros:
Free and user-friendly.
Crops UHD 4K videos with the least quality loss.
Fully compatible with new Apple standard HEVC and other 300+ video formats and codecs.
Cons:
None-leaner video editor.
Cannot crop a video frame by frame.
Free Download VideoProc for Mac:
Free Video Cropper on iPhone
#1. Photos App – iPhone Built-in Cropper
iPhone models running on iOS 13/14 and higher versions now can take advantage of the default Photos app to crop a video. For instance, you can choose to keep original, crop to 1: 1, 16:9, 10:8, 7:5 and 4:3. A particularly nice feature is that it allows you to zoom in/out videos to emphasize the key element in your shot. The whole process is no different than cropping a picture, simple and learning-curve free.
Like other apps on this roundup list, Photos app also allows you to trim, rotate, flip, and add filters to your picture and video recordings.
Pros:
Pre-installed and free.
Change video to any desired aspect ratio.
Basic video and photos editing toolkits.
Immediately sharing.
Cons:
Available for iPhone iOS 13 only.
The original HEVC clip will turn to H.264.
Can't save the cropped videos as new clips before iOS 13.3.1.
#2. iMovie for iOS – Fast Crop and Edit Video
The crop feature of iMovie on iPhone is not as extensive as on Mac as it cuts off the redundant objects by zooming in/out the frames. And, it will automatically convert any of your recordings to 16:9 aspect ratio. However, if all you want is fast cropping, trimming videos and then sharing with family and friends on Facebook or YouTube, iMovie is your thing.
iMovie comes with the basic tool to edit videos such as subtitle, filter, templates, speed control. It will require a bit of exploration first, but once you get to adapt to its workflow, making casual videos can be easy like walking in the park. In addition, you have the option to save the cropped clips as 540P, 720P, 1080P, and others higher resolution files.
Pros:
Pre-installed and free.
No watermark.
A large variety of useful tools to make basic edits.
Instantly share the outcome in a secure way.
Cons:
Not intuitive for beginners.
Only allows you to create horizontal (16:9) video.
#3. Video Crop – Crop and Resize Videos
Video Crop is a handy video cropper that enables you to easily crop out the unneeded parts of the recordings without distorting the frames and pixels. All you have to do is selecting a favored output aspect ratio, moving your finger on the screen to set the area that you want to keep. Plus, it allows you to select to export files in MPEG-4 (MP4) and QuickTime (MOV) format. As for the export quality, you are free to choose among the Highest, Medium, and Low.
Video Crop only goes as far as free video cropping software. Want to get more editing utilities? You might move to another 3 tools made by the same developers: Video Effect, Video Compress, and Video Cut.
Pros:
Free.
Give buttons to select output file properties.
Cons:
The source video will be resized
No additional editing tools.
Pop-up ads.
#4. Crop Video – Cut Video Editor
Crop Video is a full-featured video cropping and editing application on the iPhone. Just as what its name implies, Crop Video is capable of cropping the interesting area of videos to many preset and customized aspect ratios.
Free accounts have access to the ready-stock music resources, fantastic filters, and adjustment options on the lightness/contrast/saturation/temperature value by clicking the relevant icons. Paid accounts can get several editing utilities like trim, cut, and pro filters.
Pros:
Many preset aspect ratios.
Useful add-on features: color correction, music background, etc.
Cons:
Might cause visible quality loss.
Have to upgrade to a paid account to remove ads.
Not allowed to zoom in/out videos.
Is That Necessary to Apply a Third-party iOS App to Crop Video?
iOS iMovie falls short of expectations for most people due to the absence of the crop tool. But, no hurry to find external applications for help as cropping videos by using the built-in Photos app on a recent iPhone is extremely flexible and easy. This tails with Apple's attempt to turn iOS ecosystem into closed and perfect. See the how to guide on: cropping a video on an iPhone>>
Free Video Croppers for Android
#1. Smart Video Crop – Android Video Cropper, Trimmer, Cutter & Converter
Although Smart Video Crop does not offer as many preset aspect ratios as Video Crop, users wouldn't severely bother with it. The regular modes of Square, Landscape, Portrait, 3:2, and 4:3 can somehow meet the requirements of average users. And after all, we can customize the aspect ratio using its 'Free' feature.
Smart Video Crop can access your phone camera and detect all videos from your video gallery, and videos saved in other file folders including Downloads and SD cards. It integrates Cut and Crop to let you crop either the whole video or just a selected specific part of the vid.
Pros:
Video to MP4 and WebM conversion.
Output quality settings.
Frame rate adjustments.
Speed control.
Video rotation.
Audio removal.
No watermark.
Cons:
The missing 16:9 and 9:16 aspect ratios could be annoying.

#2. Video Crop – A Single-minded Video Cropper for Android Free
Video Crop is all and only about cropping video sizes on Android. Simple, straightforward, and self-illustrative.
There are 20 video cropping presets: Crop for Instagram, Square, Portrait, Landscape, 1:2, 2:1, 2:3, 3:2, 3:4, 3:5, 4:3, 4:5, 4:7, 5:3, 5:4, 5:6, 5:7, 7:5, 9:16, 16:9, and you can also customize the video size by tapping the 'Custom' button. Source videos can be selected from your video gallery and your created history. It also has access to your Android camera, so that you can directly record a live event hot and fresh and crop it right away for sharing online.
Pros:
Fast & easy to use; accurate preset aspect ratio choices.
No water mark.
Cons:
Contains ads, no advanced output settings.
#3. Wonder Video – Crop Video for Instant Share on Instagram, Tiktok, YouTube
Wonder Video gives you ample muscle to change video aspect ratio with or without actual cropping. It offers 1:1 Instagram ratio, 4:5 Instagram ratio, 16:9 YouTube ratio and 9:16 Tiktok ratio. And below the ratio setting, there are two choices – canvas and the full screen video. By tapping canvas, you can change your video ratio without cropping, while tapping the full screen your vid will be cropped and some part of the vid won't display.
Wonder Video is more of a complete video editor on Android. Besides video cropping, you can one-click add styles, songs, texts, cartoon and magic effects, and change brightness, contrast ratio, warmth, saturation etc. But you will have to pay for those features.
Pros:
a no-brainer, very easy to use.
You can choose to crop video either to fill full screen or without crop.
Cons:
Watermark cannot be removed unless you upgrade to pro version.
#4. Video Crop – Android Video Cropping for Resize and Length
Video Crop is a big searching query and this little tool also choose to share the same name, but with different logo. In comparison with the previous 'Video Crop' app, it offers you features of cutting both the length and ratio of a video. 7 aspect ratio presets are sufficient to daily use: landscape, portrait, 3:2, 5:4, 7:5, 16:9 and you can also customize the ratio totally on your own.
The app also allows for simple video trimming and cutting pinpointing to seconds. Many people who misunderstand cropping and trimming/cutting could find this a great combination to cater for both needs.
Pros:
You can close the ads upon popping up right away.
No watermark.
Cons:
You will at least see 2 times of whole screen ads for each video crop when you select a video and crop a video. Just be careful not to tap the banner ads since buttons are close together on the lower sidebar.
Can I Use The Built-in Gallery Apps to Crop a Video?
Yes and no. By far, not a single Android phone of any brand - Samsung, Huawei, Oneplus, Pixel - comes with a native Gallery app that supports cropping video screens on their own. They can only trim videos rather than crop the video frame. But some Android devices do bring along self-made video editing tools or third-party tools.
For detailed pictorials, go on reading: How to Crop A Video on Android Free – Samsung, Huawei, Pixel, Xiaomi
Best Free Video Cropper Online
#1. Ezgif Video Cropper – Crop Small Videos without Watermark
The fast processing speed of this handy video cropping tool is enough to make it one of the best online video croppers but there are many other departments where it outranks many other web-based applications – customizable aspect ratio, watermark-free, and well-supported by all prevalent browsers including Firefox, Safari, Opera and Chrome.
Ezgif is, by design, a GIF file maker. However, it is also capable of editing and converting videos thanks to the available of a number of editing tools including, reverse, resize, audio mute, add subtitles, etc.
Pros:
Free to use.
Widely compatible.
Fast response.
No watermark.
Cons:
Max file size is 100MB.
No access to change the outcome quality or format on your own.
Not supported by IE/Edge browsers.
#2. Kapwing – Crop Video to Share on Social Media Feed
Best Video Editors Without Watermark
Kapwing is a trusted and easy-to-use online video editing software. You can drag the bounding box with the mouse to fast adjust the area that you would like to keep. In addition, it's super handy for newbies to resize video for immediately sharing on social media feed as it offers 7 ready-made aspect ratio options for Facebook/Twitter portrait/landscape/cover, YouTube/Widescreen, and other popular sites.
How Kapwing stacks up to other online cropping software? Aside from the basic editing tools, it covers several advanced editing features usually found on desktop programs, as like shapes, subtitles, images, and layers. All of those features are available for free.
Pros:
No ads or watermark.
Powerful editing capabilities.
Instantly share online.
Cons:
Max file size: 500MB.
Won't publish videos beyond 7 minutes.
Have to login to remove watermarks.
#3. Veed – For Instant Social Media Sharing
Designed for social media sharing, Veed presets loads of cropping canvas size for YouTube, Twitter, Facebook, TikTok, Pinterest, LinkedIn, etc. After importing videos from local PC, Dropbox, YouTube, or even recording a video via the camera of the PC, you can start to crop the video by dragging the cropping window to remove any unwanted segment of the footage. In the end, you can download the cropped video to your computer, save as a GIF, copy the link to clipboard, share it on Facebook, Twitter, or send it via Gmail.
Just like offline video editors, Veed assists you to polish your cropped video by adding texts, filters, images, and BGM, or elements like emojis, shapes, and sound waves. If you are cropping to highlight a frame, you can also add slow-mo effects to it by adjusting the video speed.
Pros:
Free to use.
No account required.
Multiple output options.
Versatile as offline video croppers.
Cons:
File limited to 50MB in its free version.
Big brand watermark on the exported video.
Automatically add black borders if the cropped video doesn't fit the preset aspect ratio.
#4. Video Crop – The Easiest Online Cropper without Login
Among hundreds of online video croppers, Video Crop is a damn simple and juicy tool for video cropping. It supports videos uploaded from the local PC, and online drives like Dropbox, Google Drive, and OneDrive. It has two cropping modes, one is to crop while keeping the original aspect ratio, and the other is to freely crop at any aspect ratio. Since it's developed exclusively for video cropping, you cannot do any other edits in this tool. But is you just want a simple crop, this one is perfect.
Pros:
Totally free.
Directly start cropping without registering.
No watermark.
Cons:
Extremely slow to upload and export a video.
No extra functions.
How to crop videos freely: no watermark, no sign-up, no quality loss
For those who have higher demands on efficiency of video cropping - with quality settings, no watermark, no registration, no pop-up ads, besides online site, you can use lightweight desktop version.
Free download VideoProc:
Why These Free Video Cropping Software are Not on the List
Windows Movie Maker
Windows Movie Maker used to be great to quickly edit a video. It is the native solution, easy and free to use. However, it cannot actually crop a video. You can zoom in on a video with this tool, so that to some extent, the borders are cropped. Plus, this tool is discontinued in 2012. Even if you can download the installation pack from site that still hosts legacy installer, a lack of official support means incompatibilities issues and security risks. We loved Windows Movie Maker, but we decide to remove it from the top list for above reasons.
VLC
VLC is not intuitive to crop a video, but it is indeed one of the free solutions on Windows 10. The cropper tool is buried deep in menus, and you will need dozens of steps to set things up. Worse even, there is no realtime monitor for you to view the cropped video. Instead, you can only enter numbers to define how much you would love to crop.
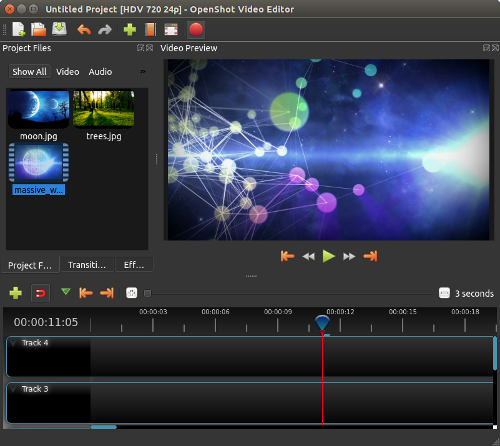
Openshot
Though Openshot is free and comes with many features to edit a video, it doesn't have a true cropping tool. The workaround is rather a compromise that uses the scale tool. You have to go all the way deep into the menu: right click on a video > properties > scroll down to find Scale > set scale X and scale Y to some number. It actually zooms in your video, so that the edges are 'cropped' while the aspect ratio and resolution stay the same.
Video Crop vs Trim/Cut, Jargons Explained
Trim & Cut a video – While trimming in most cases refer to cutting off the beginning and end part of a clip, cutting can be more diversified. You can cut a clip to add transitions, cut and remove unwanted sections from the footage, or applying J cut and I cut to spice up your story-telling.
Resize a video – Resizing changes the dimension of the video, for instance, from 1920x1080 to 960x540 proportionally.
Resizing doesn't involve the cutting away of parts of the original image, and there is only one thing to notice: always make sure the aspect ratio of the video stays the same when resizing a video. If you change resolution disproportionately, it will result in image distortion.
Crop a video – Cropping allows you to remove the unwanted areas or unnecessary portions of a video clip, just like what you usually do with photos by adjusting the edges. For instance, you can crop 30% from both the top and bottom of a video. Some of us also refer it as 'cropping the frame of a video' or 'cropping a video screen'. Cropping will unavoidably result in a changing of the aspect ratio.
Generally, this is a great solution to change portrait view to landscape and get rid of black bars, watermarks, fingers, and errant objects in the video. Many social media users also favor using this function to make square videos or videos in specific aspect ratios for sharing on Instagram, TikTok, Musical.ly, Twitter, and Facebook.
Conclusion
Cropping video is not a complicated task, but things are a little different when you crop videos on desktop, mobile, or online. Hope our picks of best video cropper for Windows, Mac, iPhone, Android and online have saved your energy and time in researching for free video croppers.
From the pros and cons of each tool, you might conclude that simple and flexible operation is the crucial feature of a video cropper. VideoProc is a piece of lightweight and easy software that enables you to crop videos by dragging the frame box freely and intuitively. Download VideoProc for more features.
There are many screen recorders that can help us to record gameplay, video calls and other screen activities, but you may find that after recording screen with some free screen recorders, there is a watermark in your recorded videos. To record screen without watermark, this guide will introduce to you 6 free screen recorders with no watermark and even no time limit. The no water screen recorders are available for Windows PC and Mac. I am sure that you can find the one you like.
Free Screen Recorder for Windows with No Watermark
I'll first show you 3 screen recorders without watermark for Windows 10, 8, 7 PC.
FonePaw Screen Recorder
FonePaw Screen Recorder is a screen recorder with no watermark. It can not only record full screen of your computer, but also a certain area or an application interface. During the recording, you can record audio and webcam as well. And the screen recorder is equipped with annotation tools, which let you add circle, texts, arrows to your screen videos. Moreover, you can schedule a recording task for the FonePaw Screen Recorder to start and stop screen recording automatically.
It is easy to record screen with this no watermark screen recorder.
Run the screen recorder on PC.
Click Video Recorder. Select the area that you want to capture screen video.
Enable Microphone, System Sound, Webcam if needed.Click Rec button.
When you finish recording, click the blue square to stop.You can preview and even clip the recorded video. No watermark is added.
Not only that it can record screen with no watermark, the recorder can also be used to capture screenshots and record audio(system & microphone sound) on Windows PC.
As a well-rounded application, FonePaw Screen Recorder is surprisingly small in size so that it can run smoothly in recording gameplay even on low-end PCs. The recorder is now free to download.
Download
Pros
Full-featured: It can be used to record screen, capture audio, take screenshots;Easy-to-use: It has a clear interface.
No lag: It runs smoothly without lagging even while there is a game running.
Cons
It is a standalone program that needs to be downloaded on your computer.
Windows 10 Game DVR
Do you know that Windows 10 has a free screen recorder without watermark? Game DVR, a feature of Windows Game Bar, can record not only games, but also other screen activities on your computer. As a built-in recorder, Game DVR, of course, won't give watermark to your screen videos.

Simply press Win + G on an active application window. This will activate Game DVR recording, which assumes that there is a game that needs to be recorded. You can then begin to record screen without watermark and time limit with Game DVR.
It is easy-to-use and totally free. However, you can't record desktop or select a specific region to record as Game DVR can only record the screen activity of an active program.
Pros
Free: You don't have to pay for the recorder.
Pre-installed: The application is pre-installed with Windows 10 system so you don't need to download it separately.
Cons
Not for computers running on Windows 8, 7.
Too primitive: It lacks features that are available on third-party screen recorders, such as selecting recording area, record webcam, add annotations.
OBS
Open Broadcaster Software(OBS) is a open source screen recording software that is free to use and can record screen without watermark and time limit. It is compatible with Windows 10, 8, 7, Mac and Linux.
OBS is more than just a screen recorder. It can be used for live streaming, creating live videos with window captures, images, text, webcams. It offers different modes - Display Capture, Window Capture, Game Capture, etc. - for you to record full screen, applications, games on the computer. And it can record screen in high quality at up to 60 FPS. Audio from different sources can be recorded, too.
However, OBS is complicated. Before you are able to use the recorder, you have to figure out elements such as Scene, Source on OBS. And it is large in size and many users complain that OBS slows down their computers when it is running.
Pros
Powerful: Record screen in high quality at 1080p and 60 FPS.
Cons
Free Video Editing Software For Mac Without Watermark Free
Difficult: You have to spend some time to figure out how OBS works. It is far more difficult to use than other screen recording programs.
Laggy: OBS tends to be laggy when running on low-end PCs.
Free Screen Recorder for Mac with No Watermark
There are also some free screen recorder without watermark for Mac computer.
FonePaw Mac Screen Recorder
This screen recorder for Mac has everything you need for recording screen videos: select recording area, record screen with audio, add annotation to your videos, capture screenshots, record screen with webcam, start screen recording with hotkeys, etc. And there will be no watermark in the screen videos you make. The screencasts can be shared to Facebook, Twitter, YouTube directly through the recorder.
FonePaw Mac Screen Recorder is available for Macs on Mac OS X 10.9 and above (the latest macOS Mojave is supported).
Download
Pros
A powerful screen recorder to record screencasts in high quality.
Compatible with Macs with different macOS versions.
Cons
The recorded screen videos can only be saved as MP4 files.
Free Video Editing Software No Download
QuickTime Screen Recording
QuickTime is not only a video player on Mac, but also a free unlimited screen recorder. You can start screen recording with QuickTime by clicking New Screen Recording on the application. If you need to record yourself in the video, you have to enable New Movie Recording first to activate your webcam. Your sound can be recorded, too, but QuickTime won't record the system sound from the computer.
Moreover, after the recording, QuickTime can trim, split, flip or rotate to screen videos.
Pros
It is a built-in application on the macOS. So it is totally free and has no watermark or time limit.
Cons
Can't record system sound.
Can't annotate your videos.
Apple's Screen Capture Tool for Mojave
Since Mojave, Apple introduce a new screen capture tool that can not only take screenshots, but also record videos of Mac screen. The new tool is simpler than QuickTime. Pressing Command + Shift + 5 button combination will launch the screen capture interface, where you can choose to record the entire screen or a selected area. When you have done recording, the tool also allow you to edit the video, for example, trim the video, add text to the video.
Though there is no watermark, the tool is too simple that it doesn't allow you to record screen with audio or webcam.
Pros
It is the simplest way to record Mac screen. You can access it by a simple keyboard shortcut.
Cons
It is only available on macOS Mojave.
That's the 6 screen recorders to record screen videos without watermark on Windows and Mac. Which one do you like? Leave your comment below.
0 notes
Text
Some important CSS and JS Libraries
1. Styled components
An idea born in an Australian whisky bar has developed into a project of 18 K stars, widely embraced within the culture. Styled components make it simpler to use CSS in React components, by identifying styled components with encapsulated styles as a mediator layer without CSS classes. Styled-components are generated by literal notation using the ES6 framework to describe components. As you would normally do using CSS, CSS properties can be applied to the component as required. Styled components can create specific class names when the JS is parsed, and inject the CSS into the DOM. You will learn more about Max Stoiber in this great chat.
2. Radium
Radium is described as "A toolchain for React component styling" at 6.5 K stars and developed by FormidableLabs. With React without CSS, it's a collection of tools to handle inline types. Radium provides a simple interface and abstractions to manage CSS features that can not easily accommodate Radium inline styles, enabling you to bundle styles together with your React elements, combining javascript, html, and styling. It also provides rendering based on props, allowing you to design your components according to the state of your game.
3. AphroditeAphrodite is a framework-agnostic CSS-in-JS library with server-side rendering support, browser prefixing and limited CSS generation support. Aphrodite transforms everything into classes, using the class attribute.This project operates with or without Respond at 4 K stars and offers features such as modeled injection into the Dom, styles of auto prefixes and more, all at a fairly small size of 20k and a handful of dependencies. Here's a handy rundown of Aphrodite vs. Radium. 4. Emotion
At 4.2 K stars Emotion is a strong and versatile CSS-in-JS library that enables you to style string or object-based apps. To prevent variance problems with CSS it has uniform structure. Based on the glam library and its philosophy the concept is to maintain runtime output by parsing styles with babel and PostCSS while writing CSS. The core runtime is 2.3 kb, and 4 kb with support from React. Emotion isn't just about Reacting.
5. Glamorous
Note: the project is no longer actively maintained! still cool though :)
At 3.6 K stars, PayPal's Glamorous is focused to create styled components and jsxtyle inspired "maintainable CSS with React." Kent C. Dodds describes the project as "React component styling with an elegant (inspired) API, small footprint (< 5 kb gzipped) and great performance (through glamour)." It has a rather similar API to modeled parts, and under the hood it uses similar methods.
6. Glamor
Glamor, inspired by ideas from this great talk, is small and powerful. It helps you to write CSS inline in your components using the same supports for style prop Object CSS syntax React. It is fast and efficient, independent system, serverside / static rendering and adds vendor prefixes / fallback values. Here's a short introductory API notes, a comparison of Glamor CSS techniques and a helpful Glamor tutorial with Gatsby.
7. Fela
<FelaComponent style={{ backgroundColor: 'blue', color: 'red' }} render={({ className, theme }) => ( <div className={className}>I am red on blue.</div> )} />
Fela is a project developed in JavaScript for State-Driven Styling, highlighting 3 things: rendering styling dynamic by design, introducing framework-agnostic (Bindings for Reacting) and performing. Based on the state of the application it is adjustable by nature and renders types. It generates atomic CSS and supports all common features of CSS such as media queries, pseudo-classes, keyframes and font faces. It can be used on any view list, including the native React.
8. Styletron
Thanks to this
code-carrot post
Styletron is a "component-oriented styling toolkit" at 2500 stars. Styletron supports stateless, single-element styled components as primitive base styling with conditional / dynamic styling prop interfaces, and style composition via (typed) JavaScript objects without additional tooling (e.g. Webpack loaders, Babel plugins, etc.). The design of style objects is often un-opinioned on. This fascinating HN thread lets you know more.
9. JSSJSS is a CSS abstraction that uses JavaScript to define styles in a declarative and maintenable manner. It is a high performance compiler JS to CSS that operates both runtime and server-side. This core library is agnostic at low level and frame, and is around 6 KB (minified and gzipped). This can also be expanded by API plugins. Here's a good SCSS (Sass) conversion tutorial here. Test out even React-JSS, a React JSS integration.
10.
Bootstrap Icons
For their icon library the Bootstrap team recently published the Alpha 3 Update. The newest update adds tons of new designs and now has over 500 icons on the Bootstrap SVG icon pack. Bootstrap Icons are designed to interact with components in Bootstrap, from shape controls to navigation. Bootstrap icons are SVGs, so they can easily and quickly scale and be styled with CSS. Although built for Bootstrap, they will work in any project. They are open source (MIT), so you can access, use, and expand it free of charge. Heads up though, right now they are in alpha and open to drastic changes.
11.
Polka
This is my short analysis of Polka which is "... just a native HTTP server with added routing, middleware, and sub-applications support ...!" even though express is relatively light, polka is lighter. What I find fascinating in this approach gives you even more insight into how to build an application. I think Polka is an excellent way to express yourself. With only a few extra modules, you'll have a fully fledged system with stable paths, templating, static files providing in a more lightweight (and hopefully faster) bundle all you have in express. It has not the same express acceptance but this could be an advantage.
12.
Size limit
Open-source tool to measure the performance of JS apps that offers an estimation of how much time end-users will need to run your Javascript. It can be plugged into Travis CI, Circle CI, GitHub Behavior so it runs automatically and prevents over-budget size limit commits.
13.
Stryker
Stryker is a very fascinating project in JavaScript and other languages to run mutation testing. It works by adding "mutations" to the code and running tests on them in random locations, testing how many of the mutations pass and how stable the code really is. By an example let's explain this, Suppose you're creating an online casino. Users are only permitted to access the casino if they are over 18. So you write the following piece of code to test if anyone can access the site:
function isUserOldEnough(user) { return user.age >= 18; }
Stryker will find the return statement and decide to change it in several ways:
/* 1 */ return user.age > 18; /* 2 */ return user.age < 18; /* 3 */ return false; /* 4 */ return true;
We call such shifts mutants. After discovering the mutants, they are introduced one by one and the experiments are performed against them. If at least one of the experiments fails, we're saying the mutant is murdered. This is what we want to see! If no check fails, then it has succeeded. The better the experiments survive the fewer mutants.Stryker produces the results in various formats. One of the easiest reporters to read is the plain text:
Mutant killed: /yourPath/yourFile.js: line 10:27 Mutator: BinaryOperator - return user.age >= 18; + return user.age > 18; Mutant survived: /yourPath/yourFile.js: line 10:27 Mutator: RemoveConditionals - return user.age >= 18; + return true;
The direct text reporter outputs precisely how the code has been changed and which mutator has been used. It would then tell us whether a mutant has been killed which means that at least one test has failed, or whether it has survived. In this case the second mutation is marked as survivor. This means that a test that specifically checks for age younger than 18 is possibly lacking
14.
Dinero.js
Dinero is a JavaScript library designed to work with monetary values. It has a well-designed API which contains all the methods for money and currency operations you might need. Dinero.js allows the development, estimation and formatting of monetary values in JavaScript. You can do arithmetic operations, read and format them thoroughly, search for a variety of items to make your own creation process simpler and safer.
15.
Uppload
Uppload.js is a modern JavaScript library designed to enhance the experience of uploading images. The library offers an elegant interface for file collection that allows the user to drag-drop images from the locale.It also allows you to import images from any data source, such as URL, camera, Instagram post, Facebook public post, etc. Thanks to its plugin program, it provides multiple upload options, allowing you to add more image sources, such as Instagram, screenshots, Giphy and more.You are also allowed to crop, resize, rotate the client-side images until they are submitted to server.
16.
MoreToggels
Pure CSS library offering over 50 stylish checkbox toggles of a pleasant variety. These are very easy to use and customize-only surround a div in your checkbox, add the right class and it's done.
17.
μPlot
Fast, memory-efficient diagram library to generate superb 2D Canvas-based charts. It offers lots of different types of graphs, lots of customization options and other cool features.
18.
Rsup Progress
Easy but still very successful progress bar plugin with promising support and smooth animations. It is super easy to configure and very useful to show the load times at the top of the page. 19.
Bootstrap Treeview
Bootstrap treeview is used to represent hierarchical information starting with the root element and continuing with its children and their respective items. Besides the root every element has a parent and can have children. Easy Bootstrap 4 plugin designed to build elegant treeviews with collapse list objects. It's a fantastic little feature and we wouldn't be shocked to see it integrated with future Bootstrap models. Siblings are objects with one parent and the same. Objects can collapse and expand.
20.
Electron React Boilerplate
Electron React Boilerplate uses Electron, React, Redux, React Router, Webpack and React Hot Loader for rapid application creation (HMR).Great starting kit for the production of Electron-based cross-platform mobile applications. The project GitHub provides a strong framework to help you customize everything and get started in no time.
21.
Panolens
They're panolens. Js is a WebGL focused and event-driven panoramic viewer. Lean and versatile. It is constructed over Three. Amazing JavaScript panorama viewer library right in the browser to create beautiful 360 ° experience. Three.js-based library keeps output fast and smooth, even when viewing high quality images or videos.
22.
Octomments
Very smart solution for adding comments to your website which uses GitHub as a discussion source. The project consists of a GitHub App and a JS library working together to view a fully featured comment section, hosted within a selected repo issue of GitHub.
23.
Rome
Rome is a toolchain experimental to JavaScript. It includes a parser, linter, formatter, bundler, frame checking and more. It aims to be a detailed platform for everything that relates to JavaScript source code production. Rome is not a set of known instruments. All the tools are designed specifically for Rome, do not rely on any external dependencies and are made to communicate with each other seamlessly.
24.
massCode
MassCode is a snippet manager for developers of open-source code. This nice little app offers a clean interface for all of your code snippets and cheatsheets to handle. Runs on Mac, Linux and Windows.
25.
Bootlint
The Bootstrap team's new linter tool that lets you test if your pages use Bootstrap's components with properly organized HTML. It also ensures the appropriate tags are used, an HTML5 doctype declaration is included, and the page's overall markup is accurate.
26.
DarkModeJS
This library uses the mix-blend-mode css to get Dark Mode on all of your websites. Only copy and paste the snippet and you'll get a plugin to turn the Dark Mode on and off. You can also use it programmatically, without the button. Lightweight module, installed in Vanilla. Super lightweight JS library to help you integrate dark & light teams into your applications. It senses local time for the user and changes the UI appearance accordingly. It doesn't have light and dark themes.
27.
Hex Engine
Modern 2D engine designed to render browser games. This versatile toolkit for game development features a Canvas-based rendering engine, aids in physics and sound, gamepad support, integrated design tools, and more.
28.
Chardin.js
A tiny JS tool which makes adding overlay instructions for your apps super simple. These guides can be extremely helpful to clarify the UI, demote the various features of the app or simply show the user what to do next.
29.
Sharect
Share. Js is a lightweight, zero-dependent JS library that transforms any text selected into quotes that can be posted on Twitter and/or Facebook, as you can see in Medium.com.
30.
Lottie
Lottie is an Android, iOS, Web, and Windows library that parses Adobe After Effects animations exported as json with Bodymovin and makes them natively accessible on the smartphone and on the web! The Airbnb developer team's incredible library that exports Adobe After. This makes animations that can be very complex with lots of details and keyframes as well as being super-performing and smooth buttery. It's now designed to expand its use to android, iOS, React Native and Windows in addition to his great work.
31.
Vue Interactive Paycard
View-Interactive-Paycard-Smooth and sweet micro-interaction credit card shape. Includes the printing of numbers, validation and automatic identification of type of token. Designed with viewjs, and completely sensitive as well. Very impressive credit card snippet type which beautifully animates as users input their data. One of the finest projects we've seen all year round, with everything polished to perfection, from the typography to the animations. It's not only pretty either-the card is also very user friendly with the formatting of numbers, validation and the identification of card size. Also, when entering cc info, users actually prefer a well-known interface and not some custom UI.
32.
Cube.js
Cube.js is a scalable open source platform for building analytical web applications and designing your own sophisticated, custom analytics systems. It consists of a wide SDK frontend and a lightweight API backend which can be linked to most databases and systems like MySQL, Postreges and MongoDB .. It is primarily used for developing internal business intelligence tools or for applying customer-facing analytics to an existing app.
33.
Tessaract
Tesseract. Js is the pure Javascript port of Tesseract's popular OCR engine. Node and browser JavaScript library which extracts text from images. It analyzes the image, automatically detects location and orientation of the text, and with great precision extracts words and sentences. Tessaract can recognize more than 60 languages including more complex ones such as Chinese, Arabic and Russian
34.
Barba
Lightweight library for linking seamless transitions to pages on your website. It takes up your usual static website and makes it a great-looking single-page application experience. It helps to reduce the delay between loading pages, to decrease requests for HTTP, and to make the web feel more premium.
35.
Freezeframe
This fun JavaScript library allows for the control of animated GIF playback. It can start and pause the GIFs, for example, based on user feedback such as clicks or hover. As it uses a canvas feature to draw the individual frames, it is also very performant under the hood.
36.
Ink
React-based App building command line interface. It provides a great range of predefined components which can be used to accelerate the creation of terminal interfaces while also allowing features such as more sophisticated templates and controls to be added.
37.
Instant Page
This fun library speeds up loading times when users hover over them by prefretching the links. This makes loading of a page faster until the user clicks on a connection and navigates to the next page. With the latest update it can also automatically prefix all links in a list-great for static content.
38.
Filepond
FilePond is a JavaScript library that lets you upload silky smooth drag n 'drop files. It has a polished UI which is a pleasure to use, while also offering some interesting features under the hood such as optimizing photos for quicker uploads. Just 21 kB gzipped, with adapters available with React, Vue, and jQuery for easier implementation. These docs can assist in downloading, setting up, updating and extending FilePond. If you don't know FilePond you can find more detail on the FilePond product page.
39.
Micromodal
Micromodalistic. Js is a modal library written in pure JavaScript, lightweight, configurable and 11y-enabled. It helps you to build modal dialogs consistent with WAI-ARIA guidelines, with trust and with minimal configuration. Minified and gzipped at just 1.9 kb, it's a tiny library for big change.
40.
Brain.js
A great project for all of you who want to take their first steps in machine learning, Brain.js offers a powerful framework for working in a JavaScript environment with the neural networks. It has lots of examples of excellent documentation that will help you understand some of the most important ML techniques.
As a reputed Software Solutions Developer we have expertise in providing dedicated remote and outsourced technical resources for software services at very nominal cost. Besides experts in full stacks We also build web solutions, mobile apps and work on system integration, performance enhancement, cloud migrations and big data analytics. Don’t hesitate to
get in touch with us!
Source:
whizzystack.co
#b2b ecommerce
#b2b content marketing
#b2b seo
#Ecommerce
#socialmediamarketing
0 notes
Text
Some important CSS and JS Libraries
1. Styled components
An idea born in an Australian whisky bar has developed into a project of 18 K stars, widely embraced within the culture. Styled components make it simpler to use CSS in React components, by identifying styled components with encapsulated styles as a mediator layer without CSS classes. Styled-components are generated by literal notation using the ES6 framework to describe components. As you would normally do using CSS, CSS properties can be applied to the component as required. Styled components can create specific class names when the JS is parsed, and inject the CSS into the DOM. You will learn more about Max Stoiber in this great chat.
2. Radium
Radium is described as "A toolchain for React component styling" at 6.5 K stars and developed by FormidableLabs. With React without CSS, it's a collection of tools to handle inline types. Radium provides a simple interface and abstractions to manage CSS features that can not easily accommodate Radium inline styles, enabling you to bundle styles together with your React elements, combining javascript, html, and styling. It also provides rendering based on props, allowing you to design your components according to the state of your game.
3. AphroditeAphrodite is a framework-agnostic CSS-in-JS library with server-side rendering support, browser prefixing and limited CSS generation support. Aphrodite transforms everything into classes, using the class attribute.This project operates with or without Respond at 4 K stars and offers features such as modeled injection into the Dom, styles of auto prefixes and more, all at a fairly small size of 20k and a handful of dependencies. Here's a handy rundown of Aphrodite vs. Radium. 4. Emotion
At 4.2 K stars Emotion is a strong and versatile CSS-in-JS library that enables you to style string or object-based apps. To prevent variance problems with CSS it has uniform structure. Based on the glam library and its philosophy the concept is to maintain runtime output by parsing styles with babel and PostCSS while writing CSS. The core runtime is 2.3 kb, and 4 kb with support from React. Emotion isn't just about Reacting.
5. Glamorous
Note: the project is no longer actively maintained! still cool though :)
At 3.6 K stars, PayPal's Glamorous is focused to create styled components and jsxtyle inspired "maintainable CSS with React." Kent C. Dodds describes the project as "React component styling with an elegant (inspired) API, small footprint (< 5 kb gzipped) and great performance (through glamour)." It has a rather similar API to modeled parts, and under the hood it uses similar methods.
6. Glamor
Glamor, inspired by ideas from this great talk, is small and powerful. It helps you to write CSS inline in your components using the same supports for style prop Object CSS syntax React. It is fast and efficient, independent system, serverside / static rendering and adds vendor prefixes / fallback values. Here's a short introductory API notes, a comparison of Glamor CSS techniques and a helpful Glamor tutorial with Gatsby.
7. Fela
<FelaComponent style={{ backgroundColor: 'blue', color: 'red' }} render={({ className, theme }) => ( <div className={className}>I am red on blue.</div> )} />
Fela is a project developed in JavaScript for State-Driven Styling, highlighting 3 things: rendering styling dynamic by design, introducing framework-agnostic (Bindings for Reacting) and performing. Based on the state of the application it is adjustable by nature and renders types. It generates atomic CSS and supports all common features of CSS such as media queries, pseudo-classes, keyframes and font faces. It can be used on any view list, including the native React.
8. Styletron
Thanks to this
code-carrot post
Styletron is a "component-oriented styling toolkit" at 2500 stars. Styletron supports stateless, single-element styled components as primitive base styling with conditional / dynamic styling prop interfaces, and style composition via (typed) JavaScript objects without additional tooling (e.g. Webpack loaders, Babel plugins, etc.). The design of style objects is often un-opinioned on. This fascinating HN thread lets you know more.
9. JSSJSS is a CSS abstraction that uses JavaScript to define styles in a declarative and maintenable manner. It is a high performance compiler JS to CSS that operates both runtime and server-side. This core library is agnostic at low level and frame, and is around 6 KB (minified and gzipped). This can also be expanded by API plugins. Here's a good SCSS (Sass) conversion tutorial here. Test out even React-JSS, a React JSS integration.
10.
Bootstrap Icons
For their icon library the Bootstrap team recently published the Alpha 3 Update. The newest update adds tons of new designs and now has over 500 icons on the Bootstrap SVG icon pack. Bootstrap Icons are designed to interact with components in Bootstrap, from shape controls to navigation. Bootstrap icons are SVGs, so they can easily and quickly scale and be styled with CSS. Although built for Bootstrap, they will work in any project. They are open source (MIT), so you can access, use, and expand it free of charge. Heads up though, right now they are in alpha and open to drastic changes.
11.
Polka
This is my short analysis of Polka which is "... just a native HTTP server with added routing, middleware, and sub-applications support ...!" even though express is relatively light, polka is lighter. What I find fascinating in this approach gives you even more insight into how to build an application. I think Polka is an excellent way to express yourself. With only a few extra modules, you'll have a fully fledged system with stable paths, templating, static files providing in a more lightweight (and hopefully faster) bundle all you have in express. It has not the same express acceptance but this could be an advantage.
12.
Size limit
Open-source tool to measure the performance of JS apps that offers an estimation of how much time end-users will need to run your Javascript. It can be plugged into Travis CI, Circle CI, GitHub Behavior so it runs automatically and prevents over-budget size limit commits.
13.
Stryker
Stryker is a very fascinating project in JavaScript and other languages to run mutation testing. It works by adding "mutations" to the code and running tests on them in random locations, testing how many of the mutations pass and how stable the code really is. By an example let's explain this, Suppose you're creating an online casino. Users are only permitted to access the casino if they are over 18. So you write the following piece of code to test if anyone can access the site:
function isUserOldEnough(user) { return user.age >= 18; }
Stryker will find the return statement and decide to change it in several ways:
/* 1 */ return user.age > 18; /* 2 */ return user.age < 18; /* 3 */ return false; /* 4 */ return true;
We call such shifts mutants. After discovering the mutants, they are introduced one by one and the experiments are performed against them. If at least one of the experiments fails, we're saying the mutant is murdered. This is what we want to see! If no check fails, then it has succeeded. The better the experiments survive the fewer mutants.Stryker produces the results in various formats. One of the easiest reporters to read is the plain text:
Mutant killed: /yourPath/yourFile.js: line 10:27 Mutator: BinaryOperator - return user.age >= 18; + return user.age > 18; Mutant survived: /yourPath/yourFile.js: line 10:27 Mutator: RemoveConditionals - return user.age >= 18; + return true;
The direct text reporter outputs precisely how the code has been changed and which mutator has been used. It would then tell us whether a mutant has been killed which means that at least one test has failed, or whether it has survived. In this case the second mutation is marked as survivor. This means that a test that specifically checks for age younger than 18 is possibly lacking
14.
Dinero.js
Dinero is a JavaScript library designed to work with monetary values. It has a well-designed API which contains all the methods for money and currency operations you might need. Dinero.js allows the development, estimation and formatting of monetary values in JavaScript. You can do arithmetic operations, read and format them thoroughly, search for a variety of items to make your own creation process simpler and safer.
15.
Uppload
Uppload.js is a modern JavaScript library designed to enhance the experience of uploading images. The library offers an elegant interface for file collection that allows the user to drag-drop images from the locale.It also allows you to import images from any data source, such as URL, camera, Instagram post, Facebook public post, etc. Thanks to its plugin program, it provides multiple upload options, allowing you to add more image sources, such as Instagram, screenshots, Giphy and more.You are also allowed to crop, resize, rotate the client-side images until they are submitted to server.
16.
MoreToggels
Pure CSS library offering over 50 stylish checkbox toggles of a pleasant variety. These are very easy to use and customize-only surround a div in your checkbox, add the right class and it's done.
17.
μPlot
Fast, memory-efficient diagram library to generate superb 2D Canvas-based charts. It offers lots of different types of graphs, lots of customization options and other cool features.
18.
Rsup Progress
Easy but still very successful progress bar plugin with promising support and smooth animations. It is super easy to configure and very useful to show the load times at the top of the page. 19.
Bootstrap Treeview
Bootstrap treeview is used to represent hierarchical information starting with the root element and continuing with its children and their respective items. Besides the root every element has a parent and can have children. Easy Bootstrap 4 plugin designed to build elegant treeviews with collapse list objects. It's a fantastic little feature and we wouldn't be shocked to see it integrated with future Bootstrap models. Siblings are objects with one parent and the same. Objects can collapse and expand.
20.
Electron React Boilerplate
Electron React Boilerplate uses Electron, React, Redux, React Router, Webpack and React Hot Loader for rapid application creation (HMR).Great starting kit for the production of Electron-based cross-platform mobile applications. The project GitHub provides a strong framework to help you customize everything and get started in no time.
21.
Panolens
They're panolens. Js is a WebGL focused and event-driven panoramic viewer. Lean and versatile. It is constructed over Three. Amazing JavaScript panorama viewer library right in the browser to create beautiful 360 ° experience. Three.js-based library keeps output fast and smooth, even when viewing high quality images or videos.
22.
Octomments
Very smart solution for adding comments to your website which uses GitHub as a discussion source. The project consists of a GitHub App and a JS library working together to view a fully featured comment section, hosted within a selected repo issue of GitHub.
23.
Rome
Rome is a toolchain experimental to JavaScript. It includes a parser, linter, formatter, bundler, frame checking and more. It aims to be a detailed platform for everything that relates to JavaScript source code production. Rome is not a set of known instruments. All the tools are designed specifically for Rome, do not rely on any external dependencies and are made to communicate with each other seamlessly.
24.
massCode
MassCode is a snippet manager for developers of open-source code. This nice little app offers a clean interface for all of your code snippets and cheatsheets to handle. Runs on Mac, Linux and Windows.
25.
Bootlint
The Bootstrap team's new linter tool that lets you test if your pages use Bootstrap's components with properly organized HTML. It also ensures the appropriate tags are used, an HTML5 doctype declaration is included, and the page's overall markup is accurate.
26.
DarkModeJS
This library uses the mix-blend-mode css to get Dark Mode on all of your websites. Only copy and paste the snippet and you'll get a plugin to turn the Dark Mode on and off. You can also use it programmatically, without the button. Lightweight module, installed in Vanilla. Super lightweight JS library to help you integrate dark & light teams into your applications. It senses local time for the user and changes the UI appearance accordingly. It doesn't have light and dark themes.
27.
Hex Engine
Modern 2D engine designed to render browser games. This versatile toolkit for game development features a Canvas-based rendering engine, aids in physics and sound, gamepad support, integrated design tools, and more.
28.
Chardin.js
A tiny JS tool which makes adding overlay instructions for your apps super simple. These guides can be extremely helpful to clarify the UI, demote the various features of the app or simply show the user what to do next.
29.
Sharect
Share. Js is a lightweight, zero-dependent JS library that transforms any text selected into quotes that can be posted on Twitter and/or Facebook, as you can see in Medium.com.
30.
Lottie
Lottie is an Android, iOS, Web, and Windows library that parses Adobe After Effects animations exported as json with Bodymovin and makes them natively accessible on the smartphone and on the web! The Airbnb developer team's incredible library that exports Adobe After. This makes animations that can be very complex with lots of details and keyframes as well as being super-performing and smooth buttery. It's now designed to expand its use to android, iOS, React Native and Windows in addition to his great work.
31.
Vue Interactive Paycard
View-Interactive-Paycard-Smooth and sweet micro-interaction credit card shape. Includes the printing of numbers, validation and automatic identification of type of token. Designed with viewjs, and completely sensitive as well. Very impressive credit card snippet type which beautifully animates as users input their data. One of the finest projects we've seen all year round, with everything polished to perfection, from the typography to the animations. It's not only pretty either-the card is also very user friendly with the formatting of numbers, validation and the identification of card size. Also, when entering cc info, users actually prefer a well-known interface and not some custom UI.
32.
Cube.js
Cube.js is a scalable open source platform for building analytical web applications and designing your own sophisticated, custom analytics systems. It consists of a wide SDK frontend and a lightweight API backend which can be linked to most databases and systems like MySQL, Postreges and MongoDB .. It is primarily used for developing internal business intelligence tools or for applying customer-facing analytics to an existing app.
33.
Tessaract
Tesseract. Js is the pure Javascript port of Tesseract's popular OCR engine. Node and browser JavaScript library which extracts text from images. It analyzes the image, automatically detects location and orientation of the text, and with great precision extracts words and sentences. Tessaract can recognize more than 60 languages including more complex ones such as Chinese, Arabic and Russian
34.
Barba
Lightweight library for linking seamless transitions to pages on your website. It takes up your usual static website and makes it a great-looking single-page application experience. It helps to reduce the delay between loading pages, to decrease requests for HTTP, and to make the web feel more premium.
35.
Freezeframe
This fun JavaScript library allows for the control of animated GIF playback. It can start and pause the GIFs, for example, based on user feedback such as clicks or hover. As it uses a canvas feature to draw the individual frames, it is also very performant under the hood.
36.
Ink
React-based App building command line interface. It provides a great range of predefined components which can be used to accelerate the creation of terminal interfaces while also allowing features such as more sophisticated templates and controls to be added.
37.
Instant Page
This fun library speeds up loading times when users hover over them by prefretching the links. This makes loading of a page faster until the user clicks on a connection and navigates to the next page. With the latest update it can also automatically prefix all links in a list-great for static content.
38.
Filepond
FilePond is a JavaScript library that lets you upload silky smooth drag n 'drop files. It has a polished UI which is a pleasure to use, while also offering some interesting features under the hood such as optimizing photos for quicker uploads. Just 21 kB gzipped, with adapters available with React, Vue, and jQuery for easier implementation. These docs can assist in downloading, setting up, updating and extending FilePond. If you don't know FilePond you can find more detail on the FilePond product page.
39.
Micromodal
Micromodalistic. Js is a modal library written in pure JavaScript, lightweight, configurable and 11y-enabled. It helps you to build modal dialogs consistent with WAI-ARIA guidelines, with trust and with minimal configuration. Minified and gzipped at just 1.9 kb, it's a tiny library for big change.
40.
Brain.js
A great project for all of you who want to take their first steps in machine learning, Brain.js offers a powerful framework for working in a JavaScript environment with the neural networks. It has lots of examples of excellent documentation that will help you understand some of the most important ML techniques.
As a reputed Software Solutions Developer we have expertise in providing dedicated remote and outsourced technical resources for software services at very nominal cost. Besides experts in full stacks We also build web solutions, mobile apps and work on system integration, performance enhancement, cloud migrations and big data analytics. Don’t hesitate to
get in touch with us!
0 notes
Text
14 PowerPoint Presentation Tips to Make More Creative Slideshows [+ Templates]
New Post has been published on http://tiptopreview.com/14-powerpoint-presentation-tips-to-make-more-creative-slideshows-templates/
14 PowerPoint Presentation Tips to Make More Creative Slideshows [+ Templates]

youtube
I like to think of Microsoft PowerPoint as a test of basic marketing skills. To create a passing presentation, I need to demonstrate design skills, technical literacy, and a sense of personal style.
If the presentation has a problem (like an unintended font, a broken link, or unreadable text), then I’ve probably failed the test.

Even if my spoken presentation is well rehearsed, a bad visual experience can ruin it for the audience.
Expertise means nothing without a good presentation to back it up. For starters, grab your collection of free PowerPoint templates below, and use the tips that follow to perfect your next presentation.
No matter your topic, successful PowerPoints depend on three main factors: your command of PowerPoint’s design tools, your attention to presentation processes, and your devotion to consistent style. Here are some simple tips to help you start mastering each of those factors, and don’t forget to check out the additional resources at the bottom of this post.
How to Make a PowerPoint Slide
Open Microsoft PowerPoint.
If a page with templates doesn’t automatically open, go to “File” at the top left of your screen and click “New Presentation”.
To use a template, either click the “Design” tab or go to “File” again and click “New from Template”.
Insert a new slide by clicking on the “Home” tab and then the “New Slide” button.
Consider what content you want to put on the slide, including heading, text, and imagery.
Keep the amount of text under 6-8 lines (or 30 words) at a minimum of size 24 pt.
Add images by clicking “Insert” and clicking the “Picture” icon.
Add other elements by using features in the “Home” and “Insert” tabs on the top ribbon.
Play around with the layout by dragging elements around with your mouse.
How to Make a PowerPoint Presentation
A presentation is made up of multiple slides, and now that you know how to make one, you can delve deeper into PowerPoint’s capabilities.
1. Open a blank presentation again or start from one you’ve already created.
If you’ve already created a presentation, double click the icon to open the existing file. Otherwise, open Microsoft PowerPoint, click “File” in the top left corner, and click “New Presentation.” From there, you can follow the prompts to set up a new presentation.
2. Choose a “theme” or create your own.
Microsoft offers built-in themes and color variations to help you design your slides with a cohesive look. To choose from these pre-built themes, choose the “File” tab again, select “New”, choose one of the options, and click “Create.”
Otherwise, you can use PowerPoint elements, your design sense, and your brand’s color palette to make your own “theme.”
3. Create a variety of slides for different purposes.
You don’t want to present the same exact slide, just with different content on it. This would bore your audience. Ensure that you create multiple variations, accommodating some of the common uses for slides. At minimum, you’ll need:
A title slide
An agenda or table of contents slide
A slide that introduces the speaker
Various content slides (create different layouts considering what kind of multimedia you’ll use)
4. Use the Duplicate Slides feature to save you time.
There’s no reason to create these designs over and over again. Now that you have a few to draw from, you can simply duplicate them before inputting your content. Here’s how to do that:
On the left pane, right click the thumbnail of the slide you want to duplicate.
Choose “Duplicate Slide” from the pop-up menu.
This will automatically add a copy of this slide to the presentation. From there, you can customize it for your needs.
5. Add transitions to your slides (optional).
Done well, transitions can add a little bit of movement and showmanship to your presentation. PowerPoint has several transitions built in for you to choose from.
To access them, select the “Transitions” tab from the top ribbon. From there, you can select a transition for it to preview on your screen. To customize it further, click “Effect Options” and play with the features to find something that suits your liking. To remove a transition, select “Transitions” and click “None.”
6. Add animations to your slides (optional).
Like transitions, animations can add movement, reveal information, and help you underscore the points you want to hit during your speech. To animate an element, follow these steps:
Select the element you want animated by clicking on it.
Choose “Animations” from the top ribbon.
You’ll have the option to choose from several effects displayed in the ribbon.
Clicking on one will give you a preview.
To customize the animation, select “Effect Options.”
To remove an animation, click “None” in the ribbon.
Some of the ways to customize animations include:
On Click
With Previous
After Previous
Duration
Delay
These describe how you want the effect to behave, so play around with them until you find an effect that suits your liking.
You’ll also have the option to move animations around as you edit your slides with the “Reorder Animation” function in the top ribbon.
7. Save your presentation.
Click “File” and “Save”, making sure to specify which folder or destination you want your PowerPoint to be stored.
8. Run your presentation.
It’s always good to do a trial run to ensure that your slides are set up properly and your animations fire they way you expect them to.
To present your PowerPoint, go to the “Slide Show” tab and click “Play from Start”. The slide will cover your whole screen, blocking out your desktop and PowerPoint software. This is so your audience (in this case, you for the trial run) is solely focused on the visual elements of your presentation.
9. Advance the slides.
When you’re done with one slide and want to show the next in your sequence, click your mouse in presentation mode. This will advance the slide.
PowerPoint Presentation Tips
Don’t let PowerPoint decide how you use PowerPoint.
Create custom slide sizes.
Edit your slide template design.
Write text with your audience in mind.
Make sure all of your objects are properly aligned.
Use “Format Menus” to better control your objects’ designs.
Take advantage of PowerPoint’s shapes.
Create custom shapes.
Crop images into custom shapes.
Present websites within PowerPoint.
Try Using GIFs.
Keep it simple.
Embed your font files.
Save your slides as JPEGs.
Embed multimedia.
Bring your own hardware.
Use “Presenter View.”
PowerPoint Style
1. Don’t let PowerPoint decide how you use PowerPoint.
Microsoft wanted to provide PowerPoint users with a lot of tools. But this does not mean you should use them all. Here are some key things to look out for:
Make sure that preset PPT themes complement your needs before you adopt them.
Try to get away from using Microsoft Office’s default fonts, Calibri and Cambria. Using these two typefaces can make the presentation seem underwhelming.
Professionals should never use PPT’s action sounds. (Please consider your audience above personal preference).
PowerPoint makes bulleting automatic, but ask yourself: Are bullets actually appropriate for what you need to do? Sometimes they are, but not always.
Recent PPT defaults include a small shadow on all shapes. Remove this shadow if it’s not actually needed. Also, don’t leave shapes in their default blue.
2. Create custom slide sizes.
While you usually can get away with the default slide size for most presentations, you may need to adjust it for larger presentations on weirdly sized displays. If you need to do that, here’s how.
In the top-left corner, choose “File.”
Select “Page Setup.”
Type the height and width of the background you’d like, and click “OK.”
A dialogue box will appear. Click “OK” again.
Your background is resized!
Tip: Resize your slides before you add any objects to them or the dimensions of your objects will become skewed.
3. Edit your slide template design.
Often, it’s much easier to edit your PowerPoint template before you start — this way, you don’t have design each slide by hand. Here’s how you do that.
Select “Themes” in the top navigation.
In the far right, click “Edit Master,” then “Slide Master.”
Make any changes you like, then click “Close Master.” All current and future slides in that presentation will use that template.
4. Write text with your audience in mind.
A significant part of a PowerPoint’s content is text. Great copy can make or break your presentation, so evaluating your written work from a few different angles could make you seem more persuasive. Thinking about how your text is received differentiates good presenters from the best.
Typography:
Many people underestimate the influence of typeface, but choosing the right font is important — the perception of your font type could influence your audience’s impression of you. The right font is an opportunity to convey consistent brand personality and professionalism.
Some fonts are seen as clean and professional, but this doesn’t mean they’re boring. A common mistake is thinking your font isn’t “exciting” enough, which could lead you to choose a font that distracts from your overall message.
Source: Workfront
That said, you can still use fun and eccentric fonts — in moderation. Offsetting a fun font or large letters with something more professional can create an engaging presentation. Above all, be sure you’re consistent so your presentation looks the same throughout each slide, so your audience doesn’t become distracted by too many disparate fonts.

Source: Design Shack
5. Make sure all of your objects are properly aligned.
Having properly aligned objects on your slide is the key to making it look polished and professional. You can manually try to line up your images … but we all know how that typically works out. You’re trying to make sure all of your objects hang out in the middle of your slide, but when you drag them there, it still doesn’t look quite right. Get rid of your guessing game and let PowerPoint work its magic with this trick.
How to align multiple objects:
Select all objects by holding down “Shift” and clicking on all of them.
Select “Arrange” in the top options bar, then choose “Align or Distribute.”
Choose the type of alignment you’d like.
How to align objects to the slide:
Select all objects by holding down “Shift” and clicking on all of them.
Select “Arrange” in the top options bar, then choose “Align or Distribute.”
Select “Align to Slide.”
Select “Arrange” in the top options bar again, then choose “Align or Distribute.”
Choose the type of alignment you’d like.
PowerPoint Design
6. Use “Format Menus” to better control your objects’ designs.
Format menus allow you to do fine adjustments that otherwise seem impossible. To do this, right click on an object and select the “Format” option. Here, you can fine-tune shadows, adjust shape measurements, create reflections, and much more. The menu that will pop up looks like this:
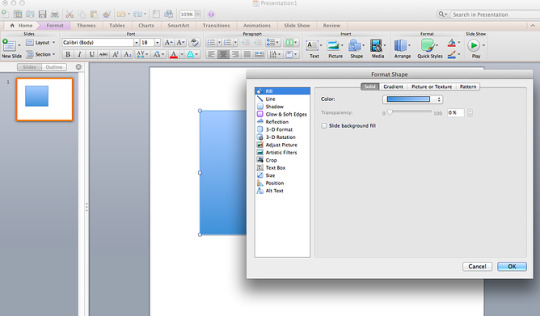
Although the main options can be found on PowerPoint’s format toolbars, look for complete control in the format window menu. Other examples of options available include:
Adjusting text inside a shape.
Creating a natural perspective shadow behind an object.
Recoloring photos manually and with automatic options.
7. Take advantage of PowerPoint’s shapes.
Many users don’t realize how flexible PowerPoint’s shape tools have become. In combination with the expanded format options released by Microsoft in 2010, the potential for good design with shapes is readily available. PowerPoint provides the user with a bunch of great shape options beyond the traditional rectangle, oval, and rounded rectangle patterns, unlike even professional design programs like Adobe Creative Suite or Quark.
Today’s shapes include a highly functional Smart Shapes function, which enables you to create diagrams and flow charts in no time. These tools are especially valuable when you consider that PowerPoint is a visual medium. Paragraphing and bullet lists are boring — you can use shapes to help express your message more clearly.
8. Create custom shapes.
When you create a shape, right click and press “Edit Points.” By editing points, you can create custom shapes that fit your specific need. For instance, you can reshape arrows to fit the dimensions you like.
Another option is to combine two shapes together. When selecting two shapes, right-click and go to the “Grouping” sub-menu to see a variety of options.
Combine creates a custom shape that has overlapping portions of the two previous shapes cut out.
Union makes one completely merged shape.
Intersect builds a shape of only the overlapping sections of the two previous shapes.
Subtract cuts out the overlapping portion of one shape from the other.
By using these tools rather than trying to edit points precisely, you can create accurately measured custom shapes.
9. Crop images into custom shapes.
Besides creating custom shapes in your presentation, you can also use PowerPoint to crop existing images into new shapes. Here’s how you do that:
Click on the image and select “Format” in the options bar.
Choose “Crop,” then “Mask to Shape,” and then choose your desired shape. Ta-da! Custom-shaped photos.
Learn more about creating images for your marketing channels in the video below.
youtube
10. Present websites within PowerPoint.
Tradition says that if you want to show a website in a PowerPoint, you should just create link to the page and prompt a browser to open. For PC users, there’s a better option.
Third party software that integrates fully into PowerPoint’s developer tab can be used to embed a website directly into your PowerPoint using a normal HTML iframe. One of the best tools is LiveWeb, a third-party software developed independently.
By using LiveWeb, you don’t have to interrupt your PowerPoint, and your presentation will remain fluid and natural. Whether you embed a whole webpage or just a YouTube video, this can be a high-quality third party improvement.
Unfortunately, Mac users don’t have a similar option. Agood second choice is to take screen shots of the website, link in through a browser, or embed media (such as a YouTube video) by downloading it directly to your computer.
11. Try Using GIFs.
GIFs are looped animated images used to communicate a mood, idea, information, and much more. Users add GIFs to Powerpoints to be funny or quickly demo a process. It’s easy to add GIFs to your slides. To do so, simply follow these steps:
Download and save the GIF you want.
Go to the slide you want the GIF on.
Go to the “Home” tab, and click either “Insert” or “Picture”.
From the “Picture” drop-down menu, choose “Picture from File”.
Navigate to where you saved your GIF and select it. Then, choose “Insert”.
To play the animated GIF, click the “Slide Show” tab and then “Play from Current Slide”.
PowerPoint Process
12. Keep it simple.
PowerPoint is an excellent tool to support your presentation with visual information, graphics, and supplemental points. This means that your powerpoint should not be your entire presentation. Your slides — no matter how creative and beautiful — shouldn’t be the star of the show. Keep your text and images clear and concise, using them only to supplement your message and authority.
If your slides have dense and cluttered information, it will both distract your audience and make it much more likely that you will lose their attention. Nothing in your slides should be superfluous! Keep your presentation persuasive by keeping it clean. There are a few ways to do this:
Limit bullet points and text.
Avoid paragraphs and long quotes.
Maintain “white space” or “negative space”.
Keep percentages, graphs, and data super basic.
13. Embed your font files.
One constant problem presenters have with PowerPoint is that fonts seem to change when presenters move from one computer to another. In reality, the fonts are not changing — the presentation computer just doesn’t have the same font files installed. If you’re using a PC and presenting on a PC, then there is a smooth work around for this issue. (When you involve Mac systems, the solution is a bit rougher. See Tip #11.)
Here’s the trick: When you save your PowerPoint file (only on a PC), you should click Save Options in the “Save As …” dialog window. Then, select the “Embed TrueType fonts” check box and press “OK.” Now, your presentation will keep the font file and your fonts will not change when you move computers (unless you give your presentation on a Mac).
14. Save your slides as JPEGs.
In PowerPoint for Mac 2011, there is no option to embed fonts within the presentation. So unless you use ubiquitous typefaces like Arial or Tahoma, your PPT is likely going to encounter font changeson different computers.
The most certain way of avoiding this is by saving your final presentation as JPEGs, and then inserting these JPEGs onto your slides. On a Mac, users can easily drag and drop the JPEGs into PPT with fast load time. If you do not use actions in your presentation, then this option works especially well.
If you want your presentation to appear “animated,” you’ll need to do a little tinkering. All you need to do is save JPEGs of each “frame” of the animation. Then, in your final presentation, you’ll just display those JPEGs in the order you’d like the animation to appear. While you’ll technically have several new slides in place of one original one, your audience won’t know the difference.
An important consideration: If your PPT includes a lot of JPEGs, then the file size will increase.
15. Embed multimedia.
PowerPoint allows you to either link to video/audio files externally or to embed the media directly in your presentation. You should embed these files if you can, but if you use a Mac, you cannot actually embed the video (see note below). For PCs, two great reasons for embedding are:
Embedding allows you to play media directly in your presentation. It will look much more professional than switching between windows.
Embedding also means that the file stays within the PowerPoint presentation, so it should play normally without extra work (except on a Mac).
Note: Mac OS users of PowerPoint should be extra careful about using multimedia files.
If you use PowerPoint for Mac, then you will always need to bring the video and/or audio file with you in the same folder as the PowerPoint presentation. It’s best to only insert video or audio files once the presentation and the containing folder have been saved on a portable drive in their permanent folder. Also, if the presentation will be played on a Windows computer, then Mac users need to make sure their multimedia files are in WMV format. This tip gets a bit complicated, so if you want to use PowerPoint effectively, consider using the same operating system for designing andpresenting, no matter what.
16. Bring your own hardware.
Between operating systems, PowerPoint is still a bit jumpy. Even between differing PPT versions, things can change. One way to fix these problems is to make sure that you have the right hardware — so just bring along your own laptop when you’re presenting.
17. Use “Presenter View.”
In most presentation situations, there will be both a presenter’s screen and the main projected display for your presentation. PowerPoint has a great tool called Presenter View, which can be found in the “Slide Show” tab of PowerPoint 2010 (or 2011 for Mac). Included in the Presenter View is an area for notes, a timer/clock, and a presentation display.

For many presenters, this tool can help unify their spoken presentation and their visual aid. You never want to make the PowerPoint seem like a stack of notes that you use a crutch. Use the Presenter View option to help create a more natural presentation.
Pro Tip: At the start of the presentation, you should also hit CTRL + H to make the cursor disappear. Hitting the “A” key will bring it back if you need it!
With style, design, and presentation processes under your belt, you can do a lot more with PowerPoint than just presentations for your clients. PowerPoint and similar slide applications are flexible tools that should not be forgotten. With a great template, you can be on your way to creating presentations that wow your audience.
Editor’s note: This post was originally published in August 2019 and has been updated for comprehensiveness.
Source link
0 notes
Text
Throne of Night Theory Builds Extras Part 2: The Aquatic Drow and Companion
This build come about by pure coincidence. I had been searching around for more art by Michael and then I came across this. At the time it never dawned on me that it was without the Fire Mountain Games on it. All I saw that Michael’s name and website attached. As such, this is an extra build that wasn’t part of the “Throne of Night” AP. At least, it doesn’t appear to be. That didn’t stop me from coming up with a build though.
I honestly have no idea what this art was originally meant to go with. The site I found it on has since closed, but thankfully I found the art before it disappeared completely and was able to save it to my Pinterest folder so I could use it at a later date.
If anyone knows, please tell me the origin of this picture/what its intended use was. It’s really cool to look at.
After looking over the build, be sure to read my final words regarding how things may or may not go after this and “Throne of Night” in the future.
I will say that I do have one more planned entry for the “Throne of Night” AP, but it’s not regarding a build or anything like that. It’s something I’ve been putting together with other game designers and a few players. It was something far too big for me, so I invited others I trusted the opinions of. I’m not sure how long it’ll take before I do that particular post though. We’ve already been working on it for a week, and it hasn’t seen much conclusion so far.
As always, for space reasons, I’ll be cropping the encounter build.
All images shared here were done by the forever fantastic and amazingly talented Michael D. Clarke, aka SpiralMagus
I do not have a Patreon or a Kickstarter, but I do have a Ko-Fi page (linked) for those who are looking to support me monetarily. There is no pressure or obligation to do so.
Finally, before I get to it, I hope everyone’s staying safe right now.
When I found this picture, I had just started up the builds for Book 5, when the PCs were traveling the Sunless Seas, and I absolutely thought this was someone who would aid the party in discovering what happened to all the kidnap victims, and not a random picture that was meant to be used for something else entirely separate from this AP. Well, for the purposes of this build, that’s its new intended designation.
The best part is because this build is completely extra, that means it’s entirely for fun and doesn’t need to conform to the OGL rules that the others would have to. To publish sources outside the official company, you need special permission to use non OGL material, or reproduce everything in its entirety. For example, a feat that’s not OGL would need to be placed in a side bar on the same page, a nearby page, or at the back of the book. In my experience, when I first started, I unfortunately put a publisher or two in that predicament without realizing. I’ve since been told what consequences my actions have had with their books. It’s not necessarily a problem, but it does add unnecessary word counts to books that tight printing guidelines, so I knew there’s no way Gary would put himself in the position. But this? All bets are off, and it was fun to colour outside the lines, even if just a little.
I will say that had I not figured out that this wasn’t AP related, I had honestly considered doing a summoner build with the eidolon looking like a variant version of the hippocampus. Why? Because the drow had read up on them, they seemed cool, and she really wanted one. Instead, we get a druid and her actual hippocampus. I’m surprisingly happy about this change.
Despite this being a Book 5 build, she’s only a CR 15. The PCs are supposed to be level 14-16 during this time, and I didn’t want to make her so powerful that she’d be capable of possibly soloing encounters on the PC’s behalf. I mean, she is a controller type build with lots of summoning potential, and doesn’t really involved with fights personally, although she’s still capable in her wild shape.
Unlike the gug slave, who is meant to fight the party first, then be won over and unleashed upon its slavers, this drow is meant to be an ally right out of the gate. An ally that might be willing to share her discovery of a secret area that might just eventually lead to the sealed doors of the trapped demigod lich.
Slight tangent: Book 7 was going to be an “extra adventure” that was unlocked in the Kickstarter, where you discovered the demigod lich and apparently gained his phylactery and became a lich as well? Maybe stole the lichdom? I honestly wish I could say that anything regarding that encounter or discovery of location is mentioned anywhere, but sadly it’s not. At least not that I ever found. Just art for the phylactery, the lich, and the lich disintegrating? Losing power? You can see more of that in my Phylactery Guardian build. What was seen, however, was when Gary released the “world map”, there’s a spot all unto itself called the Hidden Sea. It’s my belief that that’s where the lich resides. Sadly, with the Fire Mountain Games site gone, so it the map. Thankfully, a much smaller, resized one was put up on /tg/, renamed “Underground Seas map.“
As for this drow’s story, she’s just a drow that loved the Sunless Seas, and felt drawn to it, and wanted to explore it during her younger years. A few years ago, she discovered a wounded hippocampus that had somehow been swallowed up by the above waters and dragged down the underground seas. She saved it, nursed it back to health, and they’ve been inseparable ever since.
QUILDAN BAENERVS (CR 15; 51,200 XP)
Female drow aquatic druid 16
CN Medium humanoid (aquatic, elf)
Init +2; Senses darkvision 120 ft.; Perception +8
DEFENSE
AC 18, touch 13, flat-footed 16 (+4 armor, +1 deflection, +2 Dex, +1 shield)
hp 111 (16d8+32)
Fort +13, Ref +10, Will +18; +2 vs. enchantments
Defensive Abilities deep diver, resist ocean’s fury +4; DR 8/slashing or piercing; Immune sleep; SR 21
Weaknesses light blindness
OFFENSE
Speed 30 ft., swim 30 ft.
Melee +1 shortpear +15 (1d6+3/x3)
Ranged mwk light underwater crossbow +15 (1d8/19–20) or
+1 shortpear +15 (1d6+3/x3)
Special Attacks wild shape (level –2) 7/day
Druid Spells Prepared (CL 16th; concentration +22)
8th—earthquake, word of recall
7th—animate plants, heal, mass cure moderate wounds
6th—antilife shell, greater dispel magic, mass bear’s endurance, mass bull’s strength
5th—animal growth, blessing of the salamander, cure critical wounds, death ward, raise animal companion
4th—atavism, echolocation, freedom of movement, rusting grasp, thorn body
3rd—cure moderate wounds, greater longstrider, thorny entanglement (R-DC 19), water breathing (already cast on companion), wind wall
2nd—aquatic cavalry, barkskin, beast speak, resist energy, tar ball
1st—blend, bristle, goodberry, heightened awareness, speak with animals, wave shield
0 (at will)—detect magic, guidance, mending, read magic
Spell-like Abilities (CL 16th; concentration +18)
Constant—endure elements (cold only)
1/day—dancing lights, darkness, faerie fire
STATISTICS
Str 14, Dex 14, Con 12, Int 8, Wis 22, Cha 14
Base Atk +12; CMB +14; CMD 27
Feats Augment Summoning, Divine Interference, Evolved Companion (cold resistance), Monstrous Mount, Monstrous Mount Mastery, Mounted Combat, Natural Spell, Spell Focus (conjuration)
Skills Handle Animal +15, Heal +13, Knowledge (geography) +8, Knowledge (nature) +10, Perception +17, Ride +14 (+16 to stay in the saddle), Spellcraft +6, Survival +14, Swim +14; Racial Modifiers +2 Perception, +8 Swim
Languages Druidic, Elven, Undercommon
SQ aquatic adaptation +8, amphibious, poison use, nature bond (companion), nature sense, natural swimmer, timeless body, wild empathy (aquatic or water subtype only) +10
Combat Gear lesser extend metamagic rod, wand of air bubble (5 charges), wand of cure light wounds (39 charges); Other Gear +1 wild studded leather, darkwood buckler, +1 short spear, masterwork light underwater crossbow with 20 bolts, mithral dagger, belt of incredible dexterity +2, cloak of resistance +2, headband of inspired wisdom +4, ring of protection +1, aegis of recovery, assisting gloves, elixir of vision, polymorphic pouch, spell component pouch, diamond (worth 5,000 gp), 236 gp
SPECIAL ABILITIES
Aquatic Wild Empathy (Ex) An aquatic druid’s wild empathy functions only on creatures that have a swim speed or the aquatic or water subtype; however, she can improve the attitude of any such creature with Intelligence 2 or less regardless of type, including mindless creatures.
Deep Diver (Ex) An aquatic druid gains DR/slashing or piercing equal to 1/2 her level. This damage reduction also applies against spells and spell-like abilities that inflict damage by grappling or crushing (e.g., black tentacles, crushing hand). She never takes pressure damage from deep water.
Poison Use (Ex) Drow are skilled in the use of poison and never risk accidentally poisoning themselves. Drow favor an insidious toxin that causes its victims to lapse into unconsciousness—this poison allows drow to capture slaves with great ease.
Drow Poison—injury; save Fortitude DC 13; frequency 1/minute for 2 minutes; initial effect unconsciousness for 1 minute; secondary effect unconsciousness for 2d4 hours; cure 1 save.
Resist Ocean’s Fury (Ex) An aquatic druid gains a +4 bonus on saving throws against spells of the water type or the exceptional or supernatural abilities of creatures with the aquatic or water subtype.
--drow’s name means “sea strider, blessed of the depths”
--companion’s name means “water ally”
BRIZABBAN (CR —; — XP)
Female hippocampus
N Large animal (aquatic)
Init +4; Senses darkvision 60 ft., low-light vision, scent; Perception +12
DEFENSE
AC 32, touch 14, flat-footed 28 (+4 armor, +1 deflection, +4 Dex, +14 natural, –1 size)
hp 97 (13d8+39)
Fort +12, Ref +13, Will +9; +4 vs. enchantments
Defensive Abilities devotion, evasion, improved evasion; Resist cold 15
OFFENSE
Speed 5 ft., swim 80 ft.
Space 10 ft.; Reach 5 ft.
Melee 2 bites +17/+12 (1d6+8), tail slap +11 (1d4+4)
STATISTICS
Str 24, Dex 18, Con 16, Int 3, Wis 14, Cha 11
Base Atk +9; CMB +17; CMD 32
Feats Blind-Fight, Combat Reflexes, Bodyguard, Endurance, Iron Will, Weapon Focus (bite)
Skills Acrobatics +12, Perception +12, Stealth +4, Swim +15; Racial Modifiers +8 Swim
Languages understands Undercommon
SQ link, share spells, water dependency
Tricks attack, come, defend, down, fetch, guard, heel, perform, seek, stay, track
Gear +1 studded leather barding, amulet of mighty fists +1, cloak of resistance +1, headband of inspired wisdom +2, ring of protection +1, beast bond brand, bit and briddle, exotic military saddle
SPECIAL ABILITIES
Water Dependency (Ex) A hippocampus can survive out of the water for 1 minute per point of Constitution. Beyond this limit, a hippocampus runs the risk of suffocation, as if it were drowning.
--------------------------------------------
And this concludes the planned builds for Throne of Night. Anything else would honestly be just the monster stats as they are, or something with a Simple Class Template, or the Simple Advanced Template. Sadly, it’s as easy as that. At least from what I can see.
If I do any other builds, it’ll be because I had some kind of epiphany and was asked/paid to do them.
Thank you for coming with me on this journey to theory build what may have been an amazing, award-winning, underground adventure path for Pathfinder 1e.
#throne of night#michael clarke#Michael D. Clarke#SpiralMagus#gary mcbride#drow campaign#drow#dwarf#dwarf campaign#pathfinder#adventure path#pathfinder 1e#pathfinder rpg#dnd#D&D#dungeons & dragons#Dungeons and Dragons#pathfinder roleplaying game#roleplaying game#ttrpg#ttrpg art#deviantart#deviant art#kickstarter#fire mountain games#d20#dark elf#underdark#underdark campaign
0 notes
Text
GIF Manipping Tutorial
I couldn’t really think of anything to do when I passed a follower milestone, so, belatedly--and because @dreamofspring suggest-requested it--I’m going to write up a tutorial on gif manipping/merging/whatever you want to call it/the process I use to make gifs like the ones below.


Some notes before we begin:
I use Photoshop CS 6 on a Macbook Pro.
I use @patchface‘s gif making process by and large, with some additional tweaking. I’m pretty attached to using smart objects in the gif making process so this tutorial relies on that, rather than keeping frames in a timeline form. I won’t be explaining how to make gifs. @patchface‘s tutorial is pretty solid, and there are plenty of others out there if you want to dip your feet if you search around Tumblr.
I’m also going to be using Layer Masks, but not explaining how they work so much as why I use them. Here’s a tutorial that explains them, and I’ll link it again below when relevant.
Thanks to the members of the creatorsresourcenetwork for looking this over before I posted!
I. General Process
Since the reason for this is because Sarah asked, I’m going to show my process for making the last of the four gifs above--Jon & Drogon on the Wall.
1) Select your clips. This is challenging and things don’t always fit easily. The number of times I’ve had an idea, set out to make it work and then given up is very very high.
If you want, you can work with individual caps first before making your gifs. I don’t usually do that but if I’m feeling particularly frustrated I do.
Here is what I came up with for Jon (in S1) & Drogon (in Meereen) respectively

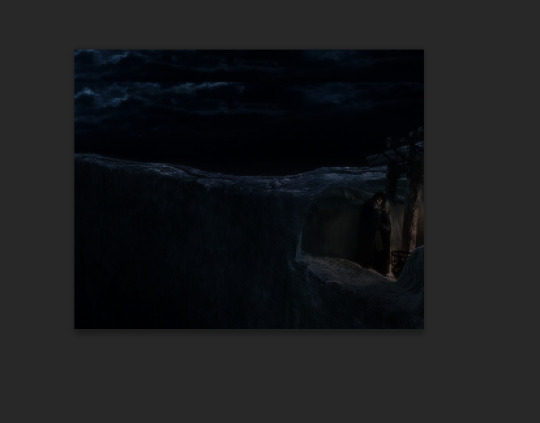
2) Crop, Make & Sharpen your gifs in two separate photoshop files.
3) Here’s where the fun begins. Depending on how you make your gifs you should put them in a folder (if you do a copy & gaussian blur technique).
Pick the gif of the two gifs you want to be your “home base” gif and drag the other one into that base gif’s canvas. Photoshop lets you have two canvases side-by-side (this is something I find useful generally for gifsets since you can see colors side-by-side before saving and exporting for tumblr). You click on the file name section

and drag it down or to the side. When you hit the edge of the photoshop window--before your tools begin or your timeline--it should highlight. Release the file and you should now see both files side by side and you can easily click and drag files from the layer section of one canvas
on top of the other canvas, which will add it to the second canvas’ layer section.
Doing so should maintain the size of the gif, based on how you cropped it, but the cropping won’t be maintained. But that’s ok-- you can click-drag the gif around on the canvas until you get it to line up the way you want it to:
I dragged Jon a little bit to make room for Drogon on top of the wall, which mean there was a gap in the top of the gif:
I duplicated the Jon gif and moved the bottom of the two gifs up to have some sky consistency. It made a texture in the upper-right corner in the final gif that, six months later, I’m annoyed at, but that’s what I did and you live and you learn.
4) Layer Mask time! As I said above, I won’t necessarily be explaining how to use layer masks, but you can read about that here. Layer masks aren’t just great for this way of manipulating gifs but also wonderful for coloring since it lets you “hide” part of your layer. In coloring that means that you can really make some colors vibrant, or dark, or desaturated, or whatever you’re going for. For this, it means you can work on blending the two gifs together.
I applied some layer masks to both gifs/gif folders to make it a little smoother. This was an initial stage--a way to get it rolling before coloring so I could see vaguely what I was aiming for. I definitely went back in after I colored and did some cleaning up:
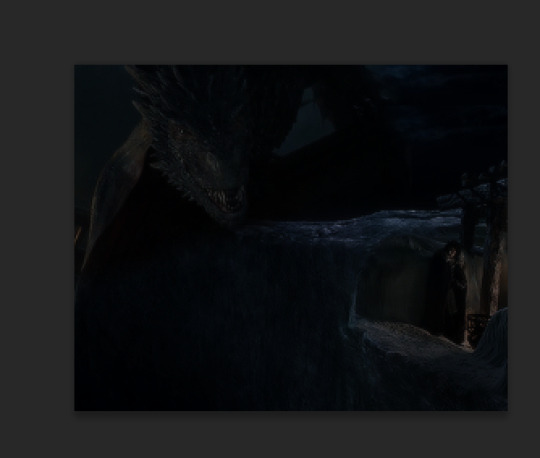
5) Coloring time! This isn’t a coloring tutorial so I won’t go into the details of how I colored. Here’s a solid list of the psds I use most frequently (though some have been taken down unfortunately!) As I mentioned above, I definitely went back in and played more with the layer masks after I’d done my coloring to make sure that things looked as good as I could make them.
I ended up with this gif from there:

II. Some Tips
Some general tips I’ve found that are helpful for gif manipping:
1) Layer Masks--this is a personal taste thing: I tend to use a very low hardness % when I’m using my brush on layer masks. This tends to be because I want to allow for movement since it’s rare that gifs are perfectly static--it lets things fade in and out imperfectly rather than having something choppy and jarring. It’s really hard to make something line up perfectly and I tend not to aim for perfection so much as my own level of “good enough,” which tends to get more precise each time I do this. Coloring can really help ease the transition between gifs. The seams between gifs also look the smoothest in dark sections (in the above, the darkness of the wall and the night helps hide a good amount of the seam) but that’s not always possible.
2) It helps a lot to pic footage where characters don’t move a lot. It makes it easier to paint your layer mask without accidentally cutting out part of a face or something. If you do end up picking something with a lot of movement, you may want to use a frame-by-frame technique rather than this one which relies heavily on smart objects.
There are some fantastic manips out there that I think are done in frame by frame animation form. For this you’d have a layer mask on each individual frame hiding the parts of the gif you don’t want to include in the final manipulation. I choose to manip the smart object rather than the frame by frame because I think it looks smoother. That’s a personal preference thing--it’s also a...laziness thing. It’s definitely easier to manip one smart object than to go through each frame and try and make it look smooth. When I was first trying to manip gifs (which would have been two years ago at this point lorddddd) I tried the timeline thing and this was what I was able to pull off:
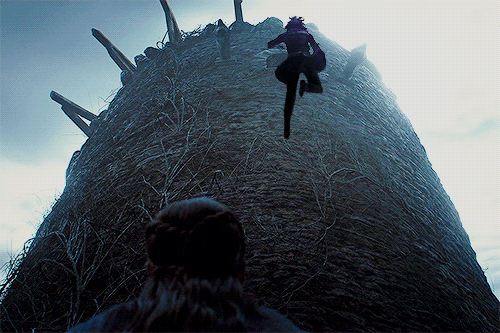
For a gif like this, I think the only way to have done it was frame by frame (since Bran’s falling from the tower and the tower is shifting underneath him and the perspective of the video is shifting) but it was very painstaking to the point of not being fun for me and I want to enjoy myself when photoshopping or else I wouldn’t do it.
3) As with any gifset for which you want the color scheme to look cohesive, it helps tremendously to work with gifs whose scenes have the same general coloring. That doesn’t mean you have to, obviously. I’ve done a lot of manipping of Jon & Daenerys together. Jon tends to be filmed in cooler scenes (since he’s in the North) while Dany’s tend to be warmer in Essos.
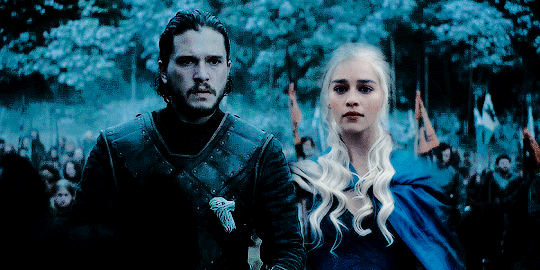
Dany is lighter than Jon in this gif, and there is more of a yellow hue to her, even beneath the cooling filters and color adjustments I put there. And while I still think it looks good (obviously, or else I wouldn’t have posted it), I think it’s less of a smooth manip than this one:

where the coloring of Dany’s scene is originally much cooler and wintery. Having the same baseline color saves a lot of energy in terms of coloring.
4) You don’t have to crop the gifs to the same size. This took me a while to realize. I was worried about preserving image quality, but I realized that frequently it’s manageable and so gifs like this
where Sansa and Bran seem to both be sitting at the same table even though in their original clips they’re taking up different amounts of space on the screen are possible. If I’m trying to get something right, I’ll sometimes save the actual gif making process until I’ve worked two caps together to the right proportions. Or I’ll go back and undo a resize in the revision history.
5) If you really want to get courageous with your coloring, you can change the blend mode on one of your gifs. I....don’t do this a lot, but one of my all time favorite gifs that I’ve ever made entailed this so I can’t say don’t ever do it ever:

I was an idiot and didn’t save this psd so I don’t remember how I did it :sigh: oh well, but it’s why the whisps of her hair are whispy.
274 notes
·
View notes
Text
ICON TUTORIAL - for beginners.
This is an easy tutorial for beginner icon makers (extremely picture heavy, an image for every step with explicit steps!) A very similar tutorial which was what taught me how to do this (with slight tweaks you will find along the way) is HERE and all credit to the darling Cassie for creating this, honestly what a life changer! (this is just a really picture heavy version of it with some weird arrows for beginners!!)
Before we start this tutorial, things you will need to have:
A version of PS, I have PS6 but I think this should be similar to any version that has the timeline option
A timeline
The screencaps you want to icon in one folder (I would rec putting this folder on your desktop for ease of access!) I would also recommend splitting your screencaps either by lighting (eg extremely dark and need to use a different psd) or by location in the caps (eg, right, left, centre etc)
A psd you want to use!
Knowledge of how to load an action into photoshop (I don’t actually go into it in this tutorial!)
A sharpening action which has been loaded into photoshop.
I’ll be using THIS action which is not mine but works spectacularly; Action 2 from this pack in particular
The end result is something like this with minimum amount of effort but the large amount of icons you need for roleplaying your favourite fc’s! Please LIKE/REBLOG if this was helpful :)
Step 1 - open timeline - it is located in the Windows tab and can be seen below.
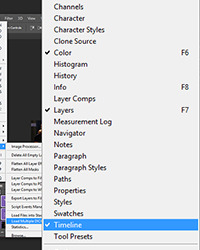
Step 2 - open your screencaps. I suggest grouping them either by lighting or by the location on the caps, I’m going to be doing my ‘left’ ones on this tutorial because the lighting is fairly similar/the psd I have created works for the scenes. Go to File>Scripts>Load Multiple DICOM Files.
Step 3 - find your caps - I suggest putting them on your desktop for ease of access, you can see I have found mine. Then press the folder (if you need a subfolder it is easier to press the little arrow on the left hand side of the folder name and it should bring up all subfolders!) So below the folder I have them in is Caitlins and the subfolder (which I will be iconning) is ‘left’.
This isn’t a step but find your bearings. OK so especially if this is your first time making icons in this way, I feel the need to show you around and not have you going around blindly - so, below I have labelled the things I am going to be using. The sharpen has been linked above and will be on your actions tab, your psd I will not be sharing with you but there are soo many psd’s out there that you can download, or even create yourself (if ever you need a psd I am willing to create one for a particular scene/show etc just give me a message!)
Step 4 - open your timeline by pressing the “Create your timeline” button in the centre of the timeline box!
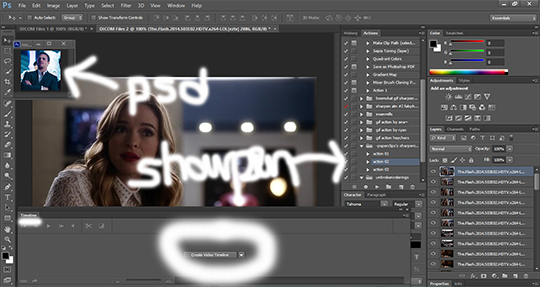
Step 5 - when you’ve created your timeline it should come up with those purple looking lines - that is not what we want right now, so press the little three dots at the bottom left of the screen, it should glow and say “Convert to frame animation”, (even if it doesn’t this is the right button so if it looks right press it!) this will create the version of the timeline we need!
Step 6 - Make frames from layers - you have to go to the top right of the box, this should lead to one of the options saying ”Make frames from layers” or something incredibly similar, press it!

Step 7 - after that, you should get this kind of screen where you can now see all your layers - you need to make sure that ALL THE LAYERS ARE SET TO ‘NO DELAY’ or 0 sec. Also be sure to check that the amount of times it replays is ‘ONCE’ rather than forever because it won’t work, we aren’t trying to gif!!
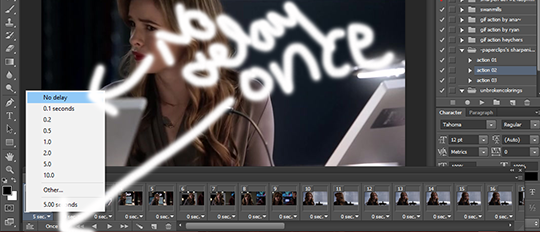
Step 8 - time to CROP. OK so first things first - uncheck the Delete Cropped Pixels, this way if you go wrong (eg accidentally find that there is a logo that gets in the way or after cropping you find you cropped too far on one side) you can go and recrop without tracing back your steps! OK so the crop button (which has been circled on the left-hand side of your screen) should be selected, and then pick the 1x1 option to make them square.
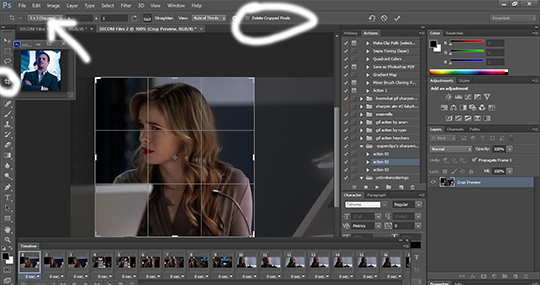
Step 9 - RESIZE - my honest piece of advice, learn the shortcut which is Ctrl+Alt+i, and then press whatever you want to resize it to, I’m doing 100x100 (remember to do it in pixels!)
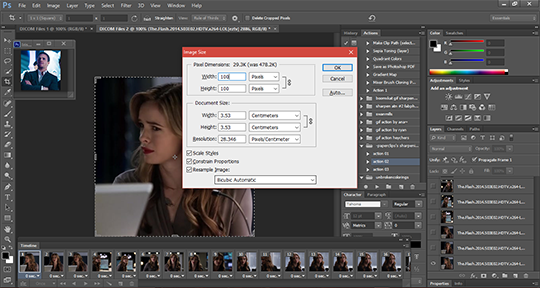
Step 10 - Convert to Video Timeline - OK now we have a little (rip sorry I didn’t realise how illegible this would be when I sized it!) Go to the right hand side of the box again and press the same thing as last time, only this time select “Convert to Video timeline”
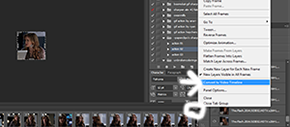
Step 11 - Below is the screen you should get!! OK so don’t worry, this is how it’s meant to look! NOOOW you see the layers on the RIGHT hand side of the screen? Select them, all of them! You need to do this for the next step!
Step 12 - Filter>Convert for Smart Filters

Step 13 - yooo where have my caps gone? Don’t panic! OK so now that they have become one object you can sharpen them all at once! Under the actions tab (where I showed you last time!) make sure it is selected and then press the play button (the little triangle). That will sharpen your icons!

Step 14 - Apply your PSD by dragging the layers (NOT in folders) onto the icons, there are loads of psd’s out there you could use so make sure you use ones that work for your caps! Once you’ve dragged them onto them, they’ll appear as layers as shown by the longer arrow, that means they have been applied. Icons = done. Now all we have to do is get them to be frames again!
Step 15 - Saving your icons. File>Export>Render video

OK so this funky screen comes up when you’re trying to save your icons! Things to watch out for
You need to select your output folder (where all your icons are going to come out in the end!) If you want to create a file just for these icons, you can check the ‘Create New Subfolder’ tab
Make sure that the Format is PNG, you don’t want to save loads of photoshop documents by accident (coughs - like I did - coughs) I’m pretty sure that is the default too so you’ll have to change it to PNG (or jpeg)
All Frames should be picked!
All of that done - Press Render

Go to your output folder and you should find all of your icons! Et voila!

260 notes
·
View notes
Text
Canva Review: The Graphic Design Tool
New Post has been published on https://emarketingshare.com/canva-review-the-graphic-design-tool/
Canva Review: The Graphic Design Tool
What Is Canva?
This Canva overview could be incomplete if I didn’t correctly introduce Canva to you.
Canva is a web-based graphics designing and picture modifying device. This freemium software program has all of the graphic designing options to furnish your wants.
With Canva, you’ll be able to create photographs of any sizes, social media posts & headers, e-mail headers, infographics or actually the rest.
And, since you aren’t a graphics designer, Canva offers you with quite a few pre-built templates to offer you a designing cushion. To not neglect, this may immensely enable you save your time.
How Does Canva Work? – Step By Step Course of
Canva might be probably the most simplistic however extremely environment friendly graphic designing device out there out there.
But a few of us are unaware of its reputation and packaged worth.
So this canva.com overview will educate you about how Canva works.
Step one – Signal Up For An Account
Identical to every other on-line utility, it’s essential to enroll and create an account.
Don’t fear, you don’t have to make use of your bank card. It’s utterly free..!!
Simply head over to the Canva dwelling web page and enroll with Google, Fb or your e-mail tackle.
Ensure that to confirm your e-mail account in order that the Canva crew is aware of that it’s a real account.
Step two – Begin Designing
Nice..!! The Canva overview has proven you learn how to get began and enroll with Canva.
Now, it’s a must to take a step ahead and begin creating your designs.
However earlier than you go any additional, Canva will ask you the explanation for utilizing Canva i.e. for private use, enterprise, training or for a non-profit trigger.
Merely click on the choice that fits your designing necessities and transfer ahead.
Select A Prepared-Made Template
Any Canva app overview could be incomplete if it doesn’t point out or speak about Canva’s most wanted characteristic – ready-made templates and designs.
After selecting who you symbolize and the way do you plan to make use of the software program, Canva showcases some pre-built template classes that can assist you rapidly get began.
A few of these templates embrace pre-built graphics & designs for Instagram posts, Twitter posts, Fb covers & posts, presentation slides, flyers, enterprise logos, and way more than these.
If the choices listed don’t present the required graphics template, you’ll be able to after all seek for it within the given search field.
It’s that straightforward and nonetheless, if you’re unable to search out it, you’ll be able to shut the pop-up and create a brand new design with customized dimensions.
Don’t fear! You’ll be able to simply import the design of any templates in your customized templates too.
However for this Canva overview, I’m going to create a brand new enterprise emblem.
Modifying & Utilizing Canva Drag & Drop Builder
You’ll be able to very effectively establish the precise ease of use of Canva through the use of its drag & drop builder.
However earlier than that, it’s essential to incorporate a design template from its library.
Since we’re making a enterprise emblem, Canva provides a set of ready-made logos and logically categorized them primarily based on their business.
Thoughts you, every emblem class could be additional expanded to discover extra designs.
And, as soon as you discover the best design that you just suppose would be capable of make a great impression then merely click on on it.
The design and all the weather will likely be included into the editor.
After this, it’s as easy a driving a sizzling knife via butter.
Every design component could be additional custom-made and molded to match your model. All it’s a must to do is click on on it and use the toolbar given above for modifying.
There are literally thousands of fonts, vectors, and colours out there to be used in Canva. That too free of charge!
Additionally, Canva autosaves your progress to cut back the burden of manually saving every change and edits.
Step three – Obtain Or Share Your Design
Lastly, whenever you suppose that you’ve created a masterpiece all it’s a must to do is both obtain it or instantly share it over social media.
Together with social media sharing choices, Canva additionally means that you can add it on Google Drive, Microsoft OneDrive, Dropbox, share it through e-mail, and lots of different mediums.
Now, after seeing how straightforward it’s to get began and creat designs with Canva, don’t you suppose that it’ll rating excessive within the “ease of use” division?
If not then enable me to checklist down –
Different Necessary Options Of Canva
Truthfully talking, Canva has a lot to supply that you’ll barely even use all of its options.
And, due to this, the overview of Canva might extraordinarily prolonged, crammed with unrelated content material.
Therefore, I’m itemizing just a few however the essential options of Canva to let you understand how beast of a graphic design device it’s.
1. All In One Social Media Graphics Software
If you happen to begin utilizing Canva, chances are you’ll by no means have to make use of every other on-line graphic design instruments. It furnishes all designing necessities for Fb, Instagram, Twitter, Pinterest, LinkedIn, YouTube and Tumblr.
Listed here are among the snapshots of the social media templates –
Fb –
Instagram –
Twitter –
Social Media Animations –
2. 1000’s Of Free Inventory Photographs
Canva provides a plethora of inventory pictures that you should use in your graphics.
Along with this, there’s an inbuilt picture editor which can be utilized to use filters, crop or alter the distinction of the picture.
3. A number of Design Parts & Shapes
To make your designs stand out among the many competitors, Canva provides tons of design components, shapes, and so on. free of charge.
4. 1000’s Of Fonts & Font Combos
Fonts play a significant position in graphic designs. And, this reality is effectively accepted and adopted by Canva.
There are a number of fonts and font combos out there that may be included in a single click on.
5. Royalty-Free Music & Video Clips
Other than creating visually pleasing graphic designs, Canva additionally lends a serving to hand by providing many royalty-free music and movies.
This might work effectively to your Social Media advert campaigns.
6. Background Pictures, Textures & Colours
Canva by no means forgets to provide you an choice so as to add an interesting background to your designs.
You might add a picture, textures or stable colours as background to your graphics.
Apart from all these superior options, Canva additionally means that you can add your personal photographs, handle your created designs, collaborate together with your crew members and likewise combine with different purposes.
Now, that can assist you see the clearer image, I’m going to checklist down all the benefits and downsides on this Canva overview that I’ve confronted whereas utilizing it.
Is Canva For Free?
Sure, completely..!!
As I’ve mentioned earlier, Canva is a freemium on-line graphic design device. When you get a lot of the essential options free of charge, you could have to pay for superior options.
Since this Canva overview is primarily targeted on the free model, I received’t be exploring the premium model or their pricing plans intimately.
Nevertheless, right here’s a fast rundown of the premium plans of Canva –
Canva Professional – This plan comes at a month-to-month subscription price of $12.95 per crew member. If you happen to go for the annual subscription, the identical plan will cut back to $9.95 per crew member / monthly.
Canva for Enterprise – The enterprise plan comes solely at a single value of $30 per crew member / monthly.
Other than this, in the event you (free person) occur to make use of a premium design component like vectors, photographs, sounds, or the rest, you could have to pay individually for that component.
If not then chances are you’ll not have the permission to obtain the graphic and even share it.
However regardless of this, you could have realized that Canva continues to be securing full marks within the division of “worth for cash”.
Execs & Cons Of Canva (As Per Private Expertise)
Listed here are among the advantages that I’ve exploited out of Canva –
It helped me save lots of time.
Since it’s free, I by no means needed to spend a single penny on graphic design.
The designs created by Canva assist me create a great impression on readers and subscribers.
I get all the things in Canva. Therefore I don’t must depend on different instruments.
Even whereas I used to be a newbie, its tutorials and coaching helped me grasp a greater understanding of designs and colour combos.
Other than graphics, I had created lots of PDFs.
Canva additionally comes as a cell utility for Android and iOS.
Whereas there are uncountable advantages of Canva, I additionally occur to face its drawbacks –
A primary characteristic just like the clear background is accessible in premium plans.
Picture resizer can also be a premium characteristic.
Canva doesn’t work offline.
As you’ll be able to see, the advantages of Canva outweighs its drawbacks.
Canva Evaluate Verdict – Is It Worth Using?
I have been using Canva for Three years now and I can proudly say that I’m glad with its service. It is without doubt one of the greatest running a blog instruments I can advocate you.
Even if you’re not a blogger, Canva will do wonders for you. And, many authors, publishers, eCommerce companies, startups, and different small companies would agree with me.
#Canva Review#Canva Review: The Graphic Design Tool#The Graphic Design#The Graphic Design Tool#Tools
0 notes
Text
America thrived by choking its rivers with dams. Now it’s time to undo the damage.
Dams fueled america’s growth by choking its rivers. Is it time to restore nature’s infrastructure? (Brian Klutch/)
The fish is nearly three feet long, and as it swims unhurriedly past the viewing window in Lower Granite Dam, Theresa Wilson glances up from her knitting. “Chinook,” she says, tapping her computer keyboard once to record its passage. The salmon pauses as if to be admired. Its mottled scales flash as it moves against the current of the Snake River. Then it darts away, bound upstream to the place where it was born.
Salmon and trout are anadromous: They hatch in rivers, spend their lives at sea, then return to their birthplaces to reproduce and die. Here on the Snake in eastern Washington, that means traversing four hydroelectric dams, an arduous undertaking few complete.
The Lower Granite is the last barrier between this chinook and its spawning grounds. It is one of 13 salmon and trout species in the Pacific Northwest that the federal government lists as threatened or endangered. The concrete and steel structure in its way stands 151 feet tall and spans a gorge, its turbines sending froth churning downstream. Clearing the wall requires that a swimmer ascend a spiral structure called a fish ladder to a resting pool, where a viewing portal lets Wilson keep track of them for University of Washington biologists and others monitoring the impact dams have on piscine populations.
According to legend, the Snake brimmed with so many fish when the explorers Lewis and Clark arrived in 1805 that one could walk from bank to bank on their backs. Today the animals pass so rarely that Wilson spends much of her eight-hour shift making socks.
As recently as the middle of the 20th century, nearly 130,000 adult chinook returned to these waters in a single year. Around 10,000 made the journey in 2017, a dip that threatens the health of the river and all it sustains. More than 130 species of insects, birds, fish, and mammals—from bears in the Teton Range to orcas in the Pacific—rely on salmon for food. Even plants and trees benefit, drawing nutrients from their waste and remains.
Across the nation, the scenario repeats. Atlantic sturgeon, once a hallmark of the eastern seaboard, can reach only about half of their historic spawning grounds. Some 40 percent of the 800 or so varieties of freshwater fish in the US, and more than two-thirds of native mussels, are rare or endangered, in part because man-made barriers have altered their ecosystems. Reservoirs disrupt currents, altering water’s velocity and temperature. That can harm its quality and interrupt the reproductive cycles of aquatic creatures. Stanching a river stops the distribution of sediment and the formation of logjams, two things critical to creating healthy habitat. It also eliminates floodplains and natural meanders, both of which prevent the banks from overflowing.
America was shaped by its rivers—more than 250,000 in all—and since Colonial times we have bent them to our will. The Army Corps of Engineers, which oversees dams owned by the federal government, lists more than 90,000 in its national inventory. Tens of thousands more remain unregistered. “Think about that number,” then-Secretary of the Interior Bruce Babbitt told a meeting of the Ecological Society of America in 1998. “That means we have been building, on average, one large dam a day, every single day, since the Declaration of Independence.” The best of them generate power, facilitate navigation, and slake our thirst. But many, perhaps the majority, are no longer essential.
The falling cost of renewable energy and continued decline of manufacturing renders many of these structures unnecessary. Others require expensive maintenance. Seven in 10 are more than 50 years old and many are falling into disrepair, according to the American Society of Civil Engineers, which pegs the cost of upgrading the 17 percent it deems a “high hazard” (meaning a failure could kill people downstream) at $45 billion. Overhauling the rest will cost many times that. In response, a growing number of scientists and environmentalists have called for razing dams that are obsolete or dispensable and letting more rivers—nature’s original infrastructure—once again run free.
Many of those advocates consider the Elwha River 50 miles west of Seattle a model. Salmon and trout had all but vanished before the National Park Service breached two dams there in 2014, reviving the waterway and surrounding wilderness with little effect on power supplies. Restoration champions believe the same will happen on the Snake, where they’ve waged a decades-long fight against the Corps, regional politicians, and farmers who argue that the hydroelectric power it generates remains essential and that knocking the system down might not save the animals.
As pressure mounts to “free the Snake,” the Corps and others are considering similar projects nationwide, a trend that could reshape what Duke University hydrologist Martin Doyle calls “our riverine republic.”
“We’re shifting our priorities, and we’re left with this relic landscape that’s no longer applicable,” he says. “Where that legacy infrastructure gets in the way or causes problems, let’s undo it. The future of 80 percent of dams is very questionable, or should be.”
“The future of 80 percent of dams is very questionable, or should be.” - Hydrologist Martin Doyle (Brian Klutch/)
The snake meanders 937 miles from its headwaters in Yellowstone National Park through Idaho (where it remains one of the most unspoiled aquatic habitats in the West) and into Washington. There, it wends another 141 miles across a region called the Palouse—5 million acres of otherworldly dunes and golden wheat fields—before joining the mighty Columbia River.
Bryan Jones grew up here, near a town called Dusty, on land his great-grandfather settled a century-and-a-half ago. The family has always grown wheat, and their farm now covers 640 acres. In a good year, Jones will harvest 18,000 bushels. Washington is the country’s fourth-largest producer of the crop, which we mostly export.
The Army Corps of Engineers built four hydroelectric dams here on the lower Snake River between 1961 and 1975, deepening and widening the channel to accommodate barges headed to Portland, Oregon. “I think we were sold the promise of this new way to ship our grain, and we thought that was a good thing,” Jones says. For years, boats provided a cheaper alternative to trucks and trains. But the locks at Ice Harbor, Lower Monumental, Little Goose, and Lower Granite dams weren’t the boon many expected, and barging declined as costs rose. Today, less than 3 million tons head downriver each year, a decrease of 26 percent from the industry’s heyday in 2000.
Jones is the rare farmer who favors razing the structures. He can make an economic argument—he believes transport over land makes more financial sense—but at the heart of his opinion lies something simpler: He misses the landscape of his childhood. “All up and down the Snake River there were sandy beaches, and orchards in the riparian area,” he says. “I can remember my grandmother having a table out here in the yard full of boxes and boxes and boxes of peaches. Everything from tomatoes and green beans, and beets and beans. There were melons, alfalfa fields.” He also recalls the abundant wildlife. Much of it is gone now, flooded by the reservoirs between the dams, he says.
So too are most of the fish. All four salmon and steelhead species found in the Snake are classified as threatened or endangered—a trend seen throughout the Pacific Northwest, where the US government manages 31 dams. Their decline prompted President Jimmy Carter to sign a law in 1980 authorizing Idaho, Montana, Oregon, and Washington to develop a plan for saving them. The Bonneville Power Administration, a federal nonprofit that sells electricity generated by the dams, has spent an average of $220 million per year on habitat restoration and hatcheries since 2007. It has also given an average of $77 million annually to the Corps and other agencies, helping finance what Corps spokesman Joe Saxon calls “the world’s most advanced fish passage systems.” Spillway weirs and ladders, both of which resemble water-park slides, help guide the animals over each dam. Workers pump small juveniles, called smolts, out of collection pools and into trucks and barges that carry them downriver. Cooling systems maintain reservoir temperatures to protect the creatures. Saxon says more than 99 percent of adults and 95 to 100 percent of youngsters survive the trip past the structures.
But those numbers reveal only part of the picture. Critics often characterize such claims as “akin to dropping a goldfish from a 100-floor skyscraper, seeing it is still alive at floor 75, and concluding it’s OK,” says Helen Neville, head scientist at the advocacy organization Trout Unlimited. Dams and reservoirs tax migratory fish by altering their route to and from the sea. This is especially hazardous for smolts. Rather than riding a swift, cold current downstream, they spend time and energy navigating the warmer, slower water of a reservoir, where they face greater odds of becoming something’s dinner. Should they escape unscathed, a 2014 study by the US Fish and Wildlife Service found that reaching the ocean takes youngsters an average of two weeks longer than it did before the dams went up. The same analysis shows the added stress kills nearly 1 in 4 migrating fish. Those that live to see the Pacific face threats there too, of course. All told, in recent years, fewer than 1 percent of juveniles that made it to the ocean have returned upstream to spawn. Before the Corps built all that hydroelectric infrastructure, the rate was 6 percent; biologists consider 2 percent sufficient to maintain a sustainable population. “They are truly straddling extinction,” Neville says.
That prompted 55 scientists from throughout the US to sign a letter in October 2019 calling for the demolition of the structures. They base their plea on five federal court rulings since 1994 directing dam and waterway managers to consider additional measures to protect the wildlife and take a closer look at removal. (The Fish Passage Center, funded by Bonneville Power to monitor piscine populations, has said breaching could quadruple the number of salmon returning to spawn.) The agencies involved must complete a court-ordered environmental-impact study—the latest of many—in 2020, but it probably won’t end the debate. Many farmers, fearing a rail monopoly, don’t want to lose the barges, and some regional politicians join the Corps in arguing against doing away with an energy source that, running at full-tilt, could power a city the size of Seattle. Currently, though, the dams provide just 4.3 percent of the region’s power.
Dismantling the structures might be the most cost-effective option. Each of the 24 turbines in the lower Snake system has exceeded its 50-year life span. The Corps signed a $115 million contract in 2016 to install three at Ice Harbor Dam. Meanwhile, the region’s hydropower prices have climbed 30 percent since 2008, making Bonneville Power electricity more expensive than juice from other sources. A 2018 study by the NW Energy Coalition, an alliance of 100 public and private entities, found that solar, wind, and natural-gas generation could provide the same backup reserve, and building the needed infrastructure would add just $2 to customers’ monthly utility bills.
Political will for removal appears to be intensifying. In April 2019, US Rep. Mike Simpson of Idaho called for a serious look at it, and Washington Gov. Jay Inslee signed legislation allocating $750,000 to study how best to assist communities that would be affected by the dams’ elimination.
In addition to the threat posed by dams, anadromous fish face an existential threat from climate change. In 2015, high water temperatures killed 96 percent of the Snake’s returning sockeye salmon. But those who favor breaching the barriers agree that unleashing the river will cool the water, create more spawning habitat, and give the imperiled creatures better odds of survival. And that, they say, can only help the Snake overall. “I hope those dams come down,” Jones says. “I’d love to see it in my lifetime. Every species that can get to the river and catch a fish is going to thrive.”
Mike McHenry’s soggy Belgian Malinois, Ginger, stands at the edge of the Elwha River in western Washington, whining softly. He holds her back from a pool where hundreds, perhaps thousands, of tiny salmon fry shimmer in the sunlight. They are just a few months old, and before long, they will begin their journey to the sea. McHenry releases the dog, and she bounds into the water. The wee fish scatter.
McHenry has spent more than three decades as a biologist and habitat manager with the Lower Elwha Klallam Tribe. Their ancestral land has been radically reshaped since the removal of two hydroelectric dams allowed the river to run unfettered for the first time in more than a century.
The waterway begins in a snowfield high in the Olympic Mountains and flows 45 miles north to the Strait of Juan de Fuca. For millennia, the river ran thick with salmon and trout. As many as 400,000 adult chinook, coho, and other species returned annually to spawn, making it one of the richest anadromous fish habitats in the nation.
That changed in 1910, when the Olympic Power Company erected the Elwha Dam to power timber and pulp mills in nearby Port Angeles. In 1927, it built another, called Glines Canyon, 8 miles upstream of the first. Beyond flooding Klallam religious sites and a verdant floodplain, the structures, which lacked fish passages, reduced spawning grounds to the river’s first 5 miles. Salmon populations plummeted in response. During the 20th century’s waning years, the system produced a negligible amount of electricity—about half the energy requirements of a single local mill—and its owners had decided that making it more fish-friendly was too expensive. In 1992, President George H.W. Bush signed a bill authorizing the Interior Department to buy the dams for $29.5 million, tear them down, and restore the habitat.
The National Park Service spent almost two decades planning the $350 million project. The biggest challenge was managing the immense amount of sediment: Some 33 million tons of silt, gravel, and rock littered the two reservoirs. A free-flowing river moves a lot of earth; letting it all go at once would wreak havoc downstream. Work started in 2008 with construction of a treatment plant to filter the Port Angeles water supply. Beginning in 2011, crews partially drained the lakes and slowly emptied them by dismantling the barriers in 10- to 20-foot sections using a crane and a barge-mounted excavator. The final chunks of concrete and steel fell in 2014.
That done, the Park Service worked with the tribe on the agency’s second-largest habitat-restoration project ever. Biologists, botanists, and volunteers planted tens of thousands of indigenous trees, grasses, and other plants on floodplains denuded by the reservoirs. Salmon and trout ventured upstream within months. Still, officials augmented their meager numbers with animals raised in hatcheries. Although the water remained cloudy for more than two years, the dirt and gravel eventually settled, creating sandbars, beaches, and a vast estuary at the river’s mouth near Port Angeles.
Researchers snorkeling the length of the Elwha in 2018 counted 15,000 steelhead trout, about twice as many as a decade before. Otters have followed the fish upstream. Birds and large fauna like deer and bears, which had dwindled alongside anadromous species, have reappeared in unprecedented numbers. The floodplain, rejuvenated by all that nutrient-rich sediment and new growth, teems with life, and logjams—some created by the river, others by McHenry and his team—provide refuge for smolts. He points out elk droppings among the alder trees, and a salmon carcass hauled ashore by a predator.
Removing the dams inarguably revitalized this riparian zone. Restoring the habitat, McHenry says, did more than save the fish. It also created a natural defense against flooding, opened the river to greater recreational opportunities (federal and tribal officials will consider allowing salmon fishing in 2021), and resurrected woodlands and shorefront. “Damming a river’s about the most egregious thing you can do if you want to mess it up,” he says. “You can argue there are services you get out of that. But at least in this part of the world, and, I guess, in my value system, I think the services a wild river offers way exceed damming it.”
For more than a century after it was dammed, the Elwha met the sea at a rough cobble shoreline. Today the free-running river has created a wide beach of fine, ashy sand dotted with shrubs that provides habitat for shellfish, beavers, shorebirds, and other creatures. None of the computer models the federal government ran before the project predicted this. “About 3.5 million cubic yards of sediment were plopped here,” McHenry says, “and now we have an estuary ecosystem where there wasn’t one before.”
Not only can young fish make the transition from fresh to salt water, the estuary attracted enough Dungeness crab to support a robust fishery. Just offshore, a long line of floats marking the location of traps runs parallel to the beach. The operation provided an unexpected economic boost.
Of the 1,605 dams toppled nationwide since 1912, the two on the Elwha remain the largest, according to the advocacy organization American Rivers. Some 1,200 have come down in 46 states and the District of Columbia in the two decades after the Interior Department’s Babbitt, who led the agency under President Bill Clinton, made river restoration a priority. In 1999, the Edwards Dam in Augusta, Maine, became the first major hydroelectric dam razed by the federal government. The structure, built in 1837 to power bygone grain mills along the Kennebec River, nearly killed off the herring, striped bass, and sturgeon. Today the waterway draws sport fishers, and the city gained a popular riverfront district with a park, pavilion, and kayak and canoe launch.
To keep the momentum going, American Rivers is working with public agencies and private organizations to bring down dozens more dams throughout New England, and restore riparian habitats across the nation. Meanwhile, the Army Corps of Engineers is considering the future of two dams at St. Anthony Falls, where the Mississippi River flows through Minneapolis. Authorities hope to breach four others on the Klamath River in Northern California within the next few years, a move that would reclaim 300 miles of salmon-spawning habitat.
Major projects like that attract a lot of attention, but the cumulative impact of many more-modest removal plans could yield equally profound ecological and economic dividends. “You can get a lot of species recovery and some very diverse ecosystem recovery with much-smaller sledgehammers,” Doyle, the Duke University hydrologist, says. Now that the usefulness of these man-made barriers has run its course, it is time to let the rivers they restrain return to theirs.
This story appears in the Spring 2020, Origins issue of Popular Science.
0 notes
Last Seen Blogs

ihadyournamefirst
Mr Libertine 2.0

deaverypriest
The Herder's Tome

krill-3
Tickety-Boo

silansolar1
Silan Solar