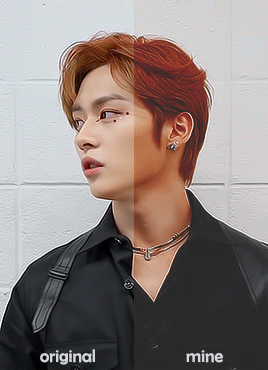
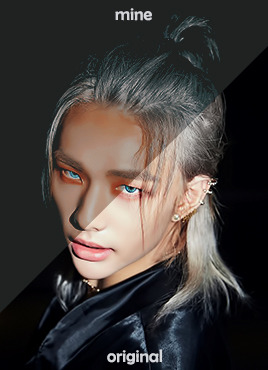
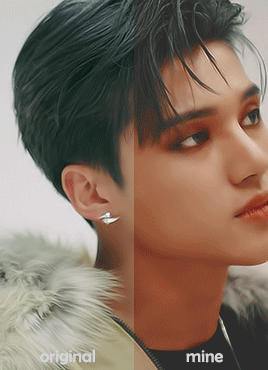
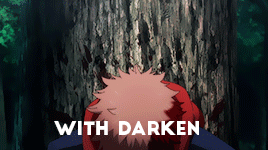
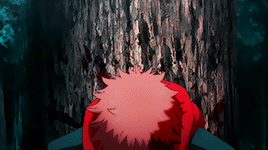
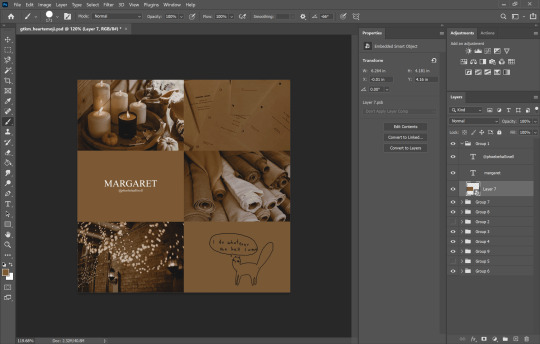
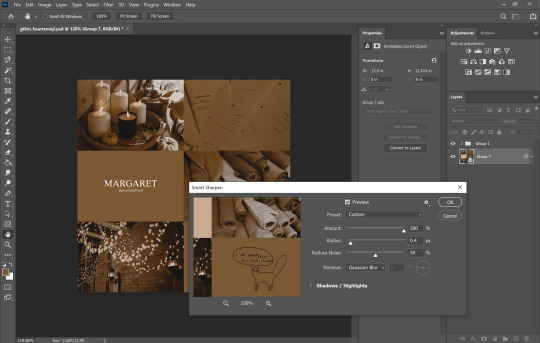
#idk i was just trying out some new psds
Text
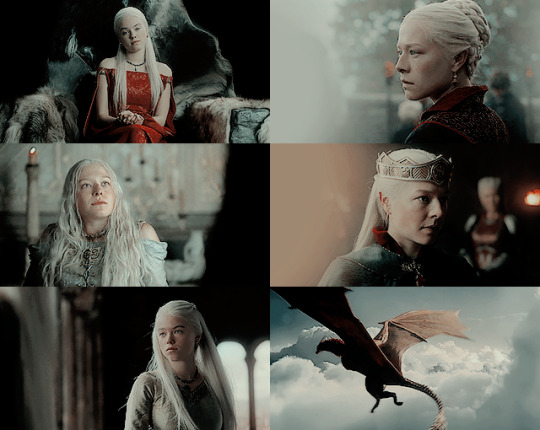
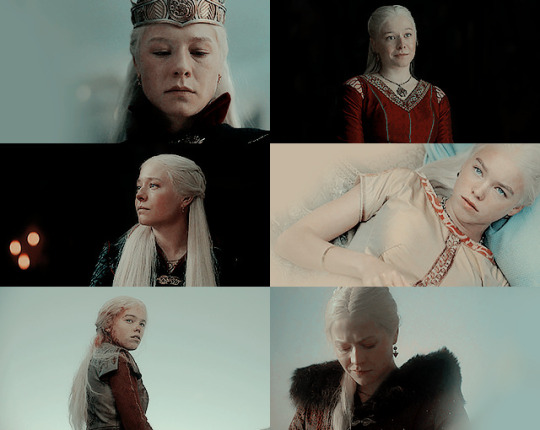
Rhaenyra Targaryen, the Realm’s Delight and Half-Year Queen, passed from this veil of tears upon the twenty-second day of the tenth moon of the 130th year after Aegon’s Conquest. She was thirty-three years of age.
#hotdedit#asoiafedit#gotedit#targaryenedit#targaryensource#asoiafmine#hotdmine#rhaenyra targaryen#idk i was just trying out some new psds#hotd spoilers#i mean the book came out in 2018#but some people are sensitive to spoilers so
144 notes
·
View notes
Note
Hi, I really love your andor gifset from September 28 2022 (idk if I can post a link so... but it's from the first episode) and I was wondering if you could maybe give me some tips on how to make it so clear and vibrant even when the picture is big? I have just started gif-making a few days ago and I definitely want to aspire to make such great gifs.
Hi there!!!! Firstly tysmmm 🥺 i really had a fun time making those big gif andor episode sets i think they all turned out great!
I did make a tutorial a while back mostly focusing on how I sharpen my gifs. My steps mostly the same as they were here except I now export gifs using "adaptive & diffusion"
The Andor gifsets you called out I did use 4K SDR videos. But I don't always think 4K is necessary (especially where r we gunna get them now rip rarbg), 1080p is always preferred and if you're d*wnl*ding / t*rr*nting i would recommend trying to pick the larger file size, for example choosing a movie thats 5GB over 1.5GB.
In my last tutorial I didn't really go into how I colour my gifs but that's where the biggest changes come into place. I don't use a set preset/psd, I colour each gifset uniquely but I do have the same order of steps generally. My order of adjustment layers tends to be: Levels, Curves, Selective Colour, Vibrancy. I also frequently use Channel Mixer and Hue/Saturation when needed. Below the cut I'll share my "starting" settings for some of the adjustments layers but these often change as the gif needs.
I hope this is somewhat helpful!! I think with practice and more gifing you'll find your own style and process. I look back at gifs I made a year ago and think oooof haha what was I doing back then. constant improvements & always finding new tricks♥️ I would also recommend following some gif resources blogs like @usergif or @pscentral they often post really helpful tutorials & tricks to help make your gifmaking the best it can be!
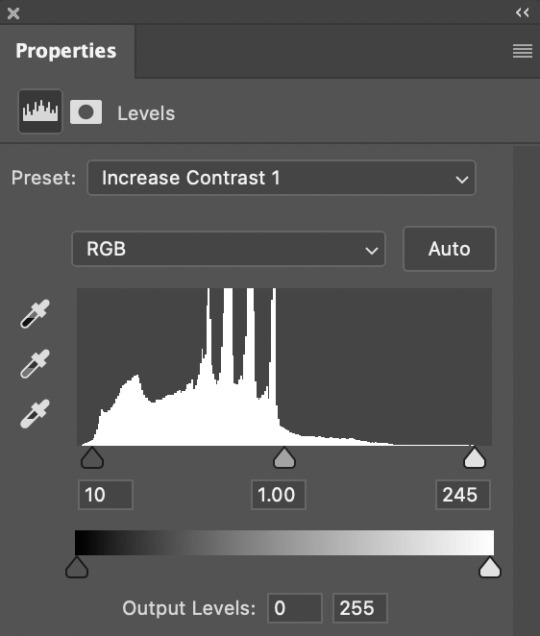
Levels - I tend to start with the default "Increase Contrast 1" or "Increase Contrast 2" depending on how dark the intial scene is. When making aditional adjustments I focus on the end sliders - the dark & light, and barely ever touch the midtones adjustment, if i do use it I go very subtly so 1.05 or 0.95. Our goal in the end is to make the darkest parts of the gif black & the lightest parts almost white.
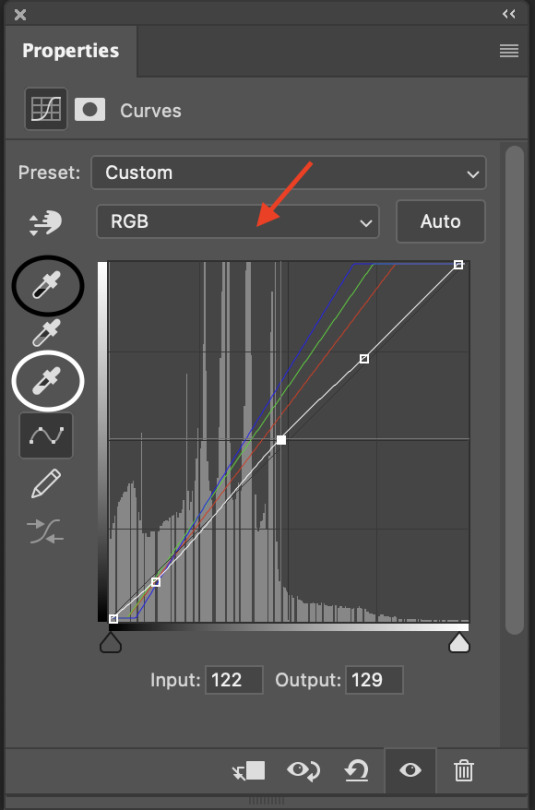
Curves - imo curves makes the biggest adjustment for the gif colouring. shes my best friend! So again I focus on the dark/light eye droppers. I start with the white eyedropper and select something white or the lightest part of the gif, then go to the black eye dropper selecting a very dark portion of the gif. Then in the middle section I adjust the curves line (white line) to meet the needs of the gif for proper contrast / brightness. If needed Ill open the RGB drop down (red arrow) and adjust specific colours. I use the Blue the most as i often see alot of yellow tint in movies (which i hate lol) so ill bring the top end of the blue line closer to the centre of the grid to reduce the yellowness. Sometimes ill make a second curves layer, set the preset to "linear contrast" then adjust the sliders as needed, this often gives additional contrast & brightness.
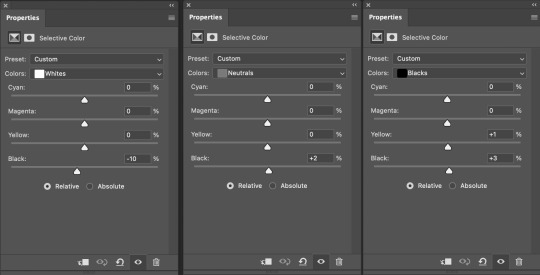
Selective Colour - my second best friend! this is where you can make little adjustments to the hues of the gif, then fine tweak the darkness/brightness in the gif. So below i have my "starting points" in the white, natural & black colours. Often the white ends up being a much lower number (-40 or less) and in the neutrals area i can fine tune the overall hue of the gif - reduce the yellows or increase the reds etc. This tool is alot of playing around with and just seeing what looks good!
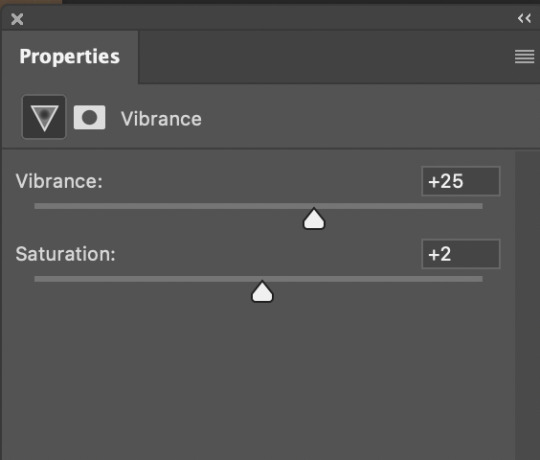
Vibrance - this is normally the last layer ill add. I barely change the settings I tend to go with 20-30 Vibrance and then 2-5 on Saturation. Just gives add extra vibrancy and colour pop. Saturation stays a bit on the lower side as often bringing it makes peoples skin tone too orange/red/yellow etc. But if I want over saturation increase on particular colours I'll make those adjustments with a Hue/Saturation layer.
10 notes
·
View notes
Note
for the emotional anguish meme: abner krill and simon monroe!! <3
thanks emyr!! please imagine me rubbing my hands together with evil glee. ***trigger warning for suicidal ideation, death, and trauma, and spoilers for the suicide squad (2021) and in the flesh.
top 5 ways to wrest anguish from abner krill:
one of those "villain mind powers puts heroes in their worst nightmare scenarios" except the worst nightmare scenario is literally just his childhood in the lab with his mom. grown-up abner screams, cries, curls up into the fetal position to try to block out the noises of his siblings screaming.
on that note, shapeshifting antagonist transforms into abner's mom OR makes his teammates look like his mom and he goes ballistic and just starts melting the people he loves <3 he's so op none of them have a defense against him. max angst!!!
put him back in a lab as an adult. maybe waller or the US government is experimenting on him to recreate the polka-dot disorder or enter the polka-dot dimension. that man is a lab rat, put him back in a cage <3
i saw something like this in a fic once i think ?? but i only read the description so idk what the specifics were. concept: an AU where abner actually teams up with starro in the suicide squad. maybe there's a psychic link there where they can communicate, maybe he's just disposed to be sympathetic towards this other being imprisoned in a cage and experimented on. he participates in the mass murder of corto maltese and also kills his former teammates. this is more about MY emotional anguish, but then also consider: at some point after it's all over, abner gets the chance to look into an alternate world where he didn't go down this path, and sees how he could've found a family with those people he so callously disintegrated. anguish and despair!
a slightly quieter one, but honestly you could have the entire TSS just slightly to the left and end up with a horrible end for abner in any other way: he chooses to run and gets his head blown off by waller, or he stays but is too cowardly to actually fight starro--thus missing out on being a hero. give him an ignoble end, no emotional catharsis, and he abandoned his team when they needed him most.
so to sum up really you can squeeze a lot of angst out of his relationship with his mom and his team because at the center of abner krill is a vast consuming hole of loneliness and self-loathing. yay!
okay, now for simon:
he actually goes through with killing kieren honestly would be number one! he's so torn between loving kieren and needing to hold true to his conviction that the second rising is necessary and good. in the show obviously he chooses kieren because... that's the kind of show it is... but if a few things had happened differently (kieren rejected him, for instance?) things could've been very different.
a riff on the above: he attempts to kill kieren and kieren is able to fight and stop him, but forever after that rejects him. simon's right back where he started, a radical who wants to change the world through fire and brimstone, in the throes of utter loneliness and lacking all sense of self apart from his mission.
look, we all know he murdered his mom while as a zombie, which is angsty enough to begin with. what if he gets force-fed blue oblivion (or better yet, has to take it as a show of loyalty to the prophet?) and goes on another spree and hurts or kills his dad too? lol.
a riff on the above: same scenario with the drug but he ends up hurting/killing someone close to kieren, like his parents. idk i just think the tension between simon's loyalty to the prophet and simon's love for kieren is so delicious.
imho the way the show uses blue oblivion didn't reach its full potential, as it seemed to crop up as something the PSD sufferers don't really want to do unless they already have a desire to hurt humans (or at least no qualms about it); i would've liked to see a new version of blue oblivion released that is actually so addictive to them that simon starts using as in small doses a coping mechanism, but he always locks himself up so he doesn't harm people. of course this goes sideways and he ends up harming people and blaming himself.
........so to sum up really you can squeeze a lot of angst out of his relationship with his parents and loyalty to the prophet and/or kieren because at the center of simon monroe is also a vast consuming hole of loneliness and self-loathing. yay?
4 notes
·
View notes
Text
get to know me meme
TAG NINE PEOPLE YOU’D LIKE TO KNOW BETTER!

1. favorite colors: raspberry pink & teal!! yes like reas psd lmao
2. favorite flavors: uhhhhhhhh. unsure!! standouts for individual flavors would be deep fried batter, butter, garlic, and sweets!!!
3. favorite genres: horror (esp movies), romance, fantasy, and action/adventure
4. favorite music: I love jrock (growing up on Naruto shaped me LMAO), Patent Pending, vocaloid (I love the 'crunch' of the synthesized music and voicebanks, so often I prefer them over their covers)... idk main ones would prolly be rock, pop, and (more picky with it) metal. Nothing screamo.
5. favorite movies: uhhhhhhhhh idk tbh I mostly watch horror and am not good at remembering movie names since they're one offs. But ones that stick out would be Rise of the Guardians, Mama, Your Name. RotG is a solid fave but others are just ones that impressed on me enough to remember their names at all
6. favorite series: Zelda!! Everything else I enjoy are either one-offs are not indicators of my interest in the entire series they're a part of (Persona Emblem vs Persona, Kirby Lost World, etc). Some of them I'd like to try the rest/more (Fire Emblem, Final Fantasy, etc) and haven't got around to it but others I'm not interested in (Persona).
edits in atla/lok bc i forgot abt it entirely oops--
edits in x2: nasuverse at large and esp fate/ rip-
7. last song: I usually just have a select few character playlists on shuffle for work or the like but first new song would be Wish by Gia Navas (Romani FGO fansong :') ) and Ghost's cover of Stay from the last Insidious movie
8. last series: Once Upon a Broken Heart trilogy overall (much fun !! :') v much want more in that world and more lore on the Fates especially--) and just now finishing up Carol & the End of the World!! :') Very fun in its own way and cute but also augh
9. last movie: ignoring misc reruns on TV I don't remember it'd be streaming the Insidious series with friends— but before that either Puss & the Last Wish or Nemona idr which! (Nemona as a character is peak sacore btw :')))
10. currently reading: Finally working through Scum Villain Saving System first hand (the official localization), on top of misc Scarlett Claire (?) books to help sleep. Thank You Libby App <3
11. currently watching: Finishing up Carol & the End of the World!! After that I'll be trying the YYH live action adaption LOL uwu
12. currently working on: uhhhhh nothing tbh!! I'd like to draw more but thats infinitely loosey goosey and nebulous along w longform fic ideas yk dghdsgh
tagged by: @tvrningout
tagging: anyone/everyone!! if anyone sees it and hasnt done it and wants to go ahead!!
1 note
·
View note
Note
im so curious what coloring and lighting combination you used for that max set? I'm trying to gif the micropeter scene, and while it's *technically* fine, the black background looks so....glitchy? and its not nearly as strong in your max set and its kinda annoying me so I was wondering what you did
hi! my first step when coloring is always to use curves auto options, which i learned from this tutorial by piximperfect on youtube (the shortcut is towards the end, but it's a good watch anyway):
youtube
i don't have the psd for that set, but i believe it was curves doing the heavy lifting, then some hue/sat and selective color to make him a little less red.
i didn't really notice much glitchiness with the background, i think that's really just down to scene selection. something that could help with your problem is making a new layer and paint over the background with the background color, then change opacity and/or blending mode to make the glitchiness a little harder to see, or at least even it out a bit. i've done that before and it usually helps. if you're worried about it looking out of place you could even put a gaussian blur on the paint layer to make it extra soft, but if it's just the black stage background i don't think you'd need it? idk just something to keep in mind.
i hope this helps, can't wait to see your set! feel free to tag me if you want
1 note
·
View note
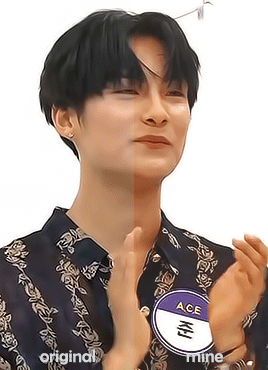
Photo
#stray kids#forskz#jisung#*gif#hello everyone i'm back kinda how's life !!#(saying that i’m back is the inly purpose of this set btw djdn)#i was going to come back yesterday but it was too late and i wanted to finish some stuff#and i rushed the seungmin n jisung gifs from before but its ok jlhhj#idk what the plan is tho i've been doing so well out of tumblr JKDHSF and i've been super relaxed stan wise like#i must've seen every skz content ever in the last 2 week that's been my only mood#and it's so soothing to not have to worry about giffing sjdfh#so like idk how active i'll be and stuff but i guess i'll try to not put much pressure on myself to gif and stuff...#also excuse my icon i really dont like it just the daily struggle of 0 minho selcas#anyways so updates#i'm trying to mix up my colorings a bit i've been looking for inspiration and trying new things so lets hope i do that! sometimes i get#stuck in the same psd bc im too lazy for my own good#news 2.0 i'm back to my jisung stan roots KJHFS therefore this random shitty set#but like he's literally back at my top 2 with seungmin. sometimes he's almost top 1 with minho but shh#i love him so much rewatching skz stuff got all my love back. not that i ever stopped biasing like he's always been in my#whole ass 4 members bias line but like yeah back at n2 now congrats!#so i'll try to gif him more#also this coloring is v old! /way to contradict myself/ so its not v nice sorry#ok thats all bye i have to go i’ll catch up later!
424 notes
·
View notes
Photo
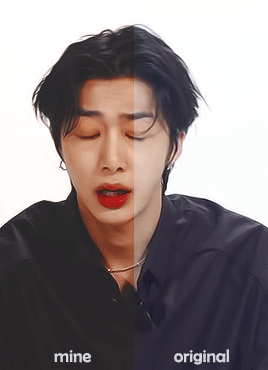
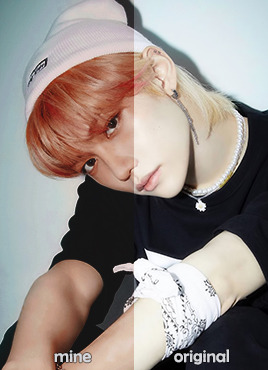
before/after coloring tag
tagged by @innielove, @skzes, @youngke, @hyeongjunz, @avocadomin, @bhangc and @junjunies on my main (i hope you don’t mind that i’m doing it here). thank you so so much!! ♡
okay well i’m not sure what to say about my coloring sdfghj i rarely make new colorings because i suck at it lmao i’ve been using this one sice back door era and it’s pretty much my best one (the one on the gifs).
when i started out i used psds as samples while trying to recreate them. lately i just mess around with adjustment layers until i like the outcome. usually after a while i try making a new coloring because i want some change lmao my colorings usually have 20+ adjustment layers, sometimes more. and when i’m in the mood i can spend hours just to create the perfect colors send help
what i usually go for is to make skin color less unwhitewashed but sometimes i go a bit overboard with reds tbh. and also the colors seem to be more lifeless on mobile so i just amp up the reds until it looks fine. and i also prefer a certain matteness to my gifs and i feel like this coloring pretty much does the job. and i tend to make my gifs a bit darker than the original.
*kinda wanted to show some of my edits too because teaser pics and stuff sometimes need much more work because they’re SO white. for example for the middle hyunjin one i combined 15 of my psds and it has 40 adjustment layers lol also the felix one. that one was a struggle to edit sdfgh
okay i think that’s it. i didn’t mean to write a whole novel but here we are :’D
i really don’t know who hasn’t done this tbh so idk feel free to ignore this. tagging @hyunnie, @chogiwow, @chrisbangs, @rigged, @skzflix and @yongbokslee. ♡
#tag game#my.gifs#m*stuff#also now y'all know who my biases are dfgh#i'm giffing hyunjin from that leaked clio clip as i'm writing this but iidk if it's okay to post them#i don't wanna get in trouble#this was fun thank you :3
63 notes
·
View notes
Text
🌻 a gif tutorial by: me! 🌻
i know there are so so many WONDERFUL tutorials out there, but i can’t say no to a very kind anon so!!! here we go. hopefully this is helpful for someone out there! if anyone doesn’t do well with picture tutorials and would find it more helpful for me to do a video, i would also be happy to try that too!!
this is definitely not the fastest way to do it, i’m sure, just the way i’ve always done it and i’m bad at learning new things so ldkjfoiw also i’m using photoshop cc 2021 (tho this method should work for any version of photoshop i think) and i use video frames to layers to gif just as an fyi
step 1: get whatever media you’re giffing! i use torrents and direct downloads. that’s how i’ve always giffed, i’ve never tried capping so i can’t help with that. sorry!
step 2: make clips of the scenes your fc is in! i have a folder dedicated to the character the fc is playing and keep all my clips in there. when i do movies, i typically only do about 12 clips at a time because it just feels less overwhelming for me. when i do a show, i only clip one episode at a time for the same reason. i use quicktime to clip, but i know some people use VLC and i’m sure there are other options out there to try, too! again, this is just what i’ve always used so i’m comfortable with it and know how it works.
when i clip, i try to start the clip a few seconds before the scene my subject is in and a few seconds after just to make sure i’m getting every single frame.
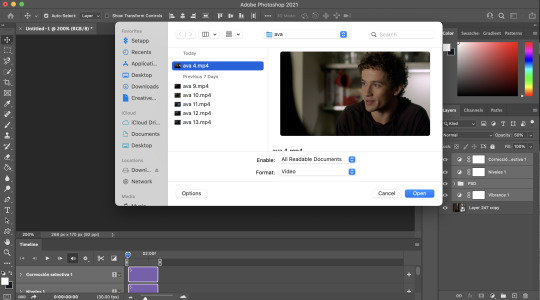
step 3: import video frames to layers! so once you have photoshop open, go to file > import > import video frames to layers
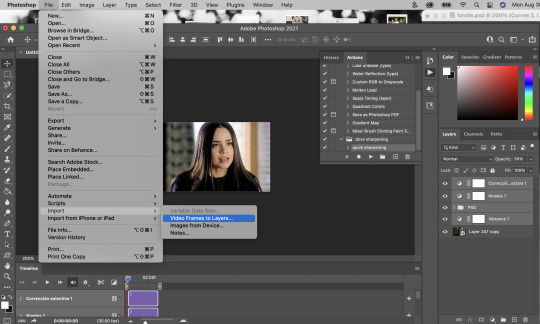
then go to your folder where you have all your clips saved and choose the one you want. i took this one out of my trash because the rest of the gifs i have to do in this episode are in the dark and that was gonna be too annoying to me lkdjfkslofw so i’m just re-making one i already did a few days ago. i’m giffing sofia carson and you can see that my clip starts on someone else’s face so i can make sure i have every frame of hers!
step 4: select the range for your gif! just like with clipping, i try to get a few frames before and a few frames after of the fc i’m working on so that i don’t miss anything. if you aren’t interested in giffing them in every single second (which is totally fine, i know a lot of people prefer not to!) then you don’t need to be as concerned with it

because i’m using a direct download, i’m not going to limit my frames to every 2. it’ll be really fast and choppy. if you screen recorded, i would suggest limited to every 2 frames and then going through and deleting each duplicate frame (when i giffed via screen recording, i found that every 6 frames or so was a duplicate). this will make sure your gif is smooth and exactly the same as one made from a direct download. it IS time consuming though, so i recommend doing a direct download/torrent if possible! if you ever need help finding downloads or need something torrented and converted for you, please feel free to message me and i’ll be happy to help!!
step 5: delete the frames you don’t need! this is the time to delete any extra frames at the beginning, end, and any duplicates
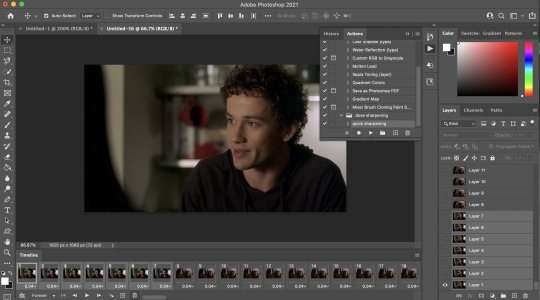
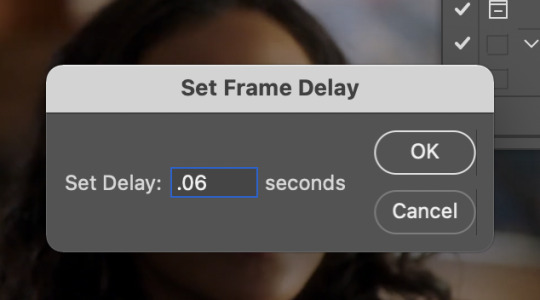
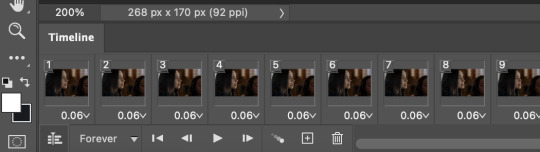
step 6: set your speed! you can do this later if you want, but i like to do it as soon as all my extra frames are deleted. my personal preference is typically .06 seconds for most of my gifs. if they’re on the shorter side (under 35 frames), i’ll do .07-.09. i know some people have very strong feelings on gif speed lskdfjpwe i do not. it’s all about what feels best for you! .06 is where i feel my gifs feel the best, but there are plenty of beautiful gifs that are slower or faster!
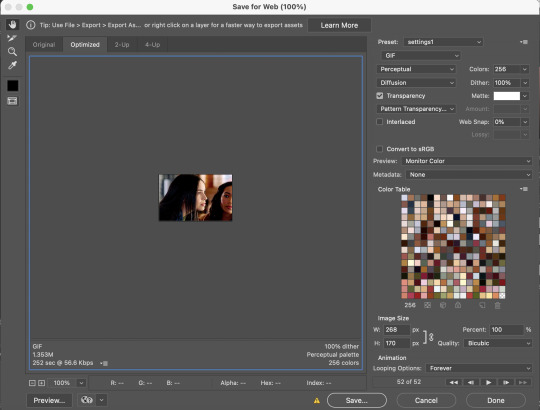
step 7: crop it! as you can see above, i set my W x H ratio to 268px x 170px. this is a size i really like, but you can make yours smaller or larger. i do suggest using the W x H ratio setting to set it to your specific pixel measurements because it cuts out having to resize after cropping.
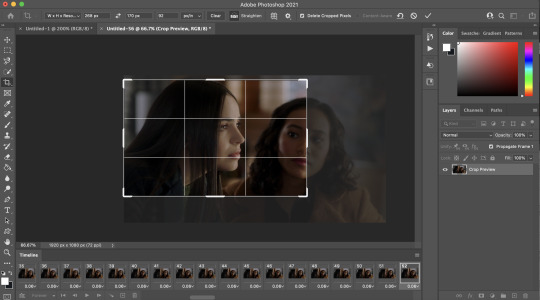
also, i have a few hundred frames in this one particular gif that i’m going to cut down in the next step. however, i know that she remains pretty much in the same place throughout the frames which is why i’m cropping them all at once. if it’s a gif where you get a few hundred frames that you’re going to turn into multiple gifs and the person moves around a lot, definitely only crop one gif at a time!
step 8: delete the frames you aren’t using! everyone has a different way of deciding how many frames their gifs are. for me, if they’re talking, i actually go and watch the segment i’m giffing to see what they’re saying, read their lips as i go through each frame, and crop it there. it’s a little more time consuming i guess but i feel like it gives me the best results. totally optional, though! if the person is NOT talking, then i typically just try to make it between 60-80ish frames and base it on facial expressions or body language. sometimes it’s more, sometimes it’s less! again just comes down to what your preference is.

step 9: convert to timeline! basically just press that lil highlighted button down there next to the “forever” and convert to timeline. pretty self explanatory
step 10: sharpening! this is where i use my sharpening action which is linked right here. i’ve been using it for a while now and i really love it! i’ve tried other sharpening actions since i made it and they just don’t make me as happy as this one lol
hit play on your action:
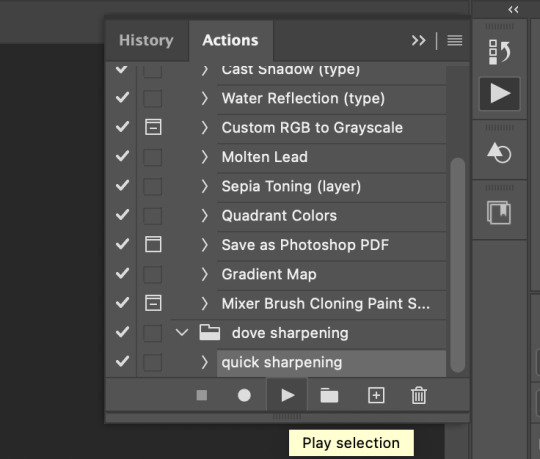
for my action, i get this popup twice and just hit “continue” and it keeps going through the steps with no problem
step 11: COLORING!!! get your psd and slap it on! i have different one base psd that i use for almost everything and will edit it to fit whatever scene/show/movie i’m working on. i’ll also save different versions of it based on the media i’m giffing. for example, the lighting on liv & maddie is SUUUUUPER different from the writing on pll: the perfectionists. so i have a “liv” psd and a “loralie” (name of my char that i use sofia for, idk why i named the first psd after liv and not my char but whatever ldkfjsoi) psd. same base, same layers, just different levels. i also will often combine psds! i’ll put my base down and then add layers from other psds or create new ones to fit whatever scene i have going!
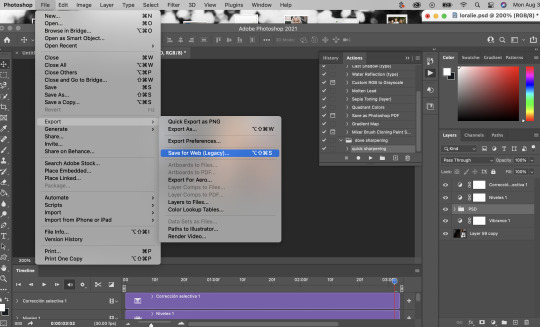
step 12: save your gif! go to file > export > save for web (legacy)...
people use different settings for saving their gifs, too. these are my personal settings. i really like them and feel they work for my gifs. feel free to copy them or play around with your own settings! just make sure it’s always on the 256 colors
step 13 (optional): preview! i like to hit the preview button just to make sure i like my gif before i save it. if i don’t like it (coloring looks off, too fast/too slow, feels like it cuts off in a weird place) i’ll hit cancel and undo everything until i’m back to wherever i need to fix it.
step 14: save your gif, yay!! YOU DID IT!!!! save that beautiful gif and feel so proud of yourself!!

step 15 (optional): if you’re making multiple gifs from the segment you imported, go back and cntrl/cmmnd + z everything until you’re back to having allllll the frames again. delete the frames of the gif you just made (in this case, it would be 52) and start again from step 8!
i hope this made sense and was helpful for anyone! please let me know if there’s anything you need clarification on!!
35 notes
·
View notes
Photo
hello! i’ve been asked by a genuinely surprising number of people to walk through how i gif, so here i am with something that’s less a tutorial and more a collection of tips, tricks, and useful links. i hope it helps! ✨
08/23 UPDATE:
i see this post is making the rounds again, but i’ve actually got something better these days: here is the super in-depth gifmaking 101: a comprehensive guide tutorial i put together earlier this year! the new one is way more helpful ✨
GIFMAKING: BASIC TUTORIALS
i’ve been doing this for just over a year two years, guys! i know nothing some things, jon snow!
i learned to gif by following tay’s (@kylos) tutorials, so rather than look to me, go ahead and check out her incredibly thorough master list of tutorials for all your giffing needs
another great resource is rina’s (@hayaosmiyazaki) extremely detailed gifmaking for beginners guide, which is current as of july 2020
V. BASIC TIPS
always, always, always gif from 1080p or up. seriously.
sharpen your gifs! tay and rina both cover sharpening, and here’s another great tutorial by @justin-ripley
always make sure you brighten + color your gifs
@anyataylorjoy has a phenomenal action pack to help you streamline your giffing process
don’t be afraid to experiment! just, idk, fuck around and play with things and see what happens
BRIGHTENING & COLORING & PSDS (OH MY)
experiment. play with levels, selective color, curves, hue and saturation, etc. until you know how they work; that’s the easiest way to figure out what your own personal style + preferences are
or, if you’re looking for something to help you along as you color, go nuts with psds
@dailypsd is an awesome resource for psds
@chaoticresources, which also has tutorials, template, fonts, etc.
@itsphotoshop also has tutorials, templates, etc.
tutorials: tay and rina both cover brightening and coloring!
@bbbbbbbbbbbbbbb-8 also has an amazing guide on how to color correct the murderously blue exegol scenes from sw: tros that is super helpful if you’re struggling with an overabundance of a particular color
i can’t for the life of me remember where i first saw this, but a great trick for Instant Brightening™ is to create a brightness/contrast layer just above your video layer, do exactly nothing to the settings themselves, and just set the blending mode to screen. it preserves most of the colors while dramatically brightening the gif and giving you a great starting point for the rest of your coloring
and holy shit, here is a truly life-changing tutorial on channel mixer which can be super intimidating if you don’t know quite how to work it
practice really is your best friend here! just fiddle around with stuff and you’ll eventually get the hang of it, i promise
FONTS
fonts are the goddamn bane of my existence, but here are some resources to help you conquer them
@yourfonts is the holy grail of font blogs! go give them some love!
@ihaveresources also has one of my favorite font tags
you can always message a content creator to ask what font(s) they’ve used in a particular edit, but if you’re not comfortable doing that, both WhatFontIs and WhatTheFont are super helpful for tracking down fonts
pick a simple, legible font (arial, alte haas grotesk, myriad pro, calibri, etc. are all good options) for subtitles
speaking of subtitles: tay and rina talk about them!
drop shadow is your friend
gradient text can be super fun! if you’re working in photoshop just go to layer > layer style > gradient overlay, and go wild
gradient text in captions is a bit of a pain but also very cool
TAGGING & POSTING
rina has a very comprehensive guide to tagging!
general rules of thumb: tag what you’re editing, who you’re editing, source blogs, and then any user tracked tags
for example: i track #userbells
be mindful of content warnings: for example, i always try to tag anything that flashes as #flashing tw
post on an east coast-ish schedule if you can! 7-10 pm est seems to be the optimal time to post if you want to maximize engagement. here’s a whole union metrics thing about it
boost your own stuff by doing a timezone reblog or two to make sure people have a chance to see it. it’s damn impossible to get a reblog in this economy, so do what you gotta do!
FINALLY! MY PERSONAL NONSENSE: STEP BY STEP
✨ updated 12/2021 ✨
for files i can successfully acquire
acquire file(s)
open file(s) in mpv player + take screencaps
load files into stack in photoshop
crop + resize canvas
covert files into layers on video timeline
sharpen
color
add text and/or effects
convert back to frames + adjust timing
export
post to tumblr
for files i cannot acquire
screen record file(s) player using mac screen capture/quicktime player
import video frames to layers in photoshop
import every frame
crop + resize canvas
manually remove duplicate frames
convert to video timeline
select all layers + convert for smart filters
sharpen
color
add any text and/or effects
convert back to frames + adjust timing
export
post to tumblr
voilà! there you have it!
i’m working on a more comprehensive guide to how i do things, but in the meantime, please feel free to send an ask/shoot me a message if you have questions about something i didn’t address here!
306 notes
·
View notes
Text
CONTENT CREATOR YEAR IN REVIEW
was thinking for 84 hours where should i post it but as its my creator blog i m doing it here <3 i was tagged by @taemaknae @suhdays @ynki @honsool @jjeongukie @taeyungie @dearbangtansonyeondan @lifegoesmon @everythingoes @flipthatjacketjiminie @yoongi-bts @jiminslight @hopekidoki @cowboyjinbop @yoonqiful @jcngkooks @pjmsdior @hobeah @balenciaguks @jinvant @hobibestboy @vjimin @yoongikook AND THANK U SO MUCH FOR INCLUDING ME T_T ik maybe its not a big deal but its a big deal to me and im touched :(((((((((((( also gimme some time to check all ur posts 👉👈 also im in a mood to say that ive collected many pokemons here djfksfhsakjddld ok nvm
also sorry for a long post ik tmblr fvcks things up sometimes when there is keep reading so dont fight me plz <3
❀ first creation and most recent creation of 2020
ok this is the fist one (still very pleased with colouring here T_T the stage lighting was,,,,,,,,,,,,,,,,,,,,, well yeah as always lmao) and this is the most recent (TBH DKJSKDSDK I WISH MY MOST RECENT POST COULD BE A DIFFERENT ONE THE ONE I WANNA MAKE FOR A MONTH NOW THE ONE ID PUT A LOT MORE EFFORTS IN SO IM A LIL FRUSTRATED i literally just missed giffing but couldnt watch anything new so took an old vid i wanted to gif once I DIDNT EVEN USE MYCOLOURING PSD IT LITERALLY HAS ONLY COUPLE OF LAYERS uhhhhhhhhhhhhhhhhhhhhh :( but whatever,,, it just kinda doesnt show the difference -_-)
❀ a creation u r really proud of
well 👁👄👁 there r quite few,,, and the main reason is colouring most of these r comps and i a b s o l u t e l y sucked at comps and esp at making the colouring consistent there lol so lets begin lol 1 (u have no idea how muchi love this set) 2 (i fucking mastered it i wanted to remake it for two years and i finally did!! 60 fps smooth good moments iconic performance iconic hair colour his attitude bruh and ofc the fact that i could do sth with colouring,,,,,, and chose such an unusual colour scheme that i doubted jckdckfdk and it still worked out 🥺) 3 (lol i had this idea written down since 2018 as well and this year i could finally collect all moments i needed and oh boi yeah,,, AND COLOURING I COULD ALMOST yeah almost do sth decent with it there r still couple moments id changed but im pleased) 4 (im so happy whenevr i see this CUZ IT ALL WORKED OUT it was such an impulsive comp i literally only saw couple moments for past few years as well where i could see three of them in one frame and suddenly I WAS LIKE I FUCKING MUST POST THOSE MOMENTS SOMEHOW and im so proud of colouring it looks so well T_T) 5 (the colouring ofc im still :o that i could get rid of that shitty shit dkksjkj AND THE MOMENTS ITSELF?????? AND BLACK SWAN???????? EVERY PERFORMANCE???? HAIR?????? OUTFIT???????? EVRERYHTIGNM???????? HIS FUCKING STARE? FACE??? DONT MAKE ME CONTINUE AAAAAAAAAAA also if im not wrong this set in particular made me start my before/after posts 🥺) 6 (i jujst love everything about it e v e r yt h i n g also i could made ppl believe that jin fr has purple hair here when in reality its brown djhfdhskdf one of blending modes or adjustment layers worked this way lol) 7 (i wont even comment this tried a great tutorial with great beautiful resuls for the first time ever and it worked out so well and i like it so much and the whole yoongi here,,,,,,,,,,,,,,,,,,,,,,,, also love me some borders that add cinematic feels to some gifs or just make them pretty in a dif way just like i did with prev post i mentioned imo lol) OK LAST ONE 8 (I USED A VIDEO OF STARS AND ADDED IT TO THE GIF FOR THE FIRST TIME EVER I FUCKED WITHMASKING FOR 3 HOURS GRRRRRRRR THIS IS SO HUGE FOR ME!!!!! i cant even explain whew IVE NEVER DID ANYTHING LIKE THIS BEFORE SO I WAS REALLY PROUD TOO even tho i fucked masking up on some layers lmao but lets not pay too much attention to it 👀)
❀ a creation that took u forever
ohhhhhhhh i think this one cuz the moments were long i couldnt decide what do i want to include + it ts file so u kno,,, the speed,,, of processing,, + somehow decided to put them all together + fucked with colouring + had to get rid of the logo and as we know japan likes a lot of big braight text around haha and draw hair in moments where logo made it look blurry + had to adjust the order and all that stuff but getting rid of logo was the longest part
❀ a creation from 2020 that received the most notes
whew this iconic one im still amazed tbh they looked soso incredible and im glad how everything turned out here <3 (could change some colouring on bg tho so it could look better and more hq :c)
❀ a creation u think deserved more notes
lol this one cuz i was so hyped to make it cuz their concert in saudi arabia is one of my fav things in the world and i waited for so long to have mood and energy to go throught it to find jk moments and i couldnt choose some for this comp for so long and just,,,,,, overall,,,, the way he looks here............................................................... its a special comp to me haha ill def gif more of it i have shit ton of clips left and also there r other members and i just want to sit and enjoy yhe whole thing to so may find more stuff to gif here lol
❀ a new fandom u joined an a creation u made for it
i didnt join anything heurheru
❀ a creation u made that breaks ur heart
OKAY LISTEN DSJAKDJHFDKJ THIS ONE IF U KNOW U KNOW AND IM SURE IT BREAKS ALMOST EVERY HEART tbh whenever i see soft smiles or soft interactions or anything like this im just :’( <3 even my serotonin boost tag does it to me cuz its too precious T_T
❀ a ‘simple’ creation that u really love
this one cuz everything about it ah and this one 🥺🥺🥺🥺🥺🥺🥺🥺🥺
❀ a creation that was inspired by someone else
ummmmmmmmmmmmmmmm idk maybe this one ? cuz i never did anything like this before and maybe i saw someones beautiful headers and decided to try one too ? i could do a lot better there is not enough depth but oh well,,, lol
❀ a favourite creatin created by someone else
oh its gonna be hard :) dear every conten creator i hope u dont mind if i wont go though the whole 2020 gif tag but choose form the most recent ones i loved? u know how much i appreciate ur content cuz i never stop screaming about it in tags but truly there r more content makers and i want u to know that i really love ur content :(
@syubb welllllllllllll i wont even comment this is iconique.....
@jinv T_T val i miss u but there should be bday comps with that BIG ASS IMAGE THAT HAS ITS PARTS ON EVERY SINGLE GIF I CANT EVEN EXPLAIN that icant even find dfjksfskj
@jung-koook i literally couldnt choose ehdskjdjksd but i decided this one cuz its sososososososososososososososososososososo well made every single detail here is chefs kiss
@kkulmoon i truly really cant get enough of ur colouring lately T_T
@minhope !!!!!!LITERALLY EVERY PANTONE COMP OR ESPECIALLY 7 YEARS WITH BTS PANTONE ONE IM AAAAAAAAAAAAA and lmao i think this is one of the most reposted things ive ever seen on internet T_T
@jjoon hng amy u know how i feel about ur content T_T decided this one cuz f l a w l e s s
@hopekidoki stuff like this makes my jaw lie in the floor dsjkdj
@flipthatjacketjiminie idk whats up but it makes me scream like a madman every time i see it.........
@lifegoesmon i cant even explain why i chose this one but everything here is so incredible !!!!!!!!1
@hobeah one of those good fucking bye ones.....
@taeyungie this made me feel so many things and a whole ass a w e so cool T_T
@jiminfilter i will never shut up about bts core jungkook one should also be here
@seoksjin THE COLOURS I SCREAM OH MY GOD O HMY OGD I JUST WENT TO CHECK OUT AND SAW THIS AND IMMEDIATELY DJKSJD DECIDED THIS IS CRAZY THE PASTELS THE PINNKS AAAAAAAAAAAAAAAAAAA EVERYHTGIN but also those birthday posts ahhh T_T
@jinvant i wanna YELL but also u know how much i love ur quality and blacks T_T and gfxs too!!!!!!!!!!!!!!
@yoongi-bts i love everything here with my whole heart!!!
@everythingoes SHOUWLD I EVEN EXPLAIN WHY
@hobibestboy THIS IS SO COOL AAAAAAAAAAAAAAA THE COLOUR SCHEME
@joenns I WONT EVEN EXPLAIN IM SO HURT HES SO THIS IS SO T____________________T
@jjeongukie idk i cant get enough of skin tone!!!!!!!!!!!!
@chaylani i really love the colouring and love these posts with highlights T_T
@eklipxe COLOURING AND EVERYTHIGN
@oncupid cant get enough of every colouring ive seen <3
@jiminslight THIS WHOLE GIF RIGHT HERE
@6dis-ease COZY AND PRECIOUS T_T
@ofkimtaehyung I LITERALLY HAVE NO WORDS ITS SO PRETTY
@taee it was really hard to choose too T_T decided to go with this cuz,, u kno
@yoonqiful CUZ THESE COLOURS DRIVE ME INSANE
OK THIS IS GETTING TOO LONG KDSFJSAKDL I WOULD ADD A LOT MORE CUZ THERE IS A LOT MORE TO ADD BUT IVE BEEN DOING THIS FOR THREE HOURS I BETTER CHILL
❀ some of your favourite content creators from this year
ok i may forgot someone + in no order in particular + literally every creator that i follow/whose content i reblog @taeguks @tearuntold @cyphertaehyungie @love4hobi @kimnamtaejin @taejoon @jimiyoong @namkook @taeyungie @jinvant @jinv @6dis-ease @jiminrolls @daechwitas @syubb @syuga @jjeongukie @cowboyjinbop @hope-film @minhope @hopekidoki @joonie @namgination @jung-koook @faerieth @kooksv @lifegoesyoon @yoonqiful @j-sope @chaylani @jiminfilter @jjoon @everythingoes @varietae @seoksjin @dearbangtansonyeondan @ofkimtaehyung @yoongi-bts @gaypeople @seokjinyoongis @agustdfeatrm @joenns @houseofarmanto @namjoon (will miss forever) @thebtsgenre @honsool @vjimin @seokjinite @jiminswn @taee @hobeah @lifegoesmon @taemaknae @gukgi @kkulmoon @flipthatjacketjiminie @jintae @jcngkooks @ynki @yoongikook @yoongiandthebiaswreckers @jiminslight @gwkie @oncupid @eternalbulletproof and many more <3
OK SO i wanna say a special thanks to every content creator ever and also i wanna say that im really glad to be a part of this community all of u r so cool and creative and make such beautiful things and many of u made me feel EMOTIONS with ur sets or not only sets ill be forever grateful that i discovered bts and for everything they do to me without even knowing ALSO THANK U FOR STILL BEING HERE ON TUMBRLDSDFKJ yeah this year was less active there were few issues many ppl went on twt but thank u for still being here also happy new year <3333333 i think i sounded deeper and more emotional when i was commenting ppls gifs :| but its almost 2 am so i hope u will understand dkfjkfsjk im happy there is this corner on the internet that feels cozy and so welcoming <3 i love u i wish u a better year ahead <3 ok for checking notifications purpose ill tag my blog lol @eternal-bangtan
64 notes
·
View notes
Note
Hey, I've been reading your story for a while, and I'm enjoying it very much. Following the De Villiers has been so fun, and you've inspired me to create my own royal Simblr!
Can you maybe share some tips about what to do with your royals? I'll be posting my family within the next few weeks, and I have already planned out several engagements + events, including visits to parks/schools/hospitals, parties, and news surrounding a royal pregnancy. I've also planned out the first arc. I don't know what else to do, and I've barely started! If you have any tips related to the beginning of your Simblr that you didn't cover in your other post, I would so appreciate them. I want to get all this nailed down *before* posting, so my blog is the best that it can be.
Also, if you have any advice on how to make things as efficient as possible (especially regarding posing sims, editing/writing posts, etc.), I would love that! I want to cut down on time wasted wherever I can.
Thank you!! :-)

AAAAAAAAAAAAAAAAAAAAAAAAAAAAAAAAAAAAAAAAAAAAAAAAAAAAAAAAAAAAAAAAAAAAAAAAAAA 🥺🥺🥺🥺🥺 me?!!?!?! ME ??????? omg 🧍♀️ thank u for reading my story 🥺 and AAAAAAAAAAAA your own royal simblr !!!!!!!!!!!!!!!!!!
ill answer everythin under the cut !!!!! spoilers: it got long sorry
first of all, remember we ALL started somewhere. you can look at my first like... fifteen and even MORE posts and they are BAD. oh my gawd idk why i thought they were good, but hey! i learned things from them. you will more than likely change your mind about certain things from the beginning of your blog to who knows, four months from now. don’t focus and worry a lot on ‘perfection’ and setting up ‘high standards’ from the beginning. treat it like a learning curve! this is something we all do for fun, so don’t get stressed a lot on it. you can always change and adapt things and that’s no problem!
i love lists, so im gonna list a few things of advice/tips basing myself on what you said!!!
i personally don't do engagements anymore, so i can't really help you in this regard of even more activities you could do 🧍♀️ what i could recommend for people to get to know your characters' personalities and private lives and grow attached to them, add in BTS posts.
continuing on my BTS’ post thing, they are a GREAT way to show more than what the public sees for your royals. because from a press and public point of view, you don't really know 'what goes on behind closed doors'. they could be all happy in public, but in privatE??!??!!?!?
as i said in my starting out guide, i did have around ~15 drafts done before i started posting. just so i could not stress about “oh my god i dont have any posts for tomorrow”. a LOT of ppl do posts and queue them as they go, and they have MANY posts done and usually they start accumulating and they are MONTHS in advance compared to what they’re currently posting. if this method works for you, you can definitely use it!
please, please please read your dialogue OUT loud. is it possible to say a 2093023902 word sentence without a singular use of punctuation? do people in this age and era really talk this way? also please if possible use correct grammar. just a little pet peeve, it can take a reader out of the immersion your story gives them.
we all have our lil dialogue habits. mine is starting sentences with “oh” and the infamous dash “—”. others use ellipses. just make sure you aren’t overdoing it. for example, doing a sentence like “oh— there you are. i was uhm— looking for you. how—how are you? its—i mean where have you uhm— been? yes—ive—ive been fine. you? i mean— your mom” ....just no 😔 it doesnt read well at ALL
you can always do lil filler posts, dont tell anyone tell you otherwise. post a little simstagram post, a little family portrait, updated portraits post, family hanging out, kids hanging out, etc.
for posing sims, i do try and remember where MOST of my poses are in the ingame list. usually creators’ correctly naming the poses helps a lot. for example i need a Mel Bennet pose; hers are usually ALL in the same spot and have the same lil aqua bg so i can easily find them. sometimes, i dl pose packs VERY specifically for a certain scene. am i gonna use them again? no. so i open the .package file in sims4studio and rename them to “00 for emi scene [rest of the og name” so when i open my game, they are around the top of the list! no more scrolling and i easily know what i need it for.
dont be scared to plan things that are happening MONTHS from now or anything in detail. some ppl dont like planning things in detail, or even dont like planning things AT ALL or things that arent happening say, in over 2 weeks because idk, they get bored. i recommend at LEAST having a list of things that HAVE to happen so you have ‘goals’ and you slowly plan out how you’re gonna get there. at LEAST theres some level of planning there. if you’re posting and PLANNING as you go, there’s gonna be holes. and it’s gonna be obvious.
editing wise, i don’t do much. my reshade does most of the work, i just add in my psd, add text and done! this is easily the fastest thing you will ever do.
if you get inspired by someone else doing, idk, a certain layout for the portraits, them adding little things to their captions, a certain edit, etc. if you want to do something similar and you ARE very much aware you were inspired by them, credit them in the caption. i beg. its free, its the nice thing to do, bc if not its rude.
if you get inspired by a certain storyline someone else did and you notice yours is gonna be similar, go ahead and send them a message to let them know and if they have any tips or feel uncomfortable with you doing this. simply put, if you don’t, you’re gonna look bad. we are all bound to do same storylines, such as assassinations, shooty shooty’s, stalkers, first loves, accidental babies, etc. but what changes is how each person approaches it. no ones gonna do it the same way as you and others. if you CONSCIOUSLY start copying else, stop it. and you could even be unconsciously be inspired by someone else too. it happens! just make sure you are able to look at the bigger picture and realize “hey, i’m doing something wrong”
same thing with dialogue. you like a line someone else said in their story? don’t just... steal it and incorporate it into yours word BY WORD
OVERALL: you can be inspired. give credit where it’s due. and don’t copy because someone else is doing ‘something others like’ and you want others to like your story. no no no !
im adding this AFTER i posted it but, be yourself. in the way you interact with others and send questions, etc. don’t try and copy someone else’s personality because they are liked and essentially absorb them. be yourself and i’m sure a lot of ppl will like you the way you are : D
for my writing dialogue etc, this goes back to my point 8. i use milanote, its free and you get 200 free thingies to use, and i plan out how every single one of my posts is gonna go. so i just have to go ingame and i already know what im gonna do. no thoughts, just taking screenshots. for example, this is how a part of my part 2, chapter 3 posts layout looks like. every square is a post that has what is happening, who is in it, what is gonna be said very vaguely, etc:
11. and the most important tip! don’t compare yourself to others. i did it at the beginning. i think we all did at one point. its not good for you at all. please always remember we all are here for share our lil stories with each other and it’s not easy get a following. you’ll get there and its gonna take time. be patient, be nice!!! and i cant wait to see your story!!!!!!!!!!
29 notes
·
View notes
Note
hello! please ignore my question if it bothers you, but i wanted to ask how you make your gifs so high quality? thank you for your wonderful graphics and i hope you have a great day!
Hello~ Thank you Anon for finding my gifs high quality ;;w;; I always find them so trashy compared to some of my mutuals that make such clean gifs. I made a tutorial a few years ago, but I changed my way of making gifs so here’s a new one ! Hope it will help you, I tried to be as accurate and detailed as possible, but if you have any questions, don’t hesitate to send me another ask ! You can also try to read other tutorials on tumblr ! Have a nice day ♡ヾ(๑❛ ▿ ◠๑ )
PS: GIF TUTORIAL *updated*
STEP 1 : DOWNLOAD VIDEOS
First of all, you will have to download the video you want to gif. Since I make anime gifs, I usually download my videos on nyaa.si (720p or 1080p). Your video must be .mp4
STEP 2 : CHOOSE THE MOMENT YOU WANT TO GIF
So you open Photoshop. Go to File > Import > Video frames to layers. Select your video. A window should pop-up. This is when you will select the moment you want to GIF.
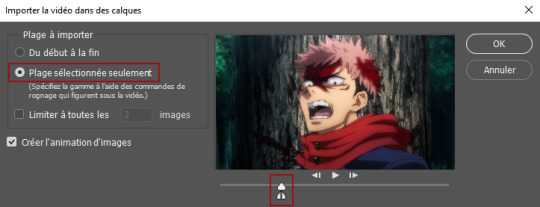
Check “Selected range only”. Select the moment you want by moving the sliders. Once it’s selected, click on OK.
STEP 3 : DELETING FRAMES
So you clicked on OK and imported the video to frames. You will have something like this :

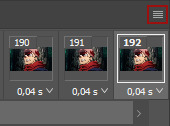
Now you can delete the frames that you don’t want to appear on the gif. You just have to select the frame (will have a light gray border, like on the first frame on the pic below), and click on the bin icon which is below the frames.
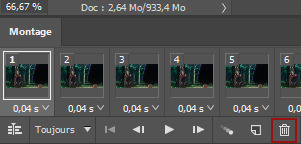
Then, we will select all the frames. Go to the drop down menu and choose “select all frames”. The drop down menu is here :
With all your frames selected (all the frames have a light gray border), you can change the time. Most of the time, I use 0,04s, but sometimes if the gif is too short I change it to 0,05s.
STEP 4 : ANIMATION BAR TO TIMELINE AND RESIZING
After that, we will convert the animation bar to a timeline. Select all your frames, and click on this :

A timeline will appear.

Then, go to the right bottom of your photoshop, where your layers are. Select all your layers (=scroll up or down, hold shift and click on the last layer).
Now, go to Filter > Convert To Smart Object. You will have only one line in the timeline like so :

Then, you will change the dimensions. You go to Image > Image Size. A window will pop up. You enter the dimensions you want (540px, 268px…) and click on OK. I don’t know if it happens to others but when I change the dimensions, a white border appears around the whole gif, as you can see below (idk why).
So I usually increase the dimensions by 2 px (for a 268 px gif I choose 270 px for example), so I can crop the borders and still get the right dimensions for my gif.
STEP 5 : SHARPEN THE GIF
Now, the important stuff. How to make your gif as HQ as possible. First of all, the settings really depend on the anime. Every now and then I have to change my settings because it doesn’t look good with this or that anime. BUT my go to thing to do is :
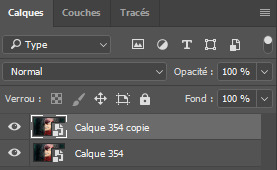
- Duplicate the gif : click right on the gif layer and choose Duplicate the layer
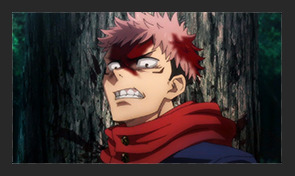
- Set the opacity of the above layer to 10%-30%. Most of the time, I use 30%, but depending on the anime, it might be too blurry in the end. For this gif of Itadori, I decided to go with 10%.

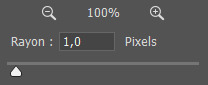
- Use the glaussian blur : Select the same layer and go to Filter > Blur > Glaussian Blur. A window will pop up, choose 1 px.
- Use Surface blur : now, you’ll select the layer below and use the surface blur (Filter > Blur > Surface Blur). The numbers may vary a lot here, because I want to make the gif look the cleanest possible but without erasing too much details. Most of the time I use 3 to 6 ratio, or 4 to 8, really depends on the details and the anime. Here, I’m gonna use 3 pixels and 6 levels.
NB : The gif might become a little transparent on the borders, so I usually create a black layer that will go below all the layers.

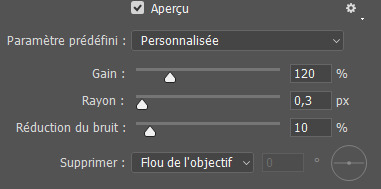
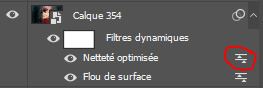
- After that, we will sharpen the gif. Select the same layer (the one below), you go to Filter > Sharpen > Smart Sharpen. Then you just adjust the sharpening to your liking. As for me, it’s most of the time 120% (varies between 80-150%) and 0,3px. Be careful not to oversharpen. Your gif will look worse than if it wasn’t sharpened. I’m choosing 120% here.
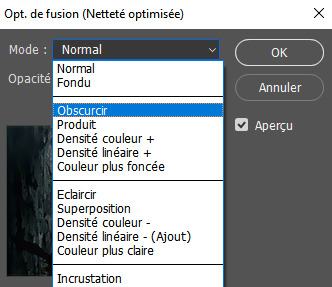
- To make the sharpening smoother, I usually go in the blending options (double click on the little arrows next to Smart Sharpen, as seen below) and choose darken (the blending mode depends on the scene, on brighter gifs lighten might look better, try it and see what you prefer).

STEP 6 : COLORING THE GIF
You can save it as it is or color it so the colors are prettier. For that you will use the settings there :
Or you can use a .psd already made (you can download them on resources blogs). Here, I’ll be using one I made. So you open the file (File > Open) and you select the one you downloaded. Click on the folder of the psd and drag it on your gif.
Be careful ! The more you change the colors, the grainier the gif is gonna get. You can find some tutorials on how to color gifs on tumblr, I’m definitely no pro lmao I usually click everywhere until it kinda works out ^^’
STEP 7 : SAVING THE GIF
Now it’s time to save the gif ! FINALLY ! Go on File > Save for web. You will have a lot of settings. First, before saving make sure the looping option is set on “forever”. Then, be sure that your gif is NOT wider than 10Mb (i think it is the latest limit, i’m not sure ^^’). If it is, try do delete some frames or adjust the colors, select pattern… Play around with the settings until it’s under 10Mb. Then, click on save and it’s done !!!

#tutorials#i hope it will help you !!!#I'm definitely no pro but I did become better with time#have a nice day Anon !#replies#anon
51 notes
·
View notes
Note
I need some kind of a photoshop lesson for this aesthetic of yours
okay i’m gonna do a tutorial real time for a picspam type aesthetic that will look like this ⇣ a photo i will put here once i make it.
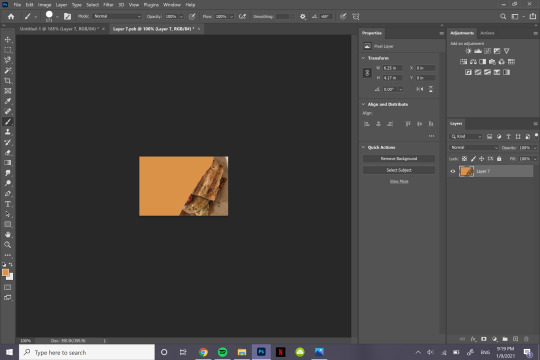
step one. open ps : )

welcome : )
okay so dimensions r a thing tumblr compresses photos like hella so i do all my still img aesthetics 900x900 is you’re trying to do this for say insta i would actually recommend jumping up to 1080x1080. pixels, obviously. idk if i have to clarify that.
so click ctrl+n or create new i’ll be doing 900x900

these r the rest of my settings i personally do not think they matter my resolution stays at 72 the only thing i’ve detected this affecting is font size. (side note notice how this pic looks all fuzzy? that’s bc it’s a ss with a boatload of pixels. and if there’s one thing tumblr hates. it’s pixels. and then it’s users. but who’s counting? tumblr is. i recommend keeping ur still images 900x900♥)
step two is collecting ur images i personally use pinterest for these bc quite frankly it’s really nice & easy to find these types of photos esp if you’re looking for a canon character bc if you type in [character name] aesthetic you’ll get stuff if you don’t quite frankly even just type in aesthetic you can scroll until you find an image you like click on that and go through like images underneath it and keep burning thru. like u probably know how to work pinterest. but i am being thorough and covering my bases. searching [color] aesthetic is also nice or even searching a character that isn’t the character you’re doing this for but who’s kind of similar that also works. i recommend esp for charmed bc their pinterest gets bogged down with screencaps and then like. charms like jewelry searching “charmed aesthetic” or “phoebe halliwell aesthetic” really just doesn’t cut it so what i’d recommend is instead of going through pins, go through boards.
bc like. big difference. other pro tips if you see a board you like, go to the person’s profile and check out their other boards bc odds are you’ll find more you like. another protip if you’re specifically doing ocs typing in oc aesthetic will get you a lot even going to the boards on that as well. yields.
so. you’ve gathered ur images. u need five. open em. i’m making an aesthetic 4 myself which you’ve probably already guessed from the fact i’m putting the finished piece at the top, but it’s not ready yet so it’s still a surprise for me.
cropping. if ur doing a 900x900, use these setting exactly. 1080x1080 use 1080/2 x 1080/3. i’m not doing the math 4 u ♥

most important part? Delete Cropped Pixels. otherwise ur not really doing anything. crop all five images.

but them in ur document. document? psd? ur thing ♥ place them places. u do not have to commit now. leave one middle one blank. it does not matter which one. i personally like to alternate my text pieces if i’m doing a long post like what i did on my ncwotng set. some people keep them all on the same side. this lowkey bugs me i feel like it throws off the Balance but i imagine some people like The Consistency. i don’t. but w/e. it’s up to u as this is gonna be ur set. also like. as you’ve cropped these to x/2,x/3 settings they should fit nice like puzzle pieces : )

the next step i personally like doing is creating by text box with The Color™ do this bc simply duplicating one of ur images, shoving it in the empty slot, and converting into a sharp object. edit contents.


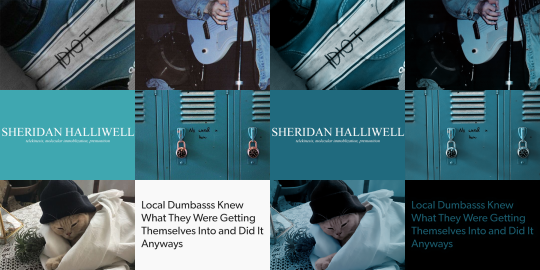
now. obvi i selected these images w a color scheme in mid. i recommend u do the same. even if it’s just vague. they don’t all have 2 fit. this is my example of my sheridan piece b4 or after. tweaking is possible. layers w masks r ur friend. i can talk about them more if need be.
But. back 2 the smart object. brush tool. paint it.
♥
the text i used was times new roman all caps 40pt font 0 spacing for the title and times new roman 14pt font 0 spacing italics for the subheading. here’s my dency b4 and after for comparison

next step is after you have your text in alright, shove everything into groups. mode on “normal”


then you can start editing. the groups let you edit things like lighting and color without touching any of the layers below it 👍
i’m not gonna do a Major coloring tutorial, for lighting i’ll usually tinker with exposure, levels, sometimes brightness/contrast. for colors, color balance + hue/saturation. i rarely touch anything else.
i’ll bring u along 4 the coloring of this one bc i’m gonna add a layer mask.

so the first thing i’m going to do bc the paper itself is already close to the vibe is i’m going to color it normal and just ignore the background

something like that. then i’m going to add a layer mask (square button w the plus sign)
and then i’m going to eye dropper a color off from somewhere else
now i was talking about the “normal” blend mode stops ur color settings from bleeding over onto other images? does not apply to painting on layers but you’re already masking this bad boy, so it doesn’t matter. just don’t say i didn’t warn u
i’d recommend using a really ridiculous blend mode to clean up ur thing at first, i’m using darken which isn’t that wild but like whatevs.
add a layer mask using this button.

select and mask
use this thing to clean up ur mask
okay so i did a lot since we last spoke

but if i impart any lesson to u. it’s: fuck around. find out. that’s literally how i’ve basically done everything. nothing’s ever really gone horribly wrong. click things. see what happens.

okay so now that you’ve kinda gotten everything figured out. change ur text box color again. i’m introducing u to ye ol trick that is not the paint brush. but. hue/saturation on colorize more yeah babyyyyy

ahaha yes. love this bad boy.
Now. Trick To Make Everything Super Cohesive™. put things above All of your groups.

yeah boy.
reorganize ur thing bc u don’t like how it looks.
fuck around w a lot of stuff.
it’s still cluttered.
fuck it. grab a new image.
something like that. never let the fear of striking out keep u from playing the game : )
fuck around a bit more.

vibes♥
save ur image bc u literally Have Not Done That Yet

& then remember the other thing u forgot to do
eyedropper what ur text box looks like move the whole thing to the tippity top and recolor

this is just bc u’ve fuck around a lot w a lot f different settings. this ensures that the text stays the same color u set it as.
okay final step.
turn The Whole Thing into a smart object, smart sharpen
leave out the text box tho. the sharpened text can look weird. it’s ur choice, but with these settings,, cronch.
and wallah. ctrl+shift+s save as png and bada bing bada boom baby. aesthetic
#like i cannot stress how much of this simply is. fuck around. find out.#like just have fun click on things#go ape#like there's no right or wrong way to do this#anyways i used to make these for harry potter on canva ♥ remember ur roots#tutorials#ps tutorial#aesthetic tutorial#ogwork
37 notes
·
View notes
Note
Hello, new editor here. Any tips from this talented editor?
hi hello!! 💐 thank you for the compliment, and welcome to the noteless world of editing!! it's gonna be so much fun 💛
i don't have a bunch of tips cause i'm still learning my way through, but ill try to be useful. i'm gonna focus mostly on photoshop cause that's what i use, so here are some tips and some advice, if you wanna take it.
im gonna divide these into two sections: tips and advice.
tips.
don't use the magic wand. she's a useless little bitch and no one likes her. use the selection tool instead! it's way easier to work with and 10x more useful. you can Actually select stuff,, (is2g the magic wand is the reason im not concerned AI will take over the world).
group your layers. this might be my personal preference, but i found that if your workspace is organised, you make it easier for yourself while editing. group your text together, your textures, your adjustments layers.
adjustments layers are your friends. they're not the best of friends and can be tricky and annoying, but give them a chance. especially selective colour, levels, and curves, my besties. (if you need your colours to be more intense, raise the blacks and the neutrals with selective color.)
layer mask everything. whenever you think to yourself "im just gonna erase directly from the layer, i won't need it in the future", you're wrong. you will need it. you will mess up and then have to Ctrl+Z everything and get mad. just. put a layer mask and delete from that, don't be a hero.
pair the ugliest fonts together. that's how i, personally, do my text placement. you get two ugly fonts that don't really work together and you make them work together. the bulkiest one with the most delicate, two serif fonts, two script fonts, whatever.
stretch, squeeze, distort your textures. beat the shit out of them if needed. rotate them, flip them, cut them. this is how you can use the same texture for multiple panels without them looking the same, but looking ✨consistent✨. also. just add a bunch of textures on top of each other and see how that looks, you might end up with the coolest thing.
keep your psds. i know this might be hard depending on how much space you have on your computer, but i always save my psds, especially for edits i made and i really like. that way, if i like a texture combination or how i made a coloring, i can use it again in the future.
sharpen them bitches. no, for real, sharpen your edits. i wish i could tell you the best sizes for tumblr, but i don't know them and i don't really care, but what helps me the most is sharpening. my usual sharpening settings are Amount: 400% Radius: 0,3px Remove Noise: 0% Remove: Gaussian Blur.
here's a thing i do and idk if it's useful, but. whenever i edit, especially when i make 6 panel edits, i always create a big canvas (3500x4000) and i use it to put my layers in the same order i would on tumblr. so every once in a while i merge my layers and drag them into this bigger canvas. depending on my process, i usually put the option with just coloring first (put them all in a folder), then as i go on i drag the version with the textures (group them again), then the one with text (the final one). it's fun to see your process that way imo and you don't have to keep uploading them on tumblr to see if they look good together.
work with high quality pictures. it makes a huge difference when it comes to the way your edits use. lq pics are such a pet peeve of mine, like it doesn't matter how cool an edit is, if the pics are grainy, i don't like it. if you found a cool picture you like on pinterest but it's tiny, reverse google search is your bestie. drag it there and find a bigger one, trust me it's worth it. if you can't find a big one, but still want to use a pic, use the Reduce Noise option.
this is not a tip, but here's a really cool pinterest board full of textures and whatnot (i know it's chaos, but there are like 8k people in that board so. yk) and here is my deviantart where i have a bunch of psds, textures, and other things saved.
advice.
do not pay for ad*be products. 🏴☠️ everything, they don't deserve a penny. i can assure you there are links for everything on the internet, and if you don't want to risk it, use Photopea!! it's literally the same thing, but online AND free.
let yourself be inspired!!! this is honestly the best advice i can give you. get inspired by other people's edits, by posters you see on the street, by stuff you see online. literally by everything cause it's the only way you're gonna try new stuff and evolve. even if you don't end up making the same thing you originally intended, you'll get to try new stuff and learn.
ask other editors if you want to know how they did something. if you see something and think it's cool and want to do it yourself, ask. most people here are absolute sweethearts and will definitely help you.
watch tutorials. i'm not even kidding when i say that most of the things i know how to do i learned from tutorials on youtube or tiktok.
learn the shortcuts! this is. so useful. i'm still learning a bunch of them, but knowing the shortcuts makes editing a little quicker and i'm, personally, all for getting shit done faster. (for almost all the photoshop tools, you can press the letter for it and it will switch to it. gamechanger.)
i said i will focus on photoshop, but another advice i have is play with other programs. i started editing in PicsArt and i still do sometimes cause it's fun. i made really cool edits using Polarr. so try them all, see what they bring to the table and see what works for you.
take breaks. this is something i always tell my friends whenever they say they think their edits are ugly, and also something i do when i feel like giving up on an edit. save the psd, close photoshop, go take a deep breath, and come back. sometimes, after you work on a thing for a long time you really start to get pissed at it especially if you don't feel like it's coming along. i think it's important to take a break from it and come back with new eyes. but i'm also a big believer in "fuck you, i'm gonna scrap everything and try again", so you do you.
click on everything. okay, listen, i'm not joking. you have no idea how many new things i learned just by clicking on random stuff in photoshop. but make sure you're not in the middle of an edit when you do that...
here's a harsh truth. your first edits will suck. i swear everything i made on my old blog is horrendous and i don't even look at them, but i did learn stuff while making those edits. so don't let yourself be discouraged by that, and keep learning.
don't limit yourself to one style. unless you want to. this is funny because i don't think i have a style but people keep telling me my "style" is so distinctive. i don't like to limit myself i don't like repealing myself, but that's me. i am a huge believer in "you don't have to be good at everything, you just have to be the best at something", but in order to become the best at that thing, you must learn how to do the others too. so make posters! make graphics! make gfx! make gifs! try everything and see 1) which one is the prettiest, and 2) which one brings you the most joy while creating (or at the end of the creative process), and then try to find a balance between them. i don't think i make the best gifs but learning how to make them was very useful cause now i know how to work with gif overlays. so you learn something from everything.
have as much fun as you can possibly have. this is corny, but at the end of the day, we're doing this shit for free on a website full of people who forgot the reblog button exists. so have fun and try not to pay attention to the notes. what matters is doing something you like and having a blast!
5 notes
·
View notes
Note
I really wouldn't mind you aiding me with some tutorials love
giffing tutorial/resources
hi anon! sorry it took me so long to answer. i figured this might be helpful for others out there who have asked me similar questions, so i’ve compiled a pretty comprehensive list of tutorials/resources. idk about others but when i was new to giffing, it took me a lot of painful effort to go around and look for resources, so i’m putting it all here to make it a little easier!
i download videos using 4k video downloader. it will download very good quality 1080p videos in .mp4 format. if you’re downloading a 4k video, make sure to change the setting option to .mkv so that you get 4k and not 1080p—for obvious reasons since you want the highest quality.
i rely on kpopexciting to get .ts files — which are basically raw, very high quality video files for live performances. they are much less grainy than .mp4 versions of live performances—which are the ones you’ll see uploaded to youtube. i’ve found that 4k videos (in .mkv) are just as good quality as .ts, but obviously you will rarely see live performances in 4k, so get .ts when you can!! you can also try to find .ts files on twitter, but you may have to do a lot of digging. i wish i could recommend you twitter accounts, but the ones i used to go to have been very inactive/taken down all their drives :( but this website is really nice and updated frequently so i would recommend it!
vapoursynth links + download. the reason you would use vapoursynth is to resize your gif, while maintaining the optimal quality of the gif. if you gif without vapoursynth (.ie only using photoshop), it will still be fine, but the image quality may be grainier. also, you will definitely need vapoursynth to gif .ts files —more will be explained in the tutorial i’ve linked below. i would recommend that you have a high processing/lots of ram/newer desktop or laptop to use vapoursynth so that 1, your computer isn’t fried and 2, your vapoursynth process will go a lot faster. i am using a 2017 macbook pro for all my work, and it runs pretty well, but my laptop still gets pretty hot so just make sure you’re not running a million things in the background while using adobe products and vapoursynth lol. i used a pretty old and beat up 2011 model macbook air back then, and i will say that yes vapoursynth worked and ran on it, but it took much longer, and basically fried the laptop’s battery (aka i had to get the battery changed twice and the laptop would die randomly) but issok it was a school borrowed laptop so i didn’t feel too bad lol. im just saying this as a precaution, to preserve the health of your electronic devices!! but don’t be afraid to use vapoursynth! you should still try it at least once.
thank you to @realstraykids for this super detailed, really nice tutorial! it includes how and where to download videos, how to gif using vapoursynth, using photoshop, comparisons, coloring, and pretty much all you need to know. 10/10 would recommend
thank you to @dreamcolouring for this lifesaver!!! the best and easiest way to blur out unwanted captions/objects in your gifs. i recommend doing this step after converting your frames to video timeline and before you do sharpening and coloring. another tip i’ll add is to feather the selection you’ve made right before you click on “add vector mask” —this will make sense once you’ve read through the tutorial. feathering it will make the blurred spot less noticeable and more subtle.
i use this generator to create gradient colored captions! copy and paste your text, then select the colors you want. generate the code, and copy it. change the settings of the text editor on your post to HTML. paste the code, preview, and voila! add elements <blockquote>,<b>,<i>, etc as needed. see more on colored captions in this tutorial by @kylos --i believe op mentioned a different and better color generator but for some reason it won’t work for me :( hopefully it works for u! basically same idea as the previous generator i mentioned.
my own mini tutorial/workflow process of making gifs. this includes working with a .ts file, vapoursynth, photoshop, coloring, watermarking, etc. and a few of my own tips below:
if you are working with an .mp4, you do not have to make any changes to the preprocessor/denoise filters/sharpening in the resizing part of vapoursynth—it doesn’t make that big of a difference if you do. but if you are working with a .ts file, definitely do make those changes,, that’s the whole reason you have vapoursynth. with an .mp4, i like to use vapoursynth to just resize, but i don’t add any additional settings. i use smart sharpen in photoshop to sharpen it, which is pretty good on it’s own (at least in photoshop 2020!).
my rule of thumb is to do add .02 seconds when i am setting frame delay. so if when you first import the frames, they are at 0.04 seconds, i usually change them to 0.06. of course, this is my personal taste—you can make all your gifs faster or slower depending on how you want em to look.
if you are on a mac, you can screen record by pressing Command+Shift+5 (it’s a shortcut to quicktime screen recording). I only screen record for things like the beyond live concert or other live streamed events. the image quality of the screen recording, in my experience, is actually pretty good. when you gif the screen recording however, you may notice that it adds extra frames that you don’t need. by that i mean duplicate frames. you could keep the duplicate frames but that just means the size of your gif is going to be much bigger (keep in mind the limit is 8mb). in order to remove those duplicates, my only solution has been to remove them manually (by holding Command while selecting), or when you are importing the video to frames, select the option to “limit to every 2 frames”—but this method will be less precise and still not as good as manually removing frames. if you remove the duplicate frames, this means you will need to set the frame delay even slower, to make up for lost frames. in my experience, fps(frames per second) and frame delay work in conjunction. so for example, if i delete every other frame because they are duplicates, but the starting frame delay is 0.02, i am now going to change it to something like 0.05 (so i added 0.03 seconds rather than my usual 0.02). if the duration length and the image dimensions of the gif are short/small, feel free to keep the duplicate frames in—i only delete duplicate frames in order to keep my gif under the 8mb limit. then, if you keep the duplicate frames in, continue with your standard frame delay preferences. now that i’m writing this im realizing this might not make a lot of sense lol.. but don’t worry about it for now and if you run into trouble w screen recorded gifs then you can come back to this for reference. again, this is only my experience recording on a mac—it may be a lot different if you use a screen recording program or are on a pc.
i don’t really use .psd templates because i like to give every gif/gifset it’s own unique coloring—so i remake the coloring every time, but if you get into a rhythm it’s pretty easy. there are a lot of nice coloring tutorials out there, too! my personal coloring adjustments in order: levels, exposure, color balance, selective color (if needed), vibrance, photo filter (if needed), color lookup (i use 2strip most often and i put it on ‘color’ blending mode). don’t forget to adjust the opacities and fills of the ‘color lookup’ adjustment layer in case it’s too strong. go back to correct each adjustment layer as needed. then, when you’re done and satisfied, group all those layers, copy the group (you can do an easy command+c), and paste it onto the next gif you’re working on for easy workflow.
if for some reason you can’t see the frames when you import your layers/video, it’s likely because your ‘timeline’ window isn’t showing up. just go to the window menu on photoshop, go to the bottom and you’ll see ‘timeline.’ make sure it has a check next to it.
i recommend watermarking your gifs because a lot of people like to repost tings these days 😠 - so make sure u got your brand on it! i keep my watermark saved to my ‘libraries’ in photoshop so it’s ready when i need it. i use the blending mode ‘overlay’ and adjust the opacity, but if you don’t want to do that you can also add a stroke/shadow to your watermark/do all sorts.
tag #nctinc for your nct creations and #jenonet for your jeno creations!!
here’s my own mini tutorial (well not much of a tutorial ig more like a work process vid?): took about ten minutes including the time to search and download the video (but i didn’t record that part i trust yall know how to do that), vapoursynth, and exporting. i hope this helps somewhat! feel free to ask more questions whenever :)
youtube
keep in mind that giffing takes a lot of patience, energy, and experience—so don’t worry if it takes you a bit to figure things out or if your gifs don’t turn out the way you want them to the first time around. we all start at the same place and all run into problems. i know giffing can sound intimidating and seem like a lot of work, but i promise, once you get into a routine, giffing is going to happen in minutes—and you’ll get beautiful gifs. have fun! 😊
#anon#answered#tut#tuts#giffing tutorial#should i make a tut/resources post on gfx? not rly sure if gfx can be taught.. it's like a lottt about personal style imo lol#hope this helps!#not just for anon but for anyone
117 notes
·
View notes
Note
What are your thoughts on people who goes all out on the aesthetic for their blogs? Do you think they’re have the right to express their creativity however they want? && Other than roleplaying, what’s your favorite hobby?
✨ @deductry. meme. still accepting!
17. What are your thoughts on people who goes all out on the aesthetic for their blogs? Do you think they’re have the right to express their creativity however they want?
i think its fine as long as aesthetic doesnt hinder the ability to make a reply i can read. some people really do be out here triple spacing their words, adding bold, italics, upside down letters, strikethroughs, underline, and everything else and for what???? for a reply that the kids i used to teach could write. and they were like 4 years old. lol. thats sad....... that’s when i know someone’s not confident in themselves
dont rly understand why ppl trend chase. ive noticed ppl putting dividers in their replies now and im just??? mystified???? what is this... what does it add to the reply.... which if ppl wanna do it then fine but please consider this: my blog is pretty and its bad enough ugly icons that dont match them are ruinin the vibe now mfs wanna add a border that is totally irrelevant to the actual reply???? i.......... im gonna get a divider / border like these 2001 old web ones and then force everyone to look at it on their blog then the concept becomes goofy


i think id be fine with aesthetics if they didnt involve those chunky dunky ass container themes with super busy backgrounds + 50 textures, the crispiest color psds, promos that all look Exactly alike, navigation that u cant see, 20 x 20 icons the size of a cheerio, 4px text, the shittiest formatting on this side of lady gaga's america, and actually gave some sort of idk. pizzazz to the muse.
like if the aesthetics are important then at least let them tell a story too. and authentic. not something thats bein done cuz everyone else is doin it. id like to think i go balls to the walls with my blog too but you walk into my blog and you know it’s a myspace era throwback because that’s what my muse is supposed to be.
everyone can do whta they want! but if its uglee imma call it dat so......
30. Other than roleplaying, what’s your favorite hobby?
im a musician before im anything else so im probably in my daw fucking around. producing something. ive recently gotten into ambient electronica / ambient techno production so im finding joy in stringing together a bunch of synths til i hit the 6 minute mark, adding random bitcrush effects, some percussion just so it looks like i actually did some work, maybe a vocal sample of someone whispering.......... and then i delete it gfkldjgslf. im actually working on a beat tape tho. its been a work in progress for the longest time. but if i actually managed to find my voice as an electronic music producer then i guess i could get somewhere. using a daw is new to me. im more of an instrumentalist. drummer and flutist, primarily. but i dont have any drums and my flute is at my grandmas so there's that..............
i also like to read!!! i buy like 3 - 4 books a month. havent bought any since like november. i only bought two i think. but its fine because ill always revisit my recent favorites. ummmmm... video games. i rly like those old school ass niche ps2 era games like mr. mosquito, space channel 5, kinetica, etc.
wow do i luv internet drama. so im probably reading up on someone’s dumb bullshit on reddit or something!! or youtube. i love internet drama, its my favorite thing on the internet. i live for watching people be the very worst!!! other than that??? i like to collect and try out different skincare and research ingredients cuz its just fun. might go to school to be an esthetician when this whole covid19 panera bread is over.
i love collecting obscure jazz records from taiwan.
#( 🌙 OOC! RULER OF THE VOLCANIC DIAMOND PLANET. ✨ )#/ i dragged a good bulk of the community but that's just how it has to be.#deductry
9 notes
·
View notes
Last Seen Blogs
kou
す

loqovowenu
Untitled
annabellaswarovski
S 0 U H A dz

undead2d
WHEN SOMETHING GOOD HAPPENS

oztasgallery-blog
گالری ازتاش 👙👕🛍