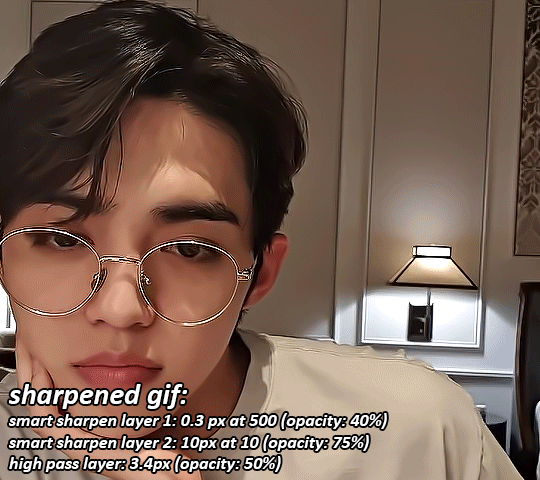
#the video was only 720p so the quality is :
Text
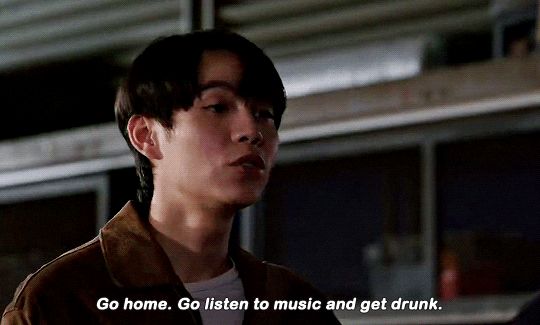

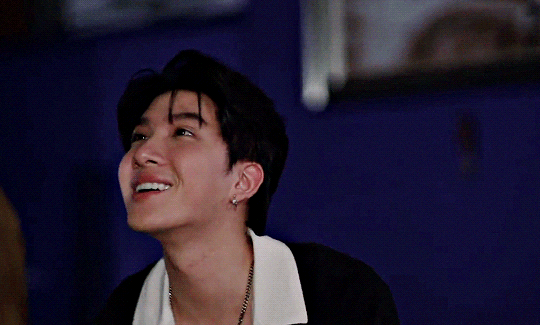
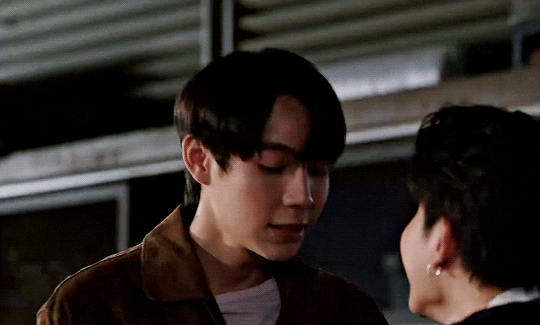
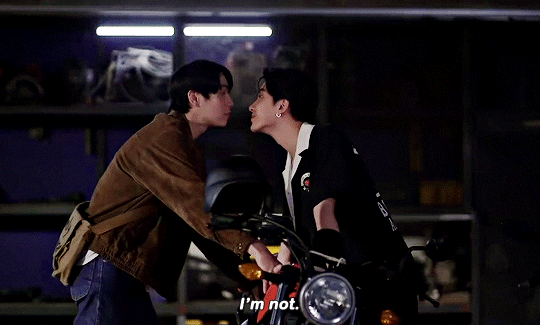

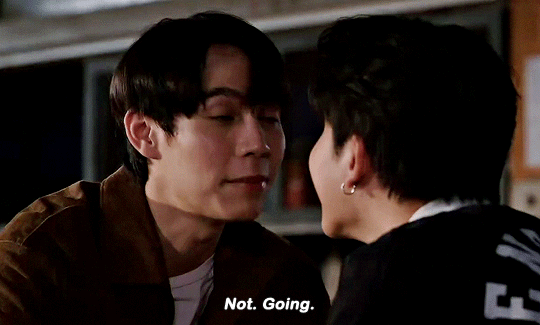
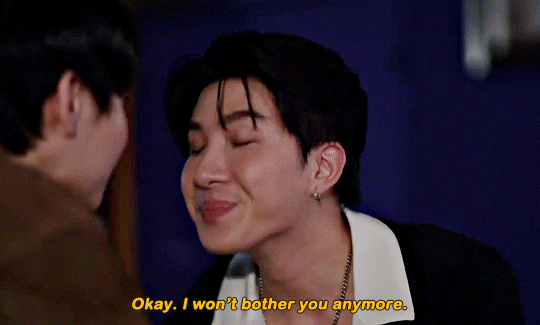


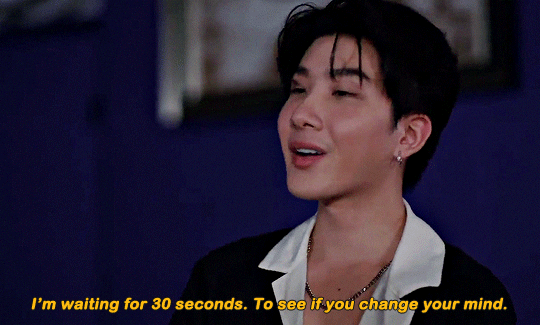
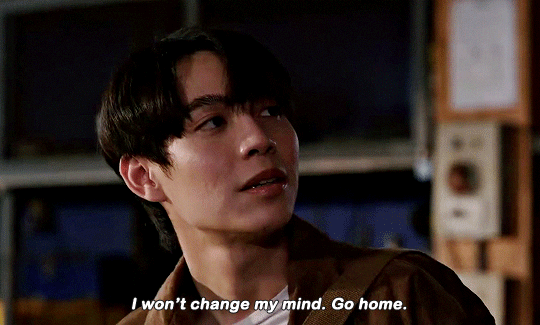
I have to go now, though. [...] You're not gonna come with me anymore? Want to go to my place and listen to music? I love the songs you play for me. I bought a lot of vinyls. Come on. See? You can't get enough. No thanks. I have to go back home. As for you...
ONLY FRIENDS | Deleted Scene
#only friends the series#ofts#only friends#first kanaphan#khaotung thanawat#raysand#sandray#my edits#the quality of the video was horrible like a 720p twitter video will never have great quality but this was something else#and i'm not talented enough to make gifs look pretty and crisp#so it is what it is ig#onlyfriendsedit
850 notes
·
View notes
Photo


🤐🤐🤐
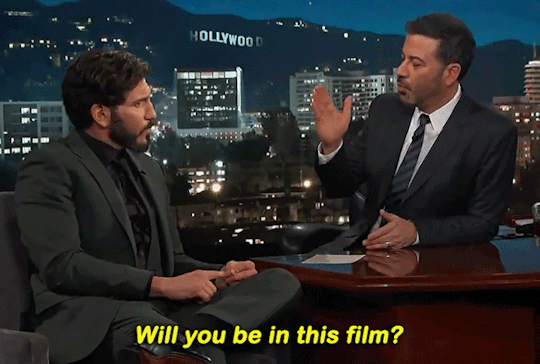
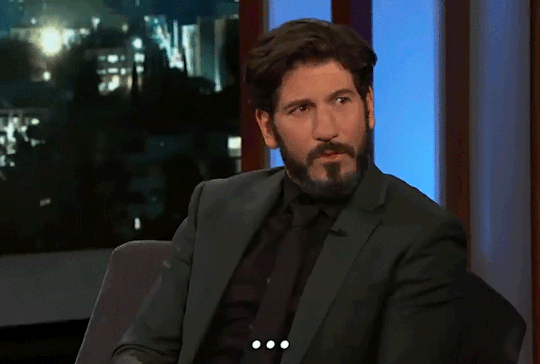
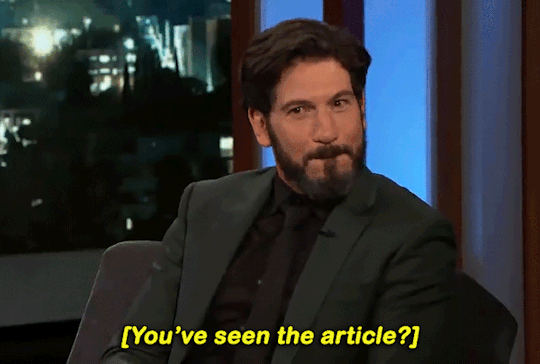
#the lil smile when he barely nods COME ONNNNNN#jon bernthal#jonbernthaledit#i had to cut out so many frames from the second gif but he literally just sat there like that for so long before smiling#he's the most adorable thing ever i just wanna squeeze him and—#*mygifs#i'll NEVER forgive this video for only being 720p i pologize for the quality but i needed to gif this i needed it in my bones#also sank you to chelle i saw this in our early convos and had to gif it
110 notes
·
View notes
Text
:) i own seasons 1-5 & 7 on DVD and 6 on blu-ray now
#VERY EXCITED TO RIP THE DELETED CEREAL DEFENSE SCENE a little bummed itll only be 720p from the DVD but hey at least i have it#ada speaks#should all be here mid-may! still hoping to find a half decently priced season 8 blu ray but thisll be good for now#one of the other wiki editors has 8 on blu ray so at least coverage is okay for that for now#gotta get sunny christmas and season 9 eventually too#THIS MEANS DISGUSTINGLY GOOD QUALITY FOR MY VIDEO EDITS AND STUFF TOO :^)))))#no more lossy conversions with fucked framerates#im so excited teehee
10 notes
·
View notes
Text
Really awesome command-line programs I've discovered on GitHub
I'm a data hoarder, so all of these have to do with downloading and saving media. I also use a Mac, so all of these are MacOS-compliant via Homebrew. If you also use a Mac (or Linux), do yourself a favor and install Homebrew via Terminal right now- all you need to do is copy-paste a line of code into Terminal and it will open you up to tons of awesome programs that normally only run on Windows.
Anyway, onto the list!
Yt-dlp (Youtube/Video downloader): On top of letting you rip Youtube videos directly from the site, this program supports a huge array of other video/media websites. The program is highly customizable as well; I would highly recommend at least installing FFmpeg, which allows you to download videos in quality higher than the default 720p. Here's a guide on how to do that for Windows and I wrote a guide here for Mac (I forgot to write in the guide that you should install FFmpeg via Homebrew).
Mangadex-dl (Mangadex downloader): Allows you to download manga directly from Mangadex, the hub of scanlation. Like yt-dlp it is customizable and you can pick which chapters you want to download (useful if you only want to download current chapters you haven't gotten before).
Gallery-dl (Bulk image downloading): A godsend for an art-hoarder like me, this program allows you to bulk download things like Pixiv pages, Twitter galleries, Deviantart galleries, Instagram pages, etc. Like yt-dlp it is highly customizable. Some websites (like Pixiv) may require user authentication; the GitHub page outlines the steps each authentication process requires.
List of other command line programs you might find interesting on GitHub
I'm sure I'll add to this list as I find more cool stuff on GitHub!
631 notes
·
View notes
Text
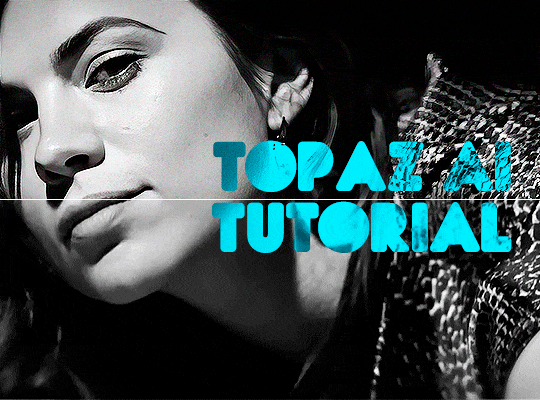
TOPAZ AI TUTORIAL
i was asked to do a tutorial for Topaz AI (a software that enhances screencaps), so here it is! :)
[tutorial under the cut]
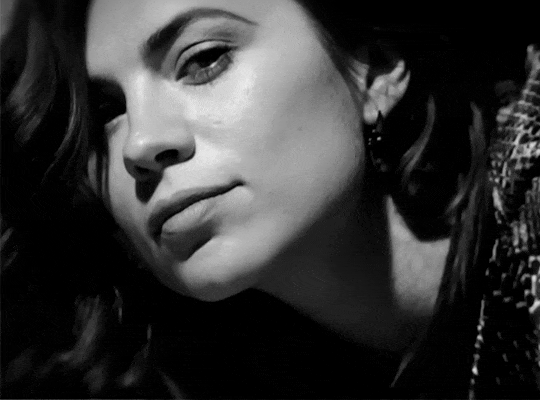
i’m going to gif a 720p YouTube video from 12 years ago as an example. it’s the bottom of the barrel when it comes to image quality, but in the end, you won’t believe it was once so shitty. here’s the gif, without any editing:
THE APPLICATION
Topaz AI is a paid software for image enhancement. you can download it for free, but your images will have watermarks. here's a random link that has nothing to do with this tutorial.
you can use Topaz AI as a Photoshop plugin or use the software separately. i will explain both methods in this tutorial.
USING SEPARATELY
it’s the way i do it because it’s more computer-friendly, the plugin can take a toll on your PC, especially when you’re dealing with a lot of screencaps.
you first take screencaps as you normally would (if you don’t, here’s a tutorial on how to do it). open Topaz AI and select all the images. wait a while for the software to do its thing.

on the left, there is your screencap untouched. on the right, is your edited version. if you click the edited screencap and hold, Topaz will show you the original, that way you can compare the versions even better than just looking at them side by side.
Topaz AI will automatically recognize faces, if any, and enhance them. this can be toggled off, by disabling the “recovering faces” option in the right panel. it’s always on for me, though. you can tweak this feature by clicking on its name, the same thing for the others.
Topaz AI will also automatically upscale your screencaps if they’re too small (less than 4k). it will upscale them to achieve said 4k (in this gif’s case, the original 1280x720 screencaps became 4621x2599). i suggest that you let the app upscale those images, giving you more gif size flexibility. you can change into whatever size you want if you want something less heavy to store. don’t worry though, even these “4k screencaps” are very light megabytes-wise, so you won’t need a supercomputer. it might take a while to render all your screencaps, though, if you’re on a lower-end computer. (the folder with the edited screencaps ended up being 1GB, but that’s because it contains 123 screencaps, which is a lot of screencaps for 4k giffing).
two options won’t be automatically selected, Remove Noise and Sharpening, you will need to enable them to use them. rarely i don’t use Remove Noise, as is the best tool to remove pixelization. the Sharpening option depends on the gif, sometimes your gif will end up too over-sharpened (because of Topaz’s sharpening and later your own). that said, i used the Sharpening option on this gif.

next, select all images by clicking the “select all” button. you will notice that one of the screencaps’s thumbnails (in my case, the first one) will have small icons the others don’t have. this is the screencap you enhanced. you will need to click the dots menu, select “apply”, and then click “apply current settings to selected images”. this way, every screencap will have the same settings. if you don’t do this step, you will end up with one edited screencap and the rest will remain untouched!

all things done, click “save X images”. in the next panel, you can select where to save your new screencaps and how you want to name them. i always choose to add a topaz- prefix so i know what files i’m dealing with while giffing.
just a note: if your way of uploading screencaps to Photoshop is through image sequence, you will need to change the names of your new screencaps so PS can perceive that as a sequence (screencap1, screencap2, etc). you can do that by selecting all the screencaps in your folder, then selecting to rename just one of them and the rest will receive numbers at the end, from first to last. you don’t need to rename them one by one.
here’s the first gif again, without any editing:
without Topaz enhancement but with sharpening:

without sharpening, only the Topaz enhancement:

with Topaz enhancement and sharpening:
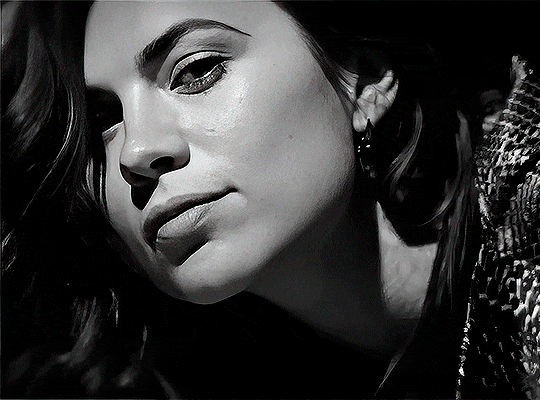
her skin is so smooth that it is a bit unrealistic. i could have edited that while tweaking the “Recovering Faces” option and/or the “Remove Noise” option, but i prefer to add noise (filter > noise > add noise) when necessary. this way, i don’t risk not enhancing the quality of the screencaps enough.

i added +3 of noise, making the gif look more natural. it’s a subtle difference, but i thought it necessary one in this case. you can continue to edit your gif as your heart desires.
VOILA! 🥳
AS A PHOTOSHOP PLUGIN
if you have Topaz AI installed on your computer, Photoshop will recognize it. you will find it in filter > Topaz Labs > Topaz AI. while in timeline mode, select the filter. the same Topaz AI window will pop up and you can tweak things the same way you do when you use the software separately. by using the plugin, you don’t need to upload your edited screencaps or use screencaps at all, a video clip (turned into a Smart Layer, that is) will suffice. the downside is that for every little thing you do, Topaz AI will recalculate stuff, so you practically can’t do anything without facing a waiting screen. a solution for that is to edit your gif in shitty quality as you would edit an HD one and at the very end, you enable Topaz AI. or just separately edit the screencaps following the first method.
this is it! it's a very simple software to use. the only downside is that it can take a while to render all screencaps, even with a stronger computer, but nothing too ridiculous.
any questions, feel free to contact me! :)
#*#*tutorial#alielook#usershreyu#userlaro#userchibi#tusernath#usersanshou#userbunneis#userzil#tuserlou#jokerous#usersnat#userdavid#userbuckleys#userbarrow#gif tutorial#completeresources#ps help#resources
106 notes
·
View notes
Text
FOR THE LOVE OF GOD PLEASE STOP REPOSTING GIFS.
“bu…bubu- but they’re just wittle pixels and digital images rwight 🥺” no. we spend hours on gifs or even one singular gif to make edits for FREE on tumblr dot com. name a person who asked us to do this. no one!! exactly!! we make gifs bc its enjoyable and fun but people like reposters suck the fun out of it!!! and do NOT go and tell us that “gifs aren’t that hard to make” baby girl what do u think we do? go online and search for a video downloader and download it at like a crappy 720p and go to like literal ezgif dot com and all the gifs just MAGICALLY have their effects, typography, colouring, blending, animation, quality all up and ready? why dont u try and make a gif. hm.
and also, @ all of you “gif collectors” or some fanfic writers. lemme tell u a secret. an itty bitty secret. did u know… theres this really cool thing called PROPERLY CREDITING? im not talking about a stupid “credits to the owners” no. it isn’t that hard to properly source the creators or accounts.
that wasn’t so hard, hm?
also oh my god, do NOT go around saying you made these gifs when it is so obvious you didn’t. no bff, it isn’t a coincidence we have the same sharpening AND colouring settings.
and hey, i’ll stop my angry typing for a minute and just say that if you wanna learn how to make gifs there are plenty of amazing accounts and tutorials that are incredibly detailed. here are a few i recommend:
how to: make high quality gifs by sith-maul
giffing 101 by cillianmurphy
giffing and colouring tutorial by sashafierce
how to fix and avoid orangewashing characters by maxchapman
how to fix and avoid white/pink/yellowwashing by jeonwonwoo
how to: colouring east & southeast asians by blueshelp
pastel gifs: a tutorial by completeresources
how to fix and avoid whitewashing in pastel gifs by fadenet
and for those who don’t want to pay/ t*rr*nt photoshop:
free giffing tutorial by ashleysolsen
photopea gif tutorial by lacebird
and @usergif has a bunch of directories and navigation for tutorials and inspiration!
again, there are so many useful tutorials if you’d just look.
i know this probably won’t stop all reposters (unfortunately) but i hope those reposters that are reading this realise how messed up stealing gifs are. it isn’t funny or cool to see gifs that you’ve spent so much time on only to be reposted here or on other sites without credit or being claimed as someone elses.
we’re just asking for a proper credit on your post or maybe even stop reposting in whole. im sure you had good intentions in making those posts, but you have to understand how much it hurts. at this point, we have to put our watermarks in the middle of our gifs to avoid people cropping them out.
and please, PLEASE reblog edits. you have no idea how diminishing it is to see such a crappy like to reblog ratio. remember this hellsite has such a crappy algorithm so reblogging is essentially one of the only ways to give posts more traction
AGAIN. dont repost gifs. dont steal gifs without credit. dont belittle gifmakers. just stop being so disrespectful and rude and have a brain for once. thank you for reading.
edit: ive noticed ppl asking why i kinda like insulted those who use 720p and ezgif, im really sorry if i made it sound like a bad thing !! i was just very angry writing this aaaadjskdks gifmaking, HQ or not is valid and nobody deserves to get their creations stolen !
2K notes
·
View notes
Text
hi everyone! I've gotten several requests to make a tutorial on how to make gifs for someone just starting out and I finally got around to slapping a tutorial together.
This tutorial will cover:
software recommendations
choosing what to gif
creating a gif step by step with probably a lot of unnecessary detail
some tips and tricks:)
(This particular tutorial will not cover how to find tv and movies to download and gif, or any specific instructions on coloring. only the basic gif making process.)
so for the purposes of this tutorial, we will be using Adobe Photoshop, which is the most common program for making gifs, and the one I recommend. the version you have doesn't make a major difference in terms of capabilities but the interface may be slightly different looking if you have an older version or a different type of device. you cannot make or edit gifs in any mobile version of the photoshop application.
Optionally, we will also be using Adobe Premiere Rush/Pro or another video editing software of your choice. wherever you are downloading Photoshop, whether from Adobe or a third party, you should easily be able to acquire Premiere as well.
I am aiming to be as detailed as possible in this tutorial, so it may sound more time consuming than it really is. once you get the hang of things, it goes fast. the most time consuming part by far is the editing and coloring.
in my opinion, one thing that majorly saves time while giffing is knowing your keyboard shortcuts and using your mouse/trackpad as little as possible. I will be going over these in this tutorial as well.
before we begin, some general tips:
gifs of single shots that do not cut between angles or subjects generally will look the best, barring exceptions
for a single gif set, choosing scenes and shots with similar lighting will be easiest to get to look uniform when compiled together, since editing wildly different looking scenes to have similar coloring and lighting is hard and takes some practice!
avoid shots that will require you to majorly crop or zoom to properly frame the subject, as this will greatly diminish quality
speaking of quality, gifs will look best using 1080p video, but you can get away with 720p as well. I would not recommend giffing with anything lower resolution than that
Tumblr's upload capacity for image and gif files is 10mb. be sure when exporting your finished gif that it is under that size. if it is a bit over, you can try trimming a few frames off your gif in the video timeline.
if you get frustrated, don't give up! giffing is hard and complicated especially if you are new to photoshop. I tried to make this tutorial as detailed as possible so it's easy to understand (although im sure I still forgot some stuff)
ok onto the tutorial!!!
STEP ONE: choose what range of frames you want to gif, and how.
once you have decided what you want to gif, there are two main way to convert your episode into a range of frames to make into a gif. the first is by screencapping. this involves downloading a program like mplayer or vlc which can be used to convert video files into "stacks" of screencaps, which can then be separated into whatever range of frames you want and imported into photoshop. this is seemingly by far the most common method I have seen amongst gifmakers*, but personally I don't care for it and I think it's more confusing and time consuming overall, so I will be explaining the second method: importing video frames to layers.
now, normally what this would mean is opening the full episode in photoshop and using the pathetic little playheads on either end of the scrub bar to trim the file into a clip. this is where your video editing software comes into play.
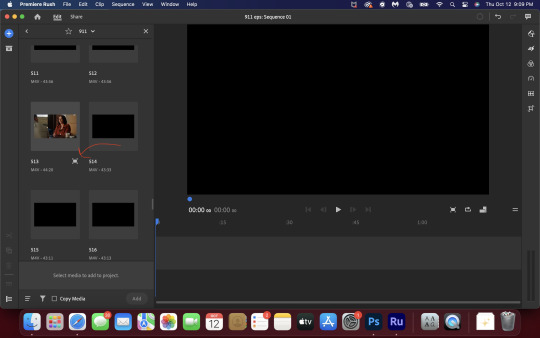
open whatever episode or movie you want to gif in your program. if it is a large file like a long movie in 1080p, this may take a few seconds. like I said, I am using Premiere Rush. I will be using a random episode of 9-1-1 for my example gif.
in your media browser, hover over whichever episode you want (you can also just add the whole episode to your project and scrub through, but that can take longer unless you know what time stamp you're after). click the fullscreen button by the bottom righthand corner.
now you can scrub through and trim the episode before you even import it to premiere. this makes trimming your clip even easier.
use the trim bar (yellow outlines) to trim as close as you can around the scene you want to gif.
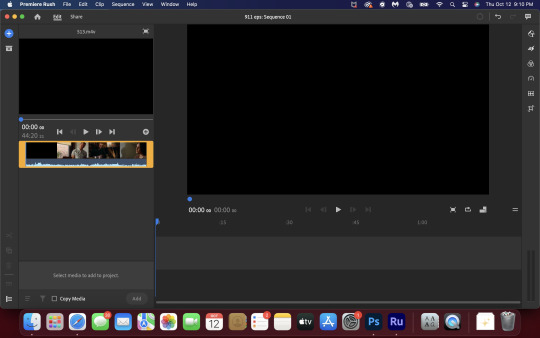
then click this plus, and then "add" below. this will add the clip to your project.
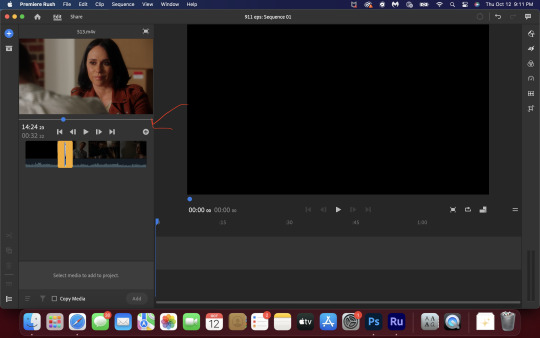
now, move the blue playhead up to the frame you want your gif to start on. then, use the scissors button off to the left to slice the clip. select the portion before the playhead, and delete it.
now move the playhead to where you want the gif to stop. a good length for most gifs is around 1.5-2 seconds in my opinion. some may be shorter depending on how long the shot is, or longer if you plan on making them smaller (remember, the uploading capacity on Tumblr is 10mb per file.) trim again, now delete the portion after the playhead. you can also use the left and right arrows beside the play button to move frame by frame, and you can adjust the side of the horizontal scroll bar below your clip to “zoom” in on it and make scrubbing easier.
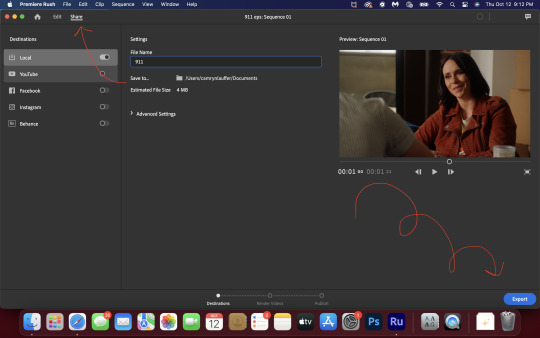
once you have your clip, go up to where it says "share". your clip will be rendered, and then you can click export to save it.
repeat step one as many times as you want for each gif. I know this may sound complicated, but like I said above once you get in the rhythm this step takes only a few seconds.
STEP TWO: create your gif!
close premiere. open photoshop. head to the control bar at the top. select file > import > import video frames to layers.
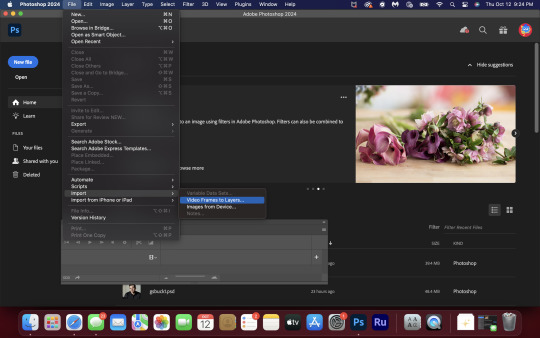
navigate to whatever folder you exported your clip to. select it, and hit enter. a second popup will appear asking you to select your range of frames. since you have already trimmed your clip to your liking, simply hit enter a second time.
now your screen looks like this, and we are going to crop and resize our gif! (troubleshooting: if you do not see the timeline bar at the bottom, select window from the control bar, scroll down, and make sure timeline is selected as part of your workspace. Adjustments and layers should be there automatically but if not add them too).

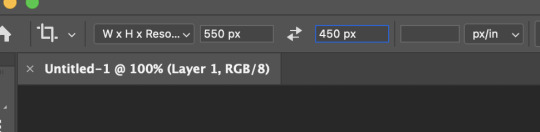
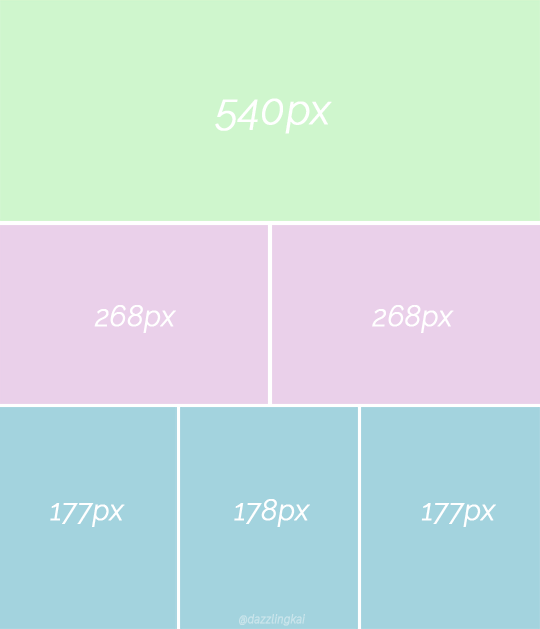
Tumblr posts are 540px wide, so in order to make my gifs as small as possible while maintaining quality, I typically crop my gifs to be around 550-600px wide, with varying heights depending on what shape I want the gif to be. experiment with this a little and decide what works for you. just don't make the width lower than 540px. once you have the portion of the frame you want inside the cropping grid, hit enter again. sometimes you have to hit it twice.
here are the measurements I am using for this gif
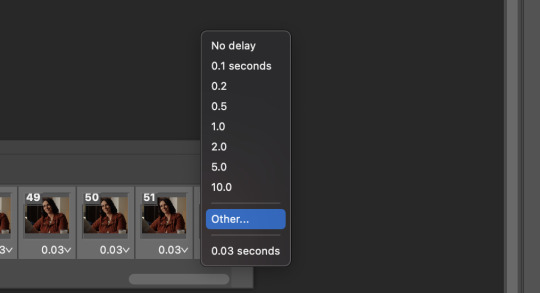
now in your timeline, select frame 1. hold down the shift key and scroll to the end to select the very last frame, thereby highlighting them all. from here we will edit our frame delay rate. photoshop will automatically set it to .03s, which will make your finished gif awkwardly fast. I typically use .05s, or .06s if I want a gif to be subtly slower (this comes in handy if the shot you are trying to gif is very short). anything longer than .06s will look weird though. choose "other" from this menu and type in your delay rate. make sure not to miss the zero after the decimal.
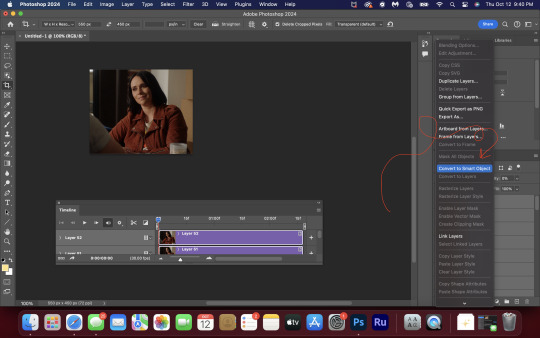
once you've set your frame rate, go to the other end of your timeline and click here to convert your frames into a video timeline.

then press option + command + A (on Mac) or windows + alt + A (on PC) to select all layers. then right click (control + click with a trackpad) on any one of the highlighted layers in your layers tab off to the right. scroll down in the popup menu and select Convert to Smart Object.
THAT'S IT!! CONGRATULATIONS!!!!! WE HAVE GIF!!!
from here comes the fun part!! you will begin adding action filters like sharpening as well as adjustment layers to color and edit your gif. experiment with different adjustments and styles until you find something you like. too many adjustment layers will up the size of the finished gif though, so I tend to keep mine to 3-4 layers max unless its a really hard to color scene. if anyone is interested in a separate coloring tutorial, please let me know!
once you are finished editing your gif, click file > export > save for web (legacy) OR hit shift + option + command + S. play your gif in the export window to make sure it looks okay, and then hit save!
I hope you guys find this helpful and informative! please hit up my in box if you have any questions or if anything doesn't make sense. happy giffing!!!
*one reason people seem to prefer screencapping to this method, is saving all the individual clips as video files does take up a lot of space on your scratch drive, which in turn can cause your computer to work slowly or crash programs. this can be rectified by making sure to delete the clips from your computer once you are done making the gifs. another space hoarder to look out for is the proxy files of your episodes that will be automatically saved to your hard drive whenever you add an episode to your project in Premiere. Periodically, go through your storage and delete all the .proxy video files. this will not delete the original episode files, only the proxy files created by Premiere.
tagging some mutuals to sb hehe: @shitouttabuck @lover-of-mine @honestlydarkprincess @eddiediaaz @compactdiscmp3 @eddiebabygirldiaz @bigfootsmom @callaplums @athenagranted @firemedicdiaz @sibylsleaves @loserdiaz @buck2eddie @diazass @eddiediaztho @giddyupbuck @monsterrae1 @icecreampotluck @sunflowerdiaiz @swiftfootedachilles @singlethread @aziraaphales @911onabc
117 notes
·
View notes
Text
so you want to use OBS
hello! i’ve decided to compile information on my OBS setup and some resources that have helped me along the way. this is mostly for personal reference, but maybe others can make use of this information!
some notes before i get into it:
i use OBS for both offline recording and (twitch) streaming. any footage i record is edited using DaVinci Resolve 18, which is free.
most of my OBS captures are of video games (through a USB capture card, specifically elgato), and the occasional screen/application capture (like clip studio paint, and sometimes PC games).
as such, the information here is reflective of these experiences. this post is not comprehensive to all of OBS’s features- this is just an overview of the settings and configurations that are most relevant to me.
with that out of the way, all the information will be under the cut!
Basic Setup
file format:
how to change: settings -> output -> recording -> recording format -> press “apply” once finished!
I save most of my recordings as .mkv files- it supports multi-track audio! i prefer .mkv over .mp4 because if your power goes out, you still have a recording to work with.
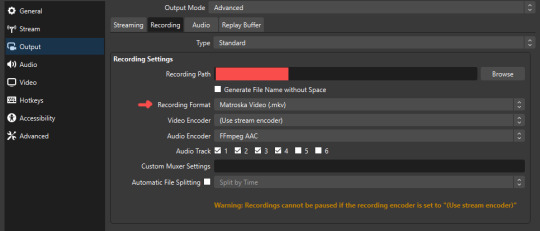
.mkv files can be read by DaVinci Resolve without an issue- but for Adobe software, they'll need to be remuxed to .mp4 within OBS! (file -> remux recordings -> press the … to select a file -> press the “remux” button)
video resolution and framerate:
how to change: settings -> video -> output (scaled) resolution
my obs canvas is @ 1920 x 1080p (16:9)
i switch between 720p and 1080p as needed! if you're concerned about space, you can probably just go for 720p. i also record at 30 fps, simply because that’s what my capture card supports.
video bitrate:
how to change: settings -> output -> encoder settings (located in both the streaming and recording tab) -> press “apply” once finished!
bitrate is a bit of a doozy to explain, but the most important thing to know is that bitrate affects your video’s quality. lower numbers = lower quality, while higher numbers = higher quality.
generally speaking, you'll want higher bitrate when you're recording things with high depth of information (e.g. you’d want a higher bitrate for something fast-paced like splatoon, compared to a slower-paced game like animal crossing).
my video bitrate is either set to 3000 or 4000 kbps! and here's some of my other (related) settings while i'm at it:
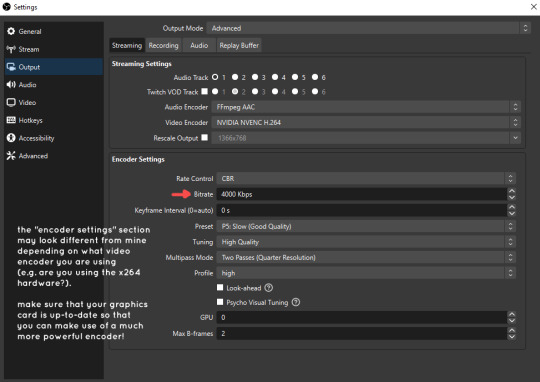
you can put your bitrate at much higher values than me if you're a stickler for quality- but keep in mind that a higher bitrate means:
bigger file size
more information to upload (when streaming)
your computer will need to encode more
i’d recommend reading twitch’s guidelines on encoding, bitrate, resolution, and framerate to get an idea of what values to pick. for people who are doing offline recording or streaming on a different platform, i suggest googling the appropriate resources!
multi-track audio:
this is mostly applicable to anyone looking to do video editing!
multi-track audio basically allows you to separate your audio sources (e.g. discord, game audio, and your own microphone) into different tracks.
this is an immensely helpful tool because it lets you adjust audio levels in post-production (editing). some examples of how this can be used:
increasing someones microphone volume if they speak too softly
increasing/decreasing game audio
muting swear words/sensitive information
completely muting voice call + microphone if you want to upload a no commentary video
and more!
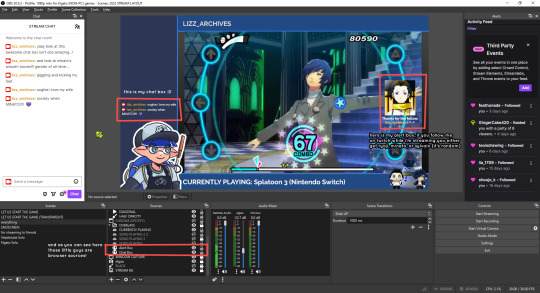
to set this up, take a look at your audio mixer panel, and press the ⚙ icon. this will bring up advanced audio properties.
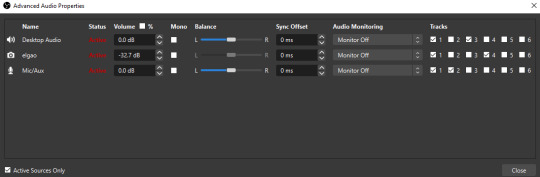
by checkmarking a track box, it puts the audio on that track. to make the above screenshot easier to digest:
track 1 consists of ALL three audio sources- desktop, elgato, and microphone.
track 2 only has the microphone audio.
track 3 only has desktop audio (i use this for voice calls)
track 4 only has the elgato capture card audio (game audio). the volume has also been lowered so that any speaking voices can be heard clearly.
tracks 5 and 6 are unused.
you might be wondering, “why do all three of these have 1 checked off?” this is what i call the universal audio track. i recommend having a universal audio track for a few reasons:
when you stream from OBS onto twitch/youtube- you have to select ONE audio track.
it’s also a nice backup in case you didn’t separate your audio correctly.
if for whatever reason you need to move around your individual audio tracks in editing, the universal track acts as a nice reference point.
mark off your audio tracks for each audio source as you see fit! once you’re finished with the advanced audio properties, go to settings > output.
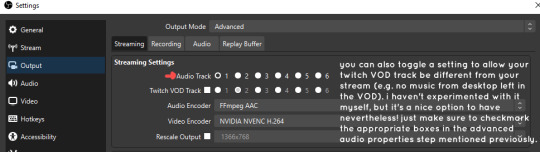
for the streaming tab, you’ll want to have the number of your universal audio track selected. in my case, that will be audio track 1.
for the recording tab, checkmark all the audio tracks that are applicable to you (in my case, audio tracks 1, 2, 3, and 4). by default, only audio track 1 is selected.
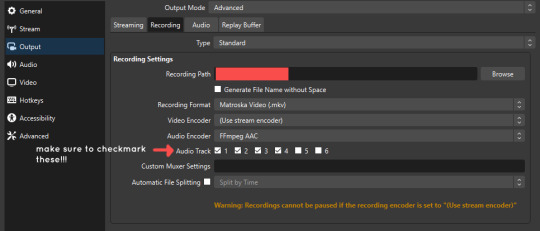
if you don’t check off the additional audio tracks in the output > recordings section, you will not have access to those audio tracks in editing, and you won’t be able to edit your audio tracks independently of each other. so don’t forget to do this! 👍
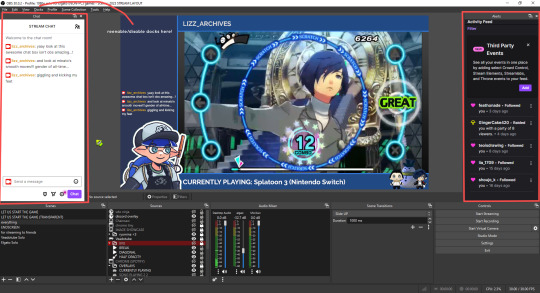
custom browser docks
custom browser docks are a great tool for when you’re streaming and want to have access to your twitch chat and/or activity feed! (or if you wanted to have some other web browser on OBS).
to create one, go to docks -> custom browser docks.
you’ll be given a table interface that asks you to put the dock name and URL. for streamers who want to have chat and alerts available, do the following:
on twitch’s homepage, go to the upper right and click your icon
then, click creator dashboard
once you’re on your dashboard, go to stream manager
click the vertical “...” on my chat OR activity feed.
press “pop-out chat” OR “pop-out activity feed”
copy and paste the link into the table back into OBS
press apply once you’re done
click and drag the docks around at your leisure to put them where you like!
if you ever decide you don’t want to have something on your OBS dock (or want to bring something back), go to the toolbar, click “docks,” and click the appropriate dock!
third party things
a section of optional things that you may enjoy having.
streamlabs alerts
this is basically for anyone who streams and wants to have their chat and/or follower notifications visualized on screen!
streamlab alerts can be added to OBS by adding a browser source into your scene, and the specifics can be customized on streamlabs itself. it’s pretty self-explanatory, so i’ll just leave a link to streamlabs website, where you can log in using the streaming platform of your choice: https://streamlabs.com/
discord overlay
this is a browser source that can be set up to show people who are in a server's voice chat and who speaks. i recommend this to people who make multiplayer content- it can help viewers distinguish who is who but also it can be helpful in editing.
to set this up, go to https://streamkit.discord.com/overlay, click “install for OBS,” and after logging in with discord, go to “voice widget” and click the server and voice channel you want.
you are able to apply CSS if you'd like more control over the visuals, but the standard layout tends to work fine for me! a search of “discord overlay css” on youtube can help you get more information.
veadotube mini
this is a pngtuber software that a friend recommended to me! no webcam is required- mouth opening and closing is based on your microphone input!
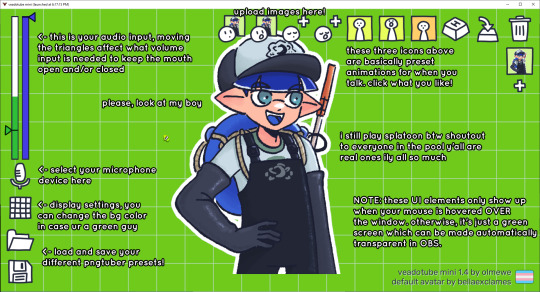
you can download it here (it’s pay what you want!): https://olmewe.itch.io/veadotube-mini
for a proper tutorial on how to use it, i recommend checking out the app's documentation, which you can read here: https://veado.tube/help/
source record
have you ever wanted to stream something with a chat overlay/layout, but wanted your recording to ONLY be the gameplay? or maybe you wanted to record BOTH your gameplay AND your webcam so that you can have a crisp zoom-in on your webcam!
source record is a third party plugin that can help you with that!
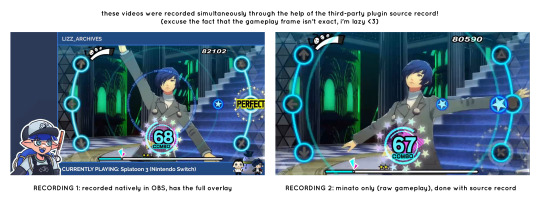
the general gist of source record involves applying the “source record” filter on either a scene or source, and customizing the encoding settings accordingly. the exact details of how to set it up is beyond the scope of this post, so I'll just direct people to this video instead (it was very helpful to me):
youtube
⚠ a quick note about source record: this plugin can be intense for your computer. be sure to do test recordings and the like to see what your computer can handle (and see if the recordings come out the way you like). it took me a few tests before i settled onto something i liked!
you can download and install source record here: https://obsproject.com/forum/resources/source-record.1285/
vdo.ninja
have you ever wanted to do a collaborative video or stream where you feature someone else’s video on your stream? or maybe you’re doing a multi-person streaming event! vdo.ninja is the perfect tool for you!
vdo.ninja turns your OBS virtual camera into a browser source link- which your collaborator can add on their stream! this is a new tool that i’ve added to my arsenal recently- since my friend and i are planning to stream a side order challenge together! i’ve still got to iron it out a bit more, but i like what i’ve used of it so far.
try it out for yourself at their website here (with documentation and demos available on the homepage!): https://vdo.ninja/ (no downloads required!)
ok! i’m set up! what now?
and with that, that’s all of the settings and tools that i thought would be worth mentioning! while most of my setup was written with video games in mind, some of these plugins and setups may be applicable to other types of videos (e.g. tabletop gaming with a physical camera)!
now that i’ve outlined all these settings, i have one more thing i have to say: regardless of what you're using OBS for, do a test recording before doing anything “official” with it. this recording can be as short as 30 seconds. it’s a good habit to develop that can make sure your streams/recordings turn out the way you want them to!
here are the kinds of things i like to check! it’s not an exhaustive list, but this can be a starting point:
video:
does my video look the way i want it to (and can my computer handle that)?
can my computer handle the load of encoding? - OBS will note in the bottom if the encoding is overloaded. if it can’t handle it, turn down your bitrate or adjust other encoding settings (e.g. i had to toggle psycho visual tuning OFF because it was causing lag)
this is especially the case if you're recording PC games- you don’t want to have slowdown on either your game or the recording!
audio:
are my audio sources (e.g. desktop audio and microphone) correct? - if you plug/unplug devices a lot, be sure to check this (settings -> audio).
are any of my audio sources muted? - make sure you don’t have anything on 🔇 if you don’t want it to be muted! otherwise the audio will be lost forever… (i lost my friend’s VC audio once… it was sad)
are my audio tracks separated properly? - requires you to boot up your editing software, but it's worth doing! for the test recording, just have something from all your sources playing at once, and see if your editor has things separated into tracks.
can i hear the voices clearly? or does the music and/or game overpower them?
if for whatever reason your OBS crashes, or you want more information on anything “critical” or “warning” worthy in your set-up, you can go to help > log files > upload current log file > analyze. crash logs currently can’t be analyzed by the log analyzer- but they’re a valuable tool when asking for help on the OBS forums!
and that’s all! for real, this time. i hope that some of these tools and settings can help anyone wanting to get more out of OBS. there’s definitely other things i didn’t touch upon (e.g. audio filters for noise compression, suppression, etc.), so i suggest doing your own research and trying things out!
happy recording/streaming, and thanks for reading! ✨
#lizzy speaks#this was a fun little write up!! i've been slowly getting some of my friends into video making teehee and its SO FUN!!!#(digital) video is like one of my other passions next to art. everyone say thank you splatoon for getting me back into it again <3#i've been using obs since like 2018 so i wanted to share some of the things i learned for funsies... i really love video...#but also i like having reference posts like this in the case people have questions they want to ask me...#because i don't always remember what video tutorials i watched and it's nice to document that somewhere...#warning to anyone who reads it this is like 2.1k words. i do want to stress that this isn't comprehensive but there's still a lot of info#that i wanted to put for this post...! that said topics like designing your own stream layout + assets for it are NOT in the scope of this#post and nor is this a beginner's guide to obs (i wrote this with the assumption that you know how to record and/or stream and that-#people already have an idea of how to use scenes and the different types of sources obs can use).#i hope everyone's had a lovely march 5th! i would love to look at the fanart but im still not done with reload...#but im hoping to finish it by the end of the month!!! yipee!!!#Youtube
45 notes
·
View notes
Text
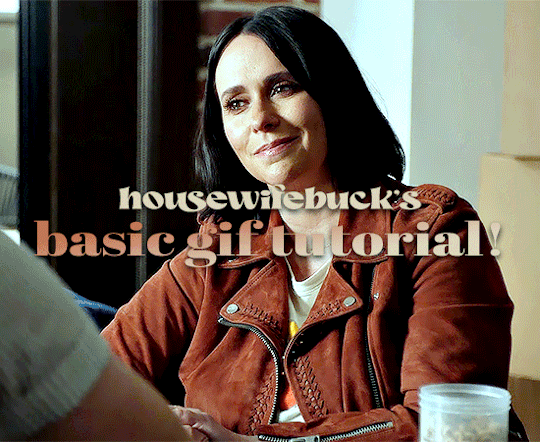
♡ basic gif tutorial!

hiiiii!!! i've made a tutorial in the past but i thought i might update it with this tutorial (re an ask i got a few days ago)! please keep in mind that i'm far from an expert when it comes to giffing but i am open to clarification and further questions <33
DISCLAIMER! there are so many ways to make gifs! everyone has a different process, so don’t be afraid to deviate from this! also! feel free to send an ask for further clarification :)
1: converting !
one of the major issues when it comes to ensuring the best quality for your gifs is making sure that you’re using an application that maintains at least a 1080p quality of the video you use. it’s not a good idea to gif anything below 720p as the quality of the video and consequently, your gifs are not going to be the best!
i) choosing a video
if you’re going to gif, i’d recommend choosing videos that are hq!
✰ Stage Gifs
for stage gifs i use .ts files! it’s definitely easier to source a performance video from youtube, but they won’t provide you with the quality you desire. if anything, use youtube as a source for stage gifs as a last resort!
for ts files, you can use:
-> rosebay
-> twitter (search [group name] + [date of performance] + [ts])
i personally use rosebay for my seventeen performance gifs but other groups do have sites/blogs that are specific to them.
psa: kpop24hours are currently not taking in any applicants atm! best advice would be to follow them on twt and keep their notifs on in case they do
these sources (at least, rosebay) are easy and pretty self explanatory to download!
✰ Normal Gifs
for normal gifs (i.e. of interviews, behind the scenes, going seventeen, etc.) i use youtube <3 keep in mind that it’s always best to use the source most reputable to ensure quality. for example, if i were to gif an inside seventeen video, i would use the seventeen official channel’s post of that, not reposts or anything like that!
to download youtube videos, i use:
-> 4K Video Downloader!
ii) how do you download youtube videos via this application?
all you have to do is:
1) copy the link to the youtube video (PSA this application only works for converting youtube videos)
2) press the green plus button on the very lefthand corner at the top
3) a window that lists the options for the video quality you want will then come up.
4) if it offers 1080p, it is almost always best to choose that for optimum quality!
5) the video will then download and you’ll be able to access it via a folder labeled 4K Video Downloader in your files app.
2. resizing and sharpening !
personally, i don’t sharpen in ps unless absolutely necessary. for most of my sharpening, i leave it to vapoursynth.
now, vapoursynth is a massive pain to download and use but it’s worth it in the end (i promise!! i’ve cried over it a lot but i probably wouldn’t be happy with posting my gifs without it)
i personally found it a bit complicated to download vs so i’ll refer you to a tutorial i used (i also got help from some of my moots bc idk how to do anything so dw if it’s confusing :sob:)
i) how to use vapoursynth now that you’ve gotten it downloaded?
this is probably the hardest part of the tutorial (at least, in my opinion) :sob: for this example, i’ll be using my 4K Video Download instead of a vlive, so if you were using a vlive, you’d have your downloads folder open instead of the 4K Video one.
1) open your files folder twice, make sure that there are two windows open - one being the vapoursynth folder (for me, it’s called VapourSynth64Portable (200722) but it depends on which version of vs you download) and another being the 4K Video Downloader folder.
2) notice the different applications (?) within the vapoursynth folder. in particular, the vapourscript (drop video file on me) one. drag the video you want to gif from the 4K Video Downloader folder onto that app, and it’ll open up a new window. this window is the timestamp window.
3) in this new window, type in the length of the video you want to gif. i personally do this bit by bit (as in, i timestamp each gif instead of letting vapoursynth run through the whole video, which, in retrospect is probably smarter but i am a Fool). for example in the video i’m giffing, i want one of my gifs to run from 0:56-0:58 of the video. so i input the start timestamp. in my case, this would be 00:00:56. and then i press enter. this would direct me to put in the duration of the video i want to encode, which, in my case, would be 2 seconds (00:00:02).

4) press enter again! it’ll open up a window on whichever internet server you use (for me, this is chrome) with a bunch of options:

5) next, you want to alter all the options so that it becomes a gif of the size and sharpening you want.
psa: all of the things below are advised options! it’s completely up to you to choose what settings you use. don’t be afraid to experiment!
ii) resizing
-> to resize, you want to use the GIF Size option. keep in mind the acceptable sizes of gifs on tumblr! if you gif something of an incorrect size, tumblr will probably destroy the quality even more than it already does and make it incredibly blurry, and you don’t want that! to prevent this, make sure to refer to this helpful guide on gif sizes for ones you could use!
for this gif, i’ll be using a 540 x 450 size.
make sure to move your gif around so that everything you want people to see in the gif is there. you can even drag the gif out to zoom in, etc.
6) input the size you desire in the width x height sections next to the GIF Size option.
iii) preprocessing
-> this indicates how fast or slow vs will make your gif. for normal videos, i use qtgmc 30 slow and debilinear. however, i’ve seen in other tutorials that it should be different for performance gifs (i.e. qtgmc 60 slow and debilinear). however, this is all up to you and your preference! experiment, and see what works for you!!
for this gif, i’ll be using qtgmc 30 slow and debliniear.
7) select the speed and debiliniear options next to the processing title.
iv) denoise filters
-> this option basically acts to smoothen your gifs!i tend to use KNLM and have actually never used BM3D before, but feel free to choose the latter!
8) choose between KNLM and BM3D (next to the denoise heading), and select the tickbox that comes up underneath it.
v) sharpening
-> this is when you sharpen your gifs! and make them look less grainy than if you were using ps directly. i personally use finesharp, but again it’s up to you!
9) choose between finesharp and VCFreq, and check the tickbox that comes up underneath it.
this is what my settings are like for this gif:

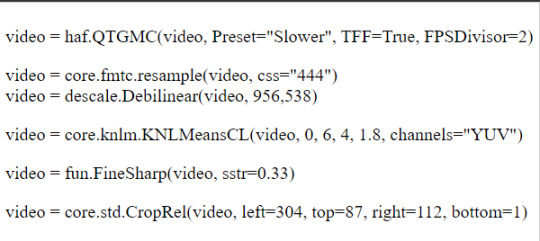
10) next! you need to alter the values for sharpening and denoise! this can be done on the coded box in the upper right-hand corner:

11) first, change the denoise filter value to whichever one you wish. for this gif, i will be using 1.8. this can be done by altering the “1.2” value in the row that has the text “video = core.knlm.KNLMeansCL(video, 0, 6, 4, 1.2, channels = "YUV”)
12) next change the sharpening value to whatever you want! for this gif, i will be using 0.33. this can be done by altering the “0.22” value in the row that has the text “video = fun.FineSharp(video, sstr=0.22).
the text box should now look like this with your altered values:
13) copy the text and you’ll notice that this window has opened on your taskbar. you will need to copy the text from here into this app - vapoursynth editor.
14) paste the text from that upper right-hand corner into the vapoursynth editor underneath the text #whatever you copied from the resizer goes here.
15) before continuing, depending on your laptop’s speed and ability to process things, i’d recommend lowering the RAM usage to something more bearable for your laptop to process without it overheating and getting damaged. i personally use 300 as the RAM usage but feel free to use whatever you want.
this is what your editor should look like now!

16) press f8 and it’ll open a new window. this will be where you get your edited video that will be good to put in ps and play around with. change the preset option to Export to MOV. and next to the header title, make sure to select Y4M in the dropdown menu. after this, you should be good to press start!
3. giffing !
now this is the part of the tutorial where you kind of get to do your own thing
i) importing
1) open photoshop and click on file, then import, and video frames to layers. it’ll open up your files.
2) what you want to do next is find the output folder. this folder can be found within your vapoursynth folder. that is:
vapoursynth64portable >> gifs >> output
3) click on the output folder and it’ll come up with another window:
make sure your settings are like this before clicking ok!
ii) actual gif making!
4) once you’ve clicked ok, it’ll direct you to the workspace. you will have the frames for your gif on the bottom and the layers on the right-hand side. i won’t go into the specifics for giffing since you asked for quality but if you’re looking for more specific instructions on how to actually gif, feel free to send in another ask or i can refer you to another tutorial!
i) timing
you can alter the timing by selecting all the frames and making it faster or slower - it depends on your preference!
ii) colouring
colouring is the foundation of your gif - it’s what makes it look good!! have fun with it, and try out different colouring! you could also look into using psds if you want! psds are basically pre-made colouring (filters, essentially) that you put over the top of your gif
5) once you’ve finished with the aesthetic steps of making your gif, it’s time to export! to export, you must click file >> export >> save for web (legacy). it’s up to you which export settings you use but make sure that your gif is under 10MB!
6) and voila <3 you’ve got a gif!

#not sure who wants this but this is re an ask i got a couple of days ago!#aria.gifs#aria.txt#userngocchi#tuserrose#hanatonin#isaishi#gif tutorials#tutorial
134 notes
·
View notes
Note
Sorry if I bother you, but I really love your gif sets! Do you know some tutorials or, app, or anything, to learn how to make good gif? I am learning and I feel very stupid because all my gifs are shit. (if my ask is inappropriate or anything, please ignore me)
you're not bothering and none of this is inappropriate, you're more than welcome in my inbox! as for your questions, let's see what i can do.
1) tutorials — i've been doing this for long enough that i don't really have much to recommend here, the only tutorials i use nowadays are all about specific things and not how to make gifs as a whole. that being said i've linked this one before, i personally do some things differently but it's a very good tutorial, well-received by gifmakers who are just starting and well written, from what i've skimmed through.
another good post to look through is this one, not a gifmaking tutorial per se but it goes into sizes, sharpening, and how to get neat & clear gifs. two of the main points are A) while you can get away with making gifs out of a 720p quality video, 1080p is what is usually recommended. you could use 4k as well, but a 1080p video is usually easier to find, will take less space in your storage, and will give you really good results already. no need for overkill <3 as for B) size matters here on tumblr dot com, mostly width. the op of the post linked in this paragraph has included a nice graphic for the size limits for gifs, you can refer to it as you make your gifs so that whatever you make won't turn out pixelated once you upload it to tumblr.
if you're curious, i've been asked about my sharpening settings here and i spoke before on tumblr sizing here
2) software — you mentioned app, if by app you mean mobile stuff then i'm sorry, i can't help you! i've never made gifs through mobile and i wouldn't even know which direction to point towards for you to find more information. as for computers, if you mean programs then these are what i use to make my gifs: potplayer (for taking screencaps) and photoshop cc 2020 (for making the actual gifs, this is the post i used but here's one with more links)
now i'd like to mention something my grandma always used to say: no one is born learned. you're not stupid just because it's taking you a while to do something, learning is a process and everyone has their own pace. i've been making gifs for a decade now and i know there are things i could do better! i'm also still learning, i make plenty of "shit" gifs before stumbling my way to something i am okay with posting, and sometimes i'm really proud of what i've made and other times i think it's just "good enough". i understand feeling disheartened but please do not feel stupid about any of this!
no use in putting yourself down, now hold my hand and let's add the finishing touches on this long ass reply <3
3) tips — we've mentioned video quality, sharpening, and sizing. what else, what else. personally i would start simple (and i did, way back when, and still do!! most of my gifs are quite simple). so: cropping/resizing + coloring + sharpening. it'll help get the basics down and then you'll have a good foundation for everything else you might want to learn. i mentioned in another ask, almost two years ago now lmao, that i used to download other people's free psds (that is, pre-made settings and layers to color your gifs) and instead of using them i would open them up and pick them apart to see how people were coloring things, which layers they used, in which order, stuff like that.
remember: there is no right or wrong to do this! you could ask ten different people how they make their gifs, and their preferences for any specific part of the process, and you'd get ten different answers. if you find a tutorial and don't vibe with it, throw that aside and look for another. pick and choose, find what works for you and what doesn't! and that means do not be afraid to experiment and try things out.
also, don't like photoshop? no problem! i started with gimp, now personally i wouldn't recommend it over ps but it's a good program, it taught me a lot, and there's really nothing to hate about it. it might have less functions than ps though, and already a decade ago there weren't that many tutorials/resources for it.
don't like photoshop AND don't want to download a program? try photopea, i haven't used it but it works directly from your browser and it should do everything photoshop does!
let me know if there's anything else i can help with <3
17 notes
·
View notes
Note
hello! i hope ur day is going well! im not really sure how to word this but ur one of my favorite gifmakers on this site!! and i was wondering if u have any tutorial or would be willing to tell how!! do u make ur gifs so sharp! along w being so smooth and gorgeous im foremost always just stumped at how beautifully sharp ur gifs r!! not to mention the coloring!! regardless of if u get to answer any part of ur process or not, i just wanted to tell you ur gifs r very very beautiful. im always so awed and admiring wnv i see them! so warm and prettily colored yet so sharp!! apologies for gushing here, pls have a good day!!!
AHHH THIS MAKES ME SO HAPPY, ANON! It always makes me so happy, when I get any kind of compliments on my gifs, so this really really really warms my heart!! ♥
I did a gif tutorial like 1,5 years ago which you can find here! My sharpening has changed slightly from back then, so I'll just tell you what I do now.

Much more detail under the cut (this got way longer and detailed than I had expected)!
This is a walk through of my sharpening/effect process, so if you want any tricks about colouring or anything let me know!
The first important step to sharp gifs is the video quality! The higher the video quality is, the prettier and sharper your gifs will be. TS files are the highest quality (most of the time, sometimes they kind of scam you ngl) files you can get. Else 4k videos are great too! For me I usually don't go under 1080p (with few 720p exceptions). Sometimes I don't really like TS files, because they're a bit too sharp for me. This is mostly if it's a variety show. Concerts tend to be not as sharp in my experience.
I use vapoursynth to resize my gifs before putting them in photoshop. I usually don't do any sharpening or denoise in vapoursynth. This site has everything you need for vapoursynth!
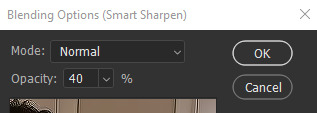
For sharpening and stuff in photoshop, I usually do camera raw + topaz denoise + sharpening + 1% blur at 30% oppacity.
A bonus tip is, if you've done everything and tried soooo hard to make it non-grainy, but you just can't get it to do whatever you want it to... embrace the grain and add a noise layer! I do this with big gifs (540x540) usually.
To go more in depth, my settings for those are as following...
Camera raw
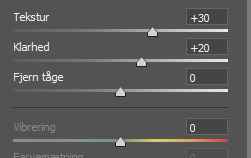
Texture (tekstur) I usually go between 20 and 30, depending on the thing I'm giffing. For Clarity (klarhed) I do the same number as texture, but minus 10. Idk why, it's just how I usually roll!
For Topaz denoise I usually only use a little bit. Like 0.04-0.06 overall strength. I don't really have any "this is what I always do" settings, but usually my shadow is at 0.90 and my highlight is 0.48 (because I liked it one time and then just kept it). You can also use the denoise option in vapoursynth, I just prefer photoshop, because it feels like I have more control over it. I know a lot of people don't use denoise at all, but I usually do with files less than 4k quality!
OBS! Using topaz denoise on smart objects in photoshop is a bit tricky, but I made a video about it once, so here you go! (the video is kind of outdated for me, so ignore the sharpening part and focus on the "how to do after you've put denoise on your gif" part. Also ignore my voice, thank you).
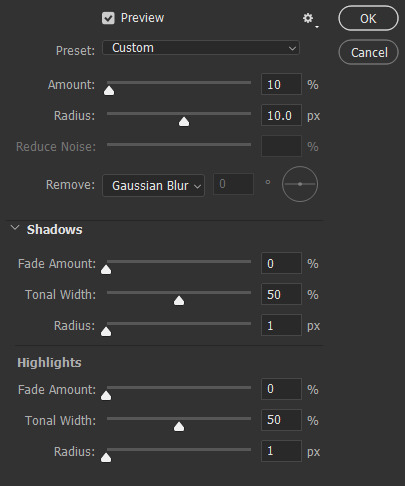
Sharpening:
These are my settings for sharpening. If I think the gif is a bit too sharp after I've added a blur filter, I change the amount (mængde, sorry my ps is in Danish) to 80% and that usually does the trick!
If you use all of these, this is how the smart object will look, before you convert it into frames
Let me know if you have any other questions or anything at all!! ♥
#ask#answered#anon#tutorial#kind of#I've kind of considered doing a “maja's tricks and tips for colouring and other stuff with gifs” post so let me know if that has any intere#i answered this as soon as i got home cause I got excited that someone was asking me for tips ♥
7 notes
·
View notes
Text
Wanting pics of the outfits from Pokemon Battle Revolution for the poll blog but the only thing I can find is a video going through them that is only 480p
So I'm getting them myself. Got a pre-100%d save file and I am up-scaling the game with Dolphin. My computer is screaming when I boot it up.
Best I can do is 720p which still doesn't look great but from what I can tell once I post these, theyll be the highest quality screen grabs out there
9 notes
·
View notes
Text
does anybody know why youtube seems to be limiting videos I watch to 720p at best? some videos I can't even watch above 360p when I KNOW I've watched them before in 1080p. I'm at my aunt's house this week on her wifi so maybe that's it, but it doesn't even give me the options to select higher quality. even when it does let me select 720p, it looks worse than I remember 720p used to look. I only noticed in the first place because the 720p videos I'm watching look so chunky it's distracting
15 notes
·
View notes
Note
Hiii, just gotta say, I LOVED your Wendy gifset and I was wondering how you got them to look that pretty?? They looks soft and detailed and like, real? Hehe I hope you can help me out, idk what I've been doing wrong with mine that are looking like shit so, help me out please
henlo anon!
when i first started gif-making, my gifs weren't the bestest either! it's a process and i think you'll get better at it w practice and trying new things !! <3 i'll throw in a bunch of pointers a lot of CCs gave me when i first started giffing and some of my opinions under the cut!
also this is definitely Not a link to download photoshop 2022 for free that i definitely didn't use as an upgrade two weeks ago
what you'll need to know before going through this long long rant of mine:
basic photoshop giffing skills
knowledge of smart filters and blending options
some patience (to hear my nonsense)
interest in maybe picking up new software
disclaimer: image heavy!

1. always use videos in their highest quality!
hq videos = hq gifs! i do not recommend using videos below 720p! also if you use photoshop, the number of colours in the gif is limited 268, meaning that sometimes your gifs can lose quality in export, and that could make lower quality videos look worse! (for eg. the video i sourced the wendy set from was 4k that i downloaded from 4kvideodownloader)
here's links to download:
4kvideodownloader
sophistagram (for vlives)
weverse lives download tutorial
twitter video downloader
a smol opinion: i've seen a lot of users use tumblr mobile, and noticed that gifs on tumblr mobile are always a little blurred out? this kind of makes the gifs look less clear </3 so using higher quality videos always helps!
2. vapoursynth / avisynth / km player!
these are softwares to sharpen and denoise your videos! they're completely optional (i used to gif with photoshop alone for the longest time) but they do make quite a lot of difference!
i highly recommend you to check the tutorials below!
gif-making with vapoursynth tutorial by @wonublr
gif-making with avisynth tutorial by @soonhoonsol
gif-making with km player (and vapoursynth!) tutorial by @woozi
a smol opinion: i've never used km player, so i don't have much to say about it. as for avisynth, it's pretty easy to work with, the only down side is that there are no denoise options. vapoursynth has both and is very user-friendly, but i found the shift from avisynth to vapoursynth slightly confusing!
these are my usual settings for vapoursynth:
3. gif sizes!
a very big (and maybe bullshit) opinion:
now, tumblr recommends you size your gifs this way:
(img src)
but it,, doesn't necessarily have to be that way 👁
i really like to fuck around and use whatever size i want for my 268px and my 177px gifs, and the wendy set was no exception! the size of each gif in the set was 400px X 580px!! this, in my opinion, makes it easier to view them (a lot more clear, you could say) :o
as for my 540px gifs, they remain the same size!

4. sharpening on photoshop!
i would always recommend you to sharpen your gifs again on photoshop. tumblr LOVES reducing gif quality, so i resharpen to give my gifs some 'depth'
this is how i usually sharpen my gifs:
(the gif above was sharpened and denoised on vs w the settings mentioned above!)
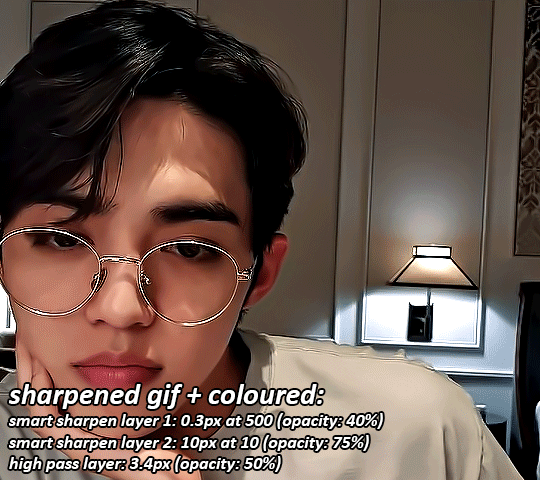
step 01:
after you're done converting your gif into a smart object on photoshop, we'll add a layer of smart sharpen. these are my settings:

step 02: more... smart sharpen :eye: :
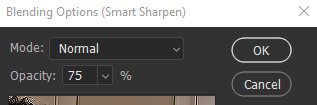
step 03: high pass (optional tbh)
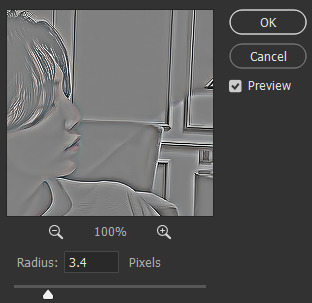
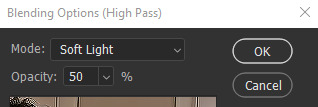
imp: don't forget to change the blending to soft light / overlay (i prefer the former)
now the gif looks like this:
something to note: i like switching up my opacity levels on these settings, and usually only ever change the radius and strength of the sharpening!
here's a few more sharpening tutorials:
sharpening tutorial by @/woozi
tutorial by @/hellboys
tutorial by @yutaslaugh
5. colouring!
colouring plays a huge role in making your gifs look sharper and cleaner! this is your playground, and this is the area you have the most freedom to change, and zuzsh up things the way you like them!
generally, i like to draw the attention to the person i'm giffing, so i make sure to set the contrasts right! i also extremely like making the colours cooler, so that it seems more natural!
the layers i use most are:
curves (on auto)
more cuves (using the eyedroppers to set my black, grey and white points)
selective colour (to change contrasts, to recolour skin)
colour balance (to balance my shadows and highlights)
levels (for brightness, contrast and depth!)
i'm not extremely good at colouring either, so here are some more in depth colouring tutorials (i'm terrible at explaining i'm so sorry sksjkd):
colouring tutorial by @/jihan
south-east asian celeb colouring tutorial by @/blueshelp
and here's some pre-made psd packs!:
psd pack by @/kpopco
psd pack by @shuatonin
psd pack by @coupsnim
psd pack by @/wonublr
closing ments:
if you've made it this far, thank you! i'm not extremely great at explaining things, but i hope you found this 'tutorial' useful! (extremely confused what this is tbh it feels like i'm rambling sgkfjsh)
here's a few more tutorials (kinda unrelated) that i found useful and fun!:
tutorial to fix grainy gifs
tutorial to remove panning from gifs
animated text tutorial
gif + more effects tutorial
112 notes
·
View notes
Text
A few days ago I was turned onto “Tubi”, another online TV/Movie streaming service. On the surface it’s nothing special, but it does cover a lot of territory that the other streaming services leave empty.
It’s fully ad supported, so there are no fees at all. That does mean it comes with commercials, but at least it’s not commercials with an additional fee on top. I’ve also heard (But cannot confirm) that the commercials are noticeably less frequent than other free-with-ads streaming services.
The bigger selling point is that it does not require an account for use, all of the content is directly available from its website without any login. You can create an account if you want (View your history, set parental controls for children, etc.), but if you’re traveling or got a new computer you don’t need to worry about any login issues or concerns about sharing your account info.
Babylon 5 is how I first discovered the service, when I went looking for places to stream the series after it left HBO Max.
The rest of its library is absolutely fascinating. It’s missing a lot of the bigger hit TV shows and movies, which isn’t surprising since so many studios and media conglomerates are setting up their own independent exclusive streaming services. But what it does have is a lot of content that I can’t find streaming anywhere else. Reboot from my childhood, the full series for Andromeda, and Tremors: The Series. It has the original Generation 1 The Transformers cartoon, plus what looks like almost every subsequent series (Including Beast Wars). Even the Strange Empire TV series that was my first introduction to Cara Gee. There’s a lot of the deep-dive backlog that normally you need to find on websites of ill repute instead of a proper streaming service.
The biggest downside seems to be that they don’t stream in the higher HD specs. The highest they go is 720p, and not every video is available in full 720 even if there have been HD releases elsewhere (Babylon 5 is only available in 576p, even though they are the remastered episodes that were released in 2021). This isn’t a huge problem, I’ve long been a proponent of “good enough” home media distribution, but it is a drawback if you’re trying to find something in 1080 or 4K. On the upside, the uploads have not been highly compressed for streaming, so the video quality is quite good despite the lower definition.
If you’re looking to save money by ditching cable/satellite TV or subscription streaming, this could be a big help. Even if you don’t want to completely ditch the other services, this grants access to a lot of content you won’t find on the big name websites.
45 notes
·
View notes
Note
Hey svenja you got any tips for keeping gifs really nice and crisp while trying to color them? The color always seems to ruin the quality for me. As well as uploading to tumblr lol
hello <3 i do have some tips, although it really depends on what the issue is: are the gifs blurry? too grainy? do the colors look washed out and weird after saving? but, in general, some things to keep in mind:
keep the number of adjustment layers to a minimum (i'd say below 10)
brightness adjustment is, to me, enemy number one. the more you play around with that the worse the quality will get; this is unavoidable depending on what you're working with.
we only have 256 individual colors available when making gifs; the more complex a gif is color-wise, the more might be lost during export, where photoshop will optimize it for web and may alter the look slightly (or a lot)
THAT SAID, it's not just about the colors. if anyone else is interested, here are some important aspects that will affect the end result:
sharpening settings: it's still a mystery to me how some people manage to make their gifs look so good, but i think i've got it figured out for the most part (300%/0.4px or 500%/0.3px)? it takes some playing around. the entire gif quality relies on this (the settings may have to be adjusted after coloring)
the resolution of your video file: i would highly discourage anyone from trying to work with 720p video files because that's setting yourself up for failure, especially when making 540px-wide gifs.
the scene itself: when i tell you the number of times i gave up and closed photoshop because i could not for the life of me get a scene to look right because it was horribly lit (or out of focus)-- we are completely at the show's mercy here. making certain scenes look good isn't impossible, but it will never be perfectly clear because it can't be. and that's alright!
the thing about uploading to tumblr. i hear this issue talked about a lot, but i haven't actually experienced it myself; i also never see the issue on other people's edits. what i have found is that sometimes, for some reason, the gifs are worse quality for a little while only on the device on which they're uploaded. i had this issue, but when i checked it on a different computer it looked fine. so maybe that's what's happening.
💖
#asks#maven#sorry for taking so long to answer#apologies if i've forgotten anything or if things are unclear
27 notes
·
View notes
Last Seen Blogs