#well. i should just buy a screwdriver so i can attach the legs to the table and then i can just do them on the actual table
Text

hell
#the bin#you cannot tell from the picture what this is lol#its a jigsaw puzzle#only 550 pieces but i had to crouch weirdly to do it bc all i have to do it on is a tabletop without the legs attached#so it took me 2 days bc i cpuldnt do it for prolonged time :(#and now my knees hurt :/ worth it tho#i have quite a few to do but havemt bc i dont have a good place to do them but i wanted to make sure tjis one has all the pieces#well. i should just buy a screwdriver so i can attach the legs to the table and then i can just do them on the actual table#but i did actually do something this weekend. it was just. a puzzle. so not a lot
1 note
·
View note
Text
fatherhood
Tentoo prepares himself for the birth of his child by trying to become the perfect dad.
It was strange, being a human.
It wasn't just that he had to watch his sugar intake now, or that his hair was receding at a worrying pace. It wasn't even the extraordinary amounts of drinking and eating he had to do, the peculiarity of human existence that forced him to constantly shovel things in his mouth.
(Read on AO3)
It was a culture shock, more than anything else. He had lived among humans for years, shared hundreds of years of his life living with their habits. But it was different, somehow. It was as though he was living abroad, rather than simply taking a holiday, and he often found himself struggling to untangle their bizarre social norms.
“Are you listening to me?”
He looked up, his eyes darting around the room. He had been engrossed in the newspaper, ticking off inaccuracies or improbabilities, and drawing tiny TARDISes in each white square of the crossword puzzle.
“Yes.”
Rose looked doubtful. “Really?”
“Oh, yeah. Of course.”
“So, what do you think?”
He hurriedly scanned the room, looking for something to have an opinion on. The walls were the same colour. The curtains, too. Even the windows looked just the same as yesterday.
“Good.” He nodded forcefully. “Good. Very good.”
“Great.” She grinned, and he relaxed.
She threw herself on the sofa next to him and stroked his shoulder.
“So, when should we start trying?”
He kissed her forehead, trying to gain some precious thinking seconds.
“Uh. Tomorrow?”
She held her head in his lap, gazing up at him with some strange human emotion.
“I can’t believe we’re going to be parents.”
Oh.
He wanted to have a child. He really did. He loved kids, enjoyed their brutal honesty and vivid imaginations. He had had children before, of course he had, and although he didn't spend an awful lot of time thinking about it, he still thought of himself as a Dad.
The responsibility of being the father of Rose’s child, though, was something else.
Everything about her was perfect. She had a beautiful face and an equally magnificent soul. Hell, she had literally been a Goddess at one point. What if his silly genes were more dominant than hers, and rather than the wonderful baby that she deserved, she ended up with a child just like him?
The only solution, really, was to just become the perfect dad. So far, Netflix had told him it included a lot of DIY, and sometimes crossing his arms. He could do that. His last body had been a wonderful mechanic, and he was sure he’d folded his arms at some point in 900 years.
The drill looked a bit scary. He would have felt better using his sonic screwdriver, but it wouldn’t have looked nearly as cool. Rose was watching him, looking concerned.
“Do you have to hold it in your mouth?”
He tried to talk, and spat the drill out, exasperated.
“Yes! I need to be holding your hand too. The baby needs to feel how good of a dad I am.”
She squeezed his arm and leant into his body.
“I’m sure they’ll know either way.”
He doubted it. Probably, they would be watching perfect Simon next door, with his massive toolbox and fancy shed, wishing that their dad could be equally handy.
“What are you drilling, then?” She asked, and he looked around the garden in panic.
He hadn't thought about that bit yet. He'd been flabbergasted by the sheer amount of attachments, and then annoyed over the stupid power chord that needed at least 3 extension leads to go anywhere useful. He'd had a vague image of himself drilling a bit of wood, and Rose clapping at his brilliance. But there wasn't any wood out here, the garden empty but for a few gnomes.
One looked up at him judgmentally, and he made a mental note to kick it when Rose wasn’t around.
“Uh – I thought I would practise, for now.”
“What, like just…turn it on?”
“Yep,” he said frantically. “A test run. See how, um, spinny it is.”
Rose dropped his hand, and he turned to her, offended. She was clutching her stomach, her eyes lit with – was that fear? Happiness?
“Rose? Are you okay?”
She nodded slowly, a small, gentle smile growing. Retaking his hand, she pressed it against her stomach, and he felt his single heart jump when he felt it.
“They’re kicking,” he whispered, dropping to his knees and pressing his ear against her stomach. The baby kicked him straight in the head, and he stared in wonder.
“It’s nice to meet you too.”
Okay, so maybe the drilling thing had failed. It was no wonder, really, he was a highly intelligent part-time lord, who couldn’t be wasting his time standing around all day just pointing hand tools at walls. His baby was unlikely to be properly impressed with that, anyway, being of superior intellect themselves.
Perhaps he needed to talk to an expert. An actual parent, one that had managed to raise an impressive child.
He thought about Jackie for a second and instantly squashed the thought.
Pete wasn’t laughing at him, exactly, but he certainly had a strange little glint in his eye that the Doctor didn’t appreciate.
“You want me to teach you how to…parent?”
The Doctor groaned. This had been a stupid idea. He turned to go, but Pete quickly grabbed his shoulder.
“Sorry. I was a mess when Jacks was pregnant, so I guess this is no different.”
“It is different!” The Doctor said, offended. “It’s Rose.”
“So just be there for her. Help her with things. I’m sure the baby would…respect that.”
The Doctor stared, wide-eyed. Pete was right. The baby was going to love Rose, just like everyone else who met her, and if he could be seen helping her…
“Thanks, Pete, bye.” He yelled, legging it out of the room.
“What are you doing?”
He frowned, offended, and the wooden spoon rolled off his tongue and onto the floor. Rose eyed it, eyebrow raised.
“How are you doing today, my darling?”
“When did you start calling me that?”
“I can call you something else!” He offered desperately. “Sweetie? Sugar? Love? Babe?”
“Do not call me babe.”
“Honeybunny?”
She was looking at him as if she was slightly concerned for his health.
“I’m making dinner.” He said quickly, gesturing to the wok. She walked over, suddenly interested, and peered down with a look that he couldn't decipher.
“Malteasers?” She asked faintly. He nodded.
“And bananas. And tea, too, for the sauce. All your favourites!”
She kept her face down, shoulders shaking. Probably, he thought, stunned in the face of his great generosity.
“Thank you, Doctor.” She finally choked out between gasps, patting him fondly on the shoulder. He puffed out his chest and went to go sort out the crockery.
“I think we should start buying things.” Rose said one day. Her legs were draped over his lap, his hands massaging her feet.
He looked at her in shock. He hadn’t even thought about all the things the baby would need, being more focused on Rose and her ever-changing moods. They were going to need so much stuff, and it was all going to have to be perfect, as well, lest the baby grew unhappy with its drab surroundings.
He knocked her feet off his lap and set off into a run.
“Why,” Rose asked, her hands on her hips, her stomach peeking out under her bottom, “do we need five cribs?”
“The baby needs options!” He insisted, gesturing at the cradles circling the room. They were all in different shades of white, with tiny little mobiles hovering over them. He had made the mobiles himself, fashioning tiny little Earth, Gallifrey and TARDIS charms to hang over the crib.
He frowned, wondering if he’d done something wrong. Maybe he should have gotten some different colours—he knew humans' fixation on pinks and blues for their offspring. Perhaps he should have picked up a few more.
“You don't think the baby will like them?” He asked, feeling a bit crushed.
Rose smiled, and hugged him, her round bump pushing into his belly.
“They’ll love them.”
Rose was in labour, and he was having a heart attack.
He didn’t like only having one heart on a good day. As a Time Lord, he’d loved Rose, but he’d also loved space, and the TARDIS, and pretty much any fascinating person he met. Now having only one, it felt like his whole body was focused on just her – everything else seemed so less important, less crucial for his day-to-day survival.
What if one heart wasn't enough? What if he couldn’t love their baby properly? What if the child grew to be unloved and unloving, unable to feel the wonderfully wide spectrum of human emotion, all because he had one, stupid heart and it was already used up.
He couldn’t breathe.
“Doctor,” Rose moaned, and he hurried over to clutch at her hand.
Rose was holding her baby.
No—his baby. No, theirs.
She looked up at him, her face pink and drenched in sweat, a soft, beautiful smile stretched across her face.
“Do you want to hold her?” She whispered, rocking the pile of blankets gently, and he nodded, dumbstruck.
Carefully, the baby--his baby!-- was settled into his arms, and he gazed at her, tears trickling down his face.
“Hello,” he whispered.
She opened her eyes and blinked up at him. Her tiny, pudgy little arm stretched out to him, reaching out towards his face, and his singular heart stretched and grew.
"She's perfect." He told Rose, who nodded, looking at him with yet another expression he couldn't untangle.
He looked back down at his daughter and ran his finger over her cheek, marvelling over how soft, how precious she was.
"I'm going to look after you," he choked out. "I'm going to be the best dad on Earth. You'll see."
The baby looked up at him, eyes filled with trust, and he thought that maybe, if he tried really, really, hard, he might just be able to do it.
#my family are in town and i have 0 time so please forgive any editing errors!#tentoo is a baby who must be protected at all costs#fics
21 notes
·
View notes
Text
old married couple | p.p.
Summary: Dating Peter means you’re basically dating all the Avengers too. And they don’t hesitate to point out when you both start turning into “that” couple.
Warnings: pure fluff, i just needed the therapy man
A/N: An anon requested this last week, so I hope you see this and like it! By the way, my requests are open so if there’s anything you want me to write just shoot me an ask and I’ll get to work on it. Also Tumblr apparently won’t let me link things so if you’re looking for my masterlist, playlist, taglist, or writing challenge it’s in my bio ♡

It had been exactly two years since you joined the Avengers as the resident kid genius. Tony had picked you from Midtown along with Peter for his internship, and he quickly found that you were an even better hacker and programmer than he was. Pretty soon he had you working alongside him, helping him make prototypes and suits.
That’s when you first met Peter Parker.
You were with Tony after school one day, tinkering with E.D.I.T.H’s programming, when Tony introduced his other intern. You knew Tony had another intern, but you’d never met them before. They always came in at a different time, though you knew it was a boy from your school.
You had no idea it was Peter Parker.
“H-hi, Y/N!” Peter stuttered, blushing when you nearly dropped your screwdriver. You smiled shyly, gripping the table as Tony started to tell Peter something about thermodynamics. You tried to keep working, but you just couldn’t focus. Peter kept looking back at you when he thought you weren’t looking, trying not to make eye contact with you.
He was so distracting, and it didn’t help that you’d had a crush on him since fourth grade.
The first time Peter asked you on a date, you were wearing your “ugly pretty clothes” and binge watching Gilmore Girls. Your parents were gone for the weekend, so the house was quiet on your own. But you were in no state to see your mail man, let alone the cute boy interning with you when he knocked on your door.
“Peter?” You asked, opening the door to a very nervous Peter. He was holding something behind his back, and when you tried to look he moved back. You were well aware that he was wearing nice, clean clothes while you looked like a rat’s nest, but there was nothing to do about it now.
“Hey, uh, you home alone?” He asked, realizing most of the house was dark. You nodded, blushing when you realized you were wearing a tank top. Peter noticed and decided to try very hard not to look at your body and focus on your face.
“Yeah, my parents are gone for the weekend. Wanna come in?” You asked, and Peter took your invitation. When he got inside, he shakily handed you a bunch of flowers and asked you if you wanted to go with him to stargaze on Friday.
“I mean, you don’t have to. This is weird, I’m sorry, I should go.” Peter rambled, after you stood silent for a moment. You were so shocked you just stared at the flowers in your hands, peonies which were your favorite. Then you remembered Peter Parker had just asked you a question and you snapped back to life.
“Oh my god, I’m sorry. I was just caught off guard, I wasn’t expecting this at all. I mean, I’ve liked you for who knows how long and you’re so cute and smart and I’m such a nerd so I never thought you’d…...what I meant to say was yes absolutely. I’d love to.” You finished, biting your lip nervously. What if he didn’t mean it, or he decided he didn’t want to go with you anymore? Peter turned back around and grinned.
“You mean it? Really?” He asked, trying not to smile like an idiot. Peter had fallen for you months ago, but he only really screwed up the courage to ask you out after his talk with Tony. Tony had told him that he was pretty sure you liked him back, and even told him what your favorite flowers were. And here you were, looking like a goddess and telling him that you thought he was cute and had liked him for a while now.
Why hadn’t he done this sooner?
“Yeah, I mean it. Like, I really like you.” You said, your face going red. You weren’t one to be so open about your feelings, but Peter thought it was adorable how your cheeks tinted when you talked to him. He felt the same way about you, his stomach had butterflies in it if you even looked at him.
“So, can I pick you up at 7?”
“Yeah, I’ll be waiting.”
Fast forward two years and you and Peter were Stark Tower’s reigning stupidly cute couple. You and Peter were basically attached at the hip, working together, eating together, cuddling together. Tony once caught the two of you having a food fight in the kitchen and had to ban whipped cream from the premises. Secretly, he was happy his two interns were so perfect for each other.
But none of the Avengers could remember when the two of you became such an old married couple.
“Peter! Come on, we’re going to the dentist!” You called, waiting downstairs for your boyfriend to appear. You’d made the appointment months ago, even though Peter hated the dentist, and promised to go with him. May was at work, and she was so grateful she’d made you cookies as a thank you (which Peter may or may not have eaten the day before).
“Noooo!!! I’m not going, I hate the dentist. That fluoride stuff is disgusting!” He yelled, holed up in his room. You sighed, noticing Natasha trying not to laugh as you threw a pillow at her. Peter groaned, trudging down the stairs and shooting death glares at you. He was wearing a very oversized sweatshirt and flannel pants, so he’d basically just gotten out of bed.
“You’re such a baby, let’s go.” You giggled, kissing Peter’s cheek as you held his hand. Peter grumbled, but a little smile formed on his lips. He loved when you kissed him, and he’d suffer through the dentist if it meant you gave him kisses afterward.
“Fine, but I want kisses when I’m done.” Peter whispered, and you finally agreed to it just to get him out the door. Natasha stood in the kitchen, shaking her head at the two of you. She wrote it off as just a cute thing long time couples do. Sure, maybe it was weird but she wasn’t going to judge.
But that wasn’t the last time it came up.
“Hey do you want-?”
“Cookies? Yeah, I’ll buy some. What else do we need?” You finished, writing things down on the grocery list. Steve and Bruce were watching from across the room, rolling their eyes. Recently, the two of you kept finishing each other’s sentences and it was getting annoying.
“Probably popcorn, we ate all of it. Oh and-”
“Lemonade.”
“Yeah, I was just about to say that. Also, can you please-?”
“Swing by the dry cleaners and pick up your suit? On it.” You stuffed the notepad in your bag and waved to a stunned Steve and Bruce. Peter looked up from his seat on the couch, smiling at you lovingly.
“Wow, look at us finishing each other’s sentences. I love you, be safe.” Peter said, throwing you your jacket. It was raining outside, and he didn’t like seeing you get wet or cold. You blushed, noticing Steve and Bruce exchanging glances.
“Love you too, I’ll be back in a bit.”
The next time it was Wanda’s turn to notice it.
She was sitting on the sofa with Thor, watching reruns of Friends when you bounded through the door in a huff. Peter followed behind, holding a laundry basket full of clothes. You slumped into the armchair next to Wanda, refusing to look at Peter.
“Baby, I’m sorry!” Peter whined, trying to kiss you. But you turned your face away, rolling your eyes when Peter threw a sock in your face.
“I told you, I fold the laundry because you can’t do it right! What sort of heathen folds shirts in half?!” You snapped, throwing the sock back at him. Peter frowned as you got up and walked past him to the kitchen. Wanda and Thor watched as Peter ran after you, not sure if they should intervene or not.
“Well, you can’t load the dishwasher right!” Peter countered, making you storm past him.
“No, YOU can’t load it right! Nobody puts plates on the top rack!” You yelled, picking up the laundry basket and giving Wanda an annoyed look. She gave you an apologetic smile, and Thor tried not to laugh when Peter tried snatching the basket back.
“Peter, I swear to God I’m going to kill you!” You hissed, and Peter ran for his life with you chasing him with the iron.
One day after work, Pepper swung by the Tower to pick up some mail for Clint. She let herself in, thinking no one was at home since it was deadly silent. Pepper almost had a heart attack when she realized halfway across the room sat you and Peter, completely silent.
You were reading, the only sound coming from you was the turn of a page. Your legs were draped over Peter, who had fallen asleep hours ago. His head was on your shoulder, little snores escaping his mouth as he slept. You had a hand in his hair, running your fingers through his curls. It was so domestic, anyone else would have thought you’d been married for years.
Pepper could hardly get out of the Tower fast enough.
At this point, all of the Avengers had seen you and Peter act like an old married couple together. It was just an unspoken thing between them, that you two were just sickening together. Nobody was going to say anything about it, who wanted to have that conversation? And as long as you both were happy, Tony didn’t want the topic broached.
Until Carol accidentally mentioned it during dinner.
“Hey Pete, can you pass me the water please?” she asked, gesturing to the jug next to Peter. Peter nodded, but at the same time you went to pass it to her too. Your hands met, and Peter chuckled as you blushed from the contact. All the Avengers looked at each other, everyone thinking the same thing.
“Gosh, you two. Just like an old married couple.” Carol laughed, taking the water from Peter. For a moment, everyone was so silent you could hear a pin drop. Peter turned bright red and you buried your face in your hands. Carol groaned, realizing the cat was out of the bag.
“Carol! We weren’t going to say anything!” Bucky whispered, watching as Tony tried to keep eating. Peter was holding your hand under the table, and you were so embarrassed. How long had they been talking about this?
“Sorry, it just came out.” She whispered back, avoiding Wanda who was biting her lip trying not to laugh. Suddenly, Thor burst out laughing at the end of the table, hitting it with his fist. He very nearly fell out of his chair, clutching his stomach. That was all it took, the rest fell like dominoes. Pretty soon Bucky, Wanda, Steve, Sam, Clint, Nat, Bruce, and Pepper were laughing so hard they were crying. Tony managed to keep it together, but he was on the verge of breaking too.
“Oh, come on! All of you?” Peter moaned, wanting to disappear into thin air. Sure, he knew you two were super domestic and cute, but the whole “old married couple” thing seemed a bit much. You couldn’t stop blushing, hoping that they weren’t going to make this into a big deal.
“It’s just you and Y/N are so comfortable around each other, you act like an old married couple.” Tony said, patting Peter’s back. “It’s not a bad thing, it’s just different. You’re old souls, that’s all.”
“Please, can we never mention this again?” You squeaked, frowning when Wanda made a heart with her hands. Sam followed suit, until the entire table was doing it. “Stop, this is so embarrassing!”
“Personally, I think it’s adorable. It’s like a little snapshot of what you and Peter will look like in fifty years.” Pepper said, kissing Tony’s cheek. You sighed, realizing that this was not going to be forgotten anytime soon. The rest of the table nodded, giving you both knowing smiles.
“Yeah, when the little Parkers show up it’ll be just like this.” Steve said, passing Clint the salt. You went so red, you thought you were turning into a tomato. Peter coughed violently, nearly choking on his food until you rubbed his back.
“Alright, that’s enough. We’re done talking about this.” He said, shooting everyone death glares. That shut them up, and pretty soon everyone was back to normal. Wanda was arguing with Sam over sports, and Steve was giving Nat dating advice. Once the attention was off the two of you, Peter leaned over and pressed a kiss to your forehead.
“You know, I like being an old married couple. It makes me excited for the real thing.” He whispered, and you couldn’t help but smile at his words. Peter was definitely the one you wanted to spend the rest of your life with, he was your soulmate. And no matter what, you wanted to grow old together
Even if he couldn’t load a dishwasher right.
TAGLIST (let me know if you want to be taken off!): @tommyparkerr @grandmascottlang @toms-order @darling-parker @spiderboythomas @cutiehollands @peterparkerstingle @peeterparkr @jupiterparker @inlovewithmob-tom @veronicas-littleworld @da5haexowin @sergeantbxrnxs @hazsterfield @itsholyholland @underoosstark @stormyholland @let-me-luve-you @smexylemony @musicgirl234 @its-livelovelife @steve-thotgers @tiny-friggin-human @lovelyh0lland @blueberry-butterscotch @keylla-dunspeh @lucille-lovely @yeahbutmarvel @lokiislowkeyhot @spideymood @cutesparker @yoharryyouawizard @tomhollanders2013 @celestialparker @letthembehappymcu @jnej @spiderman-n @positiveparker @winterssoldierrs @heycreehere @galaxy-parker @sdrecsfics @doimakeitthroughthenight @wronglanemendes @brokensimpson @naikia @spnsoap @ninetypoundsofasthma @quitetommy @voltronshepard @marvelismylifffe @annathesillyfriend @tiredfeels @scarlet-spiderr @hedwigthelegend @renesniajazza @bibliophile-grasshopp @tomhollandswhore @yeeterbenjaminparker @juliabuenooo @paradoxparker @pokeloisfk @machomango13 @parkerstylesperalta @mcuspidey @nobledoritoman @cosmicdaya @hey-its-grey @toms-gf @whypeterparkerwhy @sunshinehollandd @sunshineandparker @blissfulparker @xxtomxo @pastelpeter @nnatasha @hollandsosterfield @hillsnholland @peterplanet @hopespym @peterstrainingwheels @parrkerspeters @stuckonspidey @jacobsbatalon @aw-hawkeye @ollieologys @spideypeach @spxderbarnes @stealth-spiderr @uglypastels @darlingtholland @spideyflicker @thollandss @flirtypeter @peterparkoure @marvelous-maddi @trustfundparker @clockblobber @asmilinghopelessromantic @zaynjawy @sholla4-314@beautyandflannel @lemondropirwin @angelbabymed @in-the-corner-coffee-please @peterbparkcr @william-stanley @greenarrowhead @squishyhyunjin @starz-23 @spoopy-spooderman @whatevsholland @aestheticstom @tomzfrog @ppunderoos @spiderkat1248 @embrace-themagic @v-valz-n @hazssouthernbelle @dancingoncrackedhearts @mlt2000 @cordiebirdy @softspideyboy @headsup-itsmostlypeter @sspideytom @kisses-holland @infamousmany @theefactorygirl @aelinashryvver @sarah-moss2015 @keepmeholland @fandomdarlings @yourwonderbelle @rexorangecouny @deni-gonzalez @mylifeasafangirlforever @random-writer06 @stretchkingblog97 @sweetlyth @starsholland @notethereal @pachuh @wazzupmrstark @fandoms-stuff @petesrparker @yavinmoon @sweet-baby-cakes @noswagswag @peteunderoos @jubaydahk @jackiehollanderr @yadekms @practicallylivesonline @i-tried21 @stasye @unorganizedasf @1-800-back-off @tomshufflepuff @beequeen8020 @mejustbeingme @fanboy-tom @mimaligrl @theimpossiblehologramtree @diamonddia-mond @qrangr @parkeroffline @peterpumpkinparker @rosieredcheeks @delicatepeterparker @delicately-important-trash @zabdisamor @peterbrokenparker @the-lost-fairy-tale @everestluke @gigilame @youllbemineandillbeyours @cherryblossomcharlotte @paintingbellarke @teawithbucky @miraclesoflove @tomhaz @unholyhaz @multi-worlds @lostinspidey @definitely-not-black-cat @clara-licht @ppkrtingle @laurxn-robinson @theirmidgardian @screamholland @ddaeing @sincerelymlg @maybemona @learning-howto-be-myselfx3 @flowercrownparker @sincerelymg @dickgraysonnsworld @lowkey-holland
#peter parker#peter parker x reader#peter parker fluff#peter parker fanfiction#peter parker fic#peter parker x you#peter parker x y/n#tom holland#tom holland x reader#tom holland fluff#tom holland x you#tom holland x y/n#tom holland fanfiction#tom holland fic
2K notes
·
View notes
Text
Restoring A Mid-Century Modern Dining Chair
What you will need:
A Chair
4 Rubber Chair Feet
Upholstery Material, approx 18x18 "
About a dozen short nails (about ½ " long -- roofing nails or carpet tacks will do) OR a heavy-duty staple gun & staples.
3-4 ½" screws
A Hammer
A Saw
A Screwdriver
Optional Extras:
Padding
A Drill
8-12 medium nails 1 ½ to 2 " long depending on depth of seat (you will only need these if you are using cross pieces.)
Where to Get Supplies:
Very often, places like Lowes or Home Depot will have a scrap lumber bin, where you can get boards super cheap. You have to check carefully before you buy, because very often the reason a board gets chucked into the scrap bin is that it’s warped. And it’s a grab bag as to what will be there at any given time. Still, you can get decent wood for small projects there at reasonable prices if you keep an eye out.
For padding and upholstery, if you don’t want to buy outrageously expensive new fabric, check for places near you that sell mill-end fabric and scrap leather. Or you can repurpose old coats, quilts, comforters, etc.
For hardware, your local hardware store should have everything you need. Don’t be intimidated by rows of specialty nails and screws. A nail is pretty much a nail. There’s a flat end and a pointy end. All you need to know is, what’s the combined thickness of the things you’re going to be nailing or screwing together? Then pick nails or screws that are long enough to go past the half-way point of that thickness, but not longer than the total thickness. Heavier things need heavier nails, and lighter things need lighter nails. Simple!
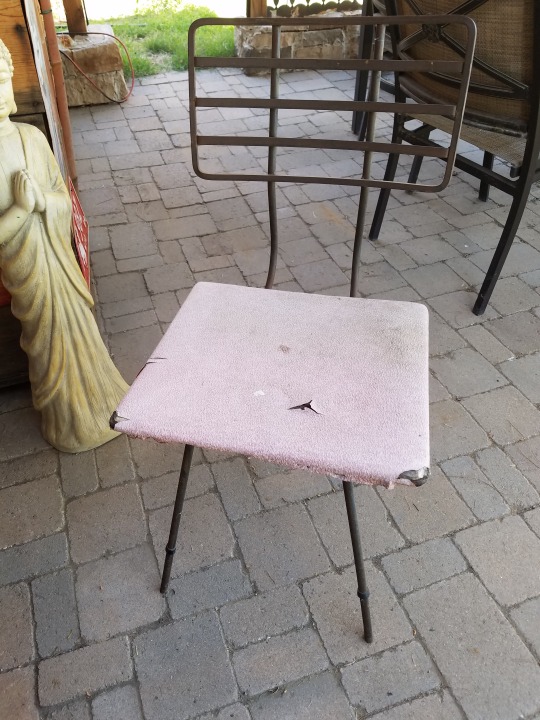
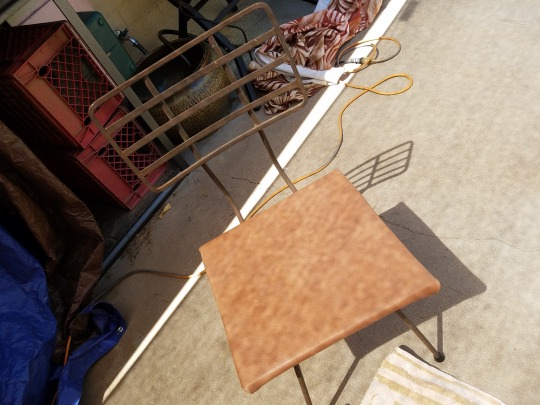
Step 1: Find A Chair
This is a chair that's been knocking around since I was a kid. It sat in my Mom’s back yard for about fifty years, and looks it. However, I think it looks kind of cool, and I wanted to fix it up.
I cleaned the iron frame up with a damp cloth to remove surface dirt and debris, but I decided that I wanted to leave the weathered, rustic look of the iron as it was. If you do want to clean minor rust like this and make it look black and shiny again, you can use either a commercial rust cleaner, or you can use a 50/50 mixture of vinegar and water. Once the rust has been removed, and the iron is dry, you can wipe it down with liquid car wax and buff it with a rag to make it more rust-resistant.
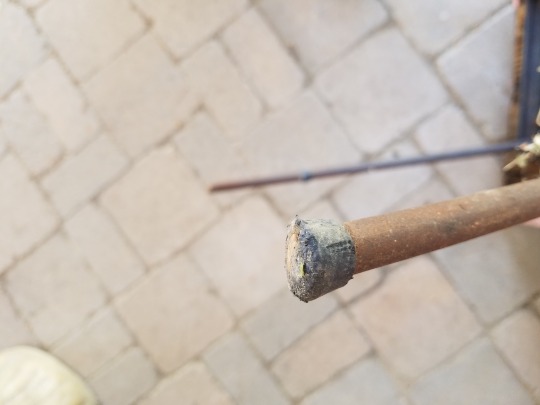
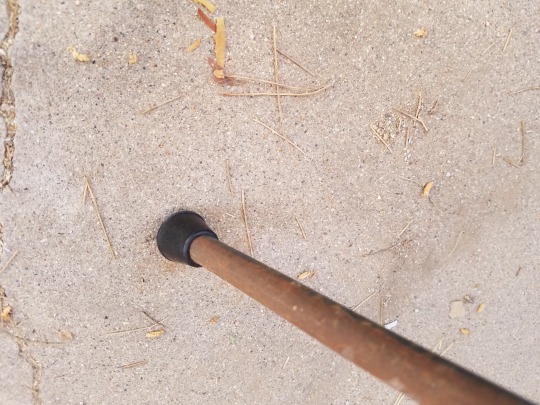
Step 2: Replace Rubber Feet
The old feet on this chair had worn completely through. Since it's iron, you don't want the bare legs scratching up your floors, or making nails-on-chalkboard screeches every time you move the chair. Replacing the rubber feet is easy: just measure the diameter of the legs, go to your local hardware store, and buy new ones.
Step 3: Check the integrity of the seat.
If you're lucky, whatever the base of your seat is will be in good condition, and you can just strip off the old upholstery and padding, and re-cover it. (You may even be able to keep the padding.) In this case, that wasn't an option. This chair has been rained on a million times, and the plywood was disintegrating. I took it off and threw the whole seat away. (The web is old. No spiders were harmed in the restoration of this chair.)
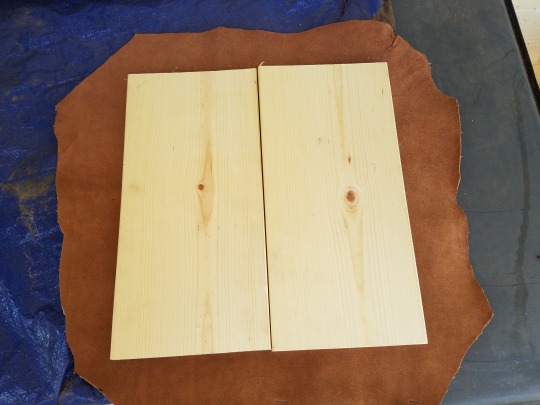
Step 4: Replace the Seat (if necessary)
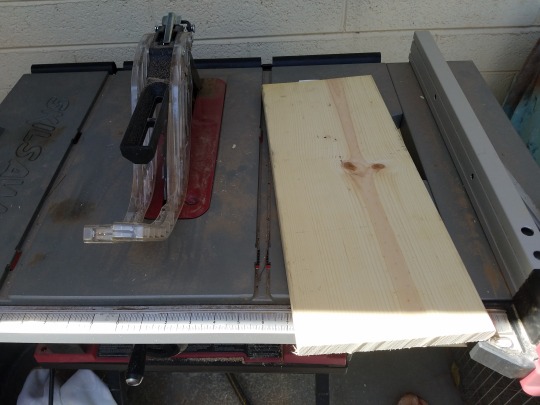
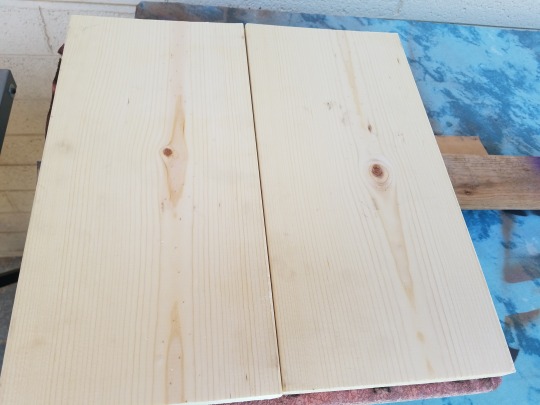
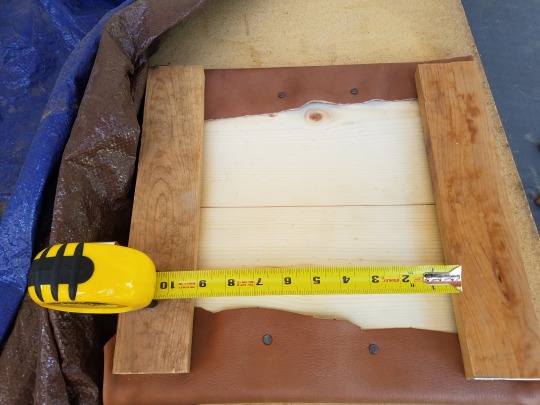
I did not have any plywood on hand, and the local hardware place does not sell plywood, and I didn't feel like running all the way across town to Lowe's. So I bought a 3′ length of 2x8 lumber instead. I cut it down into two 15-inch lengths. Put together, this made a 15x15" square. (Because 2x8s are actually 2x 7.5s. It's confusing.) This was slightly smaller than the original plywood seat, which was 15x16″, but that was no big deal.
I have a table saw, so that's what I used to cut the wood. However, you can also use a hand-held circular saw, or even a manual hand saw. If you are using a hand saw, manual or electric, unless you have an inhumanly good eye and steady hand, you will probably want to use a straight-edge and a pencil to mark your cutting lines first. It is also a good idea to have either A) someone to hold the wood still for you, or B) a working surface to which you can clamp the wood. If you can't keep your wood steady, you WILL end up with a crooked, ragged cut. And if you're using a circular saw, you could seriously injure yourself if your wood wobbles and causes kickback.
If you're using any kind of power tools, READ THE INSTRUCTIONS FIRST and follow them. You don't want to fight with a power tool; it will win.
If I had wanted to get fancy, I could have used wood glue and a couple of clamps to glue the two pieces together. But I was being impatient, and didn't want to wait for the glue to dry. So instead, I used the new upholstery to hold the two pieces together until I could nail on supporting crossbars. (See Step 6.)
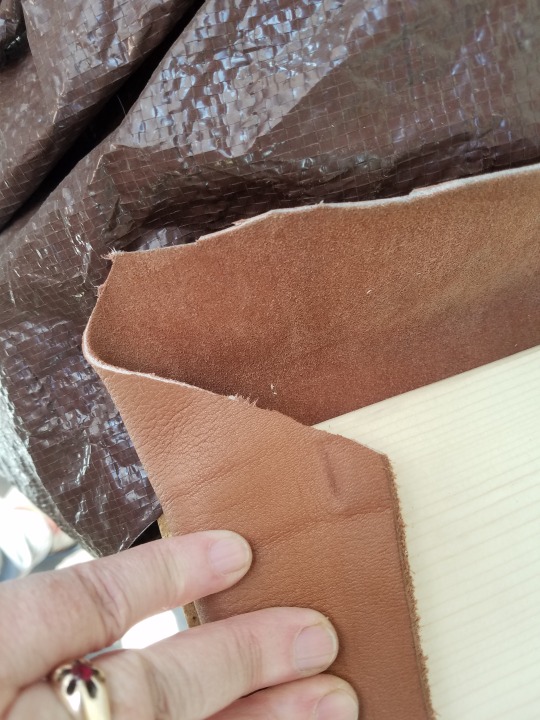
Select and Trim New Upholstery
You can use anything you like here – fabric, leather, vinyl. The only caveat is that thin fabrics will wear out more quickly, and very heavy fabric or leather can be more difficult to fold nicely at the corners. I'm using mid-weight leather for this particular piece.
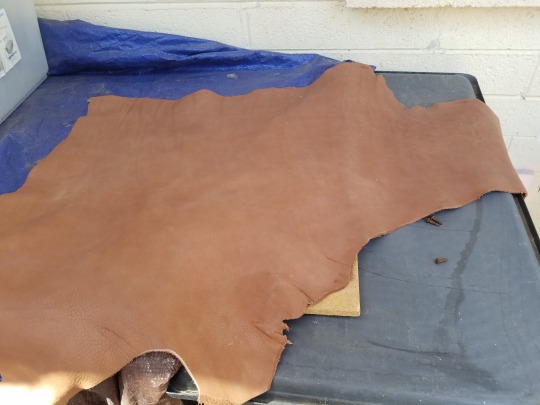
Whatever you use, invest in a good pair of sewing shears to cut it. Trying to use craft scissors to cut cloth or leather will drive you nuts. If you are using very heavy leather, an Xacto knife (one of the big ones) might work even better. If you're using an Xacto, make sure that you have a surface to cut on that you don't mind scratching up. (And of course, be careful and use good knife safety.)
Cut your upholstery AT LEAST 2 inches larger than your seat all around. Remember to account for the depth of the seat and any padding as well as the breadth. If you're using fabric that frays easily, you will probably want to turn the edge under, so add extra for that. You can always trim extra length off, but you can't untrim a piece that's too short.
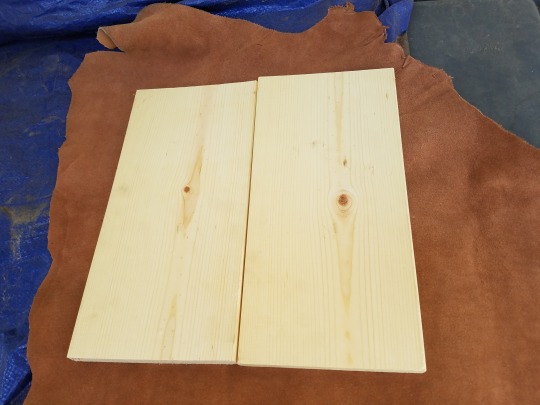
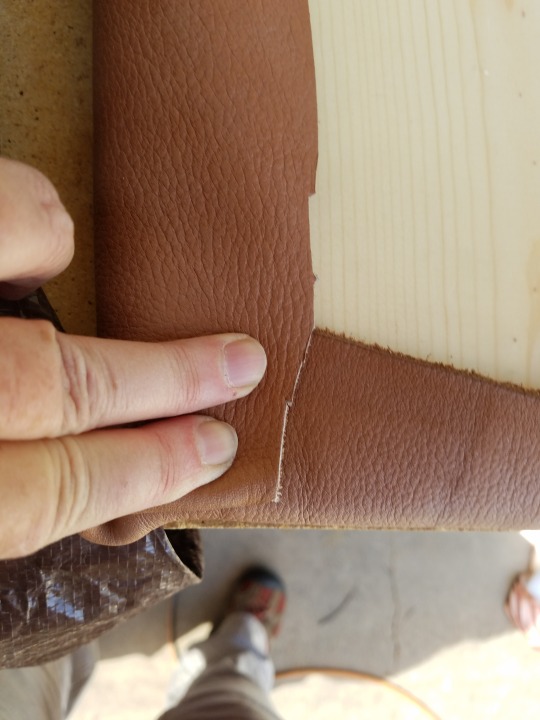
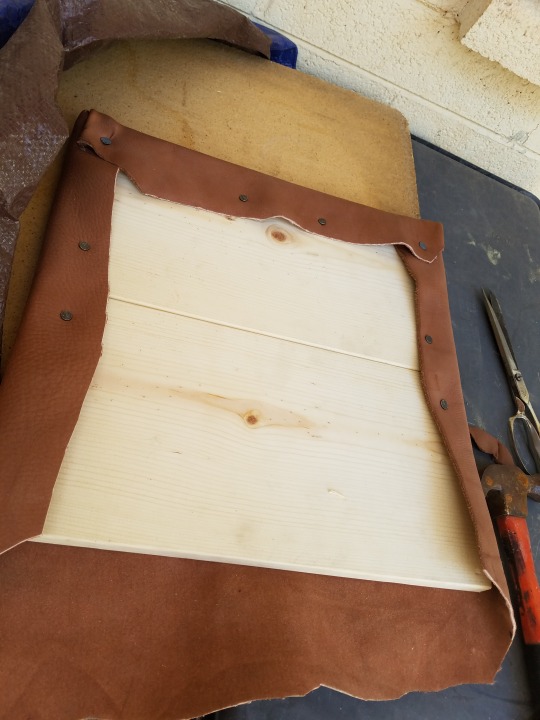
Step 6: Attach New Padding/Upholstery
If you are replacing or adding more padding, then place it between your seat base and the upholstery material before you attach the upholstery material. I decided that since my primary purpose for the chair was to put it next to my closet to throw clothes on, and this was never going to be a Comfy Chair no matter what I did, that I didn't need to bother with padding.
Since I was using moderately heavy leather, I trimmed away some excess at each corner of the seat so that it would fold more easily. Again, be careful and don't trim off too much. I used a mixture of carpet tacks and roofing nails to attach the leather to the wood (the roofing nails were for the corners, where I wanted something sharper to get through the multiple layers of leather.) Basically any short, sturdy nail will do. OR if you have a heavy-duty staple gun, that would also work well. Make sure you stretch your material evenly. It can be helpful to have a partner at this stage to hold the material even while you tack it on.
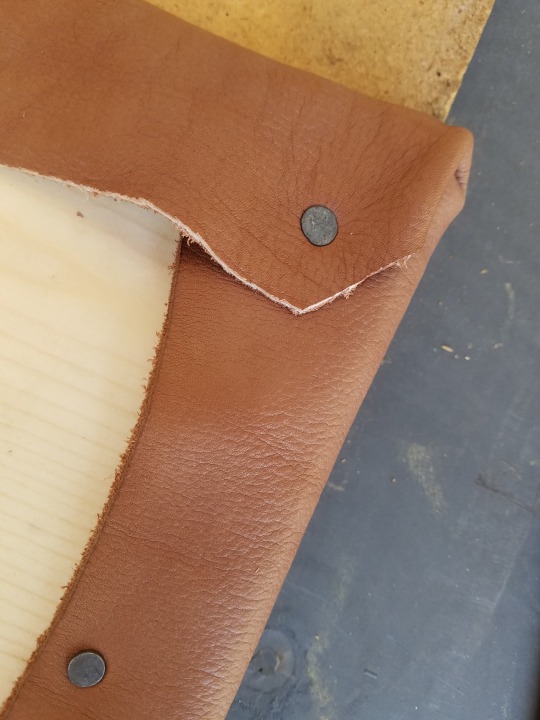
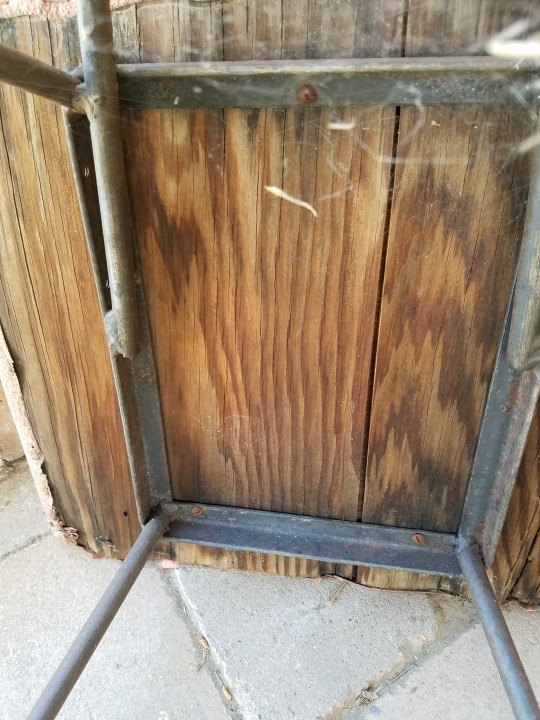
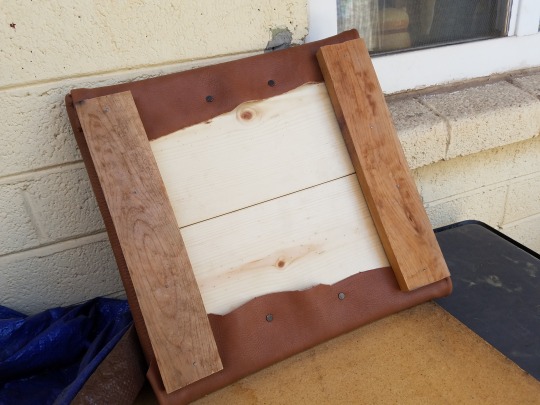
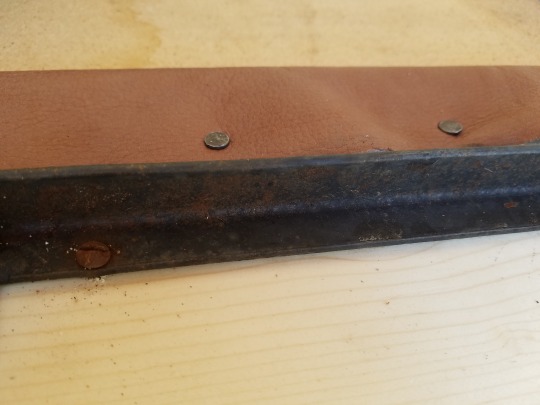
Once the leather was attached, I nailed cross bars (two 13″ 2x4s) onto each of the sides to keep the two seat pieces together. As you can probably tell, the 2x4 was just an old one I happened to have in my scrap lumber supplies. Since the frame of the chair is screwed directly to the two seat pieces, I suppose I COULD have left the crossbars off, but I wanted the extra stability. Ideally I would have used framing nails to attach the crossbars, but I was out of framing nails, so I used finishing nails instead. (Like I said, for a project this small, nails is nails.) I made sure to measure the iron seat frame first, and attach the crossbars so that there would be room enough between them to screw the frame of the chair to the seat.
There are four nails per cross bar -- because they’re finishing nails, they’re hard to see.
Step 7: Reattach Seat
Once the seat was put together, I screwed the metal frame of the chair onto the seat, right between the cross pieces. Weirdly, this particular chair only has three screws holding the seat to the frame; most chairs of this general type use four. I re-used the original screws. Optionally, you can use a drill to start your screw holes. Be sure to pick a drill bit a little smaller than the diameter of your screws.

And voila, one restored Mid-Century Modern chair!

15 notes
·
View notes
Photo

**Please do not repost without credit**
[TRANS] 2018.10.30 SONE NOTE LIVE vol. 18 with Sunny
Staff: Sunny, you tried out making Christmas bottles last time, and this time you tried making DIY cat scratch board and toy! Please share any difficulties or particular points that you had.
Sunny: The teacher was next to me and helped out, so it wasn’t difficult. I just took care that it was safe because Sogeum will use them. For example, I gently polished the sharp tips and edges with sandpaper, and I took care to not use a lot of glue because she might eat it. I feel like raising a cat is a lot like raising a baby. I can’t predict what Sogeum will do and she can’t understand speech. I can’t let my guard down ^^
Staff: This required both detailed and bold work, but which do you think matches your personality more?
Sunny: I believe details suit my personality more so than boldness. I’m told that I don’t really seem that way, but I’ve always been the type to be scared of bold challenges. Recently, I’ve become even more careful (laughs)
Staff: What were some specific difficulties?
Sunny: It wasn’t that difficult. The instructor thoroughly showed me how to do it, so it wasn’t dangerous. The instructor and staff watched over me so I was able to work without worry ^^
Staff: Which part was the most fun?
Sunny: I like fiddling around with small things, so it was interesting for me to make yarn pom poms and cute objects.
Staff: Which part was the most difficult?
Sunny: I was careful not to mess up when drilling holes into the board. That’s because it’d be ruined if the holes weren’t drilled well and then the screws wouldn’t be able to fit!
Staff: You practiced before actually getting to work.
Sunny: That’s because in spite of it all, I was nervous. No matter how many times I practiced I was still nervous because these were tools that I don’t normally use.
Staff: You made two types of items this time; what were particular points for each?
Sunny: When making the scratch board, I used a lot of strength wrapping the rope around. Cats actually use a surprising amount of strength when sharpening their claws, so the rope will easily break apart.
Staff: Is your arm strength particularly good?
Sunny: Not really, but I can do this much! I used all of my strength wrapping that rope today! I tried my best for Sogeum so that it won’t break when she uses it (laughs)
Staff: How was making the cat toy?
Sunny: It was interesting to polish the jagged parts with sandpaper. The sharp places would get smooth after a lot of polishing… I was happy to be able to see that process.
Staff: You were really good with a hammer.
Sunny: Really? (laughs) I don’t usually use them… I don’t have the talent for things like DIY projects, so I don’t really try to do them. I’ve used a hammer before for a program shoot, but as for tools that I normally use, that would be a screwdriver. I live by myself now, but when I purchased a desk and table from the internet, they come to your door unassembled. So I had experience assembling those kind of items. I never had a desktop PC before, but when I started living alone I bought one, thinking to play games with it (laughs). So I ordered a PC desk and chair and assembled them myself… It was really tough (laughs). Ah, but the assembly itself was easy! It was just that to assemble the desk legs you have to turn the desk down, right? So after that was completed, I had to get the desk upright… That was really hard. I had to lift it with my back and haul it up… (laughs) I chose a desk that was made out of an iron material so it was too heavy and lifting it was extremely tough. Looking on the internet, people have said that assembling it would take around 1~2 hours, so I was ready for that, but it only took around 40 minutes. However, turning the desk upright took around 20 minutes (laughs) It felt like my body was going to break somewhere...I worked on it while talking to myself (laughs)
Staff: If there’s no physical work involved, it seems like you have talent for DIY (laughs) You made the scratch board and wooden toy very well! You can anticipate Sogeum playing with them♪ Does she usually sharpen her claws at home?
Sunny: Yes. She likes to do that, but her favorite toy at home is the pole with a bug toy on the tip. Sogeum doesn’t really like toys with strings attached to them like fishing poles, but she likes the ones with yarn or toys attached directly to the poles. So playing with her is like being a conductor (laughs) If you swing the pole to the left, she will jump to the left, if you swing it to the right, she will jump to the right (laughs) Sometimes I only move my eyes. When that happens, Sogeum will time when the pole will move by watching my eyes. She's afraid of missing the timing (laughs) It’s very amusing because it feels like I’m conducting Sogeum. I wonder if Sogeum will notice that I made the toy box? If I expect it then I probably would get disappointed if she doesn’t notice, right? (laughs) I believe she will like the scratch board, but I’m anxious that she won’t like the toy box. But I’m looking forward to present it to her.
Staff: At the end you burn marked cat paw prints; how was that activity?
Sunny: I messed up a little (laughs) I burned one of them and it turned all black, another one I didn’t do it properly had it was hazy… It was the first time for me to use a branding iron, which has to be handled carefully, so I think I was a little nervous ^^
Staff: There were processes where you used a drill this time, but have you ever used a drill to make something?
Sunny: It was difficult because it was my first time using a drill. I thought about what if I drilled a hole in the wrong place or at a weird angle, so I was nervous during this operation as well.
Staff: Have you ever had interest in making an item like today or an interior decoration?
Sunny: I would like to try making a piece of big furniture like a dresser or a sofa. One of the good points about DIY is that you can make things that match your size. I’m short so I think it would be great to be able to make something that fits me and is easy for me to use.
Staff: What would you be the best at for interior decorating?
Sunny: I don’t think I could put up wallpaper because of my height… (laughs) Since I liked playing with Legos and plastic models before, I believe I would be good at activities where I could always fiddle around with small objects. I think I could make make some methodical decorations or detailed work very well.
Staff: You made wooden goods for your beloved cat to play with, but are there any other goods that you would like to try making for Sogeum?
Sunny: Probably a cat tower. I assembled the cat tower that’s at home, but I chose from existing designs, so if possible I would like to make one that would suit Sogeum perfectly and would have all her favorite things. For example, she likes soft cushions, but she likes it even more if they’re at a higher place. The cat tower now isn’t really soft, so I’d want to make one with comfy cushions and with a hammock. The overall design would be in princess styled pink? (laughs) Soguem’s personality is that of a proud princess, but her appearance can look a little androgynous. Since she looks kind of like a cool cat, I want to make a princess styled cat tower ^^
Staff: Have you bought items that have a cat design before?
Sunny: Keyholders and mirrors, coin purses… When there is something like that with a design that looks like Sogeum, for some reason my eyes just go to them and I sometimes buy them as well. A cat with short white fur, with pink inner ears and pink paws, and also yellow eyes. If those three features match up then it’s Sogeum. If I see it then I buy it without thinking. Before I know it I’m holding it in my hands (laughs).
Staff: Is there anything besides toys that Sogeum favors?
Sunny: She uses some pajamas that I bought as her own cushion. She bites it and kneads it gleefully with her front paws. (laughs) She gets in a really, really good mood when I wear those pajamas. They’re thicker so it’d be nice for it to become winter soon. And even on days when I don’t wear them, she gets really happy if I fold them up and place them on the edge of the bed for her like a cushion. She seems to get super happy biting and pulling on them. Fortunately, I have other pajamas...But I think I’ll go shopping again (laughs)
Staff: There are many members in SNSD with pets. Have any of them been recent topics of discussion? If so, please share what kind of episode it was.
Sunny: Everyone has dogs, and I’m the only cat person…. Before, when I met the other members’ dogs, I would try to carry them and lifted them up like you would a cat instead of a dog. But the way you hold a dog and cat are different… When you hold up a cat they stretch like cotton. So when you hold a cat you pull them up and then hold them, but dogs are stiffer than I thought (laughs) I think it was Yuri’s dog, but when I went to hold it, without thinking I lifted it like I would a cat, thinking that it would stretch like one. I got in a panic and asked the members, “What is this? I feel strange and the dog feels strange… What should I do?” The members thought that I was so funny that they even took pictures of me… They laughed at me saying, “This is too funny! You normally don’t lift up a dog like that. Sunny forgot how to hold a dog!” (laughs) I had a dog before, but before I knew it I forgot everything (laughs)
Staff: If you were to make a DIY item for another member who has a pet, what would you make and for who? Please share what color, shape, material, the idea for the member and pet, and why.
Sunny: I’ve known Tiffany’s Prince the longest, so I would like to build him a doghouse. Since his name is Prince, wouldn’t it be nice to give him one in the shape of a castle? Of course, my ability isn’t up that that point though (laughs) But if I gave a white house with light blue points… Tiffany would probably dislike it (laughs) That’s because she likes pink. But since Prince is a boy, wouldn’t pink give the wrong idea about him? (laughs) Prince has kind of short ears and I think cool colors would suit him. While saying that, I just said that I would build Sogeum a pink cat tower, right? (laughs)
Staff: Does Sogeum have a favorite color?
Sunny: Sogeum seems to be attracted to vivid colors. She probably likes them more than other colors? Even toys that are the same shape and material, she’s happier with the violet-red one than the gray one. It seems like she likes colors that stand out.
Staff: Please share if there is anything that you like now or are recently collecting.
Sunny: Right now I want to start knitting so I’ve been looking for yarn. I often knit scarves, but back then I didn’t think that the yarn was that important and only saw the yarn’s color and shape, but now I’m careful about the texture as well. There’s yarn that has cashmere in it, and it’s not only soft and flexible, but the thread itself is soft so it can be mixed with various threads. That’s why you can decide the color mix by yourself. But when you are interested in the material, you think...was yarn always this expensive…? (laughs) I’ve liked knitting since I was in elementary school. It’s very enjoyable since you can do it without thinking and I like simple repetitive activities.
Staff: How do you usually spend your time?
Sunny: I recently like to stay at home watching TV, having food delivered and eating it… I only make simple dishes, and it is very enjoyable and comfortable to spend time at home while eating fruit and the like. I would rather spend quiet time alone than have friends come over and being boisterous (laughs) I really like being at home. Being at home recharges my energy and being with Sogeum is my favorite way to spend time. However, when everyone sees this interview it would be October around the Chuseok holiday when families go out together. I somehow have plans, but we haven’t figured out a place yet ^^
Staff: Before, you mentioned that your room has a lot of pink in it, but what color do you like recently?
Sunny: I still like pink. I like pink and purple. Among pinks I like shades that don’t have orange hues. Instead of peach and coral colors I guess I like pinks that have red and purples mixed in? I’m not particular about the brightness or darkness to the color, so I like colors like Indian pink. As long as it doesn’t have orange or feel fluorescence. That’s the one thing that I don’t match well with Sogeum.
Staff: But the colors of her toys are colors that would be decided by your preference, right (laughs)
Sunny: Sogeum does not choose. That’s because I have the decisive power (laughs)
Staff: Please share if there has been a hot topic or a memorable episode among the members recently!
Sunny: We monitor each other’s individual activities in our group chat room, and we share videos of junior artists covering our songs. We also take and send pictures of delicious food that we had. However, when I talk about that kind of chat, it’s just kind of meaningless content (laughs). Among the members, Sooyoung, Yuri, and Tiffany often upload pictures. When was the last time I shared a picture…? (laughs). And I think it was Taeyeon? She ordered us with, “Take a selfie immediately and share it! I want to see what you are doing right now. What is everyone doing and where?” (laughs) So I took a selfie and shared it, making sure that they could tell what I was doing and where I was. It was like a mission. I sent a picture that I was just lying in bed at the time doing nothing. I think I sent a picture with Sogeum in it? Then all the responses were, “This is so Sunny” (laughs). All the members always have the desire to meet up, but by uploading and seeing each other’s pictures, we can say, “That’s interesting. They are enjoying themselves.” ...We can communicate how we’re doing to each other like this.
Staff: SONE NOTE LIVE is where we give preference to what the members what to try out, but do you all talk about your SONE NOTE LIVE activities? Also, please share if there is something you’d like to try next.
Sunny: We often say to each other something like, “I just tried this out the other day, it was interesting”, and discuss our experiences. I like making things, but up until now making candles was the most impressionable experience for me. If I get the chance, I’d like to try decorating something like fruits or chocolate bars. It seems fun and very cute!
Staff: Finally, a message for SONE JAPAN please!
Sunny: I’m happy that I can regularly communicate what I’m doing like this! I often see your comments on SNS. Everyone, please take care of yourselves, too. It’ll get cold soon. Always take care not to catch a cold, and please wait until the next time we can meet♪
Translation by RedSunsetXIII
source: SONE JAPAN website
**Please do not repost without credit**
8 notes
·
View notes
Text
Where Do We Put The Turtle
Albert and Elmer being domestic gay boys. What’s new?
Suggested by @menameisfinch
Words 1,111 (:O so satisfying btw)
Archive
Masterlist
Albert threw down the last box with an exaggerated sigh. He scanned the room, taking in the complete mess that was their new house. Albert and Elmer had been together for 2 years and they finally decided to buy a house. It was a cute ranch right outside of the city, and it was perfect.
Albert plopped down onto the couch next to Elmer, and rested his head against Elmer’s shoulder. “Don’t fall asleep on me yet. It’s only twelve, we still have a lot of work to do.” Elmer giggled out. Albert groaned and shoved his face into Elmer’s shoulder.
“Remind me why we decided to do this?”
“Because we love each other and want to build a life together. And I want a dog, so we need a yard.”
“Damn. You’re right.” Albert reluctantly got up from his seat and walked over to a can of paint and picked up the paint brushes. He turned back to Elmer and tossed a roller at him. “Let’s get this party started.”
000
The afternoon sun was streaming through the windows onto the walls that were gradually turning grey. The only sound was the gentle stroking of brushes against walls, and the occasional scooting of a stool. Albert focused intently on the task before him. Sitting on the floor, slowly gliding his brush against the edge of the wall, careful not to get any on the white trim below. He finally reached the corner of the wall and reached to get more paint on his brush.
He looked up at Elmer as he did so. He was standing on a stool, arms fully extended reaching to trim in the ceiling. His brows furrowed in concentration, his jaw set. Albert laid down his brush and just watched Elmer. His hand moving back and forth, covering the horrid yellow walls with a fresh new grey.
Albert rose to his feet and quietly walked behind Elmer. He was so focused on the task he didn’t notice until he felt strong arms wrap around his hips. He glanced down to see Albert hugging his legs, face pressed into the small of his back.
“Albie, whatcha doing?” He asked, placing his brush in the bucket on the ground.
“I’m just happy I get to build my life with you Ely. We bought a house, we are gonna get a dog, maybe kids one day? I’m just so lucky to have you Ely.” He spoke softly, his voice filled with content and love. Elmer smiled and turned in his grasp. He placed a kiss on top of Alberts hair and gave him a hug. When they broke apart, Elmer giggled at upon seeing Albert’s face.
“What’s so funny?” Albert questioned. Elmer only continued to laugh, and stuck his thumb out to attempt to wipe away the streak of paint that covered Albert’s cheek. It was too dry to come off though, so it remained on is cheek.
“You got a little something there.” Elmer said. Albert smiled and reached down next to him, to the brush sitting in the paint.
“Do I?” Albert asked innocently before he pulled the brush out and wiped it onto Elmer’s cheek. Elmer gasped and glared at Albert, but with a huge smile he laughed out, “Oh you’re going to pay for that!”
Elmer took a brush from nearby and splattered the paint onto Albert’s forehead. They both stopped dead in their tracks. They gave each other a look, and resumed the great battle of the grey paint. Laughing and smiling with every flick and wipe.
000
“You are not putting the turtle on the kitchen table Elmer.”
“Well why not?”
“Well for one, it is unsanitary.”
“It’s not like we’re eating out of it!”
“Well obviously no-”
“So obviously it will be fine.”
“Ely, what if we just put him on the counter in the corner. It’s perfect. No food will be over there, you can see him from all corners of the kitchen. It will be just as good as the kitchen table. I promise.”
“...The living room table.”
“UGH!”
000
“The directions say to screw it in there, and then the mount will stay attached.”
“Well, i say that we- FORGET THE DIRECTIONS!” Albert stole the instructions from Elmer’s hand and tossed them onto the couch.
“The last time you said forget the instructions, my ikea chair had two legs on the ground, and two sticking straight up. And somehow, my fridge was actually warming foods up.” Elmer snatched the directions off of the couch. “I think we should follow the instructions. They literally tell you exactly how to do it.”
Albert gave Elmer the stink eye, but after about thirty seconds of Elmer not budging, Albert let out a sigh and took the directions from his hands.
“So, i guess we have to screw on the mount.” Elmer’s face brightened into a smile. “Here, i’ll lift it onto the wall, and you screw it in.”
“That’s what she said.”
“Shut up and get the screwdriver.” Albert quickly obeyed and set to work.
000
“Perfect. Look, the tv is actually ATTACHED to the wall.” Elmer nudged his boyfriend on the shoulder.
“Shut your trap and eat your chinese food.” Albert nudged back. He shoved his chopsticks further into the container of rice in his hands. They were lounging on the couch in the center of the living room. Fresh paint covered the walls, and a newly mounted tv was playing Friends in the background. They had a few containers of chinese food set up on unpacked boxes in front of them. They were exhausted and covered in paint, but proud of themselves and the work they had done.
Albert looked over at his boyfriend who had a mouth full of rice and was laughing at one of Chandler’s dumb jokes. Yeah, he was really happy to be there with that dork.
000
Both boys laid in the bed in the empty bedroom. Their hair still damp from the long showers they took attempting to scrub off all of the paint. Albert was stroking the hair on Elmer’s forehead as the other boy began to doze off. The sun outside was setting, and the soft light cast the most beautiful shadows on Elmer’s face. His face looked a golden color, his eyelashes causing long lines that ran along his face. His freckles prominent as they swept across his face. He had a slight smile on his face as his breathing became steady and he slipped out of consciousness. Albert gazed softly at him, displaying content and love.
He couldn’t wait to start his life with the boy in front of him.
#Newsies#newsies live#albert dasilva#elmer newsies#elmer kasprzak#almer#2forapenny fic#newsies fanfiction#fluff#domestic#please reblog i need validation
42 notes
·
View notes
Text
Best DIY Home Plumbing Projects With Tips In 2019
Home Plumbing Projects With Tricks In 2019
Caulk a Tub
What You'll Need: A tube of caulk, plastic razor, mineral spirits, fine-threaded rag, painter's tape, Magic Eraser or comparable cleaning pad, scissors What It'll Cost: $5 to more than $30, based on the size of the project and which supplies you need to Purchase new What You Could SaveUpwards of $100, depending on the job's size How Long It Take: 60 to 90 minutes The way to Do It: This job is easier than replacing a drain flange. It the toilet repair job I tackled, long until I had an ounce of. I guarantee you can do it all you'll need is some patience and a steady hand. Here's how to do it, adapted from This Old House: Buy silicone or acrylic latex caulk. The former is more difficult to use, but lasts longer; the latter is much a lot easier to use, but shorter-lived. Use a plastic razor (not a regular razor blade) to cut off the old caulk. Eliminate lingering balls using a sterile pad or Magic Eraser, then complete the job with a fine rag soaked in mineral oil. Follow the instructions on your tube to get ready for application. You need the suggestion to cut in a 45-degree angle. Lay down the tape on either side of the joint of painter . Use a damp rag to smooth the newly caulk in a single fluid movement. Wipe away excess caulk as you proceed, taking good care to leave behind a uniform program. Carefully remove the tape of the painter without bothering the caulk. Repeat the procedure. Wait for the caulk to heal before using the tub -- ideally, 24 hours.
Change a Shower Head
Everything You want: A shower head, a wrench or pair of pliers, Teflon mineral spirits or tape, rust/lime remover What It'll Cost: $5 to $7 for a Simple chrome shower head; up of $40 for a high-end version (per Walmart) Everything You Could Save$45 to well over $100 (per Angie's List) How Long It'll Take: 15 How to Do It: Shower heads can be handheld adjusted, or both. However attention to detail is essential in all 3 cases, none is very difficult or time-consuming to put in. For replacing a shower head, the procedure would be: Loosen the head with an adjustable wrench or pliers that are slip-joint and then discard. Use a solution, such as CLR, to remove calcification rust, and debris . Dry the arm round the threads. Apply Teflon tape to the threads and press down to form a close bind. Hand-screw the shower head that is into the threads. Finish tightening with an adjustable wrench or pliers. Turn on the water and look for leaks. Tighten reapply or further Teflon tape if leaks are present. To put in a hybrid shower head with handheld and fixed components, you'll have to screw into an extra piece -- the diverter that regulates water flow between the two heads. The process is a little more time-consuming, and you'll need to refer to the manufacturer's installation instructions to ensure you're linking the diverter properly, but it's not an order of magnitude more complex.
Replace Faucet Fixtures
What You'll Need: Your faucet assembly, plumber's putty or silicone, a basin wrench (optional), mineral spirits, hex wrench (probably contained from the faucet assembly) What's 'll Cost: $30 to $40 for an easy chrome faucet; up of $400 to get a high-end model (per Home Depot) What You Can Save$60 to more than $500 (a HomeAdvisor) How Long It'll Require: 60 to 90 minutes The way to Do It: Replacing a faucet isn't as tough as it sounds. This explainer assumes you're not replacing the sink the true faucet meeting. It adapted from the how-to of this Lowe : Close to the hot and cold valves under the sink. Turn off the key valve of your home if the sink has no valves. Open any remaining water in the lines to drain. Unscrew the water lines or using a socket wrench. Disconnect the elevator pole (the bit that opens and closes the drain). Remove the nuts. Manually unscrew the plastic slide nut onto the P-trap (the bend in the drain ) and disconnect the drain flange. Sink holes and use mineral spirits or rust remover to wash around the drain. If not already done, put in a gasket at the base of this faucet that is new. Insert the new faucet. Tighten the mounting nuts. If not already done, set up the faucet handles and twist using a hex wrench (usually provided). Screw from the drain nut and fit tightly with the bottom gasket (push or screw in). Apply plumber's putty into the drain flange and twist within the drain . Ensure the pivot hole of that the flange faces backward. Tighten the nuts and gasket. Install and test the drain rod assembly. Reconnect the distribution lines and operate the faucet. Check the meeting for retighten and leaks or reinstall as vital. Your faucet should come with installation instructions. (How detailed they'll be is another matter.) Where these instructions conflict with those provided by the manufacturer, refer to the latter. Caution: Faucets come in all shapes and dimensions. When possible, have your faucet meeting handy once you look for your new faucet. Buying the replacement will save you aggravation and time.
Install an Automatic Dishwasher
Everything You'll Need: Your new dishwasher, a Philips head screwdriver, an adjustable wrench or pliers, electrical tape, appropriately sized screws, nuts, and the dishwasher 90 assembly (see your dishwasher's instructions for specific needs ) What It Price: $200 for a simple dishwasher to over $1,000 to get a high-end model What You Could Save: $100 depending on the sophistication of the Work and what your plumber charges Long It Require: 90 to 120 minutes The way to Do It: Installing a dishwasher is simple. There are that excursion prospective DIYers up: the weight and the prospect of working with electrical wiring of the dishwasher . In case you're match, here's what you need to perform (adapted from DIY Network's tutorial): Turn your homethe electricity of off in the breaker. Turn off the water at the sink, even if at all possible. If not, turn the water off in the line. Take the dishwasher and inspect against the schematic that is included sheet. Confirm that everything is in the ideal place and everything that the manufacturer says is included in the kit actually is. Uncap the dishwasher of your home drain line and hook up to your brand new dishwasher's drain socket. Crimp the metal clamp (included) around the drain line and thread through the pit to your own sink compartment. Position the dishwasher in its home compartment. Adjust its leg height with an adjustable wrench if necessary. Fasten the dishwasher into the countertop using appropriately sized screws (probably provided in the kit). Attach the dishwasher's wiring to the local electricity inlet (like colors together). Screw on the cable nuts and cover with tape. Position the ground cable. Consult with the instructions to ensure you of the manufacturer 've done this. Connect the dishwasher's supply line to the dishwasher 90 (a special fresh water connection that you'll need to purchase separately) and tighten. Attach the drain line. Turn on power and the water. Test a load and then repeat those steps as necessary. Caution: This job requires some mild work. If the idea of manipulating wiring makes you uneasy, in spite of the power of your house off, save this one for the professionals.
Fix a Running Toilet
What You'll Need: Pliers, adjustable wrench, cable cutters, fresh flapper (optional), new float (optional), new fill valve (optional), vinegar or mineral spirits, toothbrush What It'll Cost: Up to $25, depending on the equipment and supplies needed What You Can Save: Upwards of $100, based on the nature of the job Long It'll Take: 10 How to Do It: Should you lucky, fixing your running bathroom will cost nothing and require just a couple of minutes of your time. You may have an hours-long procedure of trial and error punctuated by trips to the hardware shop if you 're not lucky. Herethe way to tackle three common issues that can cause your bathroom to run, adapted from WikiHow: Flapper Issues: Faulty flappers are accountable for many, if not most, running bathrooms. First, turn off the water to the toilet (locally if possible) and flush. Remove the lid and inspect the valve. If it warped or deteriorated, it done for; go to the shop, purchase a new one, and install it according to the manufacturer's instructions. When it is not forming a tight seal since the chain attaching it to the flush lever is too short or long, adjust the string so (using wire cutters to shorten the string if needed ). Remove the flapper if mineral buildup appears to be the culprit and submerge it for longer or half an hour in vinegar or mineral spirits to dissolve the residue. Scrub clean with a toothbrush and then replace. Float Problems: The most probable cause is that a float that is faulty. Floats come in 2 flavors: cup and ball floats floats. In any case, an float might result. Examine the overflow tube of the bathroom -- whether it's taking on water, your water level is high. Use pliers to turn the controller screw counterclockwise of your float until the water level stabilizes at least an inch below the flow tube. Monitor the water levels and adjust. Fill Valve Problems: This is costly and definitely the most vexing of the three issues. Close off the toilet's water, flush, and then disconnect the service line (you'll want pliers or an adjustable wrench). Completely dry the inside of the tank using rag or a sponge. Remove along with your wrench, bring it to the hardware shop, and buy the right replacement. Follow the instructions to set up the replacement of the maker . Flush to check.
1 note
·
View note
Text
Top 5 Best Tabletop Air Hockey Picks You Need to Check Out in 2021
Did your last get-together not go as planned because you couldn't agree on which game to play? Get ready to wow all of your friends with this best tabletop air hockey game. You don't need to spend a fortune on it, and you can take it pretty much anywhere you would like.
We have reviewed the top 5 picks we think you'd like based on the size, budget, and design.
Check out and see for yourself why the trendy game becomes more prevalent as we speak!
Top 3 Recommendations
Editor's Choices

Best Selling
Title
Sport Squad HX40 40 inch Table Top Air Hockey Table for Kids and Adults - Electric Motor Fan -...*
Rally and Roar AWH040_018P Tabletop Air Hockey Table, Travel-Size, Lightweight, Plug-in - Mini...*
Best Choice Products 40in Portable Tabletop Air Hockey Arcade Table for Game Room, Living Room w/...*
Price
$69.95
$76.98
$54.99
Prime
-
Customer's Rating
Best Feature
Best Pick
Runner-Up
Best Portable Mini Air Hockey
Buy on Amazon
Buy on Amazon
Buy on Amazon
Editor's Choices
Title
Sport Squad HX40 40 inch Table Top Air Hockey Table for Kids and Adults - Electric Motor Fan -...*
Price
$69.95
Prime
Customer's Rating
Best Feature
Best Pick
Buy on Amazon
Title
Rally and Roar AWH040_018P Tabletop Air Hockey Table, Travel-Size, Lightweight, Plug-in - Mini...*
Price
$76.98
Prime
Customer's Rating
Best Feature
Runner-Up
Buy on Amazon
Best Selling
Title
Best Choice Products 40in Portable Tabletop Air Hockey Arcade Table for Game Room, Living Room w/...*
Price
$54.99
Prime
-
Customer's Rating
Best Feature
Best Portable Mini Air Hockey
Buy on Amazon
#1. Sport Squad HX40 Tabletop Air Hockey Table - Best Pick
The Sport Squad HX40 is the absolute best air hockey tabletop you will ever come across! Not only does it include supreme features every air hockey fan will adore, but it's also so easy to assemble. Honestly, who has the time to make the game for two hours when you are anxious to play it?!
This 40-inch table top air hockey game comes with two-goal boxes, so it means you can start playing as soon as you take it out of the box. Additionally, the tabletop air hockey table includes two pushers and pucks, so you can invite your buddy to start the early match.
This is a rare model on our list that has this kind of easy assembly. Unlike some of the other mini air hockey tables, it does not have specific legs, so the only thing to attach is the goals.
The Sport Squad tabletop air hockey table also includes a highly-popular manual sliding abacus scorer so you can effortlessly play the fast-paced game.
An AC-12V motor powers the high-quality game, and it includes an adapter. What's even more spectacular about it is that it's not all that noisy. The motor fan offers a forceful yet muted air flow that delivers a frictionless playing surface.
You can take the 40-inches long hockey table top practically anywhere! It's super lightweight at weighing only 14 lbs! Can you believe that? Now you have a practical solution on what to play on your next game night!
The compact packaging of the mini table top air hockey includes felt pads on the bottom that will protect your choice's surface.
Overall, the Sport 40-inch table top air hockey is an excellent pick if you want a lightweight and affordable model.
Pros
Affordable
Easy assembly
Cons
Not so sturdy
BUY FROM AMAZON
#2. Rally and Roar Tabletop Air Hockey Table - Runner-Up
The best pick is followed by the impressive Rally And Roar tabletop air hockey table! The arcade-style follows the standard 40 inches long size, so you can easily pack this one up and bring it on your next get-together.
I have to admit, the Rally And Roar mini air hockey game did not disappoint in the assembly section. It's not as effortless as Sport Squad one, but this one will not take more than 15 minutes for assembly. The assembly requires you to attach the goals and the padded legs. After that, you are free to play your favorite game.
Since you are probably purchasing this air hockey game for kids, you will be pleased to know that it comes with all the necessary equipment. The Rally and Roar air hockey include 2 pucks and two pushers along with the scoreboard to keep track of your progress.
Much like the best pick model, this tabletop air hockey is packed with power! It's unbelievable to know that such fantastic power is cramped in the 40-inch tabletop air hockey unit!
Air hockey is powered by an AC 12V motor that promotes optimal airflow and allows the puck to glide with ease. All you should do is find a nearby socket and plug in this bad boy.
As for its construction, it is quite sturdy and durable. The mini air hockey table is made out of fiber wood, whereas the legs are made to hold the unit in place. The air hockey tabletop legs even have protective foam underneath, so they don't scratch your playing surface.
Lastly, the scoring system can go two ways. Either you can do it by supplying two aa batteries or manually.
Pros
Easy to assemble
Convenient size
Sturdy built
Cons
Legs are not foldable
BUY FROM AMAZON
#3. Best Choice Products Portable Tabletop Air Hockey - Best Portable Mini Air Hockey
Are you a big fanatic of the classic arcade-style games but don't have space in your game room for a full-sized air hockey table? I got you covered. The Best Choice Products represents a premium choice for all arcade games fans. Plus, you can take it and install it anywhere you like! Yes, it's THAT convenient.
Now you have the chance to enjoy matches anytime you like. The Best Choice Products tabletop table features everything you might need for a start-up match. With the purchase, you will be getting 2 pucks and pushers so you can start playing as soon as you assemble the unit.
Speak of the assembly. Did I mention it's effortless? That's right. You will have your new table top table ready in no time!
As for the dimensions, this is probably my favorite model when it comes to designs and portability. The tabletop measures 40 x 20 inches, and it's super easy to transport! You can use it on the coffee table or table or any flat surface you come across.
If you prefer your air hockey table top in classic design rather than the modern one, then this is the one you should get. The Best Choice Products comes in a black wooden-look frame along with intricate black details. Honestly, who doesn't like a clean, sleek look?
The mini air hockey table is powered by a powerful 100V fan motor that promotes even airflow. The air-powered mini air hockey delivers a smooth action every player needs in a fast-paced air hockey match. It allows the pucks to glide smoothly over the surface and creates an enjoyable playing session.
Pros
Great for kids
Low height
Portable and lightweight
100V fan motor
Cons
The scorer is manual
BUY FROM AMAZON
#4. Playcraft Sport Table Top Air Hockey - Best Arcade-Style Game
Next up, we have the well-known Playcraft Sport! This time they deliver a genuinely marvelous unit in the form of tabletop air hockey, suitable for both kids and adults! This mini air hockey table will impress all ages and genders with its innovative features packed in a travel-friendly size.
The Playcraft Sport 40 inch tabletop is both sturdy and durable, which, honestly, surprised me. Generally, you can't expect much from a mini table for kids, but this one steps it up!
Starting with the size, the Playcraft follows the standard 20 x 40" inch tabletop size for air hockey games, so you can safely install it on a coffee table and give your kids hours of entertainment!
The tabletop air hockey table is made out of high-quality MDF materials that make sure there are no breakages anytime soon. Since most tabletop air hockey tables are made out of plastic, it's good to know that this one includes high-quality material, especially if you are purchasing for kids.
The game includes 2 pucks and pushers for those who want to play the game as soon as they assemble it. The quick-return system allows for faster rounds and easy puck slide over the playing surface.
Since it comes in a convenient size, it's easy to store as you won't have to remove or fold the table's legs.
Additionally, the tabletop air hockey table is powered by a 100 CFM air-powered motor. Although it may not be the most potent version for adults, it's a great pick for kids since it offers just the right amount of airflow.
This model is on the cost-effective side, so you won't have to go over your budget if you search for the best birthday gift.
Pros
Affordable
Easy to store
High-quality built
Cons
Non-electric fan
BUY FROM AMAZON
#5. Mini Arcade Air Hockey Table By Hey! Play! - Best Mini Air Hockey Table
Could you ever imagine that air hockey could fit in such a small unit? The Hey! Play! Air hockey tabletop is an excellent pick for those who want portable mini-sized air hockey. At just 22" long, this is the smallest air hockey tabletop we have come across, but it still amazed us with various features.
The tabletop air hockey game table is powered by 8AA batteries which are not included in the purchase. To insert them, you will need a Phillips screwdriver which also can be bought separately, so pay attention to that. This assembly feature may be a problem to some, as it means you can't play the game right upon opening it if you don't have the right tools.
However, the game table is made out of quality materials, and it comes in a wooden-looking frame and plastic components. That being said, it's not the world's most durable unit,' but it can still serve your little ones limitless entertainment in their game room.
With this arcade-style tabletop, you can easily keep track of the score, thanks to the scorekeeper located on each goal side. Plus, you never again have to stop the game for puck search. The tabletop air hockey table includes a nifty puck-return system.
This Hey! Play! A real airflow motor powers the tabletop air hockey table. It makes pucks glide with ease across the playing surface and offers maximum enjoyment. Since it doesn't have an electric fan motor, it's an excellent choice for younger kids playing as it does not present a hazard.
Finally, you should not expect over-the-top quality with this one as it's reserved for kid's use. The airflow is not strong enough for adult use, so you should let your kiddo have a turn with this Hey! Play! Tabletop air hockey.
Pros
Affordable
Small size
Kid-friendly
Cons
Not the best quality
Weak airflow
BUY FROM AMAZON
Buyer's Guide
1. Power Source
A lot of the audience question whether mini air hockey tables need electricity or not. Well, some of them do, and some don't. You will make your final choice based on your needs. First, consider if you will bring the tabletop air hockey table somewhere where there is no power outlet.
A few models run solely on batteries, but a few of them require a socket. Luckily, most of them only use airflow as a 'power-source, so pucks are floating with no electricity.
2. Portability
Tabletop air hockey tables are among the most trendy games for trips, birthday parties, or game nights. You can quickly bring them along due to their convenient size and weight. But, here is the trick.
Even though air hockey tables are portable, they are not always 'easy-to-transport. Some of the air hockey tables have leg levelers that are a part of the construction, so you can't fold them or hide them underneath.
The only solution is to disassemble the whole unit when you play on bringing it along. Hence, this feature may seem irrelevant, but it's super crucial for easy transport! Always do the 'portability check' before purchase.
3. Stability
Tabletop air hockey tables are not as sturdy as the 'real-deal' tables, but they do have some stability thanks to the leg-levelers and heavy-duty construction. Of course, this is a one in a million chance to come across a high-quality tabletop air hockey table since they are mostly made for kids and incorporate plastic components.
Some of the air hockey tables are designed to be stable enough to withstand a tougher force so you can fully enjoy a match.
If you are not impressed with the overall stability, most manufacturers offer a 90-day warranty where you can file your complaints.
4. Air Flow
The air flow is of extreme importance in tabletop air hockey tables. It will determine how well the puck will float on the playing surface. Most of the tabletop air hockey tables have a pretty weak airflow since a 12V motor powers them. But, considering the size and the weight of these mini air hockey tables, this kind of power is perfectly suitable for you to have an enjoyable game.
5. Accessories
Getting free accessories with your purchase is always a big plus! They might not always be the best quality, but they will serve you well until you purchase your own. Usually, tabletop air hockey tables include two pucks along with pushers, so you can start playing the tabletop game as soon as you open it.
6. Price
Tabletop air hockey tables do not cost a fortune! They usually range from $50 to $150, which makes them fit into most budgets. Purchasing the best air hockey tables is an excellent idea if you want a full-sized one but don't have the budget or any space in your room for one.
I would advise you to avoid the extremely cheap ones because you will be getting just that- a cheap, low-quality item.
Preview Product Rating Price

Sport Squad HX40 40 inch Table Top Air Hockey Table for Kids and Adults - Electric Motor Fan -...* $69.95 Buy on Amazon

Rally and Roar AWH040_018P Tabletop Air Hockey Table, Travel-Size, Lightweight, Plug-in - Mini...* $76.98 Buy on Amazon

Best Choice Products 40in Portable Tabletop Air Hockey Arcade Table for Game Room, Living Room... $54.99 Buy on Amazon

Playcraft Sport Table Top Air Hockey Table* $86.36 $31.70 Buy on Amazon

Mini Arcade Air Hockey Table- A Toy for Girls and Boys by Hey! Play! Fun Table- Top Game for... $23.95 $20.78 Buy on Amazon
FAQ
How Big Is A Mini Air Hockey Table?
The size of the mini air hockey table depends on the model. However, they mostly follow the standard size of 40", but some models like Mini Arcade Air Hockey Table By Hey! Play! Which is only 22" inches long.
Which Hockey Is Played On A Table?
The original game of ice hockey has developed in various 'table' air hockey forms. A table air hockey game is also called 'bubble hockey,' 'stick hockey,' and 'board hockey.' You can either play this trendy game on a full-sized air hockey table or enjoy a mini version in the form of a tabletop air hockey table.
What Is The Best Tabletop Air Hockey To Buy?
The best tabletop air hockey is the Sport Squad HX40 Table Top Air Hockey Table. It's durable, easy to assemble in under 5 minutes, and powered by an AC-12V motor. The convenient dimensions allow you to install it on any flat surface or bring it along to a game night.
How Do You Play Mini Air Hockey?
Let's cover some of the basic rules of mini air hockey:
The winner is the player who scores 7 points first. To do so, a player must score the puck in the opponent's goal. After a player scores, the other player is the one who serves the next puck.
It would help if you did not touch a puck with anything other than a pusher, and each player has only 10 seconds per round.
Final Words
We are wrapping it up with a summary of your favorite best tabletop air hockey. The Sport Squad Table Top Air Hockey Table is the highest rated tabletop on Amazon, and it's for a reason as well!
Sport Squad HX40 40 inch Table Top Air Hockey Table for Kids and Adults - Electric Motor Fan -...*
HIGH OUTPUT FAN CREATES A REALISTIC ARCADE-STYLE GAME PLAY: Powered by AC-12V motor and included adapter, the electric fan provides powerful, yet quiet and even airflow for a smooth and frictionless playing surface.
5 MINUTE EASY ASSEMBLY: Simply attach the 2 goal boxes and you’re ready to play! Comes with 2 air hockey strikers and 2 pucks. The manual sliding abacus scorers help keep track of total goals and the goal boxes offer convenient hockey puck return.
PORTABLE, COMPACT DESIGN: Fun and competitive, the HX40 slide hockey table is made of durable MDF. DIMS: 40"L x 20"W x 5"H and weighs 14 lbs. The compact air hockey table features non-marking rubber pads to protect all your table surfaces.
100% SATISFACTION GUARANTEE: Sport Squad listens and learns from your feedback to create quality gameroom equipment for kids & adults. If you're not 100% satisfied or have product suggestions our customer service team is available to help.
SPORT SQUAD - BRINGING FAMILY AND FRIENDS TOGETHER: As an American based company, Sport Squad brings new innovation to playing indoors and outdoors by introducing affordable, quality sports, lawn, tailgate, carnival, and game room games to market.
$69.95
Buy on Amazon
This well-functioning item follows convenient dimensions, so you can install it on your coffee table and start playing as soon as you install it.
The Sport Squad pick is an excellent solution for all the days you are obliged to stay indoors. It will supply neverending joy with fast-paced matches both you and your buddy can enjoy.
The post Top 5 Best Tabletop Air Hockey Picks You Need to Check Out in 2021 appeared first on Darts Advice.
source https://dartsadvice.com/best-tabletop-air-hockey/
0 notes
Text
Taako Day Chapter 4
Taako was not enjoying his jail cell one bit.
For starters he was sharing it with a rather angry human who wouldn’t stop beating at the bars and screaming to be let out.
Then there was the general comfort level: the lumpy bed, the leak in the roof, the smell.
He was playing it cool and polite until he was served lunch, then he threw a tantrum.
“What even is this?” he gestured towards the gray mush on his plate. “I-I-I cannot believe the injustice in our prison systems! You serve…you serve THIS to living people??”
“LET ME OUT OF HERE, I’LL KILL YOU ALL!” his cellmate roared, drowning him out. Taako couldn’t have that, he wanted to be heard.
So he cast knock on the door and let the guy out.
“Seriously, what is this?” Taako asked, leaning in the doorway of the cell as the guards struggled to force the angry man back into another cell.
“Sit down, and shut up,” a guard told him as he locked the cell again. “Anymore magic and we’ll sedate you.”
“Promise?” Taako asked. “It has been such a long day, I could go for a sedative or two, maybe a screwdriver.” He winked, but the guard just scowled.
Taako sighed, tossing the plate to the ground in a bit of childish rage and flopping back down on the bed. He wondered if Angus had started detectiving. He knew no one could stop the kid once he put his mind to a mystery, and he sort of felt comforted by the fact that the kid was no doubt clearing his name right now.
Angus woke up outside the warehouse, laying on his back in someone’s lap. For a moment he thought it was Kravitz, but a closer look revealed a pair of elven ears under the black reaper hood.
“You alright, Ango?” Lup asked. “That was some nasty stuff in there, Barry’s having a field day getting rid of it.”
“Auntie Lup,” Angus said, for Lup had insisted he call her that, “how did you find me?”
“We…uh…” Lup shrugged and gave Angus a grin. “…we felt your life force flicker there, buddy.”
“Oh…” Angus swallowed. He had been dying.
“Oh thank god!” Kravitz landed nearby, transforming back into his usual shape in a puff of black feathers. “What did I say? I said to call me once you found him!”
He grabbed Angus and hugged him close, and Angus realized for the first time that Kravitz was really attached to him. He wondered why he hadn’t figured it out sooner being a detective…but somehow he’d completely missed the fact that living with Taako and Kravitz had sort of made a family out of them.
Angus hugged Kravitz back, feeling safe in his found father’s embrace. “I’m sorry…I thought I had him…”
“I’m just glad you’re okay,” Kravitz sighed. “Did you catch him?”
“He was gone by the time we got here,” Lup said. “If he’d been here, he’d be dead. Just saying.”
“We need him alive, Auntie Lup,” Angus said. “So we can clear Taako’s name.”
“I don’t see why we can’t just go bust him out and tell them to fuck off,” Lup said. “He’s one of the seven birds, he helped save the whole fucking world and they’re gonna hold him there on food poisoning charges?”
“Hun, you know Taako wouldn’t have gone with them if he hadn’t wanted to.” Barry appeared, walking over to the group. “I think he wants to do this by the book. For once in his life.”
Lup sighed. “He would get difficult now, wouldn’t he.”
“He still blames himself, even though he knows it was Sazed who actually did the poisoning,” Angus said.
The group sat quietly for a moment, thinking about their situation, when suddenly Lup’s stone of farspeech crackled to life.
“They’ve got him on trial right now! And things aren’t looking good,” Carey’s gruff voice came through the stone. “I think you better get over here.”
“We may as well, Sazed is long gone by now,” Lup sighed. “We should go see what we can do for Taako.”
Angus felt ashamed and angry tears well up in his eyes. He’d blown it. He’d had Sazed and he’d let him escape. Now Taako was in trouble and he…
It was all his fault.
As they teleported over to Glamour Springs, Kravitz noticed Angus sniffling and pulled him in close. He kept his hand on the child’s shoulder, squeezing it reassuringly.
The reaper trio and their plus one showed up in the Glamour Springs town square, where an angry mob had assembled in front of a large stage where Taako was currently being pushed out by a pair of angry guards.
“Easy there, buy a guy dinner first,” Taako snapped at them. When he noticed his family in the audience he shouted over to Kravitz. “Why did you bring Angus? This isn’t a birthday party you know.”
“Court is now in session!” a man stepped up to the podium on stage and addressed the audience. “We bring to you the one responsible for the tragic deaths in our town six years ago.”
The audience booed, some people even threw rotting fruit at Taako. To his credit, Taako didn’t even flinch when it hit his legs and splattered on his clothes. Kravitz growled and Lup looked ready to go full fireblast, but Barry put a hand on each of their arms to calm them.
“Since this is such a serious offense, we’ve decided to do things differently today,” the man said. “The accused may provide one witness to prove his innocence, and if we don’t like what they have to say then we move on to the punishment.”
“What the fuck?” Taako said. “Uh, yeah, okay, who am I gonna call? Taako was a lone wolf back then, baby, didn’t exactly have any friends to vouch for me.”
“I’ll vouch for him.”
The audience gasped and parted for Lucretia as she approached the stage. She looked fierce and regal, even though her hands were shaking as she held the temporal chalice.
Kravitz grinned, sure that this would save the day.
Lucretia came up on stage and held the chalice out for the audience to see. She closed her eyes for a moment, channeling her magic into the relic. Then she opened her eyes again, and they were glowing with white energy. When she opened her mouth to speak it wasn’t her voice that came out, it was the voices of the dead.
“We died that day, at the unwitting hand of the elf,” the voices said. “fed poison by a man who was supposed to die by it. His assistant, wronged, conspired to take his life and ours with it. He is guilty only of hubris and cruelty.”
Taako flinched and looked down at his feet, his face contorting into a frown. Lucretia’s eyes closed again and she collapsed to her knees, groaning and clutching at her head. The audience watched in awed silence, until finally the judge on stage raised a hand.
“This is magic trickery,” he said. “How can we take the word of the dead? We have no way of knowing this is true or not!”
“What the fuck are you talking about?” Lup yelled. “That’s a fucking relic! Are you that stupid? Let my brother go!”
“We will have justice for the dead!” the man shouted, and the audience cheered with him. Angus’s eyes grew wide, and he realized that he was running to Taako. The guards tried to block him, but he cast blink the way Taako had taught him too and reappeared next to his mentor’s side. Taako was non-responsive, kneeling on the stage with tears in his eyes. Angus grabbed his shoulders and shook him, yelling his name and begging for him to free himself and escape.
“You have to go Taako, you have to go!” he said.
“Only death can pay for death!” the man said and the audience cheered again, hungry for blood. Lup, Kravitz, and Barry summoned their scythes, Carey and Killian appeared from the crowd with their weapons drawn too. Lucretia was still recovering from the chalice, and Taako and Angus were still kneeling on the stage in a tearful conversation when someone shouted.
“Stop!”
Everyone turned towards the voice, and saw a nervous man clutching at his own hands and trembling as he approached.
“Stop…please…” Sazed said. “I…I’m tired of running…”
“Sazed?” Taako looked up in disbelief.
“I’m tired of running…” Sazed repeated himself, sniffling and wiping tears from his eyes. “It was me. I killed those people. I did it to kill Taako and give him a bad name. I wanted…I just wanted him to share the show with me…I wanted him to love me back…”
The man on the stage looked down at Sazed for a long silent moment. Then he sighed and nodded to the guards.
They unlocked Taako’s cuffs, and the elf only collapsed further on the stage, steadying himself with his freed hands. Then the guards cuffed Sazed and dragged him back towards the jail cells behind the stage. As Sazed passed Taako the two shared a glance full of so many emotions and thoughts it was impossible to tell what was going on between them. Finally, Taako whipped his head away, and Sazed whimpered at the motion before being dragged out of sight.
“You are free to go,” the man said to Taako, not looking directly at him.
“I think you owe him an apology!” Angus said, surprised at how his voice didn’t tremble.
“…” the man sighed. “We apologize for your treatment and the false accusations you are now free to go.”
Lup ran up to her brother and fixed the man with a glare so fierce he stumbled backwards a few steps. She helped Taako up and then Lucretia. She took their arms, one in each hand, and led them down towards the rest of the group.
Taako gave Lucretia a look, the same kind he always gave her ever since he’d pointed the umbrastaff at her two years ago. However, despite his eyes saying he would never forgive her, his mouth said “thank you.”
Lucretia gave a tired nod, and let Lup lead her towards a portal.
#blatantbalderdash#taako#kravitz#angus mcdonald#taz#the adventure zone#taz balance#the adventure zone balance
26 notes
·
View notes
Text
Skoolie & How To Cut The Cost Of Living Up to 80%

What's A Skoolie?

More and more people try to escape the rat race by exploring alternative housing solutions. Resulting in the tiny-house movement and a not so tiny Skoolie. A Skoolie is a small portable home that once was a classic, all-American yellow school bus.
DIY School Bus Conversion Into A Not So Tiny
Home
If you're thinking about saving a bunch of cash on your RV
purchase you might consider to trick out an old yellow school bus. If you have
the at least some basic building skills you should not have a problem to
convert and old bus into a mobile home with all the conveniences you can want.
Yes you did read this right, currently there are people across the
country converting retired school busses like the ones you maybe rode to
school, into custom motor-homes. And they call those RV’s “SKOOLIES”.

What are the start up Costs?
Granted that prices vary by location and condition of the bus, retired
school buses are relatively inexpensive to buy. And if you have access to car
auctions you should be able to buy a standard 34-foot bus for about $2,500 – 3,000. And once you cleared the 70-seater
out you should have about 200 square feet to trick out into living space.
A partially tricked out
Camper Bus will start at about $10,000 and comes without a
kitchen or bath or neither.
You might not be interested in a DIY option. Therefore, you could
by a fully transitioned Skoolie for an
approximately $60,000 Dollar price
tag. However you would be ready to roll.
Don’t worry too much about high mileage, they likely auction of at
1500 000 miles or better. However, they are solid build and with a proper upkeep
will easily take you past the million mile marker. You need to remember that
they are made for schools (Government) so their Diesel Engine and Bus body as
well as the frame are better build than any commercial line.
You should however make yourself familiar with size diesel engines
and various transmission types

What does the transition into a home cost?
It goes without saying that the cost to DIY a Skoolie, greatly depends on the amount of luxury and conveniences
you install. Based on the requirements for a home with a functional kitchen and
bath, the cost start probably around $7,000 and can easily go up to $40,000 or
more.
However, with enough elbow-grease and some frugal configurations
you should be able to keep your conversion cost in a very manageable range. As
for the materials, I suggest to stick to regular standard building materials as
much as you can. And for the plumbing and electrical supplies turn to Camping /
Camper Supplier or Booting Equipment since they are more compact and are made
for your use.

How
long should it take to convert a Bus into a Skoolie?
First you need to find one close to home for a full inspection and
a low cost transport. After that it will depend on what size bus you go for,
and what you all want to do to it.
I have seen statements where the full transition of a large 40-foot bus took 2 years. Now
remember, that is also 2 years of time to store the 40-foot monster somewhere.
And if you don’t have the space you need to rent a suitable storage. Plus you
will need tools, water, and electricity to make the transition happening.
You might think that 2 years seem too long and you do it faster,
but what if you also work a full time job? And let’s be honest, this is not like
working in your home. Everything will be custom made. Each countertop, seat,
bed, and sofa will have to be custom fit and anchored.

Why not just decorate a Skoolie
You could cut the time short by buying a partial converted bus. Sometimes
you can find those sold as camper-bus. They
are labeled as Camper because they either lack the kitchen, bathroom or both.
However, all the seat benches are gone and that cuts down on much hard demo
labor. So you only need to update the kitchen / bath situation and start
decorating.

However, you still need to carefully inspect all aspects of it.
Body, Engine, und Transmission type. Is all the electrical good and why is it
not fully transitioned? Because that would come with a price tag of around
$60,000 Plus such partial converted 30-foot bus will cost you around $10,000 without
even batting an eye.
To me that is not by far the best solution. I think I could use of
the extra $7000 plus the scrap metal from the seat-benches to complete my whole
transition. And I could splurge a little for something nice instead.
Where
can I get Conversion Ideas or Plans?

Skoolie Floor Plan
There are plenty of online sources to search for bus conversion building
plans, tutorials, and tips. Here are a few to get you started:
Skoolie Forum:Forum for skoolie enthusiasts and
DIY builders DoItYourselfRV.com: Great basic bus conversion
tutorials Skoolie decorating @ accessorize
GoodNewsBus: details
one family's bus conversion in daily posts that include video tutorials and
thoughtful lessons learned. The Bus Abides site
Here is a short Kitchen Counter Top Sample Tutorial:
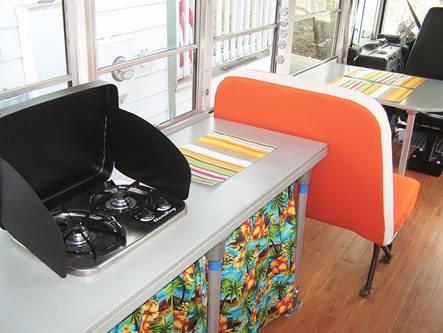
To build the countertops in the school bus, Dana used Kee Clamp fittings and pipe to support the countertops.
It took Dana a few nights of coming up with different design possibilities
before settling on the current design.
To create the counter tops, Dana used plywood for the tops. The plywood tops
were then attached to the "wall" using metal Dana bought at a local
home improvement store.
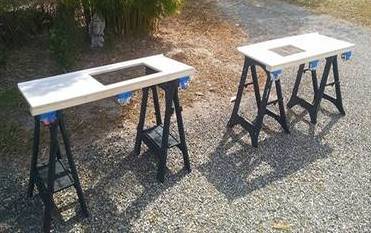
Pipe legs were then attached to the floor using the Railing Flange.

Flange
You can get these supplies at either a local hardware store or at your plumbing supplier
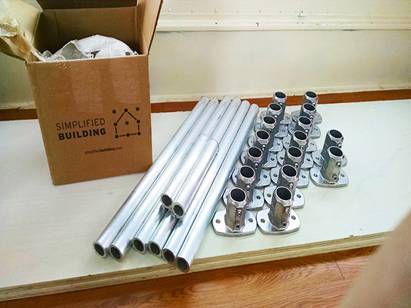
"Ordering online was simple and fast. Then, we went down to a local
metal supply shop and got the aluminum pipe we needed (cut to length)."
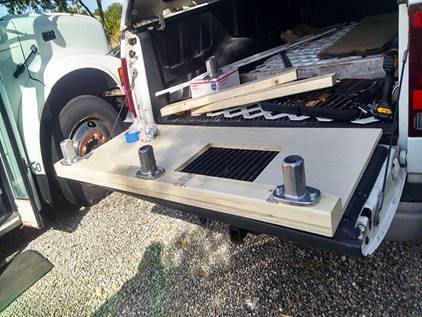
After you mount
the flanges to the bottom of your Countertop, take this countertop into your bus
lay it up-site-down (like now) on the floor where you plan to install it. And take
a measurement to determine the length of your legs. Stay about a 1-1/2 Inch
below the window seal.
You can also take 3 measurements in that area
and subtract 5 Inches from below the seal to the floor. If you use a ¾ inch plywood
and a 2x4 like illustrated. The brackets should have 1/2” thick plates.
I recommend you
cut only 2 legs and test the install. Because if the length is not good you don’t
waste all pipe. Plus now you can mark the holes to anchor your Bottom plates. If
the legs work well cut the reminder of the legs.

Overall, Dana has been pleased with the design and look of the countertops.
"We like the industrial look of the Kee Clamps and their ease of
assembly. We also like that, unlike using wood legs, we can easily modify and
add onto this build in the future. During assembly and painting we had to
remove the counters more than once. Kee Klamp fittings made this super
easy."
.
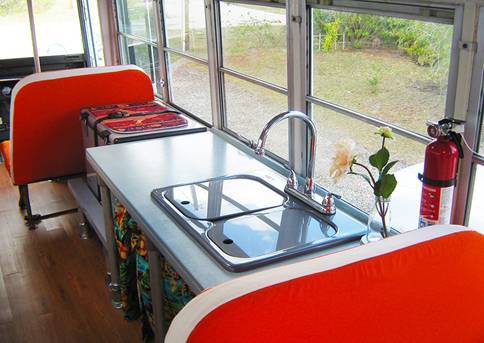
Another bonus to using Kee Clamp fittings for the design is that the
fittings themselves are adjustable. This made leveling the structures easier when
putting every together:
"They (Kee Clamp fittings) are also adjustable, which is useful when
converting a school bus. Not everything in there is square and level."
However, don't take my word for it, In
Dana's Skoolie site. Dana's challenges and adventures are documented.
Enjoy the 5 Skoolie Builds Video For Your Inspiration
https://youtu.be/biAUHjdYwtA
How
High are the operating Costs?
Even though the Skoolie lifestyle can save up to 80% of the big
city life expenses (if parked)
The total expected cost of ownership plus fuel and campsite fees
still average between $800 and $1800 compared to about $60/day and person if
renting a home.
Diesel Fuel average $300/ monthInsurance; $64/monthRenter insurance $10/ monthLaundry $15 / monthMonthly Road Costs are about $800 if you include $400 for food.I would also suggest you enroll in an AAA w/RV towing plan for peace
of mind.And save up for maintenance (oil-change $200, tires $250 each,
break-service $300)
Get more details
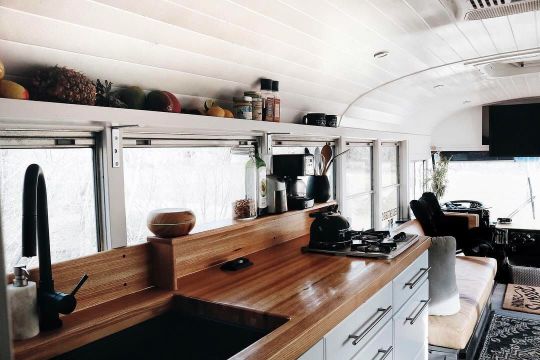
Can
I park in RV-Parks?
To be clear in some you can in others you cannot. So if you plan
your route you better check a head to have a place to rest. There are also different fees for RV
campgrounds then for Skoolie Camp Sites.
Learn 15 Things You Should Know Before Building A Skoolie School Bus Conversion from the Video
https://youtu.be/V9tZ0zzHYrs
How to Shop For A Bus or Skoolie?
Keep in mind that there is a reason to why schools replace their buses. Many of them are at the end of their useful life. There is most likely something wrong with them in one way or another. Know your transportation cost & conversion budget. Tires are very expensive. A bus with good rubber could cost $500 more than the same bus with bad tires and be still a steal. Traveling Speed. You are not going anywhere fast in Skoolies. Front or rear engine don’t really matter. However, a front engine bus is noisier and hotter for the driver. That will wear you out faster. A front engine bus is easier to repair and rear engine busses perform better in the mountains.Gas or Diesel? Short or long? You need to know that short buses have extra costs to repairing them. Especially if they are van front. Plus many mechanics will tell you: "No thank you," or charge an arm or a leg for repairs. Just read this story! Long Buses are harder to maneuver and have a huge turn radius.Corrosion -- Every bus has rust. From snowy states, to the ocean fronts, your bus will rust. Try to keep it at a minimum when buying one GET UNDER THE BUS with a bright light & check the underbody! Flooring and framing can have rust as long as it is sound and you can’t just jam a screwdriver through it.

What you should do before you buy a non/partial converted bus
You better find out beforehand how fussy your state/provincial Motor Vehicle Agency is going to be to flip the title and registration. If you converse yourself.Check to see if your state has a one-way-trip or temporary tag.You also need to keep in mind that on Auctions, once a vehicle is sold you have only limited time to pick the thing up.Also you need to get the cash and the VIN Number ready for the insurance company to pre-plan insurance.
“You
might be better off to find a carrier before you buy your bus. Especially if
you want to DIY and the bus is road ready but not fully or partially converted.
Once done just call it an RV as long as
it has the requirements like a bath, kitchen, water and bed. Otherwise try to
insure for a Commercial Tag”
SEAT BELT LAWS: You need to know the seatbelt laws for your and any state you visit. Here are the Sources.
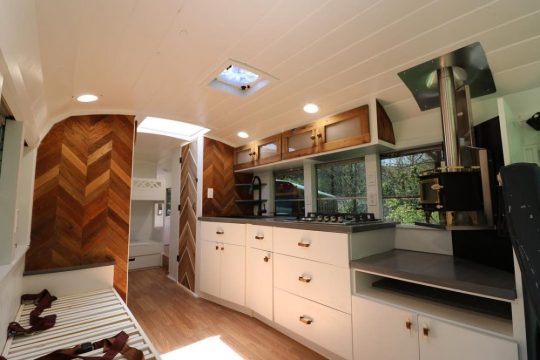
Where Can I Buy A Bus Or Skoolie?
There are a few places to look for buying a used school bus:
Bus dealerships: One of the largest Online in the U.S. is Midwest Transit Equipment.
Auctions: Public Surplus and eBay have listings. Local Classifieds: Craigslist online might be a good place to start. Trader – Magazine available at any Gas-Station Google Tiny House Listings Motor-Home Finds
Conclusion
Here I want to turn it
over to you -- Why a Skoolie? How would you justify your lifestyle?
Okay, let
me first say that you do not really NEED to justify our lifestyle and choices
to anyone on here. However, I feel like this could be a good conversation starter
with critics and skeptics. And I look really forward to read some of your
comments below.
So,
what are your reasons to live in a Skoolie? Do you have reasonable arguments
against a truck and trailer?
And as always thank you for reading and sharing JK :)
Read the full article
0 notes
Text
Drabble Ask Meme Fill
Requested by @mizjoely: Oh, here's my prompt #6: You drank a gallon of milk over night
Tom!verse; pure, unabashed fluff. I don't even know who I am anymore. (Also, these are scenes that span the pregnancy, so it doesn't fit very neatly in the chronology; some are before Janine's visit and the very last one is after, because reasons.)
*
"You drank a gallon of milk over night," she asked flatly. The space where her two bottles of milk had been were now empty. So much for that rice pudding she was going to make. And so much for breakfast.
"Drank? Not exactly."
"So it was for science." It was always for science, not 'I'm actually ten years old and do the first thing that strikes my fancy when I get bored,' even if that was the more accurate descriptor.
"No, it was for the long-term psychological well-being of our child."
"Wh—?"
"Fine," Sherlock groaned. "I wasn't going to mention it yet, but after you go back to work I'll be taking over most of the daytime care of the baby, which will include feedings. 'The breast is best' on a number of fronts past nutrition, including infant-parent bonding and brain development from holding a mother's gaze. Bottle-feeding is clearly the inferior choice, what with the potential for ingestion of air leading to a host of digestive issues, future orthodontic problems, what-have-you. So I've been looking into alternatives. I did some shopping and I've been road-testing."
"This is the slings and baby carriers all over again, isn't it? Just attach a bottle to the side of his cot like in a pet store, he'll be perfectly fine," Molly said, looking morosely at her dry, tasteless muesli, made even more dry and tasteless by the lack of milk.
"And people think I'm the unfit one," Sherlock muttered. "When our child has a healthy spine and fully developed musculature, you'll be thanking me because we went with the mei tai instead of front-facing carry."
It was entirely too early to be having this conversation. Or any, really, especially with an up-all-night Sherlock who was obviously (enviably) caffeinated.
"So what were you road testing?"
"Harnesses that allow for the simulation of breast feeding."
Delightful, she thought. She should be more surprised, but at this point, she didn't think there was much that could surprise her. He would probably volunteer for an experimental uterine transplant to carry the next one himself if he could.
"Do you call it 'The Mannery Gland?'"
"That's not one of the brands I found, I suppose I'll have to look again later..." He frowned.
"It's from a film."
"Oh."
*
"I'm not doing pregnancy yoga with you."
"It's good for the mind as well as the body."
"Both of which are still just fine, thank you. I hate yoga. It's all bending... and uncontrollable rude sounds," she said, remembering the reason she quit her first (and only) yoga class years ago.
"Molly, I've already heard every rude sound you could possibly make."
"Trust me, you have not. It's like having my very own set of bagpipes between my legs. I'd rather keep some element of mystery to the relationship, at least until your screaming, fat-headed baby rips its way out of my vagina."
He looked at her in horror, affronted that she could describe their child thus. Then again, he wasn't the one with an angry bowling ball resting on his kidneys.
*
"I smell paint. Why do I smell paint?" Molly yelled from the door as soon as she walked in.
"Because I've been painting," Sherlock said, crossing from the kitchen to the lounge to greet her. He was wearing jeans and a t-shirt like any other person, which was always a bizarre thing to see; of course he didn't have a single drop or splatter on him. It was like he was magnetized to repel dirt.
"Going to go out on a limb here and guess you finished the nursery. Which we haven't talked about at all."
"It's a surprise. So, surprise. Also, I packed you an overnight bag because we're sleeping at Baker Street tonight. These fumes probably aren't good for 2.0."
"Oh goodie. I love surprises," she said, following him up the stairs. "Aren't I supposed to be the one nesting?"
"That's late in the third trimester. And this isn't nesting, this is preparing. Better to do it now before we know the gender so the decor doesn't reflect our own inherent biases, no matter how unconscious they may be," he said, stopping outside the door. "Ready?"
"As I'll ever be."
Sherlock grinned and swung the door wide to reveal—oh dear God. It was... she didn't even know what it was. Black, white, and red stripes and dots and geometric patterns spread over the walls with no real rhyme or reason; it made her eyes hurt and she wasn't even inside the room yet.
"So what do you think?"
"Are you trying to hide the baby from Nazi submarines?" she asked.
"Dazzle camouflage wasn't actually meant to hide, it only misled. Kind of hard to miss."
"And so is this paint job."
"This 'paint job' is to provide visual stimulation in the first few weeks of life, when a baby can only process high-contrast and the colour red, thus aiding bra—"
"—brain development. Yes. But no. I'm not sitting in this migraine-waiting-to-happen while nursing our son or daughter, you're repainting it."
"You can nurse in our room. Or on the sofa," he protested, deflated. He looked like she'd kicked his puppy.
She huffed a sigh. "Fine, you can keep an accent wall. Everything else gets repainted a colour we can both agree on."
"This is Rosie's nursery all over again," he said mostly to himself as he rolled his eyes looked away theatrically.
"There's nothing wrong with Rosie's nursery. Mary changed her mind about the fish, she's the Mum, she's allowed."
"That coral took me six hours, and then you just stencilled apples and birds all over it willy-nilly and topped it all off with some frankly alarming wall stickers."
"The stickers were a gift, she wanted to use them."
"They weren't a gift, they were a curse. What better way to instil coulrophobia? I bet they came from Janine, probably some kind of revenge."
"Uh huh," Molly said. She paused a beat for dramatic effect (Sherlock was rubbing off on her, it seemed, though if he'd just done that in the first place they wouldn't even be there...). "So, DIY store at the weekend."
"If we must. At least that gives me time to pick out a new theme."
"Which we will both agree on before you buy so much as a mobile."
"Already have that."
She raised an eyebrow.
"...Which we can take back if you don't like. Dearest."
*
"...And if you'd've let me get a proper a cot instead of this flatpack abomination, we wouldn't have this problem," Sherlock said, ruffling his hair as he looked at the debris field in the (newly repainted) nursery. He was taking the fact that he'd been bested by IKEA entirely too hard.
"We're not spending £200 on a cot that can only be used for six months when Mary's already said we can use Rosie's Moses basket."
"Co-sleeping has been shown to—"
"I don't care. If nursing is a problem through the night, we'll keep the baby in bed with us. It's more practical to—"
"Yes, yes, practical. You sound like a Yorkshireman. When is Mary getting here?"
"Mary? Who said anything about Mary?"
"You phoned her, I assume, as she's the one that put all Rosie's things together."
"I helped."
"Yes, and your talent for handing over the correct screwdriver in a timely fashion is second to none. Mary?"
"Left twenty minutes ago. And she's bringing Rosie so you have something to do while the grown-ups work."
He narrowed his eyes at her. "Sometimes I wonder why I fell in love with you."
Time stopped dead; he'd never said the L-word before. "You—you're in love with me?"
"Yeeeess..." he said as though she were a particularly dim child. "Why else do you think you ended up pregnant?"
"Because you're what some in the Old West might call a quick draw?"
He frowned, which turned into a scowl when he saw her get out her phone. "What are you doing?"
"Phoning Mary. Telling her to circle the street a few times. Your 'abbreviated stamina' is actually going to work for us this time. And, for the record, I love you, too," she said, stretching up to press a kiss to his lips before Mary answered her phone.
49 notes
·
View notes
Text
Who’s The Hero Of Your Story?, Ch. 9
AO3 Link
“I’m really getting tired of Quake showing up everywhere we go,” Raina whined. The thorns all over her body had shifted away and been replaced by smooth skin and silky hair and Raina was holding an ice pack to her temple.
“You and me both, sister,” Garrett grumbled. He seemed to still be having some difficulties getting his robotic leg to detach and was angrily jabbing the flickering appendage with a screwdriver and wincing.
Quinn paced around his office, where they had all gathered to get out of their super villain attire and regroup, with a drink in his hand and scowled out the window. “Just once, it would be nice to not have to worry about getting knocked out of the sky. Helicopter repairs aren’t cheap or discreet, you know.”
Jemma just sat there silently. She had pulled a hoodie and sweatpants on over her bodysuit, just until she could get home and change like she desperately wanted to.
Raina sighed. “Yes, because that’s the most important take-away here. Not the fact that if Quake managed to capture even one of us and turn us over to the police, they would have reasonable cause to investigate everything we’ve done over the years, no matter how much money you throw at them.”
“I think you underestimate what money can do,” Quinn replied.
“And I think you overestimate it,” Raina snapped. “Look, we just need to start thinking about solutions. There’s only one superhero in this city and four of us. I may be overstating the rest of your abilities, but I think all of us can come up with something.”
“Well, we could start with her fixation on Bulbasaur over there,” Garrett suggested.
It took Jemma a few moments of silence to realize Garrett was talking about her. She shot him a glare at the nickname.
Raina hummed. “That’s true. She does seem to give Simmons more leeway than the rest of us. She can probably tell you’re still fresh out of the gate. No offense.”
“Um…none taken,” Jemma muttered. She fidgeted with the hem of her shirt. She didn’t enjoy the fact that all three sets of eyes in the room were trained on her.
Raina tossed her melted ice pack on the desk and leaned forward. Even though it was Quinn’s office, she commanded the space like she owned it.
“Simmons,” she started sweetly, “How would you like to help us with our little superhero problem? Permanently.”
~~~~~~~~~~~~~~~~~~~~~~~~~~~~
Jemma propped up her head on the coffee shop table and stared at the door. Every time it opened and the little bell dinged she perked up a bit, but when it wasn’t who she was hoping for, she relaxed and let her eyes drift closed.
She had been spending basically every hour she didn’t have to be in class in the lab growing new plants. Her advisors were starting to push even harder to get results. Since 2.0 shriveled up and died and 1.0 was inseparable from her spinal cord, she had to start from scratch again. At least the most recent ones hadn’t died yet.
The door dinged again and Jemma cracked open an eye to see just the person she was waiting for.
Fitz hustled through the throng of people standing in the morning rush line. His hair was standing up on end like he had been running his hands through it for hours, his shirt was wrinkled, and he was already clutching a very large cup of coffee.
“Morning,” Jemma muttered.
“You say 'morning' like I slept. I’ve been in the lab since you left last night,” Fitz grumbled, taking a long swig of coffee.
“I left at 5 this morning.”
“I know. I had to get a design done for class this afternoon that I barely even started on because suddenly, I have to fix Garrett’s leg and design Raina a new outfit,” Fitz complained.
“I’m sorry, Fitz. I didn’t mean to drag you into this,” Jemma said.
“It’s fine. I just don’t think your advisors realize the extra stress that they put on us.” Fitz shrugged. “Mostly you, I mean, I just get to sit in the lab and get yelled at about deadlines.”
Jemma sighed. “You don’t know the half of it.”
“I’ve been so busy complaining that I forgot you wanted to talk about something,” Fitz exclaimed. “Though, I’m curious as to why you want to talk here, where there’s a ton of people who could overhear us, instead of the unmonitored lab.”
“I don’t fully trust that it is unmonitored, honestly,” Jemma replied. “There’s always a chance that there’s some listening devices that we haven’t found that lead straight to Raina’s office. Also, I need to show you something first. I can’t be the only one to know.”
Fitz glowered over his coffee. “I have 4 hours to finish the calculations on a cloaking device for class. If you dragged me out of the lab to tell me that your new favorite place has gluten-free biscuits—“
“Caramel latte with soy milk for Jemma,” a familiar voice interrupted. Jemma saw her heading this way, she wasn’t surprised. Watching Fitz choke on his coffee in shock almost made her laugh out loud.
Daisy stood at the corner of their booth with a coffee in one hand and a plate holding a bagel in the other. Her dark makeup had more hints of blue in it than normal today, but the straight, black wig was still very much the same. Despite the goth-y look and chain jewelry, she had a friendly smile on her face directed towards Jemma. The only evidence of their meeting a few days before was the two, thin scratches trailing down her cheek with small butterfly bandages across them.
“Thank you, Daisy. I didn’t order the bagel, though,” Jemma replied.
Daisy just shrugged. “It’s on me. It’s gluten-free and comes with organic cream cheese, since I know you like that kind of stuff.”
Jemma smiled, in spite of knowing Daisy was technically her enemy. “Thank you. You really don’t have to give me free food all the time.”
“It’s not like anyone’s actually buying it,” Daisy smirked.
Daisy lingered for a moment longer, as if she wanted to say something else, but noticed Fitz and stopped herself. Fitz finally got over his initial shock and spoke up.
“What happened to your face?” he asked, tactfully, gesturing to Daisy’s cheek.
“Oh—I, uh, was petsitting for a friend whose cat hates me,” she replied nonchalantly. “I should probably get back to work. See you around?”
“See you around,” Jemma agreed.
Fitz gaped at Daisy’s back as she jogged back to the counter.
“Was that—“ Fitz whispered across the booth.
“Yep.”
“And was she—”
“Hitting on me? Yes.”
“Does she—“
“Know that I know? No.”
“Do your advisors—“
“No, and they aren’t going to.”
Fitz leaned back with his eyes wide and took another sip of his coffee. “This is insane.”
“Yes, and what’s more insane is that my advisors want me to kill her,” Jemma hissed across the table.
Fitz choked on his coffee again. “What?!”
Jemma nodded. “After our…project the other day, they were talking about 'permanent solutions' to getting rid of Quake and because, apparently, she’s nicer to me, it became my job to take care of it.” Jemma flopped her head into her hands and groaned. “What am I going to do?”
“Obviously, you’re not going to kill a person,” Fitz whispered and looked at Jemma like she had grown a second head.
“How can I not? We’ve established that they don’t have any qualms about murder. I don’t think me refusing to do what they want me to is just going to result in the loss of my scholarships at this point,” Jemma snapped. “But…” She trailed off and glanced the direction where Daisy just walked.
Fitz paused. “So, what are you planning to do?”
“I have no idea.”
~~~~~~~~~~~~~~~~~~~~~~~~~~~
Raina dropped by the lab unexpectedly the next day. Jemma was typing up her report on her latest test subjects, which were doing quite well, when Raina appeared in the doorway.
“Hope this isn’t a bad time,” she drawled.
“Raina! No, it’s not really. Um, how can I help you?” Jemma rambled.
“I’m actually here to help you today,” Raina said. “Where’s Fitz?”
“He’s in class.”
“Good. I’d like to keep this between as few people as possible,” Raina replied. “I’m sure you remember our little talk the other day about your next job.”
Jemma nodded. How could she forget?
“I thought of something that might help you accomplish that mission. Our friend Quake and I share a certain…quality that gave us our abilities.”
“What is it?” Jemma asked.
“That’s not important.” Raina waved her off. “What is important is that there’s a genetic marker involved that needs to be activated to give someone like us powers. My thought is that if you have a sample, you might be able to isolate the genetic component and whip something up to help you solve our problem.”
“O-Oh.”
Raina set herself down in one of the lab chairs, crossed her legs, and held out her arm. “Do your thing, doc.”
Jemma didn’t feel the need to remind her that she wasn’t quite a doctor yet, and fumbled through gathering the necessary supplies. Normally, she would just let her vines do all the reaching and grabbing to save herself a bit of effort. With Raina’s eyes boring into her, she felt too self-conscious and just used her hands like a normal person, while her vines stayed tucked in her sleeves.
While Jemma snapped on a tourniquet and searched for a vein to take some blood from, Raina glanced around the office.
“It looks like you’re having some more success with this batch,” she commented, nodding to the two plants growing on a nearby counter.
Jemma nodded. “Yes, these are cooperating much more than the last few. I cross-pollinated them with the spores from the one—well, the first experiment—and they’ve fared rather well. I’m almost to the point where I can attach some electrodes and see if any sort of control is possible.”
“Fascinating,” Raina muttered. “I assume we’ll be getting a full report of these developments?”
“Of course.”
“Good.” Jemma finished taking her sample and pressed a cotton ball to the area. “Well, if you have what you need, I’ll be off. Papers to grade, plans to hatch and all that.”
Raina breezed out of the room, leaving Jemma alone with a vial of blood and a thousand more questions. She could stop and consider all the ramifications of the material she was just handed, but her scientific side kicked in instead and she got to work.
~~~~~~~~~~~~~~~~~~~~~~~~~~~
Jemma spent hours staring at samples of Raina’s blood under a microscope. There was something just slightly off in the chemicals flowing through her veins, though otherwise, everything looked human.
She isolated Raina’s DNA and ran it through numerous tests to analyze every component she could. At first, she thought that the machines in the new lab weren’t properly calibrated, since she kept getting strange results. Then, she realized it wasn’t the machines: it was the DNA.
Somehow, there were extra molecules interspersed in Raina’s DNA that didn’t appear in normal DNA. In fact, it looked entirely different than any human DNA Jemma had ever seen. It was completely inhuman.
Raina (and apparently Daisy) were practically an entirely different species. Jemma pondered this revelation, while jumping into further tests.
Eventually, she found an enzyme that appeared to be produced by the extra molecules in the DNA and was able to extract them and mix up a solution that might have some effectiveness for blocking Daisy’s powers. In the back of her mind, Jemma thought it could be just as effective against Raina, if she ever needed it. She shook off that thought and glanced around, as if somehow there was a mind-reader in this room that could tell on her.
She ran some computer simulations on the compound and they all turned up positive, so Jemma was confident that it would be effective. Having made some progress, Jemma decided to take a break.
~~~~~~~~~~~~~~~~~~~~~~~~~~~
Jemma headed to the coffee shop for the fifth time this week. She only could justify coming here so often because she had a bit of expendable income from her weekend exploits. Also, she could consider it 'enemy reconnaissance' if she really had to.
Not surprisingly, Daisy was working today. She had on a red plaid shirt and matching red accents around the black on her eyes. The dark color scheme and the scowl on her face at the guy mansplaining customer service to her made Jemma think that Daisy could make a really good super villain if she wanted to.
The man finally got out of her way and Jemma approached the counter. Daisy’s face shifted completely from the annoyed scowl to a bright grin when she saw Jemma.
“Hey Jemma, what can I get you today?” she asked.
Jemma perused the menu while also glancing over Daisy. The red in her outfit today brought out the red tones in her brown eyes, which Jemma was having a hard time looking away from. It also brought out the red in the scratches on her cheek that were looking angrier than the day before.
Jemma frowned. “Your…cat scratches aren’t looking so great. Have you put anything on them?”
Daisy huffed. “I’ve tried everything. Apparently that cat got into some evil stuff before it got to me.”
Jemma suddenly had a thought. “Hm. I might have something that’ll work for that. I can bring it in tomorrow if you’d like?” Jemma offered. She couldn’t have some infection ruining her barista/nemesis’s face.
“If you have something, I’ll definitely try it. Thanks.” Daisy smiled. “Now did you want to order something, or just talk about my face all day?”
Jemma chuckled. She could definitely talk about Daisy’s face all day. “Just one of those gluten-free bagels, please.”
Daisy smirked slightly to herself as she punched in the order.
When her bagel came up in a small paper bag, Daisy dangled it over the pick-up counter and wiggled it a bit to get Jemma’s attention.
“Thank you, Daisy. I’ll see you tomorrow,” Jemma called on her way to the door.
“It’s a date!” was the reply.
Jemma scurried out the door and back toward her lab. She tried not to think about Daisy’s words. She liked Daisy (and her alter-ego Quake, for that matter), but she didn’t want to encourage her advances. Jemma was completely sure that Daisy wouldn’t approve of Jemma’s side job if she found out.
Jemma pushed thoughts of Daisy out of her mind as she returned to the lab. She finished typing up her report on her new plants to Raina and sent it off.
They had been coming along quite well and had shown some preliminary reactions to electric impulses. Because of this she was able to isolate the exact genetic code in the plant that allowed it to be controlled (which was absent in all other attempts, except the one that was on her back), so she included this information in her report as well.
Satisfied that her progress would get Raina off her back for at least a few weeks, Jemma grabbed her things and headed back to her apartment for the first time in days.
#skimmons#bioquake#jemma simmons/daisy johnson#Agents of S.H.I.E.L.D.#who's the hero of your story fic#superhero au#supervillain au
6 notes
·
View notes
Text
How To Install A Smart Thermostat With No C Wire
Do you have an Ecobee Smart Thermostat and only have two wires (a red and a white) and no c wire? Then this article is the easy answer to the problem that no one seems to be talking about.
When my wife and I recently purchased the four Ecobee Smart Thermostats that now reside in four zones of our 2700 square foot house we had no idea that there was one potentially problematic (yet common) installation problem if you do not have a C-Wire.
The following are the steps that we took to install a smart thermostat with no c-wire, specifically our Ecobee 3.
Step 1 – Some Preparation
If your furnace does not have a C terminal then according to Ecobee you will need to use their PEK or Power Extender Kit. Which looks something like this.
If you contact Ecobee they will tell you that you need to have a c-wire in order to get your thermostats up and running and that includes the PEK.
Even though at the time when we bought ours Home Depot didn’t say anything about needing one. In fact, they had a sign right in front of the Thermostat display saying “No C-Wire needed for installation”.
I have seen on the forums where a lot of people are complaining about this. So I did my research and have crafted a simple way of doing the install yourself without any need for adding a C-wire to your existing system and it is TOO SIMPLE.
Step 2 – Remove your old thermostat
I suppose I should preface this by saying a couple of things.
1. – I am not a certified electrician or plumber and that if you do this, you are doing it at your own risk.
2. – My heating system is a forced hot water boiler system and I am using Ecobee thermostats so your results may vary depending on the type of heating system you have in your home.
Now that I have that out of the way, let’s begin. First of all, you will need to have your Ecobee Thermostat completely unboxed and ready to go.
Remove your old thermostat. If you only have two wires, like me, then you will see a red wire and a white wire. Personally, I prefer to shut off the breaker to the particular thermostat that I am working on before going any further.
Step 3 – Get Out Your Screwdriver
Once you have turned off the power to that thermostat, then remove the red and white wires from the backplate. Typically you will find that they are held in by small Philips head screws.
Step 4 – Remove The Back Plate
Remove the backplate from the wall. Usually, this is held in place by two to four screws into the wall. If you have Sheetrock, be careful not to tear it to ribbons when removing the old backplate.
Step 5 – Installation Of The New Thermostat
At this point, we are ready to install our new thermostat. Now, here comes the answer to the problem.
You will need to buy a 24 Volt C-Wire Power adapter from Amazon (I haven’t found them in local stores personally). Check the current price on the ones that I personally purchased over here on Amazon.
They are relatively inexpensive and typically can be purchased for under $30. Many of these come with a rather long power cord, some are 25 feet or more!
Cut down the wire to the intended length and strip off the ends of the wire to a very short length. Then you will want to run the two wires that come from the AC adapter as well as your red and white wire coming from the wall up through the center of the round backplate before attaching the backplate to the wall.
As you can see in my picture from the one I installed in my finished basement it doesn’t need to be very long if you are near a power outlet. I know it looks messy, but this can easily be remedied with a little wire molding to tidy it up.
Step 6 – Wiring Your New Thermostat
The wiring part is easy as pie. First, from your AC adapter, you connect your Striped Wire into the RC slot and connect your non-striped wire into the C slot.
Now connect the red wire from the boiler into the RH slot and your white wire into the W1 slot.
Double-check your connections and then finish up by affixing the backplate to the wall.
At this point, you should be able to pop on your Ecobee thermostat and see it power right up with no problem.
How We Found Out About This
A little bit of a side story on this. We didn’t realize that it was this simple, so we brought home four thermostats from home depot on a Saturday morning and returned them that same Saturday night.
Because we figured we were just out of luck altogether. But I was determined that there MUST be a fix for the problem of not having a C-wire to the Ecobee thermostats in my house without spending an arm and a leg to have an electrician come in and rewire things. So I googled for hours and found all kinds of other problems but not this one in particular.
I really hope this helps someone else out before they make the mistake of returning these thermostats. Also, if you are just starting out on your home automation journey, then you may want to check out my article 11 Tips For Smart Home Beginners.
What To Do If Your Ecobee thermostat is not connecting to WiFi?
No matter which Ecobee you have, wether it’s the Ecobee3, Ecobee3 Lite or the Ecobee4. If you are having issues connecting or staying connected to your wifi. It could be one of a few things. So you’ll want to ensure that you follow the steps below to make sure that everything is working properly.
Make sure your router is powered on and that the Ecobee is connected to the 2.4 Ghz band.
Make sure your Ecobee Thermostat’s firmware is up-to-date by going into MAIN MENU > ABOUT > VERSION
Make sure that the encryption type on your router is set to WPA/WPA2-AES. Ecobee no longer supports TKIP encryption due to some security flaws.
If your signal strength is too low on the ecobee then it may be having a problem in general. You can check it by going into MAIN MENU > ABOUT > WI-FI. If you see a signal strength lower than 75% that could be your problem.
Ecobee actually discussed this issue on their website and offer some helpful troubleshooting tips as well.
Conclusion
Once you have smart thermostats in your home it is impossible to go back. It is absolutely a lifesaver, especially if you own a second home or if you rent an apartment out to someone and want to be able to control the heat.
I live in New England and just took a trip to Disney with my wife and daughter. It was so nice to be able to just schedule the thermostat differently while we were away and then have it automatically scheduled to heat up the house before we came home!
No one wants to return to a cold house in New England in the middle of winter after enjoying 8 days in sunny Buena Vista, Florida!
So there you have it, all you need is a 24 Volt AC adapter for each of your Ecobee thermostats and you are good to go. I’m no math whiz, but it makes so much more sense to me to do this rather than calling an electrician!
%How To Install A Smart Thermostat With No C Wire% was first seen on https://diysmarthomeguide.com
0 notes
Text
DIY Computer Desk Under $50
How to Build a DIY Computer desk from Scratch
Hey friends! As you all know, my whole purpose of this blog is to provide you resources for affordable homemaking without breaking the bank. In today’s post, we are going to learn how to make a DIY computer desk.
#Homemaking should be easy and stress-free. A couple with any budget should be able to establish a beautiful home of their dreams.
Click To Tweet
DIY Computer Desk Custom Design
I want to keep it real simple, as the room we were going to put this computer desk has a weird shape. Therefore, to be something simple with a custom measurement will check all the boxes.
My husband really nailed it when he showed me a simple design in Google Drive using minimum material for under $50. As you all know, any furniture item can hurt your budget for the month.
Save it or print it however you want to. We created it in google drive.
Other DIY Projects
DIY Removable Wallpaper Installation
DIY Mason Jar Organizer
Bushra’s Lifestyle is a participant in the Amazon Services, LLC Associates Program, an affiliate advertising program designed to provide a means for us to earn fees by linking to Amazon.com and affiliated sites.
Material to Build Your Desk
Here is what we purchased from Lowes:
A big long wood top. It measures 3/4″ x 24″ x 48″. The little corner in the room we were going to put this table is total 58″ wide. It was more than perfect for us.
I took the picture right away to show you guys. I like to see a very detailed tutorial.
It measures 3/4: x 24″ x 48″.
3) eight feet 2″ x 4″ long pieces for the legs at $2.50 each
2) eight feet long 1″ x 3″ pieces to put edges around the table in orderer to beautify it at $1.65 each
Considering how cheap the material is, I would buy 1 extra for each in case you make a mistake in cutting or drilling the pocket holes. It’s a lot better than having to drive back to the hardware store!
This is all that we purchased from Lowes. $31 total for the material
Required Tools
These are very handy tools for any woodworking project. We have not purchased them at once. However, my husband loaded up his workshop with all the phenomenal tools over time.
You don’t have to buy every tool I show you here, although they indeed make life easy. Just go with what is the most needed.
Kreg Jig and Kreg jig clamps ( A package deal)
Drill
Screwdriver
Kreg jig screw kit or a packet of screws
Brad nailer
Brad nails
Wood glue and glue brush
Sander – Either wood sander or just buy a cheap sanding block.
Stain (of your choice). You don’t have to strain if you don’t want to.
All the above tools are extremely useful if you do DIY projects on a regular basis. Otherwise, just to make a DIY computer desk, you can get by without having them as you can use a hammer and long nails with wood glue.
This DIY project is easy and anyone can do it. Don’t get scared, as I provided you both options with and without fancy tools.
If making your home beautiful on affordable bases is your passion, then there are so many ways to make it possible.
Click To Tweet
My goal is to provide you with the resources!
Things To Consider Before You Start
Here is a little criterion I have set for me. I follow this whenever I have to do any DIY project.
1- Difficulty Of The Project
This is something you should consider for your very first DIY projects. Since my husband has been doing wooding working for us now for the last 5 years, he is at an advanced level. However, this DIY computer desk has an easy difficulty level.
2- Ergonomically Correct
Ergonomics are something you should never ignore. We made this desk for my brother and he is little over 6 feet tall. A small desk was not going to cut it. Especially with his long legs. If you want to not have any physical discomfort, you better pay attention to ergonomics.
3- Custom Dimensions:
Most of the store-bought furniture doesn’t come with the custom dimension you want to fit in your desired location. I checked around to see if I could buy a desk to go in the weird shape of the boy’s room I have, but either they were too big or too small. It left me with only the DIY option.
4- Cost-Effective
The other big thing with DIY projects is that you almost always save money. In my personal opinion, 90% of the time you save money with DIY projects. Your work also makes you proud, and this computer desk only cost me less than $50 with our DIY skills. And we already had all the tools, which made things easier.
Keep DECC in mind and using these four-component you can create any DIY project to simply nail it.
Click To Tweet
Simple DIY Computer Desk Tutorial Steps
Step 1: Cut The Wood For The Legs
To make the legs, cut them to the plan I provided above. You need to cut 4 2″ x 4″ pieces for the verticle parts of the legs with a miter saw or any saw you have available.
You can also have someone cut according to your measurements at Lowes or Home Depot.
Here is how they look after we cut them with a miter saw
Step 2: Drill Pocket Holes With A Kreg Jig
The next step is to drill holes with a Kreg Jig. This little tool is stunning. Without it, you’d have to screw in from the sides or use nails, which wouldn’t look good. With a Kreg Jig, the screws are put in at an angle, and if you put them underneath, they won’t be visible!
You do need a drill. Otherwise, it will be very difficult to make pocket holes with the Kreg Jig.
Once you are done making holes in all of your pieces….
You are ready for the next step
We used this clamp to hold the Kreg jig, it came with the package and I will put the link below as well if you need to purchase it.
Neat and nice deep angled holes. Face them on the outside of the leg frame so they won’t be visible at all in the final results.
Step 3: Screw The Wood Together
You are going to need this handy chart to decide which screw is the best for your project.
When you order this screw box, the chart is inside of it.
My husband had these corner clamps on hand so he used these for an extra hand.
They are super cheap but awfully helpful. Notice the pocket holes are facing out!
Put all four sides together to make leg frames. Make sure you double-check the size of your screws.
Make two of them. one for each side of the table to hold the top
Here are the final results! It looks like a simple frame.
This one is middle support, make sure you place a 2 x 4 piece of wood in the center to support the table, so it stays sturdy. Face the holes outside so they will go up against the wall.
My husband cut some scrap wood (to rest the middle support on while connecting) as a simple measuring guide. This way, both sides will be the same height.
Step 4: Attach The Top For Your DIY Computer Desk
Place the legs on the floor and place your top wood on it. We used the top as it is without cutting or altering it. Just put a few brad nails or small nails to hold in place temporarily.
Step 5: Cut the Edges
Now it’s time to finalize your DIY computer desk project. Cut the 1″ x 3″ long wood according to the size using the chart above to attach it to the edges. It will give this computer desk a good and clean look.
You can also have the wood cut in the store as well.
DIY projects are an easy way to add charm to your home and a crucial part of affordable homemaking
Click To Tweet
My husband is measuring the table for the edges.
We only used glue and brad nails for the edging.
Make sure you place a 2 x 4 piece of wood in the center to support the table, so it stays sturdy
The blog post is coming on how to stain soon
Less $50 we spent!
The Exact Tools We Used For This Project
I am just listing them in case you like to buy anything. We added to our workshop over the years and bought these tools from time to time. They are perfect for any level of DIY’ers.
Kreg Jig with Kreg Clamp
An awesome tool to have. Makes very strong and hidden joints.
This Kreg screw kit is good as it gives you all the sizes you’ll possibly need to start.
You don’t need to buy this only for one project. You could get away with using regular screws, but these are great!
Corner clamps
Drill
Brad Nailer
Electric sander
PIN IT
Now It’s Your Turn!
Download the plan above or print it to start building you own. You can adjust your measurements according to your space. Hope you like it, and once you make it, come share it on our FB page with thousands of other followers!
The post DIY Computer Desk Under $50 appeared first on Bushra's Lifestyle.
from Bushra's Lifestyle https://bushraslifestyle.com/diy-computer-desk/
0 notes
Text
Best DIY Home Plumbing Projects With Tips In 2019
Caulk a Tub
What You'll Need: A tube of caulk, plastic razor, mineral spirits, fine-threaded rag, painter's cassette, Magic Eraser or comparable cleaning pad, scissors What It'll Cost: $5 to more than $30, based on how big the job and which provides You Have to buy new Everything You Can SaveUpwards of $100, based on how big the project Long It'll Take: 60 The way to Do It: This job is easier than replacing a drain flange. It the bathroom repair project I handled, long before I had an ounce of. I guarantee you can do it all you need is some patience and a steady hand. Here's how to do it, adapted from This Old House: Buy silicone or acrylic latex caulk. The former is more difficult to work with, but lasts longer; the latter is a lot easier to work with, but shorter-lived. Use a plastic wig (not a regular razor blade) to cut off the old caulk. Remove lingering chunks using a sterile pad or Magic Eraser, then finish the job using a fine rag soaked in mineral oil. Follow the instructions on your own caulking tube. You need the tip to cut on . Lay down painter's tape on either side of the joint. Use a rag to smooth the newly caulk in a fluid movement. Wipe away excess caulk as you go, taking good care to leave behind a program. Carefully remove the tape of the painter without bothering the caulk. Repeat the procedure that is smoothing. Wait for the caulk to heal before using the tub -- 24 hours, ideally.
With rented or borrowed gear, your DIY spirit, and repeated how-to movie viewings, you can tackle these house plumbing replacement and repair projects by yourself.
Install an Automatic Dishwasher
Everything You'll Need: Your new dishwasher, a Philips head screwdriver, an adjustable wrench or pliers, electrical tape, suitably sized screws, nuts, and the dishwasher 90 meeting (see your dishwasher's directions for specific requirements) What It'll Cost: $200 for a basic, entry-level dishwasher to more than $1,000 to get a model What You Can Save: $100 to more than $500, depending on the complexity of the job and what your plumber charges Much Time It'll Require: 90 How to Do It: Installing a dishwasher is amazingly straightforward. There are that excursion would-be DIYers upward: the weight and the possibility of working with electrical wiring of the dishwasher . If you're game, here's exactly what you need to do (adapted from DIY Network's tutorial): Turn your house the power of off in the breaker. Turn off the water at the sink, even if at all possible. Otherwise, turn the water off in the primary line. Just take the dishwasher from the box and inspect against the included schematic sheet. Confirm that everything is in the right place and everything that the manufacturer says is included in the kit is. Uncap the dishwasher of your home drain hook and line to your dishwasherthe drain outlet of . Crimp the metallic clamp (included) around the drain line and thread through the hole to your sink compartment. Position the dishwasher in its housing compartment. Adjust its leg elevation with an adjustable wrench. Fasten the dishwasher into the countertop using appropriately sized screws (probably provided in the kit). Attach the dishwasher's wiring into the local power inlet (like colors together). Screw on the cable nuts and pay with tape. Position the ground cable. Consult the instructions to ensure you of the manufacturer 've done this correctly. Hook the dishwasher's supply line to the dishwasher 90 (a exceptional fresh water connection that you'll want to purchase separately) and twist. Attach into the sink drain. Turn on power and the water. Test a load and repeat those steps as necessary. Caution: This job requires some work that is mild. If the idea of manipulating wiring makes you uneasy, in spite of your house 's power off, save this one for the professionals.
Fix a Toilet
Everything You'll Need: Pliers, adjustable wrench, wire cutters, fresh flapper (optional), new float (optional), new fill valve (optional), vinegar or mineral spirits, toothbrush What It'll Price: Up to $25, based upon supplies and the equipment needed Everything You Could Save: Upwards of $100, based on the nature of the project Much Time It Take: 10 to 60 minutes The way to Do It: Should you blessed, repairing your toilet that is working will cost nothing and take only a couple of minutes of your time. You may have an hours-long process of trial and error punctuated by successive trips to the hardware store if you not so lucky. Here's how to address common issues that can cause your bathroom to operate, adapted from WikiHow: Flapper Issues: Faulty flappers are responsible for many, if not most, running toilets. First, turn off the water to the bathroom (locally if possible) and flush. Remove the lid and inspect the valve. When it warped or deteriorated, it's done for; go to the shop, purchase a new one, and install it in accordance with the instructions of the manufacturer . When it is not forming a tight seal since the string attaching it to the flush lever is too short or long, fix the chain so (using wire cutters to shorten the string if needed ). If mineral buildup appears to be the culprit, eliminate the flapper and submerge it in vinegar or mineral spirits for half an hour or longer to dissolve the residue. Scrub replace and clean with a toothbrush. Float Problems: The second most probable cause is that a float. Floats come in two flavors: cup and chunk floats floats. In any scenario, an float might bring about higher-than-normal water levels, which encourage running. Check the toilet's overflow tube -- your water level is high whether it 's taking on water. Use pliers to turn the controller of your float until the water level stabilizes at least an inch below the overflow tube. Monitor the water levels frequently and fix. Fill Valve Problems: This is the most vexing and costly of those three issues. Shut off the bathroom 's water, flush, and then disconnect the service line (you'll want pliers or an adjustable wrench). Dry the inside of the tank with a sponge or rag. Remove along with your adjustable wrench, bring it and buy a suitable replacement. Follow the instructions of the manufacturer . Flush to check.
Change a Shower Head
What You'll Need: A brand new shower head, a wrench or pair of pliers, Teflon tape, rust/lime remover or mineral spirits What It'll Price: $5 to $7 for a basic chrome shower head; upwards of $40 to get a high-end model (a Walmart) What You Can Save: $45 to well over $100 (a Angie's List) Much Time It'll Require: 15 to Half an Hour How to Do It: Shower minds can be fixed, handheld, or both. However attention to detail is important in all 3 cases, none is very difficult or time-consuming to install. For replacing a shower head, the basic procedure is: Loosen the old head having pliers or an adjustable wrench and discard. Use a lubricant solution, for example CLR, to remove other debris, calcification, and rust . Dry the arm, particularly round the threads. Apply Teflon tape to the threads and then press to form a snug bind. Hand-screw the shower head to the threads. Finish tightening with an adjustable wrench or pliers. Turn on the water and check for leaks. Tighten reapply or farther Teflon tape, if leaks are found. To put in a hybrid head with handheld and fixed components, you will need to screw into an extra bit -- the diverter that regulates water flow between the two heads. The approach is slightly more time-consuming, and you will have to refer to the manufacturer's installation instructions to make certain that you're connecting the diverter correctly, but it's not an order of magnitude more complicated.
Replace Faucet Fixtures
What You'll Need: Your faucet meeting, plumber's putty or silicone, a basin wrench (optional), mineral spirits, hex wrench (probably included in the faucet assembly) What's 'll Cost: $30 to $40 for a basic chrome faucet; up of $400 for a high-end version (per Home Depot) What You Can Save: $60 to more than $500 (per HomeAdvisor) Much Time It Require: 60 to 90 minutes How to Do It: Replacing a faucet isn't as hard as it sounds. This explainer assumes you're not replacing the sink, only the actual faucet assembly. It's adapted from the how-to of this Lowe : Close to the hot and cold valves. If the sink does not have any valves, switch off the main valve of your home . Open the cold and hot taps to drain any residual water in the lines. Unscrew the water lines manually or with a basin wrench. Disconnect the elevator pole (the piece that opens and closes the drain). Remove at the base of the faucet. Manually unscrew the plastic slide nut onto the P-trap (the bend in the drain ) and disconnect the drain flange. Sink holes and use mineral spirits or rust remover to wash the drain around. Put in a gasket at the bottom of the new faucet, if not already done. Insert the faucet into the sink holes. Tighten the nuts. If not already done, set up the faucet handles and tighten with a hex wrench (usually provided). Screw from the drain nut and fit tightly with the bottom gasket (push or twist in). Apply plumber's putty to the drain flange and screw on over the drain body. Make sure the flange hole faces backward. Further tighten the nuts and gasket. Install and test the drain rod assembly. Reconnect the distribution lines and operate the faucet. Check for leaks and retighten in the whole assembly or reinstall necessary. Your new faucet should include installation instructions. (How detailed they'll be is another matter.) Where these instructions and those provided by the producer conflict, check with the latter. Caution: Faucets come in many shapes and dimensions. When possible, have your faucet meeting handy once you shop for your faucet. Purchasing the replacement will save you aggravation and time.
0 notes
Text
Weld-less Front Bike Rack
I was, in the end, roused to make my own particular rack, however, knew I needed something more trendy than a plastic box attached to a visiting rack with hose cinches, as compelling as that may be. At the opposite end of the range, my metalworking aptitudes are genuinely constrained - I can't weld, and even my hacksawing is somewhat questionable. To get around that, I concocted a plan that doesn't require any extraordinary apparatuses or aptitudes to fabricate, yet is as yet solid and looks okay. The spread legs of the rack may show up somewhat weird, yet this gives the rack its security, shaping triangles in three planes.

This outline may not be appropriate for each bicycle, so check yours before you make a beeline for the handyman shop, especially with respect to freedom from brakes and the highest point of the front wheel. It won't exactly work with suspension forks, however, I have recorded a few varieties and improvements toward the finish of this Instructable to help with some unique sorts of bicycle and loads.
Stage 1: Materials
Aluminum tubing - I utilized 13.2 mm outside measurement with 2.5 mm divider thickness, which fits 8 mm tie wire jolts. Two lengths of 1 m every way bounty for my bicycle - each completed piece was around 800 mm long.
DynaBolt tie wire jolts x 4 (a sort of suspension stay, by and large, utilized with brickwork) - prescribed
Seats and screws/fasteners, to join the crate to the tubing
P-cuts (additionally called P-clips) x 2, to join the rack to the highest point of your forks. You may need to go to car parts or modern fittings retailer to get these if your tool shop doesn't offer them.
A wooden box, or a bit of plywood for the payload plate. This should be generally firm with the goal that the heap doesn't make the tubing clasp.
Varnish, stain, paint or oil, to complete the container or plate
My bicycle doesn't have rack-mounting eyelets, so I required two further grapple focuses at the base of my forks to mount the racks. I utilized 7/8" P-cuts from my nearby bicycle shop, which are very solid, however, can slip with vibration if not introduced very right. Huge, square washers regard to use, to influence the clasp to cinch nearer to the fork. I may pull the thin vinyl covering off and supplant it with elastic shims, as it is hinting at disintegration. On the off chance that you are at all stressed over their execution, more grounded dart on fork mounts, for example, the Tubus LM-1 Mounting Set could be a decent option.
You can also read: Garden Shed Buying Guide | A Full Guide For Sheds Purchasing

In the event that your forks have low rack-mounting eyelets, you'll just need P-cuts for the best mount, in spite of the fact that you should twist the tie wire jolt heads.
The tie wire jolts are utilized to append the tubing to the P-cuts. You'll have to discover a tube estimate that intently coordinates the extent of the tie wire jolt, which might be the hardest piece of the task! On the other hand, you could level the tubing in a bad habit, however, I think the tie wire jolts are more grounded, particularly in the event that you are utilizing more slender walled tubing.
Stage 2: Tools
Twisting littler sizes of aluminum tubing don't require any exceptional instruments. I twisted mine around the washing line shaft, with about 4x2 pegged behind it to hold it set up. I filled it with sand so it would hold its shape. Every one of the apparatuses required is genuinely normal:
Hacksaw
Metal record
Every material, or fine sandpaper (discretionary)
Shower paint, for completing (discretionary)
The bad habit (prescribed)
Ruler/estimating tape
Spanners
Screwdriver
Allen keys
Penetrate and bits
A couple of assistance (or tape and braces)
Security glasses
Stage 3: Size Your Rack
As a matter of first importance, choose what measure box or plate you might want. While the essential rack legs are moderately effortlessly changed in accordance with suit distinctive measured decks, I figure it's best to construct them in light of the general size of deck you plan to utilize. I utilized a 500 mm x 360 mm x 120 mm wooden container, which I purchased.
It may help you: Dog cage: a safe home of your dog

Freely join the P-clasps to the other side of your bicycle's forks in the coveted area, with a tie-wire jolt embedded in each. I attempted to keep the lower cut as near the base of the forks as could be expected under the circumstances, to hold the heap down low, with the upper clasp situated so the rack would be clear of the brakes. Embed a bit of tubing into every one of the tie wire jolts and move the tubing around to figure out what point and lengths you'll have to twist it to keeping in mind the end goal to fit the deck.
I fabricated my fantastic rack with a regressive rake on the deck, so it doesn't tip advances when I turn the handlebars. It additionally gives me a touch of space to move with the estimations: get it somewhat amiss with a level deck, and it may wind up inclining advances!
Stage 4: Bend the Tubing
The tubing should be loaded with sand to enable it to hold its shape amid bowing. I creased one end in a bad habit, at that point stuck a bit of wooden dowel in the opposite end, held in by tape. There are least radii for twisting tubing, which would be worth exploring if your tubing has a more slender divider, or you need to twist it to a tight span. I twisted mine around the washing line post, which has a breadth of around 50 mm, and that worked fine.
It takes a touch of power to twist the tubing so you will require a comment the tubing set up. I pegged a bit of 4x2 timber into the ground, however something somewhat higher up would be useful, to make it less demanding to put your weight into the twisting - chipping away at ground level was somewhat troublesome.

You can also read: Bike Racks for Corporate Branding
Check out the point you gauged in the past advance to twist the tubing to. I put a screwdriver in the ground as a guide.
When you twist the tubing, the most vital activity applies the weight comfortable twist, moving your hands back along the tubing as the twist advances. When you have accomplished the coveted twist, hold the tubing by your bicycle to check the point. As a matter of fact, it's best to do this before you take the sand out! Utilize the main tube as a guide for the second.
At the point when the two tubes have been bowed, evacuate the sand and trim to the coveted length. Appending one side freely to the bicycle to check the length before fixing the tie wore jolts is a smart thought. Presently is likewise a decent time to give the tubing a rub with the emery material or fine sandpaper, if wanted. Mine had been scratched a bit amid conveyance and cutting and twisting; rubbing with some well-used sandpaper gave it a pleasant polished wrap-up.
Stage 5: Mount the Tie Wire Bolts
At the point when the tubing is altogether completed, it's a great opportunity to embed and fix the tie wire jolts. I really thought that it was best to hold the tubing as opposed to put it in a bad habit, as appeared, as this makes it simpler to check if the tubing is misshaping. Do as I say, not as I do (it was additionally a great deal harder taking a photograph while holding both the sickle and the tubing!).
It may help you: What Colour Should I Paint My Shed?

My hypothesis is that the jolts should simply be sufficiently fixed for the tubing the twist somewhat, yet not yield by any means. That is only my hypothesis. The base jolts don't generally should be done up that firmly as there is no danger of them being hauled out; the best jolts may be done up somewhat more tightly. As you'll see from the photo, I most likely fixed the jolts a somewhat excessively, in spite of the fact that it doesn't appear to have done any damage.
You can also read: How to Build Your Own Bike Work Stand
0 notes
Last Seen Blogs

markamark
Mark's Blog

womenandaddictions-blog
women&addictions


twins-corbin-colleen
The twins

lifes-remedy
Life's - REMedy