
sweetlab
~Sweet Lab~
sweet & accessible recipes, collected or designed by myself
32 posts
Don't wanna be here? Send us removal request.
Last Seen Blogs

waynerswords
Delivery Boy

primrosemm
Nourh

amyzi
Huh?

gabrielgros
Untitled

steamofunconsciousness
Cognitive Dissonance
Photo
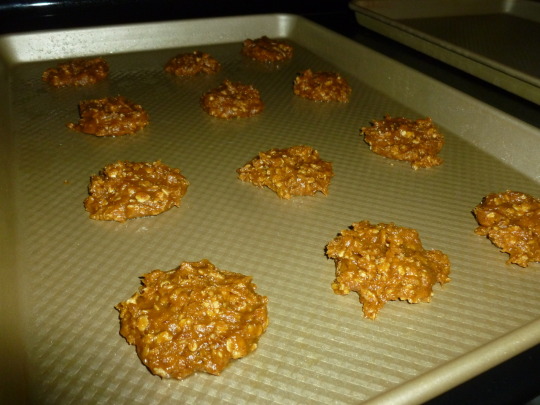
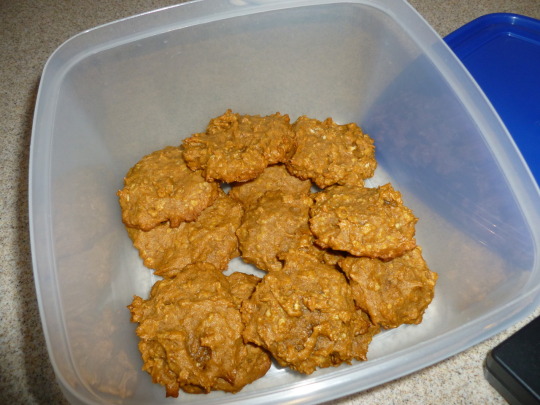
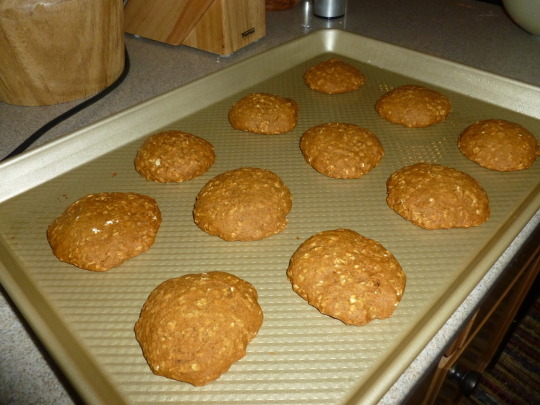
Pumpkin Oatmeal Cookies
I love pumpkin cookies in theory but in practice they store badly for me or are too heavy for my taste and not too good for you. I decided to try out this recipe and see if the addition of oatmeal and flax seed (something we have on hand all the time) would turn out a bit less perishable!
Ingredients:
2 cups flour
1 1/3 cups rolled oats
1 teaspoon baking soda
3/4 teaspoon salt
1 tsp cinnamon
1/2 teaspoon ginger
1/2 teaspoon cloves
1/2 teaspoon nutmeg
1 2/3 cups sugar
2/3 cup canola oil
2 tablespoons molasses (or 3 or 4)
1 cup canned pumpkin
1 teaspoon vanilla
optional: 1 tablespoon ground flax seeds
Preheat oven to 350 degrees fahrenheit. Grease 2 baking sheets.
Mix together flour, oats, baking soda, salt and spices.
In a seperate bowl, mix together sugar, oil, molasses, pumpkin, vanilla and flax seeds until combined. Add dry ingredients to wet, folding to combine.
Substitutions: I used a variety of substitutions in this recipe. the first photos you see are made with oil, but less white sugar, instead it was about one third white, one third brown, and one third agave nectar, plus an extra tablespoon of molasses.
The second batch of photos is from one where I completely removed oil in favor of unsweetened applesauce, and I didn't reduce the pumpkin. The ratio for the second batch was
2/3 cup applesauce (in place of oil)
1/2 cup white sugar
1/3 cup brown sugar
1/3 cup agave nectar
Drop by tablespoons onto greased cookie sheets an inch apart. They don't spread at all really so form them into cookie shapes if you care, rolling and flattening or just flattening the top with a fork or spoon. Bake for 16-18 minutes at 350.
Remove from oven and get cookies onto a wire rack to cool. these actually do REALLY WELL frozen (well after they've cooled) and I love their texture straight from the freezer >_> this is a a very chewy cookie.
Note: the source site implies in comments that a step was omitted reducing the pumpkin on stovetop to about 3/4 cup to remove excess moisture and prevent a 'cakey' texture. I did this but didn't measure exactly, I just reduced it for a little bit until i was afraid it might burn, and I didn't get too cakey cookies. The second batch I did not reduce, and honestly I preferred the first (reduced) method. Neither was terrible though!
20 notes
·
View notes
Photo
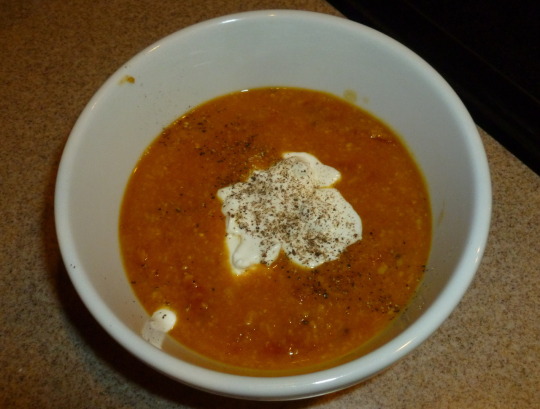


Chickpea and Fire Roasted Tomato Soup
Well since I last posted a recipe, I broke my arm, had surgery, lost about 30 pounds, and started eating a lot better. Unfortunately, "Eating better" lead to "eating being a joyless chore," haha, because there are not many healthy foods or ingredients at my disposal. However, now that my dad was diagnosed with high cholsterol, I acutally have more opportunities to cook healthy meals because he is getting bored with eating, lol. Here is a recipe I found that high in fiber and protein and can easily stand on it's own as a meal. It's also easy AND fast!
Ingredients:
a few turns of the pan of olive oil (original calls for 1/4 cup that seems excessive)
2 cloves of garlic, chopped (or 3 or 4)
1 small onion, coarsely chopped
2 cans of chickpeas (garbanzo beans, low sodium preferably), drained
2 tsp ground cumin
1/2 tsp ground cardamom
1/2 tsp turmeric
2 cups chicken or vegetable stock
1 (28 oz) can fire roasted tomatoes (or 2 14.5 oz cans)
1 cup plain yogurt for garnish (I used less)
This recipe is incredibly easy and fast but requires a food processor. Chop your garlic and onion first so you don't have to slow down once everything gets started.
Heat the olive oil in a medium pot or dutch oven over medium heat. Add the garlic and cook 2 or 3 minutes (the smaller the chop the faster it cooks be warned). Grind the chickpeas and onion in the food processor. If you are doing this in a smaller processor or processor attachment, I recommend you do the onions first as they are the ones that need to cook for 5 minutes to sweeten, if you are using a large enough processor simply do them both at once. Add the ground mixture to the pot and cook for 5 minutes (or at least the onion if you are processing in batches, the onion is priority).
Season the chickpeas with cumin, cardamom, and turmeric. You can add salt and pepper as well (this is not a spicy recipe) but I find it better to let people season that themselves (I've always been anti-salt except in baking). If no one objects, a little red pepper flake works as well, otherwise it is not a spicy soup at all. Stir in the stock, then tomatoes (do not drain). Simmer the soup for 5-10 minutes, just enough to marry the flavors. Serve with a dollop of yogurt.
Notes:
This recipe is super fast once you start the cooking/processing. You may serve it with pita (I recommend whole wheat) or naan if you are serving it as a main course instead of a first course or side dish. I chose not to because I wasn't interested in an extra carbohydrate and we were having chicken as well. Pita chips would make a great garnish as well.
The soup as described comes out chunky and hearty, and my family loved it. If you prefer creamier soups, or a more uniform texture, you can process the tomatoes before adding them, or you can choose to process the cooked soup. I did the latter with the leftover soup (and a dollop of yogurt added) and it produced a wonderfully creamy and uniform texture, probably better for picky eaters like children or myself.
With chickpeas this is a high fiber, high protein (for a meatless/easily vegetarian) soup. I used greek plain yogurt which adds even more protein. Aim for low sodium canned goods (low sodium chickpeas should be available if not tomatoes). You will probably be seeing more 'healthy' (or at least 'not terrible for you') recipes like this out of me as I finally get back in the swing of cooking more every day meals instead of baking (though, don't worry, the next recipe is a cupcake lol). Sorry there aren't more photos but it honestly went by too fast to take any!
#chickpeas#fire roasted tomatoes#garbanzo beans#food processor#recipe#soup#soup recipes#indian recipe#healthy recipe#healthy soup#high fiber#high protein
6 notes
·
View notes
Photo
I LOVE Bad Machinery. Today they posted a recipe!
2 notes
·
View notes
Text
if you got a card from me at ACEN...
sorry i didn't have a pen to scribble more useful urls!
this is my personal tumblr, and this is my website for anime and music discussion. Neither claim to be safe for work or sanity hahaha.
0 notes
Text
oh btw I haven't been posting because I broke my arm
I made my first pecan pie but I didn't get to taste it so why post it? I have no idea if it worked.
see you in another couple months
0 notes
Photo


Avgolemono - Lemon Egg Soup
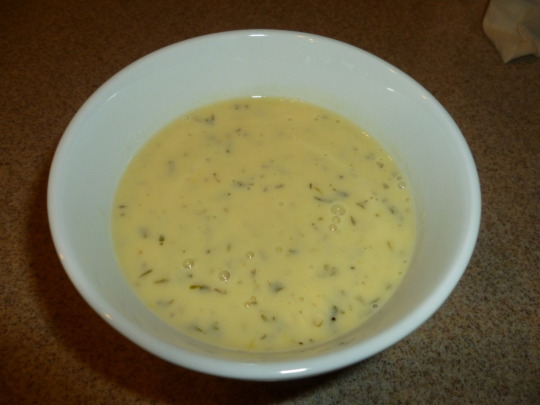
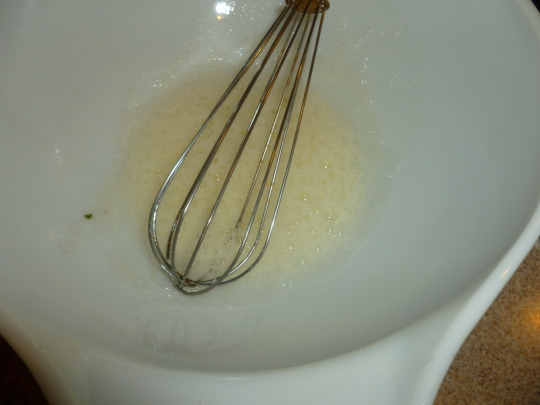
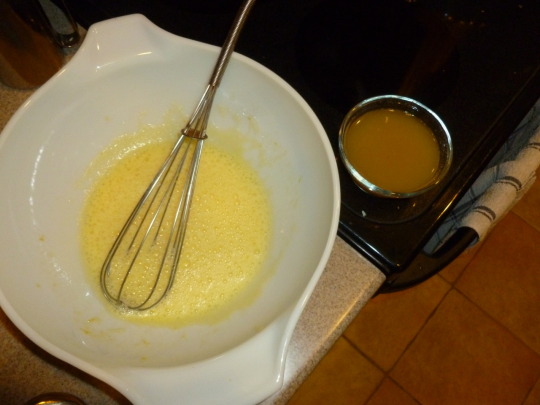
The profusion of lemons as of late has left me longing this lemon chicken and rice soup that I had a few times at a local restaurant, and it just so happens that the basic recipe is rather simple! I've added a few seasonings, though the most basic Greek recipes are simply stock - rice - egg -lemon. This recipe is scaled back slightly, since the soup isn't easy to heat due to the egg content. I've also made this with 1 cup of precooked or leftover chicken, but I really don't think it is necessary.
Ingredients:
4 cups of Chicken broth (a standard 1 quart box, or two cans to equal 4 cups)
1/2 cup of rice (I used arborio)
2 large eggs, seperated
1/4 cup fresh lemon juice
1 tsp lemon zest
1 tsp dried parsley
1/2 tsp dried thyme
1 tsp onion powder
Pour stock into a soup pot and add the parsley, thyme, and onion powder and bring to a low boil. Add the rice and simmer over low heat until rice is tender, about 20-25 minutes. (Optional: Stir in cooked chicken now and cook an additional 5 minutes).
Whisk egg whites until frothy. Stir in yolks, lemon juice, and lemon zest, and whisk to combine.
Remove 1 cup of hot soup from the pot, and slowly whisk into the egg mixture, no more than 1/2 cup at a time (I did 3rds), beating well between each addition to temper the eggs (you can NOT skip this step). Make sure soup is on very low heat and whisk the egg mixture into the soup pot, allowing it to heat gently. Do not allow mixture to boil after the addition of eggs.
#avglemono#lemon egg soup#rice soup#lemon egg rice soup#lemons#lemon recipes#soup recipes#greek recipes#greek egg soup#egg soup#chicken soup#egg chicken soup
4 notes
·
View notes
Photo
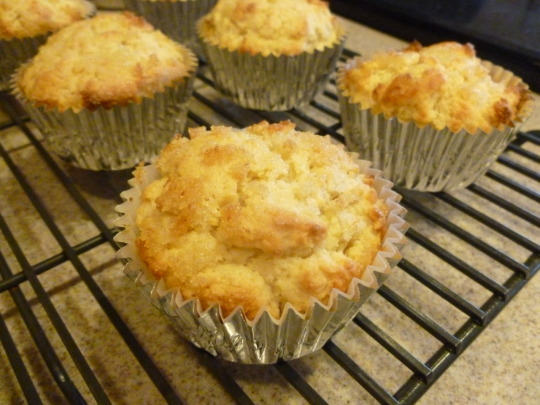
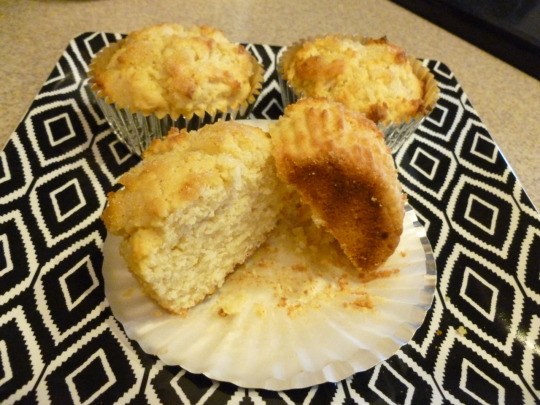
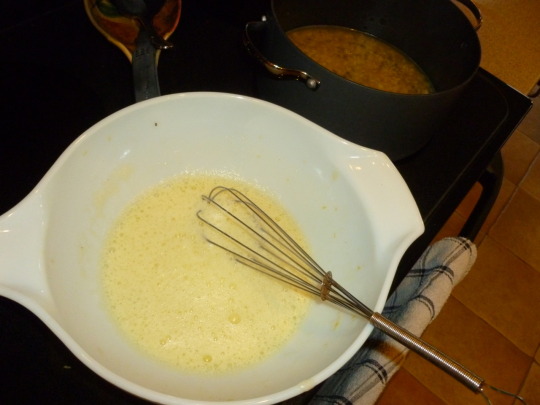
Lemon Muffins
Guess what, EVERY SEASON is lemon season in Arizona. I woke up to three bags bursting with lemons and decided it was muffin time again. I'm sorry, I don't know what's with all the muffins lately, but I love them. I've actually made many savory dishes recently as well but without photos. These muffins were pretty quick and easy to make, and incredibly lemony, and rather dense (almost dry). The idea of melting the butter on a stovetop then adding eggs frightened me at first but it worked out fine.
Ingredients:
2 cups unbleached flour
1/2 cup sugar + 2 Tbsp for topping
1 Tbsp baking powder
1 tsp salt
1/2 cup of butter
1/2 cup fresh lemon juice
2 eggs
the finely grated zest of 1 lemon
Preheat oven to 400 degrees. Spray or line 12 muffin tins. In a large bowl, combine the flour, half cup of sugar, baking powder and salt, giving it a quick whisk to blend well.
Melt the butter in a small saucepan (I recommend a medium low setting, only enough to melt it completely), then remove from heat. Grab that whisk again (I'd never instruct you to use such a hard to clean utensil only once in a recipe) and stir in the lemon juice, then most of the zest, reserving some zest for topping. Make sure to mix in the lemon ingredients first to bring the temperature of the butter mixture down before adding your eggs. Finally, whisk in the eggs one at a time, if you paced yourself correctly the mixture should be on the lukewarm-to-chilly side once it is done.
Next, stir the egg mixture into the dry ingredients. Its time to ditch the whisk for a spoon because this stuff gets thick fast. Blend until mixture is thoroughly moistened (check the accompanying photo) it will NOT be smooth.
Spoon the mixture into the prepared muffin tins, and if desired make a topping of the last two tablespoons of sugar and remaining zest and sprinkle it over the muffins. I mixed them together first before sprinkling it, though I must also admit I'd never gotten how to smoothly apply 'muffin topping' that is sugar based, so pardon the ugliness of mine. Bake for 15-20 minutes, until lightly browned. Do not over bake! These muffins are naturally quite yellow so if they are too 'browned' on top they are burnt on the bottom. I've included a bisected muffin in the photos to show how the bottom will look compared to the top (I cooked mine exactly 17 minutes but our oven is cold).
9 notes
·
View notes
Photo
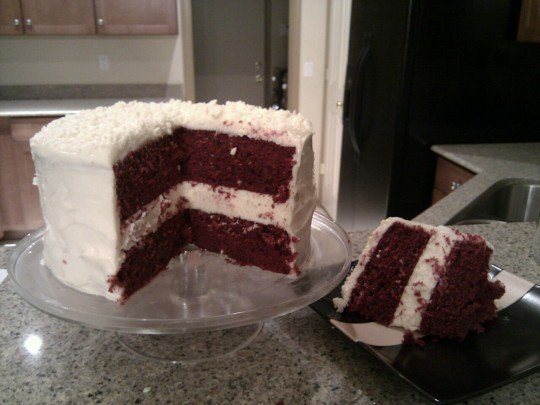
Red Velvet Cheesecake, made from http://www.recipegirl.com/2011/11/28/red-velvet-cheesecake-cake/
0 notes
Text
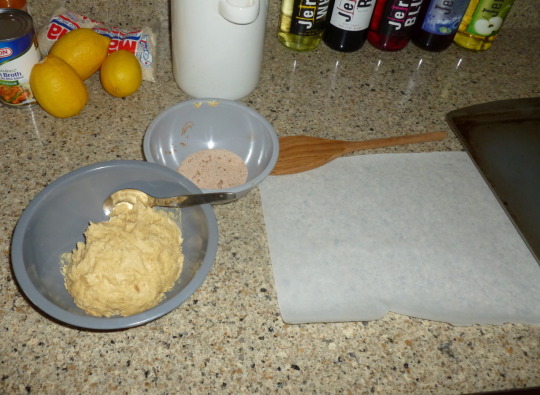
Roasted Garlic Potato Soup
Often I purchase a bag of potatoes (or convince someone else to) that doesn't get used in a timely fashion. Today was one of those days to use what's in the pantry, and I had two major ingredients on hand: half a bag of potatoes and bulbs of garlic. This is more of a "wing it" recipe than an exact science, but here's how it went...
Remove the papery outer skin of 2 bulbs of garlic, and cut off the top 1/3rd of each bulb. Wrap foil carefully around each bulb, so that olive oil will not drip out of the bottom. drizzle olive oil over the top of the bulbs, place on a baking sheet or in a small baking dish, and roast in the oven at 400 degrees for an hour.
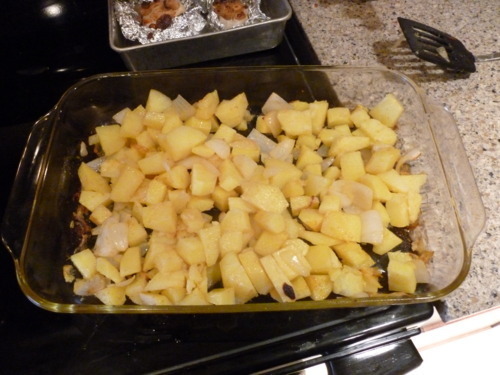
Cut your potatoes into 1/2"-1" size chunks, about 4 cup, and cut 1 onion into large chunks. Toss the potatoes and onions lightly in oil, and add to the oven half an hour after starting the garlic. I lightly seasoned my potatoes.
Remove the potatoes and onions after 20-25 minutes. Add to soup pot, with 1 bay leaf 4 cups of chicken broth (a 1lb box). Simmer for 20 minutes.
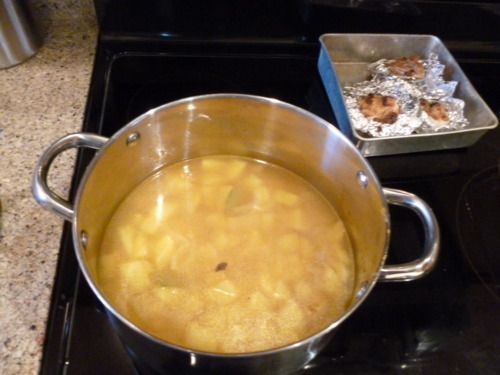
While potatoes simmer, remove garlic and let cool for 10 minutes. Carefully squeeze garlic out of peels, and smash with a fork.
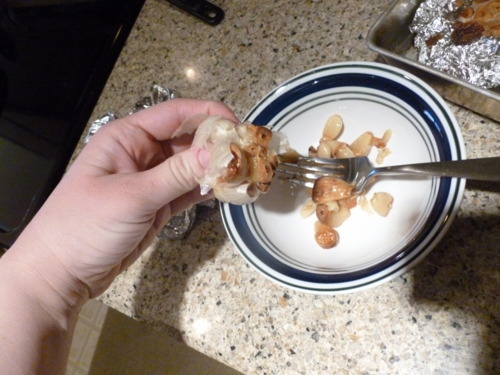
Remove bay leaf from soup, and add garlic paste.

Blend the soup, in batches in blenders, or with an immersion blender. I had to settle for hand mixer.
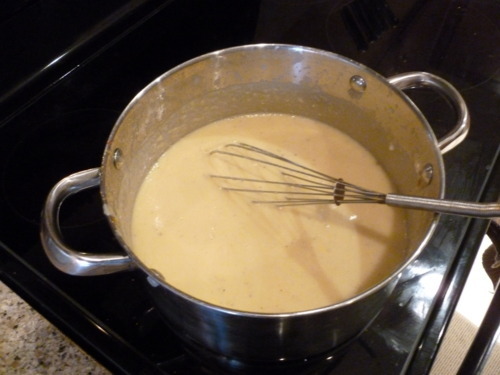
Stir in 1/2 cup of milk, and 1/2 cup of cheese. You can make a roux first if you are afraid the soup won't be thick enough. In that case, cook 2 tbsp of flour in 2 tbsp of butter, whisking constantly for 2 minutes. Slowly add the milk to thicken, and then cheese. Pour this mixture into the potato soup and stir until combined. Let stand to thicken.
#garlic potato soup#potato soup recipe#roasted garlic#roasted garlic potato soup#roasted potatoes#soups#soup recipes
2 notes
·
View notes
Photo
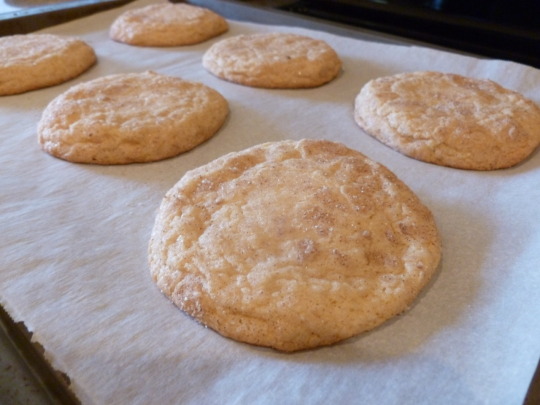
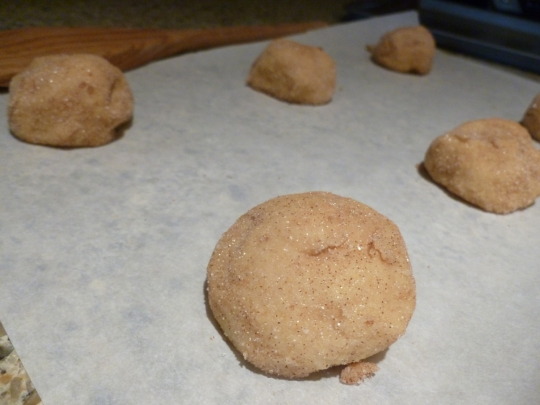
Snickerdoodles
I made reference to them here, didn't I? What better use is there of cream of tartar? This is the best recipe I've found so far, and I found the key is to not over bake them... and keep at least 1 stick of margarine in the mix. The above were made with all margarine, a 50/50 blend yields a slightly puffier cookie.
Ingredients:
1/2 lb of margarine, or 1 stick of margarine and 1 stick of unsalted butter at room temperature
1 1/2 cups sugar
2 eggs at room temperature
2 3/4 cups flour
2 tsp cream of tartar
1 tsp baking soda
1/2 tsp kosher salt
Cinammon Sugar:
2 tablespoons sugar
2-4 teaspoons ground cinnamon
Cream margarine and sugar (either with hand mixer or in a stand mixer with a paddle attachment). Add eggs to the mixture, one at a time, beating well and scraping down the bowl. Sift together flour, cream of tartar, baking soda, and salt. Carefully add flour mixture to the bowl and mix well. Cover with plastic wrap or waxed paper and refrigerate at least 2 hours, or freeze up to 2 weeks.
Place cinnamon and sugar in a small bowl and mix to combine. Preheat the over to 400 degrees.
Scoop out enough dough to form 1 inch balls. Roll the balls in the cinnamon sugar and place on an ungreased cookies sheet or parchment paper.
Bake 8-10 minutes, do not let the cookies brown. Allow to cool at least 2 minutes on the sheet before removing to rack to cool completely. For crisper cookies, allows them to cool entirely on the sheet.
11 notes
·
View notes
Photo
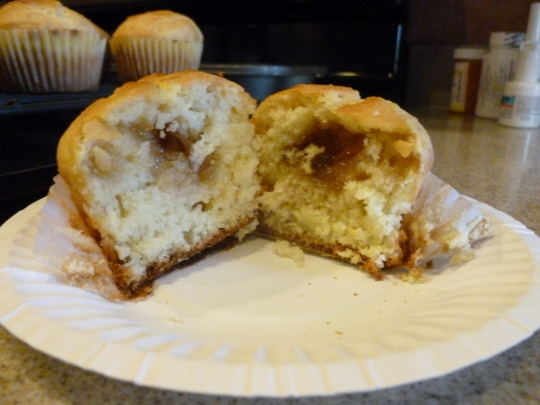
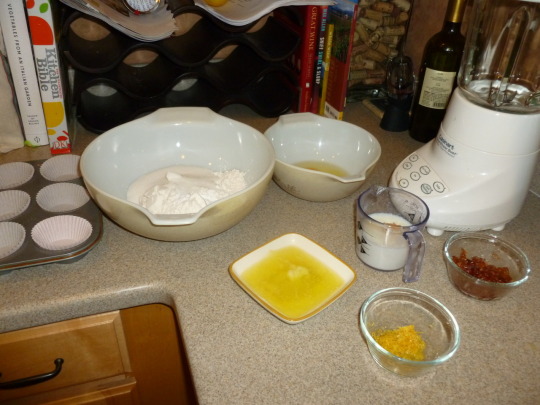
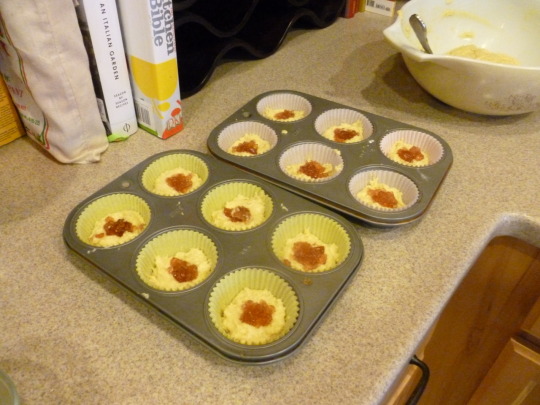
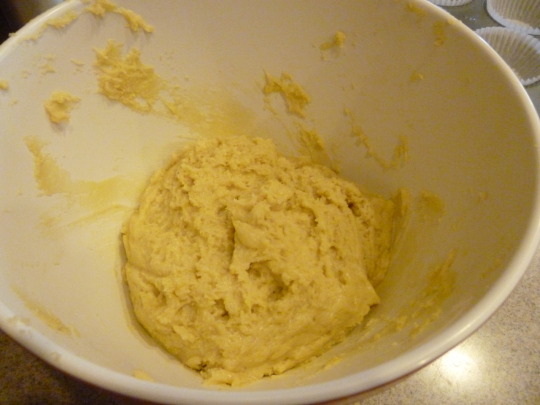
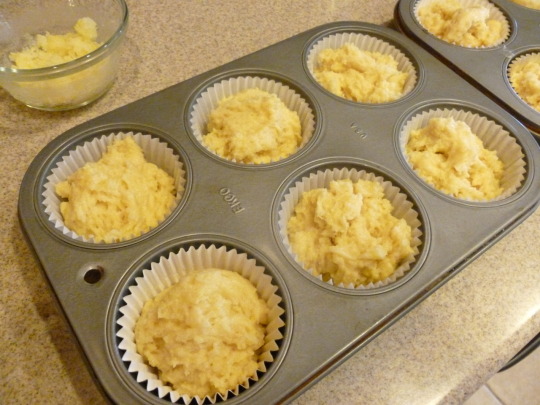
Jam Filled Muffins
After the first lemon-fruit muffin I wanted more. Another thing I have lying around is leftover jams I bought for spoon-cookies this year, particularly some pomegranate jelly. I figured, why not look for a filled recipe? When I made this, I actually soured my milk slightly by squeezing some extra lemon juice into it and letting it settle, like in my buttermilk substitution. The muffins had a rich lemony taste, though I personally should have added more jam!
Ingredients:
1 3/4 cups flour
1/2 cup sugar
1/2 tsp salt
1 Tbsp baking powder
2 eggs
2/3 cup milk
1/3 cup butter or margarine, melted
1 tsp of lemon zest
1/2 cup jam (raspberry, strawberry, etc.)
Preheat oven to 400 degrees. Grease or line a 12 cup muffin pan.
In a large bowl combine flour, sugar, baking powder, and salt. Lightly beat eggs in a smaller bowl, then add milk, butter, and lemon zest. Pour wet mixture into dry ingredients and stir just until moistened. Spoon half the batter into the prepared muffin tins. Make a smalle well in the center of each, add jam. Spoon remaining batter over jam. Bake for 20-25 minutes, or until golden. Let cool in pan 5 minutes before removing to wire racks to cool completely
5 notes
·
View notes
Photo
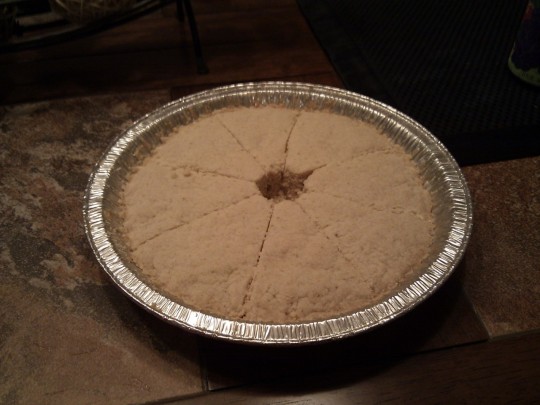
Shortbread
The traditional recipe for shortbread is simple: 1 part white sugar, 2 parts butter, 3 parts flour, baked at a relatively low temperature to avoid browning. What follows is my preferred recipe, which just has a couple alterations. My friend Matthew absolutely loves shortbread and that's all he asks me for on holidays or his birthday, which recently passed. This recipe is fairly easy, and could be made in a square pan, though I often use a round cake pan lined with foil for easy extraction (or a disposable pie pan in dire circumstances). I prefer to use kosher salt in my baking, if you do this reduce the salt to half or 3/4 of a teaspoon. I add vanilla because I love vanilla but it's not really a traditional ingredient.
Ingredients:
1/2 lb of butter, room temperature
1/4 cup white sugar
1/2 cup confectioner's (powdered) sugar
2 cups flour
1 tsp salt
1 tsp vanilla (optional)
Cream butter and sugars together until fluffy, beat in vanilla is desired. In a separate bowl whisk together flour and salt, then stir into butter mixture. Prepare a pan, 8-inch square or 9-inch round (I've used pie, tart, and cake pans), buttered or lined with (buttered) parchment paper (square) or foil (round) (make sure there is butter). Press the crumbly mixture into the pan, score into strips or wedges, then refrigerate for half an hour. Preheat your oven to 300 degrees and bake the shortbread for about an hour. Shortbread is not meant to brown and should not be overcooked: if it's brown on top it's probably burned on the bottom. In touchy ovens it sometimes take 1 hour 10 minutes but anything over should be considered excessive.
Cool the shortbread in pan on wire rack before slicing or extracting via your liner of choice.
1 note
·
View note
Photo

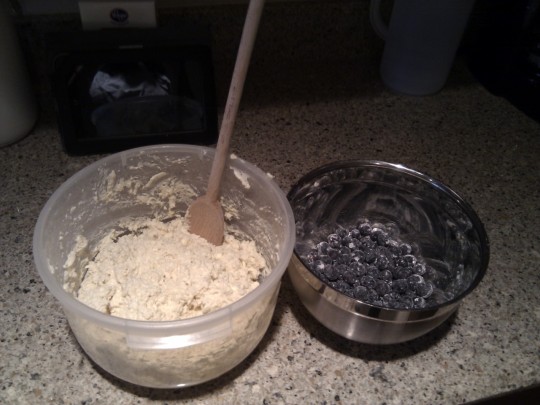
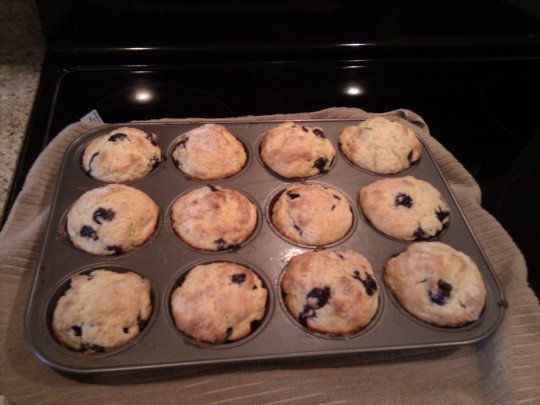
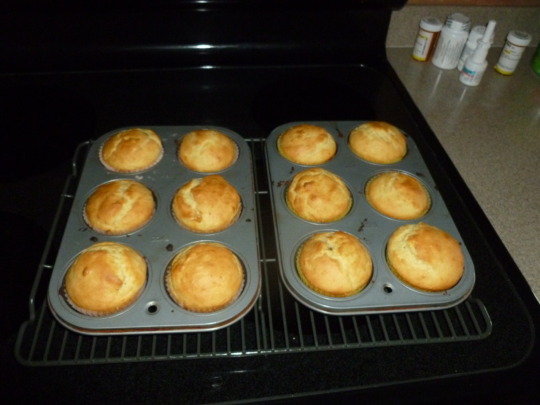
Lemon Blueberry Muffins
We have a lemon tree. Everyone has a lemon tree here. This is the time of year that people start giving you bags of citrus, because no one with a lemon tree has that much need for lemons! Especially not in January, perhaps the least lemony month of the year. But damned if I'll let my dad keep cooking the lemons. Have you ever smelled an entire lemon roasting for over an hour? D: worst Christmas ever. Anyway, this recipe incorporates blueberries, a fruit my boyfriend enjoys far more than lemons, and far less in season but still obtainable. You can use frozen if necessary
Ingredients:
2 1/4 cups flour + 3 tablespoons for blueberries
1/4 cup sugar
1 1/2 Tbsp baking powder
1 1/2 tsp salt
2 large eggs lightly beaten
3/4 cup sour cream
1/2 cup (1 stick) unsalted butter, softened + 1 tbsp melted
1/3 cup + 3 Tbsp of milk
3 Tbsp lemon juice
1 1/2 Tbsp Lemon zest
1 1/2 cups fresh blueberries
3 tsp sugar (optional for sprinkling)
Preheat oven to 400 degrees Fahrenheit. Lightly coat a 12 cup muffin tin with nonstick vegetable cooking spray. In a large bowl, combine 2 1/4 cups flour, sugar, baking powder, and salt and set aside. In a medium bowl, whisk together eggs, sour cream, butter, milk, lemon juice, and zest. Stir the egg mixture into the flour mixture with a fork, until just combined (do not overmix). In a small bowl combine the 3 tablespoons of flour and the blueberries, tossing to coat, then gently fold into batter.
Spoon 1/3 cup of batter into prepared muffin tins. Sprinkle sugar evenly over each muffin top if desired. Bake the muffins 30-35 minutes, or until tops are golden. Cool 5 minutes on a wire rack before removing to cool completely.
Happy 2012!
5 notes
·
View notes
Text
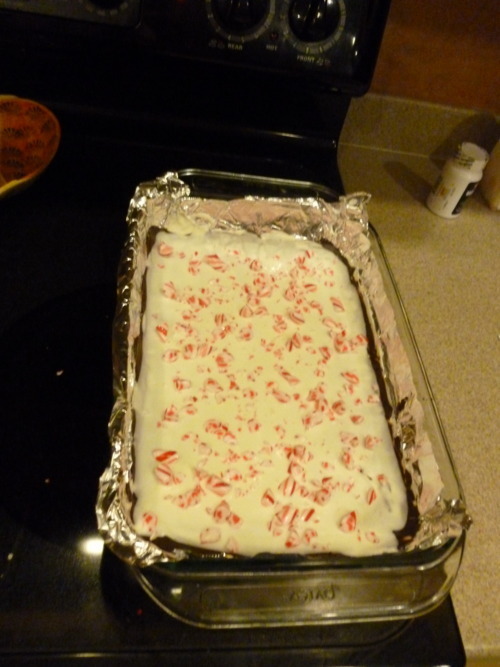
Peppermint Bark: more of a guide than a recipe
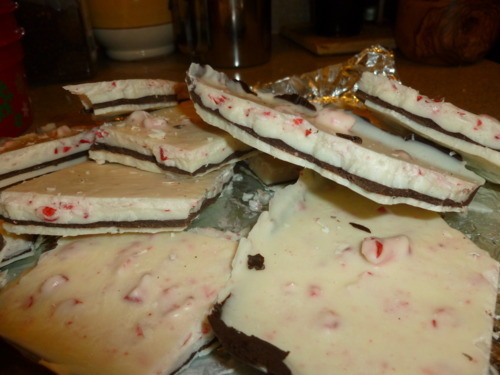
Ok, so Peppermint Bark is basically white chocolate melted down, poured out in a flat square pan, with crushed bits of peppermint candies sprinkled on top before it hardens. Often you see layered bark, with regular (milk or dark) chocolate on the bottom, though the mints are always on top in the white chocolate layers. This stuff is like $24 a box at Williams Sonoma and it's pretty ridiculous if you ask me! You can make this at home and impress people/wtfever.
This 'recipe' is pretty off the cuff, but I recommend you start with:
1 bag (2 cups) white chocolate chips
1 bag (2 cups) chocolate chips, milk, semi sweet, or dark depending on preference
some oil
1/3 cup (at least) of crushed peppermint candies
a smaller pan than I used (9' x 9' would work), lined with foil.
I made a 3 layered bark, white/dark chocolate/white, fyi.
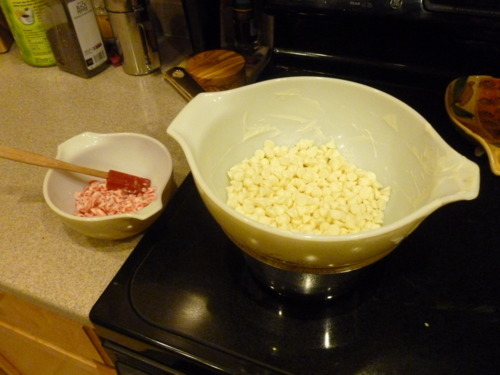
Put about an inch of water in a small pan and bring it almost to a boil on medium-low setting. You must not boil this water or let it touch the chocolate, at all. THAT WOULD BE TERRIBLE. Once the water is hot, reduce heat to low and put a heatproof bowl over it, one that is larger and won't let any steam in. Fill the bowl with 1 cup (or half your bag) of your white chocolate chips.
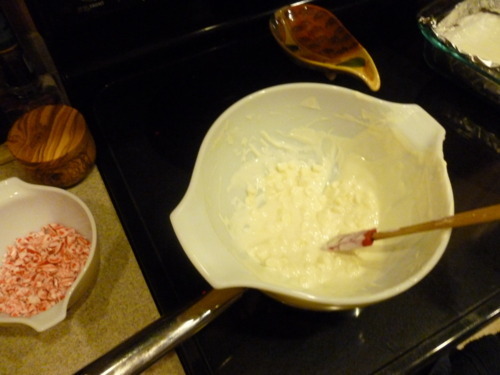
Add about 1 tablespoon of vegetable oil to the chips and begin to stir as they heat up. make sure to watch the heat, once the chips have started to melt I generally turn the stove off completely.
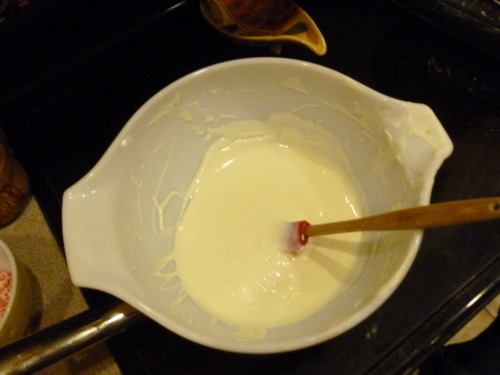
Once the chocolate is smooth, pour it into the foil lined pan.
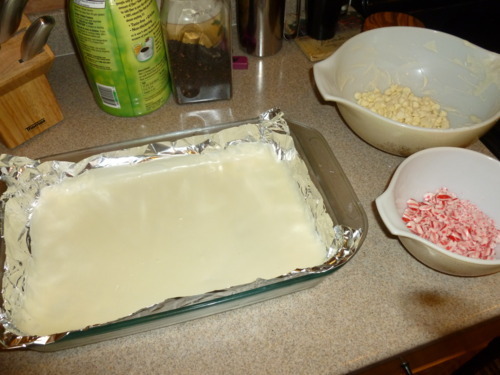
Look how stupidly big I made it! don't do that, btw! It makes things more difficult. Anyway, shake dat pan! shake and tap the pan to make the chocolate coat it evenly, to ensure a clean, distinct layer. Now comes the boring part. Put the pan in the fridge for about 20 minutes, until the layer has set and hardened. This step is pretty important if you want things to work.
Anyway, after the chocolate has hardened, start repeating the steps with the milk (or dark) chocolate.
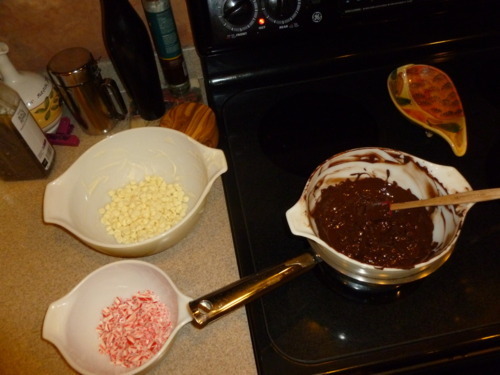
Use 1 cup or so of your chosen chocolate chips, and 1 tablespoon of vegetable oil. I over did it a bit, since this was the only layer of dark chocolate, I used about 1.5 cups. Melt throughly, like the white chips, watching the temperature. Now comes the harder part.
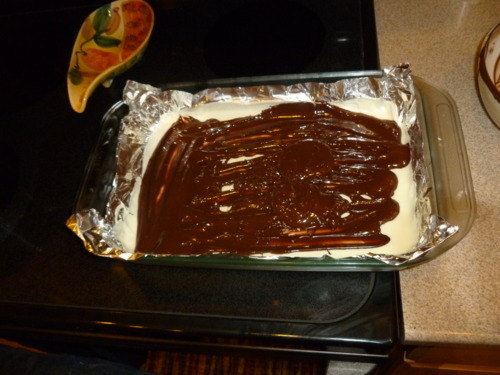
Take the pan out of the fridge and pour the chocolate over the white chocolate layer. Make sure to wipe the bottom of your melting bowl so no water gets on any of the chocolate (steam will have condensed there). Have I mentioned lately how important it is that no water or steam get in the chocolate? Oh I just did. Anyway, pour the chocolate, and attempt to tap/shake the layer flat.
If you are an idiot like me and used a pan that was too big, you may be forced to help this process along
(just tilt it around some more after you spread it to get more even coverage)
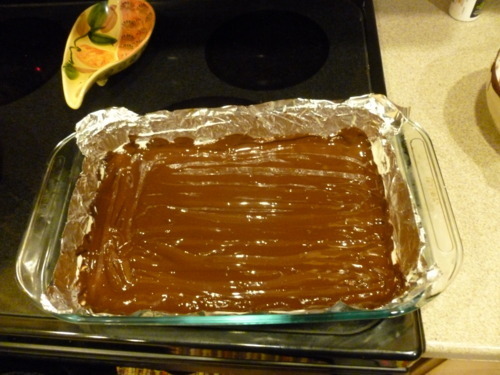
Anyway, put that shit in the fridge again. Wait another 20 minutes. Consider smashing candy canes in a heavy duty ziploc bag if you haven't yet.
IT IS TIME TO REPEAT THE FIRST STEPS.
1 cup or the rest of your white chocolate, 1 tablespoon of oil, heatproof bowl, not quite boiling water etc. Have I mentioned you could be adding pure peppermint or mint extract to the chocolate? It's not necessary but I did it on my base white chocolate layer and a bit on my top layer. Since pure mint extracts are mostly alcohol, they don't cause the chocolate to seize up like water would. I wouldn't use more than a 1/4 teaspoon.

Another layer! This one went more smoothly for me, probably cause I got the chocolate hotter. Tap, shake, tilt, etc. Now we finally get to the fun part.
BAMF! Peppermint that shit. Then WALK AWAY! Put that shit in the fridge, wait at least 30 minutes (I'd probably wait an hour just in case!) and you are done.
If you like having things easy.
for COMPLETION'S SAKE I'll show you how I finished my bark. I let the layer with the candy chunks cool. This is how most store bought bark is, with the bits just sitting on top, prone to falling off in the box or before you eat it. WELL WE CAN'T SETTLE FOR THAT CAN WE!??! I also had the misfortune of getting the wrong candy canes, so they were insanely hard to crush, yielding larger chunks as well as powdered remnants. I reserved the smallest bits, and melted another bowl of white chocolate and oil.
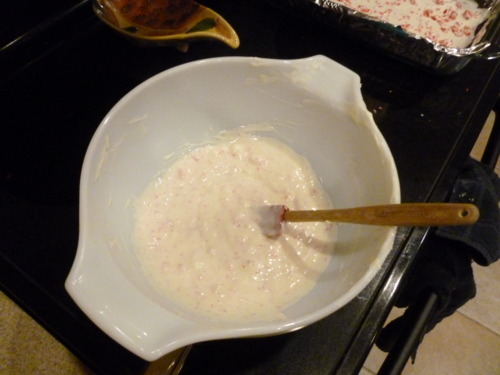
Mixing the candy with the chocolate itself is something other recipes suggest, often the ones that are only white chocolate, so you could actually do this for your final layer instead of sprinkling. I wasn't sure how nice that would look, afraid too much candy in the chocolate would make it harder to spread out, so I instead I only added the smallest crushed bits and the fine powder, and melted it all down, stirring often.

Obviously it will be chunkier than the other batches of chocolate, but try to make sure it's hot and viscous.
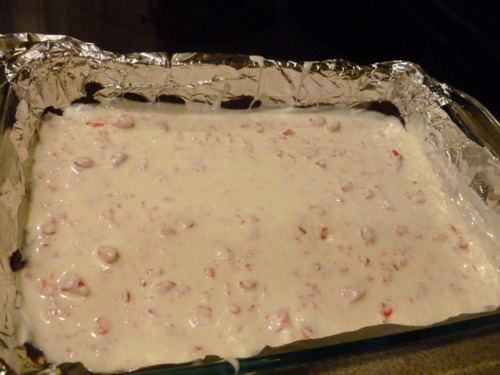
I carefully poured the pepperminty-white-chocolate over the hardened previous white chocolate layer, and tilted it around until it evened out. It worked out pretty well, thank goodness, and hopefully will help keep the candy in the bark. Then I put it in the fridge to harden.
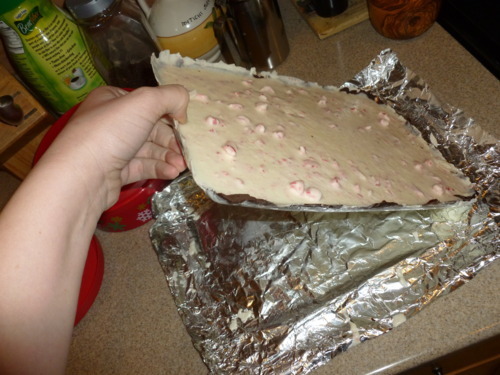
After at least half an hour take the bark out by lifting the foil out of the pan. Peel away the foil. GIANT CANDY BAR :OOO
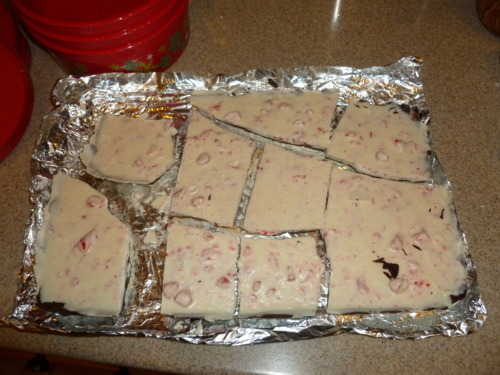
Break it into pieces (like peanut brittle) and package it up to give to people, or just eat it. I'd store this in an airtight container if I were you! Probably in the fridge! you may notice mine is sorta ugly but it's also way too big hahaha.
#recipe#peppermint bark#peppermint bark recipe#homemade peppermint bark#handmade peppermint bark#handmade#gifts#presents
21 notes
·
View notes
Note
A good recipe for a Rum cake or something featuring Carrot other than just an ordinary Carrot cake would be cool!
oh man, a hard request because i honestly hate carrots (hence my tendency towards other orange root veggies) but I will certainly keep it in mind... I do have some rum cake and rum balls recipes I'll try to find :>
0 notes
Text
what sort of recipes would you like to see?
ask box is open and always should be
I've tended to only post baking sorry
I sorta want to show the peppermint bark making but I feel a video would be better
0 notes
Photo
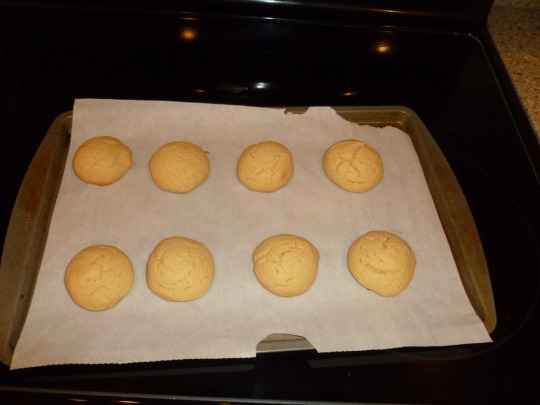
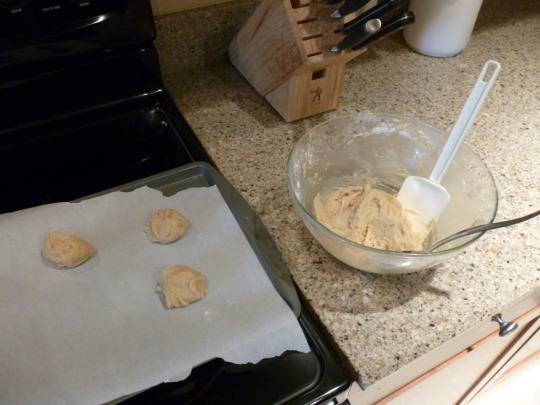
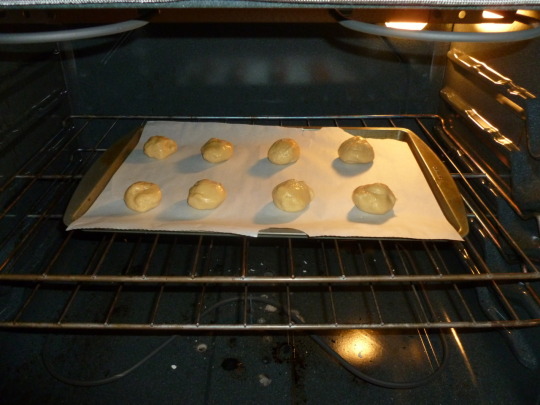
No-Chocolate Chip Cookies
My friend requested "Chocolate Chip Cookies but without the chocolate chips," basically a mixed-sugar cookie. I made it in small batch form, but here's the full recipe I adapted, typed and posted quickly so forgive me.
Ingredients:
2 1/2 cups flour
1 tsp baking soda
1 teaspoon salt
1 cup unsalted butter, room temperature
1/2 cup white sugar
3/4 cup brown sugar
1 tsp pure vanilla extract
2 large eggs
Preheat oven to 350 degrees. Sift together dry ingredients (flour, baking soda, salt) in a medium bowl and set aside. Cream butter and sugars with an electric mixer on medium speed, until light and fluffy. Beat in vanilla and eggs. scrape sides of bowl, and gradually add the dry ingredients until a smooth batter forms.
Scoop out spoonfuls of batter (optional: roll into balls) on cookie sheet lined with parchment paper (I guess you could use non stick spray) and bake 9-13 minutes until cookies are lightly brown. As always, allow cookies to cool for 2-5 minutes on the pan before moving to wire rack to cool completely. Cookies tended to puff UP not OUT, so forming them into balls first worked well.
24 notes
·
View notes