#Found this new bookbinding tutorial
Text
Man sometimes I wish ao3 had some DMs
Not all the time but today absolutely
((oh my god I rambled sm in the tags I reached the 30 limit oh my GOD JFBSJCBJD
#Found this new bookbinding tutorial#one that FINALLY explains the logistics of printing the text idk why I couldnt find one before#and while my old method was extremely simple and fun the minute you have smthn a lil bigger it's hard to open#like At Hope's End is MASSIVE for the simpler technique#and even though I knew how to play with my pages enough to make it all functional it#*it's hard to open and feels like it might break or you see the prong and idk#it's a great trophy but the functionality is meh#but yeah found an understandable tutorial on the sewing thing and I'd like to make one like this at least for At Hope's End#bc it would benefit most I think#AND SO THE POINT I WANTED TO DO WAS:#The tutorial gave the brilliant idea of putting art in some pages and stuff#and like listen I got 1 single fanart through the entire journey of Light on the Horizon#by dragonswirl on DA and insta (go look at their art btw it's pretty)#and BOY.#I LOVE IT#it was the reason I smiled all week#I showed it to anyone that had heard I write fanfic/like sonic#heck it's my phone's home screen#I go look at it sometimes randomly bc AGH IT LOOKS SOSOSO GOOD#I'll do just 1 copy of it as trophy but like a functional readable one#but I'd love to put that fanart in it#like at the beginning where in published books theres some random stuff#just put it there all like LOOK AT IT even if it'll end up being @ myself#idk I'd like to ask them if they're okay with it#and if so like actually have them know how much I love that one art and want to put it in there#IDC IF IT'S BEFORE EVEN CHAPTER ONE IT'S AMAZING AND IT MAKES ME HAPPY OK /positive /lighthearted#so yea they dont seem to have tumblr so there isn't really a mean to ask sadly#rambling#light on the horizon#at hope’s end
0 notes
Text
Binderary 2024: Week 1
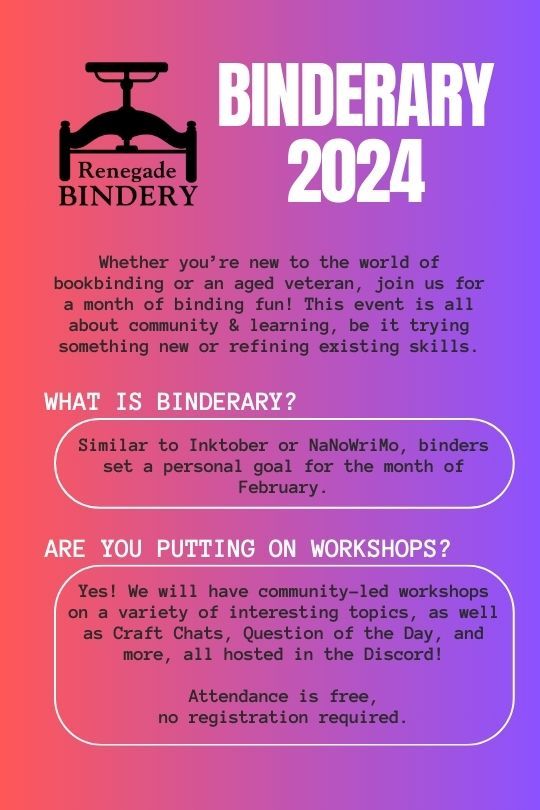
In the Renegade Bindery Discord Server, we are once again running Binderary during the month of February. Attendance is free, and a link to the 18+ Discord Server can be found on our carrd.
Whether you’re new to the world of bookbinding or an aged veteran, join us for a month of binding fun! This event is all about community & learning, be it trying something new or refining existing skills.

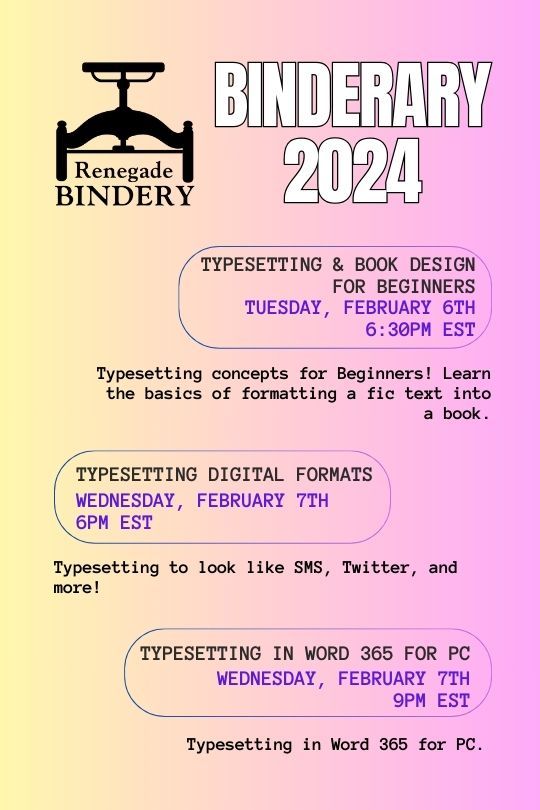

All our workshops are run by members of our fanbinding community, and some of them are even on Tumblr!
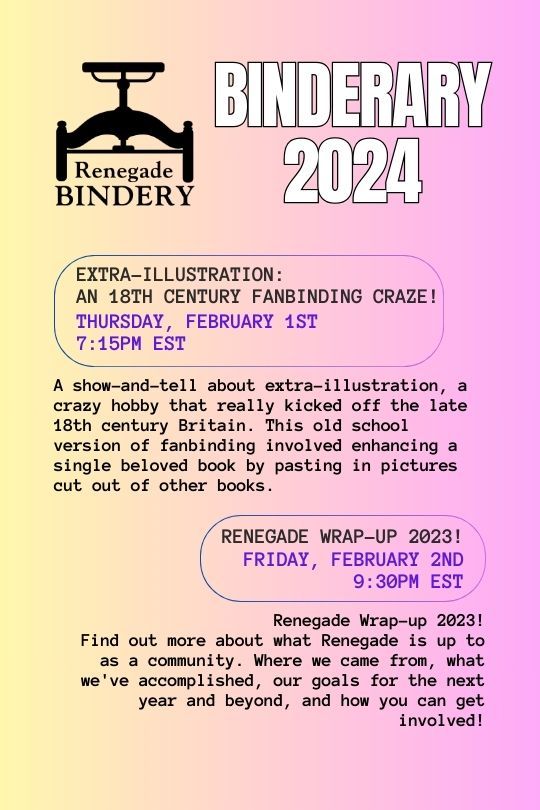
Here's the list of who's running the week 1 workshops:
Renegade Wrap-up 2023!: @robins-egg-bindery, @fanboundbooks, @celestial-sphere-press
Split Board Bindings!: @misanthropiczombie
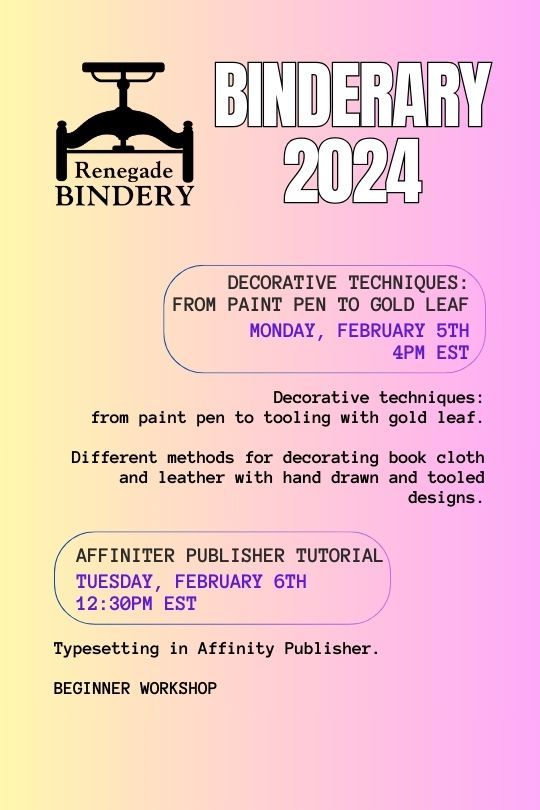
Decorative techniques: from paint pen to gold leaf.: @blackoakbindery
Affinity publisher tutorial (Beginner Workshop): @kate2kat
Typesetting & Book Design for Beginners: @bearclubbooks
Typesetting Digital Formats: @sayornispress
Typesetting in Word 365 for PC: @no-name-publishing
528 notes
·
View notes
Text
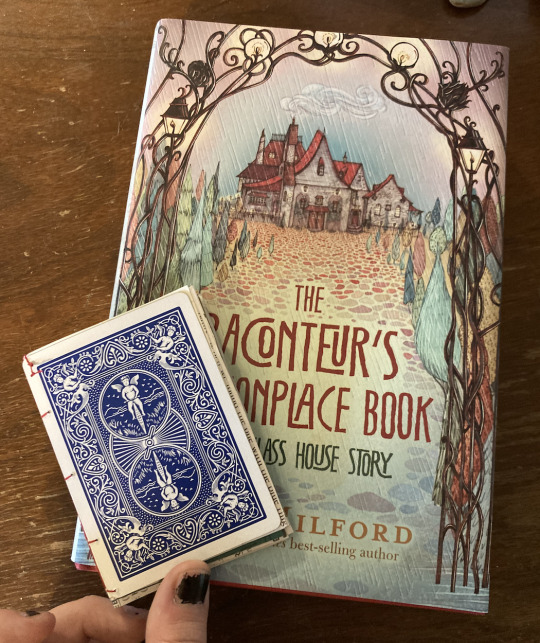
adventures in bookbinding: making the negret colophon playing card book!

it's diy girl summer and i am Bored. time to attempt a completely new craft with zero research except for like. 3 youtube videos!
so, to start off, i suppose i will ramble a wee bit about my plans/goals/reasoning. truth be told, i just really really like my blorbo who book binds and i think it would be very fun to become Just like him for real. therefore we will be embarking on a journey!! to become my blorbo and also find something crafty to do today. quick psa that this is not a real tutorial because i have absolutely zero experience, but more of a general guide and/or craft with me! let's do this in sectionssss!!
1 - the plan!!
so for my first bookbinding project we are going to do something small, starting out by being silly and taking a page (lol) out of negret colophon's book (lol....) when he makes a tiny book and uses two playing cards as the covers. this will give me a little tiny trial run so i can learn the basic skills and use easily available materials around my house!! afterwards i think i'll sketch out a more ambitious journal idea - i have lots of fabric lying around that would work perfectly to cover a cardboard cover. wow, that's wordy! so! without further ado let's begin :) negret's little bookbinding project is described in the first chapter of raconteurs in this little excerpt here.
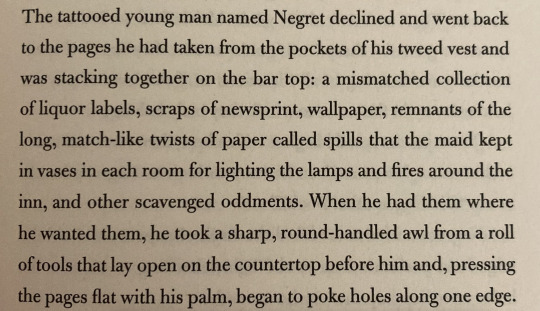
seems simple enough!! also the absolute perfect beginner project. it is tiny and the materials consist of Literally Anything. let's get groovy!!
2. materials!!

here's what we're working with:
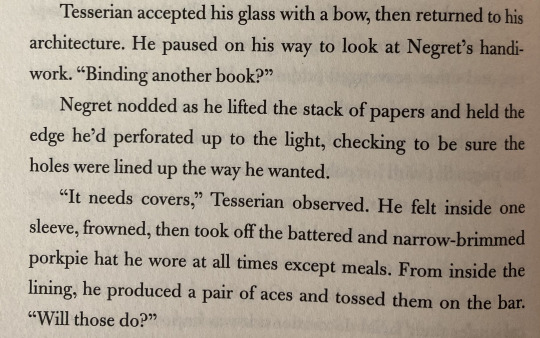
playing cards! i found a deck lying around in a random drawer somewhere and chances are you have one laying around too. i chose the ace of spades and diamonds, because the text specifies a pair of aces but i couldn't find a matching pair, lol. i was also very tempted to choose one of the king cards as an homage to maisie's story later on (and because the king cards are absolutely gorgeous and detailed) but we're sticking to canon right now. we'll use the other cards for a future project.
needles!! a lot of the tutorials i see use very big or thick needles but i don't have those and this is also a very small project, not a huge journal, so any can work.
thread!! use whatever color you would like! at this point i was very indecisive because i have a lot of options and they're all quite pretty colors, but i settled on red later.
an assortment of papers!! use literally whatever you have lying around. for me, i managed to dig up the one scrap of newspaper in my house, since that's specifically listed, but most of my pages were from a book i sacrificed for an old art project, magazines and flyers, a lot of which were college mail because we're at that point in my life, lol. this is a recycling sort of project. choose anything! the more variety the better :)
i didn't display these in the photo, but if you have an awl, use an awl! i do not have one so i improvised, which i'll elaborate upon later. also, scissors! to cut the pages to scale. a ruler also came in handy :)
alright, now that we have all our tools in order, it's time to get into it :)
3. creating the pages!!
our first step is to measure our playing cards! you might not have to do this step because i'm fairly certain most cards are uniform in size/make, but check just in case, lol.


my cards measured to be 2.5" wide and 3.5" tall. i am no mathematician but using my singular brain cell i deduced that the papers should be twice the width of our cover, since those will fold to be the same size. so, using my Expert calculations, i made a little template cut from an index card measuring 3.5" x 5".

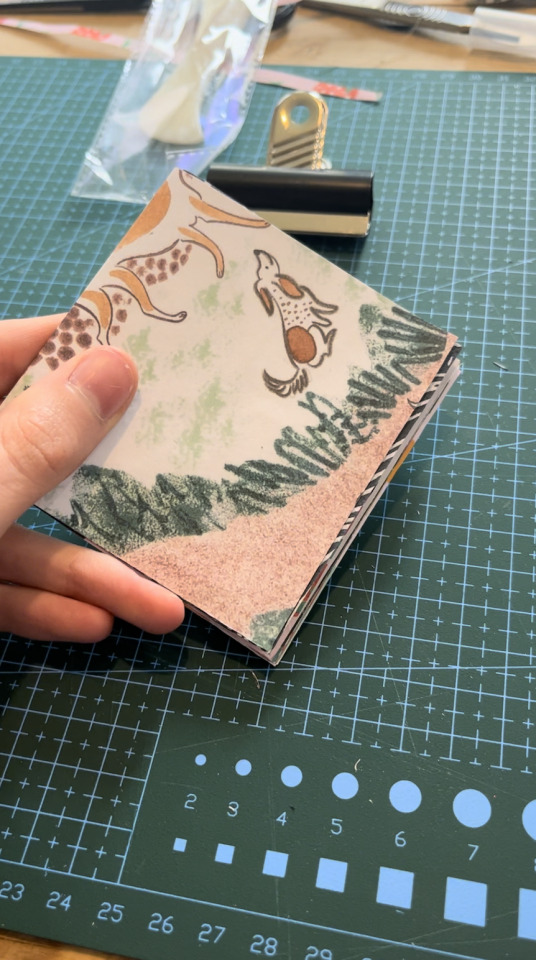
now we get to cutting!! using your various materials, cut out a bunch of papers to the size of your template. i just cut around it because i could not be bothered enough to waste time tracing, lol. i didn't go in with a plan, but i cut 16 papers to this size, which ended up being perfect. here are all my pages !! look at all the colors and textures!! the fun thing about the project being so small is that you can specifically cut the pages as the most interesting photos or sections, or you can even do it at angles too. as long as it ends up the right size, anything is fair game

now, we're going to make the papers into signatures! i just learned this word today lol. essentially, we will be grouping our papers and then folding those in half to become little mini books/pages. since i had 16 papers, i made 4 signatures with 4 pages each.
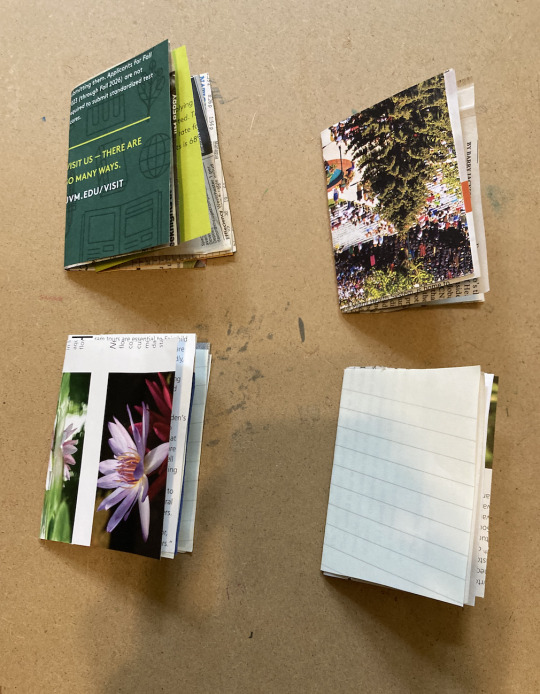
at this point i was tempted to go cut up more and make a fifth signature, but i decided against it since i didn't want the book to become too thick, and 4 sets with 4 papers each ended up being just about right. one of the tutorials i watched suggested that you group your signatures with paperclips or bobby pins, and at the time i waved off the suggestion but i totally agree now. i didn't have any clips to work with and i managed fine without them, but it definitely would have been easier if i had. so if you have them, use them! it'll make your life better lol. at this point you can stack your signatures together and itll look like a book!
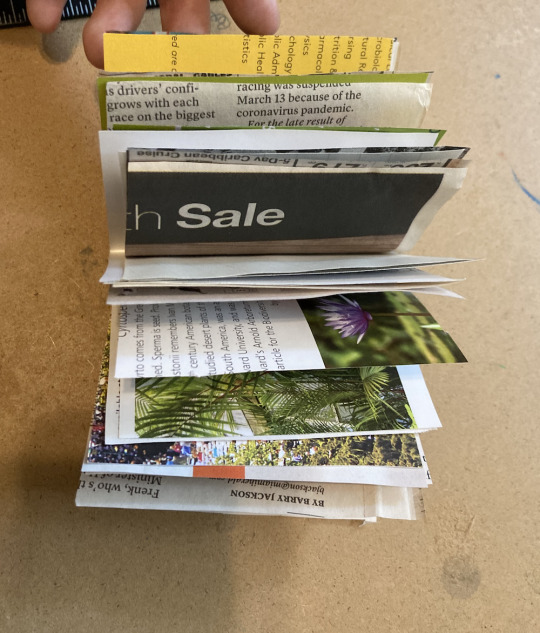
oh yeah now we're cooking!!
4. preparing for binding!!
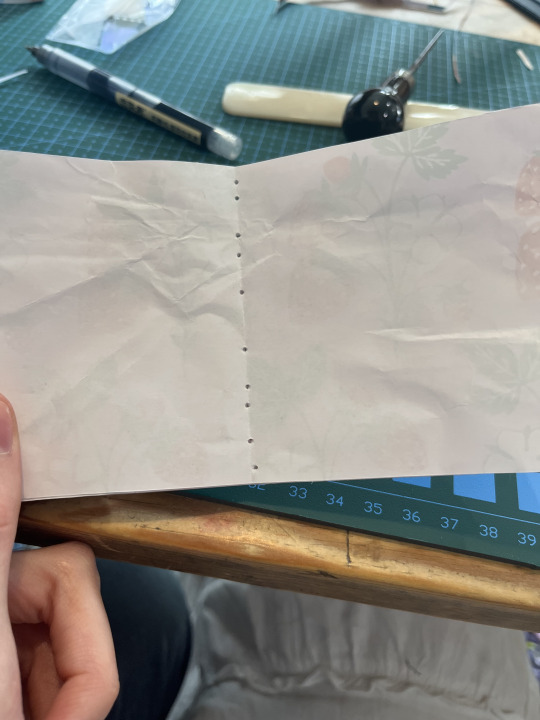
it was at this point in the process where i ventured out from knowing what i was doing to completely balling, but everything turned out okay and i'll walk you through it! our next step is to create the holes with which we will sew our signatures together. we're going to mark those off. once again i have zero clue how to do math but i managed to use my giant incredible smooth brain one more time to mark my template with a few equidistant points with which we can mark our signatures.
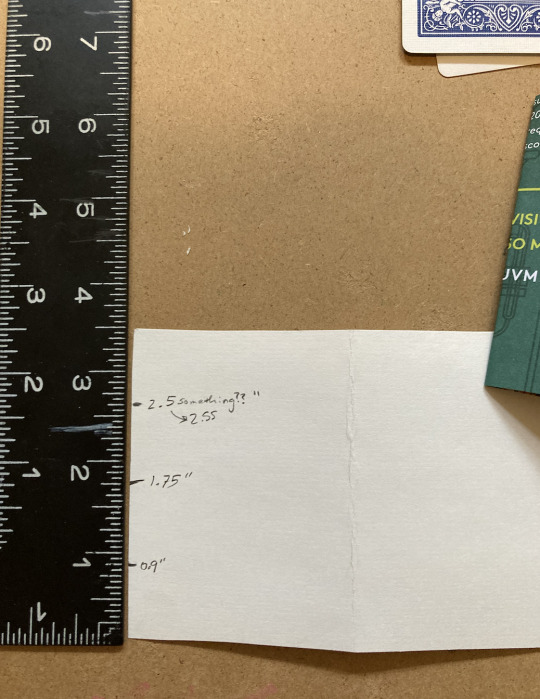
in case it's not clear, i kind of just counted the lines and then had to look up how much that was, but you can also just eyeball it if you're good enough. side note, i added two more holes after this, with one just below the very top and one just below the very bottom.

pardon my very unsightly nails, lol - here's how i used my template to mark the very center of each of my signature. you'll want to mark the point on the center line where you folded it while keeping the pages of each signature together. HOPEFULLY WITH A PAPERCLIP. and without further ado it's time for the stabbing!
now...here's where i got a little bit sacrilegious. you'll recall that earlier i mentioned how i don't have an awl in my possession yet? well, i managed to improvise a solution...

yes that is a sewing pin. IN MY DEFENSE it's all i had, and functionally it's basically the same as an awl! just on a much smaller scale. it worked out though - i imagine that if i'd been using thicker paper it would have posed a bit of a problem but for this project specifically, it was fine. do not kill me book binders. now it's time to get serious...
5. the binding
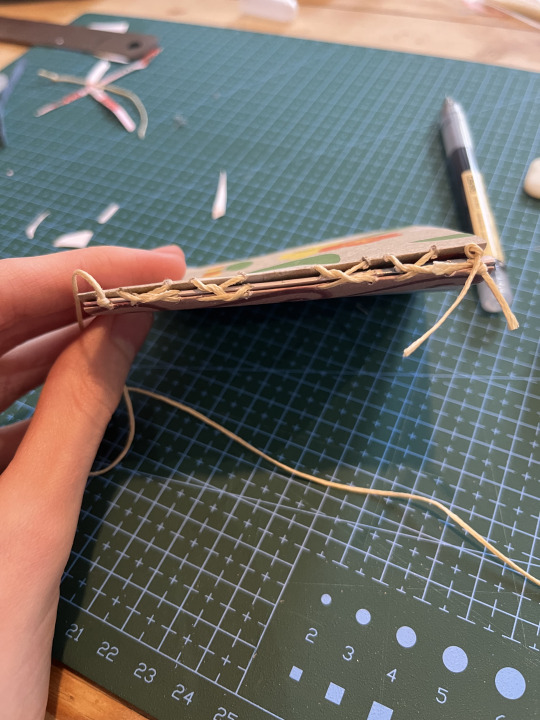
everyone stay calm! stay calm! it will be okay. i was lowkey intimidated by this part as this was Truly out of my depth of expertise, but i promise it's not that complicated. you're going to get your needle and thread now - i settled upon this gorgeous red color because it contrasted nicely with the playing cards, and there really wasn't much red in the papers i chose.
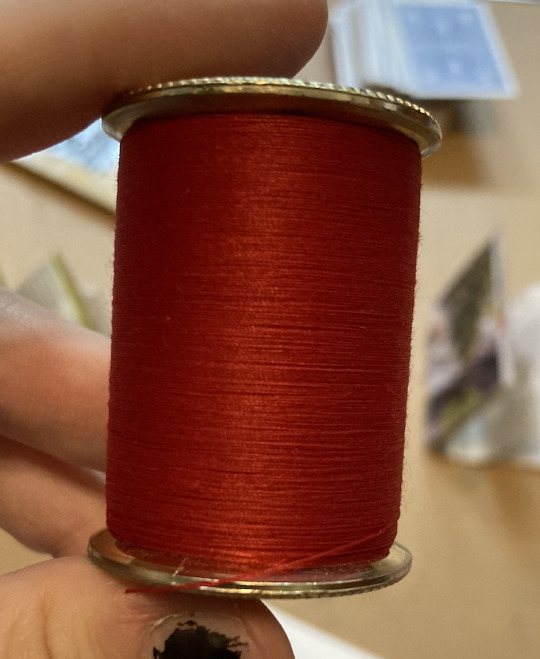
gorgeous!! tbh i always knew i'd go with the red because i've always envisioned the book with red thread anyways. like come on look at my very first drawing of negret WITH it. literally the exact same materials. i simply had to.
okay. now to the binding part. i don't have any real photos or insights or instructions for this whole stage because 1. i was deep in focus mode and 2. entirely relied on a tutorial for this part. here's the tutorial i used - massive shoutout to this lovely lady ! my spine didn't turn out nearly as neat as hers because i did not properly follow directions for the first bunch of knots (and i had to kind of improvise with the cover) but here's how it turned out!
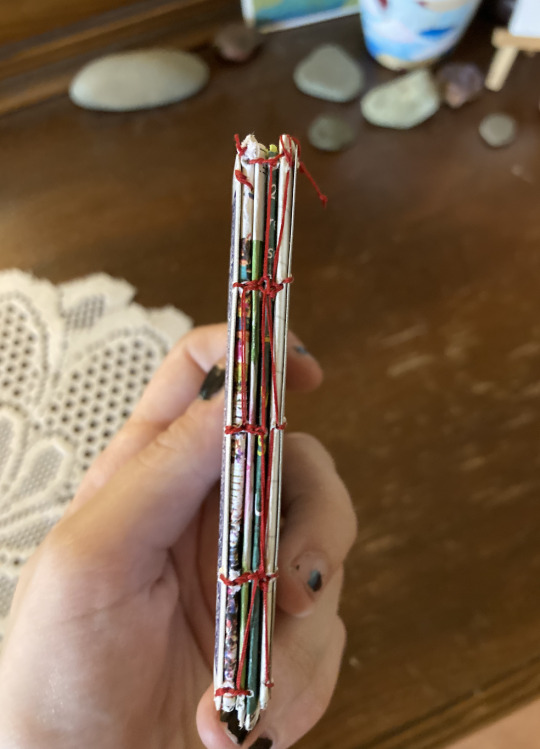
not too bad for my first book, lol. try not to stress out about it being perfect because this book is not supposed to be perfect! the imperfections give it character. worst case scenario, if you really mess up, your eclectic book is just a little more eclectic than intended. and that's never a crime :)
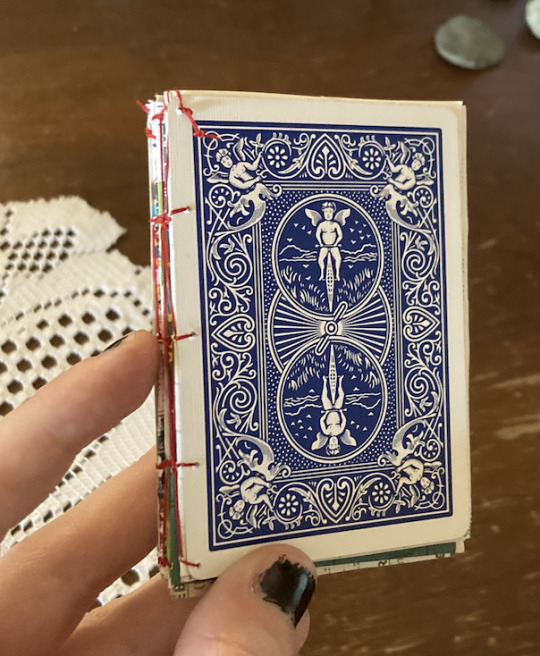
now the one problem i had to figure out on my own was how to attach the covers, since most tutorials explain how to attach actual big separate covers and not - essentially paper. i ended up just... attaching them as if they were another page or signature to the front and back. my holes on the covers were a few millimeters away from the edge, though, since there's no crease or fold to align them with. what i did was essentially do the first knots/stitching on the signature like the tutorial said, but for each hole i sewed through in the first/last signature, i also made an additional loop through the adjacent hole on the cover. you can kind of see how i passed my needle through like instructed and then took a little extra detour to stitch the card as well. in some places i ended up making new holes in the signature too that were closer to where the cards' holes lined up?? try not to do that but it worked and it looks fine so really whatever makes it attach and hold is perfect.
6. bask in your glory!!!
aaaand that's it!! you did it!! this was a ton of fun to work on and i absolutely loved making this little adventure into a new craft with something so near and dear to my heart. if you make one please be sure to tag me!! i would love love LOVE to see :) here's an additional picture of my little monster (+ next to the legend himself. art credit to me lol. look the books are twinning!!)

#the raconteurs commonplace book#raconteurs commonplace book#green glass house#nagspeake#roaming world#uhhhh#bookbinding#book binding#genuinely i dont know if those are separate words or not. either way LDJKGLHSDJG#crafts#crafting#arts and crafts#yippee this was actually so much fun#to quote alex of vfdiscord fame “the self blorbofication of quill”#it's too late i'm in too deep i'm literally him now#quill crafts
51 notes
·
View notes
Text
so I'm digging into my first real bookbinding project and this is exciting... I tried starting before, but this time I'm 4 chapters into the typesetting, and I'm learning a new program to do it! I already pay for Adobe's subscription (derogatory) because I use Premiere for videos, so I might as well learn to use InDesign since it's great for this!
So far I've been able to follow a really great tutorial + fiddle around with a few things from there, and I'm excited to keep going!
Other notable achievement: found the perfect drop cap font for the fish book!!


I'm binding a personal copy of The Disabled Tyrant's Pet Palm Fish (with the okay from the translator!) but I'm having to harvest the text from the website myself so it's anyone's guess what the finished word/page count will be... it will definitely be more than one volume but idk how many at this point. The novel has 156 chapters altogether.
#bookbinding#is this a good first project? well I'll have a lot of practice by the time I'm done!#my post
27 notes
·
View notes
Note
hi! i'm interested in getting into fic-binding, but not sure where to start. any suggestions? (your binds are so GORGEOUS)
Sea Lemon on youtube is a great place to start! She's the go to tutorial for a lot of first time bookbinders. DAS Bookbinding videos are also excellent for smaller details and getting into the history and styles of binding. Ladybobbitt on tiktok has some great videos too, and an entire document tutorial for typesetting! There's tons of resources out there and it can be a little daunting at first but I've found the bookbinding community is very happy to welcome any new curious souls. Lastly, @renegadeguild is an entire community of binders that are more than happy to answer questions and offer help! Best of luck as you start your binding journey!
3 notes
·
View notes
Text
Today I tried my hand at bookbinding! It was the first time I did anything like this but I had some tools and things laying around from leather work and some other crafts that I’ve tried or still do (leather work is fun and I still do that one for example but knitting and crocheting is something that I’ve dropped but I might pick those back up sometime in the future).
I followed a YouTube tutorial that I saw someone post on Tumblr a bit ago because I honestly had no idea how to start and it made it very easy to just start!
I started off with folding the paper I wanted to use. I’d picked some standard printing paper and some thick black aquarel paper and folded them all in half. When I folded them all I stacked them into signatures of 4 and put in the holes I’d use to sew it all together.

After I put in all the holes I started sewing together all the signatures according to the instructions in the video. It was not as hard as I thought it would be, I for some reason expected it to be a lot harder than it actually was, but it still took some time to sew all 8 signatures together.

When that was done I had to press the signatures together and glue the back together. Because I didn’t have a book press I had to improvise and grabbed two heavy books, this worked but barely.

Because it only barely worked I tried to make a makeshift book press with some stuff that was laying around the house, some scrap wood and some glue clamps, which worked a lot better!

After the glue had dried I put in a ribbon and put on an end and start page for some extra strength and put it back in the makeshift press.
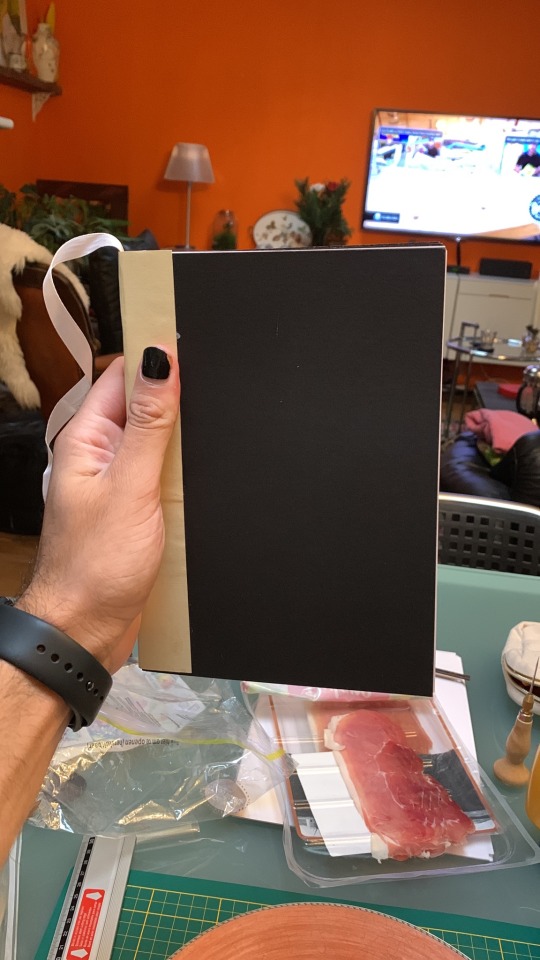

After some more drying I put on some backing paper and discovered that the paper was all a bit not too great looking. The tutorial I was watching advised to cut off a bit of the side to make it flat. I found it to be not flat enough after I cut it so I also went at it with some sandpaper to get it a bit flatter.

After all this I now have a fun new notebook to write and draw stuff in and a new skill I can use to make gifts for my friends that I’m going to use a lot! (I love giving my friends handmade gifts, even more so if it’s a handmade photo book with fun foto’s of them!)
14 notes
·
View notes
Text
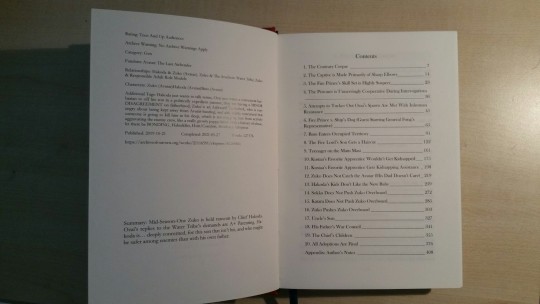
Typesetting a Book Pt.1
Masterlist // Part One // Part Two // Part Three
One of the most confusing aspects of bookbinding for beginners is the process of typesetting the text that is in the book. Typesetting refers to how the text is arranged and styled in a document, ranging from what font, font size, title, and images you've used, to the size of the margins, the alignment of the text, and what order the content is in.
This can definitely seem scary at first, but it's actually quite simple! To make this easier, we're going to split this tutorial into multiple parts, this one focusing on preparing the document for text. This tutorial uses Microsoft Word, so not all of it may apply to you if you're using a different word processer.
First, we need to set up the layout of the document, so click on the layout bar. Then you need to click on Margins, and then Custom Margins (Make sure you click the 2nd Custom Margins, the one without the icon). Once you click this, a tab called Page Setup will pop up. This is where you set your margin sizes, and the image below shows the margins I like to use.
Top Margin=2.2cm Bottom Margin=2.2cm Inside Margin=1.9cm Outside Margin=1.9cm Gutter Margin=0.0cm
Make sure that the page orientation is set to Landscape and BookFold, as this affects the end result

Once you've exited the Custom Margins tab, you can move back to the Home bar of the document, and here we can move on to font.
Most importantly you need to make sure you have selected the paragraph symbol key, as this will show you exactly where page breaks are etc. This will make formatting your text much easier in the long run.
Next you need to set a font style - this is much handier than constantly setting a new font and size each time you switch between a heading and the body of the text. If you select a pre-set style and then right-click, a list of options will appear:

Click on the Modify Option and it will bring up the Modify Style Tab:

Here you can set the font to whatever you like - personally I use Bookman Old Style in size 11. Typically I use the Justified paragraph style - both sides of the paragraph are even - but this isn't mandatory, only a personal preference. I also typically use single spaced lines, but once again this is a personal preference.
Next if you click the format button on the Modify Style tab, it will provide a list of options. Click on the second option, Paragraph, and here you can set the paragraph alignment - I use Justified as I mentioned above- set the Indentation you want - I use 'First Line hanging' by 0.7cm under the Special option as this leaves you with the first line of every new paragraph indented rather than needing to leave a blank space between each paragraph. Because of this indent you can click on the option to not add space between new paragraphs and you can still tell when a new paragraph starts.

You can set up multiple fonts this way for your headings, for italics, additions you want to make etc. and it will make editing the text much much easier. You can also set each font to bright colours to make it more engaging, and easier to tell the difference in the fonts, Just remember to change them back to black when you're finished!
While some of this is important to do exactly the same as I have shown, a lot of it is my own personal preference, that I have found works best for me and the work I do. This is just to give you a basic idea of what you need to do to prepare the document for the text, and get you started, so feel free to change things up and explore!
Pt. 2 should focus on what to include in your document, the order of pages etc.
~Admin Argent
4 notes
·
View notes
Text
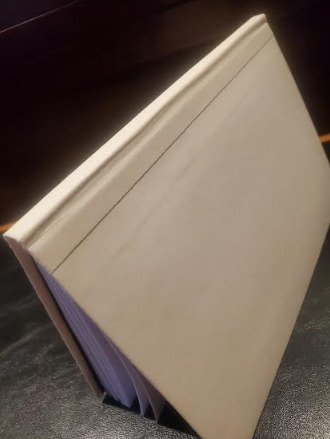
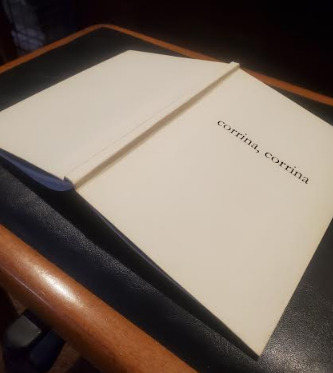
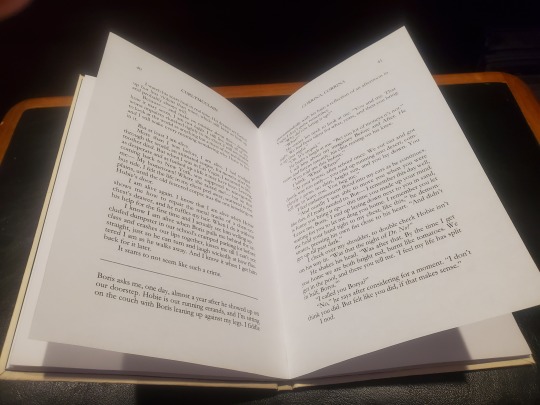
bookbinding journal (part 1)
link to main post
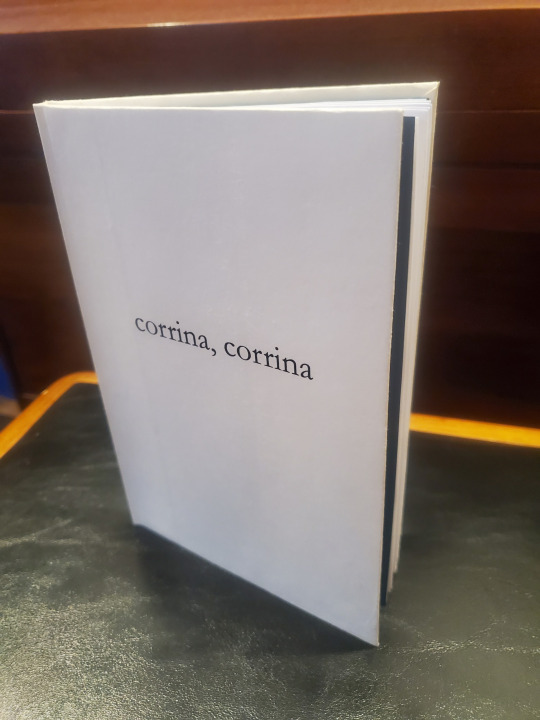
First attempt at bookbinding: “corrina, corrina“ on AO3 by curlymcclain! Thanks a lot for giving me permission to make this and for writing this wonderful fic :))
This is just a record of what I did during the process for future reference and those interested (long post ahead)
Text Formatting
Followed this tutorial by @/ArmoredSuperHeavy: (so helpful; wouldn’t have done anything without it): https://docs.google.com/document/d/11JyVxeRS8yEWgCYrNMUPlNrEbR5AAD3Z2aDP-QXEP3Y/
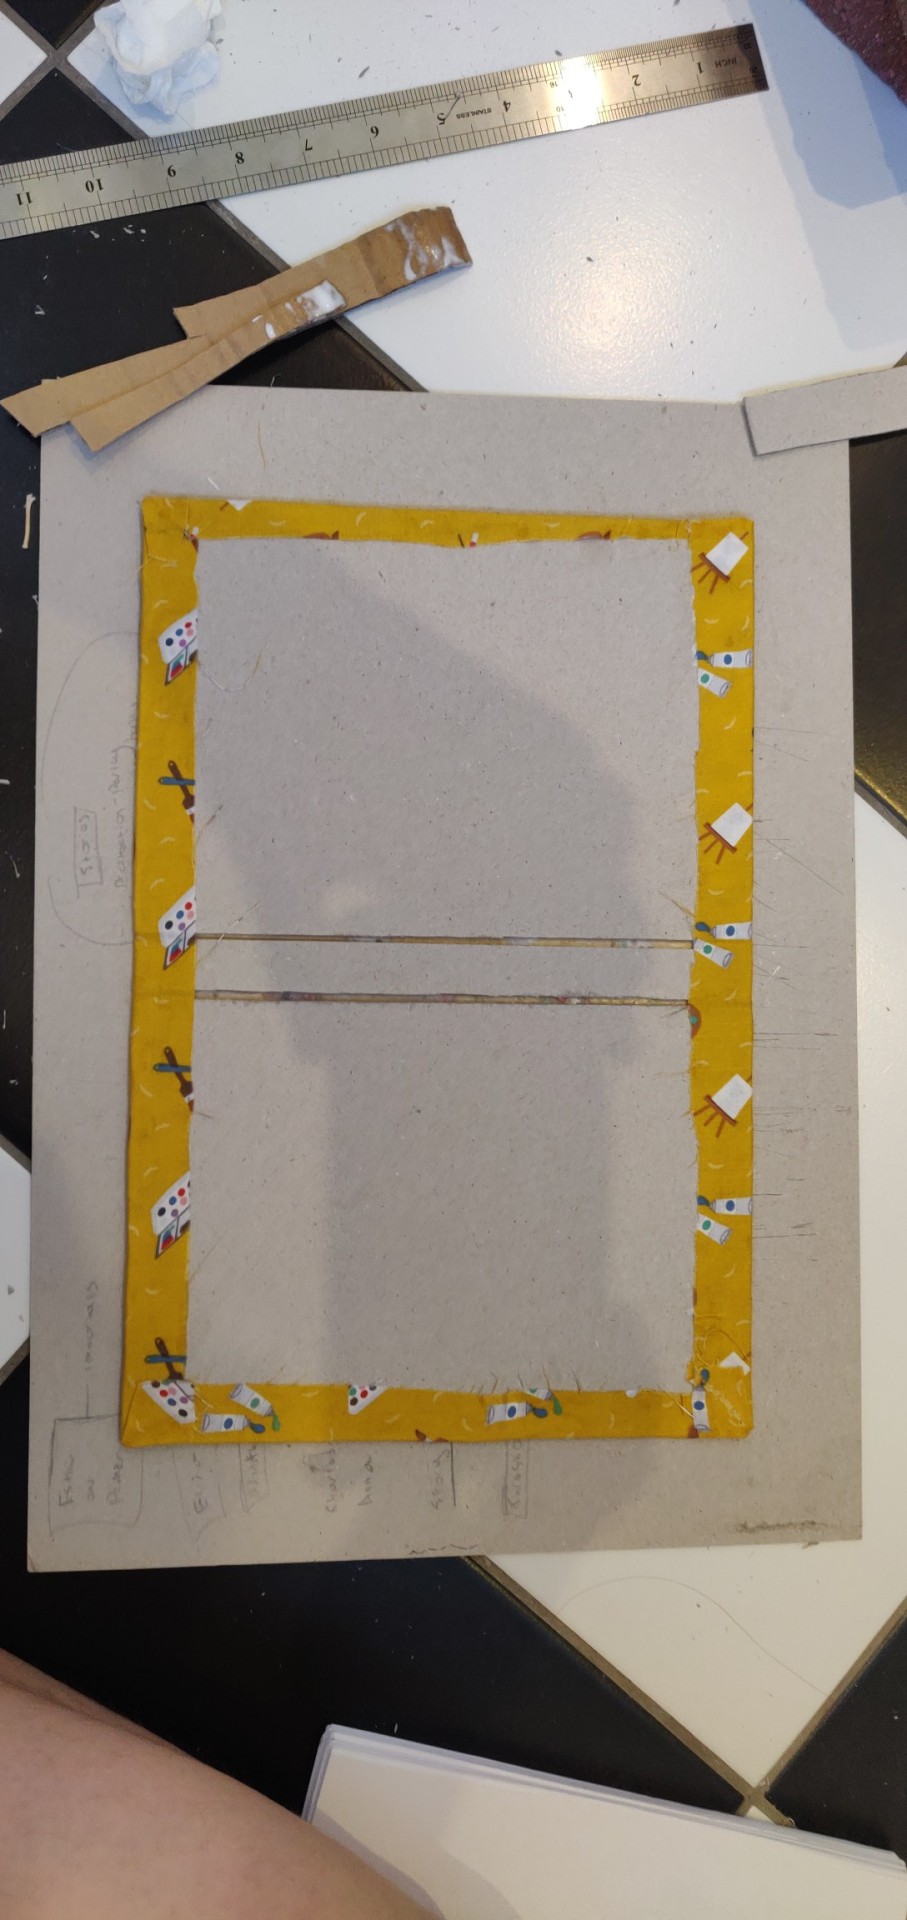
I decided to use 7.75” x 11” paper folded in half, cutting ⅜’’ off the top and bottom edges of normal letter-sized paper. Pretty worth it b/c I needed to trim the edges after binding anyway.
Used Garamond size 11.5 font. Ended up with 84 pages total; I couldn’t reasonably fit it in 72, 80, or 96. Signatures were 20-20-20-24.
Apparently, I spent 595 minutes total editing the original Word document… It was really fun though! (seriously, the first several hours on the word doc, i was the most excited i had been in a while)
Note to future self: be careful with Word’s automatic table of contents and check for accidental new lines at the beginning of pages.
Printing
Turns out, my home printer prints faint text and smears a little.
So, I tested the school printers (yes, I test-printed fanfiction in the school library). The front and back of sheets didn’t line up (shows badly in the header). Fail.
Ended up using our 6-year old discarded black-and-white printer that we dumped at an office, which worked perfectly!
Used 92 brightness 20 lb paper (default). Never realized that printer paper was so see-through, but it’s good for books (yay!).
I was concerned about the paper grain facing the “wrong way”, but didn’t have anything else. I heard that it should be alright since the paper is relatively thin?
Hole Punching
Created a guide with thicker paper, laid on top. Push-pin to poke the holes. Binder clips to keep everything together. Propped the folded pages on an open sketchbook. Worked great, but poked holes into the inside spine of the sketchbook. Whoops.
Holes seemed to move a bit between signatures, not sure why. Mostly gets covered up during stitching though.
I later found out that you can punch holes with the paper face-down on top of corrugated cardboard. Will most definitely be doing this next time.
Text Block Stitching
Used the kettle/link method by Sea Lemon: https://www.youtube.com/watch?v=9O4kFTOEh6k
Used doubled-up thin white thread and waxed it with a candle.
Bound a bit loose for the first few signatures, but the last one was good. Knots and ends were a bit sloppy (kept sticking into the book). Accidentally hooked up the bottom line of stitches on the outside spine.
Note from the future: this had literally zero impact
Glueing the Spine
Elmer’s Glue + Binder Clips + parchment paper + hardcover book cover & clipboard. No mull.
Glue seeped in a tad bit between signatures, so those pages seemed a bit more “stuck together”.
This is when I realized that this had to be hardcover due to the way I bound it (falls open too easily for paperback).
Endpages
Luckily, I acquired some dark blue paper from the unused-paper-pile in an office. All of the other colors were light and didn’t go well with the planned beige cover, so light-dark contrast here we go.
Interestingly, I think this paper had the grain in both directions, kind of like the texture of canvas cloth up close.
Then, I put more glue on the spine and laid a piece of paper over it.
Trimming Edges
This step got delayed a week due to my inability to acquire a craft knife.
This was definitely the hardest part, since I've never used a paper-cutting knife before (other than 6th grade technology class), let alone on a stack of 46 pages.
Some edges were a bit uneven, but nothing majorly bad happened (that's a win).
I went back later to fix the worse parts and used a nail file on some weird areas. One is probably not supposed to nail-file paper, but it worked…
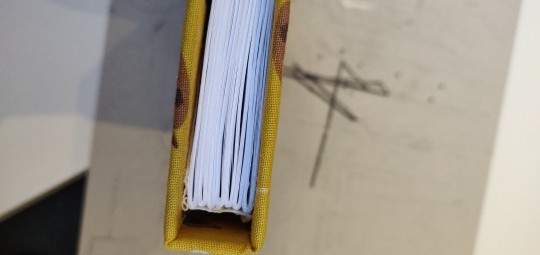
The trimmed block of text:
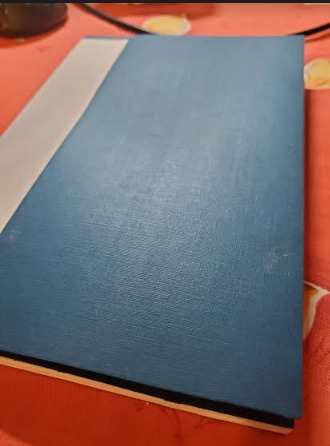
Making the Cover
Used this tutorial from Sea Lemon: https://www.youtube.com/watch?v=Av_rU-yOPd4
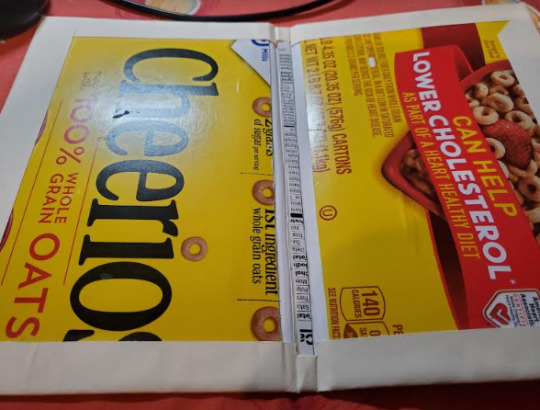
I used cardboard from a cereal box because all the other cardboard around was corrugated. And beige cardstock as the "bookcloth" (also taken from the aforementioned office).
Cutting out the cardboard took way longer than it should have, because I kept cutting away from the ruler. Doubled up the cardboard on the spine, which I forgot to include in later calculations, so the cover ended up ~1.5 mm short on width. I glued the covers and spine on a piece of printer paper first in order to have them spaced apart correctly
The beige cardstock was only letter-size, so I had to glue two pieces together with a 7-8 mm overlap. Required some math to figure out where to put the cover title.
Then, I just glued the pieces of cardboard onto the beige paper and folded it up. I was originally worried, since beige cardstock is very different than bookcloth, but it honestly turned out as well as it could have.
The book cover (not sponsored):
(the white paper around the spine is the printer paper)
Final Glueing
This step was pretty simple, though I forgot the fact that glue is wet, and some moisture seeped into the first/last few pages and made them a bit wavy (this all happened in ten minutes). To remedy this, I put tissues between a bunch of pages and pressed it overnight, which actually worked; the pages are no longer wavy. Downside is that the cover got warped inwards a bit (concave up).
The next day, I used a hairdryer, which I probably could’ve done before. Then pressed it without anything inside for a few hours and it flattened out. The pages aren’t completely flat, but otherwise, it pretty much looks like a book :D
I also got a lot of guidance on several steps from rerurumo’s bookbinding videos, so thanks to them: https://www.youtube.com/watch?v=9XCvTZRVbgg
More photos:
the unintended seam on the front cover:

the back cover seam:
the thing that my elementary teacher said not to do to books:
some pages:
noo the book isn’t perfectly flat D:

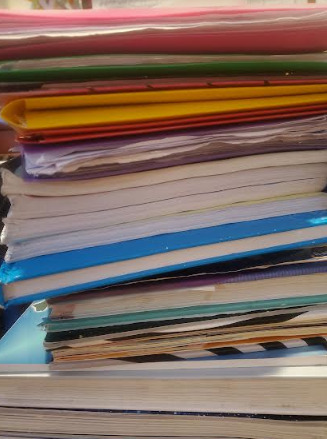
the stack of books used to press down:
alr that’s all for now o_O
18 notes
·
View notes
Text
I posted 8,699 times in 2022
That's 3,331 more posts than 2021!
71 posts created (1%)
8,628 posts reblogged (99%)
Blogs I reblogged the most:
@beatrice-otter
@cwnerd12
@fullmetalcarer
@turtletotem
@akasanata
I tagged 4,233 of my posts in 2022
#roswell new mexico - 255 posts
#malex - 137 posts
#star trek - 123 posts
#the old guard - 116 posts
#usa politics - 115 posts
#dracula daily - 107 posts
#cherik - 101 posts
#alex manes - 85 posts
#michael guerin - 82 posts
#bookbinding - 82 posts
Longest Tag: 138 characters
#and then four dozen people reply all to tell the people who are telling people not to use reply all that they shouldn't be using reply all
I sent 8 gifts in 2022
My Top Posts in 2022:
#5
Goncharov is *proof* that tumblr is unmarketable. If anyone tries to commercialize fandom, we'll invent stuff to fangirl over. No royalties for you!
110 notes - Posted November 20, 2022
#4
SPOILER WARNING FOR HEARTSTOPPER.
I hope you've watched this already, but just in case you haven't, and don't want to know why this is the most heartwarming queer love story ever, stop reading now.
Nick never puts his own angst above his concern for Charlie's feelings. That's it, that's my favorite part of the whole show. At the beginning of the show, Nick is the rugby captain and believes he's straight. Charlie is Nick's bisexual awakening, and we can see Nick struggling with coming to terms with that. He has bi panic and is afraid to come out and it takes him some time to deal with stuff.
And yet he never once mistreats Charlie and then expects Charlie to "understand" Nick's motives and agree that Nick's angst is more important than Charlie's feelings.
I love this show. The trope where Blorbo 1 completely betrays Blorbo 2, and then Blorbo 2 forgives them because Blorbo 1 had a really good reason (and somehow thinks Blorbo 1 is worthy of trust because Blorbo 1 will never have a really good reason every again??) drives me up the wall. So the fact that Heartstopper doesn't have this?? Beauty. Love. Joy. Trust. Happy sigh.

144 notes - Posted May 1, 2022
#3
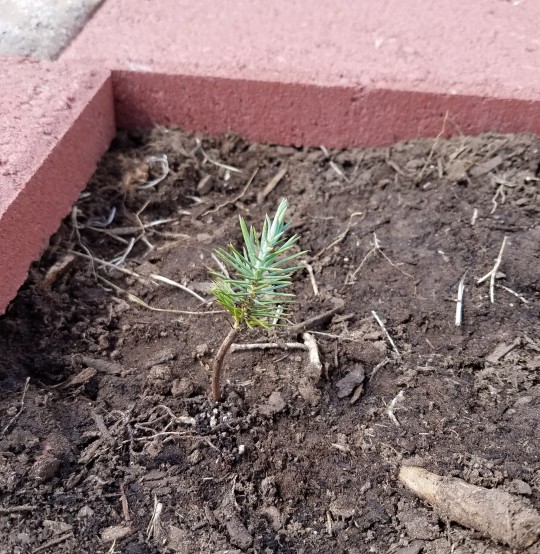
I just planted this new baby pinyon pine tree. It's the most adorable thing ever and I am very excited for it to grow up.
383 notes - Posted May 28, 2022
#2
Simplified Bookbinding Tutorials
Usually in bookbinding, you format the text into signatures, print them, fold them, sew the signatures together before casing them into a book. Sewn signatures look like this:

I don't do well sewing signatures, so I found a way to publish books that doesn't involve sewing. In the Simplified Bookbinding method, you print the text front and back on loose sheets of paper and then glue the loose sheets together. A glued text block looks like this:
See the full post
1,710 notes - Posted October 7, 2022
My #1 post of 2022
Okay, USA followers, you know how we all hate bank fees? I mean, you overdraw your account by $1.23 and you get charged $25.00? That's evil.
As of Jan 26, 2022, the Biden Administration CFPB (Consumer Financial Protection Bureau) is bringing the hammer down on junk fees. This is more than just bank fees - this is going after the junk fees on things like prepaid cards, loans, bank transfers, credit card late fees, even closing costs on a mortgage.
The CFPB needs public comments, like the opinions of real people who are affected by these fees, to build a case about telling financial organizations that THEY CAN'T CHARGE THEM ANYMORE.
The CFPB says it’s particularly interested in hearing from older and lower-income consumers, students, service members and people of color.
There's some good detail about the comments in this investopedia article. The easiest way to comment is to send an email to [email protected]. Include Docket No. CFPB-2022-0003 in the subject line of the message.
Note that these are public comments. They will be published online through the CFPB website. Don't include account numbers, social security numbers, or full names. Tell a story - tell about the time you overdrew your account by $1.23 and the bank took $35. Tell about how you signed up for a credit card and the company charged you a bunch of fees you didn't even know about. Tell about how you transferred money from your savings account to a checking account and the bank charged you $2.50.
These junk fees are a slap in the face of ordinary people who can't refuse to pay, and the CFBP is taking aim at the banks that charge them. To read what CFPB director Rohit Chopra had to say about this call to action, click here.
You have until March 31, 2022 to submit comments.
41,779 notes - Posted February 5, 2022
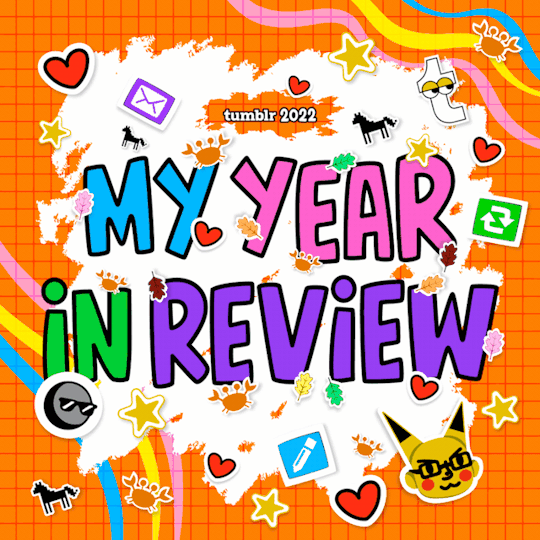
Get your Tumblr 2022 Year in Review →
2 notes
·
View notes
Note
Hi, as someone who has also dabbled in bookbinding as a hobby, I'd be super interested in any insights you have in typesetting in MS Word. You mentioned that you don't usually talk about it on here, so if you have a different blog a post along those lines would fit better, I'd appreciate being pointed in its direction
Hi! By on here I actually meant on tumblr, or online as a general thing. I talk my family's ears off about it irl but the post I made yesterday is the first time I've ever really talked about making books online.
I am far from an expert on this. I made my first book a little over a year and a half ago and have since made a grand total of five books, working on #6 right now, and a lot of what I've learned about typesetting I picked up from r/bookbinding over on reddit (I don't have an account there, I just read other people's posts). I wanted to link the tutorial I used but I can't find it in my bookmarks so I think my browser ate it.
I'm not sure how much you already know and I've never written a tutorial before, so some of this may be too detailed, but here's the parts I think are important:
-Book fold is the setting you need to make signatures. In the version of Word that I have it's under Layout, the first box that says Margins Orientation Size etc. Click the little box in the corner of that section and you'll get a popup where you can set custom margins. Set the orientation to landscape and the Pages dropdown to Book Fold. You'll need to set Sheets per Booklet (right under that dropdown) before you print because the default is "all", but I like to do this at the end when I know how many pages the text is.
-Sheets per booklet is how many actual pieces of paper are in the signature. If you tell it 4, the lowest setting, it will give you signatures of 1 piece of paper. 8 is 2 papers that nest like proper book pages, 12 is 3 papers, etc. No one told me this and my first book of like 50 pages had 12 signatures in it when I was expecting it to have 3 or 4. I got to practice stitching but it was ridiculous.
-Size 12 font is too big for most books, unless you want Large Print. I like size 11. Footnotes and page numbers should be a little smaller so I use size 10 for those.
-If you're going to trim the edges, leave extra space in the top, bottom, and outer margins. If you have page numbers or footnotes in the header or footer, you can adjust how far they are from the top and bottom of the page. Go to add the header and at the bottom of the dropdown for it is an option for "edit header". If you click this it will give you a toolbar at the top of the screen with new options; the last one on the right is "header from top" and "footer from bottom". If you leave it standard Word will put them in the space you intended to trim off, regardless of what you set your margins to.
-The tutorial I used talked about the gutter, which is the space in the middle of the book where it runs into the fold. I have not found that I needed to have a gutter, and setting the inside margins works well enough for that so your words aren't hidden in the seam. I think this comes into play more with longer books, or books that have rounded and backed spines. I haven't rounded or backed anything I've made yet so I can't speak about that.
-You can format tables of contents in Word, there are templates, but I think they look like corporate expense reports so I don't use them. I usually do the front matter (title page, contents, author's notes, etc.) in a separate document so I can add the right number of blank pages and not worry about having page numbers on the title page. For tables of contents I make a numerical list. I like 'em simple.
-If you can, Word allows you to make custom templates for anything you want. Once I had settings I liked I made a template and saved it so I don't have to reset the margins and stuff every time I make a new book. The only caveat here is remembering to hit Save As instead of Save the first time you save your work.
I hope that helps! If you'd like I would love to hear about your own tips working in MS Word, god knows mine are far from exhaustive. Or if there's something you wanted to know that I didn't mention, if I can help I'd be happy to.
#bookbinding#long post#asks#i wanted to put this under a readmore but i only reblog on here and i don't know how#time to learn i guess#snek makes books
3 notes
·
View notes
Text
Intersections.
evaluation
Starting my first term of university helped me to refine and develop my skills as I learnt things I wouldn't have elsewhere such as in the typography workshops and bookbinding. I found these fun to partake in as I aim to use my new found skills moving forward. I have also enjoyed working amongst a smaller group of people within the class to get feedback on my work. It means I can push my work further and get to know people around me who think differently to me, applying their ideas to my own.
I have enjoyed attending talks and workshops which have been offered to me. I feel that the one which has challenged me the most was learning InDesign, Photoshop and Illustrator. This proved challenging for me as there are many small elements which you have to remember in order to create the outcome.
One of the strongest parts of my project was the research behind my work. More specifically the research leading up to the end of my final Intersections project. I researched using primary and secondary sources such as carrying out surveys and reading pages online. I hope to do more research during the next project with the books provided in the library, as I think that research from books is just as important, if not more important. I set myself the goal of teaching myself to use Adobe Dimensions during the Intersections project. I completed the tutorials provided within the app and was very proud of the 3D outcomes I put together as they looked industry standard after being rendered. I would definitely use Adobe Dimensions again moving forward because it was definitely a strength within my work.
I feel that I made good use of my time as I planned it out accordingly with an Adobe Express and Tumblr account to note all my processes alongside my working. It was important to keep it up to date to document changes and the thought process behind my ideas. Throughout the term I was given feedback from both peers and lecturers. I adapted my learning and developed my work depending on what was spoken about during these sessions. Their feedback was an important part in the development of my work.
Moving forward I hope to become more skilled using softwares such as photoshop so that I am less likely to fall behind and get confused. I think this will be achievable if I spend more time outside of sessions watching youtube videos about areas I am unsure of. I also aim to work with new people within the class so that our ideas can bounce off each other.
0 notes
Text
Binderary 2024: Week 2
In the Renegade Bindery Discord Server, we are once again running Binderary during the month of February. Attendance is free, and a link to the 18+ Discord Server can be found on our carrd.
Whether you’re new to the world of bookbinding or an aged veteran, join us for a month of binding fun! This event is all about community & learning, be it trying something new or refining existing skills.


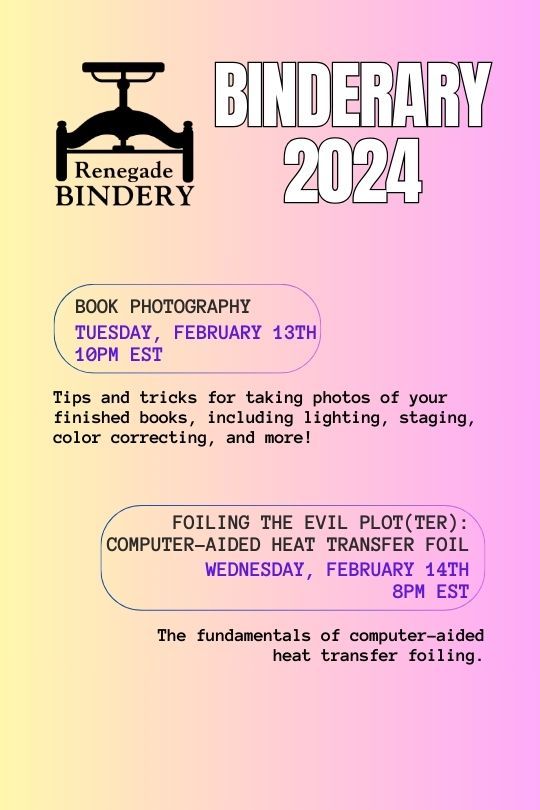

All our workshops are run by members of our fanbinding community, and some of them are even on Tumblr!
Here's the list of who's running the week 2 workshops:
Mini Monologues & Bind Along with six!: @simply-sithel
Double-core French Endband: @no-name-publishing
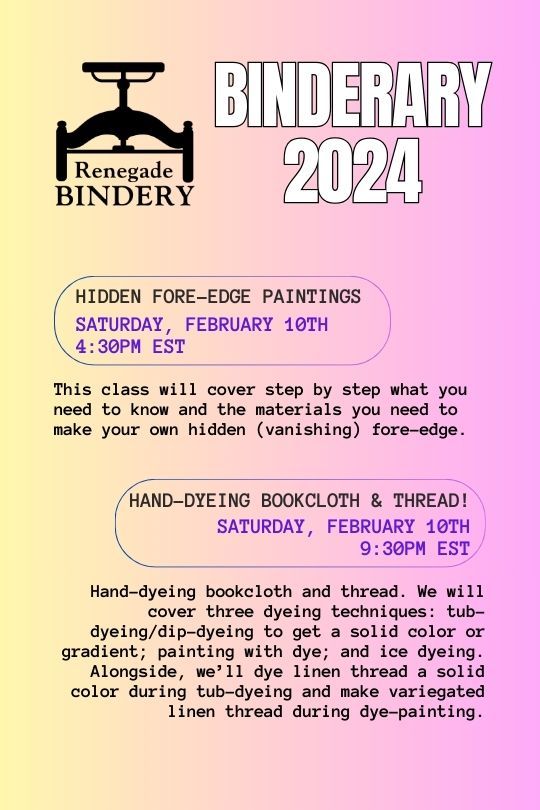
Hidden Fore-Edge Paintings: @duran-binding
Hand-dyeing Bookcloth and thread!: @epitomereally
Who Needs Tools?: @gargoyleandgremlinpress
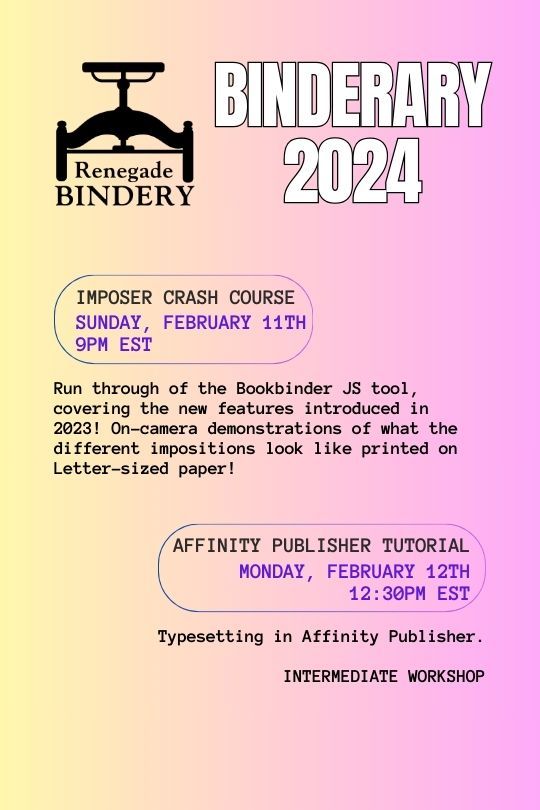
Imposer Crash Course: @simply-sithel
Affinity publisher tutorial (Intermediate): @kate2kat
Book Photography: @robins-egg-bindery
Foiling the Evil Plot(ter) -- Computer-Aided Heat Transfer Foil: @starblightbindery, @mourningmountainsbindery
277 notes
·
View notes
Text
Pre-Post-Print Experimental Publishing - Can Yang
Notes:
Diagram: fruit salad 1982
Book objects book art and literary books
Clive Phillpot
Book track- how book art presents itself
Book on Book
Ulises Carrion founded Other Books
Het Boek - inspired by French poet-made out of foam
The book is performing as a traditional book
“No need to read a sample of the work sufficed to authenticate its existence”
Interesting to think between a book and performance art
Ben Denzer
Book as archive - Fast Forward zine
Queer.archive
Weekly informed is a collection of weekly presentation of 10 example of form that relates to practise and methodology
Guai Li Luan Shen - hidden culture
The difference between diagrams show how art publishing has changed by digital and post digital practises
“The term publication is better because it can encompass digital files, hybrid media and forms we have yet to imagine”
Present Tense Pamphlets
The hazards of witnessing-extract on a digital zine on tumblr
Takachizu website that documents artefacts and objects serving as the collective memory
Onpublishingpage - you can make a book and format your page layout
Suki and Ming- famous Korean designers
Ideology press- a propositional publishing process
Earliest format of digital publication: Kenneth Goldsmith Publishing the Unpublishable serves a publication for alternating content
Paul Soulellis Library of the Printed Web- exists online and in printed web google doc
“Printed web was a fitting venue to perform and celebrate this slippery condition”
Monoskop.org - useful for art and cultural studies (research, articles can be downloaded from here)
“Information wants to be free”
Digital libraries: Aaaaaarg, Public library, UbuWeb -technically pirated and often hard to find elsewhere
Printed Matter Inc- a famous art book fair in America. Founded by art historian and xox Sofia’s artist. Non profit. If you have your own zine, feel free to contact them.
New community with educational programmes that often reach diverse locations. 45,000 works in their archive.
Temporary Service - offer zine and riso printing. Site has PDF versions of books.
Book Binding Workshop:

Due to no previous sessions in bookbinding, I had no idea how to approach this and so I have nothing to show for it. I have learning difficulties which makes it very hard for me to understand measurements, technicalities etc and I need consistent support (someone to sit with me and show me how to do things), which of course, isn't possible in a classroom setting. The same issue has affected me in my process book creation, so I resort to using my finances to pay for its print and binding. I will try this weekend with the help of my boyfriend to make a book.
Update:

Using a Youtube tutorial and my boyfriend's support, I was able to make a mini book using the French stitch bind method!
1 note
·
View note
Text
Bookbinding Fanfiction: A New Adventure Begins
and thus I rise from the dead (with no new fics of my own making though). Anyway, I'm gonna talk a bit about my process binding Salvage by @muffinlance. Thanks @necrotic-bones for (unknowingly) inspiring me to get into this (they were to first to ask to fanbind Salvage and I wanted to do it as well)
Before I begin, here are the guides/tutorials that I used:
- How To Make A Book From An AO3 Page by @armoredsuperheavy
- Bookbinding Resources Master List by members of the Renegade Bindery discord server (found through the previous guide)
- r/bookbinding has a nice beginner’s introduction to bookbinding
- the Case Bound Book series by DAS Bookbinding on youtube is very helpful as well, I specifically used Part 6 Casing In
I also found this amazing program, called Bookbinder (on quantumelephant.co.uk), that takes your pdf and formats it into proper signatures and flips every second page for you etc, so that you can print it at home (if you have the proper printer for it)
this post is probably going to be kind of long, so the entire thing is under the cut, but here’s a preview:

Anyway, I think it's been close to over two weeks since the start of my bookbinding projects, but they’re both done! I first did a kind of test run with a collection of detroit become human fanfics, which taught me four things:
- don't forget to choose natural white paper at the print shop (books never use pure white paper)
- the edges will be irregular and that is ok, do under no circumstances try to level them by hand as you will definitely not succeed in getting smooth edges, just leave the signatures as they are, trust me
- thin endpapers are horrible to smoothly glue down, so take some paper that's a bit thicker and it'll be easier
- finish watching a tutorial before doing the thing, eg. I forgot to put extra paper between the endpapers and the first two and last two pages of the DBH collection got a bit of a wave now, oh well
I might make another post properly detailing my first fanbinding journey with the DBH fics, but second things first: Salvage
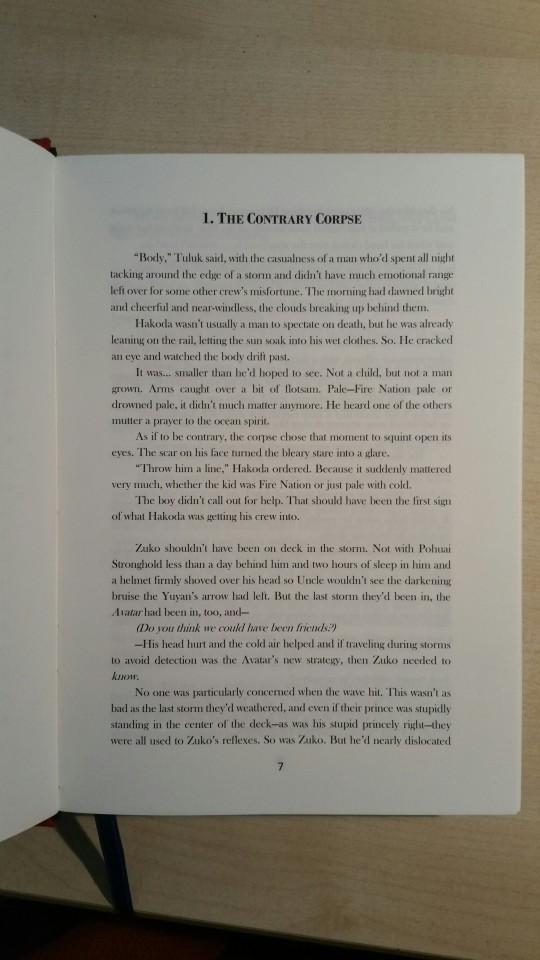
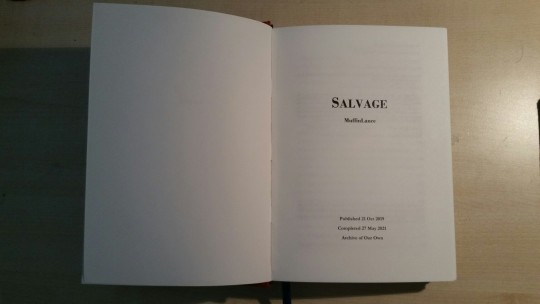
Chapter 1: The Beginning
I did dip my toes into bookbinding a few years back, but did them japanese style with an open spine, so doing a proper case bookbind with a spine and all was new to me, ArmoredSuperHeavy’s guide helped a lot
Chapter 2: Getting Materials
Step 1: Read both guides mentioned above, then go to the city to find what you need, don't really find what you need, order a bunch of shit instead
Step 2: Only partially read through the bookbinding guide and forget to order half the stuff you need, try to make do with what you have (big mistake)
Step 3: Try to make bookcloth yourself with this guide, don’t follow it properly and fail at making it, find out that buying bookcloth is dirt cheap (comparatively)
Step 4: regret buying all that cloth and unnecessarily expensive thin paper for the backing
Step 4: buy cheap bookcloth while sighing through the pain of being inconvenienced by your own stupidity, patiently wait for all of your stuff to arrive
Step 5: harvest and format your choosen works according to @armoredsuperheavy‘s guide, run it through the bookbinder program
Step 6: let a website print your script for you since your printer is barely good enough to print one (1) page if you’re lucky, let alone 64 (DBH) or flippin’ 103 (Salvage), front and back
Step 7: wait some more
Chapter 3: Binding the Book
Now sadly I barely took any pictures (read: none), except for the finished product, so I wont go into too much detail, I’ll mostly talk about my thoughts behind choosing the colors and design with a slight detour into the layout and formatting of the fic
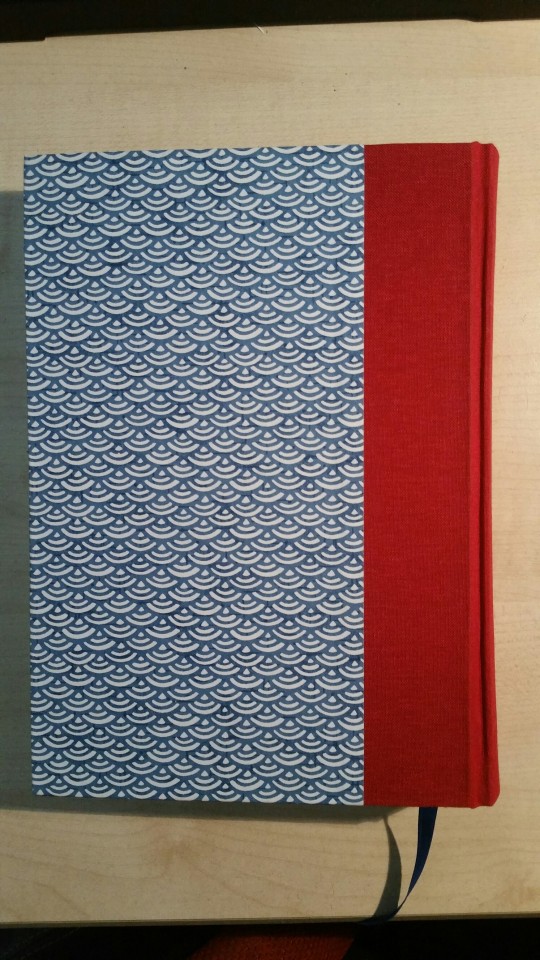
The Design:
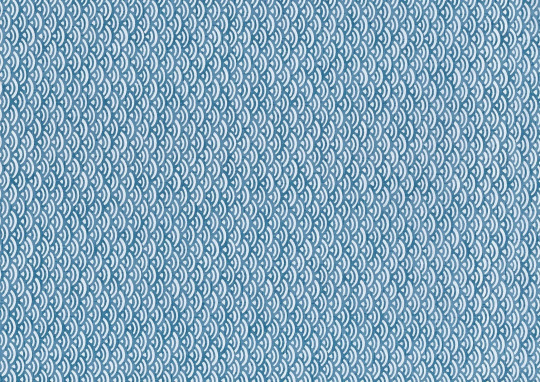
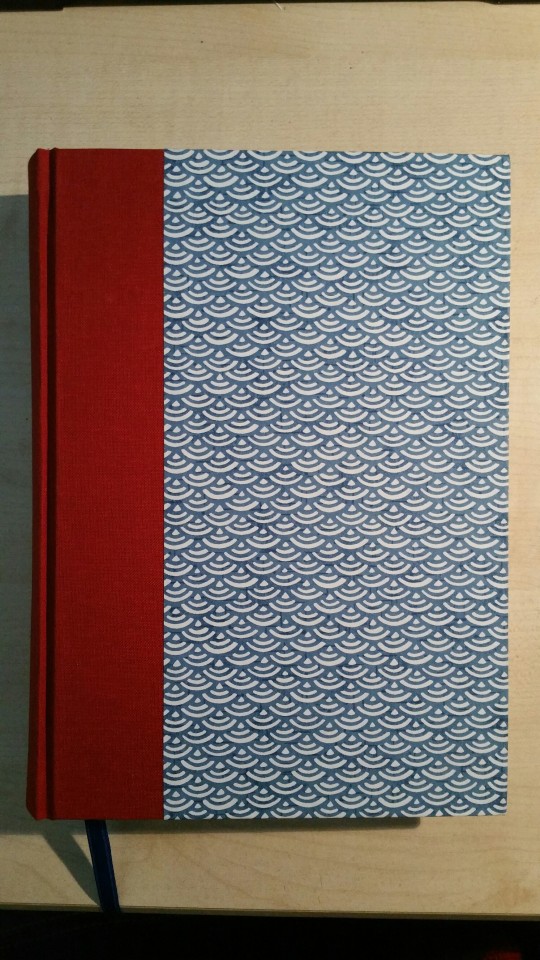
I knew that I wanted the book to be blue (since Salvage takes place at sea) and that I wanted to find some paper that had some kind of blue wave design on it, I went on ollilypaperware and found this really nice chiyogami paper with a blue wave/scale design on it:
I wanted the round parts to point upwards, but I got it all turned around while glueing it down and now they point downwards instead, but thats fine
I wanted the spine to be blue as well, but when I looked at my red bookcloth (I ordered a few different colors since shipping was a bit expensive and I wanted to get my money’s worth) and thought “red like fire, oh OH that would look fucking awesome and reflect the content of the fic much better”, so I used that instead, I also bought some blue, purple and yellow ribbons in the city and used the blue one for a bookmark by gluing it into the spine
Because of that I made a kind of template, I used Baskerville Old Face for the body, Garamond for the front matter (AO3 tags, summary etc) and Bodoni MT for the front title and chapter titles
The Formatting:
Now I did format a few works before ordering the materials, the materials were getting quite expensive and I wanted to make sure that I had more than just one fic I wanted to bind, I made a whole list and all
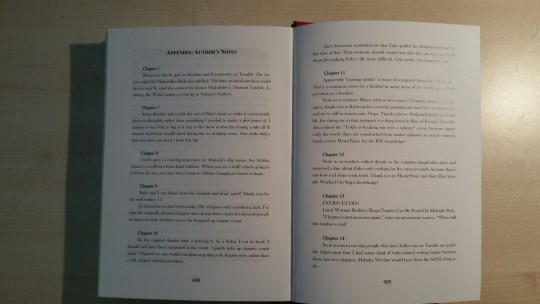
I pretty much just followed SuperArmoredHeavy’s guide on how to harvest and format AO3 fics and my layout is the same, meaning the first page is just the title, then title and author in bigger font with the AO3 tags and the summary on the back, then the fic and lastly the author’s notes in an appendix
Chapter 4: The Finished Book
My trial run was a great success in terms of learning what to do and what not to, which means that my Salvage fanbind is the best it could be (except for the endpaper at the back, which I slightly failed at gluing down smoothly, but its behind two empty pages and at the end of the book, so I dont really mind, no one will see)
I’m incredibly happy with the finish and hope that the exterior does the interior justice, but without much further ado, here are the promised pictures:

973 notes
·
View notes
Note
hey, I found a really amazing fanfic series I want to turn into a real book. Could you reshare the post about how you made the Blue Walls book?
I don't think I ever ended up making a How To post actually although I did promise! Ok give me a minute.
What you need:
A lot of a-4 plain printer paper
A LOT of white glue. More than you think.
Awl, thick needles, sewing cord coated in wax (I would recommend buying a cheap bookbinding kit, or at least bookbinding thread).
Cover fabric, I tend to buy a fat quarter and that's more than enough, try to get stuff that takes glue well.
Cardboard, not the stuff you get in boxes, that thinner sturdy stuff you can buy in packs.
Some fairly study other fabric, long, takes glue well, will be invisible by the end of the book so it doesn't matter what it looks like.
Creasing tool
METAL ruler (otherwise your knife will keep gouging it)
A sharp craft knife, sharp enough to cut good cardboard.
Lining paper, decorated and thick.
So you have to start by splitting the text up into signatures, which are like pamphlets, often made out of 8 A-4 sheets folded together so you get 32 pages out of it. You just stack them one on top of the other and fold in half. However because you're using text, you need to find out how much text of the story fits into 32 pages and then arrange it so when you fold it it folds over together. I tend to put all the text into one word document, format it the way I want (landscape, each sheet divided into two, and make sure the middle column margin is quite wide because the fold over takes up a lot of space. Also make side and top margins quite small otherwise it looks ugly). Then copy paste the 32 pages (which is 16 sheets in the document because you'll have to print double sided) into a new document, and then work with those 32 pages and rearrange them in a third document to be in the right order for double-sided printing where they all fit together to make a pamphlet. Arranging each page in the right section can be confusing and I can't really explain how it works, but it's a bit logical. Basically the first page on the first sheet should be the very last page of the 32, then the 2nd page on the first sheet should be the very first page, the first page of the second sheet should be the second page of the 32, and the second page of the second sheet should be the second to last page of the 32, and then it keeps going back and forth until it meets in the middle.
Your very front and back pages will be covered over with lining paper, so remember to leave empty spaces for them, and often you'll need to leave empty pages for aesthetic reasons, like if you want the title on the right of the spread rather than the left, for example. This is the most time consuming and frustrating part of the process, but it pays to take time and get it right.
I don't have any photos of signatures, but in a reblog I will link the webpages which I found really helpful in making this, and they have clear photos.
So you print out the signatures, you check to make sure all the pages fit together linearly, and then you crease down the middle. I would recommend buying a cheap bookbinding kit, it should have a tool for creasing, typically made with bone but now often just plastic. Creasing the inside means the pages don't crumple when you fold them over.
Then, you need to bind the signatures together. You need to sew them using thick thread with wax on it, and they're thick enough that you need to pierce them with an awl. Make five holes down the centre crease, one in the middle, then I tend to do two more one on either side an inch or an inch and a half from that first one, and then two more again, an inch or inch and a half from those.
You then sew, basically you sew along the signatures and then up to the next and then along again. I have an excellent tutorial with pictures that I will link, look at that for sure. It recommends using bookbinding tape, which gives more support to the pile of signatures, I don't use it but my books haven't been hugely thick, it's up to you. Pull the thread fairly tightly, if you don't the signatures will slide apart from each other and won't remain in line, but not so tight it wrinkles the paper.
Then, you need some thin cloth, easy to cut, takes glue easily, but sturdy. You need a length of it as long as the signatures and several times wider. None of it will be seen in the end so it doesn't matter what it looks like. What you do is you clip together the signatures tightly now they're sewn together, using bulldog clips, and cover the spines of them in white glue. White glue was invented for bookbinding originally, and you can get really fancy stuff, but tbh PVA works just as well. You need a LOT of glue, try not to let it seep between the signatures, but be liberal with it. Press the spine of the signatures directly onto the fabric, and leave the glue to dry with the signatures standing upright, I use cans of beans or whatever pressed on either side to keep it standing up.
While that's drying, make the cover. Measure the signatures beforehand, and cut out two identical rectangles of cardboard which are about a cm wider than the signatures, and between 1-2 cm taller. These will be the amount which sticks out from the pages of the book, so it depends on how much you want, but don't go too big. Also cut out a strip of cardboard exactly as tall as these rectangles, and as wide as the block of signatures is (I would suggest measuring the width of the signature block before gluing it). Then, cut out a rectangle of the cover fabric you want, it can be messily cut it doesn't matter, larger than the three pieces of cardboard arranged together in a row, and glue the cardboard to the backside of the fabric, in this arrangement:
Suddenly it starts to look like a real cover! I would recommend having a few cm of extra fabric on both sides. Use the same white glue as you did for the signatures. Leave to dry.
After everything is dry (and basically every time I say leave to dry, it should take about 12 hours maybe to be sure, there's a Lot of glue and it takes a LONG TIME). After everything is dry, you take the hanging over fabric of the cover and you fold it over and in, gluing it down to the inside of the cardboard. You can just glue as is, you can do fancy corners by pinching the fabric together at the corners and flattening that loose fabric into triangles, it's up to you. Be inventive. But make sure it's well glued down. It should go from this
To this
That's your cover!
Then, when everything is dry, you take the signature block and fabric glued to it. You trim the fabric if there's any sticking off top or bottom, and maybe cut that fabric on both sides diagonally from the top and bottom inwards, so it looks like a diamond if that makes any sense.

Unhelpful photo but see how that fabric, the cream stuff attached to the white, is kind of cut diagonally? Do that more.
Then, you glue the fabric, NOT THE SPINE, but the fabric on both sides of the spine of the signatures, to the cardboard rectangles that are the cover of the book. This is very important, you do not glue the spine of the signatures to anything, and the cardboard spine in the middle of the cover, that thin strip, is also not glued to anything. You need free movement there to be able to open the book to different pages without it being too stiff. It should end up looking like this when you close it.
No glue between the signatures and the spine of the cover.
So you leave this to dry again the signatures standing up, again the canned food is extremely helpful and beloved.
You're almost done! Get your lining paper. I got some real marbled paper from Yorkshire, very thick and heavy and pretty

But any patterned paper will do as long as it's not too thin. You can just print a design onto printer paper, that works fine.
This bit is tricky, you need to measure a rectangle on the lining paper that is exactly as high as the signatures, and as long as from the outer edge of the first page of the signature to maybe half a cm from the outer edge of the front cover. It should cover up all the edges of the fabric glued inside, but not reach all the way to the end of the cover. Do the same with the back page and back cover.
Then, you glue this paper directly onto the front cover and the front page, and the second piece directly onto the back cover and the last page. I tend to use too much glue for this so it comes out lumpy and wrinkled, so maybe use less and make sure it's positioned well. If too much sticks out from the front or back page, you can trim it a bit. Leave to dry.
That's it!!!! That's your book!! Completely made!!!!!! It's so cool!!!! In the reblog I'll put those links as I said, but really if I could figure it out you'll absolutely be able to. Good luck, show me pictures when you make it!!!
81 notes
·
View notes
Note
I’m sorry if you’ve been askes this a lot, but how did you get into book binding? Is there a sort of tutorial you follow?!
You’re projects are amazing and I’m literally jealous! I would love to learn how you do it!
Not a problem at all! Thank you so much, I’m glad you like my work ❤️ To answer the first part of your question, I kind of stumbled across it (as you may have stumbled across me!) I’ve been a fanfic writer for years, and I’ve always wanted to have bound copies of fic that I loved - and always considered using printing services to do so (which, as I now know, is illegal). I never had the money for it or knew where to start, so I never did it - but when I stumbled across fanbinding, it clicked in my brain that not only could I have bound copies of the fic, but I could make it as bespoke as I wanted.
Bookbinding for me is the perfect cross between creative and technical; I only have a certain amount of creative power (I really can’t draw to save my life!), and I like the technical side of crafting (I can knit a mean scarf). The amazing thing about fanbinding (and the tough thing) is that normally, countless people put their effort and talent into a book - and they’ll specialize in the typesetting, or the construction, whereas fanbinders have to learn it all from beginning to end!
I did a LOT of research from a lot of different sources, especially when I started getting into more specific things I wanted to do (vinyl titles, rounding, etc.), but I’ve definitely got a few places you can start!
-armoredsuperheavy, the founding father of Renegade Publishing, has written a How To guide that covers everything you need to get started on your first book. This was (and still is!) a major resource for me, especially on how to get text off AO3 cleanly.
I’ve linked here his resource post, which includes a link to the doc as well as some additional resources he recommends.
-Sealemon is a great bookbinding/crafting Youtuber who posts very easy to follow tutorials. I still use her method of kettlestitching!
-I also joined the Renegade Publishing Discord server. It’s where all of the fanbinders gather, generally (we’re just over 500 binders strong now!) and it’s an incredibly supportive, helpful group! You’re welcome to the group whether or not you’ve ever bound a book; whether you’re looking to learn or just watching to watch, and an invaluable fount of knowledge. I sit there in awe and watch binders pioneering new fanbinding methods devised specifically to overcome the unique challenges of handbinding fanfiction at home. To join, send an ask to the Renegade Publishing Tumblr; please note, the server is 18+
Hope this helps! You can always feel free to reach out to me and I’m happy to answer any questions or help however I can. Happy holidays!
43 notes
·
View notes
Last Seen Blogs

dressloveliness
Untitled

madam-miss-fortune
Rose Lady

cesarpradofficial-blog
César Prado

deluminatorillustrator
THIS BLOG IS NOW AN ARCHIVE