#Woodworking Jigs How To Make
Text
Taru van den Born is a Dutch blacksmith with a degree in Psychology, who offers training to ND folks, which he believes is therapeutic in many ways. He is doing a wonderful thing for ND folks. Folks like me, as I have ADHD.
I feel the same concepts and benefits could be found in woodworking, or any number of handcrafting/trade fields like smithing and woodworking.
I've certainly found woodoworking immensely beneficial for my ADHD. I didn't even get diagnosed or treated until I was 32. I spent my life before that being terrible at everything, and never sticking with anything for long except music, which I still wasn't very good at. I never understood why and assumed I'd always be a mess. Couldn't even hold a job for very long.
I got into woodworking shortly after getting help for my ADHD. Getting therapy and meds was profoundly life changing. Woodworking (or any craft) is no substitute for proper treatment and I wouldn't be where I am without out the support and good work being done by the docs at the Adult ADHD Clinic at the Hope Centre in North Vancouver. It's the only clinic of it's kind in Canada, a pilot project where adults with ADHD can get help entirely funded by public healthcare.
Woodworking had given me something I can engage with and focus on. I can lose myself in it for hours working on some small detail, existing only in the space between the wood and aris of the chisel. It's grounding, and very gratifying.
It requires a degree of planning and organization. I've gotten a lot of use out of the organization and project management skills I learned in Cognitive Behavioral Therapy, but also refined those and learned a lot more through woodworking. It's taught me a lot of patience as well.
It's also diverse enough to keep my ADHD brain filled with novelty and change. One day I might be carving dovetails, the next restoring an old tool using electrolysis, the next doing some basic metalworking to make a blade or a thread cutter. There's always new techniques and methods to learn or research to do. Maybe today I'll go down a rabbithole on Victorian furniture decorative carvings, or some obscure facet of making iron age lyres. I've even translated books from Swedish and Finnish just to learn the minutae of Tagelharpa and Jouhikko bowed lyres.
So it gives me a universe of things to explore while staying in orbit around that central point of woodworking.
In the end, I have a physical object I created, or someone else does, but I made it. I can see my progress in physical objective terms. There is something deeply satisfying about that. Its creative but also very functional and practical. I'm engaging my artistic side by making something that is beautiful, or makes beautiful noise. At the same time its something physical which serves a practical purpose.
I never thought I'd be good at anything, but I'm getting good at this, and getting better every day, and that simple thing alone has been so good for my ADHD brain.
Of course, at my job most of my day is just making simple components, customizing doors, or replicating pieces for customers, but its still grounding and satisfying. Sometimes that includes restoring 150 year old doors or replicating Victorian moulding. Replicating or making custom components often requires creativity as I need to work out how to do it, and occasionally design new jigs and guides specific to that component. Sometimes I get to make new tools or equipment, such as a router table, for the shop.
I have to give my company a lot of credit for being a supportive environment that's helped me grow and put up with my constant screwups. This is very much a form of privilege that many of us ND folk can only wish for, and I wish we could all have. Taru van den Born seems to be fostering that kind of environment, which is just as important as any practical skill he might teach there.
I think we all, ND and Normie alike, could learn some things from his example, and I don't just mean how to forge metal.
Anyway thanks for coming to my TED Talk.
#adhd autistic#adhd stuff#adhd#neurodiversity#neurodivergent#my adhd#woodworking#blacksmith#therapy#handcrafted#late diagnosed adhd
5 notes
·
View notes
Text
A router bit cabinet, made from miscellaneous walnut shorts, scrap birch plywood, and a little bit of maple for the shelves.

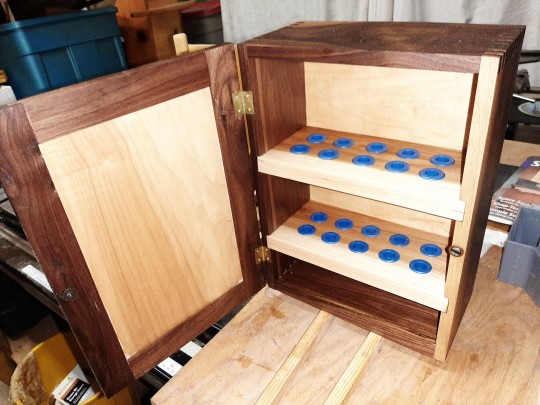
The basic plans are from "Router Bit Cabinet" in The Complete Small Shop (Woodsmith, 2021)., although I'm not quite done - the bottom will be a small drawer, which is the next piece:

This was an interesting build, as I did several things that are new or somewhat new:
Small dovetails using the Porter-Cable dovetail jig. I've done large dovetails and box joints, but not small doveralls or box joints

Rail- and-stile panel (for the door). While it seems simple enough in theory, cutting 1/4" slots into the edges of 1/2" stock was a little intimidating. I did it on the SawStop, and found it pretty straightforward. Some care needed in setup, of course, but the heavy saw and T-Glide rip fence made it simpler than I expected. That's kind of rare for me and woodworking techniques.
Dados on the new saw. Not really a new technique, but it was interesting to see how the new saw performed. Cut by repositioning the standard blade, in this case. Here again, the new table saw proved its value.
I will comment that cutting joinery into 1/4" stock, with or without using the router jig, is challenging. Quarter inch stock is bendy.
Like most builds it took longer that I planned, both because of mistakes and because making something this small is fiddly - things really need to fit.
But overall, I'm fairly pleased.
2 notes
·
View notes
Text
How to Cut Dowels: Master the Art of Precision Woodworking

To cut dowels, use a sharp handsaw or a dowel cutting jig. First, mark the desired length of the dowel, then secure it in place.
Use steady, controlled strokes to cut through the dowel. Cutting dowels can be easily accomplished using a sharp handsaw or a dowel cutting jig. These tools enable you to accurately trim dowels to the desired length. Before cutting, ensure the dowel is securely fastened to prevent any unnecessary movement.
By employing steady and controlled strokes, you can confidently cut through the dowel, achieving precise results. Whether you are working on a woodworking project or any other task that requires dowel cutting, employing these techniques will enable you to complete the task efficiently and effectively.
Choosing The Right Dowel Cutter
To ensure you cut dowels with precision, it's crucial to select the right dowel cutter. Look for a cutter with a sharp blade and adjustable sizing to meet your specific needs. Choose a high-quality cutter to achieve clean and accurate results.
When it comes to cutting dowels, choosing the right dowel cutter is crucial in achieving clean and precise cuts. The right tool will not only make the process easier but also ensure that your dowels are cut to the desired size and shape. Consider the following factors when selecting the perfect dowel cutter for your woodworking projects.
Consider The Size And Type Of Dowel
Before delving into the market to buy a dowel cutter, it's important to consider the size and type of dowel you'll be working with. Dowel cutters come in various sizes to accommodate different dowel diameters. Ensure that the cutter you choose is compatible with the specific size of dowels you intend to cut. Additionally, there are different types of dowels, such as fluted, spiral, or straight, and each may require a different type of cutter. Be sure to choose a dowel cutter that matches the type of dowel you'll be working with.
Evaluate The Quality And Durability
When investing in a dowel cutter, quality and durability should be key factors in your decision-making process. You want a tool that will withstand repeated use and produce clean and precise cuts every time. Look for dowel cutters made from high-quality materials such as hardened steel or carbide. These materials are known for their strength and longevity. Read customer reviews and consider the reputation of the brand to ensure that you are getting a reliable and durable dowel cutter.
Consider Ease Of Use And Safety Features
A good dowel cutter should be easy to use, even for beginners. Look for a cutter with ergonomic handles that provide a comfortable grip and reduce strain on your hands. Additionally, safety should always be a priority when working with any kind of cutting tool. Check if the dowel cutter has safety features such as blade guards or locking mechanisms that prevent accidents during operation. Prioritize your safety and choose a dowel cutter that offers adequate protection.
Price And Budget Considerations
While you want to invest in a high-quality dowel cutter, it's also important to consider your budget. Set a budget range before you start shopping around, and compare prices from different suppliers. Keep in mind that the most expensive cutter might not always be the best one for your needs, and a reasonably priced option might deliver great results. Look for sales or discounts to get a good deal without compromising on quality.
In conclusion, choosing the right dowel cutter is crucial for achieving clean and precise cuts. Consider the size and type of dowel you'll be working with, evaluate the quality and durability of the cutter, ensure ease of use and safety features, and take your budget into account. By considering these factors, you can select the perfect dowel cutter for your woodworking projects.

Credit: s.click.aliexpress.com
Preparing The Wood For Cutting
How to Cut Dowels - Preparing the Wood for Cutting
Cutting dowels is an essential skill for woodworking projects. Before you start cutting, it's important to properly prepare the wood to ensure accurate and clean cuts. In this section, we will cover selecting the appropriate wood as well as proper wood measurement and marking.
Selecting The Appropriate Wood
Choosing the right wood for your dowels is crucial for a successful cutting process. You'll want to consider factors such as the type of project you're working on, the wood's strength, and its grain direction.
Consider the project:
Think about the specific requirements of your project. Are you building furniture or crafting smaller decorative items? For furniture, you'll need stronger, more durable wood, while decorative items may allow for softer woods.
Evaluate the wood's strength:
Each wood species has different levels of strength and hardness. Hardwoods such as oak and maple are ideal for projects that require durability and stability, while softwoods like pine and cedar work well for less demanding applications.
Analyze the grain direction:
The grain direction of the wood affects cut quality and integrity. Look for woods with straight and consistent grain lines, as these are easier to work with and less likely to split during cutting.
Proper Wood Measurement And Marking
Accurate measurement and marking are crucial for cutting dowels to the desired lengths. Follow these steps to ensure precise cuts:
Measure twice, cut once:
Take your time to measure the required length of the dowel twice using a tape measure or ruler. This double-checking helps prevent unnecessary mistakes and wasted wood.
Mark the measurement:
Once you've determined the correct length, mark it on the wood using a pencil or a marking knife. Make sure the mark is clear and visible.
Consider safety:
Wear safety goggles and gloves when you mark the wood to protect yourself from potential injuries.
In summary, to prepare the wood for cutting dowels effectively, select the appropriate wood based on your project requirements, evaluate the wood's strength, and analyze the grain direction. Additionally, ensure accurate measurements by measuring twice and marking the intended length on the wood. Remember to prioritize your safety during these preparations.
Mastering The Cutting Technique
Cutting dowels with precision is an essential skill for woodworking projects. Mastering the cutting technique involves understanding the grain direction and using the dowel cutter safely. By following these guidelines, you can ensure clean and accurate cuts for your woodworking endeavors.
Understanding The Grain Direction
It's imperative to comprehend the grain direction of the dowel before making any cuts. The grain direction dictates how the wood fibers are aligned and significantly impacts the ease and quality of the cut. Always examine the dowel closely to identify the direction of the grain before proceeding with the cutting process.
Using The Dowel Cutter Safely
When using a dowel cutter, safety should be a top priority. Ensure that the cutter is securely clamped to a stable surface to prevent any accidents. Wear protective gear such as safety goggles and gloves to safeguard yourself from wood chips and debris during the cutting process. Always adhere strictly to the manufacturer's instructions and operate the cutter with caution.

Credit: www.amazon.com
Fine-tuning And Smoothing The Dowels
Once you've trimmed and shaped the dowel ends, it's time to focus on fine-tuning and smoothing them to achieve a professional finish. This crucial step ensures that your dowels fit seamlessly into their designated holes and that they have a smooth, polished appearance.Trimming And Shaping The Dowel EndsBefore moving on to the fine-tuning process, it is important to ensure that the dowel ends are properly trimmed and shaped. Here's how you can achieve this:
- Use a sharp saw or a dowel cutting tool to trim the dowel ends to the desired length, making sure they are perpendicular to the dowel's length.
- If necessary, use a sandpaper or a file to shape the trimmed ends. This will ensure that they fit precisely into the designated holes.
- Once you're satisfied with the shape and length of the dowel ends, it's time to move on to the fine-tuning process.
Sanding And Polishing For A Professional FinishTo achieve a polished, professional finish for your dowels, follow these steps:
- Start by sanding the entire surface of the dowels with a medium-grit sandpaper. This will help smooth out any rough edges or imperfections.
- Gradually move on to finer-grit sandpapers to achieve a smoother finish. Be sure to sand in the direction of the grain to avoid splintering the wood.
- After sanding, wipe away any dust or debris from the dowels using a clean cloth or a tack cloth.
- Apply a thin coat of wood polish or varnish to the dowels, using a brush or a cloth. This will enhance the natural beauty of the wood and provide a protective layer.
- Allow the polish or varnish to dry according to the manufacturer's instructions before handling or installing the dowels.
By following these steps, you can ensure that your dowels not only fit perfectly but also have a professional, polished appearance. This attention to detail and fine-tuning is what sets your woodworking projects apart and brings them to a whole new level of craftsmanship.
Troubleshooting And Tips
Learn how to efficiently cut dowels with these troubleshooting tips. Master the techniques to ensure clean and precise cuts every time.
Dealing With Splintering Or Rough EdgesWhen cutting dowels, it's not uncommon to encounter splintering or rough edges that can mar the finish or affect the overall fit. Luckily, there are some simple steps you can take to minimize these issues and ensure a clean, professional result.First and foremost, using the right cutting tools can make a world of difference. A sharp handsaw or a dowel cutter specifically designed for this purpose can help prevent splintering and achieve cleaner cuts. Always make sure your blades are sharp and in good condition before starting.Another tip is to score the surface of the dowel before cutting. This can be done by running a sharp utility knife along the line where you plan to make the cut. Scoring helps to prevent the wood from splintering when the saw blade makes contact.If you still encounter splintering despite these precautions, you can try wrapping the area where you plan to cut with masking tape. This can help hold the wood fibers together and reduce the likelihood of splintering.
Quick Tips to Deal with Splintering or Rough Edges:
- Use sharp cutting tools such as a handsaw or a dowel cutter
- Score the surface of the dowel with a utility knife before cutting
- Try wrapping the area with masking tape to prevent splintering
Expert Tips For Perfect Dowel CuttingTo achieve flawless dowel cuts, consider implementing these expert tips that can make all the difference:
- Take your time and go slow. Rushing through the cutting process increases the likelihood of mistakes and uneven cuts.
- Secure the dowel firmly in place before making any cuts. This can be done by using clamps or a vise to hold the dowel steady.
- Measure twice and cut once. Double-check your measurements to ensure accuracy before making any cuts.
- Use a miter box or a cutting jig to hold the dowel at the desired angle. This can help you achieve precise and consistent cuts, especially when working on angled dowels.
- Consider sanding the ends of the dowels after cutting. This can help remove any rough edges or imperfections for a smoother fit.
- Apply a small amount of wood glue to the end of the dowel before inserting it into the hole. This can provide added strength and stability to your joinery.
By following these expert tips, you'll be well on your way to achieving perfectly cut dowels that fit seamlessly into your woodworking projects.

Credit: www.amazon.com
Frequently Asked Questions Of How To Cut Dowels
What Is The Best Tool For Cutting A Dowel?
The best tool for cutting a dowel is a dowel cutter. It provides precise and clean cuts, ensuring accuracy in your woodworking projects. Use a dowel cutter to trim dowels to your desired length effortlessly.
What Do You Cut Wooden Dowels With?
You can cut wooden dowels with a saw or a sharp knife. Sawing is the most common and efficient method.
How Do You Cleanly Cut Dowels?
To cleanly cut dowels, follow these steps:
1. Mark the desired location for the cut on the dowel. 2. Use a sharp saw, handsaw, or miter saw to carefully cut along the marked line. 3. Apply consistent pressure while cutting to ensure a clean, even cut.
4. Sand the cut end of the dowel to smooth out any rough edges. 5. Remember to wear safety goggles and gloves for protection while cutting.
What Saw Is Used To Cut Dowels?
A coping saw is commonly used to cut dowels. It is best suited for making fine, curved cuts with precision.
Conclusion
Learning how to cut dowels can be a valuable skill for DIY enthusiasts and professionals alike. With the right tools and techniques, you can achieve precise and clean cuts, enhancing the quality of your woodworking projects. By following the tips and methods outlined in this guide, you can confidently tackle dowel cutting with ease and efficiency.
Read the full article
0 notes
Text
youtube
For more information on The 16000 Woodworking Plans, use the link below:
https://bit.ly/W16000Plans
Learn how to make your own DIY knobs with a 3 in 1 Star Knob Jig. This woodworking project is perfect for adding a unique touch to your furniture and cabinets. Get step-by-step instructions and unleash your creativity.
0 notes
Text

Featuring illustrated instructions for over 70 joints, this spiral-bound book is the perfect companion for any woodworker interested in improving their joint-making skills.
The Joint Book provides easy-to-follow directions for creating edge and scarf joints, lapped and housed joints, mortise-and-tenon joints, miters and bevels, dovetails, and dowels and biscuits, plus detailed descriptions of fasteners, hardware, and knockdown joints.
This hardcover book with internal spiral binding is 6.5” × 8”, the perfect size for carpenters and woodworkers to keep near their workbench or toolbox for quick access. The design of this book allows it to lay open flat for easy and frequent reference. The interior photographs, illustrations, and diagrams make the learning process simple and fun for beginners, while advanced readers will gain insight from the book’s useful tips.
Within, you’ll find:
Step-by-step illustrated instructions for making all the basic joints in every joint family—mortise and tenon, dovetails, miters, and more—and their variations.
Both hand tool methods and power tool techniques, plus a variety of easy-to-build jigs.
How the nature of wood and its properties affect joinery, glue, and furniture design.
The Joint Book is the ultimate workshop reference, providing woodworkers with the knowledge to choose the right joint for the job.
#diypalletsideas#howtomake#buildingdoor#diywood#madeofverysolidwood#madefrompallets#amazingwoodworkingskills#amazingcarpentrywoodworking#extremeskillseasy#recycle#Recycling#furniture#handmade#creative#crafts#diy#howto#100ideas#design
0 notes
Text
Mastering the Art of Joinery: A Step-by-Step Guide on How to Use a Dowel Jig
Introduction:
If you're passionate about woodworking and desire strong and seamless connections in your projects, using a dowel jig is a game-changer. A dowel jig enables you to create precise dowel holes, allowing you to join pieces of wood securely. In this post, we'll provide you with a step-by-step guide on how to use a dowel jig effectively and master the art of joinery.

Step 1: Gather the Necessary Tools and Materials: Before you begin, gather the following tools and materials:
Dowel jig
Drill
Drill bits (matching the size of the dowels)
Measuring tape, pencil, and square for marking
Wood pieces to be joined
Dowels
Clamps (if necessary)
Step 2: Mark and Prepare the Wood Pieces: Start by marking the locations on the wood pieces where you want the dowel holes to be drilled. Use a measuring tape, pencil, and square to ensure precise and accurate placement.
Step 3: Set Up the Dowel Jig: Place the dowel jig on the wood piece, aligning it with the marked locations for the dowel holes. Ensure that the jig is securely positioned and won't move during drilling. If necessary, use clamps to hold the jig in place.
Step 4: Adjust the Dowel Jig: Most dowel jigs have an adjustment mechanism that allows you to set the drilling depth and spacing between dowel holes. Consult the manufacturer's instructions for your specific dowel jig and make the necessary adjustments. Typically, you can adjust the depth by moving the drill bit guide up or down, and the spacing by moving the jig guide along the jig body.
Step 5: Drill the Dowel Holes: With the dowel jig properly adjusted, it's time to drill the dowel holes. Insert the appropriate drill bit into your drill and set it to the desired drilling depth. Place the drill bit into the guide hole of the dowel jig and position it over the marked location for the dowel hole. Hold the drill firmly and drill straight down, ensuring that the drill bit is perpendicular to the wood surface. Repeat this process for all the dowel holes needed.
Step 6: Prepare the Dowels: After drilling the dowel holes, prepare the dowels by cutting them to the appropriate length. Ensure that the dowels fit snugly into the holes without forcing them.
Step 7: Apply Glue and Assemble the Wood Pieces: Apply a small amount of wood glue inside each dowel hole. Insert the dowels into the holes, ensuring that they are fully seated. Join the wood pieces together, aligning the dowels and applying gentle pressure to create a tight fit. Wipe off any excess glue with a damp cloth.
Step 8: Allow the Glue to Dry: Give the glue sufficient time to dry according to the manufacturer's instructions. It is crucial to let the glue fully cure before applying any stress or load to the joined wood pieces.
Step 9: Sand and Finish: Once the glue has dried, sand the joined area to achieve a smooth and even surface. Apply your desired finish or stain to enhance the appearance of the project.
Conclusion:
Using a dowel jig is a valuable technique in woodworking that allows for precise and durable joinery. By following this step-by-step guide, you can harness the power of a dowel jig to create strong and seamless connections in your projects. Remember to gather the necessary tools, mark and set up the jig accurately, drill the dowel holes with care, and assemble the wood pieces using glue and pressure. With practice, you'll become proficient in using a dowel jig and unlock endless possibilities for your woodworking creations.
0 notes
Text
🔴🔴 Wood Joinery Styles (You should know )

wood mdad - you should know
One of the most fundamental ideas in woodworking is wood joinery. All woodworking items would be sculptures cut from a single piece of wood if we weren't able to solidly link two pieces of wood together. A woodworker can pick from a variety of joints depending on the job thanks to the many diverse types of joinery available for wood. You will be well on your way to becoming a very competent carpenter if you can master these wood joinery principles.
visit our blogspot
🔴 Simple Butt Joint
The butt joint is the most fundamental type of wood joinery. A butt joint is nothing more than when two pieces of wood butt against one another and are secured with mechanical fasteners (often at a right angle or square to the other board). On building projects, this kind of joint is frequently utilized in the framing of walls. Learn how to use a butt joint properly and when to use a different style of wood joinery.
🔴 The Box Joint
Although dovetail joints are attractive and sturdy, they are not always useful. A less complex option to a dovetail junction is a box joint. Find out how to construct reliable and durable box joints for your woodworking projects.
🔴 Mitered Joint
With the exception of the two boards being linked at an angle (rather than square to one another), a mitered butt joint is essentially identical to a basic butt joint. The benefit is that there won't be any end grain visible at the mitered butt joint, making it a little more aesthetically acceptable. The mitered butt joint isn't very sturdy, though.
🔴 half lap joint
In order to make the two boards join flush with one another, half of each of the two boards is removed for the half-lap joint. Although this style of wood joinery is stronger than butt joints, it might nonetheless impair the strength of the two adjacent boards.
🔴Tongue and Groove joint
One need only butt the joint together and secure it with bolts to attach two square boards together along a long edge. However, if you're going to glue the joint, the tongue and groove junction is significantly stronger and offers more adjoining surface surfaces.
🔴 Mortise and tenon joint
A traditional technique for wood joinery is the mortise and tenon. Since the dawn of woodworking, these joints have been in use, and they remain one of the best and most beautiful ways to join wood. Learn how to make perfect, tight mortise and tenon joints.
🔴 Pocket Joint
An example of a pocket junction is when two boards are joined together with a screw after a slot has been carved and an angle-drilled pilot hole. Pre-drilling must be done very precisely, hence a commercial jig is usually used to complete the task. For cabinet face frames and other comparable applications where a lot of strength is not required, pocket joints work excellently. In your woodworking tasks, learn how to make pocket joints.
🔴 Dado Joint
A dado is nothing more than an area on one board with a square groove where another board can fit. This is a typical wood joinery technique, like tongue and groove joinery, for joining plywood, such as when making cabinets.
🔴 Rabbet joint
The rabbet is yet another typical wood joint utilized in cabinetry. In essence, a rabbet is a dado cut made along a board's edge. When the back of cabinets and other similar assemblies is attached to the sides of the box using rabbets, the assembly gains a significant degree of strength. Find out when to use rabbets and how to cut them cleanly.
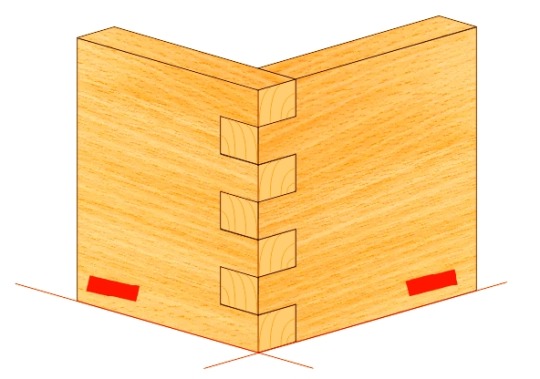
🔴 Dovetail Joint
The thru dovetail may be the most revered wood joinery technique. A traditional thru dovetail is stunning, extremely durable, and lends a touch of elegance to any item. Through dovetails can be made using a variety of techniques, such as hand cutting or jig machining. Discover the secrets to a quality
........................................
🔴🔴 Стили деревянных столярных изделий (вы должны знать)
Одной из самых фундаментальных идей в деревообработке является деревянная столярка. Все изделия из дерева были бы скульптурами, вырезанными из цельного куска дерева, если бы мы не могли прочно соединить два куска дерева вместе. Столяр может выбирать из множества соединений в зависимости от работы благодаря множеству различных типов столярных изделий, доступных для дерева. Вы будете на пути к тому, чтобы стать очень компетентным плотником, если освоите эти принципы столярного дела.
🔴 Простое стыковое соединение
Стыковое соединение является самым основным типом деревянных столярных изделий. Стыковое соединение — это не что иное, как когда два куска дерева упираются друг в друга и закрепляются механическими застежками (часто под прямым углом или под прямым углом к другой доске). В строительных проектах этот тип соединения часто используется в каркасе стен. Узнайте, как правильно использовать стыковое соединение и когда использовать другой стиль деревянных столярных изделий.
🔴 Коробчатый сустав
Хотя соединения типа «ласточкин хвост» привлекательны и прочны, они не всегда полезны. Менее сложным вариантом соединения типа «ласточкин хвост» является коробчатое соединение. Узнайте, как сконструировать надежные и прочные муфтовые соединения для ваших проектов по деревообработке.
🔴 Скошенный стык
За исключением того, что две доски соединены под углом (а не под прямым углом друг к другу), стыковое соединение под углом практически идентично обычному стыковому соединению. Преимущество заключается в том, что на скошенном стыковом стыке не будет видно торцевой шероховатости, что делает его немного более эстетически приемлемым. Однако скошенный стык не очень прочный.
🔴 соединение внахлест
Чтобы две доски стыковались заподлицо друг с другом, половина каждой из двух досок снимается для соединения внахлест. Хотя этот стиль деревянных столярных изделий прочнее, чем стыковые соединения, он, тем не менее, может ухудшить прочность двух соседних досок.
🔴Соединение языка и канавки
Нужно только соединить соединение встык и закрепить его болтами, чтобы соединить две квадратные доски вместе по длинному краю. Однако, если вы собираетесь склеивать соединение, соединение шпунт-паз значительно прочнее и предлагает больше соприкасающихся поверхностей.
🔴 Врезное и шиповое соединение
Традиционная техника деревянных столярных изделий - врезка и шип. С самого начала деревообработки эти соединения использовались, и они остаются одним из лучших и самых красивых способов соединения древесины. Узнайте, как сделать идеальные, плотные врезные и шиповые соединения.
🔴 Карманный сустав
Пример карманного соединения - это когда две доски соединяются вместе с помощью винта после того, как прорезан паз и просверлено направляющее отверстие под углом. Предварительное сверление должно быть выполнено очень точно, поэтому для выполнения этой задачи обычно используется коммерческое приспособление. Для лицевой рамы шкафа и других подобных применений, где не требуется большой прочности, идеально подходят карманные соединения. В своих задачах по деревообработке научитесь делать карманные соединения.
🔴 Дадо Джойнт
Дадо — это не что иное, как область на одной доске с квадратным углублением, куда может поместиться другая доска. Это типичная техника столярных работ по дереву, такая как соединение шпунтом и пазом, для соединения фанеры, например, при изготовлении шкафов.
🔴Шов внахлест
Фальц — еще одно типичное деревянное соединение, используемое в краснодеревщике. По сути, шпунт представляет собой вырез, сделанный вдоль края доски. Когда задняя часть шкафов и других подобных узлов крепится к бокам коробки с помощью шпунтов, сборка приобретает значительную степень прочности. Узнайте, когда использовать шпунты и как аккуратно их вырезать.
🔴 Соединение «ласточкин хвост»
Сквозной ласточкин хвост может быть самой почитаемой техникой столярного дела из дерева. Традиционный сквозной ласточкин хвост ошеломляет, чрезвычайно прочен и придает элегантность любому изделию. Сквозные ласточкины хвосты могут быть изготовлены с использованием различных методов, таких как ручная резка или координатная обработка. Откройте секреты качества
.............................................................
🔴🔴 أنماط نجارة الخشب (يجب أن تعرف)
تعتبر نجارة الخشب واحدة من الأفكار الأساسية في النجارة. ستكون جميع عناصر الأعمال الخشبية منحوتات مقطوعة من قطعة واحدة من الخشب إذا لم نتمكن من ربط قطعتين من الخشب معًا بقوة. يمكن لعامل الخشب الاختيار من بين مجموعة متنوعة من المفاصل اعتمادًا على الوظيفة بفضل الأنواع العديدة المتنوعة من النجارة المتوفرة للخشب. ستكون في طريقك إلى أن تصبح نجارًا كفؤًا للغاية إذا كنت تستطيع إتقان مبادئ نجارة الخشب هذه.
🔴 مفصل بعقب بسيط
المفصل التناكبي هو النوع الأساسي من نجارة الخشب. لا يعد مفصل المؤخرة أكثر من عندما تكون قطعتان من الخشب ضد بعضهما البعض ويتم تثبيتهما بمشابك ميكانيكية (غالبًا بزاوية قائمة أو مربع على اللوحة الأخرى). في مشاريع البناء ، يتم استخدام هذا النوع من الوصلات بشكل متكرر في تأطير الجدران. تعرف على كيفية استخدام مفصل تناكبي بشكل صحيح ومتى تستخدم نمطًا مختلفًا من نجارة الخشب.
🔴 مفصل الصندوق
على الرغم من أن المفاصل التعشيقة جذابة ومتينة ، إلا أنها ليست مفيدة دائمًا. الخيار الأقل تعقيدًا للتقاطع التعشيقي هو مفصل الصندوق. تعرف على كيفية إنشاء وصلات صندوقية موثوقة ومتينة لمشاريع الأعمال الخشبية الخاصة بك.
🔴 مفصل ميترييد
باستثناء اللوحين المرتبطين بزاوية (بدلاً من مربعتين لبعضهما البعض) ، فإن مفصل التراكب المتقلب مطابق بشكل أساسي لمفصل تناكبي أساسي. والفائدة هي أنه لن يكون هناك أي حبة نهائية مرئية عند مفصل المؤخرة المتقشرة ، مما يجعلها مقبولة أكثر من الناحية الجمالية. ومع ذلك ، فإن مفصل المؤخرة المتقوس ليس قويًا جدًا.
🔴 نصف حضن مشترك
من أجل جعل اللوحين يتحدان مع بعضهما البعض ، تتم إزالة نصف كل من اللوحتين لمفصل نصف اللفة. على الرغم من أن هذا النمط من نجارة الخشب أقوى من الوصلات التناكبية ، إلا أنه قد يضعف مع ذلك قوة اللوحين المتجاورين.
🔴 مفصل اللسان والأخدود
يحتاج المرء فقط إلى ربط المفصل معًا وتثبيته بمسامير لربط لوحين مربعين معًا على طول حافة طويلة. ومع ذلك ، إذا كنت ستلصق المفصل ، فإن تقاطع اللسان والأخدود يكون أقوى بشكل ملحوظ ويوفر المزيد من الأسطح المجاورة.
🔴 نقر ومفصل لسان
تقنية تقليدية لنجارة الخشب هي نقر ولسان. منذ فجر النجارة ، تم استخدام هذه المفاصل ، ولا تزال واحدة من أفضل وأجمل الطرق للانضمام إلى الخشب. تعلم كيف تصنع نقرًا مثاليًا وضيقًا ومفاصل لسان.
🔴 جيب مشترك
مثال على تقاطع الجيب هو عندما يتم ربط لوحين مع برغي بعد نحت فتحة وثقب تجريبي محفور بزاوية. يجب أن يتم الحفر المسبق بدقة شديدة ، ومن ثم يتم استخدام الرقصة التجارية عادةً لإكمال المهمة. بالنسبة لإطارات وجه الخزانة والتطبيقات المماثلة الأخرى التي لا تتطلب قدرًا كبيرًا من القوة ، تعمل مفاصل الجيب بشكل ممتاز. في مهام النجارة الخاصة بك ، تعلم كيفية عمل مفاصل الجيب.
🔴 دادو جوينت
دادو ليس أكثر من مساحة على لوحة واحدة بها أخدود مربع حيث يمكن أن تتسع لوحة أخرى. هذه تقنية نجارة خشبية نموذجية ، مثل نجارة اللسان والأخدود ، للانضمام إلى الخشب الرقائقي ، كما هو الحال عند صنع الخزانات.
🔴 مفصل أرنب
الأرنب هو مفصل خشبي نموذجي آخر يستخدم في الخزائن. في جوهرها ، الأرنب هو قطع دادو مصنوع على طول حافة اللوح. عندما يتم تثبيت الجزء الخلفي من الخزانات والتجمعات المماثلة الأخرى على جوانب الصندوق باستخدام الأرانب ، يكتسب التجميع درجة كبيرة من القوة. تعرف على وقت استخدام الأرانب وكيفية قصها بشكل نظيف.
🔴 وصلة متداخلة
قد يكون التوافق من خلال تقنية النجارة الخشبية الأكثر احترامًا. تتماشى القوالب التقليدية المذهلة والمتينة للغاية وتضفي لمسة من الأناقة على أي عنصر. يمكن إجراء التعشيق من خلال استخدام مجموعة متنوعة من التقنيات ، مثل القطع اليدوي أو التشكيل بالرقص. اكتشف أسرار الجودة
......................................................
🔴🔴 细木工风格(你应该知道)
木工中最基本的想法之一是木工。 如果我们不能将两块木头牢固地连接在一起,那么所有的木工制品都是从一块木头上切割下来的雕塑。 木工可以根据工作从各种接头中挑选,这要归功于木材可用的细木工制品种类繁多。 如果您能掌握这些细木工原则,您将成为一名非常称职的木匠。
🔴 简单对接
对接接头是最基本的木工制品类型。 对接接头只不过是两块木头相互对接并用机械紧固件固定(通常与另一块木板成直角或正方形)。 在建筑项目中,这种接头经常用于墙体框架。 了解如何正确使用对接接头以及何时使用不同风格的细木工制品。
🔴 盒���关节
尽管燕尾榫接头很吸引人且坚固,但它们并不总是有用。 燕尾接头的一个不太复杂的选择是箱形接头。 了解如何为您的木工项目构建可靠耐用的盒式接头。
🔴 斜接接头
除了两块板以一定角度连接(而不是彼此成直角)外,斜接对接接头与基本对接接头基本相同。 好处是在斜接接头处不会有任何可见的末端纹理,使其在美学上更容易接受。 不过,斜接接头不是很坚固。
🔴半搭接
为了使两块板拼接齐平,将两块板各取一半进行半搭接。 虽然这种木工工艺比对接接头更坚固,但它可能会削弱相邻两块木板的强度。
🔴舌槽接头
只需将接头对接在一起并用螺栓固定,即可将两块方板沿长边连接在一起。 但是,如果您要粘合接头,则榫槽连接处会明显更坚固,并提供更多的相邻表面。
🔴 榫卯
木工的传统技术是榫眼。 自木工诞生以来,这些接头就一直在使用,它们仍然是连接木材的最好、最漂亮的方法之一。 了解如何制作完美、紧密的榫卯接头。
🔴 袖珍关节
口袋连接的一个例子是,在刻槽和钻角钻导向孔后,用螺钉将两块板连接在一起。 预钻孔必须非常精确,因此通常使用商业夹具来完成任务。 对于柜面框架和其他不需要很大强度的类似应用,口袋接头非常有效。 在您的木工任务中,学习如何制作口袋接头。
🔴 Dado 关节
墙裙只不过是一块板上带有方形凹槽的区域,另一块板可以安装在该区域上。 这是一种典型的木工技术,如榫槽细木工,用于连接胶合板,例如在制作橱柜时。
🔴 榫接
槽口是橱柜中使用的另一种典型的木接头。 本质上,槽口是沿着木板边缘切割的墙裙。 当橱柜和其他类似组件的背面使用槽口连接到盒子的侧面时,组件会获得很大程度的强度。 找出何时使用槽口以及如何干净利落地切割它们。
🔴 燕尾接头
直通燕尾榫可能是最受推崇的木工技术。 传统的贯穿式燕尾榫令人惊叹,极其耐用,并为任何物品增添一丝优雅气息。 可以使用多种技术制作贯通燕尾槽,例如手工切割或夹具加工。 发现品质的秘密
.............................................................
🔴🔴 वुड जॉइनरी स्टाइल्स (आपको पता होना चाहिए)
वुडवर्किंग में सबसे मौलिक विचारों में से एक है वुड जॉइनरी। अगर हम लकड़ी के दो टुकड़ों को एक साथ जोड़ने में सक्षम नहीं होते तो लकड़ी के सभी सामान लकड़ी के एक टुकड़े से काटे जाते। लकड़ी के लिए उपलब्ध कई विविध प्रकार की जॉइनरी के लिए लकड़ी का काम करने वाला काम के आधार पर विभिन्न प्रकार के जोड़ों से चुन सकता है। यदि आप लकड़ी के जोड़ के इन सिद्धांतों में महारत हासिल कर लेते हैं, तो आप एक बहुत ही सक्षम बढ़ई बनने की राह पर अग्रसर होंगे।
🔴 सिंपल बट जॉइंट
बट जॉइंट वुड जॉइनरी का सबसे मौलिक प्रकार है। एक बट जोड़ इससे ज्यादा कुछ नहीं है जब लकड़ी के दो टुकड़े एक दूसरे के खिलाफ बट जाते हैं और यांत्रिक फास्टनरों (अक्सर एक समकोण या दूसरे बोर्ड के वर्ग) के साथ सुरक्षित होते हैं। परियोजनाओं के निर्माण पर, दीवारों के फ्रेमिंग में इस प्रकार के जोड़ का अक्सर उपयोग किया जाता है। जानें कि कैसे एक बट जोड़ का ठीक से उपयोग करना है और लकड़ी की एक अलग शैली का उपयोग कब करना है।
🔴 द बॉक्स जॉइंट
हालांकि डोवेटेल जोड़ आकर्षक और मजबूत होते हैं, लेकिन वे हमेशा उपयोगी नहीं होते हैं। ड्वेलटेल जंक्शन का एक कम जटिल विकल्प एक बॉक्स जोड़ है। अपने वुडवर्किंग प्रोजेक्ट्स के लिए विश्वसनीय और टिकाऊ बॉक्स जोड़ों का निर्माण कैसे करें, इसका पता लगाएं।
🔴 मिटर्ड ज्वाइंट
अपवाद के साथ दो बोर्डों को एक कोण पर जोड़ा जा रहा है (बजाय एक दूसरे से चौकोर), एक माइटर्ड बट जॉइंट अनिवार्य रूप से एक बेसिक बट जॉइंट के समान है। इसका लाभ यह है कि माइटर्ड बट जॉइंट पर कोई अंतिम दाना दिखाई नहीं देगा, जिससे यह सौंदर्य की दृष्टि से थोड़ा अधिक स्वीकार्य हो जाएगा। हालांकि, मिटर्ड बट जॉइंट बहुत मजबूत नहीं है।
🔴 हाफ लैप ज्वाइंट
दो बोर्डों को एक दूसरे के साथ फ्लश में शामिल करने के लिए, दो बोर्डों में से प्रत्येक के आधे हिस्से को आधा-लैप संयुक्त के लिए हटा दिया जाता है। हालांकि लकड़ी की यह शैली बट जोड़ों की तुलना में अधिक मजबूत है, फिर भी यह दो आसन्न बोर्डों की ताकत को कम कर सकती है।
🔴जीभ और नाली का जोड़
किसी को केवल जोड़ को एक साथ जोड़ने की जरूरत है और एक लंबे किनारे के साथ दो वर्ग बोर्डों को एक साथ जोड़ने के लिए इसे बोल्ट के साथ सुरक्षित करें। हालाँकि, यदि आप जोड़ को गोंद करने जा रहे हैं, तो जीभ और नाली का जंक्शन काफी मजबूत होता है और सतह से सटे अधिक सतह प्रदान करता है।
🔴 मोर्टिज़ और टेनन जोड़
लकड़ी के जोड़ के लिए एक पारंपरिक तकनीक मोर्टिज़ और टेनन है। लकड़ी के काम की शुरुआत के बाद से, ये जोड़ उपयोग में रहे हैं, और वे लकड़ी में शामिल होने के सबसे अच्छे और सबसे खूबसूरत तरीकों में से एक हैं। सही, टाइट मोर्टिज़ और टेनन जॉइंट बनाना सीखें।
🔴 पॉकेट जॉइंट
एक पॉकेट जंक्शन का एक उदाहरण है जब दो बोर्डों को एक स्लॉट के बाद एक पेंच के साथ जोड़ा जाता है और एक कोण-ड्रिल पायलट छेद होता है। प्री-ड्रिलिंग बहुत सटीक रूप से की जानी चाहिए, इसलिए कार्य को पूरा करने के लिए आमतौर पर एक वाणिज्यिक जिग का उपयोग किया जाता है। कैबिनेट फेस फ्रेम और अन्य तुलनीय अनुप्रयोगों के लिए जहां बहुत अधिक ताकत की आवश्यकता नहीं होती है, पॉकेट जोड़ उत्कृष्ट रूप से काम करते हैं। अपने वुडवर्किंग कार्यों में, पॉकेट जॉइंट बनाना सीखें।
🔴डेडो जोड़
एक डेडो एक बोर्ड पर एक चौकोर खांचे के साथ एक क्षेत्र से ज्यादा कुछ नहीं है जहां दूसरा बोर्ड फिट हो सकता है। यह एक विशिष्ट वुड जॉइनरी तकनीक है, जैसे जीभ और नाली जॉइनरी, प्लाईवुड में शामिल होने के लिए, जैसे कैबिनेट बनाते समय।
🔴खरगोश जोड़
रैबेट कैबिनेटरी में उपयोग किया जाने वाला एक और विशिष्ट लकड़ी का जोड़ है। संक्षेप में, एक रैबेट एक बोर्ड के किनारे के साथ बनाया गया डेडो कट है। जब कैबिनेट और अन्य समान असेंबली के पीछे खरगोशों का उपयोग करके बॉक्स के किनारों से जुड़ा होता है, तो असेंबली को काफी ताकत मिलती है। पता करें कि खरगोशों का उपयोग कब करना है और उन्हें कैसे साफ करना है।
🔴 डोवेटेल जॉइंट
ड्वेलटेल के माध्यम से सबसे सम्मानित लकड़ी की जॉइनरी तकनीक हो सकती है। डोवेटेल के माध्यम से एक पारंपरिक शानदार, बेहद टिकाऊ है, और किसी भी आइटम को लालित्य का स्पर्श देता है। डोवेटेल के माध्यम से विभिन्न प्रकार की तकनीकों का उपयोग करके बनाया जा सकता है, जैसे कि हाथ काटना या जिग मशीनिंग। गुणवत्ता के रहस्यों की खोज करें
Wood mdad™️
🔴 Simple Butt Joint
The butt joint is the most fundamental type of wood joinery. A butt joint is nothing more than when two pieces of wood butt against one another and are secured with mechanical fasteners (often at a right angle or square to the other board). On building projects, this kind of joint is frequently utilized in the framing of walls. Learn how to use a butt joint properly and when to use a different style of wood joinery.
🔴 The Box Joint
Although dovetail joints are attractive and sturdy, they are not always useful. A less complex option to a dovetail junction is a box joint. Find out how to construct reliable and durable box joints for your woodworking projects.
🔴 Mitered Joint
With the exception of the two boards being linked at an angle (rather than square to one another), a mitered butt joint is essentially identical to a basic butt joint. The benefit is that there won't be any end grain visible at the mitered butt joint, making it a little more aesthetically acceptable. The mitered butt joint isn't very sturdy, though.
🔴 half lap joint
In order to make the two boards join flush with one another, half of each of the two boards is removed for the half-lap joint. Although this style of wood joinery is stronger than butt joints, it might nonetheless impair the strength of the two adjacent boards.
🔴Tongue and Groove joint
One need only butt the joint together and secure it with bolts to attach two square boards together along a long edge. However, if you're going to glue the joint, the tongue and groove junction is significantly stronger and offers more adjoining surface surfaces.
🔴 Mortise and tenon joint
A traditional technique for wood joinery is the mortise and tenon. Since the dawn of woodworking, these joints have been in use, and they remain one of the best and most beautiful ways to join wood. Learn how to make perfect, tight mortise and tenon joints.
🔴 Pocket Joint
An example of a pocket junction is when two boards are joined together with a screw after a slot has been carved and an angle-drilled pilot hole. Pre-drilling must be done very precisely, hence a commercial jig is usually used to complete the task. For cabinet face frames and other comparable applications where a lot of strength is not required, pocket joints work excellently. In your woodworking tasks, learn how to make pocket joints.
🔴 Dado Joint
A dado is nothing more than an area on one board with a square groove where another board can fit. This is a typical wood joinery technique, like tongue and groove joinery, for joining plywood, such as when making cabinets.
🔴 Rabbet joint
The rabbet is yet another typical wood joint utilized in cabinetry. In essence, a rabbet is a dado cut made along a board's edge. When the back of cabinets and other similar assemblies is attached to the sides of the box using rabbets, the assembly gains a significant degree of strength. Find out when to use rabbets and how to cut them cleanly.
🔴 Dovetail Joint
The thru dovetail may be the most revered wood joinery technique. A traditional thru dovetail is stunning, extremely durable, and lends a touch of elegance to any item. Through dovetails can be made using a variety of techniques, such as hand cutting or jig machining. Discover the secrets to a quality
........................................
🔴🔴 Стили деревянных столярных изделий (вы должны знать)
Одной из самых фундаментальных идей в деревообработке является деревянная столярка. Все изделия из дерева были бы скульптурами, вырезанными из цельного куска дерева, если бы мы не могли прочно соединить два куска дерева вместе. Столяр может выбирать из множества соединений в зависимости от работы благодаря множеству различных типов столярных изделий, доступных для дерева. Вы будете на пути к тому, чтобы стать очень компетентным плотником, если освоите эти принципы столярного дела.
🔴 Простое стыковое соединение
Стыковое соединение является самым основным типом деревянных столярных изделий. Стыковое соединение — это не что иное, как когда два куска дерева упираются друг в друга и закрепляются механическими застежками (часто под прямым углом или под прямым углом к другой доске). В строительных проектах этот тип соединения часто используется в каркасе стен. Узнайте, как правильно использовать стыковое соединение и когда использовать другой стиль деревянных столярных изделий.
🔴 Коробчатый сустав
Хотя соединения типа «ласточкин хвост» привлекательны и прочны, они не всегда полезны. Менее сложным вариантом соединения типа «ласточкин хвост» является коробчатое соединение. Узнайте, как сконструировать надежные и прочные муфтовые соединения для ваших проектов по деревообработке.
🔴 Скошенный стык
За исключением того, что две доски соединены под углом (а не под прямым углом друг к другу), стыковое соединение под углом практически идентично обычному стыковому соединению. Преимущество заключается в том, что на скошенном стыковом стыке не будет видно торцевой шероховатости, что делает его немного более эстетически приемлемым. Однако скошенный стык не очень прочный.
🔴 соединение внахлест
Чтобы две доски стыковались заподлицо друг с другом, половина каждой из двух досок снимается для соединения внахлест. Хотя этот стиль деревянных столярных изделий прочнее, чем стыковые соединения, он, тем не менее, может ухудшить прочность двух соседних досок.
🔴Соединение языка и канавки
Нужно только соединить соединение встык и закрепить его болтами, чтобы соединить две квадратные доски вместе по длинному краю. Однако, если вы собираетесь склеивать соединение, соединение шпунт-паз значительно прочнее и предлагает больше соприкасающихся поверхностей.
🔴 Врезное и шиповое соединение
Традиционная техника деревянных столярных изделий - врезка и шип. С самого начала деревообработки эти соединения использовались, и они остаются одним из лучших и самых красивых способов соединения древесины. Узнайте, как сделать идеальные, плотные врезные и шиповые соединения.
🔴 Карманный сустав
Пример карманного соединения - это когда две доски соединяются вместе с помощью винта после того, как прорезан паз и просверлено направляющее отверстие под углом. Предварительное сверление должно быть выполнено очень точно, поэтому для выполнения этой задачи обычно используется коммерческое приспособление. Для лицевой рамы шкафа и других подобных применений, где не требуется большой прочности, идеально подходят карманные соединения. В своих задачах по деревообработке научитесь делать карманные соединения.
🔴 Дадо Джойнт
Дадо — это не что иное, как область на одной доске с квадратным углублением, куда может поместиться другая доска. Это типичная техника столярных работ по дереву, такая как соединение шпунтом и пазом, для соединения фанеры, например, при изготовлении шкафов.
🔴Шов внахлест
Фальц — еще одно типичное деревянное соединение, используемое в краснодеревщике. По сути, шпунт представляет собой вырез, сделанный вдоль края доски. Когда задняя часть шкафов и других подобных узлов крепится к бокам коробки с помощью шпунтов, сборка приобретает значительную степень прочности. Узнайте, когда использовать шпунты и как аккуратно их вырезать.
🔴 Соединение «ласточкин хвост»
Сквозной ласточкин хвост может быть самой почита��мой техникой столярного дела из дерева. Традиционный сквозной ласточкин хвост ошеломляет, чрезвычайно прочен и придает элегантность любому изделию. Сквозные ласточкины хвосты могут быть изготовлены с использованием различных методов, таких как ручная резка или координатная обработка. Откройте секреты качества
.............................................................
🔴🔴 أنماط نجارة الخشب (يجب أن تعرف)
تعتبر نجارة الخشب واحدة من الأفكار الأساسية في النجارة. ستكون جميع عناصر الأعمال الخشبية منحوتات مقطوعة من قطعة واحدة من الخشب إذا لم نتمكن من ربط قطعتين من الخشب معًا بقوة. يمكن لعامل الخشب الاختيار من بين مجموعة متنوعة من المفاصل اعتمادًا على الوظيفة بفضل الأنواع العديدة المتنوعة من النجارة المتوفرة للخشب. ستكون في طريقك إلى أن تصبح نجارًا كفؤًا للغاية إذا كنت تستطيع إتقان مبادئ نجارة الخشب هذه.
🔴 مفصل بعقب بسيط
المفصل التناكبي هو النوع الأساسي من نجارة الخشب. لا يعد مفصل المؤخرة أكثر من عندما تكون قطعتان من الخشب ضد بعضهما البعض ويتم تثبيتهما بمشابك ميكانيكية (غالبًا بزاوية قائمة أو مربع على اللوحة الأخرى). في مشاريع البناء ، يتم استخدام هذا النوع من الوصلات بشكل متكرر في تأطير الجدران. تعرف على كيفية استخدام مفصل تناكبي بشكل صحيح ومتى تستخدم نمطًا مختلفًا من نجارة الخشب.
🔴 مفصل الصندوق
على الرغم من أن المفاصل التعشيقة جذابة ومتينة ، إلا أنها ليست مفيدة دائمًا. الخيار الأقل تعقيدًا للتقاطع التعشيقي هو مفصل الصندوق. تعرف على كيفية إنشاء وصلات صندوقية موثوقة ومتينة لمشاريع الأعمال الخشبية الخاصة بك.
🔴 مفصل ميترييد
باستثناء اللوحين المرتبطين بزاوية (بدلاً من مربعتين لبعضهما البعض) ، فإن مفصل التراكب المتقلب مطابق بشكل أساسي لمفصل تناكبي أساسي. والفائدة هي أنه لن يكون هناك أي حبة نهائية مرئية عند مفصل المؤخرة المتقشرة ، مما يجعلها مقبولة أكثر من الناحية الجمالي��. ومع ذلك ، فإن مفصل المؤخرة المتقوس ليس قويًا جدًا.
🔴 نصف حضن مشترك
من أجل جعل اللوحين يتحدان مع بعضهما البعض ، تتم إزالة نصف كل من اللوحتين لمفصل نصف اللفة. على الرغم من أن هذا النمط من نجارة الخشب أقوى من الوصلات التناكبية ، إلا أنه قد يضعف مع ذلك قوة اللوحين المتجاورين.
🔴 مفصل اللسان والأخدود
يحتاج المرء فقط إلى ربط المفصل معًا وتثبيته بمسامير لربط لوحين مربعين معًا على طول حافة طويلة. ومع ذلك ، إذا كنت ستلصق المفصل ، فإن تقاطع اللسان والأخدود يكون أقوى بشكل ملحوظ ويوفر المزيد من الأسطح المجاورة.
🔴 نقر ومفصل لسان
تقنية تقليدية لنجارة الخشب هي نقر ولسان. منذ فجر النجارة ، تم استخدام هذه المفاصل ، ولا تزال واحدة من أفضل وأجمل الطرق للانضمام إلى الخشب. تعلم كيف تصنع نقرًا مثاليًا وضيقًا ومفاصل لسان.
🔴 جيب مشترك
مثال على تقاطع الجيب هو عندما يتم ربط لوحين مع برغي بعد نحت فتحة وثقب تجريبي محفور بزاوية. يجب أن يتم الحفر المسبق بدقة شديدة ، ومن ثم يتم استخدام الرقصة التجارية عادةً لإكمال المهمة. بالنسبة لإطارات وجه الخزانة والتطبيقات المماثلة الأخرى التي لا تتطلب قدرًا كبيرًا من القوة ، تعمل مفاصل الجيب بشكل ممتاز. في مهام النجارة الخاصة بك ، تعلم كيفية عمل مفاصل الجيب.
🔴 دادو جوينت
دادو ليس أكثر من مساحة على لوحة واحدة بها أخدود مربع حيث يمكن أن تتسع لوحة أخرى. هذه تقنية نجارة خشبية نموذجية ، مثل نجارة اللسان والأخدود ، للانضمام إلى الخشب الرقائقي ، كما هو الحال عند صنع الخزانات.
🔴 مفصل أرنب
الأرنب هو مفصل خشبي نموذجي آخر يستخدم في الخزائن. في جوهرها ، الأرنب هو قطع دادو مصنوع على طول حافة اللوح. عندما يتم تثبيت الجزء الخلفي من الخزانات والتجمعات المماثلة الأخرى على جوانب الصندوق باستخدام الأرانب ، يكتسب التجميع درجة كبيرة من القوة. تعرف على وقت استخدام الأرانب وكيفية قصها بشكل نظيف.
🔴 وصلة متداخلة
قد يكون التوافق من خلال تقنية النجارة الخشبية الأكثر احترامًا. تتماشى القوالب التقليدية المذهلة والمتينة للغاية وتضفي لمسة من الأناقة على أي عنصر. يمكن إجراء التعشيق من خلال استخدام مجموعة متنوعة من التقنيات ، مثل القطع اليدوي أو التشكيل بالرقص. اكتشف أسرار الجودة
......................................................
🔴🔴 细木工风格(你应该知道)
木工中最基本的想法之一是木工。 如果我们不能将两块木头牢固地连接在一起,那么所有的木工制品都是从一块木头上切割下来的雕塑。 木工可以根据工作从各种接头中挑选,这要归功于木材可用的细木工制品种类繁多。 如果您能掌握这些细木工原则,您将成为一名非常称职的木匠。
🔴 简单对接
对接接头是最基本的木工制品类型。 对接接头只不过是两块木头相互对接并用机械紧固件固定(通常与另一块木板成直角或正方形)。 在建筑项目中,这种接头经常用于墙体框架。 了解如何正确使用对接接头以及何时使用不同风格的细木工制品。
🔴 盒子关节
尽管燕尾榫接头很吸引人且坚固,但它们并不总是有用。 燕尾接头的一个不太复杂的选择是箱形接头。 了解如何为您的木工项目构建可靠耐用的盒式接头。
🔴 斜接接头
除了两块板以一定角度连接(而不是彼此成直角)外,斜接对接接头与基本对接接头基本相同。 好处是在斜接接头处不会有任何可见的末端纹理,使其在美学上更容易接受。 不过,斜接接头不是很坚固。
🔴半搭接
为了使两块板拼接齐平,将两块板各取一半进行半搭接。 虽然这种木工工艺比对接接头更坚固,但它可能会削弱相邻两块木板的强度。
🔴舌槽接头
只需将接头对接在一起并用螺栓固定,即可将两块方板沿长边连接在一起。 但是,如果您要粘合接头,则榫槽连接处会明显更坚固,并提供更多的相邻表面。
🔴 榫卯
木工的传统技术是榫眼。 自木工诞生以来,这些接头就一直在使用,它们仍然是连接木材的最好、最漂亮的方法之一。 了解如何制作完美、紧密的榫卯接头。
🔴 袖珍关节
口袋连接的一个例子是,在刻槽和钻角钻导向孔后,用螺钉将两块板连接在一起。 预钻孔必须非常精确,因此通常使用商业夹具来完成任务。 对于柜面框架和其他不需要很大强度的类似应用,口袋接头非常有效。 在您的木工任务中,学习如何制作口袋接头。
🔴 Dado 关节
墙裙只不过是一块板上带有方形凹槽的区域,另一块板可以安装在该区域上。 这是一种典型的木工技术,如榫槽细木工,用于连接胶合板,例如在制作橱柜时。
🔴 榫接
槽口是橱柜中使用的另一种典型的木接头。 本质上,槽口是沿着木板边缘切割的墙裙。 当橱柜和其他类似组件的背面使用槽口连接到盒子的侧面时,组件会获得很大程度的强度。 找出何时使用槽口以及如何干净利落地切割它们。
🔴 燕尾接头
直通燕尾榫可能是最受推崇的木工技术。 传统的贯穿式燕尾榫令人惊叹,极其耐用,并为任何物品增添一丝优雅气息。 可以使用多种技术制作贯通燕尾槽,例如手工切割或夹具加工。 发现品质的秘密
.............................................................
🔴🔴 वुड जॉइनरी स्टाइल्स (आपको पता होना चाहिए)
वुडवर्किंग में सबसे मौलिक विचारों में से एक है वुड जॉइनरी। अगर हम लकड़ी के दो टुकड़ों को एक साथ जोड़ने में सक्षम नहीं होते तो लकड़ी के सभी सामान लकड़ी के एक टुकड़े से काटे जाते। लकड़ी के लिए उपलब्ध कई विविध प्रकार की जॉइनरी के लिए लकड़ी का काम करने वाला काम के आधार पर विभिन्न प्रकार के जोड़ों से चुन सकता है। यदि आप लकड़ी के जोड़ के इन सिद्धांतों में महारत हासिल कर लेते हैं, तो आप एक बहुत ही सक्षम बढ़ई बनने की राह पर अग्रसर होंगे।
🔴 सिंपल बट जॉइंट
बट जॉइंट वुड जॉइनरी का सबसे मौलिक प्रकार है। एक बट जोड़ इससे ज्यादा कुछ नहीं है जब लकड़ी के दो टुकड़े एक दूसरे के खिलाफ बट जाते हैं और यांत्रिक फास्टनरों (अक्सर एक समकोण या दूसरे बोर्ड के वर्ग) के साथ सुरक्षित होते हैं। परियोजनाओं के निर्माण पर, दीवारों के फ्रेमिंग में इस प्रकार के जोड़ का अक्सर उपयोग किया जाता है। जानें कि कैसे एक बट जोड़ का ठीक से उपयोग करना है और लकड़ी की एक अलग शैली का उपयोग कब करना है।
🔴 द बॉक्स जॉइंट
हालांकि डोवेटेल जोड़ आकर्षक और मजबूत होते हैं, लेकिन वे हमेशा उपयोगी नहीं होते हैं। ड्वेलटेल जंक्शन का एक कम जटिल विकल्प एक बॉक्स जोड़ है। अपने वुडवर्किंग प्रोजेक्ट्स के लिए विश्वसनीय और टिकाऊ बॉक्स जोड़ों का निर्माण कैसे करें, इसका पता लगाएं।
🔴 मिटर्ड ज्वाइंट
अपवाद के साथ दो बोर्डों को एक कोण पर जोड़ा जा रहा है (बजाय एक दूसरे से चौकोर), एक माइटर्ड बट जॉइंट अनिवार्य रूप से एक बेसिक बट जॉइंट के समान है। इसका लाभ यह है कि माइटर्ड बट जॉइंट पर कोई अंतिम दाना दिखाई नहीं देगा, जिससे यह सौंदर्य की दृष्टि से थोड़ा अधिक स्वीकार्य हो जाएगा। हालांकि, मिटर्ड बट जॉइंट बहुत मजबूत नहीं है।
🔴 हाफ लैप ज्वाइंट
दो बोर्डों को एक दूसरे के साथ फ्लश में शामिल करने के लिए, दो बोर्डों में से प्रत्येक के आधे हिस्से को आधा-लैप संयुक्त के लिए हटा दिया जाता है। हालांकि लकड़ी की यह शैली बट जोड़ों की तुलना में अधिक मजबूत है, फिर भी यह दो आसन्न बोर्डों की ताकत को कम कर सकती है।
🔴जीभ और नाली का जोड़
किसी को केवल जोड़ को एक साथ जोड़ने की जरूरत है और एक लंबे किनारे के साथ दो वर्ग बोर्डों को एक साथ जोड़ने के लिए इसे बोल्ट के साथ सुरक्षित करें। हालाँकि, यदि आप जोड़ को गोंद करने जा रहे हैं, तो जीभ और नाली क��� जंक्शन काफी मजबूत होता है और सतह से सटे अधिक सतह प्रदान करता है।
🔴 मोर्टिज़ और टेनन जोड़
लकड़ी के जोड़ के लिए एक पारंपरिक तकनीक मोर्टिज़ और टेनन है। लकड़ी के काम की शुरुआत के बाद से, ये जोड़ उपयोग में रहे हैं, और वे लकड़ी में शामिल होने के सबसे अच्छे और सबसे खूबसूरत तरीकों में से एक हैं। सही, टाइट मोर्टिज़ और टेनन जॉइंट बनाना सीखें।
🔴 पॉकेट जॉइंट
एक पॉकेट जंक्शन का एक उदाहरण है जब दो बोर्डों को एक स्लॉट के बाद एक पेंच के साथ जोड़ा जाता है और एक कोण-ड्रिल पायलट छेद होता है। प्री-ड्रिलिंग बहुत सटीक रूप से की जानी चाहिए, इसलिए कार्य को पूरा करने के लिए आमतौर पर एक वाणिज्यिक जिग का उपयोग किया जाता है। कैबिनेट फेस फ्रेम और अन्य तुलनीय अनुप्रयोगों के लिए जहां बहुत अधिक ताकत की आवश्यकता नहीं होती है, पॉकेट जोड़ उत्कृष्ट रूप से काम करते हैं। अपने वुडवर्किंग कार्यों में, पॉकेट जॉइंट बनाना सीखें।
🔴डेडो जोड़
एक डेडो एक बोर्ड पर एक चौकोर खांचे के साथ एक क्षेत्र से ज्यादा कुछ नहीं है जहां दूसरा बोर्ड फिट हो सकता है। यह एक विशिष्ट वुड जॉइनरी तकनीक है, जैसे जीभ और नाली जॉइनरी, प्लाईवुड में शामिल होने के लिए, जैसे कैबिनेट बनाते समय।
🔴खरगोश जोड़
रैबेट कैबिनेटरी में उपयोग किया जाने वाला एक और विशिष्ट लकड़ी का जोड़ है। संक्षेप में, एक रैबेट एक बोर्ड के किनारे के साथ बनाया गया डेडो कट है। जब कैबिनेट और अन्य समान असेंबली के पीछे खरगोशों का उपयोग करके बॉक्स के किनारों से जुड़ा होता है, तो असेंबली को काफी ताकत मिलती है। पता करें कि खरगोशों का उपयोग कब करना है और उन्हें कैसे साफ करना है।
🔴 डोवेटेल जॉइंट
ड्वेलटेल के माध्यम से सबसे सम्मानित लकड़ी की जॉइनरी तकनीक हो सकती है। डोवेटेल के माध्यम से एक पारंपरिक शानदार, बेहद टिकाऊ है, और किसी भी आइटम को लालित्य का स्पर्श देता है। डोवेटेल के माध्यम से विभिन्न प्रकार की तकनीकों का उपयोग करके बनाया जा सकता है, जैसे कि हाथ काटना या जिग मशीनिंग। गुणवत्ता के रहस्यों की खोज करें
Wood mdad™️
#typeofwood#woodworkingidea#woodworkingprojects#wood#woodmdad#basicwoodworking#kindofwood#cabin in the forest#trees and forests#christmas
0 notes
Text
How can you keep two pieces of wood together while gluing them?
There are several ways to keep two pieces of wood together while gluing them, including:
Clamps: Using clamps is the most common way to keep the two pieces of wood together while the glue dries. Apply glue to one surface of the wood, place the second piece of wood on top, and use clamps to hold them together tightly. You can use a variety of clamps, including bar clamps, C-clamps, and spring clamps, depending on the size and shape of the wood pieces.
Weight: Another option is to place a heavy weight on top of the wood to keep them together while the glue dries. This method is best for small or lightweight pieces of wood. You can use heavy objects like books, bricks, or even a bag of sand to apply pressure evenly across the surface. best wood to wood adhesive
Tape: Masking tape or painter's tape can also be used to keep two pieces of wood together while gluing them. Apply the glue to one surface of the wood, place the second piece of wood on top, and wrap the tape tightly around the wood to hold them together. This method works best for smaller or more delicate pieces of wood.
Jigs: A jig is a device used to hold two pieces of wood in a specific position while they are being glued. You can make your own jig using scrap wood or purchase one from a woodworking store. A jig is useful when you need to join the wood at a specific angle or shape.
It's important to make sure the surfaces of the wood are clean and dry before applying glue and to clamp or weigh the wood together firmly to ensure a strong bond. Follow the glue manufacturer's instructions for drying time and allow the glue to dry completely before removing the clamps or weight.
You can also try the best moisture-resistant wood glue with Koffclub’s Adhesive MR.
0 notes
Text
How to Build a Kitchen Cabinet Assembly
The first step in kitchen cabinet assembly is to measure the space where you will install the cabinets. You can do this by using a stud finder. It is important to install the cabinets into wall studs, so you need to know their location. Mark each stud with a pencil mark near the center. Once you’ve marked the space, use a carpenter’s level to extend your lines. Next, mark the back of each cabinet where it will meet a stud. It’s also a good idea to drill pilot holes into each stud so that you can attach the cabinet more easily to the stud.
Preparation
The preparation process for new kitchen cabinets starts before the cabinets are even delivered. Getting the layout right is essential to a successful installation. A solid design will help avoid common problems. A good designer knows how to place vents under windows, make sure there is enough filler to avoid cabinet drawer blockage, and provide electrical outlets.
Before installing the cabinets, you need to make sure they are level. Start by outlining the base of each cabinet on the floor. You’ll also need to line up the cabinet fronts properly. If they aren’t flush, use wedge shims to adjust their depth. Then, line up the fronts of the cabinets using screws or trigger clamps.
After aligning the cabinet face frames, it is time to place the corner cabinet on the ledger board. It’s a good idea to place corner cabinets one at a time, if possible. Once it’s in the correct place, screw it to the wall studs using two-inch flathead screws. Don’t fully tighten the screws until the entire cabinet set is installed. Next, attach the filler strips between the cabinets, using woodworking clamps to hold them in place.
Tools
When it comes to building a kitchen cabinet, tools are an important part of the process. These tools can help you complete the project more quickly and accurately. Here are some essential tools you need: A miter saw – this tool is indispensable for making flush cuts and thru tenons. Crown molding is an added challenge, but a hammer and nail set can get the job done.
Cabinet hardware jig – A cabinet hardware jig can make the installation of cabinets a breeze, particularly when you’re working with drywall. It’s also useful for cutting decorative base profiles, removing depth from finished cabinets, and creating intricate shapes. A tape measure is also useful, as it allows you to measure the length of the cabinet and the distance between appliances and structures. A pencil is also important when installing cabinets, because you can mark your measurements with a pencil.
Scripts – A script with a pencil-like tip helps you make angled cuts. A miter saw can also be useful for cutting filler strips, skin panels, and crown molding. Some miter saws are designed to be flexible, so that you can use them as you need them. You should also consider investing in a high-speed hinge placement tool – this tool is ideal for placing hinges quickly and accurately. Some of these tools come with three spring-loaded punches to ensure precise placement.
Finishes
You have many options when it comes to finishes. There are varnishes, lacquer, and paint. A stain, for example, can make your cabinets look richer and more durable. It also creates a darkening pattern on the grain of the wood, with darker areas becoming darker and lighter ones remaining lighter. Stains are available in a variety of colors, and they can even amplify the colors of the wood.
Staining is a popular option for cabinets, since it provides a natural color to the wood. However, if you want a more modern look, you can choose another finish, such as varnish or paint. However, staining has its downfalls as it is more expensive to apply and requires more time and effort.
The best finish for your cabinets is the one that matches your decor. You can choose from a variety of different materials, and pick one that matches your kitchen’s design. When it comes to choosing a finish, consider the cost, durability, style, and design of your cabinets.
Mounting
Mounting kitchen cabinet assembly requires a few basic steps. It starts with aligning the cabinet faces with the face frame. Next, connect the cabinet face frames with screws. The screws should be countersunk to create a more even look. Once all of the cabinets are connected, you can start tightening the screws.
To secure the cabinet to the wall stud, you can use 3-inch #10 screws. Some manufacturers also offer washer-head screws that have a washer built into the head. You can also use toggle bolts to mount the cabinet to drywall, but you must drill holes beforehand. Then, secure the cabinet to its adjacent cabinet.
If you’re a DIYer, you can install the cabinets yourself if you’re confident in your installation skills. However, the installation process requires a lot of care and attention to detail. It’s crucial to follow the manufacturer’s instructions and wear safety equipment to prevent injury. Steel-toe shoes are especially important to prevent falls when installing cabinets. Also, make sure that you’re level so that the cabinet doors can close correctly. If the cabinets aren’t level, drawers can become stuck or the doors may not close properly. Always be sure to take your time and measure the cabinets to ensure they’ll fit properly.
Mounting kitchen cabinet assembly is not difficult if you follow these steps. First, measure the distance between the wall and the last installed unit. If the cabinets butt against a wall, you may need to install a filler strip to fill the gap. If you’re installing a stock cabinet, it’s important to remember to mark the edge with a straightedge. Next, make sure to make alignment marks about 3/4 inch off of the closest installed unit. Once you’ve measured correctly, fasten the filler strip to the wall.
Mounting to a wall stud
The first step in mounting a kitchen cabinet assembly to a wall stud is to pre-bore holes for the toggles. Each hole should be large enough to fit the toggle through the cabinet. You may also want to use a large washer in the hole to prevent the screwhead from dropping through. After drilling the holes, attach the toggles to the wall studs with self-tapping screws. Use two screws per stud.
Make sure to test the screw placement before installing. If the screw does not secure to the wall stud, try installing it at a different location. You may also want to use toggles instead of nailers. If you aren’t sure of how to properly mount a cabinet assembly to a wall stud, consider hiring a professional.
Once you have the drywall installed, you can start mounting the cabinet. To do this, cut a 2″x4″ horizontally across the space between two existing studs. Toe nail this strip to the studs. Then, fill in the hole with drywall to level the wall. Once the drywall is in place, cover the joint with the cabinet.
Filler strips
Filler strips for kitchen cabinet assembly will ensure that the cabinet door will close and open properly. They are typically one to two inches wide and will be needed where one cabinet is against the wall, or at a right angle to another cabinet. Once you have cut the filler strips to size, you will need to adhere them to the cabinets using wood glue.
Filler strips for kitchen cabinet assembly must be sanded before installation. Before attaching filler strips to your cabinets, use a belt sander to shape them to match the wall. If you don’t feel comfortable working with screws, you can also try using a silicone glue.
Filler strips for kitchen cabinet assembly should be used sparingly. You don’t want the filler strips to show, which can cause visual imbalance between your cabinets. To avoid that, you should lay out your cabinets and check for fit before you install them. Also, don’t forget to make sure you choose the correct color of filler strips for your kitchen cabinets.
You can find filler strips for kitchen cabinet assembly at big-box home improvement stores. These strips usually match the style of cabinets sold at the store. You can also find filler strips in different types of wood. Generally, these are easy to install. Filler strips for kitchen cabinet assembly are attached with glue, nails, screws, or bolts.
Mounting to a base cabinet box
Mounting your kitchen cabinet assembly to a base cabinet box requires a small amount of craftsmanship, but it is simple and quick. Once you have the necessary materials, you can begin the assembly process. Most components will arrive unattached, but you can secure them together with adhesive.
To attach the cabinet assembly to the base cabinet box, line up the four sides of the box. Make sure the front and back pieces are centered. Do not nail the back piece to the box, but instead place it inside the grooves and notches. Then, slide the back panel into place. Once the back piece is in place, use a chisel to square up the corners.
You can also use a clamp to join two base cabinets together. After the base cabinets are installed, you can install the doors and drawers. If necessary, you can also use shims to level the cabinet box. Before you start installing the base cabinet, you should make sure the wall is level and free of any other objects.
If you’re using RTA cabinets, mounting the cabinets to the base cabinet box can be tricky. It’s best to get help from someone who knows how to do it. The manufacturer should include fitting process drawings for every box so you’ll know how to attach the cabinet to the base.
.video-container {position: relative;padding-bottom: 56.25%;padding-top: 1px; height: 0; overflow: hidden;} .video-container iframe, .video-container object, .video-container embed {position: absolute;top: 0;LEFT: 0;width: 100%;height: 100%;}
youtube
The kitchen is often the heart of the home and plays a significant role in determining its overall appeal. If yours feels outdated or dated, you may feel less motivated to spend time cooking and eating in it. That’s why Vancouver kitchen Renovation is proud to bring you a Kitchen Design and Renovation package that will transform your space into something truly timeless and functional. Our Kitchen Design and Renovation packages will create a space that reflects your lifestyle and personality and gives you everything you need to cook delicious meals and entertain guests.
We understand that to be successful is to stay ahead of the curve. That means staying current with the latest technology and design trends. We always want to improve our products or services without breaking the bank. That’s why we stay connected to the latest technologies of NKBA, National Kitchen and Bath Association. In addition, at Vancouver Kitchen renovation, our primary focus is providing sustainable kitchen design and renovation packages, and we believe in sustainable living. Sustainable living is a way of life in harmony with nature. It is a lifestyle which focuses on the preservation of our environment. Sustainable living is a philosophy emphasizing respect for the environment and concern for its well-being. This means we should take care of the planet and treat it as if it were our home. We should try to preserve what we have and protect it from destruction. If we do this, we will enjoy the benefits of the earth’s resources for many generations. Whether you’re planning a major remodel or adding finishing touches to your current kitchen, we’d love to discuss your project. Book your showroom consultation online.
Main Areas of Service in British Columbia:
Vancouver
North Vancouver
West Vancouver
Burnaby
Coquitlam
Squamish
Whistler
Frequently Asked Questions
What layout is most functional for a kitchen?
An island is the best kitchen layout. It can be equipped with a stove, refrigerator, microwave, sink and dishwasher. An L-shaped kitchen layout that includes an island is considered the best in kitchen design.
What kind of kitchen backsplash is trendy?
A modern kitchen will look best with a fully-heightened backsplash. A subway tile backsplash will be a good option if you want something a little more traditional. For a rustic look, a brick or stone backsplash might be the best choice. It comes down ultimately to personal preference and what best fits your kitchen.
What are some of the cons of an open concept kitchen?
Privacy is the main issue. An open-concept, open-concept kitchen makes it impossible to conceal the mess from guests. Also, if you love to cook, the smells might bother people in other Often, there isn’t enough counter space or storage space to accommodate everything. It can be hard to clean an open kitchen if it doesn’t have a designated cooking area and dining area. Lastly, an open-concept kitchen may not be your best option if you don’t have much square footage.
What place should a refrigerator be in the kitchen?
The refrigerator should be placed between the stovetop/sink. You should place it close to the cupboards in order to quickly access what you need.
***
Planning permission is required for your new kitchen.
If you’re changing the electrical and plumbing locations, you would need electrical and plumbing permits. A building permit may be required if structural changes are being made to your walls.
You can always ask your local authority for clarification if you are unsure about whether you require planning permission.
How can I determine my budget for a kitchen remodel?
Here are some tips to help you decide on a budget.
Start by estimating the cost of materials needed for your remodel. These materials include countertops.
Check out the average cost for labor in your area. Add this number to your budget.
Add up all labor and materials costs to finish your project. Divide that number by the square footage of your kitchen. This will give you an estimate of the cost per square foot.
Add any savings that you expect from doing some work yourself, or purchasing materials at a discounted price.
To cover any unforeseen costs, consider adding a contingency rate of 10 to 20%.
These are just estimates. To get a more accurate idea of your kitchen to remodel budget, consult a professional contractor.
These guidelines will help you create a budget for your kitchen remodel. Your actual costs can vary depending upon the materials you select, the scope of the project, and other factors.
What should I do if I need a new kitchen?
You should start by writing down your desires and needs. This will enable you to communicate with potential remodelers and contractors.
Budget: How big can you spend to get a new kitchen installed?
Size: What is your kitchen’s size? What size kitchen do you need?
Layout: What’s the layout of your kitchen. Is it necessary to change the layout in your kitchen?
– Appliances: What appliances do you want in your new kitchen?
– Storage: How will your kitchen store all of your food and supplies?
– Style: Which style of kitchen do your want? Traditional, contemporary, rustic, etc.
– The Colors: What color do you want to use in your new kitchen.
After you have taken all of these factors into consideration, you can begin planning your new kitchen.
Statistics
In large firms, the commission charged by the GC ranges from 15 to 25 percent of the total job cost. (thespruce.com)
In the Pacific region (Alaska, California, Washington, and Oregon), according to Remodeling Magazine, that same midrange central kitchen remodel jumps to $72,513, and a major upscale kitchen remodels jumps up $11,823 from the national average to $143,333. (hgtv.com)
“We decided to strip and refinish our kitchen cabinets during a heat wave with 90-plus-degree temperatures and 90 percent humidity in a house with no air conditioning. (familyhandyman.com)
Followed by cabinet cost, labour, and appliance costs consume 20 percent each of your budget. (hgtv.com)
It’s a fantastic thing about most home improvement projects: no matter the job. It often seems like the last 20% is the most difficult. (familyhandyman.com)
External Links
hgtv.com
Choosing Kitchen Appliances | HGTV
HGTV – Creating a Kitchen for Entertaining
forbes.com
Amazing Kitchen Remodel Ideas That Will Refresh Your Home
thespruce.com
Open Floor Plan: History and Pros and Cons
Find professionals to estimate kitchen remodeling costs
remodeling.hw.net
Cost vs. value 2021
Cost vs. Value Project: Minor Kitchen Remodel
How To
How do you choose a kitchen remodeling contractor?
The following tips should help you make a good decision when choosing a Kitchen Remodel contractor.
Ask around to find out what friends have to say about their experiences dealing with different contractors. It is a great place to get honest feedback, especially from people who know the contractors. Ask them about the work quality, professionalism, cleanliness, punctuality, etc. Also, consider asking if they had any problems with the contractor. Do they have any problems with the contractor?
Request quotes from several companies. Prepare to give a detailed description and why you are hiring someone else. Let them know that you’re looking to hire someone who can handle kitchen remodels. Also, you can include information about the space, such as the dimensions and the materials used. Tell them exactly what type of finish (i.e. countertops, cabinets and backsplash, flooring). Make sure to include any specific requests during the project. Do you need new appliances? Do you prefer a particular type of cabinetry or style? Is there something you’d like to see in your cabinetry, like a built-in wine fridge or microwave oven?
Determine if the company offers worker’s insurance. Look online to determine if the contractor has any trade associations. It is always best to choose a company that is a member of a respected organization.
Schedule a meeting with the contractor to discuss your project in detail. Ask about their experience and qualifications. Find out what their approach would be to your project as well as the timeframe they envision.
Ask for references from past clients. When hiring a contractor, don’t just take his word for it; ask him for referrals. Call the names he recommends from his list of references. Let them know that you would like to talk to them about their positive experiences with this contractor.
Check out reviews left by customers on websites like Yelp and Angie’s List. These sites are popular for homeowners who want to leave feedback after they’ve completed projects. If you see positive reviews, it is likely that you will get a high-quality job.
Hire a kitchen designer to help you plan your kitchen remodel. An experienced designer will better understand what will look best in your kitchen than anyone else. She/he will also be knowledgeable about the latest trends for kitchens.
The post How to Build a Kitchen Cabinet Assembly first appeared on Vancouver Kitchen Renovation.
source https://vancouverkitchenrenovation.com/kitchens/how-to-build-a-kitchen-cabinet-assembly/?utm_source=rss&utm_medium=rss&utm_campaign=how-to-build-a-kitchen-cabinet-assembly
0 notes
Video
youtube
woodworking tips - handmade tools idea - 90 degree right angle multi han...
woodworking tips || handmade tools idea || 90 degree right angle multi hand drilling jig How do you drill a 90 degree hole with a hand drill? 90° Right Angle Multi Hand Drilling Jig [Woodworking Tips]
How do you drill multiple holes at the same angle?
Make a Anywhere Right-Angle Drill Guide | Tricks of the Trade
90 degree drill jig
How do you drill a perfect 90-degree angle?
How do you drill a perpendicular with a hand drill?
What is a 90 degree drill used for?
Can you drill with right angle attachment?
Right Angle Drills - The Home Depot
angle drill guide
0 notes
Text
Shopnotes box joint jig pdf
SHOPNOTES BOX JOINT JIG PDF >>Download
vk.cc/c7jKeU
SHOPNOTES BOX JOINT JIG PDF >> Leia online
bit.do/fSmfG
ncaixes (tipo finger joint). desenho baseado em matéria da edição 124 da revista shopnotes. #encaixe #finger_joint #gabarito #jig. Cut slightly long and miter to exact length on assembly. Ease top edges by routing 1/4" round-over. Router table jig makes. cutting box joints easy. 14". Video: Homemade lathe for drill press, How to make sigle blade box joint jig · técnica: Chopless Dovetails · 10 Dirt-Simple Woodworking Jigs You Need ShopNotes #08 - Box Joint Jig - Free download as PDF File (.pdf), Text File (.txt) or read online for free. 68 best diy shopnotes box joint jig plans free pdf video. how to transform your table plans. shopnotes magazine  woodworking online. in the shopFinger Joint Jig. The flexibility of this unique jig makes it easy to add eye-catching elements to your next project. last month; PDF. Bookmark; Embed; Share; Print. Download. This document was uploaded by user and they confirmed that they have the permission to share it. Dovetail joint vs box joint. I think the main reason to use dovetail joints nowadays is for their looks. Fact is, for drawers, I have mostly just used nailed
https://www.tumblr.com/sonihajexab/697695878601981952/blank-hex-map-pdf, https://www.tumblr.com/sonihajexab/697695878601981952/blank-hex-map-pdf, https://www.tumblr.com/sonihajexab/697695878601981952/blank-hex-map-pdf, https://www.tumblr.com/sonihajexab/697695483662041088/tutorial-windows-10-pdf-problems, https://www.tumblr.com/sonihajexab/697695483662041088/tutorial-windows-10-pdf-problems.
0 notes
Text
5 easy ways to improve your wood routing skills
Routing is one of the essential aspects of woodworking. By learning how to do it correctly, you can create beautiful, sturdy furniture that will last for years. Here are five easy ways to improve your skills:
Improve your wood routing skills with these five easy tips
If you're looking to improve your wood routing skills, there are a few easy ways. One is to use a router engine, which can help create even lines and angles in your wood projects. Another is to practice with different types of woods, such as oak, maple, and cherry. And lastly, try using a routing jigsaw to cut precise patterns in your wood. All of these techniques can help you create more accurate and efficient projects.
1. Understand the tools you need.
You'll want to have two basic tools while working with wood: a jigsaw and a router table. A jig saw is great for cutting out smaller pieces of wood, so they don't get lost inside the router table where the larger cuts are made. Most people use a router table to create intricate shapes and curves in their projects. If you've ever worked with wood before, you know what's involved.
You'll slice some wood into various shapes and sizes, trying not to make any mistakes along the way. The best thing about using a router table is how simple it is to set up and tear down. All the setup and cleanup take place outside the actual workspace. Once everything is put away, you have to remember where things went. So no leftover bits of wood are lying around where someone could trip over them.
2. Set up your workspace properly.
Some people choose to do their work right on top of their beds or couch. However, you never really know who might walk in after hours because it's often hard to tell if something was left out overnight. So instead, I suggest setting up shop in a well-lit area of the house with plenty of floor space to spread out.
That way, even if you leave your project unattended, there won't be any clutter for anyone else to stumble upon. As always, try to keep your materials within reach. It will help you stay organized as well as prevent spills and messes.
3. Have a clear vision in mind.
If you don't know what you're planning to build or carve out, then you probably aren't happy with the results. So before starting your work, decide what you hope to accomplish. Think about the size, shape, and purpose of the piece you plan to make. Is it meant to be decorative? Does it serve a functional purpose? Will it last forever and remain in good condition?
Once you have a solid idea of what you're looking to achieve, you'll know how many layers will fit together. In addition, building something you love and care about makes it much easier to get excited about the task.
4. Use safety precautions when cutting.
Always wear eye protection. Keep a sharp blade close at hand so you won't have to go hunting for them. Make sure your hands are clean and dry whenever you handle the tool. And don't forget about yourself! Don't take risks unless you want to experience pain and discomfort. You don't want to suffer any injuries, and neither does your family. Always consult with a professional before attempting anything new.
5. Practice makes perfect.
It isn't much you can learn in five minutes. But if you practice enough, you'll notice subtle differences between yourself and others. Over time, you'll find yourself becoming a pro at woodworking and able to tackle new projects in no time. So start small. Pick a few tiny blocks of wood and experiment with different techniques.
You may even consider making a test run on your furniture first. From there, you can graduate to bigger pieces and maybe even join a local woodworking club. Then, see how far you can go with your skill level alone.
The Bottom Line
In conclusion, these five easy tips can help improve your wood routing skills. By following these tips, you can easily create beautiful and intricate projects. So don't wait any longer. Get started on your next woodworking project!
#tips#wood#router#skills#woodworking#wood carving#carving#woodwork#carpenter#tools#tipswoodrouter#woodrouterguru#furniture#furnituredesign
0 notes
Text
How to Cut Curves in Wood with a Router - Simple Tips for Fast, Perfect Results

Routing wood is one of the simplest tasks a woodworker can perform, and there are a few simple tricks to make it easier and faster. There are a few basic tips for cutting curves in wood with a router. First, use a straight edge to make sure your cuts are even. Second, use a coping saw to make the most accurate cuts. Third, use wood glue and wood filler to keep the curves in place. Finally, sand the finished curves down to remove any excess wood.

Wood carving tips: Easy ways to make intricate details
If you're looking to make quick, perfect cuts in wood with a router, these simple tips will get the job done. With a few basic steps in mind, you can easily create curves and other patterns without any fuss.
1. Plan Your Work Area
Before starting any cutting project, plan precisely where you want to cut. Make sure you have plenty of space around your project and that you're not going to knock over anything while you work. You don't want to get frustrated trying to make the perfect curve or trim only to find out you knocked something over!
2. Choose the Right Tool
Several different types of routers are available today, each suited for specific tasks. A jig saw router is great for rough cuts and general woodworking projects, while a plunge router is best for precision-cutting applications. If you're looking for versatility, a sliding router table may be the right tool. Regardless of what type of tool you choose, make sure that you select one that matches your skill level and budget.
3. Set Up Your Work Space
To create perfectly smooth curves in your woodwork, you need a carefully set up work area. First, lay down some newspaper on your work surface to avoid scratching your tabletop. Next, place your material at least 12 inches away from any edges (including yourself). That way, if you accidentally touch any edge, your project won't be damaged. Finally, clean off your work surface using a damp cloth.
4. Adjust the Bit Depth
To ensure a precise cut every time, adjust the bit's depth according to its intended use. Most router bits come with three settings: shallow, standard, and deep. Shallow cuts are for simple shapes, while deeper cuts allow smoother transitions between two pieces of wood. Standard-depth bits are ideal for straight cuts, while deep-cut bits provide extra control for creating complex shapes.
5. Test the Bit Pressure
When using a router, it's important to know how much pressure to apply to the bit. Too little pressure results in sloppy cuts, while too much pressure could cause the bit to break. To test the correct amount of pressure, lightly press your finger against the end of the router bit. When you feel a slight pinch, that's the optimal amount of force to apply to your bit.
6. Take Care Not to Overheat the Sawdust Collector
The dust collector on your router should collect any excess sawdust produced while cutting. But if you leave the dust collector running continuously, it might clog up. To prevent this problem, turn your dust collection switch on and let it run for about five minutes before shutting it off. Then, take a few moments to clear out the clogged debris inside the dust collector.
7. Start Making Cuts
Once you've adjusted the bit to the proper depth, begin making cuts along the line you drew earlier. Remember to keep a steady hand, move slowly, and often stop to check your progress. Please keep your fingers well away from the blade during these steps because even though they don't appear dangerous, they still pose a risk of injury. Also, look for splinters and chips; these small bits of wood are easily missed, especially when making repeated passes.
Final Words
In conclusion, if you want to create curves in wood with a router, a few simple tips can help make the process incredibly fast and accurate. By following these simple steps, you can ensure that your curves are perfectly formed and look great.
0 notes
Text
Unlock the Potential of Your Harbor Freight Saw with the Ultimate 300 Blackout Jig!

The 300 Blackout Jig for Harbor Freight Saw is a valuable tool for precision cutting with a Harbor Freight Saw. This jig allows for accurate and efficient shaping of 300 Blackout cartridges, ensuring consistent dimensions for reliable performance.
Introducing the 300 Blackout Jig for Harbor Freight Saw, a powerful tool that enhances your precision cutting experience with a Harbor Freight Saw. Are you tired of inconsistent dimensions in your 300 Blackout cartridges? Look no further – this jig is here to revolutionize your ammunition shaping process.
With its innovative design, the 300 Blackout Jig guarantees accurate and efficient cuts, providing you with trustworthy performance every time. Say goodbye to guesswork and hello to reliability with the 300 Blackout Jig for Harbor Freight Saw.
Clarity The Harbor Freight Saw
Discover how the 300 Blackout Jig can enhance your Harbor Freight Saw capabilities, enabling precise and efficient cutting for your projects. Easily understand and utilize this powerful tool for optimal results.
Overview Of Harbor Freight Saw
Owning a Harbor Freight saw can be a great addition to your workshop, providing you with a reliable and cost-effective cutting tool. Made from high-quality materials, the Harbor Freight saw offers a versatile solution for a variety of cutting needs. Whether you are a DIY enthusiast or a professional woodworker, this saw is designed to meet your expectations.
With its powerful motor and efficient blade, the Harbor Freight saw delivers precise and clean cuts every time. The saw's adjustable speed feature allows you to tackle different materials with ease, providing you with the flexibility you need for various projects. Additionally, the built-in laser guide ensures accurate alignment, making it easier for you to achieve professional-level results.
Limitations Of Harbor Freight Saw
Although the Harbor Freight saw offers impressive performance and features, it does come with a few limitations that you should be aware of. Understanding these limitations will help you make an informed decision before purchasing this saw.
- The Harbor Freight saw is primarily designed for light to medium-duty applications. While it can handle most cutting tasks in this range with ease, it may not be suitable for heavy-duty industrial use.
- Some users have reported that the blade adjustment mechanism of the Harbor Freight saw can be a bit finicky, requiring extra care and attention for precise adjustments.
- When it comes to cutting thicker materials, such as hardwoods or thick metal, the Harbor Freight saw may require multiple passes, which can slow down your workflow.
- While the built-in laser guide is a useful feature, it may not be as accurate as more expensive models. It is always recommended to double-check your measurements before making any cuts.
- Like any other power tool, the Harbor Freight saw requires proper maintenance to ensure optimal performance and longevity. Regular cleaning and https://woodworkingadvisor.com/how-to-change-blade-on-ryobi-table-saw/blade replacements are necessary to avoid any potential issues.
Despite these limitations, the Harbor Freight saw remains a popular choice among DIYers and hobbyists due to its affordability and decent performance. By understanding its capabilities and limitations, you can make the most of this saw while staying within its intended usage.

Introducing The 300 Blackout Jig
Are you a seasoned DIY enthusiast or a firearms enthusiast looking to get more out of your Harbor Freight saw? If so, you're in luck because we're introducing the game-changing 300 Blackout Jig for Harbor Freight Saw. This incredible jig is designed to make your 300 Blackout conversion projects easier and more precise than ever before. Whether you're a beginner or an experienced gunsmith, this jig is a must-have tool in your workshop. Take your projects to the next level with the 300 Blackout Jig.
What Is A 300 Blackout Jig?
A 300 Blackout Jig is a specialized tool that is used to convert a standard AR-15 lower receiver to accommodate the popular 300 Blackout caliber. This jig is designed to work seamlessly with your Harbor Freight saw, allowing you to make precise cuts and modifications to your lower receiver. With the 300 Blackout Jig, you can easily convert your lower receiver without the need for expensive specialized tools. It's a cost-effective and efficient solution for any gun enthusiast.
Benefits Of Using A 300 Blackout Jig
Using a 300 Blackout Jig offers numerous benefits that will enhance your firearms projects:
- Precision: The 300 Blackout Jig ensures precise cuts and modifications to your lower receiver, resulting in a reliable and accurate firearms conversion. Say goodbye to guesswork and hello to professional-level precision.
- Cost-effectiveness: With a 300 Blackout Jig, you can convert your lower receiver without the need for expensive specialized tools. This saves you both time and money, making it an ideal choice for DIY enthusiasts and professionals alike.
- Ease of use: Designed to be user-friendly, the 300 Blackout Jig is easy to set up and operate. Even if you're a beginner, you'll find it a breeze to use and achieve professional-grade results.
- Versatility: The 300 Blackout Jig is compatible with a wide range of Harbor Freight saws, making it a versatile tool that can be easily integrated into your existing workshop setup.
- Efficiency: By using the 300 Blackout Jig, you'll be able to complete your 300 Blackout conversion projects faster than ever before. Increase your productivity and spend more time enjoying your firearms.
In conclusion, the 300 Blackout Jig for Harbor Freight Saw is a game-changer in the world of firearms conversions. It offers precision, cost-effectiveness, ease of use, versatility, and efficiency, making it the ultimate tool for gun enthusiasts and DIY enthusiasts alike. Upgrade your workshop and take your projects to the next level with the 300 Blackout Jig.
Preparing Your Harbor Freight Saw
Prepare your Harbor Freight saw for a 300 Blackout jig, ensuring optimal performance and accuracy. Upgrade your equipment for improved results.
When it comes to using a 300 Blackout jig with your Harbor Freight Saw, it's important to properly prepare your saw for efficient and safe use. This means gathering the required tools and ensuring necessary safety measures are in place. In this section, we will discuss each of these aspects in detail to help you get started on the right foot.
Gathering The Required Tools
Before you begin using your Harbor Freight Saw with the 300 Blackout jig, there are a few essential tools you'll need to gather. These tools will aid in the assembly and installation processes, ensuring that everything goes smoothly. Here is a list of the must-have tools to have on hand:
- A socket wrench set to conveniently tighten and secure various connections.
- A set of Allen wrenches to adjust and tighten screws in tight spaces.
- Quality sandpaper or emery cloth to smoothen any rough edges or burrs.
- Measuring tools such as a ruler, calipers, or a tape measure to ensure precise cuts and alignments.
- A torque wrench to apply the appropriate amount of torque to specific fasteners.
Ensuring Safety Measures
While using a Harbor Freight Saw with a 300 Blackout jig can be an exciting endeavor, it's essential to prioritize safety throughout the process. By taking the necessary precautions, you can reduce the risk of accidents and potential injury. To ensure a safe working environment, follow these safety measures:
- Wear appropriate personal protective equipment (PPE), such as safety glasses, gloves, and ear protection.
- Clear your workspace of any clutter or debris that may obstruct your movements or cause tripping hazards.
- Read and familiarize yourself with the saw's user manual to understand its specific safety features and guidelines.
- Ensure the saw is placed on a stable and level surface to prevent it from tipping or vibrating excessively during operation.
- Securely clamp your workpiece or material to prevent it from shifting or moving while cutting.
By gathering the required tools and implementing necessary safety measures, you are ready to proceed with the installation and use of your 300 Blackout jig on your Harbor Freight Saw. With a well-prepared saw and the right precautions in place, you can confidently move on to the next steps in your project.
Step-by-step Guide To Using The 300 Blackout Jig
If you're a firearm enthusiast or a DIY enthusiast looking to create your own ammunition, the 300 Blackout Jig for Harbor Freight Saw is an essential tool. By using this jig, you can easily cut and machine your own 300 Blackout ammo to exact specifications, giving you full control over the quality and performance of your ammunition. In this step-by-step guide, we'll walk you through the process of setting up the jig, preparing your ammo, and the cutting and machining process. Let's get started!
Setting Up The Jig
The first step in using the 300 Blackout Jig is setting it up correctly. This is crucial to ensure accurate and precise cuts on your ammo. Follow these steps to set up the jig:
- Start by securely mounting your Harbor Freight Saw to a workbench or surface, ensuring stability during the cutting process.
- Next, attach the 300 Blackout Jig to the miter gauge slot of the saw, making sure it is aligned properly.
- Tighten the jig's locking mechanism to secure it in place, providing stability and minimizing any potential movement or vibrations.
- Ensure that the jig's cutting guide is properly aligned with the saw's blade, allowing for precise cuts.
- Double-check all the connections and adjustments to ensure everything is secure and in the correct position.
Preparing Your Ammo
Before you start cutting and machining, it's important to properly prepare your ammo for the process. Follow these steps to prepare your ammo:
- Collect your 300 Blackout brass casings and inspect them for any signs of damage or defects.
- Clean the casings thoroughly using a brass cleaning solution to remove any dirt, debris, or residue.
- Trim the casings to the desired length using a case trimmer, ensuring they are all uniform in size.
- Chamfer and deburr the casings using a case deburring tool, creating smooth and consistent edges.
- Inspect the primers and ensure they are properly seated and not damaged.
- Finally, carefully measure and weigh each casing to ensure they meet the required specifications.
Cutting And Machining Process
Once you have set up the jig and prepared your ammo, it's time to start cutting and machining. Follow these steps for a successful cutting and machining process:
- Place a trimmed and prepared casing into the jig's cutting guide, aligning it with the cutting line.
- Slowly lower the saw's blade onto the casing, making sure to maintain a steady and controlled movement.
- Continue cutting until the blade completely passes through the casing, creating a clean and precise cut.
- Once the cut is complete, remove the casing from the jig and inspect it for any imperfections.
- Repeat the process for the remaining casings, ensuring consistency in each cut.
- After all the casings have been cut, use a case cleaner to remove any metal shavings or debris.
- Inspect each cut casing once again to ensure they meet the required specifications for length and quality.
By following this step-by-step guide, you'll be able to use the 300 Blackout Jig for Harbor Freight Saw with confidence, creating your own 300 Blackout ammo. Remember to prioritize safety and precision during the process, and always use proper protective gear. Now you're ready to embark on your DIY ammunition journey!
Testing The Performance
Testing the Performance:
Accuracy And Precision
One of the crucial aspects when evaluating the performance of a 300 Blackout jig for the Harbor Freight saw is its accuracy and precision. This refers to how closely the jig can replicate the desired measurements, ensuring that the finished product aligns perfectly with the specifications.
When testing the accuracy and precision of the 300 Blackout jig, it is essential to measure the tolerances achieved. The lower the tolerances, the more precise the jig is. By using high-quality materials and employing precise machining techniques, the Harbor Freight saw can provide exceptional accuracy and tight tolerances.
Moreover, the design of the 300 Blackout jig for the Harbor Freight saw plays a vital role in achieving accuracy. The jig must have secure clamping mechanisms and guides, enabling consistent and repeatable cuts. This ensures that every piece cut with the jig is uniform and fits together seamlessly.
Therefore, when it comes to accuracy and precision, the 300 Blackout jig for Harbor Freight saw stands out as a reliable tool for achieving precise cuts and dimensions.
Comparing Results With Other Methods
To truly understand the effectiveness of the 300 Blackout jig for the Harbor Freight saw, it is important to compare its results with other methods commonly employed in similar projects.
When comparing results, it is necessary to consider factors such as the time taken to achieve desired results, the consistency of cuts, and the quality of the finished product. The Harbor Freight saw, paired with the 300 Blackout jig, excels in all these areas.
Compared to handheld cutting methods, which are prone to human error and inconsistencies, the 300 Blackout jig allows for precise and accurate cuts consistently across multiple pieces. This not only increases productivity but also ensures a superior finished product.
In addition, other jigs available in the market may lack the necessary rigidity and stability required for cutting complex shapes with precision. The 300 Blackout jig for the Harbor Freight saw provides a robust and reliable solution for achieving accurate cuts while maintaining stability throughout the cutting process.
Therefore, when comparing the results with other methods, the 300 Blackout jig for the Harbor Freight saw proves to be a superior tool, delivering consistent, precise, and high-quality cuts.
Tips And Tricks For Optimal Results
Getting perfect results with your 300 Blackout Jig for Harbor Freight Saw requires more than just the right tools. To ensure your jig operates smoothly and delivers accurate cuts, proper maintenance and troubleshooting are essential. In this section, we’ll explore some valuable tips and tricks that will help you achieve optimal results with your jig.
Maintaining The Jig
Maintaining your 300 Blackout Jig is crucial for ensuring its longevity and consistent performance. Follow these maintenance tips to keep your jig in top shape:
- Clean the jig regularly: After each use, make sure to clean any debris or residue that may have accumulated on the jig. This will prevent buildup and potential damage to the jig components.
- Inspect for wear and tear: Regularly inspect the jig for any signs of wear and tear, such as loose screws or damaged parts. Tighten any loose screws and replace any damaged parts promptly to avoid compromising the jig's functionality.
- Apply lubrication: Lubricating moving parts of the jig can enhance smooth operation. Use a lightweight lubricant or oil recommended by the manufacturer to keep the jig running smoothly.
Troubleshooting Common Issues
Even with proper maintenance, occasional issues may arise while using the 300 Blackout Jig. Here are some common problems you may encounter and how to troubleshoot them:
Issue 1: Misaligned Cuts
If you notice that your cuts are consistently misaligned, it could be due to improper positioning of the jig or blade. Follow these steps to troubleshoot:
- Check the alignment: Ensure that the jig is properly aligned with the saw before making any cuts. Adjust the positioning as needed for precise cuts.
- Sharpen the blade: Dull blades can cause inaccurate cuts. Regularly sharpening or replacing the blade can help improve cutting precision.
- Apply steady pressure: Maintaining steady pressure while cutting can reduce the chances of misaligned cuts. Avoid rushing or applying excessive force.
Issue 2: Excessive Vibration
An excessive amount of vibration during operation can affect the quality of your cuts. Consider the following steps to minimize vibration:
- Inspect jig components: Check for any loose parts or screws that may contribute to the vibration. Tighten or replace them as necessary.
- Ensure proper blade installation: Make sure the blade is securely installed and not wobbling. Secure the blade with the appropriate tightening mechanism.
- Balance the load: If the vibration is consistently present when cutting specific materials, try distributing the load evenly across the jig. This can help minimize vibrations caused by imbalanced weight distribution.
By following these tips and troubleshooting common issues, you can optimize the performance of your 300 Blackout Jig for Harbor Freight Saw. With proper maintenance and problem-solving techniques in your arsenal, you'll be able to achieve precise and accurate cuts effortlessly.
Exploring Advanced Techniques
Exploring Advanced Techniques for 300 Blackout Jig for Harbor Freight Saw
When it comes to the 300 Blackout cartridge, precision and efficiency are key. To achieve top-notch results, it's essential to master the advanced techniques that can take your Harbor Freight Saw to the next level. In this section, we will delve into two crucial aspects of the process: Customizing Ammo Profiles and Incorporating Accessories.
Customizing Ammo Profiles
Achieving optimal performance with the 300 Blackout cartridge requires careful attention to detail when it comes to customizing ammo profiles. By tailoring your ammunition to specific parameters, you can enhance accuracy and consistency. Here are a few techniques to consider:
- Projectile Selection: Choosing the right projectile can greatly impact the performance of your rounds. Whether you opt for supersonic or subsonic ammunition, selecting the correct weight and profile will ensure desired results.
Read the full article
0 notes
Video
youtube
For more information on The 16000 Woodworking Plans, use the link below:
https://bit.ly/TedsGuide
This video shows how you can make a finger joint box using a finger joint jig on your table saw.
0 notes
Text
In this short video I will be showing you how to build a wooden rustic American Flag. In this video I'm using several techniques that I've seen other videos use and a few of my own. This video is strictly made for people who are looking to build a minimal amount of flags, as I do not use any type of jigs in this video. Pallets and waste wood are an excellent solution to save money and make your home a unique place, bathrooms, bedrooms, garden furniture, pool linings built at home with a little manual skill, will make our home a place unique.
#palletsideas#woodworkingguide#diywoodworking#woodworkingideas#woodworkingskill#recycledpallets#woodworkingprojects#diy woodworking#woodworking ideas#woodworkingskills
0 notes
Last Seen Blogs

thecrickethopco
Sustainable Cricket Protein Flour

wormy-worm
we respawn

rf2s
rF2S

vintagemartinez
CRY BABY

writersblocktango
Writer’s Block Tango