#desktop presets
Text
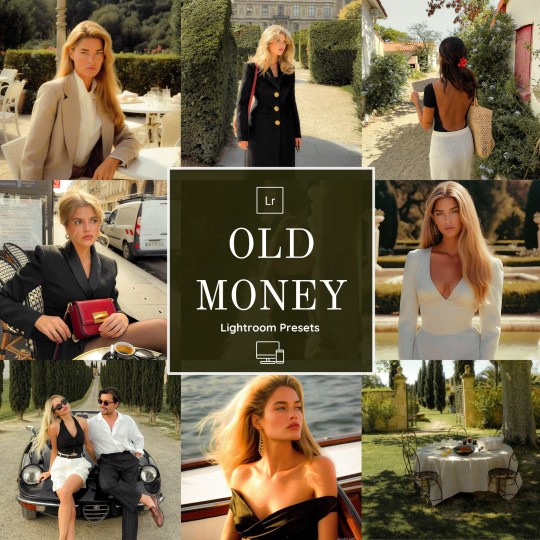
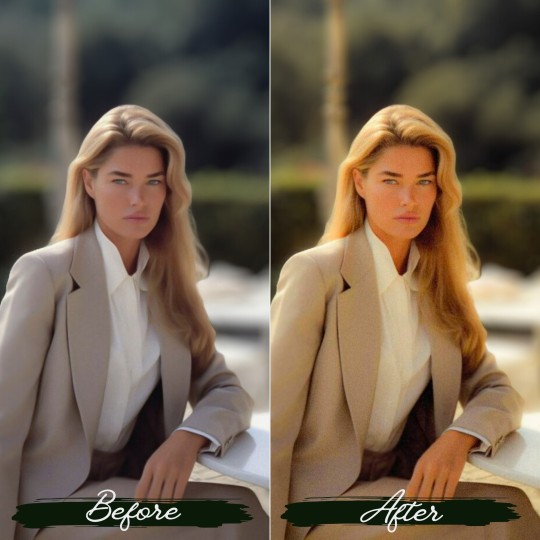
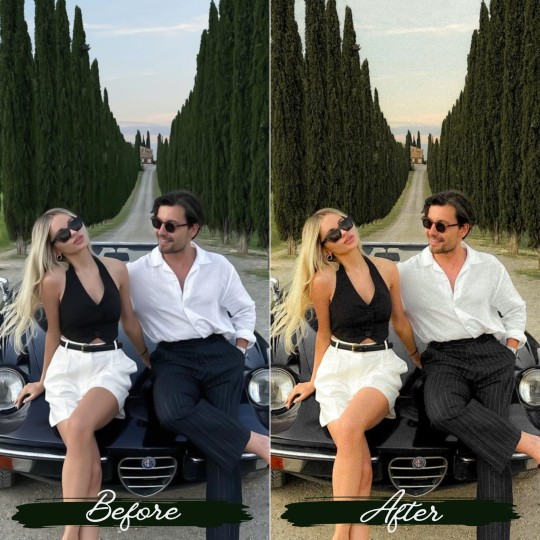
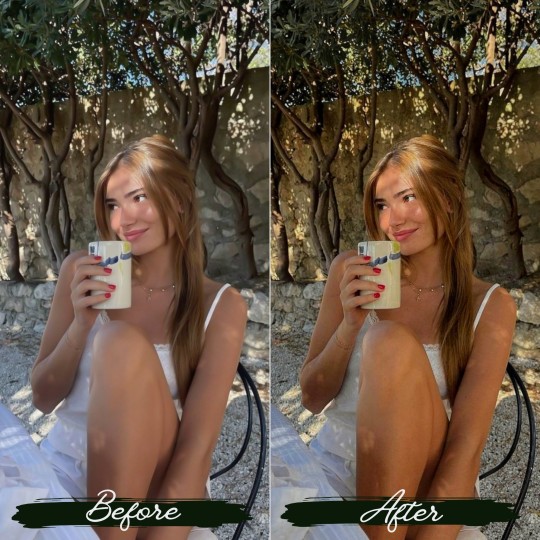
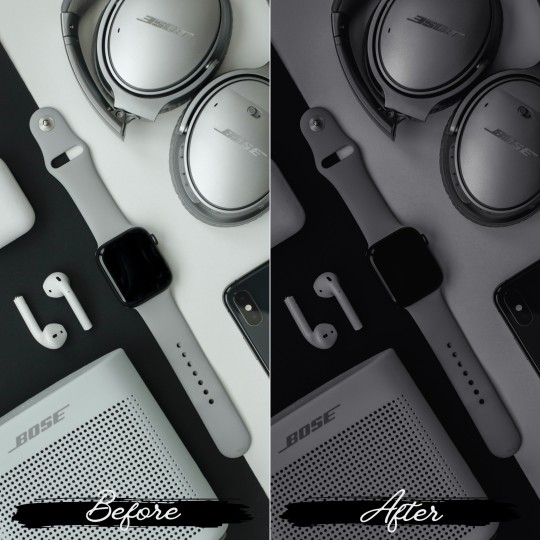
Old Money Lightroom Presets
Tranform your photo with our premium old money lightroom presets.These presets are inspired by old money aesthestic style which have a retro grainy style witth diffrent shade which is similian to the fashion magazine editorials of the 1980s and 1990s.These presets are perfect for retro photography,outdoor photography,vintage photography and many more.
#old money#old money aesthetic#cottagecore#cottage aesthetic#aestehtic#aestheitcs#aestheticfilter#blogger#influencers#instagrampresets#lightroom#lightroom presets#film grain#grainy#mobile presets#desktop presets#adobe lightroom#dark academia#dark acadamia aesthetic
2 notes
·
View notes
Text
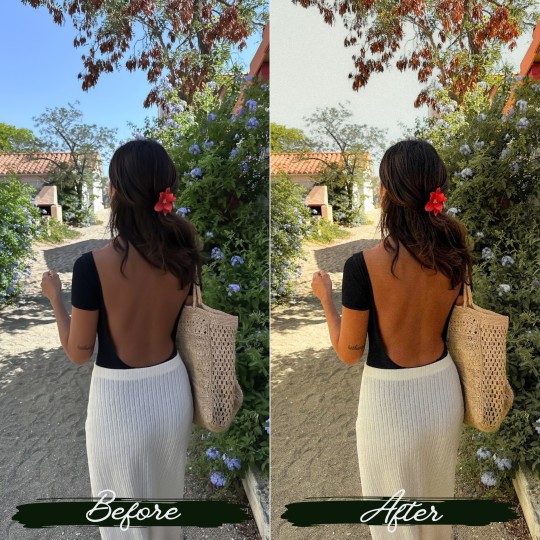
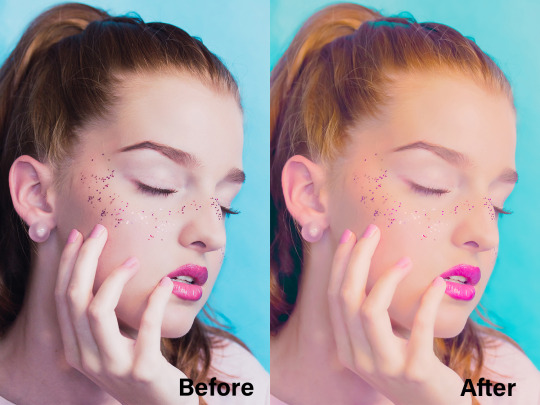
Instantly infuse your photos with a bright, captivating aesthetic that sets the perfect mood and tone with aesthetic lightroom presets. Whether it's everyday moments, Instagram posts, portraits, or travel pics, our presets are designed to make your memories shine. Don't miss out on the opportunity to transform your images effortlessly. Visit victoriabeepresets.com to purchase and unlock the full potential of your photography today!
0 notes
Text

i have a sale in my shop now. So you are very welcome =) Thats a cool lightroom presets which could make your photos more attractive.
https://www.creativefabrica.com/designer/onyx-inhale/
#ACR presets#Android Presets#Best Presets#blogger presets#cozy presets#desktop presets#everyday presets#film presets#indoor presets#instagram presets#iphone presets#light presets#lightroom mobile presets#lightroom presets#lr presets#mobile presets#natural presets#outdoor presets#photo edit#photo filter#photo presets#photography presets#Photoshop presets#portrait preset#preset bundle#travel presets#warm presets#wedding presets
1 note
·
View note
Text


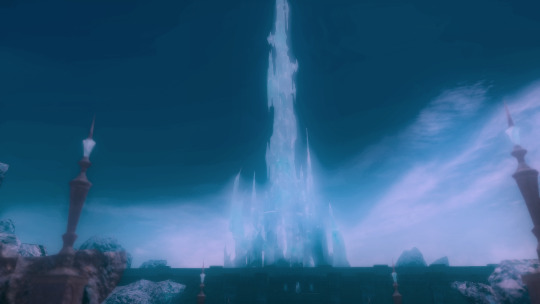
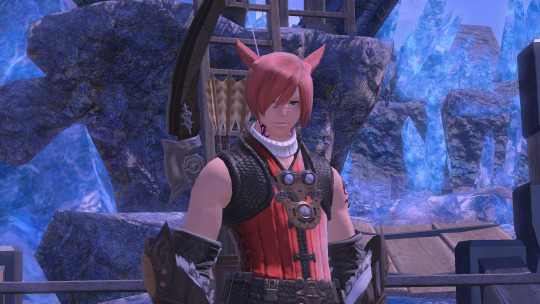

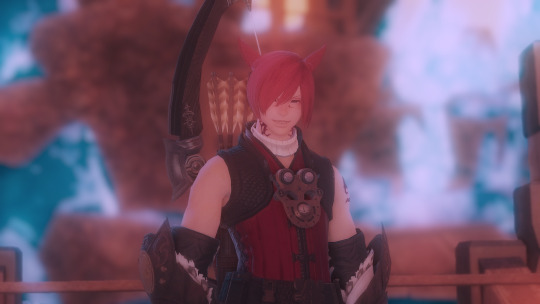
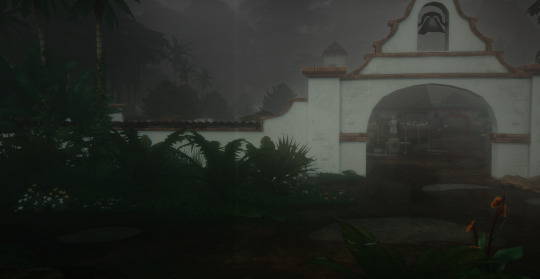
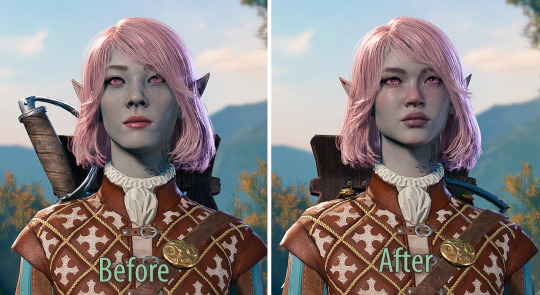
I got a new laptop and haven't been able to put more RAM in it yet, so have these screenshots brought to you by a few new reshade presets!
#bound with thread | original posts#photos of time passed | gpose#divine being of crystal and star | k'pheli tia (sae'pheli'ehva)#g'raha tia#i'm proud of these if only because i had to fiddle a bit for the glowyness of the first three aha#this preset apparently was specifically made with darkskinned characters in mind which was very nice considering pheli has a darker skinton#i think the warm tones also work good with k'pheli's warmer skintone. and g'raha too#might make that fourth image my desktop background idk. it's very pretty i think
10 notes
·
View notes
Text
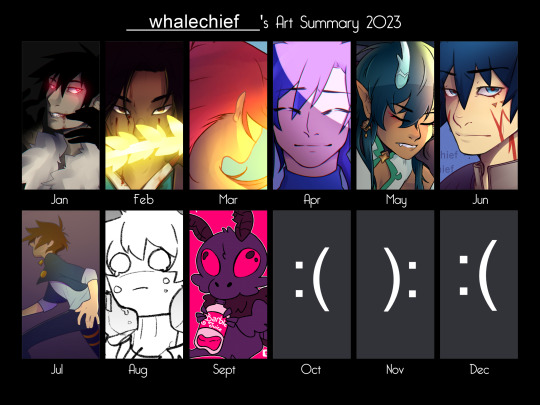
so its no secret that i've been struggling mentally for a bit and this year really pushed me too far
i drew at most 2 drawings per month it seemed...and that was on the months i DID draw
there are a lot of factors that lead to my drop off in art, but 2024 i really want to make a come back if i can
thank you to everyone who's stuck around and was just THERE, even if it was just on my timeline, it still felt like i wasnt alone and that people would be understanding when i was ready to come back
fr thank you, i hope to have lots of fun and make many memories with everyone on my favorite hellsite, tumblr dot com :) see you in 2024 <3
#template by taxkha#yes im too lazy to use emoji extensions on desktop tonight#i think ever since my previous tablet died my new one just hasnt felt right and#my drawing computers win11 forced update actually destroyed most of my brushes and presets from years of saving up and most couldnt be save#that was a year or two ago and i still am struggling after but i need to be able to move on...and also fix my desk set up so i can actually#ykno...do work again alkdfjsdf i see the steps is what im saying and i see the steps and know how to go the right path to having fun again#art summary#art summary 2023#lol i DID tell my therapist i wasnt drawing again tho so she's aware somethings up so we're gonna work on that starting next week#tl;dr im not ok but that doesnt mean i dont get to try to be ok again ^^
2 notes
·
View notes
Text
Okkkkkkkk new blog theme :)
#on desktop AND mobile#anton time ♡#there IS an issue with images getting cut off but idk the coding to fix that 😔 I just used a preset theme design#roz posts
2 notes
·
View notes
Link
#Lightroom Desktop Presets#Lightroom Mobile Presets#HOME LIGHTROOM PRESETS#LIGHTROOM#LIGHTROOM PRESETS#PRESETS
#Mother Lightroom Mobile Presets
#Lightroom Desktop Presets#Lightroom Mobile Presets#HOME LIGHTROOM PRESETS#LIGHTROOM#LIGHTROOM PRESETS#PRESETS
0 notes
Text
How do i get my presets on lightroom desktop app

How do i get my presets on lightroom desktop app how to#
How do i get my presets on lightroom desktop app software#
You can have a look at some of my edits below and on gingerpresets. My presets help me to achieve a unique aesthetic for my Instagram and make it look more streamlined. Personally I love bright, warm and colourful photos, with a slight vintage look! After years of practice I was able to create my own presets that perfectly reflect my favourite editing style. Popular editing styles include Vintage and Pastel. – How do you like the colours to look? (saturated or muted?) – Do you like a vintage matte look or bright and defined? – Do you like light and airy or dark and moody photos? The first step to creating your own preset is to decide what editing style your like. How to Make Your Own Presets in Lightroom Classic for Desktop Step 1 – Decide what editing style you like I am subscribed to the Adobe Photography Plan which gives me access to both Lightroom and Photoshop for €9.99 a month. The Lightroom mobile app is free to download (on both iOS and Android) but you will need a subscription to use the the desktop version.
How do i get my presets on lightroom desktop app how to#
In this article I will explain how to make your own presets in Lightroom (for both desktop and mobile). Presets help you to create a uniform look across all of your photos, as well as speed up the editing process. You can save the editing adjustments that you make (as a preset), so that you can then apply them to another photo. In Lightroom you can create your own filters, these are called “presets”. It is easy to use, once you understand all the different tools, and is a great way to make your photos look more professional.
How do i get my presets on lightroom desktop app software#
Lightroom is a photo editing software available for both desktop and mobile.
0 notes
Text
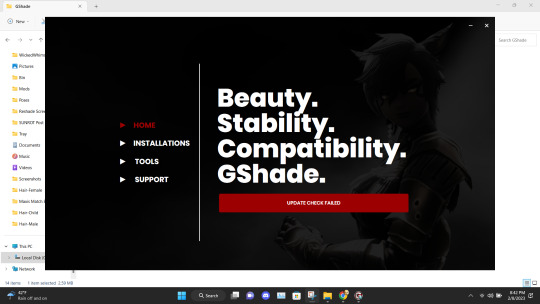
GSHADE 3.5.0 Cracked Tutorial Feb.2023
‼️Update:3/2023‼️ Due to gshade somehow being online again! You can still install the program with this tutorial but to avoid the update to version 4.2 notification keeping you from proceeding-Download the program from mediafire and then turn your pc to airplane mode and continue the process below! Note that when you turn your internet back on that your going to get the notification still ignore it. That what I’m doing.
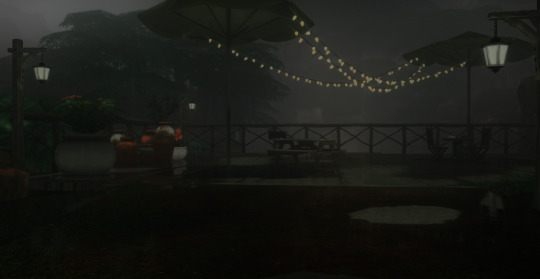
Alright with the recent events regarding the development team of GShade figuratively going under and the current version of this program available being far from perfect. It would be lovely to back to a version of GShade that doesn't have malware, the changes that disabled the depth of field effects, and the removal of some older shaders. So here's a tutorial on how to install 3.5.0 of GShade. It's the version that we as a collective switched to all those months back, when GShade popped off in the community. Also the version I used to take this picture and got from @toskasimz who sent me the files. She's the reason why I have my pretty pictures back. It took a long time to get my preset to look like this and the modern versions of Gshade and Reshade don't have the shaders for this anymore. The suggested skill level for this is basic knowledge of how to install Reshade/Gshade and knowledge of where to find the game Bin file and Program Files on your pc.
Note: This version is before the code that shut down your PC, if you manipulated the code of the program, was introduced. Use at your own risk. I personally have no issue with using it. I'm using my laptop I do school work on and I have no money to buy a new one so that's my assessment on how safe it is.
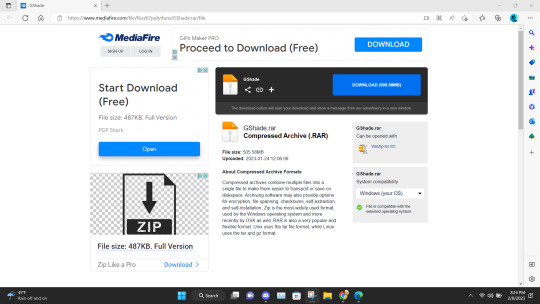
To start download this media fire file. It's a Rar file. Unzip it.
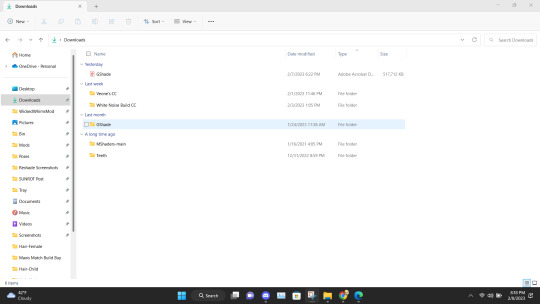
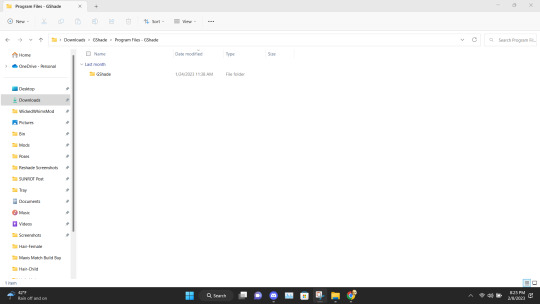
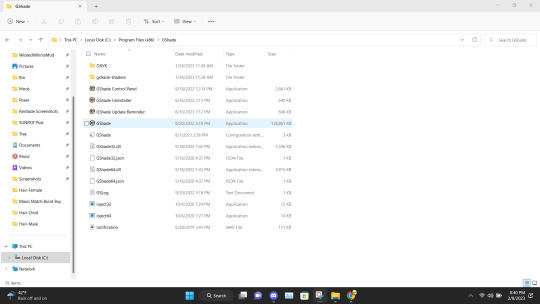
In the unzipped version of this file, you should have a folder that's highlighted below called GShade.
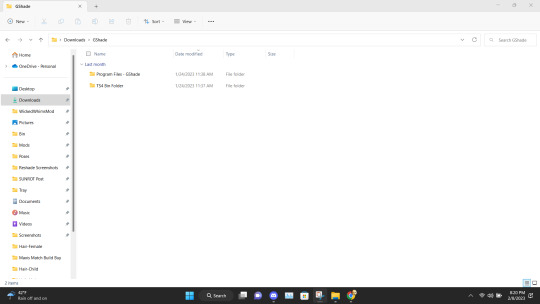
Inside that file are two folders. Program Files-G-Shade and TS4 Bin Folder. These folder names correspond with where the contents of these will go on your pc.
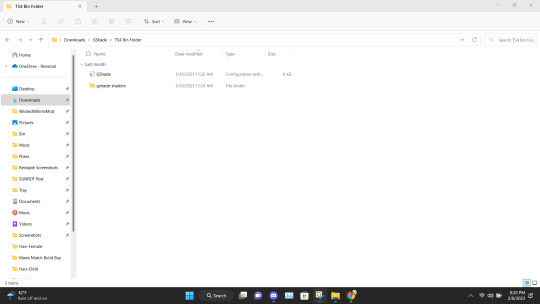
Alright inside the folders you should have the following content in the Program Files-G-Shade
Inside the TS4 Bin Folder, you should have the following contents inside it.
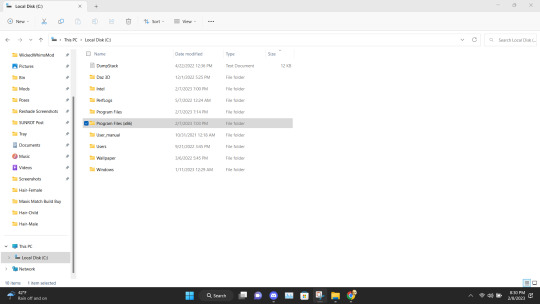
Place the GShade folder from the Program Files-G-Shade into your computer's Program(x86) file. This may have a different name based on your computer.
Next Place the contents of the TS4 Bin Folder which should be the G-Shade configuration file and the folder of GShade-Shaders into your Bin folder. (note I have gshade installed already so you won't have the extra files before installation.)
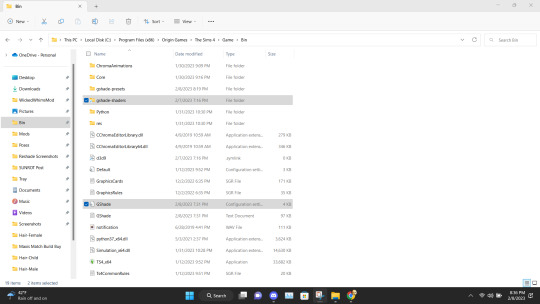
Now go back to the Program(x86) file on your PC and go into the G-shade folder.
Double Click to run the program.
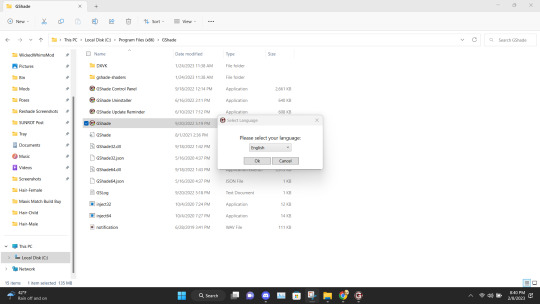
This is where you gonna need to pull your Reshade/Gshade knowledge. You just install the program as normal to the game. I will say I don't know if this will work with other games.
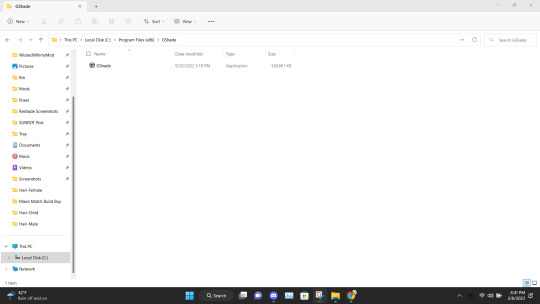
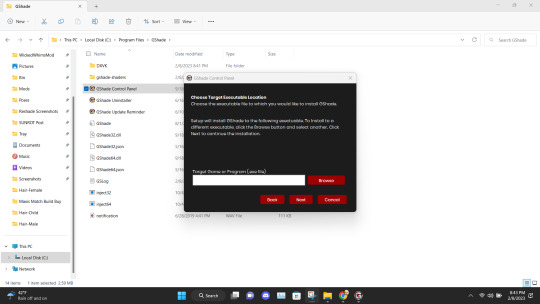
Alright, this is what you should be left with after installing G-Shade. Everything transferred to the Program Files with the exception of this folder. Leave it be and go to the Program Files file on your pc.
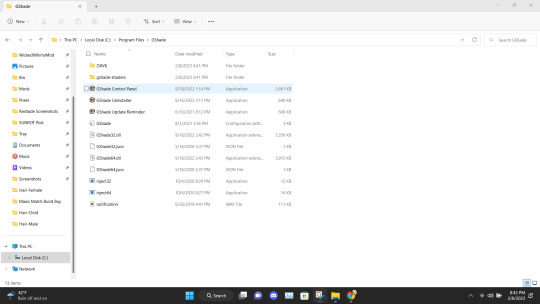
Once in the Program Files folder double click the GShade Control Panel.
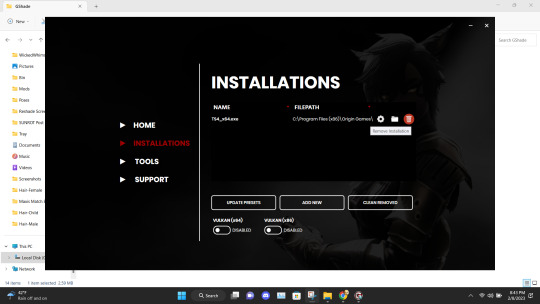
You should get the following screen Go to the Installations tab. Delete this file path. This is a very important step. It's not gonna work if you don't reinstall the program. Delete it and click Add New.
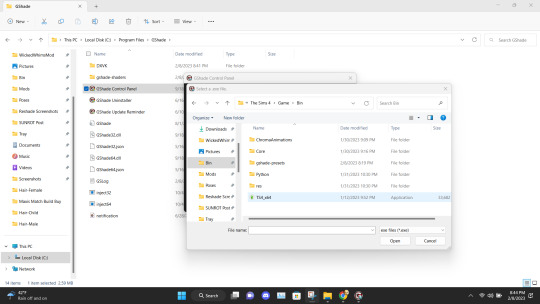
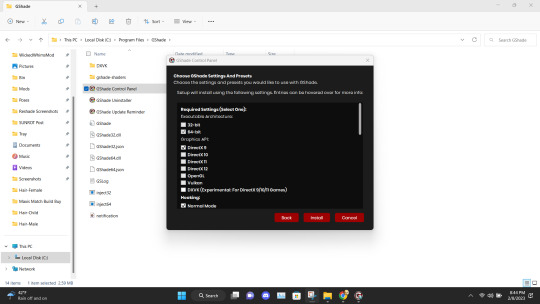
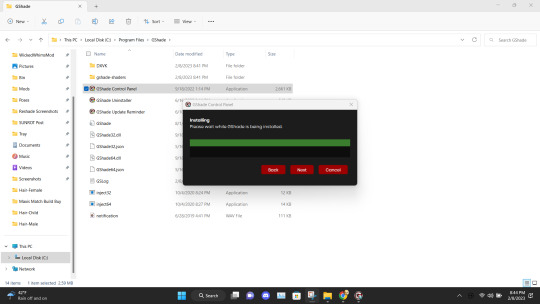
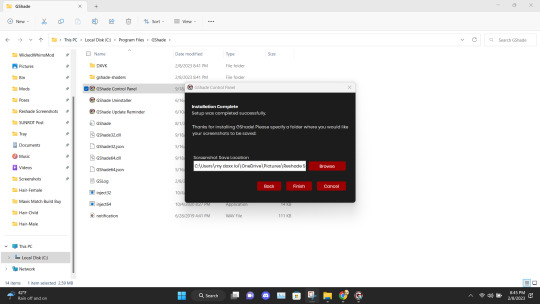
Install the program as viewed above. Click Next and set up your screenshot folder.
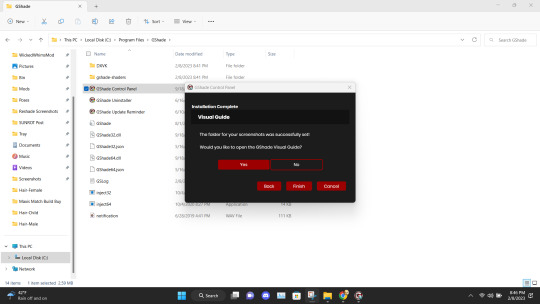
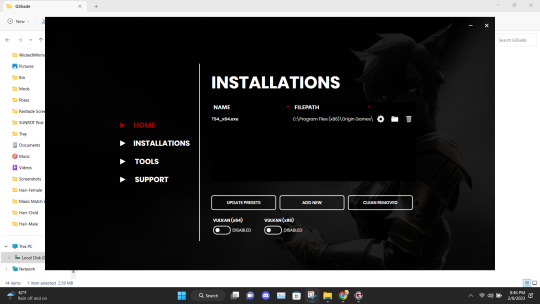
Click No on viewing the guild. You should have a control panel on your desktop. You can go in a convert you reshade presets if needed.
Alright if everything was done correctly open your game. It'll take a moment to load and when it does you greeted with the following screen on start-up.
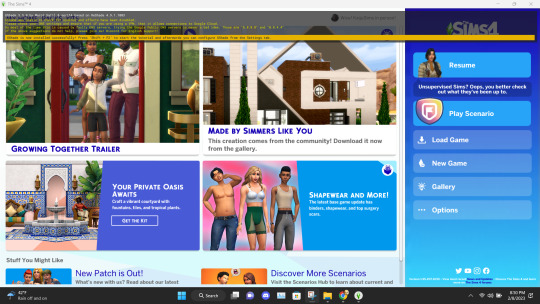
Ignore the yellow text on the top. It says that your effects are disabled because it's not online. It works I could be misinterpreting what "effect" means but my shader work so I'm not complaining.
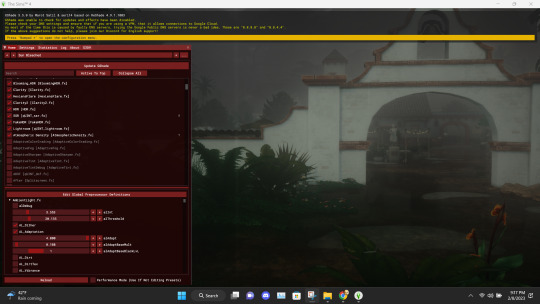
And there you go. Installed, and works perfectly. Don't update it. I don't know what it'll do. I have not tried. I will upload an edited version of my preset later this week or tonight. I have to tweak the color of the fog and make a decent post. Enjoy! I am open to helping under this post and in dms!
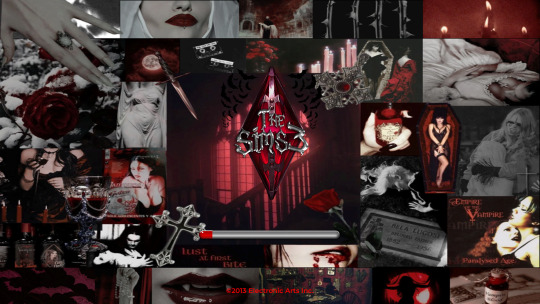
#if something you download thats for cosmetic reasons can shut down your PC that's not a normal function the program is free and basically#reshade it one of the same developers#gshade#sims 4#gshade help#ts4#simblr#tutorials
2K notes
·
View notes
Text
Baldur’s Gate 3 Modding Tutorial - How to Swap Your Character’s Head Preset Mid-game
Got a bunch of messages asking how I did this without restarting, so I thought I’d write out a quick tutorial.

1 - Extract the Models.pak file from your game directory's Data folder somewhere using the lslib tool.
I don't recommend extracting it to your game directory because you won't need all the files, it can get kinda messy, and it might cause issues in future updates. Just put them in a random folder on your desktop for now or something. I'll refer to this folder as the extracted folder for now.
2 - Figure out which preset your character is currently using (mine was the Elf Female A), and which one you'd like to swap it out for. Keep in mind, you can’t use one from a different gender/race without issues.
*I used one from the “New Character Creation Presets WIP” mod. If also using this mod, you need to install it as normal, then extract the mod's own .pak file before continuing.
3 - Find the .gr2 file of the new preset you want, and copy it into your game's directory. For me, it goes to C:\Program Files (x86)\Steam\steamapps\common\Baldurs Gate 3\Data\Generated\Public\Shared\Assets\Characters\_Anims\Elves\_Female\Resources
The exact directory will vary depending on your race/gender (refer to the extracted folders for help). If you don’t have the folders needed inside your game directory, then create them.
4 - Rename the .gr2 file you just moved to be what the old preset was named. For me, Kaari.gr2 became ELF_F_NKD_Head_A.gr2
Optional:
5 - If you want to also use the new head’s skin texture (and/or edit the skin yourself), just copy the three .dds files from your extracted Data\Generated\Public\Shared\Assets\Characters\_Models etc folder, then place them in your game directory. For me, I put them in Data\Generated\Public\Shared\Assets\Characters\_Models\Elves\ELF_F_NKD\ELF_F_Head_A\Resources
6 - Rename accordingly, just like with the .gr2 files. For me, Kaari_CLEA.dds became ELF_F_NKD_Head_A_CLEA.dds and so on. Do this for the other two .dds files as well.
Load your game and that's it! It should now replace the previous head with the new one. Your character's icon will still look like the old one unfortunately. I'll try to find out how to fix it.
#Baldur's Gate#Baldur's Gate 3#Baldur's Gate 3 Modding#BG3#BG3 modding#Blighted mods#Blighted modding#Hope this makes sense!
688 notes
·
View notes
Text
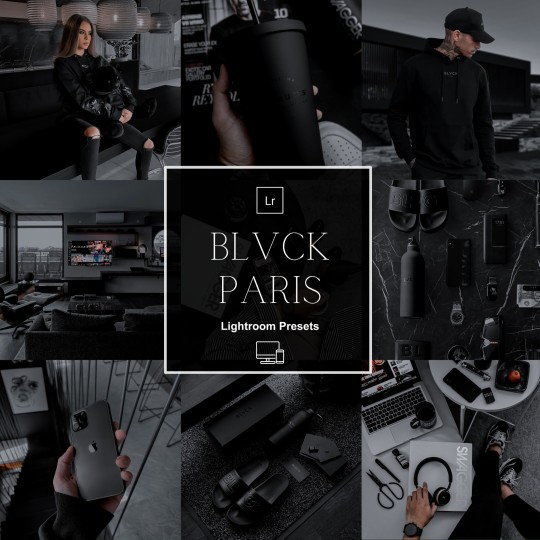
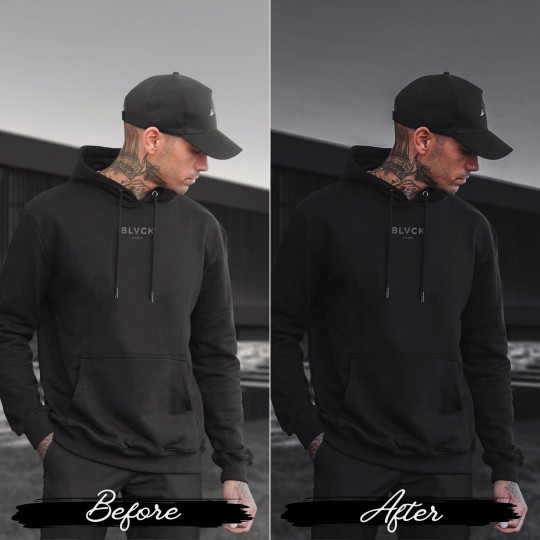
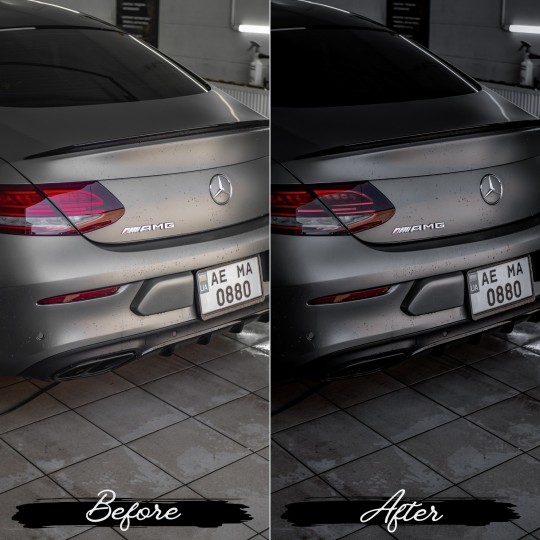

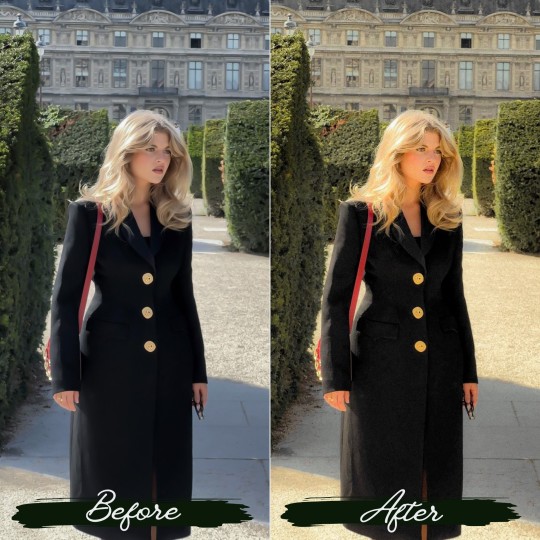
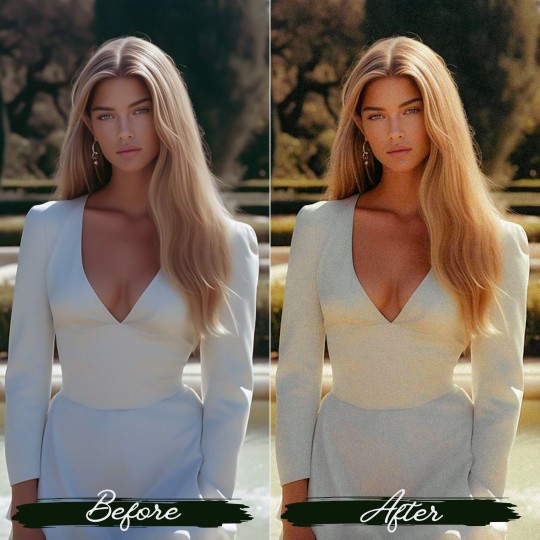
Premium Blvck Paris Lightroom Presets
Elevate Your Photography with our premium blvck paris lightroom presets.In only a few clicks, you’ll be able to edit your images with a dark, minimal, and 100% Blvck style.These presets are perfect for instagram feed,blogger,influencer,outdoor photography and many more.
#blvck#black presets#adobe lightroom#lightroom presets#lightroom#dark aesthetic#darkpresets#mobile presets#desktop presets#aestehtic#instagrampresets#blogger presets
1 note
·
View note
Text
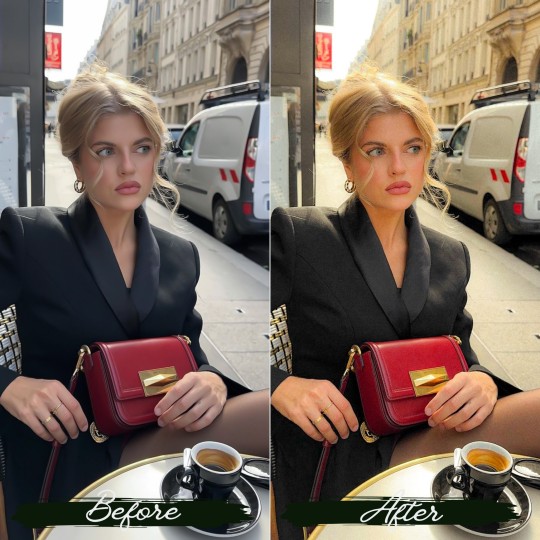
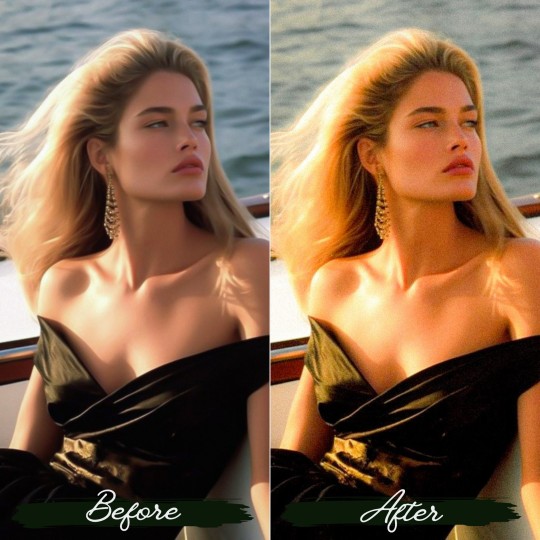
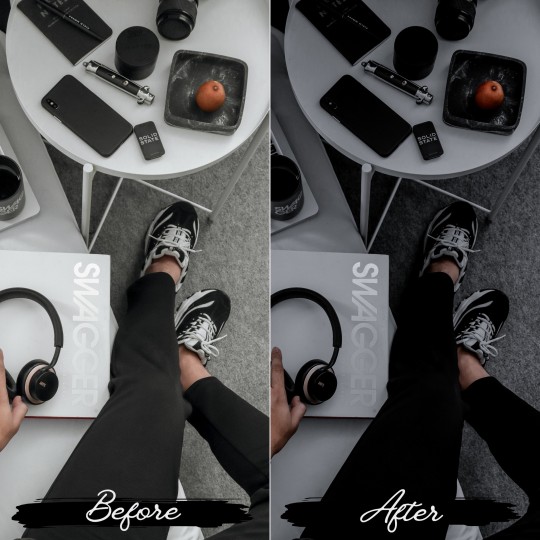
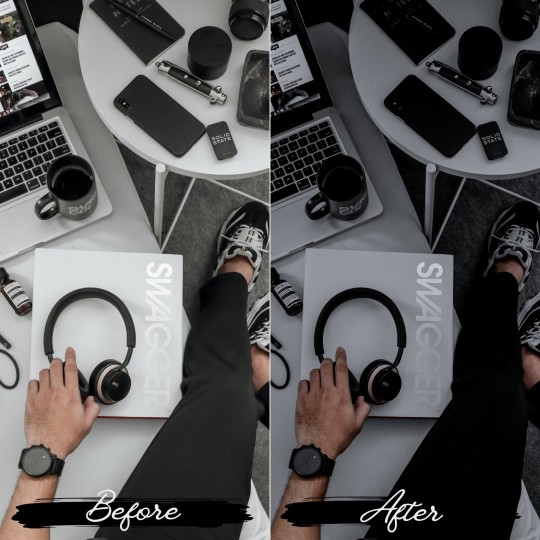
Moody Lightroom presets:
Transform your photos into captivating works of art with just one click. These moody lightroom presets create a mesmerizing blend of dark, faded, and saturated effects, turning your images into powerful storytellers. Experience the magic of dramatic effects, rich colors & subtle contrasts. Ready to add depth and emotion to your photos? Visit victoriabeepresets.com to unlock the secrets of captivating photography. Your journey to stunning visuals begins here!
0 notes
Text
PXL'S Anatomy of Screenshots
So you want to take better screenshots? There are multiple factors to consider, and if you don't enjoy tweaking reshade settings for every image, my ultimate method may not be for you. That being said, there are tips and resources in this guide that are applicable to everyone and you can select to explore those that are useful to your specific situation.
Disclaimer: I am not claiming to be an expert, nor am I offering to provide troubleshooting on an individual basis. This is a general guide and if you are unfamiliar with any of the concepts, please use the mighty power of the internet to find tutorials. I promise everything that I have learned over the years has been published and documented a thousand times better than I ever could.
There are five factors to address:
Your computer's inherent capabilities
The game's limitations
The mods you're using
Reshade
Post Processing
Graphics Card Settings & Drivers:
Become familiar with your graphic options. If you don't have a dedicated graphics card (i.e. a desktop or gaming laptop, these features may be unavailable and you should skip.)
I have an AMD Radeon Pro card which is designed for workstation level systems. It's overkill for sims, but useful for 3D rendering and modelling work. I have changed the following settings for DirectX 9 applications:
anti-aliasing - enhance application settings
anisotropic filtering - enabled
anisotropic filtering level - 16x
texture filtering quality - high
surface format optimization - high
Consider overclocking your graphics card to unlock it's full potential. DO NOT pursue this venture unless you are ok with the risk of burning out your card prematurely. I use at present, overclocked Bootcamp Drivers from BootcampDrivers.com obviously, if you're not playing on an intel based mac through Bootcamp, this is irrelevant to you.
None of these settings are useful until you address the default games limitations, which leads nicely into the next factor.
Addressing The Sims 4's Graphic Limitations:
Everyone should be familiar at this point with lighting mods, 4k, textures, disabling ssao, etc. but, I'm still going to spell it out. None of this is new information and has been covered many a time by various players ad nauseum.
remove ugly blue toned lighting in the world by choosing a lighting mod from @softerhaze here
overhaul your graphics.cfg file (i use a custom blend with features specific to me), however @simp4sims has done a ridiculous amount of work in providing a simple to install file that can be found here - read through their tutorials!! they have provided an excellent oversight of exactly what this does and why it matters
improve the indoor lighting for your sims - previously i used @luumia's no blu, no glo - recently i switched to @northernsiberiawinds better in game lighting mod here, though i have tweaked some of the settings to suit my own personal preferences
i don't use the HQ mod, i don't find that it makes enough difference for the amount of effort it requires to convert CAS CC
It should go without saying, but tweaking your graphics config file is absolutely useless if you can't play TS4 at it's maximum in game graphic settings!
The Mods You're Using:
Now that you've put in all this work into getting the game ready to make use of quality mods where do you start? Well, the CC you install matters. Whatever your preference, whether it be maxis-match, alpha or somewhere in between, priority should be given to using items textured in 2k or 4k resolutions, and specific attention should be paid to using wall and flooring textures with bump maps, and or high quality resolutions (this is important later for reshade if you intend to learn about ray tracing).
I will separately post a guide to creators with crispy textures because that is it's own novel.
Reshade:
Phew. Still with me?
There are many many many reshade presets out there, most are alike, but none employ ray tracing, and that is because a) it needs to be manually adjusted for every screenshot, b) they are paid shaders, and c) this requires advanced knowledge of reshade and a decent enough graphics set up that won't overheat - games running native ray tracing recommend a minimum VRAM of 8GB (please note RAM and VRAM are not the same) - i therefore do not recommend pursuing this option if your system does not meet those minimum requirements.
Start here to understand what ray tracing for reshade is. In my opinion, the shaders are well worth the price of $5 for the amount of work that has gone into creating them by the talented Pascal Gilcher. That link is a comprehensive starting point into expanding your knowledge of reshade and it's capabilities.
I have always created my own reshade presets from scratch, and while the core colorization settings I utilize remain largely the same, using ray tracing and re-light means every screenshot needs to be manually adjusted (lights repositioned, bounce and AO factors adjusted, etc) before being captured. @pictureamoebae just published a very timely post discussing the re-light shader and you can read it here.
Post Processing
Reshade does 99.99% of the work that traditionally would be accomplished in a photo editing software like photoshop. Occasionally, I need to adjust exposure manually, add depth of field manually, or color correct. Beyond that I use it to scale images to fit the resolution and file size limits of various platforms. Conceptually this reduces the amount of uncontrolled loss encountered when platforms like tumblr auto compress files that are too large. In reality, tumblr still makes images crappy compared to how they appear in my file folder.
optimize your images for various social media platforms using this guide
fix exposure or colorization issues using a software like photoshop
I hope that this gives you a starting point into expanding your methodologies. My process is continuously evolving and I find this aspect of the game most entertaining. For others who don't enjoy this process, it's probably not worth it!
Thanks for reading ❤ PXL
273 notes
·
View notes
Text
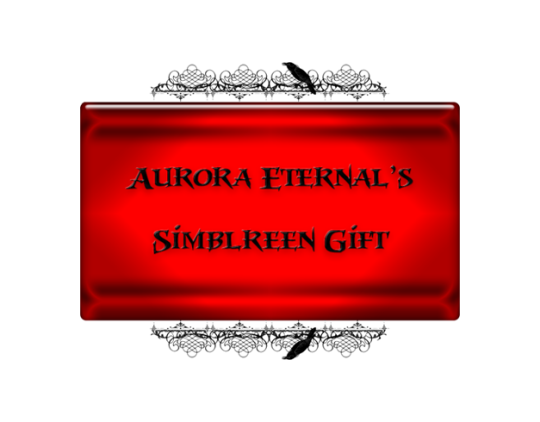
And last but not least simblreen gift will give you absolutely unique and gothique experience for your sims 3 games. I'm proudly presents you...
BLOODSUCKER UI


This would be a long-read, sorry for that!

I can consider myself one of the quickest creator of the most complete default UI for TS3 😅 But it would be impossible without help of @mookymilksims ❤ I used her BGM UI as a base, also for some reason regular method of creating DRs of loading screen doesn't work for me, so I used @justmiha97 Clean UI Loading Screen as a reference, what files Ii need to replace. And of course dino_rex with this thread on MTS. I also want to give a huge thanks for the testing and taking screenshots of the mod to @sagasimsworld and Mary_WW (she isn't on tumblr), because without them I couldn't find and fix most critical bugs in time. Also, even if most of the UI is replaced and it's fully playable, It's still need polishing and testing, so if you see any bug or some of the parts of UI that looks bad (e.g buttons that are near each other having different shades or smth like that), send me PM or ask with screenshots. Also this mod needs testing with different reshade presets, because I worry that some of them may enhance red colors of the UI and that may cause eyestrain. All screenshots are taken without reshade.
More info and screenshots:
Recolored most of the CAS, CASt, CAP, CAB (plumbots editor), Live mode, Build & Buy mode and Town mode (except map tags):


Loading Screen is compatible with any language (but has only translated in english and russian in main file and ukrainian translation in separated package (AE_BloodsuckerUI_LoadingScreen_UA), that contains translated files only for english and russian version. For working ukrainian translation in english game you need font replacement (Montserrat).
Yeah, image that I used on loading screen is different from that one I showed you on this post (it's my desktop wallpaper now lol). It's because required image for ts3 loading screens is 1024x768, and when I resize original collage it became squished, so I added more images:

In main file of the UI are added this mods, so if you have them, you need to remove it from your game: @fanaskhe-r update of More slots for topical details mod, cmar_nyc's Skintone Panel, Recolored version of Menaceman's Pets Relationships Icons (other relationship headlines recolored as well!).
I created my own replacement for occults in relationship panel, so @sweetdevil-sims icons or removing of halos isn't needed anymore.
For opportunities tab I used recolored correct Shang Simla Forbidden city icon by @thebleedingwoodland, and I definitely recommend installing the whole mod, just delete with S3PE opp_generic_china image so they wouldn't conflict.

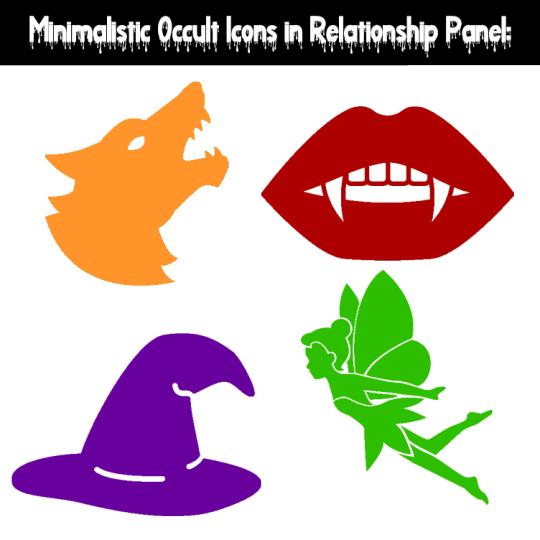
Icons are from Freepik. You are allowed to use them for creating "Minimalistic occult relationship panel" with vanilla UI or other UI default.
Also I created compatible and recolored versions for some popular mods, that replaces parts of UI, you can download them in ADDONS archive:
Recolored version of Expanded Tattoo module of Nraas MasterController (installation in Overrides, and don't forget about CmarNYC Tattoos File):
Recolored and compatible version of @lazyduchess Catalog Search Mod (installation in Overrides):


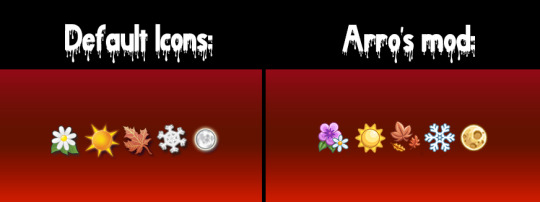
Compatible version of Arro's 4t3 Replacements of Seasons and Lunar Cycle Icons (3 versions, install only one in Overrides folder):
Compatible and/or recolored versions of Gamefreak130 World Loading Screens Overhaul (Choose only one):


Recolored @xiasimla HD icons (both regular and medieval). Totally optional.

Not an actual mod, but desktop icons (.ico format) for TS3 with logo (2 ver.) and plumbob that I created for this UI.


TOU
DOWNLOAD MAIN FILES | ALT
DOWNLOAD ADDONS | ALT
SIMBLR.CC DOWNLOAD
Credits: @mookymilksims, Fanaskher, cmar_nyc, Menaceman44, @thebleedingwoodland, Nraas team, @lazyduchess, Arro, Gamefreak130, @xiasimla for their mods; EA/Maxis, Freepik, Tumblr, Pinterest and Landing for images.
Used programs: Adobe Photoshop, Landing, S3PE, Notepad++, EasySTBL.
Fully compatible and recommended UI mods:
4t3 Cursors by Arro (I don't want make my own custom cursors).
Arro's No mod info.
Nraas Portrait Panel.
Ingredients Thumbnails fix by @tasteslikefridge.
Equestrian Centre map tag replacements by Menacemen.
Rabbitholes Map Tags Visibility Changes.
Font defaults: Font replacement by @simstate and Bigger size font.
Defaults by @alverdinesims: Build Grid, Objects placement, Skill and progress meters.
CC Icons Defaults: Replacement or Completely Remove.
CAS & Stylist Room Defaults: Monotone by @agnelid, Different by @cherdawn66, Empty CAS/Stylist, Gothic by @bast-sims.
Moodlets Icons Defaults: 2t3, 4t3.
Traits Icons Defaults (except Social Groups): 2t3, 4t3, Medieval, Medieval LTR by @aprilrainsimblr.

@pis3update @wanderingsimsfinds @bloodys-s3ccfinds @sssvitlanz @nightoccfinds @ninthcirclets3cc @kpccfinds
#my cc#simblreen#the sims 3#sims 3#ts3#s3cc#ts3cc#sims 3 simblr#sims 3 mods#sims 3 cc#ts3 simblr#ts3 mods#sims 3 cc finds#sims3cc#ts3 cc#ts3 download#sims 3 download#Spotify
188 notes
·
View notes
Text

Hi so I’ve had a couple of anons asking me how I make my gifs (some specifically hsmtmts gifs lol) so I’ve decided to write up a tutorial of the basics of how I make my gifs. I’m going to try and make it as detailed and clear as possible - but I have been pretty busy with uni and stuff so if I miss anything or anything isn’t clear just lmk and I will do my best to clarify. I’m going to try and include any resources or other tutorials which may be useful as I go along. This is going to be quite long and detailed so tutorial follows under the cut. For some basic steps I know of good tutorials for - I will link tutorials rather than re-explaining :)
Before we begin with the tutorial part bear with me there are a couple of screencaps which I took out of sequence because I forgot to take them at the step I did it - and the final gif colouring result looks kind of different from the rest of the screencaps because when I was adding the gif to the gifset I was making it for I decided it needed to be brighter because the s3 scene was much brighter than the s2 gif I made for this tutorial (none of this really matters, just explaining the slight discrepancy in some of the caps).
1. SOFTWARE
To make all of my gifs I use Photoshop CS5 (this is the version I use). Any version of Photoshop should work with the methods in this tutorial and you can find a masterlist of cracked photoshops here
2. FINDING HQ VIDEO
When making gifs I always use 1080p video - but not all 1080p is created equally. Generally remux files and larger file sizes will produce better quality screencaps so this is what I search for when giffing. I know a lot of gifmakers who swear by using 4k, but personally I find 4k is more trouble than its worth in my opinion (screencaps always come out weird on my computer - like with a full on green tint, and they take forever to download). For HSMTMS in particular I like to use the release labelled 1080p SALT.
In terms of finding videos, this is a good guide on downloading.
3. SCREENCAPPING
I use mpv player to take screencaps for my gifs. This is a tutorial on how to use and install mpv. When taking your screencaps make sure you have continuous screencaps and no frames are skipped or duplicated. These missing/extra frames will make your gif look choppy and the animation won’t be smooth.
After finishing my screencaps I put them all in folders and move the folders to my desktop (but it can be anywhere you easily can access the folder) to import into Photoshop.
4. IMPORTING SCREENCAPS TO PHOTOSHOP
Open Photoshop. Open the Menu path "File > Scripts > Load Multiple DICOM files” and select the folder where the screencaps for your gif are.
5. CROPPING AND RESIZING GIFS
Click the ‘Crop’ button on Photoshop (the little button shown in the screenshot below). Typically I like to use a preset so that all the gifs in the set I make are the same size. For this set I used the 4x5 crop preset because that is what I typically use.

Position the crop where you want the gif (typically I like the character in the center).
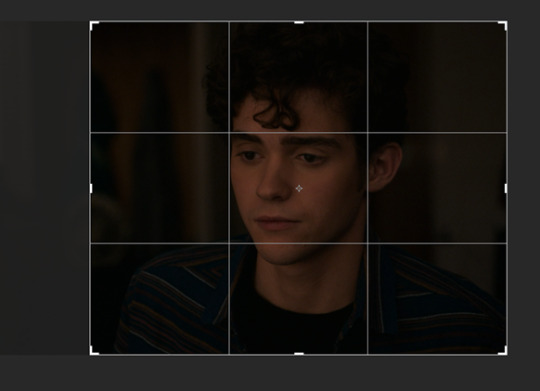
Then push enter (or the tick next to the crop buttons) to confirm your crop.
Use the keyboard shortcut Ctrl + Alt + I to resize your image. This will bring up a little pop up like this:

Resize your gif accordingly based on the width. It is important to use the correct dimensions for the size of the gif you wish to make. These are summarized in the below image.

When you change the width to the correct size (e.g. in this case 540px) the height will automatically change as well.

Click Ok to resize.
6. ANIMATING YOUR GIF + SHARPENING
There are quite a lot of steps to turning your frames into a timeline animation. They are covered in detail in this amazing gif tutorial (which is the main one which helped me learn to gif).
It would be useful to have a read of how the process works, but to speed things up for myself I use a Photoshop action (shared here) I made that does all these steps for me plus my sharpening😊 (Here is a tutorial explaining how to create & install Photoshop actions)
I just highlight the word animate click the play sign and it does all the tedious steps in a couple of seconds. Note it is important to keep the reverse frames one unticked as shown in the screencap otherwise your gifs will move backwards

After that runs through we have our gif in timeline mode sharpened and ready to colour :)

7. BASIC COLOURING TECHNIQUE
My basic colouring process is very simple and honestly it may shock some people but I primarily colour my basic scene gifs using only the curves and vibrance adjustment layers. There a few reasons for this – 1) The curves tool is a powerful tool and you can do a lot with it 2) Less adjustment layers = better quality gifs 3) This works for me and it is what I find easy. Essentially, I like to keep things simple where ever possible.
First I add a curves layer by clicking on the highlighted adjustment layer
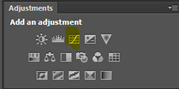
This gives you a menu that looks like this:
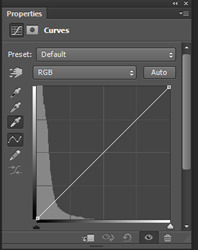
The great thing about Curves is that Photoshop will do a lot of the work for us if we use the eyedropper tools.
First I click the white eye dropper – then I pick a white point on the gif and see how it goes. This can take a few times to get right and often I will try a few times to see which I like best.
For this gif I selected the white light in the background but it looks a little green to me

After I have selected my white point I will usually do the same thing except with picking a black point of the gifs. I don’t always pick a dark point it kind of depends on how much I like what Curves has done with the white point and if I think the gif needs more contrast.
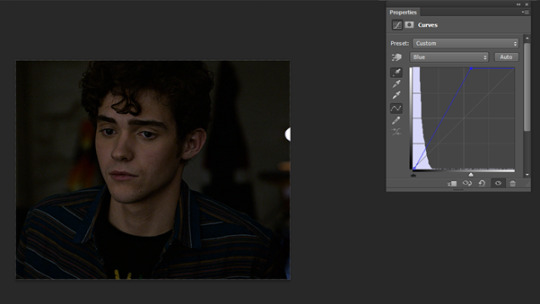
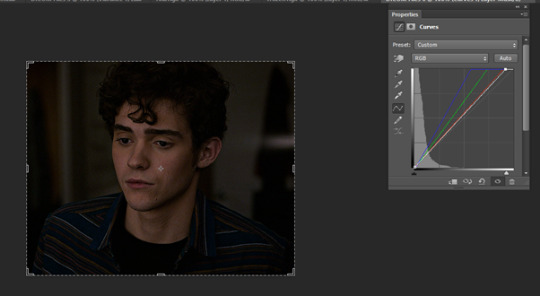
For this gif I picked a black point of the area behind Ricky. This is what the gif looks like now with the dark point chosen:
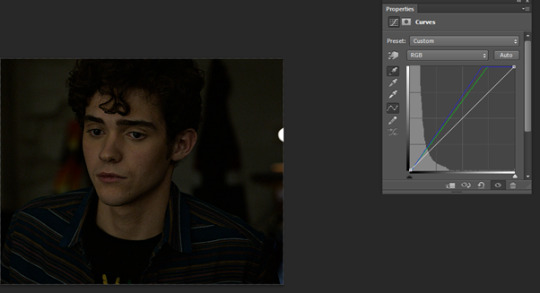
This looks a little better to me than just the white point – but the screencap still looks kind of yellowy and dark to me. So what I do now is I go into each colour channel for the curve and manually adjust it to my liking.
Since this gif is yellow I start in the blue channel and add more blue. I do this by changing the drop down menu on the curves screen from RGB to blue. This gives me something like this to work with:
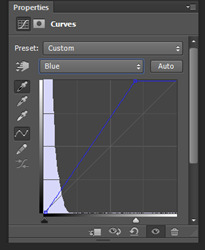
Essentially I adjust the amount of blue in the gif by sliding the white arrow down the bottom up or down to add more or less blue to the gif. For this gif I am going to slide white arrow at the bottom to the left to make the gif more blue (i.e. neutralise yellow). If I think I have added too much blue I slide it back to the right to add yellow back in.
This is what I adjusted it to and it already looks a lot better
I am actually pretty happy with the overall colouring of this for the moment and I don’t think I need to go into the red and green curves. But I will briefly explain what they do/how they work by showing what some adjustments to these curves looks like.
Red curve – here is our starting point
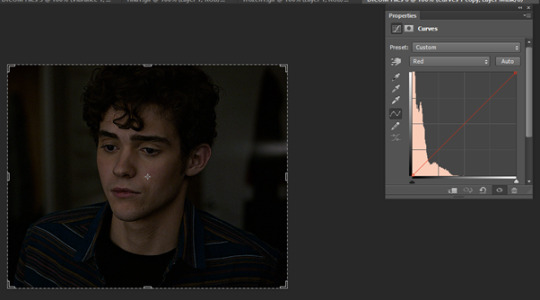
Dragging the curve to the left will introduce more red into the image

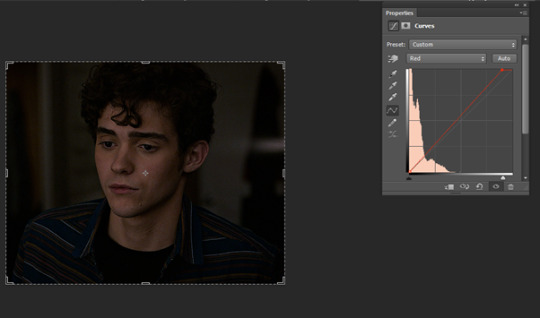
Dragging it back to the right will take out red (the gif will become more cyan)
Green curves: this is our starting point

Dragging the green curve to the left will add more green to the image
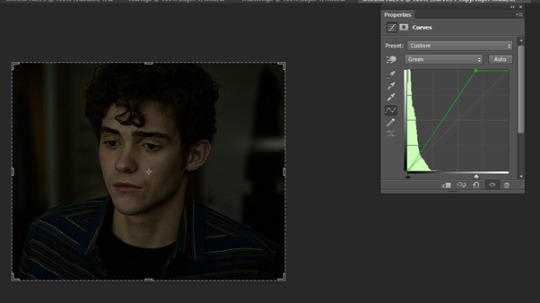
Dragging it to the right will take green out (adding pink/magenta)

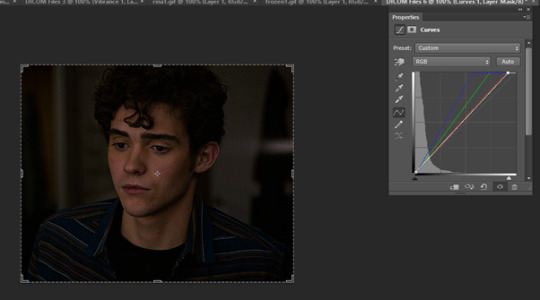
So after I am happy I have coloured the image in curves If I want the gif to be a little brighter I go back to the main RBG Curves screen and drag the white arrow a little up to the left to add some additional brightness
After colouring with Curves I add in a Vibrance layer (highlighted adjustment layer)

Typically I set the vibrance somewhere between 50 and 60.

This is what the gif looks like now:
At this point I also have another quick look at the gif and see if I think I need to go back into curves and tweak the colouring a bit and add a bit of extra brightness. When I add in the Vibrance I find it easier to see if there is any underylying colours I want to go back and neutralise/adjust in my curves layer again.
This is what I end up with after making my adjustments post vibrance layer:

Another step I do sometimes is grabbing the black slider on curves and dragging it just a little bit to the right to add some depth and contrast to the gif. As s2 of hsmtmts is really dark I didn’t do it for this gif because I don’t think it needs it. But I will show an example of what this might look like:

This is basically it for my basic colouring. Of course there are a lot of different steps to making my colourful gifsets, but this is just a basic tutorial for the way I gif standard scenes so I will move on to subtitling gifs.
8. CAPTIONS
My go to subtitle font is Arial Rounded MT Bold. I have Faux Italic and Faux Bold Selected for this. I like bigger font sizes because I have bad eyesight so usually I will opt between 20 – 24 pt font size

I click the T button to add text then I type out my caption.
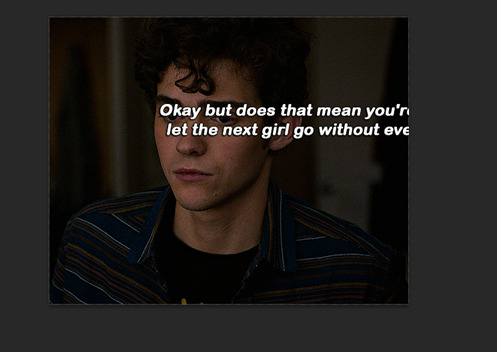
Obviously we don’t want our text here so I align it to the bottom and centre of the gif I do this by first selecting the move tool then going ctrl + a (this selects our gif as the boundary for our alignment). You will know this is done based on the border that comes around the gif (also please ignore that drop shadow and outline settings have already been applied here lol – I added this in because I forgot to screen cap/ explain this part initially)
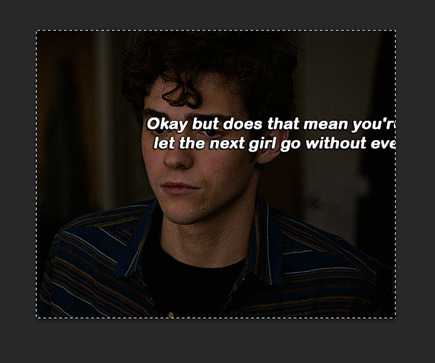
Then I align my text using the following menu buttons:
Next I Ctrl +D to remove the selection (you need to do this to be able to nudge your text up for the next step). This is the result of the alignment:
Now I nudge the caption up by selecting the text layer and pushing ctrl + shift + up
This is the result:

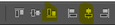
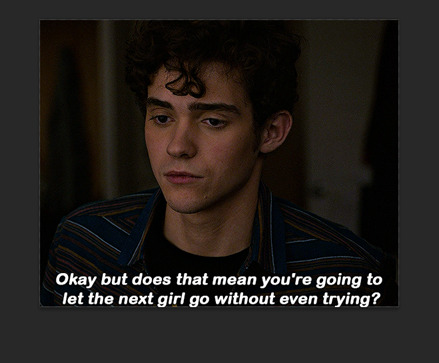
This looks ok, but I always add an outline and dropshadow to make the text more readable. To do this I go into the blending options for the text layer. You can do this by right clicking the layer and selecting blending options or by double clicking the layer (but not on the text).
First I add Stroke with these settings
Then I add Drop Shadow with these settings:

9. SAVING GIFS
To save your file use the keyboard shortcut Ctrl + Alt + Shift + S to open the save for web settings. You will get a screen like this. The settings shown in this screen are my typical save settings (except it should say ‘Forever’ on looping options)
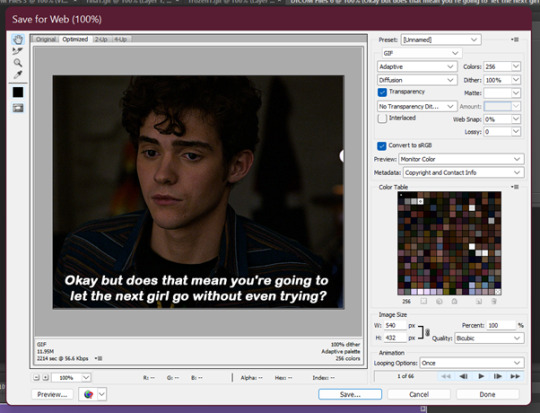
However, Tumblr’s gif limit is 10mb so the size of this gif is too big to upload (it is nearly 12 mb) so we have to go back in the timeline to shorten the gif a bit so we can upload it to tumblr.
I do this by dragging the red preview thingy (idk what else to call it) around till I find a point where I feel the gif has a natural end. Then I grab the timeline bar thingy (idk what it’s called but the silver gray bar at the end of the gif) to the red bar to shorten the gif.


Now press Ctrl + Alt + Shift + S again to save your gif and make sure you set the Looping Option to ‘Forever’. Sometimes I have to shorten the gif a few times to get it under 10mb - but luckily I got it first go this time :)
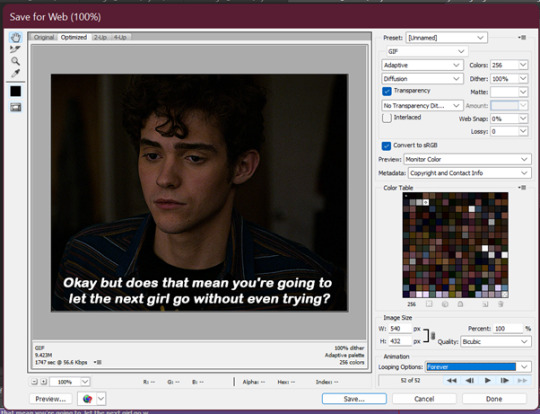
Now your gif is saved but there is still one step left to do. Photoshop has a glitch where it automatically sets gif speed to 0.7 after saving from the timeline function – we don’t want that! The gifs look very slow and are not very smooth.
So what we do is we open the gif that we just saved and this will open in the frame format. All we have to do is select all frames and set the gif speed to 0.5 – I also have this in my action so I go back to the actions and highlight the line that says ‘set frame speed’ and play the action through

Then we just save the gif again as we just did 😊
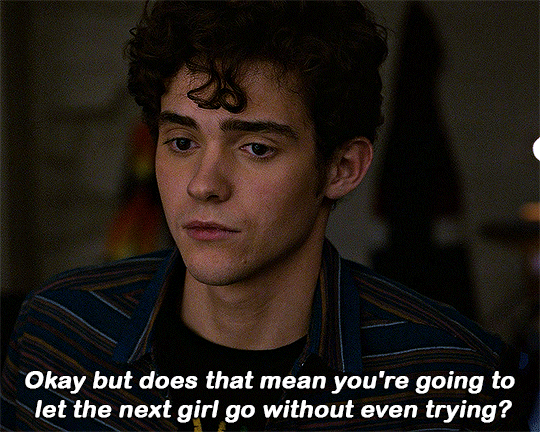
This is the end result:
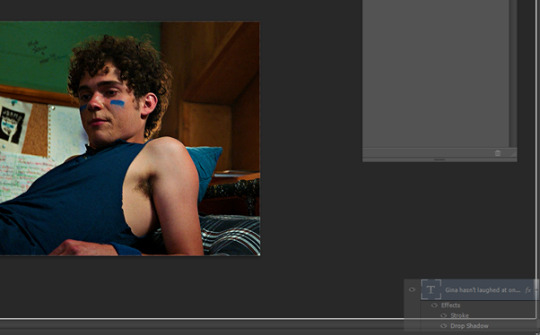
and what the gif looks like without any colouring or text:

One other helpful tip:
If you are giffing from the same scene you can do your colouring and text manually as per the tutorial on the first gif for the set and then drag what you did across to the second (after cropping, resizing and animating it). All you need to do is drag the colouring outside to a different window then highlight your adjustment layers + text and drag them to the new canvas off of the gif (If you drag it on top of the gif it will place it where you put it. Make sure to go off the canvas to so it will keep you positioning/alignment of the text you made 😊)
Basically - you drag the text, curves, vibrance (and any other layers you need) to the gray area of your photoshop document and your colouring will be applied and your text will be placed in the same position as your source doc.
Ok so that is my super basic gif tutorial - if anyone has any questions feel free to ask!
#hsmtmtsedit#*mine#request#gif tutorial#resources#ps help#photoshop tutorial#usergif#allresources#yeahps#completeresources#resourcemarket#dailyresources#userelsbeth#usersavana#useraurore#userrobin#usersole#uservalentina#tuserheidi#okkk so this is kind of a weird choice of gif for the tutorial but I just followed my process as I made a gif request this morning#plus I do feel like its a really ugly screenshot so shows the results of the colouring quite well#but anyway i hope this helps someone
1K notes
·
View notes
Link
#Lightroom Desktop Presets#Lightroom Mobile Presets#HOME LIGHTROOM PRESETS#LIGHTROOM#LIGHTROOM PRESETS#PRESETS
#Lightroom Desktop Presets#Lightroom Mobile Presets#HOME LIGHTROOM PRESETS#LIGHTROOM#LIGHTROOM PRESETS#PRESETS
0 notes
Last Seen Blogs
tadelsahc
Tadelsa Headcanons
spacekidjjo
jor | he/they
m1dnighter
we are better by design

lehmannkatz49
The Journey of Klitgaard 613

aaronsimoes
aaronsimoes