#lacto fermentation
Text
Because I am apparently a glutton for punishment who did not get my fill of vegetable prep yesterday, with these wonky joints?
Behold: this evening's plan!
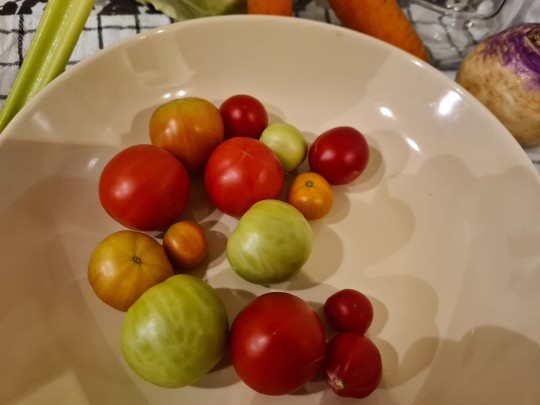
That's the latest rather pitiful haul of hard little end of season tomatoes which needed to just come off the plants. Which should at least be good for pickling! They're all rock hard, and stunted except for the few cherry tomatoes. I don't actually have much experience pickling riper-looking ones, but even those are hard enough that they should hopefully hold up OK.
They may be growing in the balcony room, but the plants are obviously really Not Happy with the dropping sunlight levels and temperatures out there. (It was already marginal enough on light, and I may well set up some LED panels this coming season. Because I am that kind of stubborn nerd.)
There were not as many tomatoes as I thought, and a couple of the bigger ones had just started going off on the plant before they were even completely red. Nowhere near enough harvest to fill up one of our fermentation lock lid jars. I could just cram them in another smaller jar without the handy airlock, but nah.
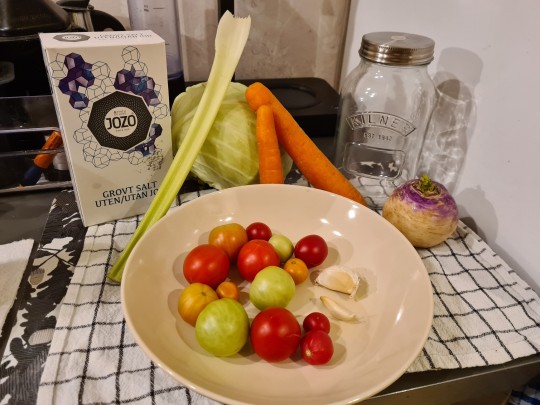
I'll just bulk it out with some or all of these other storebought veggies! 😎
(Plus some other seasonings, which I haven't quite settled on yet.)
Been meaning to put together some kind of mixed brine pickles anyway, now that I can eat them again. Excellent excuse to get at least one jar going, and honestly it should turn out more appealing than those somewhat questionable tomatoes on their own. I hope.
Going with the seasonal theme, I may also put together a jar or two of old school brine pickled chow-chow with some of that cabbage, once I pick up peppers for it. Not surprisingly, vegetable combos vary a lot for that type of relish. In my family, at least, what gets called chow-chow mostly uses cabbage, peppers (sweet and optionally hot), onion, and maybe some carrot plus spices including turmeric to turn it bright yellow. If you throw other veggies together into a similar type of relish, it is more likely to turn into piccalilli. Or just, "idk, it's some kind of mixed relish". 😁 Which all mostly does get sweet vinegar pickled by now, but I like it the other way too.
#tomatoes#green tomatoes#gardening#mixed pickles#pickling#pickled vegetables#brine pickles#lacto fermentation#clatterbane's kitchen experiments#chow-chow#hopefully soon#appalachian food
8 notes
·
View notes
Text

Fermented some sauerkraut recently and was compelled to make this because puns are a superior form of humor.
#went through all five stages of grief#then realized it was fine#sauerkraut#fermented foods#fermented vegetables#food memes#lacto fermentation#fermentation
1 note
·
View note
Text
Lacto-ferment goals for this summer:
-cucumber (pickles, obvi)
-tomato (ft. garlic)
-onion and garlic
- garlic scapes!
-asparagus
-kohlrabi
-cabbage

#lacto fermentation#green witch#kitchen witch#baby witch#greenkait#pickles#fermenting#natural fermentation#fermented vegetables#green witches of tumblr#mindful eating#healthy eating
3 notes
·
View notes
Text
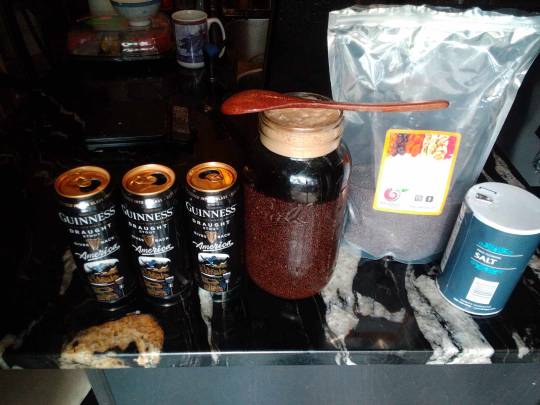
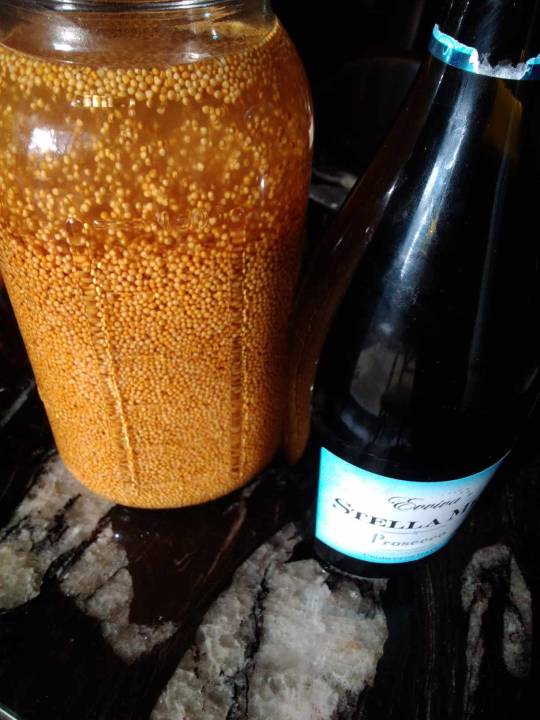

couple of mustards im experimenting with. the yellow one is a prosecco mustard and the brown one is a guinness mustard. started the lacto ferment yesterday and im gonna let it go for about a month. i have high hopes for both of these
1 note
·
View note
Text
https://cultured.guru/blog/the-complete-guide-to-safely-using-salt-in-vegetable-fermentation
Here's an article by a food microbiologist on how to safely ferment all kinds of food. Your gut will thank you.
1 note
·
View note
Text
My first sauerkraut (week 1)
I decided to try making sauerkraut for the first time, because I had leftover cabbage and didn’t know what to do with it. I started with 1/8 head, thinking it would be a lot; but after packing it into a jar (right), I thought I’d try making even more, so processed another 1/4 head (left).
I read that I should use about 2% to 2.5% of the cabbage’s weight for my salt, and wrote my measurements/recipes on the jar. To weigh the veg down, I used ziploc bags partially filled with water.
Jar 1 (larger jar on left):
490 g cabbage
12 g salt
1/4 tsp dill seed
1/8 tsp celery seed
Jar 2 (smaller jar on right):
324 g cabbage
8 g salt
1/4 tsp carraway seed
Day 0:
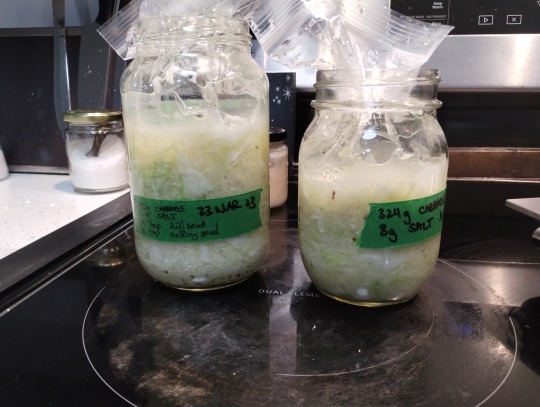
I was surprised at how much water came out of the cabbage!
Day 1
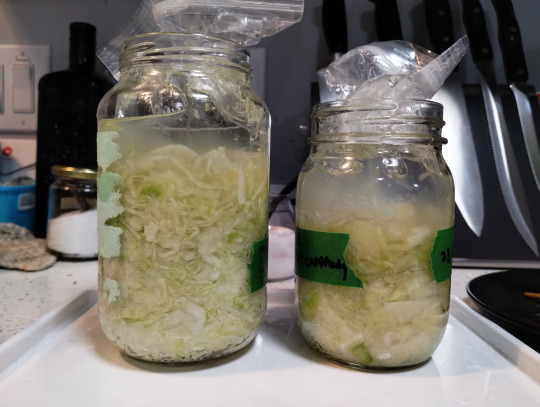
It doesn’t look like much changed. I think some of the green leaves got greener--or it might just look greener by comparison as the majority of leaves got paler.
Day 2

Not much colour change, I think the cabbage got paler overall. But I did see the first signs of gas production!

It’s alive! I can tell because it’s farting!
Day 3

The cabbage started turning yellow. Gas production continued.
Day 5 (I forgot to document day 4)
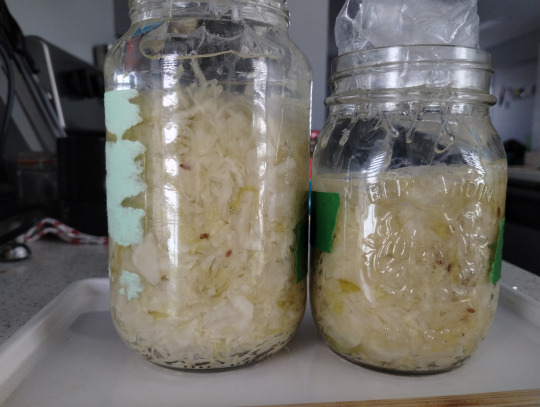
The “green” leaves turned yellow, and overall the cabbage got paler. Gas production continued. I think this was the day where I started feeling bold enough to poke the floating leaves back down using a chopstick.
Day 6

Exciting! Not much difference since day 5; maybe slightly more gaseous. There was definitely a “cabbage fart” smell, but like, in a good way, I guess?
Day 7

The anticipation--!
0 notes
Note
Hi! I love your work. Can you make lacto fermentation crocks? If you can, what would you price them at?
I’d never heard of these before! that’s a really smart way to get an airtight seal on a ceramic container. I wouldn’t want to promise anything and end up with something that doesn’t function, so I’ll do some experimenting and see if I can figure out those lids.
#asks#ask#lacto fermentation crock#ceramic#experimenting will have to wait a few weeks until the kiln firing/pottery shipping cycle restarts
43 notes
·
View notes
Text
it turns out i am not depressed (things you used to love no longer thrill you) and in fact, German pickles are just that shit
#no dill. no mustard seeds#and theyre made with vinegar not lacto fermented#spoiled voice of a child that has only eaten mrs Elswood's haimisha pickles until now
3 notes
·
View notes
Photo
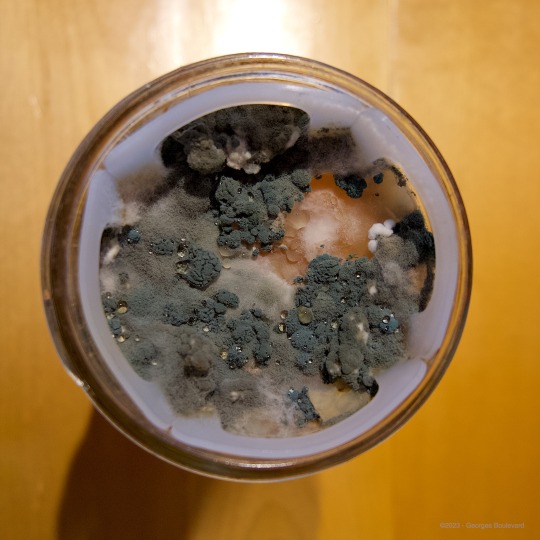
Lacto-fermentation gone whak !
35 notes
·
View notes
Text

half of this year's peppers, lacto-fermented and then mostly blended. there's still texture - not paste or really sauce, but kinda.
the peppers range from sweet and mild to habanero and ghost; overall the mixture is what i'd call medium for what that's worth.
we use it on a lot of things... it's not seriously vinegar-ish but instead has a bit of acidity and a bit of salt to it. probably not shelf-stable so we freeze it. which preserves much of the probiotics (some don't survive the freeze but it's a lot better overall than canning which is designed to kill everything!)
#food#preservation#lacto fermented peppers#big umami#some would say too hot to eat#but it's not#goes amazing with eggs and just about everything else but i don't use it non-stop because i like other flavors too lol
4 notes
·
View notes
Photo

Garlic and Dill Lacto-Fermented Pickles
Cucumbers that have been lacto-fermented at home are simple to make and are nice to have on hand to serve guests or give as a gift when eating at a friend's house.
2 notes
·
View notes
Text
if a food has a strong sour note. it's literally the best
7 notes
·
View notes
Text
Radishes are in the brine!
I only had a medium sized bunch, so I only used a 500g jar - since I’m testing these recipes out anyway!

I also decided to add some green onion (which was looking very sad in my fridge), dill and garlic 🤤
Next up…garlic scapes, and red kohlrabi!
#baby witch#kitchen witch#green witch#green witches of tumblr#lacto fermentation#lacto ferments#fermented radish#mindful eating
3 notes
·
View notes
Text
Side Dish - Garlic and Dill Lacto-Fermented Pickles

Lacto-fermented cucumbers are not too difficult to make at home and are nice to have in the fridge to share with company or present as a gift when dining at a friend's home.
0 notes
Text
The only microbe that can even approach yeast in my esteem is lactobacillus.... bacillus subtilis, you are lovely but your slime is too much for me.
0 notes
Text
How to Make Homemade Hot Sauce: A Fiery Culinary Adventure
Hot sauce lovers rejoice! If you're a fan of adding a kick to your meals, then making your own homemade hot sauce is a must-try culinary adventure. Whether you prefer a mild and tangy flavor or crave the intense heat of fiery peppers, creating your own hot sauce allows you to customize the taste to your liking. In this comprehensive guide, we'll explore the art of making homemade hot sauce, from choosing the right peppers to preserving the sauce for long-term enjoyment. So grab your apron and get ready to embark on a sizzling journey into the world of hot sauce!
Table of Contents
Introduction
The Basics of Hot Sauce
Choosing the Perfect Peppers
Fermented or Quick Cook: Two Methods, Two Flavors
The Magic of Fermentation
Quick Cook: A Speedy Alternative
Adding Depth and Flavor
Preserving Your Homemade Hot Sauce
Bottles and Labels: Presenting Your Creation
Conclusion
1. Introduction
Hot sauce has become a staple condiment in households and restaurants around the world. Its popularity stems from the unique combination of spice, tanginess, and flavor it adds to any dish. While store-bought hot sauces offer convenience, making your own hot sauce allows you to experiment with different peppers, flavors, and levels of heat. Whether you're a seasoned hot sauce aficionado or a curious beginner, this guide will provide you with all the necessary information to create your own homemade hot sauce.
2. The Basics of Hot Sauce
Hot sauce is a versatile condiment, elevating the flavors of a wide range of dishes. The fundamental ingredients of hot sauce are peppers, vinegar, and salt. These three components work together to create the signature taste and heat of hot sauce. The peppers provide the heat, the vinegar adds tanginess and acts as a preservative, and the salt enhances the overall flavor. By adjusting the ratios of these ingredients, you can tailor your hot sauce to suit your taste preferences.
3. Choosing the Perfect Peppers
The choice of peppers is a crucial step in creating your homemade hot sauce. The type of pepper you select will determine the flavor profile and level of heat in your sauce. There is a vast array of peppers to choose from, ranging from mild to extremely hot varieties. Some popular options include jalapeno, serrano, habanero, cayenne, and ghost peppers. Consider your spice tolerance and desired flavor when selecting peppers for your hot sauce.
When experimenting with different pepper combinations, it's important to note that using peppers of the same color family will maintain the vibrant hue of your sauce. Mixing different colored peppers may result in a less visually appealing brown sauce. Additionally, if you prefer a milder hot sauce, you can incorporate sweet peppers into the mix to balance out the heat.
4. Fermented or Quick Cook: Two Methods, Two Flavors
There are two primary methods for making hot sauce: fermented and quick cook. Each method offers a unique flavor profile and requires different levels of time and patience.
5. The Magic of Fermentation
Fermenting hot sauce involves a natural process that enhances the flavor complexity of the sauce. The fermentation process occurs when beneficial bacteria consume the sugars in the peppers, creating lactic acid. This lactic acid not only provides a tangy taste but also acts as a natural preservative, extending the shelf life of the sauce.
To ferment your hot sauce, begin by creating a brine using salt and warm filtered water. Next, fill a jar with your chosen peppers and garlic, then cover them with the brine. It's important to ensure that the peppers are fully submerged in the brine to prevent mold growth. Use a fermentation lid or cheesecloth to cover the jar and allow the mixture to ferment for 5-7 days, or until the brine appears cloudy.
6. Quick Cook: A Speedy Alternative
If you're short on time or prefer a simpler method, the quick cook approach is a great option. This method involves cooking the peppers and other ingredients together to create a hot sauce that is ready to use immediately. While the flavors of quick cook hot sauce may not be as complex as fermented versions, it still offers a delicious and spicy kick.
To make quick cook hot sauce, start by sautéing your chosen peppers, garlic, onions, and any additional aromatics. Once they are softened, add vinegar and simmer the mixture for a few minutes. Transfer the contents to a blender or food processor and puree until smooth. Quick cook hot sauce can be enjoyed right away or stored in the refrigerator for up to two weeks.
7. Adding Depth and Flavor
While peppers, vinegar, and salt form the foundation of hot sauce, you can elevate the flavor profile by incorporating additional ingredients. From garlic and onions to fruits and spices, the possibilities for customization are endless. These added elements can impart unique tastes and aromas, making your hot sauce truly one-of-a-kind.
Experiment with different flavor combinations to find your perfect balance. For a smoky note, consider adding chipotle peppers or smoked paprika. If you prefer a hint of sweetness, try incorporating fruits like mango or pineapple. Don't be afraid to get creative and tailor your hot sauce to suit your taste preferences.
8. Preserving Your Homemade Hot Sauce
Once you've crafted your homemade hot sauce, you'll want to ensure its longevity for future enjoyment. Fortunately, there are several methods for preserving hot sauce, allowing you to savor the flavors for months to come.
One preservation method is freezing. Simply transfer your hot sauce into freezer-safe containers or ice cube trays and place them in the freezer. Frozen hot sauce can last for up to a year, offering you the convenience of having your homemade creation readily available whenever you desire.
Another preservation option is canning. This method involves processing the hot sauce in a water bath canner to create a shelf-stable product. However, it's essential to use tested and proven canning recipes to ensure the safety and quality of your hot sauce. Follow proper canning procedures and consult reliable sources for detailed instructions on canning hot sauce.
9. Bottles and Labels: Presenting Your Creation
Once your hot sauce is ready to be stored, it's time to choose the perfect bottles and create eye-catching labels. Presentation plays a significant role in the overall experience of your homemade hot sauce, whether you plan to share it as a gift or keep it for personal use.
Select bottles that are suitable for hot liquids and have a tight-sealing lid to maintain freshness. Consider using glass bottles, as they offer an elegant and professional look. To add a personal touch, design custom labels using online templates or printable labels. These labels can showcase the name of your hot sauce, the ingredients, and even your own creative artwork.
10. Conclusion
Making your own homemade hot sauce is a thrilling culinary adventure that allows you to explore various flavors, heat levels, and preservation methods. By choosing the perfect peppers, experimenting with fermentation or quick cook techniques, and adding complementary ingredients, you can create a hot sauce that perfectly suits your taste preferences. Whether you're a fan of mild tanginess or crave the fiery heat, your homemade hot sauce will add a delightful kick to any dish. So don your apron, gather your ingredients, and embark on a journey into the world of homemade hot sauce. Get ready to ignite your taste buds and elevate your meals to new levels of flavor and spice!
Remember, the key to a successful hot sauce is experimentation and personalization. Use this guide as a starting point, but don't be afraid to unleash your creativity and develop your own unique hot sauce recipes. With each batch, you'll refine your skills and discover new flavor combinations. So embrace the heat, savor the flavors, and enjoy the incredible world of homemade hot sauce!
0 notes
Last Seen Blogs

smirkingdovelove
Cupcakes,Smut, Fluff and Men

sugarclarice
SUGARCLARICE🏳️⚧️

neto312
Untitled

waylonjk
Untitled

viperbooty
I ❤️ Hot Dads