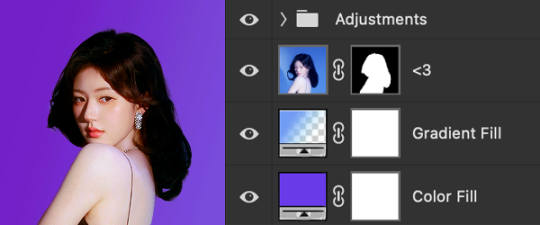
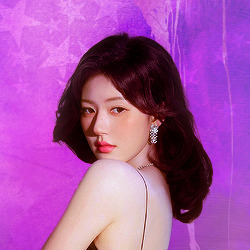
#new psd i'm trying out
Text


RALPH MACCHIO AS DANIEL LARUSSO
IN COBRA KAI SEASON 2 EPIODE 4
#ralph macchio#daniel larusso#cobra kai#ckedit#cobrakaiedit#danielalrussoedit#ck season 2 episode 4#caliedits#caligifs#( i'm trying out a new psd don't at me )#(anyways i adore him)#(trying to be back fam)
154 notes
·
View notes
Text
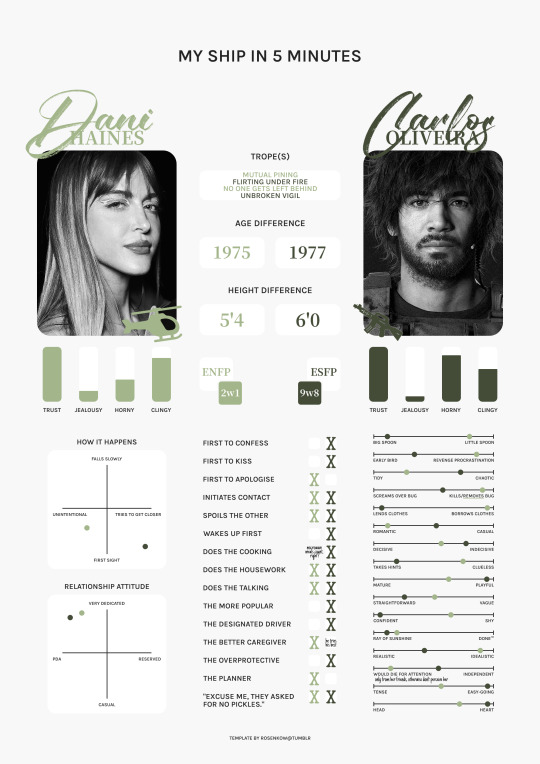
DANI HAINES x CARLOS OLIVEIRA / template.
#mine.#pair: dani x carlos#oc: dani#click for better quality as always ♡#so um i meant to post this the same time as the claire on last year but just completely forgot then found out i lost my psd so oops#i wanted to do like a stencil or army font for their names but also wanted that handwriting look so the letters overlapped...aughgh#gave up on looking for pics of carlos' face model as well i'm so sorry like there were none with his long hair and the ones from cosplay#they weren't hd or big enough so i was like whateva i'll use this pic that kinda looks real anyways 🤷#anyways yes dani has falling in love with her friends disease. she's so real for that actually#and there's something going on in my brain chemistry seeing dani be the one with two partners yet she's the jealous one...inchresting#again i'm fighting for my life with the new html text editor so hopefully this posts properly...i think the ewskers family tree#posted fine but also that one was a bit more complicated with the read more and line break pics...but omg trying to use gradient text#now...so yes anyways here are my other beloveds !! if i notice an error after posting this i'll blow up cause the new editor makes it harde#to do literally everything lmaoo i hate it sm
15 notes
·
View notes
Text
god jimin is so gorgeous 😭😭
#maddie.txt#finishing up my new psd and i'm trying them out on different pictures to see how it interacts with different colors etc#but idk. he really is the definition of lovely 🥹
0 notes
Text

In celebration of reaching 900 followers!
Ever since I started playing the Globetrotter challenge by @moonfi; I've been creating a collection of UI Widget style templates. This collection includes 20(ish) different templates for you to use in your gameplay screenshots. I'm hoping I did my best to make this as user-friendly as possible; but if you have any questions or notice something off - don't hesitate to message me or send an ask!
[Terms of Use]
Do: Use & edit as much as you want and/or know how to.
Don't: Reupload & claim as your own.
Do: Link back to this post if asked where they're from.
[You Need]
Fonts: April | Lemonmilk | Kids Handmade
TS4 Icons: deathbypufferfish | w-sims | TheSimKid
(I've had L'Universims' icons before they were hacked but as far as I know they've moved to a new website so download from there at your own risk.)
DOWNLOAD (SFS) 66.3mb **FIXED** (Missing moodlet)
[Tips & Hints]
Open the awkwardwhims psd collection file in Photoshop, then drag & drop the folder or group of templates onto your image.
The photo album template was inspired by @folkbreeze (definitely check out their resources, they're all so nice!) & other various examples I saw online.
Resize the template by selecting the folder as a whole; resizing individual layers may makes things unaligned.
Feel free to change background colors/fonts/etc as much as you want.
The text message template has 3 styles: sender, green receiver & blue receiver. There are also reaction icons & a separate reaction bar.
For the to-do list template I didn't include every aspiration icon (I was trying to keep this file as small as possible) but you can download this pack by @deathbypufferfish that has all the aspiration icons you'll need. However, it may be missing some of the newer aspiratons.
When adding photos (album cover/recent photos/etc) use a clipping mask.
The weather template includes all the different weather icons, so be sure to hide/unhide the one that applies.
For the new transaction template, make sure to only change the number of the price otherwise the Simoleon symbol will get changed to Times New Roman.
The notification message template is for life events, bad events & default game notifications (ie: legacy player, etc).
DOWNLOAD (SFS) 66.3mb **FIXED** (Missing moodlet)
@alwaysfreecc @maxismatchccworld
1K notes
·
View notes
Text
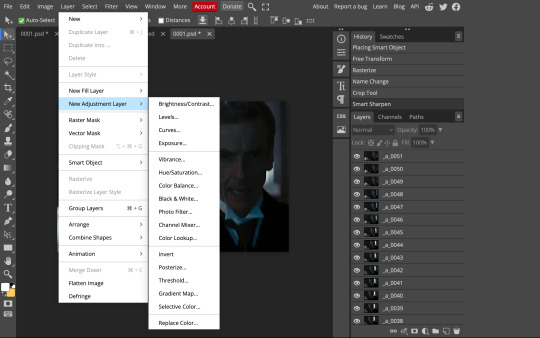
photopea gif tutorial!
i recently started learning the craft of gifmaking with the free software photopea. when i first started, i had to piece together several different tutorials as well as extrapolate from some photoshop tutorials because-- no one uses photopea.
but they should! it's free! it can run in your browser! it can do most everything photoshop can do and you don't have to deal with adobe or torrenting. so i'm making a tutorial of my photopea gifmaking process because that's what i needed a couple months ago, and i hope it can be of use to some others. let's go!
1: PREPARING
source the scene you want to gif. it's best to download your video when you can, but screen recording can work in a pinch. this is the video downloader software i use.
once the source video is downloaded, i like to pick out the specific moments i'm going to gif and save them as their own files-- this makes future steps easier. an individual gif shouldn't be more than 4ish seconds, so limit your selections to about that. name your files in a way that makes sense to you:

2: CONVERTING TO .JPG
i like to convert my video clips to .jpg format. it is possible to load video clips directly into photopea, but unless it is a very short <30fps clip, it is likely to freeze or crash in my experience. i use this website as it downloads a higher framerate (~25fps) than others i've used.

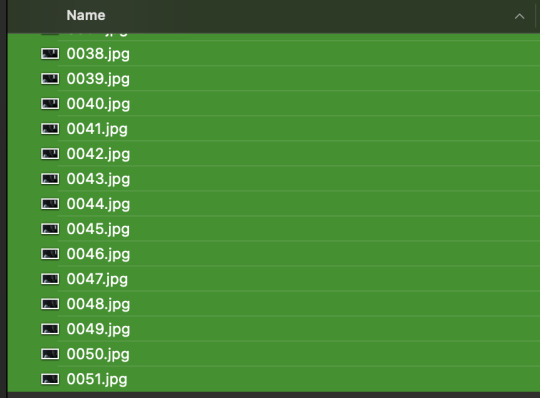
convert your video files and download the .zip folder containing your frames. make sure to unzip them and name them something helpful if you need to.
3: OPENING YOUR FRAMES IN PHOTOPEA
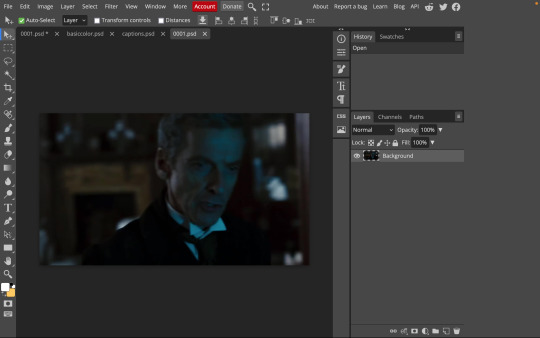
photopea looks like this when you open it:

select "open from computer" and select only the first frame of your first gif:
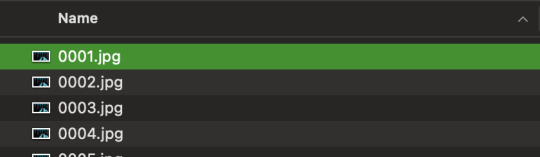
your environment should look like this (ignore the other projects i have open, you should just have 0001.psd or similar):
go to file> open and place, and select ALL of the rest of the frames from your first clip:
they'll load in one by one, and your environment should look like this:
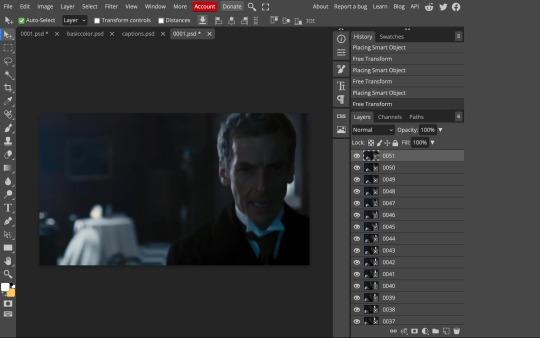
notice how all the frames have a little square in the corner? that means they are smart objects, and we need them to not be for our purposes. select all of your frames, right click, and choose rasterize:

in order to make the series of jpgs move as a gif upon download, select all of your frames and go to layer> animation> make frames:
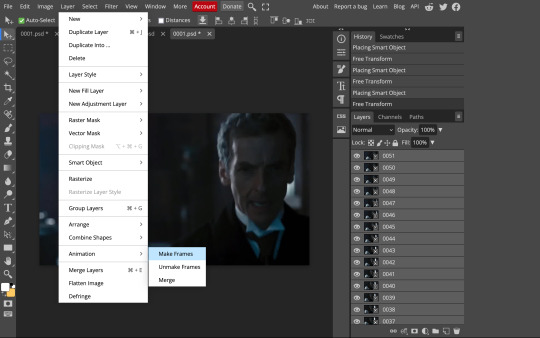
all your layer names should now start with _a_. you can really do this at any point in the process so it's not a big deal if you forget at the beginning.
finally, you want to limit the frames in individual gifs to around 50 or less. if you find you have more, delete some frames off of the beginning or end by right clicking and selecting delete.
4: CROPPING AND RESIZING
select the crop tool on the left hand panel:

at the top bar, select fixed size:

gifs on tumblr are limited to 540px wide for single column gifs, 268px for two columns, and 178px for three columns. the height is up to you; i like to use 350px height with the 540px width.
enter your values into the W and H fields and do not press enter yet. drag the cropped area to where you want it to be-- try to line up the top and bottom edges so as not to lose too much of your image. once you're satisfied with the selection, press enter. your gif is now cropped and resized to tumblr standards.
5: SHARPENING
(if you are working with low-qual video, check out this tutorial by @hellboys before sharpening. basically filter> filter gallery > grain, select soft and play with the settings. then proceed!)
still making sure all of your layers are selected, navigate to filter> sharpen > smart sharpen:
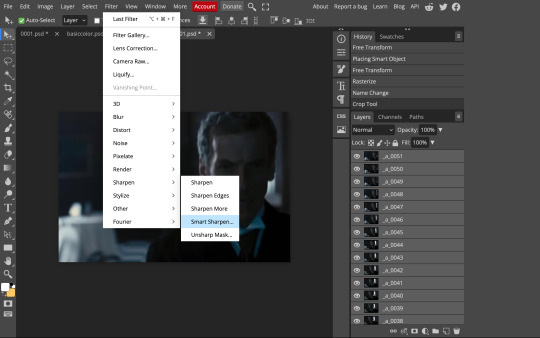
you should see this dialog box:
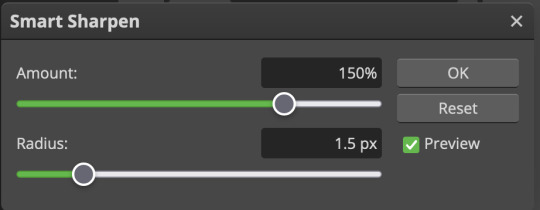
these are the settings i like to use, but you can play around to see what you like. here's the before and after of my sharpening settings:
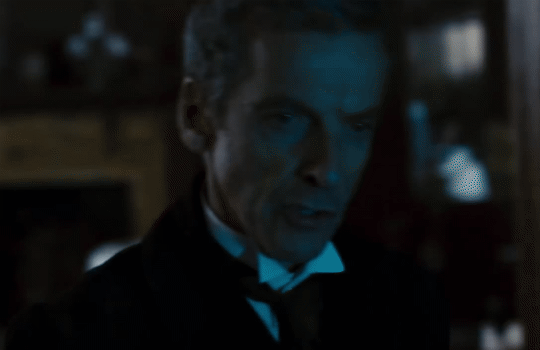
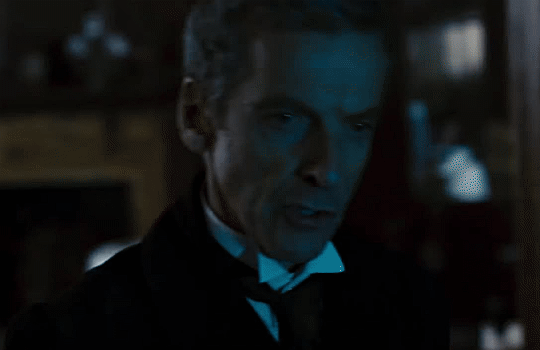
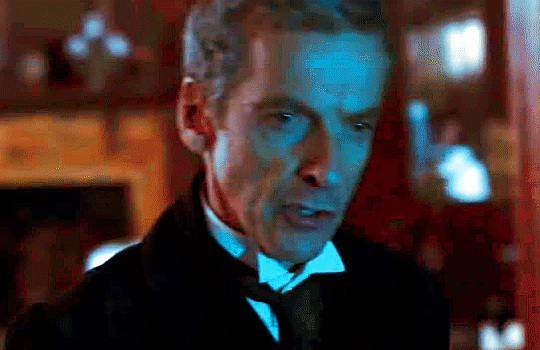
the difference will be more noticeable once we complete the next step-- brightening and coloring.
6: BRIGHTENING & COLORING
navigate to layer > new adjustment layer:
at any time, you can edit your adjustment layers by clicking this button in the right hand panel:

for each edit you make to your gif, you will add a new adjustment layer. always make sure they're at the top of your layer stack. i like to start with adjusting the brightness and exposure, which are both pretty straightforward.
additionally ,you can select a curves adjustment layer, choose the RGB channel, and drag the curve just slightly upwards to further brighten your gif, like so:
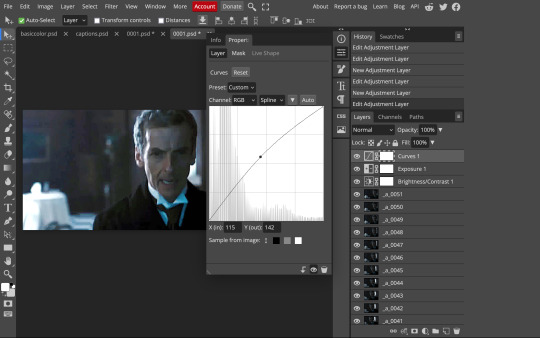
here's a before and after:
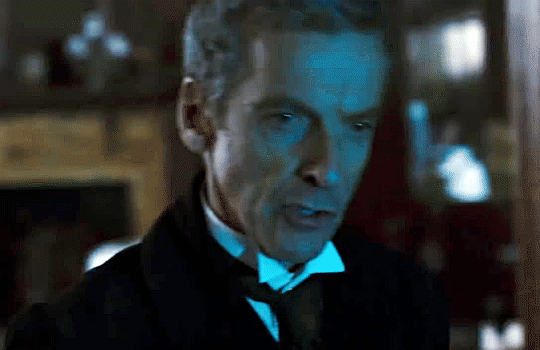
now for coloring-- i mostly use the saturation/vibrance, curves, color balance, and selective color adjustment layers. just play around with all of these until you find a style you like. i like my gifs to look really bright and colorful, so i push the saturation and try to draw out warmer tones in the color balance:
7: CAPTIONS
the font i like to use for captions is arial bold italic. you can download it (or any font of your choosing) from pretty much any free font website. if you choose to download a font not in photopea, go to file> open and select your font; it will now show up in the list of fonts.
navigate to the text button in the left hand panel:

and type in the captions for your gif. i make the font size 20 for 540px gifs.
next, while only your text layer is selected, navigate to layer> layer style > blending options:
click on drop shadow, and play around with the settings until you get something you like. here's mine:

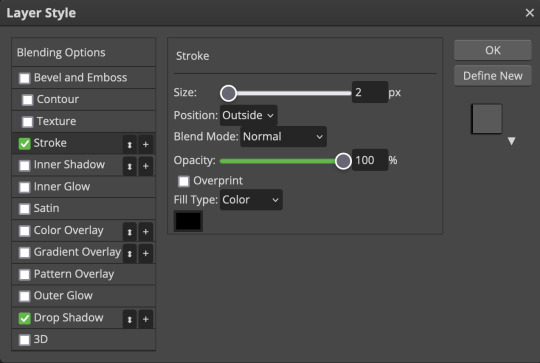
next, click on stroke and do the same thing:
when you're done, make sure your text is your top-most layer.
8: EXPORTING
you're done! head to file> export as> GIF. you'll be prompted with a dialog that looks like this, with your gif playing (you can also do these steps without saving if you want a preview of your gif during editing):
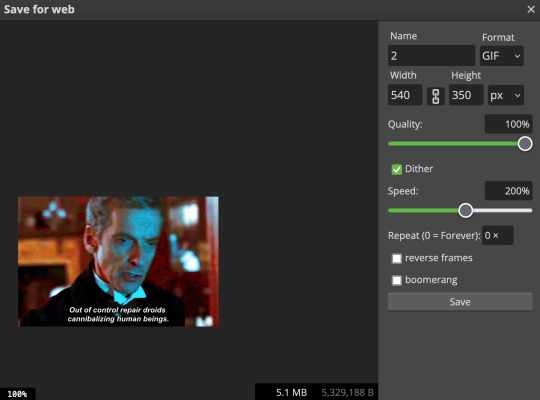
the only thing you should need to adjust is speed. this is the main difference between photopea and photoshop. the only way to specifically adjust the delay in photopea is to manually enter "_05" (or whatever amount of delay) at the end of every layer name. if you're like me you'll agree that is simply too much and settle for the speed slider.
i don't really know what logic governs the speed slider. it doesn't seem to be consistent across gifs, so play with it until it looks right. i've had it on 200% lately which seems insane but looks visually normal.
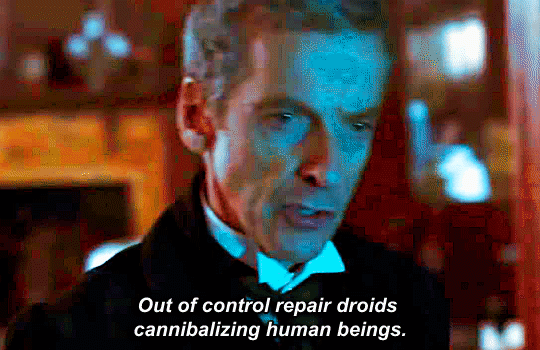
once the speed is adjusted, hit save and you're done! here's a final before and after of all the work:
BONUS: SAVING .PSD PRESETS
did you think manually creating and editing all those adjustment layers was a lot of work? here's how to streamline it for next time.
at the very bottom of your screen, below your layers, select the icon that looks like a folder (third from the right).
it will create another layer called folder 1. drag your adjustment layers into this folder, making sure they stay in the same order. your layers should look like this when you're done:
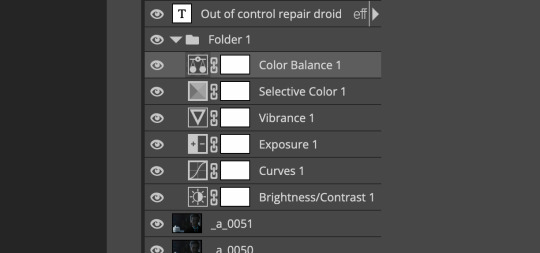
ONLY ONCE YOU HAVE SAVED YOUR GIF, delete all other layers that are not in the folder. then select file> save as PSD. save it somewhere convenient.
next time you're making gifs, after you've cropped and sharpened your frames, select file > open and choose your .psd file. it will open as another project. select the layer that says folder 1, and drag it to whatever project you're working on at the top bar. voila! your adjustment layers are applied to your new gif!
i still like to play with the settings, as coloring and brightness needs will differ from gif to gif.
thanks for reading! here's the gifset i made while making this tutorial :-)
#milk post#gif tutorial#doctor who#photopea#i can't tell if i went too detailed or not enough lol. tag me if you use this i want to see ppl's gifs!!
228 notes
·
View notes
Note
your icons are soooooo so cute honestly!!! i wanted to ask if there's any way you can make a tutorial on how to make them? of course if you want, if you don't want to, that's okay :)
Hi! I really appreciate that you like my icons, thank you so much! 💖💖💖🥹
It's been a long time since I've done a tutorial so I hope I can explain it well haha
So I will explain how i go from the original picture and the final icon below:
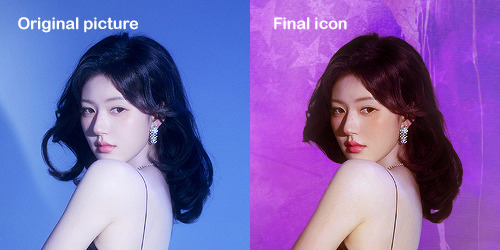
I'm using Adobe Photoshop 2024 but you can use other versions too!
First, I create a 250x250px document and apply a random color fill layer to be the background color of the icon, you can do it by going on Layer > New Layer Fill > Solid color (the color in this moment doesn't matter because I change them later according to the picture I choose to edit).
Then I place the picture I want, adjust the size to make the subject on the center and apply some smart sharpen:
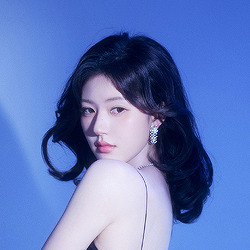
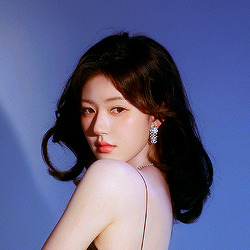
I apply some adjustments to try to color correct if the original picture using Levels, Selective Color and Color Balance to get something like this:
If you want to know the exact adjustments settings I used on this picture you can download the psd here.
To remove the background, I do the hack where I go to the Properties panel (Window > Properties) and click on the "Remove background" option. It's not always that I will get a perfect result but I think it makes easier for me to adjust the little details such as hair and accessories, etc. And I do that using the Lasso tool (shortcut L).
Now, with the background removed I pick a color that I think will match the icon in the Color Fill layer that I created before. To make the background more "fun" I like to add a Gradient Fill layer (Layer > New Layer Fill > Gradient) with a color that might go well with the one I picked earlier to make a smooth and light gradient.
My result until now:
Now it comes the fun: adding textures! I like to add some textures to make the icon more lively and I usually download them on deviantart or on resources websites. You can download some cool textures here, here and here. On this part I really test a lot of textures with different Layer blending. There are a lot of different blending options so you can try as much as you want.
Other thing I like to do is add a clipping mask above the subject layer when I want to color something specific in my picture such as the hair, the clothes or even applying some "fake" blush on the cheeks. I do this adding a new layer, then using the shortcut option (or alt) + command (or ctrl) + g to make it a clipping mask and then using the Brush layer to color what I want. For the blending mode I usually use Soft Light and sometimes Color if I want the color to really stand out.
And in the end I will have something like this:
And my layer tab will be like this:
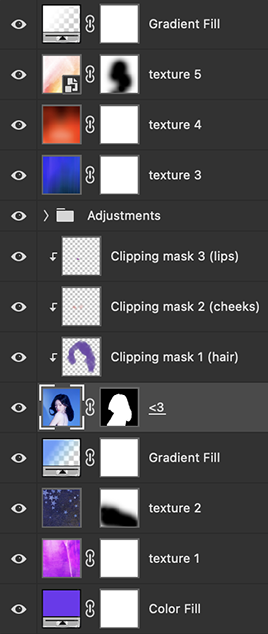
For using on the dashboard I usually resize it to 100x100 to make it look more sharper and defined but it's really a choice, you can already start making your icon using the size you want, I just prefer doing on 250x250px because i'm used to.
To save it I use the shortcut shift + option (alt) + command (ctrl) + s to save it for web with these settings:
And that's it! Sorry for not going to deep in each step but I guess you can get the feeling when you try making your own icons! Is really about trying different methods and things until you became satisfied with your result.
73 notes
·
View notes
Text
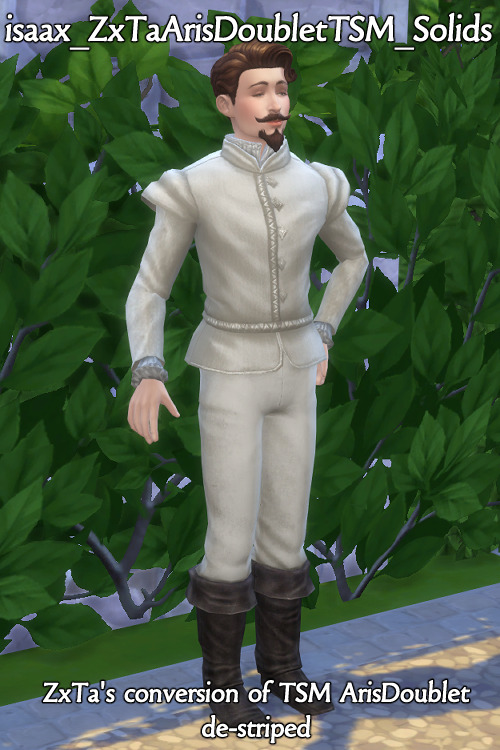
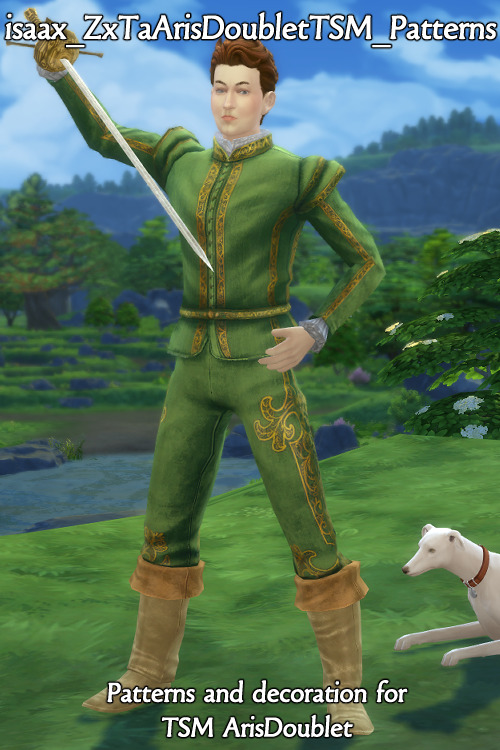

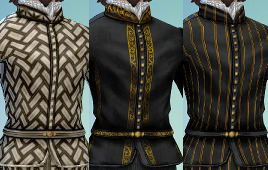
ZxTa's ArisDoublet TSM De-Striped (Outfit)
I love @zx-ta's conversion of the The Sims Medieval ArisDoublet, and decided to try my hand at painting over the doublet stripes, creating a neutral base for recolors.
isaax_ZxTaArisDoubletTSM_Solids contains 24 swatches of various solid colors. isaax_ZxTaArisDoubletTSM_Patterns contains 11 swatches of hand-drawn patterns based on various early 17th century paintings. But I am the most proud to share PSDs for recolors!! Both the original plumbbob buttons and a new style of buttons are available. I hope someone out there can put it to good use!
I used Academia gradients for many of these colors.
Notably lacking damask and brocade among the patterns, as I'm not sure how best to draw those. I may offer some later!
The mesh is not included! Download: Tumblr, or direct to CurseForge.
Download recolors at SimFileShare.
#sims 4 historical#s4cc#ts4cc#sims 4 custom content#ts4#the sims 4#the sims 4 custom content#my cc#recolor#outfit#historical#stuart#tudor#jacobean
143 notes
·
View notes
Note
i am so tired of being nice i just want to go apeshit PLEASE FOR THE LOVE OF GOD VTUBER ARTISTS WHO HAVE NEVER RIGGED BEFORE: ASK A RIGGER FOR ADVICE ABOUT SEPARATION AND LISTEN TO IT!!!! as a rigger and artist i am so fucking tired of having to spend 8+ hours re-separating and fixing all of the bullshit with your artwork that makes rigging a nightmare. AS A BASIC RULE PLEASE...
1: NEVER USE A SPACE IN LAYER NAMES!!! if you use a space in the name of any layers ( i.e. "leg l" "part 1") the name will be switched in live2D to "artmesh" and your rigger will have to RENAME EVERYTHING. if you do this for every layer THIS IS A NIGHTMARE. it's not easy to fix PLEASE use underscores instead of spaces.
2: have ANY KIND of naming system. it literally doesnt matter, as long as it exists and is consistent the rigger will figure it out. don't name one thing "left_arm_1" and another thing "Bang>SidePart" and expect me to be able to easily work with your file.
3: KEEP. LAYERS. ORGANIZED. please please PLEASE understand basic rigging hierarchy and stick to it. If the left eye folder is ten thousand layers below the right eye folder this will be extremely confusing. also make sure the limbs are ordered properly. if the shoulder is in the layer for the jacket and the hand is somewhere floating in the ether i now have to spend time to reorganize the psd.
4: LIVE 2D DOES NOT WORK LIKE A DRAWING PROGRAM. it only allows for multiply, add, and normal layers. no overlay, no screen light, just add and multiply. if I have to clip a layer to more than five other layers the program WILL lag for both you and the person who ends up using the model. Do not just leave a massive multiply layer over the entire model it doesn't work that way.
5: oh my fucking god PLEASE draw EVERYTHING even if it isnt in view. if you have a separate layer for the bang's shading, for example, in normal illustration you just draw what's visible and call it a day. I'M TURNING THE HEAD, MEANING IT WILL JUST CUT OFF. if i have to fix this for every single instance of shading i am taking time away from my work, my whole process takes longer. as a rule of thumb, always draw more than what you think you need.
6: separate more than you need, but not everything. sometimes I work with models that have not enough things separated, and its a pain to work with. sometimes i work with models that feel like the artist just sent me their work file with every tiny brushstroke on a different layer and then I have to spend a day merging and checking everything. use your head while you are drawing, think to yourself "is the thing I'm drawing something that will need to move independently?" try to imagine the model in 3D space as your working, and if you can't do that perhaps study an object in real life and see how turning it in space interacts with the lighting or whatever idk. also: if there are too many separations the model will come out looking blurrier. live2D doesn't just read the photoshop file, it creates a new texture file. imagine the model like a paper doll, it takes every piece of paper and spreads each piece down flat. this takes up much more space and many more pixels then the photoshop document, and the bigger i have to make the texture file, the laggier things become. if i don't want it to lag, everything has to be shrinked down to fit, and thus everything becomes blurry. if I don't want it all blurry, I basically have to spend hours upon hours manually placing every "piece of paper" on another piece of paper essentially playing the worlds most annoying jigsaw puzzle.
I feel like I'm working on a group project and doing half of your work. please, stop making my job much harder than it needs to be.
.
28 notes
·
View notes
Text

finally answering asks I've been keeping for a while ~.~
📝 sims2 & chalk'd ui, phone icons & wallpapers, cas bg recolor, font replacement, and some more (reshade & rig helper asks will be answered at another time ;; )
tysm anon!! I had to wrestle a bit with the file to make the taxi image work, and at the end it came out looking super neat! Especially if you have the sims 2's music playing (found a super cool music override that does that).
It's such a cool idea, and I've been researching on how to do it 😆 ngl, making cc objects is something I wanna do someday, tho from the looks of it it's gonna take me a while to understand the process lol. If/when I make any breakthrough, I'll be sure to post about it :p
(It'd be neat if it costs money too to use the taxi.)
jdfklsjf tysm @hellofears & @oshinsimblr !! I've been doing some final adjustments so hopefully I can release it within this week c:

thanks anon ^7^ you can replace them as long as you have access to the files (pancake1 made a pie menu & wants sound replacement and buurz replaced the in-game music with ones from other sims games). I looked around and found these resources you might want to check out:
TS4 Sound Tool, UI sound kit & UI audio instance list
hehe tysm anon! My UI mods won't remove the shop icon so you'll need to grab other mods that do that. I decided not to do it myself to avoid having a new mod conflict ^^
Hii @simplyamazingsims, I've tested both mirroredup & triple mirror and both v3 files are working w/ the latest update. The reflection setting must be set to low or higher for the reflection to show up. You can also try clearing your caches and try removing the resource.cfg file (file will regenerate, and doing this fixes the issue for some). Oh and ofc having other cas backgrounds can cause mine to not show up so make sure there's only one in your mods folder ^^
@claravizeu it's a map override that I'll probably work on whenever I'm in the mood 😆
Hi anon! For the phone icons, I used xosdr's phone icons psd to create mine. For the wallpaper, I haven't found someone who've gathered & shared the files for it, so I'll see if I can do that myself :)
Heyy anon, it's a CAS bg that I made for the previews so it's not available to download. I haven't got the chance to prepare the files yet, but I'll try to find the time to do so ^^
Hey anon, unfortunately the notification wall is associated w/ the texture file that handles most of the UI panels, so you won't be able to remove a specific file to achieve it. I've received a request just like yours so what I can do is share it a separate file later on ^^
Hii as well, it's compatible yes ^^ you can use both mods as they don't have any files in common that conflicts with each other.
heyy @icyaliyah, sorry it took a while to respond! While I don't have plans to recolor them, you can download these pink recolors by estellics & dumbabie ^^ and thank you very much!

Hii as well, it's been a while so I don't know if you're still having the issue or if it's already been fixed. Afaik my mod shouldn't cause any loading issues on its own, as well as if you have the conflicting mod & files present and if you remove the conflicting files. So far, I've not received any reports of this exact issue, so I can't be of help. Sorry if that doesn't answer your question 😅
ahhhh @veone thank you as well for using it ever since it came out!! 🙈

Heyy anon, basically you'd want to only remove the files that conflicts w/ the mods that you do use, and not the other way around.
For example, if you use TOOL, you'd want to delete the files in the Additional Files > TOOL folder (either both text and texture files or just the text file alone, depending on which one you prefer). If you don't use TOOL, keep the files be.
So, if you only have the UI Cheats mod and none of the listed conflicting mods, then you don't need to remove any files ^^
heyy @swithdream, well very belated happy new year to you as well despite it being april already lol
there's an update to the cas organizers that I haven't done yet, and when the time comes that I update those, I'll try to include the psds for all the templates I did ^^
Hii @kneptoone, it's a font replacement using TS3's Helvetica Rounded font that I made & haven't shared yet, yeah ^^ I can try putting it up for download since there isn't one out yet.

Heyy anon, I've been focusing on other things so I haven't yet found the time to work on my older uploads >< I'm definitely interested in doing those, but not sure when that'll be.
Hello anon, tysm! I'll do it at some point but not sure when :x I haven't properly played around w/ CAS since last year :X
22 notes
·
View notes
Text
Testing, testing...
Trying out something a little new.
I've wanted to put together family trees for my Sim families for a while, but have never found a solution I was entirely happy with (various PSD templates, Plum Tree App).
Then, I thought, since I already have a subscription to Ancestry (I'm also a genealogy geek), why do I not just use that?
So, I've had lots of fun, creating a real interlinked family tree for all my Sims - even working out accurate birth dates for them all - and here is part of the result. May I present, for example, the Bennet family tree:
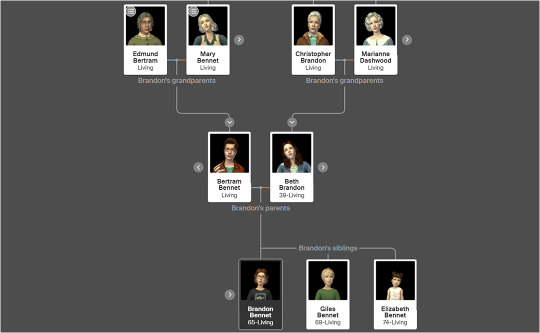
I'm not sure where to share these? Since I have so many Sims now, the idea is to help people figure out who is who. Should I start each 'Family Album' post with the tree for the family? Put them all on a separate page and provide a link? Not sure yet...
The text also isn't as sharp as I'd like it to be, so I need to try to improve that.
38 notes
·
View notes
Note
Hey ralph im new to art and im slowly learning lots of stuff but a thing I really struggle is making hair on things. (or fur) do you have any tricks for that
oh baby this is my home
OR IT WAS BUT I CAN'T FIND MY OLD PSDS but i'll try to explain it anyway without them
Lets do an experiment!
image 1:
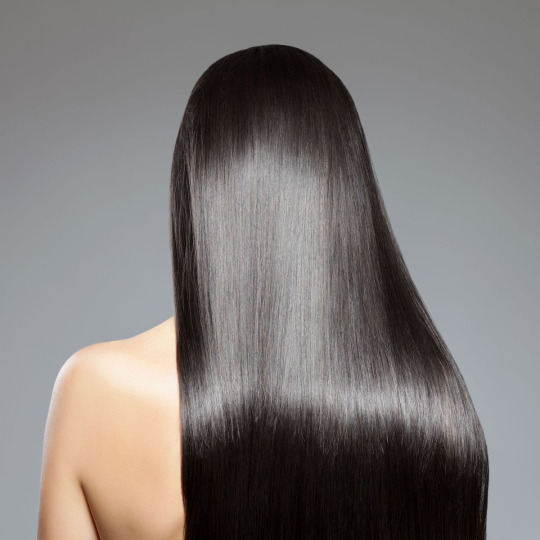
and now 2

you can tell it's hair in both images despite it being blurry, right? Well here's why and this is the most helpful tip i can give you.
When you're drawing hair/fur you're not actually painting every strand, you're painting the effect of hair/fur. Your eyes and brain will fill in the gaps, you don't need every strand/clump. Here's what I mean. I'll break it down into the main four parts: Base, Flow, Rendering, and details
Base: its just a color base that's it
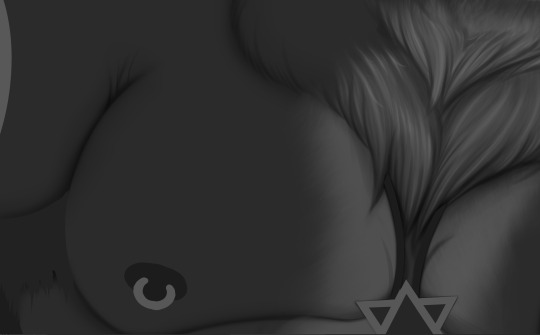
Flow: Hair and fur grows in specific patterns and directions. You want to mimic it and like. sure panthers with rippling abs don't normally exist but still you can assume the fur will grow downwards, so mimic what feels natural. Also don't be afraid to draw the lines out on a new layer i still do it sometimes.
Rendering: think of this as lighting and the MOST basic details
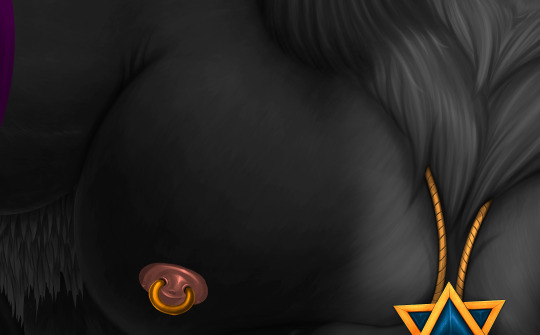
you can get a general idea of it feeling like fur without detailing. There are parts where it's almost all one color (near the nipple for example) where you still assume its fur despite it being nearly one color. Think of this as the most basic lighting you can think of. just like. general lighting.
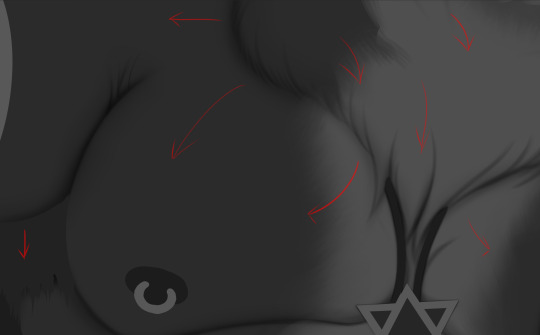
and now details:

once again, you don't want to over detail (i do because I'm an idiot) and let the mind fill in the gaps in areas. Something EXTREMELY important to keep in mind when detailing: not all areas will have the same amount of detail. darker areas generally receive much less detail than lighter areas. refer to the hair pic from earlier. the darkest parts you can't see each strand, but the shiny and light parts you can!
I'll do another one.
keep in mind of the flow and when painting please god do not use a "fur brush". this was all chalk and default round brush. Remember! the brushes don't matter so much as your grasp on the thing you're painting. Get a simple chalk, round, square, etc brush and paint in the direction you want.
refine your lighting and add your detail in the lightest/shiniest areas, the darkest areas are generally fine outside of reflected light. Also important!

when lighting realistically, the edges almost always stand out due to rim lighting and just how light interacts with fur/hair. adding details on the edges will make it feel more realistic
However! there is more! Fur comes in MANY shapes, you can play with the shapes and rendering once you're more comfortable!

Last thing i should have said earlier is fur generally lives in clumps whereas straight hair is just strand by strand
hope this helps!
184 notes
·
View notes
Text
I wanna take a minute to be excited about this for a second! So, I'm still making new updates for our comics, but at the same time I am also remastering/redrawing/doing minor re-writes on the early chapters on a rotating weekly schedule.
Part of this is by necessity--I'm reformatting for vertical scroll and when my computer before last bricked, it took the PSDs for the entire first book with it. They were some of the only things I could not retrieve, which makes cutting things up for vertical scroll impossible for the first chunk of pages. I only have access to the CMYK print-ready exports from our first print book, so I have given myself permission to just...redo stuff. As little as possible.
Aaaas you can see, I have already broken that rule. For a lot of my early pages, I was working with faber-castell brush pens on cardstock, so if something didn't look quite right after inking it? I had to either redo it entirely OR just accept what I did have as 'good enough' and move on. I rarely did that first things, and as a result, a lot of the faces in these early chapters were...not great, and absolutely unappealing to both me and to people starting at the beginning of our archive. Don't get me wrong, I do love seeing how art evolves over time! But it's not serving me very well right now, and I have the chance to pretty it up now and more than one excuse to follow through.
So, because I broke that rule for this chapter, I had to make a NEW rule where I do not mess with poses, placement or framing (unless it would make the page get done faster, and I have actually removed some panels in later pages in this chapter as a result!), and I have followed that one pretty closely.
I'm actually really happy with how this came out, and wanted to shot it off a bit on tumblr where people might actually see it. I do post this stuff up on patreon, but I have like 8 patrons right now and I want more people to see this since I've been working so hard on this batch.
Anyhow, this is actually from the second chapter that I remastered. I've already updated the complete remastered first chapter on our archive, and posted it reformatted for vertical scrolling on webtoon if you prefer to slowly read the remastered chapters there (one update a month vs one full page update a week in the main archive, with 14 years of comics in the archive if you like to binge).
The End is a queer sci-fi adventure comic made by two trans people (me and my lovely wife @femonologue) that follows a group of nerds that unwillingly get embroiled in an interstellar war after a couple of lost bird-like aliens accidentally crash a sci-fi and comics convention.
It also follows an ex-Mountie and a petty-vice-obsessed alien spy as they blunder their way across the stars trying to locate and rescue these poor abductees before anything more horrible happens to them!
8 notes
·
View notes
Note
I have a question....So I like doing art and drawing comics. I usually go for a dreamy fantasy vibe like Lore Olympus did. But I want to try a new different style, I usually go for Watercolor brushes when doing my usually style but started using Oil brushes.
Can I have some advice on changing art styles and body details.
This is where I fully support the saying "good artists copy, great artists steal", because the whole notion of 'style' is just mileage + referencing. So really, if you're wanting to try out other styles and mediums, go find artists you like who work in that style and reference them! Do studies of them! Redline their JPG's! Experiment with brushes and see which ones get the closest! Analyze their work and reverse engineer it until it makes sense!
(of course, this is all for educational purposes, so don't go literally stealing any artist's work, if you do share anything that you've experimented on be sure to credit the original artist and link to their socials or something to pay it forward <3)
With LO, a lot of how I've studied Rachel's style (and I still do because man it's hard to nail) is literally just by taking old LO panels that I like and redrawing them. Whether it involves ground up "drawing what I see" or tracing (yes, I said tracing, it's completely fine if it's for learning!!), whatever gets the piece close enough that I'm happy with it. And then from there, I refine the process - if I did a lot of dumb little steps during the experimenting phase, then I do it again and again and again until I figure out what steps can be skipped and which ones can be kept. I was actually just doing this today earlier at work because I'm STILL trying to get Rekindled closer to that S1 LO look. There's nothing even really wrong with the art in Rekindled, I like it a lot, but I'm still far from my original goal. So I study, and I study more.
Also - and this isn't something that's always going to be doable but I suggest you try it - if you're working digitally, one thing that I find helps a lot with learning an artist's process underneath the final project is finding artists who sell their PSD/CSP/art files and brushes. Some artists do and it's so helpful for pulling back the curtain and seeing what they're really doing underneath that final result. There's a lot of great info you can get just by picking things apart and making a mess. Of course, that's only applicable to artists that sell their files, and they're for studying ONLY, for obvious reasons, but it's a great way to support those artists. Some artists I've gotten PSD's from include wlop and sakimichan!
I hope that helps!! Basically, just don't be afraid to step outside of your comfort zone and always be on the lookout for what you can learn from the art you consume :)
29 notes
·
View notes
Text

howdy fiends, this is vero possessed by wednesday herself speaking! besides some essays that need to be written, i'm officially free which means i'm slowly returning to all my blogs! below the cut you'll see what i'm up to if you're curious and, if you're not, i just want to remind you that the torment will begin since i'm back. i almost feel sorry for you all.
wednesday was and always will be my numero uno priority, but i'm also going to be around my multi and barbie. rn i'm sorting through my 70+ drafts which include stuff i couldn't check out but saved for when i'd officially return. that being said, once i get my drafts under control (~40 drafts) i shall log on my multi and on barbie.
my mind is a weird place and i want you all to know it. i feel like i can't respond ooc to you if i have so much stuff saved in my drafts most likely for you. so responding to ooc messages will take a while bc someone's overwhelmed and i'm sorry you have to bare witness to this weird noggin of mine. but i will get to you, even if discord or tumblr ims have failed me. please bare with me!
are you familiar with the saying help me help you? well, after finishing my internship, one of the feedbacks i got was about continuing to work on my graphics skills. therefore, i want to keep learning and evolving but the only way i can do that is by doing things for you. i will create a sideblog to this blog and everything, but i want to help you with anything that you need, for free of course! whether it is stuff like headers, pfps, pinned images, dividers, icon borders, even psds, it's all open for you! i can also try to help you figure out an aesthetic or if there's anything you need help with around tumblr and the rp experience. this will make more sense once the sideblog is made but this is it in a nutshell!
i missed you. i missed writing here and i'm glad to see some new and old frens in my following list. i'm looking forward to writing with you, idc how many threads we have or how many memes you send or i send you. i'm glad you're here and i hope you have a fantastic day ahead of you. i'm manifesting that. oh and thank you for being here and helping me. whether we talked on private or you're writing with me, know that you make a difference (for the better) in this world. at the very least, in my little world. i can't wait to torment you all soon.
10 notes
·
View notes
Text
BAD NEWSSSS.
hi everyone!
i have some bad news!
so my external SSD containing all of my photoshop files just got completely wiped. i'm trying to recover the files, hopefully i can. i will be able to retrieve the assets from my etsy and kofi purchases as well as anything i previously kept on my laptop, but anything that i've made from scratch since getting my pc is gone, unless they can be recovered.
what that means is:
if you purchased any icon borders or other graphic templates, or plan to in the future, i will not be able to make alterations to them in terms of resizing assets or borders, because the files you receive on kofi are flat and compressed into one uneditable layer. hopefully i can restore my files because i had some personal psds that i use for graphic previews and a new one that i was working on for a new carrd template, and i just lost all of my personal use icon borders and icons and banners and stuff, and the psds for those.
with all that being said, i don't have the mental energy at this point to go and redownload and reorganize everything from my purchase histories or laptop, so i'm not sure when i'll be making new graphics. hopefully i can get my things recovered.
i apologize for any inconvenience! but let this also be a lesson to remind everyone that you should keep important files and things in multiple locations to prevent data loss!!!! don't be silly like me!!!
update: i cannot recover my files, so i'll be redownloading my assets. i no longer have access to my original files for my creations, i'm so sorry ;w; ahhh i wish this didn't happen and i wish there was a way to get my things back but unfortunately i can't. hopefully once my classes are done for the semester i'll be able to make some new content. thank you all for your patience. please join my discord server if you'd like to keep up with updates / releases! i'll have to make a new release template as well since i lost the psd for that ;w;
reminder that i also have a subscription tier where you get my releases for free (ish) for just a flat subscription price, and i try to put something out every month. i typically don't release carrd templates under the subs, but if i don't make anything else for the month, i offer a carrd as a reward! details are on the link! i have some different tiers. if you server boost my discord server, you automatically get the coven role as well!
#im cryinggggg#kjsbcsjkbs#IM LAUGHING LIEK IT'S NOT AT ALL FUNNY BUT#WHAT ELSE CAN I DO SKJBCS#rinaposting.
7 notes
·
View notes
Text
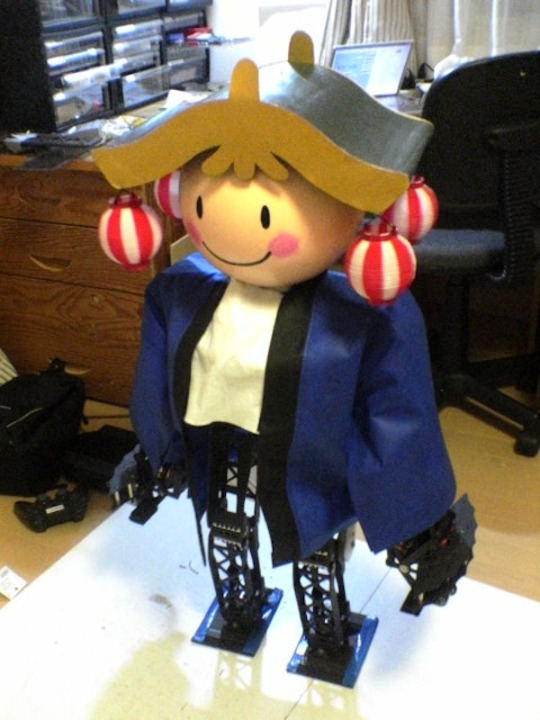
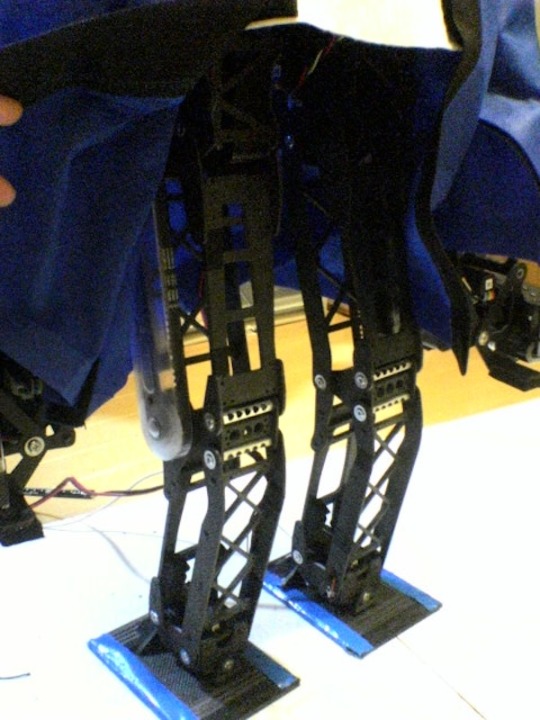

Omni Shibatan (オムニしばたん) by Takeshi Maeda, Vstone, Osaka (2010). The 18th ROBO-ONE event was held in Shibata, Niigata Prefecture on August 28–29, 2010.
"This time, the design and painting were both outsourced to the home.
New feature (1) Timing belt legs. The aim is to raise the center of gravity and lighten the tips of the legs. His knees are empty, and there are three servos (roll, upper pitch, and lower pitch) concentrated at the base of his legs, and only a small roll servo at the ankles.
New feature (2) Link arms. The aim is to concentrate the weight on the hands to increase the force of impact. It also has the advantage of keeping the hand sensor parallel.
New feature (3) Hand sensor. The sensor is a PSD [Position Sensitive Detector] distance sensor, used for semi-automatic attacks. This time, I won't let anyone say, "Mr. Maeda is bad at piloting." Or rather, even if this works well, it wouldn't mean that the controls were good…
New feature (4) Foot sole sensor. I've been avoiding using foot sole sensors because it seems difficult to use the measured values, but I felt like I had to do something about it, so I decided to give it a try. The sensor is a common reflective infrared sensor that measures the distance in a small gap, supported by a spring. It's difficult to figure out how to utilize it, but I'm still trying to implement it." – Takeshi Maeda, Robotan Production Diary.
Omni Shibatan came first place in the preliminary round, but was eliminated in the quarterfinals.
5 notes
·
View notes
Last Seen Blogs
thecasualfkfan
চিত্রা
fishberry
FISHB !?!?
booklung
Booklung
simsabii
Simsabii

wingedkittenyouth
Untitled