#sewing advice
Text
Friends that sew! I am looking for a consult on directions for a vest. I'd like to make one for myself, but here's the thing -- I really want the design to have longevity for changes in the body (ideally I'd like the clothes I make to be wearable for several years, and I do plan to have a kid in the next half-decade or so... I have no illusions that my body is going to be the same shape after that lol).
So the ask is -- any suggestions for what to look for in a pattern that could accommodate this? Open to both styling ideas (ie. here's a design for a vest that's meant to fit a little oversized) or design ideas (ie. here's a pattern that integrates a back stretch I trust, or a lace-up element).
Thanks for your help!
23 notes
·
View notes
Note
Can I ask how you made Breakdown's helmet such an accurate shape? I've been wanting to make my own Breakdown plushies and I know it says foam on the post but how do you put it together? Sorry if this is worded weirdly I'm very tired
Oh yeah, of course!
I know I didn't really get into it in much detail in the plush post, I'll be happy to give you the run-down here ^v^
So firstly, here are the two types of foam I used:

For the back of the head and the brim of the cap, I used these thin foam sheets (I'm pretty sure it's acrylic foam), they tend to be about a millimetre thick. They're pretty easy to find at your local craft/dollar store.
For the sides of the helmet, I carved the pieces out of upholstery foam. Upholstery foam can be quite pricey, especially if you're buying large amounts of it, so it'll be worthwhile to scour a thrift store for anything with some decent foam in it if you're just using a smaller amount.
(Small note: the two upholstery foam pieces in the picture were spares from the project. The foam I had was a too thick so I had to cut it in half, and the halves ended up being slightly different thicknesses. I just cut the helmet pieces out of both since I didn't know which thickness would work better until the sewing was done)
For the top of the head, I just filled the middle piece with polyfill. This distorted the shape a bit, so I ended up putting some thread tension between the sides of helmet at the base
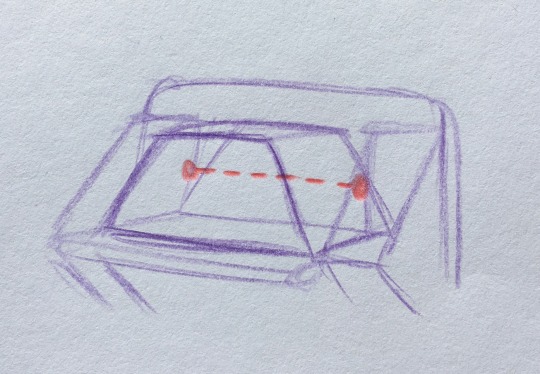
As for general construction, I ended up putting the majority of the helmet together externally using a ladder stitch. This might not have been the best method seen as there were a lot of little crevices and corners which were very finicky and difficult to get around, but it's the method I'm personally used to so I stuck with it.
(Plus I just couldn't think of a better method that would allow me to put the foam pieces in)
I did at least think to snap a picture of the helmet in a half-assembled state:

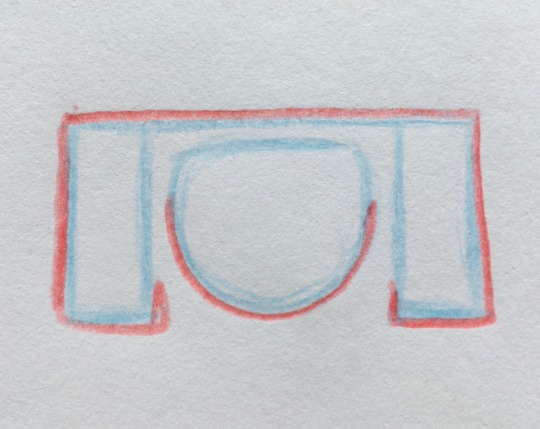
I had the cap brim fixed to the top of the face, and I also gave the face a bit of a backing to make it a bit easier to manage. I was planning on sewing the face to the helmet the entire way around, but in the end I just fixed the cap brim around the top with a ladder stitch and the back of the head to the base at the bottom with a whipstitch.

(Key: Blue line shows the shape of the head base, Red line shows the stitches)
At this point I might be going a bit further than what you were asking, but I'll also run through attaching the head to the body:
Once again I used a ladder stitch for this part, but I'll note that I didn't actually sew all the way around. Instead I pretty much just got the parts I could reach and left it at that.
Important note:
I'd recommend sewing the chin to the body before the helmet, you'll need to lift the sides of the helmet in order to reach the chin.
And just another general sewing tip:
If you use a lot of ladder stitches to attach external features, it's a good idea to go over the seam at least two or three times to both strengthen it and smooth it out. The stitches can look a bit jagged otherwise.
Well, I hope this helps!
Good luck with your plush project endeavours, and have a good day :D
13 notes
·
View notes
Text
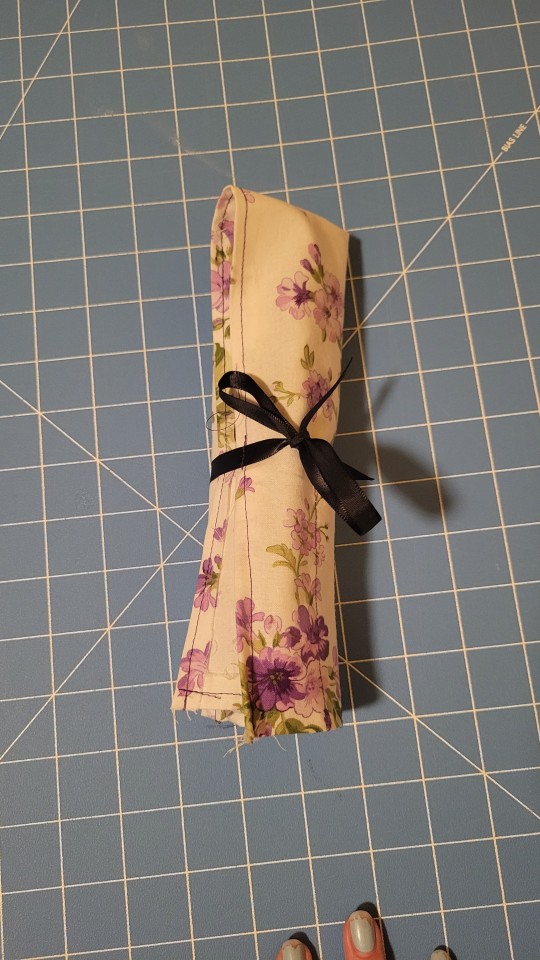


This is the crochet hook case i made recently! Its my first sewing project in like literal years, so i realize i made a LOT of mistakes lol. I was hoping mainly for criticisms as well as advice for how to improve it next time! I had a hard time keeping all the lines straight, despite my cutting mat having straight lines on it, and my fabric crayon ending up not being water-soluble 🥲 i also noticed that after sewing the bottom half was mildly shorter then the part that folds down, so its rather uneven, but im not certain how to fix it! Any advice is appreciated :))
#sewing#sewblr#sewing community#sewing help#crafting#craftblr#pls be kind i cry very easily#also if more pics are needed im happy to post em! :))#sewing advice
42 notes
·
View notes
Text
hi! looking for some advice on corset making-


i want to make anne's corset as like, a proper corset instead of this absolute abomination BUT im having a little indecision around how exactly to do that
because the back is super visible and so long, i really dont want to do more than the tiniest tightening of the laces as itll be a pain to do and end up with a lot of excess lace very quickly, sooo i need to do some kind of front closure
a centre front busk would be the obvious option but im a little hesitant to go that way because to hide it it would have to perfectly line up with the buckles and i cant guarantee that it'd work out that way- im also a little concerned about poking the busk posts through the (faux?) leather but im sure that thats something that people have done before and i can figure out a way to stabilise it if it becomes an issue
one of the main reasons id be hesitant to do a busk is simply the fact i would have to do up every single one of those buckles every time i want to get in or out- but at the same time im not sure theres going to be any method that avoids that? the only real alternate i can think of would be a zip, which has the same issues.
i dont really want to do fake fake buckles (like, velcro'd down on one side) i think theyd look far better set into the seam (and not topsewn down like hers :/ ) but i would definitely be open to some kind of quick release buckle for convenience as i dont plan on having them taking any of the actual strain of the corset.
how would you go about it? should i just cave and acknowledge im going to have to do a busk? is there any other way you can think of?
#another incoherent ramble whoops#ive got a lot more thoughts about this project already- her corset is why i wanted to do this in the first place i want to make it GOOD#i thought abt full historicalling it w stays but not this time around i think#ive got a lotta thoughts but this bits what i gotta figure out first to decide logistics of making it#i think im going to have to cave and go the proper way but uhhhh if theres another way i want to do that <3#anne bonny cosplay#sewing tips#corset making#sewing advice#also GOD thinking about her pants. fall BACK pants ass woman#i wanted to do a fall front but im in love w that as a character detail so idk idk
10 notes
·
View notes
Text
I bought this maid outfit for a local convention, this is my horror story.

This MF. It is so FREAKING SCRATCHY, so I am going to make my own dress. From scratch.
H A N D S E W I N G.
ill give updates. Right now I am dying fabric via machine wash. sobs.
#convention#bad decisions#sewing#hand sewing#what am i even doing#last minute convention shenangians#please help#sewing advice#sewing adventures#please
9 notes
·
View notes
Text
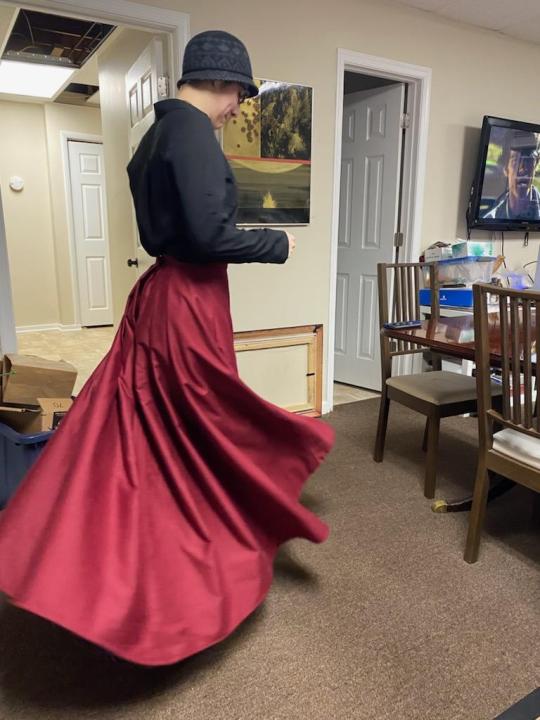
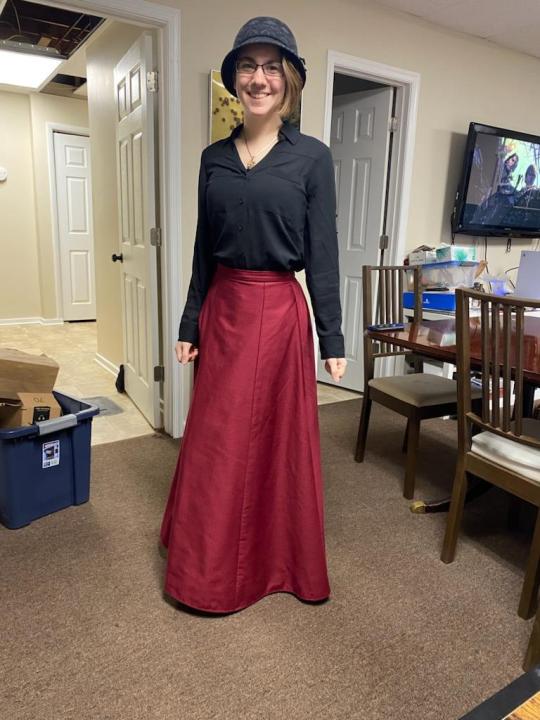

If I do the red dress, the bottom would likely be like the skirt I am wearing in this picture, but not 100% cotton and very worn lol. The blue I would likely have to do something like the right side doll gown to make it not look plain. I realized a basic idea of the plan may be helpful
6 notes
·
View notes
Text

I am making a dress for Valentine’s Day. And I was planning to wear to school with like a pink bomber jacket. But it’s so hot at the law school lately. And like I’m worried this will be way to hot? I’m gonna try to hem it to tea length? I was gonna have the lining skirt also be as full but idk now. Anyways my roommates were saying I should make a cape or something with the leftover fabric so that it breathes more and still covers my boobers. I need to figure this out like before bed so I can finish this Monday or tomorrow morning. And be ready in time? Any suggestions or should I just. Give up on wearing something themed. lol.
#I asked bradleu to take a picture so I guess I can’t complain that I don’t like the angle lmao#fashion#sewblr#sewing#sewers on tumblr#sewing advice#help#captioned
10 notes
·
View notes
Text
My sewing machine is... chugging... I've had it for like 7 years and it's been not a bad lil buy.
I want to upgrade it because... you know... NEW and STUFF.
I am planning on using the excuse to my brain (who has crippling buyers remorse and guilt over spending money on myself - side note - there is a limit, anything over £50 is a LOT, but 5x£10 is fine - which is a lil leftover emotional abuse from mum) that it's a happy birthday gift to myself AS WELL AS a "well done for getting that whole weight thing under control".
Shopping online sucks because I love a good "high to low" and there are machines... for regular quilting grannies... that cost like £9k.
thats more than my car cost.
My current machine is 46 stitches, 5mm max stitch length, 40wats and fairly portable (which matters not, it lives in this room) has a LED light and you use the up and down arrows to select a stitch number.

I've used stitches 00, 01 and 02 for zips and 03 for stretch items, and the button hole thing is annoying because it's the four step one and I always manage to fuck it up, but I think thats more on me.
I've made a lot of items on this - I'm making a bag at the moment so a machine that can handle vinyl is also required (this one does, but struggles) I also live far enough away from places that servicing yearly just... isn't possible, but I have taken this apart a few times, cleaned out and oiled it.
I've made a lot on this machine and won't be getting rid of it - I may keep it for the Less Feral Little (TM) in my life, when she masters her lil portable barbie machine.
I spent £230 on my current machine and want to spend under a grand for a new one. I'd LOVE an automatic threader and the little 'thread cut' thing at the end of the line? And a one step button would be good - I have a 4 step one at the moment.
As for decorative stitches? I never use em as I make clothes not quilts, and I don't need an extension table but I do want a free arm because I make dolls things every so often and that small space really helps with sleeves.
Anyone got advice? a machine you love?
#sewing machine#sewing machines#sewing advice#home sewing#sewing#sew#making clothes#upcyling#doll clothes#tailoring
9 notes
·
View notes
Text
Does anybody who sews know of any companies that sell plus sized patterns? (Specifically I'm like a 24 and most commercial patterns go up to 22 🙄)
I'm having a hard time finding any and it's getting frustrating so I thought I'd ask. I have a silly dream of replacing all my clothes with handmade ones but fitting is such a huge issue for me.
47 notes
·
View notes
Text
Somehow, the construction of a doll-size collar is completely beyond the lengths of what it brain can handle. Patterning a 1:6 scale jean jacket from scratch?? Sure. Putting a color on that jacket? Now you’re speaking in tongues
#this is my way of asking for help#help#mine#ooak doll#sewing advice#sewing help#pattern making#and other such tags for the smart people to find me#this is my first jacket…
2 notes
·
View notes
Text
Advice for new stitchers
As much as possible, draft, trace, and cut patterns on a table. Your back will thank you. So will your knees. Cut your fabric on the table, too. Just, get up off the floor as much as possible.
If you draft your own patterns, keep track of what you're doing. Invest in a notebook that's just for pattern notes. Leave enough room to note future changes.
If you draft your own patterns or alter existing ones, a gridded cutting mat is your friend. Wait for a sale or coupon from JoAnn's (in the US) and get the heavy plastic one. It's a pain in the ass to store, but worth it. It'll be more durable than the cardboard one in the long run. You can always stand it up behind a dresser.
EZ Pattern or non-woven interfacing is also your friend. Use it for the final version of a pattern. It's light and durable. You'll be able to use it for much longer than a paper pattern.
If you're in the US, Wawak is the place for notions. Yes, they charge shipping, but you can also get just about anything you need at a decent price. They also have volume pricing. In the northeast, their shipping is pretty fast.
If you're not sure of what kinds of fabric you like, look for places that sell swatches. That way you can feel it, wash it, see how it changes, etc. This is great if you have sensory issues because you don't want to purchase a fabric online and then find out that it's hell.
Keep a list of fabric types you like. If there are specific blends you tolerate well or specific fabric weights you like best, write that down. Most sites now give a fabric weight.
For the love of all that's holy, wash fabric before you use it. There's all kinds of stuff that gets into it during its various transits. Wash first. This will also keep the dreaded shrunken project from happening. This is also vital if you thrift fabric. Wash, wash, wash.
You can machine wash pretty much anything on a cold delicate cycle.
Don't put wool in the dryer. It will end in tears unless you actually wanted to felt it.
Iron your fabric once it's washed and dried. Future you will thank past you when you go to make something and the fabric is ready. Some fabrics, though, just want to wrinkle.
If you have one of those eternally wrinkled fabrics, still iron after drying. Then cut your pattern pieces out, iron each piece, and check it against the pattern.
If you want to custom dye fabrics, check out Dharma Trading. They're lovely people and the fabric is nice and well-priced. They also have everything you could want for dyeing.
13 notes
·
View notes
Note
Hello! I have some old plushies and I think some of them are in need of care and re-stuffing, and I remember watching through your adventures with modding the Chester plushies. I was wondering if you have any advice about what kind of stuffing to use? The actually process seems simple enough, cut seam, remove stuffing, re-stuff, sew back up. Maybe wash the fabric in there somewhere. But I worry about using a bad kind of stuffing and having to re-do the whole process.
Smart question! You're right on both accounts - it's a pretty simple process, but also the kind of stuffing you use will make a big impact on the end product. The type of stuffing you want to use depends on the outcome you want.
If you're looking for a really firm end result, you'll probably want a short-ply stuffing - it's characterized as being dry, easy to work with, being made of shorter strands of material, and having a sort of spongy, springy texture. It also tends to be a bit cheaper.
If you want a squishier, softer result, then long-ply stuffing is a better choice - it's characterized as being soft, smooth, made of longer strands of material, silky, and having a pillowy, yielding texture (though you can achieve a firmer feel with it by using a bit more). It's often a bit more expensive.
My advice would be to look online at a few brands to compare prices and reviews, and, if you have a sewing supplies store in your area, go in and gently squeeze the stuffing bags to see how it feels and which you prefer. If it's in your budget, buy two bags, one of short-ply, one of long-ply, and experiment a bit on your own to see which you like best, and what gives you the desired results. You can even mix things up a bit, like doing a plushie's limbs with long-ply and its torso and head with short-ply, or whatever suits your needs and budget.
Final, key bit of advice: test hug! Check how the 'completed' result feels before sewing them back up - squeeze gently in your hands, hug gently, hug hard! Then make adjustments to how much stuffing you've used as-needed. If you start to feel overwhelmed, don't be afraid to walk away for a breather and to hug some of your other plushies to remind yourself what the end result you're aiming for feels like.
With that, good luck, happy modding, and thanks for the ask!
9 notes
·
View notes
Quote
Plan children's clothes with thought. When buying material buy all notions and trimmings so that you can match and contrast with the best results. Put as much thought into the fashion rightness of a child's dress as you would into one for yourself.
This is from Mary Brooks Picken’s Singer Sewing Book from 1953, an era when a large generation who made up the Baby Boom were growing up. It is true that kids can suffer mightily if they feel they look different from their peers, so I was struck by Picken’s urging women to make sure children’s clothing met “fashion rightness.” It also reminded me of the sewing kits for children’s clothing at https://farmhousefabrics.com that put together a pattern, fabric, trims etc, so that you don’t have to guess if the color on your screen will match what you need.
The book owes much to Picken’s earlier sewing books for women’s garments alone, and some of the images are the same as from books from the 1940s, but this edition has section on children’s clothing and sewing for the home which makes sense as domestic life loomed in the 1950s.
#Mary Brooks Picken#singer sewing book#sewing books#1950s fashion#children's clothing#sewing advice#design advice#vintage sewing#vintage sewing books#sewing for children#children's fashion
8 notes
·
View notes
Text
Does anyone have tips for something to stick on the bottom of a sewing machine pedal to keep it from sliding?
The area I have space to work is on linoleum so the thing keeps skittering away and being a general pain. Right now I have stuck a bandaid on the bottom to keep it from sliding too bad, but that’s not really a permanent solution.
#katie is rambling 2k22#Katie sews#sewing advice#sewing machine#i can’t be the only person to have ever had this problem lol
4 notes
·
View notes
Note
🌿 Especially for sewing but not limited to that if you like!
🌿 What tips would you give a beginner? What is something you wish you had know when you started?
I am going to stick with sewing.
Something that is both a tip and something I had wish I'd known when first starting is to not use fuzzy fabric when first learning how to make pants (or anything else). Fuzzy fabric can and often does hide your stitches, which makes it harder to seam rip if anything goes wrong. Save it for later projects.
Other tips for beginners, if you're sewing on a machine, make sure you learn your machine. Putting in a needle wrong or threading the machine wrong will make sewing hard to impossible. Needles should be changed regularly to avoid skipped stitches and other issues like snagging on your material. Also, sometimes a cheap sewing machine is not worth it.
I would also recommend that if you're wanting to do garment sewing, starting to learn alterations first or early on is helpful. Doing so helps you understand how garments are put together without the confusion of trying to follow a pattern.
Now I'm going to leave it there or else I might not stop.


3 notes
·
View notes
Text

r/polyamory continually breaking new ground in the kinds of problems it's possible to have (affectionate)
15K notes
·
View notes