#until i add colour
Text
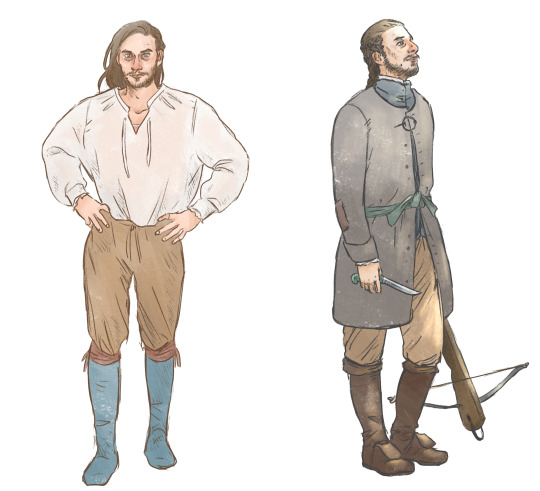

More clothing studies, this time from my fic Axis. I was aiming for authenticity while also trying to have each of their personalities show a little bit in their clothing choices. Two for Nicky, to show his layers.
#tog#the old guard#for reference the fic takes place in 1625 in iceland. i still don't think they're bundled enough though lol.#nicolo di genova#yusuf al kaysani#andromache of scythia#no quynh :(#these were a n i g t m a r e to crop correctly. tumblr why are you like this.#hence the cropping might look a little weird#siggy draws#i think these sketches took a month and a half lol. now i will be quiet about this fic and focus on writing something else.#what do we think about this style? the differently coloured lineart and the slight lighting? and the rough colours?#also i forgot my siggynature on ALL of these but that's ok. you know who i am sdfghf#my new obsession is clothing details i guess!! could always make it more detailed though! with lots of practice i can try.#no real director's commentary on these drawings like i usually write for my sketches asdsfgfd#just that this is mostly what they wear in the fic. add a coat for andy maybe and some mitts for joe.#and more weapons and bags and stuff#can't really see nicky's braids but he's got one big french braid and a few tiny ones on the sides of his head connecting to it.#his hair is like shoulder-blade length. it's about the symbolism!! of not making a change for a long time!! until he does cut it!!#and andy is wearing quynh's necklace under her shirt of course </3#joe rolls his pantaloons above the knee for maximum movement (horseriding) and fashion (gay)#i have a crush on the first nicky sketch like he's so cunty for no reason#well. he's possibly supposed to be having a serious conversation/argument with andy#kudos to the ref picture i used of luca just standing Like That
231 notes
·
View notes
Text

ugh, love him
(bonus smoke ver under the cut)
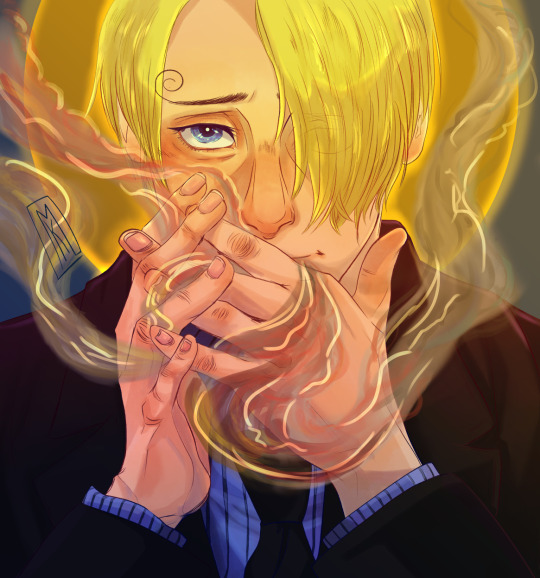
#art#sanji#black leg sanji#one piece#one piece sanji#digital art#im too lazy to add more ;-; maybe one day when my digital skill are better#i like the colouring but wait until i see it on mobile and tear my hair out
58 notes
·
View notes
Text

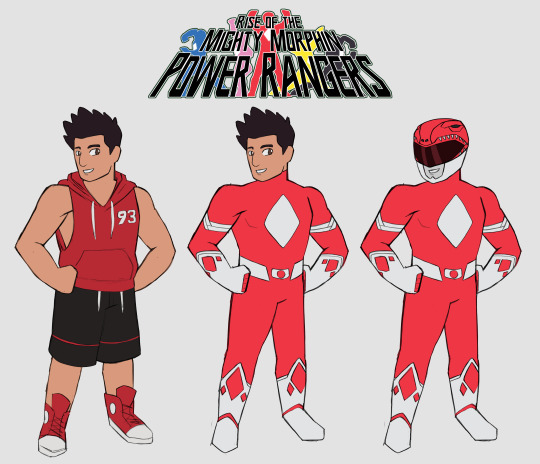
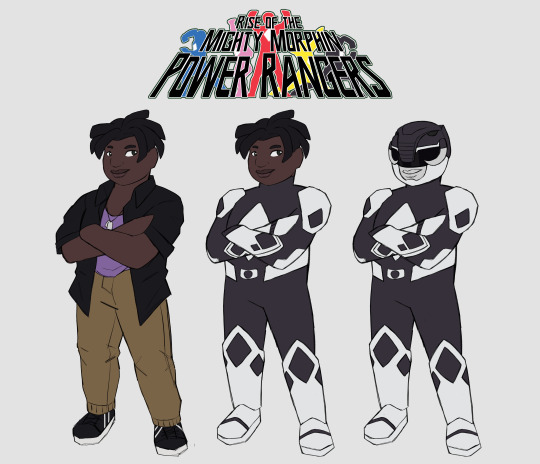
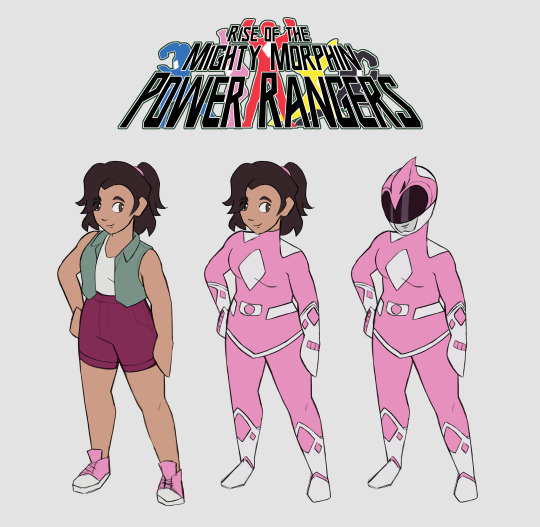

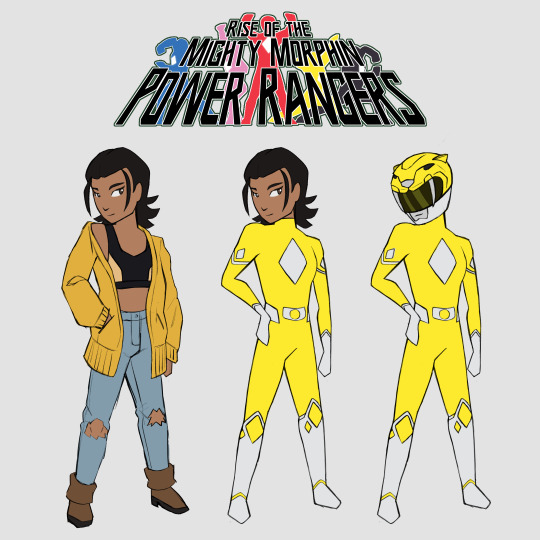
Rise of the Mighty Morphin Power Rangers - Main Team (UPDATED)
Polished up the linework for the original five to remove some of the chicken scratch and fix some design elements I wasn't fond of!
Check out the masterpost for RotMMPR here to take a look at all the designs in this series!
Also support the Megathread on Xitter to help it gain some traction!
#rotmmpr#power rangers#power rangers au#mmpr#mighty morphin power rangers#mmpr comic#my art#mostly i just fixed the design of the boots + billy's pack in ranger mode and adjusted the colours on the visors#and also fixed kim and billy's helmet mouthpieces - since i didn't come up with the animated mouth thing until i drew jason originally#and just forgot to go back and add it to them#zack's belt is also a lil thicker to match better with the others
23 notes
·
View notes
Text
Please welcome to the stage the 12th century champions of dysfunctional failmarriage: Mathilde and Aimery!
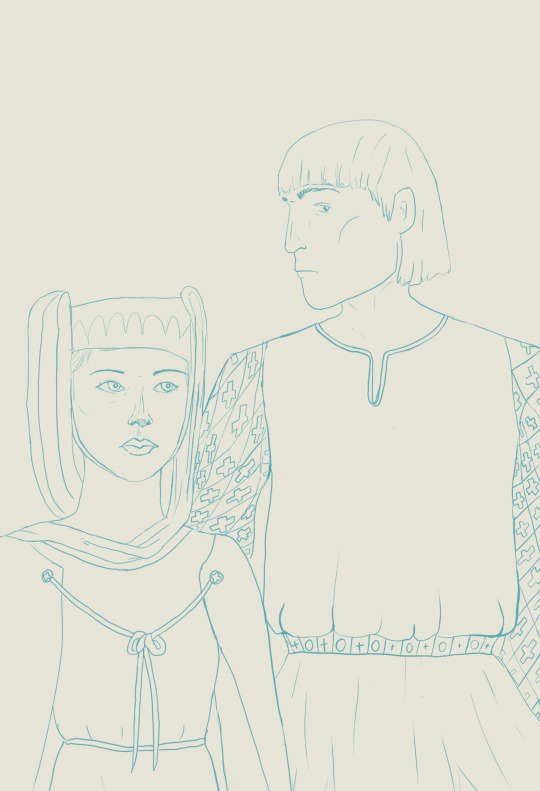
#Art#Faces#Aimery#Won't add more tags until I post the coloured-in version#This is the first art I've posted to tumblr in literal years so please be very niceys#Matilde
13 notes
·
View notes
Text
a colouring timelapse!!
#my art#fate/grand order#fgo#after using tumblr for so long i only just realised you can’t add a video to your reblog#i’ve got no art so have a colour timelapse#i wanted to record the whole thing but also realised i didn’t hit record until halfway in#IT’S BEEN A LONG DAY THAT DAY#AND A LONG DAY TODAY#timelapse#i hope my energy to draw comes back from war soon!
11 notes
·
View notes
Text

hi having fun with colouring
#marco bezzecchi#ikejimee art#oy vey I needed I break from studying. not using the main tag since I was just messing around etc#he is so wonderful to me#not necessary to add but I was doing cool colours until I got to his face and was like Oh what the fuck. and changed it halfway through#I think it's very funny
16 notes
·
View notes
Text

#Flat colours done i gotta wait until the skin is rendered to add in his scar sadly#I’m liking the pose a lot#so I should finish it#I’ll try to get it finished tomorrow#professor sharp#aesop sharp#hogwarts legacy fanart#hogwarts legacy
23 notes
·
View notes
Text
once again watching room makeover videos and wishing i could do SOMETHING to my room
#uhhhh me#i need to take initiative. i need to learn how to use all the woodworking tools in the garage#painting the ceiling will have to wait until summer when i can leave the window open and air out the room#but i can definitely add mini shelves in the corner and put up frames and stuff#idk if i'll ever get to change out the blinds in my room bc i'm in a perpetual state of 'but why replace it if it's not broken'#so i'm just hoping that soon my cats will destroy it so i have an excuse to switch it out#oh yeah i also want to change out my desk for an identical one we got on the side of the road except in a different colour#the problem is what am i going to do with the old desk. our house is cluttered enough as it is#put it outside and let people have it for free? maybe
3 notes
·
View notes
Text
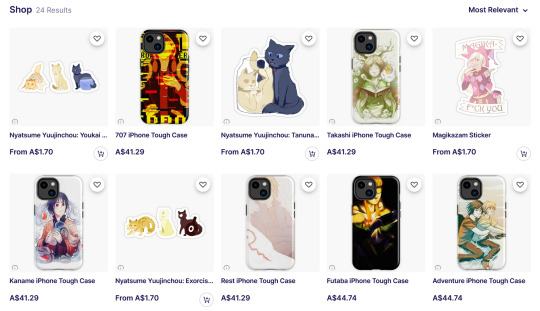
https://www.redbubble.com/people/mayorofcattown/shop
Anyway as I mentioned in the last reblog I’m probabably going to be taking down my redbubble soon due to their garbo new fee structure, so if there’s anything you want on there you can get it now, or you can also let me know what print you were looking to get and I can slap it on my inprnt instead

https://www.inprnt.com/gallery/mayorofcattown/
inprnt doesn’t have as big of a range of products, but they do have the main staples of prints, phone cases and stickers (for now just square ones, but I believe they’ve said they’re planning to release diecut ones at some point) but they also give me a better cut money wise (and they’re probably better quality too)
and they are apparently running a sale right now too
While I am planning on opening an Actual online shop with merch I’ve got manufactured myself, that’ll mostly be for selling smaller things like stickers and bookmarks and things rather than prints as they’re just more annoying to stock esp for more niche designs, so print on demand sites like inprnt are still the best way to get art prints from me if you don’t live in nz (and they’ll probably be better than the con ones I sell anyway cause I am BAD at cmyk lol)
so tldr: lemme know if there’s anything on redbubble (or just in general) that you want on my inprnt since I am yeeting my redbubble in the next few weeks
or you can just buy it on redbubble before I yeet it (esp if its like a mug or tote or smthn that inprnt doesn’t sell)
#tho saying that I might sell some of my reject prints online on clearance just to get rid of them#so I can reprint them with less bad colours lol#also not the natsuyuu cat designs will prob go up my inprnt regardless#but I'll have to wait until they actually add die cut sticker options#they're a bit too niche to get manu'd myself but I still like them :3#merch updates#lets make that a tag that seems like I good tag to have
7 notes
·
View notes
Text


#doing difference mode on my clip of film leaders and then inverting it so the dw clip is mostly normal but with really cool colours#when you dont know what clip to put somewhere just mess around with effects until you find something cool#well that and add some more clips i should probably put some 11.1 in this part
3 notes
·
View notes
Note
Your anger and sadness are so fucking justified. Stealing someone's oc is ridiculous. There's NO need to do that! You don't even need that much creativity to make your own, and if you're really stuck (like I get sometimes) just look towards canon characters or blogs dedicated to help building ocs. What's worse is tumblr's blocking system because, unless you block them on anon, it simply blocks their blog. They can log out and still view your blog! God I'm so sorry that this happened.
thank you 😭😭 i'm like so just horrifically angry right now that idk if i'm overreacting or if i was seeing things that weren't there, but no, the more i look and the more i match up the timeline of posts, it becomes extremely apparent to me that their oc is a copy of diana, and that really really hurts. and yes, i've cried a lot about it, because i talk about her so often and how much she means to me and how much just creative energy she gave me this year and the fact that i even write consistently now, so it hurts. i put a lot into her, so it's just really unfair, and like you said, blocking people on here is like hardly even effective
#asks.#anonymous#thank you for like validating my anger because i often feel a lot of guilt with my reactions and um idk like i feel like i am not allowed#to get angry in the first place because of like imposter syndrome and all that nonsense. but i just kept seeing things from that oc's story#and not just backstory but little facts or what were throw away comments and it just... everything. i could connect to diana. and the#colour scheme is similar too and the heights and the timeline and the little things about like ex-husband. working at nest. close to the#birkins. saw al as an annoyance at the start lmao like there's so much i could connect. and now seeing that their oc also injected themself#with a virus on a whim which i've talked about many times with diana doing and that he got very overprotective and worried afterwards with#it. like. all these things in isolation. fine. whatever. but when they all add up... it's ridiculous. like i'm just so hurt because i#constantly talk about how special diana is to me and how special they both are to me and i don't know what to do because i don't feel the#need to reach out and like accuse directly but it's like. they get away with that. and my ideas. and my character who has been around since#feb. i made her on valentine's day. i'm not even joking. so. i didn't post about her until early march. well i did but that's the earliest#in her tags because i delete posts a lot. went and looked at my oc blog and no there are still things from feb. but on here the earliest is#march. i'm just not doing great with it all i suppose. especially because i had something happen last week that made me really upset and i#was just getting back into like okay i'll post on here more often. and then i notice this and idk i'm rambling but i just feel really sick#like the realisation sunk in and i felt sick to my stomach so it hurts#but um thank you for saying all of this like it does mean a lot to me to know that my reaction is justified so thank you
8 notes
·
View notes
Text
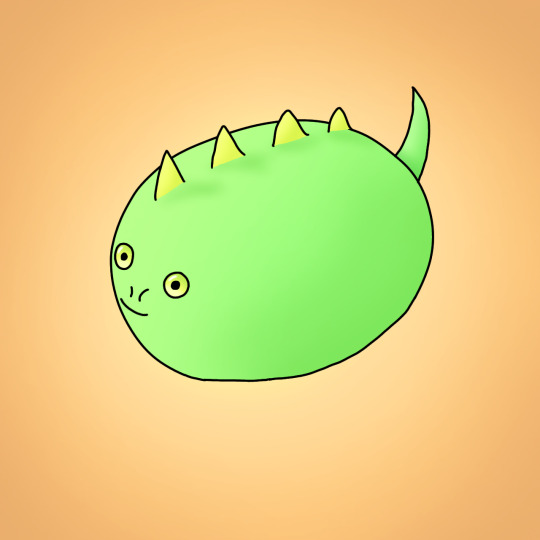

Dinosaur - 11/1/2023 (though drawn and uploaded on 12/1/2023)
The two hundred and fourty sixth friend. A little dinosaur. He's only small in a very big world. Everyone around him seems so much larger and more intimidating than him. I can be scary sometimes. He feels unimportant and insignificant at times. How can he compare to those that are so much more than him? He is still important though. No matter how small someone is, they can still have an impact. He alters so many lives in so many ways without really noticing. The world would be so different if he wasn't in it. His friends and family wouldn't quite be the people they are without his influence. Strangers and acquaintances he has interacted with have had their lives slightly changed by him, even if it isn't always a lot. Tiny actions can have large effects. The universe may be unbelievably massive, but that doesn't mean only similarly huge things matter. He matters, as does every individual. Everything is woven together in the tapestry of life and he is not excluded from that.
#art#dinosaur#reptile#his eyes are mildly starey#a little unsettling#he's alright though#some pretty decent artwork#I was going to do some spines on the tail but I forgot until I was colouring him and couldn't be bothered to add them at that point#he looks fine as he is though#I quite like the description too
2 notes
·
View notes
Note
omg do me for the color thing plz
(left is just a blend. right is moreso how I see you)
#ameeras.got.mail#kat tag#i think i assoviate tou more with ur old on but only cos u had it longer#but this one bc its a comic its onky 4 colours and i think the redish colour overpowers a bit but the grey and black and skin ton kinda??#dull it?? darken it? add a shade#the first one is just ur pfp (or the shitty screenshit i took of it) blended but the second is closer to how i see u#i kept adding and taking away those 4 main colours until i got what i think is closest
2 notes
·
View notes
Text
LINEART IS DONE

#now all i need to do is arrange the panels a little better#colour them#then add the dialogue#THEN IM FREEEEE#that is. until i start another comic#of which i have many planned unfortunately#*pensive face*#personal
0 notes
Text
Had a few folks interested in how I made the patches I posted for Solarpunk Aesthetic Week, so I thought I'd give y'all my step-by-step process for making hand-embroidered patches!

First, choose your fabric and draw on your design. You can use basically any fabric for this - for this project I'm using some felt I've had lying around in my stash for ages.

Next, choose your embroidery floss. For my patches I split my embroidery floss into two threads with 3 strands each, as pictured. You can use as many strands in your thread as you prefer, but for the main body of my patches I prefer 3 strands.
Next you're going to start filling your design using a back stitch.

First, put in a single stitch where you want your row to start.

Poke your needle up through the fabric 1 stitch-length away from your first stitch.

Poke your needle back down the same hole your last stitch went into so they line up end-to-end.
Repeat until you have a row of your desired length (usually the length of that colour section from one end to the other). Once you have your first row, you're going to do your next row slightly offset from your first row so that your stitches lay together in a brick pattern like this:

Make sure your rows of stitches are tight together, or you'll get gaps where the fabric shows through.
Rinse and repeat with rows of back stitch to fill in your patch design.

When you're almost to the end of your thread, poke your needle through to the back of the fabric and pull the thread under the back part of the stitching to tuck in the end. Don't worry if it looks messy - no one's gonna see the back anyway.
This next step is fully optional, but I think it makes the patch design really pop. Once your patch is filled in, you can use black embroidery floss to outline your design (or whatever colour you want to outline with - it's your patch, do what you want). I use the full thread (6 strands, not split) of embroidery floss to make a thicker outline.

I use the same back stitch I used to fill the piece to make an outline that adds some separation and detail. You could use most any 'outlining' stitch for this, but I just use back stitch because it's just easier for me to do.
Once you're finished embroidering your patch, it's time to cut it out!

Make sure to leave a little border around the edge to use for sewing your patch on your jacket/bag/blanket/whatever, and be careful not to accidentally cut through the stitches on the back of the patch.
If you have a sturdy enough fabric that isn't going to fray, you can just leave it like this. If not, I recommend using a whip stitch/satin stitch to seal in the exposed edges (I find that splitting your embroidery floss into 3-strand threads works best for this).

And then you're done! At this point you can put on iron-on backing if you want, or just sew it on whatever you wanna put it on. Making patches this way does take a long time, but I feel that the results are worth it.
Thanks for reading this tutorial! I hope it was helpful. If anyone makes patches using this method, I'd love to see them! 😁
#solarpunk aesthetic week#sewing#tutorial#sew on patch#punk diy#diy punk#punk aesthetic#handmade#solarpunk#handcrafted#embroidery#embroidered patch#how to#how to make a patch
17K notes
·
View notes
Text
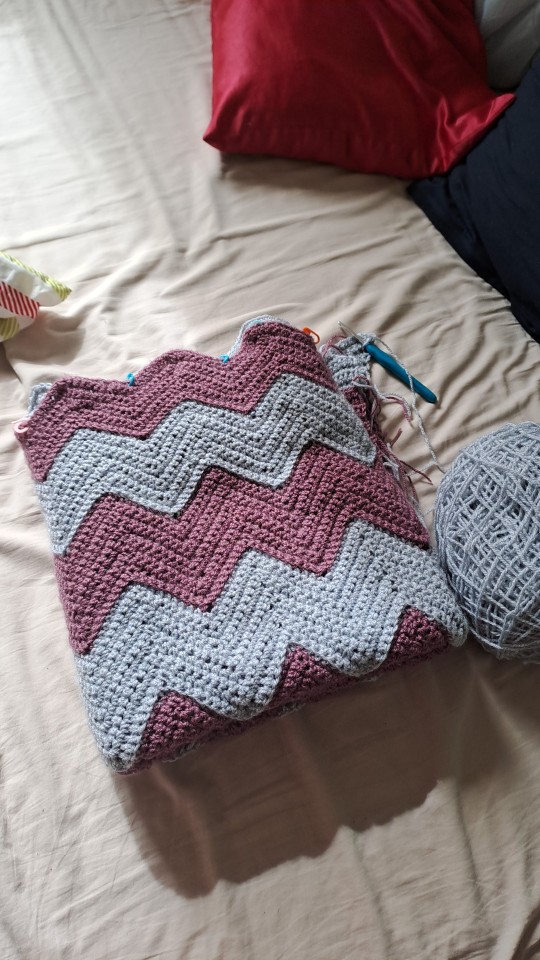
I am almost done with the blanket I am crocheting for my mom's birthday. Took 2 audio books until now xD
I think I'll do 2 or 3 more stripes and then it should be long enough. It will be longer than I am tall by then which also works well for my mom, who is barely taller than me.
So overall time will probably be 2,5 audio books
#I wanted to finish it before the semester starts because I wont have enough time to work on it otherwise#and that seems to work out just fine#my moms birthday isnt until November#so maybe ill add some small things to the blanket#maybe a doggo and kitty for our dog and late cat#or some flowers for my mom's garden#or both#but that will probably too colourful
0 notes
Last Seen Blogs
quixoatic
the coconut nut is a big big nut

corinthianism
GHOUL
angie-goddess
Angie Goddess

static-kills
Casually Confused
zongoliath
zongoliath